
Chapter 8
Understanding Service Modeling
One of the most powerful aspects of VMM 2012 is the ability to combine various library components, to deploy not only a VM, but also a complex n-tier application, across many VMs over different networks. Before you can create and deploy services in VMM, a number of prerequisites need to be met. This chapter introduces service deployment and in an extended example, takes a simple service from deployment through scaling out, exporting and importing a service template, and managing updates. This chapter covers the following main topics:
- How service templates enable you to model services and deploy them as easily as VMs
- How sequencing captures all necessary steps and resources for distributing and installing an application reliably
- The nuts and bolts of preparing, distributing, and updating services and application packages
Introduction to Service Templates
Just as VM templates provide a standardized group of hardware, software, and application settings that you can consistently reuse to create multiple new VMs, a service template provides the information required to create an instance of a service. A service can be as simple as a single tiered application contained within a VM, or it can be a multitier application spanning a number of VMs that are managed as a single entity.
Every service template has a name, which appears in the VMs and Services workspace; has a release value, which indicates the version of the service template; and is constructed from a pattern of one or more tiers, which is a model of your service graphically represented in the VMM Service Template Designer.
Each tier of your service can contain some combination of the following four components:
- A VM template (see Chapter 5, “Understanding the VMM Library”)
- A virtual IP template (see Chapter 6, “Understanding Network and Storage Integration in VMM 2012”)
- An application profile
- A SQL Server profile
Preparing the Library for Application Deployment
Before you can commission your service via VMM, you must set up and configure a number of library resources to enable you to deploy your service. These library resources include the following:
- VM template
- Hardware profile
- Guest operating-system profile
- Prebuilt virtual hard disk (VHD)
- Application profile
- SQL Server profile
- Custom resources
You start by deploying a VM template. Then you add or extend additional library resources to allow you to eventually deploy and scale out your service.
Virtual-Machine Templates
A VM template is a library resource that consists of a number of other configuration components:
- Hardware profile
- Guest operating-system profile
- Virtual hard disk
- Capability profile
- Application profile
- SQL Server profile
Creating a Hardware Profile
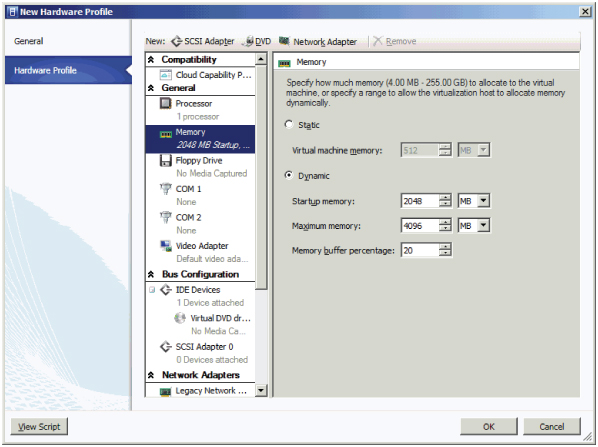
A hardware profile is a library resource that contains the hardware specifications to be applied to a new VM or to a VM template.
Use the following procedure to create a new hardware profile from within the VMM console. This profile serves as the base hardware profile and is used later in the example deployment.
Figure 8.1 Configuring the hardware profile
Creating a Guest Operating-System Profile
A guest operating-system profile is a collection of operating-system settings and values that can be imported into a VM template, thereby providing a consistent OS configuration for VMs that are deployed from that template.
Use the following procedure to create a new guest operating-system profile to serve as the base guest operating-system profile and is used later in the example deployment.
Figure 8.2 Configuring the guest OS profile

Adding a VHD to the Library
Your library must contain a sysprepped Windows 2008 R2 SP1 VHD. Adding a file-based resource such as a VHD to the library must be done manually. To use the files before the next scheduled library refresh, you must manually refresh the library server or share. To add the required VHD, complete one of the following tasks:
- Using Windows Explorer, browse to the library share and manually copy the specific files you need.
- In the VMM console, in the Library workspace, expand Library Servers, right-click a library share, and click Explore. Manually copy the specific files you need.
- In the VMM console, on the Home tab, use the Import Physical Resource and Export Physical resource options to import and export file-based resources between library shares.
To refresh the library server:
Creating a VM Template
With all the basic building blocks in place, the next step is to create a VM template.
Use the following steps to create a new VM template:
- On the Configure Applications screen, click Next for the default.
- On the Configure SQL Server screen, click Next for the default.
- On the Summary screen, click Create to finish.
Creating Application Packages with Server App-V
One of the major enhancements in VMM 2012 is the capability of VMM to manage Microsoft Server Application Virtualization (Server App-V) packages. Server App-V provides the ability to virtualize an application and abstract the application from the underlying server operating system. Applications are packaged by using a sequencer, which then makes the application files easy to copy, without requiring changes to the application itself. There are five steps to creating a Server App-V package:
Installing the Server App-V Sequencer
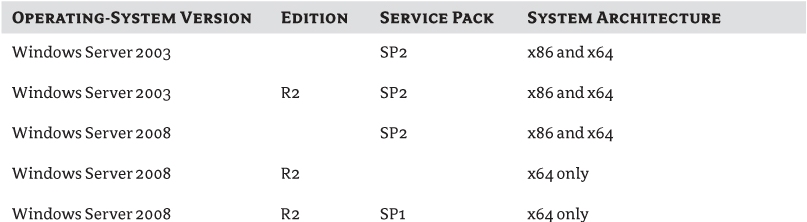
To install the Server App-V Sequencer, you must deploy a VM to act as the reference machine. Use the components you now have in the library to deploy a VM to act as your reference machine. There are a couple of important points to remember when installing Server App-V:
- Install the Server App-V Sequencer on a clean reference machine.
- If you are planning to deploy Server App-V packages to multiple operating system versions, choose the lowest OS version as the OS for your reference machine.
Table 8.1 OS requirements for the Server App-V Sequencer
The setup binaries for the Server App-V Sequencer are in a file named seqsetup.exe, which by default is on your VMM server, under either x86 or x64 system architecture, in the following directory:
c:program filesmicrosoft system center 2012virtual machine managersav
Take these steps to install the Server App-V Sequencer on the reference machine:
- On the Welcome screen, click Next.
- On the License screen click Accept.
- On the Customer Experience Improvement screen, click Next.
- On the Destination Folder screen, click Next to accept the default.
- On the Ready to Install screen, Click Install.
If it does not detect the Microsoft Visual C++ 2005 SP1 Redistributable Packages (x86) and the Microsoft Visual C++ 2008 SP1 Redistributable Packages (x86), the Setup Wizard installs them.
Creating Your First Package
If you have installed the Server App-V Sequencer on a suitable reference machine, you can start to sequence your first application. The example sequences a sample .NET application called Pet Shop 4.0, which is available for download from the following URL:
http://msdn.microsoft.com/en-us/library/aa479071.aspx
Before sequencing Pet Shop 4.0, you must ensure that the following conditions exist on the reference machine:
- The User Account Control (UAC) is off.
- The Web Server role is enabled.
- The Web Server Management Tools are enabled.
- Web Deploy 2.0 is installed.
Web Deploy enables you to package configuration and content from your installed web applications, including databases, and use the packages for storage or redeployment. Web Deploy is available in your library at
C:ProgramDataVirtual Machine Manager Library FilesApplicationFrameworks
You can also download it from
www.iis.net/download/WebDeploy
Using the Sequencer
Before you launch the Server App-V Sequencer, make sure that the Pet Shop 4.0 installation files are easily accessible to your reference machine. The procedure for sequencing the Pet Shop 4.0 application has four basic parts:
- Start the Sequencer and install.
- Perform post-installation tasks.
- Create the package.
- Store the package in the library.
To start the Sequencer and Install Pet Shop 4.0, follow these steps:
- On the Security Warning screen, click Run.
- On the Welcome To The Setup Wizard screen, click Next.
- On the License Agreement screen, click Accept.
- On the .NET Pet Shop 4.0 Information screen, click Next.
- On the Installation Options screen, click Source Code Only and Next.
Figure 8.3 The installation-folder options

- In Internet Explorer, close the readme file.
- On the Installation Complete screen, click Close.
To perform the post-installation tasks (such as sequencing Pet Shop 4.0), follow these steps:
Figure 8.4 Adding a website

To create the package (and continue sequencing Pet Shop 4.0), follow these steps:
Figure 8.5 Configuring deployment

To store the package in the library (and continue sequencing Pet Shop 4.0), follow these steps:
Figure 8.6 PetShop4 properties

Creating an Application Profile for a Server App-V Application
Application profiles provide the instructions for installing Microsoft Server App-V applications, Microsoft Web Deploy applications, and Microsoft SQL Server DACs, and for running scripts when deploying a VM as part of a service.
To create an application profile for a Microsoft Server App-V application, perform these steps:
Figure 8.7 Setting OS compatibility
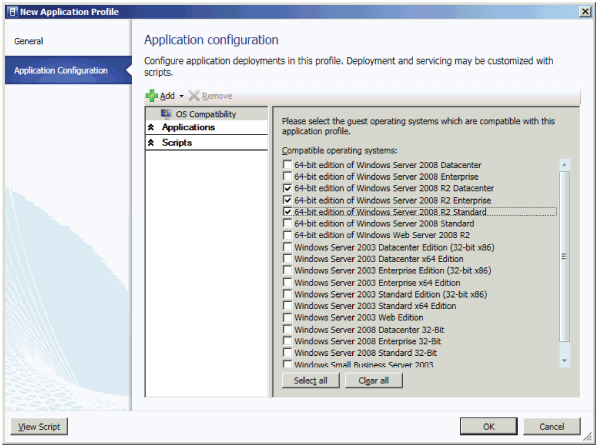
Figure 8.8 Configuring the application

SQL Server Profiles
SQL Server profiles have a key role in rapidly deploying SQL Server within your environment. You decouple the mechanics of installation (called sysprepping) from customizing SQL Server for a specific use. The first phase is to perform a standalone SQL Server deployment on a base VM, leaving configuration for a later phase, during which you'll create and use SQL Server profiles.
This approach has the following limitations:
- Only Database Engine Services and Reporting Services support standalone deployment.
- You can't use standalone deployment in combination with clustering or high-availability scenarios.
- You need the installation media when you configure the image.
Performing a Standalone Deployment
You can use the Advanced option within the SQL Server Installation Center to perform a standalone deployment. This installation option is available in all editions of SQL Server 2008 R2.
Although the instructions for performing standalone SQL deployments are not within the scope of this book, there are several articles that do describe how to do it. However, these articles typically do not explain how to use VMM when carrying out the Complete Image phase. The following TechNet article provides good instructions:
http://technet.microsoft.com/en-us/library/ee210664.aspx
Only the Prerequisites and Prepare Image sections of this article are applicable. The remainder of the configuration uses VMM, as described in subsequent sections of this chapter.
You can also perform the Prepare Image phase from the command line by running the following command:
setup.exe /q /ACTION=PrepareImage /FEATURES=SQL,RS
          /InstanceID =<MyInstanceID> /IACCEPTSQLSERVERLICENSETERMS
Once you have a standalone deployment of SQL Server, run Windows Sysprep to generalize the operating-system instance and submit the generalized VHD into the library. This is your source VHD for deploying SQL Server.
Use a descriptive name for the VHD file so you can distinguish this VHD from other VHDs in the library. For example, you can rename your VHD to W2K8R2x64_SQL2K8R2EE.VHD.
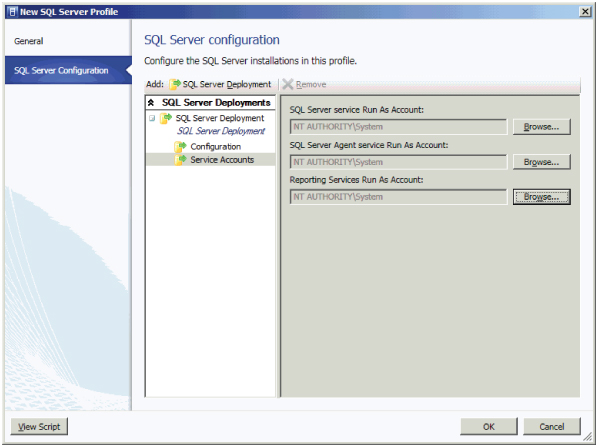
Creating a SQL Server Profile
Now that your standalone deployment of SQL is configured and in the library, use the following procedure to create a SQL Server profile.
Figure 8.9 Specifying SQL Server deployment options

Figure 8.10 Configuring SQL Server
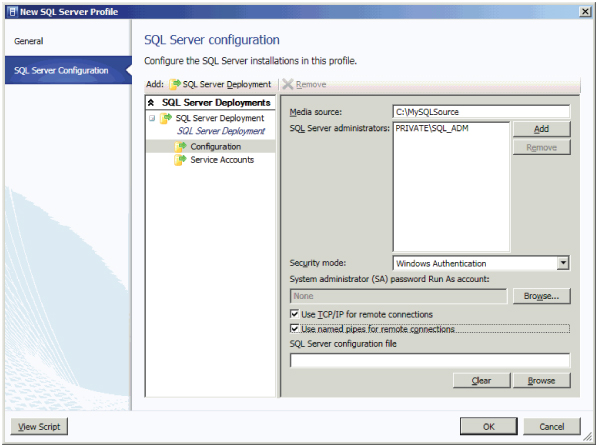
Figure 8.11 Specifying SQL service accounts
Now you have all the building blocks in place to deploy a SQL VM via VMM.
SQL Data-Tier Applications
Since SQL Server 2008 R2, the DAC feature has made it easy for database administrators to package things like databases, tables, users, and logins into a single object for deployment. Its flexibility eases implementation and configuration.
You can use the same DAC for updates or modifications to the underlying platform and for deployment of scale, thereby providing a simplified process for upgrading database servers. A DAC definition contains the following elements:
- Definition of all database objects
- Definition of all server-level objects
- DAC properties that define characteristics of the DAC package
- SQL Server selection policies
- Files and scripts associated with the DAC package
Only specific objects can be specified in a DAC package as it is being authored or edited. The Extract Data-Tier Application Wizard will not extract a DAC package from an existing database that contains objects that are not supported in a DAC package. The wizard reports the objects it finds that are not supported in a DAC. The following objects are supported in DAC packages:
- DATABASE ROLE
- FUNCTION: Inline Table-valued
- FUNCTION: Multistatement Table-valued
- FUNCTION: Scalar
- INDEX: Clustered
- INDEX: Non-clustered
- INDEX: Unique
- LOGIN
- SCHEMA
- STORED PROCEDURE: Transact-SQL
- TABLE: Check Constraint
- TABLE: Collation
- TABLE: Column, including computed columns
- TABLE: Constraint, Default
- TABLE: Constraint, Foreign Key
- TABLE: Constraint, Index
- TABLE: Constraint, Primary Key
- TABLE: Constraint, Unique
- TRIGGER: DML
- TYPE: User-defined Data Type
- TYPE: User-defined Table Type
- USER
- VIEW
Creating a DAC Package
Two methods are available for creating a DAC package that VMM can consume. They are
- Using Visual Studio 2010
- Extracting the DAC package from an existing SQL database
Extracting from an existing SQL database is an easy way to build your first DAC package. You can convert an existing database structure and its related objects to a DAC package. This method doesn't require Visual Studio 2010. It uses SQL Server Management Studio.
To create sample DAC packages, you need an existing SQL server from within your environment or, better still, a dedicated SQL server from your library. You use the SQL server to replay the Transact-SQL files you stored earlier in this chapter, when sequencing the Pet Shop 4.0 application. To create simple DAC packages, follow these steps:
Figure 8.12 Extracting a data-tier application

To store the DAC packages in the library, follow these steps:
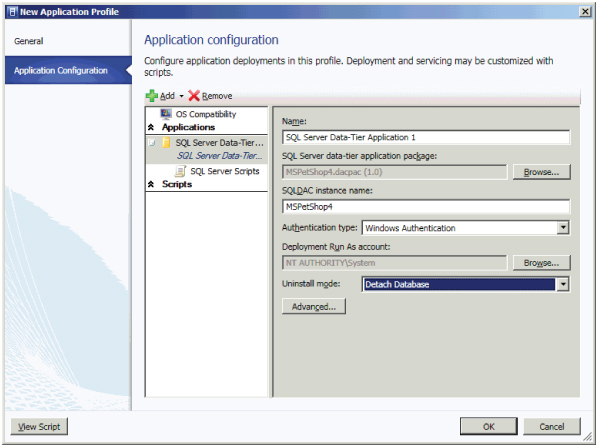
Creating an Application Profile for a SQL Data-Tier Application
Creating an application profile for a Microsoft SQL Server data-tier application (DAC) is much the same as creating an application profile for Microsoft Server App-V applications or Microsoft Web Deploy applications.
To create an application profile for a Microsoft SQL Server DAC, follow these steps:
Figure 8.13 Configuring application deployments
Web Applications
The Microsoft web deployment tool (Web Deploy) is a .NET-based application that provides both a user interface and a command-line shell, which simplifies the management, deployment, and migration of IIS web servers, websites, and web applications.
Use Web Deploy to take a website and its associated resources (for example, COM objects, content, Registry keys, and certificates) and replicate them across a group of web servers; or, more importantly for VMM 2012, create a package and deploy it. Web Deploy integrates with Visual Studio 2010 to simplify the deployment of web-based applications to web servers or web farms.
What Gets Installed
Installing Web Deploy, which is effectively a managed code framework, installs the Web Deploy engine and its public APIs. You can choose the way to install the features (Figure 8.14).
Figure 8.14 Web Deploy custom setup
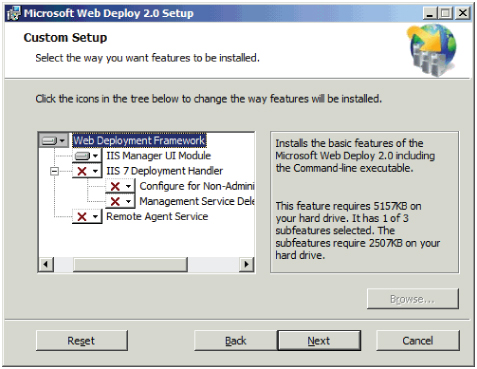
The installed components are as follows:
IIS Manager User Interface Module
Allows the web-server administrator to perform some deployment tasks, mainly packaging or deploying a website or application
IIS 7.0 Deployment Handler
A handler that integrates with IIS Web Management Service, allowing non-administrators or administrators to perform remote operations
Remote Agent Service
An administrator-specific service, based on HTTP and HTTPS, that allows the web-server administrator to connect and perform remote operations
Installing Web Deploy
Installing Web Deploy is a fairly easy and painless task because Microsoft includes the Web Deploy framework in the library. The Web Deploy binaries are at the following location:
ProgramDataVirtual Machine Manager Library FilesApplicationFrameworks
When you create your VM template, you can add a Pre-Install script to automatically install Web Deploy (Figure 8.15).
Figure 8.15 Automating the Web Deploy setup in VMM

Creating Web Deploy Packages
Two methods are available for creating a Web Deploy package that VMM can consume. They are
- Using Visual Studio 2010
- Extracting a Web Deploy package from an existing web server
Extracting a Web Deploy package from an existing web server, much like building a DAC package from an existing SQL server, is an easy way to build your first Web Deploy package. To create a simple Web Deploy package, perform these steps:
Figure 8.16 Managing components of an application package

Basic Sequencing Concepts
Sequencing is the process of discovering and recording the steps and resources necessary to install and set up an application on a system other than the one on which you developed it. The Server App-V Sequencer is the core component for producing Server App-V packages, and it relies on components of the VMM infrastructure to deploy applications.
The Sequencer takes standard, application-installation files and monitors the installation so that it can produce application packages that VMM can understand and consume. The following is a high-level description of the sequencing workflow:
Files Created by the Server App-V Sequencer
When it sequences a Windows application, the Server App-V Sequencer produces the following files:
OSD
The open software description (OSD) file provides the information necessary to find the SFT file and set up and launch the application.
SFT
The SFT file contains the core application assets. The Sequencer, without altering the application's installation routine, packages these assets so that VMM can deploy the application.
SPRJ
The Sequencer project (SPRJ) file contains a list of files, directories, and Registry entries that have been excluded. Load this file in the Sequencer to add, change, delete, or upgrade the sequenced application.
Application Manifest
The application manifest XML file contains details such as the version of the OS the application was sequenced on, and the applications, roles, and features that must be on any machine where the package is deployed.
ICO
The ICO file contains the icon associated with the application.
Deployment-Configuration Manifest
The manifest is an XML file containing customized settings that are applied to a specific, virtual application package when the package is run on a target server. The Sequencer detects some deployment configuration settings. You can add others manually.
Configuring the Sequencing Workstation
There are no hard and fast sizing guidelines for determining the hardware configuration of your sequencing workstation, because any sizing guidelines need to incorporate the requirements for the application being sequenced.
The sequencing workstation itself can be a physical server, but using VMs and snapshots (also known as checkpoints in VMM) gives you more flexibility. You can revert to a known working environment when packaging multiple applications.
Sequence the application on a machine that matches the OS and configuration of the target server. You can sometimes sequence on one version of an OS and run the virtualized application on a different version by using the lowest common denominator. However, this scenario is not guaranteed to work for all combinations of applications and operating systems.
Configure the temp directories on the sequencing workstation to ensure successful sequencing and improve performance by potentially using a second disk as a location for these files. The Sequencer uses %TMP%, %TEMP%, and its own scratch directory for temporary files.
These locations should contain free disk space equivalent to the estimated installation size. The scratch directory is where the Sequencer temporarily stores files generated during the sequencing process. You can easily check the location of the scratch directory by launching the Sequencer, clicking Options from the Tools menu, and then modifying the scratch directory box in the General tab. By default, the scratch directory location is
C:Program Files (x86)Server Application Virtualization SequencerScratch
Clean Operating System
It is important to sequence an application on your VM with a clean, known, good OS that has no extraneous applications installed. The VM should mirror the server on which the sequenced application will run and contain the lowest common denominator in terms of service packs and hot fixes.
The sequencing workstation should not have anything installed on it that could impact or impede the installation of the application you plan to sequence. This is essential so that the sequenced application package includes all required files. Third-party components or applications may include files that the sequenced application needs. In such cases, the Sequencer won't add those files to the application package.
Server App-V Q: Drive
The Server App-V agent reserves a virtual drive, usually Q:, on the Windows server. The virtual application executes from this virtual drive. This virtual drive should not be accessed by Windows Explorer and is used only by the Server App-V agent.
The drive is called the Microsoft Application Virtualization Virtual Drive. It is typically the Q: drive. However, it automatically moves if necessary at server startup. It is highly recommended to standardize the drive identifier so that you sequence and run the application from the same drive letter identifier. The drive letter identifier is configurable via the following Registry key:
HKEY_Local_MachineSoftwareWow6432NodeMicrosoftSoftGrid4.5ClientAppFS
  name equals DriveLetter
  type equals REG_SZ
  data equals Q:.
Applications That Work with Server App-V
Server App-V can sequence and deploy most, but not all, applications. It does not support sequencing applications that require device or kernel driver support (for example, antivirus software). It also does not support some large server applications such as Microsoft SQL Server and Microsoft SharePoint.
Server App-V is primarily designed for use with business applications or the business tiers of multitiered applications. There is no list of supported applications for use with Server App-V, but it is optimized to create virtual application packages for applications with the following attributes:
- State persisted to local disk
- Microsoft Windows services
- Internet Information Services (IIS)
- Uses the Registry
- COM+/DCOM
- Text-based configuration files
- WMI providers
- Microsoft SQL Reporting Services
- Local users and groups
- Java
Deploying a Service
In VMM 2012, you use the Service Template Designer to create a service template. The Service Template Designer defines the configuration of the service you are commissioning. The service template includes information about the VMs that make up the service, which applications to install on the VMs, and the network configuration needed for the service.
Service templates can use existing VM templates, or you can define the service without existing VM templates.
Using a service template, you can deploy the service to either a host group or a private cloud. Once the service is deployed, you can easily update the service template and deploy those updates to the already-deployed service. If the demand for your service increases, you can deploy additional VMs to the existing service, by scaling out, in order to provide additional resources for this service. If the demand for your service decreases, you can scale back the additional VMs associated with your existing service.
The following sections show how to create a three-tier application that consists of a web server (front-end tier), application server (middle tier) and database server (back-end tier). Sample files are available for download to help accelerate the process of implementing the example service template at https://skydrive.live.com/#cid=FD9BAD67005DBCCB&id=FD9BAD67005DBCCB%21534
Creating the Web Server–Tier Template
To create a VM template for a web server (front end) tier, follow these steps:
Figure 8.17 Configuring application scripts
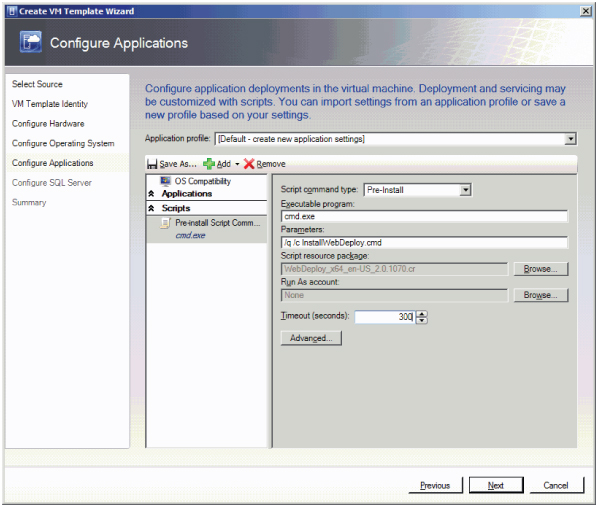
- In the Script Command Type field, select Pre-Install.
- In the Executable Program field, enter cmd.exe.
- In the Parameters field, enter /q /c InstallWebDeploy.cmd.
- In the Script Resource Package field, browse to WebDeploy_x64_en-US_2.0.1070.cr.
- In the Timeout field, enter 300.
Figure 8.18 The settings properties

CS_CORE_DB
server=@sqlComputerName@;database=MSPetShop4;user id=@petshopUser@;password=@petshopPassword@; connect timeout=200;min pool size=4;max pool size=4;
CS_ORDERS_DB
server=@sqlComputerName@;database=MSPetShop4Orders;user id=@petshopUser@;password=@petshopPassword@; connect timeout=200;min pool size=4;max pool size=4;
CS_PROFILE_DB
server=@sqlComputerName@;database=MSPetShop4Profile;user id=@petshopUser@;password=@petshopPassword@; connect timeout=200;min pool size=4;max pool size=4;
CS_SERVICES_DB
server=@sqlComputerName@;database=MSPetShop4Services; user id=@petshopUser@;password=@petshopPassword@;connect timeout=200;min pool size=4;max pool size=4;
QUEUE_PATH
FormatName:DIRECT=OS:@lobComputerName@Private$PSOrders
- In the Script Command Type field, select Post-Install.
- In the Executable Program field, enter cmd.exe.
- In the Parameters field, enter /q /c configure-webtier.cmd.
- In the Script Resources Package field, browse to petshop.wt.cr.
- In the Timeout field, enter 300.
Creating the Application Server–Tier Template
To create a VM template for an application server (middle) tier, follow these steps:
- In the Script Command Type field, select Pre-Install.
- In the Executable Program field, enter cmd.exe.
- In the Parameters field, enter /q /c InstallSAV.cmd.
- In the Script Resource Package field, browse to SAV_x64_en-US_4.7.24.1485.cr.
- In the Timeout field, enter 300.
OrderQueuePath
server=@sqlComputerName@;database=MSPetShop4Profile;user id=@petshopUser@;password=@petshopPassword@;min pool size=4;max pool size=4;
SQLConn1
server=@sqlComputerName@;user id=@petshopUser@;password=@petshopPassword@;database=MSPetShop4;min pool size=4;max pool size=4;packet size=3072;
SQLConn2
server=@sqlComputerName@;user id=@petshopUser@;password=@petshopPassword@;database=MSPetShop4Profile;min pool size=4;max pool size=4;packet size=1024;
SQLConn3
server=@sqlComputerName@;user id=@petshopUser@;password=@petshopPassword@;database=MSPetShop4Orders;min pool size=4;max pool size=4;packet size=1024; timeout=200;min pool size=4;Max pool size=4;
- In the Script Command Type field, select Post-Install.
- In the Executable Program field, enter cmd.exe.
- In the Parameters field, enter /q /c configure-midtier.cmd.
- In the Script Resources Package field, browse to petshop.mt.cr.
- In the Timeout field, enter 300.
Creating the Database Server Tier–Template
To create a VM template for a database server (back-end) tier, execute the following steps:
Figure 8.19 Configuring SQL DACPAC
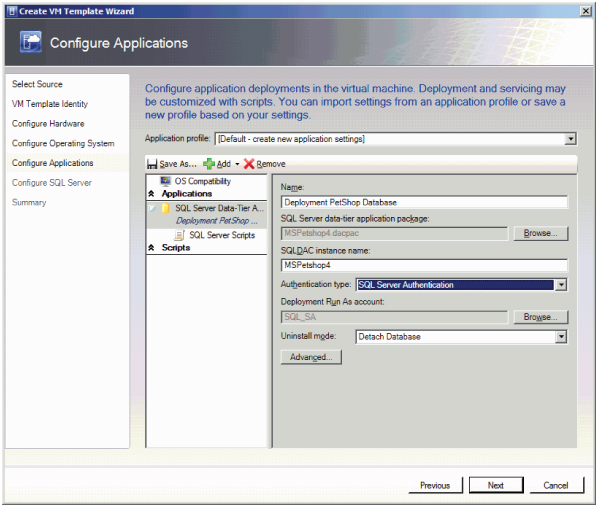
- In the Name field, enter a database name (for example, Deployment PetShop Database).
- In the SQL Server Data-Tier Application Package field, browse to PetShop4.dacpac.
- In the SQLDAC Instance Name field, don't change anything.
- In the Authentication Type field, select SQL Server Authentication.
- In the Deployment Run As Account field, click and browse to the SQL Run As account (SQL_SA) you created earlier.
- In the Script Command Type field, select Post-Install.
- In the Executable Program field, enter cmd.exe.
- In the Parameters field, enter /q /c configure-datatier.cmd @sqlAdmin@ @sqlAdminPassword@.
- In the Script Resources Package field, browse to petshop.sql.cr.
- In the Timeout field, enter 300.
Figure 8.20 Configuring SQL Server instances
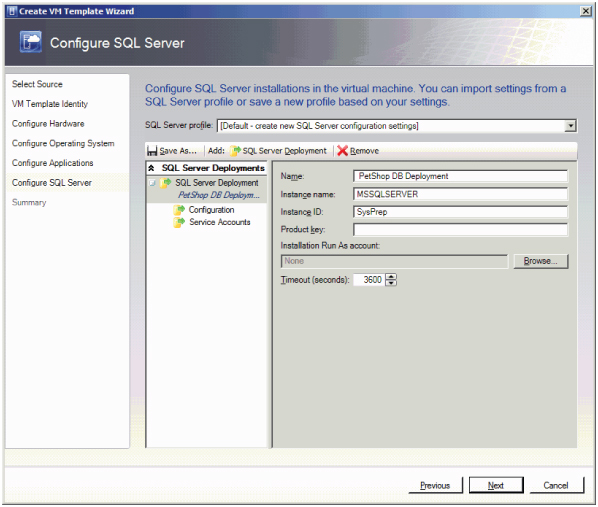
- In the Name field, enter a name for the database server (for example, PetShop DB Deployment).
- In the Instance Name field, enter MSSQLSERVER.
- In the Instance ID field, enter the Instance ID from the standalone installation (for example, SysPrep).
Figure 8.21 Configuring SQL Server
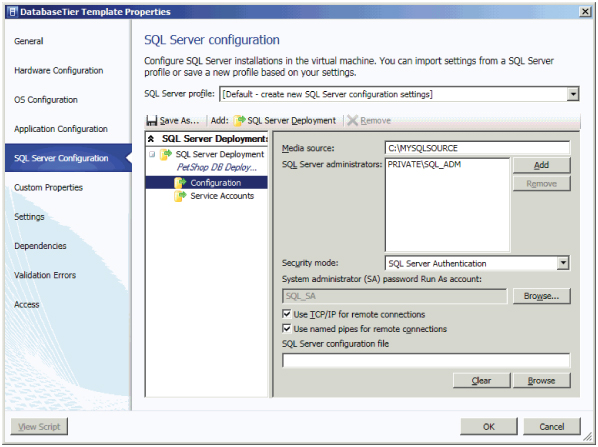
- In the Media Source field, enter C:SQLEVAL.
- In the SQL Server Administrators field, click Add to enter your SQL server administrative user or group.
- In the Security Mode field, select SQL Server Authentication.
- In the System Administrator (SA) Password Run As Account field, browse to the SQL server Run As Account SQL_SA.
- Click the Use TCP/IP For Remote Connections check box to enable.
- Click the Use Named Pipes For Remote Connections check box to enable.
- In the SQL Server Service Run As Account field, browse to NT AuthoritySystem.
- In the SQL Server Agent Service Run As Account field, browse to NT AuthoritySystem.
- In the Reporting Service Run As Account field, browse to NT AuthoritySystem.
Creating a Service Template
Before you can deploy a service, you must create a service template using the Service Template Designer. In the previous tasks, you created all the necessary VMs to enable you to deploy your first service.
To create a simple three-tier service, perform the following steps:
Figure 8.22 Creating a service template

Figure 8.23 The Service Template Designer canvas

Figure 8.24 Designing the service template on the canvas

Figure 8.25 Graphical overview of Pet Shop 4.0 deployment
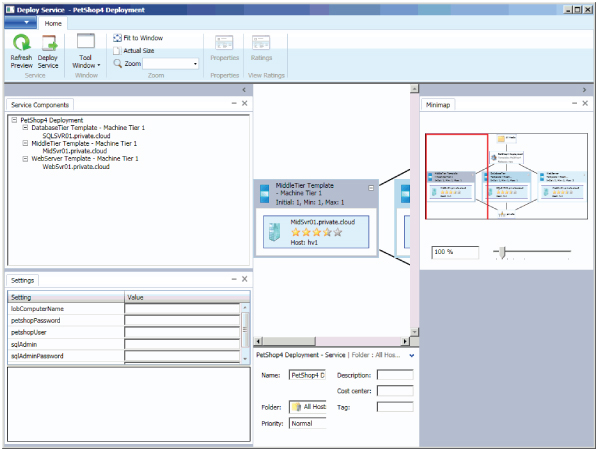
- In the lobComputerName field, enter MidSvr01.
- In the petshopPassword field, enter pass@word1.
- In the petshopUser field, enter mspetshop.
- In the sqlAdmin field, enter sa.
- In the sqlAdminPassword field, enter Password1.
- In the sqlComputerName field, enter SQLSVR01.
Scaling Out a Service
After you deploy a service in VMM, you may need to deploy additional VMs to a tier of the service. You can do this using VMM's scale-out functionality. When you create a tier in the Service Template Designer, you can specify whether that tier can be scaled out and what the minimum and maximum tier size should be. If you try to scale out a tier beyond its maximum size, you'll receive a warning, but VMM won't prevent you from scaling out that tier. Once deployed, both the tier and the service will indicate a status of Needs Attention.
Use the following procedure to scale out a service:
Exporting and Importing Service Templates
In VMM 2012, you can import and export service templates. This enables you to back them up and share them among different VMM environments, such as test, development, and production.
When you export a service template in VMM, tier definitions, hardware settings, guest operating system settings, application-installation settings, and network configurations are saved to an XML file. The export can include sensitive data, such as passwords, product keys, application settings, and global settings that are marked as secure. The sensitive settings can be encrypted to secure the output. During a service-template import, sensitive settings can be included or excluded. If sensitive settings are included, and they were encrypted during the service-template export, the encryption password is required.
You can also choose to export some or all of the physical resources associated with the service template. This can be useful when copying service templates between environments. You can, for example, exclude the virtual hard disks or other elements that are associated with the service template.
When you import a service template into VMM, it validates physical and logical resources that the service template references in the current environment and it allows you to update references to missing resources, such as logical resources, including logical networks and virtual hard disks.
Exporting a Service Template
To export a service template, use the following steps:
Importing a Service Template
To import a service template, use the following steps:
- Enter a name for the service template. If you are restoring a service template, keep the same name.
- Provide a release value for the service template. If you are restoring a service template, keep the same release value.
- If the selected name and release match those of an existing service template in the VMM environment, the next step asks whether to overwrite the existing service template.
- For each logical or physical resource that has a Current Mapping value of None (that is, the resource is missing), click the pencil icon and select a resource that is available in the current VMM environment. The most common missing resources are logical networks and virtual hard disks.
Managing and Updating a Service
Managing and updating a service in VMM is the process of modifying an already deployed service. VMM keeps track of which service template is used to deploy a service, so you can make updates to the service template and then use the updated service template to make changes to the deployed service.
VMM supports two different methods for making updates to a deployed service.
- Applying updates to existing VMs in place
- Deploying a new VM with the updated settings
Applying an update to the existing VMs is less time-consuming; the majority of configuration changes to VMs and application updates can be applied in this way.
To help minimize service interruptions when a tier is being updated in place, you can specify more than one upgrade domain in the tier properties. When the tier is updated, VMM updates the VMs in the tier according to the VMM upgrade domain. VMM upgrades one upgrade domain at a time, shutting down the VMs running within the upgrade domain, updating them, bringing them back online, and then moving to the next upgrade domain in the series. By shutting down only the VMs running within the current upgrade domain, VMM ensures that an upgrade takes place with the least possible impact to your running service.
Conversely, deploying a new VM with updated settings is a more time-consuming process, because you are replacing the existing VMs of the service with new VMs. This approach is best when deploying operating-system updates, such as a service pack for the guest operating system. If applications are installed on your VMs, and those applications have a method for saving and restoring state, you can use a script in the application profile to save the application state before the existing VMs are removed and use a script to restore the application state after the new VMs are deployed.
Creating an Update Template
To copy a service template for the purpose of updating an existing service, follow these steps:
Applying Updates to a Deployed Service
Updates are applied in two stages. You prepare the update and then, at a convenient time, you actually apply the update.
To prepare to update a deployed service, perform the following steps:
To apply a prepared update, do the following:
Summary
This chapter covered all aspects of setting up, configuring and deploying service templates: preparing the library for application deployment, coming to grips with and understanding the basic concepts of sequencing a line-of-business application with Server App-V, deploying and scaling out a service, and managing and updating a deployed service. You should now understand the considerations behind implementing and commissioning a service that VMM provides, and you should have made your choices optimally for your own unique situation. You are now ready to learn about the next aspect of your private-cloud environment, the private-cloud solution.