
Chapter 11
App Controller and the Public Cloud
Prior chapters showed you how to form a private cloud and manage VMs in it. This chapter focuses on hosting applications and introduces System Center Application Controller (App Controller), which is a feature-rich, self-service web portal created in Microsoft Silverlight and designed to replace the light-weight, self-service portal described in the previous chapter.
App Controller enables you to manage VMs and applications on your VMM private clouds, and it extends this reach to the Microsoft public cloud, Azure. App Controller is a fantastic new addition to the System Center suite of tools, and it needs a book of its own. This chapter focuses on a few of its key aspects and explains how to do the following:
- Obtain a free trial subscription to Azure
- Install App Controller
- Configure App Controller to connect with your existing VMM installation and your Azure subscriptions
- Use App Controller to perform common tasks
Introducing Windows Azure
Windows Azure is an application platform that Microsoft provides as a public cloud. As such, it is an example of the Platform as a Service (PaaS) model. It enables you to focus on business logic, not operational services, so you can quickly deploy production-ready solutions. Azure is a simple, comprehensive, and powerful platform for the creation of web applications and services. You can use it to deliver Software as a Service (SaaS) solutions.
The compute services hosted by Azure are generally categorized into two roles: Web and Worker.
Web roles provide an Internet Information Services (IIS) web server to host front-end web applications, enabling a quick and easy method to deploy sites on demand.
The Worker role, also called the Backend role, hosts longer-running tasks that are generally independent of user activities. Splitting applications to take advantage of these two roles permits better distribution of your application logic and greater control of how your business applications can scale.
Data is not persistent in either of these roles. The Azure fabric is designed to enable removing and replacing any running instance, transparently without notification or user knowledge. Applications deployed to Azure must be stateless, storing data to one of the provided Azure data-retention solutions, not simply hosting the data in a per-instance temporary folder, for example.
This stateless design means that Azure must provide a way for a role to continue processing data transparently when the active instance is swapped without warning. Azure enables application developers to persist their data in queues, tables, BLOBs (Binary Large Objects), and the SQL Azure role.
Microsoft has recently also included the Virtual Machine (VM) role, enabling the deployment of a custom Windows Server 2008 R2 (Enterprise or Standard) image (also referred to as a legacy application). The VM role runs a virtual hard drive (VHD) image of a Windows Server 2008 R2 VM. This VHD is created using an on-premises Windows Server machine and is then uploaded to Windows Azure. This new functionality extends the Azure service to offer “Infrastructure as a Service” functionality.
Windows Azure, like all public cloud services, shields users from the operational tasks of hosting a cloud, including the following:
- Fabric management
- Geolocation of hosting servers
- Real-time backup and failover for databases
- Deploying from staging to production environments
- Shared memory caches
As a consumer of Azure services, you are responsible for the following aspects:
- Application design
- Data persistence
The cost of using the Windows Azure public cloud is driven by a number of parameters, as described in Table 11.1.
Table 11.1 Public-Cloud Billing Parameters
| Subscription | Description |
| Compute Hours | A compute hour is basically the duration for which a service instance runs. If you were to keep an instance running for a single day, your compute cost would be calculated as number of instances × hours in a day × cents per computer hour. |
| Data Transfers | Data transfers (measured in GB) are charged based on the total amount of data going out of the Windows Azure platform data centers via the Internet in a given billing period. |
| Service Bus Connections | The service bus provides secure messaging and connectivity capabilities that allow you to build distributed and loosely coupled applications in the cloud, as well as build hybrid applications on-premises and in the cloud. Costs for connections are calculated by rate per 10,000 messages. |
| Access-Control Transactions | Access control provide identity and authentication to web applications and services, while integrating with standards-based identity providers, including enterprise directories such as Active Directory and web identities such as Windows Live ID, Google, Yahoo!, and Facebook. Some subscriptions include this service in their cost; others charge per 100,000 transactions. |
| Database Storage | SQL Azure is a highly available and scalable cloud database service built on SQL Server technologies. Costs are calculated based on the size of the database. |
Microsoft offers a number of subscription models to suit different customer profiles and requirements. All of the offers, including free trails, require a credit card at the time of sign up. Microsoft charges your card if you use more than the plan's allocation. While evaluating Azure, you can monitor your account subscription summary to make sure you do not exceed your package limits and receive an unexpected bill.
Currently, Microsoft offers a free 90-day trial, in addition to three subscription offers available for the Windows Azure platform. Table 11.2 describes these offers.
Table 11.2 Windows Azure Subscriptions
| Subscription | Description |
| Pay-As-You-Go | No commitment or up-front costs. Just pay for resources as they are used. |
| Subscriptions | Similar to the Pay-As-You-Go plan, with significant savings when agreeing to a six-month commitment. |
| Members | Special offers that are extended to Microsoft Software Developer Network, Microsoft Partner Network, and BizSpark members. |
The monthly allowances vary for the different subscriptions. For example, the current free trial includes the following:
- 750 hours of a small-compute instance
- 20 GB of storage with one million storage transactions
- 20 GB of outbound data transfer
- Unlimited inbound data transfer
- 1 GB Web Edition SQL Azure relational database
- 100,000 access-control transactions
- Two service-bus connections
In order to select the most appropriate plan and budget for public cloud services, you must carefully consider infrastructure costs, which previously were taken for granted as a by-product of hosting an on-premise fabric. In many cases, the application must be re-architected before being hosted on the public cloud to make sure the solution is optimized in its new ecosystem.
Organizations using the Microsoft Enterprise Agreement license program can be licensed to use Windows Azure for periods of one, two, or three years. Some benefits of the licensing program include the options to consolidate existing subscriptions to simplify management and to use invoices rather than credit cards for billing. While standard subscriptions are limited to hosting six services each, Enterprise Agreement subscriptions are permitted additional services.
Subscribing to Windows Azure is relatively easy; all you need is a Windows Live account and a credit card so you can be charged for any service consumption beyond the trial or offer. Enterprise Agreement customers should work with their Microsoft Technical Account Managers. To subscribe to Windows Azure, follow these steps:
Figure 11.1 Azure Home screen

Introducing App Controller
Application Controller, the newest member of the System Center suite of tools, offers a unified web console to simplify the management of applications across private and public clouds.
Application Controller (App Controller) is designed as a self-service user experience and currently offers no functionality to design or administer components such as templates or services. They remain in the realm of VMM authors and administrators (see Chapter 8, “Understanding Service Modeling”).
From this web console, you can easily publish new and updated templates to both private (VMM) and public (Azure) clouds using a simple graphical configuration experience, while also simplifying access and management of libraries and transferring resources to Azure storage.
Of course, App Controller provides the ability to manage the individual VMs, or VMs that are deployed within the services to which the user has access. All of the usual management capabilities are there: stopping, starting, mounting an ISO, opening a remote desktop connection, and so on.
Combining this functionality with the flexibility of managing more than one VMM server, App Controller allows you to seamlessly move resources between VMM servers (private clouds). Furthermore, role-based access to Windows Azure subscriptions (public clouds) and the ability to manage multiple subscriptions simultaneously solves many Azure-usage concerns. You can provide access through the App Controller interface based on Active Directory users/groups, without granting co-admin permissions directly to the Azure portal.
App Controller Performance and Scale
App Controller scale is not specifically affected by the number of hosts being managed in the fabric, because cloud information is the main exposure. The number of items that show up in a view (e.g., virtual machines or services) does impact App Controller's responsiveness. Assuming that most self-service users can see up to a few hundred items, response time will be reasonable to around 2,000 items in a view. Depending on the number of concurrent users and the number of items in the view, response times will slow down as the numbers increase. Server specifications will also contribute to the overall experience and scalability. Once App Controller begins to slow, you should consider adding additional instances following the App Controller “Highly Available Installation” section in this chapter.
Microsoft has published the current supported limits per App Controller instance at the following location:
http://technet.microsoft.com/en-us/library/gg696060.aspx
The maximum values are as follows:
- Objects in a Windows Azure storage directory: 900
- VMM management servers: 5
- Windows Azure subscriptions per user: 20
- Concurrent users: 75
- Jobs run in a 24-hour period: 10,000
Deploying App Controller
Before you begin to explore the functions of this new tool, you need to deploy it to your fabric. You can install it to either a physical node or a virtual node, depending on sizing requirements for the environment.
The deployment is a multiple-stage process (see the “Connecting App Controller” section later in this chapter):
System Requirements
The system requirements for deploying System Center App Controller 2012 are similar to the guidelines in Chapter 4, “Setting Up and Deploying VMM 2012.” The best scalable approach is to use a dedicated (virtual) machine and monitor the server's resources with System Center tools, such as Operations Manager, to determine whether additional resources are required.
The general requirements for the App Controller server include the following:
- The server needs to be a member of an Active Directory domain.
- The name of the server can have a maximum length of 15 characters.
- The minimum startup memory should be 1 GB if the App Controller Server is placed on a Hyper-V R2 SP1 host with dynamic memory enabled. Even then, it will warn you that at least 2 GB is recommended
The software requirements are outlined in Table 11.3.
Table 11.3 System Center App Controller Software Requirements
| Software Requirement | Notes |
| A Supported Operating System | A full installation of Windows Server 2008 R2 (Standard, Enterprise, or Datacenter) with SP1 or higher |
| .NET Framework | .NET Framework 4
(App Controller will install if required.) |
| Web Services (IIS) | IIS Features:
Common HTTP Features Static Content Default Document Directory Browsing HTTP Errors Application Development ASP.NET .NET Extensibility ISAPI Extensions ISAPI Filters Health and Diagnostics HTTP Logging Request Monitor Tracing Security Basic Authentication Windows Authentication Request Filtering Performance Static Content Compression Management Tools IIS Management Console (App Controller will install if required.) |
| VMM 2012 | VMM 2012 Console Only |
| SQL Database | SQL Server 2008 or 2008 R2
(For performance reasons, MS recommends that SQL not be hosted on the same server as App Controller.) |
In addition, App Controller requires a service account to be provided during installation. This account must also be a member of the local Administrators group on the server on which the installation is being performed.
Client Requirements
In order for the App Controller web console to be used, certain client requirements must also be met. The client must have the following:
- Windows Vista, Windows 7, Server 2008, Server 2008 R2, or newer
- A 32-bit browser that supports Silverlight 4
- Internet Explorer 8, 9, or newer
Installing and Connecting to App Controller
Before you install App Controller on your selected server, you must be logged in as a domain user with membership in the local Administrators group. The account you use must also have at least DBO permission on the database that will be used.
As with the installation of the other tools in the Microsoft System Center Suite, you will be guided through the process by a wizard. During installation, the wizard asks you to provide an optional domain-user account to use as the service account for App Controller. You must also provide the IP address and TCP port to be used for hosting the site.
Because the App Controller web interface should be secured using an SSL certificate, you will be offered the option to generate a self-signed certificate. (This is not really recommended because the certificate must then be distributed to every computer accessing the application.) Preferably, you can install an SSL certificate from your internal PKI solution or deploy a publicly signed certificate to the server prior to running the installation. The wizard presents these in a drop-down for you to select from while configuring the website.
To install App Controller, follow these steps:
Figure 11.2 Configuring the App Controller services
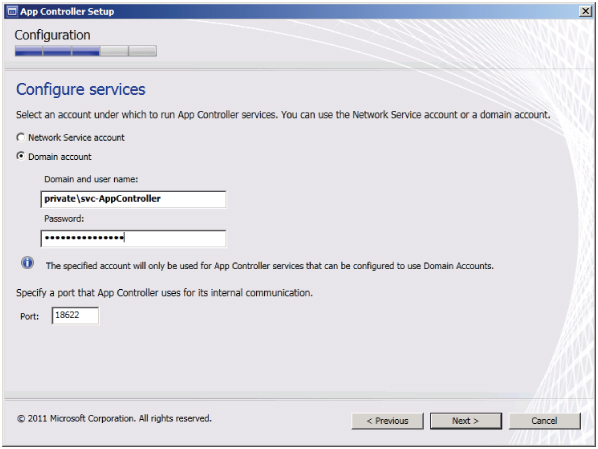
Figure 11.3 Finishing the App Controller installation

In order to connect to App Controller, you'll need a browser and an OS that work properly with Silverlight 4.0 or newer.
To connect to App Controller, follow these steps:
Enabling Single Sign-In
By default, App Controller prompts for your sign-in credentials every time you visit its web page. You can bypass this challenge by configuring Windows integrated authentication on the App Controller website. Then Windows presents your current credentials to App Controller whenever you visit its site.
To enable single sign-in, perform the following steps:
Figure 11.4 Select Authentication in the IIS group.

Installing the App Controller PowerShell Module
The App Controller PowerShell module is automatically installed when you install App Controller. To install the App Controller PowerShell module on a different computer, you must be a member of that computer's local Administrators group, and the computer must have PowerShell 2.0 or newer installed.
To install the App Controller PowerShell module, complete the following steps:
Highly Available Installation
System Center App Controller supports the following options for highly available (HA) deployments:
- Employing clustered SQL Server databases
- Load-balancing multiple App Controller servers
- Using highly available VMs
If you install multiple App Controller nodes behind a load balancer, configure them to connect with the same SQL database, which can be clustered also.
After you install the first App Controller in a high-availability farm, you can retrieve its encryption key with the following App Controller PowerShell command:
Export-ACAesKey –FilePath C:AppController.key
PowerShell asks for a password of at least eight characters, as follows:
Cmdlet Export-ACAesKey at command pipeline position 1
Supply values for the following parameters:
Password: *********
After you've supplied the password, you'll be ready to install additional App Controller servers. The installations will run as explained in the “Installing and Connecting to App Controller” section earlier in the chapter. After you've completed step 7 of that process, you'll be asked to supply the key file and the decryption password (Figure 11.5) created on the first App Controller server. By supplying this information, you are allowing the system to trust each additional server added to the farm.
Figure 11.5 Configuring encryption for an HA installation

App Controller User Roles
App Controller supports just two distinct user roles:
- Administrator, for managing and configuring the App Controller environment, including subscriptions
- Self-Service, to permit App Controller to manage access by its users to public cloud services through Microsoft Azure subscriptions
All user access to private clouds managed by VMM is controlled within the user-role services of VMM, and exposed automatically in App Controller.
Managing the user roles in App Controller is also much simpler than the hierarchical wizard-driven experience in VMM. This section describes the process of managing the App Controller user roles.
App Controller Administrators
When you install App Controller, users and groups in the local Administrators group are automatically added to the App Controller Administrator role.
The following list defines some of the properties of the Administrator profile:
- Unrestricted access is available to all App Controller resources.
- No additional customizations are available or required.
- Administrators of Connected VMM Servers are not automatically added to the App Controller Administrator role.
- App Controller administrators can create one or more self-service user roles.
Only administrators can add or remove users of the Administrator role. To do so, follow these steps:
Figure 11.6 The App Controller User Roles view

App Controller Self-Service Users
App Controller uses its self-service user roles only for managing access to Windows Azure subscriptions. Users can be scoped to specific Azure clouds, and they can be restricted with read-only access. Use VMM to manage self-service roles for private clouds.
The properties of the Self-Service role include the following:
- Used only to manage access to Azure subscriptions
- Scoped to a single Azure subscription
- Can be flagged as read-only — in which case, members will be unable to make any changes to the Windows Azure subscription
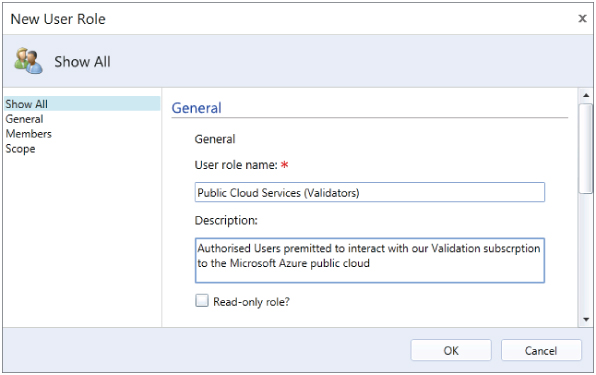
Creating a Self-Service user role in App Controller is simpler than doing so in VMM. To create a Self-Service role for access to an Azure subscription, perform the following steps:
Figure 11.7 Adding a new self-service user
Connecting App Controller
Before anyone can use App Controller, an administrator must configure it to communicate with VMM for private clouds, or Windows Azure for public cloud services. Connecting App Controller to VMM is straightforward. Connecting (or subscribing) App Controller to an Azure subscription requires a little more work.
One of the coolest features of App Controller is its support for multiple connections and subscriptions. If for business reasons you implement different VMM deployments, you can connect App Controller to each deployment. Similarly, if you have multiple subscriptions to the Microsoft Azure service, you can add them to App Controller.
Connecting to the Private Cloud
To connect App Controller to VMM, the administrator must have the privileges of the following roles:
- App Controller Administrator
- Local Administrator on the App Controller server
- VMM Administrator
- Local Administrator on the VMM server
App Controller has the ability to copy files and templates to and from the VMM libraries if the SSL certificates are imported correctly while configuring the connection
To connect App Controller to VMM, complete these steps:
Figure 11.8 Adding a new VMM connection

Connecting to the Public Cloud
The Azure management API, which is HTTPS based, is used to connect App Controller to Microsoft Azure. The certificates used to establish the trust for this SSL channel must be prepared and installed on both ends of the connection.
The service certificate (.pfx file) contains a private key, which App Controller stores in its database. Because the certificate contains the private key, you must provide the password so that App Controller can import and use the private key.
The management certificate (.cer file) contains only the public key, which is imported in Windows Azure for accessing the API. Windows Azure allows customers to create their own management certificates, either self-signed or from a certificate authority (CA).
Sharing these matching public and private keys permits the secure channel to be established, allowing App Controller and Azure to communicate.
Creating a Self-Signed Certificate
Before you create the connection between App Controller and Azure, you must first prepare, for this example, a self-signed certificate to secure the communications channel.
Open the Internet Information Services (IIS) Manager on the App Controller Server.
Exporting Certificates
You need to export the new certificate twice:
- As the PFX (service certificate), which contains the private key for use in App Controller
- As the CER file (management certificate) containing only the public key for importing into Azure
Open the Internet Information Services (IIS) Manager on your App Controller server.
Figure 11.9 IIS – Exporting a certificate

Connecting App Controller to the Azure Subscription
Using the certificates prepared in the previous section, you can establish a connection to the public cloud. The process takes two broad steps:
- Import the management certificate to the Azure subscription.
- Connect App Controller to the Azure subscription and import the services certificate.
To import the management certificate to the Azure subscription, follow these steps:
Figure 11.10 Add New Management Certificate
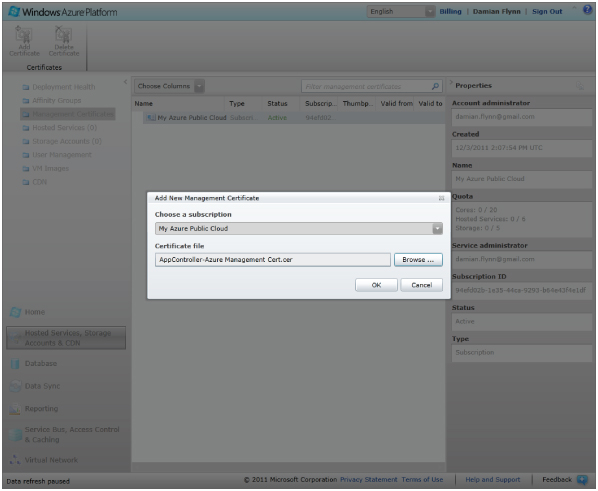
Figure 11.11 You can find the subscription ID in the Azure management portal.

This completes the first of the two steps described at the beginning of this section. To connect App Controller to the Azure subscription and import the services certificate, you'll need to complete the second procedure, as follows:
Figure 11.12 Connecting to an Azure subscription

Exploring App Controller
As a light and fast web experience, App Controller offers a lot of really cool functionality to self-service users — certainly, far too much for us to do justice to in this chapter. With that in mind, let's look at the user experience and some key end-user operations.
So that you can become acquainted with the primary areas of the new portal, let's start with the Overview Home screen in App Controller (Figure 11.13).
Figure 11.13 The App Controller overview

Table 11.4 describes the key areas of the screen. If you have already used VMM 2012, this is immediately familiar. Administrators will see additional options in the main pane.
Table 11.4 App Controller User Interface
| Screen Element | Description |
| Views/Navigation | Located on the left of the window, the View list is the access point to the different areas of control within App Controller. These include the primary views of clouds, services, VMs, libraries, and jobs, along with the secondary settings views of connections, subscriptions, and user roles. |
| Menu bar | The menu bar is located along the top of the view pane, and it offers context-aware options, along with a refresh button for the main pane, and a time stamp of the last completed refresh. A Settings icon lets you enable additional logging details if desired. |
| View pane | All of the relevant information for the active view is presented within the main pane, including status overviews, clouds, services, and VMs. |
All the Views and Panes are filtered so they present to the user only the actions, clouds, VMs, and services available for interaction from either the private or public cloud services, based on the active role.
App Controller continues the VMM philosophy of keeping track of every job executed on the service, ensuring that an audit track of all activities is maintained, while offering a simple interface where users can check the status of their recent jobs and determine the reasons for any failures.
To view the status of a job in App Controller, use the Jobs view. The list of jobs presented is filtered based on the scope and role of the user viewing the history. Administrators can view jobs from all users.
To view the job status, in the App Controller interface, expand the Jobs node.
Figure 11.14 The App Controller Jobs view

- Job: Friendly name for the job
- Target: Resources created or modified
- Status: Current completion status (In Progress, Failed, or Completed)
- Owner: User who initiated the job
- Start Time
- End Time
- Cloud System Job ID: Relates to the job on the underlying cloud environment, either VMM or Azure. This ID is very important for administrators who are tracing failed jobs to understand the reasons for failure.
- Command Parameters: The parameters provided to start the job
- Errors: Detailed error information if the job fails
The App Controller Library
In VMM, libraries play a significant and important role in private-cloud functionality. App Controller extends this concept to a higher level of abstraction, which allows you to present a library share to end users who will deliver the content to either the private cloud (VMM) or the public cloud (Azure).
The library you define in App Controller allows end users to move, store, and share objects with VMM or Azure clouds.
The App Controller interface contains a Library node (Figure 11.15), which presents a view similar to Windows Explorer.
Figure 11.15 The App Controller interface's Library view

App Controller supports the following library types:
Shares
Network file shares added by administrators. Depending on native file-server access control, users can store files and resources suitable for public and private clouds. These resources can then be copied to the Windows Azure or My Private Clouds shares.
Windows Azure
Any subscription registered to Azure appears under this library. Initially each subscription may contain a single storage account called Image Repository, which is offered by Azure for the VM role. Additional containers can be added to each subscription to host additional resources.
My Private Clouds
Cloud libraries offered from VMM for your private clouds appear under this library type, providing a unified experience for users to copy resources between private clouds, or from shares to both public and private clouds.
Adding File Shares to the App Controller Library
Any user with App Controller administrative privileges can add file shares to the library. The file server controls access to the shares, and prospective end users should have at least read access.
Adding an Azure Storage Account
After adding a subscription for Windows Azure, you should have an Azure storage account called Image Repository, which is used to store VHDs for use by the VM role in Azure. You can add a storage account so that you can upload resources to it for services publishing to the public cloud.
To add an additional storage account to the Azure subscription, follow these steps:
Figure 11.16 You can add more storage to the Azure subscription.

Copying Library Resources
After you add file shares to App Controller, you can copy resources from those shares to either your private cloud (VMM) or the public cloud (Azure). App Controller provides Copy and Paste buttons to make it easy to do.
Authorized users can copy VHD files from shares to their subscription's image repository for use by the Azure VM role. Only VHD files can be copied to the image repository.
Take the following steps to copy a resource from a library share to a cloud library:
Working with Services
So far, your journey to the private cloud has focused mainly on VMM and using it as an IaaS environment delivering VMs on demand to your consumers. Of course, having VMs on demand is very valuable for many business requirements. However, for the developers and application-hosting teams, it is just a means to an end, a step in their procedures to host applications.
VMM 2012 introduces the concept of services, a framework designed to enable users to deploy applications more efficiently by encapsulating VMs and applications as a service definition, which can then be deployed in a single step.
This approach offers a lot of benefits to the teams working with the applications — especially when you consider the work involved to deploy a moderately complex service, which then must be repeated multiple times for development, staging, quality assurance, and the production environments. The time required to complete this procedure can be quite long and prone to error — and once a deployment is complete, updates to these instances are inevitable.
One of the benefits of implementing a private cloud is to increase automation, and VMM's new Service model allows you to embrace these application deployments as part of the automated deployment process, vastly increasing the speed of deployment while reducing the potential for mistakes, on a standardized instance for each of the main environments.
Chapter 8 describes services and illustrates the key elements in creating a service and deploying it to a VMM private cloud.
With App Controller, these VMM service definitions, called templates, can be made accessible to cloud users for deployment — just as VM templates can (see Chapter 10, “Working in the Cloud”). Figure 11.17 shows the analogous process for deploying services.
Figure 11.17 The Service Deployment workflow

Chapter 10 explains how to deploy VMs using the VMM self-service portal (which Microsoft is deprecating in favor of App Controller). App Controller has a richer interface and built-in support for the new service templates, which Microsoft now recommends for all VM deployments, even single-VM installations that normally use VM templates. When a cloud user logs onto App Controller, a list of resources available for deployment, including any service templates created by the developers or the application team, appears in the Library view.
A self-service user can select the Deploy action and the service template to be deployed. App Controller requests additional information depending on the service template's requirements. After collecting the required data, App Controller coordinates with VMM and passes it the job for processing.
VMM accepts the job from App Controller, and verifies that the request matches the capabilities of the user role, the quota, and so forth. Then VMM deploys the VMs required for hosting the selected service, installs the application on these hosts, and applies any necessary customizations (for example, identifying the correct SQL server with which to connect).
Choosing an application in App Controller, in fact, chooses a service template. VMM examines the service template to determine what's required to create an instance of the application it describes; it then verifies that this request matches the cloud's quota and capabilities. If everything checks out, VMM creates one or more new VMs to run this application, installs the application in those VMs, and starts the app running.
Deploying applications through service templates has other advantages. A service template can specify that one or more of an application's tiers can be scaled out, with one or more VMs running in that tier. The template can specify a load balancer to spread requests across those VMs, and the application owner can control how many VMs run at any time.
Deployment with App Controller
Finally, you're ready to be introduced to App Controller's real value and rich interface for deploying VMs to private clouds and services to both private and public clouds. In this section, you'll work with examples of each of these deployments and be given an overview of the basic information App Controller needs to complete the deployments.
Deploying a VM to a Private Cloud
Chapter 10 explained how to deploy VMs to a private cloud using the VMM console, the self-service portal, and PowerShell. Deploying VMs in App Controller is a similar process.
To deploy a VM to a private cloud, just complete these steps:
Figure 11.18 In the App Controller interface, you can view the virtual machines.

Figure 11.19 Configuring a new VM deployment

Deploying a Service to a Private Cloud
Deploying a service with App Controller is similar to the procedure in the previous section.
To deploy a service to a private cloud, use the following steps:
Figure 11.20 Configuring a new service deployment

Deploying a Service to an Azure Cloud
What differentiates App Controller is its ability to manage both private clouds (VMM) and public clouds (Azure) while masking the complex processes involved with deploying services. Deploying a service to an Azure public cloud follows a procedure similar to those in the previous sections.
You will never be asked to decide whether you should select a Web role or a Worker role; this decision is made by the developers when they create the package for deployment. The configuration file that you will select in step 6 contains the directives for Azure to process this decision.
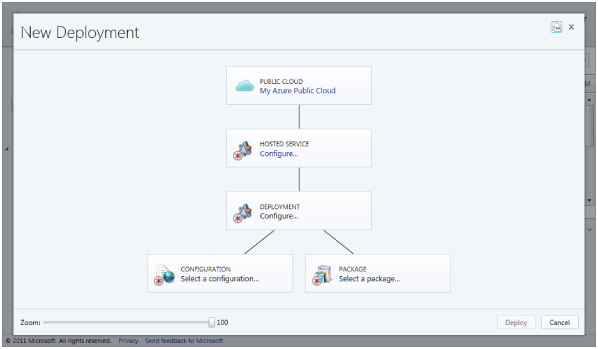
To deploy a service to an Azure public cloud, perform the following procedures:
Figure 11.21 Deploying a new service in Azure
Creating an Azure Hosted Service
The definition of a hosted service is constructed from a service name and a location to host the service on the public cloud. The hosting location you choose may affect the cost of your subscription.
As a Software as a Service public cloud, Azure requires you to define a URL to access the service (as a subdomain of cloudapp.net, which you can alias with your own domain name anytime). You can also select the region on the Azure public cloud to host the application. You must define at least one hosted service to deploy an application to Azure.
To create a hosted Azure service, perform the following procedures:
Figure 11.22 Creating a hosted service

Removing a Virtual Machine
Of course, some day you may have to remove a VM from a private cloud. The simple process involves just two steps:
Upgrading Services with App Controller
App Controller has many more features than could possibly be covered in a single chapter. The rest of this chapter will focus on using the App Controller interface to upgrade services to new versions on both public and private clouds.
Upgrading Services
Deploying an application more quickly is all but certain to please that application's users. Yet an application (and the platform it runs on) is probably updated more often than it's deployed, and so making the update process simpler also has significant value. Reflecting this, the Microsoft private cloud contains several technologies aimed at making it easier to update applications deployed from service templates.
For example, suppose your developers update their business application, which you have already deployed as a service to the VMs hosting your applications. The VMM service model allows you to deploy a new version of the business application with all the new updates included, and then reapply the application, as illustrated in the flowchart in Figure 11.23.
Figure 11.23 The Service Update workflow

Let's assume that the updated application packages (for example, a Web Deploy) are deposited into the VMM library by the development team and then tagged as a new revision of a current package family. VMM scans each service template to flag ones that use the package just upgraded.
App Controller users can select the Services view. If VMM has flagged any of the services within their scope as out of date, they will be notified. They can update the instances now, later, or not at all. If a user chooses now, App Controller initiates a job to update all affected VMs in the service, bound by the defined upgrade domain setting for the service's tier.
This scenario is slightly simplified. The service template itself also has an owner who must accept the change before the application owners are notified. Still, it illustrates the key concept: an update made to a single package can be automatically deployed to all services that use the image. This automation makes updates faster and less error-prone. This model also permits VM images to be updated separately from applications and lets organizations create and manage fewer base images. Rather than using a distinct VM image for each application, administrators can reuse a smaller set of images across multiple applications. To use VMM effectively to update VM images and applications, the hosted applications should be stateless. When this is not possible, VMM offers Server App-V to package the application and its associated state (refer to Chapter 8 for additional details).
One last point to understand is that this kind of automated update is available only with service templates; it's not possible with VM templates.
Upgrading in a Private Cloud
Private cloud services are upgraded by selecting a new version of the service template. If your service has a status of Pending Servicing, this selection has already been done for you by an administrator or via template authoring outside of App Controller. Cancelling an upgrade for a service with the Pending Servicing status deselects the upgraded template.
To upgrade a service, follow these steps:
Upgrading in a Public Cloud
Public cloud services can be upgraded in one of two ways:
- Environment swap: Place the staging environment into the production environment and the existing production environment into the staging environment.
- In-place upgrade: Replace the existing binaries and settings with new binaries and settings.
Swapping Environments
A swap works only if there is a deployment in the staging environment. If the staging environment is empty, you cannot perform a swap upgrade.
To perform an environment swap, follow these steps:
Upgrading in Place
An upgrade in place is performed one upgrade domain at a time. A deployment is made up of one or more roles, which you can view in the diagram. A role's instances are automatically divided into the upgrade domains. So, if your role has six instances and your deployment has two upgrade domains, the upgrade occurs on three of the role's instances at a time. Once all three are upgraded, the next set of role instances is upgraded. By default, the whole process of moving from upgrade domain to upgrade domain is automated. You can optionally specify that you want to manually signal when the upgrade should proceed to the next upgrade domain.
To perform an in-place upgrade, do the following:
Summary
App Controller is a feature-rich self-service web portal created in Microsoft Silverlight and designed to replace and extend the original light-weight VMM self-service portal. App Controller simplifies the process of deploying software as a service both in VMM-managed private clouds and in the Windows Azure public cloud.
Additionally, App Controller is currently the only application that offers a simple friendly interface to Windows Azure. It permits organizations to finally consolidate all their subscriptions centrally and efficiently manage them through user roles. At the same time it simplifies currently complex exercises, including copying resources such as Azure VMs.
This chapter is much too short to offer a complete overview of all the features of App Controller, its ability to work with the Services Model, and its flexibility to work with VMM and Azure. The objective is to set the seed in your mind so that you can begin to appreciate the beauty of this application and begin to dig deeper into its hidden depths.
Over the last three chapters you have been introduced to the process of delivering and consuming clouds, both private and public. Old concepts mixed with new, but you should clearly see that this is truly a Version 1.0 solution that can only get better and better.
Windows 8 Server will become Microsoft's standard hypervisor for the coming years. When compared to previous offerings, it is jam-packed with exciting new technologies such as network virtualization, VM replication, extensible switches, and so on — all of which will influence future private-cloud foundations into far more scalable and feature-rich offerings.
You don't have to be a genius to see that this is only the beginning of a journey that can lead to a very exciting future. The management framework will evolve to embrace all the features exposed in Windows 8 Server and other hypervisors, offering even more sophisticated options for building rich and powerful clouds simply!
Just imagine hybrid solutions, offering the ability to host services on private clouds hosted in-house, with hosting providers, or on the public cloud, all working smoothly together within the VMM/App Controller environment. IT pros will be able to obfuscate the underlying fabrics so they can make smart and easy business decisions to extend the fabric on demand, and instantly!
The next chapter completes the Microsoft private cloud vision by introducing Microsoft's approach to providing infrastructure as a service. This solution is still in its infancy. Read on to see how it's hatching.