
Chapter 12
Cloud Services Process Pack
Self-service is a key feature of private clouds. Self-service users can access IT resources automatically, with no human intervention required. If you, as an administrator, are comfortable creating a cloud for a subset of your organization, defining services and quotas for that cloud, and letting people use the cloud as they like, this approach can work well.
However, if you sometimes want your IT users to go through a more formal approval process to get resources, you'll need to go outside VMM or even App Controller. For such situations, Microsoft provides the System Center Cloud Services Process Pack (CSPP). CSPP enables you to attach Information Technology Infrastructure Library (ITIL)–style workflows to self-service requests generated by VMM or App Controller.
With CSPP, your enterprise can realize the benefits of Infrastructure as a Service (IaaS) while simultaneously leveraging your existing investments in System Center components. This chapter introduces these aspects of the final component of the Microsoft private-cloud solution:
- The Infrastructure as a Service vision
- The components of Cloud Services Process Pack and how they integrate with System Center components
- Setting up and using runbooks
- The role of the configuration-management database
Introducing the Vision
The goal of Service Manager is to support IT service management in a broad sense. The goal of the ITIL is to establish standard practices for managing IT services, such as change management and incident management. Service Manager's role includes implementing ITIL processes, such as change management and incident management, and it can also include processes for other things, such as allocating resources from a private cloud. For example, suppose an organization wants to let developers allocate VMs from a private cloud but decides that these requests should sometimes require approval from the developer's manager. Figure 12.1 shows an example of how this can be implemented in the Microsoft private cloud.
Figure 12.1 A Private Cloud Request flow

Within this scenario, Service Manager maintains a configuration-management database (CMDB). The Private Cloud Request flow is outlined in the following steps, which correspond to the numbers in the figure:
The Components
One of the clear differences between the CSPP and all the solutions you have encountered in this book so far is that the architecture of the solution is not created from a built-in function within System Center, but rather a customizable integration of functions and features offered through the components of the System Center suite.
CSPP is a solution accelerator, designed to help implement a highly customizable private cloud service offering while permitting easy modifications to address specific business requirements. These can span from simple changes within the approval process to extending the runbook to provision library shares, or far more-complex scenarios if necessary.
Differing from the functions offered with App Controller, this approach permits adding functionality to the solution, including the ability to implement human approval processes, and creating new service offerings that can be embellished with highly creative automation extensions.
Let's take a few moments to introduce the additional members of the System Center suite, which enrich the experience of private clouds through their integration.
Cloud Service Process Pack
Organizations considering IaaS must examine and adapt their existing tools, processes, workflows, and automation to meet the requirements of an effective cloud-services implementation. While it is critical that the underlying components (such as self-service portal, ticketing infrastructure, notifications, workflows, and automation) integrate well with each other and follow industry-wide best practices, the work involved to ensure an effective cloud-services implementation can be daunting and time-consuming.
CSPP addresses these concerns by enabling IaaS while incorporating domain expertise and best practices from enterprises that have successfully deployed IaaS. These best practices are made available out of the box and are evident in all aspects of the solution.
Created on the System Center platform, the process pack exposes the flexibility it inherits from this suite of applications, permitting solutions to be customized to address the requirements of the business. For example, Service Manager allows organizations to customize individual questions and inputs of CSPP on the self-service portal, and Orchestrator allows creation of custom runbooks that can be run as part of infrastructure service requests.
The benefits offered by CSPP for the enterprise include the following:
- A well-tested and fully supported cloud-services solution that follows industry-wide best practices
- Deep customization and extension of the cloud-services experience natively supported by the System Center suite of products
- Reduced cost, effort, and time to deploy cloud services to organizations that already leverage the System Center platform
The benefits offered by CSPP for consumers of IT within the enterprise include these:
- Standardized and well-defined processes for requesting and managing cloud services, including the ability to define projects, capacity pools, and VMs
- Natively supported request, approval, and notification to enable businesses to effectively manage their own allocated infrastructure capacity pools—for example, project administrators can approve or reject capacity pool and VM requests
Operations Manager
Operations Manager (OM) is a cross-platform data-center-management system for OSs, network devices, and hypervisors. It uses a familiar System Center interface to display state, health, and performance information of monitored infrastructure, while providing alert generation according to rules covering availability, performance, configuration, and security information.
It installs a small software component (agent) on each computer to be monitored. The agent watches relevant information sources on the computer for specific events or alerts generated by the applications executing on the monitored computer. These alerts are then forwarded by the agent to the OM server, which maintains a database on the history of these alerts.
As alerts arrive, OM uses filtering rules and can trigger notifications such as an email or a pager message, generate a network support ticket, or trigger some other workflow intended to correct the cause of the alert in an appropriate manner.
The rules are stored in management packs that Microsoft and other software vendors provide for their products. OM also provides for authoring custom management packs.
OM delivers integration, availability, performance, and security of IT services in the following ways:
- Enhances application performance and availability across heterogeneous platforms in the data center, with the ability to monitor Windows, Linux, and UNIX servers and their workloads—all through a single console
- Improves management of applications in the data center through enhanced reporting that shows how actual application performance and health map to target levels of service, as well as monitoring capabilities that scale to required workloads
- Increases speed of access to information and functionality to drive management with efficient problem identification and actions to quickly resolve issues before they become incidents
OM and VMM have a special connector functionality, which permits bidirectional communications between these products, as overviewed in Table 12.1.
Table 12.1 Operations Manager and VMM Integrations
| Component | Integration |
| Operations Manager | Powerful interoperability and automation using PRO-enabled management packs provide an automated or advised response to incidents within virtualized environments (for example, live migration of workloads between servers in response to a hardware issue on the virtualization host). |
| VMM | VMM service definitions are synchronized to Operations Manager as distributed applications. |
Orchestrator
Orchestrator is an automation platform for orchestrating and integrating IT tools to decrease the cost of data-center operations while improving the reliability of IT processes. It enables IT organizations to automate best practices, such as those found in Microsoft Operations Framework (MOF) and ITIL. It operates through workflow processes that coordinate System Center and other management tools to automate incident response, change and compliance, and service–life cycle management processes.
Through its workflow designer, Orchestrator automatically shares data and initiates tasks in OM, Configuration Manager, Service Manager, VMM, Active Directory, and third-party tools.
Orchestrator workflow automates IT infrastructure tasks, while Service Manager workflow provides automation of human workflow. The combined offering ensures repeatable, consistent results by removing the latency associated with manual-coordination service delivery.
Orchestrator enables integration, efficiency, and business alignment of IT services by doing the following:
- Automating cross-silo processes and enforcing best practices for incident, change, and service–life cycle management
- Reducing unanticipated errors and service delivery time by automating tasks across vendor and organization silos
- Integrating System Center with non-Microsoft tools to enable interoperability across the data center
- Orchestrating tasks across systems for consistent, documented, compliant activity
Orchestrator and Service Manager have a special connector functionality enabled through the Orchestrator ODATA web service, which permits bidirectional communications between these products, in addition to the integration packs that are published to Orchestrator servers as explained in Table 12.2.
Table 12.2 Orchestrator Integrations
| Component | Integration |
| Service Manager | Using Orchestrator ODATA web services, Service Manager extends its workflow functionality by consuming and executing runbooks hosted in Orchestrator in a fully integrated experience. |
| Orchestrator Integration Packs | Add-on packs that extend the functionality of Orchestrator to manage additional products are available from Microsoft and third parties (including open-source offerings hosted normally on the CODEPLEX site). |
Service Manager
Service Manager is an integrated platform for automating and adapting IT-service-management best practices, such as those found in MOF and ITIL, to provide built-in processes for incident resolution, problem resolution, and change control. By providing an integrated service-management platform, Service Manager can reduce costly downtime and improve the quality of the services in the data center.
Service Manager delivers integration, efficiency, and business alignment of IT services by doing the folllowing:
- Optimizing processes and ensuring their use through templates that effectively guide IT analysts through best practices for change and incident management
- Reducing resolution times by cutting across organizational silos, ensuring that the right information from incident, problem, change, or asset records is accessible through a single pane
- Extending the value of the System Center platform through automated generation of incidents from alerts and the coordination of activities among System Center products
- Enabling informed and cost-effective decision-making through the integration of knowledge from disparate IT-management systems and delivering out-of-the-box reporting and flexibility of data analysis through Microsoft SQL Server 2008 reporting services and Microsoft SQL Server 2008 Analysis Services–hosted cubes
Through its CMDB and process integration, Service Manager automatically connects knowledge and information from the products that integrate with Service Manager. The features provided by this integration are illustrated in Table 12.3.
Table 12.3 Service Manager Integrations
| Component | Integration |
| OM | Automatically creates configuration items in the Service Manager CMDB based on computers discovered in OM.
Automatically creates incident tickets based on alerts generated in OM. Incident tickets in Service Manager create work items for analysts. Extends and augments the knowledge-base information in Service Manager with the knowledge-base information in OM. |
| Configuration Manager | Automatically creates configuration items in the Service Manager CMDB based on computers discovered in Configuration Manager.
Automatically creates incident tickets based on changes in managed-computer configuration using the desired configuration-management (DCM) feature in Configuration Manager. |
| Orchestrator | Automatically extends Service Manger functionality to execute and monitor runbooks published in Orchestrator as part of the Service Manager workflow. |
| Active Directory | Automatically creates configuration items in the Service Manager CMDB based on computer, user, group, and printer objects in Active Directory. |
Using Service Manager, a private cloud can also handle requests that require human approvals or carry out other processes.
Implementing the Cloud Service
Prior to implementing CSPP, the following components of System Center should be deployed and functioning within your fabric:
- Service Manager
- Orchestrator
- OM
- VMM
Once the prerequisite components are in place, some additional configuration work needs to be completed by first creating the VMM, OM, and Orchestrator connectors.
A connector imports data from the System Center component to the Service Manager CMDB. Connectors can import logical networks, VM templates, storage classifications, and so on from VMM; import policies from Orchestrator; and import operational data from OM.
After the imports are complete, we will configure the VMM resources in the Service Manager console, and complete the final configuration settings for the process pack. These are the tasks we will be performing:
- Create the VMM connector.
- Create the OM connector.
- Create the Orchestrator connector.
- Configure the VMM resources.
- Create the user roles.
- Create the notification channels and subscriptions.
- Configure the general properties (global settings).
- Create the cost centers.
- Configure offerings.
Integrating VMM and OM
The VMM to OM connector enables PRO integration services between the two products. One of the key benefits of enabling this integration is the services feature in VMM. With the integration enabled, VMM can keep the service model of the distributed application up-to-date in OM, including dynamically updating the service diagram because of scale-out (for example, add a web server to a load-balanced web tier) or scale-in (for example, remove a business-logic server from a load-balanced middle tier), as well as display the health of the virtual machines, tiers, and the overall service in OM.
For this feature to function, you must first import the VMM management packs to your OM server and deploy an OM agent to the VMM server. The management packs to be imported reside on the VMM server, normally in the products' installation directory, typically at the following folder location:
C:Program FilesMicrosoft System Center 2012Virtual Machine ManagerManagementPacks.
The packs, once imported into OM, appear as follows:
- System Center 2012 Virtual Machine Manager Discovery
- System Center 2012 Virtual Machine Manager Monitoring
- System Center 2012 Virtual Machine Manager PRO Diagnostics
- System Center 2012 Virtual Machine Manager Reports
- System Center Virtual Machine Manager 2008 R2 PRO Library
- Virtual Machine Manager Library
- Virtual Machine Manager Overrides
- Virtual Machine Manager PRO Library
- Virtual Machine Manager PRO V2 Hyper-V Host Performance
- Virtual Machine Manager PRO V2 Library
After the management packs are imported, you can also add an account to the OM Administrators role to use for VMM integration.
On the VMM server, install the OM management console before starting the Integration Wizard. The Integration Wizard is located on the Settings workspace, under the System Center Settings view. The first time you launch the OM Server option, a simple wizard requests the name of the OM server, and the account that has administrative access for the integration. Additionally the wizard offers the opportunity to enable the PRO features, along with enabling maintenance mode in Operations Manager automatically. When the wizard finishes, double-click the Operations Manager Settings view again; this time you will be presented with the Settings dialog, as illustrated in Figure 12.2.
Figure 12.2 The VMM Operations Manager settings

Test the integration by clicking Test PRO. This raises a test PRO alert, which pops up a new dialog with the relevant information for your attention and should self-resolve a few moments later.
Adding the Management Packs to Service Manager
In Service Manager, you need to import some of the same management packs to meet the requirements of the CSPP installer and to ensure that the OM connector provides the required packs for synchronization.
Unlike Operations Manager, however, Service Manager does not automatically resolve the management-pack dependencies and download the missing ones. Only some of the management packs need to be imported so that Service Manager can understand the objects with which you are working. The main required pack is called System Center 2012 Virtual Machine Manager Discovery.
Table 12.4 lists the dependent management packs you must import into Service Manager, and the sequence in which they should be imported, so that the main pack can be successfully imported. The management packs are supplied with the Cloud Services Process Pack in a folder called “ManagementPacks”.
Table 12.4 Service Manager Management Pack Import Order


Table 12.5 Management Pack Source Locations
| Source | Path |
| MP | .SetupManagementPacks |
| VMM | .SetupManagementPacksVMMMP |
Creating a VMM Connector
The VMM connector is important because it imports VM templates, service templates, logical networks, VIP profiles, clouds, and VMM user roles to Service Manager to provide automation in the infrastructure when provisioning VMs.
To complete this process, you need Administrator privileges on the Service Manager system. In the Administration view in the left pane of the Service Manager console, select Connectors. A Create Connector action appears in the Tasks pane (Figure 12.3). In subsequent sections, you'll create each of the listed connectors.
Figure 12.3 Creating connectors in Service Manager

Select Virtual Machine Manager Connector. The VMM Connector Wizard opens.
Enter a name for the connection, a short description, the fully qualified name of the VMM server, and a Run As account to complete the connection. On the Summary screen, review your choices and read the Additional Information field. For example, if the wizard detects that the VMM server is configured to push data to OM, it reminds you to create an OM connector too.
Click Create to begin creating the connector.
Creating Operations Manager Connectors
Figure 12.3 shows Service Manager's two OM connectors: the Alert connector and the Configuration Items (CI) connector. Together they enable Service Manager to populate the CMDB with information from the managed environment.
Create these connectors using the same procedure as for the VMM connector. First select Operations Manager CI Connector. The OM CI Connector Wizard appears.
Provide a name for the connection, a short description, the fully qualified name of the OM server, and a Run As account.
On the Management Packs tab (Figure 12.4), the wizard lists all the management packs present on both OM and Service Manager and suitable for synchronization with the CMDB. Select all of them and ensure that the list includes the Discovery management pack:
Microsoft.SystemCenter.VirtualMachineManger.2012.Discovery
Figure 12.4 Selecting management packs for the connector

This management pack is required for CSPP to be updated with changes detected by OM. Click OK, and the Summary screen appears. Click Create.
Following the same procedures you just used, select Operations Manager Alert Connector (see Figure 12.3) to create the Alert connector. This connector is not required for the CSPP to function. Its purpose is to transfer alerts detected by OM to Service Manager to process as incidents. The connector can be filtered to the type of alerts transferred, and associated with specific templates in Service Manager.
Creating an Orchestrator Connector
The Orchestrator connector enables the integration and use of runbooks hosted on the Orchestrator server as part of the Service Manager workflows.
Following the same procedures as in previous sections, select Orchestrator Connector.
In the wizard, provide the following:
- Name and description of the new connector
- A web service URL for Orchestrator web services (for example, http://scorch2012.private.cloud:81/orchestrator2012/Orchestrator.svc)
- A Run As account with permissions to access to the runbooks
- The runbook folder to synchronize
- The URL of the Orchestrator web console to enable hyperlinks for users to monitor active jobs
Review the summary and click Create.
Installing the Cloud Service Runbooks
In the CSPP installer, select Cloud Service Runbooks to install the runbooks on the Orchestrator server. The installer requests administrative access to the Orchestrator server and the name of the Service Manager connector. Figure 12.5 shows a sample runbook installed for creating new VMs in VMM.
Figure 12.5 A sample Cloud Services runbook

These new runbooks deployed to the Orchestrator server are used by CSPP to interact with VMM (for example, deploying a new VM to a cloud after it is approved).
Installing the Cloud Service Process Pack
On the Service Manager server, start the CSPP installer. The prerequisite check verifies that everything is ready for the deployment. In particular, the OM management pack must be synchronized with the VMM Discovery management pack. The installation should proceed without issue and begin importing new management packs into the Service Manager server for the new cloud processes.
After installing CSPP, close any open Service Manager consoles and reopen them to see the new Cloud Services view in the Administrator workspace (Figure 12.6).
Figure 12.6 Viewing cloud services in the Service Manager console

Configuring VMM Resources
In the Service Manager console, Cloud Services view, select Configure VMM Resources from the solution checklist. The wizard (Figure 12.7) steps you through the tabs.
Figure 12.7 Configuring placement tabs in the Service Manager console

The Placement Tags tab enables you to offer end users input choices that you can use to determine where infrastructure requests should be placed (for example, in which data center, on which server). Figure 12.7 shows a sample tag. Other tags might include location, business impact, and compliance requirements. You can customize this list at any time.
Creating User Roles
CSPP bases user roles on the two personas described in Table 12.6.
Table 12.6 CSPP Personas
| Persona | Responsibility |
| Tenant Administrator | The tenant administrator manages the cloud subscriptions. This person decides that using the cloud for a project is a good idea and requests a new project thought the portal |
| Cloud Subscription User | The Subscription users, are the end users. They request and use VM's for project clouds |
These personas are represented in Service Manager as user roles. Defining them is simple, because you don't need to assign users or configure the roles. Initially, they are empty groups for users who later join these roles. The process of joining users to the role is addressed by the actual cloud process workflows once users begin to use the environment.
To set up the user roles, select Create User Roles for Tenant Administrators and Cloud Resources Subscription Users (refer back to Figure 12.6). This redirects us to the User Role node of the Security branch on the same pane. Select Create New User Role from the Tasks pane, and select End User as the role type.
Working through the wizard, enter the name of the first persona (Tenant Administrator). On the Management Packs screen, select All. This page filters the options that appear on the following screens. For now, simply click through the wizard to finish setting up the role for the persona.
Repeat the previous procedure for the second persona (Cloud Resources Subscription User). For clarity, as illustrated in Figure 12.8, you can name this persona CSPP Cloud Resources Subscribers.
Figure 12.8 The Cloud Services settings

Creating Notification Channels and Subscriptions
If your Service Manager installation is new, create an entry for your SMTP server. Otherwise, it probably already exists.
To check, find the Email Notification Channel configuration on the Administrators view, expand Notifications to show the Channels node, and select it to view and edit its properties.
Once the notification channel is configured, check to see if any subscriptions are enabled; they tell Service Manager which notifications to send and when to send them (for example, notify an agent when a new ticket is logged or update the requestor when a ticket is complete).
While still on the Notifications branch of the Administrators view, select the Subscriptions node to see or edit current notifications or create new ones.
Configuring General Properties (Global Settings)
Hidden in the middle of the configuration is the Cloud Services Settings screen (Figure 12.8), which is accessed by selecting step 3 of the getting started list. These important settings determine how the process-pack routes received requests for review and implementation. First, you should define the prefixes to be used within Service Manager for both Tenant and Cloud Resources Subscription requests.
The personas (user roles) you created earlier—that is, Tenant Administrator and Cloud Resources Subscribers—are now connected to the Cloud Services process pack in the dialog section titled “Enter the Service Manager user roles that will be used to manage Service Catalog access.” Defining both of these user roles enables CSPP to automatically update the user-role membership with the relevant user accounts after requests have been reviewed and approved.
The lower area of the dialog is where you specify the default reviewers and implementers of cloud-service activities—that is, the person or group that approves requests before you can process them. The Active Directory User or Groups identified for these roles must already be contained in the Service Manager CMDB; If the objects were only recently created in AD, then ensure that the AD connector has successfully completed a synchronisation to import these objects, otherwise you will be unable to store these settings when closing the dialog. Figure 12.8 shows the two additional personas in action here:
- Project Administrators whom request capacity in the cloud, initially as a Tenancy, and then as a cloud subscription for there respective projects within the Tenancy.
- Activity implementers prepare the user roles and clouds in VMM and associate the newly created VMM cloud and resources with the subscription request.
Figure 12.9 presents an overview of the CSPP personas.
Figure 12.9 The CSPP personas

Creating the Cost Centers
CSPP offers very basic chargeback support. On the Virtual Machine Cost Settings screen, specify the following costs for VM resources:
- Memory cost (GB/day)
- Storage cost (GB/day)
- CPU cost per unit per day
- Miscellaneous cost per day
All of these costs must be supplied, even if you do not plan to use the chargeback feature; in such cases, just supply a zero value.
The memory, storage, and CPU costs are pretty much self-explanatory. The miscellaneous cost is for any additional, daily fixed cost for your offered services—a tax of sorts.
Don't get too excited, though; the costing here is very simplistic and does not take different classes of storage or fabric infrastructure into account, nor does it consider whether the VM is running, stopped, or in the library! Therefore, you will want to begin with an average value.
As Chargeback/Showback is a key feature of Private Cloud and Infrastructure as a Service, Microsoft will be offering an updated Process Pack which will focus on this area in greater detail very soon.
Configuring Offerings
Now you are ready to offer the new services to end users. Installing CSPP creates additional request offerings, as described in Table 12.7.
Table 12.7 CSPP Requests
| Offering | Purpose |
| Register a Tenant | Request to host a new tenant. You specify the urgency, tenant name, tenant administrators, and a cost center. |
| Update Tenant Registration | Identify a tenant to be updated, and provide details on the changes required—for example, adding new administrators. |
| Cancel Tenant Registration | Provide information about the tenant to be decommissioned. |
| Subscribe to Cloud Resource | Request a Cloud subscription for your project. This includes VM templates and quota requirements, such as storage and memory. |
| Update Cloud Resource Subscription | Identify the Cloud subscription to be updated, and provide details on the changes required—for example, additional RAM quota. |
| Cancel Cloud Resource Subscription | Provide information about the Cloud subscription to be decommissioned. |
| Request Service | Specify the information needed to request a service. |
| Request Virtual Machine | Specify the information needed to request a VM. |
| Update Virtual Machine | Identify the VM to the updated and provide details on the changes required—for example, adding a virtual processor. |
The CSPP Request offerings are initially installed in Published status. As a best practice these should be changed to Draft status, and then copied to a new management pack, permitting you to version and customise the offering prior to being published.
To copy and publish the service requests
- In the Service Manager Console, switch to the Library workspace, expanding and selecting the Service Catalog → Request Offerings → All Request Offerings node.
- The main view will refresh and present a list of all request offerings currently defined, In this list locate the 9 request offerings as listed in Table 12.7
- In the Tasks pane select the option Unpublish, to change these to Draft status.
- Select one of the Cloud Services request offerings, and in the Tasks pane, select the option Create a Copy.
- A new dialog lets you define which management packs to place the copy in.
- You can Create a new management pack to store your CSPP requests and customizations by clicking the New button on the dialog.
- From the drop-down list, select the management pack you want to use and then click OK.
- With a new copy of the request created, edit it to provide a friendly title, for example, and then publish the request offering to the portal.
- To publish, select the request and click Publish from the Tasks pane.
- You may want to repeat this exercise for each of the service requests you changed back to draft format, so the original offerings remain unaltered or customised.
After these are published, you'll see the offerings in the portal when you switch to List view. The next logical level is to group these request offerings under a service offering, which will be presented on the home page of the portal and allow you to group and scope these request offerings.
- To publish a service offering, switch to the Library workspace, expand and select the Service Catalog → Service Offerings → All Service Offerings node.
- The main view changes to a list of all currently defined request offerings. Click the Create Service Offering option from the task list; this will launch the Create Service Offering Wizard.
- Provide a name for the Service offering, and select the target management pack to which you will be storing the customizations.
- On the Request Offerings tab, add the new Cloud Services Request offerings you want to present.
- You may set the Offering status to Publish and complete the wizard.
Using the Cloud Service
With the connectors live and the services presented, let's take a quick tour of the service offerings that users will be presented through the Self-service portal.
While implementing CSPP you created personas. These personas take a major role in the daily use of private cloud services. The illustration in Figure 12.9 shows the responsibilities of each of these characters so that you can decide whether you can combine some of these personas in your organization.
After becoming acquainted with the different personas, you should consider the process flow that occurs while using this solution and how this flow interacts with the VMM environment.
Figure 12.10 shows the stages that CSPP guides the users through, from the initial request of hosting a project, to finally automatically provisioning the VM to cloud users. You will return to this figure at the end of the chapter to explore opportunities for further automation.
Figure 12.10 The CSPP personas in workflows

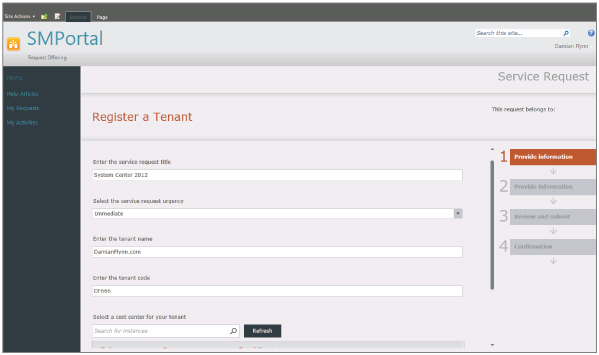
Register a Tenant
For the following instructions, assume the Project Administrator persona.
Start the cycle by selecting to Register a Tenant in the Service Manager self-service portal. The Register a Tenant screen, shown in Figure 12.11, appears. Provide details about the tenant, including its name, urgency, and the associated cost center. Supply an email address for the tenant contact and domain usernames of the project administrators.
Figure 12.11 Making a project request
For the following instructions, assume the Service Manager Administrator persona.
In the Service Manager console, Work Items view, expand the Service Request Fulfillment node to view and select All Open Service Requests to see the service request that the project administrator just submitted. Open the properties of this service request and select the Activities pane (Figure 12.12) to see the progress of the associated activities.
Figure 12.12 Viewing the request
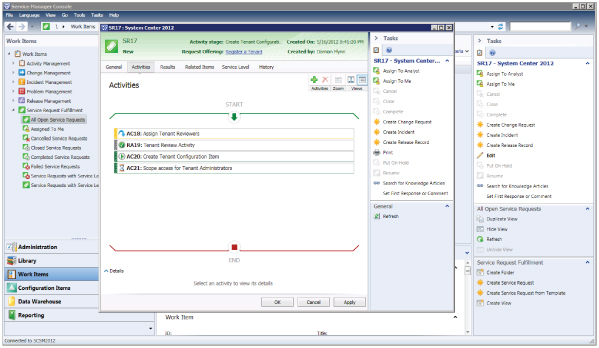
CSPP requests must be reviewed by the project reviewer for approval prior to completing the rest of the configuration. Activity RA19 in Figure 12.12 is in that state.
For the following instructions, assume the Tenant Reviewer persona.
In the Service Manger self-service portal, select the My Activities view to see the new request awaiting approval. Approve or reject the request. For the purpose of this scenario, approve the request and supply a short comment with the decision.
Subscribe to Cloud Resources
For the following instructions, assume the Project Administrator persona.
After a successful request for a new project, you can request to Subscribe to Cloud Resources in the Service Manager self-service portal. On the Subscribe to Cloud Resources screen, provide details about the pool to configure, including name, urgency, and the associated project for this pool. Provide storage capacity, CPU quota, and RAM allocations. Provide the domain names/group of users to be granted access to this pool resource.
For the following instructions, assume the Service Manager Administrator persona.
In the Service Manager console, on the All Open Service Requests node, refresh the view to see the new request, and open it to check progress persona.
For the following instructions, assume the Activity Implementer persona.
In the Service Manager console, click Work Items in the left pane. Expand the Activity Management node and its Manual Activities subnode to view and select the Activities Assigned To Me node. Figure 12.13 shows the manual activity you must now complete to fulfill the request.
Figure 12.13 Completing your manual activities

A manual activity requires you to complete some work before updating the activity to indicate that the associated task is complete. The Assign Cloud Resources for Request activity first requires that you have previously created Clouds in Virtual Machine manager to select from.
The VMM Clouds are Synchronised into the SCSM CMDB across the System Center Operations Manager connector. If you have created clouds recently, you will require the Service Manager administrator to manually synchronize the Connector in order for them to be available.
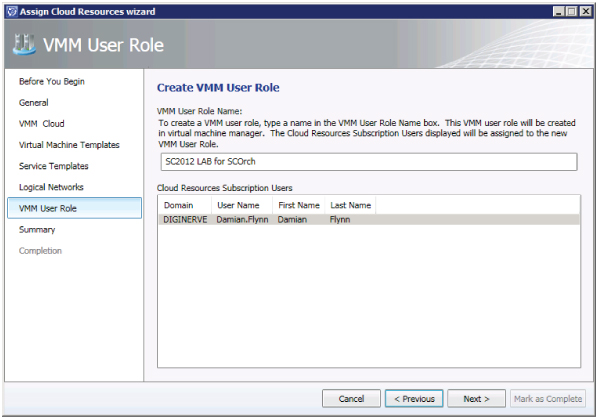
The Assign Cloud Resources wizard will prepare to create a new VMM user role which will be granted access to the selected Cloud, with the assigned resources, quota's and members (Figure 12.14) based on the information which was submitted in the request.
Figure 12.14 Configuring the new user role in the wizard
After the Manual activity is marked as completed, the following activity will invoke an Orchestrator runbook to create the defined User Role Launching the VMM Console, on the Administration view, under Security → User Roles, we will then see this role, and its configuration as illustrated in Figure 12.15
Figure 12.15 Newly created VMM User Role

After the Runbook activity has completed provisioning the new VMM User Role with access to the selected cloud, the remaining automated activities will provide access to the subscription users. These will also configure the subscription depending on whether the VM resource request for this cloud should only be available only trough the Self-Service portal, or as an Action permission on the VMM User Role.
Request Virtual Machine
For the following instructions, assume the Cloud Resources Subscriber persona.
You can use the Service Manager self-service portal to request a VM. As in previous requests, use a form to provide details on the VMs requested, including name and description, the subscription, the VM template, the network to connect the VMs to, and a potential decommissioning date.
For the following instructions, assume the Service Manager Administrator persona.
In the Service Manager console, Work Items view, All Open Service Requests node, you can refresh to see the new request. Open the request to check the progress. Because the request might generate charges to the project, the project administrator must approve.
For the following instructions, assume the Project Administrator persona.
In the Service Manager self-service portal, select the My Activities view to see the new request. Approve or reject the request. For the purpose of this example, approve the request and supply a short comment with the decision.
For the following instructions, assume the Service Manager Administrator persona.
Because the request is approved, the activities on the service request proceed. This example invokes an Orchestrator runbook. The CSPP installer created runbooks to automate transferring the approved VM request to VMM to provision this exact VM based on the criteria in the request. Refer back to Figure 12.5 to see.
For the following instructions, assume the Cloud Resources Subscriber persona.
Once the runbook automation has completed, the request will be marked as resolved. The resolved request will have being updated, and contain information confirmed that your new Virtual Machine is ready for use.
Automation: The Sky Is the Limit!
Throughout this book, you have learned that private clouds are an effective way to give IT users the computing resources they need. Yet while providing resources automatically is useful, it still might not be enough. In this chapter, you learned that with the help of additional System Center family members, you can do more. Service Manager enables you to add ITIL processes to the cloud environment, and with its integrated CMDB, it can reach out to the rest of the ecosystem and learn a lot about what is happening.
Integrating VMM and OM is a useful extension, even when you do not need all the functionality of a private cloud. The ability to dynamically monitor the virtualization environment and intelligently distribute the load based on changed fabric conditions is not new, but extending this with the services functionality of VMM to enable OM to create distributed application monitoring for each of the services is new—and it is very cool, and quite easy to implement!
Orchestrator is the dark horse of the family. This is the unexploited jewel in the crown, which will return dividends for the time you invest in learning and using its capabilities; automating every conceivable IT process as a runbook will change your working days forever. Consider Orchestrator as your junior assistant—spend a little time teaching it how to deal with an issue, and you'll never need to teach it about this problem again, as it sits obediently on the network waiting for the job to be needed and running a repeatable process every time.
Service Manager integration with these products opens the door to really changing your imagination from what if to can do.
Let your imagination run free for a moment, and consider the Pet Shop application introduced in Chapter 8, “Understanding Service Modeling,” as a VMM service template. This service is designed to scale in and out, depending on load. It uses a load balancer to connect users to the changing nodes as the service is adapted to the current demand.
Today, OM is used to monitor the server's load—which it now does quite nicely with the VMM integration, detecting and monitoring new nodes as they are deployed, and letting you know the pressure they are under so you can react accordingly.
Now, let's assume that this application is managed completely with the System Center environment; OM can direct its alerts to Service Manager, and Service Manager creates and directs incidents based on these alerts, which can now have workflows attached to engage Orchestrator to automatically address the situation. This reaction could be simply instructing VMM to deploy a scale-out instruction to part of the service that is under pressure—and before you know it, VMM will inform OM of the new node and begin monitoring it, too. Closing the loop and letting Service Manager know that the incident can be closed completely automates the process.
This is not a dream anymore, but actually quite achievable with the functions offered by System Center. Look again at Figure 12.1, and let's take a deeper look at how this process might really flow.
Conclusion
Over the last four chapters, you were introduced to the foundations for a new world built on today's technologies. As you begin to embrace the private cloud, and the management suite that Microsoft is offering to simplify and enrich this new experience, you should understand that we are only touching the surface of what is achievable.
Starting from role-based access controls and the flexibility they offer, you can implement a private cloud to enable users to interact with this once-inconceivable resource. They can use a range of interfaces designed to address all potential scenarios—from the thin web-based graphical UI to the automation-ready PowerShell service.
Moving from VMs to application services is a big step, and the benefits this will deliver over the next few years are yet unknown. But it is already clear that embracing these new ways of working will not only enhance our private-cloud objectives and enable highly serviceable and automatable solutions, but also begin to dissolve the gap between private and public clouds.
We are on the cusp of a new computing generation, and there is no better time to join us as we embrace the evolution of computing.