Figure 10-2: Start symbols bar.
Keeping it neat and tidy: Formatting options
MindManager gives you everything you need to generate a Mind Map with the same clarity you’d achieve with a pen and paper. This means that you can control the following aspects:
![]() Branch shape, thickness and colour: The program provides you with a choice of different layouts.
Branch shape, thickness and colour: The program provides you with a choice of different layouts.
![]() Script colour, size and type.
Script colour, size and type.
![]() Borders: Colours and other options: here too you can choose from among a number of different layouts. If you place a border around a branch, the highlighted branch and all its sub-branches are enclosed. MindManager’s border function also allows you to insert curly brackets after a branch and to add other branches after the brackets.
Borders: Colours and other options: here too you can choose from among a number of different layouts. If you place a border around a branch, the highlighted branch and all its sub-branches are enclosed. MindManager’s border function also allows you to insert curly brackets after a branch and to add other branches after the brackets.
![]() Icons: Via the Library tab in the Task Pane MindManager provides access to a large number of icons. You can attach as many as you like to a branch. You can filter icons but not images.
Icons: Via the Library tab in the Task Pane MindManager provides access to a large number of icons. You can attach as many as you like to a branch. You can filter icons but not images.
![]() Images: Also via Library MindManager provides a number of pre-categorised pictures; you can attach one of these to each branch. Unlike icons, images can be adjusted for size but not filtered. In addition to pre-categorised images you can also embed graphics files, such as company logos, in a Mind Map.
Images: Also via Library MindManager provides a number of pre-categorised pictures; you can attach one of these to each branch. Unlike icons, images can be adjusted for size but not filtered. In addition to pre-categorised images you can also embed graphics files, such as company logos, in a Mind Map.
You can modify all these options via the start symbols bar in the Script Type and Format areas (Figure 10-2).

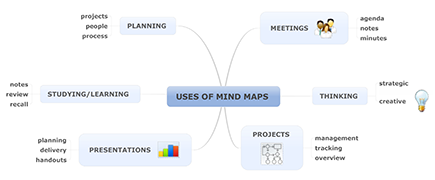
The main difference when Mind Mapping with a pen and paper is that with MindManager there’s no way of drawing branches freehand. MindManager automatically organises and positions them for you, as shown in Figure 10-3.
Figure 10-3: A formatted Mind-Manager map.
..................Content has been hidden....................
You can't read the all page of ebook, please click here login for view all page.