
![]()
The use of broadband-speed Internet gets most of us accustomed to a relatively instant Internet. But then we access it on our phones, at which point the Internet can get downright sluggish. This is mainly because mobile connection speeds are quite a bit slower than high-speed Internet. High-speed Internet unfortunately makes it easy to forget about performance because the high throughput covers over our sloppy development practices. I have frequently been guilty of this as well.
Not only do we need to start testing on our phones, we need to test with Wi-Fi off. The same page that takes several seconds to load on 3G will sometimes take less than a second with Wi-Fi turned on, so be sure to test for the disconnected user. And not only that, you should test in different locations with various levels of signal strength. Testing your mobile website on a slow connection can be a very humbling experience for the performance-conscious developer. For more information on how 3G and 4G connections affect performance and how to optimize for mobile bandwidth, I recommend a video by Ilya Grigorik called “Breaking the 1000ms Time to Glass Mobile Barrier [https://www.youtube.com/watch?v=Il4swGfTOSM].
The good news is that the most important techniques for a fast desktop website apply equally to mobile. This is particularly great news if you are developing a responsive website as we discussed in the first several chapters of this book. You optimize for one, and you optimize for both.
Web performance can be (and sometimes is) a book-length subject by itself, but we need to limit ourselves. The first thing I will do in this chapter is talk about some basic tools for measuring performance. I will then cover the most important performance tips for most sites. After looking at the list of performance techniques, you may notice that all are network related, in that they are about optimizing what happens between the server and the device. This is intentional, and the reason should be obvious: for mobile the biggest constraint is network bandwidth, and we need to optimize for that as much as possible.
Tools
Tools can be hugely helpful when performance tuning our websites. Two of these tools are useful for helping us see what is going on when we hit our website. One actually gives you advice on things you can improve. The first we will discuss is the Chrome Developer tools, the second is Fiddler.
The Chrome Developer Tools have a couple of functions that I find very useful for analyzing performance. The first is the Network tool. It looks like what you see in Figure 8-1.
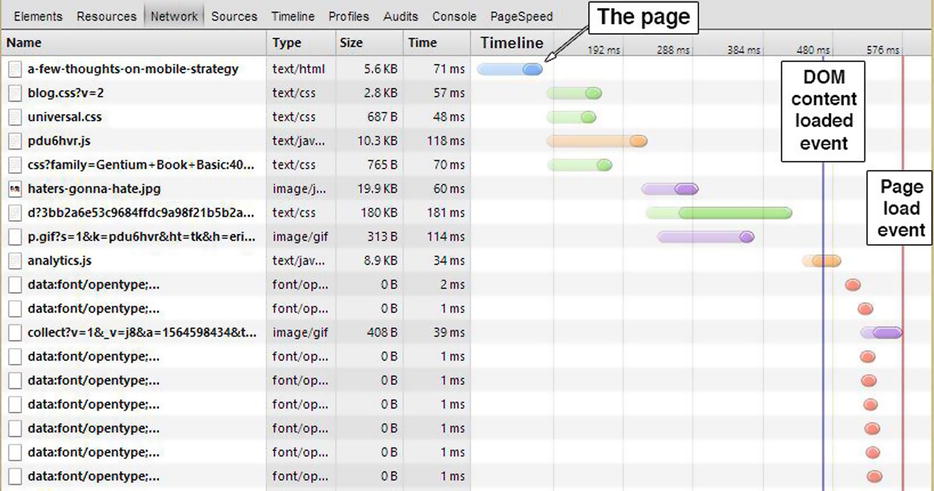
Figure 8-1. The Network tab of the Chrome developer tools. This is a screenshot taken while browsing one of my unoptimized websites
The network tab supplies you with nice graphical representation of how the various client-side assets were retrieved and how long it took. The first entry is the actual page and is delivered in 71 milliseconds (quite speedy), but this is rarely the measure of performance success as we will discuss below. Every other file will be requested after the initial page is delivered; and in this case, the browser didn’t load all assets until 589 milliseconds had passed. As you can see, the browser is good at making requests in parallel, but if you have a script (pdu6hvr.js, the script file for Typekit) that loads a CSS file (line 7) that loads other assets (in this case, the fonts, lines 10–11, 13–18), those assets can only be downloaded after the calling script is finished. This slows everything down even more.
Another interesting piece of the Chrome developer tools is the Audits tab, seen here in Figure 8-2.
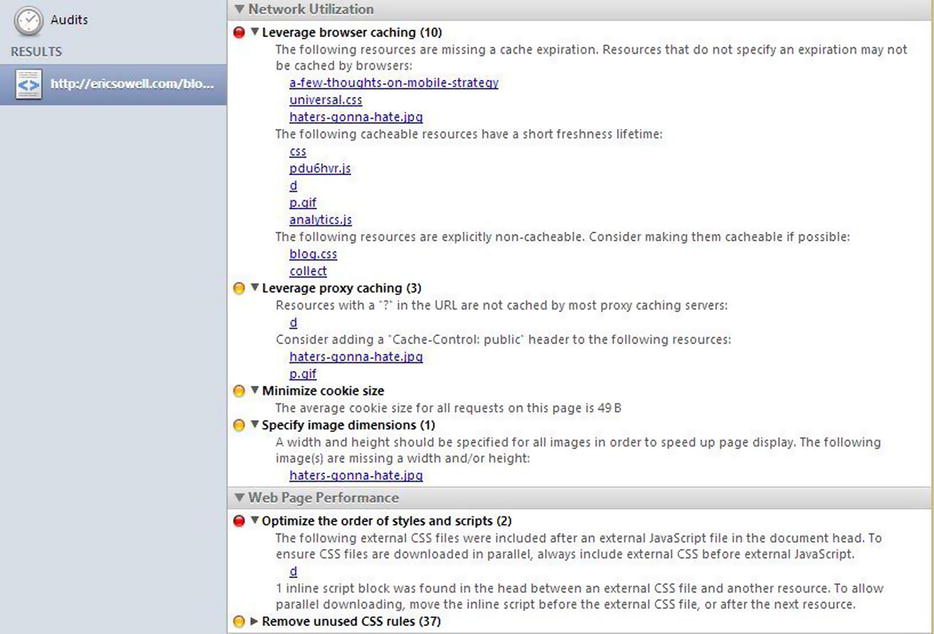
Figure 8-2. The Audits tab of the Chrome developer tools
The Audits tool applies some well-known performance rules to the page you are viewing. Recommendations are broken up between network and browser performance issues and includes color coding to help you see the more serious issues. The first suggestion contains a number of recommendations around caching, even breaking the caching issues into groups. This is a very handy way of finding easy things to improve your webpage performance. These caching issues as well as others will be discussed below.
Fiddler is a very useful web debugging proxy that is very useful for watching what’s going on over the network. Its purpose is much more broad than website performance debugging, but I find it very useful for that as well. Here in Figure 8-3 is the same request from above as seen in Fiddler.

Figure 8-3. Fiddler
It has fantastic tools for analyzing the bits passed back and forth over the network. You can also use Fiddler as a proxy server. I have frequently found it helpful for debugging to proxy my phone through Fiddler to analyze the traffic. See the documentation for your phone and for Fiddler for setting this up (here is the documentation for setting this up for an iPhone: http://fiddler2.com/documentation/Configure-Fiddler/Tasks/ConfigureForiOS).
These are our basic tools for the chapter. There are many other tools out there that have their own strengths but these at least will get you most of what you need to know for tweaking network performance.
Performance Techniques
Now that you have seen the tools it is time to cover the principles. Rules that start with “Always” are always applicable. Those that begin with “Consider” are techniques that I have used that work great but will not be necessary in all cases.
Always Reduce the Number of HTTP Requests as Much as Possible
Reducing the number of HTTP requests before the page loads is the most important thing you can do to increase mobile performance. Additional requests require the browser to talk to the carrier, which will then fetch the resources and return them, all of which will take precious milliseconds away from your user and drain their battery. If you take a look at Figure 8-1, everything after the first three requests are from third-party plugins (Google Analytics and Typekit) and are out of my control (unless I chose to remove them). The first three requests are from my actual server and the second and third (both CSS files) can actually be combined to improve my network usage. So some of these things can be fixed.
In this particular case the savings may not be all that obvious to the users of my site but in many cases this is very important. The Match mobile website has 43 CSS files and 131 JavaScript files because we keep our client-side assets in nice maintainable chunks. But instead of including them all in the page separately and making 174 HTTP requests on every page load, we make only two because we combine our files. Another similar technique is to use CSS sprites (see “Consider Using CSS Sprites” below) to save on network requests for images. Whenever you can, reduce the number of HTTP requests as much as possible.
Gzip is a commonly used compression/decompression tool for web traffic. It is well supported on both browsers and servers and is something that should always be enabled. We will discuss how a browser requests it, how we can see that in our tools and how we can enable it in IIS.
The raw HTTP request from my browser to a server to fetch a page will look something like the following (this is an actual HTTP capture from Fiddler):
GEThttp://ericsowell.com/blog/2012/9/14/a-few-thoughts-on-mobile-strategyHTTP/1.1
Host: ericsowell.com
Connection: keep-alive
Cache-Control: no-cache
Accept: text/html,application/xhtml+xml,application/xml;q=0.9,*/*;q=0.8
Pragma: no-cache
User-Agent: Mozilla/5.0 (Windows NT 6.2; WOW64) AppleWebKit/537.36 (KHTML, like Gecko)
Chrome/27.0.1453.94 Safari/537.36
Accept-Encoding: gzip,deflate,sdch
Accept-Language: en-US,en;q=0.8,fr-CA;q=0.6,fr;q=0.4
The first line of the request describes the HTTP verb as well as the URL targeted by the request. The following lines are the HTTP headers passed in the request. These are bits of information for the server and proxies along the way that describe the client and how the client wants the request to be treated. The header related to this particular discussion is the “Accept-Encoding” header. My browser (Chrome 27) supports Gzip, deflate, and sdch. Gzip compression is the one we care about because it is more reliable than deflate (browser inconsistencies) and sdch is particular to Google Chrome and some of Google’s servers. So the browser, when it makes the request, is telling the server that it supports Gzip. The server is not required to use any form of compression but should almost always do so because of the network bandwidth savings involved (it’s not uncommon to see the final result to be 60–80 percent compressed).
But the client is just one part of the part of the equation. The server must be setup to handle the Gzip encoding request. If you have a site running on Azure, it is already setup for Gzip (which is a good thing). If you have your own server it may not be and it is not setup by default in IIS on Windows 8 so you may need to set it up. When requesting the page locally (without Gzip enabled), this is the raw HTTP response:
HTTP/1.1 200 OK
Cache-Control: private
Content-Type: text/html; charset=utf-8
Server: Microsoft-IIS/8.0
X-AspNetMvc-Version: 4.0
X-AspNet-Version: 4.0.30319
X-Powered-By: ASP.NET
Date: Mon, 03 Jun 2013 16:39:00 GMT
Content-Length: 14389

<!DOCTYPE html>
...followed by the rest of the page...
If the content was Gzipped, there would be another header that specified this, namely, “Content-Encoding: gzip”. To fix this for the site, open up IIS Manager and choose the site you want to configure. There should be a “Compression” option (see Figure 8-4).
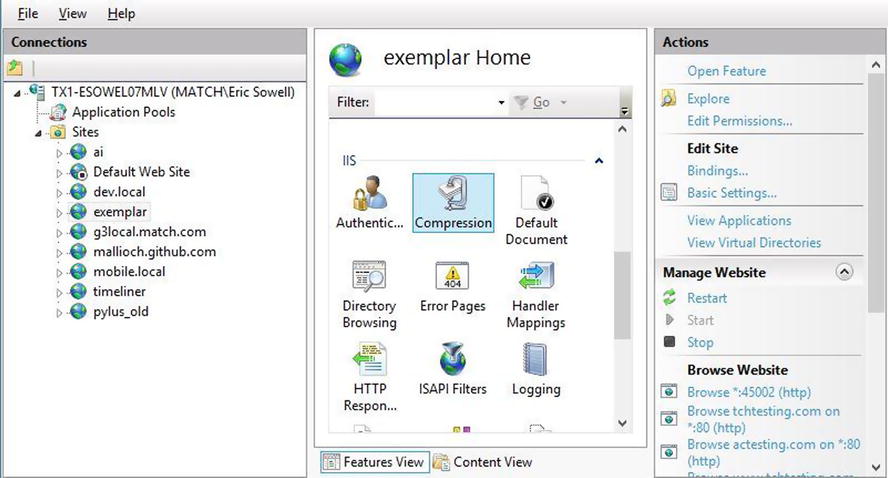
Figure 8-4. IIS Manager
Click on the compression option, and if the feature you need is not turned on (and it will not be by default), you should see the following in Figure 8-5.
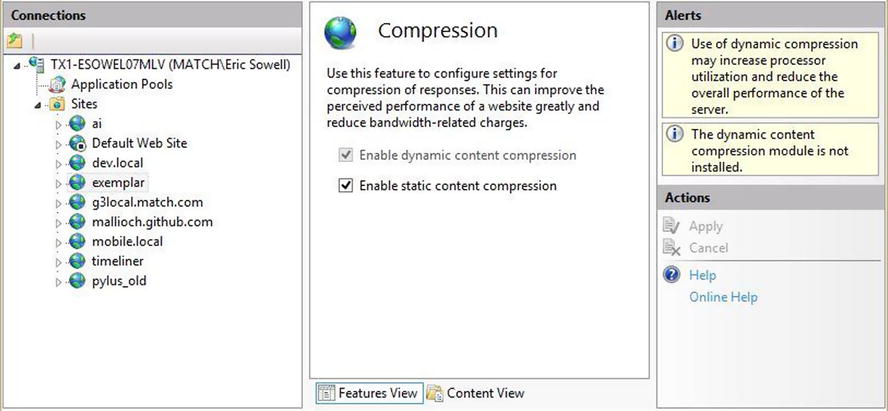
Figure 8-5. IIS Manager compression page with dynamic compression off
As you can see on the right, the dynamic content compression module is not installed. IIS will still do Gzip compression for static assets (like JavaScript and CSS files), but if I want my ASP.NET MVC views to be compressed, I will need to get dynamic content compression working. To install this, we find the “Turn Windows features on or off” for our computer, drill down into Internet Information Services ➤ World Wide Web Services ➤ Performance Features, select “Dynamic Content Compression” and hit “OK”. Now if we look back in IIS Manager we see that it is installed, as you can see in Figure 8-6.
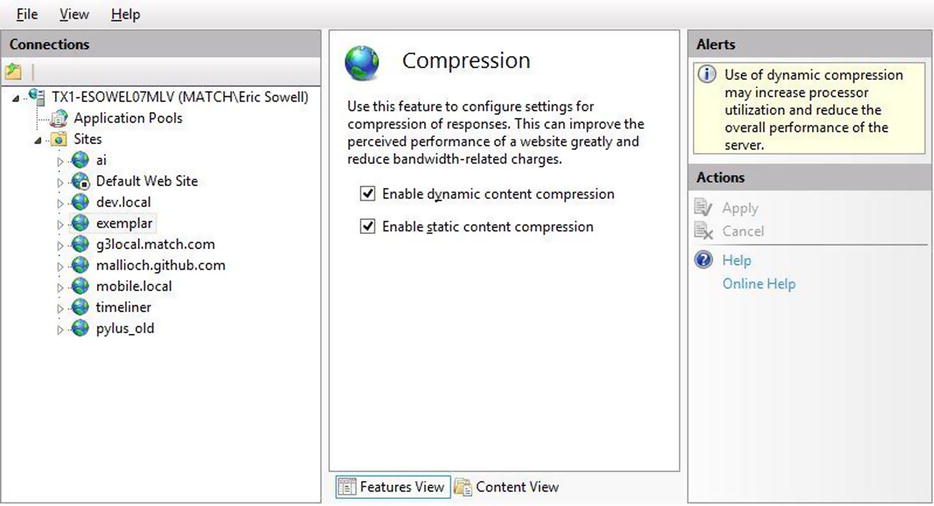
Figure 8-6. IIS Manager compression page with dynamic compression installed and turned on
At this point our MVC view will be compressed. Take a look at Figure 8-7. It has three requests to the same page. The first is a request locally without Gzip enabled. The second is a request to the site running on Azure with Gzip enabled. The third is a request to the site locally, now with Gzip enabled.

Figure 8-7. Fiddler trace of Gzip request with Gzip enabled
There are two important things to note here. First, the Gzip response (the one in focus in Figure 8-7) has a “Content-Encoding: gzip” header as it should. Second, note that the Gzipped response is 5445 bytes in size while the unzipped size is 14,389 bytes. It is almost a third the size after Gzipping.
Throughput on mobile is very important. Make sure your HTML, CSS, and JavaScript are all properly Gzipped.
Always Combine and Minify CSS and JavaScript
As discussed above, one of the most important rules of mobile web optimization is to reduce the number of HTTP requests for any given page. One of the best ways to do this is to both combine and minify your JavaScript and CSS.
Most sites have non-trivial amounts of both CSS and JavaScript and in most cases the developers have all this separated into multiple files since large files can be unwieldy. One or two large files are better from a performance perspective than many smaller files for a browser, so we need to combine these before we send them. Though this is good, it is also a good idea to minify the files as well as to limit the total bytes that have to travel over the network. Fortunately the ASP.NET has created a library to do both of these tasks easily.
Let’s start with a simple layout page that contains references to three CSS files and three JavaScript files. It could look like this:
<!DOCTYPE html>

<html>
<head>
  <meta name="viewport" content="width=device-width" />
  <title>@ViewBag.Title</title>
  <link href="/content/cssfile1.css" type="text/css" rel="stylesheet" />
  <link href="/content/cssfile2.css" type="text/css" rel="stylesheet" />
  <link href="/content/cssfile3.css" type="text/css" rel="stylesheet" />
</head>
<body>
  <div>
    @RenderBody()
  </div>
  <script src="/content/jsfile1.js"></script>
  <script src="/content/jsfile2.js"></script>
  <script src="/content/jsfile3.js"></script>
</body>
</html>
Running this in Chrome, the Network tab of the developer tools (Figure 8-8) tells me the unhappy news that the simple page built on this layout page requires six HTTP requests.
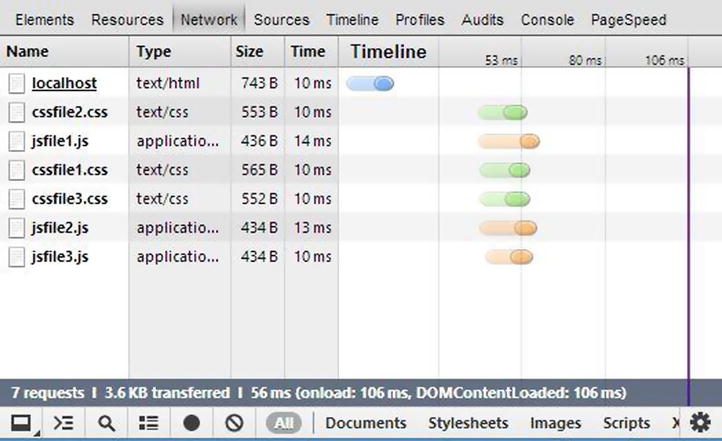
Figure 8-8. The Network tab of Chrome showing seven requests for a single web page
We can do better than this! To add Microsoft’s bundling and minification package, right-click on the web project and choose “Manage Nuget Packages...” Search for the Microsoft ASP.NET Web Optimization Framework and install it (Figure 8-9 shows you what to look for).

Figure 8-9. Microsoft ASP.NET Web Optimization Framework on Nuget
Next we need to setup our bundling in the Global.asax.cs file. There are different ways to do this. I will show you one way and will leave the further options as an exercise for the reader. The first thing I want to do is define a bundle for both the JavaScript and CSS files like this in my global.asax:
using System;
using System.Web.Http;
using System.Web.Mvc;
using System.Web.Optimization;
using System.Web.Routing;

namespace MinifyThings
{
  public class MvcApplication : System.Web.HttpApplication
  {
    protected void Application_Start()
    {
      AreaRegistration.RegisterAllAreas();

      WebApiConfig.Register(GlobalConfiguration.Configuration);
      FilterConfig.RegisterGlobalFilters(GlobalFilters.Filters);
      RouteConfig.RegisterRoutes(RouteTable.Routes);

      var css = new Bundle("∼/content/allcss", new CssMinify());

      var js = new Bundle("∼/content/alljs", new JsMinify());

      BundleTable.Bundles.Add(css);
      BundleTable.Bundles.Add(js);
  }
}
This creates bundle objects and designates a URL for those bundles, specifies what kind of asset the bundle is for (CSS and JavaScript bundles work differently due to their different syntax), and adds those bundles to a global bundles collection for the application. Now we add the files for each.
using System;
using System.Web.Http;
using System.Web.Mvc;
using System.Web.Optimization;
using System.Web.Routing;

namespace MinifyThings
{
  public class MvcApplication : System.Web.HttpApplication
  {
    protected void Application_Start()
    {
      AreaRegistration.RegisterAllAreas();

      WebApiConfig.Register(GlobalConfiguration.Configuration);
      FilterConfig.RegisterGlobalFilters(GlobalFilters.Filters);
      RouteConfig.RegisterRoutes(RouteTable.Routes);

      var css = new Bundle("∼/content/allcss", new CssMinify());
      css.Include("∼/content/cssfile1.css",
        "∼/content/cssfile2.css",
        "∼/content/cssfile3.css");

      var js = new Bundle("∼/content/alljs", new JsMinify());
      js.Include("∼/content/jsfile1.js",
        "∼/content/jsfile2.js",
        "∼/content/jsfile3.js");

      BundleTable.Bundles.Add(css);
      BundleTable.Bundles.Add(js);
    }
  }
}
The configuration of the assets is done. We need only add the bundles to the layout page, which would look like this:
<!DOCTYPE html>

<html>
<head>
  <meta name="viewport" content="width=device-width" />
  <title>@ViewBag.Title</title>

  @System.Web.Optimization.Styles.Render("∼/content/allcss")
</head>
<body>
  <div>
    @RenderBody()
  </div>

  @System.Web.Optimization.Scripts.Render("∼/content/alljs")
</body>
</html>
There are two very interesting things about how this works that makes working with these combined assets quite pleasant. First of all, the assets are only combined if the web.config compilation debug value is false. This is great because combined and minified JavaScript assets are terribly hard to use when there are errors, since the combined JavaScript will now look like something like this:
(function(){console&&console.log("file1")})(),function(){console&&console.log("file2")}(),function(){console&&console.log("file3")}()
. . . when before it looked more like this (three times over).
(function () {
  if (console)
    console.log('file 1'),
})();
Without those line breaks, the line numbers we are used to in our JavaScript error messages are useless. We can avoid this in development because we will normally have debug set to “true,” and we will get unminified JavaScript. But when we deploy, it all gets combined and minified for fast delivery.
Let’s look at another network capture of our sample site in Figure 8-10, this time with debug set to “false” in our web.config.

Figure 8-10. Our assets have been combined and minified
Not only have our assets been combined so that we now have only three HTTP requests on the page instead of seven, but also a hash has been calculated for the content and appended onto the URL for the resource. This hash will get recalculated anytime we change our assets, which will allow us to cache that asset for a very long time without having to worry about stale assets. If any of the files change, the hash change will augment the URL, and browsers will re-request this file because the URL has changed, regardless of the client-side cache configuration set for a previous version of the file. For more on caching, see the next section “Always Cache Client-side When Possible.”
Always Cache Client-Side When Possible
The fastest asset is the one you don’t have to download at all. This is what client-side caching is all about. The first time assets from a site are requested by a browser, all the assets need to be retrieved either from the server or by some caching proxy in between the browser and the server. However, our focus here is on all the following requests. If the asset requested can be cached, then the browser either doesn’t need to always retrieve the full payload or perhaps does not need to request it at all. There are several HTTP headers that we should understand that help control this.
This header will sometimes be sent by the browser and indicates that the browser has a copy of the resource in cache but is checking with the server to see if a newer copy is available. If not, it will return a status of 304 with no content, which informs the browser to use what’s in the cache. If new content is available, the content will be returned. This still requires a round trip to the server but can still save quite a bit of bandwidth. The following Fiddler trace (Figure 8-11) is from my blog.
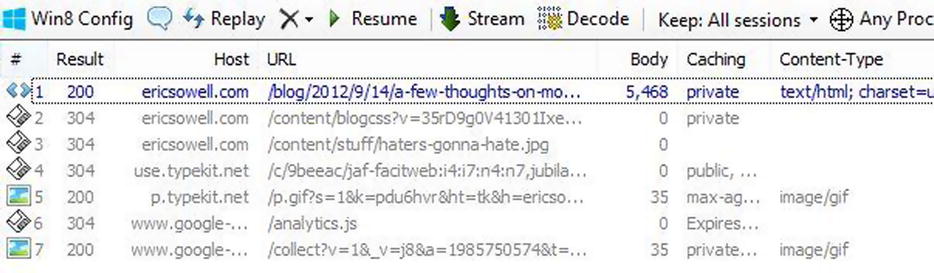
Figure 8-11. Fiddler trace showing assets served from cache
The first request was to the page and the full HTML is returned (Gzipped). Afterwards six assets are requested, four of which have results of 304. In all of these cases the browser sent an If-Modified-Since header with the request to see if the asset had changed. It had not in any of these cases, so the content for each was pulled from the browser cache, leading to a faster browsing experience.
The If-Modified-Since header is useful because it cuts down the total amount of bytes traversing the network before a page is rendered; but it would be even better if the request had not been necessary at all. This is where the Expires header is useful. The Expires header can be set on a page easily with just a little bit of code. For example, for the root of my blog I set the Expires header with this:
Response.Cache.SetExpires(DateTime.Now.AddMinutes(2));
This returns an Expires header two minutes in the future of the current request. This means the page will be cached by the browser for two minutes and if the page is requested again, it will pull from cache without checking across the network to see if it was updated. This particular use case is useful for someone browsing my blog. If they click around the blog much they will likely hit the root of the blog several times. If they do so quickly, the experience will be nice and snappy. But if the content on this page changed constantly, this would keep the data stale by two minutes and that might not be acceptable. How far you can set an Expires header into the future for a page will be dependent on each use case.
We should take a look at the example from our last performance tip and see what the HTTP response for the bundled assets is.
HTTP/1.1 200 OK
Cache-Control: public
Content-Type: text/css; charset=utf-8
Content-Encoding: gzip
Expires: Wed, 04 Jun 2014 02:57:22 GMT
Last-Modified: Tue, 04 Jun 2013 02:57:22 GMT
Vary: Accept-Encoding
Server: Microsoft-IIS/8.0
X-AspNet-Version: 4.0.30319
X-SourceFiles: =?UTF-8?B?YzpcZGV2XHRyYXNoXE1pbmlmeVRoaW5nc1xNaW5pZnlUaGluZ3NcY29udGVudFxhbGxjc3M=?=
X-Powered-By: ASP.NET
Date: Tue, 04 Jun 2013 02:57:22 GMT
Content-Length: 161
Fortunately, these are already given an Expires header of a year out from their creation (which is specified by the Date header), so as the user browses the site, the CSS and JavaScript will be served straight out of the cache. Expires headers can also be set in the web.config and IIS, which we will not cover here.
The Cache-Control header is useful in conjunction with the Expires header. Potentially any number of intermediate proxies between the server and the browser can cache a resource. ISPs will frequently cache as will large corporations at times. Setting this header to “public” indicates that this resource can be cached by any cache, including but not limited to the cache of the browser. Setting this header to “private” indicates that the response is not to be cached by any shared cache (like that of your ISP) but only by the browser cache. Taking a look again at the HTTP response from one of the bundled assets, we can see that the Cache-Control header is in use.
HTTP/1.1 200 OK
Cache-Control: public
Content-Type: text/css; charset=utf-8
Content-Encoding: gzip
Expires: Wed, 04 Jun 2014 02:57:22 GMT
Last-Modified: Tue, 04 Jun 2013 02:57:22 GMT
Vary: Accept-Encoding
Server: Microsoft-IIS/8.0
X-AspNet-Version: 4.0.30319
X-SourceFiles: =?UTF-8?B?YzpcZGV2XHRyYXNoXE1pbmlmeVRoaW5nc1xNaW5pZnlUaGluZ3NcY29udGVudFxhbGxjc3M=?=
X-Powered-By: ASP.NET
Date: Tue, 04 Jun 2013 02:57:22 GMT
Content-Length: 161
In this case, this indicates that the asset should be cached by everyone who can cache it, and it should be cached for a full year in accordance with the Expires header. For assets like this, caching for a long time makes sense.
If you want to set this in code for a page, you can do so as simply. It looks like the following:
Response.Cache.SetCacheability(HttpCacheability.Public);
Alternatively, you can set a max age on the Cache-Control header. To set the max age, do the following:
Response.Cache.SetMaxAge(new TimeSpan(DateTime.Now.AddMinutes(2).Ticks));
The max-age setting was something introduced in HTTP 1.1 to get around problems with clock synchronization inherent in the Expires header. The Cache-Control header now looks like the following:
Cache-Control: private, max-age=31536000
This sets a max age (good) but has now made the cache control private, which may not be good. You can solve this by adding yet another bit of code before the SetCacheability and SetMaxAge calls, which will now cause both settings to be taken into account. This new bit, with our other C# code can be seen in the following:
Response.Cache.SetExpires(DateTime.Now.AddMinutes(2));
Response.Cache.SetSlidingExpiration(true);
Response.Cache.SetCacheability(HttpCacheability.Public);
Response.Cache.SetMaxAge(new TimeSpan(0, 2, 0));
Another unexpected behavior you get when you set max age is that the SetMaxAge call overrides the time specified in the Expires header. As a general rule this should not be a problem; but you should be aware if you are going to use it.
In summary, cache your assets client-side when you can. This can significantly speed up your user’s experience when browsing your website. For more information on caching, I recommend MDN’s FAQ on caching [https://developer.mozilla.org/en-US/docs/HTTP_Caching_FAQ] and an article on caching from Google’s developer site [https://developers.google.com/speed/articles/caching].
Always Optimize where CSS and Scripts are Included in the Page
Where a CSS or JavaScript file is placed in a page affects the performance (perceived or actual) of a page, sometimes dramatically. Those new to web development may not be aware of this principle, but it has been standard advice for a number of years. The rule is this: load CSS files in the head of the page and load JavaScript in the footer of the page.
If we go back to our bundling example above, you can see what this looks like.
<!DOCTYPE html>
<html>
<head>
  <meta name="viewport" content="width=device-width" />
  <title>@ViewBag.Title</title>

  @System.Web.Optimization.Styles.Render("∼/content/allcss")
</head>
<body>
  <div>
    @RenderBody()
  </div>

  @System.Web.Optimization.Scripts.Render("∼/content/alljs")
</body>
</html>
Why should CSS be included in the head of the page? If there are multiple CSS files, they can be downloaded in parallel but (depending on the browser) rendering will be blocked while the CSS is downloaded and parsed. Otherwise the browser would begin rendering and then have to re-render as the styling was applied. By including the CSS in the top of the page, we can avoid a flash of unstyled content where the page partially renders before CSS gets applied.
JavaScript assets behave differently than CSS assets. JavaScript files are not downloaded in parallel and will block the rendering as well as any other downloading that might occur. Because of this, it is generally recommended to put the JavaScript files at the end of the page. This allows the page to fully render (it has all markup and CSS) before the scripts are loaded.
Ultimately this rule is more about perceived performance than actual. We want the user to see the page rendered as soon as we can, but we want it to be rendered in its final form, so we include CSS at the top. The functionality added by the JavaScript can come shortly after.
There are two new attributes for the script tag, async and defer, that have decent mobile support (Android 3+, iOS 5+, BlackBerry 7+ and IE 10+). You will have to look at your traffic to determine how many of your users these new features would affect.
If a script tag has the async attribute (and the browser supports it), the JavaScript file will be downloaded without blocking other downloads, which is different from normal behavior. When the script is fully downloaded, however, rendering will be blocked as the JavaScript executes.
If a script tag has the defer attribute (and the browser supports it), the JavaScript file will be downloaded without blocking other downloads (like async) but its execution will be deferred till the page has finished parsing, at which time it will block any rendering but rendering should be done by that time anyway.
Unfortunately, using these attributes is risky. Browsers that do not support the behavior will block as the files are downloaded. Check your visitor stats before making your choice.
The use of CSS sprites is a technique that attempts to follow rule #1: always reduce the number of HTTP requests as much as possible. Let me explain how this works. Let’s say you have two elements on a page that both use an image for their visual (see Figure 8-12).

Figure 8-12. Using a CSS sprite for the visuals for more than one element
How are you going to implement this? The most straightforward way would be to include two image tags in the page and use them for the visuals. Functionally this is fine, but it is not very performance friendly because every image tag will require a new HTTP request. Even though two requests may be perfectly acceptable, if a wide variety of images were needed (perhaps for a menu with a number of options or for a wide variety of buttons) the multiple HTTP requests can be a real problem.
Alternatively you can use CSS sprites to achieve the same visual effect while limiting the number of HTTP requests. The screenshot in Figure 8-12 was created using a sprite. The following was the markup used for the two elements.
<div class="object1"></div>
<div class="object2"></div>
This simple markup was styled with the following CSS:
<style>
  .object1 {
    background-image: url('/content/sample-sprite.jpg'),
    height: 50px;
    width: 50px;
  }

  .object2 {
    background-image: url('/content/sample-sprite.jpg'),
    height: 50px;
    width: 50px;
    background-position-x: -50px;
  }
</style>
Though the image is referenced twice in the CSS, it is only downloaded once. Each div is 50x50 pixels square. The image is 100 pixels in width and 50 pixels in height and looks like Figure 8-13.

Figure 8-13. Our image sprite
The CSS uses the same background image but shifts it around depending on which element is being styled. This works with any number of images. The only constraint is the number of images you are willing to have in the sprite. And by using these sprites you can cut down the number of HTTP requests for an image-heavy page drastically, giving a better performance.
Your HTML, CSS and JavaScript may be nice and lean, but if your images are bulky, your website may still perform poorly. Always optimize your images to give your users a better browsing experience. I have three recommendations around image optimization.
First, you have three commonly used images formats on the Web to choose from: GIF, PNG, and JPG. When you need an image, test to see which makes sense. Each has their strengths, and sometimes it’s best to try all three on a given image to see which one gives you the best compression/quality/capability combination. GIF and PNG are both lossless compression formats that support transparency, something commonly needed in web design. JPG is a lossy compression format that does not support transparency. As a lossy compression format, JPG works great for photographs but not as well for images that include text or geometric shapes because of the tendency to blur things due to the compression. For things that need to be smaller but cannot be blurred, GIF, or PNG are usually better. PNG is the generally preferred image format for the web unless, of course, you are using an animated GIF. If you are unsure of the best image format in a given situation, try them all and see what works the best.
Second, image files often have extra data embedded in them that is not needed. Removing that data can reduce download sizes without a loss of quality. This is an easy win for mobile performance. I use the free “Image Optimizer” extension for Visual Studio 2012 by Mads Kristensen to do this optimization for me within Visual Studio. It uses both Yahoo’s Smush.it (http://www.smushit.com/ysmush.it/) and punypng (http://punypng.com/) to compress images and you can see the results in the Visual Studio output window (Figure 8-14). Even if the savings are not huge, you get the savings without any negative side effects.

Figure 8-14. Savings gained by removing unnecessary data from images
Third, only serve “retina-quality” images for devices that can benefit from them. Transferring these images to lower-quality displays uses extra bandwidth, slowing down your website for users that cannot benefit. See the section on responsive images in Chapter 5 for ideas on how to solve this problem.
Consider Using a Content Delivery Network
One of the most common performance recommendations is to use Content Delivery Networks (CDNs) as much as you possibly can. CDNs are in common use these days, but for those who aren’t familiar with them, a CDN is a service that specializes in distributing content like images, CSS files, JavaScript, and videos on a broader geographical scale than the single location that a site might normally reside. In other words, if your website is on a server that physically resides in the United States, you can get a great deal of benefit by using a CDN that will make a copy of some of your assets and serve those assets from servers that are geographically dispersed.
This geographical proximity increases performance. Let’s say you live in the United States and you visit a site that is hosted in Australia. Because of the sheer distance, the network latency will be greater. It may not matter if their site is highly optimized and replies in less than 100ms, if the distance is large, the content of the site may still take a while. And as you know, once the HTML arrives, it now has to fetch all the client-side assets that the page uses. And what if those assets request more assets? Given a long distance, this can seriously impact performance.
Enter the CDN. Let’s say this Australian website kept their site where it was (creating a distributed server-side environment can be a lot of work). But they also started hosting all of their client-side assets on a CDN that had locations all over the world. Now when you request the site, the initial page request will still be just as slow, but the requests for client-side assets can go to geographically closer hosting, (potentially) increasing the response time dramatically.
For a personal site or perhaps a startup, the cost and hassle of setting up a CDN may not be worth the resources required. Your mileage may vary. I do not use a CDN for my personal site. But for higher-traffic sites, CDNs can be very beneficial.
Summary
Performance is an especially important consideration when developing websites for mobile devices. In this chapter you learned about some tools and a number of important techniques for making our mobile websites faster. There are far too many tools and techniques to cover here. For further reading, I recommend Steve Souders’s High Performance Web Sites (O’Reilly, 2007) and Richard Kiessig’s Ultra-Fast ASP.NET 4.5 (Apress, 2012). Do whatever you can because every tiny thing can help; and be sure to test on devices with Wi-Fi turned off to experience what your real users will see when they use your site.