Digital images are often distorted by random errors usually referred to as noise. There are two primary kinds of noise: Gaussian noise and impulse noise (see Figure 2-1). Gaussian noise is statistical noise having a probability distribution similar to a Gaussian distribution. It arises mainly during acquisition (e.g., in a sensor). It could be caused by poor illumination or by high temperature of the sensor. It comes from many natural sources, such as the thermal vibrations of atoms in conductors, referred to as thermal noise. It influences all pixels of the image.
Impulse noise, also called salt-and-pepper noise, presents itself as sparsely occurring light and dark pixels. It comes from pulse distortions like those coming from electrical welding near the electronic device taking up the image or due to improper storage of old photographs. It influences a small part of the set of pixels.
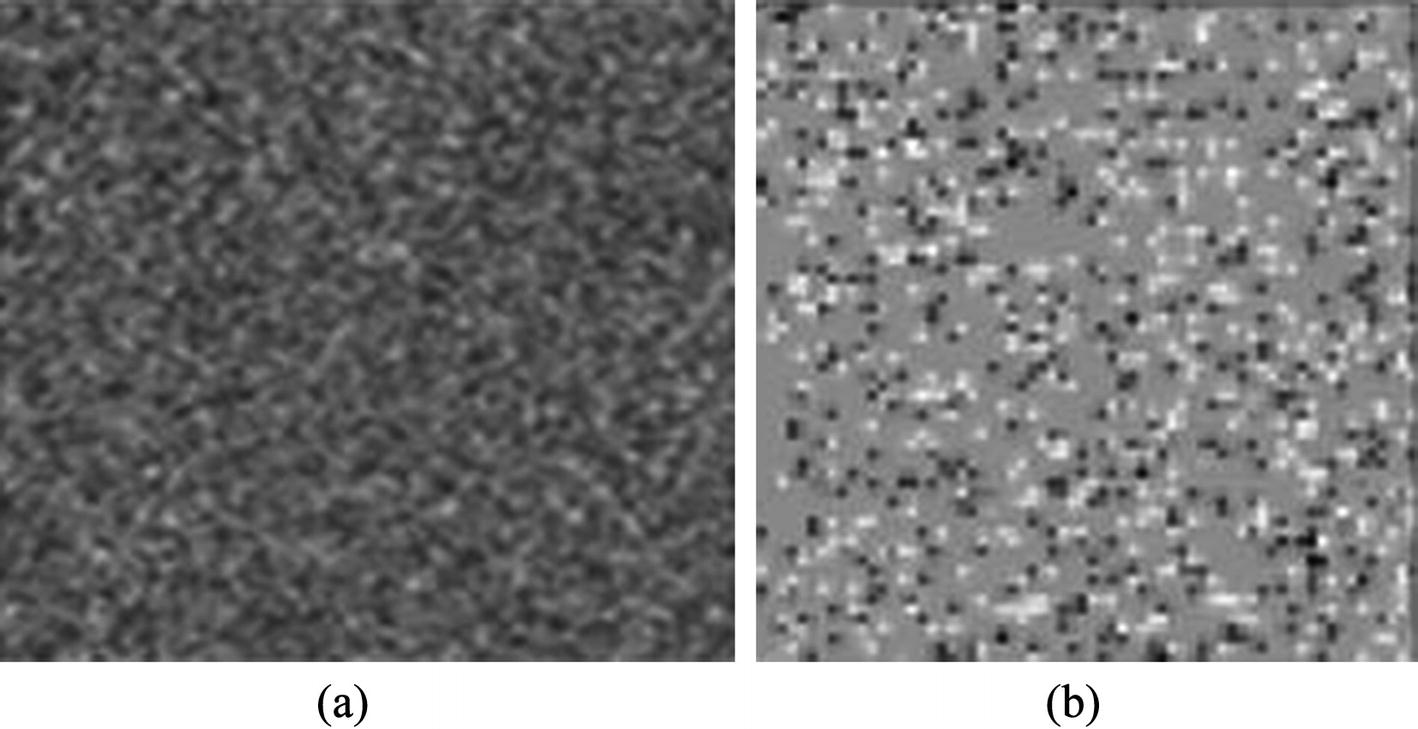
Figure 2-1
Examples of noise: (a) Gaussian noise; (b) impulse noise
The Simplest Filter
We consider first the ways of reducing the intensity of Gaussian noise. The algorithm for reducing the intensity of impulse noise is considered later in this chapter.
The most efficient method of reducing the intensity of Gaussian noise is replacing the lightness of a pixel P by the average value of the lightness of a small subset of pixels in the neighborhood of P. This method is based on the fact from the theory of random values: The standard deviation of the average of N equally distributed random values is by the factor √N less than the standard deviation of a single value. This method performs a two-dimensional convolution of the image with a mask, which is an array of weights arranged in a square of W × W pixels, and the actual pixel P lies in the middle of the square. Source code for this filter is presented later in this chapter. This method has two drawbacks: It is rather slow because it uses W × W additions for each pixel of the image, and it blurs the image. It transforms fine edges at boundaries of approximately homogeneous regions to ramps where the lightness changes linearly in a stripe whose width is equal to W pixels. The first drawback is overcome with the fast averaging filter. However, the second drawback is so important that it prevents use of the averaging filter for the purpose of noise removal. Averaging filters are, however, important for improving images with shading (i.e., those representing nonuniformly illuminated objects), as we see later. I propose another filter for the purpose of noise removal as well.
First, let us describe the simplest averaging filter. I present the source code of this simple method, which the reader can use in his or her program. In this code, as well as in many other code examples, we use certain classes, which are defined in the next section.
The Simplest Averaging Filter
The nonweighted averaging filter calculates the mean gray value in a gliding square window of W × W pixels where W is the width and height of a square gliding window. The greater the window size W, the stronger the suppression of Gaussian noise: The filter decreases the noise by the factor W. The value W is usually an odd integer W = 2 × h + 1 for the sake of symmetry. The coordinates (x + xx, y + yy) of pixels inside the window vary symmetrically around the current center pixel (x, y) in the intervals: −h ≤ xx ≤ +h and −h ≤ yy ≤ +h with h = 1, 2, 3, 4, and so on.
Near the border of the image the window lies partially outside of the image. In this case, the computation loses its natural symmetry because only pixels inside the image can be averaged. A reasonable way to solve the border problem is to take control of the coordinates (x + xx, y + yy) if they point out of the image. If these coordinates are out of the image the summation of the gray values must be suspended and the divisor nS should not be incremented.
An example of the algorithm for averaging the colors is presented here. We often use in our code comments denoted by lines of certain symbols: lines marked with = label the start and the end of a loop, lines with minus signs label if instructions, and so on. This makes the structure of the code more visible.
The simplest slow version of the algorithm has four nested for loops.
public void CImage::Averaging(CImage input, int HalfWidth)
{ int nS, sum;
for (int y=0; y<height; y++) //================================
{ for (int x=0; x<width; x++) //==============================
{ nS=sum=0;
for (int yy=-HalfWidth; yy<=HalfWidth; yy++) //=======
{ if (y+yy>=0 && y+yy<input.height )
for (int xx=-HalfWidth; xx<=HalfWidth; xx++) //===
{ if (x+xx>=0 && x+xx<input.width)
{ sum+=input.Grid[x+xx+width*(y+yy)];
nS++;
}
} //====== end for (xx... ===================
} //======== end for (yy... =======================
Grid[x+width*y]=(sum+nS/2)/nS; //+nS/2 is for rounding
} //============ end for (x... ========================
} //============== end for (y... ========================
} //****************** end Averaging ****************************
This is source code: The reader can copy it and put into its C# source, and it will work.
The parameter HalfWidth is half the width of the gliding window. The width and height of the window are both equal to 2*HalfWidth+1. The variables x and y in the preceding code are the indexes of pixels in Grid, and xx and yy are the indexes of the pixels inside the gliding averaging window.
The computation of sum in the innermost for loop needs W × W additions and W × W accesses to the image for each pixel of the input image, which is quite time consuming.
Let us remark once again that averaging filters, although they are very efficient at reducing the intensity of Gaussian noise, strongly blur the image. Therefore they should not be used for noise reduction. I suggest using the sigma filter described later in this chapter for this purpose. Averaging is used for the purpose of shading correction (see Chapter 4). Therefore it will be mostly used with a rather large gliding window, as large as half the width of the image. Then the simplest averaging routine becomes so time consuming that it is practically impossible to use it. For example, in the case of a grayscale image of 1000 × 1000 pixels and a gliding window of 400 × 400 pixels, which is typical for shading correction, the runtime of the function Averaging on a standard PC can take about 20 minutes.
The Fast Averaging Filter
The simplest averaging filter makes W2 additions and one division for each pixel of the image. For example, it makes 5 · 5 + 1 = 26 operations for each pixel in the case of a gliding window of 5 × 5 = 25 pixels. There are applications (e.g., the shading correction) that are using much greater gliding windows; for example, one of 400 × 400 = 160,000 pixels. If an application uses the simplest averaging filter with such a great gliding window, it can run for several minutes.
It is possible to accelerate the averaging filter using the following basic idea: It is possible to calculate first the sums of gray values in small one-dimensional windows of 1 × W pixels. We call the arrays of these sums the columns. In the following description of the basic idea we use a Cartesian coordinate system, the index of a column of the image being the abscissa x and the index of a row being the ordinate y. We consider the ordinate axis as directed downward, from top to bottom, which is usual in image processing and different from the direction of the ordinate axis in mathematics.
The fast averaging filter solves the same problem as the simplest filter, but it is much faster. The fast filter blurs the image in the same way as the simplest filter does. Therefore its main application is shading correction rather than noise suppression.
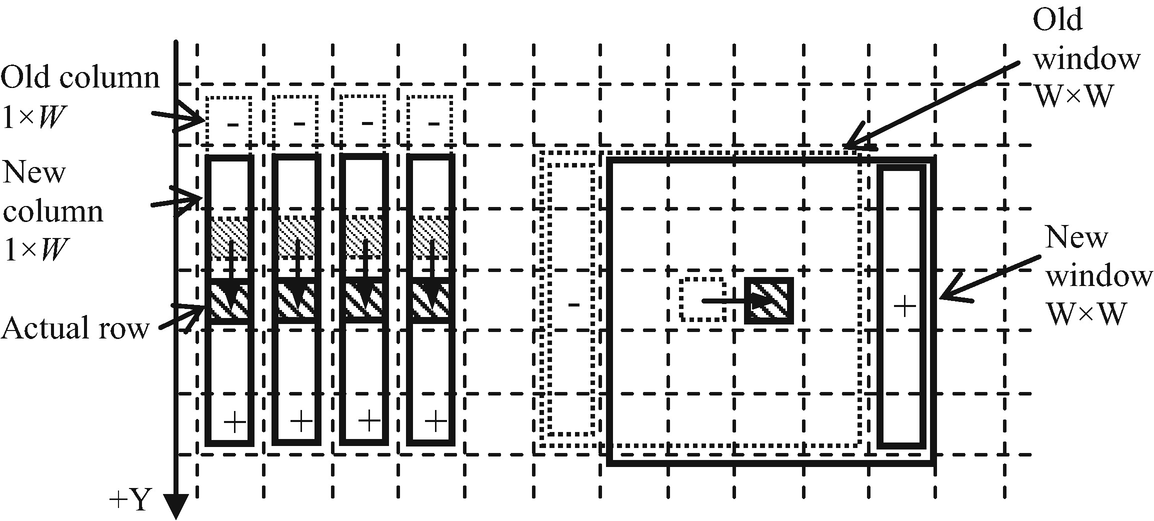
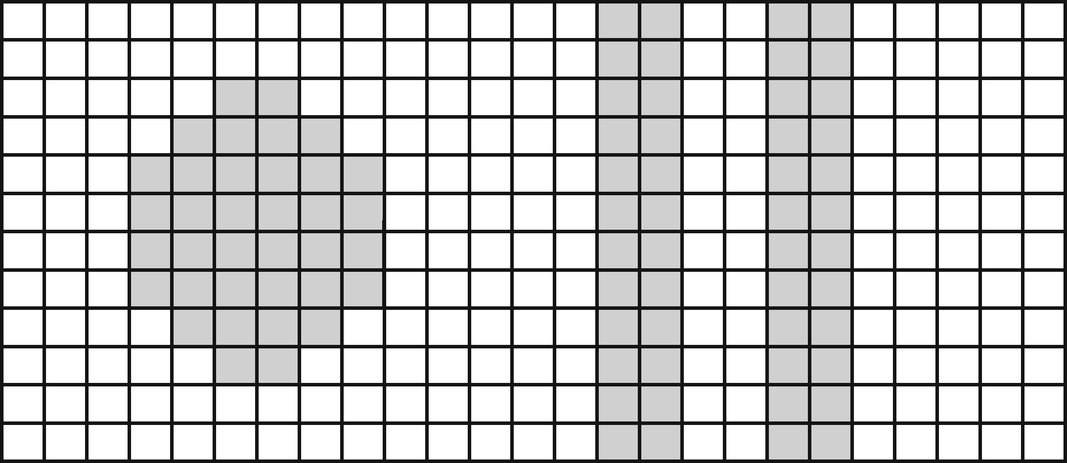
When using the basic idea just mentioned, it is possible to reduce the number of operations per pixel from W × W to ≈4: The fast filter calculates and saves the sum of the gray values in each column of W pixels, and the middle pixel of each column lies in the actual row of the image (Figure 2-2). The filter then directly calculates the sum over the window having its central pixel at the beginning of a row; that is, by adding up the sums saved in the columns. Then the window moves one pixel along the row, and the filter calculates the sum for the next location by adding the value of the column sum at the right border of the window and by subtracting the value of the column sum at the left border. It is necessary to check whether the column to be added or subtracted is inside the image. If it is not, the corresponding addition or subtraction must be skipped.
Figure 2-2
Explanation of the functioning of the fast average filter
Due to applying a similar procedure for the calculation of the column sums, the average number of additions or subtractions per pixel is reduced to ≈2 + 2 = 4. The sum inside the window must be calculated directly (i.e., by the addition of HalfWidth + 1 sums of columns) only for a pixel at the beginning of each row. The sums of columns must be calculated directly only for the pixels of the first row of the image.
The filter updates the values of the columns when proceeding to the next row of the image by adding the gray value below the lower end and subtracting the gray value at the upper end of each column (Figure 2-2). In this case it is also necessary to check whether the gray value to be added or subtracted is in the image. The filter divides (with rounding) the sum by the number of pixels in the intersection of the window with the image as soon as the sum of the gray values in a window is calculated and saves the result in the corresponding pixel of the output image.
Here is the source code of the simplest version of the fast averaging filter designed for filtering grayscale images.
public int FastAverageM(CImage Inp, int hWind, Form1 fm1)
// Filters the grayscale image "Inp" and returns the result in 'Grid' of the
// calling image.
{
width = Inp.width ; height = Inp.height; // elements of class CImage
Grid = new byte[width * height];
int[] SumColmn; int[] nPixColmn;
SumColmn = new int[width];
nPixColmn = new int[width];
for (int i = 0; i < width ; i++) SumColmn[i] = nPixColmn[i] = 0;
int nPixWind = 0, SumWind = 0;
for (int y = 0; y < height + hWind; y++) //=============================
{
int yout = y - hWind, ysub = y - 2 * hWind - 1;
SumWind = 0; nPixWind = 0;
int y1 = 1 + (height + hWind) / 100;
for (int x = 0; x < width + hWind; x++) //===========================
{
int xout = x - hWind, xsub = x - 2 * hWind - 1; // 1. and 2. addition
} //===================== end for (int x = 0; =====================
} //====================== end for (int y = 0; ======================
return 1;
} //************************* end FastAverageM ***********************
I present next the universal source code of the fast average filter designed both for color and grayscale images. It uses the variable int nbyte, which is set to 3 for color and to 1 for grayscale images. We define for the sum of color intensities in the gliding window of (2*hWind + 1)2 pixels an array SumWind[3] of three elements for sums of red, green, and blue intensities. In the case of a grayscale image, only the element SumWind[0] is being used. We use the following variables as described next.
The location with the coordinates (c+nbyte*x, nbyte*y) is the location of a color channel, one of red, green, or blue channels whose intensity is added to the corresponding element of the array SumColmn. The location (c+nbyte*x, nbyte*ysub) is that of a color channel whose intensity is to be subtracted from SumColmn. The variable c+nbyte*x is the abscissa of the short column whose contents are to be added to SumWind[c]. The variable c+nbyte*xsub is the abscissa of the short column whose contents are to be subtracted from SumWind[c].
public int FastAverageUni(CImage Inp, int hWind, Form1 fm1)
// Filters the color or grayscale image "Inp" and returns the result in
// 'Grid' of calling image.
{ int c = 0, nByte = 0;
if (Inp.N_Bits == 8) nByte = 1;
else nByte = 3;
width = Inp.width ; height = Inp.height; // elements of the class "Cimage"
Grid = new byte[nByte * width * height];
int[] nPixColmn;
nPixColmn = new int[width];
for (int i = 0; i < width ; i++) nPixColmn[i] = 0;
int[,] SumColmn;
SumColmn = new int[width, 3];
int nPixWind = 0, xout = 0, xsub = 0;
int[] SumWind = new int[3];
for (int y = 0; y < height + hWind; y++) //=============================
{ int yout = y - hWind, ysub = y - 2 * hWind - 1;
nPixWind = 0;
for (c = 0; c < nByte; c++) SumWind[c] = 0;
int y1 = 1 + (height + hWind) / 100;
for (int x = 0; x < width + hWind; x++) //============================
{ xout = x - hWind;
xsub = x - 2 * hWind - 1; // 1. and 2. addition
if (y < height && x < width) // 3. and 4. addition
} //============= end for (int x = 0; =============================
} //============== end for (int y = 0; ==============================
return 1;
} //***************** end FastAverageUni ********************************
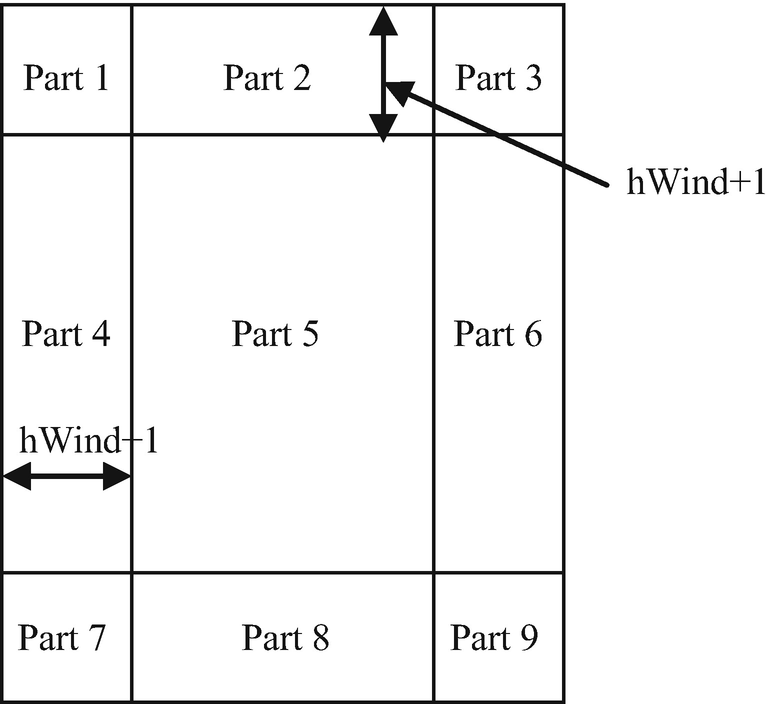
This source code can be used in a corresponding Windows Forms project. It is not the fastest version; it can be made 50 percent faster by removing the multiplications from the interior loop. Some multiplications can be performed before starting the loop; some others can be replaced by additions. A still faster version can be made containing the following nine loops instead of the two loops with the indexes y and x in FastAverageM or in FastAverageUni:
Each of the nine loops processes a part of the image (see Figure 2-3) that is either hWind + 1 pixels wide or hWind + 1 pixels high.
Figure 2-3
The nine parts of the image corresponding to the nine loops
This version of the fast averaging filter can be used only if the condition hWind ≤ min (width, height)/2 - 1 is fulfilled. In such a version of the routine the interior loops with the variable xOut contain no multiplications and no if instructions. The routine is about 60 percent faster than the previously described FastAverageM. However, it is much longer and much more difficult to debug. The gain in speed is not essential: This code uses 0.7 seconds to process a big color image of 2448 × 3264 pixels with the gliding window of 1200 × 1200 pixels, whereas FastAverageM takes 1.16 seconds. These calculation times are almost independent from the size of the gliding window: They are 0.68 and 1.12 seconds correspondingly for the case of a gliding window of 5 × 5 pixels.
The Fast Gaussian Filter
The averaging filter produces a smoothed image in which some rectangular shapes not present in the original image can be seen. These shapes appear because the averaging filter transforms each light pixel to a homogeneously light rectangle of the size of the gliding window. As soon as a pixel has an outstanding lightness strongly differing from the values of adjacent pixels, the rectangle becomes visible. This is an unwanted distortion. It can be avoided when using the Gaussian filter that multiplies the gray values to be added by values that decay with the distance from the center of the window according to the two-dimensional Gauss law. In addition, the Gaussian filter provides a better suppression of noise. An example of the weights is shown in Figure 2-4.
Figure 2-4
Example of weights in the gliding window of the classical Gauss filter
These values are called the weights of the filter. The weights corresponding to the two-dimensional Gauss law are floats less than one:
w(x, y) = (2πσxσy)-1exp(-x2/2σ2x - y2/2σ2y).
They can be calculated in advance and saved in a two-dimensional array whose size corresponds to the size of the gliding window (Figure 2-4). Then the gray values or color channels of the filtered image are multiplied with the weights and the sum of the products is calculated. This procedure needs W2 floating point multiplications and W2 additions per pixel of the grayscale image to be filtered where W is the width of the gliding window. In the case of a color image, this number is 3W2.
There is a possibility of obtaining approximately the same results using the knowledge of the statistics that says that the convolution of many equivalent probability distributions tends to the Gaussian distribution. The convergence of this process is so fast that it is sufficient to calculate the convolution of only three rectangular distributions to obtain a good approximation. A rectangular distribution has a constant density in an interval and a zero density outside the interval. If an image is processed with a filter three times, the result is equivalent to the filtering with weights being convolutions of three rectangular weights. Thus to perform approximately a Gaussian filtering of an image it is sufficient to filter the image three times with a fast averaging filter. This procedure requires 4 × 3 = 12 integer additions per color channel of a pixel independent from the size of the window. We have calculated that the standard of the equivalent Gaussian distribution is proportional to the half-width of the gliding window of the averaging filter. In Table 2-1hWind is the half-width of the averaging window, and Sigma is the standard of a random variable whose distribution corresponds to the weights calculated by the triple filtering with the fast filter.
Table 2-1. Relation Sigma/hWind tending to 1 with increasing hWind
hWind
1
2
3
4
5
Sigma
1.414
2.456
3.459
4.456
5.49
Sigma/hWind
1.414
1.218
1.153
1.114
1.098
You can see that the relation Sigma/hWind tends to 1 when the width of the window increases.
Figure 2-5 shows how the weights of the approximate Gauss filter differ from true Gauss weights.
Figure 2-5
Weights of the approximate and true Gauss filters
The Median Filter
The averaging and the Gaussian filters provide the most efficient suppression of Gaussian noise. The averaging filter with a gliding window that has the width of W = 2h + 1 pixels transforms steep edges of homogeneous regions to ramps of the width W. In the case of a Gaussian filter, the ramp is steeper. However, both these filters blur the image, so they should not be used for noise suppression.
Most textbooks on image processing recommend using median filters for noise suppression. A median filter sorts the intensities of colors in the gliding window and replaces the intensity in the middle of the gliding window by the intensity staying in the middle of the sorted sequence. Median filters can also be used for suppressing impulse noise or salt-and-pepper noise.
Almost no textbook, though, draws the attention of the reader to very important drawbacks of the median filter. First, it heavily distorts the image. A median filter with a gliding window of (2 * h + 1)2 pixels deletes each stripe of the width of less than h pixels. It also deletes a triangular part of approximately 2h pixels at each corner of a rectangular shape. Even more, it inverts a part of the image containing some parallel stripes of the width h if the width of the spaces between the stripes is also equal to h (compare Figure 2-6 with Figure 2-7). This is easily understandable if the reader notices that median makes decisions according to the majority: The central pixel becomes dark if the majority of pixels in the gliding window are dark.
Figure 2-6
Original image and the gliding window of 5 × 5 pixels
Figure 2-7
The same image after filtering with median of 5 × 5 pixels
Using the median for the suppression of impulse noise is also not recommended because it will delete objects having the shape of thin lines that have nothing to do with noise. I suggest an efficient method in a later chapter.
Sigma Filter: The Most Efficient One
The sigma filter reduces noise in the same way as the averaging filter: by averaging many gray values or colors. The idea of the sigma filter is averaging only those intensities (i.e., gray values or intensities of color channels) in a gliding window that differ from the intensity of the central pixel by no more than a fixed parameter called tolerance. According to this idea, the sigma filter reduces the Gaussian noise and retains the edges in the image not blurred.
The sigma filter was suggested by John-Sen Lee (1983). However, it remained almost unknown until recently: It has been mentioned in no textbook for image processing that I am aware of. It was mentioned in a professional paper only once Chochia (1984).
A filter similar to the sigma filter was suggested by Tomasi and Manduchi (1998), which they called the bilateral filter. They suggested assigning two kinds of weights to the colors being averaged: a domain weight becoming smaller with the increasing distance of the averaged pixel from the central pixel of the gliding window and a range weight becoming smaller with increasing difference between the intensities of colors of the pixel being averaged and that of the central pixel. Both weights can be defined as densities of the Gauss distribution. The filter works well: It reduces the Gaussian noise and preserves the sharpness of the edges. However, it is essentially slower than the sigma filter; for example, to process a color image of 2500 × 3500 pixels the bilateral filter needs 30 seconds, whereas the simplest sigma filter needs only 7 seconds. Thus the bilateral filter is approximately four times slower than the sigma filter. The authors of the bilateral filter did not mention the sigma filter among the references.
To explain why the sigma filter works so well, it can be regarded as the first iteration of the well-known expectation-maximization (EM) algorithm. The subdivision of the colors in the gliding window into two subsets, those being close to the color of the central pixel and those being far away from it, can be considered the expectation step, whereas the averaging of the close colors is the maximization step. It is well known that the EM algorithm converges rather quickly. Therefore the single first iteration brings a result that is close to the mean value of the subset of pixels in the gliding window whose colors are close to the color of the middle pixel with a high probability.
When comparing the sigma filter with the bilateral filter, it is possible to remark that the sigma filter uses an algorithm similar to that of the bilateral filter where Gaussian distributions are replaced by simpler rectangular distributions that can be calculated much faster.
Let us first present the pseudo-code for filtering grayscale images with the sigma filter. We denote with Input the input image and with Output the output image. Let a pixel with coordinates (X, Y) glide through the input image. Let M be the gray value at (X, Y). For each position (X, Y) do:
sum=0; number=0; M=Input(X,Y);
Let another pixel (x, y) run through the gliding window with the center of window at (X, Y).
for each pixel Input(x,y) do:
if (abs(Input(x,y) - M) < tolerance)
{ sum+=Input(x,y);
number++;
}
Output(X,Y)=Round(sum / number);
Now let us present the source code of this simple solution. We have replaced often repeated multiplications by additions to make the method faster (13 percent).
public int SigmaSimpleColor (CImage Inp, int hWind, int Toleranz)
// The sigma filter for 3 byte color images.
{
int[] gvMin = new int[3], gvMax = new int[3], nPixel = new int[3];
if (Inp.Grid[c+x1+y1]>=gvMin[c] && Inp.Grid[c+x1+y1]<=gvMax[c])
{ Sum[c]+=Inp.Grid[c+x1+y1];
nPixel[c]++;
}
}
for (c = 0; c < 3; c++) //======================================
{ if (nPixel[c] > 0) Grid[c+xyOut] = (byte)((Sum[c] + nPixel[c]/2)/nPixel[c]);
else Grid[c+xyOut]=0;
} //================= end for (c... ===========================
} //================== end for (int x... ==========================
} //=================== end for (int y... ===========================
return 1;
} //********************** end SigmaSimpleColor *************************
This solution works well, but it is rather slow if the size of the gliding window is greater than 5 × 5 pixels: It needs approximately OPP = 4*W2 operations per pixel for gray images or 9*W2 for color images. In the most practical cases it suffices to use the sigma filter with the window size of 3 × 3 or 5 × 5 pixels. Thus SigmaSimpleColor can be used almost everywhere.
Later we will see a faster version of the sigma filter. Unfortunately, it is impossible to apply in this case the method used in the fast averaging filter because the procedure is nonlinear. The procedure can be made faster due to the use of a local histogram. The histogram is an array in which each element contains the number of occurrences of the corresponding gray value or color intensity in the window. The sigma filter calculates the histogram for each location of the window by means of the updating procedure: Gray values or color intensities in the vertical column at the right border of the window are used to increase the corresponding values of the histogram, whereas the values at the left border are used to decrease them.
Let OPP be the number of operations per pixel. 2*3*W is the number of operations necessary to actualize the histogram and 2*3*(2*tol+1) is the number of operations necessary to calculate the sum of 3*(2*tol+1) values of the histogram and the corresponding number of pixels. Thus the overall OPP = 2*3*W+2*3*(2* tol +1).
Here is the source code for the sigma filter with a local histogram for color images.
public int SigmaColor(CImage Inp, int hWind, int Toleranz, Form1 fm1)
// The sigma filter for color images with 3 bytes per pixel.
{
int gv, y1, yEnd, yStart;
int[] gvMin = new int[3], gvMax = new int[3], nPixel = new int[3];
int Sum = new int[3];
int[,] hist = new int[256, 3];
int c;
for (y1 = 0; y1 < 256; y1++) for (c = 0; c < 3; c++) hist[y1, c] = 0;
N_Bits = Inp.N_Bits;
fm1.progressBar1.Value = 0;
int yy = 5 + nLoop * height / denomProg;
for (int y = 0; y < height; y++) //=====================================
{
if ((y % yy) == 0) fm1.progressBar1.PerformStep();
yStart = Math.Max(y - hWind, 0);
yEnd = Math.Min(y + hWind, height - 1);
for (int x = 0; x < width; x++) //====================================
{
for (c = 0; c < 3; c++) //========================================
{
if (x == 0) //-------------------------------------------
} //================ end for (c... ============================
} //================= end for (int x... ===========================
} //================== end for (int y... ============================
return 1;
} //********************** end SigmaColor ******************************
The method SigmaSimpleColor is faster than SigmaColor if the width of the gliding window is less than seven (hWind less than three). At greater values of the width SigmaColor is faster. The working time of SigmaColor changes rather slowly with the width of the gliding window. Refer to Table 2-2.
Table 2-2
Working Times for a Color Image of 1200 × 1600 Pixels in Seconds
hWind
Method
1
2
3
6
SigmaSimpleColor
0.71
1.68
3.11
10.26
SigmaColor
2.43
2.55
2.63
3.02
The method SigmaSimpleColor and similar methods for grayscale images are used in almost all projects described in this book.
Suppression of Impulse Noise
As already specified, the impulse noise affects singular, occasionally chosen pixels or small groups of adjacent pixels rather than all pixels of the image. The latter is characteristic for Gaussian noise. We distinguish between dark and light impulse noise. The dark noise contains pixels or groups of pixels whose lightness is lower than that of their neighborhood, whereas in the case of the light noise the pixels have a higher lightness than their neighborhood.
The problem of suppressing impulse noise in grayscale or color images is rather complicated: It is necessary to automatically detect all subsets S of pixels that satisfy, in the case of dark noise, the following conditions:
1.
All pixels of a subset S must have a lightness that is lower than or equal to a threshold T.
2.
The subset S is connected.
3.
The number of pixels (i.e., the area of S) is lower than a predefined value M.
4.
All pixels that do not belong to S but are adjacent to pixels of S must have a lightness that is higher than T.
5.
The threshold T can be different for different subsets S.
The problem is difficult because the thresholdT is unknown. Theoretically it is possible to solve the problem while testing all possible values of T one after another. However, such an algorithm would be very slow.
M. I. Schlesinger (1997) suggested the following idea of a fast solution:
“We propose such a procedure that the “noise removing” with subsequent thresholding gives the same results as thresholding with subsequent commonly used noise removing in the binary picture. This equivalency holds for every threshold’s value.
The algorithm of the project PulseNoise consists of four steps: (1) sorting of pixels in increasing order of their brightness, (2) white noise removal, (3) sorting of pixels in decreasing order of their brightness, and (4) black noise removal.
Ordering of pixels is fulfilled during twofold scanning of the pixels using an additional array with the length equal to the number of different brightness.
White noise removal is carried out during onefold scanning of ordered pixels. Let tibe a pixel having brightness v(ti). Processing of the pixel consists of checking whether there exists white noise region G that contains this pixel. Initially the region contains only ti. Then the region grows so that some pixel t’ is included into it if (1) t’ is a neighbor of the region G; and (2) v(t’)≥v(ti). The region grows until one of the following conditions is satisfied:
1. The size of the obtained region G exceeds the predefined size. In this case the region G is not considered as noise and the next pixel t(i+1)is processed.
2. No pixel can be included in G. In this case G is a noise and the brightness of all its pixels is equal to maximum brightness of the neighboring pixels.
Removal of black noise is similar to white noise removal.”
A detailed description and the source code of our implementation of this algorithm in the Windows Forms projectPulseNoiseWF follows. We have made some inessential changes: Instead of sorting the pixels according to their lightness, which would be too slow, we use a histogram histo[256] of the lightness and define a two-dimensional array Index[256][*]. This array contains for each value light of the lightness a different number Index[light][histo[light]] of indexes (x + Width*y) of pixels. The value (x + Width*y) is the index of the pixel with coordinates (x, y), by which the pixel can be found in the image. Thus, for example, the value Index[light][10] is the index of the tenth pixel in the set of all pixels with the lightness equal to light. When reading the array Index while starting with small lightness, we obtain the indexes of pixels sorted in the order of increasing lightness, but when reading it in the opposite direction, we obtain the indexes of pixels sorted in the order of decreasing lightness.
The project contains a file CImage.cs with the definition of the class CImage containing methods used for preprocessing the images. These methods work with objects of the class CImage, which is easier and faster than working with Bitmaps in Windows Forms.
The project contains also the file CPnoise.cs with the class CPnoise containing methods realizing the suppression of the impulse noise. There is also a small file Queue.cs containing the class Queue, which defines simple methods realizing the well-known structure Queue. A queue is a first-in-first-out (FIFO) data structure. In a FIFO data structure, the first element added to the queue will be the first one to be removed. This is equivalent to the requirement that once a new element is added, all elements that were added before it have to be removed before the new element can be removed. I describe the methods of the project in what follows.
We consider the cases of grayscale and color images together because the only difference between these cases is that in the case of color images the common lightness of the three channels—red, green, and blue—of a pixel is considered in the same way as the gray value of the grayscale image. We use for the calculation of the lightness of color pixels our method MaxC(byte R, byte G, byte B) described in Chapter 3. We use in this project the color information directly only in instructions assigning a color to the pixels of the found set S.
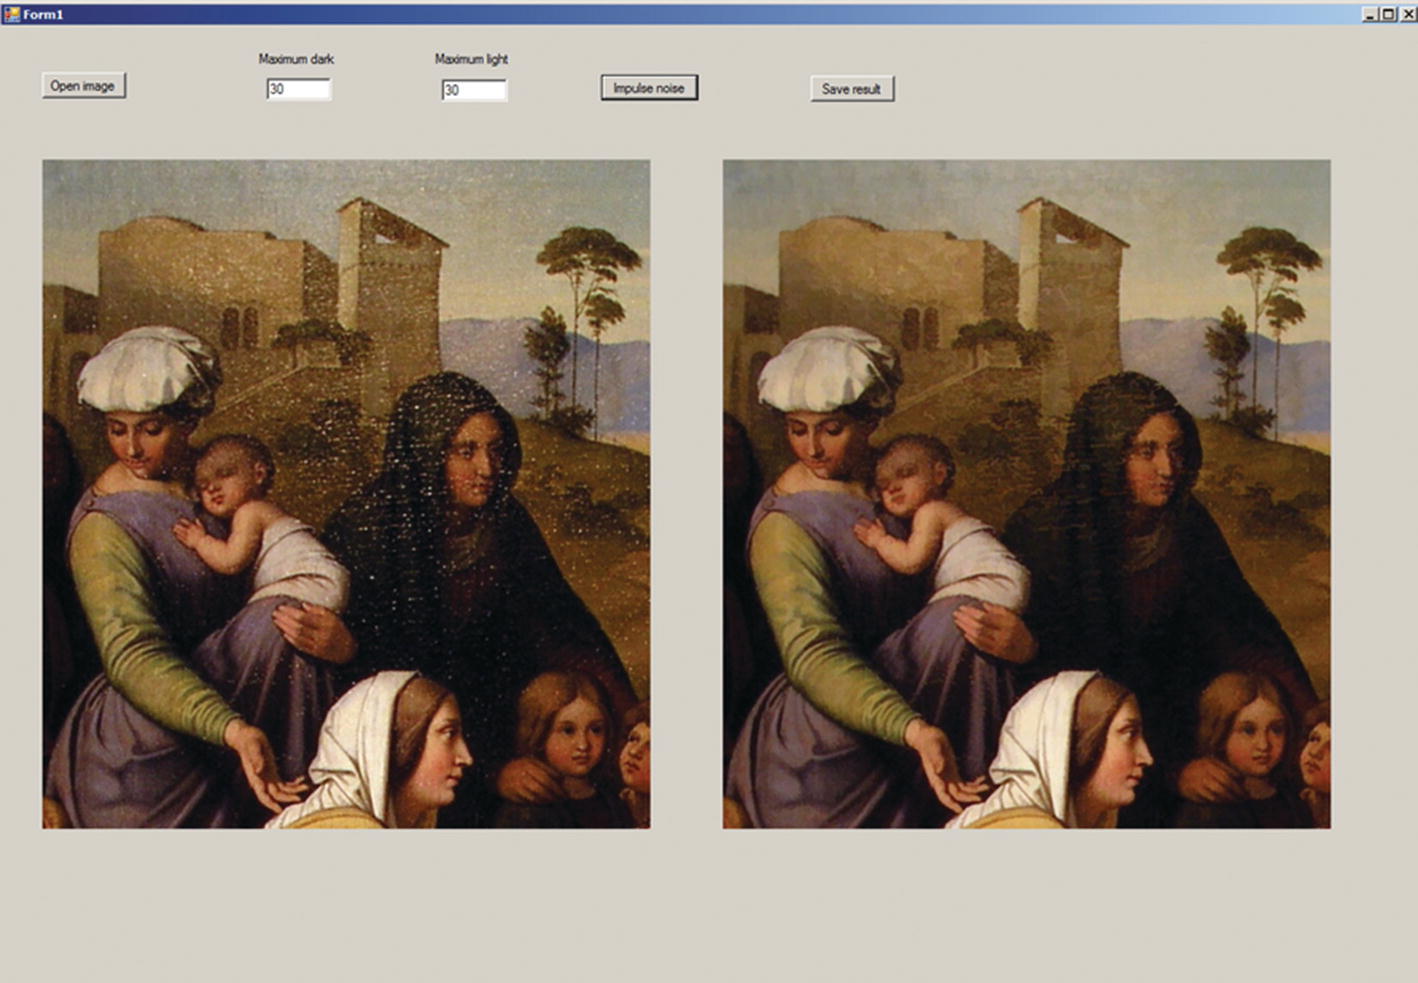
The project PulseNoiseWF displays a form shown in Figure 2-8. When the user clicks Open image, the openFileDialog1 dialog box opens and the user can choose an image. The image opens and is transformed into the object CImage.Orig by means of the methods BitmapToGrid or BitmapToGridOld, depending on the pixel format of the opened image. BitmapToGrid uses the method LockBits of the class BitmapData, which permits direct assessment to the pixels of the bitmap; this is much faster than the standard assessment with GetPixel. The code of BitmapToGrid is shown here.
if (nbyte == 1) // nbyte is global according to the PixelFormat of "bmp"
{
Color color = bmp.Palette.Entries[rgbValues[x+Math.Abs(bmpData.Stride)*y]];
Grid[3 * (x + bmp.Width * y) + 0] = color.B;
Grid[3 * (x + bmp.Width * y) + 1] = color.G;
Grid[3 * (x + bmp.Width * y) + 2] = color.R;
}
else
for (int c = 0; c < nbyte; c++)
Grid[c + nbyte * (x + bmp.Width * y)] =
rgbValues[c + nbyte * x + Math.Abs(bmpData.Stride) * y];
}
}
bmp.UnlockBits(bmpData);
progressBar1.Visible = false;
} //*********************** end BitmapToGrid ********************
The method BitmapToGridOld uses GetPixel. In the case of an 8-bit image, the color table Palette must be used to define the color of each pixel. This goes faster with GetPixel than with Palette.Entries, as this was the case in BitmapToGrid. Therefore we use BitmapToGridOld in the case of 8-bit original images.
The form Form1 contains the following definitions:
private Bitmap origBmp;
private Bitmap Result; // result of processing
CImage Orig; // copy of original image
CImage Work; // work image
public Point[] v = new Point[20];
// "v" are corners of excluded rectangles
int Number, // number of defined elements "v"
maxNumber = 8;
bool Drawn = false;
The image is shown in pictureBox1 on the left side of the form. The user can now change the values of the maximum sizes (number of pixels) of the dark and light spots to be eliminated. This can be done with the tool numericUpDown with labels Delete dark and Delete light.
When the user clicks Impulse noise, the corresponding program stump will be started. Here is the code of the stump.
} //**************************** end Impulse noise ***************
The stump calls the method DeleteBit0, deleting the bit 0 of all pixels of the image to make possible the labeling of pixels that have already been used. Then the histogram of the lightness of the image is computed, and the minimum lightness MinLight and maximum lightness MaxLight are defined.
Then the method Sort for sorting the pixels by their lightness is called. It is not necessary to sort the pixels by means of a known sorting algorithm, as this would take too much time. Instead our method Sort obtains the histogram histo[256] of the lightness of the image and fills the two-dimensional array Index[256][ ] of indexes. The argument light of Index[light] is the lightness of a pixel. The subarray Index[light][ ] is an array of indexes where nPixel[light] is the number of pixels having the lightness light. The value nPixel[light] is equal to histo[light]. Each element of the subarray Index[light][ ] is an index equal to x+width*y of a pixel with coordinates (x, y) whose lightness is equal to light. Here x is the number of a column, y is the number of a row, and width is the number of columns in the image. The method Sort saves the index ind=x+ width*y of the ith pixel with the lightness light and with coordinates (x, y) in Index[light][i]. Thus all pixels of the image are sorted in increasing order of their lightness. If a decreasing order is needed, the array Index can be read in the opposite direction. Here are the source codes of the definition of the class CPnoise and its methods. We describe the methods and show their codes outside of the definition of the class CPnoise although according to the prescription of C# .NET they should be inside. This method is more convenient because we can locate the description of a method near the code of the method.
class CPnoise
{ unsafe
public int[][] Index; // saving indexes of all pixels ordered by lightness
int[] Comp; // contains indexes of pixels of the connected subset
int[] nPixel; // number of pixels with certain lightness
int MaxSize;// admissible size of the connected subset
Queue Q1;
unsafe
public CPnoise(int[] Histo, int Qlength, int Size) // Constructor
{
this.maxSize = Size;
this.Q1 = new Queue(Qlength);//necessary to find connected subsets
this.Comp = new int[MaxSize];
this.nPixel=new int[256];//256 is the number of lightness values
} //************************ end of Constructor ******************
As we see in the preceding code of button3_Click, the method Sort is called after the computation of the histogram. It inserts indexes of all pixels of the image to the two-dimensional array Index[256][ ] of indexes. The image in which the impulse noise should be eliminated sometimes contains small spots that are not noise and should not be eliminated. For example, the eyes of a person in an image are sometimes small, dark spots of a size similar to the size of the spots of the dark noise. To prevent their elimination we have developed a simple procedure: The user should draw with the mouse in the input image some rectangles including the locations that should not be eliminated. The method Sort obtains the parameters v[ ] of these rectangles and skips the insertion of the pixels inside these rectangles into the array Index[256][ ]. For this purpose the simple method getCond is employed, which uses the array v[ ] of Points defined in Form1. The code is not presented here. The following is the source code of the method Sort.
public int Sort(CImage Image, int[] histo, int Number, int picBox1Width,
Index[light][nPixel[light]] = i; // record of index "i" of a pixel with lightness "light"
if (nPixel[light] < histo[light]) nPixel[light]++;
} //============== end for (int x=1; .. =============================
} //=============== end for (int y=1; .. ==============================
fm1.progressBar1.Visible = false;
return 1;
} //***************** end Sort *****************************************
The method Sort reads all pixels of the image and fills the two-dimensional array Index[256][ ] with indexes of the pixels. This array is used by the methods DarkNoise and LightNoise.
We consider first the case of dark noise. The method DarkNoise contains a for loop with the variable light, which scans the values of light starting with the maximum lightness minus 2 until the minimum lightness minLight. This loop contains the other loop with the variable i, which scans the values of the second index of the two-dimensional array Index[light][i] from 0 to nPixel[light]. It reads the index of a pixel from the array Index[light][i] and tests whether the pixel with this index has the lightness equal to light and whether its label is equal to zero. If both conditions are fulfilled, then the method BreadthFirst_D is called for the pixel with the index Index[light][i]. This method constructs a connected subset of pixels with lightness less than or equal to light containing the starting pixel with the index Index[light][i].
Here is the source code of DarkNoise:
public int DarkNoise(ref CImage Image, int minLight, int maxLight, int maxSize, Form1 fm1)
rv = BreadthFirst_D(ref Image, i, light, maxSize);
}
} //================= end for (int i.. ============================
} //================== end for (int light.. ==========================
fm1.progressBar1.Visible = false;
return rv;
} //*********************** end DarkNoise ******************************
The method DarkNoise calls the method BreadthFirst_D( ) with the values Image, i, light, and maxSize as its arguments. The value of maxSize is the maximum allowed number of pixels in the sought for connected set of pixels having lightness less than or equal to light. This method implements the known algorithm breadth-first search, designed to label all vertices of a tree structure. The connected set of all pixels having lightness less than or equal to light is a tree. Here is the code for BreadthFirst_D( ):
private int BreadthFirst_D(ref CImage Image, int i, int light, int maxSize)
{
int lightNeib, lightness of the neighbor
index, Label1, Label2,
maxNeib, // maxNeib is the maximum number of neighbors of a pixel
Neib, // the index of a neighbor
nextIndex, // index of the next pixel in the queue
numbPix; // number of pixel indexes in "Comp"
bool small; // equals "true" if the subset is less than "maxSize"
bool COLOR = (Image.nBits == 24);
index = Index[light][i];
int[] MinBound = new int[3]; // color of pixel with min. lightness near the subset
for (int c = 0; c < 3; c++) MinBound[c] = 300; // a value out of [0, 255]
for (int p = 0; p < MaxSize; p++) Comp[p] = -1; // MaxSize is element of the class
numbPix = 0;
maxNeib = 8; // maximum number of neighbors
small = true;
Comp[numbPix] = index;
numbPix++;
if (COLOR)
Image.Grid[1 + 3 * index] |= 1; // Labeling as in Comp (Label1)
else
Image.Grid[index] |= 1; // Labeling as in Comp
Q1.input = Q1.output = 0;
Q1.Put(index); // putting index into the queue
while (Q1.Empty() == 0) //= loop running while queue not empty ============
{
nextIndex = Q1.Get();
for (int n = 0; n <= maxNeib; n++) // == all neighbors of "nextIndex"
{
Neib = Neighb(Image, nextIndex, n); // the index of the nth neighbor of nextIndex
if (Neib < 0) continue; // Neib < 0 means outside the image
Image.Grid[Comp[m]] &= 252; // deleting the labels
} //-------------- end if (lightComp == light) and else--------------
} //-----------------end if (small != false) and else -----------------
} //==================== end for (int m=0 .. ========================
return numbPix;
} //*********************** end BreadthFirst_D ***************************
The method BreadthFirst_D obtains as parameters the lightness light and the number i of a pixel P in the array Index[light][i]. The task of this method is to find a connected set S of pixels having the lightness less than or equal to light and containing the pixel P. If this set contains a number numbPix of pixels that is less or equal to the parameter maxSize then the pixels of S obtain a lighter color and become invisible as dark pixels. Otherwise all pixels of S obtain a label indicating that these pixels have the lightness light and belong to a connected subset of more than maxSize pixels.
The method takes the index from Index[light][i], puts it into the queue Q and starts a while loop running as long as Q is not empty. In the loop the value nextIndex is taken from the queue Q and each of its eight neighbors with the index Neib is tested whether its lightness is less than or equal to light. Besides that the label of Neib is tested.
We use the least significant bits of a pixel in Image.Grid to label a pixel. In the case of a grayscale image we use two least significant bits: Bit 0 is LabelQ1 and Bit 1 is LabelBig2. In the case of a color image we use one bit of the green channel as LabelQ1 and one bit of the red channel as LabelBig2.
LabelQ1 is set if the index was already put into the queue. LabelBig2 is set if a pixel belongs to a connected big set S of pixels that is greater than maxSize and the lightness of the pixel is equal to light.
If LabelQ1 of the pixel with the index Neib is not set and its lightness is less than or equal to light, then the index Neib is saved in the array Comp containing the indexes of all pixels whose lightness is less than or equal to light. Then the index Neib is put into the queue and the pixel obtains the label LabelQ1. If, however, the lightness of Neib is greater than light, this lightness will be used for calculating the color MinBound used for filling all pixels of a small set S to be made lighter.
Both labels are important to make the method BreadthFirst_D faster: A pixel with a set LabelQ1 must not be input into the queue again and one with a set LabelBig2 indicates that the set S containing this pixel is not small. The method DarkNoise does not call the method BrightFirst_D for a pixel labeled with LabelBig2.
In the while loop of BrightFirst_D, the index nextIndex is taken from the queue as its next element. The indexes Neib of all eight neighbors of nextIndex are delivered by a method Neighb(Image, nextIndex, n) (n runs from 0 to 7) one after another. If a neighbor Neib lies outside the image (nextIndex was at the border of the image), the method Neighb returns a negative value and Neib will be ignored. Otherwise the lightness lightNeb of Neib is taken from Image. If lightNeb is greater than light, then Neib does not belong to the sought for set S of pixels composing the connected set (component) of pixels darker than or equally dark as light. The value lightNeb is then used to calculate the color MinBound which is the color with minimum lightness of pixels adjacent to S.
If lightNeb is equal to light and the pixel Neib has LabelBig2 set, then the logical variable small is set to false. Otherwise, if lightNeb is greater than or equal to light, there are two cases: In the case that Neib has LabelQ1 set, the pixel Neib is ignored; otherwise the number numbPix of pixels already included into the sought for set S is compared with maxSize. If it is greater than maxSize, then the variable small is set to false and the while loop is broken. If, however, numbPix is less than or equal to maxSize, then Neib is included into the set S (Neib is saved in the array Comp), the pixel Neib gets LabelQ1 set, and Neib is put into the queue.
After the end of the while loop the value of small is being checked. If it is true, then all pixels of S whose indexes are saved in the array Comp get the color MinBound. Otherwise the pixels of Comp having the lightness equal to light get the label LabelBig2. All other pixels of S get no label. The method returns the value numbPix.
The method BreadthFirst_L is similar to BreadthFirst_D. The difference consists mainly in interchanging some > and < operators (but not that of the instruction if (numbPix > maxSise) {...}). The method BreadthFirst_L is called by the method LightNoise, which is similar to DarkNoise. The method LightNoise reads the array Index starting with the lowest lightness and calls the method BreadthFirst_L.
All methods work with both grayscale and color images. This is reached due to the employment of the method MaxC(Red, Green, Blue) (see the explanation in Chapter 3), which calculates the lightness of a pixel with the color (Red, Green, Blue) according to this simple formula:
lightness = max(0.713*R, G, 0.527*B).
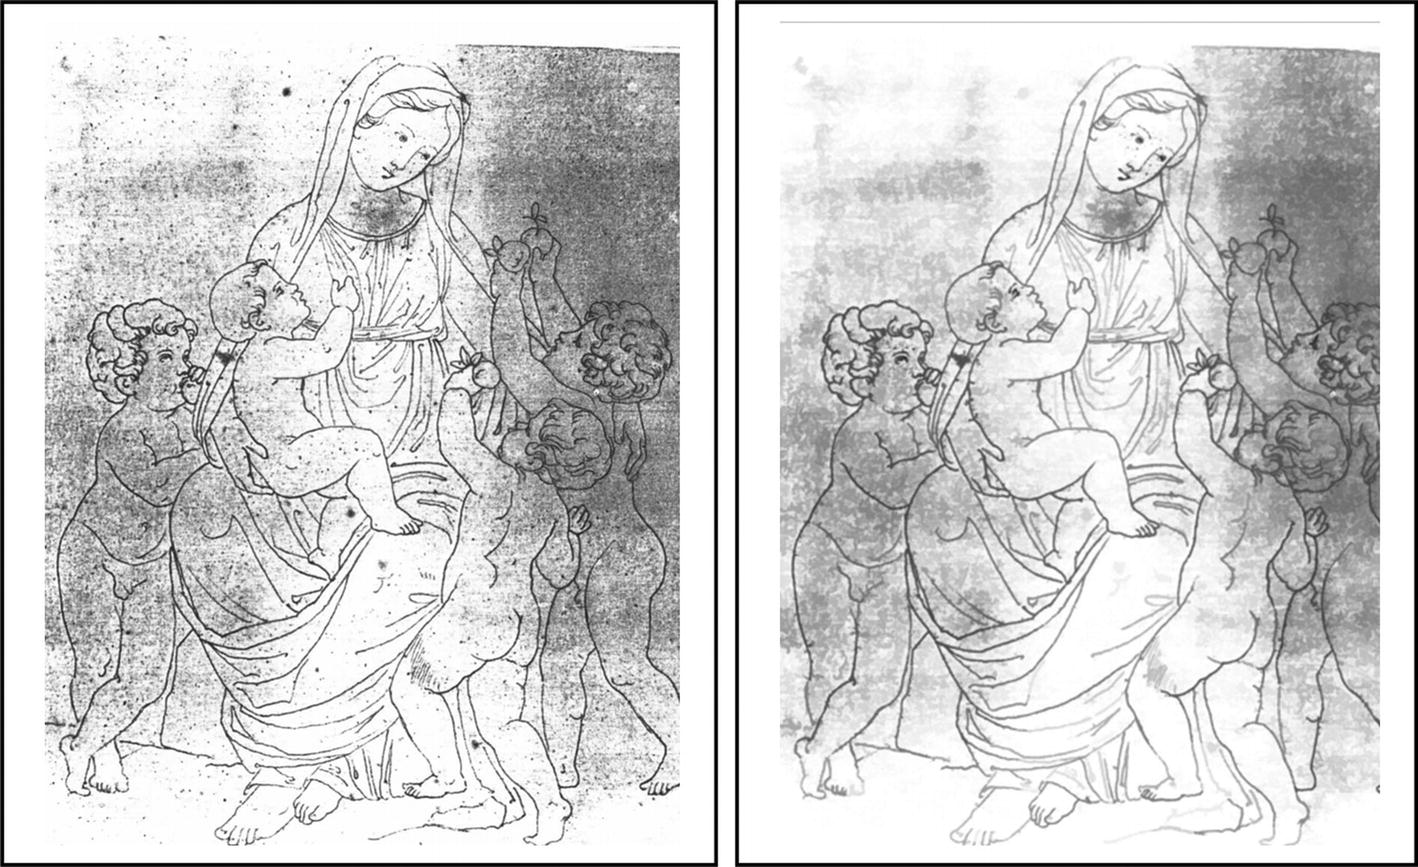
The reader can see in Figure 2-9 an example of applying this project to an old photograph of a drawing made by a famous German female painter, Louise Seidler.
Figure 2-9
Example of applying the project PulseNoiseWF to an old photograph of a drawing by Louise Seidler (left). Dark spots of less than 380 pixels are removed (right).
The results obtained for grayscale images representing old photos of drawings are much better when we use suppressing of impulse noise after a correction of shading as described in Chapters 4 and 5. The images in Figure 2-9 will also look much better after applying methods of shading correction.
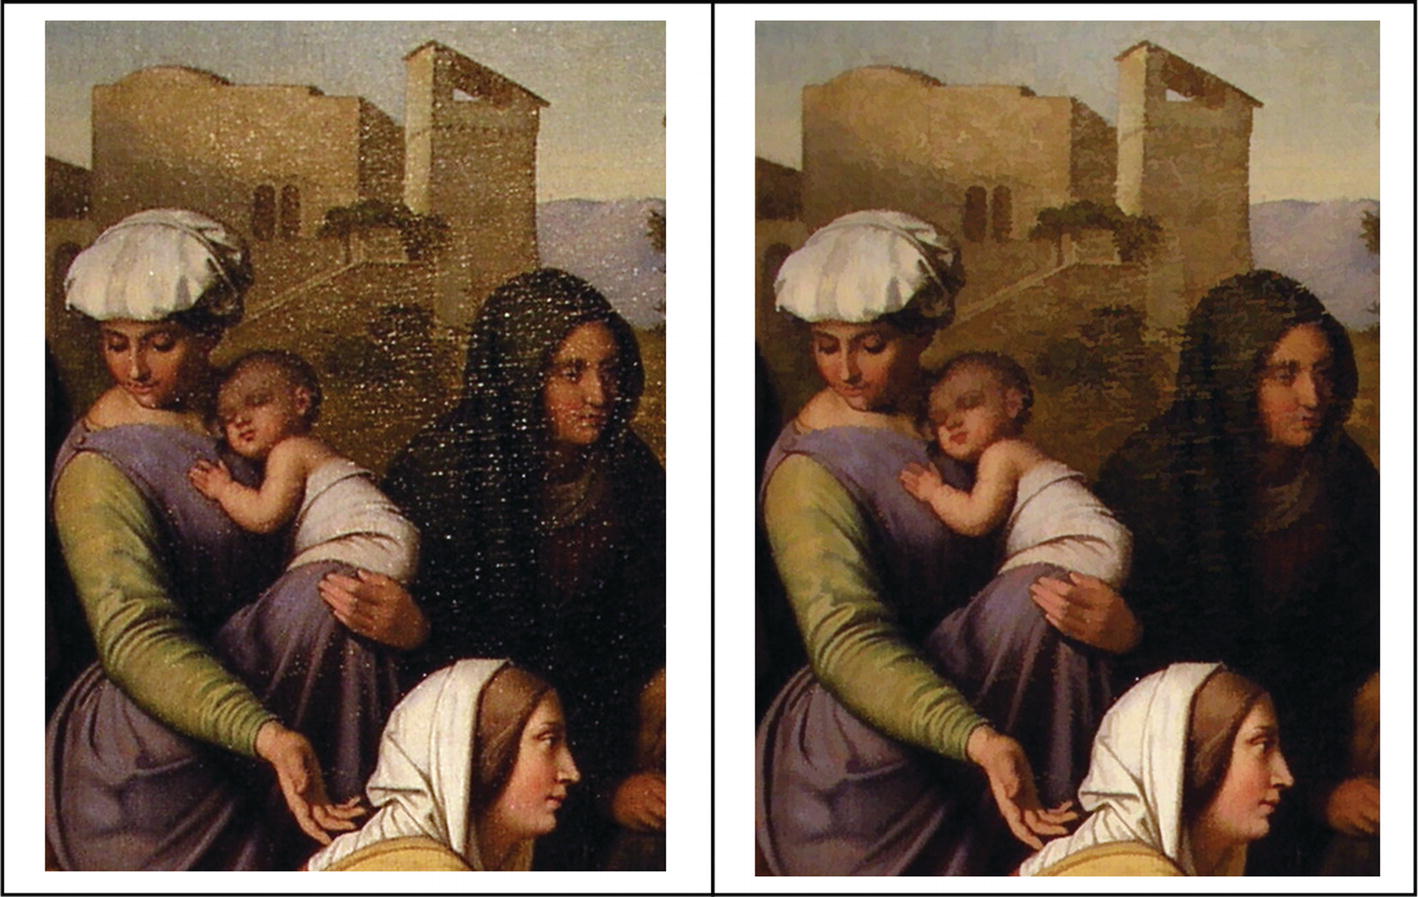
Figure 2-10 is another example of an image with light noise. It is a fragment of a photograph of the painting “Jesus and the Children” by Louise Seidler.
Figure 2-10
Example of applying the project PulseNoiseWF to a fragment of a photograph of the painting of Louise Seidler (left). Light spots of less than 30 pixels are removed (right).