CHAPTER 9
MIDI and Electronic Music Technology
Today, professional and nonprofessional musicians alike are using the language of the Musical Instrument Digital Interface (MIDI) to perform an expanding range of music and automation tasks within audio production, audio for video, film post, stage production, etc. This industry-wide acceptance can, in large part, be attributed to the cost effectiveness, power and general speed of MIDI production. Once a MIDI instrument or device comes into the production picture, there may be less need (if any at all) to hire outside musicians for a project. This alluring factor allows a musician/composer to compose, edit and arrange a piece in an electronic music environment that’s extremely flexible. By this, I’m not saying that MIDI replaces, or should replace the need for acoustic instruments, microphones and the traditional performance setting. In fact, it’s a powerful production tool that assists countless musicians to create music and audio productions in ways that are both innovative and highly personal. In short, MIDI is all about control, repeatability, flexibility, cost-effective production power and fun.
The affordable potential for future expansion and increased control over an integrated production system has spawned the growth of a production industry that allows an individual to cost effectively realize a full-scale sound production, not only in his or her own lifetime but in a relatively short time. For example, much of modern-day film composition owes its very existence to MIDI. Before this technology, composers were forced to create without the benefits of hearing their work at all or by creating a reduction score that could only be played on a piano or small ensemble (due to the cost and politics of hiring a full orchestra). With the help of MIDI, composers can now hear their work in real time, make any necessary changes, print out the scores and take a full orchestra into the studio to record the final score version. At the other end of the spectrum, MIDI can be an extremely personal tool that lets us perform, edit and layer synthesized and/or sampled instruments to create a song that helps us to express ourselves to the masses—all within the comfort of the home or personal project studio. The moral of this story is that today’s music industry would look and sound very different if it weren’t for this powerful, four-letter production word.
THE POWER OF MIDI
In everyday use, MIDI can be thought of as both a compositional tool for creating a scratch pad of sounds, then over time, help sculpt them into a final piece. It’s an awesome compositional environment that, like the digital world, is extremely chameleon-like in nature.
■ It can be used in straightforward ways, whereby sounds and textures are created, edited, mixed and blended into a composition.
■ It can be used in conjunction with groove and looping tools to augment, control and shape a production in an endless number of ways and in a wide range of music genres.
■ It can be used as a tool for capturing a performance (as a tip, if an instrument in the studio has a MIDI out jack, it’s always wise to record it to a MIDI track on your DAW). The ability to edit, change a sound or vary parameters after-the-fact is a helpful luxury that could save, augment and/or improve the track.
■ MIDI, by its very nature is a “re-amp” beast, the ability to change a sound, instruments, settings and/or parameters in post-production is what MIDI is all about, baby. You could even play the instrument back in the studio, turn it up and re-record it acoustically—there are practically no limits.
■ The ability to have real-time and post-production control over music and effects parameters is literally in MIDI’s DNA. Almost every parameter can be mangled, mutilated and finessed to fit your wildest dreams—either during the composition phase or in post-production.
In short, the name of this game is editability, flexibility and individuality. There are so many ways of approaching and working with MIDI that it’s very personal in nature. The ways that a system can be set up, the various approaches that the tools and toys are used to create music and sounds can be extremely individualistic. How you use your tools to create your own style of music is literally up to you, both in production and in post-production. That’s the true beauty of MIDI.
MIDI PRODUCTION ENVIRONMENTS
One of the more powerful aspects of MIDI production is that a system can be designed to handle a wide range of tasks with a degree of flexibility and ease that best suits an artist’s main instrument, playing style and even personal working habits. By opening up almost any industry-related magazine, you’ll easily see that a vast number of electronic musical instruments, effects devices, computer systems and other MIDI-related devices are currently available on the new and used electronic music market. MIDI production systems exist in all kinds of shapes and sizes and can be incorporated to match a wide range of production and budget needs. For example, working and aspiring musicians commonly install digital audio and MIDI systems in their homes (Figure 9.1).

FIGURE 9.1
MIDI production rooms: (a) gettin’ it all going in the bedroom studio. (Courtesy of Steinberg Media Technologies GmbH, a division of Yamaha Corporation, www.steinberg.net); (b) Moonbooter Studio. (Courtesy of Moonbooter, www.moonbooter.de, © foto by moonbooter.de)
These production environments range from ones that take up a corner of an artist’s bedroom to larger systems that are integrated into a dedicated project studio. Systems such as these can be specially designed to handle a multitude of applications and have the important advantage of letting artists produce their music in a comfortable environment—whenever the creative mood hits. Newer, laptop-based systems allow us to make music “wherever and whenever” from the comfort of your trusty backpack. Such production luxuries, that would have literally cost an artist a fortune in the not-too-distant past, are now within the reach of almost every musician.
In effect, the true power of MIDI lay in its repeatability and ability to offer control and edit functions during both production and (even more so) after the fact in post-production. When combined with digital audio workstations (DAWs) and modern-day recording technology, much of the music production process can be pre-planned and rehearsed before you even step into the studio. In fact, it’s not uncommon for recorded tracks to be laid down before they ever see the hallowed halls of a pro studio (if they see them at all). In business jargon, this luxury has reduced the number of billable hours to the artist or label to a cost-effective minimum—this flexibility, editability and affordability has placed MIDI production and control squarely at the heart of modern-day music production.
Since its inception, electronic music has been an indispensable tool for the scoring and audio post-production of television and radio commercials, industrial videos and full-feature motion picture sound tracks (Figure 9.2). For productions that are on a budget, an entire score can be created in the artist’s project studio using MIDI, hard-disk tracks and digital recorders—all at a mere fraction of what it might otherwise cost to hire the musicians and rent a studio.

FIGURE 9.2
Skywalker Sound scoring stage with orchestra, Marin County, CA. (Courtesy of Skywalker Sound, www.skysound.com)
Electronic music production and MIDI are also very much at home on the stage. In addition to using synths, samplers, DAWs and drum machines on the stage, most or all of a MIDI instrument and effects device parameters can be controlled from a pre-sequenced or real-time source. This means that all the necessary settings for the next song (or section of a song) can be automatically called up before being played. Once under way, various instrument patch and controller parameters can also be changed during a live performance from a stomp box controller, DAW or other hardware controller.
MIDI also falls squarely under the multimedia banner. General MIDI (GM, which is discussed in greater detail within Chapter 11), is a standardized spec that allows any sound-card or GM-compatible device to play back a score using the originally intended sounds and program settings. A General MIDI sequence can therefore be played on any laptop, tablet or (last but not least) phone for use with playing back music and effects within multimedia games and websites.
With the integration of the General MIDI standard into various media devices, one of the fastest growing MIDI applications, surprisingly, is probably comfortably resting in your pocket or purse right now—the ring tone on your cell phone (Figure 9.3). The ability to use MIDI (or digital sound files) to let you know who is calling has spawned an industry that allows your cell to be personalized in a super-fun way. One of my favorite ring tone stories happened on Hollywood Boulevard in L.A. This tall, lanky man was sitting at a café when his cell phone started blaring out an “If I Only Had a Brain” MIDI sequence from The Wizard of Oz. It wouldn’t have been nearly as funny if the guy didn’t look A LOT like the scarecrow character. Of course, everyone laughed.
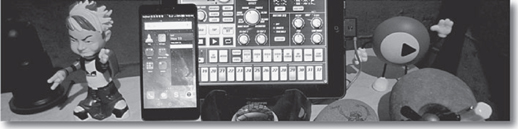
FIGURE 9.3
One ringy-dingy … MIDI (as well as digital audio) helps us to reach out and touch someone through phone ring tones.
WHAT IS MIDI?
Simply stated, the Musical Instrument Digital Interface (MIDI) is a digital communications language and compatible specification that allows multiple hardware and software electronic instruments, performance controllers, computers and other related devices to communicate with each other over a connected network (Figure 9.4). MIDI is used to translate performance- or control-related events (such as playing a keyboard, selecting a patch number, varying a modulation wheel, triggering a staged visual effect, etc.) into equivalent digital messages and then transmit these messages to other MIDI devices where they can be used to control sound generators and other performance/control parameters. The beauty of MIDI is that its data can be recorded into a DAW or hardware device (known as a sequencer), where it can then be edited and communicated between electronic instruments or other devices to create music or control any number of parameters in a performance- or post-production setting.

FIGURE 9.4
Example of a typical MIDI system with the MIDI network connections highlighted in solid lines.
In addition to composing and performing a song, musicians can also act as techno-conductors, having complete control over a wide palette of sounds, their timbre (sound and tonal quality), overall blend (level, panning) and other real-time controls. MIDI can also be used to vary the performance and control parameters of electronic instruments, recording devices, control devices and signal processors in the studio, on the road or on the stage.
The term interface refers to the actual data communications link and software/hardware systems in a connected MIDI and digital audio network. Through the use of MIDI, it’s possible for all of the electronic instruments and devices within a network to be addressed through the transmission of real-time performance and control-related MIDI data messages throughout a system to multiple instruments and devices through one or more data lines (which can be chained from device to device). This is possible because a single data cable is capable of transmitting performance and control messages over 16 discrete channels. This simple fact allows electronic musicians to record, overdub, mix and play back their performances in a working environment that loosely resembles the multitrack recording process. Once mastered, MIDI surpasses this analogy by allowing a composition to be edited, controlled, altered and called up with complete automation and repeatability—all of this providing production challenges and possibilities that are well beyond the capabilities of the traditional tape-based multitrack recording process.
WHAT MIDI ISN’T
For starters, let’s dispel one of MIDI’s greatest myths: MIDI DOESN’T communicate audio, nor can it create sounds! It is strictly a digital language that instructs a device or program to create, play back or alter the parameters of sound or control function. It is a data protocol that communicates on/off triggering and a wide range of parameters to instruct an instrument or device to generate, reproduce or control audio or production-related functions. Because of these differences, the MIDI data path is entirely distinct and separate from the audio signal paths (Figure 9.5). Even when they digitally share the same transmission cable (such as FireWire, USB or thunderbolt), the actual data paths and formats are completely separate in structure.
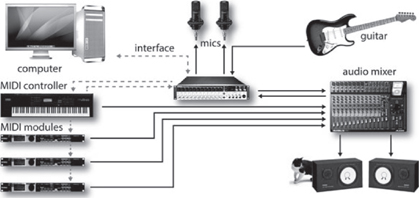
FIGURE 9.5
Example of a typical MIDI system with the audio connections highlighted in solid lines.
In short, MIDI communicates information that instructs an instrument to play or a device to carry out a function. It can be likened to the holes in a player-piano roll; when we put the paper roll up to our ears, we hear nothing, but when the cut-out dots pass over the sensors on a player piano, the instrument itself begins to make music. It’s exactly the same with MIDI. A MIDI file or data stream is simply a set of instructions that pass down a wire in a serial fashion, but when an electronic instrument interprets the data, we begin to hear sound.
It’s worth repeating here—of course, the power of MIDI lies in its ability to a capture performance, but its real strength squarely rests with the ability to edit that data, to manipulate it up, down and inside out, to control a wide range of musical and non-musical parameters as well as to alter the performance, individual notes and instrument sounds or parameters in almost an infinite way—all in the name of editing flexibility in post-production. That’s where MIDI shines.
SYSTEM INTERCONNECTIONS
As a data transmission medium, MIDI is unique in the world of sound production in that it’s able to transmit 16 discrete channels of performance, controller and timing information over a cable in one direction, using data densities that are economically small and easy to manage. In this way, it’s possible for MIDI messages to be communicated from a specific source (such as a keyboard or MIDI sequencer) to any number of devices within a connected network over a single MIDI data chain. In addition, MIDI is flexible enough that multiple MIDI data lines can be used to interconnect devices in a wide range of possible system configurations; for example, multiple MIDI lines can be used to transmit data to instruments and devices over 32, 48, 128 or more discrete MIDI channels!
Of course, those of you who are familiar with the concept of MIDI know that, over the years, the concept of interconnecting electronic instruments and other devices together has changed. These days, you’re more likely to connect a device to a computer by using a USB, FireWire, Thunderbolt or network cable than by using standard MIDI cables. In recent times, these interconnections are made “under the virtual hood,” where cable connectivity limitations are rarely an issue. However—it’s still important that we have an understanding of how these data connections are made “at a basic level,” because these older rules often still apply within a new connection environment—therefore, I present to you, the MIDI cabling system.
The MIDI Cable
A MIDI cable (Figure 9.6) consists of a shielded, twisted pair of conductor wires that has a male 5-pin DIN plug located at each of its ends. The MIDI specification currently uses only three of the five pins, with pins 4 and 5 being used as conductors for MIDI data and pin 2 is used to connect the cable’s shield to equipment ground. Pins 1 and 3 are currently not in use. The cables use twisted cable and metal shield groundings to reduce outside interference (such as electrostatic or radio-frequency interference), both of which can serve to distort or disrupt the transmission of MIDI messages.
FIGURE 9.6
The MIDI cable: (a) wiring diagram; (b) cable connectors.
MIDI Pin Description
■ Pin 1 is not used in most cases; however, it can be used to provide the V– (ground return) of a MIDI phantom power supply.
■ Pin 4 is a MIDI data line.
■ Pin 2 is connected to the shield or ground cable, which protects the signal from radio and electromagnetic interference.
■ Pin 5 is a MIDI data line.
■ Pin 3 is not used in most cases; however, it can be used to provide the +V (+9 to +15V) of a MIDI phantom power supply.
MIDI cables come prefabricated in lengths of 2, 6, 10, 20 and 50 feet and can commonly be obtained from music stores that specialize in MIDI equipment. To reduce signal degradations and external interference that tends to occur over extended cable runs, 50 feet is the maximum length specified by the MIDI spec.
It should be noted, that in modern-day MIDI production, it’s become increasingly common for MIDI data to be transmitted throughout a system network using USB, FireWire, Thunderbolt, network or Wi-Fi interconnections. Although the data isn’t transmitted through traditional MIDI cabling, the data format still adheres to the MIDI protocol.
MIDI PHANTOM POWER
In December 1989, Craig Anderton (musician and audio guru) submitted an article to EM proposing an idea that provides a standardized 12-V DC power supply to instruments and MIDI devices directly through pins 1 and 3 of a basic MIDI cable. Although pins 1 and 3 are technically reserved for possible changes in future MIDI applications (which never really came about), over the years several forward-thinking manufacturers (and project enthusiasts) have begun to implement MIDI phantom power directly into their studio and on-stage systems.
WIRELESS MIDI
Wireless MIDI transmitters (Figure 9.7) also make it possible for a battery-operated MIDI guitar, wind controller, etc., to be footloose and fancy free on-stage and in the studio. Working at distances of up to 500 feet, these battery-powered transmitter/receiver systems introduce very low delay latencies and can be switched over a number of radio channel frequencies. In recent times, however, dedicated wireless transmitters have given way to instruments, MIDI interface and portable iOS devices that communicate system-wide via Wi-Fi and network-based systems. The use of iOS devices for inputting controlling and directly interfacing with MIDI-based systems has expanded into an important way to wirelessly communicate in the studio or on-stage with relative ease (more on this in Chapter 10).
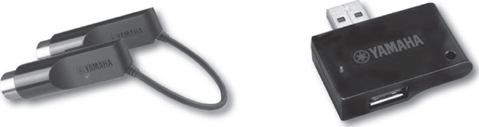
FIGURE 9.7
Yamaha UD-BT01 and MD-BT01 Bluetooth Wireless interface for Mac and iOS devices. (Courtesy of Yamaha Corporation, www.yamaha.com)
MIDI Jacks
MIDI is distributed from device to device using three types of MIDI jacks: MIDI In, MIDI Out and MIDI Thru (Figure 9.8a). These three connectors use 5-pin DIN jacks as a way to connect MIDI instruments, devices and computers into a music or production network system. As a side note, that these ports (as strictly defined by the MIDI 1.0 spec) are optically isolated to eliminate possible ground loops that might occur when connecting numerous devices together.
■ MIDI In jack: The MIDI In jack receives messages from an external source and communicates this performance, control and timing data to the device’s internal microprocessor, allowing an instrument to be played or a device to be controlled. More than one MIDI In jack can be designed into a system to provide for MIDI merging functions or for devices that can support more than 16 channels (such as a MIDI interface). Other devices (such as a controller) might not have a MIDI In jack at all.
■ MIDI Out jack: The MIDI Out jack is used to transmit MIDI performance, control messages or SysEx data from one device to another MIDI instrument or device. More than one MIDI Out jack can be designed into a system, giving it the advantage of controlling and distributing data over multiple MIDI paths using more than 16 channels (i.e., 16 channels × N MIDI port paths).
■ MIDI Thru jack: The MIDI Thru jack retransmits an exact copy of the data that’s being received at the MIDI In jack. This process is important, because it allows data to pass directly through an instrument or device to the next device in the MIDI chain (more on this later). Keep in mind that this jack is used to relay an exact copy of the MIDI In data stream, and isn’t merged with the data being transmitted from the MIDI Out jack.
MIDI ECHO
Certain MIDI devices may not include a MIDI Thru jack at all. Some of these devices, however, may have the option of switching the MIDI Out between being an actual MIDI Out jack or a MIDI Echo jack (Figure 9.8b). As with the MIDI Thru jack, a MIDI Echo option can be used to retransmit an exact copy of any information that’s received at the MIDI In port and route this data to the MIDI Out/Echo jack. Unlike a dedicated MIDI Out jack, the MIDI Echo function can often be selected to merge incoming data with performance data that’s being generated by the device itself. In this way, more than one controller can be placed in a MIDI system at one time. Note that, although performance and timing data can be echoed to a MIDI Out/Echo jack, not all devices are capable of echoing SysEx data.
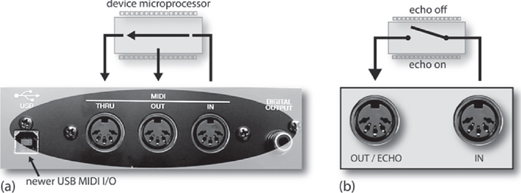
FIGURE 9.8
MIDI ports. (a) MIDI In, Out and Thru ports, showing the device’s signal path routing. (b) MIDI echo configuration.
Typical Configurations
Although electronic studio production equipment and setups are rarely alike (or even similar), there are a number of general rules that make it easy for MIDI devices to be connected to a functional network. These common configurations allow MIDI data to be distributed in the most efficient and understandable manner possible.
As a primary rule, there are only two valid ways to connect one MIDI device to another within a MIDI cable chain (Figure 9.9):
■ The MIDI Out jack of a source device (controller or sequencer/computer) must be connected to the MIDI In of a second device in the chain.
■ The MIDI Thru jack of the second device must be connected to the MIDI In jack of the third device in the chain, following this same Thru-to-In convention until the end of the chain is reached.

FIGURE 9.9
The two valid means of connecting one MIDI device to another.
THE DAISY CHAIN
One of the simplest and most common ways to distribute data throughout a MIDI system is through a daisy chain. This method relays MIDI data from a source device (controller or sequencer/computer) to the MIDI In jack of the next device in the chain (which receives and acts on this data). This next device then relays an exact copy of the incoming data at its MIDI In jack to its MIDI Thru jack, which is then relayed to the next MIDI In within the chain, and so on through the successive devices. In this way, up to 16 channels of MIDI data can be chained from one device to the next within a connected data network— and it’s precisely this concept of stringing multiple data line/channels through a single MIDI line that makes the whole concept work! Let’s try to understand this system better by looking at a few examples.
Figure 9.10a shows a simple (and common) example of a MIDI daisy chain whereby data flows from a controller (MIDI Out jack of the source device) to a synth module (MIDI In jack of the second device in the chain) then, an exact copy of the data that flows into the second device is then relayed to its MIDI Thru jack out to another synth (via the MIDI In jack of the third device in the chain). If our controller is set to transmit on MIDI channel 3, the second synth in the chain (which is set to channel 2) will ignore the messages and not play, while the third synth (which is set to channel 3) will be playing its heart out. The moral of this story is that, although there’s only one connected data line, a wide range of instruments and channel voices can be played in a surprisingly large number of combinations—all by using individual channel assignments along a daisy chain.
Another example (Figure 9.10b) shows how a computer can easily be designated as the master source within a daisy chain so that a sequencing program can be used to control the entire playback and channel routing functions of a daisy-chained system. In this situation, the MIDI data flows from a master controller/synth to the MIDI In jack of a computer’s MIDI interface (where the data can be played into, processed and rerouted through a MIDI sequencer). The MIDI Out of the interface is then routed back to the MIDI In jack of the master controller/synth (which receives and acts on this data). The controller then relays an exact copy of this incoming data out to its MIDI Thru jack (which is then relayed to the next device in the chain) and so on, until the end of the chain is reached. When we stop and think about it, we can see that the controller is essentially used as a “performance tool” for entering data into the MIDI sequencer, which is then used to communicate this data out to the various instruments throughout the connected MIDI chain.
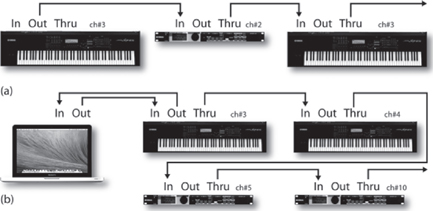
FIGURE 9.10
Example of a connected MIDI system using a daisy chain: (a) typical daisy chain hookup; (b) example of how a computer can be connected into a daisy chain.
THE MULTIPORT NETWORK
NOTE:
Although the distinction isn’t overly important, you might want to keep in mind that a MIDI “port” is a virtual data path that’s processed through a computer, whereas a MIDI “jack” is the physical connection on a device itself.
Another common approach to routing MIDI throughout a production system involves distributing MIDI data through the multiple 2, 4 and 8 In/Out ports that are available on the newer multiport MIDI interfaces or through the use of multiple MIDI USB interface devices.
In larger, more complex MIDI systems, a multiport MIDI network (Figure 9.11) offers several advantages over a single daisy chain path. One of the most important is its ability to address devices within a complex setup that requires more than 16 MIDI channels. For example, a 2x2 MIDI interface that has two independent In/Out paths is capable of simultaneously addressing up to 32 channels (i.e., port A 1–16 and port B 1–16), whereas an 8x8 port is capable of addressing up to 128 individual MIDI channels.

FIGURE 9.11
Example of a multiport network using two MIDI interfaces.
This type of multiport MIDI network has a number of advantages. As an example, port A might be dedicated to three instruments that are set to respond to MIDI channels 1–6, 7 and finally channel 11, whereas port B might be transmitting data to two instruments that are responding to channels 1–4 and 510 and port C might be communicating SysEx MIDI data to and from a MIDI remote controller to a digital audio workstation (DAW). In this modern age of audio interfaces, multiport MIDI interfaces and controller devices that are each fitted with MIDI ports, it’s a simple matter for a computer to route and synchronously communicate MIDI data throughout the studio in lots of ingenious and cost-effective ways. As you might remember, many of the newer devices that are MIDI capable might also be able to talk with the OS and host software vie USB, thereby reducing the need for a multiport setup.
EXPLORING THE SPEC
MIDI is a specified data format that must be strictly adhered to by those who design and manufacture MIDI-equipped instruments and devices. Because the format is standardized, you don’t have to worry about whether the MIDI output of one device will be understood by the MIDI in port of a device that’s made by another manufacturer. As long as the data ports say and/or communicate MIDI, you can be assured that the data (at least most of the basic performance functions) will be transmitted and understood by all devices within the connected system. In this way, the user need only consider the day-to-day dealings that are involved with using electronic instruments, without having to be concerned with compatibility between devices.
The MIDI Message
When using a standard MIDI cable, it’s important to remember that data can only travel in one direction from a single source to a destination (Figure 9.12a). In order to make two-way communication possible, a second MIDI data line must be used to communicate data back to the device, either directly or through the MIDI chain (Figure 9.12b).

FIGURE 9.12
MIDI data can only travel in one direction through a single MIDI cable: (a) data transmission from a single source to a destination; (b) two-way data communication using two cables.
MIDI digitally communicates musical performance data between devices as a string of MIDI messages. These messages are made up of groups of 8-bit words (known as bytes), which are transmitted in a serial fashion (generally at a speed of 31,250 bits/sec) to convey a series of instructions to one or all MIDI devices within a system.
Only two types of bytes are defined by the MIDI specification: the status byte and the data byte.
■ A status byte is used to identify what type of MIDI function is to be performed by a device or program. It is also used to encode channel data (allowing the instruction to be received by a device that’s set to respond to the selected channel).
■ A data byte is used to associate a value to the event that’s given by the accompanying status byte.
Although a byte is made up of 8 bits, the most significant bit (MSB; the leftmost binary bit within a digital word) is used solely to identify the byte type. The MSB of a status byte is always 1, while the MSB of a data byte is always 0. For example, a 3-byte MIDI Note-On message (which is used to signal the beginning of a MIDI note) might read in binary form as a 3-byte Note-On message of (10010100) (01000000) (01011001). This particular example transmits instructions that would be read as: “Transmitting a Note-On message over MIDI channel #5, using keynote #64, with an attack velocity [volume level of a note] of 89.”
MIDI CHANNELS
Just as a public speaker might single out and communicate a message to one individual in a crowd, MIDI messages can be directed to communicate information to a specific device or range of devices within a MIDI system. This is done by embedding a channel-related nibble (4 bits) within the status/channel number byte. This process makes it possible for up to 16 channels of performance or control information to be communicated to a specific device, or a sound generator through a single MIDI data cable (Figure 9.13).
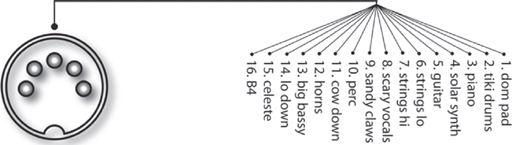
FIGURE 9.13
Up to 16 channels can be communicated through a single MIDI cable or data port.
Since this nibble is 4 bits wide, up to 16 discrete MIDI channels can be transmitted through a single MIDI cable or designated port.
| 0000 = CH#1 | 0100 = CH#5 | 1000 = CH#9 | 1100 = CH#13 | |
| 0001 = CH#2 | 0101 = CH#6 | 1001 = CH#10 | 1101 = CH#14 | |
| 0010 = CH#3 | 0110 = CH#7 | 1010 = CH#11 | 1110 = CH#15 | |
| 0011 = CH#4 | 0111 = CH#8 | 1011 = CH#12 | 1111 = CH#16 |

FIGURE 9.14
MIDI setup showing a set of MIDI channel assignments.
Whenever a MIDI device or sound generator within a device or program function is instructed to respond to a specific channel number, it will only react to messages that are transmitted on that channel (i.e., it ignores channel messages that are transmitted on any other channel). For example, let’s assume that we’re going to create a short song using a synthesizer that has a built-in sequencer (a device or program that’s capable of recording, editing and playing back MIDI data), a synthesizer and a sampler (Figure 9.14):
1. We could easily start off by recording a simple drum pattern track into the master synth on channel 10 (numerous synths are pre-assigned to output drum/percussion sounds on this channel).
2. Once recorded, the sequence will thereafter transmit the notes and data over channel 10, allowing the synth’s percussion section to be played.
3. Next, we could set the synth module to channel 3 and instruct the master synth to transmit on the same channel (since the synth module is set to respond to data on channel 3, its generators will sound whenever the master keyboard is played). We can now begin recording a melody line into the sequencer’s next track.
4. Playing back the sequence will then transmit data to both the master synth (perc section 10) and the module (melody line 3) over their respective channels. At this point, our song is beginning to take shape.
5. Now we can set the sampler (or any other instrument type) to respond to channel 5 and instruct the master synth to transmit on that channel, allowing us to further embellish the song.
6. Now that the song’s beginning to take shape, the sequencer can play the musical parts to the instruments on their respective MIDI channels—all in a “multitrack” environment that gives us complete control over voicing, volume, panning and a wide range of edit functions over each instrument. In short, we’ve created a true multichannel production environment.
It goes without saying that the above example is just one of the infinite setup and channel possibilities that can be encountered in a production environment. It’s often true, however, that even the most complex MIDI and production rooms will have a system strategy—a basic channel and overall layout that makes the day-to-day operation of making music easier. This layout and the basic decisions that you might make in your own room are, of course, up to you. Streamlining a system to work both efficiently and easily will come with time, experience and practice.
MIDI MODES
Electronic instruments often vary in the number of sounds and notes that can be simultaneously produced by their internal sound-generating circuitry. For example, certain instruments can only produce one note at a single time (known as a monophonic instrument), while others can generate 16, 32 and even 64 notes at once (these are known as polyphonic instruments). The latter type can easily play chords or more than one musical line on a single instrument at a time.
In addition, some instruments are only capable of producing a single generated sound patch (often referred to as a “voice”) at any one time. Its generating circuitry could be polyphonic, allowing the player to lay down chords and bass or melody lines, but it can only produce these notes using a single, characteristic sound at any one time (e.g., an electric piano, a synth bass or a string patch). However, the vast majority of newer synths differ from this in that they’re multitimbral in nature, meaning that they can generate numerous sound patches at any one time (e.g., an electric piano, a synth bass and a string patch, as can be seen in Figure 9.15). That’s to say that it’s common to run across electronic instruments that can simultaneously generate a number of voices, each offering its own control over a wide range of parameters. Best of all, it’s also common for different sounds to be assigned to their own MIDI channels, allowing multiple patches to be internally mixed within the device to a stereo output bus or independent outputs.

FIGURE 9.15
Multitimbral instruments are virtual bands-in-a-box that can simultaneously generate multiple patches, each of which can be assigned to its own MIDI channel.
The following list and figures explain the four modes that are supported by the MIDI spec:
■ Mode 1 (Omni On/Poly): In this mode, an instrument will respond to data that’s being received on any MIDI channel and then redirect this data to the instrument’s base channel. In essence, the device will play back everything that’s presented at its input in a polyphonic fashion, regardless of the incoming channel designations. As you might guess, this mode is rarely used.
■ Mode 2 (Omni On/Mono): As in Mode 1, an instrument will respond to all data that’s being received at its input, without regard to channel designations; however, this device will only be able to play one note at a time. Mode 2 is used even more rarely than Mode 1, as the device can’t discriminate channel designations and can only play one note at a time.
■ Mode 3 (Omni Off/Poly): In this mode, an instrument will only respond to data that matches its assigned base channel in a polyphonic fashion. Data that’s assigned to any other channel will be ignored. This mode is by far the most commonly used, as it allows the voices within a multi-timbral instrument to be individually controlled by messages that are being received on their assigned MIDI channels. For example, each of the 16 channels in a MIDI line could be used to independently play each of the parts in a 16-voice, multitimbral synth.
■ Mode 4 (Omni Off/Mono): As with Mode 3, an instrument will be able to respond to performance data that’s transmitted over a single, dedicated channel; however, each voice will only be able to generate one MIDI note at a time. A practical example of this mode is often used in MIDI guitar systems, where MIDI data is monophonically transmitted over six consecutive channels (one channel/voice per string).
CHANNEL VOICE MESSAGES
Channel Voice messages are used to transmit real-time performance data throughout a connected MIDI system. They’re generated whenever a MIDI instrument’s controller is played, selected or varied by the performer. Examples of such control changes could be the playing of a keyboard, pressing of program selection buttons or movement of modulation or pitch wheels. Each Channel Voice message contains a MIDI channel number within its status byte, meaning that only devices that are assigned to the same channel number will respond to these commands. There are seven Channel Voice message types: Note-On, Note-Off, Polyphonic Key Pressure, Channel Pressure, Program Change, Pitch Bend Change and Control Change.
■ Note-On messages (Figure 9.16): Indicate the beginning of a MIDI note. This message is generated each time a note is triggered on a keyboard, drum machine or other MIDI instrument (by pressing a key, striking a drum pad, etc.). A Note-On message consists of three bytes of information: a MIDI channel number, a MIDI pitch number, and an attack velocity value (messages that are used to transmit the individually played volume levels [0–127] of each note).
■ Note-Off messages: Indicate the release (end) of a MIDI note. Each note played through a Note-On message is sustained until a corresponding Note-Off message is received. A Note-Off message doesn’t cut off a sound; it merely stops playing it. If the patch being played has a release (or final decay) stage, it begins that stage upon receiving this message. It should be noted that many systems will actually use a Note-On message with a velocity 0 to denote a Note-Off message.
■ Polyphonic Key Pressure messages (Figure 9.17): Transmitted by instruments that can respond to pressure changes applied to the individual keys of a keyboard. A Polyphonic Key Pressure message consists of three bytes of information: a MIDI channel number, a MIDI pitch number and a pressure value.
■ Channel Pressure (or Aftertouch) messages (Figure 9.18): Transmitted and received by instruments that respond to a single, overall pressure applied to the keys. In this way, additional pressure on the keys can be assigned to control such variables as pitch bend, modulation and panning.
■ Program Change messages (Figures 9.19 and 9.20): Change the active voice (generated sound) or preset program number in a MIDI instrument or device. Using this message format, up to 128 presets (a user- or factory-defined number that activates a specific sound-generating patch or system setup) can be selected. A Program Change message consists of two bytes of information: a MIDI channel number (1–16) and a program ID number (0 –127).
■ Pitch Bend Change messages (Figures 9.21 and 9.22): Transmitted by an instrument whenever its pitch bend wheel is moved in either the positive (raise pitch) or negative (lower pitch) direction from its central (no pitch bend) position.
■ Control Change messages (Figures 9.23 and 9.24): Transmit information that relates to real-time control over a MIDI instrument’s performance parameters (such as modulation, main volume, balance and panning). Three types of real-time controls can be communicated through control change messages: continuous controllers, which communicate a continuous range of control settings, generally with values ranging from 0–127; switches (controls having an ON or OFF state with no intermediate settings); and data controllers, which enter data either through numerical keypads or stepped up/down entry buttons.

FIGURE 9.16
Byte structure of a MIDI Note-On message.

FIGURE 9.17
Byte structure of a MIDI Polyphonic Key Pressure message (generated when additional pressure is applied to each key that’s played).

FIGURE 9.18
Byte structure of a MIDI Channel Pressure message (simultaneously affect all notes that are transmitted over a MIDI channel).
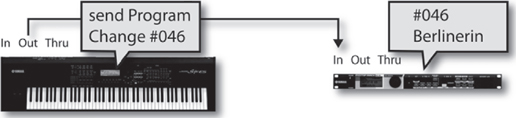
FIGURE 9.19
Program Change messages can be used to change sound patches from a sequencer or from a remote controller.
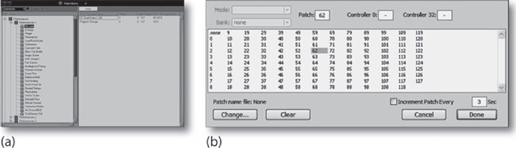
FIGURE 9.20
Workstations and sequencer software systems will often allow patches to be recalled via Program Change messages. (a) Cubase/Nuendo. (Courtesy of Steinberg Media Technologies GmbH, a division of Yamaha Corporation, www.steinberg.net) (b) Protools. (Courtesy of Digidesign, a division of Avid Technology, www.digidesign.com)

FIGURE 9.21
Byte structure of a Pitch Bend Change message.
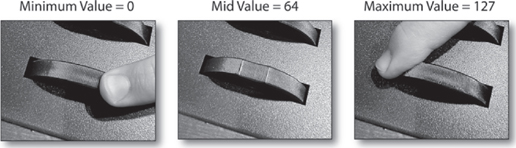
FIGURE 9.22
Pitch bend wheel data value ranges.

FIGURE 9.23
Control Change message byte structure.

FIGURE 9.24
Control messages can be varied in real time or under automation using a number of input methods.
Explanation of Controller ID Parameters
As you can see in Figure 9.23, the second byte of the Control Change message is used to denote the controller ID number. This all-important value is used to specify which of the device’s program or performance parameters are to be addressed.
The following section details the general categories and conventions for assigning controller ID numbers to an associated parameter (as specified by the 1995 update of the MMA (MIDI Manufacturers Association, www.midi.org). An overview of these controllers can be seen in Table 9.1. This is definitely an important table to earmark, because these numbers will be an important guide toward knowing and/or finding the right ID number that can help you on your path toward finding that perfect parameter for controlling a variable.
Table 9.1 Listing of Controller ID Numbers, Outlining Both the Defined Format and Conventional Controller Assignments
| Control # | Parameter |
| 14-Bit Controllers Coarse/MSB (Most Significant Bit) | |
| 0 | Bank Select 0–127 MSB |
| 1 | Modulation Wheel or Lever 0–127 MSB |
| 2 | Breath Controller 0–127 MSB |
| 3 | Undefined 0–127 MSB |
| 4 | Foot Controller 0–127 MSB |
| 5 | Portamento Time 0–127 MSB |
| 6 | Data Entry MSB 0–127 MSB |
| 7 | Channel Volume (formerly Main Volume) 0–127 MSB |
| 8 | Balance 0–127 MSB |
| 9 | Undefined 0–127 MSB |
| 10 | Pan 0–127 MSB |
| 11 | Expression Controller 0–127 MSB |
| 12 | Effect Control 1 0–127 MSB |
| 13 | Effect Control 2 0–127 MSB |
| 14 | Undefined 0–127 MSB |
| 15 | Undefined 0–127 MSB |
| 16–19 | General Purpose Controllers 1–4 0–127 MSB |
| 20–31 | Undefined 0–127 MSB |
| 14-Bit Controllers Fine/LSB (Least Significant Bit) | |
| 32 | LSB for Control 0 (Bank Select) 0–127 LSB |
| 33 | LSB for Control 1 (Modulation Wheel or Lever) 0–127 LSB |
| 34 | LSB for Control 2 (Breath Controller) 0–127 LSB |
| 35 | LSB for Control 3 (Undefined) 0–127 LSB |
| 36 | LSB for Control 4 (Foot Controller) 0–127 LSB |
| 37 | LSB for Control 5 (Portamento Time) 0–127 LSB |
| 38 | LSB for Control 6 (Data Entry) 0–127 LSB |
| 39 | LSB for Control 7 (Channel Volume, formerly Main Volume) 0–127 LSB |
| 40 | LSB for Control 8 (Balance) 0–127 LSB |
| 41 | LSB for Control 9 (Undefined) 0–127 LSB |
| 42 | LSB for Control 10 (Pan) 0–127 ISB |
| 43 | LSB for Control 11 (Expression Controller) 0–127 LSB |
| 44 | LSB for Control 12 (Effect control 1) 0–127 LSB |
| 45 | LSB for Control 13 (Effect control 2) 0–127 LSB |
| 46–47 | LSB for Control 14–15 (Undefined) 0–127 LSB |
| 48–51 | LSB for Control 16–19 (General Purpose Controllers 1–4) 0–127 LSB |
| 52–63 | LSB for Control 20–31 (Undefined) 0–127 LSB |
| 7-Bit Controllers | |
| 64 | Damper Pedal On/Off (Sustain) <63 off, >64 on |
| 65 | Portamento On/Off <63 off, >64 on |
| 66 | Sustenuto On/Off <63 off, >64 on |
| 67 | Soft Pedal On/Off <63 off, >64 on |
| 68 | Legato Footswitch <63 Normal, >64 Legato |
| 69 | Hold 2 <63 off, >64 on |
| 70 | Sound Controller 1 (default: Sound Variation) 0–127 LSB |
| 71 | Sound Controller 2 (default: Timbre/Harmonic Intensity) 0–127 LSB |
| 72 | Sound Controller 3 (default: Release Time) 0–127 LSB |
| 73 | Sound Controller 4 (default: Attack Time) 0–127 LSB |
| 74 | Sound Controller 5 (default: Brightness) 0–127 LSB |
| 75 | Sound Controller 6 (default: Decay Time: see MMA RP-021) 0–127 LSB |
| 76 | Sound Controller 7 (default: Vibrato Rate: see MMA RP-021) 0–127 LSB |
| 77 | Sound Controller 8 (default: Vibrato Depth: see MMA RP-021) 0–127 LSB |
| 78 | Sound Controller 9 (default: Vibrato Delay: see MMA RP-021) 0–127 LSB |
| 79 | Sound Controller 10 (default undefined: see MMA RP-021) 0–127 LSB |
| 80–83 | General Purpose Controller 5–8 0–127 LSB |
| 84 | Portamento Control 0–127 LSB |
| 85–90 | Undefined |
| 91 | Effects 1 Depth (default: Reverb Send Level) 0–127 LSB |
| 92 | Effects 2 Depth (default: Tremolo Level) 0–127 LSB |
| 93 | Effects 3 Depth (default: Chorus Send Level) 0–127 LSB |
| 94 | Effects 4 Depth (default: Celesta [Detune] Depth) 0–127 LSB |
| 95 | Effects 5 Depth (default: Phaser Depth) 0–127 LSB |
| Parameter Value Controllers | |
| 96 | Data Increment (Data Entry +1) |
| 97 | Data Decrement (Data Entry –1) |
| 98 | Non-Registered Parameter Number (NRPN): LSB 0–127 LSB |
| 99 | Non-Registered Parameter Number (NRPN): MSB 0–127 MSB |
| 100 | Registered Parameter Number (RPN): LSB* 0–127 LSB |
| 101 | Registered Parameter Number (RPN): MSB* 0–127 MSB |
| 102–119 | Undefined |
| Reserved for Channel Mode Messages | |
| 120 | All Sound Off 0 |
| 121 | Reset All Controllers |
| 122 | Local Control On/Off 0 off, 127 on |
| 123 | All Notes Off |
| 124 | Omni Mode Off (+ all notes off) |
| 125 | Omni Mode On (+ all notes off) |
| 126 | Poly Mode On/Off (+ all notes off) |
| 127 | Poly Mode On (+ mono off + all notes off) |
System Messages
As the name implies, System messages are globally transmitted to every MIDI device in the MIDI chain. This is accomplished because MIDI channel numbers aren’t addressed within the byte structure of a System message. Thus, any device will respond to these messages, regardless of its MIDI channel assignment. The three System message types are:
■ System Common messages
■ System Real-Time messages
■ System Exclusive messages
System-Common messages are used to transmit MIDI timecode, song position pointer, song select, tune request and end-of-exclusive data messages throughout the MIDI system or 16 channels of a specified MIDI port.
■ MIDI timecode (MTC) messages: Provide a cost-effective and easily implemented way to translate SMPTE (a standardized synchronization time-code) into an equivalent code that conforms to the MIDI 1.0 spec. It allows time-based codes and commands to be distributed throughout the MIDI chain in a cheap, stable and easy-to-implement way. MTC Quarter-Frame messages are transmitted and recognized by MIDI devices that can understand and execute MTC commands. A grouping of eight quarter frames is used to denote a complete timecode address (in hours, minutes, seconds, and frames), allowing the SMPTE address to be updated every two frames. More in-depth coverage of MIDI timecode can be found in Chapter 12.
■ Song Position Pointer (SPP) messages: Allow a sequencer or drum machine to be synchronized to an external source (such as a tape machine) from any measure position within a song. This complex timing protocol isn’t commonly used, because most users and design layouts currently favor MTC.
■ Song Select messages: Use an identifying song ID number to request a specific song from a sequence or controller source. After being selected, the song responds to MIDI Start, Stop and Continue messages.
■ Tune Request messages: Used to request that an equipped MIDI instrument initiate its internal tuning routine.
■ End of Exclusive (EOX) messages: Indicate the end of a System-Exclusive message.
System Real-Time messages provide the precise timing element required to synchronize all of the MIDI devices in a connected system. To avoid timing delays, the MIDI specification allows System Real-Time messages to be inserted at any point in the data stream, even between other MIDI messages.
■ Timing Clock messages: The MIDI Timing Clock message is transmitted within the MIDI data stream at various resolution rates. It is used to synchronize the internal timing clocks of each MIDI device within the system and is transmitted in both the start and stop modes at the currently defined tempo rate. In the early days of MIDI, these rates (which are measured in pulses per quarter note [ppq]) ranged from 24 to 128 ppq; however, continued advances in technology have brought these rates up to 240, 480 or even 960 ppq.
■ Start messages: Upon receipt of a timing clock message, the MIDI Start command instructs all connected MIDI devices to begin playing from their internal sequences’ initial start point. Should a program be in midsequence, the start command will reposition the sequence back to its beginning, at which point it will begin to play.
■ Stop messages: Upon receipt of a MIDI Stop command, all devices within the system will stop playing at their current position point.
■ Continue messages: After receiving a MIDI Stop command, a MIDI Continue message will instruct all connected devices to resume playing their internal sequences from the precise point at which it was stopped.
■ Active Sensing messages: When in the Stop mode, an optional Active Sensing message can be transmitted throughout the MIDI data stream every 300 milliseconds. This instructs devices that can recognize this message that they’re still connected to an active MIDI data stream.
■ System Reset messages: A System Reset message is manually transmitted in order to reset a MIDI device or instrument back to its initial power-up default settings (commonly mode 1, local control on and all notes off).
System-exclusive (sys-ex) messages allow MIDI manufacturers, programmers and designers to communicate customized MIDI messages between MIDI devices. The purpose of these messages is to give manufacturers, programmers and designers the freedom to communicate any device-specific data of an unrestricted length, as they see fit. Most commonly, sys-ex data are used for the bulk transmission and reception of program/patch data and sample data, as well as real-time control over a device’s parameters. The transmission format of a sys-ex message (Figure 9.25), as defined by the MIDI standard, includes a sys-ex status header, manufacturer’s ID number, any number of sys-ex data bytes and an EOX byte. When a sys-ex message is received, the identification number is read by a MIDI device to determine whether or not the following messages are relevant. This is easily accomplished by the assignment of a unique 1- or 3-byte ID number to each registered MIDI manufacturer and make. If this number doesn’t match the receiving MIDI device, the subsequent data bytes will be ignored. Once a valid stream of sys-ex data has been transmitted, a final EOX message is sent, after which the device will again begin to respond normally to incoming MIDI performance messages.

FIGURE 9.25
System-exclusive ID data and controller format.
In actual practice, the general idea behind sys-ex is that it uses MIDI messages to transmit and receive program, patch and sample data or real-time parameter information between devices. It’s sort of like having an instrument or device that’s a musical chameleon. One moment it can be configured with a certain set of sound patches and setup data and then, after it receives a new sys-ex data dump, you could easily end up with an instrument that’s literally full of new and hopefully exciting sounds and settings. Here are a few examples of how sys-ex can be put to good use:
■ Transmitting patch data between synths: Sys-ex can be used to transmit patch and overall setup data between synths of identical make and (most often) model. Let’s say that we have a Brand X Model Z synthesizer, and, as it turns out, you have a buddy across town that also has a Brand X Model Z. That’s cool, except your buddy has a completely different set of sound patches loaded into her synth—and you want them! Sys-ex to the rescue! All you need to do is go over and transfer the patch data into your synth (to make life easier, make sure you take the instruction manual along).
■ Backing up your current patch data: This can be done by transmitting a sysex dump of your synth’s entire patch and setup data to disk, to a sys-ex utility program (often shareware) or to your DAW/MIDI sequencer. This is important: Back up your factory preset or current patch data before attempting a sys-ex dump! If you forget and download a sys-ex dump, your previous settings will be lost until you contact the manufacturer, download the dump from their website or take your synth back to your favorite music store to reload the data.
■ Getting patch data from the Web: One of the biggest repositories of sys-ex data is on the Internet. To surf the Web for sys-ex patch data, all you need to do is log on to your favorite search engine and enter the name of your synth. You’ll probably be amazed at how many hits will come across the screen, many of which are chock-full of sys-ex dumps that can be downloaded into your synth.
■ Varying sys-ex controller or patch data in real time: Patch editors or hardware MIDI controllers can be used to vary system and sound-generating parameters, in real time. Both of these controller types can ease the job of experimenting with parameter values or changing mix moves by giving you physical or on-screen controls that are often more intuitive and easier to deal with than programming electronic instruments that’ll often leave you dangling in cursor and 3-inch LCD screen hell.
Before moving on, I should also point out that sys-ex data grabbed from the Web, disk, disc or any other medium will often be encoded using several sys-ex file format styles (unfortunately, none of these are standardized). Unfortunately, sequencer Y might not recognize a sys-ex dump that was encoded using sequencer Z. For this reason, dumps are often encoded using easily available, standard sys-ex utility programs for the Mac or PC or as a standard MIDI file.
At last, it seems that a single unified standard has begun to emerge from the fray that’s so simple that it’s amazing it wasn’t universally adopted from the start. This system simply records a sys-ex dump as data on a single MIDI track within your DAW. Before recording a dump to a DAW MIDI track, you may need to consult the manual to make sure that sys-ex filtering is turned off. Once this is done, simply place the track into record mode, initiate the dump and save the track in your personal sys-ex dump directory. Using this approach, it would also be possible to:
■ Import the appropriate sys-ex dump track (or set of tracks) into the current working session so as to automatically program the instruments before the sequence is played back.
■ Import the appropriate sys-ex dump track (or set of tracks) into separate MIDI tracks that can be muted or unassigned. Should the need arise, the track(s) can be activated and/or assigned in order to dump the data into the appropriate instruments.
MIDI AND THE COMPUTER
Besides the coveted place of honor in which most electronic musicians hold their instruments, the most important device in a MIDI system is undoubtedly the personal computer. Through the use of software programs and peripheral hardware, the computer is often used to control, process and distribute information relating to music performance and production from a centralized, integrated control position.
Of course, two computer types dominate modern-day music production: the PC and the Mac. In truth, each brings its own particular set of advantages and disadvantages to personal computing, although their differences have greatly dwindled over the years. My personal take on the matter (a subject that’s not even important enough to debate) is that it’s a dual-platform world. The choice is yours and yours alone to make. Many professional software and hardware systems can work on either platform. As I write this, some of my music collaborators are fully Mac, some are PC and some (like me) use both, and it doesn’t affect our production styles at all. Coexistence isn’t much of a problem, either. Living a dual-platform existence can give you the edge of being familiar with both systems, which can be downright handy in a sticky production pinch.
Connecting to the Peripheral World
An important event in the evolution of personal computing has been the maturation of hardware and processing peripherals. With the development of the USB (www.usb.org), FireWire (www.1394ta.org), Thunderbolt (www.thunderbolttechnology.net) and Dante (www.audinate.com) protocols, hardware devices such as mice, keyboards, cameras, audio interfaces, MIDI interfaces, CD and hard drives, MP3 players and even portable fans can be plugged into an available port without any need to change frustrating hardware settings or open up the box. External peripherals are generally hardware devices that are designed to do a specific task or range of production tasks. For example, an audio interface is capable of translating analog audio (and often MIDI, control and other media) into digital data that can be understood by the computer. Other peripheral devices can perform such useful functions as printing, media interfacing (video and MIDI), scanning, memory card interfacing, portable hard disk storage—the list could fill pages.
THE MIDI INTERFACE
Although computers and electronic instruments both communicate using the digital language of 1’s and 0’s, computers simply can’t understand the language of MIDI without the use of a device that translates these serial messages into a data structure that computers can comprehend. Such a device is known as the MIDI interface. A wide range of MIDI interfaces currently exist that can be used with most computer system and OS platforms. For the casual and professional musician, interfacing MIDI into a production system can be done in a number of ways. Probably the most common way to access MIDI In, Out and Thru jacks is on a modern-day USB or FireWire audio interface or controller surface (Figure 9.26), although they usually only offer up a single I/O port.

FIGURE 9.26
Many audio interface devices include MIDI I/O ports. (Courtesy of Native Instruments GmbH, www.native-instruments.com)
The next option is to choose a USB MIDI interface that can range from simpler devices that include a single port to multiple-port systems that can easily handle up to 64 channels over four I/O ports. The multiport MIDI interface (Figure 9.27) is often the device of choice for most professional electronic musicians who require added routing and synchronization capabilities. These USB devices can easily be ganged together to provide eight or more independent MIDI Ins and Outs to distribute MIDI data through separate lines over a connected network.
In addition to distributing MIDI data, these systems often include driver software that can route and process MIDI data throughout the MIDI network. For example, a multiport interface could be used to merge together several MIDI Ins (or Outs) into a single data stream, filter out specific MIDI message types (used to block out unwanted commands that might adversely change an instrument’s sound or performance) or rechannel data being transmitted on one MIDI channel or port to another channel or port (thereby allowing the data to be recognized by an instrument or device).

FIGURE 9.27
iConnect MIDI4plus 4x4 (64 channel) MIDI interface. (Courtesy of iConnectivity, www.iConnectivity.com)
Another important function that can be handled by some multiport interfaces is synchronization. Synchronization (sync, for short) allows other, external devices (such as DAWs, video decks and other media systems) to be simultaneously played back using the same timing reference. Interfaces that includes sync features will often read and write SMPTE timecode, convert SMPTE to MIDI time-code (MTC) and allow recorded timecode signals to be cleaned up when copying code from one analog device to another (jam sync). Further reading on synchronization can be found in Chapter 12.
In addition to the above interface types, a number of MIDI keyboard controllers and synth instruments have been designed with MIDI ports and jacks built right into them. For those getting started, this useful and cost-saving feature makes it easy to integrate your existing instruments into your DAW and sequencing environment.
ELECTRONIC INSTRUMENTS
Since their inception in the early 1980s (www.midi.org/articles/the-history-of-midi), MIDI-based electronic instruments have played a central and important role in the development of music technology and production. These devices (which fall into almost every instrument category), along with the advent of cost-effective analog and digital audio recording systems, have probably been the most important technological advances to shape the industry into what it is today. In fact, the combination of hardware and newer software plug-in technologies has turned the personal project studio into one of the most important driving forces behind modern-day music production.
Inside the Toys
Although electronic instruments often differ from one another in looks, form and function, they almost always share a common set of basic building block components, including the following:
■ Central processing units (CPUs): CPUs are one or more dedicated computing devices (often in the form of a specially manufactured microprocessor chip) that contain all of the necessary instructional brains to control the hardware, voice data and sound-generating capabilities of the entire instrument or device.
■ Performance controllers: These include such interface devices as music keyboards, knobs, buttons, drum pads and/or wind controllers for inputting performance data directly into the electronic instrument in real time or for transforming a performance into MIDI messages. Not all instru ments have a built-in controller. These devices (commonly known as modules) contain all the necessary processing and sound-generating circuitry; however, the idea is to save space in a cramped studio by eliminating redundant keyboards or other controller surfaces.
■ Control panel: The control panel is the all-important human interface of data entry controls and display panels that let you select and edit sounds and route and mix output signals, as well as control the instrument’s basic operating functions.
■ Memory: Digital memory is used for storing important internal data (such as patch information, setup configurations and/or digital waveform data). This digital data can be encoded in the form of either read-only memory (ROM; data that can only be retrieved from a factory-encoded chip, cartridge, or CD/DVD-ROM) or random access memory (RAM; memory that can be read from and stored to a device’s resident memory, cartridge, hard disk or recordable media).
■ Voice circuitry: Depending on the device type, this section can chain together digital processing “blocks” to either generate sounds (voices) or process and reproduce digital samples that are recorded into memory for playback according to a specific set of parameters. In short, it’s used to generate or reproduce a sound patch, which can then be processed, amplified and heard via speakers or headphones.
■ Auxiliary controllers: These are external controlling devices that can be used in conjunction with an instrument or controller. Examples of these include foot pedals (providing continuous-controller data), breath controllers, and pitch-bend or modulation wheels. Some of these controllers are continuous in nature, while others exist as a switching function that can be turned on and off. Examples of the latter include sustain pedals and vibrato switches.
■ MIDI communications ports: These data ports and physical jacks are used to transmit and/or receive MIDI data.
Generally, no direct link is made between each of these functional blocks; the data from each of these components is routed and processed through the instrument’s CPU. For example, should you wish to select a certain sound patch from the instrument’s control panel, the control panel could be used to instruct the CPU to recall all of the waveform and sound-patch parameters from memory that are associated with the particular sound. These instructional parameters would then be used to modify the internal voice circuitry, so that when a key on the keyboard is pressed or a MIDI Note-On message is received, the sound generators will output the desired patch’s note and level values.
For the remainder of this section, we’ll be discussing the various types of MIDI instruments and controller devices that are currently available on the market. These instruments can be grouped into such categories as keyboards, percussion, MIDI guitars and controlling devices.
INSTRUMENT AND SYSTEMS PLUG-INS
Of course, one of the wonderful things about living in the digital age is that many (if not most) of our new toys aren’t hardware at all—they exist as software synths, samplers, effects, manglers and musical toys of all types, features and genres. These systems (which can exist as an instrument or effects plug-in) include all known types of synths, samplers and pitch- and sound-altering devices that are capable of communicating MIDI, audio, timing sync and control data between the software instrument/effect plug-in and a host DAW program.
Using an established plug-in communications protocol, it’s possible for most or all of the audio and timing data to be routed through the host audio application, allowing the instrument or application I/O, timing and control parameters to be seamlessly integrated into the DAW or application. A few of these protocols include VST, AU, MAS, AudioSuite, RTAS.
ReWire is another type of protocol that allows audio, performance and control data of an independent audio program to be wired into a host program (usually a DAW) such that the audio routing and sync timing of the slave program is locked to the host DAW, effectively allowing them to work in tandem as a single production environment. Further reading on plug-in protocols and virtual and plug-in instruments can be found in Chapter 7.
Keyboards
By far, the most common instruments that you’ll encounter in almost any MIDI production facility will probably belong to the keyboard family. This is due, in part, to the fact that keyboards were the first electronic music devices to gain wide acceptance; also, MIDI was initially developed to record and control many of their performance and control parameters. The two basic keyboard-based instruments are the synthesizer and the digital sampler.
THE SYNTH
A synthesizer (or synth) is an electronic instrument that uses multiple sound generators, filters and oscillator blocks to create complex waveforms that can be combined into countless sonic variations. These synthesized sounds have become a basic staple of modern music and range from those that sound “cheesy” to ones that realistically mimic traditional instruments—and all the way to those that generate otherworldly, ethereal sounds that literally defy classification.
Synthesizers generate sounds using a number of different technologies or program algorithms. Examples of these include:
■ FM synthesis: This technique generally makes use of at least two signal generators (commonly referred to as “operators”) to create and modify a voice. It often does this by generating a signal that modulates or changes the tonal and amplitude characteristics of a base carrier signal. More sophisticated FM synths use up to four or six operators per voice, each using filters and variable amplifier types to alter a signal’s characteristics.
■ Wavetable synthesis: This technique works by storing small segments of digitally sampled sound into memory media. Various sample-based and synthesis techniques make use of looping, mathematical interpolation, pitch shifting and digital filtering to create extended and richly textured sounds that use a surprisingly small amount of sample memory, allowing hundreds if not thousands of samples and sound variations to be stored in a single device or program.
■ Additive synthesis: This technique makes use of combined waveforms that are generated, mixed and varied in level over time to create new timbres that are composed of multiple and complex harmonics. Subtractive synthesis makes extensive use of filtering to alter and subtract overtones from a generated waveform (or series of waveforms).
Of course, synths come in all shapes and sizes and use a wide range of patented synthesis techniques for generating and shaping complex waveforms, in a polyphonic fashion using 16, 32 or even 64 simultaneous voices (Figures 9.28 and 9.29). In addition, many synths often include a percussion section that can play a full range of drum and “perc” sounds, in a number of styles. Reverb and other basic effects are also commonly built into the architecture of these devices, reducing the need for using extensive outboard effects when being played on-stage or out of the box. Speaking of “out of the box,” a number of synth systems are referred to as being “workstations.” Such beasties are designed (at least in theory) to handle many of your basic production needs (including basic sound generation, MIDI sequencing, effects, etc.) all in one neat little package.
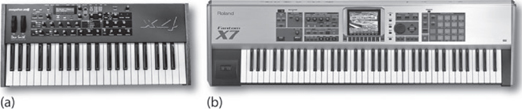
FIGURE 9.28
Hardware synths. (a) Mopho x4 4-voice analog synth. (Courtesy of Dave Smith Instruments, www.davesmithinstruments.com) (b) Fantom-X7 Workstation Keyboard. (Courtesy of Roland Corporation US, www.rolandus.com)
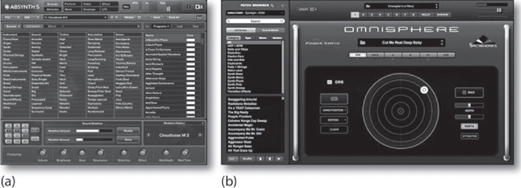
FIGURE 9.29
Software synthesizers. (a) Absynth 5. (Courtesy of Native Instruments GmbH, www.native-instruments.com) (b) Omnisphere. (Courtesy of Spectrasonics, www.spectrasonics.net)
Samplers
A sampler (Figures 9.30 and 9.31) is a device that can convert audio into a digital form that is then imported into, manipulated and output from internal random access memory (RAM).

FIGURE 9.30
Hardware samplers. (a) Akai MPC1000 Music Production Center. (Courtesy of Akai Professional, www.akaipro.com) (b) Fantom-XR sampler. (Courtesy of Roland Corporation US, www.rolandus.com)

FIGURE 9.31
Software samplers. (a) Kontact Virtual Sampler. (Courtesy of Native Instruments GmbH, www.native-instruments.com) (b) Ableton Simpler. (Courtesy of Ableton AG, www.ableton.com) (c) Reason’s NN-19 sample module. (Courtesy of Propellerhead Software, www.propellerheads.se)
Once audio has been sampled or loaded into RAM, segments of audio can then be edited, transposed, processed and played in a polyphonic, musical fashion. Additionally, signal processing capabilities, such as basic editing, looping, gain changing, reverse, sample-rate conversion, pitch change and digital mixing can also be easily applied to:
■ Edit and loop sounds into a usable form
■ Vary and modulate envelope parameters (e.g., dynamics over time)
■ Apply filtering to alter the shape and feel of the sound.
■ Vary processing and playback parameters
A sample can then be played back according to the standard Western musical scale (or any other scale, for that matter) by altering the reproduced sample rate over the controller’s note range. In simple terms, a sample can be imported into the device, where it can be mapped (assigned) to a range of keys (or just a single key) on the keyboard. When the root key is played, the sample will playback at its original pitch, however, when notes above or below that key are played, they will be transposed upwards or downwards in a musical fashion. By choosing the proper sample-rate ratios, these sounds can be polyphonically played (whereby multiple notes are sounded at once) at pitches that correspond to standard musical chords and intervals.
A sampler (or synth) with a specific number of voices (e.g., 64 voices) simply means that up to 64 notes can be simultaneously played on a keyboard at any one time. Each sample in a multiple-voice system can be assigned across a performance keyboard, using a process known as splitting or mapping. In this way, a sound can be assigned to play across the performance surface of a controller over a range of notes, known as a zone (Figure 9.32). In addition to grouping samples into various zones, velocity can enter into the equation by allowing multiple samples to be layered across the same keys of a controller, according to how soft or hard they are played. For example, a single key might be layered so that pressing the key lightly would reproduce a softly recorded sample, while pressing it harder would produce a louder sample with a sharp, percussive attack. In this way, mapping can be used to create a more realistic instrument or wild set of soundscapes that change not only with the played keys but with different velocities as well. Most samplers have extensive edit capabilities that allow the sounds to be modified in much the same way as a synthesizer, using such modifiers as:
■ Velocity
■ Panning
■ Expression (modulation and user control variations)
■ Low-frequency oscillation (LFO)
■ Attack, delay, sustain and release (ADSR) and other envelope processing parameters
■ Keyboard scaling
■ Aftertouch

FIGURE 9.32
Example of a sampler’s keyboard layout that has been programmed to include zones. Notice that the upper register has been split into several zones that are triggered by varying velocities.
Many sampling systems will often include such features as integrated signal processing, multiple outputs (offering isolated channel outputs for added live mixing and signal processing power or for recording individual voices to a multitrack recording system) and integrated MIDI sequencing capabilities.
SAMPLE LIBRARIES AND DIY SAMPLING
Just as patch data in the form of sys-ex dump files can have the effect of breathing new life into your synth, a wide range of free or commercially available samples are commonly available online or as a purchase package that lets you experiment with loading new and fresh sounds into your production system. These files can exist as unedited sound file data (which can be imported into any sample system or DAW track), or as data that has been specifically programmed by a professional musician/programmer to contain all the necessary loops, system commands and sound-generating parameters, so that all you ideally need to do is load the sample and start having fun.
The mind boggles at the range of styles and production quality that has gone into producing samples that are just ready and waiting to give your project a boost. The general production level literally runs the entire amateur-to-pro gamut—meaning that, whenever possible, it’s wise to listen to examples to determine their quality and to hear how they might fit into your own personal or project style before you buy. As a final caveat, by now, you’ve probably heard of the legal battles that have been raging over sampled passages that have been “ripped” from recordings of established artists. In the fall of 2004, in the case of Bridgeport Music et al. v. Dimension Films, the 6th Circuit U.S. Court of Appeals ruled that the digital sampling of a recording without a license is a violation of copyright, regardless of size or significance. This points to the need for tender loving care when lifting samples off a record, CD or the Web.
It goes without saying that a great deal of satisfaction and individual artistry can be gained by making your own samples. Lifting sounds from your own instruments, music projects or simply walking around the house and recording “things” with a handheld recorder can be super fun and interesting. Editing them and then importing them into a software sampler is far easier than it used to be with hardware samplers and playing the sounds of that Tibetan bell that you recorded in a cabin in the mountains of Austria can help make your music more personal. Get out, start recording and importing your own sounds and have fun!
The MIDI Keyboard Controller
As computers, sound modules, virtual software instruments and other types of digital devices have come onto the production scene, it’s been interesting to note that fewer and fewer instruments are being made that include a music keyboard in their design. As a result, the MIDI keyboard controller (Figures 9.33 and 9.34) has gained in popularity as a device that might include a:
■ Music keyboard surface
■ Variable parameter controls
■ Fader, mixing and transport controls
■ Switching controls
■ Trigger pads

FIGURE 9.33
MIDI keyboard controller. (Courtesy of M-Audio, a division of Avid Technology, Inc., www.m-audio.com).

FIGURE 9.34
MIDI keyboard controller. (Courtesy of Native Instruments GmbH, www.native-instruments.com)
As was stated, these devices contain no internal tone generators or sound-producing elements. Instead they can be used in the studio or on the road as a simple and straightforward surface for handling MIDI performance, control and device-switching events in real time.
As you might imagine, controllers vary widely in the number of features that are offered. For starters, the number of keys can vary from the sporty, portable 25-key models to those having 49 and 61 keys and all the way to the full 88-key models that can play the entire range of a full-size grand piano. The keys may be fully or partially weighted and in a number of models the keys might be much smaller than the full piano key size—often making a performance a bit difficult. Beyond the standard pitch and modulation wheels (or similar-type controller), the number of options and general features are up to the manufacturers. With the increased need for control over electronic instruments and music production systems, many model types offer up a wide range of physical controllers for varying an ever-widening range of expressive parameters.
One of the wonders of using MIDI to directly control any number of devices via MIDI control messages is that the overall communication between the host and the controller device is open to being easily configurable by the user. A controller message can easily be paired to a physical knob, button or other controller input type by a simple “learn” command. A few companies go a step further to make assignments between devices, plug-ins and software instruments that much easier to control and operate, by creating a unified system for automatically “mapping” a controller’s hardware directly to the software’s parameters in an easy to use, preprogrammed fashion.
A Word about Controllers
A MIDI controller is a device that’s expressly designed to control other devices (be they for sound, light or mechanical control) within a connected MIDI system. As was previously mentioned, these devices contain no internal tone generators or sound-producing elements but often include a high-quality control surface and a wide range of controls for handling control, trigger and device-switching events. Since controllers have become an integral part of music production and are available in many incarnations to control and emulate many types of musical instrument types, don’t be surprised to find controllers of various incarnations popping up all over this book for both recording and electronic music production applications.
One such system is AutoMap from Novation. This system allows a music or hardware controller to directly communicate with a wide range of effects and music-related plug-ins, allowing the controllers hardware surface to directly and automatically map to the selected plug-in (Figure 9.35a). Another evolving standard offered by Native Instruments is called the Native Kontrol Standard (NKS for short). NKS allows for direct control over a growing number of software instruments and plug-ins when working within Native Instrument’s Komplete 10 under the control of a Komplete Kontrol or Maschine hardware controller (Figure 9.35b).
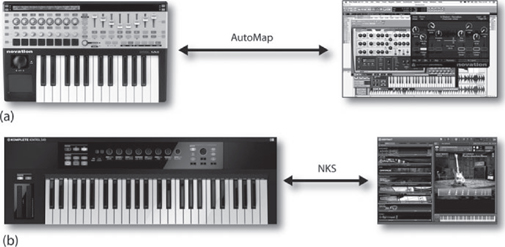
FIGURE 9.35
MIDI controller mapping to a software plug-in or instrument. (a) Novation’s Nocturn automatically maps its controls to various parameters on the target plug-in. (Courtesy of Novation Digital Music Systems, Ltd., www.novationmusic.com) (b) Native Instruments Komplete Kontrol maps its hardware controls to a growing range of instruments and plug-ins. (Courtesy of Native Instruments GmbH, www.native-instruments.com)
Percussion Instruments and Controllers
Historically speaking, one of the first applications of sample technology made use of digital audio to record and play back drum and percussion sounds. Out of this virtual miracle sprang a major class of sample and synthesis technology that lets an artist (mostly keyboard players) add drum and percussion to their own compositions with relative ease. Over the years, MIDI has brought sampled percussion within the grasp of every electronic musician, whatever skill level, from the frustrated drummer to professional percussionist/programmers—all of whom use their skills to perform live and/or to sequenced compositions.
THE DRUM MACHINE
In its most basic form, the drum machine uses ROM-based, prerecorded waveform samples to reproduce high-quality drum sounds from its internal memory. These factory-loaded sounds often include a wide assortment of drum sets, percussion sets and rare, wacky percussion hits, and effected drum sets (e.g., reverberated, gated). Who knows, you might even encounter scream hits by the venerable King of Soul, James Brown. These pre-recorded samples can be assigned to a series of playable keypads that are generally located on the machine’s top face, providing a straightforward controller surface that often sports velocity and aftertouch dynamics. Sampled voices can be assigned to each pad and edited using control parameters such as tuning, level, output assignment and panning position.
Because of new cost-effective technology, many drum machines (Figure 9.36) now include basic sampling technology, which allows sounds to be imported, edited and triggered directly from the box. As with the traditional “beat box,” these samples can be easily mapped and played from the traditionally styled surface trigger pads. Of course, virtual software drum and groove machines are part of the present-day landscape and can be used in a standalone, plug-in and rewired production environment.

FIGURE 9.36
Examples of drum machines. (a) Alesis SR-18 stereo drum machine. (Courtesy of Alesis, www.alesis.com) (b) Roland 7X7-TR-8 Rhythm Performer. (Courtesy of Roland Corporation US, www.rolandus.com)
MIDI DRUM CONTROLLERS
MIDI drum controllers are used to translate the voicing and expressiveness of a percussion performance into MIDI data. These devices are great for capturing the feel of a live performance, while giving you the flexibility of automating or sequencing a live event. These devices range from having larger pads and trigger points on a larger performance surface to drum-machine-type pads/buttons. Since the later type of controller pads are generally too small and not durable enough to withstand drumsticks or mallets, they’re generally played with the fingers. A few of the many ways to perform and sequence percussion include:
■ Drum machine button pads: One of the most straightforward of all drum controllers is the drum button pad design that’s built into most drum machines, portable percussion controllers (Figure 9.37), iOS devices and certain keyboard controllers. By calling up the desired setup and voice parameters, these small footprint triggers let you go about the business of using your fingers to do the walking through a performance or sequenced track.
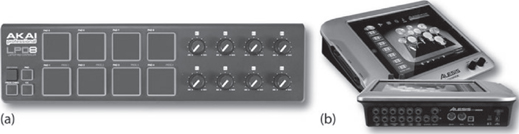
FIGURE 9.37
Portable drum controllers. (a) Akai LPD8 portable USB Drum Controller. (Courtesy Akai Professional, LP. www.akaipro.com) (b) Alesis DM Dock iPad based drum module. (Courtesy of Alesis, www.alesis.com)
■ The keyboard as a percussion controller: Since drum machines respond to external MIDI data, probably the most commonly used device for triggering percussion and drum voices is a standard MIDI keyboard controller. One advantage of playing percussion sounds from a keyboard is that sounds can be triggered more quickly because the playing surface is designed for fast finger movements and doesn’t require full hand/wrist motions. Another advantage is its ability to express velocity over the entire range of possible values (0–127), instead of the limited number of velocity steps that are available on certain drum pad models.
■ Drum pad controllers: In more advanced MIDI project studios or live stage rigs, it’s often necessary for a percussionist to have access to a playing surface that can be played like a real instrument. In these situations, a dedicated drum pad controller would be better for the job. Drum controllers vary widely in design. They can be built into a single, semi-portable case, often having between six and eight playing pads, or the trigger pads can be individual pads that can be fitted onto a special rack, traditional drum floor stand or drum set.
■ MIDI drums: Another way to MIDI-fy an acoustic drum is through the use of trigger technology. Put simply, triggering is carried out by using a transducer pickup (such as a mic or contract pickup) to change the acoustic energy of a percussion or drum instrument into an electrical voltage. Using a MIDI trigger device (Figure 9.38), a number of pickup inputs can be translated into MIDI so as to trigger programmed sounds or samples from an instrument for use on stage or in the studio.
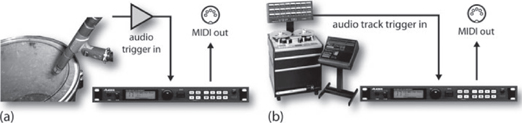
FIGURE 9.38
By using a MIDI trigger device, a pickup can be either directly replaced or sent via MIDI to another device or sequenced track (a) using a mic/instrument source, or (b) using a recorded track as a source.
DRUM REPLACEMENT
While we’re still on the subject of triggering MIDI sounds from acoustic sources such as drums, another option is the use of triggering software to detect and replace drum sounds from an already recorded DAW track (Figure 9.39). Using a software drum replacement software, it’s a relatively simple matter to replace a bad sounding kick, snare or whatever with one of the many sounds that you might have in your existing drum sample library. These trigger plug-ins can also be used to simply augment or fatten up an existing percussion track—the options and possibilities are huge.
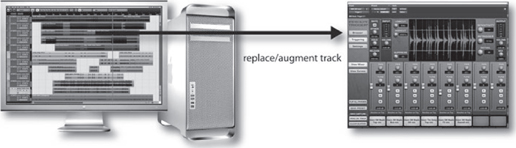
FIGURE 9.39
Steven Slate Drums Trigger 2 drum replacement plug-in. (Courtesy of Steven Slate Drums, www.stevenslatedrums.com)
Other MIDI Instrument and Controller Types
There are literally thousands of instruments and controller types out there that are capable of translating a performance or general body movements into MIDI. You’d be surprised what you’ll find searching the Web for wild and wacky controllers—both those that are commercially available and those that are made by soldering iron junkies. A few of the more traditional controllers include MIDI guitars and basses, wind controllers, MIDI vibraphones—the list goes on and on. It’ll be worth your while to search the web for something that might work best and be the most fun for you.
SEQUENCING
With regards to the modern-day project studio, one of the most important tools within MIDI production is the MIDI sequencer. A sequencer is a digital device or software application that’s used to record, edit and output MIDI messages in a sequential fashion. These messages are generally arranged in a track-based format that follows the modern production concept of having separate instruments (and/or instrument voices) located on separate tracks. This traditional track environment makes it easy for us humans to view MIDI data as isolated tracks, most commonly on our digital audio workstation (DAW).
These sequenced tracks contain MIDI-related performance and control events that are made up of such channel and system messages as Note-On, Note-Off, Velocity, Modulation, Aftertouch and Program/Continuous Controller messages. Once a performance has been recorded into a sequencer’s memory, these events can be graphically arranged and edited into a musical performance. The data can then be saved as a MIDI file or (most likely) within a DAW session and recalled at any time, allowing the data to be played back in its originally recorded or edited “sequential” order.
Integrated Hardware Sequencers
A type of keyboard synth and sampler system known as a keyboard workstation will often include much of the necessary production hardware that’s required for music production, including effects and an integrated hardware sequencer. These systems have the advantage of letting you take your instrument and sequencer on the road without having to drag your whole system along. Similar to the stand-alone hardware sequencer, a number of these sequencer systems have the disadvantage of offering few editing tools beyond transport functions, punch-in/out commands, and other basic edit functions. Newer, more powerful keyboard systems include a larger, integrated LCD display, and have extensive features that resemble their software sequencing counterparts. Other types of palm-sized sequencers offer such features as polyphonic synth voices, drum machine kits, effects, MIDI sequencing and, in certain cases, facilities for recording multitrack digital audio in an all-in-one package that fits in the palm of your hand!
Software Sequencers
By far, the most common sequencer type is the software sequencing section that exists within all major DAW programs (Figure 9.40). These tracks (which exist alongside audio tracks within a DAW) take advantage of the hardware and software versatility that only a computer can offer in the way of speed, hardware flexibility, memory management, signal routing and digital signal and MIDI processing. These sequence tracks offer a multitude of advantages over their hardware counterparts, such as:
■ Increased graphics capabilities (giving us direct control over track and transport-related record, playback, mix and processing functions)
■ Standard computer cut-and-paste edit capabilities
■ Ability to easily change note and controller values, one note at a time or over a defined range
■ A graphic user interface environment that allows easy manipulation of program, controller and edit-related data
■ Easy adjustment of performance timing and tempo changes within a session
■ Powerful MIDI routing to multiple ports within a connected system
■ Graphic assignment of instrument voices via Program Change messages
■ Ability to save and recall files using standard computer memory media

FIGURE 9.40
The MIDI edit window within a DAW. (a) Cubase audio production software. (Courtesy of Steinberg Media Technologies GmbH, a division of Yamaha Corporation, www.steinberg.net) (b) Protools. (Courtesy of Digidesign, a division of Avid Technology, www.digidesign.com)
BASIC INTRODUCTION TO SEQUENCING
When dealing with any type of sequencer, one of the most important concepts to grasp is that these devices don’t store sound directly; instead, they encode MIDI messages that instruct instruments as to what note is to be played, over what channel, at what velocity and at what, if any, optional controller values might be attributed to the messages. In other words, a sequencer simply stores command instructions that follow in a sequential order. This means that the amount of encoded data is a great deal less memory intensive than its digital audio or digital video media counterparts. Because of this, the data overhead that’s required by MIDI is very small, allowing a computer-based sequencer to work simultaneously with the playback of digital audio tracks, video images, Internet browsing, etc., all without unduly slowing down the computer’s CPU. For this reason, MIDI and the MIDI sequencer provide a media environment that plays well with other computer-based production media.
Recording
Commonly, a MIDI sequencer is an application within a DAW workspace for creating personal and commercial compositions in environments that range from the bedroom to more elaborate project and professional studios. As with audio tracks, these systems use a working interface that’s roughly designed to emulate a traditional multitrack-based environment. A tape-like set of transport controls lets us move from one location to the next using standard Play, Stop, Fast Forward, Rewind and Record command buttons. Beyond using the traditional Record-Enable button to select the track or tracks that we want to record onto, all we need to do is select the MIDI input (source) port, output (destination) port, MIDI channel (although most DAWs are also able to select all MIDI inputs as a source for ease of use), instrument/plug-in patch and other setup requirements. Then press the record button and begin laying down the track—it can be that easy.
Try This: Tutorial: Setting Up a Session and Laying Down a MIDI Track
1. Pull out a favorite MIDI instrument or call up a favorite plug-in instrument.
2. Route the instrument’s MIDI and audio cables (or plug-in routing) to your DAW.
3. Create a MIDI track that can be recorded to.
4. Set the session to a tempo that feels right for the song.
5. Assign the track’s MIDI input to the port that’s receiving the incoming MIDI data.
6. Assign the track’s MIDI output to the port and proper MIDI channel that’ll be receiving the outgoing MIDI data during playback.
7. If a click track is desired, turn it on (more about this later).
8. Name the track (always a good idea, as this will make it easier to identify the MIDI instrument/patch in the future).
9. Place the track into the Record Ready mode.
10. Play the instrument or controller. Can you hear the instrument? Do the MIDI activity indicators light up on the sequencer, track and MIDI interface? If not, check your cables and run through the checklist again. If so, press Record and start laying down your first track.
11. Once you’ve finished a track, you can jump back to the beginning of the recorded passage and listen to it. From this point, you could then “arm” (a term used to denote placing a track into the record-ready mode) the next track and go about the process of laying down additional tracks (possibly with a different instrument or sound patch) until a song begins to form.
SETTING A SESSION TEMPO
When beginning a MIDI session, one of the first aspects to consider is the tempo and time signature. The beats-per-minute (bpm) value will set the general tempo speed for the overall session. This is important to set at the beginning of the session, so as to lock the overall “bars and beats” timing elements to this initial speed that’s often essential in electronic and modern music production. This tempo/click element can then be used to lock the timing elements of other instruments and/or rhythm machines to the session (e.g., a drum machine plug-in can be pulled into the session that’ll automatically lock to the session’s speed and timing).
To avoid any number of unforeseen obstacles to a straightforward production, it’s often wise to set your session tempo (or at least think about these options) before pressing the record button.
As with most things MIDI, when working strictly in this environment, it’s extremely easy to change almost all aspects of your song (including the tempo) provided that you have initially worked to some form of an initial timing element (such as a base tempo). Although working without a set tempo can give a very human feel, it’s easy to see how this might be problematic when trying to get multiple MIDI tracks to work together in any form of musical sync and timing control. In truth, there are usually ways to pull corrective timing rabbits out of your technical hat, but the name of the game (as with most things recording) is forethought and preparation.
CHANGING TEMPO
The tempo of a MIDI production can often be easily changed without worrying about changing the program’s pitch or real-time control parameters. In short, once you know how to avoid potential conflicts and pitfalls, tempo variations can be made after the fact with relative ease. All you need to do is alter the tempo of a sequence (or part of a sequence) to best match the overall feel of the song. In addition, the tempo of a session can be dynamically changed over its duration by creating a tempo map that causes the speed to vary by defined amounts at specific points within a song. Care and preplanning should be exercised when a sequence is to be synced to another media form or device.
CLICK TRACK
When musical timing is important (as is often the case in modern music and visual media production), a click track can be used as a tempo guide for keeping the performance as accurately on the beat as possible. A click track can be set to make a distinctive sound on the measure boundary or (for a more accurate timing guide) on the first beat boundary and on subsequent meter divisions (e.g., tock, tick, tick, tick, tock, tick, tick, tick …). Most sequencers can output a click track by either using a dedicated beep sound (often outputting from the device or main speakers) or by sending Note-On messages to a connected instrument in the MIDI chain. The latter lets you use any sound you want and often at definable velocity levels. For example, a kick could sound on the beat, while a snare sounds out the measure divisions.
Care should be taken when setting the proper time signature at the session’s outset. Listening to a 4/4 click can be disconcerting when the song is being performed in 3/4 time.
The use of a click track is by no means a rule. A strong reason for using a click track (at least initially) is that it serves as a rhythmic guide that can improve the timing accuracy of a performance. However, in certain instances, it can lead to a performance that sounds stiff. For compositions that loosely flow and are legato in nature, a click track can stifle the passage’s overall feel and flow. As an alternative, you could turn the metronome down, have it sound only on the measure boundary, and then listen through one head phone. As with most creative decisions, the choice is up to you and your current circumstance.
MULTITRACK MIDI RECORDING
Although only one MIDI track is commonly recorded at a time, most mid- and professional-level sequencers let us record multiple tracks at one time. This feature makes it possible for multiple instruments and performers to be recorded to a multi-track sequence in one, live pass.
PUNCHING IN AND OUT
Almost all sequencing systems are capable of punching in and out of record while playing a sequence (Figure 9.41). This commonly used function lets you drop in and out of record on a selected track (or series of tracks) in real time, in a way that mimics the traditional multitrack overdubbing process. Although punch-in and punch-out points can often be manually performed on the fly from the transport or often from a convenient foot pedal, most sequencers can also automatically perform a punch by graphically or numerically entering in the measure/beat points that mark the in and out location points. Once done, the sequence can be rolled back to a point a few measures before the punch-in point and the artist can then play along while the sequencer automatically performs the necessary switching functions.

FIGURE 9.41
Automated punch-in and punch-out points. (Courtesy of Steinberg Media Technologies GmbH, a division of Yamaha Corporation, www.steinberg.net)
Try This: Punching During a Take
1. Create a MIDI track in your DAW and record a musical passage. Save/name the session.
2. Roll back to the beginning of the take and play along. Manually punch in and out during a few bars (simply by pressing the REC button). Now, undo or revert back to your originally saved session.
3. Read your DAW/sequencer manual and learn how to perform an automated punch (placing your punch-in and punch-out points at a logical place on the track).
4. Roll back to a point a few bars before the punch and go into the record mode. Did the track automatically place itself into record? Was that easier than doing it manually?
5. Feel free to try other features, such as record looping or stacking.
STEP TIME ENTRY
In addition to laying down a performance track in real time, most sequencers will allow us to enter note values into a sequence one note at a time. This feature (known as step time, step input or pattern sequencing) makes it possible for notes to be entered into a sequence without having to worry about the exact timing. Upon playback, the sequenced pattern will play back at the session’s original tempo. Fact is, step entry can be an amazing tool, allowing a difficult or a blazingly fast passage to be meticulously entered into a pattern and then be played out or looped with a degree of technical accuracy that would otherwise be impossible for most of us to play. Quite often, this data entry style is used with fast, high-tech musical styles where real-time entry just isn’t possible or accurate enough for the song.
DRUM PATTERN ENTRY
In addition to real-time and step-time entry, most sequencers will allow for drum and percussion notes to be entered into a drum pattern grid (Figure 9.42). This graphical environment is intuitive to most drummers and allows for patterns to be quickly and easily programmed and then linked together as a string of patterns that can form the backbone of a song’s beat.
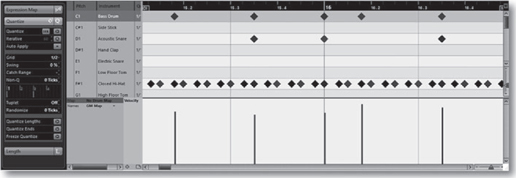
FIGURE 9.42
Drum pattern entry window in Cubase/Nuendo. (Courtesy of Steinberg Media Technologies GmbH, a division of Yamaha Corporation, www.steinberg.net)
For those who want to dive into a whole new world of experimentation and sonic surprises, here’s a possible guideline that can be used in a live recording session:: “If the instrument supports MIDI, record the performance data to a DAW MIDI track during each take.” For example:
■ You might record the MIDI out of a keyboard performance to a DAW MIDI track. If there’s a problem in the performance you can simply change the note (just after it was played or later), without having to redo the performance—or, if you want to change the sound, simply pick another sound.
■ Record the sequenced track from a triggered drum set or controller to a set of DAW MIDI tracks.
■ If a MIDI guitar riff needs some tweaking to fill out the sound, double the MIDI track with another sound patch or chord augmentation.
■ Acoustic drum recordings can benefit from MIDI by using a trigger device that can accept audio from a mic or recorded track and output the triggered MIDI messages to a sampler or instrument, in order to replace the bad tracks with samples that rock the house. Of course, don’t forget to record the trigger outputs to MIDI tracks on the DAW, just in case you want to edit or change the sounds at a later time.
■ Even if MIDI isn’t involved, a drum replacement plug-in could be used to replace bad sounds or to fill out a sound at a later time.
It’s all up to you—as you might imagine, surprises can definitely come from experiments like these.
MIDI to Audio
When mixing down a session that contains MIDI tracks, many folks prefer not to mix the sequenced tracks in the MIDI domain. Instead, they’ll often export (bounce) the hardware or plug-in instruments to an audio track within the project. Here are a few helpful hints that can make this process go more smoothly:
■ Set the main volume and velocities to a “reasonable” output level, much as you would with any recorded audio track.
■ Solo the MIDI and instrument’s audio input track and take a listen, making sure to turn off any reverb or other effects that might be on that instrument track. If you really like the instrument effect, of course, go ahead and record it; however, you might consider recording the track both with and without effects, as you might want to make changes in mixdown.
■ If any mix-related moves have been programmed into the sequence, you might want to strip out volume, pan and other controller messages before exporting the track. This is easily done by making a copy of the existing track and then stripping the controller values from the copy—an export can be taken from this track.
■ If the instrument has an acoustic element to it (such as a MIDI acoustic grand piano or MIDI guitar room/amp setup), you might also consider recording the instrument in the studio and mix these tracks in with the MIDI tracks This will often allow for a greater sense of acoustic “space” within the final mix.
It’s worth mentioning again that it is always wise to save the original MIDI track or file within the session. This makes future changes in the composition infinitely easier. Failure to save your MIDI files could limit your future options or result in major production headaches down the road.
Various DAWs will offer different options for capturing MIDI tracks as audio tracks within a session. As always, you might consider consulting your DAW’s manual for further details.
Audio to MIDI
Another tool that comes under the “You gotta try this!” category is the ability to take an audio file and extract relevant MIDI data from the track. The power in such an option is truly huge! For example, let’s say that we have a really killer bass loop audio file that has just the right vibe, but it lacks punch, is too noisy or sounds wrong. A number of DAWs actually have algorithms for detecting and extracting MIDI note values that will result in a MIDI loop or sequence that can be saved as a separate MIDI file. As with all things MIDI, this new loop can be routed to a synth, sampler or anything to change the sound in a way that’ll make it stand out. In short, you can now do “anything” with the sequence. You owe it to yourself to check it out!
There is one thing to keep in mind when extracting MIDI from an audio track or loop, however. Each DAW will usually use different detection algorithms for drum/percussion, complex melody patterns and sustained pads. You might experiment to find which will work best with your track, as different DAWs will often yield completely different results. Experimentation and experience is often the name of the game here. Lastly, the results might be close to the original (in pitch and rhythmic pattern), but it might require a bit of human editing. Once you get it right, the results can be truly fun to experiment with.
Saving Your MIDI Files
Just as it’s crucial that we carefully and methodically back up our program and production media, it’s important that we save our MIDI and session files while we’re in production. This can be done in two ways:
■ Periodically save your files over the course of a production.
■ At important points throughout a production, you might choose to save your session files under new and unique names (mysong001, mysong002, etc.), thereby making it possible to easily revert back to a specific point in the production. This can be an important recovery tool should the session take a wrong turn or for re-creating a specific effect and/or mix. Personally, I save these session versions under a “mysong_bak” sub-directory within the project session.
One other precaution will often save your butt: Always save your MIDI files within the session.
■ When working with MIDI within a DAW session, it’s always a good idea to save the original MIDI tracks within the session. This makes it easy to go back and change a note, musical key or sounding voice or to make any other alterations you want. Not saving these files could lead to some major headaches or worse.
■ Keeping your DAW’s MIDI files within a folder called “MIDI” will make it easier to identify and even hide (collapse) these tracks when they’re not needed.
MIDI files can also be converted to and saved as a standard MIDI file for use in exporting to and importing from another MIDI program or for distributing MIDI data for use on the Web, to cell phones, etc. These files can be saved in either of two formats:
■ Type 0: Saves all of the MIDI data within a session as a single MIDI track. The original MIDI channel numbers will be retained. The imported data will simply exist on a single track. Note that if you save a multi-instrument session as a Type 0, you’ll loose the ability to save the MIDI data to discrete tracks within the saved sequence.
■ Type 1: Saves all of the MIDI data within a session onto separate MIDI tracks that can be easily imported into a sequencer in a multitrack fashion.
Documentation
When it comes to MIDI sequencing, one of the things to definitely keep in mind is the need for documenting any and all information that relates to your MIDI tracks. It’s always a good idea to keep notes about:
■ What instrument/plug-in is being used on the track?
■ What is the name of the patch?
■ What are the settings that are being used (if these settings are not automatically saved within the session—and even if they are)? In such cases, you might want to make a screenshot of the plug-in settings, or if it’s a hardware device, get out your cell phone or camera and take a picture that can be placed in the documentation directory.
Placing these and any other relevant piece of information into the session (within the track notes window or in a separate doc file) can really come in handy when you have to revisit the file a year or so later and you’ve totally forgotten how to rebuild the track. Trust me on this one; you’ll eventually be glad you did.
Editing
One of the more important features that a sequencer (or MIDI track within a DAW) has to offer is its ability to edit sequenced tracks or blocks within a track. Of course, these editing functions and capabilities often vary from one DAW/sequencer to another. The main track window of a sequencer or MIDI track on a DAW is used to display such track information as the existence of track data, track names, MIDI port assignments for each track, program change assignments, volume controller values and other transport commands.
Depending on the sequencer, the existence of MIDI data on a particular track at a particular measure point (or over a range of measures) is indicated by the highlighting of track data in a way that’s extremely visible. For example, back in Figure 9.40, you’ll notice that the MIDI tracks contain graphical bar display information. This means that these measures contain MIDI messages, while the non-highlighted areas don’t.
By navigating around the various data display and parameter boxes, it’s possible to use cut-and-paste and/or edit techniques to vary note values and parameters for almost every facet of a musical composition. For example, let’s say that we really screwed up a few notes when laying down an otherwise killer bass riff. With MIDI, fixing the problem is totally a no-brainer. Simply highlight each fudged note and drag it (them) to the proper note location—we can even change the beginning and endpoints in the process. In addition, tons of other parameters can be changed, including velocity, modulation and pitch bend, note and song transposition, quantization and humanizing (factors that eliminate or introduce human timing errors that are generally present in a live performance), in addition to full control over program and continuous controller messages … the list goes on and on.
PRACTICAL EDITING TECHNIQUES
When it comes to learning the Ins, Outs and Thrus of basic sequencing, absolutely nothing can take the place of diving in and experimenting with your own setup. Here, I’d like to quote Craig Anderton, who said: “Read the manual through once when you get the program (or device), then play with the software and get to know it before you need it. Afterwards, reread the manual to pick up the system’s finer operating points.” Wise words—although I tend to take another route and simply start pressing buttons and icons until I learn what I need. I honestly think there’s something to be said for both approaches.
In this section, we’ll be covering some of the basic techniques that’ll help speed you on your way to sequencing your own music. Note that there are no rules to sequencing MIDI. As with all of music production (and the arts, for that matter), there are as many right ways to perform and play with making music via MIDI as there are musicians. Just remember that there are no hard and steadfast rules to music production—but there are always guidelines, tools and tips that can speed and improve the process.
Transposition
As was mentioned earlier, a sequencer app is capable of altering individual notes in a number of ways including pitch, start time, length and controller values. In addition, it’s generally a simple matter for a defined range of notes in a passage to be altered in ways that could alter the overall key, timing and controller processes. Changing the pitch of a note or the entire key of a song is extremely easy to do on a MIDI track. Depending on the system, a song can be transposed up or down in pitch at the global or defined measure level, thereby affecting the pitch or musical key of a song. Likewise, a segment can be shifted in pitch from the main edit, piano roll or notation edit windows by simply highlighting the bars and tracks that are to be changed and then dragging them or by calling up the transpose function from the MIDI edit menu.
Quantization
By far, most common timing errors begin with the performer. Fortunately, “to err is human,” and standard performance timing errors often give a piece a live and natural feel. However, for those situations when timing goes beyond the bounds of nature, an important sequencing feature known as quantization can help correct these timing errors. Quantization allows timing inaccuracies to be adjusted to the nearest desired musical time division (such as a quarter, eighth, or sixteenth note). For example, when performing a passage where all involved notes must fall exactly on the quarter-note beat, it’s often easy to make timing mistakes (even on a good day). Once the track has been recorded, the problematic passage can be highlighted and the sequencer can recalculate each note’s start and stop times so they fall precisely on the boundary of the closest time division.
Humanizing
The humanization process is used to randomly alter all of the notes in a selected segment according to such parameters as timing, velocity and note duration. The amount of randomization can often be limited to a user-specified value or percentage range, and parameters and can be individually selected or fine-tuned for greater control. Beyond the obvious advantages of reintroducing human-like timing variations back into a track, this process can help add expression by randomizing the velocity values of a track or selected tracks. For example, humanizing the velocity values of a percussion track that has a limited dynamic range can help bring it to life. The same type of life and human swing can be effective on almost any type of instrument.
Slipping in Time
Another timing variable that can be introduced into a sequence to help change the overall feel of a track is the slip time feature. Slip time is used to move a selected range of notes either forward or backward in time by a defined number of clock pulses. This has the obvious effect of changing the advance/retard times for these notes, relative to the other notes or timing elements in a sequence.
Editing Controller Values
Almost every DAW sequencer allows controller message values to be edited or changed often by using a simple, graphic window whereby a line or freeform curve can be drawn that graphically represents the effect that the controller messages will have on an instrument or voice. By using a mouse or other input device, it becomes a simple matter to draw a continuous stream of controller values that correspondingly change such variables as velocity, modulation, pan, etc. To physically change parameters using a controller, all you need to do is twiddle a knob, move a fader or graphically draw the variables on-screen in a WYSIWYG (“what you see is what you get”) fashion.
It almost goes without saying that a range of controller events can be altered on one or more tracks by allowing a range of MIDI events to be highlighted and then altered by entering in a parameter or processing function from an edit dialog box. This ability to define a range of events often comes in handy for making changes in pitch/key, velocity, main volume and modulation (to name a few).
Some of the more common controller values that can affect a sequence and/or MIDI mix values include (for the full listing of controller ID numbers, see Table 9.1 earlier in this chapter):
| Control # | Parameter | |
| 1 | Modulation Wheel | |
| 2 | Breath Controller | |
| 4 | Foot Controller | |
| 7 | Channel Volume (formerly Main Volume) | |
| 8 | Balance | |
| 10 | Pan | |
| 11 | Expression Controller | |
| 64 | Damper Pedal on/off (Sustain) <63 off, >64 on |
Try This: Tutorial: Changing Controller Values
1. Read your DAW/sequencer manual and learn its basic controller editing features.
2. Open a MIDI track or create a new one.
3. Highlight a segment and reduce the overall Channel Volume levels by 50%. On playback, did the levels reduce?
4. Now, refer to your DAW/sequencer manual for how to scale MIDI controller events over time.
5. Select a range of measures and change their Channel Volume settings (controller 7) over time. Does the output level change over the segment when you play it back?
7. Highlight the segment and scale the velocity values so they have a minimum value of 64 and a maximum of 96. Could you see and hear the changes?
9. Again, highlight the segment and draw or instruct the software to fade it from its current value to an ending value of 0. Hopefully, you’ve just created a Channel Volume fade. Did you see the MIDI channel fader move?
10. Undo the last fade and start a new one with an initial value of 0 and a current value of 100% toward the end of the section. Did the segment fade in?
11. Feel free to make up your own edit moves and experiment with the track(s).
Playback
Once a sequence is composed and saved within a session, all of the sequence tracks can be transmitted through the various MIDI ports and channels to the instruments or devices to make music, create sound effects for film tracks, control device parameters in real time, etc. Because MIDI data exists as encoded real-time control commands and not as audio, you can listen to the sequence and make changes at any time. You could change the patch voices, alter the final mix or change and experiment with such controllers as pitch bend or modulation—and as we’ve read, change the tempo and key signature. In short, this medium is infinitely flexible in the number of versions that can be created, saved, folded, spindled and mutilated until you’ve arrived at the overall sound and feel you want. Once done, you’ll have the option of using the medium for live performance or mixing the tracks down to a final recorded product, either in the studio or at home.
During the summer, in a wonderful small-town tavern in the city where I live, there’s a frequent performer who’ll wail the night away with his voice, trusty guitar and a backup band that consists of several electronic synth modules and a DAW that’s just chock-full of country-’n’-western sequences. His set of songs for the night is loaded into a song playlist that’s pre-programmed for that night. Using this, he queues his sequences so that when he’s finished one song, taken his bow, introduced the next song and complimented the lady in the red dress, all he needs to do is press the space bar and begin playing the next song. Such is the life of a hard workin’, on-the-road sequencer.
Mixing a Sequence
Almost all DAW and sequencer types will let you mix a sequence in the MIDI domain using various controller message types. This is usually done by simply integrating the world of MIDI into the DAW’s on-screen mixer. Instead of directly mixing the audio signals that make up a sequence, however, these controls are able to access such track controllers as Main Volume (controller 7), Pan (controller 10), and Balance (controller 8), in an environment that completely integrates into the workstation’s overall mix controls. Therefore, even with the most basic DAW, you’ll be able to mix and remix your sequences with complete automation and total settings recall whenever a new sequence is opened. As is almost always the case with a DAW’s audio and MIDI graphical user interface (GUI), the controller and mix interface will almost always have moving faders, controls and access to external hardware controllers (Figure 9.43).
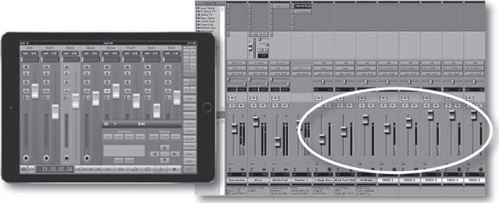
FIGURE 9.43
MIDI tracks are routinely added into the DAW mixer for real-time parameter control over hardware and/or software devices. (Courtesy of Avid Technology, Inc., www.avid.com and Neyrinck Audio, www.neyrinck.com)
Never forget that you can always export your MIDI track/instrument as an audio track for easy use and manipulation within a session. Always remember to save (and disable) your MIDI track within the session, just in case any changes need to be made later.
MUSIC PRINTING PROGRAMS
In recent times, the field of transcribing musical scores and arrangements has been strongly affected by both the computer and MIDI technology. This process has been greatly enhanced through the use of computer software that make it possible for music notation data to be entered into a computer either manually (by placing the notes onto the screen via keyboard or mouse movements) or by direct MIDI input or by sheet music scanning technology. Once entered, these notes can be edited in an on-screen environment that lets you change and configure a musical score or lead sheet using standard cut-and-paste editing techniques. In addition, most programs allow the score data to be played directly from the score by electronic instruments via MIDI. A final and important program feature is their ability to quickly print out hard copies of a score or lead sheets in a wide number of print formats and styles.
A music printing program (also known as a music notation program) lets you enter musical data into a computerized score in a number of manual and automated ways (often with varying degrees of complexity and ease). Programs of this type (Figure 9.44) offer a wide range of notation symbols and type styles that can be entered either from a computer keyboard or mouse. In addition to entering a score manually, most music transcription programs will accept MIDI input, allowing a part to be played directly into a score. This can be done in real time (by playing a MIDI instrument/controller or finished sequence directly into the program) or in step time (by entering the notes of a score one note at a time from a MIDI controller) or by entering a standard MIDI file into the program (which uses a sequenced file as the notation source).
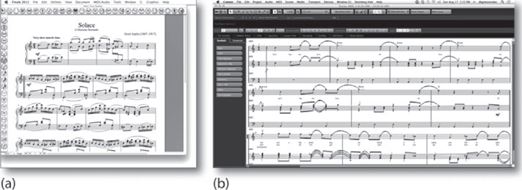
FIGURE 9.44
Music printing. (a) Finale music composition, arranging and printing program. (Courtesy of MakeMusic, Inc., www.finalemusic.com) (b) Steinberg Cubase/Nuendo score window. (Courtesy of Steinberg Media Technologies GmbH, a division of Yamaha Corporation, www.steinberg.net)
In addition to dedicated music printing programs, most DAW or sequencer packages will often include a basic music notation application that allows the sequenced data within a track or defined region to be displayed and edited directly within the program, from which it can be printed in a limited score-like fashion. However, a number of high-level workstations offer scoring features that allow sequenced track data to be notated and edited in a professional fashion into a fully printable music score.
As you might expect, music printing programs often vary widely in their capabilities, ease of use and offered features. These differences often center around the graphical user interface (GUI), methods for inputting and editing data, the number of instrumental parts that can be placed into a score, the overall selection of musical symbols, the number of musical staves (the lines that music notes are placed onto) that can be entered into a single page or overall score, the ability to enter text or lyrics into a score, etc. As with most programs that deal with artistic production, the range of choices and general functionality reflect the style and viewpoints of the manufacturer, so care should be taken when choosing a professional music notation program, to see which one would be right for your personal working style.