Chapter 9. Setting Up a Replica Set
This chapter introduces MongoDB’s replication system: replica sets. It covers:
What replica sets are
How to set up a replica set
What configuration options are available for replica set members
Introduction to Replication
Since the first chapter, we’ve been using a standalone server, a single mongod server. It’s an easy way to get started but a dangerous way to run in production: what if your server crashes or becomes unavailable? Your database will at least be unavailable for a little while. If there are problems with the hardware, you may have to move your data to another machine. In the worst case, disk or network issues could leave you with corrupt or inaccessible data.
Replication is a way of keeping identical copies of your data on multiple servers and is recommended for all production deployments. Replication keeps your application running and your data safe, even if something happens to one or more of your servers.
With MongoDB, you set up replication by creating a replica set. A replica set is a group of servers with one primary, the server taking client requests, and multiple secondaries, servers that keep copies of the primary’s data. If the primary crashes, the secondaries can elect a new primary from amongst themselves.
If you are using replication and a server goes down, you can still access your data from the other servers in the set. If the data on a server is damaged or inaccessible, you can make a new copy of the data from one the other members of the set.
This chapter introduces replica sets and covers how to set up replication on your system.
A One-Minute Test Setup
This section will get you started quickly by setting up a three-member replica set on your local machine. This setup is obviously not suitable for production, but it’s a nice way to familiarize yourself with replication and play around with configuration.
Note
This quick-start method stores data in /data/db, so make sure that directory exists and is writable by your user before running this code.
Start up a mongo shell with the --nodb option,
which allows you to start a shell that is not connected to any mongod:
$mongo--nodb
Create a replica set by running the following command:
>replicaSet=newReplSetTest({"nodes":3})
This tells the shell to create a new replica set with three servers: one primary and two secondaries. However, it doesn’t actually start the mongod servers until you run the following two commands:
>// starts three mongod processes>replicaSet.startSet()>>// configures replication>replicaSet.initiate()
You should now have three mongod processes running locally on ports 31000, 31001, and 31002. They will all be dumping their logs into the current shell, which is very noisy, so put this shell aside and open up a new one.
In the second shell, connect to the mongod running on port 31000:
>conn1=newMongo("localhost:31000")connectiontolocalhost:31000testReplSet:PRIMARY>testReplSet:PRIMARY>primaryDB=conn1.getDB("test")test
Notice that, when you connect to a replica set member, the prompt
changes to testReplSet:PRIMARY>.
"PRIMARY" is the state of the member and
"testReplSet" is an identifier for this set. You’ll
learn how to choose your own identifier later;
testReplSet is the default name
ReplSetTest uses.
Examples from now on will just use > for the prompt
instead of testReplSet:PRIMARY> to keep things more
readable.
Use your connection to the primary to run the isMaster command. This will show you the status of the set:
>primaryDB.isMaster(){"setName":"testReplSet","ismaster":true,"secondary":false,"hosts":["wooster:31000","wooster:31002","wooster:31001"],"primary":"wooster:31000","me":"wooster:31000","maxBsonObjectSize":16777216,"localTime":ISODate("2012-09-28T15:48:11.025Z"),"ok":1}
There are a bunch of fields in the output from isMaster, but the important ones indicate that
you can see that this node is primary (the "ismaster" : true
field) and that there is a list of hosts in the set.
Note
If this server says "ismaster" : false, that’s fine.
Look at the "primary" field to see which node is
primary and then repeat the connection steps above for that
host/port.
Now that you’re connected to the primary, let’s try doing some writes and see what happens. First, insert 1,000 documents:
>for(i=0;i<1000;i++){primaryDB.coll.insert({count:i})}>>// make sure the docs are there>primaryDB.coll.count()1000
Now check one of the secondaries and verify that they have a copy of all of these documents. Connect to either of the secondaries:
>conn2=newMongo("localhost:31001")connectiontolocalhost:31001>secondaryDB=conn2.getDB("test")test
Secondaries may fall behind the primary (or lag) and not have the most current writes, so secondaries will refuse read requests by default to prevent applications from accidentally reading stale data. Thus, if you attempt to query a secondary, you’ll get an error that it’s not primary:
>secondaryDB.coll.find()error:{"$err":"not master and slaveok=false","code":13435}
This is to protect your application from accidentally connecting to a secondary and reading stale data. To allow queries on the secondary, we set an “I’m okay with reading from secondaries” flag, like so:
>conn2.setSlaveOk()
Note that slaveOk is set on the
connection (conn2), not the database (secondaryDB).
Now you’re all set to read from this member. Query it normally:
>secondaryDB.coll.find(){"_id":ObjectId("5037cac65f3257931833902b"),"count":0}{"_id":ObjectId("5037cac65f3257931833902c"),"count":1}{"_id":ObjectId("5037cac65f3257931833902d"),"count":2}...{"_id":ObjectId("5037cac65f3257931833903c"),"count":17}{"_id":ObjectId("5037cac65f3257931833903d"),"count":18}{"_id":ObjectId("5037cac65f3257931833903e"),"count":19}Type"it"formore>>secondaryDB.coll.count()1000
You can see that all of our documents are there.
Now, try to write to a secondary:
>secondaryDB.coll.insert({"count":1001})>secondaryDB.runCommand({"getLastError":1}){"err":"not master","code":10058,"n":0,"lastOp":Timestamp(0,0),"connectionId":5,"ok":1}
You can see that the secondary does not accept the write. The secondary will only perform writes that it gets through replication, not from clients.
There is one other interesting feature that you should try out: automatic failover. If the primary goes down, one of the secondaries will automatically be elected primary. To try this out, stop the primary:
>primaryDB.adminCommand({"shutdown":1})
Run isMaster on the secondary
to see who has become the new primary:
>secondaryDB.isMaster()
It should look something like this:
{"setName":"testReplSet","ismaster":true,"secondary":false,"hosts":["wooster:31001","wooster:31000","wooster:31002"],"primary":"wooster:31001","me":"wooster:31001","maxBsonObjectSize":16777216,"localTime":ISODate("2012-09-28T16:52:07.975Z"),"ok":1}
Your primary may be the other server; whichever secondary noticed that the primary was down first will be elected. Now you can send writes to the new primary.
isMaster is a very old command, predating replica sets to when MongoDB only supported master-slave replication. Thus, it does not use the replica set terminology consistently: it still calls the primary a “master.” You can generally think of “master” as equivalent to “primary” and “slave” as equivalent to “secondary.”
When you’re done working with the set, shut down the servers from your first shell. This shell will be full of log output from the members of the set, so hit Enter a few times to get back to a prompt. To shutdown the set, run:
>replicaSet.stopSet()
Congratulations! You just set up, used, and tore down replication.
There are a few key concepts to remember:
Clients can send a primary all the same operations they could send a standalone server (reads, writes, commands, index builds, etc.).
Clients cannot write to secondaries.
Clients, by default, cannot read from secondaries. By explicitly setting an “I know I’m reading from a secondary” setting, clients can read from secondaries.
Now that you understand the basics, the rest of this chapter focuses
on configuring a replica set under more realistic circumstances. Remember
that you can always go back to ReplSetTest if you
want to quickly try out a configuration or option.
Configuring a Replica Set
For actual deployments, you’ll need to set up replication across multiple machines. This section takes you through setting up a real replica set that could be used by your application.
Let’s say that you already have a standalone mongod on server-1:27017 with some data on it. (If you do not have any pre-existing data, this will work the same way, just with an empty data directory.) The first thing you need to do is choose a name for your set. Any string whatsoever will do, so long as it’s UTF-8.
Once you have a name for your replica set, restart server-1 with the --replSet
option. For example:name
$ mongod --replSet spock -f mongod.conf --forkNow start up two more mongod
servers with the replSet option and the same identifier
(spock): these will be the other
members of the set:
$ssh server-2 server-2$mongod --replSet spock -f mongod.conf --fork server-2$exit$$ssh server-3 server-3$mongod --replSet spock -f mongod.conf --fork server-3$exit
Each of the other members should have an empty data directory, even if the first member had data. They will automatically clone the first member’s data to their machines once they have been added to the set.
For each member, add the replSet option to its
mongod.conf file so that it will be
used on startup from now on.
Once you’ve started the mongods, you should have three mongods running on three separate servers. However, each mongod does not yet know that the others exist. To tell them about one another, you have to create a configuration that lists each of the members and send this configuration to server-1. It will take care of propagating it to the other members.
First we’ll create the configuration. In the shell, create a document that looks like this:
>config={"_id":"spock","members":[{"_id":0,"host":"server-1:27017"},{"_id":1,"host":"server-2:27017"},{"_id":2,"host":"server-3:27017"}]}
There are several important parts of config. The config’s
"_id" is the name of the set that you passed in on the
command line (in this example, "spock"). Make sure that
this name matches exactly.
The next part of the document is an array of members of the set.
Each of these needs two fields: a unique "_id" that is
an integer and a hostname (replace the hostnames with whatever your
servers are called).
This config object is your replica set
configuration, so now you have to send it to a member of the set. To do
so, connect to the server with data on it (server-1:27017) and initiate the set with this
configuration:
>// connect to server-1>db=(newMongo("server-1:27017")).getDB("test")>>// initiate replica set>rs.initiate(config){"info":"Config now saved locally. Should come online in about a minute.","ok":1}
server-1 will parse the configuration and send messages to the other members, alerting them of the new configuration. Once they have all loaded the configuration, they will elect a primary and start handling reads and writes.
Note
Unfortunately, you cannot convert a standalone server to a replica set without some downtime for restarting it and initializing the set. Thus, even if you only have one server to start out with, you may want to configure it as a one-member replica set. That way, if you want to add more members later, you can do so without downtime.
If you are starting a brand-new set, you can send the configuration to any member in the set. If you are starting with data on one of the members, you must send the configuration to the member with data. You cannot initiate a set with data on more than one member.
Note
You must use the mongo shell to configure replica sets. There is no way to do file-based replica set configuration.
rs Helper Functions
Note the rs in the rs.initiate() command above.
rs is a global variable that contains replication
helper functions (run rs.help() to see the helpers it
exposes). These functions are
almost always just wrappers around database commands. For example, the
following database command is equivalent to
rs.initiate(config):
>db.adminCommand({"replSetInitiate":config})
It is good to have a passing familiarity with both the helpers and the underlying commands, as it may sometimes be easier to use the command form instead of the helper.
Networking Considerations
Every member of a set must be able to make connections to every other member of the set (including itself). If you get errors about members not being able to reach other members that you know are running, you may have to change your network configuration to allow connections between them.
Also, replica sets configurations shouldn’t use localhost as a hostname. There isn’t much point to running a replica set on one machine and localhost won’t resolve correctly from a foreign machine. MongoDB allows all-localhost replica sets for testing locally but will protest if you try to mix localhost and non-localhost servers in a config.
Changing Your Replica Set Configuration
Replica set configurations can be changed at any time: members can
be added, removed, or modified. There are shell helpers for some common
operations; for example, to add a new member to the set, you can use
rs.add:
>rs.add("server-4:27017")
Similarly, you can remove members;
>rs.remove("server-1:27017")FriSep2816:44:46DBClientCursor::initcall()failedFriSep2816:44:46queryfailed:admin.$cmd{replSetReconfig:{_id:"testReplSet",version:2,members:[{_id:0,host:"ubuntu:31000"},{_id:2,host:"ubuntu:31002"}]}}to:localhost:31000FriSep2816:44:46Error:errordoingquery:failedsrc/mongo/shell/collection.js:155FriSep2816:44:46tryingreconnecttolocalhost:31000FriSep2816:44:46reconnectlocalhost:31000ok
Note that when you remove a member (or do almost any configuration change other than adding a member), you will get a big, ugly error about not being able to connect to the database in the shell. This is okay; it actually means the reconfiguration succeeded! When you reconfigure a set, the primary closes all connections as the last step in the reconfiguration process. Thus, the shell will briefly be disconnected but will automatically reconnect on your next operation.
The reason that the primary closes all connections is that it briefly steps down whenever you reconfigure the set. It should step up again immediately, but be aware that your set will not have a primary for a moment or two after reconfiguring.
You can check that a reconfiguration succeeded by run rs.config() in the shell. It will print the
current configuration:
>rs.config(){"_id":"testReplSet","version":2,"members":[{"_id":1,"host":"server-2:27017"},{"_id":2,"host":"server-3:27017"},{"_id":3,"host":"server-4:27017"}]}
Each time you change the configuration, the
"version" field will increase. It starts at version
1.
You can also modify existing members, not just add and remove them.
To make modifications, create the configuration document that you want in
the shell and call rs.reconfig. For
example, suppose we have a configuration such as the one shown
here:
>rs.config(){"_id":"testReplSet","version":2,"members":[{"_id":0,"host":"server-1:27017"},{"_id":1,"host":"10.1.1.123:27017"},{"_id":2,"host":"server-3:27017"}]}
Someone accidentally added member 1 by IP, instead of its hostname. To change that, first we load the current configuration in the shell and then we change the relevant fields:
>varconfig=rs.config()>config.members[1].host="server-2:27017"
Now that the config document is correct, we need to send it to the
database using the rs.reconfig
helper:
>rs.reconfig(config)
rs.reconfig is often more
useful that rs.add and rs.remove for complex operations, such as
modifying members’ configuration or adding/removing multiple members at
once. You can use it to make any legal configuration change you need:
simply create the config document that represents your desired
configuration and pass it to rs.reconfig.
How to Design a Set
To plan out your set, there are certain replica set concepts that you must be familiar with. The next chapter goes into more detail about these, but the most important is that replica sets are all about majorities: you need a majority of members to elect a primary, a primary can only stay primary so long as it can reach a majority, and a write is safe when it’s been replicated to a majority. This majority is defined to be “more than half of all members in the set,” as shown in Table 9-1.
Note that it doesn’t matter how many members are down or unavailable, as majority is based on the set’s configuration.
For example, suppose that we have a five-member set and three members go down, as shown in Figure 9-1. There are still two members up. These two members cannot reach a majority of the set (at least three members), so they cannot elect a primary. If one of them were primary, it would step down as soon as it noticed that it could not reach a majority. After a few seconds, your set would consist of two secondaries and three unreachable members.

Many users find this frustrating: why can’t the two remaining members elect a primary? The problem is that it’s possible that the other three members didn’t go down, and that it was the network that went down, as shown in Figure 9-2. In this case, the three members on the left will elect a primary, since they can reach a majority of the set (three members out of five).
In the case of a network partition, we do not want both sides of the partition to elect a primary: otherwise the set would have two primaries. Then both primaries would be writing to the data and the data sets would diverge. Requiring a majority to elect or stay primary is a neat way of avoiding ending up with more than one primary.
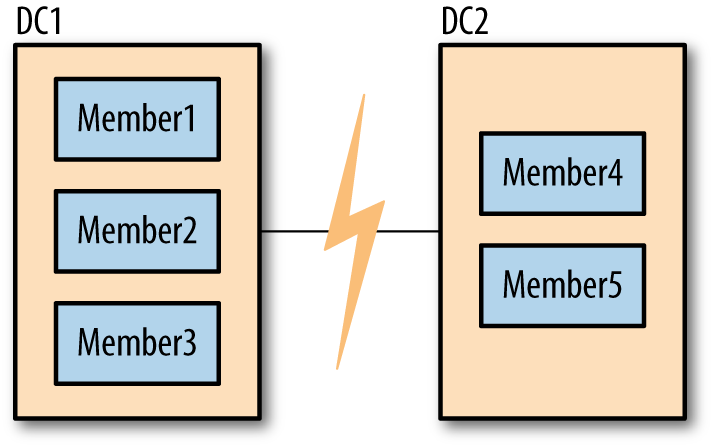
It is important to configure your set in such a way that you’ll usually be able to have one primary. For example, in the five-member set described above, if members 1, 2, and 3 are in one data center and members 4 and 5 are in another, there should almost always be a majority available in the first data center (it’s more likely to have a network break between data centers than within them).
One common setup that usually isn’t what you want is a two member set: one primary and one secondary. Suppose one member becomes unavailable: the other member cannot see it, as shown in Figure 9-3. In this situation, neither side of the network partition has a majority so you’ll end up with two secondaries. For this reason, this type of configuration is not generally recommended.

There are a couple of configurations that are recommended:
A majority of the set in one data center, as in Figure 9-2. This is a good design if you have a primary data center where you always want your replica set’s primary to be located. So long as your primary data center is healthy, you will have a primary. However, if that data center becomes unavailable, your secondary data center will not be able to elect a new primary.
An equal number of servers in each data center, plus a tie-breaking server in a third location. This is a good design if your data centers are “equal” in preference, since generally servers from either data center will be able to see a majority of the set. However, it involves having three separate locations for servers.
More complex requirements might require different configurations, but you should keep in mind how your set will acquire a majority under adverse conditions.
All of these complexities would disappear if MongoDB supported having more than one primary. However, multimaster would bring its own host of complexities. With two primaries, you would have to handle conflicting writes (for example, someone updates a document on one primary and someone deletes it on another primary). There are two popular ways of handling conflicts in systems that support multiple writers: manual reconciliation or having the system arbitrarily pick a “winner.” Neither of these options is a very easy model for developers to code against, seeing that you can’t be sure that the data you’ve written won’t change out from under you. Thus, MongoDB chose to only support having a single primary. This makes development easier but can result in periods when the replica set is read-only.
How Elections Work
When a secondary cannot reach a primary, it will contact all the other members and request that it be elected primary. These other members do several sanity checks: Can they reach a primary that the member seeking election cannot? Is the member seeking election up to date with replication? Is there anyone with a higher priority available who should be elected instead?
If a member seeking election receives “ayes” from a majority of the set, it becomes primary. If even one server vetoes the election, the election is canceled. A member vetoes an election when it knows any reason that the member seeking election shouldn’t become primary.
You may see a very large negative number in the logs, since a veto is registered as 10,000 votes. Often you’ll see messages about election results being 9,999 or similar if one member voted for a member and another member vetoed the election:
Wed Jun 20 17:44:02 [rsMgr] replSet info electSelf 1
Wed Jun 20 17:44:02 [rsMgr] replSet couldn't elect self, only received -9999 votes
If two members vetoed and one voted for, the election results would be 19,999, and so on. These messages are normal and nothing to worry about.
The member seeking election (the candidate) must be up to date with replication, as far as the members it can reach know. All replicated operations are strictly ordered by ascending timestamp, so the candidate must have operations later than or equal to any member it can reach.
For example, suppose that the latest operation that the candidate has replicated is op 123. It contacts the other members of the set and one of them has replicated up to operation 124. That member will veto the candidate’s election. The candidate will continue syncing and once it has synced operation 124, it will call for an election again (if no one else has become primary in that time). This time around, assuming nothing else is wrong with candidate, the member that previously vetoed the election will vote for the candidate.
Assuming that the candidate receives “ayes” from a majority of voters, it will transition into primary state.
A common point of confusion is that members always seek election for themselves. For simplicity’s sake, neighbors cannot “nominate” another server to be primary, they can only vote for it if it is seeking election.
Member Configuration Options
The replica sets we have set up so far have been fairly uniform in that every member has the same configuration as every other member. However, there are many situations when you don’t want members to be identical: you might want one member to preferentially be primary or make a member invisible to clients so that no read requests can be routed to it. These and many other configuration options can be specified in the member subdocuments of the replica set configuration. This section outlines the member options that you can set.
Creating Election Arbiters
The example above shows the disadvantages two-member sets have for majority requirements. However, many people with small deployments do not want to keep three copies of their data, feeling that two is enough and keeping a third copy is not worth the administrative, operational, and financial costs.
For these deployments, MongoDB supports a special type of member called an arbiter, whose only purpose is to participate in elections. Arbiters hold no data and aren’t used by clients: they just provide a majority for two-member sets.
As arbiters don’t have any of the traditional responsibilities of a mongod server, you can run an arbiter as a lightweight process on a wimpier server than you’d generally use for MongoDB. It’s often a good idea, if possible, to run an arbiter in a separate failure domain from the other members, so that it has an “outside perspective” on the set, as described in the recommended deployments listed in How to Design a Set.
You start up an arbiter in the same way that you start a normal
mongod, using the --replSet
name option and an empty data directory. You can add it to the
set using the rs.addArb()
helper:
>rs.addArb("server-5:27017")
Equivalently, you can specify the arbiterOnly
option in the member configuration:
>rs.add({"_id":4,"host":"server-5:27017","arbiterOnly":true})
An arbiter, once added to the set, is an arbiter forever: you cannot reconfigure an arbiter to become a nonarbiter, or vice versa.
One other thing that arbiters are good for is breaking ties in larger clusters. If you have an even number of nodes, you may have half the nodes vote for one member and half for another. Adding an arbiter can add a deciding vote.
Use at most one arbiter
Note that, in both of the use cases above, you need at most one arbiter. You do not need an arbiter if you have an odd number of nodes. A common misconception seems to be that you should add extra arbiters “just in case.” However, it doesn’t help elections go any faster or provide any data safety to add extra arbiters.
Suppose you have a three members set. Two members are required to elect a primary. If you add an arbiter, you’ll have a four member set, so three members will be required to choose a primary. Thus, your set is potentially less stable: instead of requiring 67% of your set to be up, you’re now requiring 75%.
Having extra members can also make elections take longer. If you have an even number of nodes because you added an arbiter, your arbiters can cause ties, not prevent them.
The downside to using an arbiter
If you have a choice between a data node and an arbiter, choose a data node. Using an arbiter instead of a data node in a small set can make some operational tasks more difficult. For example, suppose you are running a replica set with two “normal” members and one arbiter, and one of the data-holding members goes down. If that member is well and truly dead (the data is unrecoverable), you will have to get a copy of the data from the current primary to the new server you’ll be using as a secondary. Copying data can put a lot of stress on a server and, thus, slow down your application. (Generally, copying a few gigabytes to a new server is trivial but more than a hundred starts becoming impractical.)
Conversely, if you have three data-holding members, there’s more “breathing room” if a server completely dies. You can use the remaining secondary to bootstrap a new server instead of depending on your primary.
In the two-member-plus-arbiter scenario, the primary is the last remaining good copy of your data and the one trying to handle load from your application while you’re trying to get another copy of your data online.
Thus, if possible, use an odd number of “normal” members instead of an arbiter.
Priority
Priority is how strongly this member “wants” to become primary. Priority can range from 0 to 100 and the default is 1. Setting priority to 0 has a special meaning: members with 0 priority can never become primary. These members are called passive members.
The highest-priority member will always be elected primary (so long as they can reach a majority of the set and have the most up-to-date data). For example, suppose you add a member with priority of 1.5 to the set, like so:
>rs.add({"_id":4,"host":"server-4:27017","priority":1.5})
Assuming the other members of the set have priority 1, once server-4 caught up with the rest of the set, the current primary would automatically step down and server-4 would elect itself. If server-4 was, for some reason, unable to catch up, the current primary would stay primary. Setting priorities will never cause your set to go primary-less. It will also never cause a member who is behind to become primary (until it has caught up).
One interesting wrinkle with priority is that reconfigurations must always be sent to a member that could be primary with the new configuration. Therefore, you cannot set the current primary’s priority to 0 with a single reconfig (and you cannot configure a set where all of the priorities are 0).
The absolute value of a priority only matters in relation to whether it is greater or less than the other priorities in the set: members with priorities of 500, 1, and 1 will behave the same way as another set with priorities 2, 1, and 1.
Hidden
Clients do not route requests to hidden members and hidden members are not preferred as replication sources (although they will be used if more desirable sources are not available). Thus, many people will hide less powerful or backup servers.
For example, suppose you had a set that looked like this:
>rs.isMaster(){..."hosts":["server-1:27107","server-2:27017","server-3:27017"],...}
To hide server-3, add the
hidden: true field to its configuration. A member must
have a priority of 0 to be hidden (you can’t have a hidden
primary):
>varconfig=rs.config()>config.members[2].hidden=00>config.members[2].priority=00>rs.reconfig(config)
Now running isMaster() will
show:
>rs.isMaster(){..."hosts":["server-1:27107","server-2:27017"],...}
rs.status() and rs.config() will still show the member; it
only disappears from isMaster().
When clients connect to a replica set, they call isMaster() to determine the members of the
set. Thus, hidden members will never be used for read
requests.
To unhide a member, change the hidden option to
false or remove the option entirely.
Slave Delay
It’s always possible for your data to be nuked by human error: someone might accidentally drop your main database or a newly deployed version of your application might have a bug that replaces all of your data with garbage. To defend against that type of problem, you can set up a delayed secondary using the slaveDelay setting.
A delayed secondary purposely lags by the specified number of seconds. This way, if someone fat-fingers away your main collection, you can restore it from an identical copy of the data from earlier. This is covered in Restoring from a Delayed Secondary.
slaveDelay requires the member’s priority to be
0. If your application is routing reads to secondaries, you should make
slave delayed members hidden so that reads are not routed to
them.
Building Indexes
Sometimes a secondary does not need to have the same (or any)
indexes that exist on the primary. If you are using a secondary only for
backup data or offline batch jobs, you might want to specify
"buildIndexes" : false in the member’s configuration.
This option prevents the secondary from building any indexes.
This is a permanent setting: members that have
"buildIndexes" : false specified can never be
reconfigured to be “normal” index-building members again. If you want to
change a non-index-building member to an index-building one, you must
remove it from the set, delete all of its data, re-add it to the set,
and allow it to resync from scratch.