Chapter 14. Configuring Sharding
In the previous chapter, you set up a “cluster” on one machine. This chapter covers how to set up a more realistic cluster and how each piece fits, in particular:
How to set up config servers, shards, and mongos processes
How to add capacity to a cluster
How data is stored and distributed
When to Shard
Deciding when to shard is a balancing act. You generally do not want to shard too early because it adds operational complexity to your deployment and forces you to make design decisions that are difficult to change later. On the other hand, you do not want to wait too long to shard because it is difficult to shard an overloaded system without downtime.
In general, sharding is used to:
Increase available RAM
Increase available disk space
Reduce load on a server
Read or write data with greater throughput than a single
mongodcan handle
Thus, good monitoring is important to decide when sharding will be necessary. Carefully measure each of these metrics. Generally people speed toward one of these bottlenecks much faster than the others, so figure out which one your deployment will need to provision for first and make plans well in advance about when and how you plan to convert your replica set.
As you add shards, performance should increase roughly linearly per shard up to hundreds of shards. However, you will usually experience a performance drop if you move from a non-sharded system to just a few shards. Due to the overhead of moving data, maintaining metadata, and routing, small numbers of shards will generally have higher latency and may even have lower throughput than a non-sharded system. Thus, you may want to jump directly to three or more shards.
Starting the Servers
The first step in creating a cluster is to start up all of the processes required. As mentioned in the previous chapter, we need to set up the mongos and the shards. There’s also a third component, the config servers, which are an important piece. They are normal mongod servers that store the cluster configuration: who the shards are, what collections are sharded by, and the chunks.
Config Servers
Config servers are the brains of your cluster: they hold all of the metadata about which servers hold what data. Thus, they must be set up first and the data they hold is extremely important: make sure that they are running with journaling enabled and that their data is stored on non-ephemeral drives. Each config server should be on a separate physical machine, preferable geographically distributed.
The config servers must be started before any of the mongos processes, as mongos pulls its configuration from them. Config servers are standalone mongod processes, so you can start them up the same way you would a “normal” mongod:
$#server-config-1$mongod--configsvr--dbpath/var/lib/mongodb -f /var/lib/config/mongod.conf$$#server-config-2$mongod--configsvr--dbpath/var/lib/mongodb -f /var/lib/config/mongod.conf$$#server-config-3$mongod--configsvr--dbpath/var/lib/mongodb -f /var/lib/config/mongod.conf
When you start up config servers, do not use
the --replSet option: config servers are not members of
a replica set. mongos writes to all
three config servers and does a two-phase-commit-type operation to
ensure that all three servers have the same data, so all three must be
writable (in a replica set, only the primary is writable by
clients).
Note
A common question is why three config servers? The reasoning behind the choice is that one config server is not enough: you need redundancy. Conversely, you don’t want too many config servers, since confirming actions with all of them would be prohibitively time consuming. Also, if any of them goes down, you cluster’s metadata becomes read-only. Thus, three was chosen as enough to give redundancy but not have the downsides of having too many servers. It will probably be made more flexible in the future.
The --configsvr option indicates to the mongod that you are planning to use it as a
config server. It is not strictly required, as all it does is change the
default port mongod listens on to
27019 and the default data directory to /data/configdb (you can override either or
both of these settings with --port and
--dbpath).
It is recommended that you use this option because it makes it
easier to tell, operationally, what these servers are doing. If you
start up your config servers without the --configsvr
option, though, it’s not a problem.
In terms of provisioning, config servers do not need much space or many resources. A generous estimate is 1 KB of config server space per 200 MB of actual data: they really are just tables of contents. As they don’t use many resources, you can deploy config servers on machines running other things, like app servers, shard mongods, or mongos processes.
If all of your config servers are lost, you must dig through the data on your shards to figure out which data is where. This is possible, but slow and unpleasant. Take frequent backups of config server data. Always take a backup of your config servers before performing any cluster maintenance.
The mongos Processes
Once you have three config servers running, start a mongos process for your application to connect
to. mongos processes need to know
where the config servers are, so you must always start mongos with the --configdb
option:
$mongos--configdbconfig-1:27019,config-2:27019,config-3:27019>-f/var/lib/mongos.conf
By default, mongos runs on
port 27017. Note that it does not need a data directory (mongos holds no data itself, it loads the
cluster configuration from the config servers on startup). Make sure
that you set logpath to save the mongos log somewhere safe.
You can start as many mongos processes as you’d like. A common setup is one mongos process per application server (running on the same machine as the application server). Each mongos must use the exact same list of config servers, down to the order in which they are listed.
Adding a Shard from a Replica Set
Finally, you’re ready to add a shard. There are two possibilities: you may have an existing replica set or you may be starting from scratch. We will cover starting from an existing set below. If you are starting from scratch, initialize an empty set and follow the steps below.
If you already have a replica set serving your application, that will become your first shard. To convert it into a shard, you are going to tell the mongos the replica set name and give it a seed list of replica set members.
For example, if you have a replica set named
spock on server-1, server-2, server-3, server-4, and server-5, you would connect to the mongos and run:
>sh.addShard("spock/server-1:27017,server-2:27017,server-4:27017"){"added":"spock/server-1:27017,server-2:27017,server-4:27017","ok":true}
You can specify all the members of the set, but you do not have
to. mongos will automatically detect any members that were not
included in the seed list. If you run sh.status(),
you’ll see that MongoDB soon lists the shard as "spock/server-1:27017,server-2:27017,server-4:27017,server-3:27017,server-5:27017".
The set name, “spock”, is taken on as an identifier for this shard. If we ever want to remove this shard or migrate data to it, we’ll use “spock” to describe it. This works better than using a specific server (e.g., server-1), as replica set membership and status can change over time.
Once you’ve added the replica set as a shard you can convert your application from connecting to the replica set to connecting to the mongos. When you add the shard, mongos registers that all the databases in the replica set are “owned” by that shard, so it will pass through all queries to your new shard. mongos will also automatically handle failover for your application as your client library would: it will pass the errors through to you.
Test failing over a shard’s primary in a development environment to ensure that your application handles the errors received from mongos correctly (they should be identical to the errors that you receive from talking to the primary directly).
Note
Once you have added a shard, you must set up all clients to send requests to the mongos instead of contacting the replica set. Sharding will not function correctly if some clients are still making requests to the replica set directly (not through the mongos). Switch all clients to contacting the mongos immediately after adding the shard and set up a firewall rule to ensure that they are unable to connect directly to the shard.
There is a --shardsvr option, analogous to the
--configsvr option mentioned previously. As before,
--shardsvr has little practical effect (it changes the
default port to 27018) but can be nice to include operationally.
You can also create stand-alone-mongod shards (instead of replica set
shards), but this is not recommend for production
(ShardingTest in the previous chapter did this).
To add a single mongod as a shard
simply specify the hostname of the standalone server in the call to
addShard:
>sh.addShard("some-server:27017")
Stand-alone-server shards default to being named shard0000, shard0001, and so on. If you plan to switch to replica sets later, start with one-member replica sets instead of standalone servers. Switching from a stand-alone-server shard to a replica set requires downtime (see Server Administration).
Adding Capacity
When you want to add more capacity, you’ll need to add more
shards. To add a new, empty shard, create a replica set. Make sure it
has a distinct name from any of your other shards. Once it is
initialized and has a primary, add it to your cluster by running the
addShard command through mongos, specifying the new replica set’s name
and its hosts as seeds.
If you have several existing replica sets that are not shards, you can add all of them as new shards in your cluster so long as they do not have any database names in common. For example, if you had one replica set with a “blog” database, one with a “calendar” database, and one with the “mail”, “tel”, and “music” databases, you could add each replica set as a shard and end up with a cluster with three shards and five databases. However, if you had a fourth replica set that also had a database named “tel”, mongos would refuse to add it to the cluster.
Sharding Data
MongoDB won’t distribute your data automatically until you tell it
how to do so. You must explicitly tell both the database and collection
that you want them to be distributed. For example, suppose we want to
shard the artists collection in the
music database on the "name" key. First, we enable sharding for the
database, music:
>db.enableSharding("music")
Sharding a database is always prerequisite to sharding one of its collections.
Once you’ve enabled sharding on the database level, you can shard
a collection by running sh.shardCollection:
>sh.shardCollection("music.artists",{"name":1})
Now the collection will be sharded by the "name" key. If you are sharding an existing
collection there must be an index on the "name" field; otherwise the shardCollection call will return an error. If
you get an error, create the index (mongos will return the index it suggests as
part of the error message) and retry the shardCollection command.
If the collection you are sharding does not yet exist, mongos will automatically create the shard key index for you.
The shardCollection command splits the collection into chunks, which are the unit MongoDB uses to move data around. Once the command returns successfully, MongoDB will begin balancing the collection across the shards in your cluster. This process is not instantaneous. For large collections it may take hours to finish this initial balancing.
How MongoDB Tracks Cluster Data
Each mongos must always know where to find a document, given its shard key. Theoretically, MongoDB could track where each and every document lived, but this becomes unwieldy for collections with millions or billions of documents. Thus, MongoDB groups documents into chunks, which are documents in a given range of the shard key. A chunk always lives on a single shard, so MongoDB can keep a small table of chunks mapped to shards.
For example, if a user collection’s shard key is {"age" : 1}, one chunk might be all documents
with an "age" field between 3 and 17.
If mongos gets a query for {"age" : 5}, it can route the query to the shard
where the 3−17 chunk lives.
As writes occur, the number and size of the documents in a chunk might change. Inserts can make a chunk contain more documents, removes fewer. If we were making a game for children and preteens, our chunk for ages 3−17 might get larger and larger (one would hope). Almost all of our users would be in that chunk, and so on a single shard, somewhat defeating the point of distributing our data. Thus, once a chunk grows to a certain size, MongoDB automatically splits it into two smaller chunks. In this example, the chunk might be split into one chunk containing documents with ages 3 through 11 and the another containing 12 through 17. Note that these two chunks still cover the entire age range that the original chunk covered: 3−17. As these new chunks grow, they can be split into still smaller chunks until there is a chunk for each age.
You cannot have chunks with overlapping ranges, like 3−15 and 12−17. If you could, MongoDB would need to check both chunks when attempting to find an age in the overlap, like 14. It is more efficient to only have to look in one place, particularly once chunks begin moving around the cluster.
A document always belongs to one and only one chunk. One consequence
to this rule is that you cannot use an array field as your shard key,
since MongoDB creates multiple index entries for arrays. For example, if a
document had [5, 26, 83] in its "age"
field, it would belong in up to three chunks.
Note
A common misconception is that the data in a chunk is physically grouped on disk. This is incorrect: chunks have no effect on how mongod stores collection data.
Chunk Ranges
Each chunk is described by the range it contains. A newly sharded
collection starts off with a single chunk and every document lives in
this chunk. This chunk’s bounds are negative infinity to infinity, shown
as $minKey and $maxKey in the shell.
As this chunk grows, MongoDB will automatically split it into two
chunks, with the range negative infinity to <some
value> and <some
value> to infinity. <some
value> is the same for both chunks: the lower chunk
contains everything up to (but not including) <some
value> and the upper chunk actually contains
<some value>.
This may be more intuitive with an example: suppose we were
sharding by "age" as described
earlier. All documents with "age"
between 3 and 17 are contained on one chunk: 3
≤ age < 17. When this is split, we end up with two ranges:
3 ≤ age < 12 on one chunk and
12 ≤ age < 17 on the other. 12 is
called the split point.
Chunk information is stored in the config.chunks collection. If you looked at the contents of that collection, you’d see documents that looked something like this (some fields have been omitted for clarity):
>db.chunks.find(criteria,{"min":1,"max":1}){"_id":"test.users-age_-100.0","min":{"age":-100},"max":{"age":23}}{"_id":"test.users-age_23.0","min":{"age":23},"max":{"age":100}}{"_id":"test.users-age_100.0","min":{"age":100},"max":{"age":1000}}
Based on the config.chunks documents shown, here are a few examples of where various documents would live:
{"_id" : 123, "age" :
          50}
This document would live in the second chunk, as that chunk contains all documents with
"age"between 23 and 100.{"_id" : 456, "age" : 100}This document would live on the third chunk, as lower bounds are inclusive. The second chunk contains all documents up to
"age" : 100, but not any documents where"age"equals 100.{"_id" : 789, "age" : -101}This document would not be in any of these chunks. It would be in some chunk with a range lower than the first chunk’s.
With a compound shard key, shard ranges work the same way that
sorting by the two keys would work. For example, suppose that we had a
shard key on {"username" : 1, "age" :
1}. Then we might have chunk ranges such as:
{"_id":"test.users-username_MinKeyage_MinKey","min":{"username":{"$minKey":1},"age":{"$minKey":1}},"max":{"username":"user107487","age":73}}{"_id":"test.users-username_"user107487"age_73.0","min":{"username":"user107487","age":73},"max":{"username":"user114978","age":119}}{"_id":"test.users-username_"user114978"age_119.0","min":{"username":"user114978","age":119},"max":{"username":"user122468","age":68}}
Thus, mongos can easily find
on which chunk someone with a given username (or a given username and
age) lives. However, given just an age, mongos would have to check all, or almost
all, chunks. If we wanted to be able to target queries on age to the
right chunk, we’d have to use the “opposite” shard key: {"age" : 1, "username" : 1}. This is often a
point of confusion: a range over the second half of a shard key will cut
across multiple chunks.
Splitting Chunks
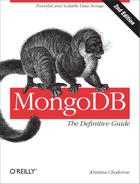
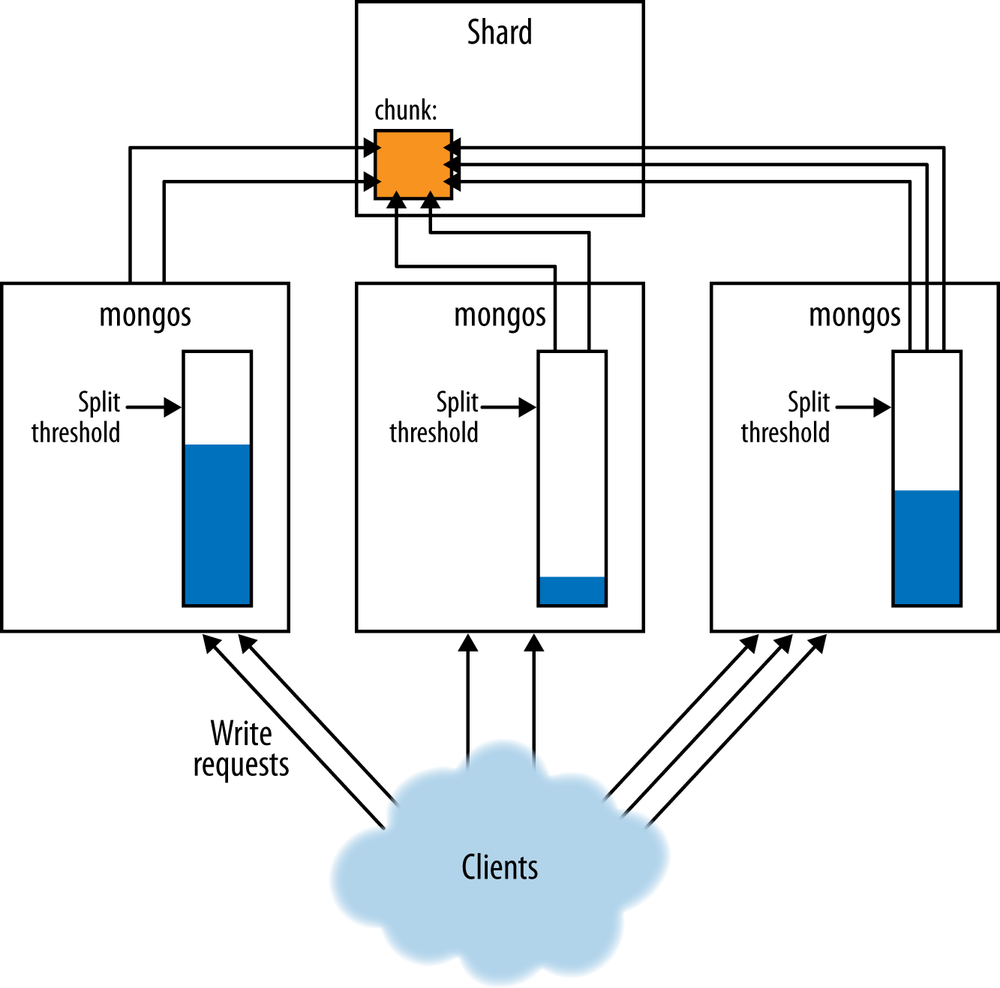
mongos tracks how much data
it inserts per chunk and, once that reaches a certain threshold, checks
if the chunk needs to be split, as shown in Figure 14-1 and Figure 14-2. If the
chunk does need to be split, mongos
will update the chunk’s metadata on the config servers. Chunk splits are
just a metadata change (no data is moved). New chunk documents are
created on the config servers and the old chunk’s range ("max") is modified. Once that process is
complete, the mongos resets its
tracking for the original chunk and creates new trackers for the new
chunks.
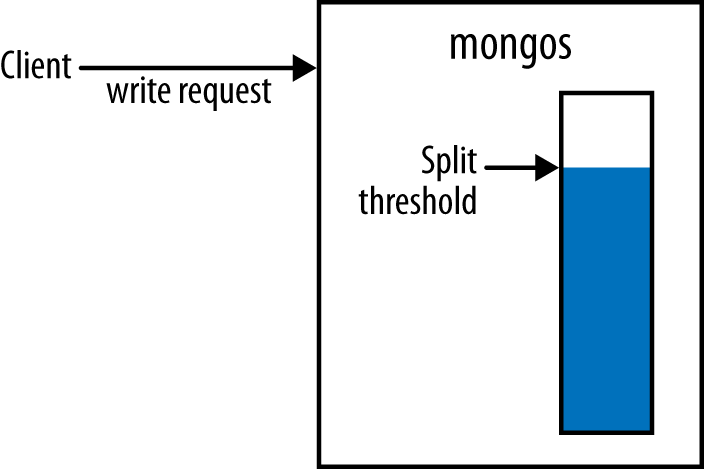
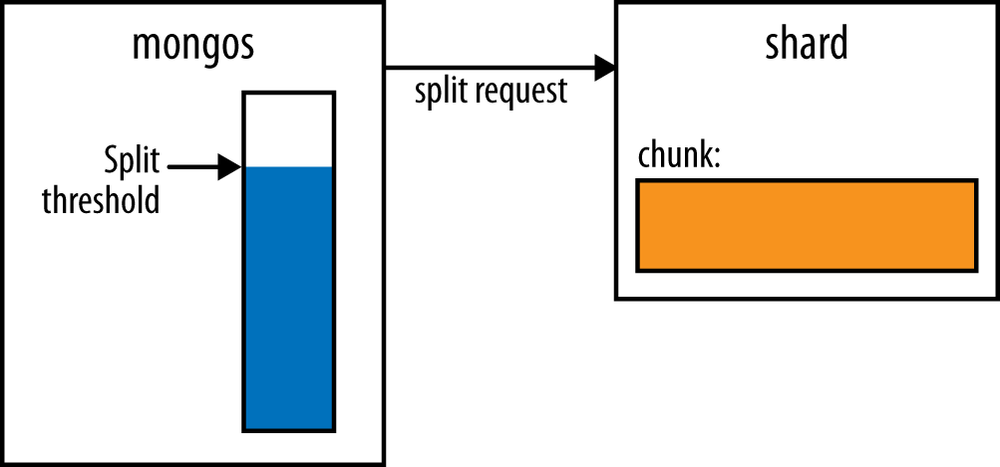
When mongos asks a shard if a chunk needs to be split, the shard makes a rough calculation of the chunk size. If it finds that the chunk is getting large, it finds split points and sends those to the mongos (as shown in Figure 14-3).
A shard may not be able to find any split points though, even for
a large chunk, as there are a limited number of ways to legally split a
chunk. Any two documents with the same shard key must live in the same
chunk so chunks can only be split between documents where the shard
key’s value changes. For example, if the shard key was "age", the following chunk could be split at
the points where the shard key changed, as indicated:
{"age":13,"username":"ian"}{"age":13,"username":"randolph"}------------// split point{"age":14,"username":"randolph"}{"age":14,"username":"eric"}{"age":14,"username":"hari"}{"age":14,"username":"mathias"}------------// split point{"age":15,"username":"greg"}{"age":15,"username":"andrew"}
mongos will not necessarily split a chunk at every split point available, but those are the possibilities it has to choose from.
For example, if the chunk contained the following documents, it could not be split (unless the application started inserting fractional ages):
{"age":12,"username":"kevin"}{"age":12,"username":"spencer"}{"age":12,"username":"alberto"}{"age":12,"username":"tad"}
Thus, having a variety of values for your shard key is important. Other important properties will be covered in the next chapter.
If one of the config servers is down when a mongos tries to do a split, the mongos won’t be able to update the metadata (as shown in Figure 14-4). All config servers must be up and reachable for splits to happen. If the mongos continues to receive write requests for the chunk, it will keep trying to split the chunk and fail. As long as the config servers are not healthy, splits will continue not to work and all the split attempts can slow down the mongos and shard involved (which repeats the process shown in Figure 14-1 through Figure 14-4 for each incoming write). This process of mongos repeatedly attempting to split a chunk and being unable to is called a split storm. The only way to prevent split storms is to ensure that your config servers are up and healthy as much of the time as possible. You can also restart a mongos to reset its write counter (so that it is no longer at the split threshold).

Another issue is that mongos might never realize that it needs to split a large chunk. There is no global counter of how big each chunk is. Each mongos simply calculates whether the writes it has received have reached a certain threshold (as shown in Figure 14-5). This means that if your mongos processes go up and down frequently a mongos might never receive enough writes to hit the split threshold before it is shut down again and your chunks will get larger and larger (as shown in Figure 14-6).

The first way to prevent this is to have fewer mongos churn. Leave mongos processes up, when possible, instead of spinning them up when they are needed and then turning them off when they are not. However, some deployments may find it too expensive to run mongos processes that aren’t being used. If you are in this situation, another way of getting more splits is to make the chunk size smaller than you actually want it to be. This will prompt splits to happen at a lower threshold.
You can turn off chunk splitting by starting every mongos with
--nosplit.
The Balancer
The balancer is responsible for migrating data. It regularly checks for imbalances between shards and, if it finds an imbalance, will begin migrating chunks. Although the balancer is often referred to as a single entity, each mongos plays the part of “the balancer” occasionally.
Every few seconds, a mongos will attempt to become the balancer. If there are no other balancers active, the mongos will take a cluster-wide lock from the config servers and do a balancing round. Balancing doesn’t affect a mongos’s normal routing operations, so clients using that mongos should be unaffected.
You can see which mongos is the balancer by looking at the the config.locks collection:
>db.locks.findOne({"_id":"balancer"}){"_id":"balancer","process":"router-23:27017:1355763351:1804289383","state":0,"ts":ObjectId("50cf939c051fcdb8139fc72c"),"when":ISODate("2012-12-17T21:50:20.023Z"),"who":"router-23:27017:1355763351:1804289383:Balancer:846930886","why":"doing balance round"}
The config.locks collection
keeps track of all cluster-wide locks. The balancer is the document with
the "_id" of "balancer". The lock’s "who" field tells you which mongos is—or was—balancing: router-23:27017 in this case. The "state" field indicates whether the balancer is
running; 0 means it is no longer active, 2 means it’s still balancing. (1
means that the mongos is attempting
to take the lock but has not yet acquired it—you won’t usually see
1.)
Once a mongos has become the balancer, it checks its table of chunks for each collection to see if any shards have hit the balancing threshold. This is when one shard has significantly more chunks than the other shards (the exact threshold varies: larger collections tolerate larger imbalances than smaller ones). If an imbalance is detected, the balancer will redistribute chunks until all shards are within one chunk of one another. If no collections have hit the balancing threshold. The mongos stops being the balancer.
Assuming that some collections have hit the threshold, the balancer will begin migrating chunks. It chooses a chunk from the overloaded shard and asks the shard if it should split the chunk before migrating. Once it does any necessary splits, it migrates the chunk to a machine with fewer chunks.
An application using the cluster does not need be aware that the data is moving: all reads and writes are routed to the old chunk until the move is complete. Once the metadata is updated, all mongos processes attempting to access the data in the old location will get an error. These errors should not be visible to the client: the mongos will silently handle the error and retry the operation on the new shard.
This is a common cause of errors you might see in mongos logs that are about being “unable to
setShardVersion.” When mongos gets this type of error, it looks up the
new location of the data from the config servers, updates its chunk table,
and attempts the request again. If it successfully retrieves the data from
the new location, it will return it to the client as though nothing went
wrong (but it will print a message in the log that the error
occurred).
If the mongos is unable to retrieve the new chunk location because the config servers are unavailable, it will return an error to the client. This is another reason why it is important to always have config servers up and healthy.