Chapter 13. Introduction to Sharding
This chapter covers how to scale with MongoDB:
What sharding is and the components of a cluster
How to configure sharding
The basics of how sharding interacts with your application
Introduction to Sharding
Sharding refers to the process of splitting data up across machines; the term partitioning is also sometimes used to describe this concept. By putting a subset of data on each machine, it becomes possible to store more data and handle more load without requiring larger or more powerful machines, just a larger quantity of less-powerful machines.
Manual sharding can be done with almost any database software. Manual sharding is when an application maintains connections to several different database servers, each of which are completely independent. The application manages storing different data on different servers and querying against the appropriate server to get data back. This approach can work well but becomes difficult to maintain when adding or removing nodes from the cluster or in the face of changing data distributions or load patterns.
MongoDB supports autosharding, which tries to both abstract the architecture away from the application and simplify the administration of such a system. MongoDB allows your application to ignore the fact that it isn’t talking to a standalone MongoDB server, to some extent. On the operations side, MongoDB automates balancing data across shards and makes it easier to add and remove capacity.
Sharding is the most difficult and complex way of configuring MongoDB, both from a development and operational point of view. There are many components to configure and monitor and data moves around the cluster automatically. You should be comfortable with standalone servers and replica sets before attempting to deploy or use a sharded cluster.
Understanding the Components of a Cluster
MongoDB’s sharding allows you to create a cluster of many machines (shards) and break up your collection across them, putting a subset of data on each shard. This allows your application to grow beyond the resource limits of a standalone server or replica set.
Note
Many people are confused about the difference between replication and sharding. Remember that replication creates an exact copy of your data on multiple servers, so every server is a mirror-image of every other server. Conversely, every shard contains a different subset of data.
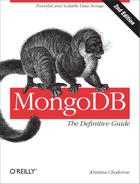
One of the goals of sharding is to make a cluster of 5, 10, or 1,000
machines look like a single machine to your application. To hide these
details from the application, we run a routing process called mongos in front of the shards. This router keeps
a “table of contents” that tells it which shard contains which data.
Applications can connect to this router and issue requests normally, as
shown in Figure 13-1. The router, knowing
what data is on which shard, is able to forward the requests to the
appropriate shard(s). If there are responses to the request, the router
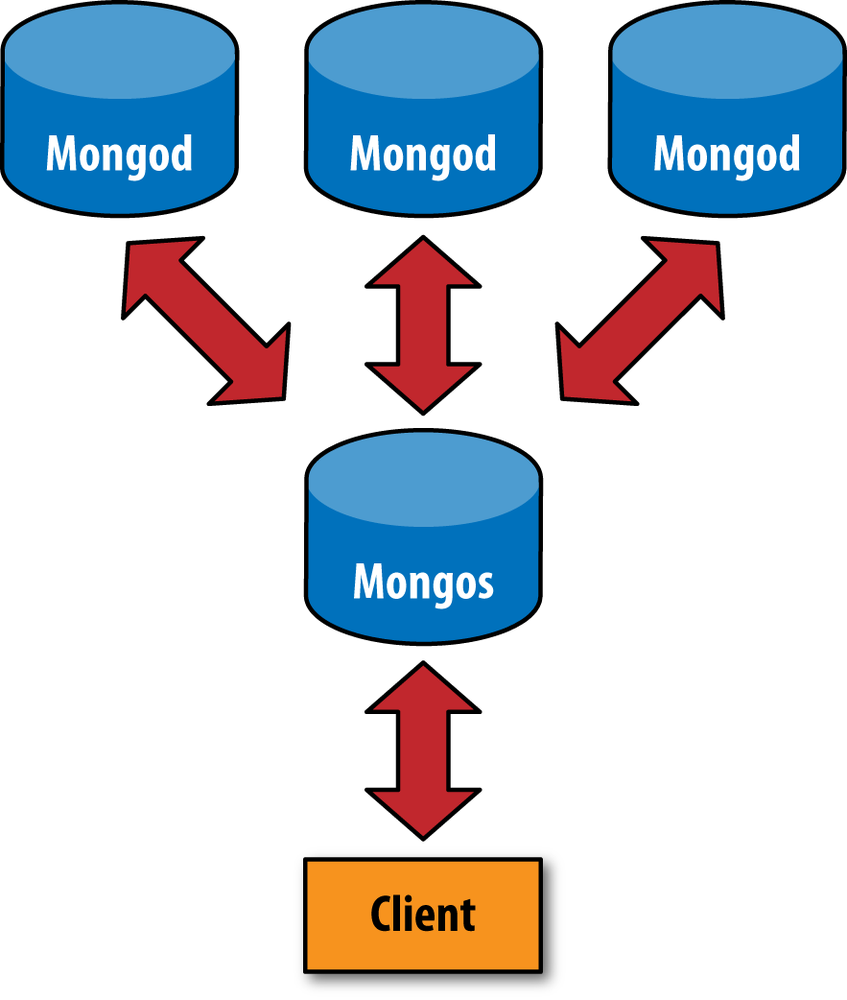
collects them, merges them, and sends them back to the application. As far
as the application knows, it’s connected to a stand-alone mongod, as in Figure 13-2.
A One-Minute Test Setup
As in the replication section, we will start by setting up a quick
cluster on a single machine. First, start a mongo shell with the
--nodb option:
$mongo--nodb
To create a cluster, use the ShardingTest
class:
>cluster=newShardingTest({"shards":3,"chunksize":1})
The chunksize option is covered in Chapter 16. For now, simply set it to 1.
Running this command creates a new cluster with three shards
(mongod processes) running on ports
30000, 30001, and 30002. By default, ShardingTest
starts a mongos on port 30999. We
will to connect to this mongos to
play around with the cluster.
Your entire cluster will be dumping its logs to your current shell, so open up a second shell and use that to connect to your cluster’s mongos:
>db=(newMongo("localhost:30999")).getDB("test")
Now you are in the situation show in Figure 13-1: the shell is the client and is connected to a mongos. You can start passing requests to the mongos and it’ll route them to the shards. You don’t really have to know anything about the shards, like how many their are or what their addresses are. So long as there are some shards out there, you can pass the requests to the mongos and allow it to forward them appropriately.
Start by inserting some data:
>for(vari=0;i<100000;i++){...db.users.insert({"username":"user"+i,"created_at":newDate()});...}>db.users.count()100000
As you can see, interacting with mongos works the same way as interacting with a stand-alone server does.
You can get an overall view of your cluster by running sh.status(). It will give you a summary of your
shards, databases, and collections:
>sh.status()---ShardingStatus---shardingversion:{"_id":1,"version":3}shards:{"_id":"shard0000","host":"localhost:30000"}{"_id":"shard0001","host":"localhost:30001"}{"_id":"shard0002","host":"localhost:30002"}databases:{"_id":"admin","partitioned":false,"primary":"config"}{"_id":"test","partitioned":false,"primary":"shard0001"}
sh is similar to rs, but for sharding: it is a global variable
that defines a number of sharding helper functions. Run sh.help() to see what it defines. As you can
see from the sh.status() output, you
have three shards and two databases (admin is created automatically).
Your test database may have a different primary shard than shown above. A primary shard is a “home base” shard that is randomly chosen for each database. All of your data will be on this primary shard. MongoDB cannot automatically distribute your data yet because it doesn’t know how (or if) you want it to be distributed. You have to tell it, per-collection, how you want it to distribute data.
Note
A primary shard is different than a replica set primary. A primary shard refers to the entire replica set composing a shard. A primary in a replica set is the single server in the set that can take writes.
To shard a particular collection, first enable sharding on the
collection’s database. To do so, run the enableSharding command:
>sh.enableSharding("test")
Now sharding is enabled on the test database, which allows you to shard collections within the database.
When you shard a collection, you choose a shard
key. This is a field or two that MongoDB uses to break up
data. For example, if you choose to shard on "username", MongoDB would break up the data into
ranges of usernames: "a1-steak-sauce" through
"defcon", "defcon1" through
"howie1998", and so on. Choosing a shard key can be
thought of as choosing an ordering for the data in the collection. This is
a similar concept to indexing, and for good reason: the shard key becomes
the most important index on your collection as it gets bigger. To even
create a shard key, the field(s) must be indexed.
Before enabling sharding, we have to create an index on the key we want to shard by:
>db.users.ensureIndex({"username":1})
Now we’ll shard the collection by "username":
>sh.shardCollection("test.users",{"username":1})
Although we are choosing a shard key without much thought here, it is an important decision that should be carefully considered in a real system. See Chapter 15 for more advice on choosing a shard key.
If you wait a few minutes and run sh.status() again, you’ll see that there’s a
lot more information displayed than there was before:
---ShardingStatus---shardingversion:{"_id":1,"version":3}shards:{"_id":"shard0000","host":"localhost:30000"}{"_id":"shard0001","host":"localhost:30001"}{"_id":"shard0002","host":"localhost:30002"}databases:{"_id":"admin","partitioned":false,"primary":"config"}{"_id":"test","partitioned":true,"primary":"shard0000"}test.userschunks:shard00014shard00024shard00005{"username":{$minKey:1}}-->>{"username":"user1704"}on:shard0001{"username":"user1704"}-->>{"username":"user24083"}on:shard0002{"username":"user24083"}-->>{"username":"user31126"}on:shard0001{"username":"user31126"}-->>{"username":"user38170"}on:shard0002{"username":"user38170"}-->>{"username":"user45213"}on:shard0001{"username":"user45213"}-->>{"username":"user52257"}on:shard0002{"username":"user52257"}-->>{"username":"user59300"}on:shard0001{"username":"user59300"}-->>{"username":"user66344"}on:shard0002{"username":"user66344"}-->>{"username":"user73388"}on:shard0000{"username":"user73388"}-->>{"username":"user80430"}on:shard0000{"username":"user80430"}-->>{"username":"user87475"}on:shard0000{"username":"user87475"}-->>{"username":"user94518"}on:shard0000{"username":"user94518"}-->>{"username":{$maxKey:1}}on:shard0000
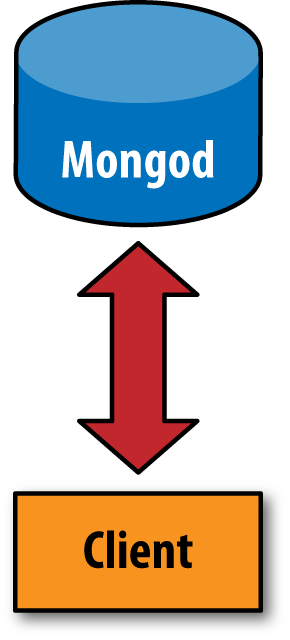
The collection has been split up into a dozen chunks, where each
chunk is a subset of your data. These are listed by shard key range (the
{"username" : denotes the
range of each chunk). Looking at the minValue} -->>
{"username" : maxValue}"on" :
part of the output, you can see
that these chunks have been evenly distributed between the
shards.shard
This process of a collection being split into chunks is shown in Figure 13-3 through Figure 13-5. Before sharding, the collection is essentially a single chunk. Sharding splits this into smaller chunks based on the shard key, as shown in Figure 13-4. These chunks can then be distributed across the cluster, as Figure 13-5 shows.


Notice the keys at the beginning and end of the chunk list:
$minKey and $maxKey.
$minKey can be thought of as “negative infinity.” It is
smaller than any other value in MongoDB. Similarly,
$maxKey is like “positive infinity.” It is greater than
any other value. Thus, you’ll always see these as the “caps” on your chunk
ranges. The values for your shard key will always be between
$minKey and $maxKey. These values
are actually BSON types and should not be used in your application; they
are mainly for internal use. If you wish to refer to them in the shell,
use the MinKey and MaxKey
constants.
Now that the data is distributed across multiple shards, let’s try doing some queries. First, try a query on a specific username:
>db.users.find({username:"user12345"}){"_id":ObjectId("50b0451951d30ac5782499e6"),"username":"user12345","created_at":ISODate("2012-11-24T03:55:05.636Z")}
As you can see, querying works normally. However, let’s run an
explain to see what MongoDB is doing
under the covers:
>db.users.find({username:"user12345"}}).explain(){"clusteredType":"ParallelSort","shards":{"localhost:30001":[{"cursor":"BtreeCursor username_1","nscanned":1,"nscannedObjects":1,"n":1,"millis":0,"nYields":0,"nChunkSkips":0,"isMultiKey":false,"indexOnly":false,"indexBounds":{"username":[["user12345","user12345"]]}}]},"n":1,"nChunkSkips":0,"nYields":0,"nscanned":1,"nscannedObjects":1,"millisTotal":0,"millisAvg":0,"numQueries":1,"numShards":1}
There are two parts to this explain: a somewhat usual-looking explain output nested inside of another
explain’s output. The way to read
this is that the outer explain is from the mongos: this describes what the mongos had to do to process this query. The
inner explain is from any shards that
were used in the query, in this case, localhost:30001.
As "username" is the shard key,
mongos could send the query directly
to the correct shard. Contrast that with the results for querying for all
of the data:
>db.users.find().explain(){"clusteredType":"ParallelSort","shards":{"localhost:30000":[{"cursor":"BasicCursor","nscanned":37393,"nscannedObjects":37393,"n":37393,"millis":38,"nYields":0,"nChunkSkips":0,"isMultiKey":false,"indexOnly":false,"indexBounds":{}}],"localhost:30001":[{"cursor":"BasicCursor","nscanned":31303,"nscannedObjects":31303,"n":31303,"millis":37,"nYields":0,"nChunkSkips":0,"isMultiKey":false,"indexOnly":false,"indexBounds":{}}],"localhost:30002":[{"cursor":"BasicCursor","nscanned":31304,"nscannedObjects":31304,"n":31304,"millis":36,"nYields":0,"nChunkSkips":0,"isMultiKey":false,"indexOnly":false,"indexBounds":{}}]},"n":100000,"nChunkSkips":0,"nYields":0,"nscanned":100000,"nscannedObjects":100000,"millisTotal":111,"millisAvg":37,"numQueries":3,"numShards":3}
As you can see from this explain, this query has
to visit all three shards to find all the data. In general, if we are not
using the shard key in the query, mongos will have to send the query to every
shard.
Queries that contain the shard key and can be sent to a single shard or subset of shards are called targeted queries. Queries that must be sent to all shards are called scatter-gather queries: mongos scatters the query to all the shards and then gathers up the results.
Once you are finished experimenting, shut down the set. Switch back
to your original shell and hit Enter a few times to get back to the
command line. Then run cluster.stop()
to cleanly shut down all of the servers:
>cluster.stop()
If you are ever unsure of what an operation will do, it can be
helpful to use ShardingTest to spin up a quick
local cluster and try it out.