This chapter covers the math module of Python that can perform calculations such as the common trigonometry functions sine, cosine, tangent, and others. We will learn to use these and more functions in the math module that are commonly needed for even the simplest of games. To make the math more interesting, we will learn to draw a circle manually and then use that code to create an analog clock with moving hands for the hours, minutes, and seconds. This will also help lead in to the upcoming chapters on bitmaps and sprite animation.
Here are the topics covered in this chapter:
Learning to use basic trigonometry
A little circle theory
Traversing a circle’s perimeter
Drawing a circle manually with sine and cosine
Creating The Analog Clock Demo
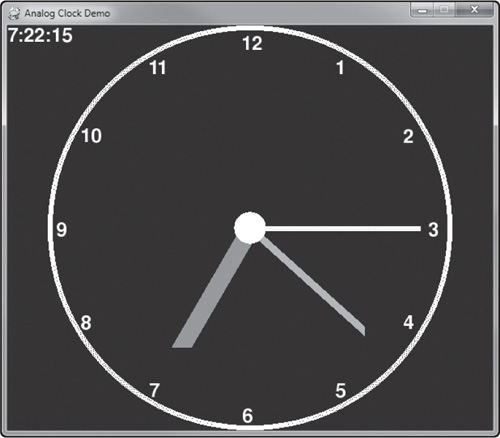
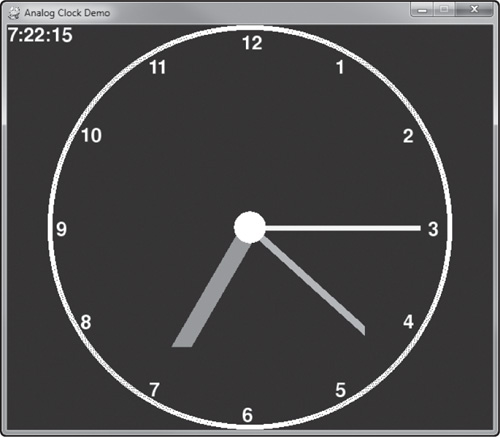
The Analog Clock Demo shows how to use some of the math functions in Python (covered in this chapter) to cause the hands of an analog clock to rotate around the clock face. See Figure 5.1.
We’re just going to learn about a few of the functions in the math module of Python, not all of them. There are several math functions that are consistently used in nearly every video game you are likely to have played—every serious game, that is, not just examples or demos. Rotation of a sprite or a mesh (the technical name of a “3D object”) is done with two very important math functions: sine and cosine.
If you have had a geometry class, I’m sure you have learned about them. In the old days of video game development, sine and cosine were a problem, because they took a lot of CPU cycles to perform one calculation! It was a bit of a performance problem on most PCs, in fact, so an optimization was invented. Take every angle around a circle, 0 to 359, and pre-calculate sine and cosine for every angle, then store the results in an array. Some games would perform this pre-calculation at the start of the game, and it could take several seconds. Some programmers would display a loading screen or introduction to the game while processes like this were running, rather than just make the player wait.
Working with angles from 0 to 359 involves degrees, but the natural “language” of trigonometry functions is radians, due to the way a circle is calculated. You might recall that the circumference (or outside perimeter) of a circle can be calculated with this formula:
C = [PI] * 2 * Radius (or [PI] * Diameter)
where [PI] = 3.14. Python’s math module defines [PI] for us with a lot more decimal digits as math.pi. Any time you include the math module with import math in the program, then math.pi can be used in code. It is approximately 3.14159265358979. Sure, you could just use that number in the program yourself and get similar results. Figure 5.2 illustrates the calculation.

At a certain point, the number of decimal digits only increase precision by a tiny amount. Now, if we’re talking about a NASA spacecraft that is travelling billions of miles (like the Voyager craft that flew past Neptune, Pluto, and left the solar system entirely), then you want quite a few digits because in the millions and billions of miles, the decimal precision is a factor! What happens if you walk 1 mile in a certain direction but you are off by just 1 degree? Not a big deal; it might be a matter of a few inches off course. Extend it to 10 miles, 20 miles, 100 miles, and what happens? That 1 degree will put you a long ways off from the desired target. Now imagine the Voyager spacecraft heading out toward Neptune, which is about 2.8 billion miles from the sun. Sometimes such a number is hard for the human mind to grasp, so let’s try some conversions: it is equal to twenty-eight hundred million miles ! It’s like going clear across the United States one million times, or travelling to the Moon and back 6,000 times! Yes, it’s that far, which is why precision is so important. In contrast, Mars is only about 30 million miles from Earth at closest approach, and we do not quite have the technology yet today to send a manned mission there.
Using the formula, let’s calculate the circumference of a sample circle with a diameter of, oh, let’s use the Moon’s diameter of 2,159 miles (3,474 km).
C = [PI] * Diameter
C = 3.14159265358979 * 2159 miles
C = 6,782.6985 miles
Do we really need to know the “.6985” part of a mile? That is about 70% of a mile, or 3,688 feet. What if we round it off to just .69? That results in 3,643 feet, an error of 45 feet! That isn’t very far considering the large number of miles we’re dealing with here, but what if you were a rocket scientist working for NASA on the Apollo missions and had to make sure the ship landed in just the right spot? Now, imagine this compounded by billions of miles! Anyway, this is the reason why you want to use as many decimal digits as possible when doing rocket science! Python will use as many digits for [PI] as the computer supports (usually a double, which is a C++ data type that supports “double precision floating point” numbers with thousands of decimal digits!).
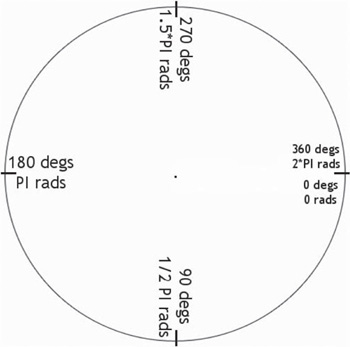
We have learned how to measure a circle, so now let’s learn how to create one. A circle can be simulated at any radius size using sine and cosine. The starting point, angle 0, is not at the top like you might naturally assume. The starting point of a circle is at the angle we would think of as 90 degrees from the top toward the right, as shown in Figure 5.3. All circle calculations are based on this angle being the starting point of 0.

Going around the circle from this starting point, a full circle in radians is 2 * [PI] radians, equal to 360 degrees. We can calculate 2 * [PI] approximately as:
2 * 3.14159265358979 = 6.28318530715978
Are these digits making your head spin? Don’t sweat it, just round off at any point you want! 6.28 is perfectly acceptable for our purposes. So, a full circle is 6.28 radians. We can use this to calculate the number of degrees in one radian:
360 / 6.28 = 57.3248
Likewise, we can calculate the number of radians in one degree:
6.28 / 360 = 0.0174
You could use these numbers to convert between degrees and radians with acceptable precision for most video games. Figure 5.4 shows a circle with four cardinal positions labeled. This is also important in a video game, because in most cases we need to wrap the angle around at the 360- degree (2*[PI] radian) point when doing rotations or revolutions.
Now that you know how to do it the hard way, will you hate me if I tell you it’s built in to Python already? You can use math.degrees() and math.radians() to convert between them!
Note
If you want to look up the complete reference that lists all of the math functions, go to the reference site at http://docs.python.org/py3k/library/math.html.
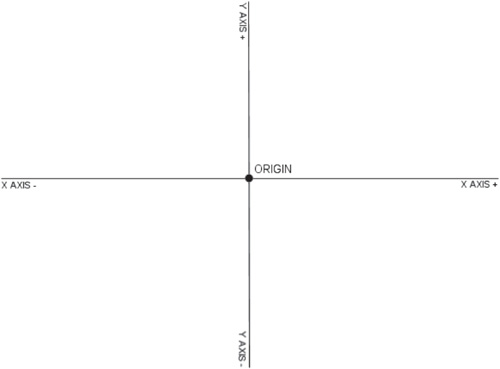
Are you enjoying this introduction to rocket science? I hope so, because it gets better! We can sort of “walk” around the perimeter of a circle using the trigonometry functions sine and cosine. All we need to know is the angle and radius. This has huge ramifications in most video games. This algorithm we’re about to learn is used in RTS (real-time strategy) games to make units move to the point on the map where you want them to go! This algorithm is also used in just about any shooting game to calculate the direction of a bullet or missile or laser beam. To calculate a point on the circle, we have to get the X and Y value for the coordinate. What’s a coordinate? It’s a point on the Cartesian coordinate system, shown in Figure 5.5. The X axis right is positive, the Y axis up is positive, and this represents the computer screen, with the origin (0,0) at the upper-left corner of the screen. The other three quadrants still exist! They are just outside the boundary of the screen! It’s just interesting to note that it’s easy to take for granted that all of the technology we use today someone had to figure out by trial and error, and once figured out, it evolved quickly.
To calculate the X coordinate of any point around the perimeter of a circle, use the cosine function. In Python, this is called math.cos(). These functions all require radians as a parameter, not degrees. So, if we have to supply radians, but you prefer to work with degrees in your code, then just convert degrees to radians on the fly. For instance:
X = math.cos( math.radians(90) )
This will be a very small number. All of them will be, at any point around the circle! To see the answer quickly, open up a Python shell and type this:
>>> import math
>>> math.cos(math.radians(90))
6.123233995736766e-17
That isn’t a very easy-to-read number because it’s in scientific notation. It has to be because this is a very tiny number! There are 16 zeroes after the decimal point before we start seeing the value. To see a number formatted in a way that’s easier to read, we have to format the output. Create a string with the formatting codes in it, and that string becomes a string class, which has a format() function. Pass your decimal variable to string.format() as a parameter. This is one of the cases where Python’s great versatility makes it also incredibly confusing at first. Here’s an example:
>>> '{:.2f}'.format(X)
'0.00'
Oh no, there’s nothing there! This is not an error; it just means the number is much, much smaller than two digits can show. In fact, this number is not just small, it’s infinitesimally small. The rather granular values typically used in a video game would never use such a small number. So, for all practical purposes, this number is zero. What we’re seeing is just a very tiny remnant of the cosine calculation. Let’s get it out to 20 digits:
>>> '{:.20f}'.format(X)
'0.00000000000000006123'
There, we can start to see the number rounded to 20 digits. Let’s extend it out some more to see what happens:
>>> '{:.30f}'.format(X)
'0.000000000000000061232339957368'
>>> '{:.40f}'.format(X)
'0.0000000000000000612323399573676603586882'
>>> '{:.50f}'.format(X)
'0.00000000000000006123233995736766035868820147291983'
>>> '{:.60f}'.format(X)
'0.000000000000000061232339957367660358688201472919830231284606'
60 digits is getting kind of ridiculous, but it’s helpful to see how Python stores the number in our X variable with such high precision. Note that the first 16 digits after the decimal are zero—those are the only important digits. The number really is zero. As we go around the perimeter of the circle, from 0 to 359 degrees, we will see small values, but nothing this small. We don’t need to print this number out anyway, as it turns out, we just need to use it to calculate the boundary of the circle at 90 degrees (which is due south—remember the orientation!). The next step is to multiply this value by the radius. Think of it as a microscopic circle around the origin point that’s so small it looks like nothing more than a single point.
Note
The Python 3.2 online reference manual for string formatting is found at http://docs.python.org/py3k/library/string.html#formatspec. There are many more ways to format numbers than the one method shown here to represent decimal numbers.
Let’s calculate the Y part of the coordinate so we can begin traversing the perimeter of a circle. To calculate Y, we use sine, which in Python is done with math.sin(angle). Let’s have the Python shell prompt do it for us:
>>> math.sin( math.radians(90) )
1.0
Would you look at that! We have a normal number of 1.0! Well, let’s think about this for a minute. 90 degrees on the circle is due south (remember, the starting point is to the right, due east on the circle). When we want to represent a point due south from any given location, what is one way to represent that?
( X = 0.0, Y = 1.0 )
Multiplying the resulting value by a radius factor causes the point to be moved from the origin (at the center of the circle) out to the perimeter. So, together, we have this new algorithm for calculating each point on the perimeter around a circle:
X = math.cos( math.radians( angle ) ) * radius
Y = math.sin( math.radians( angle ) ) * radius
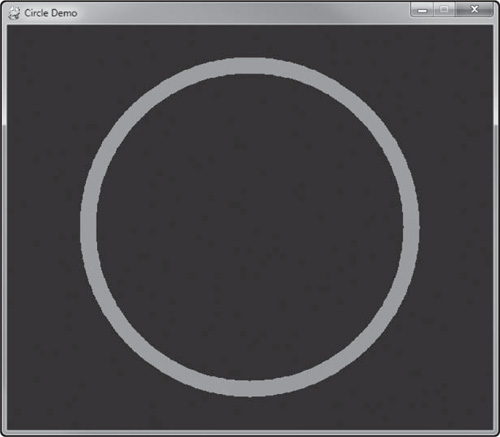
I think that’s more than enough on circle theory! Actually, would you believe there’s more yet? It’s true, there’s more on this subject, but it’s all incredibly valuable information because these concepts are at the core of most video games. Everything from making a space ship move in a certain direction, to causing a tank to fire its cannon, to having pool cue balls bounce off each other realistically can be done with these concepts related to circle theory. Let’s get an example up and running so we can see some code in action. Figure 5.6 shows the Circle Demo program running. Every time the angle reaches 360, a new random color is chosen and the circle is drawn again, one degree at a time.
import sys, random, math, pygame
from pygame.locals import *

#main program begins
pygame.init()
screen = pygame.display.set_mode((600,500))
pygame.display.set_caption("Circle Demo")
screen.fill((0,0,100))

pos_x = 300
pos_y = 250
radius = 200
angle = 360

#repeating loop
while True:
    for event in pygame.event.get():
        if event.type == QUIT:
            sys.exit()
    keys = pygame.key.get_pressed()
    if keys[K_ESCAPE]:
        sys.exit()

    #increment angle
    angle += 1
    if angle >= 360:
        angle = 0
        r = random.randint(0,255)
        g = random.randint(0,255)
        b = random.randint(0,255)
        color = r,g,b

    #calculate coordinates
    x = math.cos( math.radians(angle) ) * radius
    y = math.sin( math.radians(angle) ) * radius

    #draw one step around the circle
    pos = ( int(pos_x + x), int(pos_y + y) )
    pygame.draw.circle(screen, color, pos, 10, 0)

    pygame.display.update()
It’s really not much of a stretch to take the code from our Circle Demo and adapt it to make an analog clock. The difference will be that we need to draw lines from the center of the circle to the outer perimeter only where the hours, minutes, and seconds hands need to be positioned, based on the actual time of day. Let’s learn how to do that.
In Python, we use the datetime module (with an import statement) to gain access to the current time of day. Let’s start by importing both the date and time modules from datetime to make our code a bit easier to write:
from datetime import datetime, date, time
Now, the key to getting the current date and time for our clock is a function called datetime.today(). Once we get a “snapshot” of the current date/time, then we can use the properties returned.
today = datetime.today()
The today variable will not contain the current date and time. Print it out from the Python prompt:
>>> today = datetime.today()
>>> today
datetime.datetime(2011, 6, 28, 16, 13, 29, 6000)
Each property is accessed by logical name: year, month, day, hour, minute, second, and microsecond. We can further segregate the date from the time like so:
>>> today.date()
datetime.date(2011, 6, 28)
>>> today.time()
datetime.time(16, 13, 29, 6000)
If we want only the time, we can just grab that by itself, although it doesn’t hurt to have the date values as well:
>>> T = datetime.today().time()
>>> T
datetime.time(16, 20, 31, 295000)
At this point, the variable T contains the properties T.hour, T.minute, T.second, and T.microsecond. We can use these properties to make our clock program.
First, we’ll draw a large circle centered in the window, shown in Figure 5.7.

pygame.draw.circle(screen, white, (pos_x, pos_y), radius, 6)
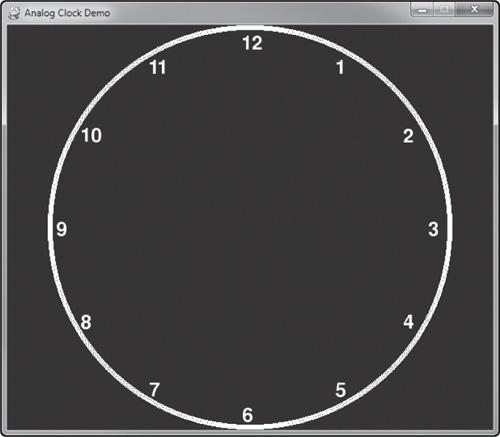
Next, we’ll draw the numbers around the clock, from 1 to 12. When drawing the number positions on the clock face, we can perform a simple calculation to find the position of each one. There are 360 degrees in a circle, and 12 numbers on a clock, so each number will be 360 degrees / 12 = 30 degrees apart. But, we have to account for the fact that angle 0 is pointing east, while the 12 o’clock position is north (from the center of the circle or clock face). So, we have to subtract 90 degrees when converting to radians. Figure 5.8 shows the clock at this stage, with the source code to follow.
Note
There’s one obvious problem with our clock: the hours and minutes hands don’t move partially in between the hour numbers as time goes on, they just jump from one number to the next (very much like a digital clock). It could be done by looking at the next-lower hand’s position and adjusting based on the percentage that lower hand is around its cycle.
    for n in range(1,13):
        angle = math.radians( n * (360/12) - 90 )
        x = math.cos( angle ) * (radius-20) - 10
        y = math.sin( angle ) * (radius-20) - 10
        print_text(font, pos_x+x, pos_y+y, str(n))
Next, we’ll draw the hour, minute, and second hands. The hours hand will be large, the minutes hand will be medium, and the seconds hand will be small. First, how do we rotate the hands so they point at the right number? That’s easy! We have already learned the algorithm for it by drawing the numbered clock positions, which the hours hand will use. The minutes and seconds hands will be based on 60 rather than 12, so that will require a different calculation.
We get the current hour of the day with this line:
datetime.today().hour
The only problem is, the hour property is returned in 24-hour time format. Rather than dig into the datetime code for a conversion, let’s just wrap it around 12-hour periods with the modulus character (%). Modulus keeps a value within a certain range. So, if you have a number, say, 15, but you want the limit to be 10, and have numbers wrap around, then
15 % 10 = 5
and that takes care of it without an if statement. Here’s a solution that keeps the 24-hour values within a 12-hour time frame:
    today = datetime.today()
    hours = today.hour % 12
Drawing the hour hand in the right position requires a call to pygame.draw.line(). The first point of the line will be the center of the clock, and the second point will be near the correct number on the clock face corresponding to the current hour of the day. Figure 5.9 shows the hour hand pointing in the right direction. The conversion from hours to a degree angle is
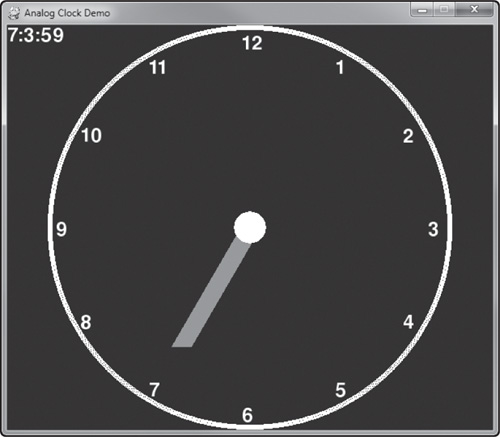
hours * (360/12) - 90
(taking into account the correct adjustment for the starting point of the circle toward the right). The rest of the code is fine-tuning the position on the clock and proper wrapping of the angle.
    #draw the hours hand
    hour_angle = wrap_angle( hours * (360/12) - 90 )
    hour_angle = math.radians( hour_angle )
    hour_x = math.cos( hour_angle ) * (radius-80)
    hour_y = math.sin( hour_angle ) * (radius-80)
    target = (pos_x+hour_x,pos_y+hour_y)
    pygame.draw.line(screen, pink, (pos_x,pos_y), target, 25)
The helper function is called wrap_angle(). It accepts an angle in degrees and returns an angle (also in degrees) wrapped within a 360-degree circle. The function is beyond simple, but it helps a bit to clean up the code. If we have too many parentheses and inline conversions that makes the code hard to read.
def wrap_angle(angle):
    return abs(angle % 360)
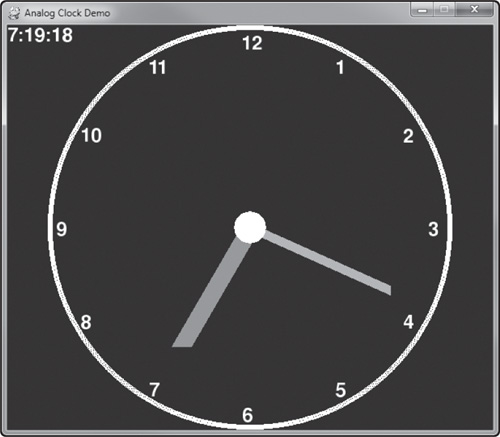
Calculating the position of the minute hand will be very similar to that of the hour hand, but we have to take into account 60 minutes in a complete hour, while the hours code was based on 12 segments. Figure 5.10 shows the result, with the code listing below.
    #draw the minutes hand
    min_angle = wrap_angle( minutes * (360/60) - 90 )
    min_angle = math.radians( min_angle )
    min_x = math.cos( min_angle ) * (radius-60)
    min_y = math.sin( min_angle ) * (radius-60)
    target = (pos_x+min_x,pos_y+min_y)
    pygame.draw.line(screen, orange, (pos_x,pos_y), target, 12)
Seconds will be a duplication of the minute hand code, only taking the value from the seconds variable instead. The end result is shown in Figure 5.11, which is the finished Clock Demo!
    #draw the seconds hand
    sec_angle = wrap_angle( seconds * (360/60) - 90 )
    sec_angle = math.radians( sec_angle )
    sec_x = math.cos( sec_angle ) * (radius-40)
    sec_y = math.sin( sec_angle ) * (radius-40)
    target = (pos_x+sec_x,pos_y+sec_y)
    pygame.draw.line(screen, yellow, (pos_x,pos_y), target, 6)
Just to be thorough, and due to the way the code has been tossed around in this chapter, following is the complete source code for the Clock Demo.
import sys, random, math, pygame
from pygame.locals import *
from datetime import datetime, date, time

def print_text(font, x, y, text, color=(255,255,255)):
    imgText = font.render(text, True, color)
    screen.blit(imgText, (x,y))

def wrap_angle(angle):
    return angle % 360

#main program begins
pygame.init()
screen = pygame.display.set_mode((600,500))
pygame.display.set_caption("Analog Clock Demo")
font = pygame.font.Font(None, 36)
orange = 220,180,0
white = 255,255,255
yellow = 255,255,0
pink = 255,100,100

pos_x = 300
pos_y = 250
radius = 250
angle = 360

#repeating loop
while True:
    for event in pygame.event.get():
        if event.type == QUIT:
            sys.exit()
    keys = pygame.key.get_pressed()
    if keys[K_ESCAPE]:
        sys.exit()

    screen.fill((0,0,100))

    #draw one step around the circle
    pygame.draw.circle(screen, white, (pos_x, pos_y), radius, 6)

    #draw the clock numbers 1-12
    for n in range(1,13):
        angle = math.radians( n * (360/12) - 90 )
        x = math.cos( angle ) * (radius-20)-10
        y = math.sin( angle ) * (radius-20)-10
        print_text(font, pos_x+x, pos_y+y, str(n))

    #get the time of day
    today = datetime.today()
    hours = today.hour % 12
    minutes = today.minute
    seconds = today.second

    #draw the hours hand
    hour_angle = wrap_angle( hours * (360/12) - 90 )
    hour_angle = math.radians( hour_angle )
    hour_x = math.cos( hour_angle ) * (radius-80)
    hour_y = math.sin( hour_angle ) * (radius-80)
    target = (pos_x+hour_x,pos_y+hour_y)
    pygame.draw.line(screen, pink, (pos_x,pos_y), target, 25)

    #draw the minutes hand
    min_angle = wrap_angle( minutes * (360/60) - 90 )
    min_angle = math.radians( min_angle )
    min_x = math.cos( min_angle ) * (radius-60)
    min_y = math.sin( min_angle ) * (radius-60)
    target = (pos_x+min_x,pos_y+min_y)
    pygame.draw.line(screen, orange, (pos_x,pos_y), target, 12)

    #draw the seconds hand
    sec_angle = wrap_angle( seconds * (360/60) - 90 )
    sec_angle = math.radians( sec_angle )
    sec_x = math.cos( sec_angle ) * (radius-40)
    sec_y = math.sin( sec_angle ) * (radius-40)
    target = (pos_x+sec_x,pos_y+sec_y)
    pygame.draw.line(screen, yellow, (pos_x,pos_y), target, 6)

    #cover the center
    pygame.draw.circle(screen, white, (pos_x,pos_y), 20)

    print_text(font, 0, 0, str(hours) + ":" + str(minutes) + ":" + str(seconds))

    pygame.display.update()
That concludes our chapter on math and graphics. We covered a lot of very important concepts in this chapter, of a variety that are found in nearly every video game, from a simple arcade-style game (such as Peggle) to a large, complex strategy game like Command & Conquer 4. In either case, we would find a lot of familiar code where movement, trajectories, and rotation of objects is concerned. In the next chapter, we’ll be ramping it up another level by learning how to load and draw bitmaps, and then we’ll use the code from this chapter to cause a spaceship to orbit around a planet.