
In Chapter 3, you built your application’s main view controller. You set it up to display heroes ordered by their name or their secret identity, and you put in place the infrastructure needed to save, delete, and add new heroes. What you didn’t do was give the user a way to edit the information about a particular hero, which means you’re limited to creating and deleting superheroes named Untitled Hero. Guess you can’t ship your application yet ;-).
That’s okay. Application development is an iterative process, and the first several iterations of any application likely won’t have enough functionality to stand on its own. In this chapter, you’re going to create an editable detail view to let the user edit the data for a specific superhero.
The controller you’re going to write will be a subclass of UITableViewController, and you’re going to use an approach that is somewhat conceptually complex but one that will be easy to maintain and expand. This is important because you’re going to be adding new attributes to the Hero managed object, as well as expanding it in other ways, so you’ll need to keep changing the user interface to accommodate those changes.
After you’ve written your new detail view controller, you will then add functionality to allow the user to edit each attribute, in place.
In Chapters 3 and 4 of Beginning iOS 6 Development, by David Mark, Jack Nutting, and Jeff LaMarche (Apress), you learned how to build a user interface using Interface Builder. Building your editable detail views in Interface Builder is definitely one way to go. But another common approach is to implement your detail view as a grouped table. Take a look at your iPhone’s Contacts application or the Contacts tab of the Phone application (Figure 4-1). The detail editing view in Apple’s navigation applications is often implemented using a grouped table rather than using an interface designed in Interface Builder.
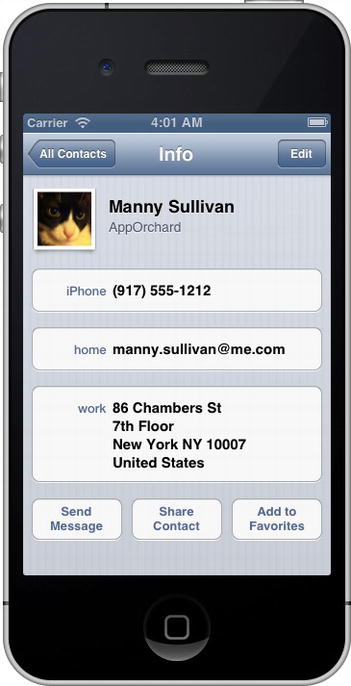
Figure 4-1. The Contacts tab of the iPhone application uses a table-based detail editing view
Since you’ve chosen to use storyboards for your SuperDB application, you’ll be using the storyboard editor. For all intents and purposes, it’s the same as building your interface with Interface Builder.
The iOS Human Interface Guidelines (http://developer.apple.com/library/ios/#documentation/UserExperience/Conceptual/MobileHIG) do not give any real guidance as to when you should use a table-based detail view as opposed to a detail view designed in Interface Builder, so it comes down to a question of which feels right. Here’s our take: if you’re building a navigation-based application and the data can reasonably and efficiently be presented in a grouped table, it probably should be. Since your superhero data is structured much like the data displayed in the Contacts application, a table-based detail view seems the obvious choice.
The table view shown in Figure 4-2 displays data from a single hero, which means that everything in that table comes from a single managed object. Each row corresponds to a different attribute of the managed object. The first section’s only row displays the hero’s name, for example. When in editing mode, tapping a specific row will display the appropriate subview to modify that attribute. For a string, it will present a keyboard; for a date, a date picker.
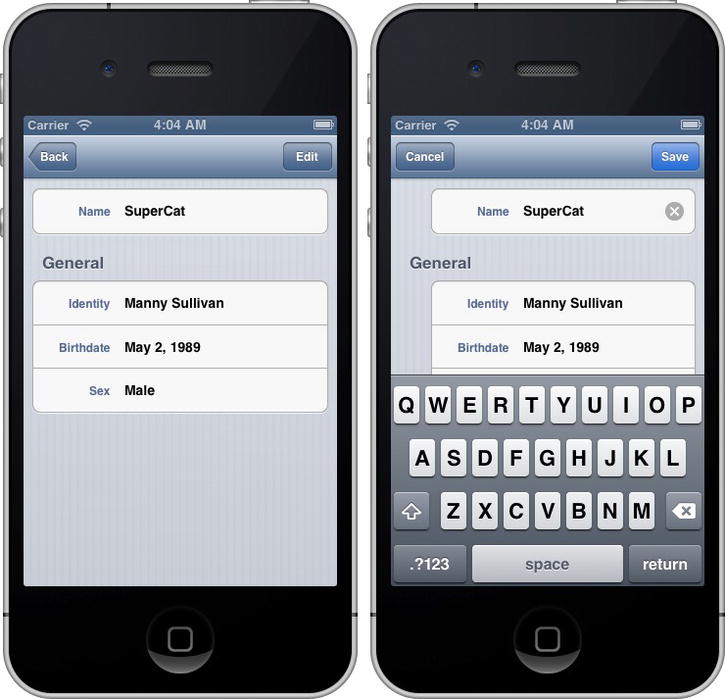
Figure 4-2. The detail view that you’ll be building in this application, in view and editing mode
The organization of the table view into sections and rows are not determined by the managed object. Instead, they are the results of design decisions you, as the developer, must make by trying to anticipate what will make sense to your users. You could, for example, put the attributes in alphabetical order, which would put birthdate first. That wouldn’t have been very intuitive because birthdate is not the most important or defining attribute of a hero. In our minds, the hero’s name and secret identity are the most important attributes and thus should be the first two elements presented in your table view.
Creating the Detail View Controller
Find your SuperDB project folder from Chapter 3 and make a copy of it. This way, if things go south when you add your new code for this chapter, you won’t have to start at the very beginning. Open this new copy of your project in Xcode.
Next, create the detail view controller itself. Remember that you’re creating a table-based editing view, so you want to subclass UITableViewController. Select SuperDB.storyboard and open the storyboard editor. Open the Utility pane, if it’s not already open, and find the table view controller in the Object library. Drag it onto the storyboard editor, to the right of the HeroListController (Figure 4-3).
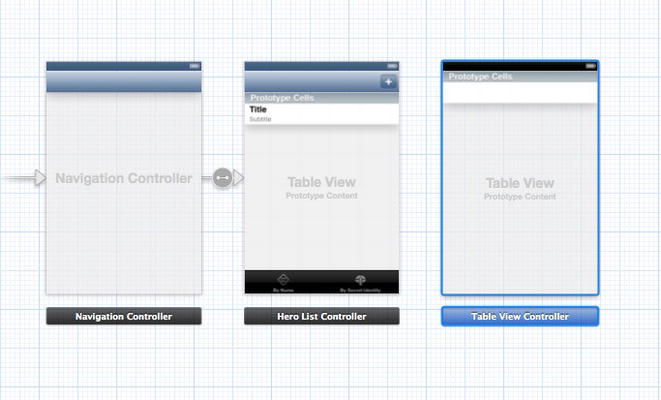
Figure 4-3. The layout of your storyboard
Make sure you’re zoom level is such that you see the three icons on the table view’s label. Single-click the table view (the grey area of the view), and switch the Utility pane to the Attribute Inspector (Figure 4-4).
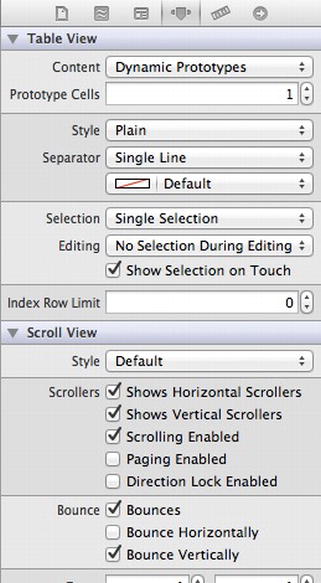
Figure 4-4. Table view’s attributes
Let’s look at the Figure 4-2 again. Your detail view has two sections, so let’s configure the table view that way. Change the Style field from Plain to Grouped. Once that’s done, the Separator field should have changed itself to Single Line Etched. If not, make the change yourself. Next, you know the number of rows in each section; one and three, respectively. Since that number is fixed, you can change the Content field from Dynamic Prototypes to Static Cells. Again, the field right below the Content field automatically changed from Prototype Cells to Sections. You know the number of sections is two, so enter 2 in that field. Finally, you don’t want to have the cells highlight on selection, so change the Selection field to No Selection. The Attribute Inspector for the table view should look like Figure 4-5.
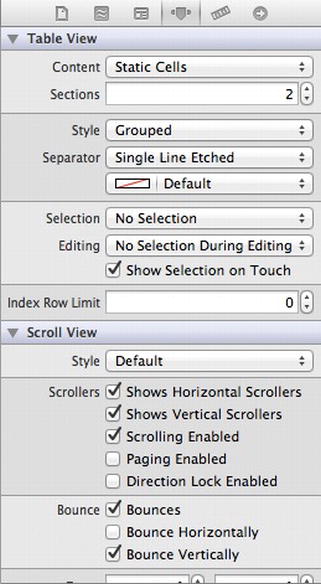
Figure 4-5. The final state of your table view attributes
Your table view should have two sections of three cells each (Figure 4-6). Section one has too many cells. You only need one cell. Select the second cell in section one. It should highlight. Delete the cell (press the Delete key, or Edit ![]() Delete). Section one should now have two cells, with the bottom cell highlighted. Delete that cell, too.
Delete). Section one should now have two cells, with the bottom cell highlighted. Delete that cell, too.
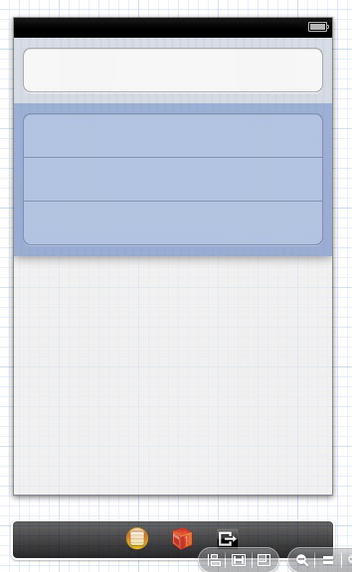
Figure 4-6. Table view
Select the table view cell in the first section. Bring the Attribute Inspector up. Change the Style from Custom to Left Detail. Set the Identifier to HeroDetailCell. Finally, set the Selection to None. The Attribute Inspector should look like Figure 4-7. Repeat the settings for the three table view cells in the second section.
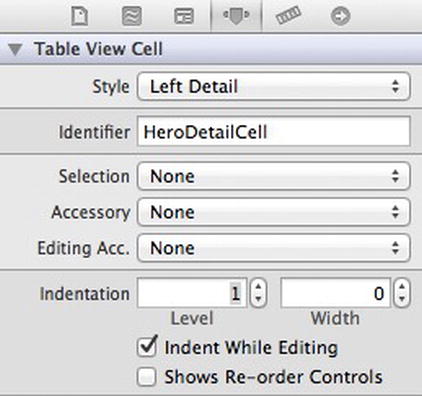
Figure 4-7. Table view cell’s attributes
The second section needs a header label, General. Select the area right above or right below the three cells in the second section. The Attribute Inspector should change to table view section (Figure 4-8). In the Header field, enter General. Now the second section should have the correct header label.
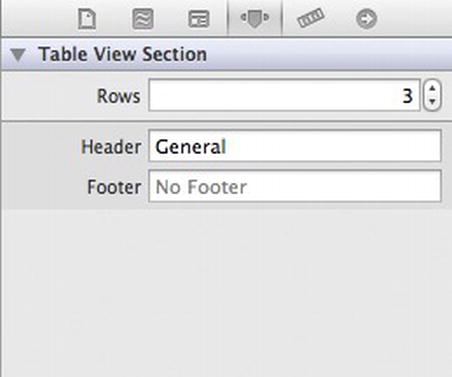
Figure 4-8. Table view section’s attributes
By the way, notice that the first field in the table view section’s Attribute Inspector is Rows. You could have used this to change the first section’s row count from three to one.
So your table view should look like Figure 4-9. It looks like the layout is all set.
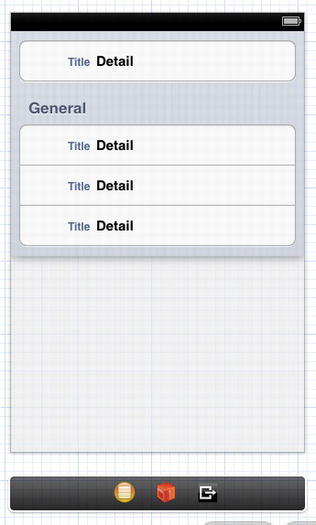
Figure 4-9. Table view layout complete
When the user taps on a cell in the HeroListController, you want the application to transition to your detail table view. Control-drag from the table view cell in the HeroListController to your detail table view (Figure 4-10). When the Segue pop-up appears (Figure 4-11), select push under the Selection Segue header.
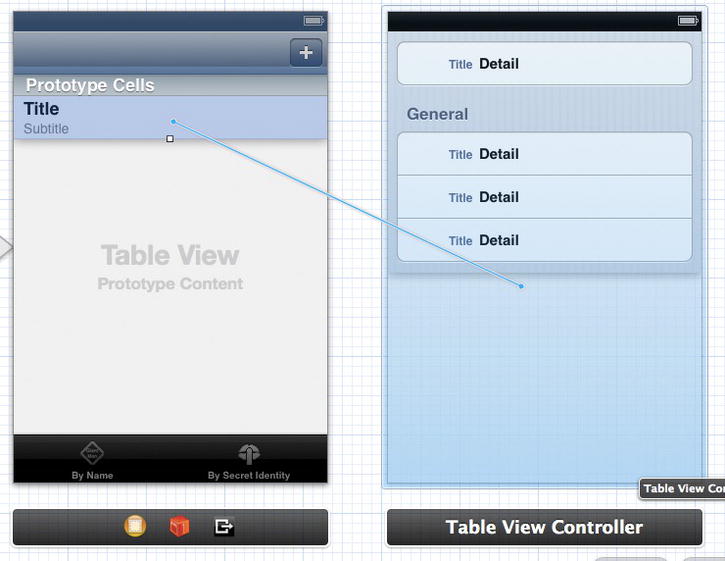
Figure 4-10. Control-drag to create the segue
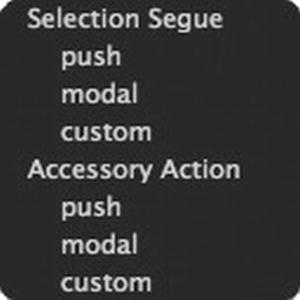
Figure 4-11. Segue pop-up selector
Now you need to create your table view subclass in order to populate your detail table view cells.
Single-click the SuperDB group in the Navigation pane. Create a new file. In the New File Assistant, select Objective-C subclass and click Next. On the next screen, name the class HeroDetailController, making it a subclass of UITableViewController. Make sure that both the “Targeted for iPad” and “With XIB for user interface” are both unchecked. Click Next. Create the file.
Moving on, select SuperDB.storyboard. In the storyboard editor, select your detail table view. Make sure the zoom level is set so you see three icons in the detail table view label. Select the table view controller icon, and bring up the Identity Inspector in the Utility pane. In the Custom Class section, change the Class field to HeroDetailController.
One more thing. When you subclassed UITableViewController, Xcode gave your HeroDetailController implementations of table view data source and delegate methods. You don’t need them right now (but will later), so you’ll comment them out. Find the following methods
- (NSInteger)numberOfSectionsInTableView:(UITableView *)tableView
- (NSInteger)tableView:(UITableView *)tableView numberOfRowsInSection:(NSInteger)section
- (UITableViewCell *)tableView:(UITableView *)tableView cellForRowAtIndexPath:(NSIndexPath *)indexPath
and comment them out (method bodies, too).
You’ve created your HeroDetailController and set your detail view controller in your storyboard to be an instance of HeroDetailController. Now you’ll create the property list that will define the table sections.
The table view architecture was designed to efficiently present data stored in collections. For example, you might use a table view to display data in an NSArray or in a fetched results controller. When you’re creating a detail view, however, you’re typically presenting data from a single object, in this case an instance of NSManagedObject that represents a single superhero. A managed object uses key-value coding but has no mechanism to present its attributes in a meaningful order. For example, NSManagedObject has no idea that the name attribute is the most important one or that it should be in its own section the way it is in Figure 4-2.
Coming up with a good, maintainable way to specify the sections and rows in a detail editing view is a non-trivial task. The most obvious solution, and one you’ll frequently see in online sample code, uses an enum to list the table sections, followed by additional enums for each section, containing constants and a count of rows for each section, like so:
enum HeroEditControllerSections {
    HeroEditControllerSectionName = 0,
    HeroEditControllerSectionGeneral,
    HeroEditControllerSectionCount
};
enum HeroEditControllerNameSection {
    HeroEditControllerNameRow = 0,
    HeroEditControllerNameSectionCount
};
enum HeroEditControllerGeneralSection {
    HeroEditControllerGeneralSectionSecretIdentityRow,
    HeroEditControllerGeneralSectionBirthdateRow,
    HeroEditControllerGeneralSectionSexRow,
    HeroEditControllerGeneralSectionCount
};
Then, in every method where you are provided with an index path, you can take the appropriate action based on the row and section represented by the index path, using switch statements, like this:
- (void)tableView:(UITableView *)tableView didSelectRowAtIndexPath:(NSIndexPath *)indexPath
{
    NSUInteger section = [indexPath section];
    NSUInteger row = [indexPath row];
    switch (section) {
        case HeroEditControllerSectionName:
            switch (row)
        {
            case HeroEditControllerNameRow :
                // Create a controller to edit name
                // and push it on the stack
                ...
                break;
            default:
                break;
        }
            break;
        case HeroEditControllerSectionGeneral:
            switch (row) {
                case HeroEditControllerGeneralSectionSecretIdentityRow:
                    // Create a controller to edit secret identity
                    // and push it on the stack
                    ...
                    break;
                case HeroEditControllerGeneralSectionBirthdateRow:
                    // Create a controller to edit birthdate and
                    // push it on the stack
                    ...
                    break;
                case HeroEditControllerGeneralSectionSexRow:
                    // Create a controller to edit sex and push it
                    // on the stack
                    ...
                    break;
                default:
                    break;
            }
            break;
        default:
            break;
    }
}
The problem with this approach is that it doesn’t scale very well at all. A nested set of switch statements like this will need to appear in almost every table view delegate or data source method that takes an index path, which means that adding or deleting rows or sections involves updating your code in multiple places.
Additionally, the code under each of the case statements is going to be relatively similar. In this particular case, you will have to create a new instance of a controller or use a pointer to an existing controller, set some properties to indicate which values need to get edited, then push the controller onto the navigation stack. If you discover a problem in your logic anywhere in these switch statements, chances are you’re going to have to change that logic in several places, possibly even dozens.
Controlling the Table Structure with Property Lists
As you can see, the most obvious solution isn’t always the best one. You don’t want to have very similar chunks of code scattered throughout your controller class, and you don’t want to have to maintain multiple copies of a complex decision tree. There’s a better way to do this.
You can use property lists to mirror the structure of your table. As the user navigates down the app, you can use the data stored in a property list to construct the appropriate table. Property lists are a simple, but powerful way to store information.
Chapter 10 of Beginning iOS 6 Development discussed property lists. Let’s quickly review them here.
Property lists are a simple way to represent, store, and retrieve data. Both Mac OS X and iOS make extensive use of property lists. Within property lists, two kinds of data types can be used: primitive and collections. The primitive types available are strings, numbers, binary data, dates, and Boolean values. The available collection types are arrays and dictionaries. The collections types can contain both primitive types and additional collections. Property lists can be stored in two file types: XML and binary data. Xcode provides a property list editor to make management of property lists easier for you. We’ll discuss that in a little bit.
Property lists start with a root node. Technically, the root node can be of any type, primitive or collection. However, a property list of a primitive type has limited usefulness as it would be a “list” of one value. More common is a root node of a collection type: an array or a dictionary. When you create a property list with the Xcode property list editor, the root node will be a dictionary.
Note To learn more detail about property lists, read Apple’s documentation at http://developer.apple.com/library/ios/#documentation/Cocoa/Conceptual/PropertyLists/Introduction/Introduction.html.
Modeling Table Structure with a Property List
So how can you use a property list to describe your table? Refer back to Figure 4-2. Looking at the table, you can see two sections. The first section has no header, but the second section has a header of General. Each section has a certain number of rows (one and three, respectively) where each row represents a specific attribute of your managed object. Additionally, each row also has a label, which tells you what value is being displayed.
To start, you represent the table as an array, with each item in the array representing a section of the table. Each section, in turn, will be represented by a dictionary. You have a header key in the section dictionary, which stores the string value of the header. Note that the first section of the table does not have a header; you just use an empty string to represent it.
Note If you recall, there are only five primitive data types in a property list: string, numbers, binary data, dates, and Booleans. That doesn’t leave you with a way to represent nil values. So you must rely on an empty string to represent nil.
The second key of the section dictionary will be rows. The value for this key will be another array, where each item of the rows array will represent the data to render the row. To represent a row, you’ll use another dictionary. This row dictionary will have a key of label, referencing a string that will be used as the row label plus a key of attribute, which will be a string of the managed object’s attribute to render in the row.
Confused? Don’t worry, it’s very difficult to model things descriptively. Figure 4-12 tries to explain it graphically.
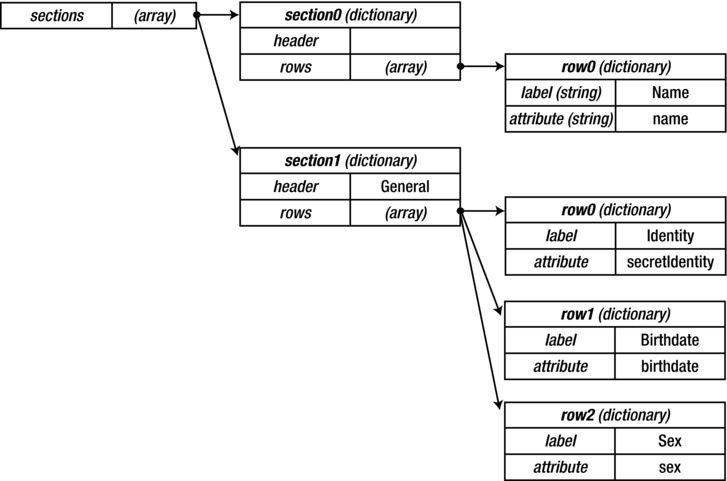
Figure 4-12. Graphical representation of your property list
That should be all the data structures you need to represent the table’s structure to start. Fortunately, if you discover that you need additional information for each row, you can always add additional data later without impacting your existing design.
Let’s begin building your detail view.
Defining the Table View via Property List
In the Navigator pane, select the Supporting Files group so that it is highlighted. Now, create a new file. Once the new file template appears, select Resource under the iOS heading. Choose the Property List template (Figure 4-13), and click Next. Name the file HeroDetailConfiguration.plist, and click Create. A new file, named HeroDetailConfiguration.plist, should appear in the Supporting Files group. The file should be selected and the editor should switch to the property list editor (Figure 4-14).
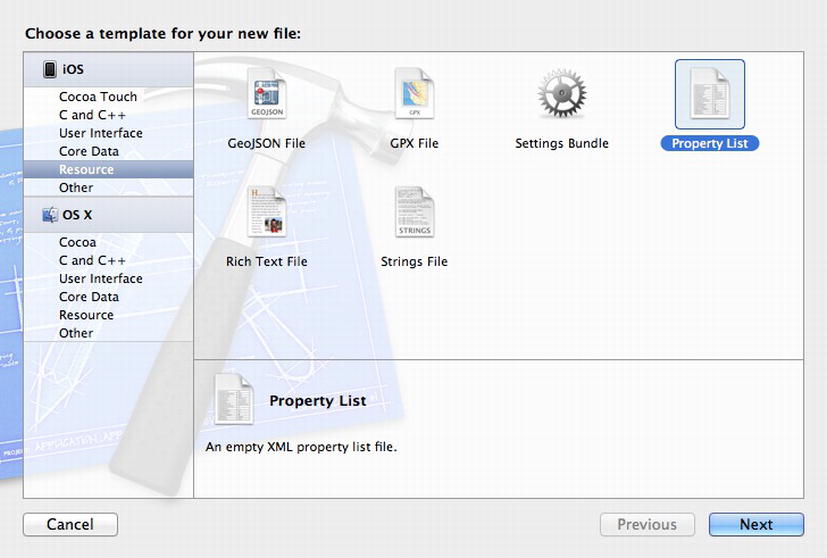
Figure 4-13. Resource file templates
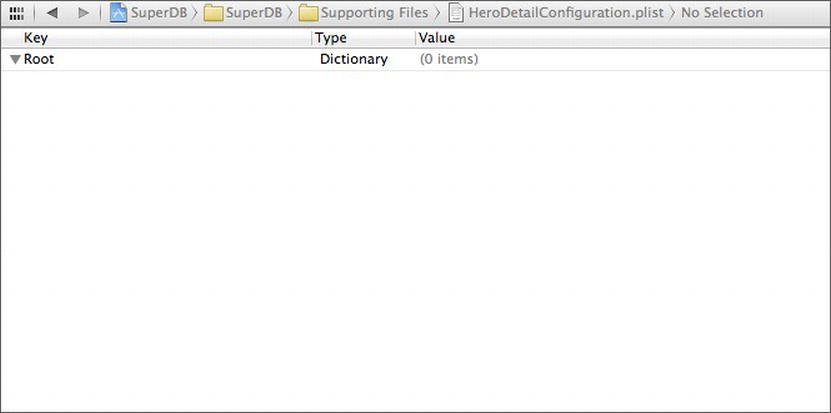
Figure 4-14. Xcode property list editor mode
Earlier we stated that the root node of a property list is a dictionary. That means each node will be a key/value pair. You can treat the key as a string, and the value can be of any of the primitive (string, number, binary data, date, or Boolean) or collection (array or dictionary) data types.
You’re going to start by creating the sections array, as we discussed earlier. To do so, you need to add a new item to the property list. There are two ways to do this. Both methods require you select the row with the name Root in the Key column. Using the first method, control-click in the blank area of the property list editor. When the pop-up menu appears, choose Add Row. Alternately, you can use the regular menu Editor ![]() Add Item option. Either way, a new row should appear in the property list editor (Figure 4-15). The item should have a key of New item, which will be selected and highlighted. Type sections and press Return to change the key name.
Add Item option. Either way, a new row should appear in the property list editor (Figure 4-15). The item should have a key of New item, which will be selected and highlighted. Type sections and press Return to change the key name.

Figure 4-15. Adding an item to the property list
Next, click the arrows next to string under the Type column to expose the possible data types. Select array. The Value column should change to read (0 items). Adding items to the sections array is a little tricky, so make sure you follow the next steps carefully.
When you changed the type from string to array, a disclosure triangle was added to the left of the sections key (Figure 4-16). Click this triangle so it is pointed downward (Figure 4-17). Now click the + button to the right of the sections. This will insert a new row. Additionally, the Value column for sections will change to read (1 item). The key of the new row will be Item 0; the type will be string; the Value column will be selected. Don’t type anything; select the sections row so it is highlighted and click the + next to sections again. This will insert another row with the key Item 1, of type string, with no value. The Value cell should be selected with a cursor. Change the type for Item 0 and Item 1 from string to dictionary (Figure 4-18).

Figure 4-16. Changing the type from string to array

Figure 4-17. Click the disclosure triangle to open the array
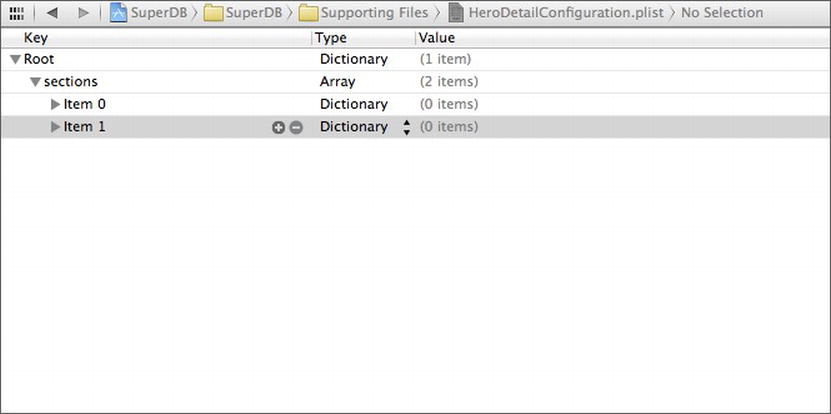
Figure 4-18. Adding two dictionary items
Remember that you were going to create an array where each item in the array represented a section of your table view? You’ve created those two items. Item 0 is the first section of HeroDetailController table view; Item 1 is the second.
Now you create the rows array under each section to hold the row information for each section. Next to Item0 there should be a disclosure triangle. Open it, and click the + next to Item0. This will create a new row with key New Item, of type string, under Item0. Change the key to rows, and change the type to array. Open the disclosure triangle next to rows, and click the + button. This will create another Item0, this time under rows. Change the type from string to dictionary. Repeat this procedure, adding a rows item under the Item1 header. This time, create three items under this second rows item. Your property list editor should look like Figure 4-19.
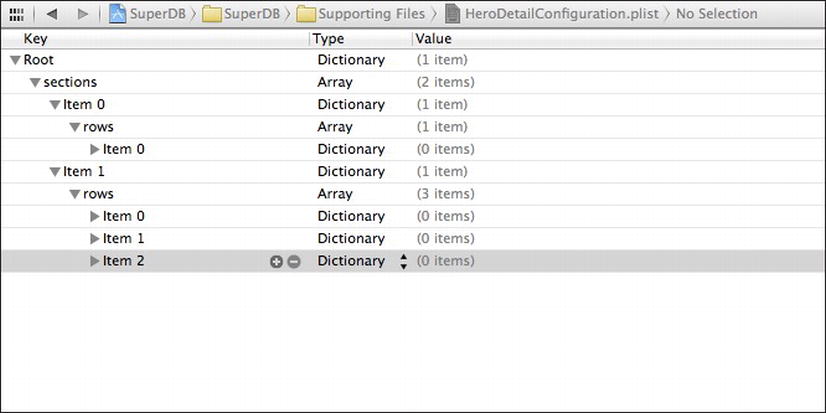
Figure 4-19. HeroDetailConfiguration.plist
For each item in each rows array, you need to add two more entries. They should be of type string, and their keys should be key and label, respectively. For section ![]() Item 0
Item 0 ![]() rows, the key value should be name and the label value should be set to Name. For section
rows, the key value should be name and the label value should be set to Name. For section ![]() Item 1
Item 1 ![]() rows, the values for key and label should be secretIdentity and Identity; birthdate and Birthdate; sex and Sex. When completed, the property list editor pane should look like Figure 4-20.
rows, the values for key and label should be secretIdentity and Identity; birthdate and Birthdate; sex and Sex. When completed, the property list editor pane should look like Figure 4-20.
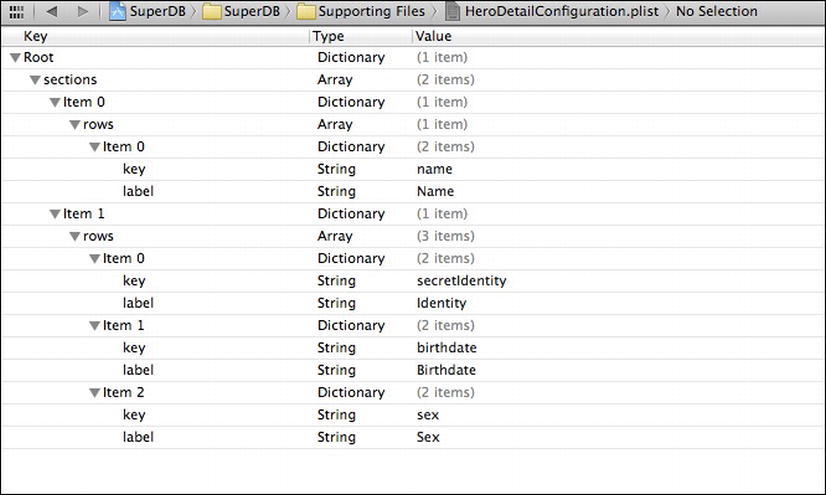
Figure 4-20. The completed HeroDetailConfiguration.plist
Now, you’ll use this property list to set up the HeroDetailController table view.
You need to add a property to store the information from the property list you just created. Since this property only needs to be used by the HeroDetailController internally, you’ll make it a private, via the category inside of HeroDetailController.m.
@interface HeroDetailController ()
@property (strong, nonatomic) NSArray *sections;
@end
Next, you need to load the property list and read the sections key. Before the end of viewDidLoad, add the following:
NSURL *plistURL = [[NSBundle mainBundle] URLForResource:@"HeroDetailConfiguration"
                                           withExtension:@"plist"];
NSDictionary *plist = [NSDictionary dictionaryWithContentsOfURL:plistURL];
self.sections = [plist valueForKey:@"sections"];
You declare a property, sections, of type NSArray, to hold the contents of the sections array in your HeroDetailConfiguration.plist property list. You read in the contents of the property list using the NSDictionary class method dictionaryWithContentsOfURL:. Since you know that this dictionary only has one key/value pair, with a key of sections, you read that value into sections property. You then use that property to layout the HeroDetailController table view.
You now have the metadata needed to populate your HeroDetailController’s table view cells, but you don’t have the data. The data should come from the HeroListController in one of two ways: when the user taps on a cell and when the user taps on the Add (+) button.
Pushing the Details
Before you can send the data down from the HeroListController, you need something to receive it in the HeroDetailController. Add the following property to the HeroDetailController interface declaration in HeroDetailController.h:
@property (strong, nonatomic) NSManagedObject *hero;
Now edit the HeroListController.m. Find the addHero: method. Change the line that reads
[NSEntityDescription insertNewObjectForEntityForName:[entity name]
                               inManagedObjectContext:managedObjectContext];
to
NSManagedObject *newHero = [NSEntityDescription insertNewObjectForEntityForName:[entity name]
                                                 inManagedObjectContext:managedObjectContext];
Then add the following to the end:
[self performSegueWithIdentifier:@"HeroDetailSegue" sender:newHero];
First, you assign your new Hero instance to the variable newHero. Then you told the HeroListController to execute the segue named HeroDetailSegue and pass newHero as the sender. Where did that segue name, HeroDetailSegue, come from? From you.
Remember the segue you created earlier for when a user taps on a cell in the HeroListController? Well, now you’re going to get rid of it. Why? Because it doesn’t give you the flexibility you need to transition from both a cell and the Add (+) button. You need to create a manual segue and invoke it from code.
Select the SuperDB.storyboard, and find the segue between the HeroListController and the HeroDetailController. Delete it. Control-drag from the HeroListController (the icon in the label) to the HeroDetailController (somewhere in the view). A pop-up with a header of Manual Segue should appear; choose the push menu item. A new segue should appear between the two view controllers, select it. In the Attributes Inspector, give it the identifier HeroDetailSegue (Figure 4-21).
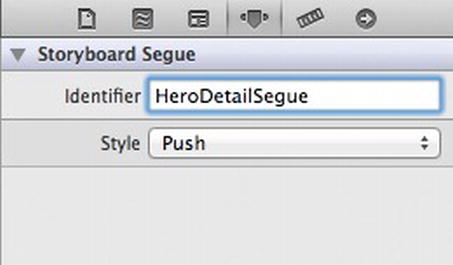
Figure 4-21. Setting the segue identifier
Now you need to reconnect the HeroListController cells to the HeroDetailSegue. Edit HeroListController.m. Find the method tableView:didSelectRowAtIndexPath: and replace the method body with
NSManagedObject *selectedHero = [self.fetchedResultsController objectAtIndexPath:indexPath];
[self performSegueWithIdentifier:@"HeroDetailSegue" sender:selectedHero];
You’re essentially doing the same thing you did in addHero:, except that the Hero object is coming from the fetched results controller rather than being created. This looks good so far, but you still aren’t sending data to the HeroDetailController. You handle that in the UIViewController method prepareForSegue:sender:. Add this method to the HeroListController (you can put it anywhere, but you put it after the setEditing:animated: method):
- (void)prepareForSegue:(UIStoryboardSegue *)segue sender:(id)sender
{
    if ([segue.identifier isEqualToString:@"HeroDetailSegue"])
    {
        if ([sender isKindOfClass:[NSManagedObject class]]) {
            HeroDetailController *detailController = segue.destinationViewController;
            detailController.hero = sender;
        }
        else {
            UIAlertView *alert =
                  [[UIAlertView alloc] initWithTitle:NSLocalizedString(@"Hero Detail Error",
                                                                       @"Hero Detail Error")
                                     message:NSLocalizedString(@"Error trying to show Hero detail",
                                                                   @"Error trying to show Hero detail")
                                    delegate:self
                           cancelButtonTitle:NSLocalizedString(@"Aw, Nuts", @"Aw, Nuts")
                           otherButtonTitles:nil];
            [alert show];
        }
    }
}
Note that prepareForSegue:sender: is called by performSegueWithName:sender: internally. It’s a hook Apple gives you to set things up correctly before showing the HeroDetailController.
By the way, Xcode should have complained about HeroDetailController and detailController.hero. Add the following #import at the top of HeroListViewController.m:
#import "HeroDetailController.h"
You’re sending the Hero object down from the HeroListController to the HeroDetailController. Now you’re ready to show the details. Edit HeroDetailController.m and find tableView:cellForRowAtIndexPath:. Remember you commented it out earlier, so it won’t show up in the jump bar function menu. Uncomment it and replace the body with this:
static NSString *CellIdentifier = @"HeroDetailCell";
UITableViewCell *cell = [tableView dequeueReusableCellWithIdentifier:CellIdentifier];
if (cell == nil)
    cell = [[UITableViewCell alloc] initWithStyle:UITableViewCellStyleValue2
                                   reuseIdentifier:CellIdentifier];
// Configure the cell...
NSUInteger sectionIndex = [indexPath section];
NSUInteger rowIndex = [indexPath row];
NSDictionary *section = [self.sections objectAtIndex:sectionIndex];
NSArray *rows = [section objectForKey:@"rows"];
NSDictionary *row = [rows objectAtIndex:rowIndex];
cell.textLabel.text = [row objectForKey:@"label"];
cell.detailTextLabel.text = [self.hero valueForKey:[row objectForKey:@"key"]];
return cell;
Build and run the app. You get your list of heroes. Tap one to see the details.
It didn’t work, did it? Why not? The problem is the birthdate attribute. If you recall, birthdate is an NSDate object. And cell.textLabel.text expects a string. You’ll handle properly in a little bit, but for now change the assignment to read
cell.detailTextLabel.text = [[self.hero valueForKey:[row objectForKey:@"key"]] description];
Try running it again. View an existing hero and try adding a new one. After adding a hero, your detail view should look like Figure 4-22.
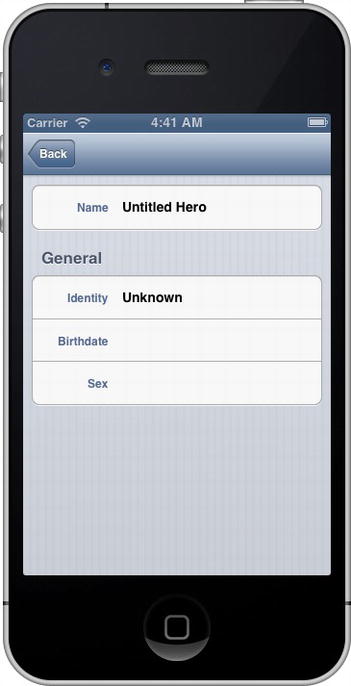
Figure 4-22. Detail view for a new hero
Look back at Figure 4-2 and compare it to Figure 4-22. Note that the left image in Figure 4-2 has an Edit button on the right side of the navigation bar. And Figure 4-2 specifies that you have an Edit mode for the detail view, as seen in the right image. Let’s add the Edit button and implement the Edit mode in the HeroDetailController.
Editing Mode in the Detail View
Compare the two images in Figure 4-2. How do they differ? First, the Edit button in the left image has been replaced with a Save button in the right image. Also, the Save button is highlighted. The Back button has been replaced with a Cancel button. The cells in the right image appear to be indented. While it appears to be a lot of changes, it’s actually not that much effort to implement.
First, add the Edit button to the navigation bar. Select HeroDetailController.m and find the viewDidLoad method. Uncomment the following line:
self.navigationItem.rightBarButtonItem = self.editButtonItem;
Run the application and drill down to the detail view. There’s the Edit button on the right side of the navigation bar. If you click it, the view should change to look like Figure 4-23.
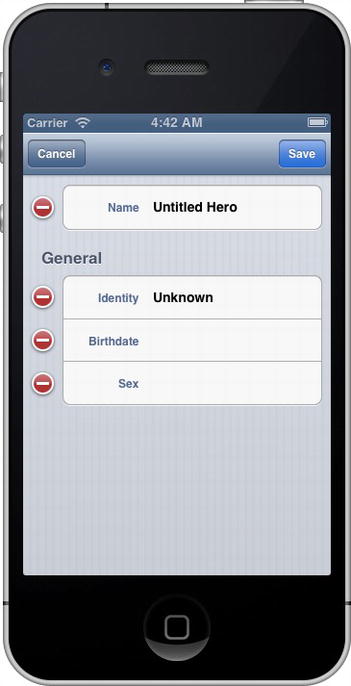
Figure 4-23. The detail view in editing mode
Note that the Edit button has automatically changed into a Done button and is highlighted. If you click Done, it will revert back into the Edit button. This is fine, but you really want the Done button to read Save. That’s a little more work.
As you’ve seen, the editButtonItem method gives you an instance of a UIBarButton that toggles between Edit and Done when pressed. It also toggles the editing property in your HeroDetailController (which inherits the property from UITableViewController) between NO and YES. The button also invokes the setEditing:animated: callback.
You want to replace the Done with Save. To accomplish this, you need to replace the Edit button with a Save button. While you’re at it, add a specific method to handle the saving, which you’ll use later. First, you need to add a property for the Save button and a callback method. Since you only access the Save button inside HeroDetailController, you can make it a private property. And since the callback is only used by the Save button you can make that a private declaration as well. Edit HeroDetailController.m and add it to the category.
@interface HeroDetailController ()
@property (strong, nonatomic) NSArray *sections;
@property (strong, nonatomic) UIBarButtonItem *saveButton;
- (void)save;
@end
Now you need to create an instance of a Save button and assign it to this variable. Add the following to viewDidLoad in HeroDetailController.m, right after the Edit button code you just uncommented.
self.saveButton = [[UIBarButtonItem alloc] initWithBarButtonSystemItem:UIBarButtonSystemItemSave

                                       target:self
                                   action:@selector(save)];
Now, you need to switch between the Edit and Save buttons. But where do you call this method? Remember, when the Edit button is pressed, it invokes the setEditing:animated: method. Override the default setEditing:animated: method, and have yours switch the buttons.
- (void)setEditing:(BOOL)editing animated:(BOOL)animated
{
        [super setEditing:editing animated:animated];
        self.navigationItem.rightBarButtonItem = (editing) ? self.saveButton : self.editButtonItem;
}
And you need to add the save method (put it at the bottom of the file, just before the @end).
#pragma mark - (Private) Instance Methods
- (void)save
{
        [self setEditing:NO animated:YES];
}
Save your work and run the application. Navigate down the detail view, and click the Edit button. It should toggle between Edit and Save as you toggle in and out of editing mode. Now, let’s fix it so the Back button changes into a Cancel button.
The process is almost identical to what you did for the Edit/Save buttons: declare a property and callback method, and toggle the button in the navigation bar. However, you also need an property to store the Back button. Add the following to the HeroDetailController category:
@property (strong, nonatomic) UIBarButtonItem *backButton;
@property (strong, nonatomic) UIBarButtonItem *cancelButton;
- (void)cancel;
Assign the backButton to the left navigation bar button, and create an instance of the Cancel button in viewDidLoad.
self.backButton = self.navigationItem.leftBarButtonItem;
self.cancelButton = [[UIBarButtonItem alloc] initWithBarButtonSystemItem:UIBarButtonSystemItemCancel
                               target:self
                                           action:@selector(cancel)];
Modify setEditing:animated: to toggle the Back and Cancel buttons.
self.navigationItem.leftBarButtonItem = (editing) ? self.cancelButton : self.backButton;
Finally, add the cancel callback method. For now, it’s identical to the save method, but you’ll be changing that soon.
- (void)cancel
{
    [self setEditing:NO animated:YES];
}
Run the application again. When you hit the Edit button in the detail view, the Back button should switch to Cancel. If you press the Cancel button, you should exit editing mode.
Now you want to eliminate those red buttons that appear to right of each cell in editing mode. When you click those buttons, they rotate and a Delete button will appear in the appropriate cell. This isn’t really relevant for the detail view, you can’t delete an attribute (you can, however, clear it, or set its value to nil). So you don’t want this button to appear at all. Add this method to HeroDetailController.m (somewhere with the other table view delegate methods):
- (UITableViewCellEditingStyle)tableView:(UITableView *)tableView
            editingStyleForRowAtIndexPath:(NSIndexPath *)indexPath
{
 return UITableViewCellEditingStyleNone;
}
Running application shows that the red buttons are gone. You are able to toggle the detail view in and out of editing mode, but you still can’t edit anything. There’s still a bit of work ahead of you to add this functionality.
Creating a Custom UITableViewCell Subclass
Let’s look at the Contacts application. When you edit a contact’s attributes, an accessory view appears, with a keyboard (Figure 4-24), allowing for inline editing. You’re going to emulate this functionality in your SuperDB application. This is going to require you to develop a custom UITableViewCell subclass.
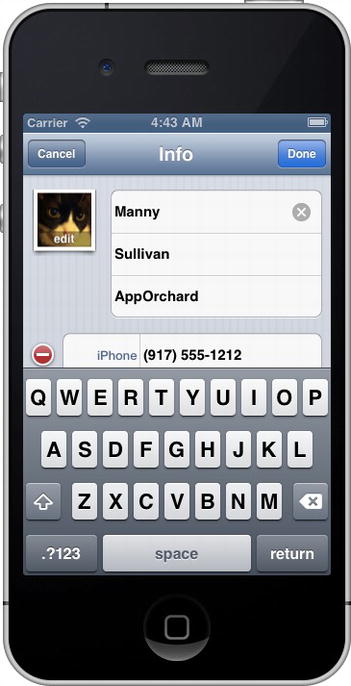
Figure 4-24. Editing in the Contacts application
Let’s look at the current layout of the table view cell. Currently, you set two parts of the cell: the textLabel and the detailTextLabel (Figure 4-25). Both parts are static text; you can assign the values programmatically, but you are unable to interact with them via the user interface. The iOS SDK does not give you a class where you can assign the textLabel statically but edit the detailTextLabel portion. That’s what you have to build.
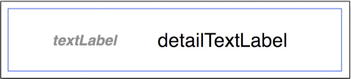
Figure 4-25. Current breakdown of the table view cell
The key component is replacing the detailTextLabel property with a UITextField. This will give you the ability to edit within the table view cell. Since you replaced one portion of the table view cell, you have to replace the textLabel as well. Since that text is static, you’ll use a UILabel. In principle, your custom table view cell should look like Figure 4-26.
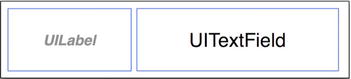
Figure 4-26. Breakdown of your custom table view cell
Let’s get started.
Single click the SuperDB group in the Navigator pane, and create a new file. Choose Objective-C class, under the iOS/Cocoa Touch templates. Make this class a subclass of UITableViewCell. Let’s name the file SuperDBEditCell.m. Click Next, then Create.
You need a UILabel and a UITextField. Add those properties to SuperDBEditCell.h.
@interface SuperDBEditCell : UITableViewCell

@property (strong, nonatomic) UILabel *label;
@property (strong, nonatomic) UITextField *textField;
@end
Now add the appropriate initialization code. Edit SuperDBEditCell.m and find initWithStyle:reuseIdentifier:. Right after the Initialization Code comment, add
self.selectionStyle = UITableViewCellSelectionStyleNone;

self.label = [[UILabel alloc] initWithFrame:CGRectMake(12.0, 15.0, 67.0, 15.0)];
self.label.backgroundColor = [UIColor clearColor];
self.label.font = [UIFont boldSystemFontOfSize:[UIFont smallSystemFontSize]];
self.label.textAlignment = NSTextAlignmentRight;
self.label.textColor = kLabelTextColor;
self.label.text = @"label";
[self.contentView addSubview:self.label];

self.textField = [[UITextField alloc] initWithFrame:CGRectMake(93.0, 13.0, 170.0, 19.0)];
self.textField.backgroundColor = [UIColor clearColor];
self.textField.clearButtonMode = UITextFieldViewModeWhileEditing;
self.textField.enabled = NO;
self.textField.font = [UIFont boldSystemFontOfSize:[UIFont systemFontSize]];
self.textField.text = @"Title";
[self.contentView addSubview:self.textField];
Note that kLabelTextColor is a constant that you calculated so the label will have the same color as before. Add this #define before the @implementation directive:
#define kLabelTextColor [UIColor colorWithRed:0.321569f green:0.4f blue:0.568627f alpha:1.0f]
Now you need to adjust the HeroDetailController to use SuperDBEditCell. But before you do that, you need to fix the configuration in SuperDB.storyboard.
Open SuperDB.storyboard, and select the first table view cell in the HeroDetailController. Open the Identity Inspector and change the Class field to SuperDBEditCell. Switch to the Attributes Inspector, and change the Style to Custom. Repeat this for the three other table view cells.
Open HeroDetailController.m. Add this #import
#import "SuperDBEditCell.h"
as the second #import directive. Then find tableView:cellForRowAtIndexPath: and edit it to read
static NSString *CellIdentifier = @"SuperDBEditCell";
SuperDBEditCell *cell = [tableView dequeueReusableCellWithIdentifier:CellIdentifier];
if (cell == nil)
    cell = [[SuperDBEditCell alloc] initWithStyle:UITableViewCellStyleValue2
                                   reuseIdentifier:CellIdentifier];
// Configure the cell. . .
NSUInteger sectionIndex = [indexPath section];
NSUInteger rowIndex = [indexPath row];
NSDictionary *section = [self.sections objectAtIndex:sectionIndex];
NSArray *rows = [section objectForKey:@"rows"];
NSDictionary *row = [rows objectAtIndex:rowIndex];
cell.label.text = [row objectForKey:@"label"];
cell.textField.text = [[self.hero valueForKey:[row objectForKey:@"key"]] description];
return cell;
Save and run the app. It should behave exactly as before you created your custom table view cell. Now you can turn on the ability to edit.
Override the setEditing: method in SuperDBEditCell.m .
- (void)setEditing:(BOOL)editing animated:(BOOL)animated
{
   [super setEditing:editing animated:animated];
 self.textField.enabled = editing;
}
Save and run the app again. Navigate to the detail view, and enter editing mode. Tap over the Unknown Hero of the Identity row. You should see the keyboard input view appear on the bottom of the screen, and a cursor should appear at the end of Unknown Hero. Click another row. The cursor should appear in that row.
Let’s edit the Identity row. Tap over the Unknown Hero to activate the keyboard input view. Click the x button at the right end of the cell. This should erase Unknown Hero. Now type Super Cat, and tap Save. You should exit editing mode, and your hero’s new identity should read Super Cat. Tap on Back to return to the list view.
Wait. What happened? You renamed your hero Super Cat, but the list view still shows Unknown Hero. If you click on the Unknown Hero row, the detail view also still shows Unknown Hero. Why weren’t your changes saved?
Remember when you added the Save button to the detail view? You also added a callback, save, to be invoked when the Save button was pressed. Let’s look at the callback again.
- (void)save
{
    [self setEditing:NO animated:YES];
}
Note that this method doesn’t save anything! All it does is turn off editing mode. Let’s figure out how to save your changes for real.
Let’s review your detail view. The detail view is a table view managed by your HeroDetailController. The HeroDetailController also has a reference to your Hero object, which is an NSManagedObject. Each row in the table view is your custom table view cell class, SuperDBEditCell. Depending on which row you need, you assign a different hero attribute to display.
Now, to save the changes you make, the Save button invokes the save method. This is the point where you need to save the changes to your NSManagedObject. You will modify your SuperDBEditCell class to know what attribute it is displaying. In addition, you will define a property, value, to tell you the new data in the cell.
First, add your properties to SuperDBEditCell.h.
@property (strong, nonatomic) NSString *key;
@property (strong, nonatomic) id value;
Next, edit SuperDBEditCell.m to define an property override methods for the value property.
#pragma mark - Property Overrides
- (id)value
{
    return self.textField.text;
}
- (void)setValue:(id)aValue
{
    self.textField.text = aValue;
}
Finally, modify HeroDetailController.m to assign the key name to each cell inside tableView:cellForRowAtIndexPath.
cell.key = [row objectForKey:@"key"];
Then iterate over each cell on save to update the hero’s attributes in the save method.
for (SuperDBEditCell *cell in [self.tableView visibleCells])
    [self.hero setValue:[cell value] forKey:[cell key]];

NSError *error;
if (![self.hero.managedObjectContext save:&error])
    NSLog(@"Error saving: %@", [error localizedDescription]);

[self.tableView reloadData];
Save and run the application. Navigate down to the detail view, and enter editing mode. Change the Identity to Super Cat and click Save. Click the Back button to return to the list view. You should see that the hero’s identity is now displaying Super Cat.
Now you’re going to work on specialized input views for the birthdate and sex attributes.
Note that when you click the Birthdate or Sex row in the detail view, the keyboard input view is displayed. You could allow the user to enter the birthdate or sex via the keyboard and validate the input, but there is a better way. You can create subclasses of SuperDBEditCell to handle those special cases.
DatePicker SuperDBEditCell Subclass
Single-click the SuperDB group in the Navigator pane, and create a new file. Select Objective-C class, and make it a subclass of SuperDBEditCell. Name the class SuperDBDateCell and create the files. Edit SuperDBDateCell.m to read as follows:
#import "SuperDBDateCell.h"

static NSDateFormatter *__dateFormatter = nil;

@interface SuperDBDateCell ()
@property (strong, nonatomic) UIDatePicker *datePicker;
- (IBAction)datePickerChanged:(id)sender;
@end

@implementation SuperDBDateCell

+ (void)initialize
{
    __dateFormatter = [[NSDateFormatter alloc] init];
    [__dateFormatter setDateStyle:NSDateFormatterMediumStyle];
}
- (id)initWithStyle:(UITableViewCellStyle)style reuseIdentifier:(NSString *)reuseIdentifier
{
    self = [super initWithStyle:style reuseIdentifier:reuseIdentifier];
    if (self) {
        // Initialization code
        self.textField.clearButtonMode = UITextFieldViewModeNever;
        self.datePicker = [[UIDatePicker alloc] initWithFrame:CGRectZero];
        self.datePicker.datePickerMode = UIDatePickerModeDate;
        [self.datePicker addTarget:self
                             action:@selector(datePickerChanged:)
                   forControlEvents:UIControlEventValueChanged];
        self.textField.inputView = _datePicker;
    }
    return self;
}
#pragma mark - SuperDBEditCell Overrides
- (id)value
{
    if (self.textField.text == nil || [self.textField.text length] == 0)
        return nil;
    return self.datePicker.date;
}
- (void)setValue:(id)value
{
    if (value != nil && [value isKindOfClass:[NSDate class]]) {
        [self.datePicker setDate:value];
        self.textField.text = [__dateFormatter stringFromDate:value];
    }
    else {
        self.textField.text = nil;
    }
}
#pragma mark - (Private) Instance Methods
- (IBAction)datePickerChanged:(id)sender
{
    NSDate *date = [self.datePicker date];
    self.value = date;
    self.textField.text = [__dateFormatter stringFromDate:date];
}

@end
What have you done here? You defined a local static variable __dateFormatter of type NSDateFormatter. You’re doing this because creating an NSDateFormatter is an expensive operation, and you don’t want to have to create a new instance every time you want to format a an NSDate object. You could have made it a private property of SuperDBDateCell and lazily created it, but that would mean you would create a new one for every instance of SuperDBDateCell. By making it a local static variable, you only have to create one instance for the lifetime of the SuperDB application.
Next, you declared a private UIDatePicker property, datePicker, and a callback for datePicker, datePickerChanged.
In the SuperDBDateCell @implementation, you defined a class method, +initialize. This is a special class method inherited from NSObject. The SuperDB application will call SuperDBDateCell + initialize exactly one time, before any call to the SuperDBDateCell class or an instance. This is where you initialize the local static __dateFormatter to hold an NSDateFormatter instance.
You added some custom initialization code to initWithStyle:reuseIdentifier:. This is where you instantiate the datePicker property and assign it to the textField inputView property. Normally inputView is nil. This tells iOS to use the keyboard input view for the textField. By assigning it an alternate view, you’re telling iOS to show the alternate view when editing the textField.
SuperDBDateCell overrides the value property to make sure you display and return an NSDate, rather than an NSString. This is where you use the __dateFormatter to convert the date to a string, then assign it to the textField text property.
Finally, you implement the datePicker’s callback for when you change the date via the UI. Every time you change the date in the datePicker, you update the textField to reflect that change.
Using the DatePicker SuperDBEditCell Subclass
Let’s review how the table view cells are created. In the HeroDetailController, you created the cells in the tableView:cellForRowAtIndexPath: method. When you first wrote this method, you created an instance UITableViewCell. Later, you replaced this with an instance of your custom subclass, SuperDBEditCell. Now you‘ve created another subclass for a specific IndexPath, the IndexPath displaying the birthdate attribute. How can you tell your application which custom subclass to use? That’s right, you’ll add that information to your property list: HeroDetailController.plist.
Single-click HeroDetailController.plist. Expand all the disclosure triangles, so you can see all the elements. Navigate down sections ![]() Item 0
Item 0 ![]() rows
rows ![]() Item 0
Item 0 ![]() key. Single-click the key row so that it is highlighted. Click the
+
button next to key. Rename this row from New Item to class. In the value column, type SuperDBEditCell. Repeat this for all the key rows under sections
key. Single-click the key row so that it is highlighted. Click the
+
button next to key. Rename this row from New Item to class. In the value column, type SuperDBEditCell. Repeat this for all the key rows under sections ![]() Item 1. They should all have the value SuperDBEditCell, except for the class row below the birthdate key. That should have a value of SuperDBDateCell (Figure 4-27).
Item 1. They should all have the value SuperDBEditCell, except for the class row below the birthdate key. That should have a value of SuperDBDateCell (Figure 4-27).
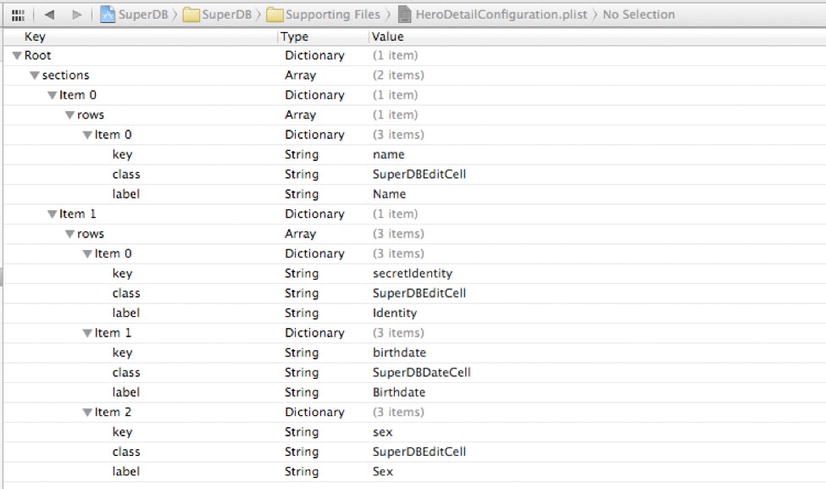
Figure 4-27. HeroDetailController.plist after adding the table view cell class key
You need to modify tableView:cellForRowAtIndexPath: to make use of the information you just placed in the property list. Open HeroDetailController.m, and edit tableView:cellForRowAtIndexPath: to appear like this:
- (UITableViewCell *)tableView:(UITableView *)tableView cellForRowAtIndexPath:(NSIndexPath *)indexPath
{
    NSUInteger sectionIndex = [indexPath section];
    NSUInteger rowIndex = [indexPath row];
    NSDictionary *section = [self.sections objectAtIndex:sectionIndex];
    NSArray *rows = [section objectForKey:@"rows"];
    NSDictionary *row = [rows objectAtIndex:rowIndex];
    NSString *cellClassname = [row valueForKey:@"class"];
    SuperDBEditCell *cell = [tableView dequeueReusableCellWithIdentifier:cellClassname];
    if (cell == nil) {
        Class cellClass = NSClassFromString(cellClassname);
        cell = [cellClass alloc];
        cell = [cell initWithStyle:UITableViewCellStyleValue2 reuseIdentifier:cellClassname];
    }
    // Configure the cell. . .
    cell.key = [row objectForKey:@"key"];
    cell.value = [self.hero valueForKey:[row objectForKey:@"key"]];
    cell.label.text = [row objectForKey:@"label"];
    return cell;
}
Save and run the application. Navigate down to the detail view, and enter editing mode. Click the Birthdate cell, next to the label. The accessory input view should appear and should be a date picker set to today’s date. When you change the date in the date picker, the date should change in the table view cell.
There’s one more input to take care of. This version of your application uses the string attribute editor to solicit the sex (sorry, we couldn’t resist!) of the superhero. This means that there is no validation on the input other than that it’s a valid string. A user could type M, Male, MALE, or Yes, Please, and they would all be happily accepted by the application. That means, later on, if you want to let the user sort or search their heroes by gender, you could have problems because the data won’t be structured in a consistent manner. You’ll tackle that problem next.
Implementing a Selection Picker
As you saw earlier, you could have enforced a specific sex spelling by using a regular expression, putting up an alert if the user typed something besides Male or Female. This would have prevented values other than the ones you want from getting entered, but this approach is not all that user friendly. You don’t want to annoy your user. Why make them type anything at all? There are only two possible choices here. Why not present a selection list and let the user just tap the one they want? Hey, that sounds like a great idea! You’re glad you thought of it. Let’s implement it now, shall you?
Again, create a new Objective-C class, and make it a subclass of SuperDBEditCell. Name the class SuperDBPickerCell, after that fact that you will be using a UIPickerView. Most of what you do will be similar to what you did for SuperDBDateCell, but there are some key differences.
Edit the interface definition in SuperDBPickerCell.h to read
@interface SuperDBPickerCell : SuperDBEditCell < UIPickerViewDataSource, UIPickerViewDelegate>

@property (strong, nonatomic) NSArray *values;

@end
The property is named pickerValues, which will hold the possible selections. You also added the UIPickerViewDataSource and UIPickerViewDelegate protocols to SuperDBPickerCell.
Now, let’s edit the implementation of SuperDBPickerCell in SuperDBPickerCell.m.
@interface SuperDBPickerCell ()
@property (strong, nonatomic) UIPickerView *pickerView;
@end

@implementation SuperDBPickerCell

- (id)initWithStyle:(UITableViewCellStyle)style reuseIdentifier:(NSString *)reuseIdentifier
{
    self = [super initWithStyle:style reuseIdentifier:reuseIdentifier];
    if (self) {
        self.textField.clearButtonMode = UITextFieldViewModeNever;
        self.pickerView = [[UIPickerView alloc] initWithFrame:CGRectZero];
        self.pickerView.dataSource = self;
        self.pickerView.delegate = self;
        self.pickerView.showsSelectionIndicator = YES;
        self.textField.inputView = self.pickerView;
    }
    return self;
}
#pragma mark UIPickerViewDataSource Methods
- (NSInteger)numberOfComponentsInPickerView:(UIPickerView *)pickerView
{
    return 1;
}
- (NSInteger)pickerView:(UIPickerView *)pickerView numberOfRowsInComponent:(NSInteger)component
{
    return [self.values count];
}
#pragma mark - UIPickerViewDelegate Methods
- (NSString *)pickerView:(UIPickerView *)pickerView
              titleForRow:(NSInteger)row
             forComponent:(NSInteger)component
{
    return [self.values objectAtIndex:row];
}
- (void)pickerView:(UIPickerView *)pickerView
       didSelectRow:(NSInteger)row        inComponent:(NSInteger)component
{
    self.value = [self.values objectAtIndex:row];
}
#pragma mark - SuperDBEditCell Overrides
- (void)setValue:(id)value
{
    if (value != nil) {
        NSInteger index = [self.values indexOfObject:value];
        if (index != NSNotFound) {
            self.textField.text = value;
        }
    }
    else {
        self.textField.text = nil;
    }
}
@end
SuperDBPickerCell is conceptually identical to SuperDBDateCell. Rather than using an NSDatePicker, you use a UIPickerView. In order to tell the pickerView what to display, you need to have SuperDBDateCell conform to the protocols UIPickerViewDataSource and UIPickerViewDelegate. Rather than having a callback on the pickerView to indicate when the picker value has changed, you use the delegate method pickerView:didSelectRow:. Since you’re storing the value as a string, you don’t need to override the implementation of the value accessor method. However, you do need to override the value mutator.
You need to tell the application to use this new class for the Sex attribute. Edit the class row in the property list, HeroDetailController.plist. Change the value from SuperDBEditableCell to SuperDBPickerCell. Make sure you are changing the right row. The label row should read Sex, and the attribute row should read sex.
If you run the application now and try to edit the Sex attribute, you should see the picker wheel appear on the bottom on of the screen. However, there are no values to choose from. If you look back at the code you just added, the picker wheel gets its information from the values property. But you never set this. Again, you could hardcode this in the SuperDBPickerCell object, but that would limit the usefulness of this object. Instead, you’ll add a new item to the property list.
Just like you did earlier with the class item, you need to add a new key, which you’ll call values. Unlike the class key, you’ll only add it to the item with the sex key. Edit the HeroDetailController.plist and open all the nodes. For the last item, find the row with the key label. Click the + button on that row. Name the new item values and change its type to array. Add two string items to the values array and give them the values Male and Female. See Figure 4-28.

Figure 4-28. HeroDetailController.plist with values for the sex item
Now you need to pass the contents of values to table view cell when tableView:cellForRowAtIndexPath: is in the HeroDetailController. Open HeroDetailController.m, and add the following to tableView:cellForRowAtIndexPath: before the other cell configuration code:
NSArray *values = [row valueForKey:@"values"];
if (values != nil) {
    // TODO clean this up - ugh
    [cell performSelector:@selector(setValues:) withObject:values];
}
Build and run the app. Navigate down to the detail view and tap the Edit button. Tap on the Sex cell, and the picker view should appear with the choices Male and Female. Set the value, tap Save, and the Sex cell should be populated.
Devil’s End
Well, you’re at the end of a long and conceptually difficult chapter. You should congratulate yourself on making it all the way through with us. Table-based detail editing view controllers are some of the hardest controller classes to write well, but now you have a handful of tools in your toolbox to help you create them. You’ve seen how to use a property list to define your table view’s structure, you’ve seen how to create a custom UITableViewCell subclasses to edit different types of data, and you’ve also seen how to use Objective-C’s dynamic nature to create instances of classes based on the name of the class stored in an NSString instance.
Ready to move on? Turn the page. Let’s get going!