
Application security is an important aspect of development. Protecting your users’ information is an essential feature that you need to think about while developing. It’s important to remember that security is not a product, nor is it a check-mark that you can think about at the end of the development. Security is a process that has to be taken in to consideration during all stages of development, from design to implementation, through testing and release.
We’ll go over some basic security issues you should keep in mind and how to handle them in iOS. Then we’ll cover Security SDK, which provides three services: Certificate, Key, and Trust Services, which are used to manage certificates, keys, and trust policies; Keychain Services, which are used to manage keychain items; and Randomization Services, which are used to create cryptographically secure random numbers.
Note An important security issue is sending and receiving data securely over the network. We won’t be covering that in this chapter. Check Apple’s Networking documentation. Start with Networking Overview (https://developer.apple.com/library/ios/#documentation/NetworkingInternetWeb/Conceptual/NetworkingOverview/), then read Secure Transport Reference (https://developer.apple.com/library/ios/#documentation/Security/Reference/secureTransportRef/ ). You may need to read the CFNetwork Programming Guide (https://developer.apple.com/library/ios/#documentation/Networking/Conceptual/CFNetwork/) as well.
You’re going to create an application that will list the keychain items. By default, your application will have no keychain items, so you’ll embed two certificates (your self-signed root certificate and user certificate) into the application and add them to the keychain. Your keychain item detail view will allow you to encrypt and decrypt some text as a demonstration of functionality.
When you ask your user to provide some personal data, you are implicitly asking the user to trust that you, the application developer, will keep that information safe and secure. You are also implying that you are only asking for the information you need—and no more. If you send that data over the Internet, you have to make sure that the data is transmitted in a secure manner. When your application receives signed data, it’s your job to verify those signatures and ensure that they can be trusted.
When asking your users for information, you need to take into consideration what could happen if that data were compromised. If your application is a game that only stores the user’s high score, you probably don’t need to worry too much if the database is accessed outside your application. However, if you are asking your users for passwords or other sensitive information, it is crucial that you do your best to protect your users’ information. One possible solution is to encrypt the data, making it more difficult to read.
Many mobile applications routinely transmit information to a cloud-based service to centrally store and update data. If you are transmitting sensitive user information between your iOS application and a cloud server, you need to ensure the security of the data on both the client and server, and you must ensure that the data is transmitted securely. Furthermore, you need to make sure the communication won’t be intercepted by a malicious third-party who will try to access your user’s information or send back malicious data to aid in accessing your user’s data on the device.
The following sections cover some common security techniques.
We’re sure you all know what encrypting data is and means, but let’s go over it anyway. At its simplest, it’s a way of protecting data by transforming it into a non-readable form. In order to read it, you need to decrypt it. Decryption is accomplished by knowing the cipher—the technique used to encrypt the data. Ciphers work by applying a key, an additional piece of information, to the data in order to encrypt it. You encrypt data prior to transmitting it in order to protect it from being intercepted and read. You also encrypt data before storing it locally to prevent it from being read if the device is lost or stolen.
There are two major encryption techniques:
- Symmetric : A single key is shared between parties to encrypt and decrypt the data. Since the key is shared, if it is discovered, the data can be compromised.
- Asymmetric : Two mathematically related keys are used transform the data. Data encrypted with one key can be decrypted with the other. Generally, one key is shared between parties and the other key is kept private. Another term for asymmetric encryption is public key cryptography.
Asymmetric encryption can be computationally expensive. A common technique is to use asymmetric encryption to encrypt a shared key, then use symmetric encryption to share the actual data.
In cryptography, a hash is a smaller piece of data that is derived from a larger set of data. This smaller piece can then be used as a proxy for the larger data set. You can think of hashing as one-way encryption: you encrypt the data in to a unique value, but you can’t decrypt it back. You may use hashing whenever you use a dictionary. The dictionary key is hashed to ensure it always points to the same value.
Hashing is typically used for checksumming. A large set of data is hashed using a well-known algorithm. After you download the data, you hash the data set and compare the hashed value with the expected one. If the values differ, you can assume the data has been compromised in some way.
Using encryption and hashing, you’re able to create certificates that will tie a public key to specific trusted source. Given a set of data (say an e-mail message or web page), the sender will compute the hash of the data and encrypt it with a private key. This encrypted hash is sent with the data and the sender’s certificate. The receiver decrypts the sender’s hash using the certificate’s public key and compares the value to a locally computed hash. If the hashes match, then the data wasn’t compromised and was sent by the certificate’s owner. This process of hashing and encrypting using a certificate is called a signature. Users sign their data to prove that it came from them.
How can you trust the certificate used to sign the data? The certificate itself is signed by another source. That source may be trusted by both the sender and receiver, or that source’s certificate may need to be signed by someone else. This series of certificate signing may continue until there is a certificate that the receiver trusts. This series of certificate signing is called the chain of trust. The last certificate in the chain is called the anchor or root certificate.
Signatures and certificates rely on someone being a certificate authority that everyone trusts on some level. The chain of trust is only as strong as the security of the certificate authority.
Combining a certificate with a private key creates a digital identity. An identity is usually transferred using a password-protected format, PKCS #12, which typically has a .p12 extension.
Since iOS 4, developers have the option to leverage the built-in encryption hardware on iOS devices to further protect their application data. This feature leverages the passcode lock setting in iOS. When the device is locked, the data is inaccessible, even to the application. The device must be unlocked before you application can access the data. Remember, you might code for this functionality into your application, but unless the device user activates the passcode lock setting, it won’t be used. Generally, it’s better to add this feature. If your users then use the passcode lock setting, they’ll have the extra level of protection.
To protect your application’s file data, you need to specify the correct extended attribute to level of protection you want. You can set this attribute using either the NSData or NSFileManager class. For existing files, you use the setAttributes:ofItemAtPath:error: method on NSFileManager. The attributes parameter is an NSDictionary, where the key is NSFileProtectionKey. For new files, you use the NSData method writeToFile:options:error: method, using the correct options bitmask to specify the level of protection. The possible level of protections are shown in Table 13-1.
Table 13-1. Levels of Protection
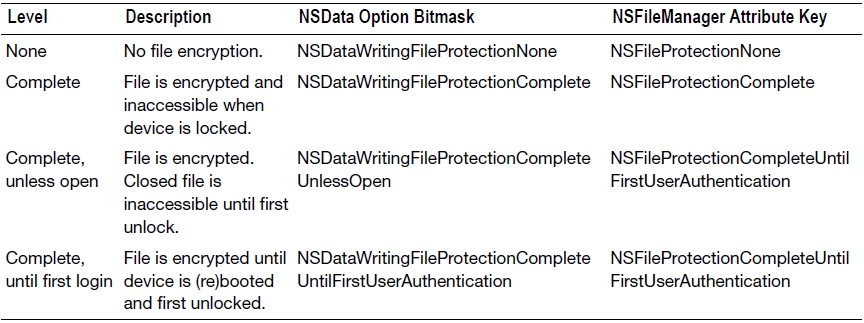
Note NSData has three other writing options: NSDataWritingAtomic, NSDataWritingWithoutOverwriting, NSDataWritingFileProtectionMask. The first two have to do with how an NSData instance writes its files, while the last sets the permissions of the file itself. None of these options set the file protection with respect to password locking.
If you set a level of protection, then you must prepare for the file to potentially be inaccessible. In order to do that, you application needs to check file accessibility. There are a few ways to do this:
- Implement the applicationProtectedDataWillBecomeUnavailable: and applicationProtectedDataDidBecomeAvailable: methods in your AppDelegate.
- Register for the UIApplicationProtectedDataWillBecomeUnavailable and UIApplicationProtectedDataDidBecomeAvailable notifications.
- Check the protectedDataAvailable property in UIApplication.
The keychain is an encrypted container used to hold passwords, certificates, or other information. The keychain is encrypted and locked using the iOS passcode lock mechanism. When your iOS device is locked, no one can access the contents. Once you enter your passcode, iOS unlocks and decrypts the keychain for access. From the user’s perspective, the keychain provides transparent authentication. Suppose your application communicates with services on the Internet. Each of those services require your users to provide login information. Rather than requiring your users to enter that information every time they access those Internet services, you can store that information in the keychain. Since the keychain is secure, you can count on that information being safe.
In iOS, each application has its own keychain. Each keychain contains a set of information called keychain items (or just items). A keychain Item consists of data and a set of attributes. Programmatically, a keychain item is a dictionary (specifically a CFDictionary). The item data may or may not be encrypted; this is determined by the type of data being store in the item (i.e., passwords or certificates).
When defining your keychain item dictionary, you must specify the item class using the key constant kSecClass. The possible values for kSecClass are a defined set of constants (Table 13-2).
Table 13-2. Possible Values for kSecClass
| kSecClassGenericPassword | Generic password item |
|---|---|
| kSecClassInternetPassword | Internet password item |
| kSecClassCertificate | Certificate item |
| kSecClassKey | Cryptographic key item |
| kSecClassIdentity | Identity (certificate and private key) item |
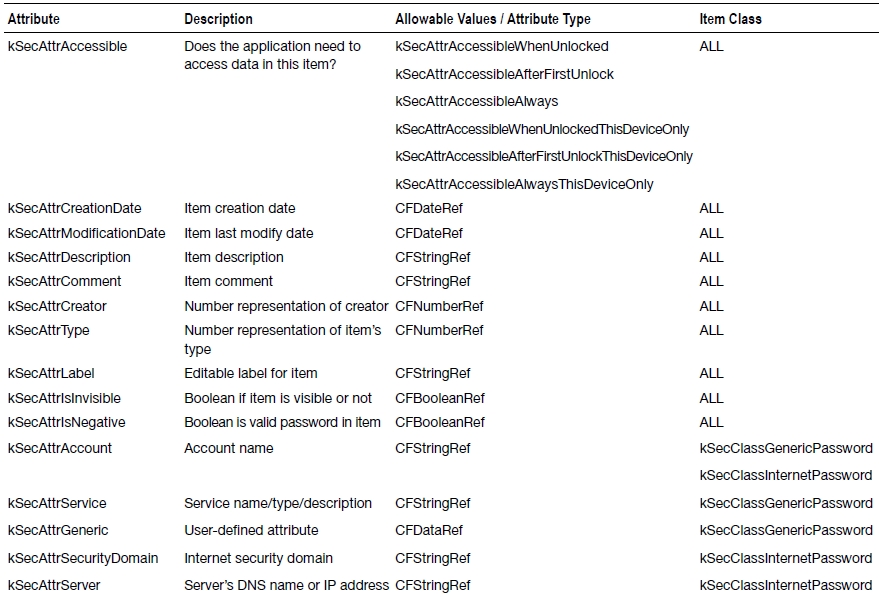
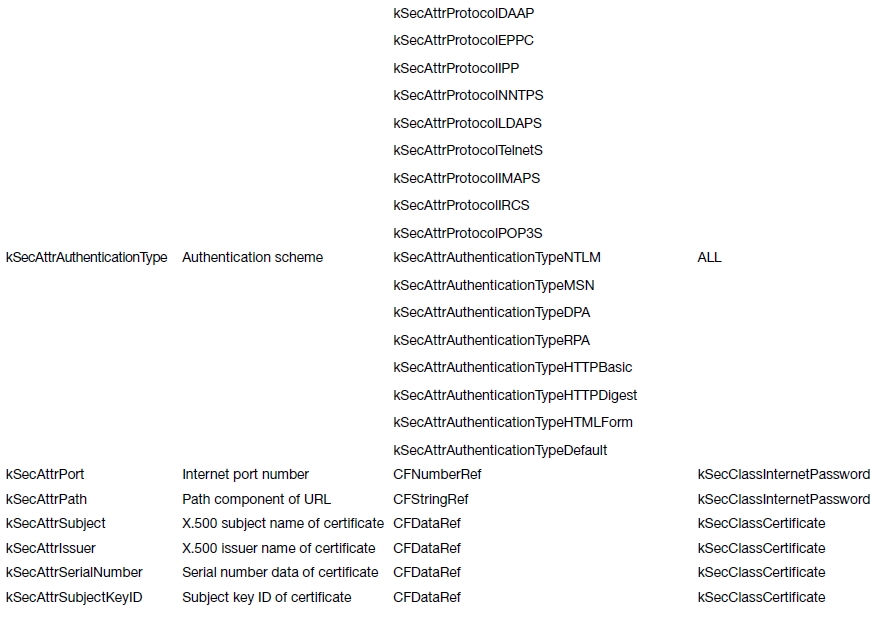
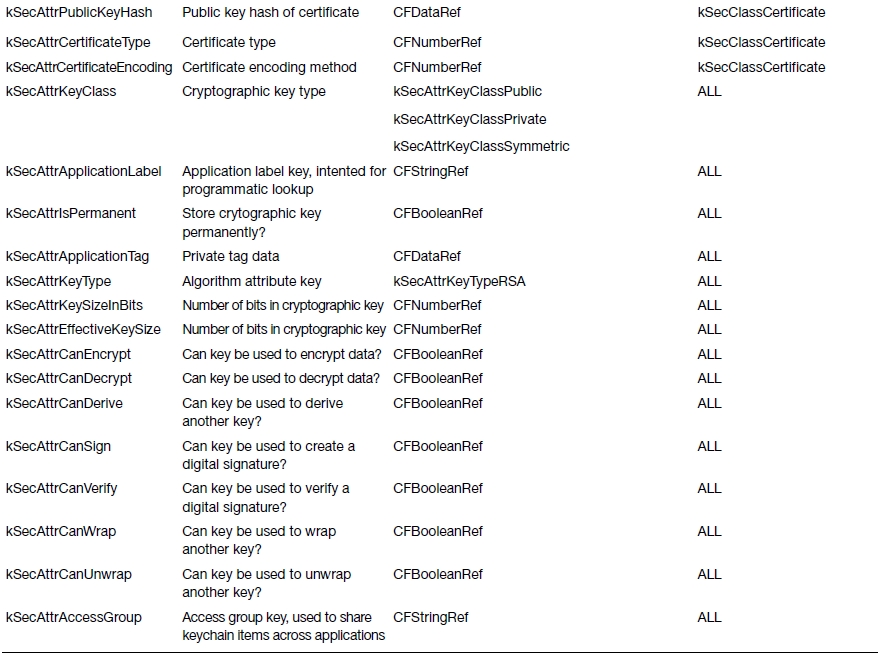
Depending on the keychain item class value, there are a set of allowable attribute keys that can be used (see Table 13-3).
Table 13-3. Keychain Item Attribute Keys

The Keychain SDK is a Core Foundation C API, not Objective-C. That’s why everything is a Core Foundation data type. The API is a simple set of functions:
- SecItemAdd: Add an item to the keychain
- SecItemDelete: Remove an item from the keychain
- SecItemUpdate: Update an item in the keychain
- SecItemCopyMatching: Return an item matching the search criteria.
That’s it.
Certificates, Keys, and Trust Services
In order to make managing and using certificates easier, Apple added a number of functions in iOS to ease the management of certificates, generating keys, and evaluating your chain of trust. Specifically, you use the Certificate, Key, and Trust SDK to determine identity by matching a certificate to a private key; create and request certificates; import certificates, keys, and identities into your keychain; create public-private key pairs; and manage trust policies.
These services leverage the keychain to store certificates and keys. Like the Keychain SDK, the Certificate, Key and Trust SDK is a C API, not Objective-C. At the core, a set of security objects are defined:
- SecCertificate (SecCertificateRef): The certificate object
- SecIdentity (SecIdentityRef): The identity (certificate and private key) object
- SecKey (SecKeyRef): The (asymmetric) key object, both public and private
- SecPolicy (SecPolicyRef): The policy object
- SecTrust (SecTrustRef): The trust management object
Correspondingly, the Security framework provides a series of functions to manage certificates; manage identities; generate and use keys; plus manage policies and trust. We won’t go over each function in detail, but we will cover some of them in this chapter’s application. To learn more, read Apple’s Certificate, Key, and Trust Services Programming Guide (https://developer.apple.com/library/ios/#documentation/Security/Conceptual/CertKeyTrustProgGuide/01introduction/ ) and Reference (https://developer.apple.com/library/ios/#documentation/Security/Reference/certifkeytrustservices/ ).
You’re going to create a simple application that will show you how to use your application’s keychain items. At the beginning, the keychain should be empty. You’ll add functionality to import a self-signed root certificate and a digital identity created from that root certificate. You’ll show the details of each certificate. Finally, you’ll add a simple encryption/decryption example from the digital identity’s public-private key pair.
Before you start building your application, you need to create your root certificate and digital identity. We’ll be using the Certificate Assistant in the Keychain Access application on our Mac.
Note If you don’t feel like learning how to create certificates and digital identities, you can skip this section. We’ve provided two files, root.der and cert.p12, in the book’s download archive for this chapter. Feel free to use them instead.
Create a Certificate Authority
Open Keychain Access.app. You can find in /Application/Utilities. Go to Keychain Access ![]() Certificate Assistant
Certificate Assistant ![]() Create Certificate Authority (Figure 13-1). The Certificate Assistant should open with a form to create a new Certificate Authority (CA) (Figure 13-2). Give the CA a unique name, and fill in an e-mail address. Uncheck the “Make this CA the default” checkbox. The rest of defaults should be fine. Click Create. If the Certificate Assistant is successful, you should see a window like Figure 13-3. If you click the “Show Certificate Authority” button, it will open a Finder window to your ∼/Library/Application Support/Certificate Authority/<CA Name> directory. This is where the Certificate Assistant has placed the relevant CA files, including your root certificate.
Create Certificate Authority (Figure 13-1). The Certificate Assistant should open with a form to create a new Certificate Authority (CA) (Figure 13-2). Give the CA a unique name, and fill in an e-mail address. Uncheck the “Make this CA the default” checkbox. The rest of defaults should be fine. Click Create. If the Certificate Assistant is successful, you should see a window like Figure 13-3. If you click the “Show Certificate Authority” button, it will open a Finder window to your ∼/Library/Application Support/Certificate Authority/<CA Name> directory. This is where the Certificate Assistant has placed the relevant CA files, including your root certificate.
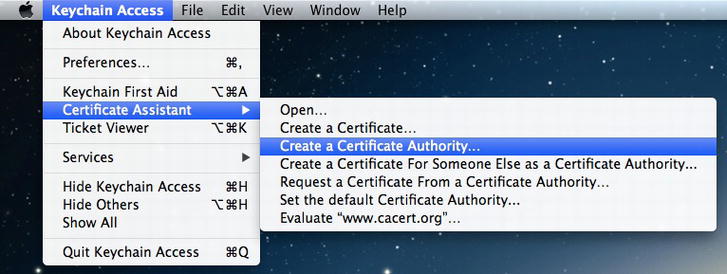
Figure 13-1. Creating a Certificate Authority
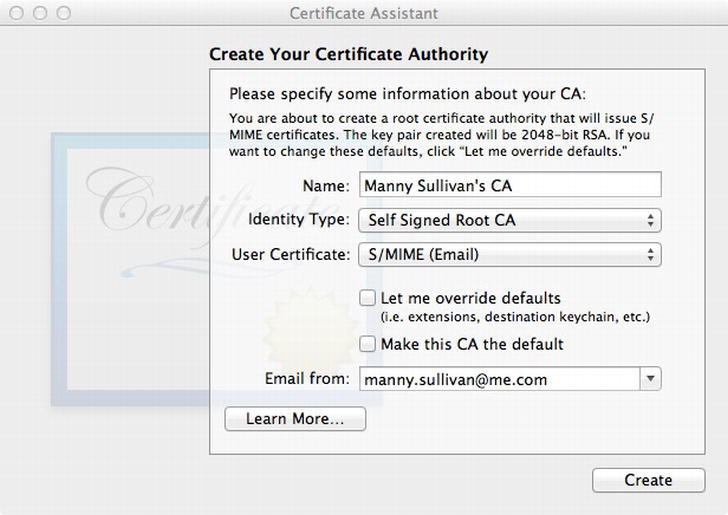
Figure 13-2. Certificate Assistant
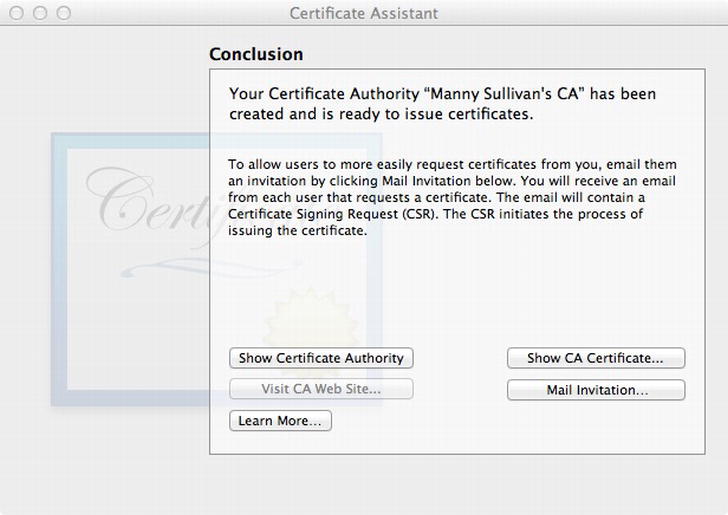
Figure 13-3. Successful Certificate Authority creation
Now you need to use your CA to create a new user certificate. Go back to
Keychain Access.app and select Keychain Access ![]() Certificate Assistant
Certificate Assistant ![]() Request a Certificate from a Certificate Authority. The Certificate Assistant should present a new form (Figure 13-4). Enter the e-mail address for the user and a common name (it doesn’t have to be the name of a person). For the CA Email Address, enter the e-mail address you used when creating the CA (Figure 13-2). Since the CA is self-signed, select the “Save to disk” option. Click Continue. You will be presented with a Save dialog. Pick a location to save the file (the default name is fine), and click Save. When the Certificate Assistant is finished creating the certificate signing request, you can click Done to close the assistant.
Request a Certificate from a Certificate Authority. The Certificate Assistant should present a new form (Figure 13-4). Enter the e-mail address for the user and a common name (it doesn’t have to be the name of a person). For the CA Email Address, enter the e-mail address you used when creating the CA (Figure 13-2). Since the CA is self-signed, select the “Save to disk” option. Click Continue. You will be presented with a Save dialog. Pick a location to save the file (the default name is fine), and click Save. When the Certificate Assistant is finished creating the certificate signing request, you can click Done to close the assistant.
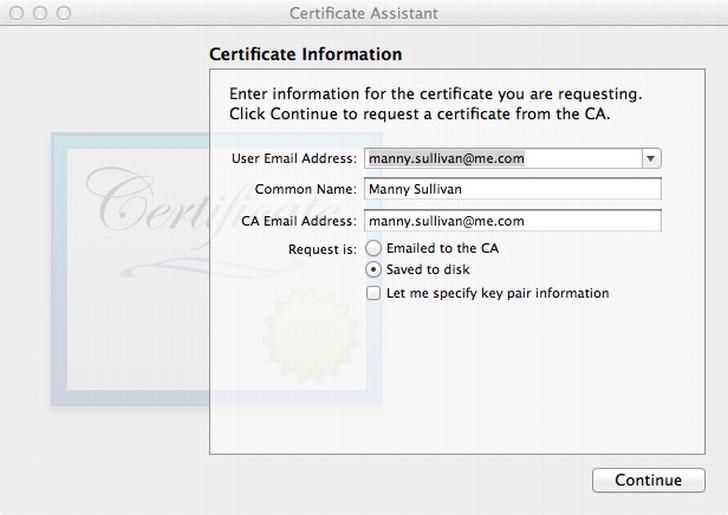
Figure 13-4. Creating a certificate signing request
You’re going to use this certificate signing request to create a new certificate. In Keychain Access.app, select Keychain Access ![]() Certificate Assistant
Certificate Assistant ![]() Create a Certificate for Someone Else as a Certificate Authority. Drag the certificate signing request you just created into the specified area in the Certificate Assistant (Figure 13-5). The Certificate Assistant should change to ask you to specify the issuing CA. Select the CA name you created earlier. Leave the two checkboxes unchecked and click Continue. The Certificate Assistant will ask you for the same information again (to be honest, we’re not sure why). Again, select the CA name you created earlier, leave the checkboxes unchecked, and click Continue (Figure 13-5). Once the Certificate Assistant is done, it will open Mail.app and create a draft e-mail with the certificate attached. You don’t need this, so you can discard the message and close Mail.app. You should see the certificate information displayed in the Certificate Assistant (Figure 13-7). Click Done to close the assistant.
Create a Certificate for Someone Else as a Certificate Authority. Drag the certificate signing request you just created into the specified area in the Certificate Assistant (Figure 13-5). The Certificate Assistant should change to ask you to specify the issuing CA. Select the CA name you created earlier. Leave the two checkboxes unchecked and click Continue. The Certificate Assistant will ask you for the same information again (to be honest, we’re not sure why). Again, select the CA name you created earlier, leave the checkboxes unchecked, and click Continue (Figure 13-5). Once the Certificate Assistant is done, it will open Mail.app and create a draft e-mail with the certificate attached. You don’t need this, so you can discard the message and close Mail.app. You should see the certificate information displayed in the Certificate Assistant (Figure 13-7). Click Done to close the assistant.
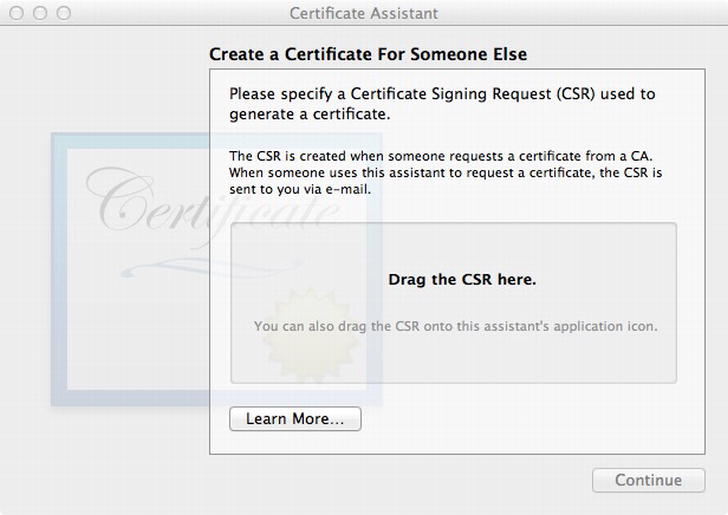
Figure 13-5. Creating a certificate from your CSR
Now you need to extract the digital identity from the user certificate. In Keychain Access.app, select the login keychain on the left, and select the Certificates category below that. Find the certificate you just created. It should have the common name you entered when creating the certificate signing request (Figure 13-6). Open the disclosure triangle next to the name. The private key should be exposed below the certificate, with the same name as the certificate. Select the private key, then File ![]() Export Items . Name the file cert in the Save dialog, making sure the file format is Personal Information Exchange (.p12). Click Save. You will be asked to provide a password for the .p12 file. It’s a good idea to pick something the Password dialog thinks is secure. In our case, we used “@Super2048Cat”. After you click OK, you may be asked to enter your keychain password. This is your login password. Enter it and click Allow. On successful certificate creation, the Certificate Assistant will show you the details for your certificate (Figure 13-7). Notice that since it was self-signed, it’s marked as being signed by an untrusted issuer.
Export Items . Name the file cert in the Save dialog, making sure the file format is Personal Information Exchange (.p12). Click Save. You will be asked to provide a password for the .p12 file. It’s a good idea to pick something the Password dialog thinks is secure. In our case, we used “@Super2048Cat”. After you click OK, you may be asked to enter your keychain password. This is your login password. Enter it and click Allow. On successful certificate creation, the Certificate Assistant will show you the details for your certificate (Figure 13-7). Notice that since it was self-signed, it’s marked as being signed by an untrusted issuer.
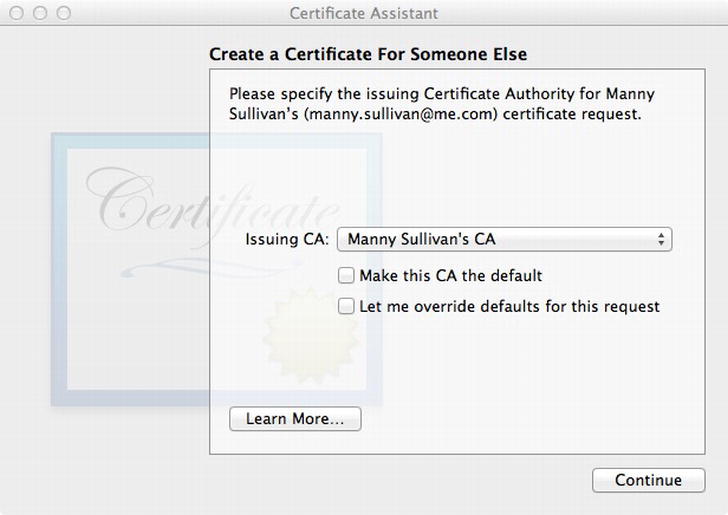
Figure 13-6. Select the Issuing Certificate Authority for your certificate
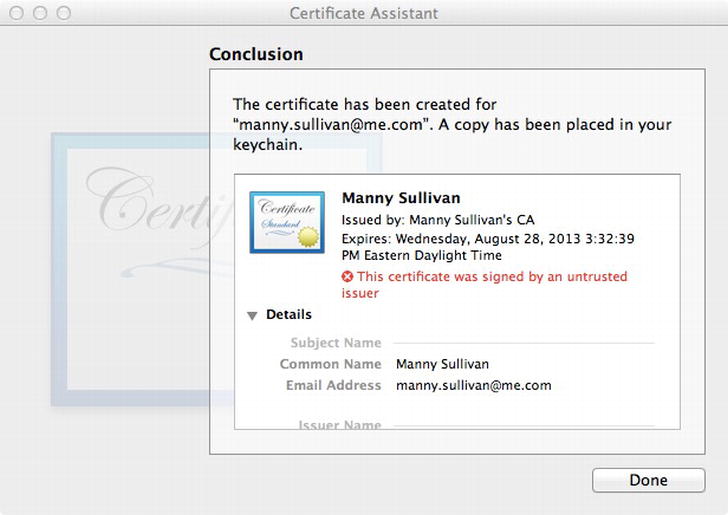
Figure 13-7. Successful certificate creation
One last thing. The Security framework expects your root certificate of DER format, not the PEM that’s created by the Certificate Assistant. Open Terminal.app and change directories to the ∼/Library/Application Support/Certificate Authority/<CA Name> directory. You should see a file named <CA Name> certificates.pem. Enter this command
> openssl x509 -in <PEM file> −inform PEM -out root.der -outform DER
replacing <PEM file> with the name of the file.
Now you’re ready to build your application.
You’re going to use the Tabbed Application template as the starting point for your application. Open Xcode and create a new project. Select the Tabbed Application template. Name the project KeychainViewer, and have the project use both storyboards and Automatic Reference Counting.
Once the project is created, you need to add the Security framework to it. Select the project in the Project Navigator. Select the Keychain Viewer target in the project editor and navigate to the Build Phases tab. Expand the Link Binary with Libraries (3 Items) section and add Security.framework. Clean up the Project Navigator by moving the Security.framework into the Frameworks group.
You’re going to replace the FirstViewController and SecondViewController with different implementations. So select the files FirstViewController.h, FirstViewController.m., SecondViewController.h, and SecondViewController.m and delete them. You don’t need to keep the files, so select Move to Trash when Xcode asks.
You’ll delete the First View Controller and Second View Controller scenes in the main storyboard in a little bit. First, you’ll define some keychain item classes. The Keychain API is a C language API, not Objective-C, so you’re going to wrap it in an Objective-C class to make access easier. Create a new Objective-C class, in the Keychain Viewer group, named KeychainItem. Make it a subclass of NSObject.
Select KeychainItem.h, and add an import directive for the Security framework header file.
#import <Security/Security.h>
For each KeychainItem object, you need to know what type it might be (i.e. kSecClassGenericPassword), and the actual keychain item. Both of these can be captured using the CFTypeRef CoreFoundation type. CFTypeRef maps to the generic Objective-C object id. So you’ll add two properties of type id to your KeychainItem class. You’ll also define an NSDictionary property to hold the dictionary of attributes you get back for each keychain item. Finally, you’ll have a property to hold the persistent reference of the keychain item.
@property (strong, nonatomic) id type;
@property (strong, nonatomic) id item;
@property (strong, nonatomic) NSDictionary *attributes;
@property (strong, nonatomic) id persistentRef;
You need an initializer that will take these two properties.
- (id)initWithItem:(CFTypeRef)item;
- (id)initWithData:(NSData *)data options:(NSDictionary *)options;
You’ll use initWithItem: for when you create a keychain item via the Keychain API. initWithData:options: is intended for when you are loading a keychain item from a file or URL; the options dictionary is for when you need to pass additional information to load a keychain item.
You want to be able to save keychain items (i.e. write them to your keychain), so you’ll implement a save method. The save method will return a BOOL to indicate success or failure. You’ll pass in a pointer to an NSError pointer to allow you to send an error message on failure. You’ll also add a convenience method, valueForAttribute:, to wrap the Keychain API call to retrieve value for the keychain item.
- (BOOL)save:(NSError **)error;
- (id)valueForAttribute:(CFTypeRef)attr;
Let’s implement these methods.
Open KeychainItem.m and add your initializer.
- (id)initWithItem:(CFTypeRef)item
{
    self = [self init];
    if (self) {
        self.item = CFBridgingRelease(item);
    }
    return self;
}
This should be pretty standard fare by now. Note the use of the function CFBridgingRelease. This is part of the toll-free bridge between CoreFoundation and Objective-C. It converts a non-Objective-C pointer to an Objective-C object. It also transfers the memory management to ARC. The inverse of CFBridgingRelease is CFBridgingRetain, which you’ll use a little later on. Notice that you haven’t set the type property in the initializer. That’s because you intend KeychainItem to be an abstract base class. Hopefully, you won’t ever instantiate an instance of KeychainItem, but rather a subclass. It’s in those subclasses where you’ll set the type property.
Since KeychainItem is abstract, initWithData:options: should do nothing.
- (id)initWithData:(NSData *)data options:(NSDictionary *)options
{
    return nil;
}
The save: method turns out to be more complicated than you think.
- (BOOL)save:(NSError **)error
{
    NSDictionary *attributes = @{
        (__bridge id)kSecValueRef : self.item,
        (__bridge id)kSecReturnPersistentRef : (id)kCFBooleanTrue
    };
    CFTypeRef cfPersistentRef;
    OSStatus status = SecItemAdd((__bridge CFDictionaryRef)attributes, &cfPersistentRef);

    if (status != errSecSuccess) {
        NSDictionary *userInfo = nil;
        switch (status) {
            case errSecParam:
                userInfo = @{ NSLocalizedDescriptionKey : NSLocalizedString(@"errorSecParam",
                  @"One or more parameters passed to the function were not valid.") };
                break;
            case errSecAllocate:
                userInfo = @{ NSLocalizedDescriptionKey : NSLocalizedString(@"errSecAllocate",
                  @"Failed to allocate memory.") };
                break;
            case errSecDuplicateItem:
                userInfo = @{ NSLocalizedDescriptionKey : NSLocalizedString(@"errSecDuplicateItem",
            @"The item already exists.") };
                break;
        }
        if (*error)
            *error = [NSError errorWithDomain:NSOSStatusErrorDomain code:status userInfo:userInfo];
        return NO;
    }

    self.persistentRef = CFBridgingRelease(cfPersistentRef);
    return YES;
}
The bulk of the method is taken up handling the different error conditions of the call to SecItemAdd, which adds the keychain item to the keychain, fails. You’ve got a bunch of casts that begin with __bridge. This is another part of the toll-free bridge. In this case, you don’t want to transfer memory management to ARC (or in the case of (__bridge CFDictionaryRef) cast, away from ARC). You could have done this as pure CoreFoundation code, but you’d have to explicitly release your CoreFoundation objects with a call to CFRelease, and we thought this was easier.
valueForAttribute: is a simple wrapper to the NSDictionary method valueForKey: to make life easier for you, so you don’t have to put (__bridge id) casts all over your code.
- (id)valueForAttribute:(CFTypeRef)attr
{
    return [self.attributes valueForKey:(__bridge id)attr];
}
Now you need to implement your concrete subclasses of KeychainItem. Recall that there are four keychain item types defined in the Security framework: kSecClassGenericPassword, kSecClassInternetPassword, kSecClassCertificate, and kSecClassIdentity. You’re only going to work with two of them, Certificates and Identities. As a result, you only need to define two concrete subclasses for your application: KeychainCertificate and KeychainIdentity.
Create a new file using the Objective-C class template. Name the class KeychainCertificate, and make it a subclass of KeychainItem. Once the file is created, select KeychainCertificate.m, and implement the initializer methods.
- (id)init
{
    self = [super init];
    if (self) {
        self.type = [(__bridge id)kSecClassCertificate copy];
    }
    return self;
}

- (id)initWithData:(NSData *)data options:(NSDictionary *)options
{
    SecCertificateRef cert = SecCertificateCreateWithData(NULL, (__bridge CFDataRef)data);
    if (cert) {
        self = [self initWithItem:cert];
    }
    return self;
}
Use the generic init method to set the type property. The init method will override the default init in KeychainItem. When KeychainItem initWithItem: is invoked, it calls init. When you call initWithItem with a KeychainCertificate, you’ll call this init method.
Now, let’s create the KeychainIdentity class. Create a new Objective-C class, name it KeychainIdentity, and make it subclass of KeychainItem. Since this encapsulates a digital identity, you need a password when loading from a file.
- (id)init
{
    self = [super init];
    if (self) {
        self.type = [(__bridge id)kSecClassIdentity copy];
    }
    return self;
}

- (id)initWithData:(NSData *)data options:(NSDictionary *)options
{
    CFDataRef inPKCS12Data = (__bridge CFDataRef)data;
    CFArrayRef items = CFArrayCreate(NULL, 0, 0, NULL);
    // Options dictionary needs key kSecImportExportPassphrase with password used to protect file
    OSStatus status = SecPKCS12Import(inPKCS12Data, (__bridge CFDictionaryRef)options, &items);
    if (status != errSecSuccess) {
        NSLog(@"Error Reading P12 file");
        abort();
    }
    CFDictionaryRef myIdentityAndTrust = CFArrayGetValueAtIndex(items, 0);
    SecIdentityRef identity =         (SecIdentityRef)CFDictionaryGetValue(myIdentityAndTrust, kSecImportItemIdentity);
    if (identity)
        self = [self initWithItem:identity];

    return self;
}
Again, you override the init method to set the type property; this time to kSecClassIdentity. initWithData:options: is used to load data in PKCS #12 format. Since this data is password protected, you need the options dictionary to have the key kSecImportExportPassphrase and the value of the password used when the file was created.
You need to define the view controller classes that will use these KeychainItem classes you just created. Create a new file using the Objective-C class template. Name the file KeychainItemsViewController and make it a subclass of UITableViewController. This will be your abstract base view controller class. Open KeychainItemsViewController.h and add the following property:
@property (strong, nonatomic) NSArray *items;
The items property will hold the array of keychain items you want to display. Open KeychainItemsViewController.m so you can work on all the changes you need to make. First, you need to import the KeychainItem header file.
#import "KeychainItem.h"
Next, you need to update the table view data source methods to return the correct number of sections and rows per section.
- (NSInteger)numberOfSectionsInTableView:(UITableView *)tableView
{
    // Return the number of sections.
    return 1;
}

- (NSInteger)tableView:(UITableView *)tableView numberOfRowsInSection:(NSInteger)section
{
    // Return the number of rows in the section.
    return self.items.count;
}
Finally, you need to use the keychain item to configure your table view cell.
- (UITableViewCell *)tableView:(UITableView *)tableView cellForRowAtIndexPath:(NSIndexPath *)indexPath
{
    static NSString *CellIdentifier = @"KeychainItemCell";
    UITableViewCell *cell = [tableView dequeueReusableCellWithIdentifier:CellIdentifier
      forIndexPath:indexPath];

    // Configure the cell...
    KeychainItem *item = self.items[indexPath.row];
    cell.textLabel.text = [item valueForAttribute:kSecAttrLabel];

    return cell;
}
That’s all you need for your KeychainItemViewController. Let’s define the concrete subclasses you’ll actually use. Create a new Objective-C class file. Name it CertificatesViewController, subclass of KeychainItemsViewController. You don’t need to modify the default code at this point. Create another KeychainItemsViewController subclass. This time name the class IdentitiesViewController.
Now, let’s update the storyboard to use the KeychainCertificate and KeychainItem classes. Open the MainStoryboard.storyboard in the storyboard editor. Find the First View Controller and delete it. Repeat for the second view controller. Now drag a UITableViewController into the Editor pane. Control-drag from the tab bar controller to the table view controller. When the Segue Selector pop-up appears, select View Controllers under the Relationship Segue label. The table view controller should have a tab bar appear along the bottom with the label Item (Figure 13-8). Click the label and open the Attribute Inspector. Rename the title to Identities, and use the image called first.png.
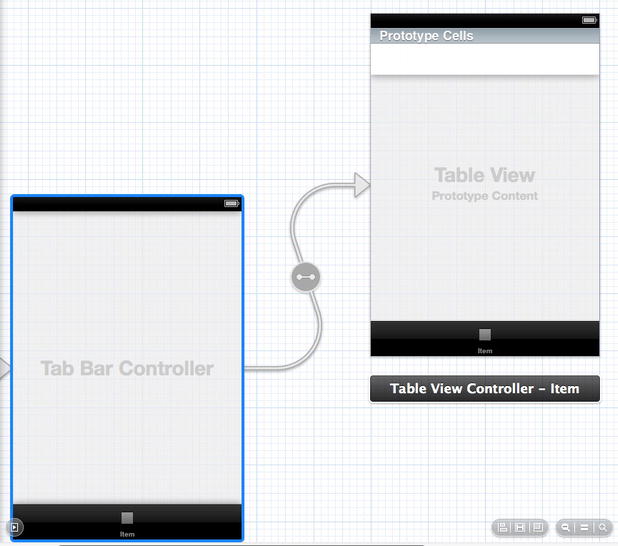
Figure 13-8. Connecting the table view controller to the tab bar controller
Select the table view controller, and in the Identity Inspector, change the class from UITableViewController to IdentitiesViewController. Select the table view cell under the Prototype Cells label. In the Attributes Inspector, change the style from Custom to Basic. Give the table view cell the identifier of KeychainItemCell. Change the accessory to Disclosure Indicator.
Drag another UITableViewController to the Editor pane. Control-drag from the tab bar controller to this table view controller, select the view controllers in the pop-up again. Relabel the tab bar to Certificates and use the second.png image. Change the table view controller class to CertificatesViewController. Adjust the table view cell to the Basic Style, give it the identifier of KeychainItemCell, and change the accessory to Disclosure Indicator.
Build and run the app (Figure 13-9). The table views are empty, since you haven’t loaded the keychain identities or certificates to display.
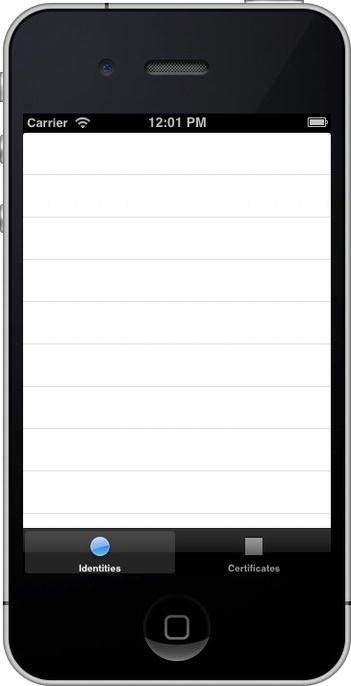
Figure 13-9. The Keychain Viewer application without any keychain items
Edit CertificatesViewController.m. First, you need to import the KeychainCertificate.h header file.
#import "KeychainCertificate.h"
And you need to update viewDidLoad to load your KeychainCertificates.
- (void)viewDidLoad
{
    [super viewDidLoad];
        // Do any additional setup after loading the view.
    self.items = [KeychainCertificate allKeychainCertificates];
}
You’re invoking a KeychainCertificate class method, allKeychainCertificates, to populate your items property. But you haven’t defined that method yet. Open KeychainCertificate.h and add the class method declaration.
+ (NSArray *)allKeychainCertificates;
Open KeychainCertificate.m so you can implement allKeychainCertificates.
+ (NSArray *)allKeychainCertificates
{
    NSMutableArray *certs = [NSMutableArray array];
    NSDictionary *query = @{
        (__bridge id)kSecClass               : (__bridge id)kSecClassCertificate,
        (__bridge id)kSecReturnRef           : (id)kCFBooleanTrue,
        (__bridge id)kSecReturnAttributes    : (id)kCFBooleanTrue,
        (__bridge id)kSecReturnPersistentRef : (id)kCFBooleanTrue,
        (__bridge id)kSecMatchLimit          : (__bridge id)kSecMatchLimitAll
    };
    CFTypeRef results = NULL;
    OSStatus status = SecItemCopyMatching((__bridge CFDictionaryRef)query, &results);
    if (status == errSecSuccess && results != NULL) {
        for (NSDictionary *result in (__bridge NSArray *)results) {
            id itemRef = [result valueForKey:(__bridge id)kSecValueRef];
            id persistentRef = [result valueForKey:(__bridge id)kSecValuePersistentRef];
            NSMutableDictionary *attrs = [NSMutableDictionary dictionaryWithDictionary:result];
            [attrs removeObjectForKey:(__bridge id)kSecValueRef];
            [attrs removeObjectForKey:(__bridge id)kSecValuePersistentRef];
            KeychainCertificate *cert =                 [[KeychainCertificate alloc] initWithItem:(__bridge CFTypeRef)itemRef];
            cert.persistentRef = persistentRef;
            cert.attributes = attrs;
            [certs addObject:cert];
        }
    }
    return certs;
}
You query the keychain for all certificates, asking for the certificates, their attributes, and their persistent references. The results come back as an array of dictionaries. You need to parse the dictionary to extract the certificate and persistent reference. The remaining dictionary are the attributes. You create a KeychainCertificate from each dictionary and return an array of KeychainCertificates back.
You need to repeat the process for the IdentitiesViewController. Edit IdentitiesViewController.m and import the KeychainIdentity.h header file.
#import "KeychainIdentity.h"
Modify viewDidLoad to load all the keychain identities.
- (void)viewDidLoad
{
    [super viewDidLoad];
        // Do any additional setup after loading the view.
    self.items = [KeychainIdentity allKeychainIdentities];
}
Now you need to define and implement the allKeychainIdentities class method on KeychainIdentity. Open KeychainIdentity.h to add the definition.
+ (NSArray *)allKeychainIdentities;
Add the implementation to KeychainIdentity.m.
+ (NSArray *)allKeychainIdentities
{
    NSMutableArray *idents = [NSMutableArray array];
    NSDictionary *query = @{
        (__bridge id)kSecClass               : (__bridge id)kSecClassIdentity,
        (__bridge id)kSecReturnRef           : (id)kCFBooleanTrue,
        (__bridge id)kSecReturnAttributes    : (id)kCFBooleanTrue,
        (__bridge id)kSecReturnPersistentRef : (id)kCFBooleanTrue,
        (__bridge id)kSecMatchLimit          : (__bridge id)kSecMatchLimitAll
    };
    CFTypeRef results = NULL;
    OSStatus status = SecItemCopyMatching((__bridge CFDictionaryRef)query, &results);
    if (status == errSecSuccess && results != NULL) {
        for (NSDictionary *result in (__bridge NSArray *)results) {
            id itemRef = [result valueForKey:(__bridge id)kSecValueRef];
            id persistentRef = [result valueForKey:(__bridge id)kSecValuePersistentRef];
            NSMutableDictionary *attrs = [NSMutableDictionary dictionaryWithDictionary:result];
            [attrs removeObjectForKey:(__bridge id)kSecValueRef];
            [attrs removeObjectForKey:(__bridge id)kSecValuePersistentRef];

            KeychainIdentity *ident =
      [[KeychainIdentity alloc] initWithItem:(__bridge CFTypeRef)itemRef];
            ident.persistentRef = persistentRef;
            ident.attributes = attrs;
            [idents addObject:ident];
        }
    }
    return idents;
}
This implementation is essentially identical to allKeychainCertificates, except you query for digital identities and create KeychainIdentities instead of KeychainCertificates. You could probably refactor the common code into a class method in KeychainItem, but this works for now.
Building and running the app still doesn’t show any identities or certificates. Remember in iOS, keychains are only in the scope of the application. Your application doesn’t have any keychain items. You’re going to load the certificate and identity you created earlier.
First, let’s add the two certificates you created earlier to your project. Select the Supporting Files group in the Project Navigator pane, and add the files root.cer and cert.p12 to the project. Make sure you check the “Copy items to destination group’s folder (if needed)” checkbox.
You’re going to load these items when you run your application, but you don’t want to load them every time you launch your app. Open AppDelegate.m, and import your KeychainCertificate and KeychainIdentity header files.
#import "KeychainCertificate.h"
#import "KeychainIdentity.h"
Next, define a private category.
@interface AppDelegate ()
- (BOOL)isAnchorCertLoaded;
- (void)addAnchorCertificate;
- (void)addIdentity;
@end
You defined a method to check if your anchor certificate has been loaded, plus two methods to add the anchor certificate and digital identity. Before you implement those methods, you need to modify application:didFinishLoadingWithOptions:.
- (BOOL)application:(UIApplication *)application        didFinishLaunchingWithOptions:(NSDictionary *)launchOptions
{
    // Override point for customization after application launch.
    if ([self isAnchorCertLoaded]) {
        [self addIdentity];
        [self addAnchorCertificate];
    }

    return YES;
}
Check if the anchor certificate is loaded. If not, load the digital identity and anchor certificate. The loading should happen only once, essentially at first launch of the application. The implementation of isAnchorCertLoaded is very simple.
- (BOOL)isAnchorCertLoaded
{
    return ([[NSUserDefaults standardUserDefaults] valueForKey:@"anchor_certificate"] == nil);
}
You just check if the key anchor_certificate exists in the application’s User Defaults. If it doesn’t, you assume the certificate and digital identity haven’t been loaded. To load the certificate, you simply load the file, instantiate a KeychainCertificate, then save it. Remember your KeychainItem save: method writes the keychain item to the keychain.
- (void)addAnchorCertificate
{
    NSString *rootCertificatePath = [[NSBundle mainBundle] pathForResource:@"root" ofType:@"der"];
    NSData *data = [[NSData alloc] initWithContentsOfFile:rootCertificatePath];
    KeychainCertificate *cert = [[KeychainCertificate alloc] initWithData:data options:nil];
    if (cert) {
        NSError *error;
        BOOL saved = [cert save:&error];
        if (!saved) {
            NSLog(@"Error Saving Certificate: %@", [error localizedDescription]);
            abort();;
        }
        NSUserDefaults *userDefaults = [NSUserDefaults standardUserDefaults];
        [userDefaults setObject:cert.persistentRef forKey:@"anchor_certificate"];
        [userDefaults synchronize];
    }
}
As a final step, you write the certificate’s persistent reference to your User Defaults, using the key anchor_certificates.
Adding a digital identity is similar to adding a certificate. You need send the password used to protect the identity file. You’ll hard-code that value. In a production application, you’d probably use an Alert dialog asking the user to enter the password.
- (void)addIdentity
{
    NSString *identityPath = [[NSBundle mainBundle] pathForResource:@"cert" ofType:@"p12"];
    NSData *data = [[NSData alloc] initWithContentsOfFile:identityPath];
    NSString *password = @"@Super2048Cat";
    KeychainIdentity *ident =
       [[KeychainIdentity alloc] initWithData:data
       options:@{ (__bridge id)kSecImportExportPassphrase : password }];
    if (ident) {
        NSError *error;
        BOOL saved = [ident save:&error];
        if (!saved) {
            NSLog(@"Error Saving Identity: %@", [error localizedDescription]);
            abort();
        }
    }
}
You’re assuming that if the certificate is loaded, that you’ve loaded the digital identity as well. Again, in a production application, you’d probably want a check for each keychain item you need.
Build and run your app. Now you should see your digital identity and certificates (Figure 13-10).
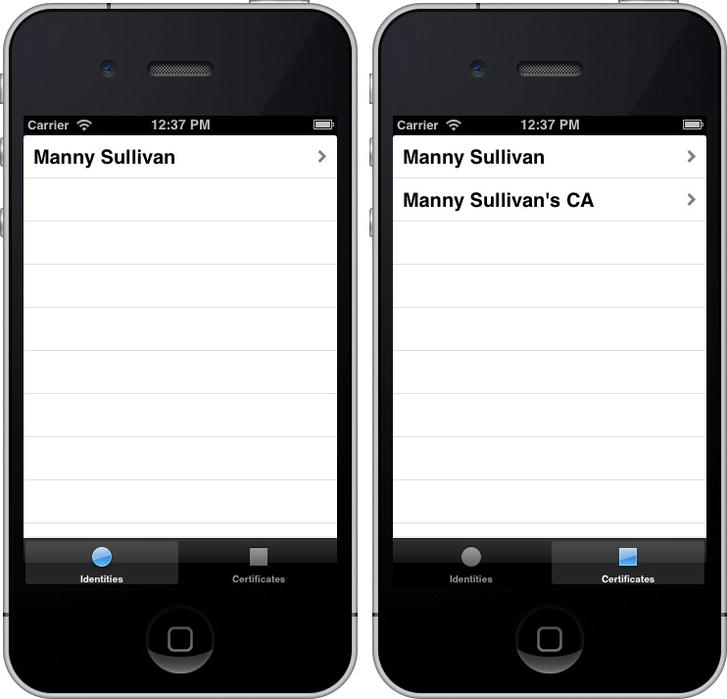
Figure 13-10. Keychain viewer with your digital identity (left) and certificates (right)
Let’s add a detail view for your digital identity and certificates. You’ll just use a simple text view to print out the attributes. You’ll be presenting this view controller modally, so you’ll add a single button to dismiss it.
Start by creating a new Objective-C class, named KeychainItemViewController, which will be a subclass of UIViewController. Once the class files are created, open KeychainItemViewController.h. Before the @interface declaration, you’ll predeclare the KeychainItem class.
@class KeychainItem;
You do this because you want to have a KeychainItem property. In addition, you’ll declare a UITextView property where you’ll put the keychain item attribute information.
@property (strong, nonatomic) KeychainItem *item;
@property (weak, nonatomic) IBOutlet UITextView *textView;
Finally, you’ll define an action that will dismiss your view controller when the user taps a button.
- (IBAction)done:(id)sender;
Open KeychainItemViewController.m, and implement the done: action.
- (IBAction)done:(id)sender
{
    [self dismissViewControllerAnimated:YES completion:nil];
}
You’re ready to add the view controller scenes. Open MainStoryboard.storyboard. Drag a UIViewController from the Object Library to the storyboard editor next to the IdentitiesViewController. Drag another UIViewController, this time placing it next to the CertificatesViewController. Change the background color for both views to black. Next add a UITextView to both UIViewControllers. When you place them over the UIViewControllers, they should expand to fill the view. If they don’t, that’s okay. You want to adjust each one to be the width of the view (320.0 px), but have a height less than the full height of the view (we used 400.0 px). Delete the default text in each text view.
Drag a UIButtonto each area below the text views. Use the blue guidelines to align the buttons to the left, below the text view. Change the button label text from Button to Done.
For each scene, use the Identity Inspector to change the class of each view controller from UIViewController to KeychainItemViewController. Control-drag from the view controller icon to the text view and select the textView outlet. Control-drag from the Done button to the view controller and select the done: Action.
Finally, control-drag from the table view cell in the IdentitiesViewController to the KeychainItemViewController right next to it. Select the modal Selection Segue in the pop-up menu that appears. Select the new segue and name it IdentitySegue in the Attributes Inspector. Repeat the process for the CertificatesViewController and the KeychainItemViewController next to it. This time, name the segue CertificateSegue in the Attributes Inspector.
You want to populate the text view with the keychain item’s attributes. You’ll use the UIViewController method viewWillAppear to populate the text view.
- (void)viewWillAppear:(BOOL)animated
{
    if (self.item) {
        NSMutableString *itemInfo = [NSMutableString string];
        [itemInfo appendFormat:@"AccessGroup: %@
",
            [self.item valueForAttribute:kSecAttrAccessGroup]];
        [itemInfo appendFormat:@"CreationDate: %@
",
            [self.item valueForAttribute:kSecAttrCreationDate]];
        [itemInfo appendFormat:@"CertificateEncoding: %@
",
            [self.item valueForAttribute:kSecAttrCertificateEncoding]];
        [itemInfo appendFormat:@"CreationDate: %@
",
            [self.item valueForAttribute:kSecClass]];
        [itemInfo appendFormat:@"Issuer: %@
",
            [self.item valueForAttribute:kSecAttrIssuer]];
        [itemInfo appendFormat:@"Label: %@
",
            [self.item valueForAttribute:kSecAttrLabel]];
        [itemInfo appendFormat:@"ModificationDate: %@
",
            [self.item valueForAttribute:kSecAttrModificationDate]];
        [itemInfo appendFormat:@"Accessible: %@
",
            [self.item valueForAttribute:kSecAttrAccessible]];
        [itemInfo appendFormat:@"PublicKeyHash: %@
",
            [self.item valueForAttribute:kSecAttrPublicKeyHash]];
        [itemInfo appendFormat:@"SerialNumber: %@
",
            [self.item valueForAttribute:kSecAttrSerialNumber]];
        [itemInfo appendFormat:@"Subject: %@
",
            [self.item valueForAttribute:kSecAttrSubject]];
             self.textView.text = itemInfo;
    }
}
Next, check to see if you have a keychain item. If you do, you create and fill an NS(Mutable)String with some attribute values. That string is used to set the text view text.
For each table view controller, you need to implement prepareForSegue:sender: to set the keychain item for the KeychainItemViewController. Open CertificatesViewController.m and add import the KeychainItemViewController header file.
#import "KeychainItemViewController.h"
The implementation of prepareForSegue:sender: check the segue being called and sets the KeychainItem property for the KeychainItemViewController.
- (void)prepareForSegue:(UIStoryboardSegue *)segue sender:(id)sender
{
    if ([segue.identifier isEqualToString:@"CertificateSegue"]) {
        NSIndexPath *indexPath = [self.tableView indexPathForSelectedRow];
        KeychainCertificate *cert = self.items[indexPath.row];
        KeychainItemViewController *kivc = [segue destinationViewController];
        kivc.item = cert;
    }
}
You want to repeat the process for the IdentitiesViewController, with some minor changes.
- (void)prepareForSegue:(UIStoryboardSegue *)segue sender:(id)sender
{
    if ([segue.identifier isEqualToString:@"IdentitySegue"]) {
        NSIndexPath *indexPath = [self.tableView indexPathForSelectedRow];
        KeychainIdentity *ident = self.items[indexPath.row];
        KeychainItemViewController *kivc = [segue destinationViewController];
        kivc.item = ident;
    }
}
You check for the segue identifier IdentitySegue, and you’re sending KeychainIdentity object rather than a KeychainCertificate.
Build and run your app. Select the digital identity and look at the attribute details. Dismiss the detail view and look at a certificate. You could extend this app to show the attributes that are specific to each keychain item. You’re going to do something else. You’re going to enhance the digital identity to allow you to encrypt and decrypt data.
Open KeychainIdentity.h. You want to add two methods.
- (NSData *)encrypt:(NSData *)data;
- (NSData *)decrypt:(NSData *)data;
For each method, you pass in an NSData object, whose data needs to be encrypted or decrypted. Each method will return a new NSData object with the transformed data.
Before you can use the public and private keys to encrypt and decrypt data, you need to know if the digital identity can be trusted. You only need to check trust once, so you’ll do it lazily, checking only when you need it. You’ll declare private ivar, _trusted, to tell you if the KeychainIdentity can be trusted. Since you don’t want to check trust every time trusted is false, you’ll also declare another property, trust, which is of type SecTrustRef.
@interface KeychainIdentity ()
@property (assign, nonatomic, readonly, getter=isTrusted) BOOL trusted;
@property (assign, nonatomic, readonly) SecTrustRef trust;
@property (assign, nonatomic, readonly) SecCertificateRef anchorCertificate;
@property (assign, nonatomic, readonly) SecCertificateRef certificate;
- (BOOL)recoverTrust;
@end
You also declared two additional properties, anchorCertificate and certificate, and a private method, recoverTrust, which you’re going to need. We’ll explain why when we get to the implementation.
Inside the implementation, you’ll synthesize trusted, trust, anchorCertificate, and certificate so you have access to the ivars, _trusted, _trust _anchorCertificate and _certificate.
@synthesize trusted = _trusted;
@synthesize trust = _trust;
@synthesize anchorCertificate = _anchorCertificate;
@synthesize certificate = _certificate;
Let’s update the init method to initialize these ivars.
- (id)init
{
    self = [super init];
    if (self) {
        self.type = [(__bridge id)kSecClassIdentity copy];
        _trusted = NO;
        _trust = NULL;
    }
    return self;
}
You need to implement the dealloc method to release the trust and certificate references, if necessary.
- (void)dealloc
{
    if (_trust)
        CFRelease(_trust);
    if (_certificate)
        CFRelease(_certificate);

    if (_anchorCertificate)
        CFRelease(_anchorCertificate);
}
Before you can implement methods for trust and trusted, you need to implement methods for anchorCertificate and certificate.
- (SecCertificateRef)anchorCertificate
{
    if (_anchorCertificate == NULL) {
        id persistentRef =             [[NSUserDefaults standardUserDefaults] objectForKey:@"anchor_certificate"];
        NSDictionary *query = @{
                (__bridge id)kSecClass               : (__bridge id)kSecClassCertificate,
                (__bridge id)kSecValuePersistentRef  : persistentRef,
                (__bridge id)kSecReturnRef           : (id)kCFBooleanTrue,
                (__bridge id)kSecMatchLimit          : (__bridge id)kSecMatchLimitOne
        };
        OSStatus status =             SecItemCopyMatching((__bridge CFDictionaryRef)query, (CFTypeRef *)&_anchorCertificate);
        if (status != errSecSuccess || _anchorCertificate == NULL) {
            NSLog(@"Error loading Anchor Certificate");
            abort();
        }
    }
    return _anchorCertificate;
}
You lazily load the anchor certificate. This is the root certificate you loaded into the keychain in your AppDelegate. You retrieve the persistent reference you loaded into the User Defaults and use it to query the keychain for the anchor certificate. If you succeed, you set the _anchorCertificate ivar. If you fail, you’ve got a bigger problem, so you log an error and abort the application.
Loading the digital identity certificate is much easier.
- (SecCertificateRef)certificate
{
    if (_certificate == NULL) {
        OSStatus status =             SecIdentityCopyCertificate((__bridge SecIdentityRef)self.item, &_certificate);
        if (status != errSecSuccess) {
            NSLog(@"Error retrieving Identity Certificate");
            return NULL;
        }
    }
    return _certificate;
}
You need to create a policy reference, and use that with the certificates to create a trust reference.
- (SecTrustRef)trust
{
    if (_trust == NULL) {
        SecPolicyRef policy = SecPolicyCreateBasicX509();
        NSArray *certs = @[ (__bridge id)self.certificate, (__bridge id)self.anchorCertificate ];
        OSStatus status =             SecTrustCreateWithCertificates((__bridge CFTypeRef)certs, policy, &_trust);
        if (status != errSecSuccess) {
            NSLog(@"Error Creating Trust from Certificate");
            return NULL;
        }
    }
    return _trust;
}
You’ll use these methods to implement the getter for the trusted property, isTrusted.
- (BOOL)isTrusted
{
    if (_trust == NULL) {
        SecTrustResultType trustResult;
        OSStatus status = SecTrustEvaluate(self.trust, &trustResult);
        if (status == errSecSuccess) {
            switch (trustResult) {
                case kSecTrustResultInvalid:
                case kSecTrustResultDeny:
                case kSecTrustResultFatalTrustFailure:
                case kSecTrustResultOtherError:
                    _trusted = NO;
                    break;
                case kSecTrustResultProceed:
                case kSecTrustResultConfirm:
                case kSecTrustResultUnspecified:
                    _trusted = YES;
                    break;
                case kSecTrustResultRecoverableTrustFailure:
                    _trusted = [self recoverTrust];
                    break;
            }
        }
        else
            _trusted = NO;
    }
    return _trusted;
}
You check if the _trust ivar is NULL or not. If it is, then you need to check if the digital identity can be trusted or not. You access the trust property and evaluate it. If the trust result code is not successful, then the digital identity cannot be trusted. The next three result codes, kSecTrustResultProceed, kSecTrustResultConfirm, kSecTrustResultUnspecified, indicate that that the digital identity can be trusted. The last, kSecTrustResultUnspecified, simply means that you haven’t set an explicit trust setting for the underlying certificate.
With the last result code, kSecTrustResultRecoverableTrustFailure, means that you technically have failed, but there are ways to recover so that the digital identity can be trusted. In this specific application, the recoverable trust failure is because you are using a self-signed certificate authority. In order to recover from this, you need to explicitly tell the Security framework to trust your certificate authority. That’s where the method recoverTrust comes in.
- (BOOL)recoverTrust
{
    NSArray *anchorCerts = @[ (__bridge id)self.anchorCertificate ];
    SecTrustSetAnchorCertificates(self.trust, (__bridge CFArrayRef)anchorCerts);
    SecTrustSetAnchorCertificatesOnly(self.trust, NO);
    SecTrustResultType trustResult;
    OSStatus status = SecTrustEvaluate(self.trust, &trustResult);
    if (status == errSecSuccess) {
        switch (trustResult) {
            case kSecTrustResultInvalid:
            case kSecTrustResultDeny:
            case kSecTrustResultFatalTrustFailure:
            case kSecTrustResultOtherError:
            case kSecTrustResultRecoverableTrustFailure:
                return NO;
                break;
            case kSecTrustResultProceed:
            case kSecTrustResultConfirm:
            case kSecTrustResultUnspecified:
                return YES;
                break;
        }
    }
    return NO;
}
You explicitly set the anchor certificate to your self-signed root certificate you created earlier and reevaluate the trust. You handle the trust result the same way as before, except this time, you treat a recoverable trust failure as a failure.
Now you can implement your encrypt: method.
- (NSData *)encrypt:(NSData *)data
{
    if (!self.isTrusted)
        return nil;
First, you check if your digital identity can be trusted. If not, you return nil.
Next, you copy your public key from your trust reference. You use it to determine the block size and the size, in bytes, that you can encrypt.
    SecKeyRef publicKey = SecTrustCopyPublicKey(self.trust);
    size_t keyBlockSize = SecKeyGetBlockSize(publicKey);
    size_t bufferSize = keyBlockSize*sizeof(uint8_t);
You use the bufferSize to allocate the data buffers you’ll use for encryption. Your source buffer needs to be shorted by 11 bytes due to the padding you’re going to use.
    uint8_t *srcBuffer = malloc(bufferSize);
    size_t srcBufferLen = keyBlockSize - 11;

    uint8_t *buffer = malloc(bufferSize);
    size_t bufferLen = keyBlockSize;
You allocate your output NSData object. You actually use an NSMutableData instance so you can append data to it.
NSMutableData *result = [[NSMutableData alloc] init];
If your input NSData object is larger than the allowable block/buffer size, you need to encrypt the data in chunks and append them to your output NSMutableData instance.
    NSRange range = NSMakeRange(0, keyBlockSize);
    while (range.location < data.length) {
        memset(srcBuffer, 0x0, bufferSize);
        memset(buffer, 0x0, bufferSize);

        if (NSMaxRange(range) > data.length)
            range.length = data.length - range.location;

        [data getBytes:srcBuffer range:range];
        OSStatus status =             SecKeyEncrypt(publicKey, kSecPaddingPKCS1, srcBuffer, srcBufferLen, buffer, &bufferLen);
        if (status != errSecSuccess) {
            NSLog(@"Error Encrypting Data");
            free(buffer);
            free(srcBuffer);
            free(publicKey);
            return nil;
        }
        [result appendBytes:buffer length:bufferLen];
        range.location += srcBufferLen;
    }
On an encryption error, you log an error and simply return nil.
Finally, you release the buffers and public key reference an return the encrypted data object.
    free(buffer);
    free(srcBuffer);
    free(publicKey);

    return result;
}
Decryption works in a similar fashion with one minor difference.
- (NSData *)decrypt:(NSData *)data
{
    if (!self.isTrusted)
        return nil;

    SecKeyRef privateKey;
    OSStatus status =  SecIdentityCopyPrivateKey((__bridge SecIdentityRef)self.item, &privateKey);
    if (status != errSecSuccess && privateKey != NULL) {
        CFRelease(privateKey);
        privateKey = NULL;
                return nil;
    }

    size_t keyBlockSize = SecKeyGetBlockSize(privateKey);
    size_t bufferSize = keyBlockSize*sizeof(uint8_t);

    uint8_t *srcBuffer = malloc(bufferSize);

    uint8_t *buffer = malloc(bufferSize);
    size_t bufferLen = keyBlockSize;

    NSMutableData *result = [[NSMutableData alloc] init];

    NSRange range = NSMakeRange(0, keyBlockSize);
    while (range.location < data.length) {
        memset(srcBuffer, 0x0, bufferSize);
        memset(buffer, 0x0, bufferSize);

        if (NSMaxRange(range) > data.length)
            range.length = data.length - range.location;

        [data getBytes:srcBuffer range:range];
        OSStatus status =              SecKeyDecrypt(privateKey, kSecPaddingPKCS1, srcBuffer, keyBlockSize, buffer, &bufferLen);
        if (status != errSecSuccess) {
            NSLog(@"Error Decrypting Data");
            free(buffer);
            free(srcBuffer);
            free(privateKey);
            return nil;
        }
        [result appendBytes:buffer length:bufferLen];
        range.location += keyBlockSize;
    }

    free(buffer);
    free(srcBuffer);
    free(privateKey);

    return result;
}
You retrieve the private key from the digital identity and check the return code to make sure you’ve successfully retrieved it.
Let’s use the digital identity encrytion/decryption in the identity detail view controller. You need create a subclass of KeychainItemViewController, named IdentityViewController, first. You want to add a button to allow you to encrypt and decrypt the text view contents. Open IdentityViewController.h and declare the outlet and action for this button.
@property (weak, nonatomic) IBOutlet UIButton *cryptButton;
- (IBAction)crypt:(id)sender;
Open IdentityViewController.m. First you’ll add some ivars and methods in a private category.
@interface IdentityViewController () {
    NSData *_encryptedData;
}
- (void)encrypt;
- (void)decrypt;
@end
_encryptedData will contain the encrypted data (obviously). You’ll also use it determine if the data should be encrypted or decrypted. The methods, encrypt and decrypt, should be self-explanatory.
The crypt: action method is a simple check to determine which method to call.
- (IBAction)crypt:(id)sender
{
    if (_encryptedData)
        [self decrypt];
    else
        [self encrypt];
}
The encrypt method takes the contents of the text view and sends them to the KeychainIdentity encrypt method. The results are stored in the _encryptedData ivar. It’s important to note that you encode the text view contents using UTF-8 encoding. This is important, as the Security framework works on an 8-bit data boundary.
- (void)encrypt
{
    KeychainIdentity *ident = (KeychainIdentity *)self.item;
    NSData *data = [self.textView.text dataUsingEncoding:NSUTF8StringEncoding];
    _encryptedData = [ident encrypt:data];
    if (_encryptedData == nil) {
        NSLog(@"Encryption Failed");
        return;
    }

    self.textView.text = [_encryptedData description];
    [self.cryptButton setTitle:@"Decrypt" forState:UIControlStateNormal];
}
Once you have the encrypted data, you display it in the text view and change the label on the crypt button Outlet.
The decrypt method works in the opposite manner.
- (void)decrypt
{
    KeychainIdentity *ident = (KeychainIdentity *)self.item;
    NSData *data = [ident decrypt:_encryptedData];
    if (data == nil) {
        NSLog(@"Decryption Failed");
        return;
    }

    NSString *decryptedString = [[NSString alloc] initWithBytes:[data bytes]
    length:[data length]
    encoding:NSUTF8StringEncoding];
    _encryptedData = nil;
    self.textView.text = decryptedString;
    [self.cryptButton setTitle:@"Encrypt" forState:UIControlStateNormal];
}
Now you need to adjust the storyboard to use the new IdentityViewController. Select MainStoryboard.storyboard to open the storyboard editor. Find the KeychainItemViewController next to the IdentitiesViewController. Select it and change the class from KeychainItemViewController to IdentityViewController. Drag a UIButton to the bottom right of the view and use the blue guidelines to align it with the Done button and right side of the view. Change the label to read Encrypt. Control-drag from the view controller icon to the Encrypt button and bind it to the cryptButton outlet. Control-drag from the Encrypt button to the view controller icon and bind it to the crypt: Action.
Build and run your application. Select the digital identity to open the IdentityViewController. Click the Encrypt button to encrypt the text, then click the Decrypt button to decrypt the text (Figure 13-11).
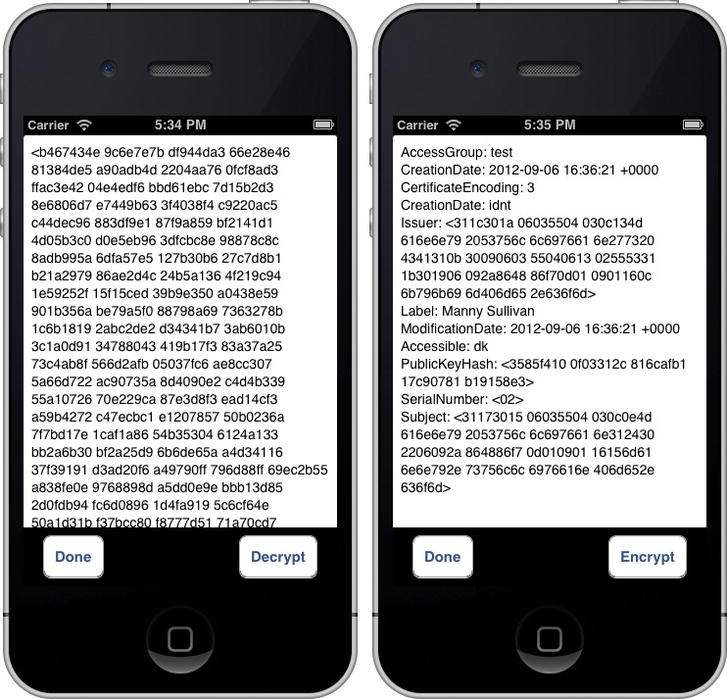
Figure 13-11. Encrypting (left) and decrypting (right) your digital identity information
Security Never Sleeps
As we stated at the beginning of the chapter, security is a process. It’s something you need to think about every step of the way when developing your application, and beyond. We’ve given you a taste of the functionality that’s available in iOS via the Security framework. Hopefully it’s enough information to give you a solid basis for your future application development.
If you’re interested in learning more, read Apple’s Secure Coding Guide (https://developer.apple.com/library/ios/#documentation/Security/Conceptual/SecureCodingGuide/ ). Another general security resource is Foundations of Security by Christoph Kern, Anita Kesavan, and Neil Daswani (Apress, 2007). While this book is a few years old now, the principles it covers remain perfectly valid.
Next up, you’re going work on keeping your interface responsive in iOS. It’s quite a shift from what you just covered. Take a deep breath and turn the page.