
Media Library Access and Playback
Every iOS device, at its core, is a first class media player. Out of the box, people can listen to music, podcasts, and audio books, as well as watch movies and videos.
iOS SDK applications have always been able to play sounds and music, but Apple has been extending the functionality with each iOS release. iOS 3 gave us the MediaPlayer framework which, among other things, provided access to the user’s audio library; iOS 5 extended this by giving us access to video stored in the user’s library.
iOS 4 extended the AVFoundation framework, which offers finer control of playing, recording, and editing of media. This control comes at a cost, as most of the MediaPlayer framework’s functionality is not directly implemented in AVFoundation. Rather, AVFoundation lets you implement custom controls for your specific needs.
In this chapter, you’ll develop three applications: a simple audio player, a simple video player, and a combined audio/video player. The first two will use the MediaPlayer framework exclusively. The final application will use the MediaPlayer framework to access the user’s media library, but then use AVFoundation for playback.
The methods and objects used to access the media library are part of the MediaPlayer framework, which allows applications to play both audio and video. While the framework gives you access to all types of media from the user’s library, there are some limitations that only allow you to work with audio files.
The collection of media on your iOS device was once referred as the iPod library, a term that we shall use interchangeably with media library. The latter is probably more accurate, as Apple has renamed the music player from iPod to Music and moved video media into an application called Videos. More recently, Apple has gone even further, creating a Podcasts application to handle your podcast collections.
From the perspective of the MediaPlayer framework, the entire media library itself is represented by the class MPMediaLibrary. You won’t use this object very often, however. It’s primarily used only when you need to be notified of changes made to the library while your application is running. It was rare for changes to be made to the library while your application is running, since such changes usually happened as the result of synchronizing your device with your computer. Nowadays, you can synchronize your music collection directly with the iTunes Store, so you may need to monitor changes in the media library.
A media item is represented by the class MPMediaItem. If you wish to play songs from one of your user’s playlists, you will use the class MPMediaPlaylist, which represents the playlists that were created in iTunes and synchronized to your user’s device. To search for either media items or playlists in the iPod library, you use a media query, which is represented by the class MPMediaQuery. Media queries will return all media items or playlists that match whatever criteria you specify. To specify criteria for a media query, you use a special media-centric form of predicate called a media property predicate, represented by the class MPMediaPropertyPredicate.
Another way to let your user select media items is to use the media picker controller, which is an instance of MPMediaPickerController. The media picker controller allows your users to use the same basic interface they are accustomed to using from the iPod or Music application.
You can play media items using a player controller. There are two kinds of player controllers: MPMusicPlayerController and MPMoviePlayerController. The MPMusicPlayerController is not a view controller. It is responsible for playing audio and managing a list of audio items to be played. Generally speaking, you are expected to provide any necessary user interface elements, such as buttons to play, pause, skip forward, or backward. The MediaPlayer framework provides a view controller class, MPMoviePlayerViewController, to allow for the simple management of a full screen movie player within your applications.
If you want to specify a list of media items to be played by a player controller, you use a media item collection, represented by instances of the class MPMediaItemCollection. Media item collections are immutable collections of media items. A media item may appear in more than one spot in the collection, meaning you could conceivably create a collection that played “Happy Birthday to You” a thousand times, followed by a single playing of “Rock the Casbah.” You could do that … if you really wanted to.
The class that represents media items, MPMediaItem, works a little differently than most Objective-C classes. You would probably expect MPMediaItem to include properties for things like title, artist, album name, and the like. But that is not the case. Other than those inherited from NSObject and the two NSCoding methods used to allow archiving, MPMediaItem includes only a single instance method called valueForProperty:.
valueForProperty: works much like an instance of NSDictionary, only with a limited set of defined keys. So, for example, if you wanted to retrieve a media item’s title, you would call valueForProperty: and specify the key MPMediaItemPropertyTitle, and the method would return an NSString instance with the audio track’s title. Media items are immutable on the iOS, so all MPMediaItem properties are read-only.
Some media item properties are said to be filterable. Filterable media item properties are those that can be searched on, a process you’ll look at a little later in the chapter.
Every media item has a persistent identifier (or persistent ID), which is a number associated with the item that won’t ever change. If you need to store a reference to a particular media item, you should store the persistent ID, because it is generated by iTunes and you can count on it staying the same over time.
You can retrieve the persistent ID of a media track using the property key MPMediaItemPropertyPersistentID, like so:
NSNumber *persistentId = [mediaItem valueForProperty:MPMediaItemPropertyPersistentID];
Persistent ID is a filterable property, which means that you can use a media query to find an item based on its persistent ID. Storing the media item’s persistent ID is the surest way to guarantee you’ll get the same object each time you search. We’ll talk about media queries a bit later in the chapter.
All media items have a type associated with them. Currently, media items are classified using three categories: audio, video, and generic. You can determine a particular media item’s type by asking for the MPMediaItemPropertyMediaType property, like so:
NSNumber *type = [mediaItem valueForProperty:MPMediaItemPropertyMediaType];
Media items may consist of more than a single type. A podcast, for example, could be a reading of an audio book. As a result, media type is implemented as a bit field (sometimes called bit flags).
Note Bit fields are commonly used in C, and Apple employs them in many places throughout its frameworks. If you’re not completely sure how bit fields are used, you can check out Chapter 11 of Learn C on the Mac for OS X and iOS by David Mark and James Bucanek (Apress, 2012). You can find a good summary of the concept on Wikipedia as well at http://en.wikipedia.org/wiki/Bitwise_operation .
With bit fields, a single integer datatype is used to represent multiple, nonexclusive Boolean values, rather than a single number. To convert type (an object) into an NSInteger, which is the documented integer type used to hold media types, use the integerValue method, like so:
NSInteger mediaType = [type integerValue];
At this point, each bit of mediaType represents a single type. To determine if a media item is a particular type, you need to use the bitwise AND operator (&) to compare mediaType with system-defined constants that represent the available media types. Here is a list of the current constants:
- MPMediaTypeMusic: Used to check if the media is music.
- MPMediaTypePodcast: Used to check if the media is an audio podcast.
- MPMediaTypeAudioBook: Used to check if the media is an audio book.
- MPMediaTypeAudioAny: Used to check if the media is any audio type.
- MPMediaTypeMovie: Used to check if the media is a movie.
- MPMediaTypeTVShow: Used to check if the media is a television show.
- MPMediaTypeVideoPodcast: Used to check if the media is a video podcast.
- MPMediaTypeMusicVideo: Used to check if the media is a music video.
- MPMediaTypeITunesU: Used to check if the media is an iTunes University video.
- MPMediaTypeAnyVideo: Used to check if the media is any video type.
- MPMediaTypeAny: Used to check if the media is any known type.
To check if a given item contains music, for example, you take the mediaType you retrieved and do this:
if (mediaType & MPMediaTypeMusic) {
    // It is music. . .
}
MPMediaTypeMusic’s bits are all set to 0, except for the one bit that’s used to represent that a track contains music, which is set to 1. When you do a bitwise AND (&) between that constant and the retrieved mediaType value, the resulting value will have 0 in all bits except the one that’s being checked. That bit will have a 1 if mediaType has the music bit set or 0 if it doesn’t. In Objective-C, an if statement that evaluates a logical AND or OR operation will fire on any nonzero result; the code that follows will run if mediaType’s music bit is set; otherwise, it will be skipped.
Media type is a filterable property, so you can specify in your media queries (which we’ll talk about shortly) that they should return media of only specific types.
Bitwise Macros
Not every programmer is comfortable reading code with bitwise operators. If that describes you, don’t despair. It’s easy to create macros to turn these bitwise checks into C function macros, like so:
#define isMusic(x) (x & MPMediaTypeMusic)
#define isPodcast(x) (x & MPMediaTypePodcast)
#define isAudioBook(x) (x & MPMediaTypeAudioBook)
Once these are defined, you can check the returned type using more accessible code, like this:
if (isMusic([type integerValue])) {
// Do something
}
There are several properties that you might want to retrieve from a media item, including the track’s title, its genre, the artist, and the album name. In addition to MPMediaItemPropertyPersistentID and MPMediaItemPropertyMediaType, here are the filterable property constants you can use:
- MPMediaItemPropertyAlbumPersistentID: Returns the item’s album’s persistent ID.
- MPMediaItemPropertyArtistPersistentID: Returns the item’s artist’s persistent ID.
- MPMediaItemPropertyAlbumArtistPersistentID: Return item’s album’s principle artist’s persistent ID.
- MPMediaItemPropertyGenrePersistentID: Return item’s genre’s persistent ID.
- MPMediaItemPropertyComposerPersistentID: Return item’s composer’s persistent ID.
- MPMediaItemPropertyPodcastPersistentID: Return item’s podcast’s persistent ID.
- MPMediaItemPropertyTitle: Returns the item’s title, which usually means the name of the song.
- MPMediaItemPropertyAlbumTitle: Returns the name of the item’s album.
- MPMediaItemPropertyArtist: Returns the name of the artist who recorded the item.
- MPMediaItemPropertyAlbumArtist: Returns the name of the principal artist behind the item’s album.
- MPMediaItemPropertyGenre: Returns the item’s genre (e.g., classical, rock, or alternative).
- MPMediaItemPropertyComposer: Returns the name of the item’s composer.
- MPMediaItemPropertyIsCompilation: If the item is part of a compilation, returns true.
- MPMediaItemPropertyPodcastTitle: If the track is a podcast, returns the podcast’s name.
Although the title and artist will almost always be known, none of these properties are guaranteed to return a value, so it’s important to code defensively any time your program logic includes one of these values. Although unlikely, a media track can exist without a specified name or artist.
Here’s an example that retrieves a string property from a media item:
NSString *title = [mediaItem valueForProperty:MPMediaItemPropertyTitle];
Nonfilterable Numerical Attributes
Nearly anything that you can determine about an audio or video item in iTunes can be retrieved from a media item. The values in the following list are not filterable—in other words, you can’t use them in your media property predicates. You can’t, for example, retrieve all the tracks that are longer than four minutes in length. But once you have a media item, there’s a wealth of information available about that item.
- MPMediaItemPropertyPlaybackDuration: Returns the length of the track in seconds.
- MPMediaItemPropertyAlbumTrackNumber: Returns the number of this track on its album.
- MPMediaItemPropertyAlbumTrackCount: Returns the number of tracks on this track’s album.
- MPMediaItemPropertyDiscNumber: If the track is from a multiple-album collection, returns the track’s disc number.
- MPMediaItemPropertyDiscCount: If the track is from a multiple-album collection, returns the total number of discs in that collection.
- MPMediaItemPropertyBeatsPerMinute: Returns the beats per minute of the item.
- MPMediaItemPropertyReleaseDate: Returns the release date of the item.
- MPMediaItemPropertyComments: Returns the item’s comments entered in the Get Info tab.
Numeric attributes are always returned as instances of NSNumber. The track duration is an NSTimeInterval, which can be retrieved from NSNumber by using the doubleValue method. The rest are unsigned integers that can be retrieved using the unsignedIntegerValue method.
Here are a few examples of retrieving numeric properties from a media item:
NSNumber *durationNum = [mediaItem valueForProperty:MPMediaItemPropertyPlaybackDuration];
NSTimeInterval duration = [durationNum doubleValue];

NSNumber *trackNum = [mediaItem valueForProperty:MPMediaItemPropertyAlbumTrackNumber];
NSUInteger trackNumber = [trackNum unsignedIntegerValue];
If a media track has lyrics associated with it, you can retrieve those using the property key MPMediaItemPropertyLyrics. The lyrics will be returned in an instance of NSString, like so:
NSString *lyrics = [mediaItem valueForProperty:MPMediaItemPropertyLyrics];
Some media tracks have a piece of artwork associated with them. In most instances, this will be the track’s album’s cover picture, though it could be something else. You retrieve the album artwork using the property key MPMediaItemPropertyArtwork, which returns an instance of the class MPMediaItemArtwork. The MPMediaItemArtwork class has a method that returns an instance of UIImage to match a specified size. Here’s some code to get the album artwork for a media item that would fit into a 100-by-100 pixel view:
MPMediaItemArtwork *art = [mediaItem valueForProperty:MPMediaItemPropertyArtwork];
CGSize imageSize = {100.0, 100.0};
UIImage *image = [art imageWithSize:imageSize];
Another set of data that you can retrieve from a media item are termed User-Defined. These are properties set on the media item based on the user’s interaction. These include properties like play counts and ratings.
- MPMediaItemPropertyPlayCount: Returns the total number of times that this track has been played.
- MPMediaItemPropertySkipCount: Returns the total number of times this track has been skipped.
- MPMediaItemPropertyRating: Returns the track’s rating, or 0 if the track has not been rated.
- MPMediaItemPropertyLastPlayedDate: Returns the date the track was last played.
- MPMediaItemPropertyUserGrouping: Returns the info from the Grouping tab from the iTunes Get Info panel.
Media items can be grouped into collections, creatively called media item collections. In fact, this is how you specify a list of media items to be played by the player controllers. Media item collections, which are represented by the class MPMediaItemCollection, are immutable collections of media items. You can create new media item collections, but you can’t change the contents of the collection once it has been created.
The easiest way to create a media item collection is to put all the media items you want to be in the collection into an instance of NSArray, in the order you want them. You can then pass the instance of NSArray to the factory method collectionWithItems:, like so:
NSArray *items = @[mediaItem1, mediaItem2];
MPMediaItemCollection *collection = [MPMediaItemCollection collectionWithItems:items];
To retrieve a specific media item from a media item collection, you use the instance method items, which returns an NSArray instance containing all of the media items in the order they exist in the collection. If you want to retrieve the specific media item at a particular index, for example, you would do this:
MPMediaItem *item = [[mediaCollection items] objectAtIndex:5];
Because media item collections are immutable, you can’t add items to a collection, nor can you append the contents of another media item collection onto another one. Since you can get to an array of media items contained in a collection using the instance method items, however, you can make a mutable copy of the items array, manipulate the mutable array’s contents, and then create a new collection based on the modified array.
Here’s some code that appends a single media item onto the end of an existing collection:
NSMutableArray *items = [[originalCollection items] mutableCopy];
[items addObject:mediaItem];
MPMediaItemCollection *newCollection = [MPMediaItemCollection collectionWithItems:items];
Similarly, to combine two different collections, you combine their items and create a new collection from the combined array:
NSMutableArray *items = [[firstCollection items] mutableCopy];
[items addObjectsFromArray:[secondCollection items]];
MPMediaItemCollection *newCollection = [MPMediaItemCollection collectionWithItems:items];
To delete an item or items from an existing collection, you can use the same basic technique. You can retrieve a mutable copy of the items contained in the collection, delete the ones you want to remove, then create a new collection based on the modified copy of the items, like so:
NSMutableArray *items = [[originalCollection items] mutableCopy];
[items removeObject:mediaItemToDelete];
MPMediaItemCollection *newCollection = [MPMediaItemCollection collectionWithItems:items];
Media Queries and Media Property Predicates
To search for media items in the media library, you use media queries, which are instances of the class MPMediaQuery. A number of factory methods can be used to retrieve media items from the library sorted by a particular property. For example, if you want a list of all media items sorted by artist, you can use the artistsQuery class method to create an instance of MPMediaQuery configured, like this:
MPMediaQuery *artistsQuery = [MPMediaQuery artistsQuery];
Table 12-1 lists the factory methods on MPMediaQuery.
Table 12-1. MPMediaQuery Factory Methods
These factory methods are useful for displaying the entire contents of the user’s library that meet preset conditions. That said, you will often want to restrict the query to an even smaller subset of items. You can do that using a media predicate. Media predicates can be created on any of the filterable properties of a media item, including the persistent ID, media type, or any of the string properties (like title, artist, or genre).
To create a media predicate on a filterable property, use the class MPMediaPropertyPredicate. Create new instances using the factory method predicateWithValue:forProperty:comparisonType:. Here, for example, is how to create a media predicate that searches for all songs with the title “Happy Birthday”:
MPMediaPropertyPredicate *titlePredicate =
    [MPMediaPropertyPredicate predicateWithValue:@"Happy Birthday"
                                      forProperty:MPMediaItemPropertyTitle
                                   comparisonType:MPMediaPredicateComparisonContains];
The first value you pass—in this case, @“Happy Birthday”—is the comparison value. The second value is the filterable property you want that comparison value compared to. By specifying MPMediaItemPropertyTitle, you’re saying you want the song titles compared to the string “Happy Birthday”. The last item specifies the type of comparison to do. You can pass MPMediaPredicateComparisonEqualTo to look for an exact match to the specified string, or MPMediaPredicateComparisonContains to look for any item that contains the passed value as a substring.
Note Media queries are always case-insensitive, regardless of the comparison type used. Therefore, the preceding example would also return songs called “HAPPY BIRTHDAY” and “Happy BirthDAY.”
Because you’ve passed MPMediaPredicateComparisonContains, this predicate would match “Happy Birthday, the Opera” and “Slash Sings Happy Birthday,” in addition to plain old “Happy Birthday.” Had you passed MPMediaPredicateComparisonEqualTo, then only the last one—the exact match—would be found.
You can create and pass multiple media property predicates to a single query. If you do, the query will use the AND logical operator and return only the media items that meet all of your predicates.
To create a media query based on media property predicates, you use the init method initWithFilterPredicates: and pass in an instance of NSSet containing all the predicates you want it to use, like so:
MPMediaQuery *query =
    [[MPMediaQuery alloc] initWithFilterPredicates:[NSSet setWithObject:titlePredicate]];
Once you have a query—whether it was created manually or retrieved using one of the factory methods—there are two ways you can execute the query and retrieve the items to be displayed:
- You can use the items property of the query, which returns an instance of NSArray containing all the media items that meet the criteria specified in your media property predicates, like so:
NSArray *items = query.items;
- You can use the property collections to retrieve the objects grouped by one of the filterable properties. You can tell the query which property to group the items by by setting the groupingType property to the property key for the filterable attribute you want it grouped by. If you don’t set groupingType, it will default to grouping by title.
When you access the collections property, the query will instead return an array of MPMediaItemCollections, with one collection for each distinct value in your grouping type. So, if you specified a groupingType of MPMediaGroupingArtist, for example, the query would return an array with one MPMediaItemCollection for each artist who has at least one song that matches your criteria. Each collection would contain all the songs by that artist that meet the specified criteria. Here’s what that might look like in code:
query.groupingType = MPMediaGroupingArtist;
NSArray *collections = query.collections;
for (MPMediaItemCollection *oneCollection in collections) {
    // oneCollection has all songs by one artist that meet criteria
}
You need to be very careful with media queries. They are synchronous and happen in the main thread, so if you specify a query that returns 100,000 media items, your user interface is going to hiccup while those items are found, retrieved, and stored in collections or an array. If you are using a media query that might return more than a dozen or so media items, you might want to consider moving that action off the main thread. You’ll learn how to move operations off of the main thread in Chapter 14.
If you want to let your users select specific media items from their library, you’ll want to use the media picker controller. The media picker controller lets your users choose audio from their iPod library using an interface that’s nearly identical to the one in the Music application they’re already used to using. Your users will not be able to use Cover Flow, but they will be able to select from lists sorted by song title, artist, playlist, album, and genre, just as they can when selecting music in the Music application (Figure 12-1).
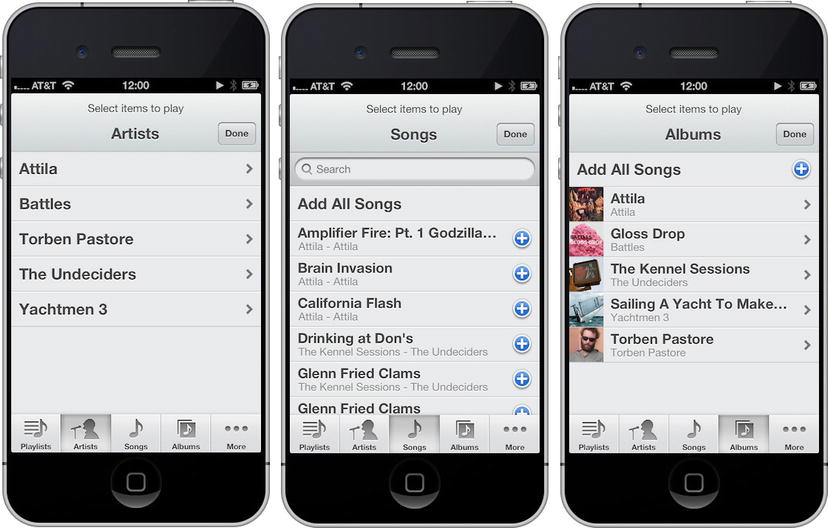
Figure 12-1. The media picker controller by artist, song, and album
The media picker controller is extremely easy to use. It works just like many of the other provided controller classes covered in the previous chapters, such as the image picker controller and the mail compose view controller that you used in Chapter 11. Create an instance of MPMediaPickerController, assign it a delegate, and then present it modally, like so:
MPMediaPickerController *picker = [[MPMediaPickerController alloc] initWithMediaTypes:MPMediaTypeMusic];
picker.delegate = self;
[picker setAllowsPickingMultipleItems:YES];
picker.prompt = NSLocalizedString(@"Select items to play", @"Select items to play");
[self presentModalViewController:picker animated:YES];
When you create the media picker controller instance, you need to specify a media type. This can be one of the three audio types mentioned earlier—MPMediaTypeMusic, MPMediaTypePodcast, or MPMediaTypeAudioBook. You can also pass MPMediaTypeAnyAudio, which will currently return any audio item.
Note Passing non-audio media types will not cause any errors in your code, but when the media picker appears, it will only display audio items.
You can also use the bitwise OR (|) operator to let your user select any combination of media types. For example, if you want to let your user select from podcasts and audio books, but not music, you could create your picker like this:
MPMediaPickerController *picker = [[MPMediaPickerController alloc] initWithMediaTypes:MPMediaTypePodcast | MPMediaTypeAudioBook ];
By using the bitwise OR operator with these constants, you end up passing an integer that has the bits representing both of these media types set to 1 and all the other bits set to 0.
Also notice that you need to tell the media picker controller to allow the user to select multiple items. The default behavior of the media picker is to let the user choose one, and only one, item. If that’s the behavior you want, then you don’t have to do anything, but if you want to let the user select multiple items, you must explicitly tell it so.
The media picker also has a property called prompt, which is a string that will be displayed above the navigation bar in the picker (see the top of Figure 12-1). This is optional, but generally a good idea.
The media picker controller’s delegate needs to conform to the protocol MPMediaPickerControllerDelegate. This defines two methods: one that is called if the user taps the Cancel button and another that is called if the user chooses one or more songs.
If, after you present the media picker controller, the user hits the Cancel button, the delegate method mediaPickerDidCancel:will be called. You must implement this method on the media picker controller’s delegate, even if you don’t have any processing that needs to be done when the user cancels, since you must dismiss the modal view controller. Here is a minimal, but fairly standard, implementation of that method:
- (void)mediaPickerDidCancel:(MPMediaPickerController *)mediaPicker
{
    [self dismissModalViewControllerAnimated: YES];
}
Handling Media Picker Selections
If the user selected one or more media items using the media picker controller, then the delegate method mediaPicker:didPickMediaItems: will be called. This method must be implemented, not only because it’s the delegate’s responsibility to dismiss the media picker controller, but also because this method is the only way to know which tracks your user selected. The selected items are grouped in a media item collection.
Here’s a very simple example implementation of mediaPicker:didPickMediaItems: that assigns the returned collection to one of the delegate’s properties:
- (void)mediaPicker:(MPMediaPickerController *)mediaPicker         didPickMediaItems:(MPMediaItemCollection *)theCollection
{
    [self dismissModalViewControllerAnimated: YES];
    self.collection = theCollection;
}
As we discussed before, there are two player controllers in the MediaPlayer framework: the music player controller and movie player controller. We’ll get to the movie player controller later. The music player controller allows you to play a queue of media items by specifying either a media item collection or a media query. As we stated earlier, the music player controller has no visual elements. It’s an object that plays the audio. It allows you to manipulate the playback of that audio by skipping forward or backward, telling it which specific media item to play, adjusting the volume, or skipping to a specific playback time in the current item.
The MediaPlayer framework offers two completely different kinds of music player controllers: the iPod music player and the application music player. The way you use them is identical, but there’s a key difference in how they work. The iPod music player is the one that’s used by the Music app; as is the case with those apps, when you quit your app while music is playing, the music continues playing. In addition, when the user is listening to music and starts up an app that uses the iPod music player, the iPod music player will keep playing that music. In contrast, the application music player will kill the music when your app terminates.
There’s a bit of a gotcha here in that both the iPod and the application music player controllers can be used at the same time. If you use the application music player controller to play audio, and the user is currently listening to music, both will play simultaneously. This may or may not be what you want to happen, so you will usually want to check the iPod music player to see if there is music currently playing, even if you actually plan to use the application music player controller for playback.
Creating the Music Player Controller
To get either of the music player controllers, use one of the factory methods on MPMusicPlayerController. To retrieve the iPod music player, use the method iPodMusicPlayer, like so:
MPMusicPlayerController *thePlayer = [MPMusicPlayerController iPodMusicPlayer];
Retrieving the application music player controller is done similarly, using the applicationMusicPlayer method instead, like this:
MPMusicPlayerController *thePlayer = [MPMusicPlayerController applicationMusicPlayer];
Determining If the Music Player Controller Is Playing
Once you create an application music player, you’ll need to give it something to play. But if you grab the iPod music player controller, it could very well already be playing something. You can determine if it is by looking at the playbackState property of the player. If it’s currently playing, it will be set to MPMusicPlaybackStatePlaying.
if (player.playbackState == MPMusicPlaybackStatePlaying) {
    // playing
}
Specifying the Music Player Controller’s Queue
There are two ways to specify the music player controller’s queue of audio tracks: provide a media query or provide a media item collection. If you provide a media query, the music player controller’s queue will be set to the media items returned by the items property. If you provide a media item collection, it will use the collection you pass as its queue. In either case, you will replace the existing queue with the items in the query or collection you pass in. Setting the queue will also reset the current track to the first item in the queue.
To set the music player’s queue using a query, use the method setQueueWithQuery:. For example, here’s how you would set the queue to all songs, sorted by artist:
MPMusicPlayerController *player = [MPMusicPlayerController iPodMusicPlayer];
MPMediaQuery *artistsQuery = [MPMediaQuery artistsQuery];
[player setQueueWithQuery:artistsQuery];
Setting the queue with a media item collection is accomplished with the method setQueueWithItemCollection:, like so:
MPMusicPlayerController *player = [MPMusicPlayerController iPodMusicPlayer];
NSArray *items = [NSArray arrayWithObjects:mediaItem1, mediaItem2, nil];
MPMediaItemCollection *collection = [MPMediaItemCollection collectionWithItems:items];
[items setQueueWithItemCollection:collection];
Unfortunately, there’s currently no way to retrieve the music player controller’s queue using public APIs. That means you will generally need to keep track of the queue independently of the music player controller if you want to be able to manipulate the queue.
Getting or Setting the Currently Playing Media Item
You can get or set the current song using the nowPlayingItem property. This lets you determine which track is already playing if you’re using the iPod music player controller and lets you specify a new song to play. Note that the media item you specify must already be in the music player controller’s queue. Here’s how you retrieve the currently playing item:
MPMediaItem *currentTrack = player.nowPlayingItem;
To switch to a different track, do this:
player.nowPlayingItem = newTrackToPlay; // must be in queue already
The music player controller allows you to skip forward one song using the method skipToNextItem or to skip back to the previous song using skipToPreviousItem. If there is no next or previous song to skip to, the music player controller stops playing. The music player controller also allows you to move back to the beginning of the current song using skipToBeginning.
Here is an example of all three methods:
[player skipToNextItem];
[player skipToPreviousItem];
[player skipToBeginning];
When you’re using your iPhone, iPod touch, or iTunes to listen to music, if you press and hold the forward or back button, the music will start seeking forward or backward, playing the music at an ever-accelerating pace. This lets you, for example, stay in the same track, but skip over a part you don’t want to listen to, or skip back to something you missed. This same functionality is available through the music player controller using the methods beginSeekingForward and beginSeekingBackward. With both methods, you stop the process with a call to endSeeking.
Here is a set of calls that demonstrate seeking forward and stopping, then seeking backwards and stopping:
[player beginSeekingForward];
[player endSeeking];

[player beginSeekingBackward];
[player endSeeking];
Not to be confused with payback time (something we’ve dreamt of for years, ever since they replaced the excellent Dick York with the far blander Dick Sargent), playback time specifies how far into the current song you currently are. If the current song has been playing for five seconds, then the playback time will be 5.0.
You can retrieve and set the current playback time using the property currentPlaybackTime. You might use this, for example, when using an application music player controller, to resume a song at exactly the point where it was stopped when the application was last quit. Here’s an example of using this property to skip forward ten seconds in the current song:
NSTimeInterval currentTime = player.currentPlaybackTime;
MPMediaItem *currentSong = player.nowPlayingItem;
NSNumber *duration = [currentSong valueForProperty:
MPMediaItemPropertyPlaybackDuration];
currentTime += 10.0;
if (currentTime > [duration doubleValue])
    currentTime = [duration doubleValue];
player.currentPlaybackTime = currentTime;
Notice that you check the duration of the currently playing song to make sure you don’t pass in an invalid playback time.
Music player controllers have ordered queues of songs and, most of the time, they play those songs in the order they exist in the queue, playing from the beginning of the queue to the end and then stopping. Your user can change this behavior by setting the repeat and shuffle properties in the iPod or Music application. You can also change the behavior by setting the music player controller’s repeat and shuffle modes, represented by the properties repeatMode and shuffleMode. There are four repeat modes:
- MPMusicRepeatModeDefault: Uses the repeat mode last used in the iPod or Music application.
- MPMusicRepeatModeNone: Don’t repeat at all. When the queue is done, stop playing.
- MPMusicRepeatModeOne: Keep repeating the currently playing track until your user goes insane. Ideal for playing “It’s a Small World.”
- MPMusicRepeatModeAll: When the queue is done, start over with the first track.
There are also four shuffle modes:
- MPMusicShuffleModeDefault: Use the shuffle mode last used in the iPod or Music application.
- MPMusicShuffleModeOff: Don’t shuffle at all—just play the songs in the queue order.
- MPMusicShuffleModeSongs: Play all the songs in the queue in random order.
- MPMusicShuffleModeAlbums: Play all the songs from the currently playing song’s album in random order.
Here is an example of turning off both repeat and shuffle:
    player.repeatMode = MPMusicRepeatNone;
    player.shuffleMode = MPMusicShuffleModeOff;
Adjusting the Music Player Controller’s Volume
The music player controller lets you manipulate the volume at which it plays the items in its queue. The volume can be adjusted using the property volume, which is a clamped floating-point value. Clamped values store numbers between 0.0 and 1.0. In the case of volume, setting the property to 1.0 means play the tracks at the maximum volume, and a value of 0.0 means turn off the volume. Any value between those two extremes represents a different percentage of the maximum volume, so setting volume to 0.5 is like turning a volume knob halfway up.
Caution Setting volume to 1.1 will not make the volume any louder than setting it to 1.0. Despite what Nigel might have told you, you can’t set the volume to 11.
Here’s how you set a player to maximum volume:
player.volume = 1.0;
And here’s how you set the volume to its midpoint:
player.volume = 0.5;
Music Player Controller Notifications
Music player controllers are capable of sending out notifications when any of three things happen:
- When the playback state (playing, stopped, paused, seeking, etc.) changes, the music player controller can send out the MPMusicPlayerControllerPlaybackStateDidChangeNotification notification.
- When the volume changes, it can send out the MPMusicPlayerControllerVolumeDidChangeNotification notification.
- When a new track starts playing, it can send out the MPMusicPlayerControllerNowPlayingItemDidChangeNotification notification.
Note that music player controllers don’t send any notifications by default. You must tell an instance of MPMusicPlayerController to start generating notifications by calling the method beginGeneratingPlaybackNotifications. To have the controller stop generating notifications, call the method endGeneratingPlaybackNotifications.
If you need to receive any of these notifications, you first implement a handler method that takes one argument, an NSNotification *, and then register with the notification center for the notification of interest. For example, if you want a method to fire whenever the currently playing item changed, you could implement a method called nowPlayingItemChanged:, like so:
- (void)nowPlayingItemChanged:(NSNotification *)notification {
    NSLog(@"A new track started");
}
To start listening for those notifications, you could register with the notification for the type of notification you’re interested in, and then have that music player controller start generating the notifications:
NSNotificationCenter *notificationCenter = [NSNotificationCenter defaultCenter];
[notificationCenter addObserver:self selector:@selector(nowPlayingItemChanged:)
    name:MPMusicPlayerControllerNowPlayingItemDidChangeNotification
    object:player];
[player beginGeneratingPlaybackNotifications];
Once you do this, any time the track changes, your nowPlayingItemChanged: method will be called by the notification center.
When you’re finished and no longer need the notifications, you unregister and tell the music player controller to stop generating notifications:
NSNotificationCenter *center = [NSNotificationCenter defaultCenter];
[center removeObserver:self
    name:MPMusicPlayerControllerNowPlayingItemDidChangeNotification
    object:player];
[player endGeneratingPlaybackNotifications];
Now that you have all that theory out of the way, let’s build something!
Simple Music Player
The first application you’re going to build is going to take what you’ve covered so far to build a simple music player. The application will allow users to create a queue of songs via the MPMediaPickerController and play them back via the MPMusicPlayerController.
Note We’ll use the term queue to describe the application’s list of songs, rather than the term playlist. When working with the media library, the term playlist refers to actual playlists synchronized from iTunes. Those playlists can be read, but they can’t be created using the SDK. To avoid confusion, we’ll stick with the term queue.
When the application launches, it will check to see if music is currently playing. If so, it will allow that music to keep playing and will append any requested music to the end of the list of songs to be played.
Tip If your application needs to play a certain sound or music, you may feel that it’s appropriate to turn off the user’s currently playing music, but you should do that with caution. If you’re just providing a soundtrack, you really should consider letting the music that’s playing continue playing, or at least giving the users the choice about whether to turn off their chosen music in favor of your application’s music. It is, of course, your call, but tread lightly when it comes to stomping on your user’s music.
The application you’ll build isn’t very practical because everything you’re offering to your users (and more) is already available in the Music application on your iOS device. But writing it will allow you to explore almost all of the tasks your own application might ever need to perform with regard to the media library.
Caution This chapter’s application must be run on an actual iOS. The iOS Simulator does not have access to the iTunes library on your computer, and any of the calls related to the iTunes library access APIs will result in an error on the Simulator.
Building the SimplePlayer Application
Your app will retrieve the iPod music player controller and allow you to add songs to the queue by using the media picker. You’ll provide some rudimentary playback controls to play/pause the music, as well as to skip forward and backward in the queue.
Note As a reminder, the Simulator does not yet support the media library functionality. To get the most out of the SimplePlayer application, you need to run it on your iOS device, which means signing up for one of Apple’s paid iOS Developer Programs. If you have not already done that, you might want to take a short break and head over to http://developer.apple.com/programs/register/ and check it out.
Let’s start by creating a new project in Xcode. Since this is a very simple application, you’ll use the Single View Application project template and name the new project SimplePlayer. Since you only have one view, you don’t need your project to use storyboards, though you can use them if you wish.
Once your new project is created, you need to add the MediaPlayer framework to the project. Select the SimplePlayer project at the top of the Navigator Pane. In the Project Editor, select the SimplePlayer target and open the Build Phases pane. Find the Link Binary With Libraries (3 Items) section and expand it. Click the + button at the bottom of the section and add the MediaPlayer framework. If you’ve done this correctly, the MediaPlayer.framework should appear in the project in the Navigator pane. Let’s keep things clean, and move the MediaPlayer.framework to the Frameworks group in your project.
Single-click ViewController.xib to open Interface Builder. Let’s take a look at Figure 12-2. There are three labels along the top, an image view in the middle, and button bar on the bottom with four buttons. Let’s start from the bottom and work our way up.
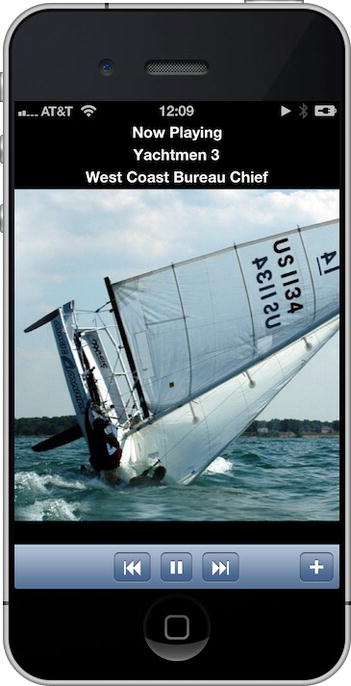
Figure 12-2. The SimplePlayer application playing a song
Drag a UIToolbar from the object library to the bottom of the UIView. By default, the UIToolbar gives you a UIBarButtonItem aligned to the left side of the toolbar. Since you need four buttons in your toolbar, you’ll keep this button. Drag a flexible space bar button item (Figure 12-3) to the left of the UIBarButtonItem. Make sure you use the flexible space, not the fixed space. If you placed it in the correct spot, the UIBarButtonItem should now be aligned to the right side of the UIToolbar (Figure 12-4).
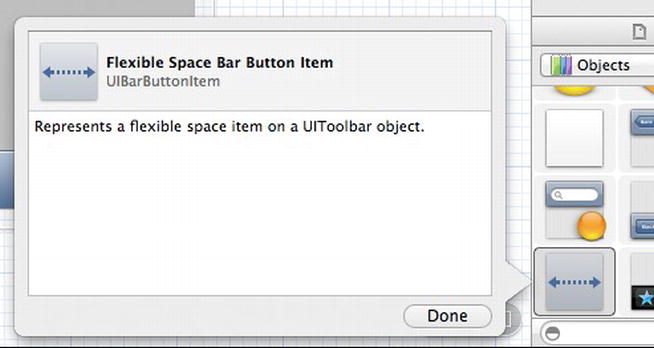
Figure 12-3. The flexible space bar button item in the Object Library
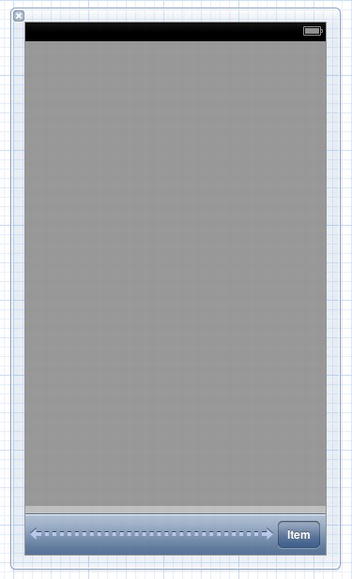
Figure 12-4. The SimplePlayer toolbar with the flexible space
Add three UIBarButtonItems to the left of the flexible space. These will be your playback control buttons. In order to center these buttons, you need to add one more flexible space bar button Item to left side of your UIToolbar (Figure 12-5). Select the left most button and open the Attribute Inspector. Change the Identifier from Custom to Rewind (Figure 12-6). Select the button to the right of your new Rewind button and change the Identifier to Play. Change the Identifier to right of your Play button to Fast Forward. Select the rightmost button and change the Identifier to Add. When you’re done, it should look like Figure 12-7.
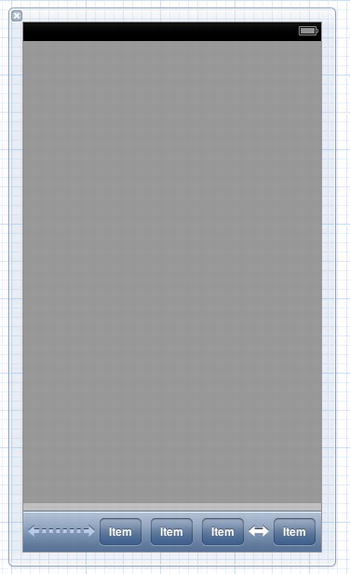
Figure 12-5. Toolbar with all your buttons
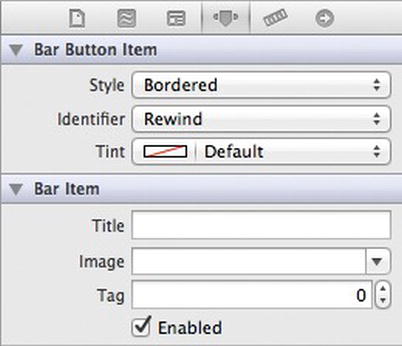
Figure 12-6. Changing the bar button item identifier to Rewind
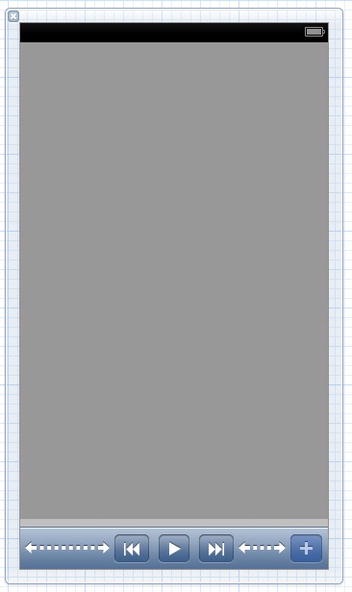
Figure 12-7. The completed Toolbar
Moving up the view, you need to add a UIImageView. Drag one onto your view, above the toolbar. Interface Builder will expand the UIImageView to fill the available area. Since you don’t want that, open the Size Inspector in the Utility pane. The UIImageView should be selected, but if it isn’t, select it to make sure you’re adjusting the right component. The Size Inspector should show that your UIImageView width is 320. Change the height to match the width. Your image view should now be square. Center the image view in your view, using the guidelines to help.
Now you need to add the three labels across the top. Drag a label to the top of your application’s view. Extend the area of the label to the width of your view. Open the Attribute Inspector, and change the label text from “Label” to “Now Playing.” Change the label’s color from black to white, and set the font to System Bold 17.0. Set the alignment to center. Finally, change the label’s background color to black (Figure 12-8). Add another label below this label. Give it the same attributes as the first label, but set the text from “Label” to “Artist.” Add one more label, below the Artist label, with the same attribute settings, and set the text to “Song.”
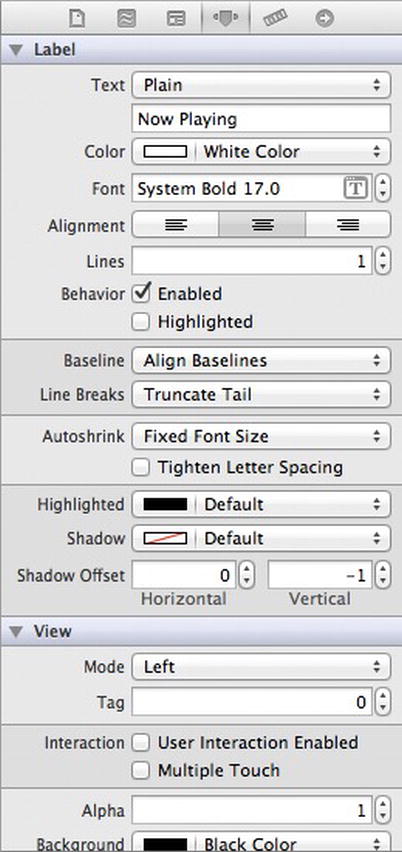
Figure 12-8. Your SimplePlayer label attributes
Finally, set the background of your view to black. Because black is cool.
In Interface Builder, switch from the standard editor to the assistant editor. The Editor pane should split to show Interface Builder on the left and ViewController.h on the right. Control-drag from the label with the text “Now Playing” to just below the @interface declaration. Create a UILabel outlet and name it “status.” Repeat for the Artist and Song labels, naming the outlets “artist” and “song,” respectively.
Control-drag from the image view to below the label outlets and create a UIImageView outlet named “imageView.” Do the same for the Toolbar and the Play button. Now that you have your outlets set up, you need to add your actions.
Control-drag from the rewindButton, and create an action named “rewindPressed.” Repeat for each button. Name the play action “playPausePressed,” the fast forward action “fastForwardPressed,” and the add action “addPressed.”
Switch back to the standard editor and select ViewController.h to open it in the editor.
First, you need to have your ViewController conform to the MPMediaPickerDelegate protocol, so you can use the MPMediaPicker controller. In order to do that, you need to import the MediaPlayer header file, right after the UIKit header import:
#import <MediaPlayer/MediaPlayer.h>
Then you’ll add the protocol declaration to ViewController:
@interface ViewController : UIViewController <MPMediaPickerControllerDelegate>
You need to add another UIBarButtonItem property to hold the pause button you’ll display while music is playing. You also need to change the Play button property from weak to strong so you can toggle between the two.
@property (strong, nonatomic) IBOutlet UIBarButtonItem *play;
@property (strong, nonatomic)          UIBarButtonItem *pause;
You need two more properties: one to hold your MPMediaPlayerController instance, and the other to hold the MPMediaItemCollection that the player is playing.
@property (strong, nonatomic) MPMusicPlayerController *player;
@property (strong, nonatomic) MPMediaItemCollection   *collection;
When the MPMusicPlayerController starts playing a new media item, it sends a notification of type MPMusicPlayerControllerNowPlayingItemDidChangeNotification. You’ll set up an observer for that notification to update the labels in your view.
- (void)nowPlayingItemChanged:(NSNotification *)notification;
Select ViewController.m to open it in the Editor pane. First you need to set up things for when the view loads. Find the viewDidLoad method. After the call to super, you need to instantiate the Pause button.
self.pause = [[UIBarButtonItem alloc] initWithBarButtonSystemItem:UIBarButtonSystemItemPause                                                            target:self                                                            action:@selector(playPausePressed:)];
[self.pause setStyle:UIBarButtonItemStyleBordered];
Next, create your MPMusicPlayerController instance.
self.player = [MPMusicPlayerController iPodMusicPlayer];
Then register for the notification when the Now Playing item changes in the player.
NSNotificationCenter *notificationCenter = [NSNotificationCenter defaultCenter];
[notificationCenter addObserver:self                        selector:@selector(nowPlayingItemChanged:)
 name:MPMusicPlayerControllerNowPlayingItemDidChangeNotification
object:self.player];
[self.player beginGeneratingPlaybackNotifications];
Note that you must tell the player to begin generating playback notifications. Since you registered for notifications, you have to remove your observer when view is released.
- (void)didReceiveMemoryWarning
{
    [super didReceiveMemoryWarning];
    // Dispose of any resources that can be recreated.
    [[NSNotificationCenter defaultCenter]
   removeObserver:self
   name:MPMusicPlayerControllerNowPlayingItemDidChangeNotification
   object:self.player];
}
Let’s work on the button actions next. When the user presses the Rewind button, you want the player to skip to the previous song in the queue. However, if it’s at the first song in the queue, it’ll just skip to the beginning of that song.
- (IBAction)rewindPressed:(id)sender
{
    if ([self.player indexOfNowPlayingItem] == 0) {
        [self.player skipToBeginning];
    }
    else {
        [self.player endSeeking];
        [self.player skipToPreviousItem];
    }
}
When the Play button is pressed, you want to start playing the music. You also want to the button to change to the Pause button. Then, if the player is already playing music, you want to player to pause (stop), and have the button change back to the Play button.
- (IBAction)playPausePressed:(id)sender
{
    MPMusicPlaybackState playbackState = [self.player playbackState];
    NSMutableArray *items = [NSMutableArray arrayWithArray:[self.toolbar items]];
    if (playbackState == MPMusicPlaybackStateStopped || playbackState == MPMusicPlaybackStatePaused) {
        [self.player play];
        [items replaceObjectAtIndex:2 withObject:self.pause];
    }
else if (playbackState == MPMusicPlaybackStatePlaying) {
        [self.player pause];
        [items replaceObjectAtIndex:2 withObject:self.play];
    }
    [self.toolbar setItems:items animated:NO];
}
You query the player for its playback state, then use it to determine whether you should start or stop the player. In order to toggle between the Play and Pause buttons, you need to get the array of items in the toolbar and replace the third item (index of 2) with the appropriate button. Then you replace the entire array of bar button items for the toolbar.
The Fast Forward button works similarly to the Rewind button. When pressed, the player moves forward in the queue and plays the next song. If it’s at the last song in the queue, it stops the player and resets the Play button.
- (IBAction)fastForwardPressed:(id)sender
{
    NSUInteger nowPlayingIndex = [self.player indexOfNowPlayingItem];
    [self.player endSeeking];
    [self.player skipToNextItem];
    if ([self.player nowPlayingItem] == nil) {
        if ([self.collection count] > nowPlayingIndex+1) {
            // added more songs while playing
            [self.player setQueueWithItemCollection:self.collection];
            MPMediaItem *item = [[self.collection items] objectAtIndex:nowPlayingIndex+1];
            [self.player setNowPlayingItem:item];
            [self.player play];
        }
        else {
            // no more songs
            [self.player stop];
            NSMutableArray *items = [NSMutableArray arrayWithArray:[self.toolbar items]];
            [items replaceObjectAtIndex:2 withObject:self.play];
            [self.toolbar setItems:items];
        }
    }
}
When the Add button is pressed, you need to modally display the MPMediaPickerController. You set it to display only music media types, and set its delegate to ViewController.
- (IBAction)addPressed:(id)sender
{
    MPMediaType mediaType = MPMediaTypeMusic;
    MPMediaPickerController *picker =         [[MPMediaPickerController alloc] initWithMediaTypes:mediaType];
    picker.delegate = self;
    [picker setAllowsPickingMultipleItems:YES];
    picker.prompt = NSLocalizedString(@"Select items to play", @"Select items to play");
    [self presentViewController:picker animated:YES completion:nil];
}
This seems like a good point to add the MPMediaPickerControllerDelegate methods. There are only two methods that are defined in the protocol: mediaPicker:didPickMediaItems:, called when the user is done selecting; and mediaPickerDidCancel:, called when the user has cancelled the media selection.
#pragma mark - Media Picker Delegate Methods

- (void)mediaPicker:(MPMediaPickerController *)mediaPicker         didPickMediaItems:(MPMediaItemCollection *)theCollection
{
    [mediaPicker dismissViewControllerAnimated:YES completion:nil];

    if (self.collection == nil) {
        self.collection = theCollection;
        [self.player setQueueWithItemCollection:self.collection];
        MPMediaItem *item = [[self.collection items] objectAtIndex:0];
        [self.player setNowPlayingItem:item];
        [self playPausePressed:self];
    }
    else {
        NSArray *oldItems = [self.collection items];
        NSArray *newItems = [oldItems arrayByAddingObjectsFromArray:[theCollection items]];
        self.collection = [[MPMediaItemCollection alloc] initWithItems:newItems];
    }
}

- (void)mediaPickerDidCancel:(MPMediaPickerController *) mediaPicker
{
    [mediaPicker dismissViewControllerAnimated:YES completion:nil];
}
When the user is done selecting, you dismiss the media picker controller. Then you look at the media collection property. If your ViewController collection property is nil, then you simply assign it to the media collection sent in the delegate call. If a collection exists, then you need to append the new media items to the existing collection. The mediaPickerDidCancel: method simply dismissed the media picker controller.
Lastly, you need to implement the notification method for when the now playing item changes.
#pragma mark - Notification Methods

- (void)nowPlayingItemChanged:(NSNotification *)notification
{
        MPMediaItem *currentItem = [self.player nowPlayingItem];
    if (currentItem == nil) {
        [self.imageView setImage:nil];
        [self.imageView setHidden:YES];
        [self.status setText:NSLocalizedString (@"Tap + to Add More Music", @"Add More Music")];
        [self.artist setText:nil];
        [self.song setText:nil];
    }
    else {
        MPMediaItemArtwork *artwork = [currentItem valueForProperty: MPMediaItemPropertyArtwork];
        if (artwork) {
            UIImage *artworkImage = [artwork imageWithSize:CGSizeMake(320, 320)];
            [imageView setImage:artworkImage];
            [imageView setHidden:NO];
        }

        // Display the artist and song name for the now-playing media item
        [self.status setText:NSLocalizedString(@"Now Playing", @"Now Playing")];
        [self.artist setText:[currentItem valueForProperty:MPMediaItemPropertyArtist]];
        [self.song setText:[currentItem valueForProperty:MPMediaItemPropertyTitle]];
    }
}
The nowPlayingItemChanged: method first queries the player for the media item that it is playing. If it is not playing anything, it resets the view and sets the status label to tell the user to add more music. If something is playing, then it retrieves the artwork for the media item using the MPMediaItemPropertyArtwork property. It checks to make sure the media item has artwork, and if it does, it puts it in your image view. Then you update the labels to tell you the artist and song name.
Build and run the SimplePlayer application. You should be able to select music from your media library and play it. This is a pretty simple player (duh) and doesn’t give you much in terms of functionality, but you can see how to use the MediaPlayer framework to play music. Next, you’ll use the MediaPlayer framework to playback video as well.
Playing back video with the MediaPlayer framework is very simple. First, you need the URL of the media item you wish to play back. The URL could point to either a video file in your media library or to a video resource on the Internet. If you want to play a video in your media library, you can retrieve the URL from an MPMediaItem via its MPMediaItemPropertyAssetURL.
// videoMediaItem is an instance of MPMediaItem that point to a video in our media library
NSURL *url = [videoMediaItem valueForProperty:MPMediaItemPropertyAssetURL];
Once you have your video URL, you use it to create an instance of MPMoviePlayerController. This view controller handles the playback of your video and the built-in playback controls. The MPMoviePlayerController has a UIView property where the playback is presented. This UIView can be integrated into your application’s view (controller) hierarchy. It is much easier to use the MPMoviePlayerViewController class, which encapsulates the MPMoviePlayerController. Then you can push the MPMoviePlayerViewController into you view (controller) hierarchy modally, making it much easier to manage. The MPMoviePlayerViewController class gives you access to its underlying MPMoviePlayerController as a property.
In order to determine the state of your video media in the MPMoviePlayerController, a series of notifications are sent (Table 12-2).
Table 12-2. MPMoviePlayerController Notifications
| Notification | Description |
|---|---|
| MPMovieDurationAvailableNotification | The movie (video) duration (length) has been determined. |
| MPMovieMediaTypesAvailableNotification | The movie (video) media types (formats) have been determined. |
| MPMovieNaturalSizeAvailableNotification | The movie (video) natural (preferred) frame size has been determined or changed. |
| MPMoviePlayerDidEnterFullscreenNotification | The player has entered full screen mode. |
| MPMoviePlayerDidExitFullscreenNotification | The player has exited full screen mode. |
| MPMoviePlayerIsAirPlayVideoActiveDidChangeNotification | The player has started or finished playing the movie (video) via AirPlay. |
| MPMoviePlayerLoadStateDidChangeNotification | The player (network) buffering state has changed. |
| MPMoviePlayerNowPlayingMovieDidChangeNotification | The current playing movie (video) has changed. |
| MPMoviePlayerPlaybackDidFinishNotification | The player is finished playing. The reason can be found via the MPMoviePlayerDidFinishReasonUserInfoKey. |
| MPMoviePlayerPlaybackStateDidChangeNotification | The player playback state has changed. |
| MPMoviePlayerScalingModeDidChangeNotification | The player scaling mode has changed. |
| MPMoviePlayerThumbnailImageRequestDidFinishNotification | A request to capture a thumbnail image has completed. It may have succeeded or failed. |
| MPMoviePlayerWillEnterFullscreenNotification | The player is about to enter full screen mode. |
| MPMoviePlayerWillExitFullscreenNotification | The player is about to exit full screen mode. |
| MPMovieSourceTypeAvailableNotification | The movie (video) source type was unknown and is now known. |
Generally, you only need to worry about these notifications if you use MPMoviePlayerController.
Enough talk. Let’s build an app that plays both audio and video media from your Media Library.
You’re going to build a new app using the MediaPlayer framework that will allow you to play both audio and video content from your media library. You’ll start with a tab bar controller with a tab for your audio content and another tab for your video content (Figure 12-9). You won’t be using a queue to order your media choices. You’ll keep this simple: the user picks a media item, the application will play it.
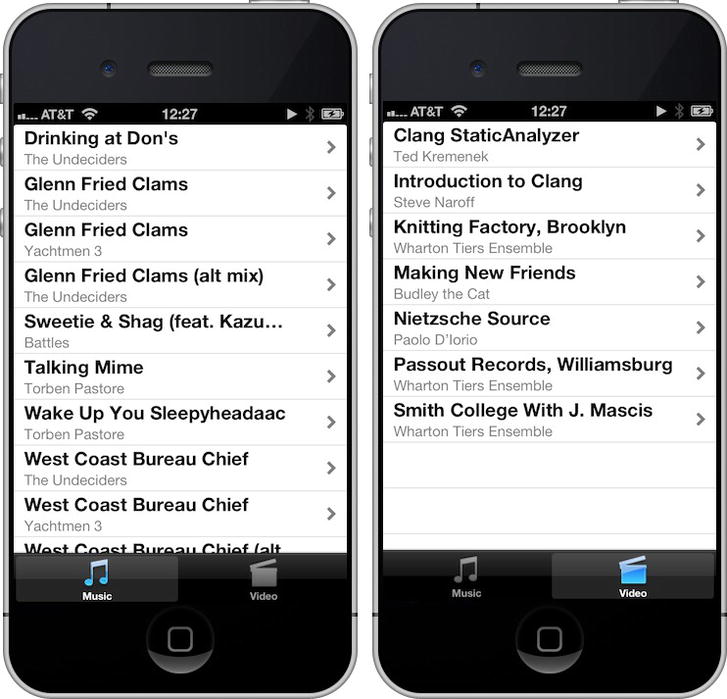
Figure 12-9. MPMediaPlayer with Music and Video tabs
Create a new project using the Tabbed Application template. Name the application MPMediaPlayer, and have the project use storyboards and Automatic Reference Counting. Add the MediaPlayer framework to the MPMediaPlayer target. If you’re not sure how to do that, review how you did it in the SimplePlayer application.
Xcode will create two view controllers, FirstViewController and SecondViewController, and provide the tab bar icons in standard size (first.png, second.png) and double size ([email protected] , [email protected] ). You’re going to replace these controllers and images, so delete them. Select the controller files, FirstViewController.[hm] and SecondViewController.[hm], and the .png files in the Navigator pane. Delete files. When Xcode asks, move the files to the Trash. Select MainStoryboard.storyboard to open it in the storyboard editor. Select the first view controller scene and delete it. Repeat for the second view controller. The storyboard editor should consist of the tab bar controller only (Figure 12-10).
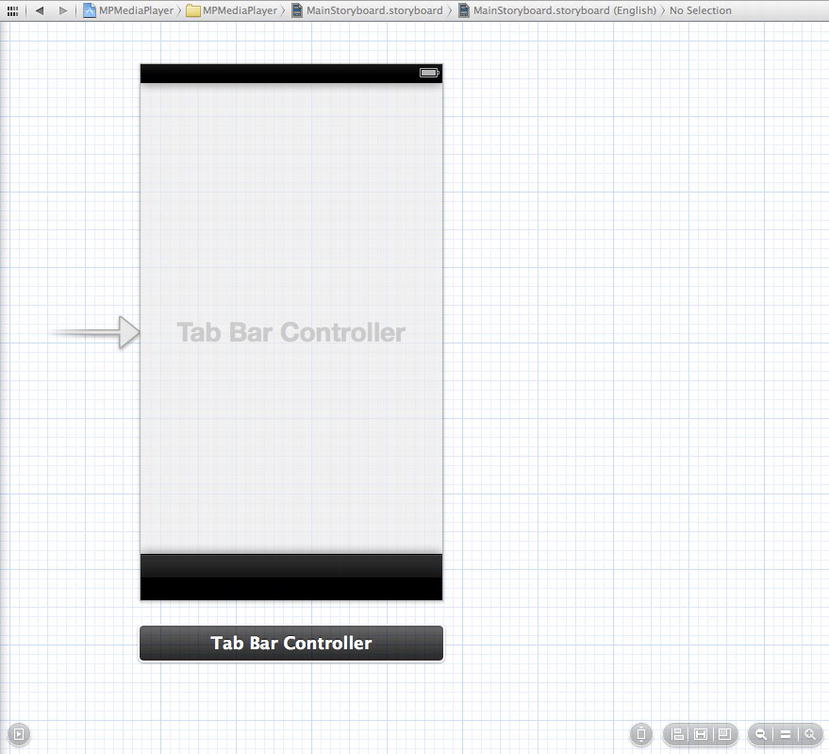
Figure 12-10. Deleting the first and second view controllers
Looking at Figure 12-9, you see that each tab controller is a table view controller. Drag a UITableViewController from the Object Library to the right of the tab bar controller in the storyboard editor. Control-drag from the tab bar view controller to the new table view controller. When the Segue pop-up menu appears, select the view controllers option under the Relationship Segue heading. Add a second UITableViewController and control-drag from the tab bar controller to it, selecting the view controllers option again. Align the two table view controllers and try to make your storyboard look like Figure 12-11.
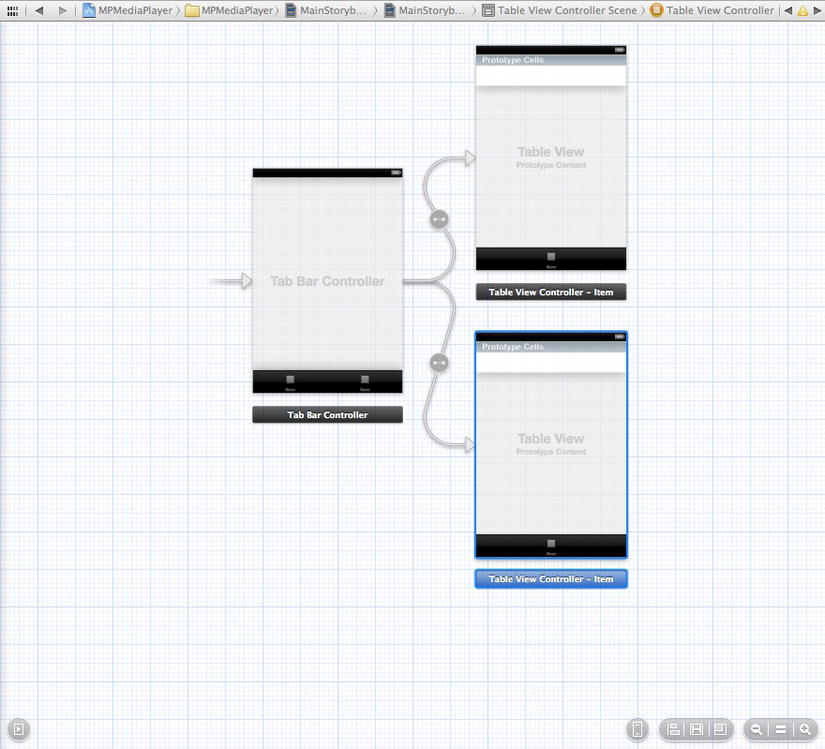
Figure 12-11. Adding the new table view controllers
Select the table view cell from the top table view controller. Open the Attribute Inspector and set the Style attribute to Subtitle. Give it an Identifier attribute a value of MediaCell. Set the Selection attribute to None, and the Accessory attribute to Disclosure Indicator. Repeat the attribute settings for the table view cell for the bottom table view controller.
You’ll use the top table view controller for your audio media and the bottom table view controller for your video media. So you’ll want an audio and video view controller. However, each view controller is really just a media view controller. So, you’ll begin by creating a MediaViewController class, then subclass it. Create a new file using the Objective-C class template. Name the class MediaViewController, and make it subclass of UITableViewController.
You want the MediaViewController to be generic enough to handle both audio and video media. That means you need to store an array of media items and provide a method to load those items. Open MediaViewController.h. You’ll need to import the MediaPlayer header to start. Add it after the UIKit header import.
#import <MediaPlayer/MediaPlayer.h>
We said you needed to store an array of media items. You’ll declare that as a property of the MediaViewController class.
@property (strong, nonatomic) NSArray *mediaItems;
And you’ll declare a method to populate the mediaItems depending on media type.
- (void)loadMediaItemsForMediaType:(MPMediaType)mediaType;
Select MediaViewController.m and adjust the implementation. First, you need to fix your table view data source methods to define the number of sections and rows per section in the table view.
- (NSInteger)numberOfSectionsInTableView:(UITableView *)tableView
{
    // Return the number of sections.
    return 1;
}

- (NSInteger)tableView:(UITableView *)tableView numberOfRowsInSection:(NSInteger)section
{
    // Return the number of rows in the section.
    return self.mediaItems.count;
}
Next, you want to adjust how the table view cell is populated.
- (UITableViewCell *)tableView:(UITableView *)tableView
cellForRowAtIndexPath:(NSIndexPath *)indexPath
{
    static NSString *CellIdentifier = @"MediaCell";
    UITableViewCell *cell = [tableView dequeueReusableCellWithIdentifier:CellIdentifier                                                             forIndexPath:indexPath];

    // Configure the cell. . .
    NSUInteger row = [indexPath row];
    MPMediaItem *item = [self.mediaItems objectAtIndex:row];
    cell.textLabel.text = [item valueForProperty:MPMediaItemPropertyTitle];
    cell.detailTextLabel.text = [item valueForProperty:MPMediaItemPropertyArtist];
    cell.tag = row;

    return cell;
}
Finally, you need to implement your loadMediaItemsForMediaType: method.
- (void)loadMediaItemsForMediaType:(MPMediaType)mediaType
{
    MPMediaQuery *query = [[MPMediaQuery alloc] init];
    NSNumber *mediaTypeNumber= [NSNumber numberWithInt:mediaType];
    MPMediaPropertyPredicate *predicate =
    [MPMediaPropertyPredicate predicateWithValue:mediaTypeNumber
    forProperty:MPMediaItemPropertyMediaType];
    [query addFilterPredicate:predicate];
    self.mediaItems = [query items];
}
You’ve got your MediaViewController class defined. Let’s create your audio and video subclasses. Create a new Objective-C class, named AudioViewController, which will be a subclass of MediaViewController. Repeat this process, this time naming the file VideoViewController. You only need to make two minor adjustments to each file. First, open AudioViewController.m, and add the following line to the viewDidLoad method, after the call to super:
[self loadMediaItemsForMediaType:MPMediaTypeMusic];
Do the same for VideoViewController.m, except this time you want to load videos.
[self loadMediaItemsForMediaType:MPMediaTypeAnyVideo];
Let’s get your app to use your new view controllers. Select MainStoryboard.storyboard to open the storyboard editor. Select the top table view controller. In the Identity Inspector, change the Custom Class from a UITableViewController to AudioViewController. Change the bottom table view controller class to VideoViewController.
Before moving on, let’s update the tabs for each view controller. Select the tab bar in the audio view controller. In the Attributes Inspector, set the Title to “Music” and set the Image to music.png. You can find the image files, music.png and video.png, in this chapter’s download folder. Select the tab bar in the video view controller and set its title to “Video” and its image to video.png.
Build and run your app. You should see all your media library’s music when selecting the Music tab, and all the media library’s videos when selecting the Video tab. Great! Now you need to support playback. You’ll be using the MPMoviePlayerViewController to playback video, but like the SimplePlayer, you need to make an audio playback view controller. You’re going to make an even simpler version of your audio playback controller. Create a new Objective-C file named PlayerViewController, which will be a subclass of UIViewController.
Select the MainStoryboard.storyboard so you can work on the PlayerViewController scene. Drag a UIViewController to the right of the audio view controller. Select the new view controller, and open the Identity Inspector. Change its class from UIViewController to PlayerViewController. Control-drag from the table view cell in the audio view controller to the UIViewController and select the modal Manual Segue. Select the segue between AudioViewController and PlayerViewController, and name it “PlayerSegue” in the Attributes Inspector.
Your audio playback view controller will look like Figure 12-12 when you’re done. Starting at the top, add two UILabels. Stretch them to width of the view. Like you did with the SimplePlayer, extend the labels to the width of the view and adjust their attributes (System Bold 17.0 font, center alignment, white foreground color, black background color). Set the top label text to “Artist” and the bottom label text to “Song.”
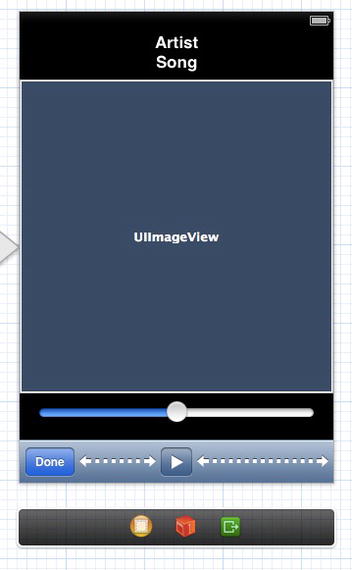
Figure 12-12. MPMediaPlayer audio playback view controller
Drag a UIImageView into the scene, just below the Song label. Use the blue guide lines to space it properly. Adjust the size of the image view to fit the width of the view, and make it square (320px by 320px). Just below the image view, drag a UISlider. Adjust the width of the slider, using the blue margin guidelines. Finally, drag a UIToolbar to the bottom of the PlayerViewController view. Select the UIBarButtonItem on the left side of the toolbar. Using the Attribute Inspector, change the Identifier from Custom to Done. Drag a flexible space bar button Item to the right of the Done button. Next, add a UIBarButtonItem to the right of the flexible space item. Select the new bar button item and change its Identifier to Play in the Attributes Inspector. Finally, to center your Play button, add another flexible space bar button item to the right of the Play button.
Just as you did with SimplePlayer, you need to create some outlets and actions for your PlayerViewController. Enter Assistant Editor mode. Control-drag from the Artist label to the PlayerViewController implementation, and create an outlet named “artist.” Do the same for the Song label and name it song. Create outlets for the Image View, the slider, the toolbar and the Play button. The names of the outlets should be obvious (i.e. imageView for the Image View), except for the slider. You’ll name the outlet “volume,” since you’re going to use the slider to control the volume level.
You need to define three actions. Control-drag from the volume slider, and create an action named volumeChanged: for the Value Changed event. Control-drag from the Done button to create a donePressed: action. Control-drag from the Play button to create a playPausePressed: event. Put the Editor back into Standard mode, and select PlayerViewController.h.
First, you need to import the MediaPlayer header file. You add the import declaration after the UIKIt header import.
#import <MediaPlayer/MediaPlayer.h>
As you did with the SimplePlayer, you need to redefine the play property outlet from weak to strong. You also declare your pause (button) property.
@property (strong, nonatomic) IBOutlet UIBarButtonItem *play;
@property (strong, nonatomic)          UIBarButtonItem *pause;
You need to add two more properties: one to hold the MPMusicPlayerController and one to hold the MPMediaItem that is being played.
@property (strong, nonatomic) MPMusicPlayerController *player;
@property (strong, nonatomic) MPMediaItem *mediaItem;
You need to know when the player state has changed and when the player media item has changed. Remember, these are handled via notifications. You’ll declare some methods to register with the Notification Center.
- (void)playingItemChanged:(NSNotification *)notification;
- (void)playbackStateChanged:(NSNotification *)notification;
Let’s move over to PlayerViewController.m and work on the implementation. You need to create your Pause button since it’s not part of your storyboard scene. Find the viewDidLoad method, and create it after the call to super.
self.pause = [[UIBarButtonItem alloc] initWithBarButtonSystemItem:UIBarButtonSystemItemPause target:self action:@selector(playPausePressed:)];
[self.pause setStyle:UIBarButtonItemStyleBordered];
You need a MPMusicPlayerController instance to play your music.
self.player = [MPMusicPlayerController applicationMusicPlayer];
You want to observe the player notifications, so you register for those and ask the player to start generating them.
NSNotificationCenter *notificationCenter = [NSNotificationCenter defaultCenter];
[notificationCenter addObserver:self
                       selector:@selector(playingItemChanged:)
                           name:MPMusicPlayerControllerNowPlayingItemDidChangeNotification
                         object:self.player];
[notificationCenter addObserver:self
                       selector:@selector(playbackStateChanged:)
                           name:MPMusicPlayerControllerPlaybackStateDidChangeNotification
                         object:self.player];
[self.player beginGeneratingPlaybackNotifications];
You need to pass your media item to the player. But the player takes MPMediaItemCollections, not individual an MPMediaItem. You’ll do this assignment in the viewDidAppear: method where you’ll create a collection and pass it to your player.
- (void)viewDidAppear:(BOOL)animated
{
    [super viewDidAppear:animated];
    MPMediaItemCollection *collection =
   [[MPMediaItemCollection alloc] initWithItems:@[self.mediaItem]];
    [self.player setQueueWithItemCollection:collection];
    [self.player play];
}
You need to stop generating notifications and unregister your observers when the PlayerViewController is released. Find the didGenerateMemoryWarning method, and add the following calls:
[self.player endGeneratingPlaybackNotifications];
[[NSNotificationCenter defaultCenter]
  removeObserver:self
  name:MPMusicPlayerControllerPlaybackStateDidChangeNotification
  object:self.player];
[[NSNotificationCenter defaultCenter]
  removeObserver:self
  name:MPMusicPlayerControllerNowPlayingItemDidChangeNotification
  object:self.player];
The volumeChanged: method simply needs to change the player volume to reflect the value of the volume slider.
- (IBAction)volumeChanged:(id)sender
{
    self.player.volume = [self.volume value];
}
The donePressed: method stops the player and dismisses the PlayerViewController.
- (IBAction)donePressed:(id)sender
{
    [self.player stop];
    [self dismissViewControllerAnimated:YES completion:nil];
}
Your playPausePressed: method is similar to the one in SimplePlayer. You don’t update the Play/Pause button in the toolbar; you’ll handle that in the playbackStateChanged: method.
- (IBAction)playPausePressed:(id)sender
{
    MPMusicPlaybackState playbackState = [self.player playbackState];
    if (playbackState == MPMusicPlaybackStateStopped || playbackState == MPMusicPlaybackStatePaused) {
        [self.player play];
    }
else if (playbackState == MPMusicPlaybackStatePlaying) {
        [self.player pause];
    }
}
Implementing your notification observer methods is pretty straightforward. You update the view when the player media item changes. Again, it’s similar to the same method in SimplePlayer.
- (void)playingItemChanged:(NSNotification *)notification
{
    MPMediaItem *currentItem = [self.player nowPlayingItem];
    if (nil == currentItem) {
        [self.imageView setImage:nil];
        [self.imageView setHidden:YES];
        [self.artist setText:nil];
        [self.song setText:nil];
    }
    else {
        MPMediaItemArtwork *artwork = [currentItem valueForProperty: MPMediaItemPropertyArtwork];
        if (artwork) {
            UIImage *artworkImage = [artwork imageWithSize:CGSizeMake(320, 320)];
            [self.imageView setImage:artworkImage];
            [self.imageView setHidden:NO];
        }

        // Display the artist and song name for the now-playing media item
        [self.artist setText:[currentItem valueForProperty:MPMediaItemPropertyArtist]];
        [self.song setText:[currentItem valueForProperty:MPMediaItemPropertyTitle]];
    }
}
The playbackStateChanged: notification observer method is new to you. You added this notification so that when the player automatically starts playing music in viewDidAppear:, it’ll update the Play/Pause button state.
- (void)playbackStateChanged:(NSNotification *)notification
{
    MPMusicPlaybackState playbackState = [self.player playbackState];
    NSMutableArray *items = [NSMutableArray arrayWithArray:[self.toolbar items]];
    if (playbackState == MPMusicPlaybackStateStopped || playbackState == MPMusicPlaybackStatePaused) {
        [items replaceObjectAtIndex:2 withObject:self.play];
    }
else if (playbackState == MPMusicPlaybackStatePlaying) {
        [items replaceObjectAtIndex:2 withObject:self.pause];
    }
    [self.toolbar setItems:items animated:NO];
}
You need to send the music media item from the AudioViewController when the table view cell is selected to the PlayerViewController. To do that, you need to modify your AudioViewController implementation. Select AudioViewController.m and add the following method:
- (void)prepareForSegue:(UIStoryboardSegue *)segue sender:(id)sender
{
    if ([segue.identifier isEqualToString:@"PlayerSegue"]) {
        UITableViewCell *cell = sender;
        NSUInteger index = [cell tag];
        PlayerViewController *pvc = segue.destinationViewController;
        pvc.mediaItem = [self.mediaItems objectAtIndex:index];
    }
}
One last thing: you need to import the PlayerViewController into the AudioViewController.m. At the top of the file, just below the import of AudioViewController.h, add this import:
#import "PlayerViewController.h"
Build and run the app. Select a music file to play. The app should transition the PlayerViewController and start playing automatically. Slide the volume slider and see how you can adjust the playback volume now. Next, let’s add video playback. It’s trivially easy with the MediaPlayer framework. Open VideoViewController and implement the table view delegate method tableView:didSelectRowAtIndexPath:, like so:
- (void)tableView:(UITableView *)tableView didSelectRowAtIndexPath:(NSIndexPath *)indexPath
{
    MPMediaItem *mediaItem = [self.mediaItems objectAtIndex:[indexPath row]];
    NSURL *mediaURL = [mediaItem valueForProperty:MPMediaItemPropertyAssetURL];
    MPMoviePlayerViewController *player =         [[MPMoviePlayerViewController alloc] initWithContentURL:mediaURL];
    [self presentMoviePlayerViewControllerAnimated:player];
}
That’s it. Build and run your application. Select the Video tab and pick a video to play. Easy!
The AVFoundation framework was originally introduced in iOS 3 with limited audio playback and recording functionality. iOS 4 expanded the framework to include video playback and recording, as well as the audio/video asset management.
At the core, AVFoundation represents an audio or video file as an AVAsset. It’s important to understand that an AVAsset may have multiple tracks. For example, an audio AVAsset may have two tracks: one for the left channel and one for the right. A video AVAsset could have many more tracks; some for video, some for audio. Additionally, an AVAsset may encapsulate additional metadata about the media it represents. It’s important to note that simply instantiating an AVAsset does not mean it will be ready for playback. It may take some time for the to analyze the data the AVAsset represents.
In order to give you fine grained control on how to playback an AVAsset, AVFoundation separates the presentation state of a media item from the AVAsset. This presentation state is represented by an AVPlayerItem. Each track within an AVPlayerItem is represented by an AVPlayerItemTrack. By using an AVPlayerItem and its AVPlayerItemTracks, you are allowed to determine how to present the item (i.e., mix the audio tracks or crop the video) via an AVPlayer object. If you wish to playback multiple AVPlayerItems, you use the AVPlayerQueue to schedule the playback of each AVPlayerItem.
Beyond giving finer control over media playback, AVFoundation gives you the ability to create media. You can leverage the device hardware to create your new media assets. The hardware is represented by an AVCaptureDevice. Where possible, you can configure the AVCaptureDevice to enable specific device functionality or settings. For example, you can set the flashMode of the AVCaptureDevice that represents your iPhone’s camera to be on, off, or use auto sensing.
In order to use the output from the AVCaptureDevice, you need to use an AVCaptureSession. AVCaptureSession coordinates the management data from an AVCaptureDevice to its output form. This output is represented by an AVCaptureOutput class.
It’s a complicated process to create media data using AVFoundation. First, you need to create an AVCaptureSession to coordinate the capture and creation of your media. You define and configure your AVCaptureDevice, which represents the actual physical device (such as your iPhone camera or microphone). From the AVCaptureDevice, you create an AVCaptureInput. AVCaptureInput is a <?> object that represents the data coming from the AVCaptureDevice. Each AVCaptureInput instance has a number of ports, where each port represents a data stream from the device. You can think of a port as a capture analogue of an AVAsset track. Once you’ve created your AVCaptureInput(s), you assign then to the AVCaptureSession. Each session can have multiple inputs.
You’ve got your capture session, and you’ve assigned inputs to your session. Now you have to save the data. You use the AVCaptureOutput class and add it to your AVCaptureSession. You can use a concrete AVCaptureOutput subclass to write your data to a file, or you can save it to a buffer for further processing.
Your AVCaptureSession is now configured to receive data from a device and save it. All you need to do is tell your session to startRunning. Once you’re done, you send the stopRunning message to your session. Interestingly, it is possible to change your session’s input or output while it is running. In order to insure a smooth transition, you would wrap these changes with a set of beginConfiguration / commitConfiguration messages.
Asset metadata is represented by the AVMetadataItem class. To add your own metadata to an asset, you use the mutable version, AVMutableMetadataItem, and assign it to your asset.
There are times where you may need to transform your media asset from one format to another. Similar to capturing media, you use an AVAssetExportSession class. You add your input asset to the export session object, then configure the export session to your new output format, and export the data.
Next, let’s delve into the specifics of playing media via AVFoundation.
At start, your AVFoundation-based media player will look identical to the MPMediaPlayer (Figure 12-9). Unlike MPMediaPlayer, your AVFoundation player will use a unified player view controller to play back both audio and video media. There are a couple of reasons for this, but it’s primarily because AVFoundation does not give you a video playback view controller similar to MPMoviePlayerViewController. Rather, you need to define a UIView subclass to use an AVPlayerLayer view layer. Regardless of the media type, you use an AVPlayer instance to load the AVAsset and manage the playback controls.
Using Xcode, create a new project and name it AVMediaPlayer. Since AVMediaPlayer uses a tab bar controller, and behaves like MPMediaPlayer, follow the same steps you used for MPMediaPlayer, right up to the point where you add the MediaPlayer framework. You still need the MediaPlayer framework to access your media library. Since this project will use AVFoundation to play back media, you also need to add the AVFoundation framework.
Like MPMediaPlayer, AVMediaPlayer will use a generic MediaViewController as an abstract base class. Create a new Objective-C class named MediaViewController, subclassed from UITableViewController. Again, this MediaViewController class needs to be generic enough support both audio and video media. Also, similar to MPMediaPlayer MediaViewController, you need a way to load your media items. AVFoundation does not give access to your media library; that functionality only exists in the MediaPlayer framework. Since you intend to use the AVPlayer class to play back your media, you need to convert the MPMediaItems to AVAssets. First, you need to modify MediaViewController.h.
#import <UIKit/UIKit.h>
#import <MediaPlayer/MediaPlayer.h>

@interface MediaViewController : UITableViewController

@property (strong, nonatomic) NSArray *assets;
- (void)loadAssetsForMediaType:(MPMediaType)mediaType;

@end
This time, you named your NSArray property assets, as it is an array of AVAssets, rather than MPMediaItems. Correspondingly, you named your loader method loadAssetsForMediaType: for the same reason.
In MediaViewController.m, you need to update your table view data source methods. Before you do that, you need to import the AVFoundation header, right after the import of MediaViewController.h.
#import <AVFoundation/AVFoundation.h>
Now, find and update the table view data source methods.
- (NSInteger)numberOfSectionsInTableView:(UITableView *)tableView
{
    // Return the number of sections.
    return 1;
}

- (NSInteger)tableView:(UITableView *)tableView numberOfRowsInSection:(NSInteger)section
{
    // Return the number of rows in the section.
    return self.assets.count;
}

- (UITableViewCell *)tableView:(UITableView *)tableView
  cellForRowAtIndexPath:(NSIndexPath *)indexPath
{
    static NSString *CellIdentifier = @"MediaCell";
    UITableViewCell *cell = [tableView dequeueReusableCellWithIdentifier:CellIdentifier
    forIndexPath:indexPath];

    // Configure the cell. . .
    NSUInteger row = [indexPath row];
    AVAsset *asset = [self.assets objectAtIndex:row];
    cell.textLabel.text = [asset description];
    cell.tag = row;

    return cell;
}
Again, this is similar to what you did in MPMediaPlayer. Notice that tableView:cellForRowAtIndexPath: retrieves an AVAsset from your assets array. Remember, AVAsset doesn’t have an easy way to access its metadata properties like artist name, song title, or artwork. You’ll get to loading that information in a little bit. For now, you’ll just display the asset’s description in the table view cell.
Now, you need to implement loadAssetsForMediaType: method. You’ll add it to the bottom of MediaViewController.m, just before the @end declaration.
#pragma mark - Instance Methods

- (void)loadAssetsForMediaType:(MPMediaType)mediaType
{
    MPMediaQuery *query = [[MPMediaQuery alloc] init];
    NSNumber *mediaTypeNumber= [NSNumber numberWithInt:mediaType];
    MPMediaPropertyPredicate *predicate = [MPMediaPropertyPredicate predicateWithValue:mediaTypeNumber                                                           forProperty:MPMediaItemPropertyMediaType];
    [query addFilterPredicate:predicate];

    NSMutableArray *mediaAssets = [[NSMutableArray alloc] initWithCapacity:[[query items] count]];
    for (MPMediaItem *item in [query items]) {
        [mediaAssets addObject:            [AVAsset assetWithURL:[item valueForProperty:MPMediaItemPropertyAssetURL]]];
    }
    self.assets = mediaAssets;
}
The difference between this method and loadMediaItemsForMediaType: in MPMediaPlayer is that you use the MPMediaItemPropertyAssetURL to create your AVAssets.
You need to create two Objective-C classes: AudioViewController and VideoViewController. They are both subclasses of MediaViewController. Add the following to AudioViewController.m to have it load audio to your audio media:
- (void)viewDidLoad
{
    [super viewDidLoad];
    // Do any additional setup after loading the view.
    [self loadAssetsForMediaType:MPMediaTypeMusic];
}
Do the same for VideoViewController.m, except the media type you want to load is MPMediaTypeAnyVideo.
Open MainStoryboard.storyboard and change the custom classes for the two table view controllers to AudioViewController and VideoViewController, like you did in the MPMediaPlayer.
Build and run AVMediaPlayer. It looks like you’re reading your media library, but its not very useful, yet. Let’s fix it so you can get your asset metadata.
Recall that an AVAsset’s information may not be available or loaded on instantiation. Asking an asset for information may block the call thread. If you were to do that in AVMediaPlayer, you would slow down the UI components, specifically the table views and their scrolling. In order to avoid this, you’re going to load an asset’s metadata asynchronously, using the AVAsset method loadValuesAsynchronouslyForKeys:completionHandler:. Furthermore, you’re going to encapsulate your AVAsset into a custom class to handle the loading and caching of this data.
Create a new Objective-C class named AssetItem, subclassed from NSObject. Once the files are created and in your project, select AssetItem.h. Since AssetItem is intended to encapsulate an AVAsset, you’ll predeclare the AVAsset class for convenience. You’ll also modify the AssetItem declaration to conform to the NSCopying protocol.
@class AVAsset;

@interface AssetItem : NSObject <NSCopying>
You need a property to hold your AVAsset instance. Since you’re loading your AVAssets from a URL, you’ll add property to hold your asset URL as well. This will allow you to load the AVAsset lazily, which should also help with performance.
@property (strong, nonatomic) NSURL *assetURL;
@property (strong, nonatomic) AVAsset *asset;
You define three read-only properties that represent the asset metadata you care most about for your application.
@property (strong, nonatomic, readonly) NSString *title;
@property (strong, nonatomic, readonly) NSString *artist;
@property (strong, nonatomic, readonly) UIImage *image;
Next, define two read-only properties to tell you the state of your AssetItem. Both are BOOLs. One, metadataLoaded, is a flag to tell you if you’ve already loaded the AVAsset’s metadata. The second, isVideo, tells you if your AVAsset has video tracks.
@property (assign, nonatomic, readonly) BOOL metadataLoaded;
@property (assign, nonatomic, readonly) BOOL isVideo;
You need to declare two initializer methods. One creates an instance from a URL. The other creates a copy from another AssetItem instance; this is needed for the NSCopying protocol.
- (id)initWithURL:(NSURL *)aURL;
- (id)initWithAsset:(AssetItem *)assetItem;
You need a method to call that will asynchronously load your AVAsset’s metadata.
- (void)loadAssetMetadataWithCompletionHandler:(void (^)(AssetItem *assetItem))completion;
Now you’re ready to work on the implementation of AssetItem. Open AssetItem.m. To start, you need to import the AVFoundation header, right below the AssetItem header import. You’ll also define a string constant, kAssetItemDispatchQueue. We’ll explain why you need it in just a second.
#import <AVFoundation/AVFoundation.h>

#define kAssetItemDispatchQueue "AssetQueue"
You need to define a private property to hold your dispatch queue. We’ll discuss dispatch queues in more detail in Chapter 14. Dispatch queues are part of the Grand Central Dispatch framework. You’re using a dispatch queue to order your asset loading operations. As you load an AVAsset and perform your asynchronous loading requests, you’ll put them into the dispatch queue. The benefits of this are two-fold. First, assets will be loaded in the order they are request, which should be the order they were requested. Second, this will keep your application from creating too many background requests. If your media library has hundreds or thousands of items, you could potentially spawn a process (thread) for each item. Create too many, and your application will freeze. A dispatch queue ensures that you keep your process (thread) count down. Your private category declaration starts like this:
@interface AssetItem ()
@property (strong, nonatomic) dispatch_queue_t dispatchQueue;
Your private category will also include a number of methods to help with the asynchronous nature of loading.
- (AVAsset *)assetCopyIfLoaded;
- (AVAsset *)localAsset;
- (NSString *)loadTitleForAsset:(AVAsset *)a;
- (NSString *)loadArtistForAsset:(AVAsset *)a;
- (UIImage *)loadImageForAsset:(AVAsset *)a;
@end
We’ll discuss the specifics of these methods when we get to their implementations.
Since you have a number of read-only properties, you need to synthesize them, right after the @implementation declaration.
@synthesize title = _title;
@synthesize artist = _artist;
@synthesize image = _image;
Let’s start your method implementation with your initializers.
- (id)initWithURL:(NSURL *)aURL
{
    self = [super init];
    if (self) {
        self.assetURL = aURL;
        self.dispatchQueue = dispatch_queue_create(kAssetItemDispatchQueue, DISPATCH_QUEUE_SERIAL);
    }
    return self;
}

- (id)initWithAsset:(AssetItem *)assetItem
{
    self = [super init];
    if (self) {
        self.assetURL = assetItem.assetURL;
        self.asset = [assetItem assetCopyIfLoaded];
        _title = assetItem.title;
        _artist = assetItem.artist;
        _image = assetItem.image;
        _metadataLoaded = assetItem.metadataLoaded;
        _isVideo = assetItem.isVideo;
        self.dispatchQueue = dispatch_queue_create(kAssetItemDispatchQueue, DISPATCH_QUEUE_SERIAL);
    }
    return self;
}
Both initializers should be straightforward. In both methods, you create a dispatch queue, with your constant string identifier, kAssetItemDispatchQueue, and as a serial queue. The initWithAsset: method copies the relevant properties. Note the use of the private method assetCopyIfLoaded when copying the AVAsset property.
Next, you’ll define the methods you need to conform to the NSCopying protocol.
#pragma mark - NSCopying Protocol Methods

- (id)copyWithZone:(NSZone *)zone
{
        AssetItem *copy = [[AssetItem allocWithZone:zone] initWithAsset:self];
        return copy;
}

- (BOOL)isEqual:(id)anObject
{
        if (self == anObject)
                return YES;

        if ([anObject isKindOfClass:[AssetItem class]]) {
                AssetItem *assetItem = anObject;
                if (self.assetURL && assetItem.assetURL)
                        return [self.assetURL isEqual:assetItem.assetURL];
                return NO;
        }
        return NO;
}

- (NSUInteger)hash
{
    return (self.assetURL) ? [self.assetURL hash] : [super hash];
}
For the isEqual: and hash methods, you rely on the uniqueness of the asset’s URL.
You’ll override the accessors for some properties. To access an AssetItem’s underlying AVAsset, you make a copy of the asset. This is because an AVAsset instance can only be accessed from one thread at a time. If you returned a reference to the AssetItem’s actual AVAsset, you can’t guarantee that it won’t be accessed from different threads. Note that you don’t copy the underlying AVAsset ivar; rather you’ve invoked the method localAsset.
#pragma mark - Property Overrides

// Make a copy since AVAsset can only be safely accessed from one thread at a time
- (AVAsset*)asset
{
        __block AVAsset *theAsset = nil;
        dispatch_sync(self.dispatchQueue, ^(void) {
                theAsset = [[self localAsset] copy];
        });
        return theAsset;
}

- (NSString *)title
{
    if (_title == nil)
        return [self.assetURL lastPathComponent];
    return _title;
}

- (NSString *)artist
{
    if (_artist == nil)
        return @"Unknown";
    return _artist;
}
The title and artist accessors check their respective ivars. If they are nil, you can assume either you haven’t loaded the asset’s metadata (yet), or the metadata values don’t exists. In those cases, you use a fall back value. For the asset title, you use the last component of the asset URL. For artist name, you simply use the value Unknown.
Loading an asset’s metadata can be a little complicated, so let’s step through the implementation.
- (void)loadAssetMetadataWithCompletionHandler:(void (^)(AssetItem *assetItem))completion
{
    dispatch_async(self.dispatchQueue, ^(void){
The first thing you do is wrap the entire method body with a dispatch_async call to your dispatch queue. You’ll be invoking this method from the main thread. The dispatch_async call ensures that the method will be placed in your dispatch queue and executed off the main thread. You retrieve your AVAsset and have it load its metadata asynchronously.
        AVAsset *a = [self localAsset];
        [a loadValuesAsynchronouslyForKeys:@[@"commonMetadata"] completionHandler:^{
            NSError *error;
            AVKeyValueStatus cmStatus = [a statusOfValueForKey:@"commonMetadata" error:&error];
            switch (cmStatus) {
                case AVKeyValueStatusLoaded:
                    _title = [self loadTitleForAsset:a];
                    _artist = [self loadArtistForAsset:a];
                    _image = [self loadImageForAsset:a];
                    _metadataLoaded = YES;
                    break;

                case AVKeyValueStatusFailed:
                case AVKeyValueStatusCancelled:
                    dispatch_async(dispatch_get_main_queue(), ^{
                        NSLog(@"The asset's available metadata formats were not loaded:
%@", [error localizedDescription]);
                    });
                    break;
            }
On completion of loadValuesAsychronouslyForKeys:completetionHandler:, the completion handler block checks the status of the commonMetadata key. If the load failed or was cancelled for some reason, you log the error. If the load was successful, you load the metadata properties you care about and set the metadataLoaded flag to YES.
            /* IMPORTANT: Must dispatch to main queue in order to operate on the AVPlayer and AVPlayerItem. */
            dispatch_async(dispatch_get_main_queue(), ^{
                if (completion)
                    completion(self);
            });
        }];
    });
}
Finally, you invoke the completion handler passed into your method. You dispatch this call back to the main queue as it will interact with your AVPlayer and AVPlayerItem instances.
Now let’s implement your private category methods. One thing about these methods: they are implicitly or explicitly expected to be performed in the dispatch queue (thread). assetCopyIfLoaded is only used in the initWithAssetItem:initializer method to copy your AVAsset property. You dispatch the AVAsset copying to the dispatch queue to keep the copying from potentially blocking the main thread, which would cause the UI to freeze.
- (AVAsset*)assetCopyIfLoaded
{
        __block AVAsset *theAsset = nil;
        dispatch_sync(self.dispatchQueue, ^(void){
                theAsset = [_asset copy];
        });
        return theAsset;
}
The localAsset method is your private accessor to the AVAsset property/ivar. It follows a lazy loading logic to instantiate the _asset ivar if necessary. Remember, if you’re invoking the localAsset method, you’re operating from the dispatch queue thread, and it’s only being invoke from another AssetItem method.
- (AVAsset*)localAsset
{
    if (_asset == nil) {
        _asset = [[AVURLAsset alloc] initWithURL:self.assetURL options:nil];
    }
    return  _asset;
}
Take a look back at the loadAssetMetadataWithCompletionHandler: method. On successful loading of the metadata, you call loadTitleForAsset:, loadArtistForAsset:, and loadImageForAsset:. Let’s step over each one, starting with loadTitleForAsset:. First, you extract the asset titles that are stored in the asset’s commonMetadata property.
- (NSString *)loadTitleForAsset:(AVAsset *)a
{
    NSString *assetTitle = nil;
    NSArray *titles = [AVMetadataItem metadataItemsFromArray:[a commonMetadata]
    withKey:AVMetadataCommonKeyTitle
    keySpace:AVMetadataKeySpaceCommon];
If the titles array is not empty, then you need to find the title that matches the device user’s preferred language and/or locale. Language and locale preference is a system setting. If there are multiple titles returned for a language/locale preference, you just return the first one.
    if ([titles count] > 0) {
        // Try to get a title that matches one of the user’s preferred languages.
        NSArray *preferredLanguages = [NSLocale preferredLanguages];

        for (NSString *thisLanguage in preferredLanguages) {
            NSLocale *locale = [[NSLocale alloc] initWithLocaleIdentifier:thisLanguage];
            NSArray *titlesForLocale = [AVMetadataItem metadataItemsFromArray:titles                                                                    withLocale:locale];
            if ([titlesForLocale count] > 0) {
                assetTitle = [[titlesForLocale objectAtIndex:0] stringValue];
                break;
            }
        }
If you haven’t been able to match a title using the preferred language/locale, you just return the first one in your original titles array.
// No matches in any of the preferred languages.
// Just use the primary title metadata we find.
        if (assetTitle == nil) {
            assetTitle = [[titles objectAtIndex:0] stringValue];
        }
    }
    return assetTitle;
}
Finding the artist name from the asset metadata is pretty much identical, except you use the key AVMetadataCommonKeyArtist to extract the artist names array from the commonMetadata property.
- (NSString *)loadArtistForAsset:(AVAsset *)a
{
    NSString *assetArtist = nil;
    NSArray *titles = [AVMetadataItem metadataItemsFromArray:[a commonMetadata]
 metadata is pretty much identical, except withKey:AVMetadataCommonKeyArtist
 metadata is pretty much identical, except keySpace:AVMetadataKeySpaceCommon];
    if ([titles count] > 0) {
        // Try to get a artist that matches one of the user’s preferred languages.
        NSArray *preferredLanguages = [NSLocale preferredLanguages];

        for (NSString *thisLanguage in preferredLanguages) {
            NSLocale *locale = [[NSLocale alloc] initWithLocaleIdentifier:thisLanguage];
            NSArray *titlesForLocale = [AVMetadataItem metadataItemsFromArray:titles                                                                    withLocale:locale];
            if ([titlesForLocale count] > 0) {
                assetArtist = [[titlesForLocale objectAtIndex:0] stringValue];
                break;
            }
        }

        // No matches in any of the preferred languages.
// Just use the primary artist metadata we find.
        if (assetArtist == nil) {
            assetArtist = [[titles objectAtIndex:0] stringValue];
        }
    }
    return assetArtist;
}
Loading the asset artwork from the commonMetadata is much simpler. You load the potential array of images from the asset metadata. The first item in the images array can either be a dictionary or a block of data. If the item is a dictionary, the image data is stored under the key data. Either way, you can instantiate a UIImage from the data.
- (UIImage *)loadImageForAsset:(AVAsset *)a
{
    UIImage *assetImage = nil;
    NSArray *images = [AVMetadataItem metadataItemsFromArray:[a commonMetadata]
 metadata is pretty much identical, except withKey:AVMetadataCommonKeyArtwork
 metadata is pretty much identical, except keySpace:AVMetadataKeySpaceCommon];
    if ([images count] > 0) {
        AVMetadataItem *item = [images objectAtIndex:0];
        NSData *imageData = nil;
        if ([item.value isKindOfClass:[NSDictionary class]]) {
            NSDictionary *valueDict = (NSDictionary *)item.value;
            imageData = [valueDict objectForKey:@"data"];
        }
        else if ([item.value isKindOfClass:[NSData class]])
            imageData = (NSData *)item.value;
        assetImage = [UIImage imageWithData:imageData];
    }
    return assetImage;
}
Remember that you load an asset’s metadata asynchronously. That means when you load the asset from your media library, you queue the request to load the asset metadata. Meanwhile, your application needs to populate the table view cells with something. By default, AssetItem will return the last path item of the asset URL for the title and “Unknown” for the artist. You need the table view cells to reload once the asset metadata has been loaded. You’ll need to modify the MediaViewController class to do this.
MediaViewController will need to know about your new AssetItem class. Open MediaViewController.m and import the AssetItem header, right after the other header import declarations
#import "AssetItem.h"
Next, you’ll add two private category methods. One will be use to configure the table view cell for a given index path. The other will be used at the completion handler when you invoke loadAssetMetadataWithCompletionHandler: on an AssetItem.
@interface MediaViewController ()
- (void)configureCell:(UITableViewCell *)cell forIndexPath:(NSIndexPath *)indexPath;
- (void)updateCellWithAssetItem:(AssetItem *)assetItem;
@end
Since configureCell:forIndexPath: will be used to configure your table view cells, you can modify table:cellForRowAtIndexPath: table view data source method.
- (UITableViewCell *)tableView:(UITableView *)tableView
  cellForRowAtIndexPath:(NSIndexPath *)indexPath
{
    static NSString *CellIdentifier = @"MediaCell";
    UITableViewCell *cell = [tableView dequeueReusableCellWithIdentifier:CellIdentifier
  forIndexPath:indexPath];

    // Configure the cell. . .
    [self configureCell:cell forIndexPath:indexPath];

    return cell;
}
Now, you can implement configureCell:forIndexPath:.
- (void)configureCell:(UITableViewCell *)cell forIndexPath:(NSIndexPath *)indexPath
{
    NSInteger row = [indexPath row];

    AssetItem *assetItem = [self.assets objectAtIndex:row];
    if (!assetItem.metadataLoaded) {
        [assetItem loadAssetMetadataWithCompletionHandler:^(AssetItem *assetItem){
            [self updateCellWithAssetItem:assetItem];
        }];
    }

    cell.textLabel.text = [assetItem title];
    cell.detailTextLabel.text = [assetItem artist];
    cell.tag = row;
}
You find the AssetItem in the assets property array for the row of the given index path. You check if the AssetItem’s metadata has been loaded. If not, you tell the AssetItem to load its metadata. Your completion handler block is a single call to updateCellWithAssetItem:. Finally, you populate the cell with the AssetItem title and artist.
Your completion handler, updateCellWithAssetItem:, will cause the table view cell that contains the passed in AssetItem to reload and redisplay itself. As a minor performance check, you only update the table view cell to update if it’s currently visible.
- (void)updateCellWithAssetItem:(AssetItem *)assetItem
{
        NSArray *visibleIndexPaths = [self.tableView indexPathsForVisibleRows];
        for (NSIndexPath *indexPath in visibleIndexPaths) {
        AssetItem *visibleItem = [self.assets objectAtIndex:[indexPath row]];
                if ([assetItem isEqual:visibleItem]) {
                        UITableViewCell *cell = [self.tableView cellForRowAtIndexPath:indexPath];
                        [self configureCell:cell forIndexPath:indexPath];
                        [cell setNeedsLayout];
                        break;
                }
        }
}
Finally, you need to populate your assets property with AssetItems. Locate the method loadAssetsForMediaType: and find the line
[mediaAssets addObject:[AVAsset assetWithURL:[item valueForProperty:MPMediaItemPropertyAssetURL]]];
and replace it with
[mediaAssets addObject: [[AssetItem alloc] initWithURL:[item valueForProperty:MPMediaItemPropertyAssetURL]]];
Build and run the app. You should see the audio view controller populate the table view cells, then refresh them with the correct metadata. If you have a large enough media library, you can scroll down and see the table view cells refresh themselves.
Your AVMediaPlayer can load your audio and video media from your media library, load them as AVAssets (encapsulated in your custom AssetItem class, and load and display the asset’s metadata. What’s left? You need to play your media!
Create a new Objective-C class. Name it PlayerViewController and make it subclass of UIViewController. That’s all you need to do with this class for now. You’ll return to this class when you lay out the scene in the storyboard.
Now, create another Objective-C class named AVPlayerView, which is a subclass of UIView. This is the view that you’ll be using the play video media. It’s a simple extension on UIView. Open AVPlayerView.h, and modify it to match this implementation:
#import <UIKit/UIKit.h>

@class AVPlayer;

@interface AVPlayerView : UIView

@property (strong, nonatomic) AVPlayer* player;
- (void)setVideoFillMode:(NSString *)fillMode;

@end
The implementation of AVPlayerView is a little trickier. Open AVPlayerView.m. First, you need to import the AVFoundation header file.
#import "AVPlayerView.h"
#import <AVFoundation/AVFoundation.h>

@implementation AVPlayerView
Next, you need to override the UIView method layerClass to return AVPlayerLayer.
+ (Class)layerClass
{
        return [AVPlayerLayer class];
}
Next, you override the player property to redirect to your view’s layer.
- (AVPlayer *)player
{
        return [(AVPlayerLayer *)[self layer] player];
}

- (void)setPlayer:(AVPlayer *)player
{
        [(AVPlayerLayer*)[self layer] setPlayer:player];
}
Finally, you add the ability to adjust the video fill mode.
/* Specifies how the video is displayed within a player layer’s bounds.
   (AVLayerVideoGravityResizeAspect is default) */
- (void)setVideoFillMode:(NSString *)fillMode
{
        AVPlayerLayer *playerLayer = (AVPlayerLayer*)[self layer];
        playerLayer.videoGravity = fillMode;
}

@end
Now you can work on building your player interface. Open MainStoryboard.storyboard. Drag a UIViewController to right of the AudioViewController and VideoViewController. Align it so it matches Figure 12-13. Control-drag from the prototype table view cell in the AudioViewController to the new UIViewController. In the pop-up menu, select Modal under the Selection Segue header. Repeat this process for the VideoViewController. Select the new UIViewController and change its class from UIViewController to PlayerViewController in the Identity Inspector. For AVMediaPlayer, the PlayerViewController will play both audio and video files.
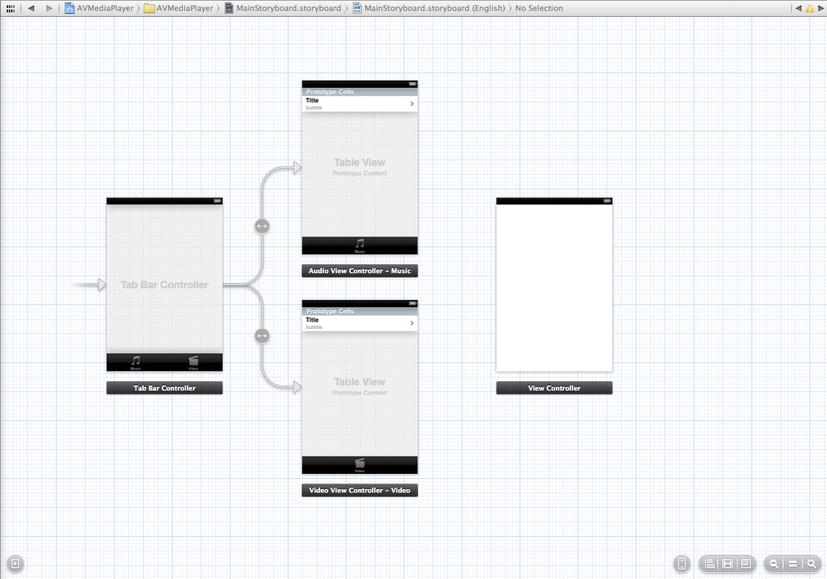
Figure 12-13. Laying out your UIViewController
Drag a UIView onto the PlayerViewController. It should expand to fill the entire scene. If not, adjust the size of the new UIView so it does. Open the Identity Inspector and change the view’s class from UIView to AVPlayerView. Switch to the Attributes Inspector to change the background color from white to black. Switch to the assistant editor, and create a new outlet for the AVPlayerView. Name the outlet “playerView.” Switch back to the standard editor.
Drag another UIView onto the PlayerViewController. Again, it should expand to fill the entire scene; adjust it if it doesn’t. Unlike the playerView, you can keep the view’s class as UIView. Open the Attributes Inspector and change the background color to Default (clear). Using the assistant editor, create a new outlet for this UIView and name it controlView. You’re going to add the same control components to the controlView that you did for MPMediaPlayer, with some minor additions. Look at Figure 12-14 and compare it to Figure 12-12. You’ve added a UISlider with two UILabels on each side between the Song label and image view. Start by dragging a UILabel to the far left edge of the scene, right below the Song label. Change the text from “label” to “00:00,” the color from black to white, the font to System 12.0, and right align the text. Add a UILabel to the far right edge, with the same attribute changes, except left align the text. Place a UISlider between the two labels, extending it to fill the space between the labels. Use the Attribute Inspector to change its current value from 0.5 to 0.0.
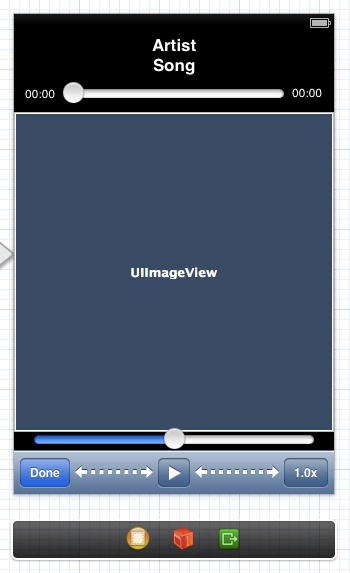
Figure 12-14. AVMediaPlayer PlayerViewController layout
You’ll also add an additional UIBarButtonItem to the far right of the toolbar. Keep the button Identifier attribute as Custom, but change the Title to read 1.0x. You’ll be using this button to toggle playback speed between different rates.
You need to add outlets for the UI components you added. Select the assistant editor. Create an outlet named “artist” for the label titled Artist. For the Song label, name the outlet “song.” Create an outlet for the top slider, and name it “scrubber.” Create an outlet for the label left of the scrubber slider, and name it “elapsedTime.” For the label to the right of the scrubber slider, name the outlet “remainingTime.” The UIImageView outlet should be named “imageView.” And the bottom slider will be named “volume.” You need outlets for the UIToolbar (toolbar), the Play button (play), and the 1.0x button (rate). Like with MPMediaPlayer, you don’t need an outlet for the Done button.
Now you need to add the appropriate actions. Control-drag from the scrubber slider and add a new action named beginScrubbing for the touchDown: event. Control-drag from the scrubber slider again, and add a new action named scrub for the valueChanged: event. Finally, add a new ction named endScrubbing for the touch up inside event. Add a new action from the volume slider, named volumeChanged for the valueChanged event. For each of the toolbar buttons, add an action: the Done button (donePressed), the Play button (playPressed), and the Rate button (ratePressed).
Return to the standard editor, and select PlayerViewController.h. You need to import the following header files:
#import <AVFoundation/AVFoundation.h>
#import "AVPlayerView.h"
#import "AssetItem.h"
As you did before, you need to redefine the play property outlet from weak to strong. You also declare out pause (button) property.
@property (strong, nonatomic) IBOutlet UIBarButtonItem *play;
@property (strong, nonatomic)          UIBarButtonItem *pause;
You need to declare properties for an AssetItem, an AVPlayerItem, and AVPlayer.
@property (strong, nonatomic) AssetItem *assetItem;
@property (strong, nonatomic) AVPlayerItem *playerItem;
@property (strong, nonatomic) AVPlayer *player;
You going to have the Play and Pause buttons each have their own action, so declare the pause button action.
- (IBAction)pausePressed:(id)sender;
Before you can work on the PlayerViewController implementation, you need to add a method to your AssetItem to prepare the AVAsset for playback. Open AssetItem.h and add the following method declaration:
- (void)loadAssetForPlayingWithCompletionHandler:(void (^)(AssetItem *assetItem, NSArray *keys))completion;
Inside AssetItem.m, the implementation is pretty simple.
- (void)loadAssetForPlayingWithCompletionHandler:(void (^)(AssetItem *assetItem, NSArray *keys))completion;
{
    dispatch_async(self.dispatchQueue, ^(void){
        NSArray *keys = @[ @"tracks", @"playable" ];
        AVAsset *a = [self localAsset];
        [a loadValuesAsynchronouslyForKeys:keys completionHandler:^{
            /* IMPORTANT: Must dispatch to main queue in order to operate on the AVPlayer and AVPlayerItem. */
            dispatch_async(dispatch_get_main_queue(), ^{
                if (completion)
                    completion(self, keys);
            });
        }];
    });
}
You dispatch the asynchronous loading of the AVAsset tracks. Since you’re loading two keys, you’ll defer the check for each key to your completion handler. So all you do is invoke your completion handler on the main thread.
You need to implement the method assetHasVideo:. First, you declare it in your private category at the top of AssetItem.m.
- (BOOL)assetHasVideo:(AVAsset *)a;
Your implementation can be added at the bottom of the AssetItem implementation, after the other private category method implementations.
- (BOOL)assetHasVideo:(AVAsset *)a
{
    NSArray *videoTracks = [a tracksWithMediaType:AVMediaTypeVideo];
    return ([videoTracks count] > 0);
}
You simply query the asset for its video tracks.
Now you can work on the PlayerViewController implementation. First, you need to create the Pause button. Inside the viewDidLoad method, add the following lines:
    self.pause = [[UIBarButtonItem alloc] initWithBarButtonSystemItem:UIBarButtonSystemItemPause                                                                target:self                                                                action:@selector(pausePressed:)];
    [self.pause setStyle:UIBarButtonItemStyleBordered];
Next, you need to load prepare your asset for playback. You’ll do this in the viewDidAppear: method.
- (void)viewDidAppear:(BOOL)animated
{
    if (self.assetItem) {
        [self.assetItem loadAssetForPlayingWithCompletionHandler:^(AssetItem *assetItem, NSArray *keys){
If you have an assetItem, you tell it to prepare it for playback by invoking loadAssetForPlayingWithCompletionHandler:. The first step of the completion handler is to check if the load status of each key.
            NSError *error = nil;
            AVAsset *asset = assetItem.asset;
            for (NSString *key in keys) {
                AVKeyValueStatus status = [asset statusOfValueForKey:key error:&error];
                if (status == AVKeyValueStatusFailed) {
                    NSLog(@"Asset Load Failed: %@ | %@", [error localizedDescription], [error localizedFailureReason]);
                    return;
                }
                // handle AVKeyValueStatusCancelled
            }
As a sanity check, we see if the our underlying AVAsset is playable.
            if (!asset.playable) {
                NSLog(@"Asset Can’t be Played");
                return;
            }
If you’ve already allocated your playerItem property, you need to remove an observer.
            if (self.playerItem) {
                [self.playerItem removeObserver:self forKeyPath:@"status"];
                [[NSNotificationCenter defaultCenter]
                removeObserver:self
                name:AVPlayerItemDidPlayToEndTimeNotification
                object:self.playerItem];
            }
You assign a new AVPlayerItem to your playerItem property. Since you’re using ARC, any previous instance will be automatically released. This is why you removed the observer in the previous step.
self.playerItem = [AVPlayerItem playerItemWithAsset:asset];
You add an observer to your playerItem for the status key path.
            [self.playerItem addObserver:self
            forKeyPath:@"status"
            options:NSKeyValueObservingOptionInitial | NSKeyValueObservingOptionNew
            context:PlayerViewControllerStatusObservationContext];
Note the use of PlayerViewControllerStatusObservationContext. This is a special constant you’ll declare in a little bit. You use this constant to ease the registration and identification of your AVPlayerItem notifications.
You add another observer, this time to the default notification center. You’ll invoke the method playerItemDidReachEnd: for the AVPlayerItemDidPlayToEndTimeNotification.
            [[NSNotificationCenter defaultCenter] addObserver:self
            selector:@selector(playerItemDidReachEnd:)
            name:AVPlayerItemDidPlayToEndTimeNotification
            object:self.playerItem];
If your player property is not assigned, you create one with your playerItem property. Then you add two observers to your player for the currentItem and rate key paths. Notice again that you’ve used two special constants, PlayerViewControllerCurrentItemObservationContext and AVPlayerViewControllerRateObservationContext.
            if (self.player == nil) {
                self.player = [AVPlayer playerWithPlayerItem:self.playerItem];
                [self.player addObserver:self
                forKeyPath:@"currentItem"
                options:NSKeyValueObservingOptionInitial | NSKeyValueObservingOptionNew
                context:PlayerViewControllerCurrentItemObservationContext];
                [self.player addObserver:self
                forKeyPath:@"rate"
                options:NSKeyValueObservingOptionInitial | NSKeyValueObservingOptionNew
                context:AVPlayerViewControllerRateObservationContext];
            }
Next you make sure the player’s playerItem is correct.
            if (self.player.currentItem != self.playerItem)
                [[self player] replaceCurrentItemWithPlayerItem:self.playerItem];
Finally, you do some initialization of UI components. If the asset is a video, you hide the image view, as you don’t need it.
            self.artist.text = self.assetItem.artist;
            self.song.text = self.assetItem.title;
            self.imageView.image = self.assetItem.image;
            self.imageView.hidden = self.assetItem.isVideo;
            self.scrubber.value = 0.0f;
        }];
    }
}
Let’s declare the three observation context constants you used. At the top of PlayerViewController.m, just after the import declaration, add the following:
         static void *PlayerViewControllerStatusObservationContext =
         &PlayerViewControllerStatusObservationContext;
         static void *PlayerViewControllerCurrentItemObservationContext =

         &PlayerViewControllerCurrentItemObservationContext;
         static void *AVPlayerViewControllerRateObservationContext =
         &AVPlayerViewControllerRateObservationContext;
This is just a fancy way of defining some constant context values. You could have used string values if you wanted, but this is a bit cleaner.
So you added your PlayerViewController as an observer for your AVPlayer and AVPlayerItem. Unlike default notification center observers, you didn’t specify what method to invoke. Rather the AVPlayer and AVPlayerItem observer will depend on a key-value observer. All you need to do is implement the method observeValueForKeyPath:ofObject:change:context:. This method will need to check the context value to decide what to do.
- (void)observeValueForKeyPath:(NSString *)path
                      ofObject:(id)object
                        change:(NSDictionary* )change
                       context:(void *)context
{
        /* AVPlayer "playerItem" property value observer. */
        if (context == PlayerViewControllerStatusObservationContext) {
        }
        /* AVPlayer "rate" property value observer. */
        else if (context == AVPlayerViewControllerRateObservationContext) {
        }
        /* AVPlayer "currentItem" property value observer. */
        else if (context == PlayerViewControllerCurrentItemObservationContext) {
        }
        else {
        NSLog(@"Other Context");
           [super observeValueForKeyPath:path ofObject:object change:change context:context];
        }
}
You added hooks for each of the context constants you defined in your PlayerViewController. If the context is unknown, you pass it up the view controller hierarchy with a call to super. We’ve left each context section empty because handling each context is a discussion of itself, and we want to go over each one in detail.
We’re doing to have you do some work that won’t necessarily be clear right now, but will become clear once you implement your context handlers and action methods. First, you need to add the CoreMedia framework to your project. Select the project in the Navigator pane, and add the CoreMedia framework to the AVMediaPlayer target via the Build Phases pane. Return to editing PlayerViewController.m and import the CoreMedia header.
#import <CoreMedia/CoreMedia.h>
You’re going to declare and implement some private category properties methods that you’ll need for your context handlers and action methods.
@interface PlayerViewController ()
@property (assign, nonatomic) float prescrubRate;
@property (strong, nonatomic) id playerTimerObserver;

- (void)showPlay;
- (void)showPause;
- (void)updatePlayPause;
- (void)updateRate;

- (void)addPlayerTimerObserver;
- (void)removePlayerTimerObserver;
- (void)updateScrubber:(CMTime)currentTime;

- (void)playerItemDidReachEnd:(NSNotification *)notification;

- (void)handleStatusContext:(NSDictionary *)change;
- (void)handleRateContext:(NSDictionary *)change;
- (void)handleCurrentItemContext:(NSDictionary *)change;
@end
You’ll discuss each of these as you implement them.
The showPlay and showPause methods are just convenience methods to toggle the Play and Pause buttons on the toolbar.
- (void)showPlay
{
    NSMutableArray *toolbarItems = [NSMutableArray arrayWithArray:self.toolbar.items];
    [toolbarItems replaceObjectAtIndex:2 withObject:self.play];
    self.toolbar.items = toolbarItems;
}

- (void)showPause
{
    NSMutableArray *toolbarItems = [NSMutableArray arrayWithArray:self.toolbar.items];
    [toolbarItems replaceObjectAtIndex:2 withObject:self.pause];
    self.toolbar.items = toolbarItems;
}
You need a method to check whether to show the Play or Pause button. You know if the media is playing based on the player’s rate property. A rate of 0.0f means the media is not playing.
- (void)updatePlayPause
{
    if (self.player.rate == 0.0f)
        [self showPlay];
        else
        [self showPause];
}
The updateRate method is just used to set the text of the Rate button. You add a hook so the button shows “1.0x” if the actual player rate is 0.0f.
- (void)updateRate
{
    float rate = self.player.rate;
    if (rate == 0.0f)
        rate = 1.0f;
    self.rate.title = [NSString stringWithFormat:@"%.1fx", rate];
}
While the player is playing, you need to add an periodic observer to update the scrubber and time labels. You also need a method to remove the periodic observer.
- (void)addPlayerTimerObserver
{
    __block id blockSelf = self;
    self.playerTimerObserver =
  [self.player addPeriodicTimeObserverForInterval:CMTimeMakeWithSeconds(0.1f, NSEC_PER_SEC)
    queue:nil
    usingBlock:^(CMTime time){ [blockSelf updateScrubber:time]; }];
}

- (void)removePlayerTimerObserver
{
        if (self.playerTimerObserver) {
                [self.player removeTimeObserver:self.playerTimerObserver];
                self.playerTimerObserver = nil;
        }
}
Note that the AVPlayer periodic observer uses the CMTime structure. CMTime is defined in the CoreMedia framework, which is why you needed to include it in this project. You have the periodic observer fire every 0.1s and invoke the updateScrubber: method.
- (void)updateScrubber:(CMTime)currentTime
{
        if (CMTIME_IS_INVALID(self.playerItem.duration)) {
                self.scrubber.minimumValue = 0.0;
                return;
        }

        double duration = CMTimeGetSeconds(self.playerItem.duration);
        if (isfinite(duration))
{
            float minValue = [self.scrubber minimumValue];
            float maxValue = [self.scrubber maximumValue];
            double time = CMTimeGetSeconds([self.player currentTime]);
            [self.scrubber setValue:(maxValue - minValue) * time / duration + minValue];

            Float64 elapsedSeconds = CMTimeGetSeconds(currentTime);
            Float64 remainingSeconds = CMTimeGetSeconds(self.playerItem.duration) - elapsedSeconds;
            self.elapsedTime.text = [NSString stringWithFormat:@"%d:%02d",
         (int)elapsedSeconds / 60,
            (int)elapsedSeconds % 60];
            self.remainingTime.text = [NSString stringWithFormat:@"%d:%02d",
        (int)remainingSeconds / 60,
        (int)remainingSeconds % 60];
        }
}
updateScrubber: first performs a check on the CMTime value. If the time is invalid, you set the scrubber to 0.0 and return. If the time is valid, you query the playerItem for its duration. If the duration is finite, then you use it to determine where to set the scrubber value. Both the current time and duration are used to update the elapsedTime and remainingTime labels.
The notification handler method playerItemDidReachEnd: has the same effect as if you had tapped the Done button, so you simply call the donePressed: method.
Before you work on your context handlers, let’s implement your action methods.
When you begin moving the scrubber, you need to remove the player’s periodic observer to keep it from updating while the scrubber slider is being adjusted. You cache the current playback rate, and stop the player.
- (IBAction)beginScrubbing:(id)sender
{
    self.prescrubRate = self.player.rate;
    self.player.rate = 0.0f;
    [self removePlayerTimerObserver];
}
The scrub: action updates the player to the playback point that can be calculated from the scrubber value and playerItem duration. You then use those values to update the elapsedTime and remainingTime labels to reflect the new scrubber value.
- (IBAction)scrub:(id)sender
{
        if ([sender isKindOfClass:[UISlider class]]) {
                UISlider* slider = sender;
                if (CMTIME_IS_INVALID(self.playerItem.duration)) {
                        return;
                }

                double duration = CMTimeGetSeconds(self.playerItem.duration);
                if (isfinite(duration)) {
                    float minValue = [slider minimumValue];
                    float maxValue = [slider maximumValue];
                    float value = [slider value];
                    double time = duration * (value - minValue) / (maxValue - minValue);
                    [self.player seekToTime:CMTimeMakeWithSeconds(time, NSEC_PER_SEC)];

                    Float64 remainingSeconds = duration - time;
                    self.elapsedTime.text = [NSString stringWithFormat:@"%d:%02d",                                                                       (int)time / 60, (int)time % 60];
                    self.remainingTime.text = [NSString stringWithFormat:@"%d:%02d",                                                                          (int)remainingSeconds / 60,                                                                          (int)remainingSeconds % 60];
                }
        }
}
When you’ve completed scrubbing, you restore the player playback rate and periodic observer.
- (IBAction)endScrubbing:(id)sender
{
        if (self.playerTimerObserver == nil) {
            [self addPlayerTimerObserver];
    }

        if (self.prescrubRate != 0.0f) {
            self.player.rate = self.prescrubRate;
            self.prescrubRate = 0.0f;
        }
}
Changing the volume with an AVPlayer is much more complicated process. Your media asset could have multiple tracks, not just because of video; a stereo audio asset could have two tracks. As a result, you need to find all the audio tracks in an asset and adjust the audio mix to the new volume.
- (IBAction)volumeChanged:(id)sender
{
    float volume = [self.volume value];
    NSArray *audioTracks = [self.assetItem.asset tracksWithMediaType:AVMediaTypeAudio];

    NSMutableArray *allAudioParams = [NSMutableArray array];
    for (AVAssetTrack *track in audioTracks) {
        AVMutableAudioMixInputParameters *audioInputParams =
  [AVMutableAudioMixInputParameters audioMixInputParameters];
        [audioInputParams setVolume:volume atTime:kCMTimeZero];
        [audioInputParams setTrackID:[track trackID]];
        [allAudioParams addObject:audioInputParams];
    }

    AVMutableAudioMix *audioMix = [AVMutableAudioMix audioMix];
    [audioMix setInputParameters:allAudioParams];

    [self.playerItem setAudioMix:audioMix];
}
donePressed: will stop the player and return you to the MediaViewController.
- (IBAction)donePressed:(id)sender
{
    [self.player pause];
    [self dismissViewControllerAnimated:YES completion:nil];
}
playPressed: and pausePressed: update the player and toolbar as appropriate.
- (IBAction)playPressed:(id)sender
{
    [self.player play];
    [self updatePlayPause];
}

- (void)pausePressed:(id)sender
{
    [self.player pause];
    [self updatePlayPause];
}
The ratePressed: Action toggles the playback rate between three rates: 0.5, 1.0, and 2.0.
- (IBAction)ratePressed:(id)sender
{
    float rate = self.player.rate;
    rate *= 2.0f;
    if (rate > 2.0f)
        rate = 0.5;
    self.player.rate = rate;
}
Now you can implement your context handlers. For a change in playerItem status, you handle three possible statuses: unknown, ready to play, and failure.
- (void)handleStatusContext:(NSDictionary *)change
{
    [self updatePlayPause];

    AVPlayerStatus status = [[change objectForKey:NSKeyValueChangeNewKey] integerValue];
    switch (status) {
        case AVPlayerStatusUnknown:
            [self removePlayerTimerObserver];
            [self updateScrubber:CMTimeMake(0, NSEC_PER_SEC)];
            break;

        case AVPlayerStatusReadyToPlay:
            [self addPlayerTimerObserver];
            break;

        case AVPlayerStatusFailed:
            NSLog(@"Player Status Failed");
            break;
    }
}
When the player rate changes, you just perform a sanity check to make sure you’re displaying the correct label on the Rate button.
- (void)handleRateContext:(NSDictionary *)change
{
    [self updatePlayPause];
    [self updateRate];
}
Finally, you only care about the player’s currentItem when you’ve either created a new AVPlayer or AVPlayerItem instance. If you have a new playerItem, you need to make sure the playerView player is updated accordingly.
- (void)handleCurrentItemContext:(NSDictionary *)change
{
    // We’ve added/replaced the AVPlayer’s AVPlayerItem
    AVPlayerItem *newPlayerItem = [change objectForKey:NSKeyValueChangeNewKey];
    if (newPlayerItem != (id)[NSNull null]) {
        // We really have a new AVPlayerItem
        self.playerView.player = self.player;
        [self.playerView setVideoFillMode:AVLayerVideoGravityResizeAspect];
    }
    else {
        // No AVPlayerItem
        NSLog(@"No AVPlayerItem");
    }
}
Your PlayerViewController is complete. Now you just need to ensure that your media AssetItem is set when selecting from the AudioViewController or VideoViewController. Open MediaViewController.m. Add an import directive for PlayerViewController.h.
#import "PlayerViewController.h"
Then add the implementation for prepareForSegue:sender:.
- (void)prepareForSegue:(UIStoryboardSegue *)segue sender:(id)sender
{
    PlayerViewController *pvc = segue.destinationViewController;
    UITableViewCell *cell = sender;
    pvc.assetItem = [self.assets objectAtIndex:cell.tag];
}
You don’t need to check which segue is begin invoked, as there should only be one.
Build and run the AVMediaPlayer. Select a song or video to play. Slider the scrubber to change the playback point. Toggle the rate to see how you can change the playback rate. Pretty slick, right?
In this chapter, you took a long but pleasant walk through the hills and valleys of using the iPod music library. You saw how to find media items using media queries, and how to let your users select songs using the media picker controller. You learned how to use and manipulate collections of media items. We showed you how to use music player controllers to play media items and how to manipulate the currently playing item by seeking or skipping. You also learned how to find out about the currently playing track, regardless of whether it’s one your code played or one that the user chose using the iPod or Music application.
But now, shore leave is over, matey. It’s time to set sail into the open waters of iOS security. Batten down the hatches and secure the ship!