
Relationships, Fetched Properties and Expressions
Welcome to the final chapter on Core Data. So far, your application includes only a single entity, Hero. In this chapter, we’re going to show you how managed objects can incorporate and reference other managed objects through the use of relationships and fetched properties. This will give you the ability to make applications of much greater complexity than your current SuperDB application.
That’s not the only thing you’re going to do in this chapter, however. You’re also going turn your HeroDetailController into a generic managed object controller. By making the controller code even more generic, you’ll make the controller subclasses smaller and easier to maintain. You’ll extend the configuration property list to allow you to define additional entity views.
You have a lot to do in this chapter, so no dallying. Let’s get started.
Expanding Your Application: Superpowers and Reports
Before we talk about the nitty-gritty, let’s quickly look at the changes you’re going to make to the SuperDB application in this chapter. On the surface, the changes look relatively simple. You’ll add the ability to specify any number of superpowers for each hero, and also add a number of reports that show other superheroes that meet certain criteria, including heroes who are either younger or older than this hero, or who are the same sex or the opposite sex (Figure 7-1).
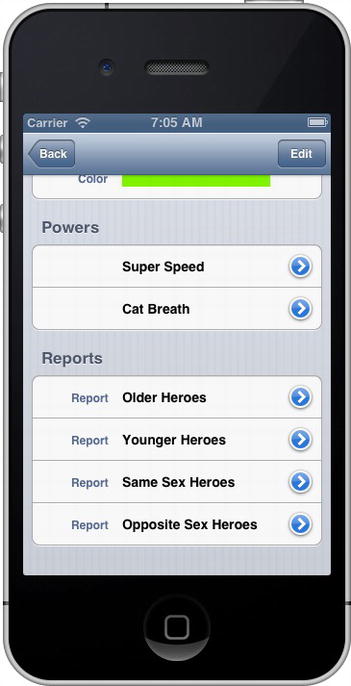
Figure 7-1. At the end of this chapter, you’ll have added the ability to specify any number of superpowers for each hero, as well as provided a number of reports that let you find other heroes based on how they relate to this hero
The powers will be represented by a new entity that you’ll create and imaginatively call Power. When users add or edit a power, they will be presented with a new view (Figure 7-2), but in reality, under the hood, it will be a new instance of the same object used to edit and display heroes.

Figure 7-2. The new view for editing powers is actually an instance of the same object used to edit heroes
When users drill down into one of the reports, they will get a list of the other heroes that meet the selected criteria (Figure 7-3).

Figure 7-3. The Reports section on your hero will let you find other heroes who meet certain criteria in relation to the hero you’re currently editing. Here, for example, you’re seeing all the heroes who were born after Super Cat
Tapping any of the rows will take you to another view where you can edit that hero, using another instance of the same generic controller class. Your users will be able to drill down an infinite number of times (limited only by memory), all courtesy of a single class.
Before you start implementing these changes, you need to understand a few concepts and then make some changes to your data model.
Relationships
We introduced the concept of Core Data relationships back in Chapter 2. Now we will go into more detail, and show how they can be used in applications. The relationship is one of the most important concepts in Core Data. Without relationships, entities would be isolated. There would be no way to have one entity contain another entity or reference another entity. Let’s look at a hypothetical header file for a simple example of an old-fashioned data model class to give you a familiar point of reference:
#import <UIKit/UIKit.h>

@class Address;

@interface Person : NSObject

@property (strong, nonatomic) NSString *firstName;
@property (strong, nonatomic) NSString *lastName;
@property (strong, nonatomic) NSDate *birthdate;
@property (strong, nonatomic) UIImage *image;
@property (strong, nonatomic) Address *address;
@property (strong, nonatomic) Person *mother;
@property (strong, nonatomic) Person *father;
@property (strong, nonatomic) NSMutableArray *children;

@end
Here you have a class that represents a single person. You have instance variables to store a variety of information about that person and properties to expose that information to other objects. There’s nothing earth-shattering here. Now, let’s think about how you could re-create this object in Core Data.
The first four instance variables—firstName, lastName, birthDate, and image—can all be handled by built-in Core Data attribute types, so you could use attributes to store that information on the entity. The two NSString instances would become String attributes, the NSDate instance would become a Date attribute, and the UIImage instance would become a Transformable attribute, handled in the same way as UIColor in the previous chapter.
After that, you have an instance of an Address object. This object probably stores information like street address, city, state or province, and postal code. That’s followed by two Person instance variables and a mutable array designed to hold pointers to this person’s children. Most likely, these arrays are intended to hold pointers to more Person objects.
In object-oriented programming, including a pointer to another object as an instance variable is called composition. Composition is an incredibly handy device because it lets you create much smaller classes and reuse objects, rather than have data duplicated.
In Core Data, you don’t have composition per se, but you do have relationships, which essentially serve the same purpose. Relationships allow managed objects to include references to other managed objects of a specific entity, known as destination entities, or sometimes just destinations. Relationships are Core Data properties, just as attributes are. As such, they have an assigned name, which serves as the key value used to set and retrieve the object or objects represented by the relationship. Relationships are added to entities in Xcode’s data model editor in the same way attributes are added. You’ll see how to do this in a few minutes. There are two basic types of relationships: to-one relationships and to-many relationships.
When you create a to-one relationship, you are saying that one object can contain a pointer to a single managed object of a specific entity. In your example, the Person entity has a single to-one relationship to the Address entity.
Once you’ve added a to-one relationship to an object, you can assign a managed object to the relationship using key-value coding (KVC). For example, you might set the Address entity of a Person managed object like so:
NSManagedObject *address = [NSEntityDescription insertNewObjectForEntityForName:@"Address"
                                        inManagedObjectContext:thePerson.managedObjectContext];
[thePerson setValue:address forKey:@"address"];
Retrieving the object can also be accomplished using KVC, just with attributes:
NSManagedObject *address = [thePerson valueForKey:@"address"];
When you create a custom subclass of NSManagedObject, as you did in the previous chapter, you can use Objective-C properties and dot notation to get and set those properties. The property that represents a to-one relationship is an instance of NSManagedObject or a subclass of NSManagedObject, so setting the address looks just like setting attributes:
NSManagedObject *address = [NSEntityDescription insertNewObjectForEntityForName:@"Address"
                                        inManagedObjectContext:thePerson.managedObjectContext];
thePerson.address = address;
And retrieving a to-one relationship becomes as follows:
NSManagedObject *address = thePerson.address;
In almost every respect, the way you deal with a to-one relationship in code is identical to the way you’ve been dealing with Core Data attributes. You use KVC to get and set the values using Objective-C objects. Instead of using Foundation classes that correspond to different attribute types, you use NSManagedObject or a subclass of NSManagedObject that represents the entity.
To-many relationships allow you to use a relationship to associate multiple managed objects to a particular managed object. This is equivalent to using composition with a collection class such as NSMutableArray or NSMutableSet in Objective-C, as with the children instance variable in the Person class you looked at earlier. In that example, you used an NSMutableArray, which is an editable, ordered collection of objects. That array allows you to add and remove objects at will. If you want to indicate that the person represented by an instance of Person has children, you just add the instance of Person that represents that person’s children to the children array.
In Core Data, it works a little differently. To-many relationships are unordered. They are represented by instances of NSSet, which is an unordered, immutable collection that you can’t change, or by NSMutableSet, an unordered collection that you can change. Here’s how getting a to-many relationship and iterating over its contents might look with an NSSet:
NSSet *children = [thePerson valueForKey:@"children"];
for (NSManagedObject *oneChild in children) {
    // do something
}
Note Do you spot a potential problem from the fact that to-many relationships are returned as an unordered NSSet? When displaying them in a table view, it’s important that the objects in the relationship are ordered consistently. If the collection is unordered, you have no guarantee that the row you tap will bring up the object you expect. You’ll see how to deal with that a little later in the chapter.
On the other hand, if you wish to add or remove managed objects from a to-many relationship, you must ask Core Data to give you an instance of NSMutableSet by calling mutableSetValueForKey: instead of valueForKey:, like so:
NSManagedObject *child = [NSEntityDescription insertNewObjectForEntityForName:@"Person"
                                        inManagedObjectContext:thePerson.managedObjectContext];
NSMutableSet *children = [thePerson mutableSetValueForKey:@"children"];
[children addObject:child];
[children removeObject:child];
If you don’t need to change which objects a particular relationship contains, use valueForKey:, just as with to-one arrays. Don’t call mutableSetValueForKey:if you don’t need to change which objects make up the relationship, as it incurs slightly more overhead than just calling valueForKey:.
In addition to using valueForKey: and mutableSetValueForKey:, Core Data also provides special methods, created dynamically at runtime, that let you add and delete managed objects from a to-many relationship. There are four of these methods per relationship. Each method name incorporates the name of the relationship. The first allows you to add a single object to a relationship
- (void)addXXXObject:(NSManagedObject *)value;
where XXX is the capitalized name of the relationship and value is either an NSManagedObject or a specific subclass of NSManagedObject. In the Person example you’ve been working with, the method to add a child to the children relationship looks like this:
- (void)addChildrenObject:(Person *)value;
The method for deleting a single object follows a similar form.
- (void)removeXXXObject:(NSManagedObject *)value;
The dynamically generated method for adding multiple objects to a relationship takes the following form:
- (void)addXXX:(NSSet *)values;
The method takes an instance of NSSet containing the managed objects to be added. So, the dynamically created method for adding multiple children to your Person managed object is as follows:
- (void)addChildren:(NSSet *)values;
Finally, here’s the method used to remove multiple managed objects from a relationship:
- (void)removeXXX:(NSSet *)values;
Remember that these methods are generated for you when you declare a custom NSManagedObject subclass. When Xcode encounters your NSManagedObject subclass declaration, it creates a category on the subclass that declares the four dynamic methods using the relationship name to construct the method names. Since the methods are generated at runtime, you won’t find any source code in your project that implements the methods. If you never call the methods, you’ll never see the methods. As long as you’ve already created the to-many relationship in your model editor, you don’t need to do anything extra to access these methods. They are created for you and ready to be called.
Note There’s one tricky point associated with the methods generated for to-many relationships. Xcode declares the four dynamic methods when you first generate the NSManagedObject subclass files from the template. If you have an existing data model with a to-many relationship and a subclass of NSManagedObject, what happens if you decide to add a new to-many relationship to that data model? If you add the to-many relationship to an existing NSManagedObject subclass, you need to add the category containing the dynamic methods yourself, which is what you’ll do a little later in the chapter.
There is absolutely no difference between using these four methods and using mutableSetValueForKey:. The dynamic methods are just a little more convenient and make your code easier to read.
In Core Data, every relationship can have an inverse relationship. A relationship and its inverse are two sides of the same coin. In your Person object example, the inverse relationship for the children relationship might be a relationship called parent. A relationship does not need to be the same kind as its inverse. A to-one relationship, for example, can have an inverse relationship that is to-many. In fact, this is pretty common. If you think about it in real-world terms, a person can have many children. The inverse is that a child can have only one biological mother and one biological father, but the child can have multiple parents and guardians. So, depending on your needs and the way you modeled the relationship, you might choose to use either a to-one or a to-many relationship for the inverse.
If you add an object to a relationship, Core Data will automatically take care of adding the correct object to the inverse relationship. So, if you had a person named Steve and added a child to Steve, Core Data would automatically make the child’s parent Steve.
Although relationships are not required to have an inverse, Apple generally recommends that you always create and specify the inverse, even if you won’t need to use the inverse relationship in your application. In fact, the compiler will actually warn you if you fail to provide an inverse. There are some exceptions to this general rule, specifically when the inverse relationship will contain an extremely large number of objects, since removing the object from a relationship triggers its removal from the inverse relationship. Removing the inverse will require iterating over the set that represents the inverse, and if that’s a very large set, there could be performance implications. But unless you have a specific reason not to do so, you should model the inverse, as it helps Core Data ensure data integrity. If you have performance issues as a result, it’s relatively easy to remove the inverse relationship later.
Note You can read more about how the absence of inverse relationships can cause integrity problems at
https://developer.apple.com/library/mac/#documentation/Cocoa/Conceptual/CoreData/Articles/cdRelationships.html .Relationships allow you to associate managed objects with specific other managed objects. In a way, relationships are sort of like iTunes playlists where you can put specific songs into a list and then play them later. If you’re an iTunes user, you know that there are things called Smart Playlists, which allow you to create playlists based on criteria rather than a list of specific songs. You can create a Smart Playlist, for example, that includes all the songs by a specific artist. Later on, when you buy new songs from that artist, they are added to that Smart Playlist automatically because the playlist is based on criteria and the new songs meet those criteria.
Core Data has something similar. There’s another type of attribute you can add to an entity that will associate a managed object with other managed objects based on criteria, rather than associating specific objects. Instead of adding and removing objects, fetched properties work by creating a predicate that defines which objects should be returned. Predicates, as you may recall, are objects that represent selection criteria. They are primarily used to sort collections and fetch results.
Tip If you’re rusty on predicates, Learn Objective-C on the Mac, 2ndEdition, by Scott Knaster, Waqar Maliq, and Mark Dalrymple (Apress, 2012) devotes an entire chapter to the little beasties.
Fetched properties are always immutable. You can’t change their contents at runtime. The criteria are usually specified in the data model (a process that you’ll look at shortly), and then you access the objects that meet that criteria using properties or KVC.
Unlike to-many relationships, fetched properties are ordered collections and can have a specified sort order. Oddly enough, the data model editor doesn’t allow you to specify how fetched properties are sorted. If you care about the order of the objects in a fetched property, you must actually write code to do that, which you’ll look at later in this chapter.
Once you’ve created a fetched property, working with it is pretty straightforward. You just use valueForKey: to retrieve the objects that meet the fetched property’s criteria in an instance of NSArray.
NSArray *olderPeople = [person valueForKey:@"olderPeople"];
If you use a custom NSManagedObject subclass and define a property for the fetched property, you can also use dot notation to retrieve objects that meet the fetched property’s criteria in an NSArray instance, like so:
NSArray *olderPeople = person.olderPeople;
Creating Relationships and Fetched Properties in the Data Model Editor
The first step in using relationships or fetched properties is to add them to your data model. Let’s add the relationship and fetched properties you’ll need in your SuperDB application now. If you look back at Figure 7-1, you can probably guess that you’re going to need a new entity to represent the heroes’ powers, as well as a relationship from your existing Hero entity to the new Power entity you’re going to create. You’ll also need four fetched properties to represent the four different reports.
Every relationship, regardless of its type, has something called a delete rule, which specifies what happens when one object in the relationship is deleted. There are four possible delete rules:
- Nullify:This is the default delete rule. With this delete rule, when one object is deleted, the inverse relationship is just updated so that it doesn’t point to anything. If the inverse relationship is a to-one relationship, it is set to nil. If the inverse relationship is a to-many relationship, the deleted object will be removed from the inverse relationship. This option ensures that there are no references to the object being deleted, but does nothing more.
- No Action:If you specify a delete rule of No Action, when you delete one object from a relationship, nothing happens to the other object. Instances where you would use this particular rule are extremely rare and are generally limited to one-way relationships with no inverse. This action is rarely used because the other object’s inverse relationship would end up pointing to an object that no longer exists.
- Cascade:If you set the delete rule to Cascade, when you delete a managed object, all the objects in the relationship are also removed. This is a more dangerous option than Nullify, in that deleting one object can result in the deletion of other objects. You would typically choose Cascade when a relationship’s inverse relationship is to-one and the related object is not used in any other relationships. If the object or objects in the relationship are used only for this relationship and not for any other reason, then you probably do want a Cascade rule, so that you don’t leave orphaned objects sitting in the persistent store taking up space.
- Deny:This delete rule option will actually prevent an object from being deleted if there are any objects in this association, making it the safest option in terms of data integrity. The Deny option is not used frequently, but if you have situations where an object shouldn’t be deleted as long as it has any objects in a specific relationship, this is the one you would choose.
Another use of expressions is to aggregate attributes without loading them all into memory. If you want to get the average, median, minimum, or maximum for a specific attribute, such as the average age of your heroes or count of female heroes, you can do that (and more) with an expression. In fact, that’s how you should do it. To understand why, you need to know a little about the way Core Data works under the hood.
The fetched results controller you’re using in HeroListController contains objects for all of the heroes in your database, but it doesn’t have all of them fully loaded into memory as managed objects. Core Data has a concept of a fault. A fault is sort of like a stand-in for a managed object. A fault object knows a bit about the managed object it’s standing in for, such as its unique ID and perhaps the value of one attribute being displayed, but it’s not a fully managed object.
A fault turns into a full-fledged managed object when something triggers the fault. Triggering a fault usually happens when you access an attribute or key that the fault doesn’t know about. Core Data is smart enough to turn a fault into a managed object when necessary, so your code usually doesn’t need to worry about whether it’s dealing with a fault or a managed object. However, it’s important to know about this behavior so you don’t unintentionally cause performance problems by triggering faults unnecessarily.
Most likely, the faults in your fetched results controller don’t know anything about the sex attribute of Hero. So, if you were to loop through the heroes in your fetched results controller to get a count of the female heroes, you would be triggering every fault to become a managed object. That’s inefficient because it uses a lot more memory and processing power than necessary. Instead, you can use expressions to retrieve aggregate values from Core Data without triggering faults.
Here’s an example of how to use an expression to retrieve the average birth date calculated for all female heroes in your application (you can’t use age in a fetch request because it’s a transient attribute that isn’t stored).
NSExpression *ex = [NSExpression expressionForFunction:@"average:"
                                 arguments:@[[NSExpression expressionForKeyPath:@"birthdate"]]];
NSPredicate *pred = [NSPredicate predicateWithFormat:@"sex == 'Female'"];

NSExpressionDescription *ed = [[NSExpressionDescription alloc] init];
[ed setName:@"averageBirthdate"];
[ed setExpression:ex];
[ed setExpressionResultType:NSDateAttributeType];

NSArray *properties = [NSArray arrayWithObject:ed];

NSFetchRequest *request = [[NSFetchRequest alloc] init];
[request setPredicate:pred];
[request setPropertiesToFetch:properties];
[request setResultType:NSDictionaryResultType];

NSEntityDescription *entity = [NSEntityDescription entityForName:@"Hero"
                                          inManagedObjectContext:context];
[request setEntity:entity];

NSArray *results = [context executeFetchRequest:request error:nil];
NSDate *date = [results objectAtIndex:0];
NSLog(@"Average birthdate for female heroes: %@", date);
Aggregate expressions are relatively new to Core Data. As of this writing, the process of using expressions to obtain aggregates is not thoroughly documented, but the preceding code sample, along with the API documentation for NSExpression and NSExpressionDescription, should get you pointed in the right direction for working with aggregates.
Before you start making changes, create a new version of your data model by single-clicking the current version in the Groups & Files pane (the one with the green check mark), and then selecting “Add Model Version” from the Data Model submenu of the Design menu. This ensures that the data you collected using the previous data models migrate properly to the new version you’ll be creating in this chapter.
Click the current data model to bring up the model editor. Using the plus icon in the lower-left corner of the model editor’s entity pane, add a new entity and call it Power. You can leave all the other fields at their default values (Figure 7-4).

Figure 7-4. Rename the new entity Power and leave the other fields at their default values
If you look back at Figure 7-2, you can see that the Power object has two fields: one for the name of the power and another that identifies the source of this particular power. In the interest of keeping things simple, the two attributes will just hold string values.
With Power still selected in the property pane, add two attributes using the property pane. Call one of them name, uncheck the Optional check box, set its Type to String, and give it a Default value of New Power. Give the second one a name of source, and set its Type to String as well. Leave Optional checked. There is no need for a default value. Once you’re finished, you should have two rounded rectangles in the model editor’s diagram view (Figure 7-5).

Figure 7-5. You now have two entities, but they are not related in any way
Creating the Powers Relationship
Right now, the Power entity is selected. Single-click the rounded rectangle that represents the Hero entity or select Hero in the entity pane to select it. Now, in the properties pane, click and hold the plus button and select Add Relationship. In the model editor’s detail pane, change the name of the new relationship to powers and the Destination to Power. The Destination field specifies which entity’s managed objects can be added to this relationship, so by selecting Power, you are indicating that this relationship stores powers.
You can’t specify the inverse relationship yet, but you do want to check the To-Many Relationship box to indicate that each hero can have more than one power. Also, change the delete rule to Cascade. In your application, every hero will have his or her own set of powers—no sharing of powers between heroes. When a hero is deleted, you want to make sure that hero’s powers are deleted as well, so you don’t leave orphaned data in the persistent store. Once you’re finished, the detail pane should look like Figure 7-6, and the diagram view should have a line drawn between the Hero and Power entities to represent the new relationship (Figure 7-7).

Figure 7-6. The detail pane view of the powers relationship
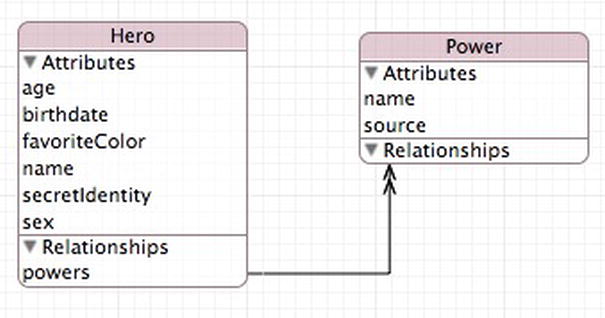
Figure 7-7. Relationships are represented in the diagram view by lines drawn between rounded rectangles. A single arrowhead represents a to-one relationship and a double arrowhead (as shown here) represents a to-many relationship
Creating the Inverse Relationship
You won’t actually need the inverse relationship in your application, but you’re going to follow Apple’s recommendation and specify one. Since the inverse relationship will be to-one, it doesn’t present any performance implications. Select the Power entity again, and add a relationship to it using the property pane. Name this new relationship hero, and select a Destination entity of Hero. If you look at your diagram view now, you should see two lines representing the two different relationships you’ve created.
Next, click the Inverse pop-up menu and select powers. This indicates that the relationship is the inverse of the one you created earlier. Once you’ve selected it, the two relationship lines in the diagram view will merge together into a single line with arrowheads on both sides (Figure 7-8).
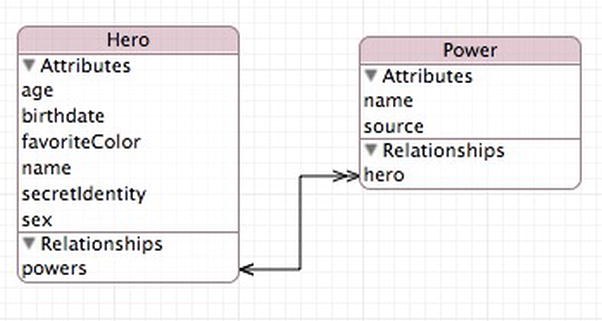
Figure 7-8. Inverse relationships are represented as a single line with arrowheads on both sides, rather than two separate lines
Creating the olderHeroes Fetched Property
Select the Hero entity again so that you can add some fetched properties to it. In the property pane, click and hold the plus button and choose Add Fetched Property. Call the new fetched property olderHeroes. Notice that there is only one other field that can be set on the detail pane: a big white box called Predicate (Figure 7-9).
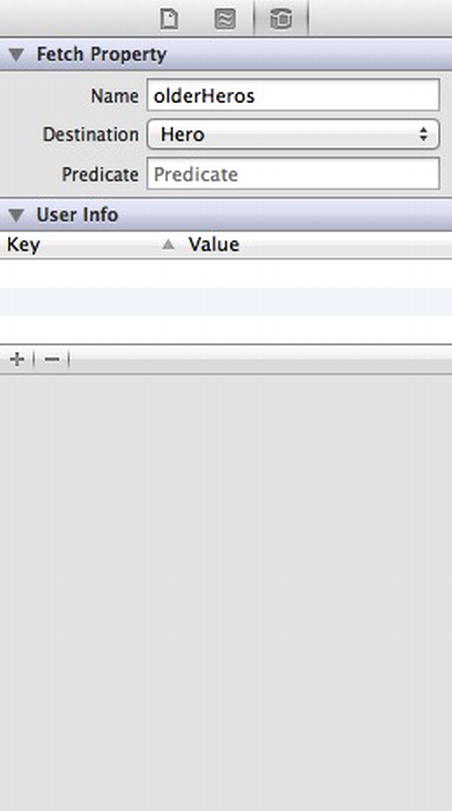
Figure 7-9. The detail pane showing a fetched property
Tip Both relationships and fetched properties can use their own entity as the Destination.
A predicate is a statement that returns a Boolean value. Think of them as like a conditional statement within an if or while. They are intended to be used against a set of objects, whether Cocoa or Core Data. Predicates are not dependent on the specific data being searched, but rather provide an abstract way of defining a query to filter data. At its simplest, a predicate compares two values using an operator. An example operator would be ‘==’ to test if two values are equal. There are more sophisticated operators that allow for string comparison (using LIKE or CONTAINS). Predicates can be joined to format a compound predicated. Typically, predicates are joined with an AND or an OR operator.
There are two special variables you can use in the predicate of a fetched property: $FETCH_SOURCE and $FETCHED_PROPERTY. $FETCH_SOURCE refers to the specific instance of a managed object. $FETCHED_PROPERTY is a description of the entity property being fetched.
You can read more detail in Apple’s Predicate Programming Guide (https://developer.apple.com/library/ios/#documentation/Cocoa/Conceptual/Predicates/predicates.html ).
Tip Both relationships and fetched properties can use their own entity as the Destination.
So you need to define a predicate that finds all the heroes who are older (i.e. have an earlier birthdate) than the Hero in the detail view. You need to compare your Hero’s birthdate against all the other Hero entities. If $FETCH_SOURCE is your Hero entity, your predicate will be
$FETCH_SOURCE.birthdate > birthdate
Enter this formula into the Predicate field in the attribute inspector. Remember, a date is really just an integer; the later the date, the greater the value.
Creating the youngerHeroes Fetched Property
Add another fetched property named youngerHeroes. The Destination will be Hero again, and the predicate should be the same as the previous one, except the operator will be < instead of >. Type the following for the youngerHeroes predicate in the attribute inspector:
$FETCH_SOURCE.birthdate < birthdate
One thing to be aware of is that a fetched property retrieves all matching objects, potentially including the object on which the fetch is being performed. This means it is possible to create a result set that, when executed on Super Cat, returns Super Cat.
Both the youngerHeroes and olderHeroes fetched properties automatically exclude the hero being evaluated. Heroes cannot be older or younger than themselves; their birth date will always exactly equal their own birth date, and so no hero will ever meet the two criteria you just created.
Let’s now add a fetched property that has slightly more complex criteria.
Creating the sameSexHeroes Fetched Property
The next fetched property you’re going to create is called sameSexHeroes and it returns all heroes who are the same sex as this hero. You can’t just specify to return all heroes of the same sex, however, because you don’t want this hero to be included in the fetched property. Super Cat is the same sex as Super Cat, but users will not expect to see Super Cat when they look at a list of the heroes who are the same sex as Super Cat.
Create another fetched property, naming it sameSexHeroes. Open the model editor. Make sure the Destination is set to Hero. For the Predicate field, type
($FETCH_SOURCE.sex == sex) AND ($FETCH_SOURCE != SELF)
It’s pretty clear what the left side of this compound predicate is doing. But what are you doing on the right side? Remember, a fetched property predicate will return all matching objects, including the object that owns the fetched property. In this case, you asked for all heroes of a certain sex, and your hero in the detail view will match that criteria. You need to exclude that specific hero.
You could just compare names and exclude heroes with the same name as yours. That might work, except for the fact that two heroes might have the same name. Maybe using name isn’t the best idea. But what value is there that uniquely identifies a single hero? There isn’t one, really.
Fortunately, predicates recognize a special value called SELF, which returns the object being compared. The $FETCH_SOURCE variable represent the object where the fetch request is happening. Therefore, to exclude the object where the fetch request is firing, you just need to require it to return only objects where $FETCH_SOURCE != SELF.
Creating the oppositeSexHeroes Fetched Property
Create a new fetched property called oppositeSexHeroes and enter the predicate of
$FETCH_SOURCE.sex != sex
Make sure you save your data model before continuing.
Adding Relationships and Fetched Properties to the Hero Class
Since you created a custom subclass of NSManagedObject, you need to update that class to include the new relationship and fetched properties. If you had not made any changes to the Hero class, you could just regenerate the class definition from your data model, and the newly generated version would include properties and methods for the relationships and fetched properties you just added to your data model. Since you have added validation code, you need to update it manually. Single-click Hero.h and add the following code:
(Before @interface)
@class Power;
(After other properties)
@property (nonatomic, retain) NSSet *powers;

@property (nonatomic, readonly) NSArray *olderHeroes;
@property (nonatomic, readonly) NSArray *youngerHeroes;
@property (nonatomic, readonly) NSArray *sameSexHeroes;
@property (nonatomic, readonly) NSArray *oppositeSexHeroes;
(After @end)
@interface Hero (PowerAccessors)
- (void)addPowersObject:(Power *)value;
- (void)removePowersObject:(Power *)value;
- (void)addPowers:(NSSet *)value;
- (void)removePowers:(NSSet *)value;
@end
Save the file. Switch over to Hero.m and make the following changes (after the other @dynamic declarations):
@dynamic powers;
@dynamic olderHeroes, youngerHeroes, sameSexHeroes, oppositeSexHeroes;
Looking at Figure 7-1, you have two new table view sections to add to your detail view: Powers and Reports. Unfortunately, it won’t be as easy as adding new cells to the General section was in Chapter 6. It turns out that you can’t use the storyboard editor to set things up for you. The reason is that the Powers section is dynamically data driven. You don’t know how many rows are in the Powers section until you have a Hero entity to inspect. All the other sections have a fixed set of rows.
You start by converting HeroDetailControllerto be more data-driven in its current configuration. Open SuperDB.storyboard and find the HeroDetailController. Select the table view and open the attribute inspector. Change the table view’s Content field from Static Cells to Dynamic Prototypes. The detail view should change to a single table view cell with a section header of Prototype Cells (Figure 7-10).

Figure 7-10. Changing the table view content to dynamic prototypes
Select the one table view cell that remains and change the Utility pane to the attribute inspector. In the Identifier field, delete it so that it is empty.
Now open HeroDetailController.m. Look for the methods numberOfSectionsInTableView: and tableView:numberOfRowsInSection:. You can’t use the jump bar to find them because you commented them out, but if you look for the label “Table view data source,” it should place you near the right place. Uncomment the methods, and change their bodies to read
- (NSInteger)numberOfSectionsInTableView:(UITableView *)tableView
{
    return self.sections.count;
}

- (NSInteger)tableView:(UITableView *)tableView numberOfRowsInSection:(NSInteger)section
{
    NSDictionary *sectionDict = [self.sections objectAtIndex:section];
    NSArray *rows = [sectionDict objectForKey:@"rows"];
    return rows.count;
}
You’re simply using your configuration information to determine how many sections your table view has and how many rows are in each section.
Now, your configuration information doesn’t contain the Header value. If you ran the app now, the detail view would look like Figure 7-11.
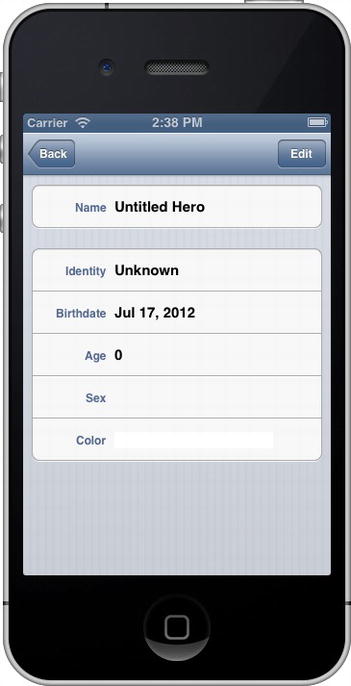
Figure 7-11. Detail view with no general section header
Add the header information to your configuration plist. Edit HeroDetailController.plist and navigate to Root ![]() Section
Section ![]() Item 1. Open Item 1, select the Item 1 row, and add a new item. Give the item a key of header and a value of General. Keep the type as String (Figure 7-12).
Item 1. Open Item 1, select the Item 1 row, and add a new item. Give the item a key of header and a value of General. Keep the type as String (Figure 7-12).

Figure 7-12. Adding the general section header to the property list
Now head back over the HeroDetailController.m. And add the following method (we put it after tableView:numberOfRowsInSection:):
- (NSString *)tableView:(UITableView *)tableView titleForHeaderInSection:(NSInteger)section
{
    NSDictionary *sectionDict = [self.sections objectAtIndex:section];
    return [sectionDict objectForKey:@"header"];
}
The General label should be there. Since you didn’t put the header item in the first section, objectForKey: will return nil, which the table view interprets as no header label.
Now you’re ready to add the new Powers and Reports sections.
Head back to the HeroDetailController.plist property list and select the Sections item. Open the Sections item, then make sure Item 0 and Item 1 are both closed. Hover the pointer over Item 1 until the (+) and (−) buttons appear next to Item 1. Click the (+) button. A new Item 2 should appear. Set Item 2’s type to Dictionary and open it. Add an to Item 2. Name it header with a value of Powers.
Before you go further, take a step back and think about your detail configuration property list. You just added a new section to represent the Powers section. You added a header item to contain the Section Header string. Now you need to add the rows item, right?
Probably not.
Remember that the rows item is an array that tells you how to configure each cell in the section plus what label, cell class, and property key to use. The number of cells is determined by the number of array items. The situation with the Powers section is almost the opposite. You don’t know how many rows you need; that’s coming from the Powers relationship of the Hero entity. And the configuration of each cell should be identical.
There are a couple of approaches you can take. Let’s discuss two ideas.
For the Powers section, you’ll make the rows item a dictionary. The dictionary will contain three String items. The keys will be key, class, and label. These are the same keys you are using for each item when rows is an Array. You can infer that when the rows item is a dictionary, the section is data-driven; but when the rows item is an Array, the section is configuration-driven.
Here’s another approach. For each section, along with the header item, you define an item titled dynamic which will be a Boolean type, If YES, then the section is data-driven; if NO, the section is configuration-driven. For all cases, rows will be an array, but for dynamic sections, it will contain only one entry. If there is no dynamic item, it is the same as dynamic being set to NO.
Either approach will work. There are probably many more ideas we could toss around, but that’s not where we’re heading with this. Regardless of the approach you take, it’s going to require adding a lot of code to handle this logic—code that, so far, you’ve put inside the HeroDetailController class. Adding this parsing logic may belong inside the HeroDetailController, but as it gets more complicated, will only muddy your code. You’re going to refactor your application to pull the property list handling code out of HeroDetailController into a new class, HeroDetailConfiguration. Then you’ll choose which approach to take to handle the data-driven Powers section.
Create a new Objective-C class. Make it a subclass of NSObject and name it HeroDetailConfiguration.
Looking at HeroDetailController, you see that you put the sections array inside a private category. You’ll do the same for HeroDetailConfiguration. Open HeroDetailConfiguration.m and add the following above the @implmentation:
@interface HeroDetailConfiguration ()
@property (strong, nonatomic) NSArray *sections;
@end
Next you need to create your initializer. You want it to open the property list and parse the contents into the sections array.
- (id)init
{
    self = [super init];
    if (self) {
        // Initialization Code
        NSURL *plistURL = [[NSBundle mainBundle] URLForResource:@"HeroDetailConfiguration"                                                   withExtension:@"plist"];
        NSDictionary *plist = [NSDictionary dictionaryWithContentsOfURL:plistURL];
        self.sections = [plist valueForKey:@"sections"];
    }
    return self;
}
Now let’s go back to HeroDetailController.m and see where to use the sections array. The following methods access the HeroDetailController sections array:
numberOfSectionsInTableView:
tableView:numberOfRowsInSection:
tableView:titleForHeaderInSection:
tableView:cellForRowAtIndexPath:
You can use this to design your methods for HeroDetailConfiguration. Right off the bat, you can see the three methods needed:
numberOfSections
numberOfRowsInSection:
headerInSection:
Define the methods in HeroDetailConfiguration.h.
- (NSInteger)numberOfSections;
- (NSInteger)numberOfRowsInSection:(NSInteger)section;
- (NSString *)headerInSection:(NSInteger)section;
Now let’s implement them in HeroDetailConfiguration.m. It should be pretty straightforward.
- (NSInteger)numberOfSections
{
    return self.sections.count;
}

- (NSInteger)numberOfRowsInSection:(NSInteger)section
{
    NSDictionary *sectionDict = [self.sections objectAtIndex:section];
    NSArray *rows = [sectionDict objectForKey:@"rows"];
    return rows.count;
}

- (NSString *)headerInSection:(NSInteger)section
{
    NSDictionary *sectionDict = [self.sections objectAtIndex:section];
    return [sectionDict objectForKey:@"header"];
}
The implementations are should be pretty much the same as what you implemented before in the HeroDetailController.
Now you need to look at what you’re doing in HeroDetailController tableView:cellForRowAtIndexPath:. The heart of the what’s needed is at the beginning of the method.
    NSUInteger sectionIndex = [indexPath section];
    NSUInteger rowIndex = [indexPath row];
    NSDictionary *section = [self.sections objectAtIndex:sectionIndex];
    NSArray *rows = [section objectForKey:@"rows"];
    NSDictionary *row = [rows objectAtIndex:rowIndex];
Essentially, you get the row dictionary for a specific index path. And that’s what you need your HeroDetailConfiguration object to do for you: give you a row dictionary for an index path. So the method you want would be something like
- (NSDictionary *)rowForIndexPath:(NSIndexPath *)indexPath;
Let’s add it to HeroDetailConfiguration.h. And let’s stub the body in HeroDetailConfiguration.m.
Before you worry about handling the issue of implementing the Powers section, just replicate the functionality you already have in place. In this case, you just add that the five lines of code from the beginning of HeroDetailController tableView:cellForRowAtIndexPath: and put it in your new method.
- (NSDictionary *)rowForIndexPath:(NSIndexPath *)indexPath
{
    NSUInteger sectionIndex = [indexPath section];
    NSUInteger rowIndex = [indexPath row];
    NSDictionary *section = [self.sections objectAtIndex:sectionIndex];
    NSArray *rows = [section objectForKey:@"rows"];
    NSDictionary *row = [rows objectAtIndex:rowIndex];
    return row;
}
Now let’s edit HeroDetailController.m to use your new HeroDetailConfiguration class. First, add the #import at the top (right below the SuperDBEditCell #import).
#import "HeroDetailConfiguration.h"
Replace the sections Property declaration with one for HeroDetailConfiguration.
@property (strong, nonatomic) NSArray *sections;
@property (strong, nonatomic) HeroDetailConfiguration *config;
Replace the sections initialization code in viewDidLoad with config initialization.
    NSURL *plistURL = [[NSBundle mainBundle] URLForResource:@"HeroDetailController" withExtension:@"plist"];
    NSDictionary *plist = [NSDictionary dictionaryWithContentsOfURL:plistURL];
    self.sections = [plist valueForKey:@"sections"];
    self.config = [[HeroDetailConfiguration alloc] init];
Replace the code in numberOfSectionsInTableView.
- (NSInteger)numberOfSectionsInTableView:(UITableView *)tableView
{
    return self.sections.count;
    return [self.config numberOfSections];
}
Replace the code in tableView:numberOfRowsInSection:.
- (NSInteger)tableView:(UITableView *)tableView numberOfRowsInSection:(NSInteger)section
{
    NSDictionary *sectionDict = [self.sections objectAtIndex:section];
    NSArray *rows = [sectionDict objectForKey:@"rows"];
    return row.count;
        return [self.config numberOfRowsInSection:section];
}
Replace the code in tableView:titleForHeaderInSection:.
- (NSString *)tableView:(UITableView *)tableView titleForHeaderInSection:(NSInteger)section
{
    NSDictionary *sectionDict = [self.sections objectAtIndex:section];
    return [sectionDict objectForKey:@"header"];
    return [self.config headerInSection:section];
}
Finally, replace the code in tableView:cellForRowAtIndexPath:.
    NSUInteger sectionIndex = [indexPath section];
    NSUInteger rowIndex = [indexPath row];
    NSDictionary *section = [self.sections objectAtIndex:sectionIndex];
    NSArray *rows = [section objectForKey:@"rows"];
    NSDictionary *row = [rows objectAtIndex:rowIndex];
    NSDictionary *row = [self.config rowForIndexPath:indexPath];
At this point, your app should behave just like it did before you started this refactoring.
Encapsulation and Information Hiding
Before you move on to handling the Power section (you’ll get there soon, promise!), let’s look at HeroDetailController tableView:cellForRowAtIndexPath: once more. Your HeroDetailConfiguration is returning a row dictionary. In turn, you are using that information throughout the remainder of the method.
    NSDictionary *row = [self.config rowForIndexPath:indexPath];
    NSString *cellClassname = [row objectForKey:@"class"];
        ...
    NSArray *values = [row valueForKey:@"values"];
        ...
    cell.key = [row objectForKey:@"key"];
    cell.value = [self.hero valueForKey:[row objectForKey:@"key"]];
    cell.label.text = [row objectForKey:@"label"];
While it’s probably fine to keep things this way, you probably want replace these calls with a method in HeroDetailConfiguration. Why? In short, because of two concepts: encapsulation and information hiding. Information hiding is the idea of hiding the implementation details. Imagine that you change how you store your configuration information. In that case, you’d have to change the way you populate your table view cell. By putting the specific access calls inside HeroDetailConfiguration, you don’t have to worry if your configuration storage mechanism changes. You can freely change the internal implementation without having to worry about your table view cell code. Encapsulation is the idea that you placed all the configuration access code into a single object, HeroDetailConfiguration, rather peppering the access code all over your view controllers.
Looking at the calls to objectForKey: on the row dictionary, you probably want methods like
- (NSString *)cellClassnameForIndexPath:(NSIndexPath *)indexPath;
- (NSArray *)valuesForIndexPath:(NSIndexPath *)indexPath;
- (NSString *)attributeKeyForIndexPath:(NSIndexPath *)indexPath;
- (NSString *)labelForIndexPath:(NSIndexPath *)indexPath;
Add them to HeroDetailConfiguration.h and then add their implementations to HeroDetailConfiguration.m.
- (NSString *)cellClassnameForIndexPath:(NSIndexPath *)indexPath
{
    NSDictionary *row = [self rowForIndexPath:indexPath];
    return [row objectForKey:@"class"];
}

- (NSArray *)valuesForIndexPath:(NSIndexPath *)indexPath
{
    NSDictionary *row = [self rowForIndexPath:indexPath];
    return [row objectForKey:@"values"];
}

- (NSString *)attributeKeyForIndexPath:(NSIndexPath *)indexPath
{
    NSDictionary *row = [self rowForIndexPath:indexPath];
    return [row objectForKey:@"key"];
}

- (NSString *)labelForIndexPath:(NSIndexPath *)indexPath
{
    NSDictionary *row = [self rowForIndexPath:indexPath];
    return [row objectForKey:@"label"];
}
Finally, replace the code in HeroDetailController tableView:cellForRowAtIndexPath: with the new methods.
    NSDictionary *row = [self.config rowForIndexPath:indexPath];
    NSString *cellClassname = [row objectForKey:@"class"];
    NSString *cellClassname = [self.config cellClassnameForIndexPath:indexPath];
        ...
    NSArray *values = [row valueForKey:@"values"];
    NSArray *values = [self.config valuesForIndexPath:indexPath];
        ...
    cell.key = [row objectForKey:@"key"];
    cell.value = [self.hero valueForKey:[row objectForKey:@"key"]];
    cell.label.text = [row objectForKey:@"label"];
    cell.key = [self.config attributeKeyForIndexPath:indexPath];
    cell.value = [self.hero valueForKey:[self.config attributeKeyForIndexPath:indexPath]];
    cell.label.text = [self.config labelForIndexPath:indexPath];
If you wanted to, you could keep refactoring your code, but this is a good point to move on.
Okay, now you’re ready to tackle the whole point of this refactoring. It’s time to set up the property list to handle the data-driven Powers section. We detailed two possible approaches earlier. You’re going to take the approach that has you add a dynamic Boolean item and keeps the row item as an array. For items where dynamic is YES, the row item array will have only one element. If there are more, you’re going to ignore them.
Open HeroDetailConfiguration.plist, and navigate to Root ![]() sections
sections ![]() Item 2. If the disclosure triangle is closed, open it. Select the item named header, and add an two items after it. Name the first item dynamic, set its type to Boolean, and give it a value of YES. Name the second item rows, and set its type to Array. Add a dictionary to the rows Array and give the dictionary three items. Give the three Dictionary items the names of key, class, and label. Leave the type of all three items as String. Set the key value to powers; class to SuperDBCell. Leave the label value blank.
Item 2. If the disclosure triangle is closed, open it. Select the item named header, and add an two items after it. Name the first item dynamic, set its type to Boolean, and give it a value of YES. Name the second item rows, and set its type to Array. Add a dictionary to the rows Array and give the dictionary three items. Give the three Dictionary items the names of key, class, and label. Leave the type of all three items as String. Set the key value to powers; class to SuperDBCell. Leave the label value blank.
Your property list editor should look something like Figure 7-13.
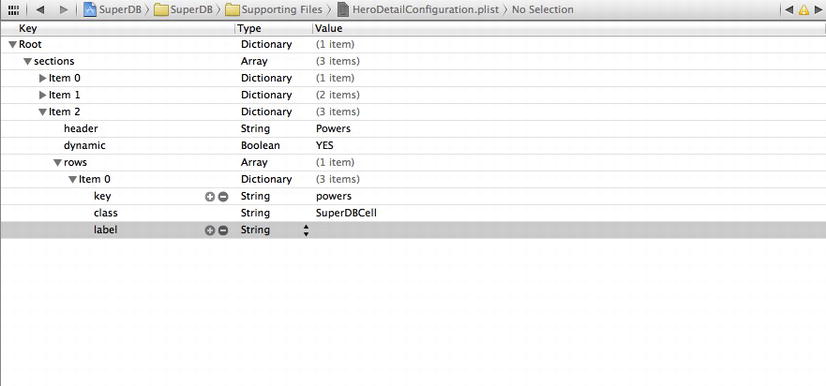
Figure 7-13. The Power section property list configuration
Now you need the HeroDetailConfiguration to use this new dynamic item.
First, you need to define a method to check if the section you are looking at is dynamic or not. Let’s add that method declaration to HeroDetailConfiguration.h.
- (BOOL)isDynamicSection:(NSInteger)section;
Let’s add the implementation to HeroDetailConfiguration.m.
- (BOOL)isDynamicSection:(NSInteger)section
{
    BOOL dynamic = NO;

    NSDictionary *sectionDict = [self.sections objectAtIndex:section];
    NSNumber *dynamicNumber = [sectionDict objectForKey:@"dynamic"];
    if (dynamicNumber != nil)
        dynamic = [dynamicNumber boolValue];

    return dynamic;
}
By default, you’ll assume that a section is not dynamic if there’s no dynamic entry in the configuration property list section.
Now, you need to update the rowForIndexPath: method to handle dynamic sections. You just need to change one line.
    NSUInteger rowIndex = [indexPath row];
    NSUInteger rowIndex = ([self isDynamicSection:sectionIndex]) ? 0 : [indexPath row];
While you’re here, add the following method declaration to HeroDetailConfiguration.h:
- (NSString *)dynamicAttributeKeyForSection:(NSInteger)section;
(You’re cheating a little here because you know that this method will make your life easier in a little bit.) The implementation in HeroDetailConfiguration.m will look like this:
- (NSString *)dynamicAttributeKeyForSection:(NSInteger)section
{
    if (![self isDynamicSection:section])
        return nil;

    NSIndexPath *indexPath = [NSIndexPath indexPathForRow:0 inSection:section];
    return [self attributeKeyForIndexPath:indexPath];
}
If the section is not dynamic, you’ll return nil. Otherwise, you create an index path and use the existing functionality.
Now you can move on to updating the HeroDetailController to use this new configuration setup. In HeroDetailController.m, edit tableView:numberOfRowsInSection: like so:
- (NSInteger)tableView:(UITableView *)tableView numberOfRowsInSection:(NSInteger)section
{
    NSInteger rowCount = [self.config numberOfRowsInSection:section];
    if ([self.config isDynamicSection:section]) {
        NSString *key = [self.config dynamicAttributeKeyForSection:section];
        NSSet *attributeSet = [self.hero mutableSetValueForKey:key];
        rowCount = attributeSet.count;
    }

    return rowCount;
}
You ask the HeroDetailConfiguration to tell you the number of rows in the section. If the section is dynamic, you read the row configuration to determine what property to use from your Hero entity. That property will be a Set, so you need to convert it to an Array to get its size.
Well, you still don’t have any powers in your Hero entity. So you need a way to add new powers to your Hero. Clearly, you should do that when you’re editing the Hero’s details. If you run the app, navigate to the detail view and tap the Edit button, the Powers section is still blank. Go back to the Address Book application: when you need a new address, a cell appears with a green (+) button to add a new address (Figure 7-14). You need to mimic that behavior.
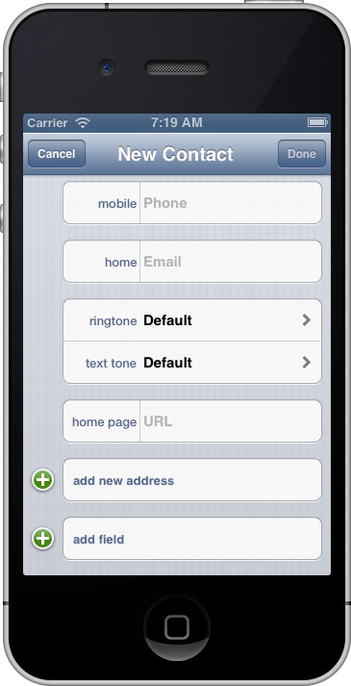
Figure 7-14. Adding a new address in the Address Book app
Open HeroDetailController.m and find the tableView:numberOfRowsInSection: method you just modified. Change this line
rowCount = attributeSet.count;
to this
rowCount = (self.editing) ? attributeSet.count+1 : attributeSet.count;
However, this is not enough. You need to have the table view refresh when you enter Edit mode. In setEditing:animated:, add this line
[self.tableView reloadData];
after the call to super.
If you run the app now and edit your Hero’s details (Figure 7-15), there are two issues. First, the new cell in the Powers section has a strange value. Second, if you watch closely while entering and exiting Edit mode, the transition no longer seems smooth. The cells seem to jump. Everything works but it isn’t a good user experience.

Figure 7-15. First step to adding new powers
Let’s take a look at fetched results controller delegate methods in the HeroListController. When the updates begin, you call the beginUpdates method on the table view. Then you insert or delete rows with insertRowsAtIndexPath:withRowAnimation: and deleteRowsAtIndexPath:withRowAnimation:. Finally, when the updates are complete, you call endUpdates on the table view. You need to do something similar with the Powers section when entering and leaving Edit mode.
In the private category at the top of HeroDetailController.m, add the new method declaration
- (void)updateDynamicSections:(BOOL)editing;
and call it from setEditing:animated:.
- (void)setEditing:(BOOL)editing animated:(BOOL)animated
{
    [self.tableView beginUpdates];
    [self updateDynamicSections:editing];
    [super setEditing:editing animated:animated];
    [self.tableView endUpdates];

    self.navigationItem.rightBarButtonItem = (editing) ? self.saveButton : self.editButtonItem;
    self.navigationItem.leftBarButtonItem = (editing) ? self.cancelButton : self.backButton;
}
Here’s the implementation:
- (void)updateDynamicSections:(BOOL)editing
{
    for (NSInteger section = 0; section < [self.config numberOfSections]; section++) {
        if ([self.config isDynamicSection:section]) {
            NSIndexPath *indexPath;
            NSInteger row = [self tableView:self.tableView numberOfRowsInSection:section];
            if (editing) {
                indexPath = [NSIndexPath indexPathForRow:row inSection:section];
                [self.tableView insertRowsAtIndexPaths:@[indexPath]                                       withRowAnimation:UITableViewRowAnimationAutomatic];
            }
            else {
                indexPath = [NSIndexPath indexPathForRow:row-1 inSection:section];
                [self.tableView deleteRowsAtIndexPaths:@[indexPath]                                       withRowAnimation:UITableViewRowAnimationAutomatic];
            }
        }
    }
}
Now the addition and removal of a cell to Powers section when entering and exiting Edit mode looks much smoother.
Way back in Chapter 4 when you first wrote the HeroDetailController, you implemented the table view delegate method of tableView:editingStyleForRowAtIndexPath:.
- (UITableViewCellEditingStyle)tableView:(UITableView *)tableView            editingStyleForRowAtIndexPath:(NSIndexPath *)indexPath
{
        return UITableViewCellEditingStyleNone;
}
If you recall, this turns off the appearance of the Delete button next to table view cell when the detail view enters Edit mode. Now you want it to show the appropriate button next to the Power section cells.
- (UITableViewCellEditingStyle)tableView:(UITableView *)tableView            editingStyleForRowAtIndexPath:(NSIndexPath *)indexPath
{
    UITableViewCellEditingStyle editStyle = UITableViewCellEditingStyleNone;
    NSInteger section = [indexPath section];
    if ([self.config isDynamicSection:section]) {
        NSInteger rowCount = [self tableView:self.tableView numberOfRowsInSection:section];
        if ([indexPath row] == rowCount-1)
            editStyle = UITableViewCellEditingStyleInsert;
        else
            editStyle = UITableViewCellEditingStyleDelete;
    }
    return editStyle;
}
For the Insert button to work, you need to implement the table view data source method tableView:commitEditingStyle:forRowAtIndexPath: method. This method already exists in HeroDetailController.m, but is commented it out. You can find it in the table view data source section of the jump bar. Uncomment it, and modify it so it looks like this:
- (void)tableView:(UITableView *)tableView         commitEditingStyle:(UITableViewCellEditingStyle)editingStyle         forRowAtIndexPath:(NSIndexPath *)indexPath
{
    NSString *key = [self.config attributeKeyForIndexPath:indexPath];
    NSMutableSet *relationshipSet = [self.hero mutableSetValueForKey:key];
    NSManagedObjectContext *managedObjectContext = [self.hero managedObjectContext];

    if (editingStyle == UITableViewCellEditingStyleDelete) {
        // Delete the row from the data source
        NSManagedObject *relationshipObject =             [[relationshipSet allObjects] objectAtIndex:[indexPath row]];
        [relationshipSet removeObject:relationshipObject];
    }
    else if (editingStyle == UITableViewCellEditingStyleInsert) {
        NSEntityDescription *entity = [self.hero entity];
        NSDictionary *relationships = [entity relationshipsByName];
        NSRelationshipDescription *destRelationship = [relationships objectForKey:key];
        NSEntityDescription *destEntity = [destRelationship destinationEntity];

        NSManagedObject *relationshipObject =             [NSEntityDescription insertNewObjectForEntityForName:[destEntity name]                                           inManagedObjectContext:managedObjectContext];
        [relationshipSet addObject:relationshipObject];
    }

    NSError *error = nil;
    if (![managedObjectContext save:&error]) {
        // need to make HeroDetailController a UIAlertViewDelegate
        UIAlertView *alert =             [[UIAlertView alloc] initWithTitle:NSLocalizedString(@"Error saving entity",                                                                  @"Error saving entity")
                        message:[NSString stringWithFormat:NSLocalizedString(@"Error was: %@, quitting.",                                                                                   @"Error was: %@, quitting."),                                                            [error localizedDescription]]
                       delegate:self
              cancelButtonTitle:NSLocalizedString(@"Aw, Nuts", @"Aw, Nuts")
              otherButtonTitles:nil];
        [alert show];
    }

    if (editingStyle == UITableViewCellEditingStyleDelete) {
        // Delete the row from the data source
        [tableView deleteRowsAtIndexPaths:@[indexPath]                          withRowAnimation:UITableViewRowAnimationFade];
    }
    else if (editingStyle == UITableViewCellEditingStyleInsert) {
        // Create a new instance of the appropriate class, insert it into the array,         // and add a new row to the table view
         [tableView insertRowsAtIndexPaths:@[indexPath]                           withRowAnimation:UITableViewRowAnimationAutomatic];
    }
}
Every time you get a new Powers cell, it displays some strange String, Relationship 'powers'... That’s because it’s displaying the results of a valueForKey: call on the Hero entity, with a key of powers. You need to update your tableView:cellForRowAtIndexPath: to handle dynamic sections. Replace
cell.value = [self.hero valueForKey:[self.config attributeKeyForIndexPath:indexPath]];
with
    if ([self.config isDynamicSection:[indexPath section]]) {
        NSString *key = [self.config attributeKeyForIndexPath:indexPath];
        NSMutableSet *relationshipSet = [self.hero mutableSetValueForKey:key];
        NSArray *relationshipArray = [relationshipSet allObjects];
        if ([indexPath row] != [relationshipArray count]) {
            NSManagedObject *relationshipObject = [relationshipArray objectAtIndex:[indexPath row]];
            cell.value = [relationshipObject valueForKey:@"name"];
            cell.accessoryType = UITableViewCellAccessoryDetailDisclosureButton;
            cell.editingAccessoryType = UITableViewCellAccessoryDetailDisclosureButton;
        }
        else {
            cell.label.text = nil;
            cell.textField.text = @"Add New Power...";
        }
    }
    else {
        cell.value = [self.hero valueForKey:[self.config attributeKeyForIndexPath:indexPath]];
    }
Notice that for a dynamic cell, you set the accessoryType and editingAccessoryType. This is the blue arrow button on the cell’s right edge. Also, you handle the case for when you add an additional cell in Edit mode.
Now you need to add a power view so that you can edit the name and source of your Hero’s new powers.
Refactoring the Detail View Controller
You have a new managed object that you want to display and edit. You could make a new table view controller class specifically to handle displaying a Power entity. It would a pretty simple class, and you could implement it very quickly. Sometimes when developing, you might do that. It’s not necessarily the most elegant solution, but it might the most expedient. And sometimes you just need to get it working.
But since this a book and you’re working through this example, it makes sense to refactor your HeroDetailController into a more generic ManagedObjectController. Later you can use this refactored controller to implement the views for the fetched properties of the Hero entity. You laid the foundation for this work when you moved the view controller configuration into a property list. Since then, you’ve tried to implement generic solutions in the HeroDetailController. Hopefully, that work paid off.
First, you’re going to rename the HeroDetailConfiguration class to ManagedObjectConfiguration. You won’t change the name of the property list because that’s still specific for displaying the Hero entity. Next, you’ll create the ManagedObjectController class. You’ll move most of the logic from the HeroDetailController to the ManagedObjectController. The only HeroDetailController will be a very thin subclass that knows the name of the configuration property list to load.
Let’s get started.
Renaming the Configuration Class
The HeroDetailConfiguration class name worked because it was used by the HeroDetailController. Now that you’re renaming the Controller class, you should rename the configuration class. Open HeroDetailConfiguration.h, and highlight the class name in the Editor. Select the Edit ![]() Refactor
Refactor ![]() Rename menu, and rename the class to ManagedObjectConfiguration (Figure 7-16). Click Preview and review the changes Xcode made. It should change the interface and implementation files, as well as the references in HeroDetailController. When you’re ready, click Save.
Rename menu, and rename the class to ManagedObjectConfiguration (Figure 7-16). Click Preview and review the changes Xcode made. It should change the interface and implementation files, as well as the references in HeroDetailController. When you’re ready, click Save.

Figure 7-16. The Rename refactoring pane
There’s a code change you need to make. In the ManagedObjectConfiguration init method, the configuration property list is loaded like this:
NSURL *plistURL = [[NSBundle mainBundle] URLForResource:@"ManagedObjectConfiguration" withExtension:@"plist"];
Remember, you’re keeping the current configuration property list name as HeroDetailController.plist. If you hardcode that name, you won’t have really done anything useful. You need to change the initializer from a simple init method to something like
- (id)initWithResource:(NSString *)resource;
Add that declaration to the ManagedObjectController.h file, inside the @interface. Then you can change the init method to
- (id)init
- (id)initWithResource:(NSString *)resource
{
    self = [super init];
    if (self) {
        // Initialization Code
        NSURL *plistURL = [[NSBundle mainBundle] URLForResource:@"ManagedObjectConfiguration"
                                                   withExtension:@"plist"];
        NSURL *plistURL = [[NSBundle mainBundle] URLForResource:resource withExtension:@"plist"];
        NSDictionary *plist = [NSDictionary dictionaryWithContentsOfURL:plistURL];
        self.sections = [plist valueForKey:@"sections"];
    }
    return self;
}
Now you need to change this line in the HeroDetailController viewDidLoad method
self.config = [[ManagedObjectConfiguration alloc] init];
to
self.config = [[ManagedObjectConfiguration alloc] initWithResource:@"HeroDetailConfiguration"];
Note Why make this change if you’re just going to refactor HeroDetailController? Well, one of the big keys with refactoring is making small changes and checking things still work. You wouldn’t want to make a lot of changes, just to find things don’t work. Another key to successful refactoring is writing unit tests. Then you have a repeatable set of tests that will help ensure you haven’t make drastic changes you don’t expect. You’ll learn about unit tests in Chapter 15.
At this point your app should still be working, but you’ve only made a very minor change. The big one is coming up next.
Refactoring the Detail Controller
You could just create a new class named ManagedObjectContro ller and move most of the code from HeroDetailController to your new class. But this is adding a layer of complexity (moving code), that could lead to a mistake being made. It’s easier to rename the HeroDetailController, clean up the code to be more generic, and then implement a new HeroDetailController class.
Open HeroDetailController.h and rename the class to ManagedObjectController, using Edit ![]() Refactor
Refactor ![]() Rename. Review the proposed changes by Xcode. You’ll notice that Xcode is changing SuperDB.storyboard, which is just an XML file internally. You’ll just have to have faith that Xcode knows what it’s doing. Click Save. You may want to build and run the app, just to check it’s still working.
Rename. Review the proposed changes by Xcode. You’ll notice that Xcode is changing SuperDB.storyboard, which is just an XML file internally. You’ll just have to have faith that Xcode knows what it’s doing. Click Save. You may want to build and run the app, just to check it’s still working.
Refactoring the Hero Instance Variable
In your ManagedObjectEditor class, you have an instance variable called hero. That variable name is no longer representative of what that variable holds, so let’s refactor it as well. Open ManagedObjectEditor.h, and rename the hero property to managedObject. Now you must make the changes in the rest of the app.
Note Why not use the Xcode refactor option? You could have, but it’s not so good at renaming instance variables. When we tried it, it wanted to make changes to both the data model and storyboard. That’s just wrong. We could have unchecked those changes in the File Preview pane, and saved the changes. But Xcode doesn’t rename the other occurrences, so you have to do it manually anyway.
Open ManagedObjectEditor.m, and find all occurrences of
self.hero
and change them to
self.managedObject
Lastly, edit HeroListContoller.m, and change this line in prepareForSegue:sender
detailController.hero = sender;
to
detailController.managedObject = sender;
Save your work, and check the app.
While you’re working on ManagedObjectController, take this opportunity to add some discrete functionality. Specifically, when you add or remove powers, you put the code to do this in tableView:commitEditingStyle:forRowAtIndexPath:. Let’s split this code into specific methods to add and remove Relationship objects. Add the following method declarations to ManagedObjectController.h:
- (NSManagedObject *)addRelationshipObjectForSection:(NSInteger)section;
- (void)removeRelationshipObjectInIndexPath:(NSIndexPath *)indexPath;
Before you implement these methods, add a new private method. Find the private category in ManagedObjectController.m, and add this line:
- (void)saveManagedObjectContext;
Then, add the implementation:
- (void)saveManagedObjectContext
{
    NSError *error;
    if (![self.managedObject.managedObjectContext save:&error]) {
        // need to make HeroDetailController a UIAlertViewDelegate
        UIAlertView *alert =             [[UIAlertView alloc] initWithTitle:NSLocalizedString(@"Error saving entity",                                                                  @"Error saving entity")
                       message:[NSString stringWithFormat:NSLocalizedString(@"Error was: %@, quitting.",                                                                          @"Error was: %@, quitting."),                                                               [error localizedDescription]]
                       delegate:self
             cancelButtonTitle:NSLocalizedString(@"Aw, Nuts", @"Aw, Nuts")
             otherButtonTitles:nil];
        [alert show];
    }
}
Does this look familiar? It should; it’s essentially the code in the save method. So update the following lines in the save method from
    NSError *error;
    if (![self.managedObject.managedObjectContext save:&error])
        NSLog(@"Error saving: %@", [error localizedDescription]);
into
[self saveManagedObjectContext];
Now you can add the new method implementations (we added them just for the @end in ManagedObjectController.m).
#pragma mark - Instance Methods

- (NSManagedObject *)addRelationshipObjectForSection:(NSInteger)section
{
    NSString *key = [self.config dynamicAttributeKeyForSection:section];
    NSMutableSet *relationshipSet = [self.managedObject mutableSetValueForKey:key];

    NSEntityDescription *entity = [self.managedObject entity];
    NSDictionary *relationships = [entity relationshipsByName];
    NSRelationshipDescription *destRelationship = [relationships objectForKey:key];
    NSEntityDescription *destEntity = [destRelationship destinationEntity];

    NSManagedObject *relationshipObject =         [NSEntityDescription insertNewObjectForEntityForName:[destEntity name]                                        inManagedObjectContext:self.managedObject.managedObjectContext];
    [relationshipSet addObject:relationshipObject];
    [self saveManagedObjectContext];
    return relationshipObject;
}

- (void)removeRelationshipObjectInIndexPath:(NSIndexPath *)indexPath
{
    NSString *key = [self.config dynamicAttributeKeyForSection:[indexPath section]];
    NSMutableSet *relationshipSet = [self.managedObject mutableSetValueForKey:key];
    NSManagedObject *relationshipObject =         [[relationshipSet allObjects] objectAtIndex:[indexPath row]];
    [relationshipSet removeObject:relationshipObject];
    [self saveManagedObjectContext];
}
Finally, change tableView:commitEditingStyle:forRowAtIndexPath:.
- (void)tableView:(UITableView *)tableView         commitEditingStyle:(UITableViewCellEditingStyle)editingStyle         forRowAtIndexPath:(NSIndexPath *)indexPath
{
    if (editingStyle == UITableViewCellEditingStyleDelete) {
        // Delete the row from the data source
        [tableView deleteRowsAtIndexPaths:@[indexPath] withRowAnimation:UITableViewRowAnimationFade];
    }
    else if (editingStyle == UITableViewCellEditingStyleInsert) {
        // Create a new instance of the appropriate class, insert it into the array,         // and add a new row to the table view
        [tableView insertRowsAtIndexPaths:@[indexPath]                          withRowAnimation:UITableViewRowAnimationAutomatic];
    }
}
You’re not adding or removing the Relationship object anymore. All you’re doing is adding or removing table view cells. You’ll see why soon.
Now you want to create a new HeroDetailController to replace the one you renamed to the ManagedObjectController. Create a new Objective-C class, name it HeroDetailController, and make it a subclass of ManagedObjectController. Before you modify the HeroDetailController, you need to make some changes to the ManagedObjectController. You need to move the property that holds the configuration information from the private category to the @interface declaration. Edit ManagedObjectController.h, and declare the configuration property (you also need to declare the ManagedObjectConfiguration).
#import <UIKit/UIKit.h>

@class ManagedObjectConfiguration;

@interface ManagedObjectController : UITableViewController

@property (strong, nonatomic) ManagedObjectConfiguration *config;
@property (strong, nonatomic) NSManagedObject *managedObject;

- (NSManagedObject *)addRelationshipObjectForSection:(NSInteger)section;
- (void)removeRelationshipObjectInIndexPath:(NSIndexPath *)indexPath;

@end
Since you moved the configuration, you need to delete the declaration in ManagedObjectController.m.
@interface ManagedObjectController ()
@property (strong, nonatomic) ManagedObjectConfiguration *config;
@property (nonatomic, strong) UIBarButtonItem *saveButton;
You also need to delete the assignment in viewDidLoad.
- (void)viewDidLoad
{
    [super viewDidLoad];
        ...
    self.config = [[ManagedObjectConfiguration alloc] initWithResource:@"HeroDetailConfiguration"];
}
Now you can update HeroDetailController. All you need to do is load your configuration property list. Your HeroDetailController.m should look like this:
#import "HeroDetailController.h"
#import "ManagedObjectConfiguration.h"

@implementation HeroDetailController

- (void)viewDidLoad
{
    [super viewDidLoad];
    // Do any additional setup after loading the view.
    self.config = [[ManagedObjectConfiguration alloc] initWithResource:@"HeroDetailConfiguration"];
}

@end
Now you need to tell your storyboard to use this HeroDetailController. Open SuperDB.storyboard, and select the ManagedObjectController scene. Set the zoom level so that you see the View Controller icon in the scene’s label. Select the View Controller icon and open the identity inspector. Change the class from ManagedObjectController to HeroDetailController.
Note How did this change? It happened when you used the rename refactoring. When Xcode showed you the change in SuperDB.storyboard, this was the change it was making.
And that should do it. You’re ready to create a power view.
You’ll start by creating the new power view controller in SuperDB.storyboard. Open SuperDB.storyboard and add a new table view controller to the right of the hero detail controller. If you zoom out in the storyboard editor, your storyboard should look like Figure 7-17.

Figure 7-17. Adding a table view controller to SuperDB.storyboard
Zoom in so the icons are visible in the table view controller label. Select the table view controller and in the identity inspector, change the class to PowerViewController. Next select the table view in the scene and in the attribute inspector, change the style from Single to Grouped.
The last thing you need to do is define the segue between the HeroDetailController to your new PowerViewController. Control-drag from the HeroDetailController icon (in the label bar) to the PowerViewController scene. When the Manual Segue pop-up appears, select Push. Select the segue, and give it the name PowerViewSeguein the attribute inspector.
Now you need to create the PowerViewController class and configuration. Create a new Objective-C class, named PowerViewController, subclass of ManagedObjectController. Edit PowerViewController.m.
#import "PowerViewController.h"
#import "ManagedObjectConfiguration.h"

@implementation PowerViewController

- (void)viewDidLoad
{
    [super viewDidLoad];
    // Do any additional setup after loading the view.
    self.config = [[ManagedObjectConfiguration alloc] initWithResource:@"PowerViewConfiguration"];
}

@end
Essentially, this is the same as the HeroDetailController.m. Instead of loading the HeroDetailConfiguration property list, you load the PowerViewConfiguration property list. Let’s create this property list. Create a new property list file and name it PowerViewConfiguration.plist. You need a configuration property list with two sections. Each section has no header label and one row each. In the end, your property list should look like Figure 7-18.

Figure 7-18. Power view configuration
Navigating to the PowerViewController
Your PowerViewController is defined and configured. You’ve defined the segue to transition from the HeroDetailController to PowerViewController. Now you need to execute the PowerViewSegue when the user adds a new power or selects a power in Edit mode. Open HeroDetailController.m, and add the following table view data source method:
#pragma mark - Table view data source

- (void)tableView:(UITableView *)tableView         commitEditingStyle:(UITableViewCellEditingStyle)editingStyle         forRowAtIndexPath:(NSIndexPath *)indexPath
{
    if (editingStyle == UITableViewCellEditingStyleDelete)
        [self removeRelationshipObjectInIndexPath:indexPath];
    else if (editingStyle == UITableViewCellEditingStyleInsert) {
        NSManagedObject *newObject = [self addRelationshipObjectForSection:[indexPath section]];
        [self performSegueWithIdentifier:@"PowerViewSegue" sender:newObject];
    }

    [super tableView:tableView commitEditingStyle:editingStyle forRowAtIndexPath:indexPath];
}
Since you added this method, you added the logic to remove a power as well. Remember when you changed this method in ManagedObjectController? You only added and removed the table view cells. We said you were going to handle adding and removing powers to the Hero entity later. Well, here it is. Pretty simple, right? Finally, you call the super method (which is in the ManagedObjectController).
One last thing you need to do is handle when you want to view an existing power. Below the HeroDetailController tableView:commitEditingStyle:forRowAtIndexPath:, add this table view delegate method:
#pragma mark - Table view delegate

- (void)tableView:(UITableView *)tableView         accessoryButtonTappedForRowWithIndexPath:(NSIndexPath *)indexPath
{
    NSString *key = [self.config attributeKeyForIndexPath:indexPath];
    NSMutableSet *relationshipSet = [self.managedObject mutableSetValueForKey:key];
    NSManagedObject *relationshipObject =         [[relationshipSet allObjects] objectAtIndex:[indexPath row]];
    [self performSegueWithIdentifier:@"PowerViewSegue" sender:relationshipObject];
}
When the user taps the blue disclosure button in the Power cell, it will push the PowerViewController onto the NavigationController stack. In order to pass the power managed object to the PowerViewController, you need to implement the prepareForSegue:sender: method in HeroDetailController.m.
- (void)prepareForSegue:(UIStoryboardSegue *)segue sender:(id)sender
{
    if ([segue.identifier isEqualToString:@"PowerViewSegue"])
{
        if ([sender isKindOfClass:[NSManagedObject class]]) {
            ManagedObjectController *detailController = segue.destinationViewController;
            detailController.managedObject = sender;
    }
    else {
        UIAlertView *alert = [[UIAlertView alloc] initWithTitle:NSLocalizedString(@"Power Error",
                                                                                  @"Power Error")
                                     message:NSLocalizedString(@"Error trying to show Power detail",
                                                               @"Error trying to show Power detail")
                                    delegate:self
                          cancelButtonTitle:NSLocalizedString(@"Aw, Nuts", @"Aw, Nuts")
                          otherButtonTitles:nil];
        [alert show];
    }
}
That’s it. The Power section and view are all set. Now let’s look into displaying fetched properties.
Look back at Figure 7-1. Below the Powers section is another section titled Reports that shows four cells. Each cell holds a fetched property and accessory disclosure button. Tapping on the disclosure button will show the results of the fetched property (Figure 7-3). Let’s get this working.
Looking at Figure 7-3, you can see that it’s a simple table view that displays the hero’s name and secret identity. You need to create a new table view controller for the report display. Create a new Objective-C class named HeroReportController; make it a subclass of UITableViewController. Select HeroReportController.h, and add new property to hold the list of heroes you wish to display.
@property (strong, nonatomic) NSArray *heroes;
Switch over to HeroReportController.m. You need to import your Hero header at the top of the file.
#import "Hero.h"
Next, adjust the table view data source methods.
- (NSInteger)numberOfSectionsInTableView:(UITableView *)tableView
{
    // Return the number of sections.
    return 1;
}

- (NSInteger)tableView:(UITableView *)tableView numberOfRowsInSection:(NSInteger)section
{
    // Return the number of rows in the section.
    return self.heroes.count;
}

- (UITableViewCell *)tableView:(UITableView *)tableView          cellForRowAtIndexPath:(NSIndexPath *)indexPath
{
    static NSString *CellIdentifier = @"HeroReportCell";
    UITableViewCell *cell = [tableView dequeueReusableCellWithIdentifier:CellIdentifier                                                             forIndexPath:indexPath];

    // Configure the cell...
    Hero *hero = [self.heroes objectAtIndex:[indexPath row]];
    cell.textLabel.text = hero.name;
    cell.detailTextLabel.text = hero.secretIdentity;

    return cell;
}
Let’s lay out your HeroReportController in your storyboard. Open SuperDB.storyboard. Select a table view controller from the Object Library in the Utility pane, and drop it below the PowerViewController. Select this new table view controller and open the identity inspector. Change the class to HeroReportController. Next, select the table view in the new table view controller, and open the attribute inspector. Change the Selection field from Single Selection to No Selection. Finally, select the table view cell. In the attribute inspector, change the Style to Subtitle; enter HeroReportCell for the Identifier; and change the Selection field to None.
Now control-drag from the HeroDetailController view controller to the new table view controller. When the Manual Segue pop-up appears, select Push. Select the new segue, and in the attribute inspector, name it ReportViewSegue.
Next, you need to edit HeroDetailConfiguration property list to add the Reports section. Navigate to Root ![]() sections
sections ![]() Item 2. Make sure the Item 2 disclosure triangle is closed. Select the Item 2 row, and add an new item. Item 3 should appear. Change Item 3 from String to Dictionary. Open the Item 3 disclosure triangle and add two sub items. Name the first one header, and give it a value of Reports. Name the second rows and make it an Array. You’re going to add four items to the rows Array, each one representing the report you wish to view. By the time you’re done, it should look like Figure 7-19.
Item 2. Make sure the Item 2 disclosure triangle is closed. Select the Item 2 row, and add an new item. Item 3 should appear. Change Item 3 from String to Dictionary. Open the Item 3 disclosure triangle and add two sub items. Name the first one header, and give it a value of Reports. Name the second rows and make it an Array. You’re going to add four items to the rows Array, each one representing the report you wish to view. By the time you’re done, it should look like Figure 7-19.
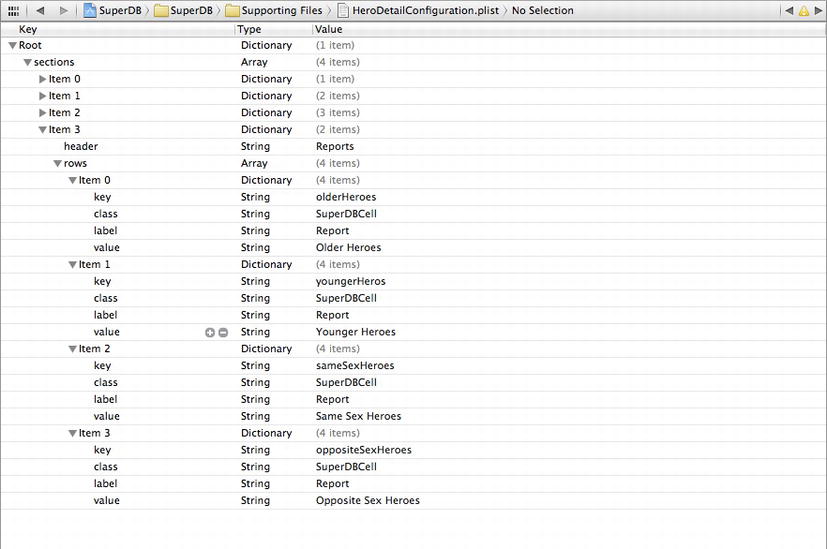
Figure 7-19. Adding the reports configuration
Notice that you’ve added a new item for these row items: value. You’re going to use this to use a static value for your report section cells. Open ManagedObjectController.m, and navigate to tableView:cellForRowAtIndexPath:. Replace the non-dynamic table view cell configuration code.
    else {
        cell.value =
             [self.managedObject valueForKey:[self.config attributeKeyForIndexPath:indexPath]];
        NSString *value = [[self.config rowForIndexPath:indexPath] objectForKey:@"value"];
        if (value != nil) {
            cell.value = value;
            cell.accessoryType = UITableViewCellAccessoryDetailDisclosureButton;
            cell.editingAccessoryType = UITableViewCellAccessoryDetailDisclosureButton;
        }
        else
            cell.value =
                 [self.managedObject valueForKey:[self.config attributeKeyForIndexPath:indexPath]];
    }
You’ve added the disclosure button for the Report section cells as well, so you need to handle that in the HeroDetailController. Edit HeroDetailController.m, and modify tableView:accessoryButtonTappedForRowWithIndexPath:.
- (void)tableView:(UITableView *)tableView accessoryButtonTappedForRowWithIndexPath:(NSIndexPath *)indexPath
{
    NSString *key = [self.config attributeKeyForIndexPath:indexPath];
    NSEntityDescription *entity = [self.managedObject entity];
    NSDictionary *properties = [entity propertiesByName];
    NSPropertyDescription *property = [properties objectForKey:key];

    if ([property isKindOfClass:[NSAttributeDescription class]]) {
        NSMutableSet *relationshipSet = [self.managedObject mutableSetValueForKey:key];
        NSManagedObject *relationshipObject =             [[relationshipSet allObjects] objectAtIndex:[indexPath row]];
        [self performSegueWithIdentifier:@"PowerViewSegue" sender:relationshipObject];
    }
    else if ([property isKindOfClass:[NSFetchedPropertyDescription class]]) {
        NSArray *fetchedProperties = [self.managedObject valueForKey:key];
        [self performSegueWithIdentifier:@"ReportViewSegue" sender:fetchedProperties];
    }
}
Now you need to check if you’ve tapped a relationship cell (the Powers section) or a fetched property cell (the Reports section). You’re calling the segue, ReportViewSegue, when tapping on a fetched property cell. You haven’t defined that segue yet, but you will in a just a second. Before you do that, let’s update prepareForSegue:sender: to handle the ReportViewSegue. After the PowerViewSegue check, add this
    else if ([segue.identifier isEqualToString:@"ReportViewSegue"]) {
        if ([sender isKindOfClass:[NSArray class]]) {
            HeroReportController *reportController = segue.destinationViewController;
            reportController.heroes = sender;
        }
        else {
            UIAlertView *alert = [[UIAlertView alloc] initWithTitle:NSLocalizedString(@"Power Error",
                                                                                     @"Power Error")
                                    message:NSLocalizedString (@"Error trying to show Power detail",
                                                               @"Error trying to show Power detail")
                                   delegate:self
                          cancelButtonTitle:NSLocalizedString(@"Aw, Nuts", @"Aw, Nuts")
                          otherButtonTitles:nil];
            [alert show];
        }
    }
Finally, since you’re using the HeroReportController, you need to import its header file at the top of HeroDetailController.m.
#import "HeroReportController.h"
Build and run SuperDB. Add a few different heroes with different birthdays and of different sex. Drill down the report and see the results when looking for older, younger, same sex, and opposite sex heroes. Create a new hero, but don’t set the sex. See what happens. The sexless hero will appear on the opposite sex report, but not on the same sex report. We’ll leave it you to reason out why, and how you might fix this ;-).
This chapter and the previous chapters have given you a solid foundation in the use of Core Data. Along the way, we provided some information about how to design complex iPhone applications so that they can be maintained and expanded without writing unnecessary code or repeating the same logic in multiple places. We demonstrated just how much benefit you can get from taking the time to write code generically. We showed you how to look for opportunities to refactor your code to make it smaller, more efficient, easier to maintain, and just generally more pleasant to be around.
We could go on for several more chapters about Core Data and not exhaust the topic. But Core Data is not the only new framework introduced since iOS SDK 3. At this point, you should have a solid enough understanding of Core Data to be able to, armed with Apple’s documentation, take your explorations even further.
Now it’s time to leave our friend Core Data behind and explore some of the other aspects of iOS SDK.