In Chapter 3, we built our application's main table view controller. We set it up to display heroes ordered by their name or their secret identity, and we put in place the infrastructure needed to save, delete, and add new heroes. What we didn't do was give the user a way to edit the information about a particular hero, which means we're limited to creating and deleting superheroes named Untitled Hero. I guess we can't ship our application yet, huh?
That's okay. Application development is an iterative process, and the first several iterations of any application likely won't have enough functionality to stand on its own. In this chapter, we're going to create an editable detail view to let the user edit the data for a specific superhero.
The controller we're going to write will be a subclass of UITableViewController, and we're going to use an approach that is somewhat conceptually complex, but that will be easy to maintain and expand. This is important, because we're going to be adding new attributes to the Hero managed object, as well as expanding it in other ways and we'll need to keep changing the user interface to accommodate those changes.
Instead of hard-coding the table's structure in our code, we're going to use NSArray instances to represent the structure of our tables. By changing the contents of those arrays, we will be able to change the number, order, and content of the sections and rows in our table, meaning that the code we write in our table view data source and delegate methods will not have to change when we make changes to our table's structure. This will make our application easier to expand in future chapters.
After we've written our detail view controller, we will then write additional controller classes, each of which will be designed to let the user edit a single type of data. This will give us the abilty to use the same class for multiple attributes, yet the flexibility to handle special cases when the need arises.
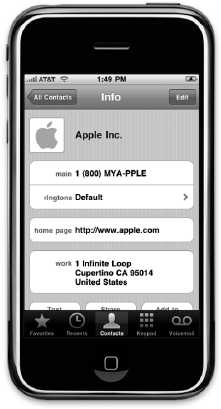
In Chapters 3 and 4 of Beginning iPhone 3 Development (Apress, 2009), we showed how to build a user interface using Interface Builder. Building your editable detail views in Interface Builder is definitely one way to go. But another common approach is to implement your detail view as a grouped table. Take a look at your iPhone's Contacts application or the Contacts tab of the Phone application (Figure 4-1). The detail editing view in Apple's navigation applications are often implemented using a grouped table rather than using an interface designed in Interface Builder.
The Human Interface Guidelines do not give any real guidance as to when you should use a table-based detail view as opposed to a detail view designed in Interface Builder, so it comes down to a question of which feels right. Here's our take: If you're building a navigation-based application, and the data can reasonably and efficiently be presented in a grouped table, it probably should be. Since our superhero data is structured much like the data displayed in the Contacts application, a table-based detail view seems the obvious choice.
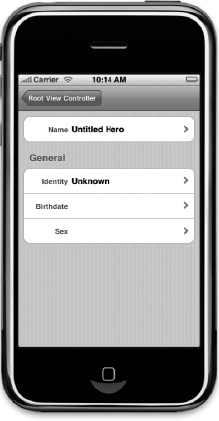
Figure 4-2 shows what this chapter's detail view will look like by the end of this chapter.
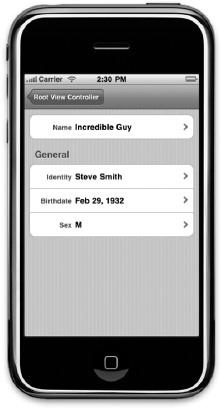
Figure 4.2. The detail editing view that we'll be building in this application is modeled very closely on Apple's approach in the Phone application
The table view shown in Figure 4-2 displays data from a single hero, which means that everything in that table comes from a single managed object. Each row corresponds to a different attribute of the managed object. The first section's only row displays the hero's name, for example. The disclosure indicator on that row tells the user that tapping that row will take them to a new view where they can change this hero's name.
The organization of the sections and the order in which attributes are displayed are not determined by the managed object. Instead, they are the results of design decisions we, as the developers, have to make by trying to anticipate what will make sense to our users. We could, for example, put the attributes in alphabetical order, which would put birthdate first. That wouldn't have been very intuitive because birthdate is not the most important or defining attribute of a hero. In our minds, the hero's name and secret identity are the most important attributes and are the first two elements presented in our table view.
The table view architecture was designed to efficiently present data stored in collections. For example, you might use a table view to display data in an NSAarray or in a fetched results controller. When you're creating a detail editing view, however, you're typically presenting data from a single object, in this case an instance of NSManagedObject that represents a single superhero. A managed object uses key-value coding but has no mechanism to present its attributes in a meaningful order. For example, NSManagedObject has no idea that the name attribute is the most important one or that it should be in its own section the way it is in Figure 4-2.
Coming up with a good, maintainable way to specify the sections and rows in a detail editing view is a non-trivial task. The most obvious solution, and one you'll frequently see in online sample code, uses an enum to list the table sections, followed by additional enums for each section, containing constants and a count of rows for each section, like so:
enum HeroEditControllerSections {
    HeroEditControllerSectionName = 0,
    HeroEditControllerSectionGeneral,
    HeroEditControllerSectionCount
};

enum HeroEditControllerNameSection {
    HeroEditControllerNameRow = 0,
    HeroEditControllerNameSectionCount
};

enum HeroEditControllerGeneralSection {
    HeroEditControllerGeneralSectionSecretIdentityRow,
    HeroEditControllerGeneralSectionBirthdateRow,
    HeroEditControllerGeneralSectionSexRow,
    HeroEditControllerGeneralSectionCount
};
Then, in every method where you are provided with an index path, you can take the appropriate action based on the row and section represented by the index path, using switch statements, like this:
- (void)tableView:(UITableView *)tableView
didSelectRowAtIndexPath:(NSIndexPath *)indexPath {
    NSUInteger section = [indexPath section];
    NSUInteger row = [indexPath row];

    switch (section) {
        case HeroEditControllerSectionName:
            switch (row)
            {
                case HeroEditControllerNameRow :
                    // Create a controller to edit name
                    // and push it on the stack
                    ...
                    break;
                default:
                break;
            }
            break;
        case HeroEditControllerSectionGeneral:
            switch (row) {
                case HeroEditControllerGeneralSectionSecretIdentityRow:
                    // Create a controller to edit secret identity
                    // and push it on the stack
                    ...
break;
case HeroEditControllerGeneralSectionBirthdateRow:
// Create a controller to edit birthdate and
// push it on the stack
...
break;
case HeroEditControllerGeneralSectionSexRow:
// Create a controller to edit sex and push it
// on the stack
...
break;
default:
break;
}
break;
default:
break;
}
}The problem with this approach is that it doesn't scale very well at all. A nested set of switch statements like this will need to appear in almost every table view delegate or datasource method that takes an index path, which means that adding or deleting rows or sections involves updating your code in multiple places.
Additionally, the code under each of the case statements is going to be relatively similar. In this particular case, we will have to create a new instance of a controller or use a pointer to an existing controller, set some properties to indicate which values need to get edited, then push the controller onto the navigation stack. If we discover a problem in our logic anywhere in these switch statements, chances are we're going to have to change that logic in several places, possibly even dozens.
As you can see here, the most obvious solution isn't always the best one. We don't want to have very similar chunks of code scattered throughout our controller class, and we don't want to have to maintain multiple copies of a complex decision tree. There's a better way to do this.
We can use arrays to mirror the structure of our table. As the user descends into our table, we can use the data stored in an array to construct the appropriate table. The key to this approach is a combination of paired arrays and nested arrays.
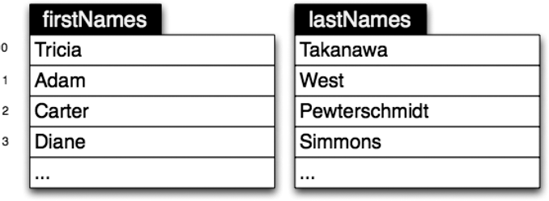
As the name implies, paired arrays are a pair of arrays whose contents are kept in sync. Paired arrays always have the same number of rows, and the object at a given index in one of the arrays corresponds to the object at the same index in the other paired array. Let's look at a simple example. Figure 4-3 represents a list of peoples' first and last names using paired arrays.
If you look at Figure 4-3 and look at the first row (index zero), you'll notice that the firstNames array has a value of Tricia and the lastNames array has a value of Takanawa. That means that index zero in this array pair represents Tricia Takanawa. Pretty easy, right? It's not a difficult concept, but it can be a powerful one, as you'll see in a few minutes.
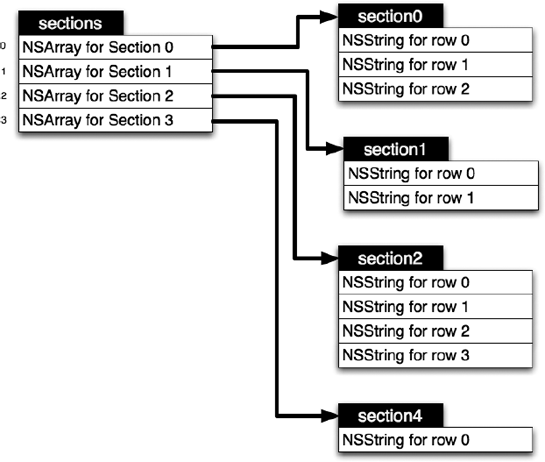
Nested arrays are nearly as simple as paired arrays. A nested array is nothing more than an array—in our case, it will be an instance of NSArray—that contains other arrays. A nested array can be used to represent the sections and rows in a table view. You can see a visual representation of this in Figure 4-4. The main array, or outer array, contains a series of subarrays, each of which represents a section in our table. Each subarray is another instance of NSArray and contains a series of NSString instances, each of which represents a single row in its section.
We can take these two concepts and combine them. Paired nested arrays are simply nested arrays with the same number of subarrays and where the same index in each subarray corresponds to different information about the same item. Read on to see how we do this.
Let's use these concepts to represent the structure of our detail view table. The first thing we need is a simple NSArray instance that defines the sections in our table. Each object in this array, which we'll call sectionNames, will be an instance of NSString that represents the section's name, which will be displayed above the section in the table. For sections with no name, we'll use an instance of the class NSNull instead of an NSString to indicate that a section exists, but doesn't have a title.
Note
Collection classes like NSArray and NSDictionary cannot contain nil values. NSNull was created specifically as a placeholder for nil. It is an object that can go into collections, but it doesn't really do anything other than take up space. NSNull is implemented as a singleton, which means that there's ever only a single instance of NSNull, but it can be used in as many places as you need.
Next, we need a nested array to hold the name of the attribute that will be displayed in a particular row. We'll call this array rowKeys. Now, we could derive the label to be displayed on each row from the row key. So, for example, if the row key was name, we could capitalize it to create a label of Name. We're not going to do that, however. To give ourselves more flexibility and the ability to localize our application into other languages, we'll create a second nested array called rowLabels that will hold the label to be displayed on each row next to the attribute value (the words to the left of each field in Figure 4-2).
Finally, we need one last nested array that will contain the name of the controller class that will be used to edit this row's attribute. We'll use Objective-C's dynamic nature to let us create instances at runtime based on the name of a class.
That should be all the data structures we need to represent the table's structure for now. Fortunately, if we discover that we need additional information for each row, we can always add an additional nested array later without impacting our existing design.
In order to make our life easier when it comes time to retrieve data from our nested arrays, let's write a category on NSArray that will add two new methods specifically designed for those situations. The first of these methods will take an NSIndexPath and return the corresponding object from the nested subarray. This will allow us, in one line, to retrieve the object we need from any nested array.
In the table view datasource method tableView:cellForRowAtIndexPath:, we'll use this method to turn an NSIndexPath into its corresponding row key and row label. We'll also write a method that returns the count of a specific subarray, which we will later use in tableView:numberOfRowsInSection: to return the correct number of rows for a particular section.
Find your SuperDB project folder from Chapter 3 and make a copy of it. That way, if things go south when we add our new code for this chapter, you won't have to start at the very beginning. Open this new copy of your project in Xcode.
Single-click your project's root node (the top row in the Groups & Files pane) and select New Group from the Project menu. This will create a new folder in your Groups & Files pane. Rename this new group Categories.
Single-click the new Categories folder and select New File... from the File menu. Select Cocoa Touch Class from under the iPhone OS heading in the left pane, then select the Objective-C Class icon from the upper-right and make sure that the Subclass of pop-up menu reads NSObject. If you don't see these options, look instead for an icon called NSObject subclass. We're not actually going to create a subclass of NSObject, we're going to create a category. Xcode currently has no template for creating a category. We could choose to create two empty files, but since this template will give us both header and implementation files that are already correctly named, we'll choose it and then just delete the code that the template gives us.
Name the new "class" NSArray-NestedArrays.m and make sure that Also create "NSArray-NestedArrays.h" is checked.
Once the files are created, single-click NSArray-NestedArrays.h and replace any existing content with the following category header:
#import <Foundation/Foundation.h>

@interface NSArray(NestedArrays)
/**
 This method will return an object contained with an array
 contained within this array. It is intended to allow
 single-step retrieval of objects in the nested array
 using an index path
 */
- (id)nestedObjectAtIndexPath:(NSIndexPath *)indexPath;

/**
 This method will return the count from a subarray.
 */
- (NSInteger)countOfNestedArray:(NSUInteger)section;
@end
Tip
Did you notice the format of the comments above each of the methods? This is called javadoc notation. There are several tools you can use to automatically create API documentation from your Objective-C code based on class structure and the comments you place in your code using this format, or alternatively, a format called headerdoc notation. Apple maintains an open source program called HeaderDoc that will create the documentation for you; there's a third-party tool called Doxygen that can also create API documentation for most popular programming languages, including Objective-C.
Headerdoc can be found here: http://developer.apple.com/opensource/tools/headerdoc.html
Doxygen is located here: http://www.doxygen.org/
Now, single-click on NSArray-NestedArrays.m and replace the contents with the following code:
#import "NSArray-NestedArrays.h"

@implementation NSArray(NestedArrays)

- (id)nestedObjectAtIndexPath:(NSIndexPath *)indexPath {
        NSUInteger row = [indexPath row];
        NSUInteger section = [indexPath section];
        NSArray *subArray = [self objectAtIndex:section];

        if (![subArray isKindOfClass:[NSArray class]])
                return nil;

        if (row >= [subArray count])
                return nil;

        return [subArray objectAtIndex:row];
}

- (NSInteger)countOfNestedArray:(NSUInteger)section {
        NSArray *subArray = [self objectAtIndex:section];
        return [subArray count];
}

@end
Now, thanks to the chewy goodness of categories, NSArray now has two new methods, nestedObjectAtIndexPath: and countOfNestedArray:.
One issue with our table-based approach is that we have attributes of different types to display to the user. Although string attributes can just be displayed as is, most other attributes will have to be converted to a string to be displayed in a table.
There are several approaches we can take to format our attributes. We could create a subclass of NSFormatter for each attribute. NSFormatter is a class specifically designed for converting data for display. However, NSFormatter is overkill for our situation. We can find something simpler.
Another approach is to use the description method, which is declared in NSObject. This is the method that gets sent to an object when you use a format string and the %@ token, like this:
NSLog(@"My object value: %@", theObject);
In this line of code, which is likely similar to code you've written before, NSLog() sends theObject a description message and replaces the %@ token in the string with the string returned by description.
This method is a good starting point, and it would work for most attribute types. NSNumber, for example, returns the number it represents as a string and NSString simply returns itself. NSDate, however, returns the date it represents like this:
2009-09-02 20:28:19 −0400
There are two problems with this display. First, it's not all that user-friendly. Most people aren't used to seeing dates displayed like this. The second problem is that this format is too long to fit in the space available using the default table view font.
Instead, we're going to send the attribute objects a custom message called heroValueDisplay. We'll create categories on each of the classes that are used to represent attributes and add a category method that, as needed, formats that attribute's data as a string, formatted exactly the way we want it to be.
Single-click the Categories folder in the Groups & Files pane and select New File... from the File menu again.
Select Cocoa Touch Class from under the iPhone OS heading in the left pane, then select the Objective-C Class icon from the upper-right and make sure that the Subclass of pop-up menu reads NSObject. As with last time, if you don't see these options, look instead for an icon called NSObject subclass and select that. When prompted for a name, type HeroValueDisplay.m and make sure that Also create "HeroValueDisplay.h" is checked.
We're going to put multiple categories into a single file. This is perfectly okay. Although the majority of the time, each class and category is placed into its own header and implementation file pair, there's absolutely no reason why you can't put multiple categories or classes in the same file pair if it make sense and helps organize your project. These categories are all very small and all serve the same purpose, so putting them into a single file pair seems to make sense.
In that file, we're also going to create a protocol that defines the heroValueDisplay method. This will afford us some type safety later when we send the heroValueDisplay message to objects retrieved using objectForKey:.
Single-click HeroValueDisplay.h and replace the contents of the file with the following:
#import <Foundation/Foundation.h>

@protocol HeroValueDisplay
- (NSString *)heroValueDisplay;
@end

@interface NSString (HeroValueDisplay) <HeroValueDisplay>
- (NSString *)heroValueDisplay;
@end

@interface NSDate (HeroValueDisplay) <HeroValueDisplay>
- (NSString *)heroValueDisplay;
@end

@interface NSNumber (HeroValueDisplay) <HeroValueDisplay>
- (NSString *)heroValueDisplay;
@end

@interface NSDecimalNumber (HeroValueDisplay) <HeroValueDisplay>
- (NSString *)heroValueDisplay;
@end
Notice that each of our categories conforms their class to the HeroValueDisplay protocol. Our code that sends the heroValueDisplay message won't know what type of object it's dealing with since the same exact code will handle every row, regardless of the attribute's type. By creating a protocol and conforming all of these objects to that protocol, we'll be able to send this message without getting compiler warnings, as you'll see a little later.
Single-click HeroValueDisplay.m and replace the contents with this code:
#import "HeroValueDisplay.h"

@implementation NSString (HeroValueDisplay)
- (NSString *)heroValueDisplay {
        return self;
}
@end

@implementation NSDate (HeroValueDisplay)

- (NSString *)heroValueDisplay {
        NSDateFormatter *formatter = [[NSDateFormatter alloc] init];
        [formatter setDateStyle:NSDateFormatterMediumStyle];
        NSString *ret = [formatter stringFromDate:self];
        [formatter release];
        return ret;
}
@end

@implementation NSNumber (HeroValueDisplay)
- (NSString *)heroValueDisplay {
    return [self descriptionWithLocale:[NSLocale currentLocale]];
}
@end

@implementation NSDecimalNumber (HeroValueDisplay)
- (NSString *)heroValueDisplay {
    return [self descriptionWithLocale:[NSLocale currentLocale]];
}
@end
With these categories defined, we can send any of our attributes the heroValueDisplay message and show the returned string in the table.
The next file we need to create is the detail view controller itself. Remember that we're creating a table-based editing view, so we want to subclass UITableViewController. Single-click the Classes folder in Xcode's Groups & Files pane and type
Warning
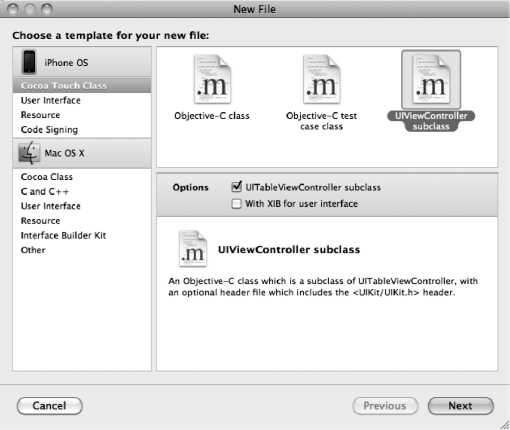
The arrangement of the new file assistant has changed a little in each of the last several releases of the iPhone SDK. As a result, the step-by-step instructions on this page may not exactly match what you need to do if you are on an older release (pre 3.1). You need to create a table view controller subclass. If you don't see those options under UIViewController, check under Objective-C class. If you are given the opportunity to create an XIB for user interface as in the screenshot in Figure 4-5, do not select that option because table view controllers generally don't need a nib file.
Select Cocoa Touch Class from under the iPhone OS heading in the left pane, then select the UIViewController subclass. Make sure the check box labeled UITableViewController subclass is checked, but that the With XIB for user interface checkbox is not. If you don't see these options, check the previous tech block for more information.
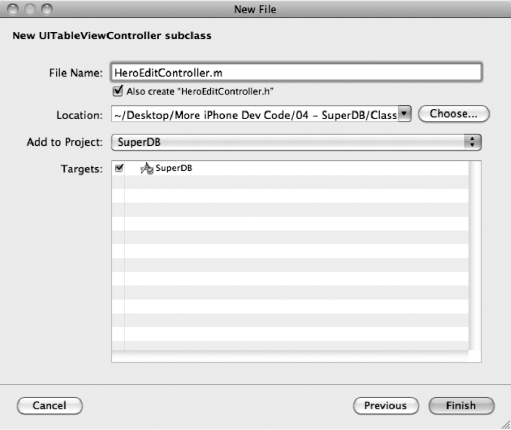
When prompted for a filename (Figure 4-6), type in HeroEditController.m and make sure that Also create "HeroEditController.h" is checked. Once the two new files are created, single-click on HeroEditController.h so you can add the necessary instance variables and properties.
Since this editing view will display and allow the editing of a single hero, it needs an NSManagedObject instance variable to hold the hero to be displayed or edited. We also need instance variables to hold the various paired arrays we discussed earlier that define the layout of the table. Make the following changes to HeroEditController.h:
#import <UIKit/UIKit.h>

@interface HeroEditController : UITableViewController {
    NSManagedObject *hero;

@private
    NSArray         *sectionNames;
    NSArray         *rowLabels;
    NSArray         *rowKeys;
    NSArray         *rowControllers;
}
@property (nonatomic, retain) NSManagedObject *hero;
@endNotice that we've created five instance variables but only one property. While properties are useful for making memory management easier, they are not always appropriate. In this case, we don't want other objects to be able to change our table structure and there's no real reason why they would ever access these arrays. Therefore, we make them @private and do not declare properties for them, which restricts their use to our class.
You might be wondering why we didn't choose to also make hero a private instance variable. There's nothing particularly sensitive or unusual about this particular instance variable that makes it dangerous and there are valid reasons why a subclass might need to access this directly. The default visibility for instance variables in Objective-C 2.0 is @protected, not @public, so there's really no danger in having hero above the @private. @protected instance variables can be freely accessed by subclasses, but not by other classes, which seems like appropriate behavior.
Warning
While the scope limiters @private and @protected are enforced on the iPhone, they are not enforced in the iPhone Simulator. As of this writing, the iPhone Simulator is still a 32-bit Mac application that can't take advantage of all the features of the Objective-C 2.0 runtime. On the simulator, accessing another class's @private or @protected instance variables will result in a compiler warning, but the code will work. On the device, it will not work, and will generate a compiler error instead of a warning. This should serve as just another reason to do something you were going to do anyway (right?), which is to make sure you test your applications thoroughly on a physical device before shipping.
We're going to approach the implementation of our controller in two stages. First, we're going to make sure the controller displays its information correctly, then we're going to implement editing.
Single-click on HeroEditController.m. The template we chose gave us a lot of stubs and commented-out code. Rather than try to give you instructions on how to make changes to the existing file, just delete the code that the template provided and replace it with this:
#import "HeroEditController.h" #import "NSArray-NestedArrays.h" #import "HeroValueDisplay.h" @implementation HeroEditController @synthesize hero;
- (void)viewDidLoad {
sectionNames = [[NSArray alloc] initWithObjects:
[NSNull null],
NSLocalizedString(@"General", @"General"),
nil];
rowLabels = [[NSArray alloc] initWithObjects:
// Section 1
[NSArray arrayWithObjects:NSLocalizedString(@"Name", @"Name"), nil],
// Section 2
[NSArray arrayWithObjects:NSLocalizedString(@"Identity", @"Identity"),
NSLocalizedString(@"Birthdate", @"Birthdate"),
NSLocalizedString(@"Sex", @"Sex"),
nil],
// Sentinel
nil];
rowKeys = [[NSArray alloc] initWithObjects:
// Section 1
[NSArray arrayWithObjects:@"name", nil],
// Section 2
[NSArray arrayWithObjects:@"secretIdentity", @"birthdate", @"sex", nil],
// Sentinel
nil];
// TODO: Populate the rowControllers array
[super viewDidLoad];
}
- (void)dealloc {
[hero release];
[sectionNames release];
[rowLabels release];
[rowKeys release];
[rowControllers release];
[super dealloc];
}
#pragma mark -
#pragma mark Table View Methods
- (NSInteger)numberOfSectionsInTableView:(UITableView *)theTableView {
return [sectionNames count];
}
- (NSString *)tableView:(UITableView *)theTableView titleForHeaderInSection:(NSInteger)section {
id theTitle = [sectionNames objectAtIndex:section];
if ([theTitle isKindOfClass:[NSNull class]])
return nil;
return theTitle;}
- (NSInteger)tableView:(UITableView *)theTableView numberOfRowsInSection:(NSInteger)section {
return [rowLabels countOfNestedArray:section];
}
- (UITableViewCell *)tableView:(UITableView *)theTableView cellForRowAtIndexPath:(NSIndexPath *)indexPath {
static NSString *CellIdentifier = @"Hero Edit Cell Identifier";
UITableViewCell *cell = [theTableView
dequeueReusableCellWithIdentifier:CellIdentifier];
if (cell == nil) {
cell = [[[UITableViewCell alloc] initWithStyle:UITableViewCellStyleValue2
reuseIdentifier:CellIdentifier] autorelease];
}
NSString *rowKey = [rowKeys nestedObjectAtIndexPath:indexPath];
NSString *rowLabel = [rowLabels nestedObjectAtIndexPath:indexPath];
id <HeroValueDisplay, NSObject> rowValue = [hero valueForKey:rowKey];
cell.detailTextLabel.text = [rowValue heroValueDisplay];
cell.textLabel.text = rowLabel;
cell.accessoryType = UITableViewCellAccessoryDisclosureIndicator;
return cell;
}
- (void)tableView:(UITableView *)theTableView
didSelectRowAtIndexPath:(NSIndexPath *)indexPath {
// TODO: Push editing controller onto the stack.
}
@endLet's take a look at the code we just wrote. Notice first that we import both of the categories we created earlier. If we don't import the category headers, the compiler doesn't know that those methods exist and will give us compile warnings. We also synthesize our only property:
#import "HeroEditController.h" #import "NSArray-NestedArrays.h" #import "HeroValueDisplay.h" @implementation HeroEditController @synthesize hero;
Next comes viewDidLoad. In this method, we create and populate those various arrays we discussed earlier that will define the structure of our tables. For now, we're just going to create the arrays here in code. If our table gets more complex, we might want to consider putting the contents of the arrays into property lists or text files and creating the arrays from those files rather than hardcoding them as we've done here. That would reduce the size and complexity of our controller class. At this point, there doesn't seem to be much benefit to doing that. One of the nice things about this approach is that since the arrays' contents drive the table structure and the rest of the code in this controller class is relatively generic, we can change how we create our arrays without impacting the functionality of the rest of the code in this controller.
The first array we populate is the sectionNames array. Notice that because we are not using a property, we don't have an accessor. Since we're not using an accessor that will retain the instance for us, we don't release it. After this line of code, sectionNames has a retain count of 1, which is exactly what it would be if we assigned it to a property specified with the retain keyword, and then released it after making the assignment.
- (void)viewDidLoad {
sectionNames = [[NSArray alloc] initWithObjects:
[NSNull null],
NSLocalizedString(@"General", @"General"),
nil];Tip
Notice that we pass a nil as the last parameter to initWithObjects:. This is important. initWithObjects: is a variadic method, which is just a fancy way of saying it takes a variable number of arguments. We can pass in any number of objects to this method, and they will all get added to this array. The terminating nil is how we tell the initWithObjects: method that we've got not more objects for it. This terminating nil is called a sentinel. Starting with Snow Leopard, Xcode will warn you if you forget the sentinel, but on Leopard, a missing sentinel can be a very hard-to-debug problem.
After this line of code fires, sectionNames has two elements. The first one is that special placeholder, NSNull, we talked about. If you look at Figure 4-2, you can see that the first section has no header. This is how we're going to indicate that there's a section, but that it doesn't have a header. The second object in the array is a localized string that contains the word "General." By creating a localized string, we have the ability to translate this header into whatever languages we wish. If you need a refresher on localizing your apps, the topic is covered in Chapter 17 of Beginning iPhone 3 Development.
Next, we populate the rowLabels array. This is the array that defines the blue labels displayed on each row that you can see in Figure 4-2. Notice again, that we've used localized strings so that if we want to later translate our labels into other languages, we have the ability to do so without having to change our code. Because we've got nested object creation here, we've added comments so that when we revisit this somewhat complex code, we'll remember what each bit of code is used for.
rowLabels = [[NSArray alloc] initWithObjects:
// Section 1
[NSArray arrayWithObjects:NSLocalizedString(@"Name", @"Name"), nil],
// Section 2
[NSArray arrayWithObjects:NSLocalizedString(@"Identity", @"Identity"),
NSLocalizedString(@"Birthdate", @"Birthdate"),
NSLocalizedString(@"Sex", @"Sex"),
nil],// Sentinel
nil];The code that populates the rowKeys array is very similar, except we don't localize the strings. These are key values that are used to indicate which attribute gets shown in which row, and localizing them would break the functionality. The key is the same regardless of the language our user understands.
rowKeys = [[NSArray alloc] initWithObjects:
// Section 1
[NSArray arrayWithObjects:@"name", nil],
// Section 2
[NSArray arrayWithObjects:@"secretIdentity",
@"birthdate",
@"sex",
nil],
// Sentinel
nil];We have one more array, but we're not populating it yet. The last array defines which controller classes are used to edit which rows. We haven't written any such controller classes yet, so we've got nothing to put in that array. We're also not yet accessing this array anywhere, so it's okay to just put in a reminder to do it later. As you've already seen, when developing more complex applications, you will often have to implement some functionality in an incomplete manner and then come back later to finish it.
// TODO: Populate the rowControllers array
[super viewDidLoad];
}The next method we implemented was dealloc, and there shouldn't be anything too surprising here. We release all of the objects that we've retained, both those that are associated with properties, and those that aren't. Remember, in viewDidLoad, we left our various structure arrays at a retain count of 1, so we have to release them here to avoid leaking memory.
- (void)dealloc {
[hero release];
[sectionNames release];
[rowLabels release];
[rowKeys release];
[rowControllers release];
[super dealloc];
}Even though we haven't yet created or populated rowControllers, it's perfectly okay to release it here. Sending a release message to nil is just fine and dandy in Objective-C.
Next up are the table view datasource methods. The first one we implement tells our table view how many sections we have. We return the count from sectionNames here. By doing that, if we change the number of objects in the sectionNames array, we automatically change the number of sections in the table and don't have to touch this method.
#pragma mark -
#pragma mark Table View Methods
- (NSInteger)numberOfSectionsInTableView:(UITableView *)theTableView {
return [sectionNames count];
}Since sections have an optional header displayed, we also implement tableView:titleForHeaderInSection:. For this, we just need to return the value from sectionNames. If the value NSNull is stored as a section name, we need to convert it to nil, since that's what UITableView expects for a section with no header.
- (NSString *)tableView:(UITableView *)theTableView titleForHeaderInSection:(NSInteger)section {
id theTitle = [sectionNames objectAtIndex:section];
if ([theTitle isKindOfClass:[NSNull class]])
return nil;
return theTitle;
}In addition to telling our table view the number of sections, we need to tell it the number of rows in each section. Thanks to that category on NSArray we wrote earlier, this can be handled with one line of code. It doesn't matter which of the paired arrays we use, since they should all have the same number of rows in every subarray. We obviously can't use rowControllers, since we haven't populated it yet. We chose rowLabels, but rowKeys would have worked exactly the same.
- (NSInteger)tableView:(UITableView *)theTableView numberOfRowsInSection:(NSInteger)section {
return [rowLabels countOfNestedArray:section];
}The tableView:cellForRowAtIndexPath: method is where we actually create the cell to be displayed. We start out almost exactly in the same way as every other table view controller, by looking for a dequeued cell and using it, or creating a new cell if there aren't any dequeued cells.
- (UITableViewCell *)tableView:(UITableView *)theTableView
cellForRowAtIndexPath:(NSIndexPath *)indexPath {
static NSString *CellIdentifier = @"Hero Edit Cell Identifier";
UITableViewCell *cell = [theTableView
dequeueReusableCellWithIdentifier:CellIdentifier];
if (cell == nil) {
cell = [[[UITableViewCell alloc] initWithStyle:UITableViewCellStyleValue2
reuseIdentifier:CellIdentifier] autorelease];
}Next, we retrieve the attribute name and the label for this row, again using that category method we added to NSArray to retrieve the correct object based on index path.
NSString *rowKey = [rowKeys nestedObjectAtIndexPath:indexPath];
NSString *rowLabel = [rowLabels nestedObjectAtIndexPath:indexPath];
Once we know the attribute name, we can retrieve the object that's used to represent this attribute using valueForKey:. Notice that we declare our rowValue object as id. We do this because the returned object could be instances of any number of different classes. We put HeroValueDisplay between angle brackets to indicate that we know the returned object will be an object that conforms to that HeroValueDisplay protocol we created earlier. This gives us the ability to call the heroValueDisplay method on whatever was returned without having to figure out what type of object it was.
id <HeroValueDisplay, NSObject> rowValue = [hero valueForKey:rowKey];
Finally, we assign the label and value to the cell's labels, and then return the cell.
cell.detailTextLabel.text = [rowValue heroValueDisplay];
cell.textLabel.text = rowLabel;
cell.accessoryType = UITableViewCellAccessoryDisclosureIndicator;
return cell;
}The final method in our controller class is just a stub with a reminder to add this functionality later.
- (void)tableView:(UITableView *)theTableView
didSelectRowAtIndexPath:(NSIndexPath *)indexPath {
// TODO: Push editing controller onto the stack.
}
@endNow that we have our new controller class, we have to create instances of it somewhere and push those onto the stack. To do that, we have to revisit HeroListViewController. We could create a new instance of HeroEditController every time a row is tapped. Only one copy of HeroEditController will ever need to be on the navigation stack at a time. As a result, we can reuse a single instance over and over. We can also save ourselves several lines of code by adding an instance of HeroEditController to MainWindow.xib and adding an outlet to that instance to HeroListViewController. Remember, when you add an icon to a nib, an instance of that object gets created when the nib loads.
Single-click HeroListViewController.h, and add the following code to add an outlet for the instance of HeroEditController we're going to add to MainWindow.xib:
#import <UIKit/UIKit.h>
#define kSelectedTabDefaultsKey @"Selected Tab"
enum {
kByName = 0,kBySecretIdentity, };@class HeroEditController;@interface HeroListViewController : UIViewController <UITableViewDelegate, UITableViewDataSource, UITabBarDelegate, UIAlertViewDelegate, NSFetchedResultsControllerDelegate>{ UITableView *tableView; UITabBar *tabBar;HeroEditController *detailController;@private NSFetchedResultsController *_fetchedResultsController; } @property (nonatomic, retain) IBOutlet UITableView *tableView; @property (nonatomic, retain) IBOutlet UITabBar *tabBar;@property (nonatomic, retain) IBOutlet HeroEditController *detailController;@property (nonatomic, readonly) NSFetchedResultsController *fetchedResultsController; - (void)addHero; - (IBAction)toggleEdit; @end
Now that we've got it declared, save HeroListViewController.h, and we'll go add the instance to MainWindow.xib.
Double-click on MainWindow.xib to open the nib file in Interface Builder. Look in the library for a Table View Controller, and drag one of those over to the nib's main window. The newly added controller should be selected, so press
Next, in the main nib window, click on the Hero Edit Controller disclosure triangle and double-click on the Table View that appears. Alternatively, you can just click in the Hero Edit Controller window so the Table View shown in that window is selected. Now, press
Back in the main nib window, open the disclosure triangle to the left of Navigation Controller to reveal an item named Hero List View Controller (Root View Controller). Control-drag from that item to the Hero Edit Controller icon and select the detailController outlet.
Note
Note that your Hero List View Controller (Root View Controller) might instead have the name Hero List View Controller (SuperDB). No worries, it should work just fine.
Save and close this nib and go back to Xcode.
Single-click HeroListViewController.m. There are two methods that we need to implement. When a user taps a row, we want to use the detail controller to show them information about the hero on which they tapped. When they add a new hero, we also want to take them down to the newly added hero so they can edit it. We haven't implemented the editing functionality yet, but we can still configure and push detailController onto the stack now, so let's do that.
First, we need to import HeroEditController.h and synthesize the detailController outlet:
#import "HeroListViewController.h" #import "SuperDBAppDelegate.h"#import "HeroEditController.h"@implementation HeroListViewController @synthesize tableView; @synthesize tabBar;@synthesize detailController;@synthesize fetchedResultsController = _fetchedResultsController; ...
Now, find the addHero method, and add the following new code to it. You can also delete the old TODO comment.
- (void)addHero {
NSManagedObjectContext *context = [self.fetchedResultsController
managedObjectContext];
NSEntityDescription *entity = [[self.fetchedResultsController fetchRequest]
entity];
NSManagedObject *newManagedObject = [NSEntityDescription
insertNewObjectForEntityForName:[entity name] inManagedObjectContext:context];
NSError *error;
if (![context save:&error])
NSLog(@"Error saving entity: %@", [error localizedDescription]);
// TODO: Instantiate detail editing controller and push onto stack
detailController.hero = newManagedObject;
[self.navigationController pushViewController:detailController animated:YES];
}We assign the new managed object to detailController's hero property, which is how we tell that controller that this is the hero to be viewed and/or edited. Then, we push it onto the stack. Easy enough?
Now, find tableView:didSelectRowAtIndexPath:. It should just be a stub with a TODO comment. Replace it with this new version:
- (void)tableView:(UITableView *)theTableView
didSelectRowAtIndexPath:(NSIndexPath *)indexPath {
detailController.hero = [self.fetchedResultsController
objectAtIndexPath:indexPath];
[self.navigationController pushViewController:detailController animated:YES];
[theTableView deselectRowAtIndexPath:indexPath animated:YES];
}That should look pretty familiar. We're doing almost the same thing, except instead of pushing a new managed object onto the stack, we're retrieving the object that corresponds to the row on which the user tapped.
Save HeroListViewController.m and then build and run your application. Try adding new rows, or tapping on an existing row. You still don't have the ability to edit them, but when you add a new row, you should get a new screen of data that looks like Figure 4-7.
All that's missing is the ability to edit the individual fields, so let's add that now.
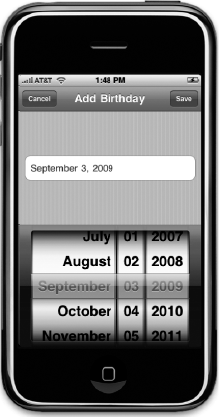
Our next step is to create a series of new controllers, each of which can be used to edit an individual value on a hero. For now, we need one that can edit string attributes (Figure 4-8) and one that can edit date attributes (Figure 4-9). We'll be adding other controllers later. All of these controllers have common functionality. They'll all take a managed object and the name of the attribute on that managed object to be edited. They'll all need a Save button and a Cancel button.
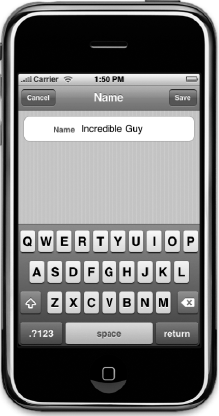
Figure 4.8. The subcontroller that will allow the user to edit string attributes. Here, it's being used to edit the name attribute.
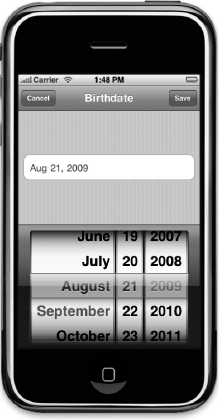
Figure 4.9. The subcontroller that allows editing date attributes. Here, it's being used to edit the birthdate attribute.
Whenever you are about to implement multiple objects that have some common functionality, you should put some thought into whether that common functionality can be put into a single class that the other controllers can then subclass. In this case, there is enough common functionality that a common superclass is appropriate. Let's create that common superclass now.
Single-click the Classes folder in the Groups & Files pane and select New File... from the File menu. Create another UITableViewController subclass, as you did earlier when you created the HeroEditController class. Call this new class ManagedObjectAttributeEditor and make sure you create both the implementation and header file but do not create a nib file.
Single-click ManagedObjectAttributeEditor.h, and replace the contents with this code:
#import <UIKit/UIKit.h> #define kNonEditableTextColor [UIColor colorWithRed:.318 green:0.4 blue:.569alpha:1.0] @interface ManagedObjectAttributeEditor : UITableViewController { NSManagedObject *managedObject; NSString *keypath; NSString *labelString; }
@property (nonatomic, retain) NSManagedObject *managedObject; @property (nonatomic, retain) NSString *keypath; @property (nonatomic, retain) NSString *labelString; -(IBAction)cancel; -(IBAction)save; @end
Tip
Wondering about that funky looking arrow (
The constant kNonEditableTextColor is defined to match the color used in the table view cell style UITableViewCellStyleValue2. We can't use the default cell styles and let the user edit values using a text field, but we want to match the appearance as closely as we can (Figure 4-8).
We could have called the managedObject attribute hero instead, but by using more generic terms, it'll be easier to reuse this code in future projects. Having a property called hero wouldn't make much sense if we were writing an application to keep track of recipes, for example.
Instead of attribute name, we've defined a property called keypath. This will be the attribute name, but by using keypath instead of key, we'll have the ability to edit attributes on other objects, not just on the one we're editing. Don't worry if that doesn't make much sense now; you'll see why we chose keypath instead of attribute or key in Chapter 7 when we start talking about relationships and fetched properties. We've also provided a property for a label. Not all subclasses will need this, but many will, so we'll provide the instance variable and property definition here in our superclass.
We also define two methods, cancel and save, that will be called when the user presses either of the buttons that will be presented. Switch over to ManagedObjectAttributeEditor.m and replace the existing contents with the following code:
#import "ManagedObjectAttributeEditor.h"
@implementation ManagedObjectAttributeEditor
@synthesize managedObject;
@synthesize keypath;
@synthesize labelString;
- (void)viewWillAppear:(BOOL)animated {
UIBarButtonItem *cancelButton = [[UIBarButtonItem alloc]
initWithTitle:NSLocalizedString(@"Cancel",
@"Cancel - for button to cancel changes")
style:UIBarButtonSystemItemCancel
target:self
action:@selector(cancel)];
self.navigationItem.leftBarButtonItem = cancelButton;
[cancelButton release];
UIBarButtonItem *saveButton = [[UIBarButtonItem alloc]
initWithTitle:NSLocalizedString(@"Save",@"Save - for button to save changes")
style:UIBarButtonItemStyleDone
target:self
action:@selector(save)];
self.navigationItem.rightBarButtonItem = saveButton;
[saveButton release];
[super viewWillAppear:animated];
}
-(IBAction)cancel {
[self.navigationController popViewControllerAnimated:YES];
}
-(IBAction)save {
// Objective-C has no support for abstract methods, so we're going
// to take matters into our own hands.
NSException *ex = [NSException exceptionWithName:
@"Abstract Method Not Overridden"
reason:NSLocalizedString(@"You MUST override the save method",
@"You MUST override the save method")
userInfo:nil];
[ex raise];
}
-(void)dealloc {
[managedObject release];
[keypath release];
[labelString release];
[super dealloc];
}
@endMuch of this should make sense to you, but there are a few things that warrant explanation. In the viewWillAppear: method, we are creating two bar button items to go in the navigation bar. You can see these two buttons, labeled Cancel and Save, in Figure 4-8.
Bar button items are similar to standard controls like UIButtons, but they are a special case, designed to be used on navigation bars and toolbars only. One key difference between a bar button item and a regular UIButton is that bar button items only have one target and action. They don't recognize the concept of control events. Bar button items send their message on the equivalent of touch up inside only. Here's where we create the Cancel button. The code that creates the Save button is nearly identical:
UIBarButtonItem *cancelButton = [[UIBarButtonItem alloc]
initWithTitle:NSLocalizedString(@"Cancel",
@"Cancel - for button to cancel changes")
style:UIBarButtonSystemItemCancel
target:self
action:@selector(cancel)];
self.navigationItem.leftBarButtonItem = cancelButton;
[cancelButton release];When we create the button, notice that we're once again using the NSLocalizedString macro to make sure that any text to be displayed to the user can be translated. There are several bar button styles, including one intended for Cancel buttons called UIBarButtonSystemItemCancel, which we've used here.
We also have to provide a target and action for the bar button item. The target is self, because we want it to call a method on the instance of this controller that is active. The action is a selector to one of those action methods we declared in the header file. Setting a target and action like this is exactly equivalent to control-dragging from a button to a controller class and selecting an action method, we're just doing it in code this time because we don't have a nib.
The cancel method does nothing more than pop the subcontroller off the navigation stack, which returns the user to the previous screen. In this case, it will return them to the detail view for the hero. Since we don't take any steps to capture the input from the user, the managed object stays the same as it was before.
Note
Strictly speaking, the save and cancel methods do not need to be declared with the IBAction keyword, since we're not triggering those methods from a nib. They are, however, action methods, and it is conceivable that at some point in the future, we could convert this controller to using a nib file, so we declare both of the action methods with the IBAction keyword just to be safe and to advertise that these are, indeed, methods that will be triggered by user interface controls.
The save method is a little unusual here. We will never actually create an instance of this class. We're creating this class only to contain common functionality that we expect to exist among classes we're going to write. In most languages, we would define this as an abstract class. But Objective-C doesn't have abstract classes, and it doesn't have a mechanism to force a subclass to implement a given method. Therefore, just to be safe, we throw an exception in our save method. That way, if we ever forget to implement save in a subclass we create, we'll know about it instantly. Instead of unpredictable behavior, we'll get slammed with a runtime exception. While that may be a little unpleasant when it happens, it will be very easy to debug because our exception will tell us exactly what we did wrong.
NSException *ex = [NSException exceptionWithName:
@"Abstract Method Not Overridden"
reason:NSLocalizedString(@"You MUST override the save method",
@"You MUST override the save method")
userInfo:nil];
[ex raise];Warning
Objective-C does have exceptions, as you can see here. Objective-C does not use exceptions the way many other languages, such as Java and C++, do. In Objective-C, exceptions are used only for truly exceptional situations and are usually an indication of a problem within your code. They should never be used just to report a run-of-the-mill error condition. Exceptions are used with much less frequency in Objective-C then they are in many other languages.
Now it's time to create a generic controller class to handle the editing of string attributes. Single-click on Classes and create a new implementation and header file pair. Just as you did before, create a subclass of UITableViewController and do not create a nib file. Name the class ManagedObjectStringEditor. Single-click ManagedObjectStringEditor.h, and replace the contents with the following code:
#import <UIKit/UIKit.h>
#import "ManagedObjectAttributeEditor.h"
#define kLabelTag 1
#define kTextFieldTag 2
@interface ManagedObjectStringEditor : ManagedObjectAttributeEditor {
}
@endAs you can see, we're not adding any additional properties or instance variables. We do change the subclass to ManagedObjectAttributeEditor so that we inherit the functionality we implemented there, and we also define two constants that will be used in a moment to let us retrieve subviews from the table view cell. The default table view cell styles don't allow in-place editing, so we have to customize the contents of our cell. Since we don't have a nib, we don't have a way to connect outlets, so instead of using outlets, we'll assign tags to each of the subviews we add to the table view cell, and then we'll use that tag later to retrieve them.
Save ManagedObjectStringEditor.h and switch over to ManagedObjectStringEditor.m. Replace the contents of that file with this code:
#import "ManagedObjectStringEditor.h"
@implementation ManagedObjectStringEditor
#pragma mark -
#pragma mark Table View methods
- (NSInteger)tableView:(UITableView *)tableView
numberOfRowsInSection:(NSInteger)section {
return 1;
}
- (UITableViewCell *)tableView:(UITableView *)tableView
cellForRowAtIndexPath:(NSIndexPath *)indexPath {
static NSString *ManagedObjectStringEditorCell =
@"ManagedObjectStringEditorCell";
UITableViewCell *cell = [tableView dequeueReusableCellWithIdentifier:
ManagedObjectStringEditorCell];
if (cell == nil) {
cell = [[[UITableViewCell alloc] initWithStyle:UITableViewCellStyleDefault
reuseIdentifier:ManagedObjectStringEditorCell] autorelease];
UILabel *label = [[UILabel alloc] initWithFrame:CGRectMake(10, 10, 80, 25)];
label.textAlignment = UITextAlignmentRight;label.tag = kLabelTag;
UIFont *font = [UIFont boldSystemFontOfSize:14.0];
label.textColor = kNonEditableTextColor;
label.font = font;
[cell.contentView addSubview:label];
[label release];
UITextField *theTextField = [[UITextField alloc]
initWithFrame:CGRectMake(100, 10, 190, 25)];
[cell.contentView addSubview:theTextField];
theTextField.tag = kTextFieldTag;
[theTextField release];
}
UILabel *label = (UILabel *)[cell.contentView viewWithTag:kLabelTag];
label.text = labelString;
UITextField *textField = (UITextField *)[cell.contentView
viewWithTag:kTextFieldTag];
NSString *currentValue = [self.managedObject valueForKeyPath:self.keypath];
NSEntityDescription *ed = [self.managedObject entity];
NSDictionary *properties = [ed propertiesByName];
NSAttributeDescription *ad = [properties objectForKey:self.keypath];
NSString *defaultValue = nil;
if (ad != nil)
defaultValue = [ad defaultValue];
if (![currentValue isEqualToString:defaultValue])
textField.text = currentValue;
[textField becomeFirstResponder];
return cell;
}
- (void)tableView:(UITableView *)tableView didSelectRowAtIndexPath:
(NSIndexPath *)indexPath {
[tableView deselectRowAtIndexPath:indexPath animated:YES];
}
-(IBAction)save {
NSUInteger onlyRow[] = {0, 0};
NSIndexPath *onlyRowPath = [NSIndexPath indexPathWithIndexes:onlyRow length:2];
UITableViewCell *cell = [self.tableView cellForRowAtIndexPath:onlyRowPath];
UITextField *textField = (UITextField *)[cell.contentView
viewWithTag:kTextFieldTag];
[self.managedObject setValue:textField.text forKey:self.keypath];
NSError *error;
if (![managedObject.managedObjectContext save:&error])
NSLog(@"Error saving: %@", [error localizedDescription]);
[self.navigationController popViewControllerAnimated:YES];
}
@endAlmost everything we do in this class is covered in Chapters 8 and 9 of Beginning iPhone 3 Development, but there's some code in tableView:cellForRowAtIndexPath: that is worth taking a look at. We've set default values for two of our attributes because they were required fields. When the user taps one of those rows, they aren't going to want to have to delete the default value before typing in the new value. So, we've added some code to check to see if the current value is the same as the default value and, if it is, we tell the text field to clear on editing.
Here's the code from tableView:cellForRowAtIndexPath: that does that. First, we grab the current value held by the attribute.
NSString *currentValue = [self.managedObject valueForKeyPath:self.keypath];
Next, we grab the managed object's entity. Information about an entity is returned in an NSEntityDescription instance:
NSEntityDescription *ed = [self.managedObject entity];
We can retrieve a dictionary with the properties, which includes attributes, by calling propertiesByName on the entity description.
NSDictionary *properties = [ed propertiesByName];
We can retrieve the NSAttributeDescription that stores information about the attribute we're editing from that dictionary using key-value coding:
NSAttributeDescription *ad = [properties objectForKey:self.keypath];
One piece of information that the attribute description holds is its default value, if any, so we retrieve the default value.
NSString *defaultValue = nil;
if (ad != nil)
defaultValue = [ad defaultValue];Once we have the default value, we compare it to the current value. If they're not the same, then we set the text field's value. If they are the same, then we won't bother populating the text field with the current value because we know they're going to change it.
if (![currentValue isEqualToString:defaultValue])
textField.text = currentValue;Note
Little details like not making your users spend time deleting default values can make the difference between a good application and a great one. Don't expect to anticipate every possible detail in advance, however. These are the kind of things that often don't become obvious until you start testing and actually using the application, but when they become apparent, make sure you deal with them. Annoying customers is not a good strategy.
You should also notice that we implement the save method, overriding the one in our superclass, which throws an exception. Looking at that save method, you might also be wondering if we made a mistake in this controller. In Beginning iPhone 3 Development, we warned against relying on controls on table view cells to maintain state for you, since cells can get dequeued and reused to represent a different row. Yet we are doing just that here. We are relying on a text field on a table view cell to keep track of the changes the user has made to the attribute until they tap Save, at which point, we copy the value from the text field back into the attribute. In this particular case, we know that there will always be exactly one row in this table. Since a table view is always capable of displaying one row, this cell can never get dequeued. That makes this scenario an exception to the general rule that you shouldn't rely on table view cells to maintain state for you.
Create yet another table view subclass, this time calling the class ManagedObjectDateEditor. Once you've created the file, single-click on ManagedObjectDateEditor.h and replace the contents with the following code:
#import <Foundation/Foundation.h>
#import "ManagedObjectAttributeEditor.h"
@interface ManagedObjectDateEditor : ManagedObjectAttributeEditor {
UIDatePicker *datePicker;
UITableView *dateTableView;
}
@property (nonatomic, retain) UIDatePicker *datePicker;
@property (nonatomic, retain) UITableView *dateTableView;
- (IBAction)dateChanged;
@endThe controller for editing dates is slightly more complex than the one for editing a string. If you look at Figure 4-9, you'll see that there is a text field that displays the current value, and there is also a date picker that can be used to change the date.
Save ManagedObjectDateEditor.h then single-click ManagedObjectDateEditor.m and replace its contents with the following code:
#import "ManagedObjectDateEditor.h"
@implementation ManagedObjectDateEditor
@synthesize datePicker;
@synthesize dateTableView;
- (IBAction)dateChanged {
[self.dateTableView reloadData];
}
#pragma mark -
#pragma mark Superclass Overrides
-(IBAction)save {
[self.managedObject setValue:self.datePicker.date forKey:self.keypath];NSError *error;
if (![managedObject.managedObjectContext save:&error])
NSLog(@"Error saving: %@", [error localizedDescription]);
[self.navigationController popViewControllerAnimated:YES];
}
- (void)loadView {
[super loadView];
UIView *theView = [[UIView alloc] initWithFrame:[[UIScreen mainScreen] bounds]];
self.view = theView;
[theView release];
UITableView *theTableView = [[UITableView alloc] initWithFrame:
CGRectMake(0.0, 67.0, 320.0, 480.0) style:UITableViewStyleGrouped];
theTableView.delegate = self;
theTableView.dataSource = self;
[self.view addSubview:theTableView];
self.dateTableView = theTableView;
[theTableView release];
UIDatePicker *theDatePicker = [[UIDatePicker alloc]
initWithFrame:CGRectMake(0.0, 200.0, 320.0, 216.0)];
theDatePicker.datePickerMode = UIDatePickerModeDate;
self.datePicker = theDatePicker;
[theDatePicker release];
[datePicker addTarget:self action:@selector(dateChanged)
forControlEvents:UIControlEventValueChanged];
[self.view addSubview:datePicker];
self.view.backgroundColor = [UIColor groupTableViewBackgroundColor];
}
- (void)viewWillAppear:(BOOL)animated {
if ([managedObject valueForKeyPath:self.keypath] != nil)
[self.datePicker setDate:[managedObject
valueForKeyPath:keypath] animated:YES];
else
[self.datePicker setDate:[NSDate date] animated:YES];
[self.tableView reloadData];
[super viewWillAppear:animated];
}
-(void)dealloc {
[datePicker release];
[dateTableView release];
[super dealloc];
}
#pragma mark -
#pragma mark Table View Methods
- (NSInteger)tableView:(UITableView *)tableView numberOfRowsInSection:(NSInteger)section
{
return 1;
}- (UITableViewCell *)tableView:(UITableView *)tableView
cellForRowAtIndexPath:(NSIndexPath *)indexPath {
static NSString *GenericManagedObjectDateEditorCell =
@"GenericManagedObjectDateEditorCell";
UITableViewCell *cell = [tableView dequeueReusableCellWithIdentifier:
GenericManagedObjectDateEditorCell];
if (cell == nil)
{
cell = [[[UITableViewCell alloc] initWithStyle:UITableViewCellStyleDefault
reuseIdentifier:GenericManagedObjectDateEditorCell] autorelease];
cell.textLabel.font = [UIFont systemFontOfSize:17.0];
cell.textLabel.textColor = [UIColor colorWithRed:0.243 green:0.306
blue:0.435 alpha:1.0];
}
NSDateFormatter *formatter = [[NSDateFormatter alloc] init];
[formatter setDateStyle:NSDateFormatterMediumStyle];
cell.textLabel.text = [formatter stringFromDate:[self.datePicker date]];
[formatter release];
return cell;
}
@endMost of what's going on in this class should be familiar to you. The one thing that's somewhat strange with this is how we've implemented the date picker view. If we had just created a UIDatePicker and added it as a subview of our table view, then the picker would have scrolled with the table and been unusable. Instead, we use loadView, which is used to create a user interface programmatically, and we create both a UIDatePicker and a second UITableView. We make both of these new objects subviews of our view property. This controller is actually modeled after the way that Apple's Contacts application accepts date inputs (Figure 4-10).
There's just one last task that we need to handle before we can try out our new iteration of the SuperDB application. We have to add code to use these new attribute editors. Single-click HeroEditController.m. First, add the following declaration to the top of the file:
#import "ManagedObjectAttributeEditor.h"
Next, in the viewDidLoad method, get rid of the TODO comment, and replace it with the code that follows. This will define which controller class gets used for each row in each section.
rowControllers = [[NSArray alloc] initWithObjects:// Section 1[NSArray arrayWithObject:@"ManagedObjectStringEditor"],// Section 2[NSArray arrayWithObjects:@"ManagedObjectStringEditor",@"ManagedObjectDateEditor",@"ManagedObjectStringEditor", nil],// Sentinelnil];
Now, replace the tableView:didSelectRowAtIndexPath: method with the following:
- (void)tableView:(UITableView *)tableViewdidSelectRowAtIndexPath:(NSIndexPath *)indexPath {NSString *controllerClassName = [rowControllersnestedObjectAtIndexPath:indexPath];NSString *rowLabel = [rowLabels nestedObjectAtIndexPath:indexPath];NSString *rowKey = [rowKeys nestedObjectAtIndexPath:indexPath];Class controllerClass = NSClassFromString(controllerClassName);ManagedObjectAttributeEditor *controller =[controllerClass alloc];controller = [controller initWithStyle:UITableViewStyleGrouped];controller.keypath = rowKey;controller.managedObject = hero;controller.labelString = rowLabel;controller.title = rowLabel;[self.navigationController pushViewController:controller animated:YES];[controller release];}
This may be new to you, so let's review it. The first thing we do is retrieve the name of the controller class that should be used to edit this particular row.
NSString *controllerClassName = [rowControllers
nestedObjectAtIndexPath:indexPath];We also retrieve the attribute name and label for the selected row.
NSString *rowLabel = [rowLabels nestedObjectAtIndexPath:indexPath];
NSString *rowKey = [rowKeys nestedObjectAtIndexPath:indexPath];Next, we use a special function called NSClassFromString() that creates an instance of a class based on its name stored in an NSString instance.
Class controllerClass = NSClassFromString(controllerClassName);
After this line of code, controllerClass will be the class object for the class whose name we put in the rowController array. You can use a Class object just like you can the name of the class when you alloc a new object. So, if controllerClassName was Foo, then doing
id theObject = [controllerClass alloc];
would be exactly the same as calling
id theObject = [foo alloc];
So, in the next line of code, we do this:
ManagedObjectAttributeEditor *controller =
[controllerClass alloc];Here, we're actually creating an instance of the class that will be used to edit this particular attribute. That's probably a little confusing and, if so, don't worry too much. It can take some time to get used to Objective-C's dynamic nature. We've already allocated the controller. Now, we just need to initialize it, set its properties, then push it onto the navigation stack, like so:
controller = [controller initWithStyle:UITableViewStyleGrouped];
controller.keypath = rowKey;
controller.managedObject = hero;
controller.labelString = rowLabel;
controller.title = rowLabel;
[self.navigationController pushViewController:controller animated:YES];
[controller release];Save HeroEditController.m and build and run your application. You should be able to edit all the attributes by tapping a row.
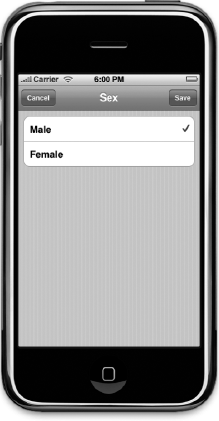
There's one last loose end to take care of. This version of our application uses the string attribute editor to solicit the sex (sorry, we couldn't resist!) of the superhero. This means that there is no validation on the input other than that it's a valid string. A user could type M, Male, MALE, or Yes, Please, and they would all be happily accepted by the string attribute editor. That means, later on, if we want to let the user sort or search their heroes by gender, we could have problems, because the data won't be structured in a consistent manner.
As you saw earlier, we could have enforced a specific sex spelling by using a regular expression, putting up an alert if the user typed something besides Male or Female. This would have prevented values other than the ones we want from getting entered, but this approach is not all that user friendly. We don't want to annoy our user. Why make them type anything at all? There are only two possible choices here. Why not present a selection list and let the user just tap the one they want? Hey, that sounds like a great idea! We're glad you thought of it. Let's implement it now, shall we?
We could, of course, write a special controller to present a two-item list, but that wouldn't be the best use of our time. Such a controller would only be useful when we were soliciting sex (gee, did we do that again?). Wouldn't it be more useful to create a controller that can be used for any selection list? Of course it would, so let's do that.
Create a new table view controller as you did previously, calling this class ManagedObjectSingleSelectionListEditor. After you create the files, single-click on ManagedObjectSingleSelectionListEditor.h and replace its contents with the following code:
#import <UIKit/UIKit.h>
#import "ManagedObjectAttributeEditor.h"
@interface ManagedObjectSingleSelectionListEditor :
ManagedObjectAttributeEditor {
NSArray *list;@private
NSIndexPath *lastIndexPath;
}
@property (nonatomic, retain) NSArray *list;
@endThe structure here might seem somewhat familiar. It's almost identical to one of the controllers from the Nav application in Chapter 9 of Beginning iPhone 3 Development. The list property will contain the array of values from which the user can select, and lastIndexPath will be used to keep track of the selection.
Save ManagedObjectSingleSelectionListEditor.h and single-click on ManagedObjectSingleSelectionListEditor.m. Replace the contents of that file with the following code:
#import "ManagedObjectSingleSelectionListEditor.h"
@implementation ManagedObjectSingleSelectionListEditor
@synthesize list;
-(IBAction)save {
UITableViewCell *selectedCell = [self.tableView
cellForRowAtIndexPath:lastIndexPath];
NSString *newValue = selectedCell.textLabel.text;
[self.managedObject setValue:newValue forKey:self.keypath];
NSError *error;
if (![self.managedObject.managedObjectContext save:&error])
NSLog(@"Error saving: %@", [error localizedDescription]);
[self.navigationController popViewControllerAnimated:YES];
}
- (void)viewWillAppear:(BOOL)animated
{
NSString *currentValue = [self.managedObject valueForKey:self.keypath];
for (NSString *oneItem in list) {
if ([oneItem isEqualToString:currentValue]) {
NSUInteger newIndex[] = {0, [list indexOfObject:oneItem]};
NSIndexPath *newPath = [[NSIndexPath alloc] initWithIndexes:
newIndex length:2];
[lastIndexPath release];
lastIndexPath = newPath;
break;
}
}
[super viewWillAppear:animated];
}
- (void)dealloc {
[list release];
[lastIndexPath release];
[super dealloc];
}
#pragma mark -
#pragma mark Table View Methods- (NSInteger)tableView:(UITableView *)tableView numberOfRowsInSection:(NSInteger)section {
return [list count];
}
- (void)tableView:(UITableView *)tableView
didSelectRowAtIndexPath:(NSIndexPath *)indexPath {
int newRow = [indexPath row];
int oldRow = [lastIndexPath row];
if (newRow != oldRow || newRow == 0) {
UITableViewCell *newCell = [tableView cellForRowAtIndexPath:indexPath];
newCell.accessoryType = UITableViewCellAccessoryCheckmark;
UITableViewCell *oldCell = [tableView cellForRowAtIndexPath:lastIndexPath];
oldCell.accessoryType = UITableViewCellAccessoryNone;
[lastIndexPath release];
lastIndexPath = indexPath;
}
[tableView deselectRowAtIndexPath:indexPath animated:YES];
}
- (UITableViewCell *)tableView:(UITableView *)tableView
cellForRowAtIndexPath:(NSIndexPath *)indexPath {
static NSString *GenericManagedObjectListSelectorCell =
@"GenericManagedObjectListSelectorCell";
UITableViewCell *cell = [tableView
dequeueReusableCellWithIdentifier:GenericManagedObjectListSelectorCell];
if (cell == nil) {
cell = [[[UITableViewCell alloc] initWithStyle:UITableViewCellStyleDefault
reuseIdentifier:GenericManagedObjectListSelectorCell] autorelease];
}
NSUInteger row = [indexPath row];
NSUInteger oldRow = [lastIndexPath row];
cell.textLabel.text = [list objectAtIndex:row];
cell.accessoryType = (row == oldRow && lastIndexPath != nil) ?
UITableViewCellAccessoryCheckmark : UITableViewCellAccessoryNone;
return cell;
}
@endThere's really nothing new here. The logic we're using is exactly the same that we used in the Nav application. If you aren't sure what's going on here, go back and take a look through Chapter 9 of Beginning iPhone 3 Development. The only difference here is that we're using the keypath and managedObject to determine the initial selection and then pushing the final selection back into managedObject when the user presses the Save button.
Now, the question is, how do we provide the values (Male and Female) to this subcontroller? Remember: we want to avoid creating special cases. We want to keep our code as generic as possible. We don't want to, for example, hard code a check for this new controller's class, and then set the list property. That would work, but we want to find a solution that's flexible, reusable, and easy to maintain as our application grows. What we're going to do is create another paired nested array to hold additional arguments to be passed on to the subordinate controller. Anything we put into this dictionary for a given row will be passed along to the subordinate controller using key-value coding. This gives us the flexibility to pass on any information to any controller we create.
The first step toward implementing this is to add an instance variable for the new nested array. Single-click HeroEditController.h and add the following line of code:
#import <UIKit/UIKit.h>
@interface HeroEditController : UITableViewController {
NSManagedObject *hero;
@private
NSArray *sectionNames;
NSArray *rowLabels;
NSArray *rowKeys;
NSArray *rowControllers;
NSArray *rowArguments;
}
@property (nonatomic, retain) NSManagedObject *hero;
@endSave HeroEditController.h and flip over to HeroEditController.m. We need to make two changes here. First, we need to create and populate the new rowArguments array. And second, we need to write code to pass the key/value pairs from that array on to the subordinate controller.
First, look for the viewDidLoad method. Find where we create and populate rowControllers, and replace that code with the following version, which changes the controller used for the row that represents the hero's sex.
rowControllers = [[NSArray alloc] initWithObjects:
// Section 1
[NSArray arrayWithObject:@"ManagedObjectStringEditor"],
// Section 2
[NSArray arrayWithObjects:@"ManagedObjectStringEditor",
@"ManagedObjectDateEditor",
@"ManagedObjectSingleSelectionListEditor", nil],
// Sentinel
                nil];
rowArguments = [[NSArray alloc] initWithObjects:
// Section 1
[NSArray arrayWithObject:[NSNull null]],
// Section 2,
[NSArray arrayWithObjects:[NSNull null],[NSNull null],
[NSDictionary dictionaryWithObject:[NSArray
arrayWithObjects:@"Male", @"Female", nil]
forKey:@"list"],
nil],
// Sentinel
nil];Pretty straightforward, right? Most of the rows don't need any arguments, so we use our friend NSNull again as placeholders for those rows in the rowArguments array. We could have also created empty instances of NSArray to represent rows that need no arguments passed on, but it seemed silly to create new instances when we have a singleton object instance already around and ready made just for this kind of work.
Now, find tableView:didSelectRowAtIndexPath: and insert the following code, which retrieves the arguments for this row and, if the object retrieved is a dictionary, it loops through the keys contained in that dictionary and passes the key and value on to the controller.
- (void)tableView:(UITableView *)tableView
didSelectRowAtIndexPath:(NSIndexPath *)indexPath {
NSString *controllerClassName = [rowControllers
        nestedObjectAtIndexPath:indexPath];
NSString *rowLabel = [rowLabels nestedObjectAtIndexPath:indexPath];
    NSString *rowKey = [rowKeys nestedObjectAtIndexPath:indexPath];
Class controllerClass = NSClassFromString(controllerClassName);
AbstractManagedObjectAttributeEditor *controller =
[controllerClass alloc];
controller = [controller initWithStyle:UITableViewStyleGrouped];
controller.keypath = rowKey;
controller.managedObject = hero;
controller.labelString = rowLabel;
controller.title = rowLabel;
NSDictionary *args = [rowArguments nestedObjectAtIndexPath:indexPath];
if ([args isKindOfClass:[NSDictionary class]]) {
if (args != nil) {
for (NSString *oneKey in args) {
id oneArg = [args objectForKey:oneKey];
[controller setValue:oneArg forKey:oneKey];
}
}
}
[self.navigationController pushViewController:controller animated:YES];
[controller release];
}Tip
The isKindOfClass: method that we used in this new chunk of code is a method that will return YES when called on an instance of a specific class or an instance of any class that descends from that class. In this case, since we pass the NSArray class object in as an argument, the method will return YES if args was an instance of NSDictionary or if it was an instance of NSMutableDictionary, but would return NO if args is the singleton NSNull.
Save HeroEditController.m and build and run the application. This time, when you tap on the row labeled Sex, you should get a nice, user-friendly list like in Figure 4-11.
Well, we're at the end of a long and conceptually difficult chapter. You should congratulate yourself on making it all the way through with us. Table-based detail editing view controllers are some of the hardest controller classes to write well, but now you have a handful of tools in your toolbox to help you create them. You've seen how to use nested and paired arrays to define your table view's structure, you've seen how to create generic classes that can be used to edit multiple types of data, and you've also seen how to use Objective-C's dynamic nature to create instances of classes based on the name of the class stored in an NSString instance.
Ready to move on? Turn the page. Let's get going!
