
iPhones have always had a way to determine where in the world they are. Even though the original iPhone didn't have GPS, it did have a Maps application and was able to represent its approximate location on the map using cell phone triangulation or by looking up its WiFi IP address in a database of known locations. Prior to SDK 3, there was no way to leverage this functionality within your own applications. It was possible to launch the Maps application to show a specific location or route, but it wasn't possible, using only Apple-provided APIs, to show map data without leaving your application.
That changed with the release of the MapKit framework in the 3.0 release of the iPhone SDK. Applications now have the ability to show maps, including the user's current location, and even drop pins and show annotations on those maps. MapKit's functionality isn't limited to just showing maps, either. It includes functionality called reverse geocoding, which allows you to take a set of specific coordinates and turn them into a physical address. Your application can use those coordinates to find out not just where the person is located but, frequently, the actual address associated with that location. You can't always get down to the street address, but you can almost always get the city and state or province no matter where in the world your user is. In this chapter, we're going to look at the basics of adding MapKit functionality to any application.
Note
The application we build in this chapter will run just fine in the iPhone Simulator; however, the Simulator won't report your actual location. Instead, it always returns the address of Apple's corporate headquarters at 1 Infinite Loop in Cupertino, California.
Our chapter's application will start by showing a map of the entire world (Figure 11-1). Other than the map, our interface will be empty except for a single button with the imaginative title of Go. When the button is pressed, the application will determine our current location, zoom the map to show that location, and drop a pin to mark the location (Figure 11-2).
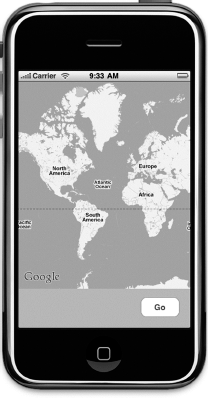
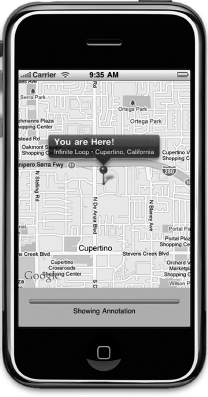
Figure 11.2. After determining the current location, the map will zoom in to give a better view of that location, and then drop a pin to mark the location. We'll then use the reverse geocoder to determine the address that corresponds to the phone's current location and add an annotation view to the map displaying the address.
We will then use MapKit's reverse geocoder to determine the address of our current location and we'll add an annotation to the map to display the specifics of that location.
Despite its simplicity, this application leverages most of the basic MapKit functionality. Before we start building our project, let's explore MapKit, see what makes it tick.
Although MapKit is not particularly complex, it can be a bit confusing. Let's start with a high-level view and nail down the terminology, then we'll dig down into the individual components.
To display map-related data, you add a map view to one of your application's views. Map views can have a delegate, and that delegate is usually the controller class responsible for the view in which the map view resides. That's the approach we'll use for this chapter's application. Our application will have a single view and a single view controller. That single view will contain a map view, along with a few other items, and our single view controller will be the map view's delegate.
Map views keep track of locations of interest using a collection of annotations. Any time you see an icon on a map, whether it's a pin, a dot, or anything else, it's an annotation. When an annotation is in the part of the map that's being shown, the map view asks its delegate to provide a view for that annotation (called an annotation view) that the map view will draw at the specific location on the map.
Annotations are selectable, and a selected annotation will display a callout, which is a small view that floats above the map like the You are Here! view shown in Figure 11-2. If the user taps an annotation view and that annotation view is selectable, the map view will display the callout associated with that view.
The core element of the MapKit framework is the map view, represented by the class MKMapView. The map view takes care of drawing the maps and responding to user input. Users can use all the gestures they're accustomed to, including a pinch in or out to do a controlled zoom, a double-tap to zoom in, or a two-finger double tap to zoom out. You can add a map view to your interface and configure it using Interface Builder. Like many iPhone controls, much of the work of managing the map view is done by the map view's delegate.
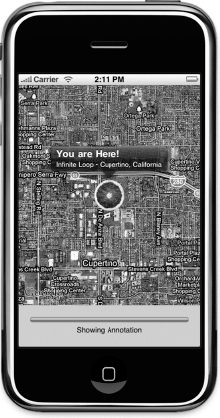
Map views are capable of displaying maps in several different ways. They can display the map as a series of lines and symbols that represent the roadways and other landmarks in the area being shown. This is the default display, and it's known as the standard map type. You can also display the map using satellite images by specifying the satellite map type, or you can use what's called the hybrid map type, where the lines representing roadways and landmarks from the standard type are superimposed on top of the satellite imagery of the satellite type. You can see an example of the default map type in Figure 11-2. Figure 11-3 shows the satellite map type and Figure 11-4 shows the hybrid map type.


Figure 11.4. The hybrid type overlays the lines and symbols of the default type on top of the imagery from the satellite type
You can set the map type in Interface Builder or by setting the map view's mapType property to one of the following:
mapView.mapType = MKMapTypeStandard;
    mapView.mapType = MKMapTypeSatellite;
mapView.mapType = MKMapTypeHybrid;Map views will, if configured to do so, use Core Location to keep track of the user's location and display it on the map using a blue dot, much like the way the Maps application does. We won't be using that functionality in this chapter's application, but you can turn it on by setting the map view's showsUserLocation property to YES, like so:
mapView.showsUserLocation = YES;
If the map is tracking the user's location, you can determine if their present location is visible in the map view by using the read-only property userLocationVisible. If the user's current location is being displayed in the map view, userLocationVisible will return YES.
You can get the specific coordinates of the user's present location from the map view by first setting showsUserLocation to YES, and then accessing the userLocation property. This property returns an instance of MKUserLocation. MKUserLocation is an object and has a property called location which itself is a CLLocation object. A CLLocation contains a property called coordinate that points to a set of coordinates. All this means you can get the actual coordinates from the MKUserLocation object, like so:
CLLocationCoordinate2D coords = mapView.userLocation.location.coordinate;
A map view wouldn't be much good if you couldn't tell it what to display or find out what part of the world it's currently showing. With map views, the key to being able to do those tasks is the MKCoordinateRegion, a struct that contains two pieces of data that together define the portion of the map to be shown in a map view.
The first member of MKCoordinateRegion is called center. This is another struct of type CLLocationCoordinate2D, which you may remember from the chapter on Core Location in Beginning iPhone 3 Development (Apress, 2009). A CLLocationCoordinate2D contains two floating point values, a latitude and longitude, and is used to represent a single spot on the globe. In the context of a coordinate region, that spot on the globe is the spot that represents the center of the map view.
The second member of MKCoordinateRegion is called span, and it's a struct of type MKCoordinateSpan. The MKCoordinateSpan struct has two members called latitudeDelta and longitudeDelta. These two numbers are used to set the zoom level of the map by identifying how much of the area around center should be displayed. These values represent that distance in degrees latitude and longitude. If latitudeDelta and longitudeDelta are small numbers, the map will be zoomed in very close; if they are large, the map will be zoomed out and show a much larger area.
Figure 11-5 shows the makeup of the MKCoordinateRegion struct.
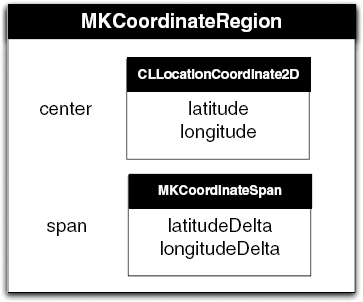
Figure 11.5. The MKCoordinateRegion represented graphically. It contains two members, both of which are, in turn, structs that own two members.
If you look back at Figure 11-2, the point of the pin you can see is at the coordinates that were passed in MKCoordinateRegion.center. The distance from the top of the map to the bottom of the map was passed in, represented as degrees latitude, using the MKCoordinateRegion.span.latitudeDelta. Similarly, the distance from the left side of the map to the right side of the map was passed in, represented as degrees longitude, as the MKCoordinateRegion.span.longitudeDelta.
Tip
If you have trouble remembering which lines are latitude and which are longitude, here's a tip from our third grade geography teacher, Mrs. Krabappel (pronounced, kruh-bopple). Latitude sounds like altitude, so latitude tells you how high on the globe you are. The equator is a line of latitude. And the Prime Meridian is a line of longitude. Thanks, Mrs. Krabappel!
There are two challenges that this approach presents to the programmer. First, who thinks in degrees latitude or longitude? Although degrees latitude represent roughly the same distance everywhere in the world, degrees longitude vary greatly in the amount of distance they represent as you move from the pole to the equator, so calculating the degrees longitude isn't as straightforward.
The second challenge is that a map view has a specific width-to-height ratio (called an aspect ratio), and the latitudeDelta and longitudeDelta you specify have to represent an area with that same aspect ratio. Fortunately, Apple provides tools for dealing with both of these issues.
Each degree of latitude represents approximately 69 miles, or about 111 kilometers, no matter where you are. This makes determining the number to pass in as the latitudeDelta of an MKCoordinateSpan fairly easy to calculate. You can just divide the lateral distance you want to display by 69 if you're using miles, or 111 if you're using kilometers.
Note
Since the earth isn't a perfect sphere (technically speaking, it's close to being an oblate spheroid), there actually is some variation between the amount of distance that one degree latitude represents, but it's not enough variation to bother factoring into our calculation, since it's only about a one degree variation from pole to equator. At the equator, one degree of latitude equals 69.046767 miles or 111.12 kilometers and the number gets a little smaller as you move toward the poles. We chose 69 and 111 because they're nice round numbers that are within 1% of the actual distance pretty much everywhere.
The distance represented by one degree longitude, however, is not quite so easy to calculate. To do the same calculation for longitude, you have to take the latitude into account, because the distance represented by one degree longitude depends on where you are in relation to the equator. To calculate the distance represented by degrees longitude, you have to perform some gnarly math. Fortunately, Apple has done the gnarly math for you and provides a method called MKCoordinateRegionMakeWithDistance() that you can use to create a region. You provide coordinates to act as the center, along with the distance in meters for the latitudinal and longitudinal span. The function will look at the latitude in the coordinates provided and calculate both delta values for you in degrees. Here is how you might create a region to show one kilometer on each side of a specific location represented by a CLLocationCoordinate2D called center:
MKCoordinateRegion viewRegion = MKCoordinateRegionMakeWithDistance(center,
    2000, 2000);
To show a kilometer on each side of center, we have to specify 2000 meters total for each span: 1000 to the left, 1000 to the right, 1000 to the top, and 1000 to the bottom. After this call, viewRegion will contain a properly formatted MKCoordinateRegion that's almost ready for use. All that's left is taking care of the aspect ratio problem.
THE GNARLY MATH
The math to calculate the distance of one degree longitude really isn't that gnarly, so we thought we'd show those of you who are interested what the man behind the curtain is doing. To calculate the distance for one degree longitude at a given latitude, the calculation is:
If Apple didn't provide a function for us, we could create a couple of macros that would accomplish the same thing just by following this formula. The radius of the earth is roughly 3963.1676 miles, or 6378.1 kilometers. So, to calculate the distance for one degree of longitude at a specific latitude contained in the variable lat, you would do this:
double longitudeMiles = ((M_PI/180.0) × 3963.1676 × cos(latitude));
You can do the same calculation to determine the distance of one degree longitude in kilometers, like so:
double longitudeKilometers = ((M_PI/180.0) × 6378.1 × cos(latitude));
If you're interested, you can find macros in the provided 11 – MapMe project in the project archive that accompanies this book. Look in the file called MapMeViewController.h for macros that implement these calculations. In this chapter, we'll use the function provided by Apple to calculate the span, but we've provided these macros for the curious, or for those who prefer to work in miles or kilometers rather than meters.
In the previous section, we showed how to create a span that showed one kilometer on each side of a given location. However, unless the map view is perfectly square, there's no way that the view can show exactly one kilometer on each of the four sides of center. If the map view is wider than it is tall, the longitudeDelta will need to be larger than the latitudeDelta. If the map view is taller than it is wide, the opposite is true.
The MKMapView class has an instance method that will adjust a coordinate region to match the map view's aspect ratio. That method is called regionThatFits:. To use it, you just pass in the coordinate region you created, and it will return a new coordinate region that is adjusted to the map view's aspect ratio. Here's how you would use it:
MKCoordinateRegion adjustedRegion = [mapView regionThatFits:viewRegion];
Once you've created a coordinate region, you can tell a map view to display that region by calling the method setRegion:animated:. If you pass YES for the second parameter, the map view will zoom, shift, or otherwise animate the view from its current location to its new location. Here is an example that creates a coordinate region, adjusts it to the map views's aspect ratio, and then tells the map view to display that region:
MKCoordinateRegion viewRegion =
        MKCoordinateRegionMakeWithDistance(center, 2000, 2000);
    MKCoordinateRegion adjustedRegion = [mapView regionThatFits:viewRegion];
[mapView setRegion:adjustedRegion animated:YES];As we mentioned earlier, map views can have delegates. Map views, unlike table views and pickers, can function without a delegate. On a map view delegate, there are a number of methods you can implement if you need to be notified about certain map-related tasks. They allow you, for example, to get notified when the user changes the part of the map they're looking at, either by dragging to reveal a new section of the map, or by zooming to reveal a smaller or larger area. You can also get notified when the map view loads new map data from the server, or when the map view fails to do so. The map view delegate methods are contained in the MKMapViewDelegate protocol, and any class that is used as a map view delegate should conform to that protocol.
The MapKit framework uses Google Maps to do its job. It doesn't store any map data locally except for temporary caches. Whenever the map view needs to go to Google's servers to retrieve new map data, it will call the delegate method mapViewWillStartLoadingMap:, and when it has successfully retrieved the map data it needs, it will call the delegate method mapViewDidFinishLoadingMap:. If you have any application-specific processing that needs to happen at either time, you can implement the appropriate method on the map view's delegate.
If MapKit encounters an error loading map data from the server, it will call the method mapViewDidFailLoadingMap:withError: on its delegate. At very least, you should implement this delegate method and inform your user of the problem so they aren't sitting there waiting for an update that will never come. Here's a very simple implementation of that method that just shows an alert and lets the user know that something went wrong:
- (void)mapViewDidFailLoadingMap:(MKMapView *)mapView
                       withError:(NSError *)error {
    UIAlertView *alert = [[UIAlertView alloc]
        initWithTitle:NSLocalizedString(@"Error loading map",
            @"Error loading map")
        message:[error localizedDescription]
        delegate:nil
        cancelButtonTitle:NSLocalizedString(@"Okay", @"Okay")
        otherButtonTitles:nil];
    [alert show];
    [alert release];
}If your map view is enabled, the user will be able to interact with it using the standard iPhone gestures, like drag, pinch in, pinch out, and double-tap. Doing so will change the region being displayed in the view. There are two delegate methods that will get called whenever this happens, if the map view's delegate implements those methods. As the gesture starts, the delegate method mapView:regionWillChangeAnimated: gets called. When the gesture stops, the method mapView:regionDidChangeAnimated: gets called. You would implement these if you had functionality that needed to happen while the view region was changing, or after it had finished changing.
Before we move on to the rest of the map view delegate methods, we need to first discuss the topic of annotations.
Map views offer the ability to tag a specific location with a set of supplementary information. That information, along with its graphic representation on the map, is called an annotation. The pin we drop in the application we're going to write (see Figure 11-2) is a form of annotation. The annotation is composed of two components, the annotation object, and an annotation view. The map view will keep track of its annotations and will call out to its delegate when it needs to display any of its annotations.
Every annotation must have an annotation object, which is almost always going to be a custom class that you write and that conforms to the protocol MKAnnotation. An annotation object is typically a fairly standard data model object whose job it is to hold whatever data is relevant to the annotation in question. The annotation object has to respond to two methods and implement a single property. The two methods that an annotation object must implement are called title and subtitle, and they are the information that will be displayed in the annotation's callout, the little floating view that pops up when the annotation is selected. Back in Figure 11-4, you can see the title and subtitle displayed in the callout. In that instance, the annotation object returned a title of You are Here!, and a subtitle of Infinite Loop • Cupertino, CA.
An annotation object must also have a property called coordinate that returns a CLLocationCoordinate2D specifying where in the world (geographically speaking) the annotation should be placed. The map view will use that location to determine where to draw the annotation.
As we said before, when a map view needs to display any of its annotations, it will call out to its delegate to retrieve an annotation view for that annotation. It does this using the method mapView:viewForAnnotation:, which needs to return an MKAnnotationView or a subclass of MKAnnotationView. The annotation view is the object that gets displayed on the map, not the floating window that gets displayed when the annotation is selected. In Figure 11-4, the annotation view is the pin in the center of the window. It's a pin because we're using a provided subclass of MKAnnotationView called MKPinAnnotationView, which is designed to draw a red, green, or purple pushpin. It also adds some additional functionality that MKAnnotationView doesn't have, such as the pin drop animation.
You can subclass MKAnnotationView and implement your own drawRect: method if you have advanced drawing needs for your annotation view. Subclassing MKAnnotationView is often unnecessary, however, because you can create an instance of MKAnnotationView and set its image property to whatever image you want. This opens up a whole world of possibilities without having to ever subclass or add subviews to MKAnnotationView (see Figure 11-6).
The map view keeps track of all of its annotations, so adding an annotation to the map is simply a matter of calling the map view's addAnnotation: method and providing an object that conforms to the MKAnnotation protocol:
[mapView addAnnotation:annotation];
You can also add multiple annotations by providing an array of annotations, using the method addAnnotations:.
[mapView addAnnotations:[NSArray arrayWithObjects:annotation1, annotation2, nil]];
You can remove annotations by using either the removeAnnotation: method, and passing in a single annotation to be removed, or by calling removeAnnotations: and passing in an array containing multiple annotations to be removed. All the map view's annotations are accessible using a property called annotations, so if you wanted to remove all annotations from the view, you could to this:
[mapView removeAnnotations:mapView.annotations];
At any given time, one and only one annotation can be selected. The selected annotation will usually display a callout, which is that floating bubble or other view that gives more detailed information about the annotation. The default callout shows the title and subtitle from the annotation. However, you can actually customize the callout, which is just an instance of UIView. We won't be providing custom callout views in this chapter's application, but the process is very similar to customizing table view cells the way we did in Chapter 8 of Beginning iPhone 3 Development. For more information on customizing a callout, check the documentation for MKAnnotationView.
Note
Although only a single annotation can currently be selected, MKMapView actually uses an instance of NSMutableArray to keep track of the selected annotations. This may be an indication that at some point in the future, map views will support selecting multiple annotations at once. Currently, if you provide a selectedAnnotations array with more than one annotation, only the first object in that array will be selected.
If the user taps an annotation's image (the push pin in Figure 11-4, or the blood orange in Figure 11-6), it selects that annotation. You can also select an annotation programmatically using the method selectAnnotation:animated: and can deselect an annotation programmatically using deselectAnnotation:animated:, passing in the annotation you want to select or deselect. If you pass YES to the second parameter, it will animate the appearance or disappearance of the callout.
Map views ask their delegate for the annotation view that corresponds to a particular annotation using a delegate method called mapView:viewForAnnotation:. This method is called anytime an annotation moves into the map view's displayed region.
Very much like the way table view cells work, annotation views are dequeued, but not deallocated when they scroll off of the screen. Implementations of mapView:viewForAnnotation: should ask the map view if there are any dequeued annotation views before allocating a new one. That means that mapView:viewForAnnotation: is going to look a fair amount like the many tableView:cellForRowAtIndexPath: methods we've written. Here's an example that creates an annotation view, sets its image property to display a custom image, and returns it:
- (MKAnnotationView *) mapView:(MKMapView *)theMapView
             viewForAnnotation:(id <MKAnnotation>) annotation {
    static NSString *placemarkIdentifier = @"my annotation identifier";
    if ([annotation isKindOfClass:[MyAnnotation class]]) {
        MKAnnotationView *annotationView = [theMapView
            dequeueReusableAnnotationViewWithIdentifier:placemarkIdentifier];
        if (annotationView == nil)  {
            annotationView = [[MKAnnotationView alloc] initWithAnnotation:annotation
reuseIdentifier:placemarkIdentifier];
annotationView.image = [UIImage imageNamed:@"blood_orange.png"];
}
else
annotationView.annotation = annotation;
return annotationView;
}
return nil;
}A few things to notice, here. First, notice that we check the annotation class to make sure it's an annotation we know about. The map view's delegate doesn't only get notified of our custom annotations. Remember, earlier, we talked about the MKUserLocation object that encapsulated the user's location. Well, that's an annotation also, and when you turn on user tracking for a map, your delegate method gets called whenever the user location needs to be displayed. You could provide your own annotation view for that, but if you return nil, the map view will use the default annotation view for it. Generally speaking, for any annotation you don't recognize, your method should return nil and the map view will probably handle it correctly.
Notice we also have an identifier value called placemarkIdentifier. This allows us to make sure we're dequeing the right kind of annotation view. We're not limited to using only one type of annotation view for all of our map's annotations, and the identifier is the way we tell which ones are used for what.
If we did dequeue an annotation view, it's important that we set its annotation property to the annotation that was passed in (annotation in the preceding example). The dequeued annotation view is almost certainly linked to some annotation, and not necessarily the one it should be linked to.
The map view may be the core of MapKit's functionality, but there's more to explore. Another big feature of MapKit is the ability to do reverse geocoding, which turns a set of coordinates into an address. Reverse geocoding works by comparing a set of coordinates with values stored in a large database (in the case of MapKit, it's Google's database) and returning data about that location. In almost all locations, reverse geocoding will be able to tell you the country and state or province that you're in. The more densely populated the area, the more information you're likely to get. If you're downtown in a large city, you might very well retrieve the street address of the building in which you are located. In most cities and towns, reverse geocoding will, at the very least, get you the name of the street you are on. The tricky thing is, you never know for sure what level of detail you're going to get back.
Reverse geocoding is handled by the MKReverseGeocoder class. It works asynchronously in the background, in much the same way as the networking classes we used in the last three chapters.
To perform reverse geocoding, you start by creating an instance of MKReverseGeocoder and initializing it with the coordinates you want to reverse geocode. Then you tell it to start.
MKReverseGeocoder *geocoder = [[MKReverseGeocoder alloc]
        initWithCoordinate:coordinates];
    geocoder.delegate = self;
    [geocoder start];
If the instance of MKReverseGeocoder is unable to resolve the coordinates, it will call the method reverseGeocoder:didFailWithError: on its delegate. Here's a simple implementation of that method that just logs the error. In your real-world applications, you'll probably want to take other actions, such as to inform the user of the problem.
- (void)reverseGeocoder:(MKReverseGeocoder *)geocoder
       didFailWithError:(NSError *)error {
    NSLog(@"Error resolving coordinates: %@", [error localizedDescription]);
    geocoder.delegate = nil;
    [geocoder autorelease];
}
Assuming the reverse geocoder doesn't hit an error, it will call the method reverseGeocoder:didFindPlacemark: to provide its delegate with all the information about the coordinates that it was able to discern. A placemark, represented by the class MKPlacemark, contains information about a specific location. It's designed to hold an address for any location in the world. As a result, it doesn't use, perhaps, the terminology you might expect it to use. You won't see street address, city, state, or ZIP. Instead, you'll see properties like thoroughfare, subthoroughfare, locality, and administrativeArea.
Here is a handy table to help map MKPlacemark's terminology to the terms with which you might be more familiar:
MKPlacemark Property | Meaning |
|---|---|
| Street address. First line if multiple lines. |
| Street address, second line (e.g., apartment or unit number, box number) |
| City |
| This might contain a neighborhood or landmark name, though it's often |
| State, province, territory, or other similar unit |
| County |
| ZIP code |
| Country |
| Two-digit ISO country code (see: |
Here's an example that pulls information from a placemark in the reverseGeocoder:didFindPlacemark: method:
- (void)reverseGeocoder:(MKReverseGeocoder *)geocoder
        didFindPlacemark:(MKPlacemark *)placemark {
    NSString *streetAddress = placemark.thoroughfare;
    NSString *city = placemark.locality;
    NSString *state = placemark.administrativeArea;
    NSString *zip = placemark.postalCode;

    // Do something with information

    geocoder.delegate = nil;
    [geocoder autorelease];
}
Notice that in both of the reverse geocoder delegate methods, when we're all done, we set the geocoder's delegate to nil and release it. Once a geocoder has either found a placemark or failed to do so, there's not much purpose it can serve, so it makes sense to clean it up forthwith.
You know what? That's enough talking about MapKit. Let's start actually using it.
Let's build an application that shows some of the basic features of the MapKit. Start by creating a new project in Xcode using the View-based Application template. Call the new project MapMe.
Before we head over to Interface Builder to design our application's interface, let's declare the outlets and actions we need. We've only got one button, so we only need one action method. We also need an outlet to that button, so we can hide it when it's not available, as well as an outlet to a progress indicator, an outlet to a label, and, of course, an outlet to a map view.
Single-click MapMeViewController.h, and replace the contents with the following:
#import <UIKit/UIKit.h>
#import <MapKit/MapKit.h>
#import <CoreLocation/CoreLocation.h>

@interface MapMeViewController : UIViewController
    <CLLocationManagerDelegate, MKReverseGeocoderDelegate, MKMapViewDelegate,
     UIAlertViewDelegate> {
    MKMapView           *mapView;
    UIProgressView      *progressBar;
    UILabel             *progressLabel;
    UIButton            *button;
}

@property (nonatomic, retain) IBOutlet MKMapView *mapView;
@property (nonatomic, retain) IBOutlet UIProgressView *progressBar; @property (nonatomic, retain) IBOutlet UILabel *progressLabel; @property (nonatomic, retain) IBOutlet UIButton *button; - (IBAction)findMe; @end
Note
Although map views are capable of tracking the user's current location, we're going to track the user's location manually using Core Location in this application. By doing it manually, we can show you more MapKit features. If you need to track the user's location in your own applications, just let the map view do it for you.
For starters, we import both the MapKit and CoreLocation header files, because we're going to use both Core Location and Map Kit in this application. Then we conform our class to a whole bunch of delegate protocols. We conform to CLLocationManagerDelegate so we can get notified by Core Location of the user's current location, MKReverseGeocoderDelegate because we're going to use MapKit's reverse geocoder, MKMapKitDelegate because we're going to be our map view's delegate and, finally, we conform to the UIAlertViewDelegate so we can get notified when the user has dismissed the alert views that we'll use to inform the user if something went wrong.
After that, we have four instance variables for each of the user interface items we're going to add in Interface Builder, and four properties, one for each instance variable, all specified with the IBOutlet keyword. We only have one action method, called findMe, which will be called when our application's lone button is pressed.
Save MapMeViewController.h and double-click MapMeViewController.xib to launch Interface Builder.
Once Interface Builder opens, look in the library for a Map View (Figure 11-7). Drag the map view over to the window titled View. Interface Builder will resize the view to fit the entire window since it's the first object we're adding. Drop it on the view so it takes up the entire area, then click and drag up on the bottom-middle resize handle to shorten the view and leave some room at the bottom for the other controls like in Figure 11-8. We made the map view 400 pixels tall, though you don't have to match that exactly. Note that you also accomplish this by typing
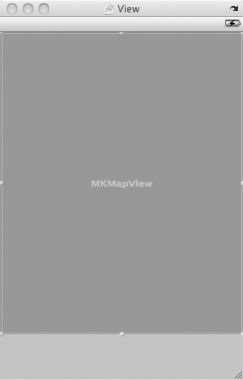
Control-drag from the map view to the File's Owner icon in the nib's main window and select delegate to make MapMeViewController the map view's delegate. Next, control-drag back from File's Owner to the map view and select the mapView outlet.
Next, drag a Round Rect Button from the library over to the window, and place it in the space below the map view, against the right margin. Double-click the newly placed button to edit its title, and type Go. Control-drag from the button you just placed to File's Owner and select the findMe action so that the new button triggers our application's one action method. Then, control-drag back from File's Owner to the button and select the button outlet.
Drag a Progress View from the library, and place it to the left of the button, with the top of the progress view and the top of the button aligned. Resize using the blue guidelines so it extends horizontally from the left margin to the right margin. It will overlap the button, and that's okay. Control-drag from File's Owner to the progress view and select the progressBar outlet. Press
Finally, drag a Label from the library over to the view and place it below the progress bar. Resize it horizontally so that it takes up the entire width from the left margin guides to the right margin guides. Control-drag from File's Owner to the label and select the progressLabel outlet. Now, use the attribute inspector to center the label's text then press
Save the nib and go back to Xcode.
We need to create a class to hold our annotation object. We're going to build a simple one that stores some address information, which we'll pull from the reverse geocoder. Single-click the Classes folder in the Groups & Files pane and then press
Once the new files have been created, single-click MapLocation.h. Replace the existing file with the following class header:
#import <Foundation/Foundation.h>
#import <MapKit/MapKit.h>

@interface MapLocation : NSObject <MKAnnotation, NSCoding> {
    NSString *streetAddress;
    NSString *city;
    NSString *state;
    NSString *zip;

    CLLocationCoordinate2D coordinate;
}

@property (nonatomic, copy) NSString *streetAddress;
@property (nonatomic, copy) NSString *city;
@property (nonatomic, copy) NSString *state;
@property (nonatomic, copy) NSString *zip;
@property (nonatomic, readwrite) CLLocationCoordinate2D coordinate;

@end
We did say that annotations were pretty standard data model classes, didn't we? We conformed this to MKAnnotation, and also to NSCoding. We're not actually going to use the archiving functionality, but it's just good habit to conform data model classes to NSCoding. We have four NSString instance variables and corresponding properties that we'll use to store address data, along with a CLLocationCoordinate2D, which will be used to track this annotation's location on the map.
Notice that we've specifically declared the coordinate property to be readwrite. The MKAnnotation protocol declares this property as readonly. We could have declared it that way as well, and then just set the coordinate property by using the underlying instance variable, but we wanted to use the property to let other classes set our annotation's coordinates. It's okay to redefine properties to be more permissive than the same property as declared in a protocol to which you've conformed, or as declared in your superclass. You can always redefine a readonly or writeonly property to be readwrite, but you have to explicitly use the readwrite keyword. Most of the time, that keyword isn't used because it's the default value and unnecessary.
Save MapLocation.h and switch over to the implementation file, MapLocation.m. Replace it with the following code:
Note
You can type the • character by pressing
#import "MapLocation.h"
#import <MapKit/MapKit.h>

@implementation MapLocation
@synthesize streetAddress;
@synthesize city;
@synthesize state;
@synthesize zip;
@synthesize coordinate;

#pragma mark -
- (NSString *)title {
    return NSLocalizedString(@"You are Here!", @"You are Here!");
}

- (NSString *)subtitle {
    NSMutableString *ret = [NSMutableString string];
    if (streetAddress)
        [ret appendString:streetAddress];
    if (streetAddress && (city || state || zip))
        [ret appendString:@" • "];
    if (city)
        [ret appendString:city];
    if (city && state)
        [ret appendString:@", "];
    if (state)
        [ret appendString:state];
    if (zip)
        [ret appendFormat:@", %@", zip];

    return ret;
}

#pragma mark -
- (void)dealloc {
    [streetAddress release];
    [city release];
    [state release];
    [zip release];
    [super dealloc];
}

#pragma mark -
#pragma mark NSCoding Methods
- (void)encodeWithCoder: (NSCoder *)encoder {
[encoder encodeObject: [self streetAddress] forKey: @"streetAddress"];
[encoder encodeObject: [self city] forKey:@"city"];
[encoder encodeObject: [self state] forKey: @"state"];
[encoder encodeObject: [self zip] forKey: @"zip"];
}
- (id) initWithCoder: (NSCoder *)decoder {
if (self = [super init]) {
[self setStreetAddress: [decoder decodeObjectForKey: @"streetAddress"]];
[self setCity: [decoder decodeObjectForKey: @"city"]];
[self setState: [decoder decodeObjectForKey: @"state"]];
[self setZip: [decoder decodeObjectForKey: @"zip"]];
}
return self;
}
@endThere really shouldn't be anything there that throws you for a loop. For the MKAnnotation protocol method, title, we just return You are Here!:
- (NSString *)title {
    return NSLocalizedString(@"You are Here!", @"You are Here!");
}
The subtitle method, however, is a little more complex. Because we don't know which data elements the reverse geocoder will give us, we have to build the subtitle string based on what we have. We do that by declaring a mutable string, and then appending the values from our non-nil, non-empty properties.
- (NSString *)subtitle {
    NSMutableString *ret = [NSMutableString string];
    if (streetAddress)
        [ret appendString:streetAddress];
    if (streetAddress && (city || state || zip))
        [ret appendString:@" • "];
    if (city)
        [ret appendString:city];
    if (city && state)
        [ret appendString:@", "];
    if (state)
        [ret appendString:state];
    if (zip)
        [ret appendFormat:@", %@", zip];

    return ret;
}
Everything else here is standard stuff you've seen dozens of times, so let's move on to implementing the MapMeViewController class. Save MapLocation.m before proceeding.
Single-click MapMeViewController.m. Replace the existing template code with the following:
#import "MapMeViewController.h"
#import "MapLocation.h"

@implementation MapMeViewController
@synthesize mapView;
@synthesize progressBar;
@synthesize progressLabel;
@synthesize button;
#pragma mark –

- (IBAction)findMe {
    CLLocationManager *lm = [[CLLocationManager alloc] init];
    lm.delegate = self;
    lm.desiredAccuracy = kCLLocationAccuracyBest;
    [lm startUpdatingLocation];

    progressBar.hidden = NO;
    progressBar.progress = 0.0;
    progressLabel.text = NSLocalizedString(@"Determining Current Location",
        @"Determining Current Location");

    button.hidden = YES;
}

- (void)openCallout:(id<MKAnnotation>)annotation {
    progressBar.progress = 1.0;
    progressLabel.text = NSLocalizedString(@"Showing Annotation",
        @"Showing Annotation");
    [mapView selectAnnotation:annotation animated:YES];
}

#pragma mark -
- (void)viewDidLoad {
    // uncomment different rows to change type
    mapView.mapType = MKMapTypeStandard;
    //mapView.mapType = MKMapTypeSatellite;
    //mapView.mapType = MKMapTypeHybrid;
}

- (void)viewDidUnload {
    self.mapView = nil;
    self.progressBar = nil;
    self.progressLabel = nil;
    self.button = nil;
}

- (void)dealloc {
    [mapView release];
    [progressBar release];
    [progressLabel release];
    [button release];
    [super dealloc];
}
#pragma mark -
#pragma mark CLLocationManagerDelegate Methods
- (void)locationManager:(CLLocationManager *)manager
didUpdateToLocation:(CLLocation *)newLocation
fromLocation:(CLLocation *)oldLocation {
if ([newLocation.timestamp timeIntervalSince1970] <
[NSDate timeIntervalSinceReferenceDate] - 60)
return;
MKCoordinateRegion viewRegion =
MKCoordinateRegionMakeWithDistance(newLocation.coordinate, 2000, 2000);
MKCoordinateRegion adjustedRegion = [mapView regionThatFits:viewRegion];
[mapView setRegion:adjustedRegion animated:YES];
manager.delegate = nil;
[manager stopUpdatingLocation];
[manager autorelease];
progressBar.progress = .25;
progressLabel.text = NSLocalizedString(@"Reverse Geocoding Location",
@"Reverse Geocoding Location");
MKReverseGeocoder *geocoder = [[MKReverseGeocoder alloc]
initWithCoordinate:newLocation.coordinate];
geocoder.delegate = self;
[geocoder start];
}
- (void)locationManager:(CLLocationManager *)manager
didFailWithError:(NSError *)error {
NSString *errorType = (error.code == kCLErrorDenied) ?
NSLocalizedString(@"Access Denied", @"Access Denied") :
NSLocalizedString(@"Unknown Error", @"Unknown Error");
UIAlertView *alert = [[UIAlertView alloc]
initWithTitle:NSLocalizedString(@"Error getting Location",
@"Error getting Location")
message:errorType
delegate:self
cancelButtonTitle:NSLocalizedString(@"Okay", @"Okay")
otherButtonTitles:nil];
[alert show];
[alert release];
[manager release];
}
#pragma mark -
#pragma mark Alert View Delegate Methods
- (void)alertView:(UIAlertView *)alertView didDismissWithButtonIndex:(NSInteger)buttonIndex {
progressBar.hidden = YES;
progressLabel.text = @"";
}#pragma mark -
#pragma mark Reverse Geocoder Delegate Methods
- (void)reverseGeocoder:(MKReverseGeocoder *)geocoder
didFailWithError:(NSError *)error {
UIAlertView *alert = [[UIAlertView alloc]
initWithTitle:NSLocalizedString(
@"Error translating coordinates into location",
@"Error translating coordinates into location")
message:NSLocalizedString(
@"Geocoder did not recognize coordinates",
@"Geocoder did not recognize coordinates")
delegate:self
cancelButtonTitle:NSLocalizedString(@"Okay", @"Okay")
otherButtonTitles:nil];
[alert show];
[alert release];
geocoder.delegate = nil;
[geocoder autorelease];
}
- (void)reverseGeocoder:(MKReverseGeocoder *)geocoder
didFindPlacemark:(MKPlacemark *)placemark {
progressBar.progress = 0.5;
progressLabel.text = NSLocalizedString(@"Location Determined",
@"Location Determined");
MapLocation *annotation = [[MapLocation alloc] init];
annotation.streetAddress = placemark.thoroughfare;
annotation.city = placemark.locality;
annotation.state = placemark.administrativeArea;
annotation.zip = placemark.postalCode;
annotation.coordinate = geocoder.coordinate;
[mapView addAnnotation:annotation];
[annotation release];
geocoder.delegate = nil;
[geocoder autorelease];
}
#pragma mark -
#pragma mark Map View Delegate Methods
- (MKAnnotationView *)mapView:(MKMapView *)theMapView
viewForAnnotation:(id <MKAnnotation>)annotation {
static NSString *placemarkIdentifier = @"Map Location Identifier";
if ([annotation isKindOfClass:[MapLocation class]]) {
MKPinAnnotationView *annotationView = (MKPinAnnotationView *)[theMapView
dequeueReusableAnnotationViewWithIdentifier:placemarkIdentifier];
if (annotationView == nil) {
annotationView = [[MKPinAnnotationView alloc]
initWithAnnotation:annotation reuseIdentifier:placemarkIdentifier];
}
else
annotationView.annotation = annotation;annotationView.enabled = YES;
annotationView.animatesDrop = YES;
annotationView.pinColor = MKPinAnnotationColorPurple;
annotationView.canShowCallout = YES;
[self performSelector:@selector(openCallout:) withObject:annotation
afterDelay:0.5];
progressBar.progress = 0.75;
progressLabel.text = NSLocalizedString(@"Creating Annotation",
@"Creating Annotation");
return annotationView;
}
return nil;
}
- (void)mapViewDidFailLoadingMap:(MKMapView *)theMapView
withError:(NSError *)error {
UIAlertView *alert = [[UIAlertView alloc]
initWithTitle:NSLocalizedString(@"Error loading map",
@"Error loading map")
message:[error localizedDescription]
delegate:nil
cancelButtonTitle:NSLocalizedString(@"Okay", @"Okay")
otherButtonTitles:nil];
[alert show];
[alert release];
}
@endLet's take it from the top, shall we? The first method in our class is the action method that gets called when the user presses a button. This is the logical starting point for our application's logic, so let's look at it first.
As we've discussed before, we could have used the map view's ability to track the user's location, but we wanted to handle things manually to show more functionality. Therefore, we allocate and initialize an instance of CLLocationManager so we can determine the user's location. We set self as the delegate, and tell the Location Manager we want the best accuracy available, before telling it to start updating the location.
- (IBAction)findMe {
    CLLocationManager *lm = [[CLLocationManager alloc] init];
    lm.delegate = self;
    lm.desiredAccuracy = kCLLocationAccuracyBest;
    [lm startUpdatingLocation];
Then, we unhide the progress bar and set the progress label to tell the user that we are trying to determine the current location.
progressBar.hidden = NO;
    progressBar.progress = 0.0;
    progressLabel.text = NSLocalizedString(@"Determining Current Location",
        @"Determining Current Location");
Lastly, we hide the button so the user can't press it again.
button.hidden = YES;
}
Next, we have a private method called openCallout: that we'll use a little later to select our annotation. We can't select the annotation when we add it to the map view. We have to wait until it's been added before we can select it. This method will allow us to select an annotation, which will open the annotation's callout, by using performSelector:withObject:afterDelay:. All we do in this method is update the progress bar and progress label to show that we're at the last step, and then use the MKMapView's selectAnnotation:animated: method to select the annotation, which will cause its callout view to be shown.
Note
We didn't declare this method in our header file, nor did we declare it in a category or extension. Yet the compiler is happy. That's because this method is located earlier in the file than the code that calls it, so the compiler knows about. If we were to move the openCallout: method to the end of the file, then we would get a compile time warning, and would have to declare the method in an extension or in our class's header file.
- (void)openCallout:(id<MKAnnotation>)annotation {
    progressBar.progress = 1.0;
    progressLabel.text = NSLocalizedString(@"Showing Annotation",
        @"Showing Annotation");
    [mapView selectAnnotation:annotation animated:YES];
}
In the viewDidLoad method, we gave you code to try out all three map types, with two of them commented out. This is just to make it easier for you to change the one you're using and experiment a little.
- (void)viewDidLoad {
    // uncomment different rows to change type
    mapView.mapType = MKMapTypeStandard;
    //mapView.mapType = MKMapTypeSatellite;
    //mapView.mapType = MKMapTypeHybrid;
}
Both viewDidUnload and dealloc are standard, so we won't talk about them. After those, we get to our various delegate methods. First up is the location manager delegate method where we're notified of the user's location. We did something here that we didn't do in Beginning iPhone 3 Development, which is to check the timestamp of newLocation and make sure it's not more than a minute old.
In the application we built in the first book, we wanted to keep getting updates while the application was running. In this application, we only want to know the current location once, but we don't want a cached location. Location Manager caches locations so that it has quick access to the last known location. Since we're only going to use one update, we want to discard any stale location data that was pulled from the location manager's cache.
- (void)locationManager:(CLLocationManager *)manager
    didUpdateToLocation:(CLLocation *)newLocation
fromLocation:(CLLocation *)oldLocation {
if ([newLocation.timestamp timeIntervalSince1970] <
[NSDate timeIntervalSinceReferenceDate] - 60)
return;Once we've made sure we have a fresh location, taken within the last minute, we then use the MKCoordinateRegionMakeWithDistance() function to create a region that shows one kilometer on each side of the user's current location.
MKCoordinateRegion viewRegion =
        MKCoordinateRegionMakeWithDistance(newLocation.coordinate, 2000, 2000);
We then adjust that region to the aspect ratio of our map view and then tell the map view to show that new adjusted region.
MKCoordinateRegion adjustedRegion = [mapView regionThatFits:viewRegion];
    [mapView setRegion:adjustedRegion animated:YES];
Now that we've gotten a non-cache location, we're going to stop having the location manager give us updates. Location updates are a drain on the battery, so when you don't want any more updates, you'll want to shut location manager down, like so:
manager.delegate = nil;
    [manager stopUpdatingLocation];
    [manager autorelease];
Then we update the progress bar and label to let them know where we are in the whole process. This is the first of four steps after the Go button is pressed, so we set progress to .25, which will show a bar that is one-quarter blue.
progressBar.progress = .25;
    progressLabel.text = NSLocalizedString(@"Reverse Geocoding Location",
        @"Reverse Geocoding Location");
Next, we allocate an instance of MKReverseGeocoder using the current location pulled from newLocation. We set self as the delegate and kick it off.
MKReverseGeocoder *geocoder = [[MKReverseGeocoder alloc]
        initWithCoordinate:newLocation.coordinate];
    geocoder.delegate = self;
    [geocoder start];
}
Note
We didn't release geocoder here, nor did we release the location manager in the findMe method. In both cases, we autorelease the objects in the last delegate method we use.
If the location manager encounters an error, we just show an alert. Not the most robust error handling, but it'll do for this.
- (void)locationManager:(CLLocationManager *)manager
       didFailWithError:(NSError *)error {

    NSString *errorType = (error.code == kCLErrorDenied) ?
    NSLocalizedString(@"Access Denied", @"Access Denied") :
    NSLocalizedString(@"Unknown Error", @"Unknown Error");
UIAlertView *alert = [[UIAlertView alloc]
initWithTitle:NSLocalizedString(@"Error getting Location",
@"Error getting Location")
message:errorType
delegate:self
cancelButtonTitle:NSLocalizedString(@"Okay", @"Okay")
otherButtonTitles:nil];
[alert show];
[alert release];
[manager release];
}Our alert view delegate method just hides the progress bar and sets the progress label to an empty string. For simplicity's sake, we're just dead-ending the application if a problem occurs. In your apps, you'll probably want to do something a little more user-friendly.
- (void)alertView:(UIAlertView *)alertView
didDismissWithButtonIndex:(NSInteger)buttonIndex {
    progressBar.hidden = YES;
    progressLabel.text = @"";
}
If the reverse geocoding fails, we do basically the same thing we'd do if the location manager failed: put up an alert and dead-end the process.
- (void)reverseGeocoder:(MKReverseGeocoder *)geocoder
       didFailWithError:(NSError *)error {
    UIAlertView *alert = [[UIAlertView alloc]
                          initWithTitle:NSLocalizedString(
                              @"Error translating coordinates into location",
                              @"Error translating coordinates into location")
                          message:NSLocalizedString(
                              @"Geocoder did not recognize coordinates",
                              @"Geocoder did not recognize coordinates")
                          delegate:self
                          cancelButtonTitle:NSLocalizedString(@"Okay", @"Okay")
                          otherButtonTitles:nil];
    [alert show];
    [alert release];

    geocoder.delegate = nil;
    [geocoder autorelease];
}
If the reverse geocoder succeeded, however, we update the progress bar and progress label to inform the user that we're one step further along in the process.
- (void)reverseGeocoder:(MKReverseGeocoder *)geocoder
       didFindPlacemark:(MKPlacemark *)placemark {
    progressBar.progress = 0.5;
    progressLabel.text = NSLocalizedString(@"Location Determined",
        @"Location Determined");
Then, we allocate and initialize an instance of MapLocation to act as the annotation that represents the user's current location. We assign its properties from the returned placemark.
MapLocation *annotation = [[MapLocation alloc] init];
    annotation.streetAddress = placemark.thoroughfare;
    annotation.city = placemark.locality;
    annotation.state = placemark.administrativeArea;
    annotation.zip = placemark.postalCode;
    annotation.coordinate = geocoder.coordinate;
Once we have our annotation, we add it to the map view and release it.
[mapView addAnnotation:annotation];

    [annotation release];
And, then, to be good memory citizens, we set the geocoder's delegate to nil and autorelease it.
geocoder.delegate = nil;
    [geocoder autorelease];
}
When the map view for which we are the delegate needs an annotation view, it will call this next method. The first thing we do is declare an identifier so we can dequeue the right kind of annotation view, then we make sure the map view is asking us about a type of annotation that we know about.
- (MKAnnotationView *) mapView:(MKMapView *)theMapView
             viewForAnnotation:(id <MKAnnotation>) annotation {
    static NSString *placemarkIdentifier = @"Map Location Identifier";
    if ([annotation isKindOfClass:[MapLocation class]]) {
If it is, we dequeue an instance of MKPinAnnotationView with our identifier. If there are no dequeued views, we create one. We could also have used MKAnnotationView here instead of MKPinAnnotationView. In fact, there's an alternate version of this project in the project archive that shows how to use MKAnnotationView to display a custom annotation view instead of a pin.
MKPinAnnotationView *annotationView = (MKPinAnnotationView *)[theMapView
            dequeueReusableAnnotationViewWithIdentifier:placemarkIdentifier];
        if (annotationView == nil)  {
            annotationView = [[MKPinAnnotationView alloc]
                initWithAnnotation:annotation reuseIdentifier:placemarkIdentifier];
        }
If we didn't create a new view, it means we got a dequeued one from the map view. In that case, we have to make sure the dequeued view is linked to the right annotation.
else
            annotationView.annotation = annotation;
Then we do some configuration. We make sure the annotation view is enabled so it can be selected, we set animatesDrop to YES because this is a pin view, and we want it to drop onto the map the way pins are wont to do. We set the pin color to purple, and make sure that it can show a callout.
annotationView.enabled = YES;
        annotationView.animatesDrop = YES;
        annotationView.pinColor = MKPinAnnotationColorPurple;
        annotationView.canShowCallout = YES;
After that, we use performSelector:withObject:afterDelay: to call that private method we created earlier. We can't select an annotation until its view is actually being displayed on the map, so we wait half a second to make sure that's happened before selecting. This will also make sure that the pin has finished dropping before the callout is displayed.
[self performSelector:@selector(openCallout:) withObject:annotation
            afterDelay:0.5];
We need to update the progress bar and text label to let the user know that we're almost done.
progressBar.progress = 0.75;
        progressLabel.text = NSLocalizedString(@"Creating Annotation",
            @"Creating Annotation");
Then we return the annotation view.
return annotationView;
    }
If the annotation wasn't one we recognize, we return nil and our map view will use the default annotation view for that kind of annotation.
return nil;
}
And, lastly, we implement mapViewDidFailLoadingMap:withError: and inform the user if there was a problem loading the map. Again, our error checking in this application is very rudimentary; we just inform the user and stop everything.
- (void)mapViewDidFailLoadingMap:(MKMapView *)theMapView
                       withError:(NSError *)error {
    UIAlertView *alert = [[UIAlertView alloc]
                          initWithTitle:NSLocalizedString(@"Error loading map",
                              @"Error loading map")
                          message:[error localizedDescription]
                          delegate:nil
                          cancelButtonTitle:NSLocalizedString(@"Okay", @"Okay")
                          otherButtonTitles:nil];
    [alert show];
    [alert release];
}Before you can build and run your app, you need to right-click on the Frameworks folder in the Groups & Files pane and select Existing Frameworks... from the Add submenu. Select CoreLocation.framework and MapKit.framework and click the Add... button.
You should now be able to build and run your application, so do that, and try it out. Try experimenting with the code. Change the map type, add more annotations, or try experimenting with custom annotation views.
That brings us to the end of our discussion of MapKit. You've seen the basics of how to use MapKit, annotations, and the reverse geocoder. You've seen how to create coordinate regions and coordinate spans to specify what area the map view should show to the user, and you've learned how to use MapKit's reverse geocoder to turn a set of coordinates into a physical address.
Now, armed with your iPhone, MapKit, and sheer determination, navigate your way one page to the East, err... right, so that we can talk about in-application e-mail.