The iPhone, in addition to being a phone, is a first-class music player as well. Out of the box, people can (and do) use it to listen to music, podcasts, and audio books. Of course, it goes without saying that the iPod touch is also a music player.
iPhone SDK programs have always been able to play sounds and music, but with the 3.0 SDK, we now have access to our user's entire audio library. This means, for example, that games can provide a soundtrack or allow users to create one from their own music library. In this chapter, we're going to explore the various aspects of finding and playing the user's own music.
In this chapter, we're going to build an application that lets users create a queue of songs from the music stored on their iPod touch or iPhone.
Note
We'll use the term queue to describe our application's list of songs, rather than the term playlist. When working with the iPod library, the term playlist refers to actual playlists synchronized from iTunes. Those playlists can be read, but they can't be created using the SDK. To avoid confusion, we'll stick with the term queue.
We'll allow users to select songs in two ways:
Enter a search term for titles they want to add to their queue (Figure 13-1).
Choose specific songs using the iPod's media picker, which is essentially the iPod application presented modally from within our application (Figure 13-2). Using the media picker, our user can select audio tracks by album, song, or playlist, or using any other approach that the iPod application supports (with the exception of Cover Flow).

Figure 13.1. Our application's main page. The user can add songs to the list of songs to be played by entering a partial title into the Title Search text field and pressing the Append Matching Songs button.
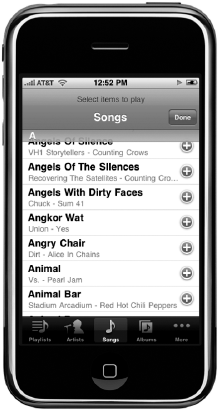
Figure 13.2. Users can also use the iPod media picker to select songs to add to our application's queue.
When our application launches, it will check to see if music is currently playing. If so, it will allow that music to keep playing and will append any requested music to the end of the list of songs to be played.
Tip
If your application needs to play a certain sound or music, you may feel that it's appropriate to turn off the user's currently playing music, but you should do that with caution. If you're just providing a soundtrack, you really should consider letting the music that's playing continue playing, or at least giving the users the choice about whether to turn off their chosen music in favor of your application's music. It is, of course, your call, but tread lightly when it comes to stomping on your user's music.
As you can see in Figure 13-1, the currently selected song will have a small icon to the left of it in the table: either a small play triangle, if it's actually being played, or a small pause symbol, if it's paused. The user can play and pause, skip to the next or previous track, seek forward and backward within the current songs, and delete items from the queue.
The application we'll build isn't very practical, because everything we're offering to our users (and more) is already available in the iPod application on the iPhone or the Music application on the iPod touch. But writing it will allow us to explore almost all of the tasks your own application might ever need to perform with regard to the iPod library.
Warning
This chapter's application must be run on an actual iPhone or iPod touch. The iPhone simulator does not have access to the iPod library on your computer, and any of the calls related to the iPod library access APIs will result in an error on the simulator.
The methods and objects used to access the iPod library are part of the MediaPlayer framework, which allows applications to play both audio and video. Currently, only audio tracks from our user's media library can be accessed using the MediaPlayer framework, but the framework also provides tools for playing back video files pulled from the Web or from an application's bundle.
The collection of audio files on your user's device is referred to as the iPod library. This is a generic term that applies to all the audio tracks on either an iPod touch or an iPhone. You will interact with several classes when using the iPod library. The entire iPod library itself is represented by the class MPMediaLibrary. You won't use this object very often, however. It's primarily used only when you need to be notified of changes made to the library while your application is running. It's pretty rare for changes to be made to the library while your application is running, since such changes will usually happen as the result of synchronizing your device with your computer.
A specific audio item from your iPod library is called a media item, which is represented by the class MPMediaItem. If you wish to play songs from one of your user's playlists, you will use the class MPMediaPlaylist, which represents the playlists that were created in iTunes and synchronized to your user's device. To search for either media items or playlists in the iPod library, you use a media query, which is represented by the class MPMediaQuery. Media queries will return all media items or playlists that match whatever criteria you specify. To specify criteria for a media query, you use a special media-centric form of predicate called a media property predicate, represented by the class MPMediaPropertyPredicate.
Another way to let your user select media items is to use the media picker controller, which is an instance of MPMediaPickerController. The media picker controller allows your users to use the same basic interface they are accustomed to using from the iPod or Music application.
You can play media items using a music player controller, which is done by creating an instance of MPMusicPlayerController. Music player controllers are not view controllers. They are responsible for playing audio and managing a list of media items to be played. Generally speaking, you are expected to provide any necessary user interface elements, such as buttons to play or pause, or to skip forward or backward.
Note
Don't confuse MPMusicPlayerController with MPMoviePlayerController. Unlike MPMoviePlayerController, MPMusicPlayerController is not a view controller. A movie player controller is a view controller that takes over the screen completely. A music player controller, on the other hand, just controls the music, doing things like managing the queue, stopping, starting, and skipping forward through songs. Since it is not a view controller, it has no direct impact on your application's user interface or visual appearance. It is responsible only for playing and manipulating the playback of audio.
If you want to specify a list of media items to be played by a music player controller, you use a media item collection, represented by instances of the class MPMediaItemCollection. Media item collections are immutable collections of media items. A media item may appear in more than one spot in the collection, meaning you could conceivably create a collection that played "Happy Birthday to You" a thousand times, followed by a single playing of "Rock the Casbah." You could do that ... if you really wanted to.
The class that represents media items, MPMediaItem, works a little differently than most Objective-C classes. You would probably expect MPMediaItem to include properties for things like title, artist, album name, and the like. But that's not the case. Other than those inherited from NSObject and the two NSCoding methods used to allow archiving, MPMediaItem includes only a single instance method, called valueForProperty:.
valueForProperty: works much like an instance of NSDictionary, only with a limited set of defined keys. So, for example, if you wanted to retrieve a media item's title, you would call valueForProperty: and specify the key MPMediaItemPropertyTitle, and the method would return an NSString instance with the audio track's title. Media items are immutable on the iPhone, so all MPMediaItem properties are read-only.
Some media item properties are said to be filterable. Filterable media item properties are those that can be searched on, a process we'll look at a little later in the chapter.
Every media item has a persistent identifier (or persistent ID), which is a number associated with the item that won't ever change. If you need to store a reference to a particular media item, you should store the persistent ID, because it is generated by iTunes, and you can count on it staying the same over time.
You can retrieve the persistent ID of a media track using the property key MPMediaItemPropertyPersistentID, like so:
NSNumber *persistentId = [mediaItem
    valueForProperty:MPMediaItemPropertyPersistentID];
Persistent ID is a filterable property, which means that you can use a media query to find an item based on its persistent ID. Storing the media item's persistent ID is the surest way to guarantee you'll get the same object each time you search. We'll talk about media queries a bit later in the chapter.
All media items have a type associated with them. Currently, media items are classified using three categories: music, podcast, and audio book. You can determine a particular media item's type by asking for the MPMediaItemPropertyMediaType property, like so:
NSNumber *type = [mediaItem valueForProperty:MPMediaItemPropertyMediaType];
Media items may consist of more than a single type. A podcast, for example, could be a reading of an audio book. As a result, media type is implemented as a bit field (sometimes called bit flags).
Note
Bit fields are commonly used in C, and Apple employs them in many places throughout its frameworks. If you're not completely sure how bit fields are used, you can check out Chapter 11 of Learn C on the Mac by Dave Mark (Apress, 2008). You can find a good summary of the concept on Wikipedia as well: http://en.wikipedia.org/wiki/Bitwise_operation.
With bit fields, a single integer datatype is used to represent multiple, nonexclusive Boolean values, rather than a single number. To convert type (an object) into an NSInteger, which is the documented integer type used to hold media types, use the integerValue method, like so:
NSInteger mediaType = [type integerValue];
At this point, each bit of mediaType represents a single type. To determine if a media item is a particular type, you need to use the bitwise AND operator (&) to compare mediaType with system-defined constants that represent the available media types. Here is a list of the current constants:
To check if a given item contains music, for example, you would take the mediaType you retrieved and do this:
if (mediaType & MPMediaTypeMusic) {
    // It is music...
}MPMediaTypeMusic's bits are all set to 0, except for the one bit that's used to represent that a track contains music, which is set to 1. When you do a bitwise AND (&) between that constant and the retrieved mediaType value, the resulting value will have 0 in all bits except the one that's being checked. That bit will have a 1 if mediaType has the music bit set, or 0 if it doesn't. In Objective-C, an if statement that evaluates a bitwise AND or OR operation will fire on any nonzero result; the code that follows will run if mediaType's music bit is set; otherwise, it will be skipped.
Media type is a filterable property, so you can specify in your media queries (which we'll talk about shortly) that they should return media of only specific types.
Note
additional constants are defined for media types: MPMediaTypeAnyAudio and MPMediaTypeAny. These could theoretically be used to check the returned type; however, there's currently little reason to use these constants in that way. Because the only media types currently supported are all audio, every valid media item will always check positive when compared to either of these constants.
There are several string properties that you might want to retrieve from a media item, including the track's title, its genre, the artist, and the album name. Here are the filterable string property constants you can use:
MPMediaItemPropertyTitle: Returns the track's title, which usually means the name of the song or podcast episode.MPMediaItemPropertyAlbumTitle: Returns the name of the track's album.MPMediaItemPropertyArtist: Returns the name of the artist who recorded the track.MPMediaItemPropertyAlbumArtist: Returns the name of the principal artist behind the track's album.MPMediaItemPropertyGenre: Returns the track's genre (e.g., Classical, Rock, or Alternative).MPMediaItemPropertyComposer: Returns the name of the track's composer.MPMediaItemPropertyPodcastTitle: If the track is a podcast, returns the podcast's name.
Although the title and artist will almost always be known, none of these properties are guaranteed to return a value, so it's important to code defensively any time your program logic includes one of these values. Although unlikely, a media track can exist without a specified name or artist.
Here's an example that retrieves a string property from a media item:
NSString *title = [mediaItem valueForProperty:MPMediaItemPropertyTitle];
Nearly anything that you can determine about a song or other audio track in iTunes can be retrieved from a media item. The numeric values in the following list are not filterable—in other words, you can't use them in your media property predicates. You can't, for example, retrieve all the tracks that are longer than four minutes in length. But once you have a media item, there's a wealth of information available about that item.
MPMediaItemPropertyPlaybackDuration: Returns the length of the track in seconds.MPMediaItemPropertyAlbumTrackNumber: Returns the number of this track on its album.MPMediaItemPropertyAlbumTrackCount: Returns the number of tracks on this track's album.MPMediaItemPropertyDiscNumber: If the track is from a multiple-album collection, returns the track's disc number.MPMediaItemPropertyDiscCount: If the track is from a multiple-album collection, returns the total number of discs in that collection.MPMediaItemPropertyPlayCount: Returns the total number of times that this track has been played.MPMediaItemPropertySkipCount: Returns the total number of times this track has been skipped.MPMediaItemPropertyRating: Returns the track's rating, or 0 if the track has not been rated.
Numeric attributes are always returned as instances of NSNumber. The track duration is an NSTimeInterval, which can be retrieved from NSNumber by using the doubleValue method. The rest are unsigned integers that can be retrieved using the unsignedIntegerValue method.
Here are a few examples of retrieving numeric properties from a media item:
NSNumber *durationNum = [mediaItem valueForProperty:
        MPMediaItemPropertyPlaybackDuration];
     NSTimeInterval duration = [durationNum doubleValue];

     NSNumber *trackNum = [mediaItem valueForProperty:
        MPMediaItemPropertyAlbumTrackNumber];
NSUInteger trackNumber = [trackNum unsignedIntegerValue];If a media track has lyrics associated with it, you can retrieve those using the property key MPMediaItemPropertyLyrics. The lyrics will be returned in an instance of NSString, like so:
NSString *lyrics = [mediaItem valueForProperty:MPMediaItemPropertyLyrics];
Some media tracks have a piece of artwork associated with them. In most instances, this will be the track's album's cover picture, though it could be something else. You retrieve the album artwork using the property key MPMediaItemPropertyArtwork, which returns an instance of the class MPMediaItemArtwork. The MPMediaItemArtwork class has a method that returns an instance of UIImage to match a specified size. Here's some code to get the album artwork for a media item that would fit into a 100-by-100 pixel view:
MPMediaItemArtwork *art = [mediaItem
        valueForProperty:MPMediaItemPropertyArtwork];
     CGSize imageSize = {100.0, 100.0};
UIImage *image = [art imageWithSize:imageSize];One last piece of data that you can retrieve from a media item is the date and time when it was last played. You can retrieve that in the form of an NSDate instance by using the property key MPMediaItemPropertyLastPlayedDate, like so:
NSDate *lastPlayed = [mediaItem
    valueForProperty:MPMediaItemPropertyLastPlayedDate];
Media items can be grouped into collections, creatively called media item collections. In fact, this is how you specify a list of media items to be played by the music player controller. Media item collections, which are represented by the class MPMediaItemCollection, are immutable collections of media items. You can create new media item collections, but you can't change the contents of the collection once it has been created.
The easiest way to create a media item collection is to put all the media items you want to be in the collection into an instance of NSArray, in the order you want them. You can then pass the instance of NSArray to the factory method collectionWithItems:, like so:
NSArray *items = [NSArray arrayWithObjects:mediaItem1, mediaItem2, nil];
     MPMediaItemCollection *collection = [MPMediaItemCollection
collectionWithItems:items];To retrieve a specific media item from a media item collection, you use the instance method items, which returns an NSArray instance containing all of the media items in the order they exist in the collection. If you want to retrieve the specific media item at a particular index, for example, you would do this:
MPMediaItem *item = [[mediaCollection items] objectAtIndex:5];
Because media item collections are immutable, you can't add items to a collection, nor can you append the contents of another media item collection onto another one. Since you can get to an array of media items contained in a collection using the instance method items, however, you can make a mutable copy of the items array, manipulate the mutable array's contents, and then create a new collection based on the modified array.
Here's some code that appends a single media item onto the end of an existing collection:
NSMutableArray *items = [[originalCollection items] mutableCopy];
     [items addObject:mediaItem];
     MPMediaItemCollection *newCollection = [MPMediaItemCollection
        collectionWithItems:items];
     [items release];
Similarly, to combine two different collections, you would combine their items and create a new collection from the combined array:
NSMutableArray *items = [[firstCollection items] mutableCopy];
     [items addObjectsFromArray:[secondCollection items]];
     MPMediaItemCollection *newCollection = [MPMediaItemCollection
        collectionWithItems:items];
    [items release];
To delete an item or items from an existing collection, you can use the same basic technique. You can retrieve a mutable copy of the items contained in the collection, delete the ones you want to remove, then create a new collection based on the modified copy of the items, like so:
NSMutableArray *items = [[originalCollection items] mutableCopy];
     [items removeObject:mediaItemToDelete];
     MPMediaItemCollection *newCollection = [MPMediaItemCollection
        collectionWithItems:items];
[items release];To search for media items in the iPod library, you use media queries, which are instances of the class MPMediaQuery. A number of factory methods can be used to retrieve media items from the library sorted by a particular property. For example, if you wanted a list of all media items sorted by artist, you would use the artistsQuery class method to create an instance of MPMediaQuery configured, like this:
MPMediaQuery *artistsQuery = [MPMediaQuery artistsQuery];
Table 13-1 lists the factory methods on MPMediaQuery.
Table 13.1. MPMediaQuery Factory Methods
Factory Method | Included Media Types | Grouped/Sorted By |
|---|---|---|
| Music | Album |
| Music | Artist |
| Audio Books | Title |
| Any | Album[a] |
| Any | Composer |
| Any | Genre |
| Any | Playlist |
| Podcasts | Podcast Title |
| Music | Title |
[a] Includes only albums with | ||
These factory methods are useful for displaying the entire contents of the user's library that meet preset conditions. That said, you will often want to restrict the query to an even smaller subset of items. You can do that using a media property predicate. Media property predicates can be created on any of the filterable properties of a media item, including the persistent ID, media type, or any of the string properties (like title, artist, or genre).
To create a media property predicate on a filterable property, use the class MPMediaPropertyPredicate. Create new instances using the factory method predicateWithValue:forProperty:comparisonType:. Here, for example, is how you would create a media property predicate that searched for all songs with the title "Happy Birthday":
MPMediaPropertyPredicate *titlePredicate =
    [MPMediaPropertyPredicate predicateWithValue:@"Happy Birthday"
        forProperty:MPMediaItemPropertyTitle
        comparisonType:MPMediaPredicateComparisonContains];
The first value you pass—in this case, @"Happy Birthday"—is the comparison value. The second value is the filterable property you want that comparison value compared to. By specifying MPMediaItemPropertyTitle, we're saying we want the song titles compared to the string "Happy Birthday". The last item specifies the type of comparison to do. You can pass MPMediaPredicateComparisonEqualTo to look for an exact match to the specified string, or MPMediaPredicateComparisonContains to look for any item that contains the passed value as a substring.
Note
Media queries are always case-insensitive, regardless of the comparison type used. Therefore, the preceding example would also return songs called "HAPPY BIRTHDAY" and "Happy BirthDAY."
Because we've passed MPMediaPredicateComparisonContains, this predicate would match "Happy Birthday, the Opera" and "Slash Sings Happy Birthday," in addition to plain old "Happy Birthday." Had we passed MPMediaPredicateComparisonEqualTo, then only the last one—the exact match—would be found.
You can create and pass multiple media property predicates to a single query. If you do, the query will use the AND logical operator and return only the media items that meet all of your predicates.
To create a media query based on media property predicates, you use the init method initWithFilterPredicates:, and pass in an instance of NSSet containing all the predicates you want it to use, like so:
MPMediaQuery *query = [[MPMediaQuery alloc] initWithFilterPredicates:[NSSet
        setWithObject:titlePredicate]];
Once you have a query—whether it was created manually or retrieved using one of the factory methods—there are two ways you can execute the query and retrieve the items to be displayed:
You can use the
itemsproperty of the query, which returns an instance ofNSArraycontaining all the media items that meet the criteria specified in your media property predicates, like so:NSArray *items = query.items;
You can use the property
collectionsto retrieve the objects grouped by one of the filterable properties. You can tell the query which property to group the items by setting thegroupingTypeproperty to the property key for the filterable attribute you want it grouped by. If you don't setgroupingType, it will default to grouping by title.
When you access the collections property, the query will instead return an array of MPMediaItemCollections, with one collection for each distinct value in your grouping type. So, if you specified a groupingType of MPMediaGroupingArtist, for example, the query would return an array with one MPMediaItemCollection for each artist who has at least one song that matches your criteria. Each collection would contain all the songs by that artist that meet the specified criteria. Here's what that might look like in code:
query.groupingType = MPMediaGroupingArtist;
     NSArray *collections = query.collections;
     for (MPMediaItemCollection *oneCollection in collections) {
         // oneCollection has all songs by one artist that meet criteria
     }
You need to be very careful with media queries. They are synchronous and, if performed in an action or delegate method, will block the main thread while the search is performed, so if you specify a query that returns 100,000 media items, your user interface is going to hiccup while those items are found, retrieved, and stored in collections or an array. If you are using a media query that might return more than a dozen or so media items, you might want to consider moving that action off the main thread. We'll look at how to move operations off of the main thread in Chapter 14.
If you want to let your users select specific media items from their library, you'll want to use the media picker controller. The media picker controller lets your users choose songs from their iPod library using an interface that's nearly identical to the one in the iPod or Music application they're already used to using. Your users will not be able to use Cover Flow, but they will be able to select from lists sorted by song title, artist, playlist, album, and genre, just as they can when selecting music in the iPod or Music application (Figure 13-2).
The media picker controller is extremely easy to use. It works just like many of the other provided controller classes that we've covered in the previous chapters, such as the image picker controller and the mail compose view controller that we used in Chapter 12. Create an instance of MPMediaPickerController, assign it a delegate, and then present it modally, like so:
MPMediaPickerController *picker = [[MPMediaPickerController alloc]
        initWithMediaTypes:MPMediaTypeMusic];
     picker.delegate = self;
     [picker setAllowsPickingMultipleItems:YES];
     picker.prompt = NSLocalizedString(@"Select items to play",
        @"Select items to play");
     [self presentModalViewController:picker animated:YES];
    [picker release];
When you create the media picker controller instance, you need to specify a media type. This can be one of the three values we talked about earlier—MPMediaTypeMusic, MPMediaTypePodcast, or MPMediaTypeAudioBook—or you can use MPMediaTypeAny to let your users select any media item in their library. You can also pass MPMediaTypeAnyAudio, which will currently return any media item, but if future versions of the SDK expand the media types that can be accessed using a media query, then the query will exclude those other types that might be added, such as video.
You can also use the bitwise OR (|) operator to let your user select any combination of media types. For example, if you wanted to let your user select from podcasts and audio books, but not music, you would create your picker like this:
MPMediaPickerController *picker = [[MPMediaPickerController alloc]
        initWithMediaTypes:MPMediaTypePodcast | MPMediaTypeAudioBook ];
By using the bitwise OR operator with these constants, you end up passing an integer that has the bits representing both of these media types set to 1 and all the other bits set to 0.
Also notice that we need to tell the media picker controller to allow the user to select multiple items. The default behavior of the media picker is to let the user choose one, and only one, item. If that's the behavior you want, then you don't need to do anything, but if you want to let the user select multiple items, you must explicitly tell it so.
The media picker also has a property called prompt, which is a string that will be displayed above the navigation bar in the picker (see the top of Figure 13-2). This is optional, but generally a good idea.
The media picker controller's delegate needs to conform to the protocol MPMediaPickerControllerDelegate. This defines two methods: one that is called if the user taps the Cancel button and another that is called if the user chooses one or more songs.
If, after you present the media picker controller, the user hits the Cancel button, the delegate method mediaPickerDidCancel: will be called. You must implement this method on the media picker controller's delegate, even if you don't have any processing that needs to be done when the user cancels, since you must dismiss the modal view controller. Here is a minimal, but fairly standard, implementation of that method:
- (void) mediaPickerDidCancel: (MPMediaPickerController *) mediaPicker {
    [self dismissModalViewControllerAnimated: YES];
}If the user selected one or more media items using the media picker controller, then the delegate method mediaPicker:didPickMediaItems: will be called. This method must be implemented, not only because it's the delegate's responsibility to dismiss the media picker controller, but also because this method is the only way to know which tracks your user selected. The selected items are grouped in a media item collection.
Here's a very simple example implementation of mediaPicker:didPickMediaItems: that assigns the returned collection to one of the delegate's properties:
- (void)mediaPicker: (MPMediaPickerController *) mediaPicker
   didPickMediaItems: (MPMediaItemCollection *) theCollection {
    [self dismissModalViewControllerAnimated: YES];
    self.collection = theCollection;
}
The last component used to access the iPod library is the music player controller, which allows you to play a queue of media items by specifying either a media item collection or a media query. As we stated earlier, the music player controller has no visual elements. It's an object that plays the audio. It allows you to manipulate the playback of that audio by skipping forward or backward, telling it which specific media item to play, adjusting the volume, or skipping to a specific playback time in the current item.
The iPod library offers two completely different kinds of music player controllers: the iPod music player and the application music player. The way you use them is identical, but there's a key difference in how they work. The iPod music player is the one that's used by the iPod and Music apps. As is the case with those apps, when you quit your app while music is playing, the music continues playing. In addition, when the user is listening to music and starts up an app that uses the iPod music player, the iPod music player will keep playing that music. In contrast, the application music player will kill the music when your app terminates.
There's a bit of a gotcha here in that both the iPod and the application music player controllers can be used at the same time. If you use the application music player controller to play audio, and the user is currently listening to music, both will play simultaneously. This may or may not be what you want to happen, so you will usually want to check the iPod music player to see if there is music currently playing, even if you actually plan to use the application music player controller for playback.
To get either of the music player controllers, use one of the factory methods on MPMusicPlayerController. To retrieve the iPod music player, use the method iPodMusicPlayer, like so:
MPMusicPlayerController *thePlayer = [MPMusicPlayerController iPodMusicPlayer];
Retrieving the application music player controller is done similarly, using the applicationMusicPlayer method instead, like this:
MPMusicPlayerController *thePlayer = [MPMusicPlayerController
applicationMusicPlayer];Once you create an application music player, you'll need to give it something to play. But if you grab the iPod music player controller, it could very well already be playing something. You can determine if it is by looking at the playbackState property of the player. If it's currently playing, it will be set to MPMusicPlaybackStatePlaying.
if (player.playbackState == MPMusicPlaybackStatePlaying) {
        // playing
}There are two ways to specify the music player controller's queue of audio tracks: provide a media query or provide a media item collection. If you provide a media query, the music player controller's queue will be set to the media items returned by the items property. If you provide a media item collection, it will use the collection you pass as its queue. In either case, you will replace the existing queue with the items in the query or collection you pass in. Setting the queue will also reset the current track to the first item in the queue.
To set the music player's queue using a query, use the method setQueueWithQuery:. For example, here's how you would set the queue to all songs, sorted by artist:
MPMusicPlayerController *player = [MPMusicPlayerController iPodMusicPlayer];
     MPMediaQuery *artistsQuery = [MPMediaQuery artistsQuery];
    [player setQueueWithQuery:artistsQuery];
Setting the queue with a media item collection is accomplished with the method setQueueWithItemCollection:, like so:
MPMusicPlayerController *player = [MPMusicPlayerController iPodMusicPlayer];
     NSArray *items = [NSArray arrayWithObjects:mediaItem1, mediaItem2, nil];
     MPMediaItemCollection *collection = [MPMediaItemCollection
        collectionWithItems:items];
    [items setQueueWithItemCollection:collection];
Unfortunately, there's currently no way to retrieve the music player controller's queue using public APIs. That means you will generally need to keep track of the queue independently of the music player controller if you want to be able to manipulate the queue.
You can get or set the current song using the nowPlayingItem property. This lets you determine which track is already playing if you're using the iPod music player controller, and lets you specify a new song to play. Note that the media item you specify must already be in the music player controller's queue. Here's how you retrieve the currently playing item:
MPMediaItem *currentTrack = player.nowPlayingItem;
To switch to a different track, do this:
player.nowPlayingItem = newTrackToPlay; // must be in queue already
The music player controller allows you to skip forward one song using the method skipToNextItem, or to skip back to the previous song using skipToPreviousItem. If there is no next or previous song to skip to, the music player controller stops playing. The music player controller also allows you to move back to the beginning of the current song using skipToBeginning.
Here is an example of all three methods:
[player skipToNextItem];
    [player skipToPreviousItem];
[player skipToBeginning];When you're using your iPhone, iPod touch, or iTunes to listen to music, if you press and hold the forward or back button, the music will start seeking forward or backward, playing the music at an ever-accelerating pace. This lets you, for example, stay in the same track, but skip over a part you don't want to listen to, or skip back to something you missed. This same functionality is available through the music player controller using the methods beginSeekingForward and beginSeekingBackward. With both methods, you stop the process with a call to endSeeking.
Here is a set of calls that demonstrate seeking forward and stopping, and then seeking backwards and stopping:
[player beginSeekingForward];
     [player endSeeking];

     [player beginSeekingBackward];
[player endSeeking];Not to be confused with payback time (something we've dreamt of for years, ever since they replaced the excellent Dick York with the far blander Dick Sargent), playback time specifies how far into the current song we currently are. For example, if the current song has been playing for five seconds, then the playback time will be 5.0.
You can retrieve and set the current playback time using the property currentPlaybackTime. You might use this, for example, when using an application music player controller, to resume a song at exactly the point where it was stopped when the application was last quit. Here's an example of using this property to skip forward ten seconds in the current song:
NSTimeInterval currentTime = player.currentPlaybackTime;
     MPMediaItem *currentSong = player.nowPlayingItem;
     NSNumber *duration = [currentSong valueForProperty:
         MPMediaItemPropertyPlaybackDuration];
     currentTime += 10.0;
     if (currentTime > [duration doubleValue])
         currentTime = [duration doubleValue];
     player.currentPlaybackTime = currentTime;
Notice that we check the duration of the currently playing song to make sure we don't pass in an invalid playback time.
Music player controllers have ordered queues of songs and, most of the time, they play those songs in the order they exist in the queue, playing from the beginning of the queue to the end and then stopping. Your user can change this behavior by setting the repeat and shuffle properties in the iPod or Music application. You can also change the behavior by setting the music player controller's repeat and shuffle modes, represented by the properties repeatMode and shuffleMode. There are four repeat modes:
MPMusicRepeatModeDefault: Uses the repeat mode last used in the iPod or Music application.MPMusicRepeatModeNone: Don't repeat at all. When the queue is done, stop playing.MPMusicRepeatModeOne: Keep repeating the currently playing track until your user goes insane. Ideal for playing "It's a Small World."MPMusicRepeatModeAll: When the queue is done, start over with the first track.
There are also four shuffle modes:
MPMusicShuffleModeDefault: Use the shuffle mode last used in the iPod or Music application.MPMusicShuffleModeOff: Don't shuffle at all—just play the songs in the queue order.MPMusicShuffleModeSongs: Play all the songs in the queue in random order.MPMusicShuffleModeAlbums: Play all the songs from the currently playing song's album in random order.
Here is an example of turning off both repeat and shuffle:
player.repeatMode = MPMusicRepeatNone;
player.shuffleMode = MPMusicShuffleModeOff;The music player controller lets you manipulate the volume at which it plays the items in its queue. The volume can be adjusted using the property volume, which is a clamped floating-point value. Clamped values store numbers between 0.0 and 1.0. In the case of volume, setting the property to 1.0 means play the tracks at the maximum volume, and a value of 0.0 means turn off the volume. Any value between those two extremes represents a different percentage of the maximum volume, so setting volume to 0.5 is like turning a volume knob halfway up.
Warning
Setting volume to 1.1 will not make the volume any louder than setting it to 1.0. Despite what Nigel might have told you, you can't set the volume to 11.
Here's how you would set a player to maximum volume:
player.volume = 1.0;
And here's how you would set the volume to its midpoint:
player.volume = 0.5;
Music player controllers are capable of sending out notifications when any of three things happen:
When the playback state (playing, stopped, paused, seeking, etc.) changes, the music player controller can send out the
MPMusicPlayerControllerPlaybackStateDidChangeNotificationnotification.When the volume changes, it can send out the
MPMusicPlayerControllerVolumeDidChangeNotificationnotification.When a new track starts playing, it can send out the
MPMusicPlayerControllerNowPlayingItemDidChangeNotificationnotification.
Note that music player controllers don't send any notifications by default. You must tell an instance of MPMusicPlayerController to start generating notifications by calling the method beginGeneratingPlaybackNotifications. To have the controller stop generating notifications, call the method endGeneratingPlaybackNotifications.
If you need to receive any of these notifications, you first implement a handler method that takes one argument, an NSNotification *, and then register with the notification center for the notification of interest. For example, if we wanted a method to fire whenever the currently playing item changed, we might implement a method called nowPlayingItemChanged:, like so:
- (void)nowPlayingItemChanged:(NSNotification *)notification {
        NSLog(@"A new track started");
    }
To start listening for those notifications, we would register with the notification for the type of notification we're interested in, and then have that music player controller start generating the notifications:
NSNotificationCenter *notificationCenter = [NSNotificationCenter defaultCenter];
     [notificationCenter addObserver:self
        selector:@selector(nowPlayingItemChanged:)
        name:MPMusicPlayerControllerNowPlayingItemDidChangeNotification
        object:player];
     [player beginGeneratingPlaybackNotifications];
Once we do this, any time the track changes, our nowPlayingItemChanged: method will be called by the notification center.
When we're finished and no longer need the notifications, we unregister and tell the music player controller to stop generating notifications:
NSNotificationCenter *center = [NSNotificationCenter defaultCenter];
     [center removeObserver:self
        name:MPMusicPlayerControllerNowPlayingItemDidChangeNotification
object:player];
[player endGeneratingPlaybackNotifications];Now that we have all that theory out of the way, let's build something!
Now, we'll create an application that leverages most of the iPod library functionality that was added with iPhone SDK 3.0. Our application will retrieve the iPod music player controller, and allow our users to add songs to the playlist by specifying partial song titles to search for or by using the media picker. We'll provide rudimentary playback controls that will let users pause and play music, as well as skip forward and backward. By tapping and holding the forward or backward button, they will be able to seek forward and backward in the currently playing song. We'll also provide a table that shows the current queue of songs to be played and allows users to remove songs from the queue.
Note
As a reminder, the simulator does not yet support the iPod library functionality. To get the most out of the Simple Player application, you'll want to run it on your iPhone or iPod touch, which means signing up for one of Apple's paid iPhone Developer Programs. If you have not already done that, you might want to take a short break and head over to http://developer.apple.com/iphone/program/ and check it out.
In Xcode, press
Expand the Classes and Resources folder, and then single-click the Classes folder to select it.
MPMediaItemCollections are immutable, but we need the ability to manipulate collections in our application. So, we'll add a category on MPMediaItemCollection that will make it easier to create new collections based on existing collections. Press
Once the new files have been created, single-click MPMediaItemCollection-Utils.h in the Groups & Files pane and replace the current file with the following:
#import <Foundation/Foundation.h>
#import <MediaPlayer/MediaPlayer.h>
@interface MPMediaItemCollection(Utils)
/** Returns the first media item in the collection.
*/
- (MPMediaItem *)firstMediaItem;
/** Returns the last media item in the collection.
*/
- (MPMediaItem *)lastMediaItem;
/** This method will return the item in this media collection at a specific index.
*/
- (MPMediaItem *)mediaItemAtIndex:(NSUInteger)index;
/** Given a particular media item, this method will return the next media item in
the collection. If there are multiple copies of the same media item in the list,
it will return the one after the first occurrence.
*/
- (MPMediaItem *)mediaItemAfterItem:(MPMediaItem *)compare;
/** Returns the title of the media item at a given index.
*/
- (NSString *)titleForMediaItemAtIndex:(NSUInteger)index;
/** Returns YES if the given media item occurs at least once in this collection.
*/
- (BOOL)containsItem:(MPMediaItem *)compare;
/** Creates a new collection by appending otherCollection to the end of this collection.
*/
- (MPMediaItemCollection *)collectionByAppendingCollection:
(MPMediaItemCollection *)otherCollection;
/** Creates a new collection by appending an array of media items to the end of this collection.
*/
- (MPMediaItemCollection *)collectionByAppendingMediaItems:(NSArray *)items;
/** Creates a new collection by appending a single media item to the end of this collection.
*/
- (MPMediaItemCollection *)collectionByAppendingMediaItem:(MPMediaItem *)item;
/** Creates a new collection based on this collection, but excluding the specified items.
*/
- (MPMediaItemCollection *)collectionByDeletingMediaItems:(NSArray *)itemsToRemove;
/** Creates a new collection based on this collection, but which doesn't include the specified media item.
*/
- (MPMediaItemCollection *)collectionByDeletingMediaItem:
(MPMediaItem *)itemToRemove;/** Creates a new collection based on this collection, but excluding the media item
at the specified index.
*/
- (MPMediaItemCollection *)collectionByDeletingMediaItemAtIndex:(NSUInteger)index;
/** Creates a new collection based on this collection, but excluding the media
items starting with the objects at index from and ending with
to.
*/
- (MPMediaItemCollection *)collectionByDeletingMediaItemsFromIndex:(NSUInteger)from
toIndex:(NSUInteger)to;
@endNote
You don't need to type in the JavaDoc-style comments. We often include them with categories and other reusable code, but if you want to save yourself some typing time, we won't be offended if you choose to leave them out.
The method names in this header file are fairly self-explanatory. The first four items are shortcut methods to allow easier access to specific media items in the collection. The fifth method, titleForMediaItemAtIndex:, give us a one-line way to retrieve the title of a track, which we'll use later to display the titles from the queue in our table view. The rest of the methods create new collections in various ways. They will allow us to create new collections by combining collections or by adding or deleting items from an existing collection. Make sure you save MPMediaItemCollection-Utils.h.
Now, switch over to MPMediaItemCollection-Utils.m and replace its contents with the following code:
#import "MPMediaItemCollection-Utils.h"
@implementation MPMediaItemCollection(Utils)
- (MPMediaItem *)firstMediaItem {
return [[self items] objectAtIndex:0];
}
- (MPMediaItem *)lastMediaItem {
return [[self items] lastObject];
}
- (MPMediaItem *)mediaItemAtIndex:(NSUInteger)index {
return [[self items] objectAtIndex:index];
}
- (MPMediaItem *)mediaItemAfterItem:(MPMediaItem *)compare {
NSArray *items = [self items];
for (MPMediaItem *oneItem in items) {
if ([oneItem isEqual:compare]) {
// If last item, there is no index + 1
if (![[items lastObject] isEqual: oneItem])
return [items objectAtIndex:[items indexOfObject:oneItem] + 1];
}
}return nil;
}
- (NSString *)titleForMediaItemAtIndex:(NSUInteger)index {
MPMediaItem *item = [[self items] objectAtIndex:index];
return [item valueForProperty:MPMediaItemPropertyTitle]; }
- (BOOL)containsItem:(MPMediaItem *)compare {
NSArray *items = [self items];
for (MPMediaItem *oneItem in items) {
if ([oneItem isEqual:compare])
return YES;
}
return NO;
}
- (MPMediaItemCollection *)collectionByAppendingCollection:
(MPMediaItemCollection *)otherCollection {
return [self collectionByAppendingMediaItems:[otherCollection items]]; }
- (MPMediaItemCollection *)collectionByAppendingMediaItems:(NSArray *)items {
if ([items count] == 0)
return self;
NSMutableArray *appendCollection = [[[self items] mutableCopy] autorelease];
[appendCollection addObjectsFromArray:items];
return [MPMediaItemCollection collectionWithItems:appendCollection];
}
- (MPMediaItemCollection *)collectionByAppendingMediaItem:(MPMediaItem *)item {
if (item == nil)
return nil;
return [self collectionByAppendingMediaItems:[NSArray arrayWithObject:item]];
}
- (MPMediaItemCollection *)collectionByDeletingMediaItems:(NSArray *)itemsToRemove {
if (itemsToRemove == nil || [itemsToRemove count] == 0)
return [[self copy] autorelease];
NSMutableArray *items = [[[self items] mutableCopy] autorelease];
[items removeObjectsInArray:itemsToRemove];
return [MPMediaItemCollection collectionWithItems:items];
}
- (MPMediaItemCollection *)collectionByDeletingMediaItem:
(MPMediaItem *)itemToRemove {
if (itemToRemove == nil)
return [[self copy] autorelease];
NSMutableArray *items = [[[self items] mutableCopy] autorelease];
[items removeObject:itemToRemove];
return [MPMediaItemCollection collectionWithItems:items];
}
- (MPMediaItemCollection *)collectionByDeletingMediaItemAtIndex:(NSUInteger)index {NSMutableArray *items = [[[self items] mutableCopy] autorelease];
[items removeObjectAtIndex:index];
return [items count] > 0 ? [MPMediaItemCollection collectionWithItems:items] : nil;
}
- (MPMediaItemCollection *)collectionByDeletingMediaItemsFromIndex:(NSUInteger)from
toIndex:(NSUInteger)to {
// Ensure from is before to
if (to < from) {
NSUInteger temp = from;
to = from;
from = temp;
}
NSMutableArray *items = [[[self items] mutableCopy] autorelease];
[items removeObjectsInRange:NSMakeRange(from, to - from)];
return [MPMediaItemCollection collectionWithItems:items];
}
@endThere's nothing here we haven't talked about before, but you should browse through the methods and make sure you understand what they're doing. They all use the same basic approach, accessing or copying the items property of self to retrieve a specific item or to create a new collection.
Save MPMediaItemCollection-Utils.m before continuing.
Single-click Simple_PlayerViewController.h and replace its contents with the following code:
#import <UIKit/UIKit.h>
#import <MediaPlayer/MediaPlayer.h>
@interface Simple_PlayerViewController : UIViewController
<MPMediaPickerControllerDelegate, UITableViewDelegate, UITableViewDataSource> {
UITextField *titleSearch;
UIButton *playPauseButton;
UITableView *tableView;
MPMusicPlayerController *player;
MPMediaItemCollection *collection;
MPMediaItem *nowPlaying;
BOOL collectionModified;
NSTimeInterval pressStarted;
}
@property (nonatomic, retain) IBOutlet UITextField *titleSearch;
@property (nonatomic, retain) IBOutlet UIButton *playPauseButton;
@property (nonatomic, retain) IBOutlet UITableView *tableView;
@property (nonatomic, retain) MPMusicPlayerController *player;
@property (nonatomic, retain) MPMediaItemCollection *collection;@property (nonatomic, retain) MPMediaItem *nowPlaying; - (IBAction)doTitleSearch; - (IBAction)showMediaPicker; - (IBAction)backgroundClick; - (IBAction)seekBackward; - (IBAction)previousTrack; - (IBAction)seekForward; - (IBAction)nextTrack; - (IBAction)playOrPause; - (IBAction)removeTrack:(id)sender; - (void)nowPlayingItemChanged:(NSNotification *)notification; @end
We start by conforming our class to three protocols: MPMediaPickerControllerDelegate, because we're going to be using MPMediaPickerController to let our user picks songs, and UITableViewDelegate and UITableViewDataSource, because our controller will be acting as the delegate and datasource for the table that shows the current queue of songs.
Following that, we have three instance variables that will be used as outlets to user interface items. One outlet will point to the text field where the user can enter title search values. We'll need a reference to that field so we can retrieve the typed value, and so that we can have it resign first responder status when we want the keyboard to retract. We also need a reference to the play/pause button so we can change the image it shows, toggling between a play icon and a pause icon. When a song is playing, we want to show the pause icon, and when it's stopped or paused, we want to show a play icon. The last outlet will be to the table view, which we'll need whenever our song queue changes so we can tell it to reload its data to let our users see the changes.
Next up is an instance of MPMusicPlayerController. This will be a pointer to the iPod music player controller, which we'll retrieve in viewDidLoad:.
The next three items work together. The first, collection, contains the current queue of songs. The second item, nowPlaying, is a reference to the song that's currently playing. collection will usually be player's queue. There's an exception to that, however. When music is playing, the only way to add items to or remove items from the music player controller's queue is to create a new collection containing both the existing queue of songs and the new ones to be added or deleted, and then setting that collection as the player's queue, replacing the existing queue. Doing that while a song is playing will cause a small skip in playback, even if you save the currently playing item and the current playback time, and restore them after installing the new queue. As a result, we're going to wait until the song changes to update the player's queue. That's where the third instance variable, collectionModified, comes in. We'll set that to YES anytime a change is made to our collection. That way, when the currently playing song changes, we can install the new collection during the pause between songs, which won't be noticeable to the user.
The final instance variable, pressStarted, is used by the forward or back button methods. When the user taps and holds, we want to seek forward or back; if the user just single-taps, we want to skip. Each of those buttons will call two different methods: one when the user touches the screen, and another when the user lifts a finger off the screen after the touch. When the user taps down, we'll store the current time, and when the user lifts up their finger, we'll use the amount of time elapsed to determine whether we should skip to the next track.
After that, we define properties for our outlets, as well as for player, collection, and nowPlaying, and then declare our class's methods. The first two methods are triggered by two buttons on our application's user interface. doTitleSearch will be called when the Append Matching Songs button is pressed, and showMediaPicker will be called when the Use Media Picker button is pressed.
The method backgroundClick should look familiar. This is a technique we used in Chapter 4 of Beginning iPhone 3 Development (Apress, 2009) to allow our user to put away the keyboard by tapping outside the text area.
The next four methods are used by the forward and backward buttons. When they are tapped, either seekBackward or seekForward will be called. When the tap ends, previousTrack or nextTrack will be called. In those methods, we'll include the logic to determine if we should skip or just seek. The playOrPause method will be triggered by the button that's used for playing or pausing music.
The last method, removeTrack:, will be used by buttons on cells in our table view. This button will allow the user to delete a track from the queue. We'll use sender in this method so that we can identify which row triggered the delete, and remove the appropriate item from the playlist.
Make sure you save Simple_PlayerViewController.h.
Double-click Simple_PlayerViewController.xib to launch Interface Builder. The first order of business is to close the window labeled View. We're going to change the view's class, and we'll open the window again in a bit.
Once the View window is closed, click the icon labeled View in the nib's main window. Then press
The icon labeled View should have just been renamed to Control. Now double-click the Control icon in the main window to open that Control window. Don't worry—even though the window is labeled Control, it's still a subclass of UIView and will still act as our application's main view.
The next step is to connect the content area of the view that is not covered by other active controls to the backgroundClick method. Select the Control icon, and press
Select a Label from the library, and drag it over to the window that's now labeled Control. Use the blue guidelines to place it in the upper-left side of the window, against the margins. Double-click it, and change its text to Title Search.
Now, grab a text field from the library, and add it to the Control window. Use the blue guidelines to place it below the label you just added, and then use the resize handles to make it stretch from the left margin to the right margin. Control-drag from File's Owner to this text field, and then select the titleSearch outlet.
Drag a Round Rect Button from the library and place it below the text field. Use the blue guidelines to place it against the right margin and the appropriate distance below the text field. Double-click the button, and change its title to read Append Matching Songs. You may need to adjust the button's position after changing the title so it's once again against the right margin. Control-drag from this button to File's Owner, and select the doTitleSearch action method.
Drag another Round Rect Button from the library; alternatively, you can option-drag the existing button to create a copy of it. Double-click the button, and change its label to Use Media Picker. Then place the button against the lower-right margins using the blue guidelines. Control-drag from this button to File's Owner, and select the showMediaPicker action.
From the library, grab one more Round Rect Button, or option-drag one of the existing buttons to make another copy. Then use the blue guidelines to place the new button above the Use Media Picker button, centered horizontally in the window. Press
You might want to select Show Bounds Rectangles from the Layout menu so that you can see where this button is. That option will draw a thin line around all interface elements, even empty custom buttons (Figure 13-3).
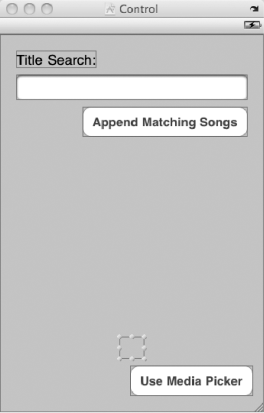
Figure 13.3. The Show Bounds Rectangles option in the Layout menu will draw a thin line around all of the interface elements, including those that are empty or blank.
With the custom button still selected, switch to the size inspector by pressing
Next, we'll make two copies of this custom button: one on either side of our play/pause button. The left button will hold the previous track image, and the right button will hold the next track image. Hold down the option key and drag the custom button to the left, using the blue guidelines to place the new button.
With this new button selected, press
Repeat this process to create the next track button. Single-click the empty button in the middle, and option-drag to the right this time to create another button. For this one, assign a Background of nexttrack.png. Then press
Select the next track button, and press
At this point, the connections inspector should look like Figure 13-4. If you find anything out of place, you can always delete connections and redo them.
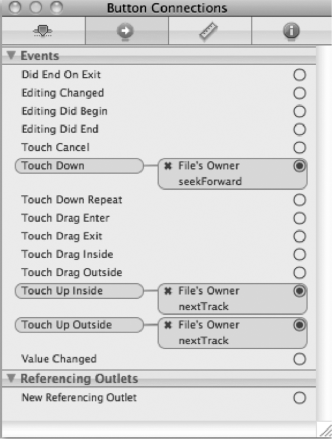
Figure 13.4. All the connections needed to let the next track button handle both seeking and skipping
Now, single-click the blank middle button. In the inspector, drag from the circle to the right of Touch Up Inside to File's Owner, and select the playOrPause action. Then control-drag from File's Owner to the button, and select the playPauseButton outlet.
Next, click the left-hand button. In the inspector, look for the Touch Down circle, and drag to File's Owner, selecting the seekBackward action. Drag again from the circle next to Touch Up Inside to File's Owner, and select the previousTrack action. Drag one last time from the circle next to Touch Up Outside, and again select the previousTrack action method.
From the library, grab a Table View and place it just below the Append Matching Songs button. Drag on the table view's lower-right corner to resize it to the right margin and just above the three buttons you just added. Control-drag from the new table view to File's Owner twice, connecting to the delegate outlet the first time, and the dataSource outlet the second time. Then control-drag back from File's Owner to the table view, and select the tableView outlet.
Save your nib, quit Interface Builder, and go back to Xcode so we can finish up.
Back in Xcode, single-click Simple_PlayerViewController.m. Replace the existing contents with the following code:
#import "Simple_PlayerViewController.h"
#import "MPMediaItemCollection-Utils.h"
#define kTableRowHeight 34
@implementation Simple_PlayerViewController
@synthesize titleSearch;
@synthesize playPauseButton;
@synthesize tableView;
@synthesize player;
@synthesize collection;
@synthesize nowPlaying;
#pragma mark -
- (IBAction)doTitleSearch {
if ([titleSearch.text length] == 0)
return;
MPMediaPropertyPredicate *titlePredicate =
[MPMediaPropertyPredicate predicateWithValue:titleSearch.text
forProperty:MPMediaItemPropertyTitle
comparisonType:MPMediaPredicateComparisonContains];
MPMediaQuery *query = [[MPMediaQuery alloc] initWithFilterPredicates:
[NSSet setWithObject:titlePredicate]];
if ([[query items] count] > 0) {
if (collection)
self.collection = [collection collectionByAppendingMediaItems:
[query items]];
else {
self.collection = [MPMediaItemCollection collectionWithItems:
[query items]];
[player setQueueWithItemCollection:self.collection];
[player play];
}
collectionModified = YES;
[self.tableView reloadData];
}
[query release];
titleSearch.text = @"";
[titleSearch resignFirstResponder];
}
- (IBAction)showMediaPicker {
MPMediaPickerController *picker = [[MPMediaPickerController alloc]
initWithMediaTypes:MPMediaTypeMusic];
picker.delegate = self;
[picker setAllowsPickingMultipleItems:YES];
picker.prompt = NSLocalizedString(@"Select items to play...",
@"Select items to play...");
[self presentModalViewController:picker animated:YES];
[picker release];}
- (IBAction)backgroundClick {
[titleSearch resignFirstResponder];
}
- (IBAction)seekBackward {
[player beginSeekingBackward];
pressStarted = [NSDate timeIntervalSinceReferenceDate];
}
- (IBAction)previousTrack {
[player endSeeking];
if (pressStarted >= [NSDate timeIntervalSinceReferenceDate] - 0.1)
[player skipToPreviousItem];
}
- (IBAction)seekForward {
[player beginSeekingForward];
pressStarted = [NSDate timeIntervalSinceReferenceDate];
}
- (IBAction)nextTrack {
[player endSeeking];
if (pressStarted >= [NSDate timeIntervalSinceReferenceDate] - 0.1)
[player skipToNextItem];
}
- (IBAction)playOrPause {
if (player.playbackState == MPMusicPlaybackStatePlaying) {
[player pause];
[playPauseButton setBackgroundImage:[UIImage imageNamed:@"play.png"]
forState:UIControlStateNormal];
}
else {
[player play];
[playPauseButton setBackgroundImage:[UIImage imageNamed:@"pause.png"]
forState:UIControlStateNormal];
}
[self.tableView reloadData];
}
- (IBAction)removeTrack:(id)sender {
NSUInteger index = [sender tag];
MPMediaItem *itemToDelete = [collection mediaItemAtIndex:index];
if ([itemToDelete isEqual:nowPlaying]) {
if (!collectionModified) {
[player skipToNextItem];
}
else {
[player setQueueWithItemCollection:collection];
player.nowPlayingItem = [collection mediaItemAfterItem:nowPlaying];
}
}
MPMediaItemCollection *newCollection = [collectioncollectionByDeletingMediaItemAtIndex:index];
self.collection = newCollection;
collectionModified = YES;
NSUInteger indices[] = {0, index};
NSIndexPath *deletePath = [NSIndexPath indexPathWithIndexes:indices length:2];
[self.tableView deleteRowsAtIndexPaths:[NSArray arrayWithObject:deletePath]
withRowAnimation:UITableViewRowAnimationFade];
if (newCollection == nil &&
player.playbackState == MPMusicPlaybackStatePlaying) {
MPMediaItem *next = player.nowPlayingItem;
self.collection = [MPMediaItemCollection collectionWithItems:
[NSArray arrayWithObject:next]];
[tableView reloadData];
}
}
#pragma mark -
- (void)viewDidLoad {
MPMusicPlayerController *thePlayer = [MPMusicPlayerController iPodMusicPlayer];
self.player = thePlayer;
[thePlayer release];
if (player.playbackState == MPMusicPlaybackStatePlaying) {
[playPauseButton setBackgroundImage:[UIImage imageNamed:@"pause.png"]
forState:UIControlStateNormal];
MPMediaItemCollection *newCollection = [MPMediaItemCollection
collectionWithItems:[NSArray arrayWithObject:[player nowPlayingItem]]];
self.collection = newCollection;
self.nowPlaying = [player nowPlayingItem];
}
else {
[playPauseButton setBackgroundImage:[UIImage imageNamed:@"play.png"]
forState:UIControlStateNormal];
}
NSNotificationCenter *notificationCenter = [NSNotificationCenter defaultCenter];
[notificationCenter addObserver:self
selector:@selector (nowPlayingItemChanged:)
name:MPMusicPlayerControllerNowPlayingItemDidChangeNotification
object: player];
[player beginGeneratingPlaybackNotifications];
}
- (void)viewDidUnload {
self.titleSearch = nil;
self.playPauseButton = nil;
self.tableView = nil;
[super viewDidUnload];
}
- (void)dealloc {
NSNotificationCenter *center = [NSNotificationCenter defaultCenter];
[center removeObserver:selfname:MPMusicPlayerControllerNowPlayingItemDidChangeNotification
object:player];
    [player endGeneratingPlaybackNotifications];
[titleSearch release];
[playPauseButton release];
[tableView release];
[player release];
[collection release];
[super dealloc];
}
#pragma mark -
#pragma mark Media Picker Delegate Methods
- (void)mediaPicker: (MPMediaPickerController *) mediaPicker
didPickMediaItems: (MPMediaItemCollection *) theCollection {
[self dismissModalViewControllerAnimated: YES];
if (collection == nil){
self.collection = theCollection;
[player setQueueWithItemCollection:collection];
[player setNowPlayingItem:[collection firstMediaItem]];
self.nowPlaying = [collection firstMediaItem];
[player play];
[playPauseButton setBackgroundImage:[UIImage imageNamed:@"pause.png"]
forState:UIControlStateNormal];
}
else {
self.collection = [collection
collectionByAppendingCollection:theCollection];
}
collectionModified = YES;
[self.tableView reloadData];
}
- (void) mediaPickerDidCancel: (MPMediaPickerController *) mediaPicker {
[self dismissModalViewControllerAnimated: YES];
}
#pragma mark -
#pragma mark Player Notification Methods
- (void)nowPlayingItemChanged:(NSNotification
*)notification {
if (collection == nil) {
MPMediaItem *nowPlayingItem = [player nowPlayingItem];
self.collection = [collection
collectionByAppendingMediaItem:nowPlayingItem];
}
else {
if (collectionModified) {
[player setQueueWithItemCollection:collection];
[player setNowPlayingItem:[collection mediaItemAfterItem:nowPlaying]];
[player play];
}
if (![collection containsItem:player.nowPlayingItem] &&player.nowPlayingItem != nil) {
self.collection = [collection
collectionByAppendingMediaItem:player.nowPlayingItem];
}
}
[tableView reloadData];
self.nowPlaying = [player nowPlayingItem];
if (nowPlaying == nil)
[playPauseButton setBackgroundImage:[UIImage imageNamed:@"play.png"]
forState:UIControlStateNormal];
else
[playPauseButton setBackgroundImage:[UIImage imageNamed:@"pause.png"]
forState:UIControlStateNormal];
collectionModified = NO;
}
#pragma mark -
#pragma mark Table View Methods
- (NSInteger)tableView:(UITableView *)theTableView
numberOfRowsInSection:(NSInteger)section {
return [collection count];
}
- (UITableViewCell *)tableView:(UITableView *)theTableView
cellForRowAtIndexPath:(NSIndexPath *)indexPath {
static NSString *identifier = @"Music Queue Cell";
UITableViewCell *cell = [theTableView
dequeueReusableCellWithIdentifier:identifier];
if (cell == nil) {
cell = [[[UITableViewCell alloc] initWithStyle:UITableViewCellStyleDefault
reuseIdentifier:identifier] autorelease];
UIButton *removeButton = [UIButton buttonWithType:UIButtonTypeCustom];
UIImage *removeImage = [UIImage imageNamed:@"remove.png"];
[removeButton setBackgroundImage:removeImage forState:UIControlStateNormal];
[removeButton setFrame:CGRectMake(0.0, 0.0, removeImage.size.width,
removeImage.size.height)];
[removeButton addTarget:self action:@selector(removeTrack:)
forControlEvents:UIControlEventTouchUpInside];
cell.accessoryView = removeButton;
}
cell.textLabel.text = [collection titleForMediaItemAtIndex:[indexPath row]];
if ([nowPlaying isEqual:[collection mediaItemAtIndex:[indexPath row]]]) {
cell.textLabel.font = [UIFont boldSystemFontOfSize:21.0];
if (player.playbackState == MPMusicPlaybackStatePlaying)
cell.imageView.image = [UIImage imageNamed:@"play_small.png"];
else
cell.imageView.image = [UIImage imageNamed:@"pause_small.png"];
}
else {
cell.textLabel.font = [UIFont systemFontOfSize:21.0];
cell.imageView.image = [UIImage imageNamed:@"empty.png"];
}cell.accessoryView.tag = [indexPath row];
return cell;
}
- (void)tableView:(UITableView *)theTableView
didSelectRowAtIndexPath:(NSIndexPath *)indexPath {
MPMediaItem *selected = [collection mediaItemAtIndex:[indexPath row]];
if (collectionModified) {
[player setQueueWithItemCollection:collection];
collectionModified = NO;
}
[player setNowPlayingItem:selected];
[player play];
[playPauseButton setBackgroundImage:[UIImage imageNamed:@"pause.png"]
forState:UIControlStateNormal];
[self.tableView reloadData];
}
- (CGFloat)tableView:(UITableView *)theTableView heightForRowAtIndexPath:(NSIndexPath *)indexPath {
return kTableRowHeight;
}
@endOkay, flex your fingers a bit to rest them from all that typing, go get a beverage and tasty snack, and we'll take a look through the code to see what's what. Although the file is long, and a lot of subtle stuff is going on, we've already covered most of what we do in this controller class.
Our first method is the one that is called when the Append Matching Songs button is pressed. If the user hasn't typed a search term, we're just going to return without doing anything. In a real application, you might want to handle this situation differently, perhaps giving some feedback about why nothing happened when the button. The reason we ignore the press here is because a media query with an empty comparison value will return every media item in the person's library. On a 32-gigabyte iPhone—or, worse, a 64-gigabyte iPod touch—that could potentially be an awful lot of music. Since this method is firing on the main thread, that means the user interface will likely freeze while we retrieve every single item in their library, and we don't want that to happen.
- (IBAction)doTitleSearch {
    if ([titleSearch.text length] == 0)
        return;
Next, we build a media property predicate using the search term typed into the text field, and then create a media query using that predicate.
MPMediaPropertyPredicate *titlePredicate =
        [MPMediaPropertyPredicate predicateWithValue: titleSearch.text
        forProperty: MPMediaItemPropertyTitle
comparisonType:MPMediaPredicateComparisonContains];
MPMediaQuery *query = [[MPMediaQuery alloc] initWithFilterPredicates:
[NSSet setWithObject:titlePredicate]];If the query actually returns items, then we either append the returned items to collection or, if collection is nil, we create a new media item collection based on the results of the query and assign it to collection. We also set collectionModified to YES so that when the currently playing song ends or a new song is played, it will update the music player with the modified queue.
if ([[query items] count] > 0) {
        if (collection)
            self.collection = [collection collectionByAppendingMediaItems:
                [query items]];
        else {
            self.collection = [MPMediaItemCollection collectionWithItems:
                [query items]];
            [player setQueueWithItemCollection:self.collection];
            [player play];
        }

        collectionModified = YES;
        [self.tableView reloadData];
    }
After that, we just release our query, reset the text field, and retract the keyboard.
[query release];
    titleSearch.text = @"";
    [titleSearch resignFirstResponder];
}
If the user presses the Use Media Picker button, then this method is called. We start by creating an instance of MPMediaPickerController, assign self as the delegate, and specify that the user can select multiple items. We assign a string to display at the top of the media picker, and then present the picker modally.
- (IBAction)showMediaPicker {
    MPMediaPickerController *picker = [[MPMediaPickerController alloc]
        initWithMediaTypes:MPMediaTypeMusic];
    picker.delegate = self;
    [picker setAllowsPickingMultipleItems:YES];
    picker.prompt = NSLocalizedString(@"Select items to play...",
        @"Select items to play...");
    [self presentModalViewController:picker animated:YES];
    [picker release];
}
If the user clicks anywhere in the view that doesn't contain an active control, we'll tell the text field to resign first responder status. If the text field is not the first responder, then nothing happens. But if it is, it will resign that status, and the keyboard will retract.
- (IBAction)backgroundClick {
    [titleSearch resignFirstResponder];
}
When the user first taps the left-arrow button, we begin seeking backward in the song, and make note of the time that this occurred.
Tip
Generally speaking, an NSTimeInterval, which is just a typedef'd double, is much faster than using NSDate for tracking specific moments in time, such as we do here.
- (IBAction)seekBackward {
    [player beginSeekingBackward];
    pressStarted = [NSDate timeIntervalSinceReferenceDate];
}
When the user's finger lets up after tapping the left arrow, we stop seeking. If the total length of time that the user's finger was on the button was less than a tenth of a second, we skip back to the previous track. This approximates the behavior of the buttons in the iPod or Music application. In the case of a normal tap, the seeking happens for such a short period of time before the new track starts that the user isn't likely to notice it. To exactly replicate the logic of the iPod application would be considerably more complex, but this is close enough for our purposes.
- (IBAction)previousTrack {
    [player endSeeking];

    if (pressStarted >= [NSDate timeIntervalSinceReferenceDate] - 0.1)
        [player skipToPreviousItem];
}
In the two methods used by the right-arrow buttons, we have basically the same logic, but seek forward and skip to the next song, rather than to the previous one.
- (IBAction)seekForward {
    [player beginSeekingForward];
    pressStarted = [NSDate timeIntervalSinceReferenceDate];
}

- (IBAction)nextTrack {
    [player endSeeking];
    if (pressStarted >= [NSDate timeIntervalSinceReferenceDate] - 0.1)
        [player skipToNextItem];
}
In the method called by the play/pause button, we check to see if the music player is playing. If it is playing, then we pause it; if it's not playing, then we start it. In both cases, we update the middle button's image so it's showing the appropriate icon. When we're finished, we reload the table, because the currently playing item in the table has a play or pause icon next to it, and we want to make sure that this icon is updated accordingly.
- (IBAction)playOrPause {
    if (player.playbackState == MPMusicPlaybackStatePlaying) {
        [player pause];
        [playPauseButton setBackgroundImage:[UIImage imageNamed:@"play.png"]
            forState:UIControlStateNormal];
    }
    else {
        [player play];
[playPauseButton setBackgroundImage:[UIImage imageNamed:@"pause.png"]
forState:UIControlStateNormal];
}
[self.tableView reloadData];
}Our final action method is called when the user taps the red button in the accessory pane of a table row, which indicates that the user wants to remove a given track from the queue. Each button's tag will be set to the current row number its cell currently represents. We retrieve the tag from sender, and then use that index to delete the appropriate item. If the item being deleted is the currently playing track, we skip to the next item.
- (IBAction)removeTrack:(id)sender {
    NSUInteger index = [sender tag];
    MPMediaItem *itemToDelete = [collection mediaItemAtIndex:index];
    if ([itemToDelete isEqual:nowPlaying])  {
        if (!collectionModified) {
            [player skipToNextItem];
        }
        else {
            [player setQueueWithItemCollection:collection];
            player.nowPlayingItem = [collection mediaItemAfterItem:nowPlaying];
        }

    }
    MPMediaItemCollection *newCollection = [collection
        collectionByDeletingMediaItemAtIndex:index];
    self.collection = newCollection;
As always, we don't actually update the music player controller's queue now, because we don't want a skip in the music. If the song that was deleted was the currently playing one, calling skipToNextItem will result in our notification method getting called, so we don't need to install the queue here. Instead, we just set collectionModified to YES so that the notification method knows to install the modified queue.
collectionModified = YES;
Of course, we want the deleted row to animate out, rather than just disappear, so we create an NSIndexPath that points to the row that was deleted and tell the table view to delete that row.
NSUInteger indices[] = {0, index};
    NSIndexPath *deletePath = [NSIndexPath indexPathWithIndexes:indices length:2];
    [self.tableView deleteRowsAtIndexPaths:[NSArray arrayWithObject:deletePath]
        withRowAnimation:UITableViewRowAnimationFade];
This last bit of code in the method may seem a little strange. If the row that was deleted was the last row in the table, we need to check to see if there's any music playing. Generally, there won't be, but if the music that's playing was already playing when our application started, there's a queue already in place that we can't access. Remember that we do not have access to a music player controller's queue. Suppose the row that was deleted represented a track that was playing, and it was also the last track in the queue. When we skipped forward, we may have caused the iPod music player to pull another song from that queue that we can't access. In that situation, we find out the new song that's playing and append it to the end of our queue, so the user can see it.
if (newCollection == nil &&
        player.playbackState == MPMusicPlaybackStatePlaying) {
        MPMediaItem *next = player.nowPlayingItem;
        self.collection = [MPMediaItemCollection collectionWithItems:
            [NSArray arrayWithObject:next]];
        [tableView reloadData];
    }
}
Note
The fact that we can't get to the iPod music player controller's queue isn't ideal in terms of trying to write a music player. However, we're writing a music player only to demonstrate how to access music in the iPod Library. The iPhone already comes with a very good music player that has access to things that we don't, including its own queues. Think of our example as purely a teaching exercise, and not the start of your next big App Store megahit.
In viewDidLoad, we get a reference to the iPod music player controller and assign it to player. We also check the state of that player to see if it's already playing music. We set the play/pause button's icon based on whether it's playing something, and we also grab the track that's being played and add it to our queue so our user can see the track's title.
- (void)viewDidLoad {
    MPMusicPlayerController *thePlayer = [MPMusicPlayerController iPodMusicPlayer];
    self.player = thePlayer;
    [thePlayer release];

    if (player.playbackState == MPMusicPlaybackStatePlaying) {
        [playPauseButton setBackgroundImage:[UIImage imageNamed:@"pause.png"]
            forState:UIControlStateNormal];
        MPMediaItemCollection *newCollection = [MPMediaItemCollection
            collectionWithItems:[NSArray arrayWithObject:[player nowPlayingItem]]];
        self.collection = newCollection;
        self.nowPlaying = [player nowPlayingItem];
    }
    else {
        [playPauseButton setBackgroundImage:[UIImage imageNamed:@"play.png"]
            forState:UIControlStateNormal];
    }
Next, we register with the notification center to receive notifications when the media item being played by player changes. We register the method nowPlayingItemChanged: with the notification center. In that method, we'll handle installing modified queues into player. We also need to tell player to begin generating those notifications, or our method will never get called.
NSNotificationCenter *notificationCenter = [NSNotificationCenter defaultCenter];
    [notificationCenter addObserver:self
        selector:@selector (nowPlayingItemChanged:)
        name:MPMusicPlayerControllerNowPlayingItemDidChangeNotification
object: player];
[player beginGeneratingPlaybackNotifications];
}The viewDidUnload method is standard and doesn't warrant discussing, but the dealloc method has a few things we don't normally see. In addition to releasing all of our objects, we also unregister from the notification center and have player stop generating notifications. This is good form. In our particular case, it probably wouldn't matter if we didn't do this, since notificationCenter will be deallocated when our application exits. That said, you really should unregister any object that has been registered with the notification center when the object that's registered is deallocated. The notification center does not retain the objects it notifies, so it will continue to send notifications to an object after that object has been released if you don't do this.
NSNotificationCenter *center = [NSNotificationCenter defaultCenter];
    [center removeObserver:self
        name:MPMusicPlayerControllerNowPlayingItemDidChangeNotification
        object:player];
    [player endGeneratingPlaybackNotifications];
The rest of the dealloc method is pretty much what you're used to seeing. After dealloc, we begin the various delegate and notification methods. First up is the method that's called when our user selects one or more items using the media picker. This method begins by dismissing the media picker controller.
- (void) mediaPicker: (MPMediaPickerController *) mediaPicker
   didPickMediaItems: (MPMediaItemCollection *) theCollection {
    [self dismissModalViewControllerAnimated: YES];
Next, we check to see if we already have a collection. If we don't, then all we need to do is pass theCollection on to player and tell it to start playing. We also set the play/pause button to show the pause icon.
if (collection == nil){
        self.collection = theCollection;
        [player setQueueWithItemCollection:collection];
        [player setNowPlayingItem:[collection firstMediaItem]];
        self.nowPlaying = [collection firstMediaItem];
        [player play];
        [playPauseButton setBackgroundImage:[UIImage imageNamed:@"pause.png"]
            forState:UIControlStateNormal];
    }
If we already have a collection, we use one of those category methods we created earlier to append theCollection to the end of the existing collection.
else {
        self.collection = [collection
            collectionByAppendingCollection:theCollection];
    }
Next, we set collectionModified to YES so that the updated collection is installed next time there's a break between songs, and we reload the table so the user can see the change.
collectionModified = YES;
    [self.tableView reloadData];
}
If the user canceled the media picker, the only thing we need to do is dismiss it.
- (void) mediaPickerDidCancel: (MPMediaPickerController *) mediaPicker {
    [self dismissModalViewControllerAnimated: YES];
}
When a new track starts playing—whether it's because we told the player to start playing, because we told it to skip to the next or previous song, or simply because it reached the end of the current song—the item-changed notification well be sent out, which will cause this next method to fire.
The logic here may not be obvious, because we have several possible scenarios to take into account. First, we check to see if collection is nil. If it is, then most likely, something outside our application started the music playing or triggered the change. Perhaps the user squeezed the button on the iPhone's headphones to restart a previously playing song. In that case, we create a new media item collection containing just the playing song.
- (void)nowPlayingItemChanged:(NSNotification *)notification {
    if (collection == nil) {
        MPMediaItem *nowPlayingItem = [player nowPlayingItem];
        self.collection = [collection
            collectionByAppendingMediaItem:nowPlayingItem];
    }
Otherwise, we need to check to see if collection has been modified. If it has, then the music player controller's queue and our queue are different, and we use this opportunity to install our collection as the music player's queue.
else {
        if (collectionModified) {
            [player setQueueWithItemCollection:collection];
            [player setNowPlayingItem:[collection mediaItemAfterItem:nowPlaying]];
            [player play];
        }
Regardless of whether the collection was modified, we must see if the item that is being played is in our collection. If it's not, that means it pulled another item from a queue that we didn't create and can't access. If that's the case, we just grab the item that's playing now and append it to our collection. We may not be able to show the users the preexisting queue, but we can show them each new song that's played from it.
if (![collection containsItem:player.nowPlayingItem] &&
             player.nowPlayingItem != nil) {
            self.collection = [collection
                collectionByAppendingMediaItem:player.nowPlayingItem];
        }
    }
No matter what we did above, we reload the table to make sure that any changes become visible to our user, and we store the currently playing item into an instance variable so we have ready access to it.
[tableView reloadData];
    self.nowPlaying = [player nowPlayingItem];
We also need to make sure that the play or pause button shows the correct image. This method is called after the last track in the queue is played, so it's possible that we've gone from no music playing to music playing or vice versa. As a result, we need to update this button to show the play icon or the pause icon, as appropriate.
if (nowPlaying == nil)
        [playPauseButton setBackgroundImage:[UIImage imageNamed:@"play.png"]
            forState:UIControlStateNormal];
    else
        [playPauseButton setBackgroundImage:[UIImage imageNamed:@"pause.png"]
            forState:UIControlStateNormal];
Of course, once we're finished here, we need to reset collectionModified back to NO so that we can tell if the collection is changed again.
collectionModified = NO;
}
Our last group of methods contains our table view datasource and delegate methods. The first one we implement is tableView:numberOfRowInSection:. In that method, we just return the number of media items in collection.
- (NSInteger)tableView:(UITableView *)theTableView
numberOfRowsInSection:(NSInteger)section {
    return [collection count];
}
In tableView:cellForRowAtIndexPath:, we dequeue or create a cell, pretty much as always.
- (UITableViewCell *)tableView:(UITableView *)theTableView
        cellForRowAtIndexPath:(NSIndexPath *)indexPath {
    static NSString *identifier = @"Music Queue Cell";
    UITableViewCell *cell = [theTableView
        dequeueReusableCellWithIdentifier:identifier];
    if (cell == nil) {
        cell = [[[UITableViewCell alloc] initWithStyle:UITableViewCellStyleDefault
            reuseIdentifier:identifier] autorelease];
When we add a new cell, we need to create a button and assign it to the accessory view. The button's target is set to the removeTrack: method, which means that any tap on any row's button will trigger that method.
UIButton *removeButton = [UIButton buttonWithType:UIButtonTypeCustom];
        UIImage *removeImage = [UIImage imageNamed:@"remove.png"];
        [removeButton setBackgroundImage:removeImage forState:UIControlStateNormal];
        [removeButton setFrame:CGRectMake(0.0, 0.0, removeImage.size.width,
            removeImage.size.height)];
        [removeButton addTarget:self action:@selector(removeTrack:)
            forControlEvents:UIControlEventTouchUpInside];
        cell.accessoryView  = removeButton;
    }
We assign the cell's text based on the title of the media item the row represents:
cell.textLabel.text = [collection titleForMediaItemAtIndex:[indexPath row]];
Then we check to see if this row is the current one that's playing. If it is, we set the cell's image to a small play or pause icon, and make the row's text bold. Otherwise, we set the row's image to an empty image the same size as the play and pause icon, and set the text so it's not bold. The empty image is just to keep the rows' text nicely aligned.
if ([nowPlaying isEqual:[collection mediaItemAtIndex:[indexPath row]]]) {
        cell.textLabel.font = [UIFont boldSystemFontOfSize:21.0];
        if (player.playbackState ==  MPMusicPlaybackStatePlaying)
            cell.imageView.image = [UIImage imageNamed:@"play_small.png"];
        else
            cell.imageView.image = [UIImage imageNamed:@"pause_small.png"];

    }
    else {
        cell.textLabel.font = [UIFont systemFontOfSize:21.0];
        cell.imageView.image = [UIImage imageNamed:@"empty.png"];
    }
Note
Our application currently does not keep track of the index of the currently playing item. We could implement that for queues we create, but not for ones that are already playing. As a result, if you have multiple copies of the same item in the queue, when that song plays, every row that contains that same item will be bold and have a play or pause icon. Since we don't have access to queues created outside our application, there's no good solution to this problem here, and since it's not a real-world application, we can live with it.
We make sure to set the cell's delete button's tag to the row number this cell will be used to represent. That way, our removeTrack: method will know which track to delete. After that, we're ready to return cell.
cell.accessoryView.tag = [indexPath row];

    return cell;
}
If the user selected a row, we want to play the song that was tapped. The only gotcha here is that we must make sure that the updated queue is installed in the player before we start the new song playing. If we didn't do this, we might end up telling the player to play a song it didn't know about, because it was added to the queue since the last track change.
- (void)tableView:(UITableView *)theTableView
    didSelectRowAtIndexPath:(NSIndexPath *)indexPath {
    MPMediaItem *selected = [collection mediaItemAtIndex:[indexPath row]];

    if (collectionModified) {
        [player setQueueWithItemCollection:collection];
        collectionModified = NO;
    }

    [player setNowPlayingItem:selected];
[player play];
[playPauseButton setBackgroundImage:[UIImage imageNamed:@"pause.png"]
forState:UIControlStateNormal];
[self.tableView reloadData];
}Last, but certainly not... well, actually, this might be least. We're using a slightly smaller font size and cell height than the default values, and here's where we specify the row height to use. kTableRowHeight was defined at the beginning of the file as 34 pixels. By placing it at the top of the file, it's easier to find should we want to change it.
- (CGFloat)tableView:(UITableView *)theTableView
        heightForRowAtIndexPath:(NSIndexPath *)indexPath {
    return kTableRowHeight;
}

@endWell, wow! That was a lot of functionality used in such a small application. Let's try it out. But, before you can do that, you need to link to the MediaPlayer framework. At this point, you should know how to do that, but in case your brain is fried, we'll remind you. Right-click the Frameworks folder in the Groups & Files pane. From the menu that pops up, select the Add submenu, then select Existing Frameworks.... Check the box next to MediaPlayer.framework and click the Add button.
Go ahead and take the app for a spin. Remember that although Simple Player may launch in the simulator, the simulator does not currently support a media library, so you'll want to run Simple Player on your device. As usual, we won't get into the details here. Apple has excellent documentation on their portal site, which you'll have access to once you join one of the paid iPhone Developer Programs.
After your app is running on your device, play with all the different options. Make sure you try adding songs both by typing in a title search term and by using the media picker. Also try deleting songs from the queue, including the currently playing song.
If this were a shipping app, we would have done a number of things differently. For example, we would move the title search field to its own separate view with its own table view so you could see the results of your search as you typed. We would tweak the seek threshold until we got it just right. We would also use Core Data to add persistence to keep our queue around from one run of the app to the next. There are other elements we might change, but we wanted to keep the code as small as possible to focus on the iPod library.
In this chapter, we took a long but pleasant walk through the hills and valleys of using the iPod music library. You saw how to find media items using media queries, and how to let your users select songs using the media picker controller. We demonstrated how to use and manipulate collections of media items. We showed you how to use music player controllers to play media items, and to manipulate the currently playing item by seeking or skipping. You also learned how to find out about the currently playing track, regardless of whether it's one your code played or one that the user chose using the iPod or Music application.
But now, shore leave is over, matey. It's time to leave the sheltered cove and venture out into the open water of concurrency (writing code that executes simultaneously) and debugging. Both of these topics are challenging but supremely important. So, all hands on deck! Man the braces and prepare to make sail.