By the time you reached the end of Chapter 4, you mastered a great deal of the Core Data architecture and functionality. Together, we built a fully functioning, albeit somewhat simple, Core Data application. You've now got enough Core Data chops to build a solid app, send it to your testers, and then on to the App Store.
But what happens if you change your data model and send a new version of your application out to testers who already have the previous version? Consider our SuperDB app. Let's say we decide to add a new attribute to the Hero entity, make one of the existing, currently optional attributes required, and then add a new entity. Can we just send the program out to our users, or is this going to cause problems with their data?
As things stand right now, if you make changes to your data model, the existing data sitting in the user's persistent store on their iPhone will be unusable in the new version of your application. Your application will crash on launch. If you launch the new version from Xcode, you will see a big, scary error message like the following:
2009-09-08 14:37:26.392 SuperDB[4138:207] Unresolved error Error Domain=NSCocoaErrorDomain Code=134100 UserInfo=0x14049d0 "Operation could not be completed. (Cocoa error 134100.)", {
    metadata =     {
        NSPersistenceFrameworkVersion = 241;
        NSStoreModelVersionHashes =         {
            Hero = <209a8e07 84180c10 08c4a2fe a68af2a1 e0d620b1 f592e6b0 66ea6663 ef6bc252>;
        };
        NSStoreModelVersionHashesVersion = 3;
        NSStoreModelVersionIdentifiers =         (
        );
        NSStoreType = SQLite;
        NSStoreUUID = "663F93E0-BD32-4F80-87F2-D72011101610";
    };
    reason = "The model used to open the store is incompatible with the one used to create the store";
}
If this happens in development, it's not usually a big deal. If nobody else has a copy of your app and you don't have any irreplaceable data stored in it, you can just select Reset Content and Settings... from the iPhone Simulator menu in the simulator or uninstall the application from your iPhone using Xcode's Organizer window, and Core Data will create a new persistent store based on the revised data model next time you install and run your application.
If, however, you have given the application to others, they will be stuck with an unusable application on their iPhone unless they uninstall and re-install the application, thereby losing all of their existing data.
As you probably imagine, this is not something that makes for particularly happy customers. In this chapter, we're going to show you how to version your data model, then we'll talk a little bit about Apple's mechanism for converting data between different data model versions, which are called migrations. We'll talk a little about the difference between the two types of migrations: lightweight migrations and standard migrations. Then we will set up our SuperDB Xcode project to use lightweight migrations so that the changes we make in the next few chapters won't cause problems for our (admittedly non-existent) users.
At the end of this chapter, our SuperDB application will be all set up and ready for new development, including changes to our data model, without having to worry about our users losing their data when we ship our new verion.
When you create a new Xcode project using a template that supports Core Data, you are provided with a single data model in the form of an .xcdatamodel file in your project's Resources folder. In Chapter 2, we saw how this file was loaded into an instance of NSManagedObjectModel at runtime in the application delegate's managedObjectModel method. In order to understand versioning and migrations, it's important to look a little deeper under the hood to see what's going on.
The .xcdatamodel class in your project does not get copied into your application's bundle the way other resources do. The data model file contains a lot of information that your application doesn't need. For example, it contains information about the layout of the objects in Xcode's data model editor's diagram view (Figure 5-1) that is only there to make your life easier. Your application doesn't care about how those rounded rectangles are laid out, so there's no reason to include that information inside your application bundle.
Instead, your .xcdatamodel files get compiled into a new type of file with an extension of .mom, which stands for managed object model (sorry, Mom). This is a much more compact binary file that contains just the information that your application needs. This .mom file is what is actually loaded to create instances of NSManagedObjectModel.

You most likely understand what versioning means, in a general sense. When a company releases a new version of a piece of software with new features, it typically has a new number or designation. For example, you are working on a specific version of Xcode (for us, it's 3.2.1), and a specific version of Mac OS X (for us it's 10.6.2, also known as Snow Leopard).
These are what are called marketing version identifiers or numbers, as they are primarily intended to let customers tell the difference between different released versions of the software. Marketing versions are incremented when a new version of the program is released to customers.
There are other, finer-grained forms of versioning used by developers, however. If you've ever used a concurrent versioning system such as cvs, svn, or git, you're probably aware of how this all works. Versioning software keeps track of the changes over time to all of the individual source code and resource files that make up your project (among other things).
Note
We're not going to be discussing regular version control, but it's a good thing to know about if you're a developer. Fortunately, there are a lot of resources on the Web for learning to use and install different version-control software packages. A good place to start is the Wikipedia page on version control at: http://en.wikipedia.org/wiki/Revision_control.
Xcode integrates with several version-control software packages, but it also has some built-in version-control mechanisms, including one that's intended for use with Core Data data models. Creating new versions of your data models is the key to keeping your users happy. Every time you release a version of your application to the public, you should create a new version of your data model. This will create a new copy so that the old version can be kept around to help the system figure out how to update the data from a persistent store made with one version to a newer version.
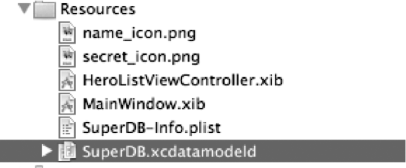
Single-click SuperDB.xcdatamodel in Xcode. Now click the Design menu, select the Data Model sub-menu and, finally, select Add Model Version. You just added a new version of your data model. Once you select that, the SuperDB.xcdatamodel file will disappear from your Resources group and be replaced by a new resource with the extension .xcdatamodeld with a disclosure triangle next to it. This is your indication that you have a versioned data model (Figure 5-2).
If you expand the disclosure triangle next to SuperDB.xcdatamodeld, you can see all the different versions of your data model. The icon for one of the versions will have a green checkmark on it (Figure 5-3). This indicates the current version, which is the one that your application will use. By default, when you create a new version, the current version continues to be the one with the original name, and the copy is created with the same name but an incrementally larger number affixed to the end. In our case, the one we just created, SuperDB 2.xcdatamodel, is the original data model that represents what our data model looked like at the time we created the new version. It should be left untouched.
The fact that the higher number is the older file might seem a little weird but, as more versions accumulate, the numbering will make more sense. The next time we create a new version, the old version will be named SuperDB 3.xcdatamodel, and so on. The numbering makes sense for all the non-current versions, since each version will have a number one higher than the previous one. By keeping the name of the current model the same, it's easy to tell which one you should be making changes to.
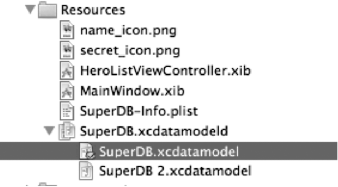
In Figure 5-3, SuperDB.xcdatamodel is the current version of the data model, and SuperDB 2.xcdatamodel is the previous version. You can now safely make changes to the current version, knowing that a copy of the previous version exists, frozen in time, which will give us the ability to migrate our users' data from the old version to the next version when we release it.
You can change which version is the current version. To do this, select the data model you want to make current, then select Set Current Version from the Design menu, Data Model submenu. You won't do this often, but you might do it if you needed to revert to an older version of the application for some reason. You can use migrations to go back to an older version as well as move to a new version.
Although you can assign version identifiers like 1.1 or Version A to data models by selecting the data model in the Groups & Files pane and pressing
Instead, Core Data performs a mathematical calculation called a hash on each entity in your data model file. The hash values are stored in your persistent store. When Core Data opens your persistent store, Core Data uses these hash values to ensure that the version of your data stored in the store are compatible with the current data model.
Since Core Data does its version validation using the stored hash values, you don't need to worry about incrementing version numbers for versioning to work. Core Data will just know which version a persistent store was created for by looking at the stored hash value and comparing it to the hash calculated on the current version of the data model.

Back in Chapter 2, when we walked through the Core Data template, we looked at this accessor method:
- (NSManagedObjectModel *)managedObjectModel {

    if (managedObjectModel != nil) {
        return managedObjectModel;
    }
    managedObjectModel = [[NSManagedObjectModel mergedModelFromBundles:nil] retain];
    return managedObjectModel;
}
During our discussion, we said that mergedModelFromBundles: iterated through all the resources in your application's bundle and loaded any data models it found. Well, that's perfectly true, but this can cause a problem when you're using versioned data models.
When versioned data models are compiled, they get compiled to a .momd, which is a versioned managed object model containing the current data model and all previous versions of it. Before we versioned our data model, it was getting compiled to a .mom file. The NSManagedObjectModel class is capable of working with either a .mom or a .momd file, but just to be safe, we're going to point it to the .momd file now that we've versioned our data model to make sure it's loading the correct one.
Strictly speaking, this isn't necessary; however, unless you do a clean build after versioning your data model, the existing .mom file will still be part of your application. When mergedModelFromBundles: is used in this scenario, it attempts to load both the versioned and non-versioned data model into a single instance of NSManagedObjectModel. Since a managed object model can only have one copy of any entity and these two data models will contain at least some of the same entities, this call will fail.
If you experience this problem, selecting Clean... from the Build menu will delete the old data model file, fixing the problem. We like to take the uncertainty out of the situation by tweaking the way our NSManagedObjectModel instance is created so that it always loads the correct file no matter what our application bundle contains. This is an optional step; however, it will avoid some potentially hard-to-debug scenarios.
In Xcode, single-click on the SuperDBAppDelegate.m file and scroll down to the method called managedObjectModel. Replace the existing version with this new version:
- (NSManagedObjectModel *)managedObjectModel {
    if (managedObjectModel != nil) {
        return managedObjectModel;
    }

    NSString *path = [[NSBundle mainBundle] pathForResource:@"SuperDB"
        ofType:@"momd"];
    NSURL *momURL = [NSURL fileURLWithPath:path];
    managedObjectModel = [[NSManagedObjectModel alloc]
        initWithContentsOfURL:momURL];

    return managedObjectModel;
}
This is pretty straightforward. Instead of using the factory method mergedModelFromBundles:, we're allocating an instance of NSManagedObjectModel from a single managed object model, but notice the type of the resource we're requesting. We're not specifying a regular managed object model (.mom), we're specifying the versioned object model (.momd). By specifying the .momd file, we're telling Core Data to only use the versioned data model. Core Data is savvy enough to only load the current version, and will use the other ones only if a migration is necessary.
Which is a nice segue into...
As you saw at the beginning of the chapter, when Core Data detects that the persistent store in use is incompatible with the current data model, it throws an exception. The solution is to provide a migration to tell Core Data how to move data from the old persistent store to a new one that matches the current data model.
There are two different types of migrations supported by Core Data. The first, called a lightweight migration, is only available in the case of relatively straightforward modifications to your data model. If you add or remove an attribute from an entity or add or delete an entity from the data model, for example, Core Data is perfectly capable of figuring out how to migrate the existing data into the new model. In the case of a new attribute, it simply creates storage for that attribute, but doesn't populate it with data for the existing managed objects. In a lightweight migration, Core Data actually analyzes the two data models and creates the migration for you.
If you make a change that's not straightforward and thus can't be resolved by the lightweight migration mechanism, then you have to use a standard migration. A standard migration involves creating a mapping model and possibly writing some code to tell Core Data how to move the data from the old persistent store to the new one.
The changes we will be making to the SuperDB application in this book are all pretty straightforward, and an in-depth discussion of standard migrations is beyond the scope of this book. Apple has documented the process fairly thoroughly in the developer documentation, though, so you can read more about standard migrations at http://developer.apple.com/mac/library/documentation/Cocoa/Conceptual/CoreDataVersioning/index.html.
On the other hand, we will be using lightweight migrations a lot through the rest of the book. In every remaining Core Data chapter, we will create a new version of our data model and let lightweight migrations handle moving the data. However, lightweight migrations are not turned on by default, so we need to make some more changes to our application delegate to enable them.
Back in Xcode, SuperDBAppDelegate.m should still be showing in the editing pane. If it's not, single-click SuperDBAppDelegate.m. Use the function pop-up menu to navigate to the existing persistentStoreCoordinator method. It should look basically like this:
- (NSPersistentStoreCoordinator *)persistentStoreCoordinator {

    if (persistentStoreCoordinator != nil) {
        return persistentStoreCoordinator;
    }

    NSURL *storeUrl = [NSURL fileURLWithPath: [[self applicationDocumentsDirectory]
        stringByAppendingPathComponent: @"SuperDB.sqlite"]];


    NSError *error = nil;
    persistentStoreCoordinator = [[NSPersistentStoreCoordinator alloc]
initWithManagedObjectModel:[self managedObjectModel]];
if (![persistentStoreCoordinator addPersistentStoreWithType:NSSQLiteStoreType
configuration:nil URL:storeUrl options:nil error:&error]) {
// error handling code goes here
}
return persistentStoreCoordinator;
}The way that we turn on lightweight migrations is to pass a dictionary in to the options argument when we call the addPersistentStoreWithType:configuration:URL:options:error: method to add our newly created persistent store to the persistent store coordinator. In that dictionary, we use two system-defined constants, NSMigratePersistentStoresAutomaticallyOption and NSInferMappingModelAutomaticallyOption, as keys in the dictionary, and store an NSNumber under both of those keys that holds an Objective-C YES value. By passing a dictionary with these two values in when we add the persistent store to the persistent store coordinator, we indicate to Core Data that we want it to attempt to automatically create migrations if it detects a change in the data model version, and if it's able to create the migrations, to automatically use those migrations to migrate the data to a new persistent store based on the current data model.
Replace the existing version with this new one.
- (NSPersistentStoreCoordinator *)persistentStoreCoordinator {

    if (persistentStoreCoordinator != nil) {
        return persistentStoreCoordinator;
    }

    NSURL *storeUrl = [NSURL fileURLWithPath: [[self applicationDocumentsDirectory]
        stringByAppendingPathComponent: @"SuperDB.sqlite"]];

    NSDictionary *options = [NSDictionary dictionaryWithObjectsAndKeys:
        [NSNumber numberWithBool:YES], NSMigratePersistentStoresAutomaticallyOption,
        [NSNumber numberWithBool:YES], NSInferMappingModelAutomaticallyOption, nil];

    NSError *error = nil;
    persistentStoreCoordinator = [[NSPersistentStoreCoordinator alloc]
        initWithManagedObjectModel:[self managedObjectModel]];
    if (![persistentStoreCoordinator addPersistentStoreWithType:NSSQLiteStoreType
        configuration:nil URL:storeUrl options:options error:&error]) {

        NSLog(@"Unresolved error %@, %@", error, [error userInfo]);
        abort();
    }

    return persistentStoreCoordinator;
}
And that's it. With these changes made to our project, we are ready to start making changes to our data model without fear. Well, maybe not completely without fear. By using lightweight migrations, we limit the complexity of the changes we're able to make. For example, we won't be able to split an entity up into two different entities or move attributes from one entity to another, but the majority of changes you'll need to make outside of major refactoring can be handled by lightweight migrations, and once you set your project up the way we've done in this chapter, that functionality is basically free.
After a couple of long, conceptually difficult chapters, taking a break to set up our project to use migrations gave us a nice breather, but don't underestimate the importance of migrations. The people who use your applications are trusting you to take a certain amount of care with their data. Putting some effort into making sure that your changes don't cause major problems for your users is important.
Any time you put out a new release of your application with a new data model version, make sure you test the migration thoroughly. This is true regardless of whether you're using the lightweight migrations we set up in this chapter or the heavier-duty standard migrations.
Migrations, especially lightweight migrations, are relatively easy to use, but they hold the potential for causing your users significant inconvenience, so don't get lulled into a false sense of security by how easy they are to use. Test every migration thoroughly with as much realistic data as you can.
And with that warning out of the way, let's continue adding functionality to our SuperDB application. Up next? Custom managed objects for fun and profit.