Welcome to the final chapter on Core Data. So far, our application includes only a single entity: Hero. In this chapter, we're going to show you how managed objects can incorporate and reference other managed objects through the use of relationships and fetched properties. This will give you the ability to make applications of much greater complexity than our current SuperDB application. That's not the only thing we're going to do in this chapter, however.
Throughout the book, we've endeavored to write our code in a generic fashion. We created our HeroEditController, for example, so that the structure and content were completely controlled by a handful of arrays, and we implemented error validation in our managed object attribute editors by adding generic code to their common superclass. In this chapter, we're going to reap the benefits of writing our code that way. We'll introduce a new entity, yet we won't need to write a new controller class to display that entity and let the user edit it. Our code is generic enough that we're simply going to refactor our existing HeroEditController into a generic class that can display and edit any managed object just by changing the data stored in those paired, nested arrays. This will greatly reduce the number of controller classes we need in our application as the complexity of the data model increases. Instead of having dozens of individual controller classes for each entity that needs to be edited by or displayed to the user, we'll have a single, generic controller class capable of displaying and editing the contents of any managed object.
We have a lot to do in this chapter, so no dallying. Let's get started.
Before we talk about the nitty-gritty, let's quickly look at the changes we're going to make to the SuperDB application in this chapter. On the surface, the changes look relatively simple. We'll add the ability to specify any number of superpowers for each hero, and also add a number of reports that show other superheroes that meet certain criteria, including heroes who are either younger or older than this hero, or who are the same sex or the opposite sex (Figure 7-1).

Figure 7.1. At the end of our chapter, we'll have added the ability to specify any number of superpowers for each hero, as well as provided a number of reports that let us find other heroes based on how they relate to this hero.
Heroes' powers will be represented by a new entity that we'll create and imaginatively call Power. When users add or edit a power, they will be presented with a new view (Figure 7-2), but in reality, under the hood, it will be a new instance of the same object used to edit and display heroes.

Figure 7.2. The new view for editing powers is actually an instance of the same object used to edit heroes.
When users drill down into one of the reports, they will get a list of the other heroes that meet the selected criteria (Figure 7-3).

Figure 7.3. The Reports section on our hero will let us find other heroes who meet certain criteria in relation to the hero we're currently editing. Here, for example, we're seeing all the heroes who were born after Ultra Guy.
Tapping any of the rows will take you to another view where you can edit that hero, using another instance of the same generic controller class. Our users will be able to drill down an infinite number of times (limited only by memory), all courtesy of a single class.
Before we start implementing these changes, we need to talk about a few concepts, and then make some changes to our data model.
We introduced the concept of Core Data relationships back in Chapter 2. Now we will go into more detail, and see how these can be used in applications. The relationship is one of the most important concepts in Core Data. Without relationships, entities would be isolated. There would be no way to have one entity contain another entity or reference another entity. Let's look at a hypothetical header file for a simple example of an old-fashioned data model class to give us a familiar point of reference:
#import <UIKit/UIKit.>

@class Address;

@interface Person : NSObject {

    NSString        *firstName;
    NSString        *lastName;
    NSDate          *birthdate;
    UIImage         *image;

    Address         *address;

    Person          *mother;
    Person          *father;

    NSMutableArray  *children;
}

@property (nonatomic, retain) NSString *firstName;
@property (nonatomic, retain) NSString *lastName;
@property (nonatomic, retain) NSDate *birthdate;
@property (nonatomic, retain) UIImage *image;
@property (nonatomic, retain) Address *address;
@property (nonatomic, retain) Person *mother;
@property (nonatomic, retain) Person *father;
@property (nonatomic, retain) NSMutableArray *children;

@end
Here, we have a class that represents a single person. We have instance variables to store a variety of information about that person and properties to expose that information to other objects. There's nothing earth-shattering here. Now, let's think about how we could re-create this object in Core Data.
The first four instance variables—firstName, lastName, birthDate, and image—can all be handled by built-in Core Data attribute types, so we could use attributes to store that information on the entity. The two NSString instances would become String attributes, the NSDate instance would become a Date attribute, and the UIImage instance would become a Transformable attribute, handled in the same way as UIColor in the previous chapter.
After that, we have an instance of an Address object. This object probably stores information like street address, city, state or province, and postal code. That's followed by two Person instance variables and a mutable array designed to hold pointers to this person's children. Most likely, these arrays are intended to hold pointers to more Person objects.
In object-oriented programming, including a pointer to another object as an instance variable is called composition. Composition is an incredibly handy device, because it lets us create much smaller classes and reuse objects, rather then have data duplicated.
In Core Data, we don't have composition per se, but we do have relationships, which essentially serve the same purpose. Relationships allow managed objects to include references to other managed objects of a specific entity, known as destination entities, or sometimes just destinations. Relationships are Core Data properties, just as attributes are. As such, they have an assigned name, which serves as the key value used to set and retrieve the object or objects represented by the relationship. Relationships are added to entities in Xcode's data model editor in the same way attributes are added. You'll see how to do that in a few minutes. There are two basic types of relationships: to-one relationships and to-many relationships.
When you create a to-one relationship, you are saying that one object can contain a pointer to a single managed object of a specific entity. In our example, the Person entity has a single to-one relationship to the Address entity.
Once you've added a to-one relationship to an object, you can assign a managed object to the relationship using key-value coding (KVC). For example, you might set the Address entity of a Person managed object like so:
NSManagedObject *address = [NSEntityDescription insertNewObjectForEntityForName:
        @"Address" inManagedObjectContext:thePerson.managedObjectContext];
    [thePerson setValue:address forKey:@"address"];
Retrieving the object can also be accomplished using KVC, just with attributes:
NSManagedObject *address = [thePerson valueForKey:@"address"];
When you create a custom subclass of NSManagedObject, as we did in the previous chapter, you can use Objective-C properties and dot notation to get and set those properties. The property that represents a to-one relationship is an instance of NSManagedObject or a subclass of NSManagedObject, so setting the address looks just like setting attributes:
NSManagedObject *address = [NSEntityDescription insertNewObjectForEntityForName:
        @"Address" inManagedObjectContext:thePerson.managedObjectContext];
    thePerson.address = address;
And retrieving a to-one relationship becomes as follows:
NSManagedObject *address = thePerson.address;
In almost every respect, the way you deal with a to-one relationship in code is identical to the way we've been dealing with Core Data attributes. We use KVC to get and set the values using Objective-C objects. Instead of using Foundation classes that correspond to different attribute types, we use NSManagedObject or a subclass of NSManagedObject that represents the entity.
To-many relationships allow you to use a relationship to associate multiple managed objects to a particular managed object. This is equivalent to using composition with a collection class such as NSMutableArray or NSMutableSet in Objective-C, as with the children instance variable in the Person class we looked at earlier. In that example, we used an NSMutableArray, which is an editable, ordered collection of objects. That array allows us to add and remove objects at will. If we want to indicate that the person represented by an instance of Person has children, we just add the instance of Person that represents that person's children to the children array.
In Core Data, it works a little differently. To-many relationships are unordered. They are represented by instances of NSSet, which is an unordered, immutable collection that you can't change, or by NSMutableSet, an unordered collection that you can change. Here's how getting a to-many relationship and iterating over its contents might look with an NSSet:
NSSet *children = [person valueForKey:@"children"];
    for (NSManagedObject *oneChild in children) {
        // do something
    }
Note
Do you spot a potential problem from the fact that to-many relationships are returned as an unordered NSSet? When displaying them in a table view, it's important that the objects in the relationship are ordered consistently. If the collection is unordered, you have no guarantee that the row you tap will bring up the object you expect. You'll see how to deal with that a little later in the chapter.
On the other hand, if you wish to add or remove managed objects from a to-many relationship, you must ask Core Data to give you an instance of NSMutableSet, by calling mutableSetValueForKey: instead of valueForKey:, like so:
NSManagedObject *child = [NSEntityDescription insertNewObjectForEntityForName:
        @"Person" inManagedObjectContext:thePerson.managedObjectContext];
    NSMutableSet *children = [person mutableSetValueForKey:@"children"];
[children addObject:child];
[children removeObject:childToBeRemoved];If you don't need to change which objects a particular relationship contains, use valueForKey:, just as with to-one arrays. Don't call mutableSetValueForKey: if you don't need to change which objects make up the relationship, as it incurs slightly more overhead than just calling valueForKey:.
In addition to using valueForKey: and mutableSetValueForKey:, Core Data also provides special methods, created dynamically at runtime, that let you add and delete managed objects from a to-many relationship. There are four of these methods per relationship. Each method name incorporates the name of the relationship. The first allows you to add a single object to a relationship:
- (void)addXxxObject:(NSManagedObject *)value;
where Xxx is the capitalized name of the relationship, and value is either an NSManagedObject or a specific subclass of NSManagedObject. In the Person example we've been working with, the method to add a child to the children relationship looks like this:
- (void)addChildrenObject:(Person *)value;
The method for deleting a single object follows a similar form:
- (void)removeXxxObject:(NSManagedObject *)value;
The dynamically generated method for adding multiple objects to a relationship takes the following form:
- (void)addXxx:(NSSet *)values;
The method takes an instance of NSSet containing the managed objects to be added. So, the dynamically created method for adding multiple children to our Person managed object is as follows:
- (void)addChildren:(NSSet *)values;
Finally, here's the method used to remove multiple managed objects from a relationship:
- (void)removeXxx:(NSSet *)values;
Remember that these methods are generated for you when you declare a custom NSManagedObject subclass. When Xcode encounters your NSManagedObject subclass declaration, it creates a category on the subclass that declares the four dynamic methods using the relationship name to construct the method names. Since the methods are generated at runtime, you won't find any source code in your project that implements the methods. If you never call the methods, you'll never see the methods. As long as you've already created the to-many relationship in your data model editor, you don't need to do anything extra to access these methods. They are created for you and ready to be called.
Note
There's one tricky point associated with the methods generated for to-many relationships. Xcode declares the four dynamic methods when you first generate the NSManagedObject subclass files from the template. If you have an existing data model with a to-many relationship and a subclass of NSManagedObject, what happens if you decide to add a new to-many relationship to that data model? If you add the to-many relationship to an existing NSManagedObject subclass, you'll need to add the category containing the dynamic methods yourself, which is what we'll do a little later in the chapter.
There is absolutely no difference between using these four methods and using mutableSetValueForKey:. The dynamic methods are just a little more convenient and make your code easier to read.
In Core Data, every relationship can have an inverse relationship. A relationship and its inverse are two sides of the same coin. In our Person object example, the inverse relationship for the children relationship might be a relationship called parent. A relationship does not need to be the same kind as its inverse. A to-one relationship, for example, can have an inverse relationship that is to-many. In fact, this is pretty common. If you think about it in real-world terms, a person can have many children. The inverse is that a child can have only one biological mother and one biological father, but the child can have multiple parents and guardians. So, depending on your needs and the way you modeled the relationship, you might choose to use either a to-one or a to-many relationship for the inverse.
If you add an object to a relationship, Core Data will automatically take care of adding the correct object to the inverse relationship. So, if you had a Person named steve and added a child to steve, Core Data would automatically make the child's parent steve.
Although relationships are not required to have an inverse, Apple generally recommends that you always create and specify the inverse, even if you won't need to use the inverse relationship in your application. In fact, the compiler will actually warn you if you fail to provide an inverse. There are some exceptions to this general rule, specifically when the inverse relationship will contain an extremely large number of objects, since removing the object from a relationship triggers its removal from the inverse relationship. Removing the inverse will require iterating over the set that represents the inverse, and if that's a very large set, there could be performance implications. But unless you have a specific reason not to do so, you should model the inverse, as it helps Core Data ensure data integrity. If you have performance issues as a result, it's relatively easy to remove the inverse relationship later.
Note
You can read more about how the absence of inverse relationships can cause integrity problems here:
http://developer.apple.com/mac/library/documentation/Cocoa/Conceptual/CoreData/Articles/cdRelationships.html#//apple_ref/doc/uid/TP40001857–SW6
Every relationship, regardless of its type, has something called a delete rule, which specifies what happens when one object in the relationship is deleted. There are four possible delete rules:
Nullify: This is the default delete rule. With this delete rule, when one object is deleted, the inverse relationship is just updated so that it doesn't point to anything. If the inverse relationship is a to-one relationship, it is set tonil. If the inverse relationship is a to-many relationship, the deleted object will be removed from the inverse relationship. This option ensures that there are no references to the object being deleted, but does nothing more.No Action: If you specify a delete rule ofNo Action, when you delete one object from a relationship, nothing happens to the other object. Instances where you would use this particular rule are extremely rare, and are generally limited to one-way relationships with no inverse. This action is rarely used because the other object's inverse relationship would end up pointing to an object that no longer exists.Cascade: If you set the delete rule toCascade, when you delete a managed object, all the objects in the relationship are also removed. This is a more dangerous option thanNullify, in that deleting one object can result in the deletion of other objects. You would typically want to chooseCascadewhen a relationship's inverse relationship is to-one and the related object is not used in any other relationships. If the object or objects in the relationship are used only for this relationship and not for any other reason, then you probably do want a cascade rule, so that you don't leave orphaned objects sitting in the persistent store taking up space.Deny: This delete rule option will actually prevent an object from being deleted if there are any objects in this association, making it the safest option in terms of data integrity. TheDenyoption is not used frequently, but if you have situations where an object shouldn't be deleted as long as it has any objects in a specific relationship, this is the one you would choose.
Relationships allow you to associate managed objects with specific other managed objects. In a way, relationships are sort of like iTunes playlists, where you can put specific songs into a list and then play them later. If you're an iTunes user, you know that there are things called Smart Playlists, which allow you to create playlists based on criteria rather than a list of specific songs. You can create a Smart Playlist, for example, that includes all the songs by a specific artist. Later on, when you buy new songs from that artist, they are added to that Smart Playlist automatically, because the playlist is based on criteria and the new songs meet those criteria.
Core Data has something similar. There's another type of attribute you can add to an entity that will associate a managed object with other managed objects based on criteria, rather than associating specific objects. Instead of adding and removing objects, fetched properties work by creating a predicate that defines which objects should be returned. Predicates, as you may recall, are objects that represent selection criteria. They are primarily used to sort collections and fetch results.
Tip
If you're rusty on predicates, Learn Objective-C on the Mac by Scott Knaster and Mark Dalrymple (Apress, 2009) devotes an entire chapter to the little beasties.
Fetched properties are always immutable. You can't change their contents at runtime. The criteria are usually specified in the data model (a process that we'll look at shortly), and then you access the objects that meet that criteria using properties or KVC.
Unlike to-many relationships, fetched properties are ordered collections and can have a specified sort order. Oddly enough, the data model editor doesn't allow you to specify how fetched properties are sorted. If you care about the order of the objects in a fetched property, you must actually write code to do that, which we'll look at later in this chapter.
Once you've created a fetched property, working with it is pretty straightforward. You just use valueForKey: to retrieve the objects that meet the fetched property's criteria in an instance of NSArray:
NSArray *olderPeople = [person valueForKey:@"olderPeople"];
If you use a custom NSManagedObject subclass and define a property for the fetched property, you can also use dot notation to retrieve objects that meet the fetched property's criteria in an NSArray instance, like so:
NSArray *olderPeople = person.olderPeople;
The first step in using relationships or fetched properties is to add them to your data model. Let's add the relationship and fetched properties we'll need in our SuperDB application now. If you look back at Figure 7-1, you can probably guess that we're going to need a new entity to represent the heroes' powers, as well as a relationship from our existing Hero entity to the new Power entity we're going to create. We'll also need four fetched properties to represent the four different reports.
Before we start making changes, create a new version of your data model by single-clicking the current version in the Groups & Files pane (the one with the green check mark), and then selecting Add Model Version from the Data Model submenu of the Design menu. This ensures that the data we collected using the previous data models migrate properly to the new version we'll be creating in this chapter.
Click the current data model to bring up the data model editor. Using the plus icon in the lower-left corner of the data model editor's entity pane, add a new entity and call it Power. You can leave all the other fields at their default values (Figure 7-4).
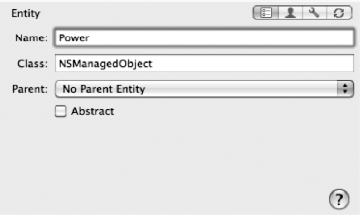
If you look back at Figure 7-2, you can see that our Power object has two fields: one for the name of the power and another that identifies the source of this particular power. In the interest of keeping things simple, the two attributes will just hold string values.
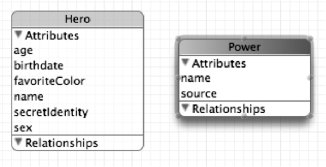
With Power still selected in the property pane, add two attributes using the property pane. Call one of them name, uncheck the Optional check box, set its Type to String, and give it a Default value of New Power. Give the second one a name of source, and set its Type to String as well. Leave Optional checked. There is no need for a default value. Once you're finished, you should have two rounded rectangles in the data model editor's diagram view (Figure 7-5).
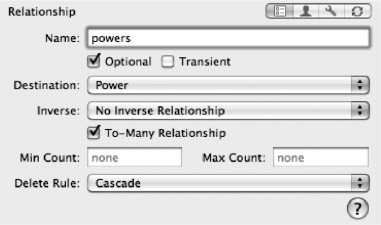
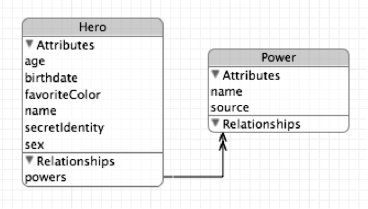
Right now, the Power entity is selected. Single-click the rounded rectangle that represents the Hero entity, or select Hero in the entity pane to select it. Now, in the properties pane, click the plus button and select Add Relationship. In the data model editor's detail pane, change the name of the new relationship to powers and the Destination to Power. The Destination field specifies which entity's managed objects can be added to this relationship, so by selecting Power, we are indicating that this relationship stores powers.
We can't specify the inverse relationship yet, but we do want to check the To-Many Relationship box to indicate that each hero can have more than one power. Also, change the Delete Rule to Cascade. In our application, every hero will have his or her own set of powers—we won't be sharing powers between heroes. When a hero is deleted, we want to make sure that hero's powers are deleted as well, so we don't leave orphaned data in the persistent store. Once you're finished, the detail pane should look like Figure 7-6, and the diagram view should have a line drawn between the Hero and Power entities to represent the new relationship (Figure 7-7).
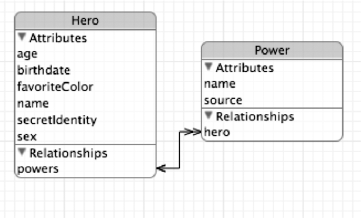
We won't actually need the inverse relationship in our application, but we're going to follow Apple's recommendation and specify one. Since the inverse relationship will be to-one, it doesn't present any performance implications. Select the Power entity again, and add a relationship to it using the property pane. Name this new relationship hero, and select a Destination entity of Hero. If you look at your diagram view now, you should see two lines representing the two different relationships we've created.
Next, click the Inverse pop-up menu and select powers. This indicates that the relationship is the inverse of the one we created earlier. Once you've selected it, the two relationship lines in the diagram view will merge together into a single line with arrowheads on both sides (Figure 7-8).
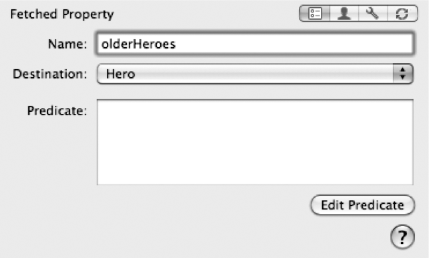
Select the Hero entity again so that you can add some fetched properties to it. In the property pane, select the plus button and choose Add Fetched Property. Call the new fetched property olderHeroes, and select a Destination of Hero. Notice that there is only one other field that can be set on the detail pane: a big white box called Predicate (Figure 7-9).
Tip
Both relationships and fetched properties can use their own entity as the Destination.
Although the Predicate field is a text field, it's not directly editable. Once you've created a predicate, it will show a string representation of that predicate, but you can't actually type into the field. Instead, to set the predicate for this fetched property, you click the Edit Predicate button to enter Xcode's predicate builder. Let's do that now. Go ahead. It's perfectly safe. No, seriously—click the darn button already.
The predicate builder is a visual tool for building criteria (Figure 7-10), and it can be used to specify some relatively sophisticated logic. We're going to start with a fairly simple predicate, and then we'll build a little more complex one later.
When the predicate builder opens, it contains a single row that represents the first criterion. Without at least one criterion, a predicate serves no purpose, so Xcode gives you the first one automatically. The pop-up menu on the left side allows you to select among the properties on the destination entity, as well as some other options that we'll look at later. The predicate we're building now needs to be based on birthdate, so single-click the pop-up menu and select birthdate, and then change the second pop-up menu (the one currently set to =) to <. For another hero to be older than this hero, that hero's birth date must be earlier.
When you change the leftmost pop-up menu to birthdate, the text field on the row changes into a date-picker control. If we wanted the comparison to be against a date constant, we would enter that date value there. That's not what we want, however. The way to change this is not obvious. Control-click in the space between the date field and the minus button. That brings up a contextual menu, and one of the things you can do with this contextual menu is change the operator type.
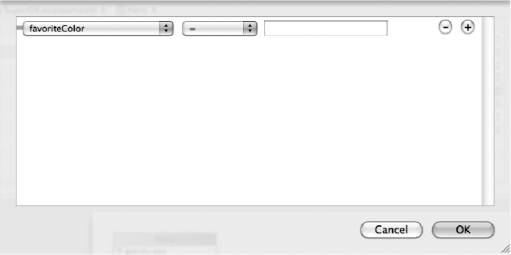
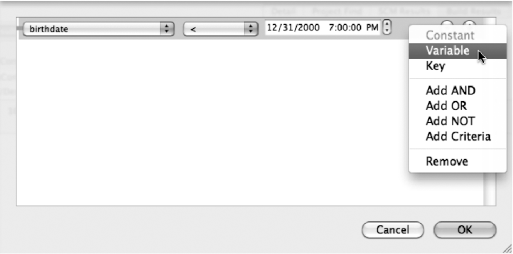
Figure 7.11. The super-secret predicate trick: right-clicking in the white space to the left of the minus button lets you change the type of operand.
Three types of operands are available in the predicate builder, and both the left and right operand can be changed to any of these three types:
Constant: A constant is a specified value you enter into a field. Constants never change value.
Key: A key is a value on the object to be retrieved that is specified using KVC. The left operand always defaults to a key, so when we selected
birthdatea moment ago, we were setting a key operand.Variable: A variable is a special value that is entered into a text field and evaluated at runtime. The primary usage of variable operands is to allow you to compare attributes on the entities being evaluated with the attributes on the source object where the fetched property is being called.
Your first instinct might be to specify Key for the right operand, since we want to compare to the birthdate attribute on this object. However, it doesn't work that way. Key operators always and only refer to keys on the managed objects being retrieved—no matter on which side of the equation they appear. So, if we were to select Key here, we would be comparing each hero's birth date to his or her own birth date. Instead, we want to choose Variable. Do that now, and the date field should turn back into a text field, where you can type.
The Variable option allows you to use special predicate builder variables that are evaluated at runtime. These variables also can be combined with keypaths to get to specific attributes of that object. The variable that's used to refer to the object where the fetched property is being executed is called $FETCH_SOURCE. To specify the birth date value on the source object, type FETCH_SOURCE.birthdate in the text field (without the dollar sign), which tells Core Data that we want to compare to the birthdate value on the object where the fetched property is being executed.
Warning
The dollar sign is, in fact, part of the variable name. However, the predicate builder automatically prefixes whatever you type in the variable field with a dollar sign, so it's important that you don't type it in, as that would result in two dollar signs being used.
Now click the OK button, because this predicate is done. The detail pane for your new fetched property should look like Figure 7-12.
Note
The variable text field is not big enough to show the entire value you just typed. Just type carefully, and everything will be okay.
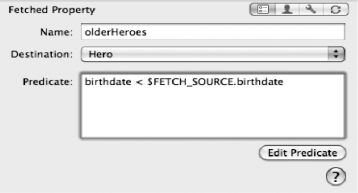
Figure 7.12. The finished fetched property. Notice that the predicate in the box includes a dollar sign before FETCH_SOURCE, even though you didn't type one.
Here are a few points of caution:
When you add or change a predicate, always take a look at the result before you run the application.
Make sure variables start with a dollar sign and are not surrounded by quotes.
Make sure you did not choose
Constantinstead ofVariable(a common mistake).
If you've checked these things and still run into problems, try doing a clean build. Sometimes that helps.
Note
In addition to $FETCH_SOURCE, Core Data also offers the variable $FETCHED_PROPERTY, which points to the description of a fetched property. You might use this is you want to compare an object attribute with the name of the fetched property being run. We won't use $FETCHED_PROPERTY in this book, but you can find out more about it by reading the Core Data Programming Guide:
http://developer.apple.com/mac/library/documentation/Cocoa/Conceptual/CoreData/Articles/cdRelationships.html
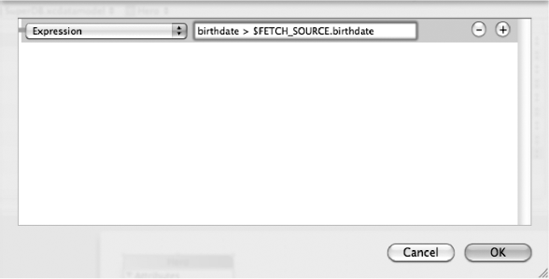
Add another fetched property named youngerHeroes. The Destination will be Hero again, and the predicate should be the same as the previous one, except the operator will be > instead of <. However, we're not going to build this one in quite the same way we did the previous one. Instead, we're going to show you another way of entering criteria in the predicate builder.
In addition to specifying criteria using the pop-up menus as we just did, Xcode's predicate builder also allows us to use something called an expression. In the context of a predicate, an expression is just a string that represents one or more criteria. (For those who have worked with SQL, a predicate's expression is similar to a SQL statement's WHERE clause, although the syntax is different.)
Click the Edit Predicate button again to open the predicate builder for this new fetched property. From the pop-up menu on the left, instead of selecting birthdate, select Expression, which should be the topmost item in the menu. A large text field appears to the right of the pop-up button. In that text field, type the following expression string:
birthdate > $FETCH_SOURCE.birthdate
Once you're finished typing this expression, your predicate builder sheet should look like Figure 7-13.
Note
The syntax for expressions is documented in the Predicates Programming Guide:
http://developer.apple.com/mac/library/DOCUMENTATION/Cocoa/Conceptual/Predicates/predicates.html
Hit the OK button, and this predicate is done.
One thing to be aware of is that a fetched property retrieves all matching objects, potentially including the object on which the fetch is being performed. This means it is possible to create a result set that, when executed on Ultra Guy, returns Ultra Guy.
Both the youngerHeroes and olderHeroes fetched properties automatically exclude the hero being evaluated. Heroes cannot be older or younger than themselves; their birth date will always exactly equal their own birth date, and so no hero will ever meet the two criteria we just created.
Let's now add a fetched property that has slightly more complex criteria.
The next fetched property we're going to create is called sameSexHeroes, and it returns all heroes who are the same sex as this hero. We can't just specify to return all heroes of the same sex, however, because we don't want this hero to be included in the fetched property. Ultra Guy is the same sex as Ultra Guy, but users will not expect to see Ultra Guy when they look at a list of the heroes who are the same sex as Ultra Guy.
Create another fetched property, naming it sameSexHeroes. Assign the new fetched property a Destination of Hero, and then open the predicate builder. In the pop-up menu on the left, select sex. Right-click in the blank area to the left of the plus and minus buttons, change the right operand to Variable, and type in FETCH_SOURCE.sex. The operator should have defaulted to =, but if not, change it to =. Now our predicate specifies all heroes who are the same sex as this hero, but we need another criterion to exclude the hero for whom this fetched property is being executed.
Right-click in the space to the left of the plus and minus buttons again. Notice that there are some other options below the operand types. Select Add AND to add another criterion to this predicate. You could also have accomplished this by clicking the + button, but we wanted you to see this other way. After you add the second criteria, your predicate should look like Figure 7-14.
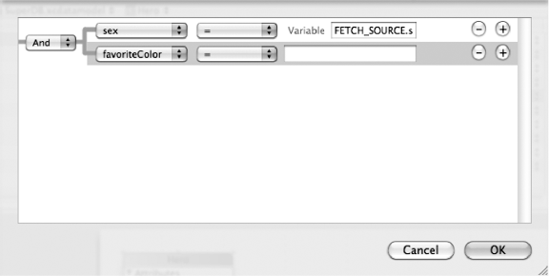
Figure 7.14. The predicate builder allows you to build complex criteria using Boolean logic. Here, we have two criteria being joined by an AND operator.
Because we selected AND, this fetched property will return only heroes that meet both criteria. So, what should the second criterion be?
We could just compare names and exclude heroes with the same name as ours. That might work, except for the fact that two heroes might have the same name. Maybe using name isn't the best idea. But what value is there that uniquely identifies a single hero? There isn't one, really.
Fortunately, predicate builder expressions recognize a special value called SELF, which returns the object being compared. The $FETCH_SOURCE variable represent the object where the fetch request is happening. Therefore, to exclude the object where the fetch request is firing, we just need to require it to return only objects where SELF != $FETCH_SOURCE. To prevent this predicate from including the object where the selection is happening, click the left pop-up menu on the second row and select Expression. In the text field that appears, type the following:
SELF != $FETCH_SOURCE
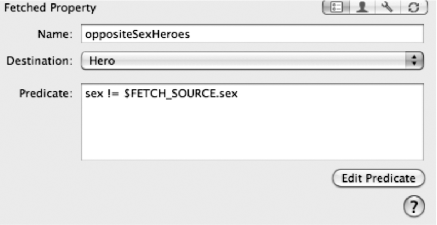
Create a new fetched property called oppositeSexHeroes and give it a Destination of Hero. Use the predicate editor to retrieve all heroes of the opposite sex. We're not going to give you the exact steps for this one, but your completed fetched property should look like Figure 7-15. Make sure you save your data model before continuing.
Since we created a custom subclass of NSManagedObject, we need to update that class to include the new relationship and fetched properties. If we had not made any changes to the Hero class, we could just regenerate the class definition from our data model, and the newly generated version would include properties and methods for the relationships and fetched properties we just added to our data model. Since we have added validation code, we'll need to update it manually. Single-click Hero.h and add the following code:
#import <CoreData/CoreData.h> #define kHeroValidationDomain @"com.Apress.SuperDB.HeroValidationDomain" #define kHeroValidationBirthdateCode 1000 #define kHeroValidationNameOrSecretIdentityCode 1001@class Power;@interface Hero : NSManagedObject { } @property (nonatomic, readonly) NSNumber * age; @property (nonatomic, retain) NSString * secretIdentity; @property (nonatomic, retain) NSString * sex; @property (nonatomic, retain) NSString * name; @property (nonatomic, retain) NSDate * birthdate; @property (nonatomic, retain) UIColor * favoriteColor;@property (nonatomic, retain) NSSet* powers;
@property (nonatomic, readonly) NSArray *olderHeroes;@property (nonatomic, readonly) NSArray *youngerHeroes;@property (nonatomic, readonly) NSArray *sameSexHeroes;@property (nonatomic, readonly) NSArray *oppositeSexHeroes;@end@interface Hero (PowerAccessors)- (void)addPowersObject:(Power *)value;- (void)removePowersObject:(Power *)value;- (void)addPowers:(NSSet *)value;- (void)removePowers:(NSSet *)value;@end
Save the file.
Switch over to Hero.m, and make the following changes:
#import "Hero.h" @implementation Hero @dynamic age; @dynamic secretIdentity; @dynamic sex; @dynamic name; @dynamic birthdate; @dynamic favoriteColor;@dynamic powers;@dynamic olderHeroes, youngerHeroes, sameSexHeroes, oppositeSexHeroes;- (void) awakeFromInsert { ...
Our data model is now complete. Next, we need to make changes to our user interface to let the user see the fetched properties and to view and edit powers. In order to let our users view the fetched properties, we'll create a new generic attribute controller, such as the one found in ManagedObjectStringEditor.m, that will be used to display all four fetched properties. We'll also be able to use this controller in the future to display any other fetched properties we add. How should we implement a controller for editing powers?
Throughout the book, we've been harping on writing code generically. We've talked about and demonstrated some of the benefits of doing that. We're now able to add and remove attributes from our user interface without needing to write any substantive code. This means it will be easy to extend and maintain HeroEditController as our application grows. There's also another benefit.
Powers and heroes are both represented by managed objects. Since we've written HeroEditController so generically, we could just copy the contents of HeroEditController into a new controller class called PowerEditController. Then all we would need to do is change the array that is created in viewDidLoad:, and everything should pretty much work, right?
Yes, but ...
Any time you find yourself copying and pasting large amounts of code, you need to take a step back and ask yourself if there isn't some way to avoid duplicating logic. What happens if you discover a bug in the controller logic? If you copy that logic over to a new controller class, you'll need to fix it in two places. In this case, we want to look for a way to leverage the same code to display both the Hero and Power managed object, and also to handle any additional entities that we might create in the future.
By writing our code generically, we have done almost all the work needed to display and edit any Core Data managed object. We have a class, HeroEditController, that with a little restructuring can be used to display any managed object. Having a generic managed object editor will make our life much easier as we expand our application in the future, so let's refactor now.
We're going to start by renaming HeroEditController to ManagedObjectEditor. We'll remove all of the hero-specific code from that the renamed class and move it to a category on ManagedObjectEditor that will contain all of our project-specific code. This will allow us to reuse the class in other projects, without needing to copy code that's specific to another project. After that, we'll make a handful of changes so that the class is more generic and to handle the display of relationships.
The name HeroEditController was very descriptive up to now, because that was exactly the job this controller was performing. By the end of this chapter, however, it will be used to display and edit two completely different entities, and will be capable of displaying others. Therefore, a new name seems to be in order. HeroAndPowerAndOtherManagedObjectsEditController is one candidate, but that's a little long, even in the iPhone development world. Let's go with ManagedObjectEditor.
In the Groups & Files pane, single-click HeroEditController.h. Find the following line:
@interface HeroEditController : UITableViewController {In this line, double-click the word HeroEditController to select it. Now, from the Edit menu, select Refactor..., or press
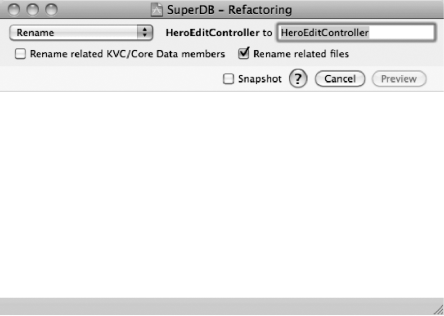
The preview will show you all the changes that Xcode will make for you if you decide to apply the change. If you select any of the listed filenames, it will show you all the changes that will be made to that file. The existing file will be displayed on the left, and the refactored view will appear on the right (Figure 7-17).
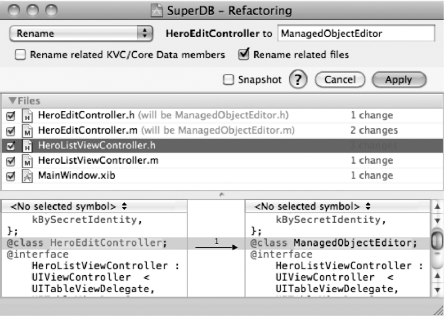
Click the Apply button to commit the changes, and then press
In our ManagedObjectEditor class, we have an instance variable called hero. That variable name is no longer representative of what that variable holds, so let's refactor that as well. Single-click ManagedObjectEditor.h, and then double-click the hero instance variable to select it. Press
Currently, our one instance of ManagedObjectEditor (formerly HeroEditController) is contained in MainWindow.xib, and the arrays that define the table structure are created in viewDidLoad:. Since viewDidLoad: will be called no matter which entity is being displayed, we need to move the arrays somewhere else. For now, this object-specific code doesn't belong in a generic class, so we'll delete it. We'll re-create the code a little later in a new location outside the main class definition.
Single-click ManagedObjectEditor.m and delete all of the code from the viewDidLoad: method except the call to super. Here's the new version of viewDidLoad::
- (void)viewDidLoad {
    [super viewDidLoad];
}
Don't worry—we'll write code elsewhere to populate the arrays. Before we do that, though, we have a few other changes to make.
One difference between HeroEditController and ManagedObjectEditor is that HeroEditController always existed at the same spot in the navigation hierarchy. You could drill down to it from one, and only one, place: the navigation controller's root view controller. When we use the class to let users edit and display powers, however, we're giving them the ability to add a new object by tapping a row on another object. As was the case with our generic attribute editors, our users are going to expect to be able to save or cancel when they are in the process of adding a new power. In addition, since this same code will be used to display a selected hero, we need to handle the case where save and cancel are not needed. Our new generic controller handles both cases.
Single-click ManagedObjectEditor.h and make the following changes:
#import <UIKit/UIKit.h>#define kToManyRelationship @"ManagedObjectToManyRelationship"#define kSelectorKey @"selector"@interface ManagedObjectEditor : UITableViewController { NSManagedObject *managedObject;BOOL showSaveCancelButtons;
@private
    NSArray         *sectionNames;
    NSArray         *rowLabels;
    NSArray         *rowKeys;
    NSArray         *rowControllers;
    NSArray         *rowArguments;

}
@property (nonatomic, retain) NSManagedObject *managedObject;
@property BOOL showSaveCancelButtons;
- (IBAction)save;
- (IBAction)cancel;

@end
We first define a couple of constants that we'll need later. Don't worry about them for now. We'll explain what they're used for later when we use them in code. Next, we need an instance variable to keep track of whether we should show the Save and Cancel buttons, so we declare showSaveCancelButtons. We also declare a corresponding property of the same name to expose this variable to other objects. We then add two action methods to handle the result of pressing either of the two buttons. Don't forget to save this file.
Flip over to ManagedObjectEditor.m. Synthesize the showSaveCancelButtons property and add the implementation of the save and cancel methods, as follows:
#import "ManagedObjectEditor.h" #import "NSArray-NestedArrays.h" #import "HeroValueDisplay.h" #import "ManagedObjectAttributeEditor.h" @implementation ManagedObjectEditor @synthesize managedObject; @synthesize showSaveCancelButtons;- (IBAction)save {NSError *error;if (![self.managedObject.managedObjectContext save:&error])NSLog(@"Error saving: %@", [error localizedDescription]);[self.navigationController popViewControllerAnimated:YES];}- (IBAction)cancel {if ([self.managedObject isNew])[self.managedObject.managedObjectContext deleteObject:self.managedObject];[self.navigationController popViewControllerAnimated:YES];}- (void)viewWillAppear:(BOOL)animated { ...
Notice that we're only logging errors in save, and not reporting them to the user. This is because we validate and save every time an individual attribute is edited. Doing it here would be redundant; we just log the error to help us with debugging. In theory, once our application has been tested, the code here should never actually encounter an error in the wild.
The cancel method might look a little odd. Remember that this same class is used to create and edit powers. If it's a new object, then Cancel means the new object that was created needs to be deleted before we go back to the previous level in the navigation hierarchy. If we're just editing an existing object, we don't want to delete it—we just move back up to the previous view in the hierarchy.
In the cancel method, we used a method on NSManagedObject called isNew that returns YES if this object has not been saved to the database. This is a handy method. Unfortunately, it doesn't exist on NSManagedObject, so we need to add it using a category. Single-click the Categories folder in the Groups & Files pane, and then select New File... from the File menu and select Objective-C class from under the Cocoa Touch Class heading. Make the file a subclass of NSObject. Name the new file NSManagedObject-IsNew.m, and make sure you check the box to have it create the header file.
Single-click NSManagedObject-IsNew.h and replace its contents with the following:
#import <Foundation/Foundation.h>

@interface NSManagedObject(IsNew)
/**
   Returns YES if this managed object is new and has not yet been saved in the persistent store.
*/
-(BOOL)isNew;
@end
Switch over to NSManagedObject-IsNew.m and replace its contents with this:
#import "NSManagedObject-IsNew.h"

@implementation NSManagedObject(IsNew)
-(BOOL)isNew
{
    NSDictionary *vals = [self committedValuesForKeys:nil];
    return [vals count] == 0;
}
@end
This method relies on the fact that managed objects maintain a dictionary of committed values, which are the values of attributes that have already been saved in the persistent store. This is the way it tells if values have been changed since the last save. If there aren't any attributes in the dictionary returned by committedValuesForKeys:, then the object must be new, because that indicates that there are no values saved in the persistent store.
Make sure both of these files are saved. Then go back to ManagedObjectEditor.m and add this import statement to the top to prevent compiler warnings about the isNew method not existing:
#import "ManagedObjectEditor.h"
#import "NSArray-NestedArrays.h"
#import "HeroValueDisplay.h"
#import "ManagedObjectAttributeEditor.h"
#import "NSManagedObject-IsNew.h"

@implementation ManagedObjectEditor
@synthesize managedObject;
@synthesize showSaveCancelButtons;

- (IBAction)save {
...The property showSaveCancelButtons tracks whether we should show the Save and Cancel buttons. Now we need to add code to viewWillAppear: to actually add those buttons to the navigation bar. Since it's possible that an instance of ManagedObjectEditor will be reused for different managed objects, we also need to make sure that we're not showing buttons from a previous use when showSaveCancelButtons is NO. Still in ManagedObjectEditor.m, add the following code to viewWillAppear:.
- (void)viewWillAppear:(BOOL)animated {
    [self.tableView reloadData];
    if (showSaveCancelButtons) {
        UIBarButtonItem *cancelButton = [[UIBarButtonItem alloc]
            initWithTitle:NSLocalizedString(@"Cancel",
            @"Cancel - for button to cancel changes")
            style:UIBarButtonSystemItemCancel
            target:self
            action:@selector(cancel)];
        self.navigationItem.leftBarButtonItem = cancelButton;
        [cancelButton release];
        UIBarButtonItem *saveButton = [[UIBarButtonItem alloc]
            initWithTitle:NSLocalizedString(@"Save",
            @"Save - for button to save changes")
            style:UIBarButtonItemStyleDone
            target:self
            action:@selector(save)];
        self.navigationItem.rightBarButtonItem = saveButton;
        [saveButton release];
    }
    else {
        self.navigationItem.leftBarButtonItem = nil;
        self.navigationItem.rightBarButtonItem = nil;
    }
    [super viewWillAppear:animated];
}If you look back at Figure 7-1, you'll see that we display a row for every power in the powers relationship and also use our table view's editing mode buttons to let the user delete powers or insert powers. We're going to use functionality built into UITableView to handle the deletes and inserts for to-many relationships. This is the presentation that the users will expect based on their experiences with built-in iPhone applications like Contacts and Calendar. It also allows us to leverage built-in code, rather than writing our own.
In order to leverage the table's built-in editing functionality, we need to turn on edit mode for our table view. Unlike in previous examples, we're going to leave edit mode on all the time. This is a controller intended specifically for editing, so we're not going to make the users take an extra step to turn on edit mode before they're allowed to add or delete objects from a relationship. Let's turn on edit mode in viewDidLoad: by adding the following two lines of code:
- (void)viewDidLoad {
    self.tableView.editing = YES;
    self.tableView.allowsSelectionDuringEditing = YES;

    [super viewDidLoad];
}
The first line of code turns on the table view's edit mode. The second line allows rows to be selected when edit mode is on. Ordinarily, there would be no need to select a row while in edit mode, because you would be in edit mode only for the time it takes to delete or move a row, and being able to accidentally select a row could get in the way of that functionality. As a result, by default, you can't select a row when edit mode is turned off. We need it turned back on so that the user can interact with our rows and drill down to edit attributes.
By default, any row that can be edited gets indented so that there's room for the delete or insert button to the left of the cell. In our design, rows in sections that represent to-many relationships will always be indented. All the rows in the Powers section will be indented to make room for the delete or insert button. Note that all to-many sections will always have at least one row labeled Add New..., and that section will always feature an insert button, as shown in Figure 7-1.
Our goal here is to build a generic managed object editor that we can use for the Powers section, as well as for any other to-many sections we might add to our application in the future.
We use the rowControllers subarray to represent a table section. We'll embed the constant kToManyRelationship we defined earlier inside any subarray pointed to by rowControllers when that subarray represents a to-many section.
Let's add a method to ManagedObjectEditor now that takes a section index and returns a BOOL that identifies whether the section is a regular section or a to-many relationship section. Later in the chapter, we'll add the code that embeds the kToManyRelationship constant in the section array if the section does represent a to-many relationship.
Insert the code shown in bold into ManagedObjectEditor.m:
#import "ManagedObjectEditor.h" #import "NSArray-NestedArrays.h" #import "HeroValueDisplay.h" #import "ManagedObjectAttributeEditor.h" #import "NSArray-Set.h" #import "NSManagedObject-IsNew.h"@interface ManagedObjectEditor()- (BOOL)isToManyRelationshipSection:(NSInteger)section;@end@implementation ManagedObjectEditor @synthesize managedObject @synthesize showSaveCancelButtons;- (BOOL)isToManyRelationshipSection:(NSInteger)section{NSArray *controllersForSection = [rowControllers objectAtIndex:section];if ([controllersForSection count] == 0)return NO;NSString *controllerForRow0 = [controllersForSection objectAtIndex:0];NSArray *sectionKeys = [rowKeys objectAtIndex:section];return [sectionKeys count] == 1 && [controllerForRow0isEqualToString:kToManyRelationship];}- (IBAction)save { ...
Since this method is not one that would ever be used outside our class, we're not going to declare it in our header. If we declared it there, we would advertise it to other classes. Instead, we'll use an Objective-C extension to declare it. Doing this lets the compiler know about the existence of our method without advertising it outside our class.
Note
Extensions are new to Objective-C 2.0. They exist specifically to let you declare a method without exposing it in your header file.
The isToManyRelationshipSection: method grabs the controller for the specified section. Unlike other sections, to-many sections will have only a single value in the rowControllers subarray. If the specified section array does not contain a row (is empty), then we know it's not a to-many section, and we return NO because there's no point in doing any further work. Otherwise, we look at the controller class, and if there's only one row and that row contains the constant kToManyRelationship, then we return YES. For any other values, we return NO.
Now that we have the ability to determine if a section is a to-many section, we can implement the delegate method that identifies which rows should be indented. Add the following method just about the @end declaration in ManagedObjectEditor.m:
- (BOOL)tableView:(UITableView *)tableView
  shouldIndentWhileEditingRowAtIndexPath:(NSIndexPath *)indexPath {
    return [self isToManyRelationshipSection:[indexPath section]];
}
Now, any row that represents a to-many section will get indented and leave room for the insert or delete button. Any other row will appear unindented, as in the previous iterations of the application.
That's not all there is to supporting to-many relationships. We also need to change the tableView:numberOfRowsInSection: method so that it returns a value based on the number of objects in a to-many relationship when a section is a to-many section. Replace the existing method in ManagedObjectEditor.m with this new version:
- (NSInteger)tableView:(UITableView *)tableView
        numberOfRowsInSection:(NSInteger)section {
    if ([self isToManyRelationshipSection:section]) {
        NSArray *sectionKeys = [rowKeys objectAtIndex:section];
        NSString *row0Key = [sectionKeys objectAtIndex:0];
        return [[managedObject valueForKey:row0Key] count] + 1;
    }
    return [rowLabels countOfNestedArray:section];
}
Notice that we actually return a number that is one higher than the number of objects in the to-many relationship. If you look at Figure 7-1, you'll see that we need an additional row to allow the user to insert a new power. You cannot have an insert and a delete button on the same row, so we need an additional row to let the user insert new values.
Note
Yes, the Contacts application on the iPhone has both a plus button and a minus button on some rows. That ability has not been exposed through public APIs, however, so we can't easily provide that same functionality without violating the iPhone SDK agreement that prohibits the use of private APIs.
We mentioned earlier that to-many relationships are represented as an unordered collection using NSSet. What's critical is that the list of to-many objects be consistently represented in the same order.
Before we modify our delegate and data source methods to handle to-many relationships, let's create a category on NSArray that will allow us to create an array from a set by specifying a key that should be used for ordering the objects. If we pass an NSSet into this method, it will always spit out an array with the same objects that are in the NSSet, only in a specific order.
In your Groups & Files pane, select the Categories folder. Then select
Single-click NSArray-Set.h and replace the contents with the following:
#import <Foundation/Foundation.h>

@interface NSArray(Set)
+ (id)arrayByOrderingSet:(NSSet *)set byKey:(NSString *)key ascending:(BOOL)ascending;

@end
Save your changes.
Now switch over to NSArray-Set.m and replace its contents with the following:
#import "NSArray-Set.h"

@implementation NSArray(Set)
+ (id)arrayByOrderingSet:(NSSet *)set byKey:(NSString *)key ascending:(BOOL)ascending {
    NSMutableArray *ret = [NSMutableArray arrayWithCapacity:[set count]];
    for (id oneObject in set)
        [ret addObject:oneObject];

    NSSortDescriptor *descriptor = [[NSSortDescriptor alloc] initWithKey:key
        ascending:ascending];
    [ret sortUsingDescriptors:[NSArray arrayWithObject:descriptor]];
    [descriptor release];
    return ret;
}
@end
Now, we have the ability to quickly and easily create ordered arrays from unordered sets. We can create order from chaos. We are now truly masters of the universe.
Okay, that might be overstating the case just a touch, but it's still pretty cool. Since we're going to be using this category in several methods in the ManagedObjectEditor class, insert the following import statement near the top of ManagedObjectEditor.m:
#import "ManagedObjectEditor.h"
#import "NSArray-NestedArrays.h"
#import "HeroValueDisplay.h"
#import "ManagedObjectAttributeEditor.h"
#import "NSManagedObject-IsNew.h"
#import "NSArray-Set.h"

@interface ManagedObjectEditor()
...The default editing style for all rows in a table is the delete style. Since our table view will always be in edit mode, if we stay with the delete style, a delete button will always appear next to each of our table rows. That's not what we want. Instead, we want insert and delete buttons only in to-many sections. To do that, add the following method just above the @end declaration in ManagedObjectEditor.m:
- (UITableViewCellEditingStyle)tableView:(UITableView *)tableView
editingStyleForRowAtIndexPath:(NSIndexPath *)indexPath {

    if ([self isToManyRelationshipSection:[indexPath section]]) {
        NSUInteger newPath[] = {[indexPath section], 0};
        NSIndexPath *row0IndexPath = [NSIndexPath indexPathWithIndexes:
            newPath length:2];

        NSString *rowKey = [rowKeys nestedObjectAtIndexPath:row0IndexPath];
        NSString *rowLabel = [rowLabels nestedObjectAtIndexPath:row0IndexPath];
        NSMutableSet *rowSet = [managedObject mutableSetValueForKey:rowKey];
        NSArray *rowArray = [NSArray arrayByOrderingSet:rowSet byKey:rowLabel
            ascending:YES];

        if ([indexPath row] >= [rowArray count])
            return UITableViewCellEditingStyleInsert;

        return UITableViewCellEditingStyleDelete;
    }
    return UITableViewCellEditingStyleNone;
}
For sections that hold to-many relationships, we return UITableViewCellEditingStyleDelete, which shows the delete button, unless it's that last additional row in the section—the one that allows the user to Add New.... In that case, we return UITableViewCellEditingStyleInsert, which shows an insert button. For all other rows, we return UITableViewCellEditingStyleNone, which tells the table view to show neither button.
We need to update tableView:cellForRowAtIndexPath: so that it knows about to-many sections. This requires some substantial changes, because we must add a new cell identifier with a different cell style for the to-many sections. For the existing rows, we'll continue to use UITableViewCellStyleValue2, which has two fields: a blue text label and a larger black text label. We don't want to use that style for to-many sections. We want to use the default style with just a single black text label.
Because the changes to this method are so extensive, we'll just replace the existing tableView:cellForRowAtIndexPath: in ManagedObjectEditor.m with the following new version:
- (UITableViewCell *)tableView:(UITableView *)tableView
        cellForRowAtIndexPath:(NSIndexPath *)indexPath {
    static NSString *defaultIdentifier = @"Managed Object Cell Identifier";
static NSString *relationshipIdentifier =
@"Managed Object Relationship Cell Identifier";
id rowController = [rowControllers nestedObjectAtIndexPath:indexPath];
NSString *rowKey = [rowKeys nestedObjectAtIndexPath:indexPath];
NSString *rowLabel = [rowLabels nestedObjectAtIndexPath:indexPath];
if (rowController == nil) {
NSUInteger newPath[] = {[indexPath section], 0};
NSIndexPath *row0IndexPath = [NSIndexPath indexPathWithIndexes:newPath
length:2];
rowController = [rowControllers nestedObjectAtIndexPath:row0IndexPath];
rowKey = [rowKeys nestedObjectAtIndexPath:row0IndexPath];
rowLabel = [rowLabels nestedObjectAtIndexPath:row0IndexPath];
}
NSString *cellIdentifier = nil;
UITableViewCellStyle cellStyle;
if ([rowController isEqual:kToManyRelationship]) {
cellIdentifier = relationshipIdentifier;
cellStyle = UITableViewCellStyleDefault;
}
else {
cellIdentifier = defaultIdentifier;
cellStyle = UITableViewCellStyleValue2;
}
UITableViewCell *cell = [tableView
dequeueReusableCellWithIdentifier:cellIdentifier];
if (cell == nil) {
cell = [[[UITableViewCell alloc] initWithStyle:cellStyle
reuseIdentifier:cellIdentifier] autorelease];
}
if ([rowController isEqual:kToManyRelationship]) {
NSSet *rowSet = [managedObject valueForKey:rowKey];
if ([rowSet count] == 0 || [indexPath row] >= [rowSet count]) {
cell.textLabel.text = NSLocalizedString(@"Add New...", @"Add New...");
cell.editingAccessoryType = UITableViewCellAccessoryDisclosureIndicator;
}
else {
NSArray *rowArray = [NSArray arrayByOrderingSet:rowSet byKey:rowLabel
ascending:YES];
NSUInteger row = [indexPath row];
NSManagedObject *relatedObject = [rowArray objectAtIndex:row];
NSString *rowValue = [[relatedObject valueForKey:rowLabel]
heroValueDisplay];
cell.textLabel.text = rowValue;
cell.editingAccessoryType = UITableViewCellAccessoryDisclosureIndicator;
}
} else if ([rowController isEqual:@"ManagedObjectFetchedPropertyDisplayer"]) {
cell.detailTextLabel.text = rowLabel;
cell.editingAccessoryType = UITableViewCellAccessoryDisclosureIndicator;
cell.textLabel.text = @"";
} else {
id <HeroValueDisplay, NSObject> rowValue = [managedObject
valueForKey:rowKey];cell.detailTextLabel.text = [rowValue heroValueDisplay];
cell.textLabel.text = rowLabel;
cell.editingAccessoryType = (rowController == [NSNull null]) ?
UITableViewCellAccessoryNone :
UITableViewCellAccessoryDisclosureIndicator;
if ([rowValue isKindOfClass:[UIColor class]])
cell.detailTextLabel.textColor = (UIColor *)rowValue;
else
cell.detailTextLabel.textColor = [UIColor blackColor];
}
return cell;
}This is a little more complex than the old version, so let's step through what we're doing.
First, we define two cell identifiers, one for each of the types of cells that we want to use in our table:
static NSString *defaultIdentifier = @"Managed Object Cell Identifier";
    static NSString *relationshipIdentifier =
        @"Managed Object Relationship Cell Identifier";
Basically, a managed object relationship cell is a row in our table that appears in a to-many section. All other rows are managed object cells.
Next, we retrieve the controller, key, and label from our nested arrays using indexPath, which identifies the current section and row, just as we did previously.
id rowController = [rowControllers nestedObjectAtIndexPath:indexPath];
    NSString *rowKey = [rowKeys nestedObjectAtIndexPath:indexPath];
    NSString *rowLabel = [rowLabels nestedObjectAtIndexPath:indexPath];
Next, we check to see if rowController is nil. This will happen only if the current section is a to-many section and we are in the second row or greater. Why? Because in managed object sections (which are not to-many sections), every row will have an associated row controller. In addition, in a to-many section, the first item will have a value in the row controller field of kToManyRelationship. So if rowController is nil, we know we're in row 2+ of a to-many section, and we go back and get the values from the first row in the section, which we do by creating a new index path:
if (rowController == nil) {
        NSUInteger newPath[] = {[indexPath section], 0};
        NSIndexPath *row0IndexPath = [NSIndexPath indexPathWithIndexes:newPath
            length:2];
        rowController = [rowControllers nestedObjectAtIndexPath:row0IndexPath];
        rowKey = [rowKeys nestedObjectAtIndexPath:row0IndexPath];
        rowLabel = [rowLabels nestedObjectAtIndexPath:row0IndexPath];
    }
After that, we declare local variables to represent the cell identifier and style, and then set them based on whether indexPath points to a row in a to-many section or a regular section:
NSString *cellIdentifier = nil;
    UITableViewCellStyle cellStyle;
    if ([rowController isEqual:kToManyRelationship]) {
cellIdentifier = relationshipIdentifier;
cellStyle = UITableViewCellStyleDefault;
}
else {
cellIdentifier = defaultIdentifier;
cellStyle = UITableViewCellStyleValue2;
}Once we have the style and identifier, we dequeue or create a new cell as normal:
UITableViewCell *cell = [tableView
                             dequeueReusableCellWithIdentifier:cellIdentifier];
    if (cell == nil) {
        cell = [[[UITableViewCell alloc] initWithStyle:cellStyle
                                       reuseIdentifier:cellIdentifier] autorelease];
    }
Now things get a little hairy. We check to see if we have a to-many relationship:
if ([rowController isEqual:kToManyRelationship]) {Then we grab the set that represents the to-many relationship and check to see if the row that this cell represents is greater than or equal to the number of objects in the relationship. If it is, then this row is that special insert row that doesn't actually represent any object in the relationship, so we set the cell label to the string constant @"Add New...":
NSSet *rowSet = [managedObject valueForKey:rowKey];
        if ([rowSet count] == 0 || [indexPath row] >= [rowSet count]) {
            cell.textLabel.text = NSLocalizedString(@"Add New...", @"Add New...");
            cell.editingAccessoryType = UITableViewCellAccessoryDisclosureIndicator;
        }
If it's not the last row, we need to order the set into an array. Since we don't need to display a label on each row for to-many arrays, we're repurposing that subarray for to-many sections to hold a key value that identifies which value on the other managed object should be displayed in the text label for the row. That key value will also be used to order the rows in the relationship, so they are always in the same order. Later, when we re-create the table structure arrays, we'll specify @"name" in that subarray for the powers to-many section to indicate that it should order the powers by the name attribute and display the name attribute in the table view cell.
Note
Yes, this is a little confusing. Bear with us. It probably would have been clearer to declare another array to hold the key value for to-many sections. However, since we already have a nested array that isn't needed by to-many sections, and we would need another nested array that is used only for to-many sections, we're trading off a little complexity for improved efficiency. We'll just need to make sure we document the fact that the rowLabels subarrays serve a slightly different purpose for to-many sections.
else {
            NSArray *rowArray = [NSArray arrayByOrderingSet:rowSet byKey:rowLabel
                ascending:YES];
NSUInteger row = [indexPath row];
NSManagedObject *relatedObject = [rowArray objectAtIndex:row];
NSString *rowValue = [[relatedObject valueForKey:rowLabel]
heroValueDisplay];
cell.textLabel.text = rowValue;
cell.editingAccessoryType = UITableViewCellAccessoryDisclosureIndicator;
}A little later in the chapter, we're going to write a controller class to display fetched properties. You can see what the end result of that controller class will look like in Figure 7-3. To avoid going back and forth later on, we're going to write the code for those rows now, since they require slightly different logic than other attributes. If you look at Figure 7-1, you'll see that we use only one of the two labels for the fetched properties, so the next chunk of code handles the display of fetched properties by setting the unused text label to display an empty string:
} else if ([rowController isEqual:@"ManagedObjectFetchedPropertyDisplayer"]) {
        cell.detailTextLabel.text = rowLabel;
        cell.editingAccessoryType = UITableViewCellAccessoryDisclosureIndicator;
        cell.textLabel.text = @"";
    }
Otherwise, we have the same basic logic we used before:
else {
        id <HeroValueDisplay, NSObject> rowValue = [managedObject
            valueForKey:rowKey];
        cell.detailTextLabel.text = [rowValue heroValueDisplay];
        cell.textLabel.text = rowLabel;
        cell.editingAccessoryType = (rowController == [NSNull null]) ?
            UITableViewCellAccessoryNone :
            UITableViewCellAccessoryDisclosureIndicator;

        if ([rowValue isKindOfClass:[UIColor class]])
            cell.detailTextLabel.textColor = (UIColor *)rowValue;
        else
            cell.detailTextLabel.textColor = [UIColor blackColor];
    }
Of course, once we're finished, we return the cell:
return cell;
}
Just as we did in the previous section, what we do when a user taps on a row depends on whether it's a row in a to-many section or just a regular section. Replace your existing tableView:didSelectRowAtIndexPath: method with this new version:
- (void)tableView:(UITableView *)tableView
didSelectRowAtIndexPath:(NSIndexPath *)indexPath {

    if ([self isToManyRelationshipSection:[indexPath section]]) {

        NSUInteger newPath[] = {[indexPath section], 0};
NSIndexPath *row0IndexPath = [NSIndexPath indexPathWithIndexes:newPath
length:2];
NSString *rowKey = [rowKeys nestedObjectAtIndexPath:row0IndexPath];
NSString *rowLabel = [rowLabels nestedObjectAtIndexPath:row0IndexPath];
NSSet *rowSet = [managedObject valueForKey:rowKey];
NSDictionary *args = [rowArguments nestedObjectAtIndexPath:row0IndexPath];
NSString *selectorString = [args objectForKey:kSelectorKey];
NSEntityDescription *ed = [managedObject entity];
NSRelationshipDescription *rd = [[ed relationshipsByName]
valueForKey:rowKey];
NSEntityDescription *dest = [rd destinationEntity];
NSString *entityName = [dest name];
ManagedObjectEditor *controller = [ManagedObjectEditor
performSelector:NSSelectorFromString(selectorString)];
NSMutableSet *relationshipSet = [self.managedObject
mutableSetValueForKey:rowKey];
if ([rowSet count] == 0 || [indexPath row] >= [rowSet count]) {
NSManagedObject *object = [NSEntityDescription
insertNewObjectForEntityForName:entityName
inManagedObjectContext:[self.managedObject managedObjectContext]];
controller.managedObject = object;
[relationshipSet addObject:object];
controller.title = [NSString stringWithFormat:@"New %@", entityName];
}
else {
NSArray *relationshipArray = [NSArray arrayByOrderingSet:relationshipSet
byKey:rowLabel ascending:YES];
NSManagedObject *selectedObject = [relationshipArray
objectAtIndex:[indexPath row]];
controller.managedObject = selectedObject;
controller.title = entityName;
}
controller.showSaveCancelButtons = YES;
[self.navigationController pushViewController:controller animated:YES];
}
else {
NSString *controllerClassName = [rowControllers
nestedObjectAtIndexPath:indexPath];
NSString *rowLabel = [rowLabels nestedObjectAtIndexPath:indexPath];
NSString *rowKey = [rowKeys nestedObjectAtIndexPath:indexPath];
Class controllerClass = NSClassFromString(controllerClassName);
ManagedObjectAttributeEditor *controller =
[controllerClass alloc];
controller = [controller initWithStyle:UITableViewStyleGrouped];
controller.keypath = rowKey;
controller.managedObject = managedObject;
controller.labelString = rowLabel;
controller.title = rowLabel;
NSDictionary *args = [rowArguments nestedObjectAtIndexPath:indexPath];
if ([args isKindOfClass:[NSDictionary class]]) {
if (args != nil) {
for (NSString *oneKey in args) {id oneArg = [args objectForKey:oneKey];
[controller setValue:oneArg forKey:oneKey];
}
}
}
[self.navigationController pushViewController:controller animated:YES];
[controller release];
}
}This code may look a little scary, but it's not really that bad. Let's break it down.
First, we check to see if we're dealing with a to-many relationship:
if ([self isToManyRelationshipSection:[indexPath section]]) {If we are, then we create an NSIndexPath instance that points to the first row in the nested arrays, because that's where the information for a to-many relationship is stored:
NSUInteger newPath[] = {[indexPath section], 0};
NSIndexPath *row0IndexPath = [NSIndexPath indexPathWithIndexes:newPath
length:2];Then we use that index path to get the various values we need from our nested arrays:
NSString *rowKey = [rowKeys nestedObjectAtIndexPath:row0IndexPath];
NSString *rowLabel = [rowLabels nestedObjectAtIndexPath:row0IndexPath];
NSSet *rowSet = [managedObject valueForKey:rowKey];
NSDictionary *args = [rowArguments nestedObjectAtIndexPath:row0IndexPath];Earlier in the chapter, we defined the two constants kToManyRelationship and kSelectorKey. We used one of them to identify when a section was a to-many section. Now, we're going to use the other one, which will be used as a key in the rowArguments dictionary. Later, when we re-create our table structure arrays, we'll store the name of an Objective-C method, under the kSelectorKey key, into the rowArguments subarray for the heroes section. That method name will be a class method that can be called on ManagedObjectEditor. That class method will return an instance of ManagedObjectEditor with the nested arrays all populated for the display of the Power entity. Later, we'll use categories to add factory methods to ManagedObjectEditor for each entity that we let the user edit. Here, we retrieve the value stored under that key:
NSString *selectorString = [args objectForKey:kSelectorKey];
We also need to know the name of the destination entity used in this relationship. We can get that information from the data model, although it takes a couple of calls to get to the information we need:
NSEntityDescription *ed = [managedObject entity];
NSRelationshipDescription *rd = [[ed relationshipsByName]
valueForKey:rowKey];
NSEntityDescription *dest = [rd destinationEntity];
NSString *entityName = [dest name];Next, we create a new instance of ManagedObjectEditor that will be used to display and edit the object on which the user tapped. So, if the user tapped on a power in Figure 7-1, here, we would be creating a new instance of ManagedObjectEditor configured to allow editing of Power managed objects.
This code takes advantage of Objective-C's dynamic nature. We take the name of the factory method that we just retrieved from the rowArguments nested array and use NSSelectorFromString() to turn it into a selector. We then perform that selector on ManagedObjectEditor, which is how you call class methods dynamically:
ManagedObjectEditor *controller = [ManagedObjectEditor
performSelector:NSSelectorFromString(selectorString)];If the user tapped on the last row in the section, we need to create a new object, since this is the Add New... row. The next chunk of code checks if the user tapped the last row, and then it creates a new entity if necessary:
NSMutableSet *relationshipSet = [self.managedObject
mutableSetValueForKey:rowKey];
if ([rowSet count] == 0 || [indexPath row] >= [rowSet count]) {
NSManagedObject *object = [NSEntityDescription
insertNewObjectForEntityForName:entityName
inManagedObjectContext:[self.managedObject managedObjectContext]];
controller.managedObject = object;
[relationshipSet addObject:object];
controller.title = [NSString stringWithFormat:@"New %@", entityName];
}If the user tapped on any other row besides the last one in the section, then we retrieve the object that corresponds to the row tapped. We need to create an ordered array from the set so we know which object was tapped:
else {
NSArray *relationshipArray = [NSArray arrayByOrderingSet:relationshipSet
byKey:rowLabel ascending:YES];
NSManagedObject *selectedObject = [relationshipArray
objectAtIndex:[indexPath row]];
controller.managedObject = selectedObject;
controller.title = entityName;
}Once we have the controller, and have either retrieved the object to be edited or created a new object, we set showSaveCancelButtons to tell the new instance of ManagedObjectEditor to show the Save and Cancel buttons, and then we push it onto the navigation stack so the user sees it:
controller.showSaveCancelButtons = YES;
[self.navigationController pushViewController:controller animated:YES];
}If the row isn't a to-many section, then we use the previous logic that grabs the information from the nested arrays and pushes the appropriate attribute editor onto the stack for the attribute that corresponds to the row that was tapped:
else {
NSString *controllerClassName = [rowControllers
nestedObjectAtIndexPath:indexPath];
NSString *rowLabel = [rowLabels nestedObjectAtIndexPath:indexPath];
NSString *rowKey = [rowKeys nestedObjectAtIndexPath:indexPath];
Class controllerClass = NSClassFromString(controllerClassName);
ManagedObjectAttributeEditor *controller =[controllerClass alloc];
controller = [controller initWithStyle:UITableViewStyleGrouped];
controller.keypath = rowKey;
controller.managedObject = managedObject;
controller.labelString = rowLabel;
controller.title = rowLabel;
NSDictionary *args = [rowArguments nestedObjectAtIndexPath:indexPath];
if ([args isKindOfClass:[NSDictionary class]]) {
if (args != nil) {
for (NSString *oneKey in args) {
id oneArg = [args objectForKey:oneKey];
                    [controller setValue:oneArg forKey:oneKey];
                }
            }
        }
        [self.navigationController pushViewController:controller animated:YES];
        [controller release];
    }
}When the user taps on a delete or insert icon, our delegate method tableView:commitEditingStyle:forRowAtIndexPath: is called. In that method, if the delete button was tapped, we need to handle deleting the selected object and removing it from the relationship. If the insert button was tapped, we need to handle that as well. Add the following method to ManagedObjectEditor.m, just before the @end declaration:
- (void)tableView:(UITableView *)tableView
commitEditingStyle:(UITableViewCellEditingStyle)editingStyle
forRowAtIndexPath:(NSIndexPath *)indexPath {
if (editingStyle == UITableViewCellEditingStyleInsert) {
[self tableView:tableView didSelectRowAtIndexPath:indexPath];
}
else if (editingStyle == UITableViewCellEditingStyleDelete) {
NSUInteger newPath[] = {[indexPath section], 0};
        NSIndexPath *row0IndexPath = [NSIndexPath indexPathWithIndexes:newPath
            length:2];
NSString *rowKey = [rowKeys nestedObjectAtIndexPath:row0IndexPath];
NSString *rowLabel = [rowLabels nestedObjectAtIndexPath:row0IndexPath];
NSMutableSet *rowSet = [self.managedObject mutableSetValueForKey:rowKey];
NSArray *rowArray = [NSArray arrayByOrderingSet:rowSet byKey:rowLabel
ascending:YES];
NSManagedObject *objectToRemove = [rowArray objectAtIndex:[indexPath row]];
[rowSet removeObject:objectToRemove];
[self.tableView deleteRowsAtIndexPaths:[NSArray arrayWithObject:indexPath]
withRowAnimation:UITableViewRowAnimationFade];
[[objectToRemove managedObjectContext] deleteObject:objectToRemove];
NSError *error;
if (![self.managedObject.managedObjectContext save:&error])
NSLog(@"Error saving: %@", [error localizedDescription]);} }
This method is considerably shorter and less complex than the last few, but it's still important to understand.
The first thing we do here is check the editing style, which will tell us which button was tapped. In the case of an insert, we call the tableView:cellForRowAtIndexPath: method. If you recall, we already wrote functionality in that method so that a tap on the last row in a to-many section will add a new managed object. There's no point in doing it again, so we just call that method:
if (editingStyle == UITableViewCellEditingStyleInsert) {
[self tableView:tableView didSelectRowAtIndexPath:indexPath];
}Otherwise, we're dealing with a delete. We use an else if just to be safe. Although currently this method will be called only with either UITableViewCellEditingStyleDelete or UITableViewCellEditingStyleInsert, we want to code defensively so our application doesn't break if Apple someday adds another editing style into the mix.
else if (editingStyle == UITableViewCellEditingStyleDelete) {If it's a delete, we know that we're dealing with a to-many relationship, so we create an index path pointing to the first object in the nested subarrays, and use it to retrieve the row key and label:
NSUInteger newPath[] = {[indexPath section], 0};
NSIndexPath *row0IndexPath = [NSIndexPath indexPathWithIndexes:newPath
length:2];
NSString *rowKey = [rowKeys nestedObjectAtIndexPath:row0IndexPath];
NSString *rowLabel = [rowLabels nestedObjectAtIndexPath:row0IndexPath];Next, we get the set that represents the relationship. We use mutableSetValueForKey: instead of valueForKey:, so that we can remove objects from the relationship:
NSMutableSet *rowSet = [self.managedObject mutableSetValueForKey:rowKey];
We need to order the set into an array so we know which object the user tapped:
NSArray *rowArray = [NSArray arrayByOrderingSet:rowSet byKey:rowLabel
ascending:YES];Then we can get the actual object that needs to be deleted and removed from the relationship. Once we have it, we remove it from the mutable set, which removes it from the relationship. We then delete the row from the table, delete the object from the persistent store, and save.
NSManagedObject *objectToRemove = [rowArray objectAtIndex:[indexPath row]];
[rowSet removeObject:objectToRemove];
[self.tableView deleteRowsAtIndexPaths:[NSArray arrayWithObject:indexPath]
withRowAnimation:UITableViewRowAnimationFade];
[[objectToRemove managedObject] deleteObject:objectToRemove];
NSError *error;
if (![self.managedObject.managedObjectContext save:&error])
NSLog(@"Error saving: %@", [error localizedDescription]);
}Warning
In our application, each hero has his or her own powers. Powers are not shared, so we just delete them with impunity. Not all relationships in all applications you write will be this way. Often, the inverse relationship will be to-many also, and objects will be shared. In those instances, you will need to be sure to delete the object only if there are no other objects in the inverse relationship. If other objects exist, you shouldn't delete the selected object, but just remove it from the relationship.
Well, congratulations. You now have a generic controller class for editing data stored in Core Data. But before you get too excited, we still have work to do. For one thing, we completely broke our application when we took the code to create the nested arrays out of viewDidLoad: earlier. If you run the application now, it will not work. Let's fix things.
Refactoring can be hard, confusing work. The payoff is going to be substantial and have lasting effects, so stick with us. The next thing we need to do is fix the application so that it uses this new class to edit heroes and their powers. To accomplish that, we need to add factory methods to ManagedObjectEditor to return a fully initialized controller for each entity we want to use.
Because we have created a generic controller, we don't want it to have code that ties it to our specific data model. So, we'll create a project-specific category on ManagedObjectEditor that will contain the code to create the arrays. This will maximize reusability of our code, because what's contained in ManagedObjectEditor.m will be completely generic and can be copied to other projects.
In the Groups & Files pane in Xcode, select the Categories folder and select
#import "ManagedObjectEditor.h" @interface ManagedObjectEditor(HeroEditor) + (id)controllerForHero; - (id)initHeroEditor; @end @interface ManagedObjectEditor(PowerEditor) + (id)controllerForPower; - (id)initPowerEditor; @end
Save the file.
We're actually creating two categories in this one file pair. We could have just as easily added these four methods in a single category, but to make things more organized, we're separating the methods by the entity that they are used to edit.
Switch over to ManagedObjectEditor-SuperDB.m and replace its contents with the following:
#import "ManagedObjectEditor-SuperDB.h"
@implementation ManagedObjectEditor (HeroEditor)
+ (id)controllerForHero {
id ret = [[[self class] alloc] initHeroEditor];
return [ret autorelease];
}
- (id)initHeroEditor {
if (self = [super initWithStyle:UITableViewStyleGrouped])
{
sectionNames = [[NSArray alloc] initWithObjects:
[NSNull null],
NSLocalizedString(@"General", @"General"),
NSLocalizedString(@"Powers", @"Powers"),
NSLocalizedString(@"Reports", @"Reports"),
nil];
rowLabels = [[NSArray alloc] initWithObjects:
// Section 1
[NSArray arrayWithObjects:NSLocalizedString(@"Name", @"Name"), nil],
// Section 2
[NSArray arrayWithObjects:NSLocalizedString(@"Identity", @"Identity"),
NSLocalizedString(@"Birthdate", @"Birthdate"),
NSLocalizedString(@"Age", @"Age"),
NSLocalizedString(@"Sex", @"Sex"),
NSLocalizedString(@"Fav. Color", @"Favorite Color"),
nil],
// Section 3
[NSArray arrayWithObject:@"name"], // label here is the key on the
// other object to use as the label
// Section 4
[NSArray arrayWithObjects:
NSLocalizedString(@"All Older Heroes", @"All Older Heroes"]),
NSLocalizedString(@"All Younger Heroes", @"All Younger Heroes"),
NSLocalizedString(@"Same Sex Heroes", @"Same Sex Heroes"),
NSLocalizedString(@"Opposite Sex Heroes", @" Opposite Sex Heroes"),
nil],
// Sentinel
nil];
rowKeys = [[NSArray alloc] initWithObjects:// Section 1
[NSArray arrayWithObjects:@"name", nil],
// Section 2
[NSArray arrayWithObjects:@"secretIdentity", @"birthdate", @"age",
@"sex", @"favoriteColor", nil],
// Section 3
[NSArray arrayWithObject:@"powers"],
// Section 4
[NSArray arrayWithObjects:@"olderHeroes", @"youngerHeroes",
@"sameSexHeroes", @"oppositeSexHeroes", nil],
// Sentinel
nil];
rowControllers = [[NSArray alloc] initWithObjects:
// Section 1
[NSArray arrayWithObject:@"ManagedObjectStringEditor"],
// Section 2
[NSArray arrayWithObjects:@"ManagedObjectStringEditor",
@"ManagedObjectDateEditor",
[NSNull null],
@"ManagedObjectSingleSelectionListEditor",
@"ManagedObjectColorEditor",
nil],
// Section 3
[NSArray arrayWithObject:kToManyRelationship],
// Section 4
[NSArray arrayWithObjects:
@"ManagedObjectFetchedPropertyDisplayer",
@"ManagedObjectFetchedPropertyDisplayer",
@"ManagedObjectFetchedPropertyDisplayer",
@"ManagedObjectFetchedPropertyDisplayer",
nil],
// Sentinel
nil];
rowArguments = [[NSArray alloc] initWithObjects:
// Section 1
[NSArray arrayWithObject:[NSNull null]],
// Section 2
[NSArray arrayWithObjects:[NSNull null],
[NSNull null],
[NSNull null],
[NSDictionary dictionaryWithObject:
[NSArray arrayWithObjects:@"Male", @"Female", nil]
forKey:@"list"],
[NSNull null],[NSNull null],
nil],
// Section 3
[NSArray arrayWithObject:[NSDictionary dictionaryWithObjectsAndKeys:
@"controllerForPower", kSelectorKey, nil]],
//Section 4
[NSArray arrayWithObjects:
[NSDictionary dictionaryWithObjectsAndKeys:
@"name", @"displayKey", @"controllerForHero",
@"controllerFactoryMethod", nil],
[NSDictionary dictionaryWithObjectsAndKeys:
@"name", @"displayKey", @"controllerForHero",
@"controllerFactoryMethod", nil],
[NSDictionary dictionaryWithObjectsAndKeys:
@"name", @"displayKey", @"controllerForHero",
@"controllerFactoryMethod", nil],
[NSDictionary dictionaryWithObjectsAndKeys:
@"name", @"displayKey", @"controllerForHero",
@"controllerFactoryMethod", nil],
nil],
// Sentinel
nil];
}
return self;
}
@end
@implementation ManagedObjectEditor (PowerEditor)
+ (id)controllerForPower {
id ret = [[[self class] alloc] initPowerEditor];
return [ret autorelease];
}
- (id)initPowerEditor {
if (self = [[[self class] alloc] initWithStyle:UITableViewStyleGrouped]) {
sectionNames = [[NSArray alloc] initWithObjects:[NSNull null],
[NSNull null], nil];
rowLabels = [[NSArray alloc] initWithObjects:
[NSArray arrayWithObject:NSLocalizedString(@"Name", @"Name")],
[NSArray arrayWithObject:NSLocalizedString(@"Source", @"Source")],
nil];
rowKeys = [[NSArray alloc] initWithObjects:
[NSArray arrayWithObject:@"name"],
[NSArray arrayWithObject:@"source"],
nil];
rowControllers = [[NSArray alloc] initWithObjects:
[NSArray arrayWithObject:@"ManagedObjectStringEditor"],
[NSArray arrayWithObject:@"ManagedObjectStringEditor"],
nil];
rowArguments = [[NSArray alloc] initWithObjects:[NSArray arrayWithObject:[NSNull null]],
[NSArray arrayWithObject:[NSNull null]],
nil];
}
return self;
}
@endThe two init methods should look familiar to you. They set up the structure arrays, just as in viewDidLoad. The contents of the Hero arrays have gotten a little more complex, since we've added a to-many relationship and four fetched properties, but the basic concept is unchanged from before.
You should look these over to make sure you understand what they're doing. We've been working with the nested arrays long enough now that we're not going to step through them line by line.
We need to delete the instance of ManagedObjectEditor in MainWindow.xib. If you remember from the earlier chapters, there is an instance of HeroEditController in the nib, and that instance is used to edit all heroes. When we refactored HeroEditController, the instance of the nib became an instance of ManagedObjectEditor.
We can no longer instantiate our controller class from the nib file because the nested arrays won't be set up properly if we leave it like this. We used to create the arrays in viewDidLoad, but that is no longer the case, so we need to create the controller instance in code to make sure that those arrays are created.
Double-click MainWindow.xib in the Groups & Files pane to open Interface Builder. Look in the nib's main window for an icon labeled Managed Object Editor. Single-click it to select it, and then press the Delete key on your keyboard to delete it. Note that if you are in list mode, Managed Object Editor will also have a child Table View. No worries—that child view will disappear when you delete the parent. Save the nib and go back to Xcode.
Now that we're not creating an instance of ManagedObjectEditor in MainWindow.xib, we need to take care of that task in code. We will do this in HeroListViewController, which is the navigation controller's root view controller. Single-click HeroListViewController.m and add the following import statements at the top of the file:
#import "HeroListViewController.h" #import "SuperDBAppDelegate.h" #import "ManagedObjectEditor.h" #import "Hero.h"#import "ManagedObjectEditor-SuperDB.h"
@implementation HeroListViewController ...
Next, we need to create the controller class in viewDidLoad. Insert the following line of code into viewDidLoad to accomplish that:
- (void)viewDidLoad {
[super viewDidLoad];
self.detailController = [ManagedObjectEditor controllerForHero];
NSError *error = nil;
...Because we're using the factory method controllerForHero, the controller class that is created will have all the arrays populated so that it works correctly and allows the user to edit the Hero entity.
At this point, the application should run and work mostly okay, with the exception of the fetched properties. We haven't written the controller to display them yet. Let's do that now. You've written enough of these attribute editing classes, so we won't walk through this one step by step.
Create a new file by single-clicking the Classes folder and selecting
#import <Foundation/Foundation.h>
#import "ManagedObjectAttributeEditor.h"
@interface ManagedObjectFetchedPropertyDisplayer : ManagedObjectAttributeEditor {
NSString *displayKey;
NSString *controllerFactoryMethod;
}
@property (nonatomic, retain) NSString *displayKey;
@endSave the file.
Switch over to ManagedObjectFetchedPropertyDisplayer.m and replace its contents with the following:
#import "ManagedObjectFetchedPropertyDisplayer.h"
#import "NSArray-Set.h"
#import "ManagedObjectEditor.h"
@implementation ManagedObjectFetchedPropertyDisplayer
@synthesize displayKey;
- (void)viewWillAppear:(BOOL)animated {
[super viewWillAppear:animated];self.navigationItem.leftBarButtonItem = nil;
self.navigationItem.rightBarButtonItem = nil;
}
- (void)dealloc {
[displayKey release];
[super dealloc];
}
#pragma mark -
#pragma mark Table View Methods
- (NSInteger)tableView:(UITableView *)theTableView numberOfRowsInSection:(NSInteger)section {
NSArray *array = [self.managedObject valueForKey:keypath];
return [array count];
}
- (UITableViewCell *)tableView:(UITableView *)theTableView
cellForRowAtIndexPath:(NSIndexPath *)indexPath {
static NSString *CellIdentifier = @"Fetched Property Display Cell";
UITableViewCell *cell = [theTableView
dequeueReusableCellWithIdentifier:CellIdentifier];
if (cell == nil) {
cell = [[[UITableViewCell alloc] initWithStyle:UITableViewCellStyleDefault
reuseIdentifier:CellIdentifier] autorelease];
}
NSArray *array = [self.managedObject valueForKey:keypath];
NSManagedObject *oneObject = [array objectAtIndex:[indexPath row]];
cell.textLabel.text = [oneObject valueForKey:displayKey];
cell.accessoryType = UITableViewCellAccessoryDisclosureIndicator;
return cell;
}
- (void)tableView:(UITableView *)tableView
didSelectRowAtIndexPath:(NSIndexPath *)indexPath {
NSArray *array = [self.managedObject valueForKey:keypath];
NSManagedObject *oneObject = [array objectAtIndex:[indexPath row]];
SEL factorySelector = NSSelectorFromString(controllerFactoryMethod);
ManagedObjectEditor *controller = [ManagedObjectEditor
performSelector:factorySelector];
controller.managedObject = oneObject;
[self.navigationController pushViewController:controller animated:YES];
}
@endThis attribute editor uses Objective-C's dynamic dispatching to let the calling object specify a factory method that can be used to edit any of the objects in the fetched relationship. Selecting a hero in one of the lists drills down and lets you edit that hero in a new instance of ManagedObjectEditor. In fact, you can drill down endlessly, even in our simple application—at least until you run out of memory.
Build and run the application, and then test it. Try out the four fetched properties, and make sure you see the heroes you expect to see in each one. Try drilling down to edit the heroes from the fetched property.
It's pretty good, and you can extend this application quite a bit without writing any code except new factory methods to populate those arrays.
There is still one minor problem to address. Select a hero or create a new one, and then hit the plus button to add a new power to the hero. Once the new view comes up, immediately hit the Cancel button. When you get back to the original hero, you'll see two insert rows, as shown in Figure 7-18.

Here's what's happening. When we added the new power, the power instance was added to the managed object context in memory. When we pressed the Cancel button, we deleted the object from the context. But instead, the delete rule should have come into play, and the object should have been deleted from the data structure that Core Data uses to represent the relationship in memory. This is a bug—at least as of this writing. We could have ignored this, hoping that the bug was fixed before the book was released, but we didn't want to leave you hanging. There are a number of ways that we could handle this.
We could, for example, give the ManagedObjectEditor class a property that points to its parent controller—the one that created it and pushed it onto the navigation stack. With that information, we could then remove the offending object from the relationship when we delete it. That creates a dependency, however. It operates under the assumption that the parent view controller is the same class, and we know that that's not always true, because HeroListController is the parent view controller for one instance of this class.
How can we fix the problem, then?
What we can do is loop through the properties of the managed object looking for instances of NSSet, which we know will represent to-many relationships. When we find one, we can loop through the objects in the relationship, and if we find a deleted one, we can remove it.
In order to get access to information about an object's properties, we need to use the Objective-C runtime, which is a library of C functions that are responsible for Objective-C's dynamic nature.
Single-click ManagedObjectEditor.m. In order to call any of the Objective-C runtime's functions, we need to import two header files. Insert the following two lines of code near the top of the file:
#import "ManagedObjectEditor.h" #import "NSArray-NestedArrays.h" #import "HeroValueDisplay.h" #import "ManagedObjectAttributeEditor.h" #import "NSManagedObject-IsNew.h" #import "NSArray-Set.h"#import <objc/runtime.h>#import <objc/message.h>...
Now, look for the viewWillAppear: method. At the very beginning of that method, insert the following code:
- (void)viewWillAppear:(BOOL)animated {
unsigned int outCount;
objc_property_t *propList =
class_copyPropertyList([self.managedObject class], &outCount);
for (int i = 0; i < outCount; i++) {
objc_property_t oneProp = propList[i];
NSString *propName = [NSString
stringWithUTF8String:property_getName(oneProp)];
NSString *attrs = [NSString stringWithUTF8String:
property_getAttributes(oneProp)];
if ([attrs rangeOfString:@"NSSet"].location != NSNotFound) {
NSMutableSet *objects = [self.managedObjectvalueForKey:propName];NSMutableArray *toDelete = [NSMutableArray array];for (NSManagedObject *oneObject in objects) {if ([oneObject isDeleted])[toDelete addObject:oneObject];}for (NSManagedObject *oneObject in toDelete) {[objects removeObject:oneObject];NSError *error;if (![self.managedObject.managedObjectContext save:&error])NSLog(@"Error saving: %@", [error localizedDescription]);}}}free(propList);[self.tableView reloadData]; ...
Note
The Objective-C runtime is fairly advanced juju, so if you don't 100% understand this right now, don't worry about it. You can read up on the Objective-C runtime in Apple's documentation:
http://developer.apple.com/mac/library/documentation/Cocoa/Reference/ObjCRuntimeRef/Reference/reference.html
This is the first time we've worked with the Objective-C runtime directly. Although for most programming jobs there's no need to dive down into the runtime, having access to the same functions that are used to implement Objective-C gives us an incredible amount of power. Let's quickly run through what we're doing here, but don't feel like you have to grok this one the first time through.
First, we declare an int, which will hold the number of properties that managedObject has. Then we declare a pointer to an objc_property_t, which is a datatype that represents Objective-C 2.0 properties, and use a runtime function called class_copyPropertyList() to retrieve the list of pointers to the managedObject properties. This function also populates outCount with the number of properties.
unsigned int outCount;
objc_property_t *propList =
class_copyPropertyList([self.managedObject class], &outCount);Next, we use a for loop to iterate over the properties:
for (int i=0; i < outCount; i++) {We grab a reference to the structure that points to one property in the list, and then get the property's name as an NSString instance. We also get the property's attributes, which are contained in a string. The format for the attribute string is documented in Apple's Objective-C runtime documentation, but for our purposes, all we need to know is that it contains (among other things) the class of the property.
objc_property_t oneProp = propList[i];
NSString *propName = [NSString
stringWithUTF8String:property_getName(oneProp)];
NSString *attrs = [NSString stringWithUTF8String:
property_getAttributes(oneProp)];We check to see if the attribute string contains @"NSSet":
if ([attrs rangeOfString:@"NSSet"].location != NSNotFound) {If it does, we then retrieve the set and create an instance of NSMutableArray to keep track of the objects that need to be deleted. It is not safe to delete objects from a collection while we are iterating over it, so we'll stick them in an array. Then, when we're finished iterating, we'll iterate through the array of objects that need to be deleted and remove them.
NSMutableSet *objects = [self.managedObject
valueForKey:propName];
NSMutableArray *toDelete = [NSMutableArray array];
for (NSManagedObject *oneObject in objects) {
if ([oneObject isDeleted])
[toDelete addObject:oneObject];
}
for (NSManagedObject *oneObject in toDelete) {
[objects removeObject:oneObject];
NSError *error;
if (![self.managedObject.managedObjectContext save:&error])
NSLog(@"Error saving: %@", [error localizedDescription]);
}
}
}And, believe it or not, the application is done. Build and run it, and try it out. See how many times you can drill down. Try creating new powers, deleting existing powers, and canceling when editing both new and existing powers.
Now, if you really want to challenge yourself, try adding more entities and relationships and using ManagedObjectEditor instances and its nested arrays to allow editing of those new entities. In short, play. Get used to this application. Expand it. Change it. Break it. And then fix it. That's the best way to cement your understanding of everything we did in this chapter.
This chapter and the previous chapters have given you a solid foundation in the use of Core Data. Along the way, we've also tried to give you some information about how to design complex iPhone applications so that they can be maintained and expanded without writing unnecessary code or repeating the same logic in multiple places. We've demonstrated just how much benefit you can get from taking the time to write code generically. We've showed you how to look for opportunities to refactor your code to make it smaller, more efficient, easier to maintain, and just generally more pleasant to be around.
We could go on for several more chapters about Core Data and not exhaust the topic. But Core Data is not the only new framework introduced in iPhone SDK 3. At this point, you should have a solid enough understanding of Core Data to be able to, armed with Apple's documentation, take your explorations even further.
Now it's time to leave our friend Core Data behind and explore some of the other aspects of iPhone SDK 3.