
As you saw in the last chapter, writing code to communicate over a network can be complex and, at times, difficult. Fortunately, for many common network-related tasks, Apple has provided higher-level methods and objects that will make your life considerably easier. One fairly common task when you're writing software for a device that's pretty much always connected to the Internet is to retrieve data from web servers. There is a large amount of data available for applications to use on the World Wide Web, and there are countless reasons why an iPhone application might want to pull data from the Web.
Note
The applications we're writing in this chapter will work just fine on the simulator. But, as you might expect, since those applications will be retrieving data from the Web, they'll only work if the computer on which the simulator is running has an active connection to the Internet.
There are a number of techniques you can use to grab data from web servers. In this chapter, we're going to show you three of them. We'll first show you how to leverage special methods that exist in several Foundation classes that allow you to retrieve data based on a URL in just a line or two of code. We'll expand on that and show you how to take more control over the process so that you can detect when errors occur. Next, we'll show you how to pull data asynchronously, so your application can do other things while data is being retrieved in the background. And finally, we'll learn how to make different types of HTTP requests and pass form parameters so you can retrieve data from web applications and web services as well as static files.
Since each of these topics stands alone, we'll build our chapter application-iteratively. We'll discuss one type of retrieval, then add it to the application.
We'll start by setting up an application skeleton. Next, we'll add URL-based methods to retrieve both an image and text from the Web. Then we'll talk about doing a more robust form of data retrieval, and then add code to our application to retrieve the same image and text file using that approach. After that, we'll talk about asynchronous data retrieval and then add code to our application to retrieve the text and image in the background. You can look at Figure 10-1 to see what our application will look like when done.
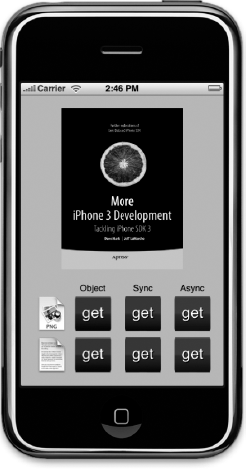
Figure 10.1. One of the two applications we'll build in this chapter The top row of buttons will retrieve an image file from a web server in one of three different ways. The bottom row of buttons will retrieve a text document in one of three different ways.
Once we're done with those different ways of retrieving static data, we'll move on to forms and various HTTP request types. Then we will build another small application that uses both kinds of form parameters and two different request types (Figure 10-2).
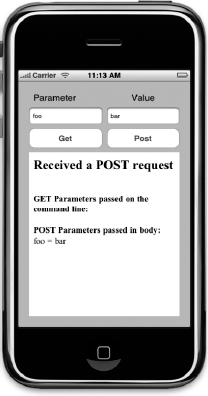
Figure 10.2. The second application we're going to build in this chapter shows how to change the request type and how to pass form parameters
We're going to start by creating an application skeleton with stub methods for each of the tasks that we're going to implement in the first application. A stub method (sometimes referred to as just a stub) is typically an empty method, or one with only one or two lines of code designed to act as a placeholder for a method that you plan to add later. This allows you to set up your user interface before you're ready to write the code behind it. As we discuss the different ways to retrieve data, we will add code to these stubs.
In Xcode, create a new project, select the View-based Application template, and call the new project WebWork. Once the project is open, find the project archives that accompany this book and look in the 10 – WebWork folder for the images called blue_get.png, green_get.png, lavender_get.png, text.png, and image.png and add them all to your project. These are the images you'll need for the buttons as well as the text and image icons that appear to the left of the buttons in Figure 10-1.
Single-click on WebWorkViewController.h so we can add our outlet and action declarations. Replace the existing contents with the following code:
#import <UIKit/UIKit.h>

#define kImageURL   @"http://iphonedevbook.com/more/10/cover.png"
#define kTextURL    @"http://iphonedevbook.com/more/10/text.txt"

typedef enum RequestTypes {
    kRequestTypeImage,
    kRequestTypeText,
} RequestType;

@interface WebWorkViewController : UIViewController {
    UIActivityIndicatorView *spinner;
    UIImageView             *imageView;
    UITextView              *textView;

    NSMutableData           *receivedData;
    RequestType             requestType;
}

@property (nonatomic, retain) IBOutlet UIActivityIndicatorView *spinner;
@property (nonatomic, retain) IBOutlet UIImageView *imageView;
@property (nonatomic, retain) IBOutlet UITextView *textView;
@property (nonatomic, retain) NSMutableData *receivedData;

- (void)clear;

- (IBAction)getImageUsingNSData;
- (IBAction)getImageSynchronously;
- (IBAction)getImageAsynchronously;

- (IBAction)getTextUsingNSString;
- (IBAction)getTextSynchronously;
- (IBAction)getTextAsynchronously;
@end
We start off by defining two constants that point to an image file and a text file that we've hosted on the Internet for your use. This is the data that we'll be pulling into our application. Feel free to use different URLs if you prefer.
#define kImageURL   @"http://iphonedevbook.com/more/10/cover.png"
#define kTextURL    @"http://iphonedevbook.com/more/10/text.txt"
Next, we define a new type along with an enum. In some parts of our code, we will be using delegate methods (surprise!), and we will need a way to know in one of those delegate methods whether the data being we're retrieving holds an image or text. While there are ways to determine that from the web server's response (which we'll see later in the chapter), just keeping track of which we've requested is a lot easier and more efficient.
typedef enum RequestTypes {
    kRequestTypeImage,
    kRequestTypeText,
} RequestType;
We have three views that we'll need outlets to so that we can show the returned data. The UIImageView will be used to show the retrieved image, the UITextView will be used to display the retrieved text, and the UIActivityIndicatorView is that white spinning doohickey that tells the user that some action is in progress (you'll know it when you see it). When we retrieve the data asynchronously, we'll show the activity indicator so that the user knows we're in the process of retrieving the data they requested. Once we have the data, we'll hide the activity indicator and show the image or text that was requested.
@interface WebWorkViewController : UIViewController {
    UIActivityIndicatorView *spinner;
    UIImageView             *imageView;
    UITextView              *textView;
We also declare an instance of NSMutableData that will be used to store the data when fetching asynchronously. When we do that, a delegate method that we will implement will be called repeatedly and provided with small chunks of the requested data. We will accumulate those chunks in this instance so that when the process is complete, we'll have the whole image or text file.
NSMutableData *receivedData;
And, here's where we'll keep track of whether an image or text was last requested.
RequestType requestType;
We also declare properties for our instance variables, using the IBOutlet keyword for those that will need to be connected to objects in Interface Builder.
@property (nonatomic, retain) IBOutlet UIActivityIndicatorView *spinner;
@property (nonatomic, retain) IBOutlet UIImageView *imageView;
@property (nonatomic, retain) IBOutlet UITextView *textView;
@property (nonatomic, retain) NSMutableData *receivedData;
And then we have our methods. The first one is just used to clear the requested data so that the application can be used again without restarting.
- (void)clear;
And we have six action methods, one for each of the buttons you can see in Figure 10-1. Since each button represents a different way to retrieve one kind of data, it makes sense to give each of the buttons its own action method.
- (IBAction)getImageUsingNSData;
- (IBAction)getImageSynchronously;
- (IBAction)getImageAsynchronously;

- (IBAction)getTextUsingNSString;
- (IBAction)getTextSynchronously;
- (IBAction)getTextAsynchronously;
Now that we have our actions and outlets in place, make sure you save first, then double-click WebWorkViewController.xib to open up the file in Interface Builder.
Let's start off by dragging an Image View from the library over to the window labeled View. Interface Builder will resize the image view to take up the whole window, which isn't what we want this time, so press
Then, control-drag from File's Owner to the image view and select the imageView outlet. Press
Now, drag a Text View from the library to the View window. Place it in exactly the same location as the image view and make it exactly the same size. Once it's placed, control-drag from File's Owner to the text view and select the textView outlet. Double-click the text view so that the text it contains is editable, make sure all the text is selected, and hit the delete button. In the attribute inspector, uncheck the box that says Editable so that our user can't change the downloaded text.
In the library, look for an Activity Indicator View and drag one to the View window. Use the blue guidelines to line it up with the horizontal and vertical centers of the text and image views you already added. Then, control-drag from File's Owner to the activity indicator and select the spinner outlet. Press
Now, drag another Image View to the view. Place it somewhere in the bottom half of the screen; the exact placement doesn't matter for now. Press
Bring over another Image View and select image.png for its image. Use
Next, bring over a Round Rect Button from the library, and use the size inspector (
Now, bring over a Label over from the library, and place it above the left-most button, the blue one. Change the font size to 14 points (you can change the font size using the fonts palette
Now, control-drag from all six of the buttons to File's Owner and select the action methods that match the button's position. For the top-left button, for example, you should select getImageUsingNSData, and for the bottom-left button you should select getTextUsingNSString. Once you have connected all six buttons to the appropriate action method, save the nib and head back to Xcode.
Now we're going to write our implementation file, but aren't going to write any of the actual code to retrieve the data yet. We're just putting in placeholders so we have a place to add the code later in the chapter. Single-click WebWorkViewController.m and replace the current contents with the following:
#import "WebWorkViewController.h"

@implementation WebWorkViewController
@synthesize spinner;
@synthesize imageView;
@synthesize textView;
@synthesize receivedData;

- (void)clear {
    imageView.hidden = YES;
    textView.hidden = YES;
}

- (IBAction)getImageUsingNSData {
    NSLog(@"Entering %s", __FUNCTION__);
}

- (IBAction)getImageSynchronously {
    NSLog(@"Entering %s", __FUNCTION__);
}

- (IBAction)getImageAsynchronously {
    NSLog(@"Entering %s", __FUNCTION__);
}

- (IBAction)getTextUsingNSString {
    NSLog(@"Entering %s", __FUNCTION__);
}

- (IBAction)getTextSynchronously {
    NSLog(@"Entering %s", __FUNCTION__);
}

- (IBAction)getTextAsynchronously {
    NSLog(@"Entering %s", __FUNCTION__);
}

- (void)viewDidUnload {
    self.spinner = nil;
    self.imageView = nil;
    self.textView = nil;
}

- (void)dealloc {
[spinner release];
[imageView release];
[textView release];
[receivedData release];
[super dealloc];
}
@endThe only thing in this file right now that might be new to you are the lines that look like this:
NSLog(@"Entering %s", __FUNCTION__);
All this line does is print to the console the name of the method that's being called. __FUNCTION__ is a special macro that compiles into a C-string that holds the name of the function or method currently being executed.
Note
It may not be obvious from looking at it on the printed page, but __FUNCTION__ has two underscores at the beginning and another two underscores at the end for a total of four underscore characters.
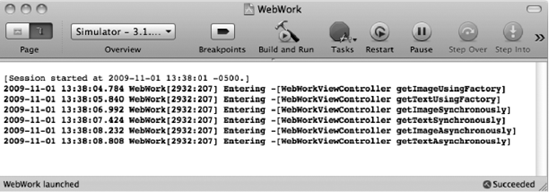
By doing this, we can quickly check our stubs to make sure they get called when they're supposed to be. Save and then select Build and Run from the Build menu. You should be able to click all six of the buttons and have the appropriate method for each button print in the console. This is a good way, when building your own applications, to make sure that your nib is set up correctly. A missed nib connection can be surprisingly difficult to debug, so making sure all your connections are made and are made to the correct actions before you start writing application code can be a very good idea (Figure 10-3).
By far, the easiest way to retrieve data from a web server is to use a class that has an init method or factory method whose name contains withContentsOfURL:. These are special methods that take care of all aspects of retrieving a particular kind of data from the Internet. All you have to do is provide these methods with an instance of NSURL, a class that holds a single URL, and it will initialize and return an object containing the data pointed to by the URL.
Note
These URL-based methods can also be used to create objects based on data located in a local file or using other Internet protocols like FTP. Basically, any data that can be retrieved using a URL can be used to instantiate these objects.
To initialize an NSData instance from a file on the Web, for example, you could do this:
NSString *theUrlString = @"http://domainname.com/filename";
    NSURL *url = [NSURL urlWithString:theUrlString];
    NSData *imageData = [NSData dataWithContentsOfURL:url];
To initialize an NSString instance from a file on the Web, it looks like this:
NSString *theUrlString = @"http://domainname.com/filename";
    NSURL *url = [NSURL urlWithString:theUrlString];
    NSString *string = [NSString stringWithContentsOfURL:url
        encoding:NSUTF8StringEncoding error:nil];
These aren't the only two classes that have URL-based init or factory methods, but they are the two that you will most commonly use. Most of the other methods only work if the provided URL points to data of a specific type or that's in a specific format. For NSDictionary and NSArray, for example, the URL has to lead to a property list in the format that those classes need. For AVAudioPlayer, the URL must point to a valid audio file in a format that the iPhone supports natively. How you use all of these objects is identical to the two examples shown in this section, however.
There's no doubt that these methods are convenient. If you compare the three-line process in these examples with the process we went through in the previous chapter to receive data from another device, these methods must seem laughably easy. But they do have some drawbacks. In fact, there are two major drawbacks to this approach that prevent them from being used in a lot of places. First, if anything goes wrong, the only indication you get is that they return nil. You aren't told if the file doesn't exist, or if the network connection is down. You just get a nil, and you should be happy about it. Why, when we were kids, we'd walk 20 miles, barefoot, in a blizzard just for a chance to see a nil. And we liked it!
Okay, a few of these methods will return an NSError object using a pointer to a pointer, as you can see in the last line of the NSString example, so in some instances, you have a little bit more information than just a nil, but with these techniques, you do not get detailed information about how the server responded.
The other drawback is that the process is synchronous, which means that when you call the method, no other code can run (at least on the main thread that controls the user interface) until it has finished downloading the data. If you're pulling down a small text file, that might not be a big deal, but if you're pulling down a high-res image or a video file, it's a very big deal. Your user interface will become unresponsive and your application will be unable to do anything else until the data has all been retrieved.
As a result, you should limit your use of these methods for retrieving data from the network to very small pieces of data, and even then, use them with caution. Users do not appreciate apps that become unresponsive for no apparent reason, and this as a reason will definitely not be apparent to most end users. They also don't like when things don't work and they don't know why. If they are expecting an image, and you give them nothing and no explanation about why they're getting nothing, they're bound to be unhappy about it.
Let's implement the two left-most buttons in our application so you can see this process in action.
Single-click WebWorkViewController.m and replace the existing stub implementation of getImageUsingNSData with this new version that retrieves a picture from the Web using NSData:
- (IBAction)getImageUsingNSData {
    textView.hidden = YES;
    imageView.hidden = NO;

    NSURL *url = [NSURL URLWithString:kImageURL];
    NSData *imageData = [NSData dataWithContentsOfURL:url];
    imageView.image = [UIImage imageWithData:imageData];
    [self performSelector:@selector(clear) withObject:nil afterDelay:5.0];
}
Also replace the existing stub implementation of getTextUsingNSString with this new version:
- (IBAction)getTextUsingNSString {
    textView.hidden = NO;
    imageView.hidden = YES;
    NSURL *url = [NSURL URLWithString:kTextURL];
    textView.text = [NSString stringWithContentsOfURL:url
        encoding:NSUTF8StringEncoding error:nil];
    [self performSelector:@selector(clear) withObject:nil afterDelay:5.0];
}
In each of these methods, we make sure the appropriate view for the type of data we're using is visible, then create an NSURL instance based on one of the two string constants we declared earlier. Then we retrieve the data from the Web using those special methods and stick the data into the appropriate view. Once we're all done with that, we use performSelector:withObject:afterDelay: to clear the text or image after five seconds so the user can try another button without having to quit.
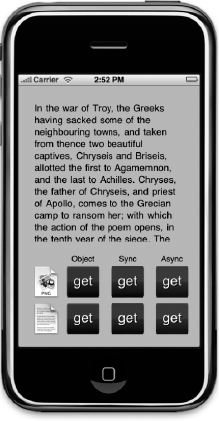
Now try it out. When you use the top-left button, you should end up with a picture of the cover of this book, like the one shown in Figure 10-1. If you tap the lower-left button, you'll get the first page of the Iliad by Homer (Figure 10-4). Since the image and text being retrieved here are relatively small, you probably won't notice more than a minor hiccup in your application's reponsiveness after you tap the button. If you're on a fast enough connection, you may not even notice that. But, trust us when we say that if you were to do this to retrieve a large data file, the delay would definitely be noticeable.
The code we just added was short and sweet, and it did the job. Mostly. But what if there was a problem? What if the file wasn't found, or the server wasn't responding? What if the user's Internet connection was down for some reason? The URL init or factory methods would return nil, and all we'd know for sure was that something prevented the object from being created. In most cases, we're going to want more information than that. We're going to want to know why our call failed so we can give our users a satisfying answer about what went wrong.
To do that, we have to take a little more control over the situation. Instead of using an init or factory method that takes an NSURL, we have to create an object called an NSURLRequest (or just a "request"), which is used to request data from a remote server using a URL. Here's how we create such a request:
NSURLRequest *req = [[NSURLRequest alloc] initWithURL:url];
Not too difficult, huh? Okay, so once you have your request, how do you use it to get data? In addition to the request, we also need a connection, which is represented by the class NSURLConnection. To request data synchronously, however, we don't actually have to create a connection, we can just use a class method on NSURLConnection to send our request and retrieve the data, like so:
NSHTTPURLResponse* response = nil;
    NSError* error nil;
    NSData *responseData = [NSURLConnection sendSynchronousRequest:req
        returningResponse:&response
        error:&error];
As Newton said, every request has an equal and opposite response. Okay, we didn't really pay much attention in Physics class, so that's probably not quite what he said, but it's true in the context of the Web. For every request you send, you get back a response. The NSHTTPURLResponse object holds the response from the server if it was able to reach the server, or nil if the server could not be reached. On return, the response object will contain all the information provided by the server in response to that request except for the actual data from the requested file which, in the this example, is held in responseData.
That response object gives us much more information than our previous examples because it tells us exactly what happened. It will contain a response code, which tells us if the server was able to fulfill the request, and how. It also contains a content-type which tells us what kind of data is contained in responseData. We can retrieve the content type and response code like this:
NSInteger statusCode = [response statusCode];
    NSString *contentType = [[response allHeaderFields]
        objectForKey:@"Content-Type"];
Tip
You can find a list of the HTTP response codes and response header fields in the HTTP protocol specification at http://www.w3.org/Protocols/rfc2616/rfc2616-sec6.html. The IANA (the same organization that keeps the port number registery we talked about in the last chapter) also keep a registry of content-types, which you can find at http://www.iana.org/assignments/media-types/.
As we said before, if the server couldn't be reached at all, then response will be nil. If the server responded, but something went wrong, the response code will give us more information about the problem. If reponseData is nil, we might find out that the data wasn't found (response code 404) or that it moved to a new location (301) or that we don't have privileges to download it (401). Armed with the list of response codes, we can give our users a much better answer about why we weren't able to get the file for them. We can also ensure that the data we're receiving is the same type that we were expecting. Web servers will often forward requests, so responseData might contain, for example, the HTML for a 404 page, or a page full of ads rather than the file we were trying to retrieve.
Let's use this technique to implement the middle two buttons of our application. Single-click WebWorkViewController.m if it's not already selected and replace the existing stub implementation of getImageSynchronously with the following version:
- (IBAction)getImageSynchronously {
    textView.hidden = YES;
    imageView.hidden = NO;
    NSURL *url = [[NSURL alloc] initWithString:kImageURL];
    NSURLRequest *req = [[NSURLRequest alloc] initWithURL:url];

    NSHTTPURLResponse* response = nil;
    NSError* error = nil;
    NSData *responseData = [NSURLConnection sendSynchronousRequest:req
                                                 returningResponse:&response
                                                             error:&error];
    if (response == nil) {
        UIAlertView *alert = [[UIAlertView alloc] initWithTitle:@"Error!"
            message:@"Unable to contact server."
            delegate:nil
            cancelButtonTitle:@"Bummer"
            otherButtonTitles:nil];
        [alert show];
        [alert release];
    }

    NSInteger statusCode = [response statusCode];
    NSString *contentType = [[response allHeaderFields]
        objectForKey:@"Content-Type"];

    if (statusCode >= 200 && statusCode < 300 && [contentType hasPrefix:@"image"]) {
        imageView.image = [UIImage imageWithData:responseData];
    }
    else {
        UIAlertView *alert = [[UIAlertView alloc] initWithTitle:@"Error!"
            message:[NSString stringWithFormat:
                @"Encountered %d error while loading", statusCode]
            delegate:nil
            cancelButtonTitle:@"Bummer"
            otherButtonTitles:nil];
        [alert show];
        [alert release];
    }

    [url release];
    [req release];
    [self performSelector:@selector(clear) withObject:nil afterDelay:5.0];
}
Now, find the getTextSynchronously stub and replace it with this version:
- (IBAction)getTextSynchronously {
    textView.hidden = NO;
    imageView.hidden = YES;
    NSURL *url = [[NSURL alloc] initWithString:kTextURL];
    NSURLRequest *req = [[NSURLRequest alloc] initWithURL:url];

    NSHTTPURLResponse* response = nil;
    NSError* error = nil;
    NSData *responseData = [NSURLConnection sendSynchronousRequest:req
                                                 returningResponse:&response
                                                             error:&error];
    if (response == nil) {
UIAlertView *alert = [[UIAlertView alloc] initWithTitle:@"Error!"
message:@"Unable to contact server."
delegate:nil
cancelButtonTitle:@"Bummer"
otherButtonTitles:nil];
[alert show];
[alert release];
return;
}
NSInteger statusCode = [response statusCode];
NSString *contentType = [[response allHeaderFields]
objectForKey:@"Content-Type"];
if (statusCode >= 200 && statusCode < 300 && [contentType hasPrefix:@"text"]) {
NSString *payloadAsString = [[NSString alloc] initWithData:responseData
encoding:NSUTF8StringEncoding];
textView.text = payloadAsString;
[payloadAsString release];
}
else {
UIAlertView *alert = [[UIAlertView alloc] initWithTitle:@"Error!"
message:[NSString stringWithFormat:
@"Encountered %d error while loading", statusCode]
delegate:nil
cancelButtonTitle:@"Bummer"
otherButtonTitles:nil];
[alert show];
[alert release];
return;
}
[url release];
[req release];
[self performSelector:@selector(clear) withObject:nil afterDelay:5.0];
}In both cases, we create an NSURL and an NSURLRequest, then use NSURLConnection to send the request to the server. If the response is nil, we put up an alert telling our user that the server could not be reached.
If response was not nil, then we check the response code and content type. Generally speaking, the 200 series of response codes (200 through 299) are used to indicate that the server was able to fulfill our request, so if we got a response code in that range, and the content-type matches the type of data we're expecting, we add the text or image it contains to the appropriate view. Otherwise, we show an alert letting the user know that there was a problem. After we're done, we release url and req so that we don't leak memory, and then use performSelector:withObject:afterDelay: to reset the user interface after five seconds.
Try out the new version. If all is right with the world, you should notice no difference between what the middle buttons do and the left buttons do. But, if something does go wrong, we're much better equipped to inform the user. In our simple example here, the user will know if there's something wrong with their Internet connection (Figure 10-5) or if the URL we used was wrong (Figure 10-6). You can test this out if you're using the simulator by turning Airport off or unplugging your Ethernet cable so that the remote server can't be reached. Another way you can test is to change the URL to point to an object that doesn't exist on the server, like so:
#define kImageURL   @"http://iphonedevbook.com/more/10/foo.png"
#define kTextURL    @"http://iphonedevbook.com/more/10/foo.txt"
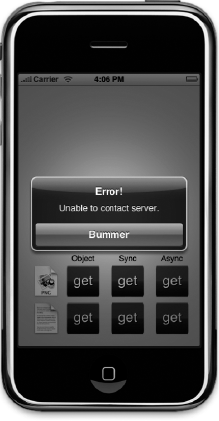
Figure 10.5. If the network connecton isn't working, or the remote server can't be reached, we're able to tell the user that
That is much better, but we still have that little hiccup when the user presses the button. With synchronous requests, the entire user interface freezes for the length of time it takes to retrieve the data. Not a huge deal here where we're only pulling a few kilobytes of data, but potentially a very big deal in many situations. Let's look at how to fix that by requesting the data asynchronously.

In the last chapter, we discussed CFNetwork's interaction with an application's run loop and the notifications your application will receive when a variety of events occur, such as receiving data. Well, the URL loading system that we just used to load data synchronously can also leverage the run loop in a similar fashion. This will allow us to request the data pointed to by a URL, and then go about our merry way while the request chugs away in the background. Once the data has been received, we can then take appropriate action, and our user interface will never become unresponsive.
As you've already seen in previous chapters, asynchronous network communication can be hard. It can be. But it doesn't have to be. Apple's URL loading system actually makes it pretty easy to retrieve data asynchronously. We start off in a manner pretty similar to the synchronous request. This time, we will create an instance of NSURL and NSURLRequest, just like before, but we'll also create an instance of NSURLConnection. Last time, we just used a class method on that object to retrieve the data, but this time we're actually going to create an instance. Just by instantiating NSURLConnection, we actually kick off the asynchronous fetch. That's all we have to do. We do have to specify a delegate when we create the connection so NSURLConnection knows what object to notify when something happens. You will usually specify self to make your controller class (or whatever class this code is part of) the delegate. Here's an example that creates a connection object:
NSURLRequest *req = [[NSURLRequest alloc] initWithURL:[NSURL
        URLWithString:kTextURL]];
    NSURLConnection *con =[[NSURLConnection alloc] initWithRequest:req
        delegate:self];
If we were able to create a connection, then we need to make sure we've got a place to store the data as it comes in. The easiest way to do that is to use an instance of NSMutableData, like the one we declared in our header file earlier.
if (con) {
        NSMutableData *data = [[NSMutableData alloc] init];
        self.receivedData = data;
        [data release];
    }
After that, we're done until the delegate calls one of our methods. The only thing we need to do is release the request, because we allocated it:
[req release];
Notice that we do not release the connection, however. If we released the connection, it would be deallocated because it's not currently retained by anything else. Don't worry, though, we won't leak the memory. When the connection is all finished, it will call one of our delegate methods, and we will have the chance to free up its memory at that time. Let's look at the delegate methods now.
When the connection is established and a response has been received by the NSURLConnection object, the NSURLConnection will call the method connection:didReceiveResponse: on its delegate. At this point, we can check the response code to make sure we've received a valid code, but that's not always necessary. Here's why.
With asynchronous handling, you will be notified multiple times if a request gets forwarded, which isn't an uncommon occurrence when requesting data from web servers. A redirect typically results in a 300 series response code, which is then followed by another response a few moments later with a new code. This often happens, for example, if a resource moves to a new location on the server.
If the connection fails to retrieve the requested data, the connection will call another delegate method to inform you of that, so very often you don't even need to check the response code in this method unless you specifically need to know about things like redirects.
As we stated, if a connection is forwarded, this delegate method may be called multiple times for a single request. One thing you need to do here, as a result, is to reset the mutable data instance's length to 0, which removes any data that it's currently holding. You do not want to include the data from any of the earlier redirect responses in the object. Here's an example implementation of this delegate method:
- (void)connection:(NSURLConnection *)connection
didReceiveResponse:(NSURLResponse *)response {
// check response code here if necessary
[receivedData setLength:0];
}After a response is received, if there is data, it will be sent to the delegate using the method connection:didReceiveData:. This method typically gets called multiple times, and you must capture all the data sent in the order in which it was sent, to ensure that you have received the complete object. Fortunately, all that usually entails is appending the received data onto the instance of NSMutableData being used to accumulate the data, like so:
- (void)connection:(NSURLConnection *)connection
    didReceiveData:(NSData *)data {
    [receivedData appendData:data];
}
If an error is encountered while trying to retrieve the requested object, the delegate method connection:didFailWithError: gets called. Here's a simple implementation of that method that simply logs the error:
- (void)connection:(NSURLConnection *)connection
didFailWithError:(NSError *)error {
    [connection release];
    self.receivedData = nil;
    NSLog(@"Error retrieving data for url %@, error was: %@",
        [error localizedDescription], [[error userInfo]
        objectForKey:NSErrorFailingURLStringKey]);
}
In real-world applications, you'll typically want to take more significant action when a connection fails, at the very least informing the user of the failure.
When all of the data that makes up the requested object has been retrieved, the connection will call the delegate method connectionDidFinishLoading:. When this method is called, the instance of NSMutableData in which we've been collecting the received data should have the complete object, and you can do whatever is appropriate with it. You also need to release the connection here so that you don't leak the memory. It's also usually appropriate to release the mutable data instance that was used to accumulate the data, once you've used the data, though that may not always be the case. Here's a simple example that creates an instance of UIImage based on the received data and puts it into a UIImageView.
- (void)connectionDidFinishLoading:(NSURLConnection *)connection {
    imageView.image = [UIImage imageWithData:receivedData];
    [connection release];
    self.receivedData = nil;
}Here we come, rounding third based on our WebWorks application. We're almost done. Find the stub implementation of getImageAsynchronously and replace it with this version:
- (IBAction)getImageAsynchronously {[spinner startAnimating];
NSURLRequest *req = [[NSURLRequest alloc] initWithURL:
[NSURL URLWithString:kImageURL]];
NSURLConnection *con = [[NSURLConnection alloc] initWithRequest:req
delegate:self];
if (con) {
NSMutableData *data = [[NSMutableData alloc] init];
self.receivedData = data;
[data release];
requestType = kRequestTypeImage;
}
else {
UIAlertView *alert = [[UIAlertView alloc]
initWithTitle:@"Error"
message:@"Error connecting to remote server"
delegate:self
cancelButtonTitle:@"Bummer"
otherButtonTitles:nil];
[alert show];
[alert release];
}
[req release];
}Now find the stub implementation of getTextAsynchronously and replace it with this version:
- (IBAction)getTextAsynchronously {
    [spinner startAnimating];

    NSURLRequest *req = [[NSURLRequest alloc] initWithURL:
        [NSURL URLWithString:kTextURL]];
    NSURLConnection *con = [[NSURLConnection alloc] initWithRequest:req
                                                          delegate:self];
    if (con) {
        NSMutableData *data = [[NSMutableData alloc] init];
        self.receivedData = data;
        [data release];
        requestType = kRequestTypeText;
    }
    else {
        UIAlertView *alert = [[UIAlertView alloc]
            initWithTitle:@"Error"
            message:@"Error connecting to remote server"
            delegate:self
            cancelButtonTitle:@"Bummer"
            otherButtonTitles:nil];
        [alert show];
        [alert release];
    }
    [req release];
}
In both methods, we follow the same basic logic. First, we create the URL and request, then use those to create an instance of NSURLConnection, specifying self as the delegate. We check to make sure the connection object is not nil, which would indicate that the server could not be reached, and if we have a valid connection, we allocate our NSMutableData instance to hold the data we're about to start receiving.
So now, the right-hand buttons kick off an asynchronous request and shows the activity indicator. Since the retrieval will happen in the background, there shouldn't be a hiccup or any noticeable unresponsiveness in the app. Of course, it also won't ever show the image or text because we haven't implemented our connection delegate methods. Let's do that now. At the end of the file, just above the @end declaration, add the following methods:
#pragma mark -
#pragma mark NSURLConnection Callbacks
- (void)connection:(NSURLConnection *)connection
        didReceiveResponse:(NSURLResponse *)response {
    [receivedData setLength:0];
}

- (void)connection:(NSURLConnection *)connection didReceiveData:(NSData *)data {
    [receivedData appendData:data];
}

- (void)connection:(NSURLConnection *)connection
  didFailWithError:(NSError *)error {
    [connection release];
    self.receivedData = nil;

    UIAlertView *alert = [[UIAlertView alloc] initWithTitle:@"Error"
        message:[NSString stringWithFormat:
            @"Connection failed! Error - %@ (URL: %@)",
            [error localizedDescription],[[error userInfo]
            objectForKey:NSErrorFailingURLStringKey]]
        delegate:self
        cancelButtonTitle:@"Bummer"
        otherButtonTitles:nil];
    [alert show];
    [alert release];
    [spinner stopAnimating];
}

- (void)connectionDidFinishLoading:(NSURLConnection *)connection {
    if (requestType == kRequestTypeImage) {
        imageView.hidden = NO;
        textView.hidden = YES;
        imageView.image = [UIImage imageWithData:receivedData];
    }
    else {
        imageView.hidden = YES;
        textView.hidden = NO;
        NSString *payloadAsString = [[NSString alloc] initWithData:receivedData
            encoding:NSUTF8StringEncoding];
        textView.text = payloadAsString;
        [payloadAsString release];
    }

    [connection release];
    self.receivedData = nil;
[spinner stopAnimating];
[self performSelector:@selector(clear) withObject:nil afterDelay:5.0];
}Let's look at what we did. The first connection delegate method we implement gets called whenever the connection gets a response from the server. Remember, we might get more than one response if the server forwards our request, so we reset our mutable data every time this gets called:
- (void)connection:(NSURLConnection *)connection
didReceiveResponse:(NSURLResponse *)response {
[receivedData setLength:0];
}Every time the connection has a chunk of data for us, it will call the next method we wrote, so we take the data and append it to our mutable data instance.
- (void)connection:(NSURLConnection *)connection
didReceiveData:(NSData *)data {
[receivedData appendData:data];
}In the event of an error, the connection will call our delegate method connection:didFailWithError:. All we do is report the error to the user using an alert, and release the connection so that we're not leaking memory. We also stop the activity indicator so that the user doesn't think we're still trying to retrieve the data.
- (void)connection:(NSURLConnection *)connection
didFailWithError:(NSError *)error {
[connection release];
self.receivedData = nil;
UIAlertView *alert = [[UIAlertView alloc] initWithTitle:@"Error"
message:[NSString stringWithFormat:
@"Connection failed! Error - %@ (URL: %@)",
[error localizedDescription],[[error userInfo]
objectForKey:NSErrorFailingURLStringKey]]
delegate:self
cancelButtonTitle:@"Bummer"
otherButtonTitles:nil];
[alert show];
[alert release];
[spinner stopAnimating];
}Finally, when all the data has been retrieved, our delegate method connectionDidFinishLoading: gets called. We check the request type that we set earlier, and use the received data to populate either the text view or the image view. We also stop the activity indiator, and release the connection so that we don't leak memory.
- (void)connectionDidFinishLoading:(NSURLConnection *)connection {
if (requestType == kRequestTypeImage) {
imageView.hidden = NO;
textView.hidden = YES;
imageView.image = [UIImage imageWithData:receivedData];
}
else {imageView.hidden = YES;
textView.hidden = NO;
NSString *payloadAsString = [[NSString alloc] initWithData:receivedData
encoding:NSUTF8StringEncoding];
textView.text = payloadAsString;
[payloadAsString release];
}
[connection release];
self.receivedData = nil;
[spinner stopAnimating];
    [self performSelector:@selector(clear) withObject:nil afterDelay:5.0];
}Well, that's better. Take it out for a spin. Try changing the two URLs to point to bigger files if you want to really see the difference that asynchronous retrieval can make in your application.
At this point, you should have a pretty good handle on retrieving static data. But there's more to the Web than getting files from static URLs so, before we leave the chapter, let's take a quick look at how to change the request type and pass form parameters so that you can also retrieve information from web applications and web services.
The Web is so much more than a network of static files now. The Internet is chock full of various forms of web applications. If you need to pull data from a web service or other form of web application, then a standard GET request like the ones we've been creating aren't going to cut it for you. Fortunately, the iPhone's URL handling system is capable of creating any type of HTTP request that you might need.
The HTTP protocol actually defines multipe types of requests. In addition to the standard GET request that we've been using, there's also something called a POST request, which is used by most web forms. There's also the lesser-used PUT, which is used to add or replace an existing resource with a new one, and DELETE which is used to remove a resource or make it unavailable.
In the early days of the Web, GET was used to retrieve static files and POST was used for pretty much any kind of interactivity. As a result, there are a lot of web applications and services that still use only GET and POST. With the rising popularity of RESTful web services, many newer web applications do require requests to use the proper request type depending on the task they are seeking to perform. We're not going to try and teach you the nuances of when to use each of the different HTTP request types. Our goal is to show you how to specify the type of your request and pass the necessary parameters so that you can retrieve data from web applications regardless of which request type you need to use.
Note
If you're interested in finding out more about what the different request types are used for, a good place to start would be the HTTP 1.1 specification available at http://www.w3.org/Protocols/rfc2616/rfc2616.html.
The NSURLRequest class that we used in the WebWorks application earlier in the chapter is incapable of doing any other type of request besides a GET request. Sorry, nothing we can do about that. Hope you never need to do anything other than a GET.
Warning
We'd like to apologize for the attempt at subtle humor you just experienced. Dave and Jeff have been chastised by their editors and promise not to attempt such humor again. It slows down the book and annoys the patrons. Sincerely yours, the management.
Okay, there actually is a way to create other types of requests. There is a mutable subclass of NSURLRequest called NSMutableURLRequest, and it allows you to specify, among other things, the request type. Here's how you would create one and set the request type to POST:
NSMutableURLRequest *req = [[NSMutableURLRequest alloc]
initWithURL:url];
[req setHTTPMethod:@"POST"];If you substitute @"PUT" for @"POST", you'll create a PUT request, and if you substitute @"DELETE" instead, you'll create a DELETE request. What could be easier?
You can pass parameters to a web server when you make a request. Web applications can read the parameters you pass in and use them to figure out what they should return. If, instead of retrieving a static image, we were retrieving an image from a web application that returns an image of a specific person, we might pass in the person's name or some other kind of identifying value in the parameters so the web application would know what person's image to send back to us.
Parameters come in two flavors, which are named after the two most commonly used request types: GET and POST. As you might have guessed, GET requests usually use GET parameters, and POST requests usually use POST parameters.
Get parameters are passed in as part of the URL. At the end of the URL, if you add a question mark (?), you are telling the server that everything else after that question mark in the URL is part of the parameters. The parameters are specified as key/value pairs, with each pair separated by an equal sign. If there is more than one pair, the pairs are each separated by ampersand characters (&). A URL that includes get parameters might look like this:
http://www.foobar.org/picture?id=1001&size=200x200
This particular URL has two parameters, one called id which is being set to 1001, and another called size, which is being set to 200x200.
When using the URL loading system, the way that you set GET parameters is by appending them to the end of the URL string before creating your instance of NSURL. Nothing fancy, you just do something like this:
NSString *url = [NSString stringWithFormat:@"http://www.foo.bar/action?%@=%@",
paramName, paramValue];It's not always desirable to have the parameters being passed in as part of the URL. For one thing, the user can see those values in the URL bar of their browser. When submitting web forms, a different kind of parameter, called POST, is used. POST parameters work in pretty much the same way as GET parameters. They are key value pairs with an equal sign between the key and value and with each pair being separated by an ampersand. The difference is that this parameter string isn't passed as part of the URL, it goes as part of the request body, which typically isn't seen by the user and doesn't show up in the URL.
To set the POST parameters for a request, you have to be using an NSMutableURLRequest. Then you just create a string that contains all the parameters you want to pass, convert that string into an instance of NSData, and then set that instance to be the request's body, like so:
NSString *paramDataString = [NSString stringWithFormat:@"%@=%@", paramName,
paramValue];
NSData *paramData = [paramDataString dataUsingEncoding:NSUTF8StringEncoding];
[req setHTTPBody: paramData];In Xcode, create a new project with the View-based Application template again, this time calling the project RequestTypes. Once the project is open, single-click on RequestTypesViewController.h and replace the contents with this version:
#import <UIKit/UIKit.h>
#define kFormURL @"http://iphonedevbook.com/more/10/echo.php"
@interface RequestTypesViewController : UIViewController {
UIWebView *webView;
UITextField *paramName;
UITextField *paramValue;
NSMutableData *receivedData;
}
@property (nonatomic, retain) IBOutlet UIWebView *webView;
@property (nonatomic, retain) IBOutlet UITextField *paramName;
@property (nonatomic, retain) IBOutlet UITextField *paramValue;
@property (nonatomic, retain) NSMutableData *receivedData;
- (IBAction)doGetRequest;
- (IBAction)doPostRequest;
@endThe constant defines a string that holds a URL to a very simple web service that we've set up for you to use. It will echo back to you with the request type used and both the GET and POST parameters you passed in. We're keeping things relatively simple in this application. We have two text fields, one you can use to enter a parameter name, and another you can use to enter a value for that parameter. We also have a web view that we'll use to display the response from the web application. The UIWebView is capable of displaying URLs, or HTML that is contained in a string. We'll be using it for the latter, just so we don't have to do any processing or formatting of the data returned by the web service.
Our class defines two action methods, one to post a GET request using GET parameters, and another button for sending a POST request with POST parameters. Save RequestTypesViewController.h and double-click RequestTypesViewController.xib to open Interface Builder.
Using Figure 10-7 as a guide, add two Labels, two Text Fields, two Round Rect Buttons, and a Web View to the window labeled View. Control-drag from File's Owner to the two text fields. For the one on the left, select the paramName outlet. For the one on the right, select the paramValue outlet. Then control-drag again to the web view and select the webView outlet. Next, control drag from the left button to File's Owner and select the action named doGetRequest. Repeat with the button on the right and connect to the doPostRequest action. Save the nib and go back to Xcode.
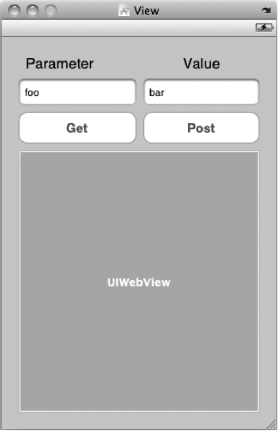
Figure 10.7. Use this as a guide when building the RequestTypes application interface. The exact placement isn't important.
Single-click RequestTypesViewController.m and replace the contents with this version:
#import "RequestTypesViewController.h"
@implementation RequestTypesViewController
@synthesize webView;
@synthesize paramName;
@synthesize paramValue;
@synthesize receivedData;
- (IBAction)doGetRequest {
NSMutableString *urlWithParameters = [NSMutableString
stringWithString:kFormURL];
[urlWithParameters appendFormat:@"?%@=%@", paramName.text, paramValue.text];
NSURLRequest *req = [[NSURLRequest alloc] initWithURL:[NSURL
URLWithString:urlWithParameters]];
NSURLConnection *theConnection=[[NSURLConnection alloc] initWithRequest:req
delegate:self];
if (theConnection) {
NSMutableData *data = [[NSMutableData alloc] init];
self.receivedData = data;[data release];
}
else {
[webView loadHTMLString:@"Unable to make connection!"
baseURL:[NSURL URLWithString:kFormURL]] ;
}
[paramName resignFirstResponder];
[paramValue resignFirstResponder];
[req release];
}
- (IBAction)doPostRequest {
NSURL *url = [[NSURL alloc] initWithString:kFormURL];
NSMutableURLRequest *req = [[NSMutableURLRequest alloc]
initWithURL:url];
[req setHTTPMethod:@"POST"];
NSString *paramDataString = [NSString stringWithFormat:@"%@=%@", paramName.text,
paramValue.text];
NSData *paramData = [paramDataString dataUsingEncoding:NSUTF8StringEncoding];
[req setHTTPBody: paramData];
NSURLConnection *theConnection = [[NSURLConnection alloc]
initWithRequest:req
delegate:self];
if (theConnection) {
NSMutableData *data = [[NSMutableData alloc] init];
self.receivedData = data;
[data release];
}
else {
[webView loadHTMLString:@"Unable to make connection!" baseURL:[NSURL
URLWithString:kFormURL]] ;
}
[url release];
[req release];
[paramName resignFirstResponder];
[paramValue resignFirstResponder];
}
- (void)viewDidUnload {
self.webView = nil;
self.paramName = nil;
self.paramValue = nil;
}
- (void)dealloc {
[webView release];
[paramName release];
[paramValue release];
[receivedData release];
[super dealloc];
}#pragma mark -
#pragma mark NSURLConnection Callbacks
- (void)connection:(NSURLConnection *)connection
        didReceiveResponse:(NSURLResponse *)response {
    [receivedData setLength:0];
}
- (void)connection:(NSURLConnection *)connection
        didReceiveData:(NSData *)data {
    [receivedData appendData:data];
}
- (void)connection:(NSURLConnection *)connection
didFailWithError:(NSError *)error {
[connection release];
self.receivedData = nil;
UIAlertView *alert = [[UIAlertView alloc] initWithTitle:@"Error"
message:[NSString stringWithFormat:
@"Connection failed! Error - %@ (URL: %@)",
[error localizedDescription], [[error userInfo]
objectForKey:NSErrorFailingURLStringKey]]
delegate:self
cancelButtonTitle:@"Bummer"
otherButtonTitles:nil];
[alert show];
[alert release];
}
- (void)connectionDidFinishLoading:(NSURLConnection *)connection {
webView.hidden = NO;
NSString *payloadAsString = [[NSString alloc] initWithData:receivedData
encoding:NSUTF8StringEncoding];
[webView loadHTMLString:payloadAsString baseURL:[NSURL URLWithString:kFormURL]];
[payloadAsString release];
[connection release];
self.receivedData = nil;
}
@endMuch of this controller class is identical to our earlier asynchronous example. There are a few things you should take notice of. In doGetRequest, we use a mutable string to append parameters onto the URL.
NSMutableString *urlWithParameters = [NSMutableString
stringWithString:kFormURL];
[urlWithParameters appendFormat:@"?%@=%@", paramName.text, paramValue.text];From that point on, everything is the same as our previous examples. Because we're creating a GET request, we don't need a mutable request.
In doPostRequest, things have changed a little more. We start off by allocating a URL and a mutable request and setting the request's type to POST:
- (IBAction)doPostRequest {NSURL *url = [[NSURL alloc] initWithString:kFormURL];
NSMutableURLRequest *req = [[NSMutableURLRequest alloc]
                                initWithURL:url];
[req setHTTPMethod:@"POST"];We then create a string that holds the parameters entered by our user in the two text fields.
NSString *paramDataString = [NSString stringWithFormat:@"%@=%@", paramName.text,
        paramValue.text];
We convert that string into an instance of NSData using UTF-8 encoding, which is the default encoding type used by NSMutableURLRequest. Then we set that as the body of the request.
NSData *paramData = [paramDataString dataUsingEncoding:NSUTF8StringEncoding];
    [req setHTTPBody: paramData];
From that point on, everything else is the same. We create the connection just as we did in the asynchronous example and if our connection isn't nil, we allocate an instance of NSMutableData to hold the returned value.
And there you have it. If you type values into the two text fields and hit either button, you'll send different types of requests with different types of parameters. From these two examples, you should be able to craft pretty much any kind of request you need.
As an example, if you press the Get button with foo in the Parameter field and bar in the Value field, it's as if you sent out this URL:
http://iphonedevbook.com/more/10/echo.php?foo=bar
If you press the Post button, it's as if you had submitted an HTML form with an action of http://iphonedevbook.com/more/10/echo.php that contained a text field (or other control) named foo and the user entered a value of bar into that field before hitting the Submit button. These parameters don't actually go in as part of the URL. Instead, they are passed in the body of the request, which typically isn't seen when you're using a browser.
So, now, we must bid adieu to our friend the network. We've spent three chapters exploring ways to exchange information with other machines over network connections. In this chapter, you saw how to perform synchronous and asynchronous requests to web servers, saw how to change the request's type, and also saw how to send both kinds of form parameters.
In the next chapter, we're going to look at using MapKit, Apple's framework for displaying locations and directions on a map right in your own application.