Core Data is a framework and set of tools that allow you to persist your application's data to the iPhone's file system automatically. Core Data is a form of something called object-relational mapping, or ORM, which is just a fancy way of saying that Core Data takes the data stored in your Objective-C objects and translates (or maps) that data into another form so that it can be easily stored in a database, such as SQLite, or into a flat file.
Core Data can seem like magic when you first start using it. Objects are simply dealt with as objects, and they seem to know how to save themselves into the database or file system. You won't create SQL strings or make file management calls—ever. Core Data insulates you from some complex and difficult programming tasks, which is great for you. By using Core Data, you can develop applications with complex data models much, much faster than you could using straight SQLite, object archiving, or flat files.
Technologies that hide complexity the way Core Data does can encourage "voodoo programming"—that most dangerous of programming practices where you include code in your application that you don't necessarily understand. Sometimes, that mystery code arrives in the form of a project template. Or, perhaps, you downloaded a utilities library that did a task for you that you just don't have the time or expertise to do for yourself. That voodoo code does what you need it to do, and you don't have the time or inclination to step through it and figure it out, so it just sits there, working its magic ... until it breaks. Though this is not always the case, as a general rule, if you find yourself with code in your own application that you don't fully understand, it's a sign you should go do a little research, or at least find a more experienced peer to help you get a handle on your mystery code.
The point is that Core Data is one of those complex technologies that can easily turn into a source of mystery code that will make its way into many of your projects. Although you don't need to know exactly how Core Data accomplishes everything it does, you should invest some time and effort into understanding the overall Core Data architecture.
In this chapter, we'll start with a brief history of Core Data, and then dive into the Core Data template itself. By dissecting Xcode's default Core Data template, you'll find it much easier to understand the more complex Core Data projects we get into in the following chapters.
Core Data has been around for quite some time, but it just became available on the iPhone with the release of iPhone SDK 3.0. Core Data was originally introduced with Mac OS X 10.4 (Tiger), but some of the DNA in Core Data actually goes back about 15 years, to a NeXT framework called Enterprise Objects Framework (EOF), part of NeXT's WebObjects web development tool set.
EOF was designed to work with remote databases, and it was a pretty revolutionary tool when it first came out. Although there are now many good ORM tools for almost every language, when WebObjects was in its infancy, most web applications were written to use handcrafted SQL or file system calls to persist their data. Back then, writing web applications was incredibly time- and labor-intensive. WebObjects, in part because of EOF, cut the development time needed to create complex web applications by an order of magnitude.
In addition to being part of WebObjects, EOF was also used by NeXTSTEP, which was the predecessor to Cocoa. When Apple bought NeXT, the Apple developers used many of the concepts from EOF to develop a new persistence tool called Core Data. Core Data does for desktop applications what EOF had previously done for web applications: It dramatically increases developer productivity by removing the need to write file system code or interact with an embedded database.
Fire up Xcode and select New Project... from the File menu, or press
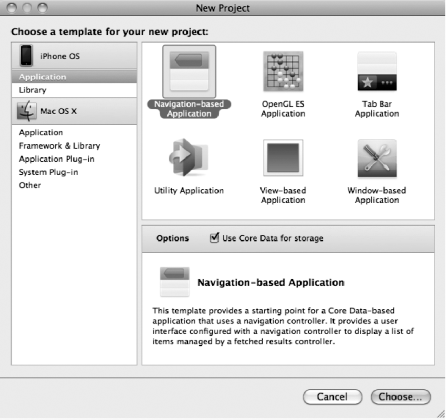
Call your project CoreData. Now build and run the application. It will work fine in either the simulator or on a physical device. It should look something like Figure 2-2.
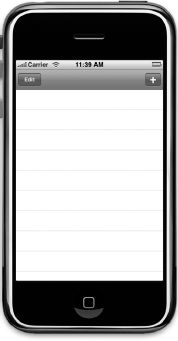
If you press the plus icon in the upper-right corner, it will insert a new row into the table that shows the exact date and time the plus button was pressed. You can also use the Edit button to delete rows. Exciting, huh?
Warning
Early versions of the Core Data Navigation-based Application template had a small bug. If you deleted the last row, the application would crash. This was fixed in SDK 3.1.
Under the hood of this simple application, a lot is happening. Think about it—without adding a single class, or any code to persist data to a file or interact with a database, pressing the plus button created an object, populated it with data, and saved it to a SQLite database created for us automatically. There's plenty of free functionality here.
Now that you've seen an application in action, let's take a look at what's going on behind the scenes.
Like most complex technologies, Core Data has its own terminology that can be a bit intimidating to newcomers. Let's break down the mystery and get our arms around Core Data's nomenclature.
Figure 2-3 shows a simplified, high-level diagram of the Core Data architecture. Don't expect it all to make sense now, but as we look at different pieces, you might want to refer back to the diagram to cement your understanding of how they fit together.

Figure 2.3. A high-level view of the Core Data architectures. We'll be looking at each of these pieces in this chapter.
There are five key concepts to focus on here. As you proceed through this chapter, make sure you understand each of the following:
Persistent store
Data model
Persistent store coordinator
Managed object and managed object context
Fetch request
Once again, don't let the names throw you. Follow along, and you'll see how all these pieces fit together.
The persistent store, which is sometimes referred to as a backing store, is where Core Data stores its data. By default on the iPhone, Core Data will use a SQLite database contained in your application's documents folder as its persistent store. But this can be changed without impacting any of the other code you write by tweaking a single line of code. We'll show you the actual line of code to change in a few moments.
Warning
Do not change the type of persistent store once you have posted your application to the App Store. If you must change it for any reason, you will need to write code to migrate data from the old persistent store to the new one, or else your users will lose all of their data—something that will likely make them quite unhappy.
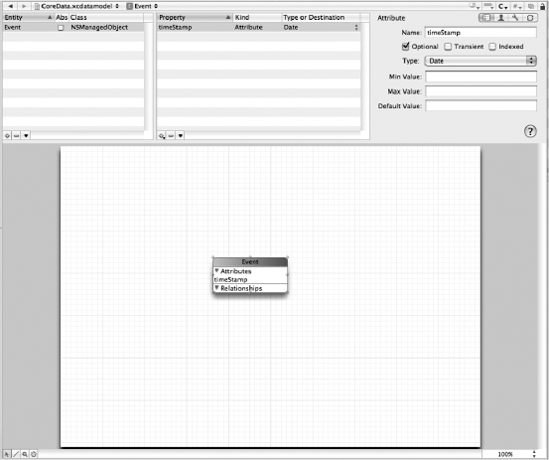
Every persistent store is associated with a single data model, which defines the types of data that the persistent store can store. If you expand the Resources folder in the Groups & Files pane in Xcode, you'll see a file called CoreData.xcdatamodel. That file is the default data model for your project. The project template we chose gave us a single persistent store and an associated data model. Single-click CoreData.xcdatamodel now to bring up Xcode's data model editor. Your editing pane in Xcode should now look like Figure 2-4. As you design your own applications, this is where you'll build your application's data model.
In this chapter, we'll explore the data model that comes with the template. In Chapter 3, we'll actually use the editor to create a custom data model.
Take a look at the data model editor. Notice the single rounded rectangle in the middle of the editing window. That rectangle is known as an entity. In effect, an entity is like a class definition, wrapping your various data elements under a single umbrella. This particular entity has the name Event, and it features sections for Attributes and Relationships. There's a single attribute, named timeStamp, and no relationships.
Click off the entity rectangle. The title bar should turn a light pink. Click back on the entity, and it will turn blue, indicating the entity is selected.
The entity was created as part of this template. If you use this template to create your own Core Data application, you get the Event entity for free. As you design your own data models, you'll most likely delete the Event entity and create your own entities from scratch.
A moment ago, you ran your Core Data sample application in the simulator. When you pressed the plus icon, a new instance of an Event was created. Entities, which we'll look at more closely in a few pages, replace the Objective-C data model class you would otherwise use to hold your data.
We'll get back to the data model editor in just a minute to see how it works. For now, just remember that the persistent store is where Core Data stores its data, and the data model defines the form of that data. Also remember that every persistent store has one, and only one, data model.
Although you won't typically access your application's data model directly, you should be aware of the fact that there is an Objective-C class that represents the data model in memory. This class is called NSManagedObjectModel, and the template automatically creates an instance of NSManagedObjectModel based on the data model file in your project. Let's take a look at the code that creates it now.
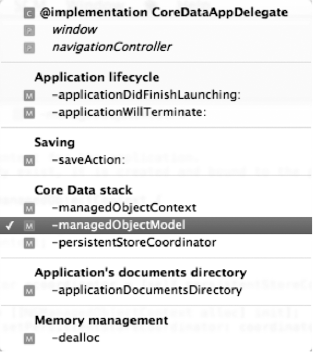
In your project window's Groups & Files pane, open the Classes group and single-click CoreDataAppDelegate.m. At the top of the editor pane, click the function menu to bring up a list of the methods in this class (see Figure 2-5). Select -managedObjectModel, which will take you to the method that creates the object model based on the CoreData.xcdatamodel file.
The method should look like this:
/**
 Returns the managed object model for the application.
 If the model doesn't already exist, it is created by merging all of the models
 found in the application bundle.
 */
- (NSManagedObjectModel *)managedObjectModel {
    if (managedObjectModel != nil) {
        return managedObjectModel;
    }
    managedObjectModel = [[NSManagedObjectModel mergedModelFromBundles:nil] retain];
    return managedObjectModel;
}
The first thing it does is check the instance variable managedObjectModel to see if it's nil. This accessor method uses a form of lazy loading. The underlying instance variable doesn't actually get instantiated until the first time the accessor method is called. For this reason, you should never, ever access managedObjectModel directly (except within the accessor method itself, of course). Always make sure to use the accessor methods. Otherwise, you could end up trying to make calls on an object that hasn't been created yet.
Tip
The data model class is called NSManagedObjectModel because, as you'll see a little later in the chapter, instances of data in Core Data are called managed objects.
If managedObjectModel is nil, we'll go get our data models. Remember how we said that a persistent store was associated with a single data model? Well, that's true, but it doesn't tell the whole story. You can combine multiple .xcdatamodel files into a single instance of NSManagedObjectModel, creating a single data model that combines all the entities from multiple files. This line of code takes any .xcdatamodel files that might be in your Xcode project and combines them together into a single instance of NSManagedObjectModel:
managedObjectModel = [[NSManagedObjectModel mergedModelFromBundles:nil] retain];
So, for example, if you were to create a second data model file and add it to your project, that new file would be combined with CoreData.xcdatamodel into a single managed object model that contained the contents of both files. This allows you to split up your application's data model into multiple smaller and more manageable files.
The vast majority of iPhone applications that use Core Data have a single persistent store and a single data model, so the default template code will work beautifully most of the time, and will let you spread your data model out over multiple files. That said, Core Data does support the use of multiple persistent stores. You could, for example, design your application to store some of its data in a SQLite persistent store and some of it in a binary flat file. If you find that you need to use multiple data models, remember to change the template code here to load the managed object models individually, using initWithContentsOfURL:.
The persistent store isn't actually represented by an Objective-C class. Instead, a class called NSPersistentStoreCoordinator controls access to the persistent store. In essence, it takes all the calls coming from different classes that trigger reads or writes to the persistent store and serializes them so that multiple calls against the same file are not being made at the same time, which could result in problems due to file or database locking.
As is the case with the managed object model, the template provides us with a method in the application delegate that creates and returns an instance of a persistent store coordinator. Other than creating the store and associating it with a data model and a location on disk (which is done for you in the template), you will rarely need to interact with the persistent store coordinator directly. You'll use high-level Core Data calls, and Core Data will interact with the persistent store coordinator to retrieve or save the data.
Let's take a look at the method that returns the persistent store coordinator. In CoreDataAppDelegate.m, select -persistentStoreCoordinator from the function pop-up menu. Here's the method:
/**
 Returns the persistent store coordinator for the application.
 If the coordinator doesn't already exist, it is created and the application's store
 added to it.
 */
- (NSPersistentStoreCoordinator *)persistentStoreCoordinator {

    if (persistentStoreCoordinator != nil) {
        return persistentStoreCoordinator;
    }

    NSURL *storeUrl = [NSURL fileURLWithPath: [[self applicationDocumentsDirectory]
        stringByAppendingPathComponent: @"CoreData.sqlite"]];

    NSError *error;
    persistentStoreCoordinator = [[NSPersistentStoreCoordinator alloc]
        initWithManagedObjectModel: [self managedObjectModel]];
    if (![persistentStoreCoordinator addPersistentStoreWithType:NSSQLiteStoreType
        configuration:nil URL:storeUrl options:nil error:&error]) {
        // Handle error
    }

    return persistentStoreCoordinator;
}
As with the managed object model, this persistentStoreCoordinator accessor method uses lazy loading and doesn't instantiate the persistent store coordinator until the first time it is accessed. Then it creates a path to a file called CoreData.sqlite in the documents directory in your application's sandbox. The template will always create a filename based on your project's name. If you want to use a different name, you can change it here, though it generally doesn't matter what you call the file, since the user will never see it.
Warning
If you do decide to change the filename, make sure you don't change it after you've posted your application to the App Store, or else future updates will cause your users to lose all of their data.
Take a look at this line of code:
if (![persistentStoreCoordinator addPersistentStoreWithType:NSSQLiteStoreType
        configuration:nil URL:storeUrl options:nil error:&error]) {
The first parameter to this method, NSSQLiteStoreType, determines the type of the persistent store. NSSQLiteStoreType is a constant that tells Core Data to use a SQLite database for its persistent store. If you want your application to use a single, binary flat file instead of a SQLite database, you could specify the constant NSBinaryStoreType instead of NSSQLiteStoreType. The vast majority of the time, the default setting is the best choice, so unless you have a compelling reason to change it, leave it alone.
Note
A third type of persistent store supported by Core Data on the iPhone is called in-memory store. The primary use of this option is to create a caching mechanism, storing the data in memory instead of in a database or binary file. To use an in-memory store, specify a store type of NSInMemoryStoreType.
Before we move on to other parts of Core Data, let's quickly review how the pieces we've looked at so far fit together. You might want to refer back to Figure 2-3.
The persistent store (or backing store) is a file on the iPhone's file system that can be either a SQLite database or a binary flat file. A data model file, contained in one or more files with an extension of .xcdatamodel, describes the structure of your application's data. This file can be edited in Xcode. The data model tells the persistent store coordinator the format of all data stored in that persistent store. The persistent store coordinator is used by other Core Data classes that need to save, retrieve, or search for data. Easy enough, right? Let's move on.
Let's go back to the data model editor and take a closer look at the simple data model that was provided as part of the template. Single-click CoreData.xcdatamodel again. Your editor pane (the large pane at the bottom of the window) should look similar to the one shown earlier in Figure 2-4.
As we said before, the rounded rectangle in the center is an entity. In effect, an entity is like an Objective-C class declaration. Each data model class you would create if you didn't use Core Data translates to an entity when you do use Core Data.
Each entity has a name—in this case, Event—which must begin with a capital letter. In the template application you ran earlier, each time you pressed the plus button, a new instance of Event was created and stored in the application's persistent store.
In the data model editor, you can tell if an entity is selected by its color. A selected entity will have a blue title bar and be surrounded by eight resize handles. An unselected entity will have a reddish-gray title bar, and it will not have any resize handles. Single-click the Event entity title bar to select it.
As you select the Event entity, take a look at the top-left pane, known as the entity pane. The entity pane is a list of all the entities that have been defined in this data model. The template we used for this project creates a single entity, Event. Selecting Event in the entity pane is the same as selecting the rounded rectangle in the bottom pane. Try it: Click outside the entity in the bottom pane to deselect it, and then click the Event line in the entity pane. The entity in the bottom pane will also be selected. The upper-left and bottom panes show two different views of the same entity list.
While the entity pane lists all the data model's entities, the upper-middle pane, known as the property pane, lists the properties that belong to the selected entity.
The entity itself has no mechanism for storing data. Instead, entities are made up of one or more properties that define it. When you select an entity in the entity pane, its properties are displayed in the property pane.
An entity can be made up of any number of properties. There are four different types of properties: attributes, relationships, fetched properties, and fetch requests.
The property that you'll use the most when creating entities is the attribute, which serves the same function in a Core Data entity as an instance variable does in an Objective-C class—they both hold data. If you look at your data model editor (or at Figure 2-4), you'll see that the Event entity has one property: an attribute named timeStamp. The timeStamp attribute holds the date and time when a given Event instance was created. In our sample application, when you click the plus sign, a new row is added to the table displaying a single Event's timeStamp.
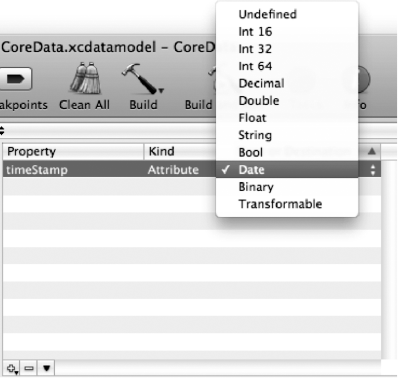
Just like an instance variable, each attribute has a type, which is set using a pop-up menu in the third column of the attribute pane. Let's take a look at that pop-up menu. Make sure Event is selected in the entity pane, and then select timeStamp in the attribute pane. Note the word Date in the third column of the timeStamp attribute. That's a pop-up menu (see Figure 2-6). Select it, but don't change its value (leave it as Date). You can see the range of options for attribute type. We'll look at the different attribute types in the next few chapters when we begin building our own data models.
A date attribute, such as timeStamp, corresponds to an instance of NSDate. If you want to set a new value for a date attribute, you need to provide an instance of NSDate to do so. A string attribute corresponds to an instance of NSString, and most of the numeric types correspond to an instance of NSNumber.
Tip
Don't worry too much about all the other buttons, text fields, and check boxes in the data model editor. As you make your way through the next few chapters, you'll get a sense of what each does.
As the name implies, a relationship defines the associations between two different entities. In the template application, no relationships are defined for the Event entity. We'll begin discussing relationships in Chapter 7, but here's an example just to give you a sense of how they work.
Suppose we created an Employee entity and wanted to reflect each Employee's employer in the data structure. We could just include an employer attribute, perhaps an NSString, in the Employee entity, but that would be pretty limiting. A more flexible approach would be to create an Employer entity, and then create a relationship between the Employee and Employer entities.
Relationships can be to one or to many, and they are designed to link specific objects. The relationship from Employee to Employer might be a to-one relationship, if we assume that your Employees do not moonlight and have only a single job. On the other hand, the relationship from Employer to Employee is to many, since an Employer might employ many Employees.
To put this in Objective-C terms, a to-one relationship is like using an instance variable to hold a pointer to an instance of another Objective-C class. A to-many relationship is more like using a pointer to a collection class like NSMutableArray or NSSet, which can contain multiple objects.
A fetched property is like a query that originates with a single managed object. For example, suppose we added a birthdate attribute to Employee. We might add a fetched property, called sameBirthdate, to find all Employees with the same birthdate as the current Employee.
Unlike relationships, fetched properties are not loaded along with the object. For example, if Employee has a relationship to Employer, when an Employee instance is loaded, the corresponding Employer instance will be loaded, too. But when an Employee is loaded, sameBirthdate is not evaluated. This is a form of lazy loading. You'll learn more about fetched properties in Chapter 7.
While a fetched property is like a query that originates with a single managed object, a fetch request is more like a class method that implements a canned query. For example, we might build a fetch request named canChangeLightBulb that returns a list of Employees who are taller than 80 inches (about 2 meters). We can run the fetch request any time we need a light bulb changed. When we run it, Core Data searches the persistent store to find the current list of potential light-bulb-changing Employees.
We will create many fetch requests programmatically in the next few chapters, and we'll be looking at a simple one a little later in this chapter, in the "Creating a Fetched Results Controller" section.
Entities define the structure of your data, but they do not actually hold any data themselves. The instances of data are called managed objects. Every instance of an entity that you work with in Core Data will be an instance of the class NSManagedObject or a subclass of NSManagedObject.
The NSDictionary class allows you to store objects in a data structure and retrieve an object using a unique key. Like the NSDictionary class, NSManagedObject supports the key-value methods valueForKey: and setValue:forKey: for setting and retrieving attribute values. It also has additional methods for working with relationships. You can, for example, retrieve an instance of NSMutableSet representing a specific relationship. Adding managed objects to this mutable set, or removing them will add or remove objects from the relationship it represents.
If the NSDictionary class is new to you, take a few minutes to fire up Xcode and read about NSDictionary in the documentation viewer. The important concept to get your head around is key-value coding, or KVC. Core Data uses KVC to store and retrieve data from its managed objects.
In our template application, consider an instance of NSManagedObject that represents a single Event. We could retrieve the value stored in its timeStamp attribute by calling valueForKey:, like so:
NSDate *timeStamp = [managedObject valueForKey:@"timeStamp"];
Since timeStamp is an attribute of type date, we know the object returned by valueForKey: will be an instance of NSDate. Similarly, we could set the value using setValue:ForKey:. The following code would set the timeStamp attribute of managedObject to the current date and time:
[managedObject setValue:[NSDate date] forKey:@"timeStamp"];
KVC also includes the concept of a keypath. Keypaths allow you iterate through object hierarchies using a single string. So, for example, if we had a relationship on our Employee entity called whereIWork, which pointed to an entity named Employer, and the Employer entity had an attribute called name, then we could get to the value stored in name from an instance of Employee using a keypath like so:
NSString *employerName = [managedObject valueForKeyPath:@"whereIWork.name"];
Notice that we use valueForKeyPath: instead of valueForKey:, and we provide a dot-separated value for the keypath. KVC parses that string using the dots, so in this case, it would parse it into two separate values: whereIWork, and name. It uses the first one (whereIWork) on itself, and retrieves the object that corresponds to that key. It then takes the next value in the keypath (name) and retrieves the object stored under that key from the object returned by the previous call. Since Employer is a to-one relationship, the first part of the keypath would return a managed object instance that represented the Employee's employer. The second part of the keypath would then be used to retrieve the name from the managed object that represents the Employer.
Core Data maintains an object that acts as a gateway between your entities and the rest of Core Data. That gateway is called a managed object context (often just referred to as a context). The context maintains state for all the managed objects that you've loaded or created. The context keeps track of changes that have been made since the last time a managed object was saved or loaded. When you want to load or search for objects, for example, you do it against a context. When you want to commit your changes to the persistent store, you save the context. If you want to undo changes to a managed object, you just ask the managed object context to undo. (Yes, it even handles all the work needed to implement undo and redo for your data model.)
When building iPhone applications, the vast majority of the time, you will have only a single context. However, you can have more than one context. For example, if your application supports threading or some other form of concurrency, such as NSOperationQueue, you'll need more than one context, since contexts are not thread-safe and cannot be shared across threads. This means that the same managed object can exist in two different places with different values if you're not careful.
Because every application needs at least one managed object context to function, the template has very kindly provided us with one. Click CoreDataAppDelegate.m again, and select -managedObjectContext from the function menu. You will see a method that looks like this:
/**
 Returns the managed object context for the application.
 If the context doesn't already exist, it is created and bound to the persistent
 store coordinator for the application.
 */
- (NSManagedObjectContext *) managedObjectContext {

    if (managedObjectContext != nil) {
        return managedObjectContext;
    }

    NSPersistentStoreCoordinator *coordinator = [self persistentStoreCoordinator];
    if (coordinator != nil) {
        managedObjectContext = [[NSManagedObjectContext alloc] init];
        [managedObjectContext setPersistentStoreCoordinator: coordinator];
    }
    return managedObjectContext;
}
This method is actually pretty straightforward. Using lazy loading, managedObjectContext is checked for nil. If it is not nil, its value is returned. If managedObjectContext is nil, we check to see if our NSPersistentStoreCoordinator exists. If so, we create a new managedObjectContext, then use setPersistentStoreCoordinator: to tie the current coordinator to our managedObjectContext. When we're finished, we return managedObjectContext.
Note that managed object contexts do not work directly against a persistent store; they go through a persistent store coordinator. As a result, every managed object context needs to be provided with a pointer to a persistent store coordinator in order to function. Multiple managed object contexts can work against the same persistent store coordinator, however.
While we're in the application delegate, let's scroll up to another method called applicationWillTerminate:, which saves changes to the context if any have been made. The changes are saved to the persistent store. As its name implies, this method is called just before the application exits.
/**
 applicationWillTerminate: saves changes in the application's managed object context before the application terminates.
 */
- (void)applicationWillTerminate:(UIApplication *)application {

    NSError *error;
    if (managedObjectContext != nil) {
        if ([managedObjectContext hasChanges] && ![managedObjectContext
            save:&error]) {
            // Handle error.
            NSLog(@"Unresolved error %@, %@", error, [error userInfo]);
            exit(-1);  // Fail
        }
    }
}
This is a nice bit of functionality, but there may be times when you don't want the data to be saved. For example, what if the user quits after creating a new entity, but before entering any data for that entity? In that case, do you really want to save that empty managed object into the persistent store? Possibly not. We'll look at dealing with situations like that in the next few chapters.
Run the Core Data application we built earlier and press the plus button a few times (see Figure 2-7). Quit the simulator, and then run the application again. Note that the timestamps from our previous runs were saved into the persistent store and loaded back in for this run.
Click RootViewController.m so you can see how this happens. As you can probably guess from the filename, RootViewController is the view controller class that acts as our application's, well, root view controller. This is the view controller for the view you can see in Figure 2-7 and which is, in fact, the only view in the template application.
Once you've clicked the filename, you can use the function menu to find the viewDidLoad: method, although it will probably be on your screen already, since it's the first method in the class. The default implementation of the method looks like this:
- (void)viewDidLoad {
    [super viewDidLoad];

    // Set up the edit and add buttons.
    self.navigationItem.leftBarButtonItem = self.editButtonItem;

    UIBarButtonItem *addButton = [[UIBarButtonItem alloc]
        initWithBarButtonSystemItem:UIBarButtonSystemItemAdd target:self
        action:@selector(insertNewObject)];
    self.navigationItem.rightBarButtonItem = addButton;
    [addButton release];

    NSError *error = nil;
    if (![[self fetchedResultsController] performFetch:&error]) {
        // Update to handle the error appropriately.
NSLog(@"Unresolved error %@, %@", error, [error userInfo]);
exit(-1); // Fail
}
}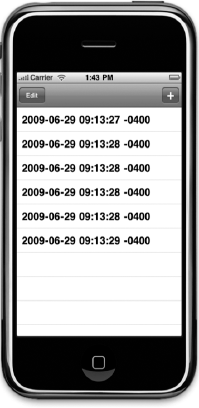
Figure 2.7. The template application saves your application data when you quit. When you launch it again, it loads all the existing data from the persistent store.
The first thing the method does is call super. Next, it sets up the Edit and Add buttons. Note that RootViewController inherits from UIViewController. UIViewController provides a property named editButtonItem, which returns an Edit button. Using dot notation, we retrieve editButtonItem and pass it to the mutator for leftBarButtonItem. Now the Edit button is the left button in the navigation bar.
Let's do the Add button. Since UIViewController does not provide an Add button, we'll use alloc to create one from scratch and add it as the right button in the navigation bar. The next chunk of code may seem a bit strange:
NSError *error;
if (![[self fetchedResultsController] performFetch:&error]) {This code calls performFetch: on an object returned by the method fetchedResultsController. The method fetchedResultsController returns an instance of NSFetchedResultsController, which is a new generic controller class added with version 3.0 of the SDK. Let's take a look at how the fetched results controller works.
Conceptually speaking, the fetched results controller isn't quite like the other generic controllers you've seen in the iPhone SDK. If you've used Cocoa bindings and the generic controller classes available on the Mac, such as NSArrayController, then you're already familiar with the basic idea. If you're not familiar with those generic controller classes, a little explanation is probably in order.
Most of the generic controller classes in the iPhone SDK—such as UINavigationController, UITableViewController, and UIViewController—are designed to act as the controller for a specific type of view. View controllers, however, are not the only types of controller classes that Cocoa Touch provides, although they are the most common. NSFetchedResultsController is an example of a controller class that is not a view controller.
NSFetchedResultsController is designed to handle one very specific job, which is to manage the objects returned from a Core Data fetch request. NSFetchedResultsController makes displaying data from Core Data easier than it would otherwise be, because it handles a bunch of tasks for you. It will, for example, purge any unneeded objects from memory when it receives a low-memory warning and reload them when it needs them again. If you specify a delegate for the fetched results controller, your delegate will be notified when certain changes are made to its underlying data.
You start by creating a fetch request, and then use that fetch request to create a fetched results controller. In our template, this is done in RootViewController.m, in the fetchedResultsController method. fetchedResultsController starts by creating a new fetch request. A fetch request is basically a specification that lays out the details of the data to be fetched. You'll need to tell the fetch request which entity to fetch. In addition, you'll want to add a sort descriptor to the fetch request. The sort descriptor determines the order in which the data is organized.
Once the fetch request is complete, the fetched results controller is created. The fetched results controller is an instance of the class NSFetchedResultsController. Remember that the fetched results controller's job is to use the fetch request to keep its associated data as fresh as possible.
Once the fetched results controller is created, you'll do your initial fetch. We do this in RootViewController.m at the end of ViewDidLoad, by sending our fetched results controller the PerformFetch message.
Now that you have your data, you're ready to be a data source and a delegate to your table view. When your table view wants the number of sections for its table, it will call numberOfSectionsInTableView:. In our version, we get the section information by passing the appropriate message to fetchResultsController. Here's the version from RootViewController.m:
- (NSInteger)numberOfSectionsInTableView:(UITableView *)tableView {return [[fetchedResultsController sections] count]; }
The same strategy applies in tableView:numberOfRowsInSection:
- (NSInteger)tableView:(UITableView *)tableView
numberOfRowsInSection:(NSInteger)section {
id <NSFetchedResultsSectionInfo> sectionInfo =
[[fetchedResultsController sections] objectAtIndex:section];
return [sectionInfo numberOfObjects];
}You get the idea. You used to need to do all this work yourself. Now you can ask your fetched results controller to do all the data management for you. It's an amazing time-saver!
Let's take a closer look at the creation of the fetched results controller. In RootViewController.m, use the function menu to go to the method -fetchedResultsController. It should look like this:
- (NSFetchedResultsController *)fetchedResultsController {
if (fetchedResultsController != nil) {
return fetchedResultsController;
}
/*
Set up the fetched results controller.
*/
// Create the fetch request for the entity.
NSFetchRequest *fetchRequest = [[NSFetchRequest alloc] init];
// Edit the entity name as appropriate.
NSEntityDescription *entity = [NSEntityDescription entityForName:@"Event"
inManagedObjectContext:managedObjectContext];
[fetchRequest setEntity:entity];
// Set the batch size to a suitable number.
[fetchRequest setFetchBatchSize:20];
// Edit the sort key as appropriate.
NSSortDescriptor *sortDescriptor = [[NSSortDescriptor alloc]
initWithKey:@"timeStamp" ascending:NO];
NSArray *sortDescriptors = [[NSArray alloc] initWithObjects:sortDescriptor,
nil];
[fetchRequest setSortDescriptors:sortDescriptors];
// Edit the section name key path and cache name if appropriate.
// nil for section name key path means "no sections".
NSFetchedResultsController *aFetchedResultsController =
[[NSFetchedResultsController alloc] initWithFetchRequest:fetchRequest
managedObjectContext:managedObjectContext sectionNameKeyPath:nil
cacheName:@"Root"];
aFetchedResultsController.delegate = self;
self.fetchedResultsController = aFetchedResultsController;[aFetchedResultsController release];
[fetchRequest release];
[sortDescriptor release];
[sortDescriptors release];
return fetchedResultsController;
}This method uses lazy loading. The first thing it does is check fetchedResultsController for nil. If fetchedResultsController already exists, it is returned; otherwise, the process of creating a new fetchedResultsController is started.
As the first step, we'll need to create an NSFetchRequest and NSEntityDescription, and then attach the NSEntityDescription to the NSFetchRequest:
NSFetchRequest *fetchRequest = [[NSFetchRequest alloc] init];
// Edit the entity name as appropriate.
NSEntityDescription *entity = [NSEntityDescription entityForName:@"Event"
inManagedObjectContext:managedObjectContext];
[fetchRequest setEntity:entity];Remember, we're building a fetched results controller, and the fetch request is part of that. Next, we set the batch size to 20. This tells Core Data that this fetch request should retrieve its results 20 at a time. This is sort of like a file system's block size.
// Set the batch size to a suitable number.
[fetchRequest setFetchBatchSize:20];Next, we build an NSSortDescriptor and specify that it use timeStamp as a key, sorting the timestamps in ascending order (earlier dates first).
// Edit the sort key as appropriate.
NSSortDescriptor *sortDescriptor = [[NSSortDescriptor alloc]
initWithKey:@"timeStamp" ascending:YES];Now we create an array of sort descriptors. Since we'll be using only one, we pass in sortDescriptor and follow it with nil to let initWithObjects know we'll just have a single element in the array. (Note that the template could have used initWithObject instead.)
NSArray *sortDescriptors = [[NSArray alloc] initWithObjects:sortDescriptor,
nil];
[fetchRequest setSortDescriptors:sortDescriptors];Try this experiment: Change ascending:YES to ascending:NO and run the application again. What do you think will happen? Don't forget to change it back when you are finished.
Tip
If you need to restrict a fetch request to a subset of the managed objects stored in the persistent store, you use a predicate. There's an entire chapter dedicated to predicates in Learn Objective-C on the Mac by Mark Dalrymple and Scott Knaster (Apress, 2009). The default template does not use predicates, but we'll be working with them in the next several chapters.
Now we create an NSFetchedResultsController using our fetch request and context. We'll cover the third and fourth parameters, sectionNameKeyPath and cacheName, in Chapter 3.
// Edit the section name key path and cache name if appropriate.
// nil for section name key path means "no sections".
NSFetchedResultsController *aFetchedResultsController =
[[NSFetchedResultsController alloc] initWithFetchRequest:fetchRequest
managedObjectContext:managedObjectContext sectionNameKeyPath:nil
cacheName:@"Root"];Next, we set self as the delegate, and set fetchedResultsController to the fetched results controller we just created.
aFetchedResultsController.delegate = self;
self.fetchedResultsController = aFetchedResultsController;Finally, we release our locals and return our newly created fetchedResultsController:
[aFetchedResultsController release];
[fetchRequest release];
[sortDescriptor release];
[sortDescriptors release];
return fetchedResultsController;
}Don't worry too much about the details here. Try to get your head around the big picture. As you make your way through the next few chapters, the details will come into focus.
The fetched results controller must have a delegate, and that delegate must provide four methods, which we will describe in the pages that follow. These four methods are defined in the protocol NSFetchedResultsControllerDelegate. The fetched results controller monitors its managed object context and calls its delegates as changes are made to its context.
When the fetched results controller observes a change that affects it—such as an object it manages being deleted or changed, or when a new object is inserted that meets the criteria of the fetched results controller's fetch request—the fetched results controller will notify its delegate before it makes any changes, using the method controllerWillChangeContent:.
The vast majority of the time, a fetched results controller will be used along with a table view, and all you need to do in that delegate method is to inform the table view that updates about to be made might impact what it is displaying. Here is how you do that:
- (void)controllerWillChangeContent:(NSFetchedResultsController *)controller {
[self.tableView beginUpdates];
}As of this writing, the Xcode project templates do not handle most of the fetched results controller delegate task for you, so you will usually need to add the methods in this section to your controller classes. If there is an existing controllerWillChangeContent: method, replace it with this one.
Note
The NSFetchedResultsController was a brand-new object with SDK 3.0. The Core Data Navigation-based Application project template, which uses it, has changed several times since the initial release. The earliest version did not implement any of the fetched results controller delegate methods. Later versions implemented the controllerWillChangeContent: delegate method, but just triggered a table reload. The implementations we're providing in this section are generic and robust. You should be able to just copy them into your template and go.
After the fetched results controller makes its changes, it will then notify its delegate using the method controllerDidChangeContent:. At that time, if you're using a table view (and you almost certainly will be), you need to tell the table view that the updates you told it were coming in controllerWillChangeContent: are now complete. You do that like so:
- (void)controllerDidChangeContent:(NSFetchedResultsController *)controller {
[self.tableView endUpdates];
}When the fetched results controller notices a change to a specific object, it will notify its delegate using the method controller:didChangeObject:forChangeType:newIndexPath:. This method is where you need to handle updating, inserting, deleting, or moving rows in your table view to reflect whatever change was made to the objects managed by the fetched results controller. Here is a standard implementation of the delegate method that will take care of updating the table view for you:
- (void)controller:(NSFetchedResultsController *)controller
didChangeObject:(id)anObject
atIndexPath:(NSIndexPath *)indexPath
forChangeType:(NSFetchedResultsChangeType)type
newIndexPath:(NSIndexPath *)newIndexPath {
switch(type) {
case NSFetchedResultsChangeInsert:
[self.tableView insertRowsAtIndexPaths:[NSArray
arrayWithObject:newIndexPath]
withRowAnimation:UITableViewRowAnimationFade];
break;
case NSFetchedResultsChangeDelete:
[self.tableView deleteRowsAtIndexPaths:[NSArrayarrayWithObject:indexPath]
withRowAnimation:UITableViewRowAnimationFade];
break;
case NSFetchedResultsChangeUpdate: {
NSString *sectionKeyPath = [controller sectionNameKeyPath];
if (sectionKeyPath == nil)
break;
NSManagedObject *changedObject = [controller
objectAtIndexPath:indexPath];
NSArray *keyParts = [sectionKeyPath componentsSeparatedByString:@"."];
id currentKeyValue = [changedObject valueForKeyPath:sectionKeyPath];
for (int i = 0; i < [keyParts count] - 1; i++) {
NSString *onePart = [keyParts objectAtIndex:i];
changedObject = [changedObject valueForKey:onePart];
}
sectionKeyPath = [keyParts lastObject];
NSDictionary *committedValues = [changedObject
committedValuesForKeys:nil];
if ([[committedValues valueForKeyPath:sectionKeyPath]
isEqual:currentKeyValue])
break;
NSUInteger tableSectionCount = [self.tableView numberOfSections];
NSUInteger frcSectionCount = [[controller sections] count];
if (tableSectionCount != frcSectionCount) {
// Need to insert a section
NSArray *sections = controller.sections;
NSInteger newSectionLocation = −1;
for (id oneSection in sections) {
NSString *sectionName = [oneSection name];
if ([currentKeyValue isEqual:sectionName]) {
newSectionLocation = [sections indexOfObject:oneSection];
break;
}
}
if (newSectionLocation == −1)
return; // uh oh
if (!((newSectionLocation == 0) && (tableSectionCount == 1)
&& ([self.tableView numberOfRowsInSection:0] == 0)))
[self.tableView insertSections:[NSIndexSet
indexSetWithIndex:newSectionLocation]
withRowAnimation:UITableViewRowAnimationFade];
NSUInteger indices[2] = {newSectionLocation, 0};
newIndexPath = [[[NSIndexPath alloc] initWithIndexes:indices
length:2] autorelease];
}
}
case NSFetchedResultsChangeMove:
if (newIndexPath != nil) {
[self.tableView deleteRowsAtIndexPaths:[NSArray
arrayWithObject:indexPath]
withRowAnimation:UITableViewRowAnimationFade];
[self.tableView insertRowsAtIndexPaths: [NSArray
arrayWithObject:newIndexPath]
withRowAnimation: UITableViewRowAnimationRight];
}else {
[self.tableView reloadSections:[NSIndexSet
indexSetWithIndex:[indexPath section]]
withRowAnimation:UITableViewRowAnimationFade];
}
break;
default:
break;
}
}Most of this code is fairly straightforward. If a row has been inserted, we receive a type of NSFetchedResultsChangeInsert, and we insert a new row into the table. If a row was deleted, we receive a type of NSFetchedResultsChangeDelete, and we delete the corresponding row in the table. If a type of NSFetchedResultsChangeMove was received, we know that a row was moved, so we delete it from the old location and insert it at the location specified by newIndexPath.
The one section that's not so straightforward is NSFetchedResultsChangeUpdate, which is received when one of the objects the fetched results controller manages changes. Most of the time, you don't need to do anything when that happens. That's a lot of code for doing nothing, isn't it?
The problem is that an update might impact the table view. If you change the field that is used to order the rows or to divide the rows into sections, then you need to take further actions. As of this writing, for example, when changing an object causes it to move to a new section, you are not notified of a move or a section insert—just of the change. The gnarly code under NSFetchedResultsChangeUpdate handles this problem. Don't worry if you don't fully understand that code. It has been written generically, so you should be able to just use it as is. It is advanced code, and understanding it involves understanding things that will be explained in the next chapters.
Lastly, if a change to an object affects the number of sections in the table, the fetched results controller will call the delegate method controller:didChangeSection:atIndex:forChangeType:. If you specify a sectionNameKeyPath when you create your fetched results controller, you need to implement this delegate method to take care of adding and deleting sections from the table as needed. If you don't, you will get runtime errors when the number of sections in the table doesn't match the number of sections in the fetched results controller. Here is a fairly standard implementation of that delegate method that should work for most situations:
- (void)controller:(NSFetchedResultsController *)controller
didChangeSection:(id <NSFetchedResultsSectionInfo>)sectionInfo
atIndex:(NSUInteger)sectionIndex
forChangeType:(NSFetchedResultsChangeType)type {
switch(type) {
case NSFetchedResultsChangeInsert:
if (!((sectionIndex == 0) && ([self.tableView numberOfSections] == 1)
&& ([self.tableView numberOfRowsInSection:0] == 0)))
[self.tableView insertSections:[NSIndexSet
indexSetWithIndex:sectionIndex]
withRowAnimation:UITableViewRowAnimationFade];
break;
case NSFetchedResultsChangeDelete:
if (!((sectionIndex == 0) && ([self.tableView numberOfSections] == 1)
&& ([self.tableView numberOfRowsInSection:0] == 0)))
[self.tableView deleteSections:[NSIndexSet
indexSetWithIndex:sectionIndex]
withRowAnimation:UITableViewRowAnimationFade];
break;
case NSFetchedResultsChangeMove:
case NSFetchedResultsChangeUpdate:
default:
break;
}
}Once you've implemented these four delegate methods, if you add a new managed object, the fetched results controller will detect that, and your table will be updated automatically. If you delete or change an object, the controller will detect that, too. Any change that affects the fetched results controller will automatically trigger an appropriate update to the table view, including properly animating the process. This means that you don't need to litter your code with calls to reloadData every time you make a change that might impact your dataset.
Our table view delegate methods became much shorter and more straightforward, since our fetched results controller does much of the work that we previously did in those methods. For example, to retrieve the object that corresponds to a particular cell, which we often need to do in tableView:cellForRowAtIndexPath: and tableView:didSelectRowAtIndexPath:, we can just call objectAtIndexPath: on the fetched results controller and pass in the indexPath parameter, and it will return the correct object:
NSManagedObject *managedObject = [fetchedResultsController
objectAtIndexPath:indexPath];From the function menu in the editor pane, select insertNewObject, which is the method that is called when the plus button is pressed in the sample application. It's a nice, simple example of how to create a new managed object, insert it into a managed object context, and then save it to the persistent store.
- (void)insertNewObject {
// Create a new instance of the entity managed by the fetched results
// controller.
NSManagedObjectContext *context =
[fetchedResultsController managedObjectContext];
NSEntityDescription *entity = [[fetchedResultsController fetchRequest] entity];
NSManagedObject *newManagedObject = [NSEntityDescription
insertNewObjectForEntityForName:[entity name]
inManagedObjectContext:context];
// If appropriate, configure the new managed object.
[newManagedObject setValue:[NSDate date] forKey:@"timeStamp"];
// Save the context.
NSError *error;
if (![context save:&error]) {
// Handle the error...
}
}Notice that the first thing the code does is to retrieve a managed object context from the fetched results controller. In this simple example, where there's only one context, we could also have retrieved the same context from the application delegate. There are a few reasons why the default code uses the context from the fetched results controller. First of all, we already have an instance variable that points to the fetched results controller, so we can get to the context in just one line of code:
NSManagedObjectContext *context =
[fetchedResultsController managedObjectContext];More important, though, a fetched results controller always knows which context its managed objects are contained by, so even if you decide to create an application with multiple contexts, you'll be sure that you're using the correct context if you pull it from the fetched results controller.
Just as we did when we created a fetch request, when inserting a new object, we need to create an entity description to tell Core Data which kind of entity we want to create an instance of. The fetched results controller also knows what entity the objects it manages are, so we can just ask it for that information:
NSEntityDescription *entity = [[fetchedResultsController fetchRequest] entity];
Then it's simply a matter of using a class method on NSEntityDescription to create the new object and insert it into a context:
NSManagedObject *newManagedObject = [NSEntityDescription
insertNewObjectForEntityForName:[entity name]
inManagedObjectContext:context];It does seem a little odd that we use a class method on NSEntityDescription, rather than an instance method on the context we want to insert the new object into, but that's the way it's done.
Though this managed object has now been inserted into the context, it still exists in the persistent store. In order to insert it from the persistent store, we must save the context, which is what happens next in this method:
NSError *error;
if (![context save:&error]) {
// Handle the error...
}Notice that we don't call reloadData on our table view. The fetched results controller will realize that we've inserted a new object that meets its criteria and call the delegate method, which will automatically reload the table.
Deleting managed objects is pretty easy when using a fetched results controller. Use the function menu to navigate to the method called tableView:commitEditingStyle:forRowAtIndexPath:. That method should look like this:
// Override to support editing the table view.
- (void)tableView:(UITableView *)tableView
commitEditingStyle:(UITableViewCellEditingStyle)editingStyle
forRowAtIndexPath:(NSIndexPath *)indexPath {
if (editingStyle == UITableViewCellEditingStyleDelete) {
// Delete the managed object for the given index path
NSManagedObjectContext *context =
[fetchedResultsController managedObjectContext];
[context deleteObject:[fetchedResultsController
objectAtIndexPath:indexPath]];
// Save the context.
NSError *error;
if (![context save:&error]) {
// Update to handle the error appropriately.
NSLog(@"Unresolved error %@, %@", error, [error userInfo]);
        exit(-1);  // Fail
    }
}
}The method first makes sure that we're in a delete transaction (remember that this same method is used for deletes and inserts):
if (editingStyle == UITableViewCellEditingStyleDelete) {Next, we retrieve the context:
NSManagedObjectContext *context =
[fetchedResultsController managedObjectContext];Then the context is asked to delete that object:
[context deleteObject:[fetchedResultsController
            objectAtIndexPath:indexPath]];
Next, the managed object context's save: method is called to cause that change to be committed to the persistent store:
NSError *error;
        if (![context save:&error]) {
            // Update to handle the error appropriately.
            NSLog(@"Unresolved error %@, %@", error, [error userInfo]);
            exit(-1);  // Fail
        }
And that's all there is to deleting managed objects.
At this point, you should have a pretty good handle on the basics of using Core Data. You've learned about the architecture of a Core Data application and the process of using entities and properties. You've seen how the persistent store, managed object model, and managed object context are created by your application delegate. You learned how to use the data model editor to build entities that can be used in your program to create managed objects. You also learned how to retrieve, insert, and delete data from the persistent store.
So, enough with the theory. Let's move on and build us some Core Data applications, shall we?