2. Understanding and Working with the Interface Screens
In this chapter, you find out how to navigate and customize your PlayStation Vita’s interface and become familiar with its screens and preinstalled applications.
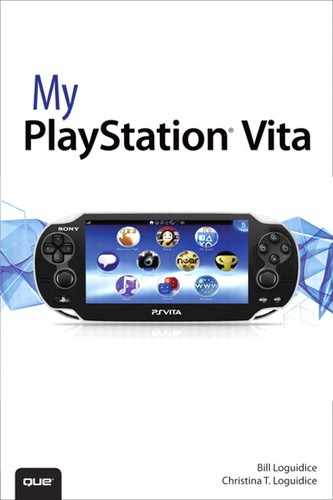
• Info Bar
Like most touchscreen devices, PlayStation Vita’s interface is intuitive, so you’ll feel comfortable using it whether you are an aficionado of touchscreen devices or a newcomer to this technology. Vita’s touchscreen navigation represents a radical departure from the XMB (XrossMediaBar) menu its predecessors the PlayStation 3 and PlayStation Portable used to navigate content. Unlike the rigid XMB menu, which uses horizontal rows to arrange system features into categories and a vertical column to show actions that you can perform under each category, the Vita’s touchscreen is tidy, intuitive, and highly responsive. It enables you to quickly find, launch, and exit applications, whether you navigate the system by touch or via physical controls using the directional pad (sometimes called the D-pad) or left analog stick.
In this chapter, you receive an overview of Vita’s various touchscreen interfaces, including its Unlock, Home, LiveArea, Index, and Application screens, and you find out how to navigate and perform various actions on these screens. You also receive an overview of the Welcome Park application, which serves as a fun tutorial on your Vita’s functionality and features.
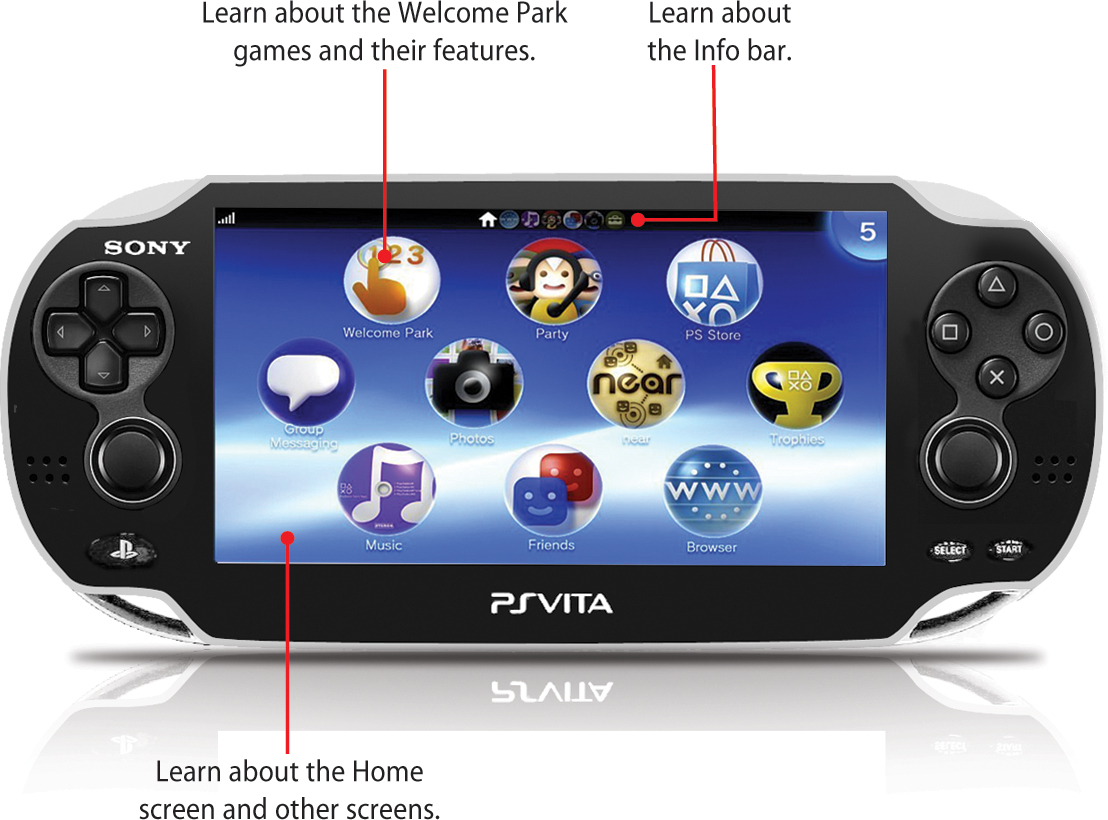
Unlock Screen
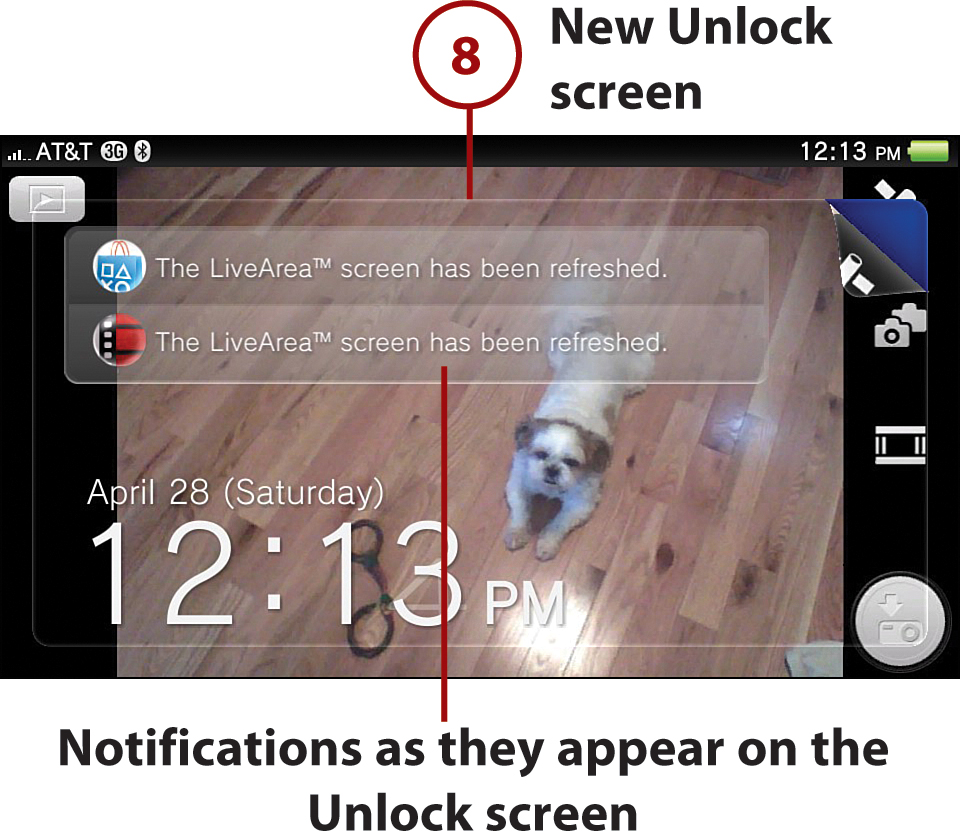
The Unlock screen is the default screen, making it the first screen you encounter when you interact with your Vita. On this screen, you see the date and time, and you receive notifications here as well. This is also where you are first introduced to the peeling gesture (see “Using Touch Controls,” in Chapter 1, “Getting Started,” for more on this and other gestures), which is used to close applications and games by peeling them off the screen. To exit the Unlock screen, touch the top-right corner of the screen where you see the page pulled back and drag the corner down and off the screen with your finger. After you do this, you’re transported to either the Home screen or to the app you were in before your Vita took a snooze.
Changing the Unlock Screen Wallpaper
If you want to give your Unlock screen a personalized touch, you can change its wallpaper; however, you need to have photos or other images stored on your Vita to select from. Follow these steps to give your gateway into Vita a new look.
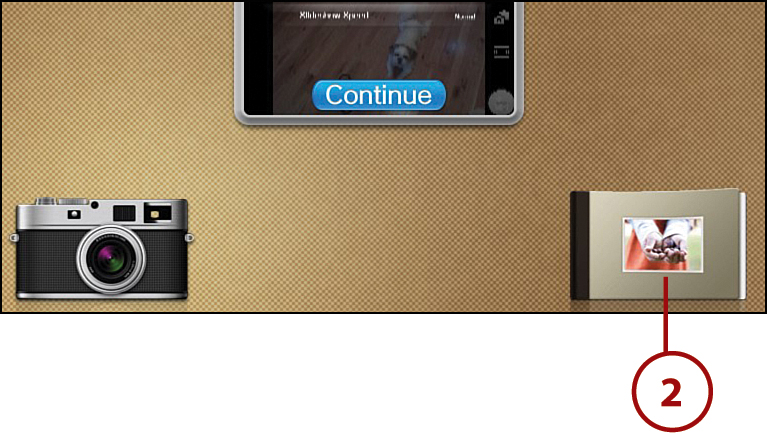
1. Go to the Home screen and select the Photos icon.
2. At the Photos LiveArea screen, tap the album icon at the lower right of the screen.
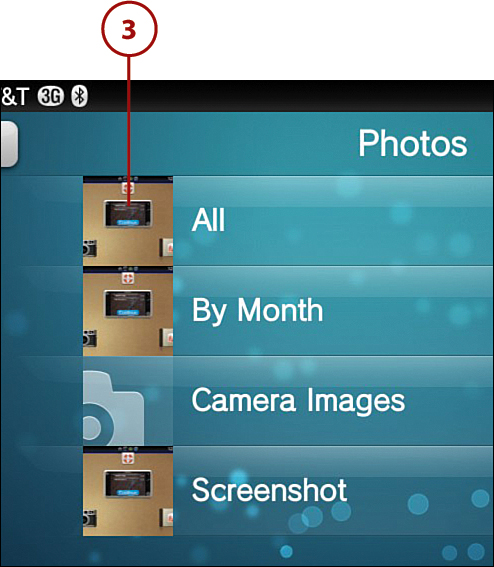
3. Tap the collection that has the photo or image you want to use. If you don’t know which category contains the item you want, select “All” to see every photo and image stored on your Vita.
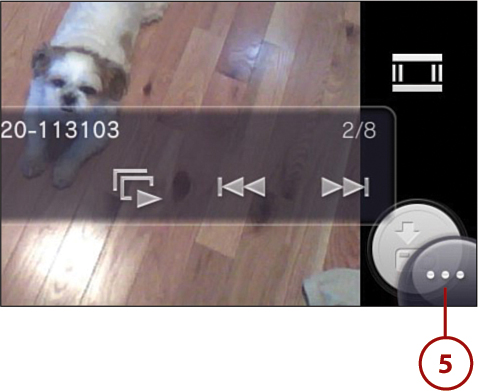
4. Tap the photo or image you want to use.
5. Tap the bubble with the ellipsis (three dots) at the bottom right of the screen.
6. Tap Use as Start Screen.

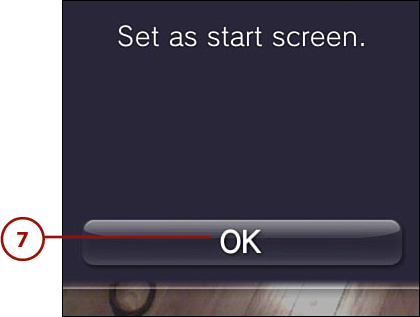
8. You now have a personalized Start screen.
Liked the Default Wallpaper After All?
If you decide you want to go back to your Vita’s default wallpaper, you can easily restore it. Select the Settings icon from the Home screen. At the Settings page, select Format. From the Format menu, select Restore Start Screen Image.
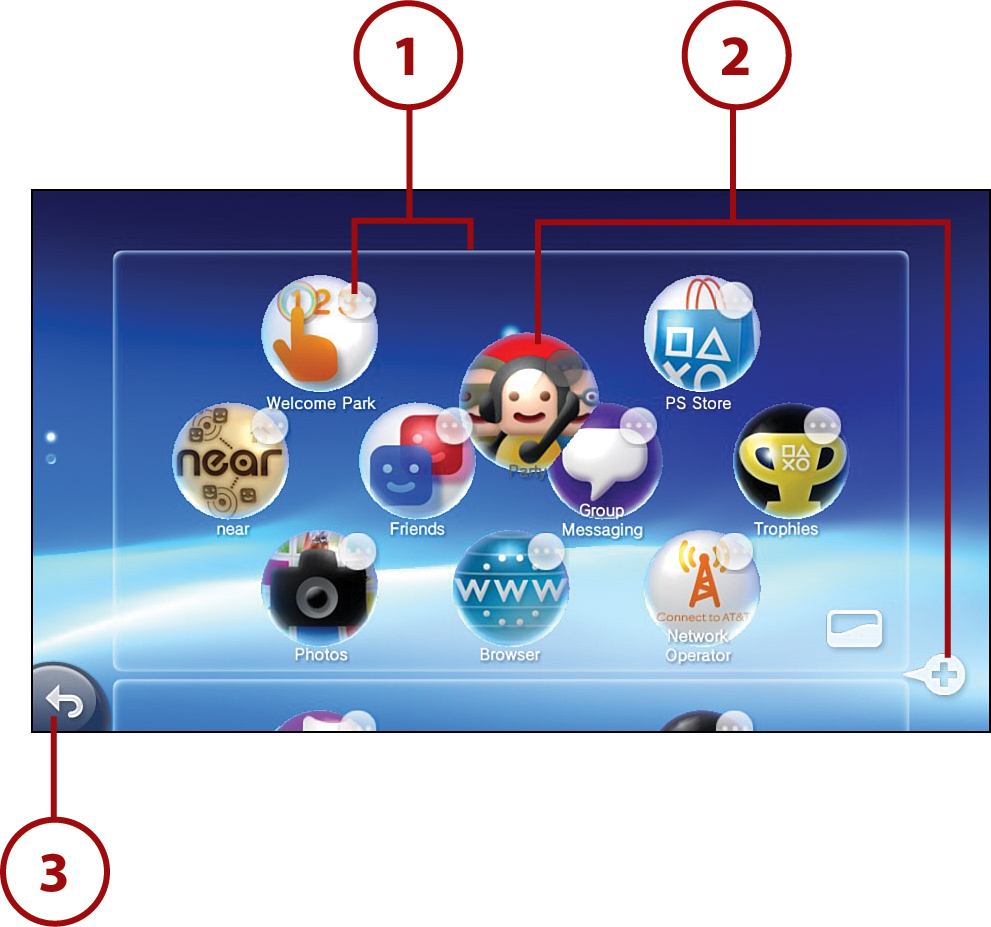
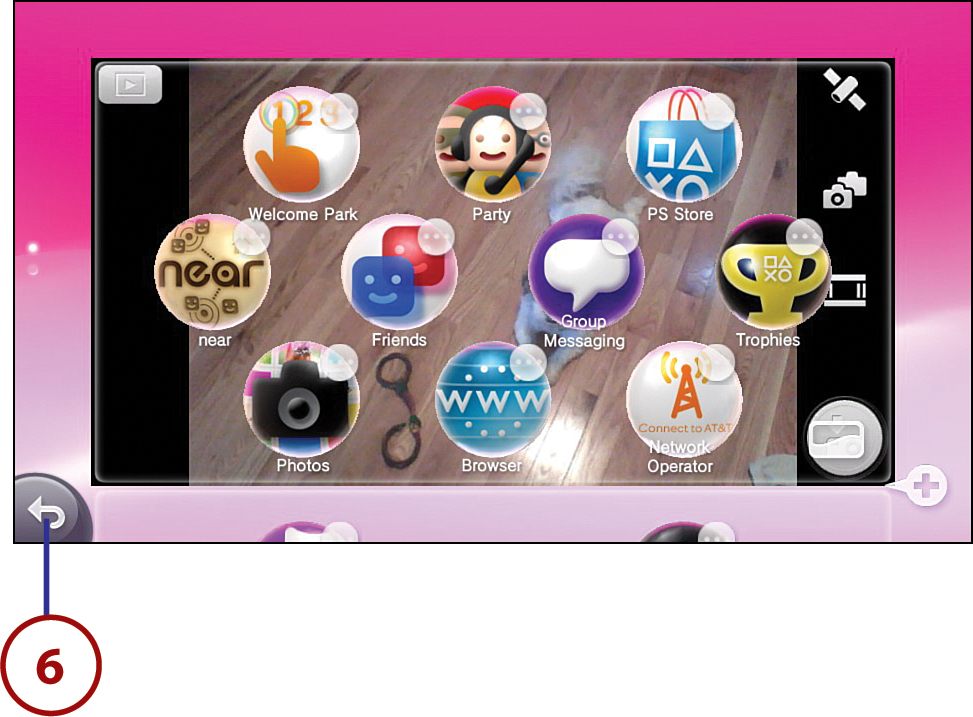
Home Screen
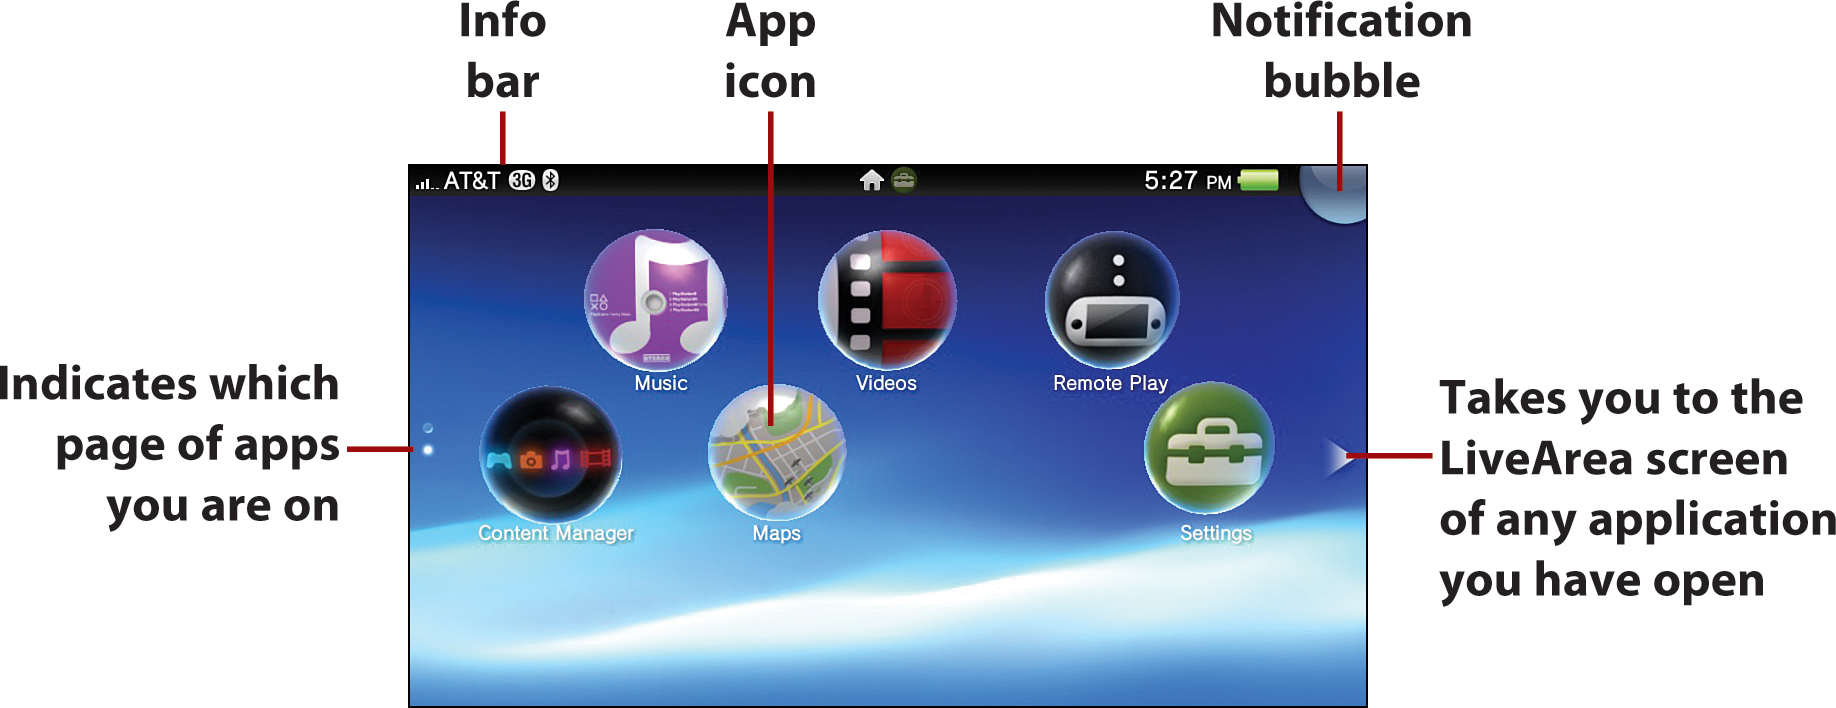
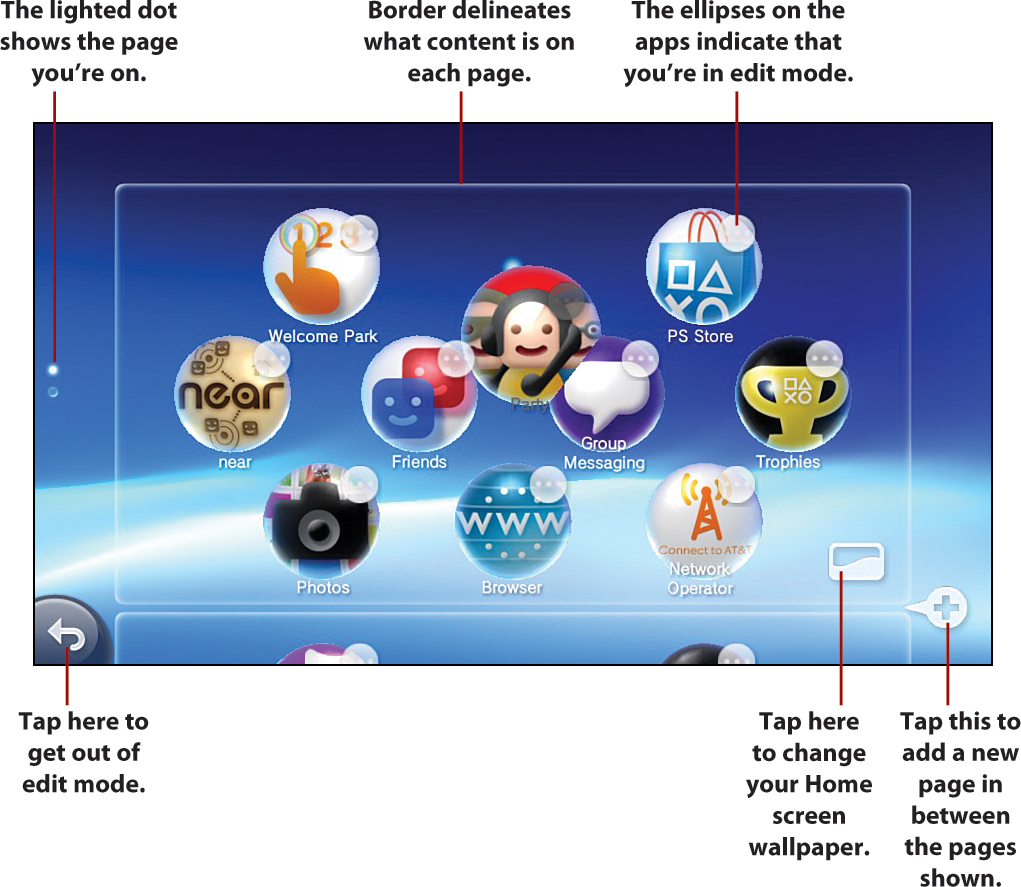
The Home screen houses all the applications on your Vita, which are designated by round icons under which the app’s name appears. You can have up to 10 pages of apps on the Home screen, with each page holding up to 10 app icons. The number of pages you have is indicated by the white dots that appear on the middle left of the screen. The dot for the page currently being viewed is white.
You can use touchscreen gestures or button controls, including the directional pad and left analog stick, to navigate the Home menu; see “Using Touch Controls,” and “Using Physical Controls,” respectively, in Chapter 1. The next sections examine the bundled-in apps that come with your Vita and some of the things you might want to do to customize the Home screen, such as rearranging the apps and changing the background.
When there are notifications, a number appears in the Notification bubble to indicate the number of notifications you have.
Examining Your Vita’s Preinstalled Apps
As of this writing, the Vita has 16 default apps, which come either preinstalled or are automatically installed as part of an update. Although this number is bound to change as the system continues to be developed for and refined, a dramatic change to any of the following core apps is unlikely.
• Welcome Park—This tutorial app uses seven minigames to show you how to properly use the features and functions of your PlayStation Vita. For more details on this app, turn to “Playing in Welcome Park” later in this chapter.
• Party—This social app enables you to text and voice chat with up to seven PlayStation Network friends in real time, even if they are playing a different game. You can also use it to create or join an online multiplayer gaming session, although everyone must have the proposed game to participate. Turn to “Getting to Know the Party App” in Chapter 6, “Exploring Social Apps,” to learn more about this app.

• PS Store—This app serves as a storefront, connecting you directly to the PlayStation Store, where you can browse and download content directly to your Vita. Turn to Chapter 5, “Shopping in the PlayStation Store,” for a comprehensive look at the goodies in store for you, pun intended.

• Near—The Near app provides you with location-based information that enables you to socialize with your PlayStation Network friends, as well as like-minded gamers around you. For example, you can use this app to leave gifts for other gamers to find and use in their games, or to launch a friendly (optional) gaming competition with a Vita-owning gamer in your community. For more on this app, turn to Chapter 4, “Getting Oriented with Near and Maps.”

• Friends—This social app enables you to see all of your PlayStation Network friends, including their party statuses, recent activities, trophy collections, recently played games, and profiles. You can also manage your PlayStation Network friends list. Turn to “Using the Friends App” in Chapter 6 for more information.

• Group Messaging—This chat app enables you to share texts and photos on the PlayStation Network. Although this sounds a bit like the Party app, the Group Messaging app is better thought of as email for the Vita. For more information on this app, turn to “Group Messaging with Friends” in Chapter 6.

• Trophies—This app enables you to browse all the trophies you’ve achieved on your PlayStation 3 and Vita. You can also use this app to compare your trophies with those of people on your friends list as well as those with whom you have a shared play history (people you’ve played Vita games with online). Turn to “Trophies” in Chapter 9, “Gaming on Your Vita,” to discover more.

• Photos—This app gives you direct access to the PlayStation Vita’s front and rear cameras and to the Photo Viewer, which enables you to view and manage the images and videos you take. Turn to Chapter 10, “Snapping Pictures and Video with the Cameras,” for more on the Photos app.

• Browser—This app is your portal to the Web. The Vita has full HTML 5 support, meaning your Vita’s browser supports a wide range of video formats, including almost all popular formats except for Flash. For more on using the Vita’s browser, turn to Chapter 7, “Surfing with the Internet Browser.”

• Network Operator—This app, which only appears on Vitas with 3G support, enables you to activate and adjust your Vita’s 3G data service. For more on networking your Vita and establishing a 3G connection, see “Establishing 3G Connections” in Chapter 3, “Settings and Networking on Your Vita.”
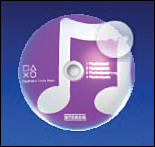
• Music—This app enables you to listen to music on your Vita, including music copied from your PlayStation 3 or a computer. It supports the MP3, MP4, and WAVE formats. For more information on the Music app, turn to Chapter 12, “Tuning in to Music.”
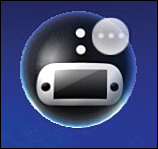
• Remote Play—This remote-access app enables you to operate your PlayStation 3 system using your Vita, even if you are overseas. Turn to “Remote Play with the PlayStation 3” in Chapter 9 for more on this app.
• Content Manager—This app enables you to run a system update and transfer or back up data between your Vita and a PlayStation 3 or a computer, whether a PC or Mac. Turn to Chapter 8, “Managing Media with Content Manager,” for more on the Content Manager app.

• Maps—This app uses Google maps to give you access to walking and driving directions, as well as satellite imagery. For more on the Maps app, turn to “Finding Your Way with the Maps App” in Chapter 4.

• Settings—This app enables you to customize your Vita’s System settings. For example, you can set parental controls for young players or create privacy zones, run system updates, tweak your Vita’s sound and display, and adjust your power save settings. For a comprehensive overview of your Vita’s settings, turn to Chapter 3.

• Videos—This application enables you to watch videos that you buy or rent from the PlayStation Store or that you transfer to your Vita from a PlayStation 3 or a computer. Turn to Chapter 11, “Viewing Video Content,” for more information.
Getting Into Edit Mode
To customize the Home screen, you need to put it in edit mode. This task is so simple that it does not require a step list. All you need to do is place and hold your finger anywhere on the Home screen until the icons shrink and a circle holding an ellipsis appears to the top right of each one. In addition, each menu page is enclosed in a border and a plus sign appears in between each page so that you can add pages.
Moving App and Game Icons
As you start using your Vita and acquiring new apps and games, you’ll need to move their icons around to your desired configuration. Fortunately, it is a simple fingers-on procedure.
1. Put the Home screen into edit mode by holding your finger on the screen. Once the ellipses appear and the page is boxed out, you’re in edit mode.
2. Place and hold your finger on the icon you want to move until the icon enlarges. Now drag the icon to your desired location and raise your finger to deposit it there. If that location is another page, drag the icon to the bottom or top of the screen, depending on if you want to move it further down or up, respectively. If you want to place it on a new page, create that page first by tapping the plus sign where you want that page created.
3. When you are happy with where your icons appear, you can exit edit mode by tapping the arrow at the bottom left of the screen or by pressing the PS Button.
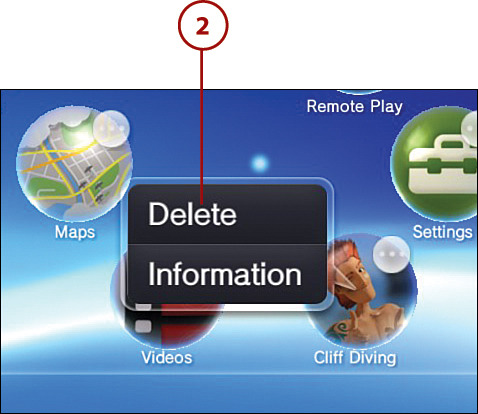
Deleting an App or Game
You can’t delete the apps that come preinstalled on your Vita. You can only delete games and apps that you’ve downloaded; however, after you’ve deleted an app from your Vita, there is no recycle bin to retrieve it from. You have to go back to the PlayStation Store and redownload it to your Vita (see “Redownloading Content” in Chapter 5 for more on this). When you are sure you want to delete an app or game from your Vita, follow these steps:
1. Put the Home screen in edit mode. Tap the ellipsis for the app or game you want to delete.
2. Tap Delete; only apps that can be deleted have this option. (Tapping Information lets you know how much space the app or game takes up.)
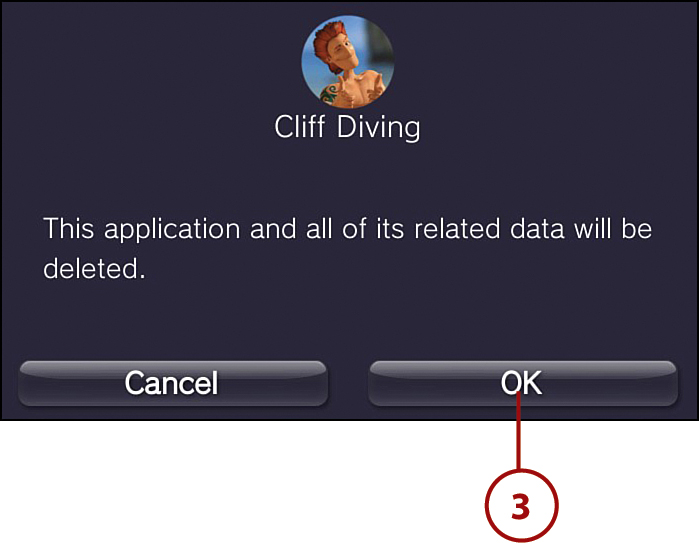
3. Tap OK to proceed, or Cancel if you’ve had a change of heart.
Changing the Home Screen Wallpaper
Although the Vita’s vibrant blue wallpaper is quite appealing, having the ability to customize the background to better suit your tastes is nice. You can opt to simply change the color of the wallpaper, or you can use an image on your system as the background. Keep in mind that every page on your Vita has its own wallpaper and each page’s wallpaper has to be set individually. Although this task might seem cumbersome, at least no scrapers or slimy solvents are required.
1. Put the Home screen in edit mode.
2. Tap the Background Settings icon for the page you want to change.
3. Choose one of the available colors for your background. After you make your selection, a check mark appears on it. If you prefer to use an image stored on your Vita instead, proceed to step 4. Otherwise, proceed to step 5.
4. Tap the first block, which contains a camera icon, and then tap to get to the album and photo you want to use. After you tap a photo, Vita shows you how it looks. If you don’t like what you see, select the Background Settings icon and make a new selection. Once you are happy with your image selection, proceed to step 6.
5. Tap the X on the top left of the screen to exit.
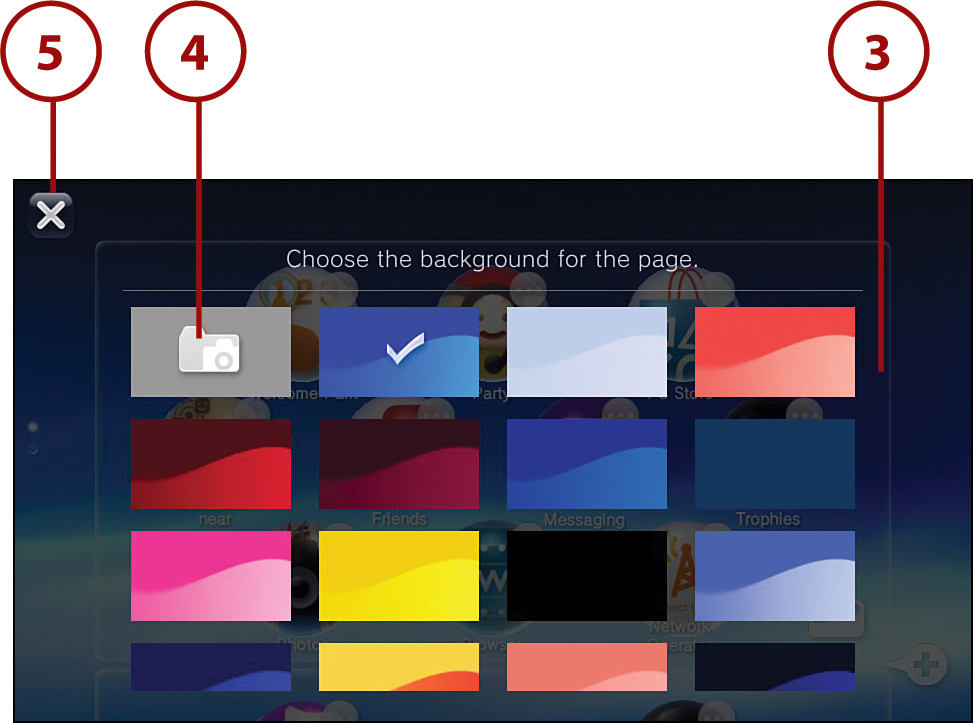
6. Tap the arrow at the bottom left of the screen or press the PS Button to get out of edit mode.
Obtaining Vita Wallpaper Online
Many websites have free wallpaper that you can download to your Vita. Follow these steps to download wallpaper directly to your Vita from an online source.
1. Tap the Browser icon on the Home screen and enter the URL for the website that has the wallpaper. If you are not sure how to use the browser, turn to Chapter 7, “Surfing with the Internet Browser,” for guidance.
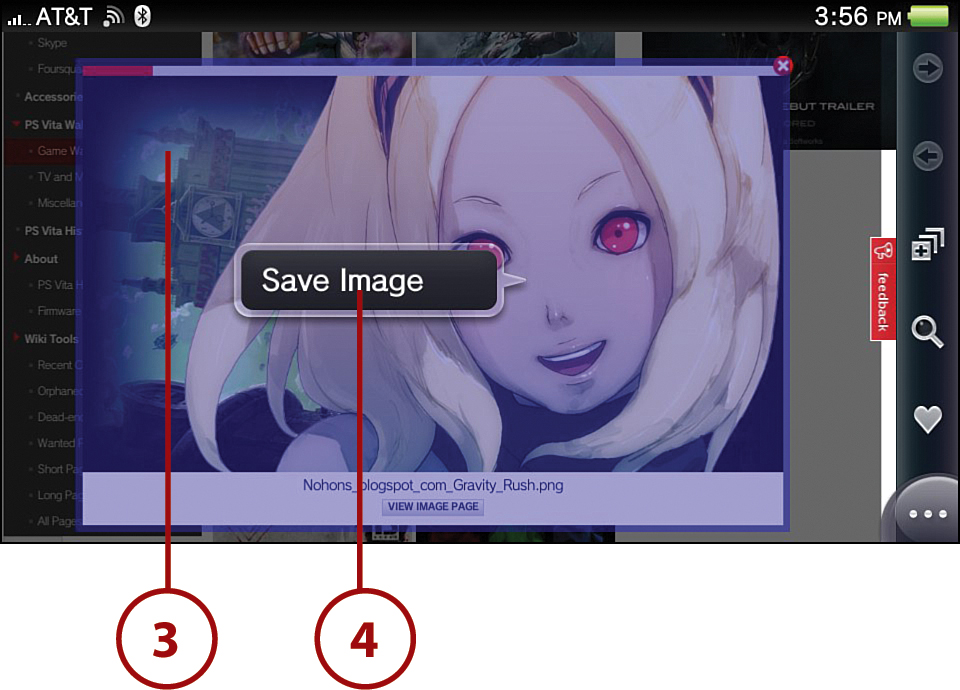
One reputable site to check out is http://www.ign.com/wikis/ps-vita/PS_Vita_Wallpapers, which features various wallpapers grouped under TV and Movies, Games, and Miscellaneous (features cars, logos, art, and more) categories. This is the online source we used.
2. On the website, tap (do not hold) the image that you want to save to your Photos; it might take a few seconds to load.
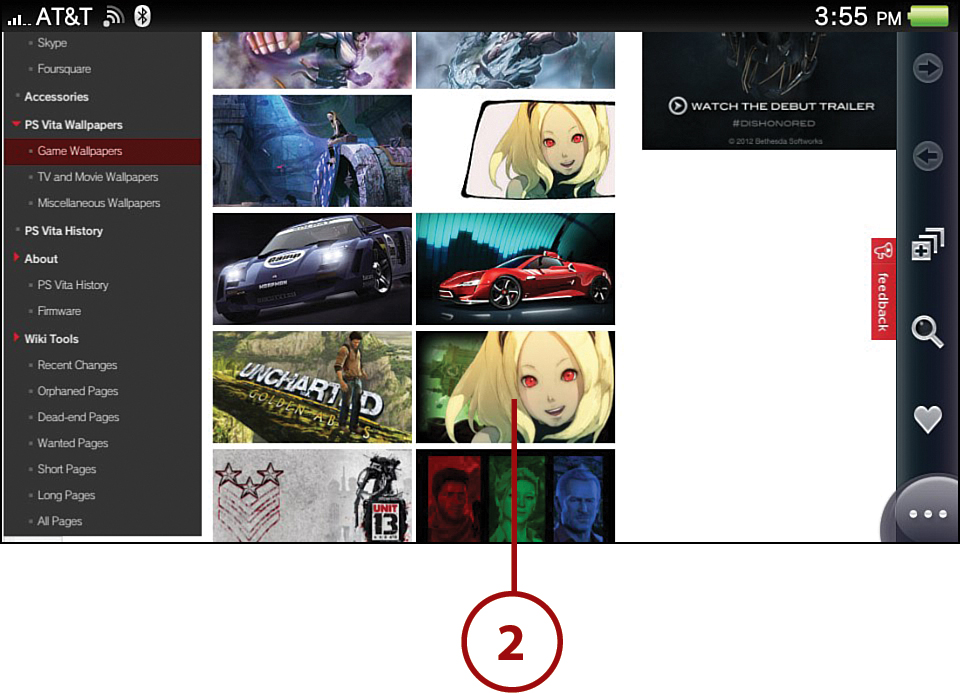
3. When the full-sized image appears onscreen, tap and hold your finger on the image to open a Save Image bubble.
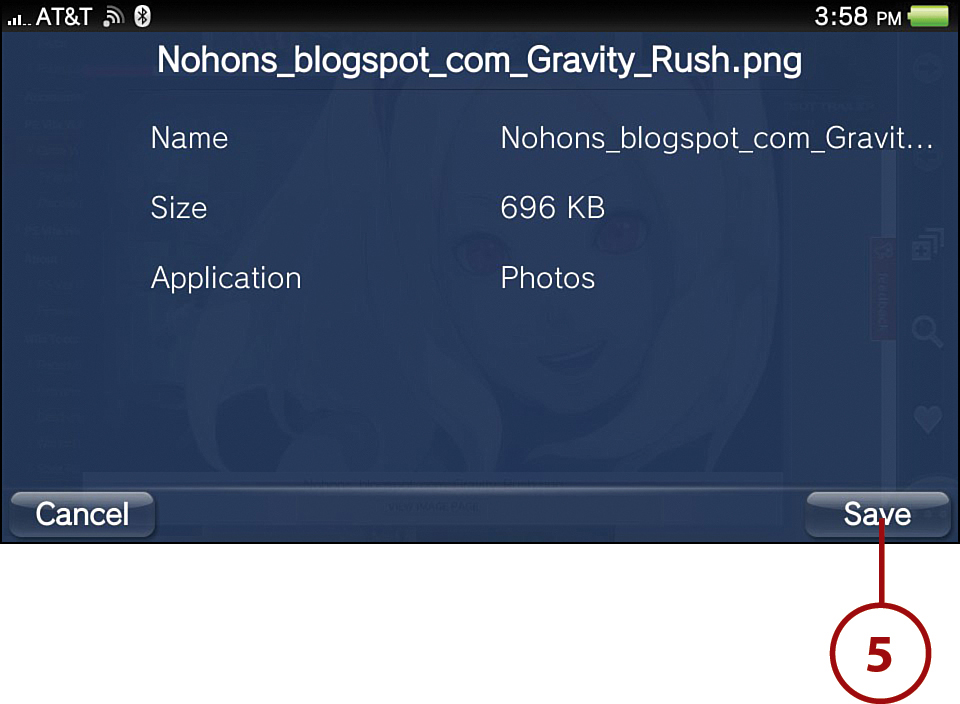
4. Tap the Save Image bubble. You see a screen with information about the image, including its name, size, and application.
5. Tap Save to proceed, or tap Cancel if you don’t want to save it after all. Tapping Save puts the image in your Photos folder so you can use it as wallpaper on your Unlock screen or on the Home screen.
LiveArea Screen
When you tap an app or game icon from the Home screen, you enter the app’s or game’s LiveArea screen, respectively. This screen provides information and features related to the application you launched. Although the LiveArea’s content and appearance varies between applications, some key features are shared, which are outlined shortly. For more details regarding the LiveArea screen for a specific preinstalled app, turn to the section noted for that app in “Examining Your Vita’s Preinstalled Apps” earlier in this chapter.
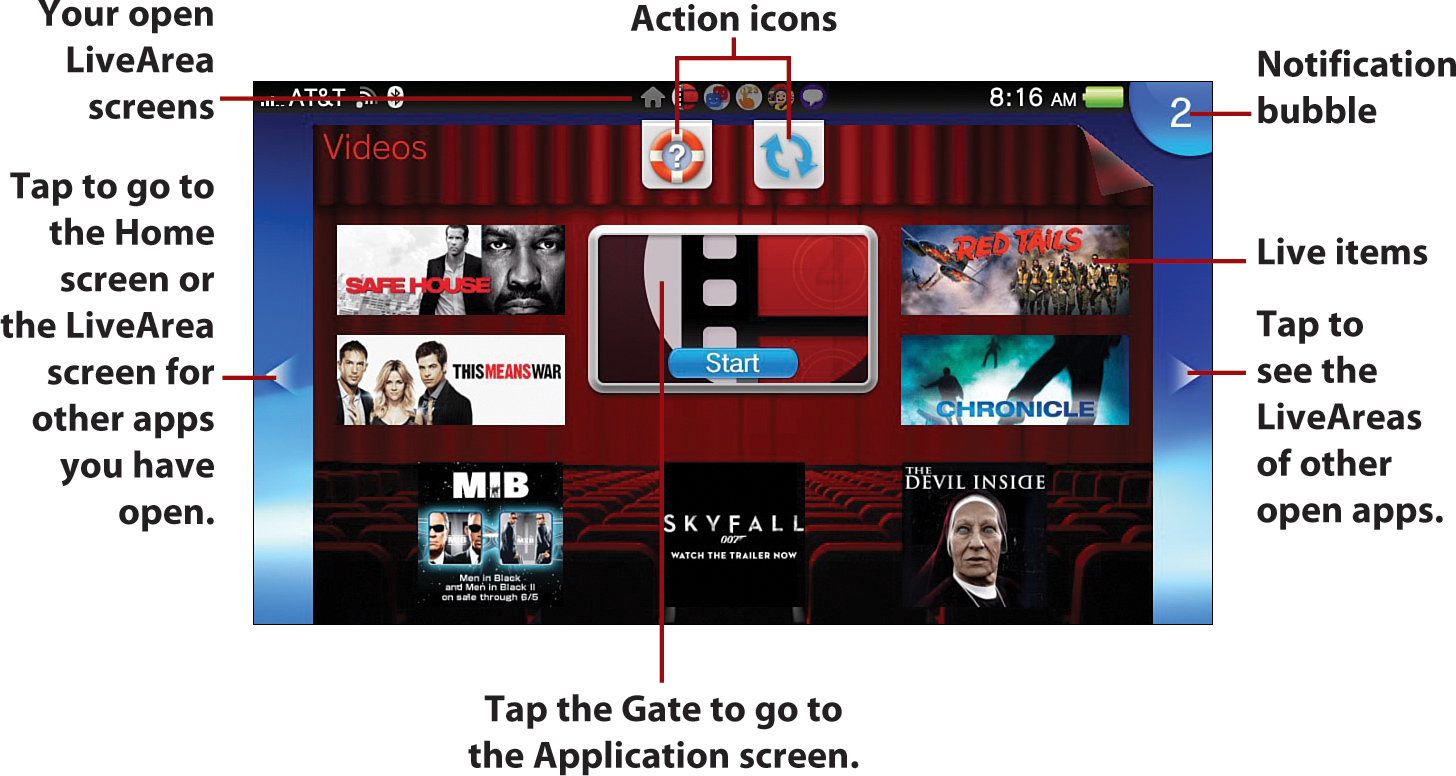
The LiveArea screen might include Action icons and Live items, but it always has a Gate. As you can surmise, an Action icon is one that enables you to perform a function in an application. The Action icons are consistent across LiveArea screens, but not all Action icons may be used in an app, and some, such as the Welcome Park LiveArea, might have no Action icons. A Gate, which appears boxed out, is your portal to launch an application; all you need to do is tap it. The Live items generally surround the Gate and display information related to or found in the application.
Keep Abreast of Vita Happenings
Tap the Notification bubble to see updates on actions that have occurred, such as data updates and arrival of new messages.
Your Vita’s Action icons are as follows:
• Update—Tapping this icon updates the application you are in. This icon only appears when an update is available for download.

• Internet Search—Tapping this icon opens your Vita’s browser, displaying the keyword search screen.

• Redeem Codes—Tapping this icon enables you to enter a code to redeem a purchase from the PlayStation Store.
• User’s Guide—Tapping this icon pulls up the Vita’s user guide.
• Software Manual—Tapping this icon pulls up the user guide for the application you are in.
• Refresh LiveArea Screen—Tapping this icon refreshes the content displayed on the LiveArea screen.
• Import Saved Data—Tapping this icon imports saved data. Only games that support this feature display this icon.
You can have multiple LiveArea screens open simultaneously. To navigate between each of these screens and the Home screen, flick the screen left and right, tap on the left and right arrows, or press left and right on the directional pad or left analog stick. If you press the PS button while in a LiveArea screen, you are brought to the Index screen, which is discussed later in this chapter in the “Index Screen” section. To close a LiveArea screen, simply peel it off the screen.
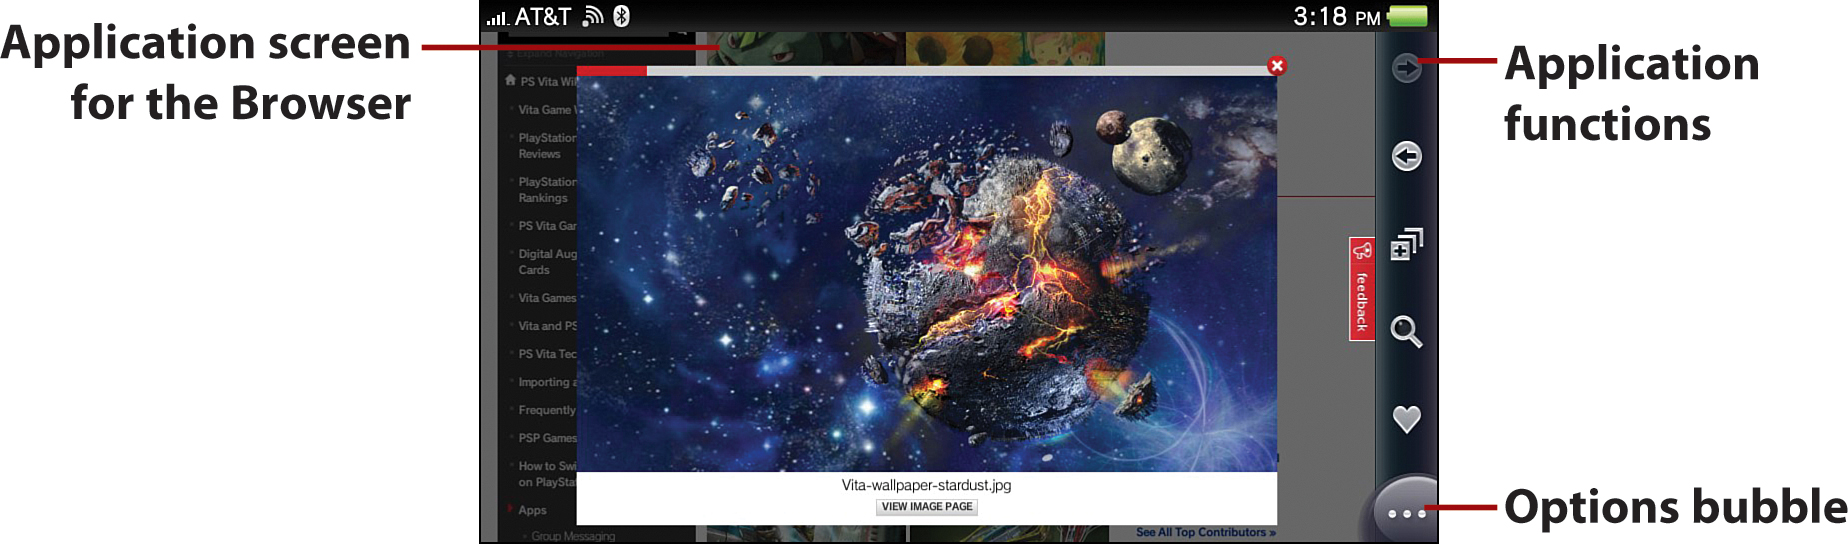
Application Screen
The Application screen is the screen you enter after you pass through an application’s or game’s LiveArea screen. Not all applications or games have an Application screen, but each that does has its own unique interface, from which you can perform various actions; thus, like LiveArea screens, these screens differ. However, there is generally one distinguishing element to look for on an Application screen: the Options bubble. The Options bubble appears as an ellipsis in a semicircle at the lower-right corner of the screen and yields a context-sensitive menu of potential actions when tapped, such as Delete, Copy, or Add Bookmark.
Info Bar
The Info bar serves as your Vita’s dashboard, providing information about your network connections, signal strength, active applications, audio output, and remaining battery charge via various icons. It also features a digital clock and a Notification bubble.
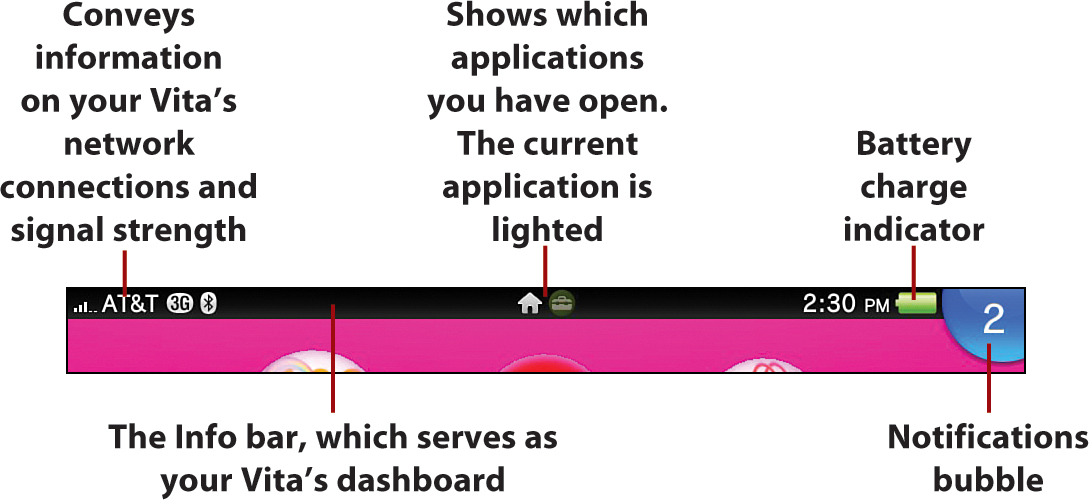
• Mobile Signal Strength icon—If you have a 3G/Wi-Fi Vita, this icon shows your mobile network’s signal strength by displaying icons that contain one to five bars, with one bar being a poor signal and five bars being the best signal. If your Vita receives no signal, it notes the words “No Signal,” whereas if connectivity is limited, an X appears over the five-bar signal strength icon. If your Vita overheats, the temporary suspension icon appears, which looks like a red X. During this time, you are prevented from using your Vita’s mobile network until a regular mobile strength signal icon reappears, indicating your Vita has sufficiently cooled down.
• R icon—This icon indicates that your Vita is roaming, meaning you are using your Vita’s mobile network outside of your carrier’s coverage area. In such cases, you might incur roaming charges. This issue is only a concern on 3G/Wi-Fi Vita models.
• Data Transmission Mode icons—The 3G/Wi-Fi Vita models have five modes of data transmission, which are indicated as follows:
• 3G icon—You are using a 3G network.
• H icon—You are using an enhanced or souped-up 3G network that is supposed to provide higher data transfer speeds and capacity (the H stands for high-speed downlink packet access, also known by its acronym of HSDPA, and is sometimes referred to as 3.5G).
• 2G icon—You are using a 2G network, which is an older, more inefficient network that is likely to be retired in the not-so-distant future.
• E icon—You are using the EDGE network, which stands for Enhanced Data rates for Global Evolution and is also sometimes referred to as 2.5G, as this represents an advancement in data transmission over 2G, but is not as sophisticated as 3G.
• G icon—You are using a packet-oriented mobile data service that works on both 2G and 3G networks but might have variable quality (the G stands for general packet radio service, which is also known by the acronym of GPRS).
• Wi-Fi Signal Strength icon—This icon, which looks like sound waves emanating from a fixed point, has four waves. The more waves that are highlighted, the better the signal.
• A icon—You are in ad hoc mode, meaning you are privately connected over Wi-Fi locally with other nearby Vita systems. This is typically used to enable multiplayer gaming when other Vita owners are in close proximity and have the same game.
• Bluetooth icon—Appears when you use a Bluetooth-enabled device (such as a headset) with your Vita.
• Network Activity Indicator icon—This icon, which looks like a circle composed of little circles, appears when you are transmitting or receiving data over a Wi-Fi or mobile network.
• Flight Mode icon—This icon, which shows an airplane, indicates you are in flight mode, which disables your Vita’s signal transmitting functions. While in this mode, no other communication status icons appear, as you are not able to partake in any activities that require Wi-Fi or a mobile network.
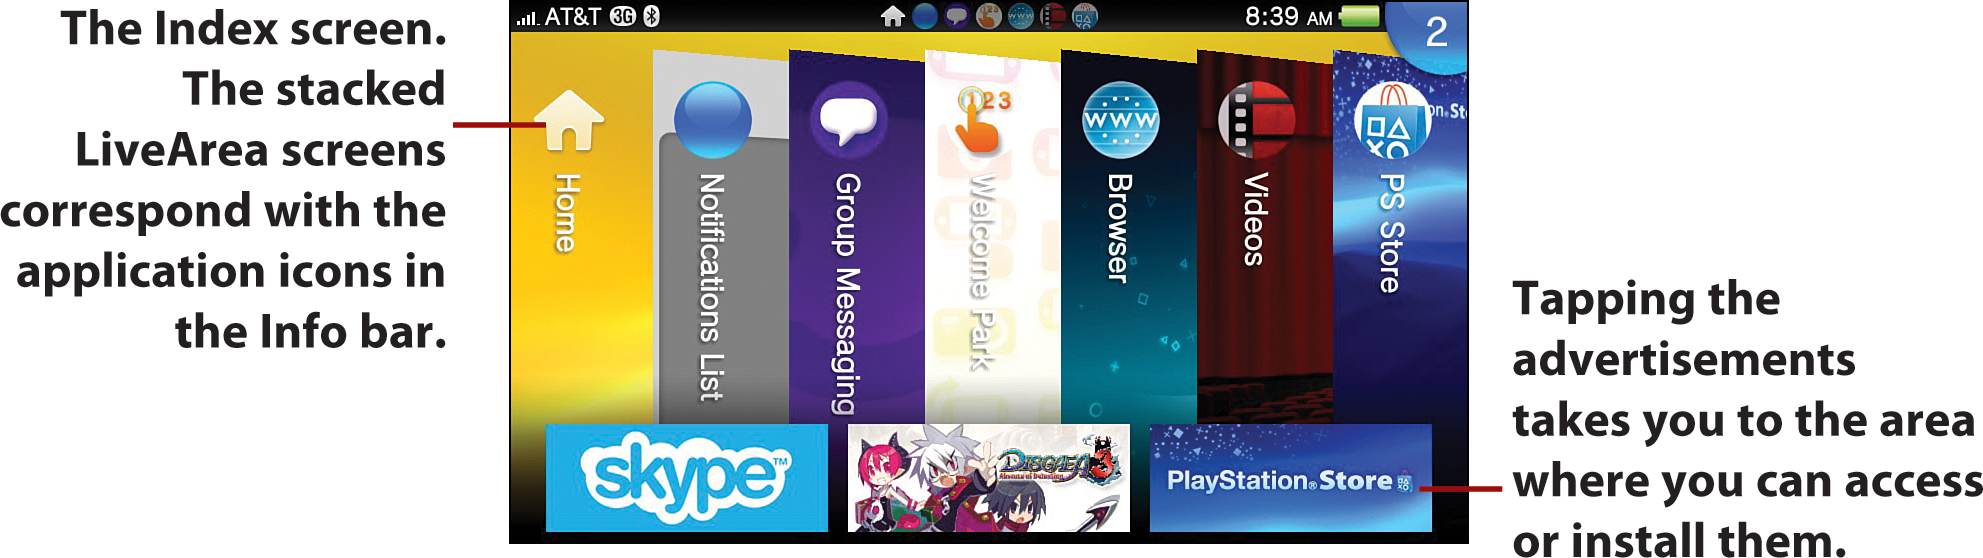
Index Screen
The Index screen serves as a catalog of your open LiveArea screens. The listings here correspond with the application icons featured in the middle of the Info bar. Whereas the icons in the Info bar are merely a point of reference, the Index screen serves as your portal to the LiveAreas of any of the applications you have open. Simply tap the blade for the application you want to access and you’ll be in it faster than you can say “Green grass through a goose.”
To pull up the Index screen, press the PS button while you are on the Home screen. Press the PS button again if you want to exit the Index screen.
Playing in Welcome Park
If you are wondering why we included discussion on Welcome Park in a chapter on the Vita screens, it is because this application provides a great tutorial on interacting with your Vita and its screens, and it’s fun to boot (another pun intended).
To get started, tap the Welcome Park icon on the Home screen, and at the LiveArea screen, tap the Start box. You now see five icons swirling about. Each of these represents a minigame intended to teach you some aspect of your Vita’s touch operations, sensing orientation, and motion controls. Your Vita has you play through the minigames in Welcome Park in a particular order, with the icon for the recommended minigame appearing in the center of the globe as you move through each one.
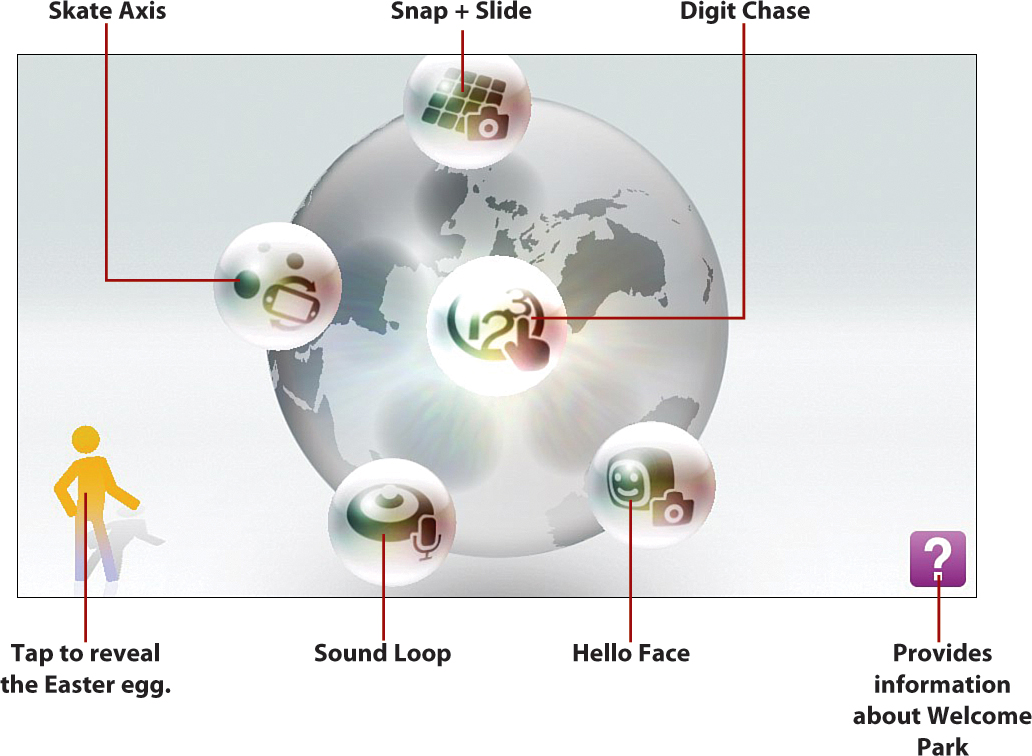
An Easter egg is a hidden treasure or function in a game. If you tap the stick man in Welcome Park, he jumps up and pulls down a hidden bubble that contains the video that plays when you turn on your Vita for the first time.
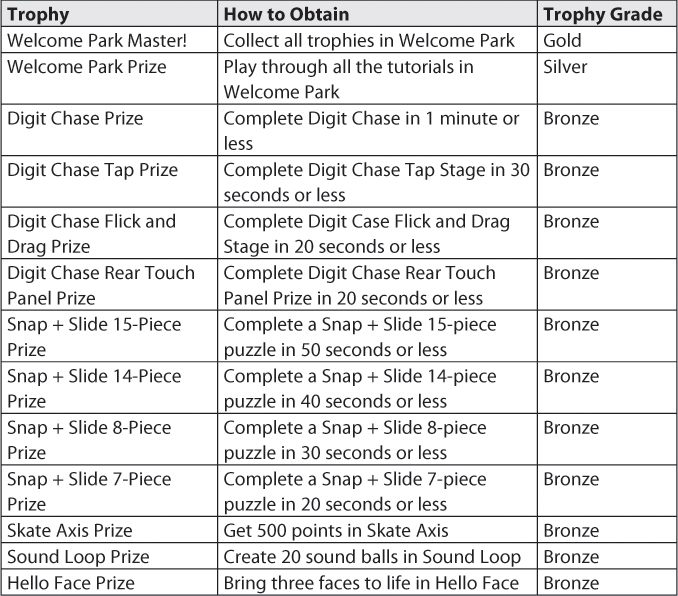
You can earn 13 trophies in Welcome Park (see Table 2.1), which makes it not only an instructive app, but an addictive one. You can see the trophies you earn in the Trophies app, which is discussed in the “Trophies” section in Chapter 9.
Table 2.1. Welcome Park Trophies
The descriptions of the minigames that follow appear in the order your Vita wants you to play them the first time. Your Vita also provides descriptions of each game before you launch it.
Digit Chase
Digit Chase is a touch-based tutorial in which you try various ways of using touch to make the numbers displayed onscreen disappear in the correct order. The three stages to this game are Digit Chase Tap, Digit Chase Flick and Drag, and Digit Chase Rear Touch Panel. What follows is a brief summary of each of these.
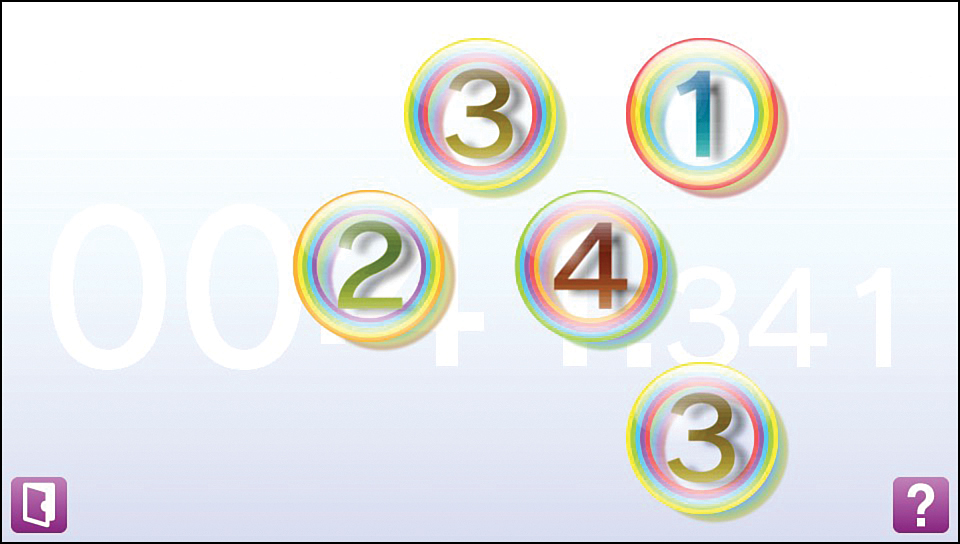
• Digit Chase Tap—In this minigame, number buttons appear onscreen, and your objective is to tap these in numerical order. As the game progresses, duplicate numbers appear, which need to be tapped simultaneously, and there are stacked numbers, requiring double taps. The target time to get through this stage is 30 seconds.
To gain the speed needed to get through this minigame in the target time or less, place your Vita down on a stable surface so that you can enlist multiple digits to tap away at the numbers onscreen.
• Digit Chase Flick and Drag—This minigame features a reel that has colored pages sitting on it, numbered 1 to 10 in random order. The objective is to use the flicking motion to spin the wheel to bring each number to the forefront in consecutive order and then peel the numbered page off the screen. The target time is 20 seconds.
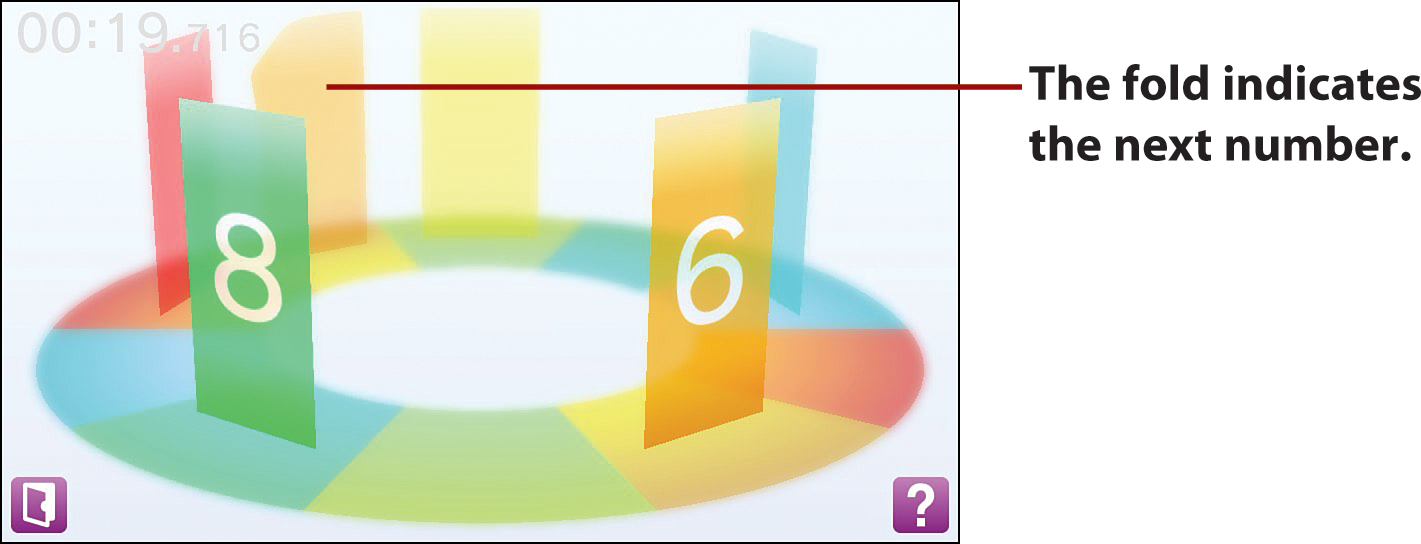
After you flick a number off the reel, the page containing the next consecutive number folds at the top right. Looking for the fold, rather than at the numbers themselves, saves considerable time.
• Digit Chase Rear Touch Panel—This minigame makes use of your Vita’s rear touch panel. A blue portal and red portal appear at the bottom left and right of the screen, respectively, above which number buttons appear. The objective is to have each portal send out an orb to eliminate the numbers appearing above it, but the numbers are only eliminated if hit by the orb in numerical order. The target time is 20 seconds.
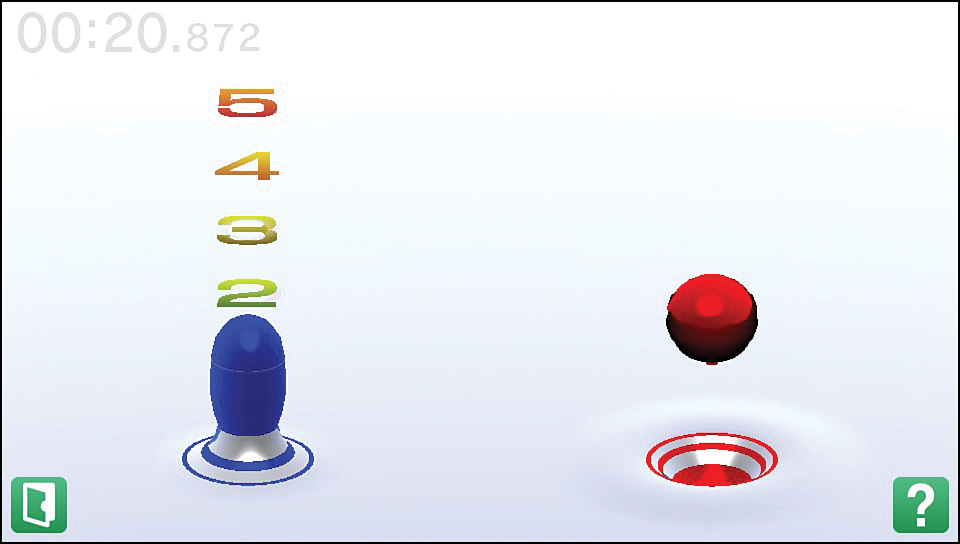
You can get through this stage more efficiently if you use two fingers to rapidly tap the rear touch panel to send out orbs, sort of like the button mashing that occurs in some games.
Snap + Slide
The objective of the Snap + Slide puzzle-based minigame is to put the picture pieces back in the correct order. It is meant to serve as a tutorial on your Vita’s camera and the dragging gesture.
You are first instructed to take a picture of something around you. When you do, be sure to line up your picture carefully in the boxes shown, because each of the squares in the grid becomes a puzzle piece. Thereafter, you pick how many puzzle pieces you want made out of your picture. The options are 7 (target time, 20 seconds), 8 (target time, 30 seconds), 14 (target time, 40 seconds), and 15 (target time, 50 seconds) pieces. After you make your selection and your puzzle is created, you have to slide the pieces back together in the correct order, with a goal of reaching or beating the appropriated target time. When the correct pieces are brought together, you hear a snap sound.
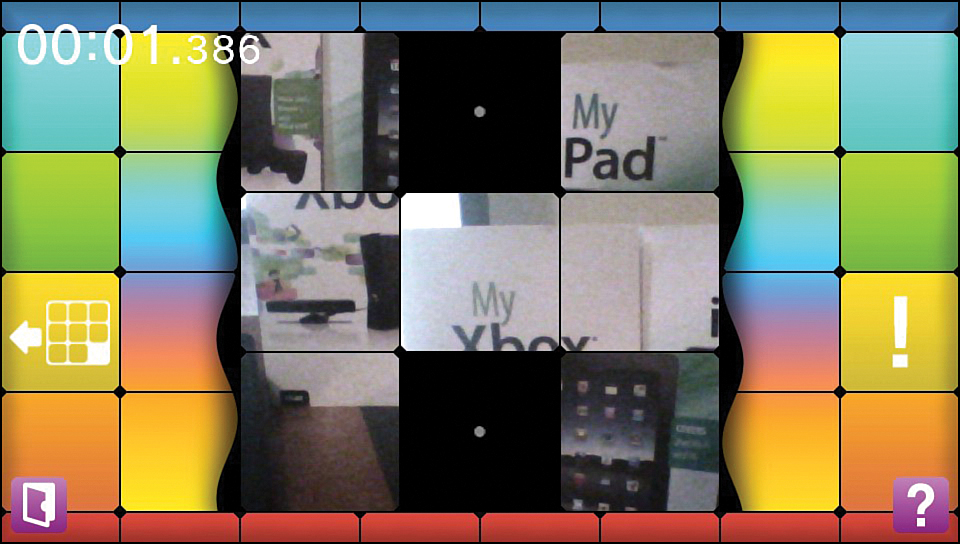
Mastering the Snap + Slide can be difficult if you take a picture that does not create very distinguishable pieces, such as a picture of a field of grass or marbles in a jar. One person who posted online suggested taking a picture of a number grid, with each number occupying one of the squares on the virtual grid that appears on your Vita. With this strategy, you are sure to know exactly where each piece goes, saving valuable time.
Skate Axis
Skate Axis helps you get a handle on your Vita’s motion controls. In this minigame, you tilt your Vita left and right to move your skater around onscreen to dodge incoming balls; the more extreme the tilt, the faster your skater moves. You also collect stars to increase your score by moving your Vita away from you. Every ball you dodge earns you 10 points. Each golden star you capture earns you 20 points, whereas each silver star earns you 10 points. The target score is 500. As you advance, an increasing number of balls are tossed your way simultaneously.
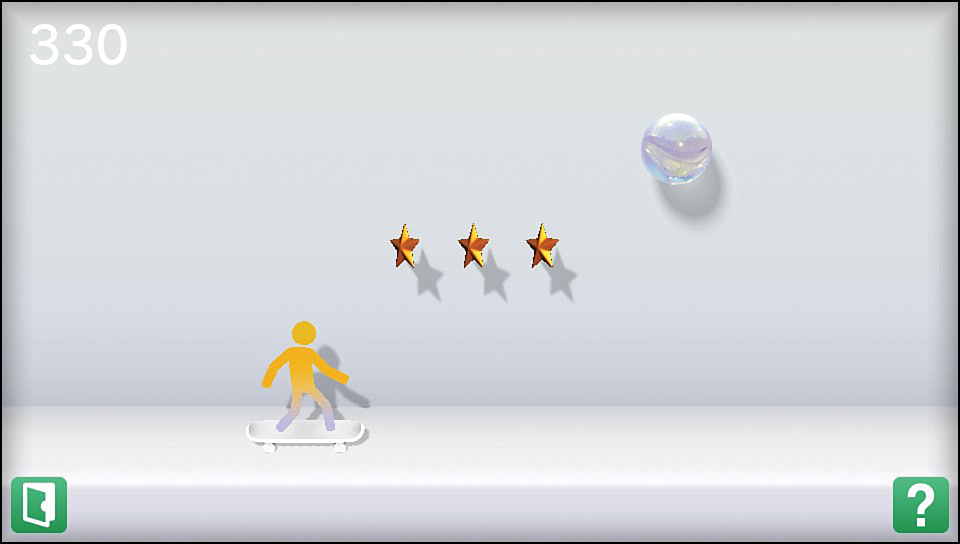
This minigame’s target score of 500 is easy to achieve if you pay close attention to the balls. One way to get the best perspective on where the balls will hit the ground is to have your skater stay to the left of the screen before the first ball bounces and then return to that position after clearing subsequent balls.
Sound Loop
As you no doubt surmise, the Sound Loop minigame familiarizes you with your Vita’s microphone. The objective is to record 20 different sounds. Place your finger anywhere on your Vita’s screen to start your recording, and keep your finger put for 20 seconds as an increasing number of balls appear onscreen. You can let your Vita pick up and record sounds from your environment or record your own specific sounds. After you’ve recorded 20 sounds, you receive the Sound Loop Prize.
Hello Face
Hello Face serves as a tutorial of your Vita’s camera. The objective is to take pictures of various objects in your environment that look like faces; pictures of real faces do not work well. Make sure when you take the picture that the eyes and mouth of your face appear in the designated box. After you successfully capture three items that your Vita can turn into an animated face, you earn the Hello Face Prize.
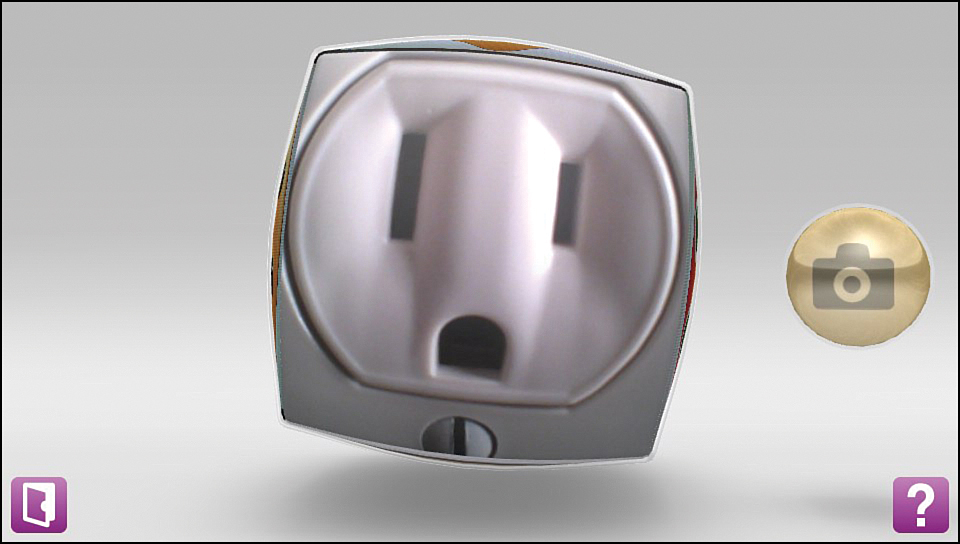
An easy way to fill your three-face quota is to snap a picture of an electrical outlet three times. You can also draw a simple happy face on a piece of paper and photograph that, or type “Happy Faces” into Google Images and then snap a picture of any of the images that appear. After you create your faces, be sure to visit them on occasion. Depending on when you visit, they’ll have different things to tell you.