6. Exploring Social Apps
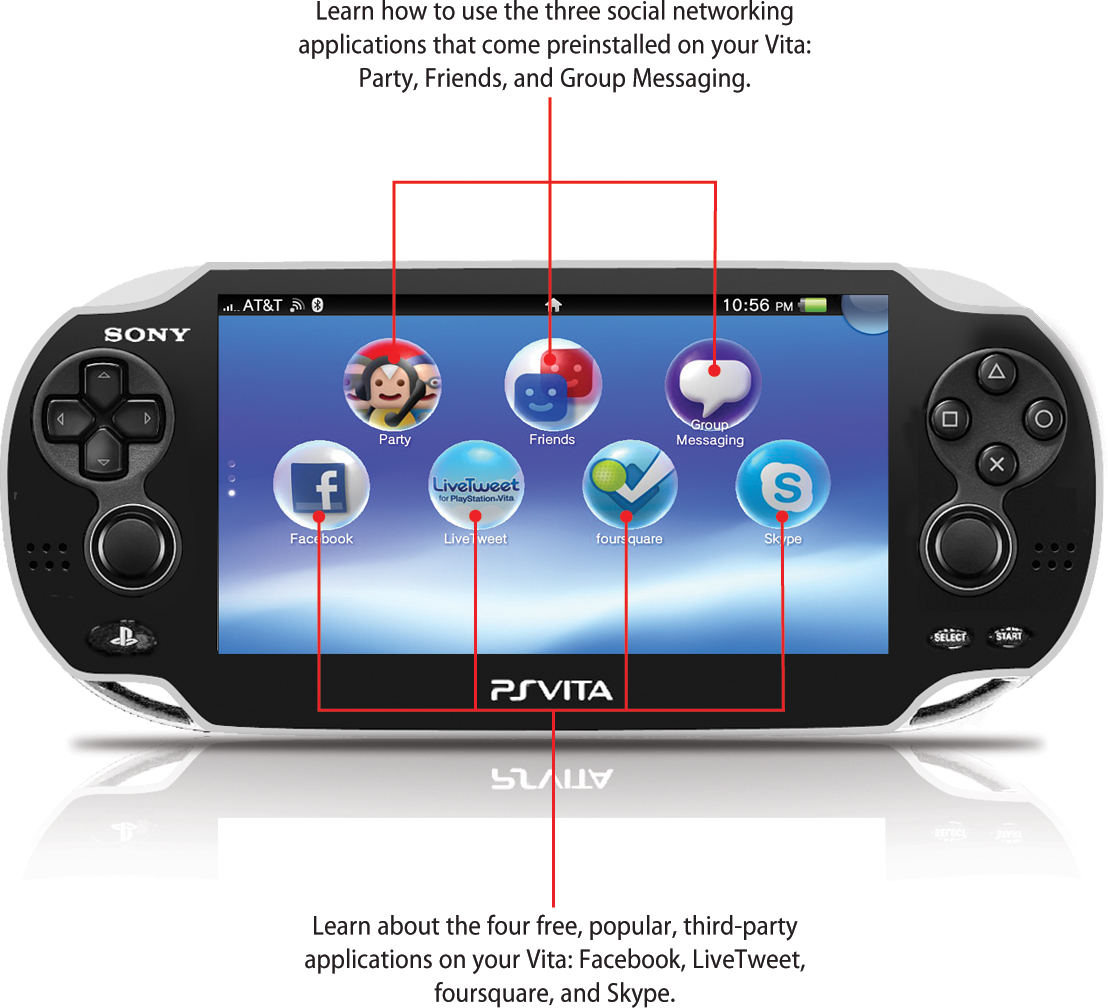
In this chapter, you learn all about the myriad social media applications available on the Vita, including built-in apps such as Group Messaging, and third-party apps such as Facebook and foursquare.
• Getting to Know the Party App
• Group Messaging with Friends
• Connecting and Sharing with Facebook
• Sharing and Discovering with Twitter
You’ve no doubt heard of “six degrees of separation,” a concept that emerged in the 1960s that any two people on the planet are separated on average by no more than six intermediate connections. In 1994, a popular variation called “Six Degrees of Kevin Bacon” emerged, linking the hard-working actor to most other Hollywood actors and actresses. Now, in the 2010s, social media is connecting everyone in the world more than ever before. Recent research using Facebook data indicate that people are currently, on average, just 4.74 connections apart. If you factor in the multitude of other social apps people use, including those available on your Vita, this number is likely considerably lower. This chapter explores some of the numerous ways you can get social on your Vita, both by enhancing connectivity with individuals you have already befriended and by forging new connections.
Getting to Know the Party App
As you might have guessed, the Party app serves as your gateway to creating and joining parties on your Vita. Although no food or libations are served at these parties, you can get a virtual coffee klatch going via voice and text chat with other Vita owners and join in games with them. Of course, there are a few prerequisites before you can join or launch a party:
• You must be signed up for the PlayStation Network on your Vita.
• You and your attendees must have a Vita, because this app does not interface with the PlayStation 3.
• If you are invited to join a game or invite someone else to join in a game, participation in the game can only occur if everyone owns the game.
Party LiveArea and Party and Application Screens
Take a quick look at the Party app’s main screens—LiveArea and Application—before getting started with launching and joining parties.
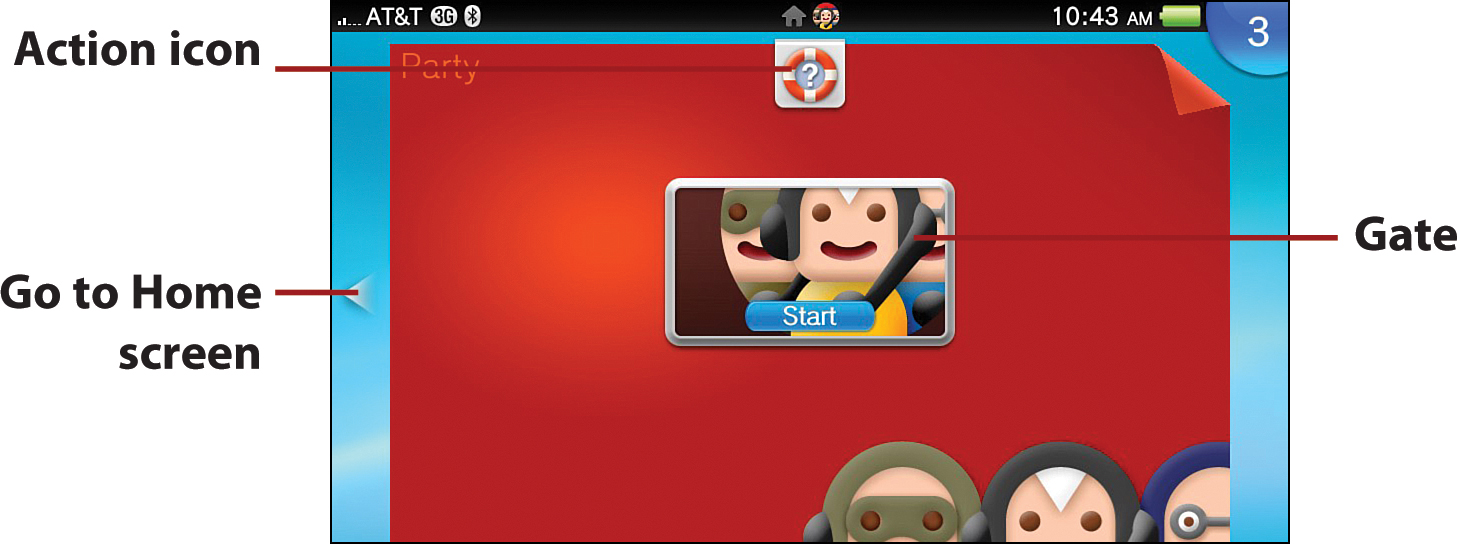
After you tap or select the Party icon from the Home screen, you see the Party LiveArea screen, which is rather barebones compared with some other LiveAreas. You have the Action icon, which directs you to the Party app section of the PlayStation Vita User’s Guide, and the Gate, through which you get into the app.
Upon passing through the Gate, you might encounter one of two screens: a Party screen or the Application screen. From the Party screen, you can easily get a party started by tapping the Create Party button. If you want to get to the Application screen, tap the X on the top-left corner of the screen.
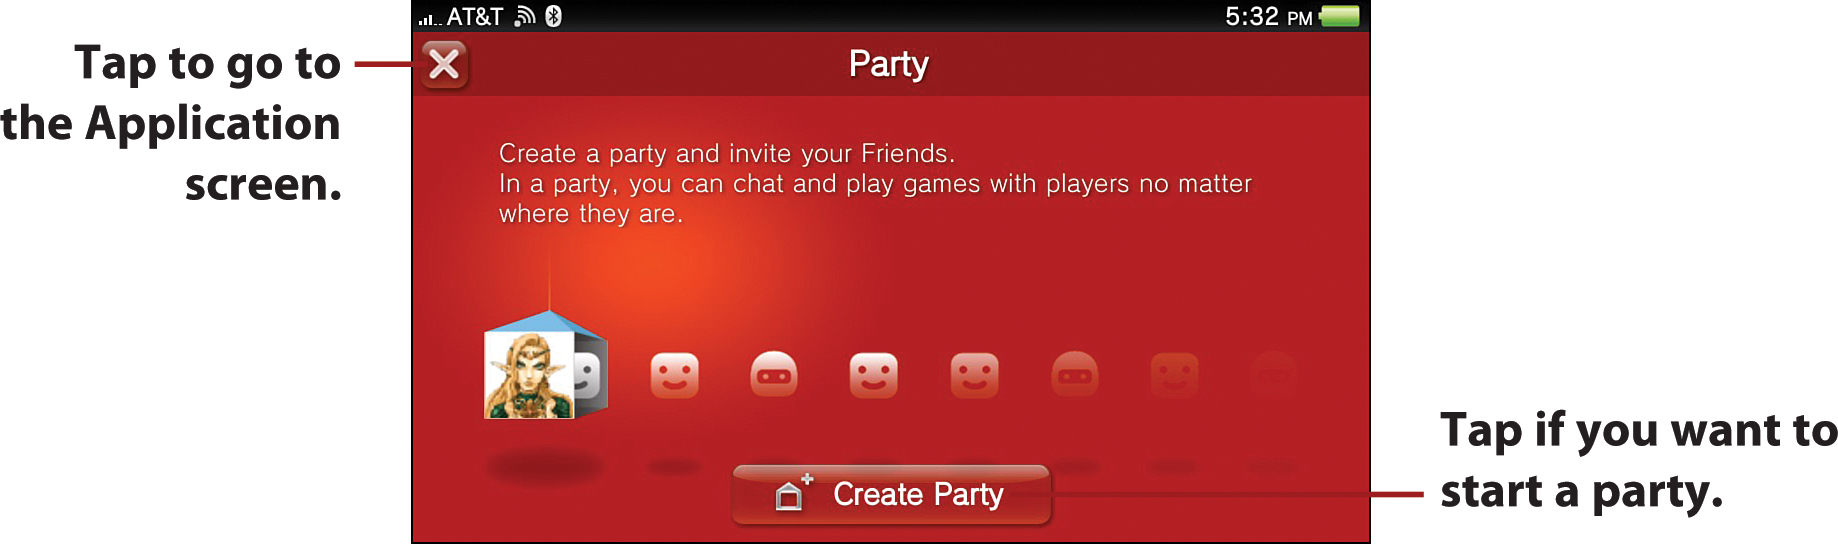
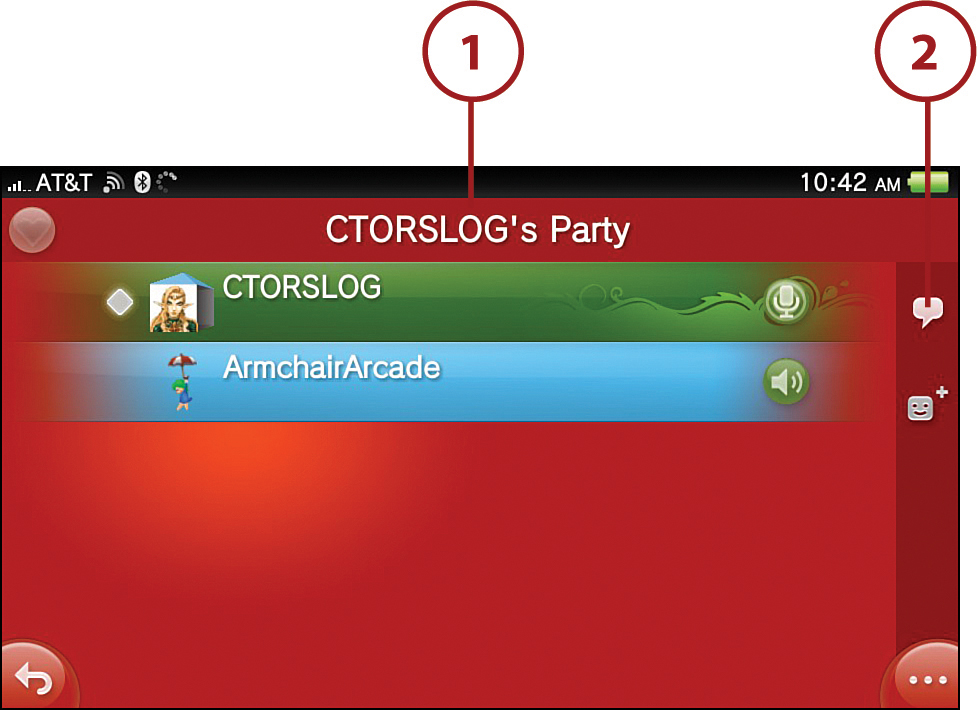
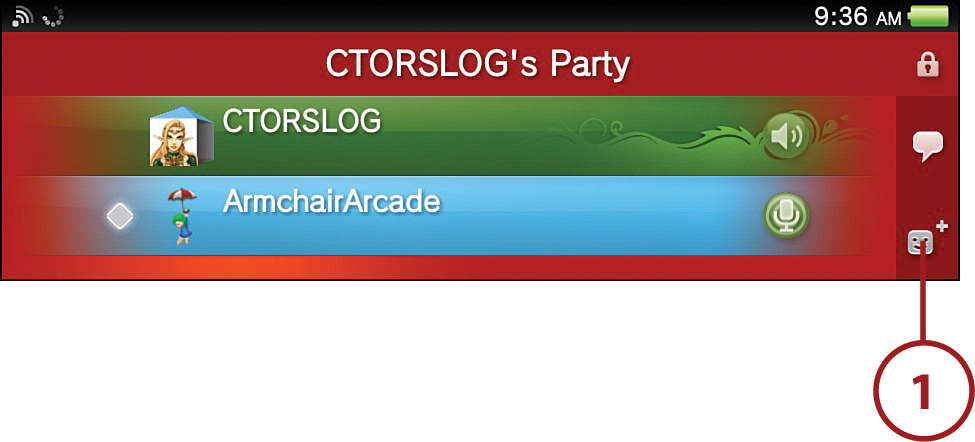
From the Application screen, all the main functions of the Party app become available, including the ability to launch and join parties. The figure shows a party in progress. When you are not in any parties, there are no party banners to break up the sea of red on the Application screen, and there is also no Return to Party icon. All the available onscreen features of the Party application are as follows:
• Friends icon—Tap this icon to view a list of friends who have joined your party.
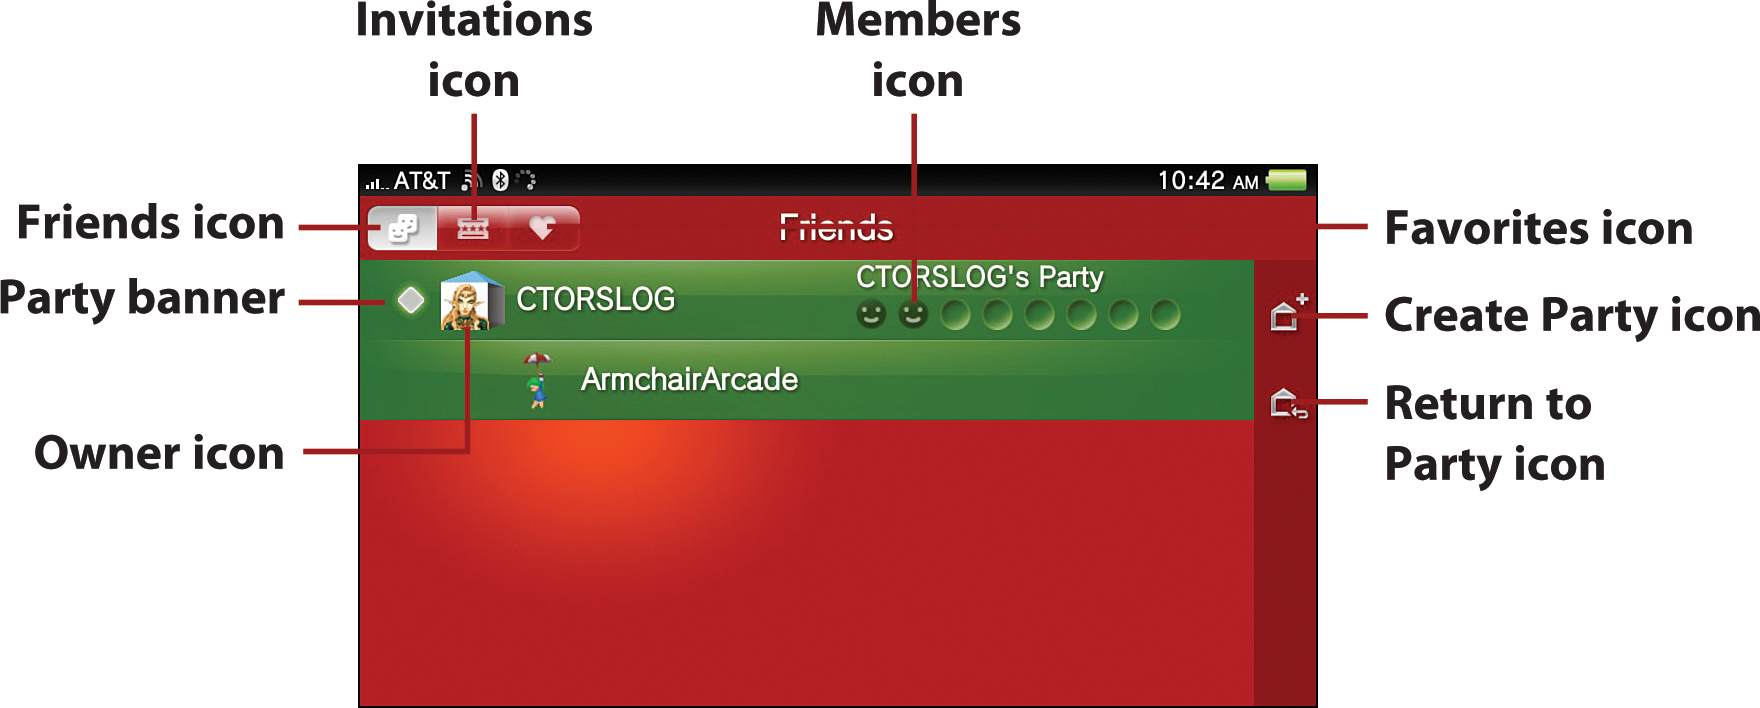
• Invitations icon—Tap this icon to view a list of parties to which you are invited.
• Favorites icon—Tap this icon to view a list showing the history of parties you’ve attended, including your favorite parties. The list shows up to 20 total parties and up to 10 favorite parties.
• Create Party icon—Tap this icon to create a new party.
• Return to Party icon—Tap this icon to return to the party in which you are currently a member. This option only appears when you are currently a member of a party.
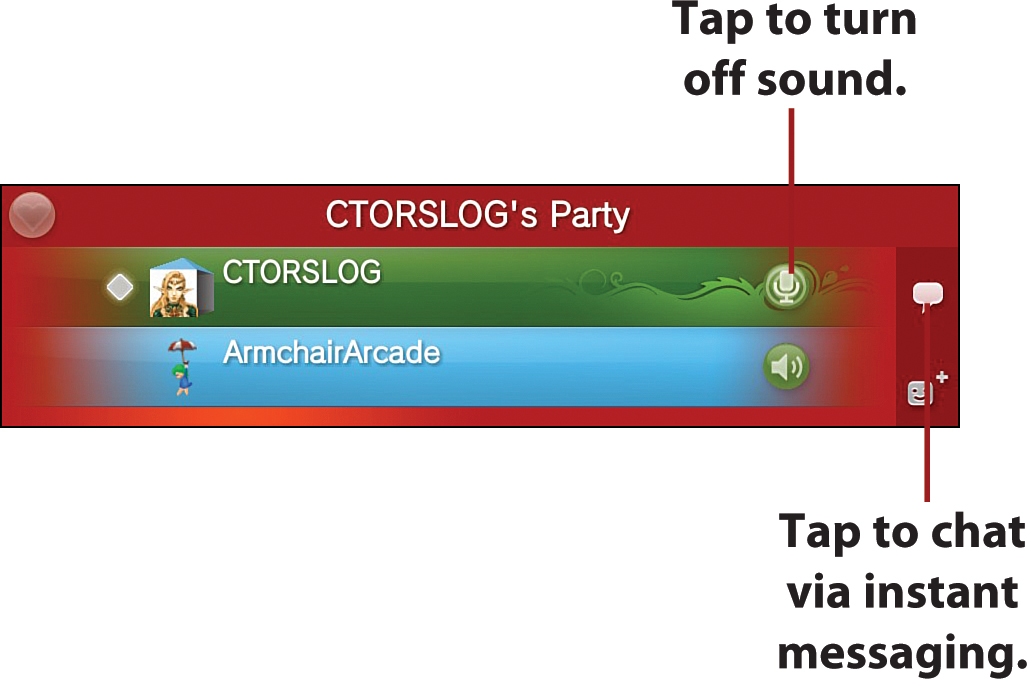
• Party banner—Tap the banner to enter the Party screen for the outlined party. From the Party screen, you can communicate with party members via voice and text chat.
• Owner icon—This icon appears next to the name of the individual who created the party. This individual has the ability to kick out party members.
• Members icon—This icon shows the number of individuals who are currently members of a party and provides information about these partygoers.
• Invitation icon—This icon appears when you’ve been invited to a party but have not yet joined it. To join the party, just tap the icon.
Creating Parties
Although the Party app enables you to create multiple parties, you can only join one party at a time. Therefore, when creating additional parties, you’ll first have to leave the one you most recently joined. To create a party, follow these steps:
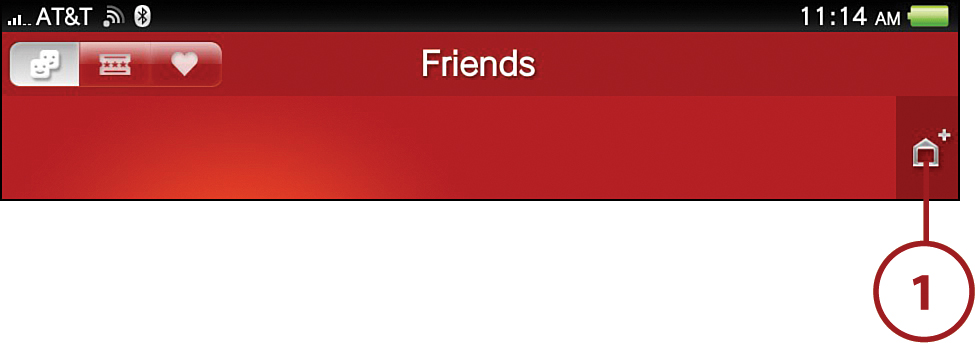
1. Tap the Create Party icon from the Party screen or from the Friends Application screen (shown).
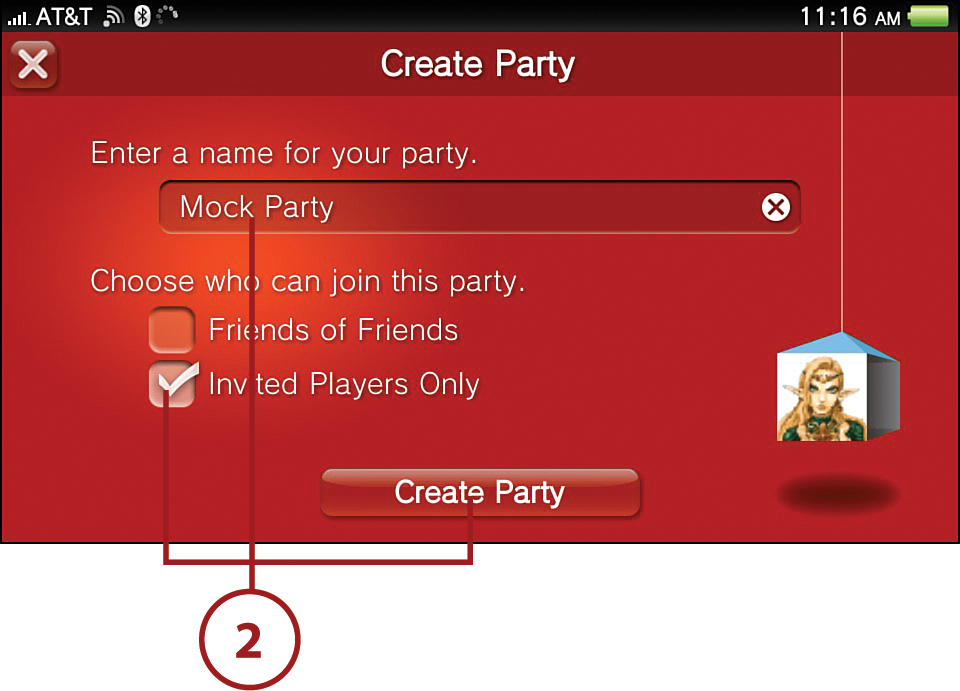
2. Enter the name of the party, tap who can join the party (whether Friends of Friends or Invited Players Only), and then tap Create Party.
3. If you selected Invited Players Only, at the Invite screen, tap the checkboxes next to the names of the individuals you want to invite and then tap Invite.
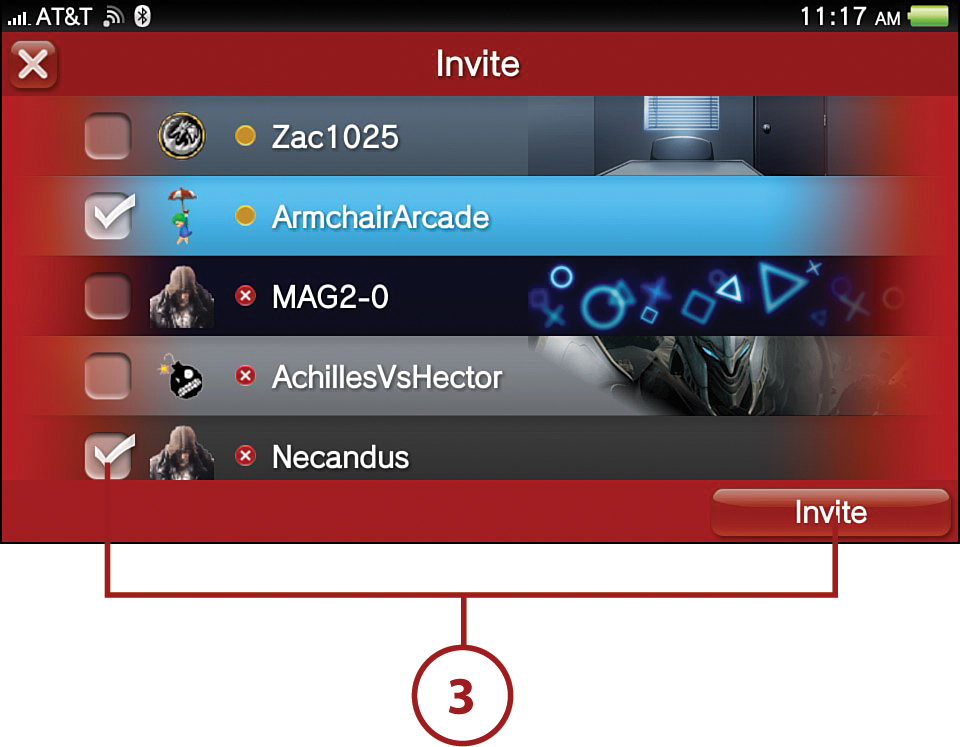
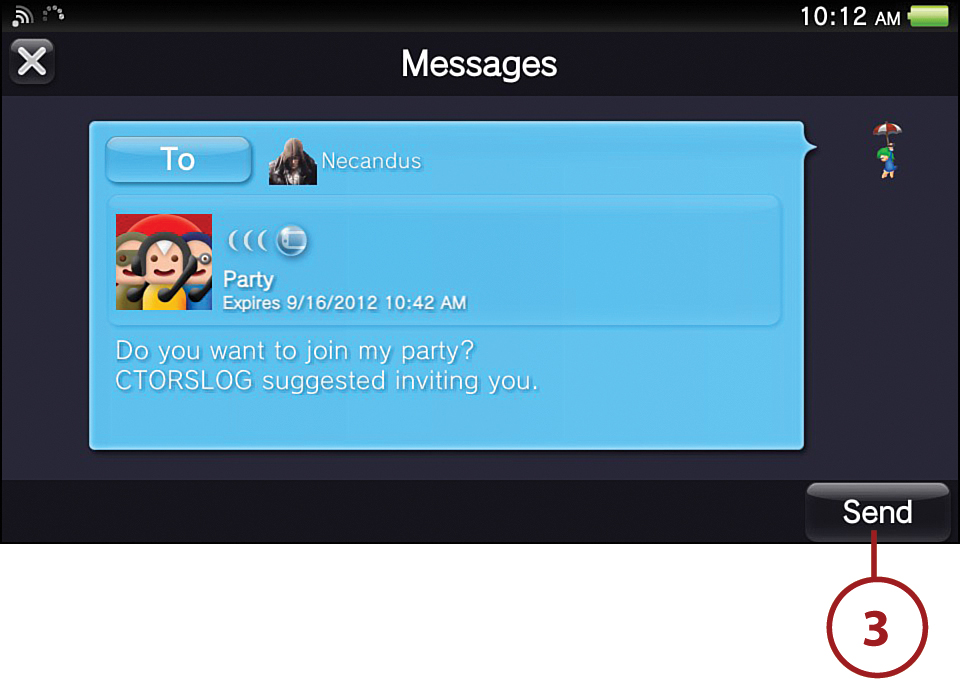
4. On the invitation message screen, tap Send. There is no way to customize your message.

5. Your message has now been sent, and after people start joining your party, you can hear them and start chatting with them via voice and text chat. You are the owner of this party.
As in real life, you might regret having sent someone a party invitation. If you find this to be the case, you can easily expel the individual from the party with just a few taps. Select the attendee you want to remove, tap the Options bubble, and then select Kick Out. Sayonara, rabble-rouser!
Joining Parties
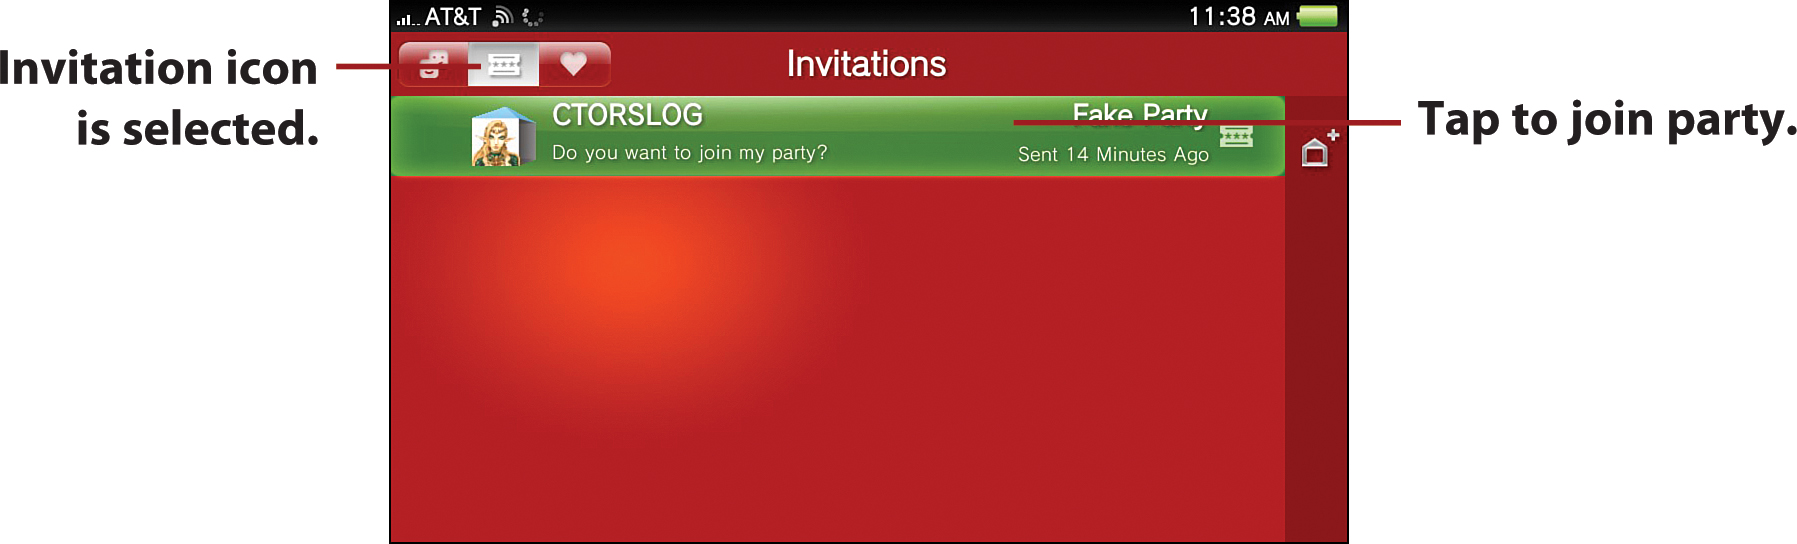
You can be invited directly to a party or attend friends’ parties that have an open invitation. When you are directly invited to a party, the invitation appears when the Invitation icon is selected on the Application screen of the Party app. Simply tap the icon to join the party.
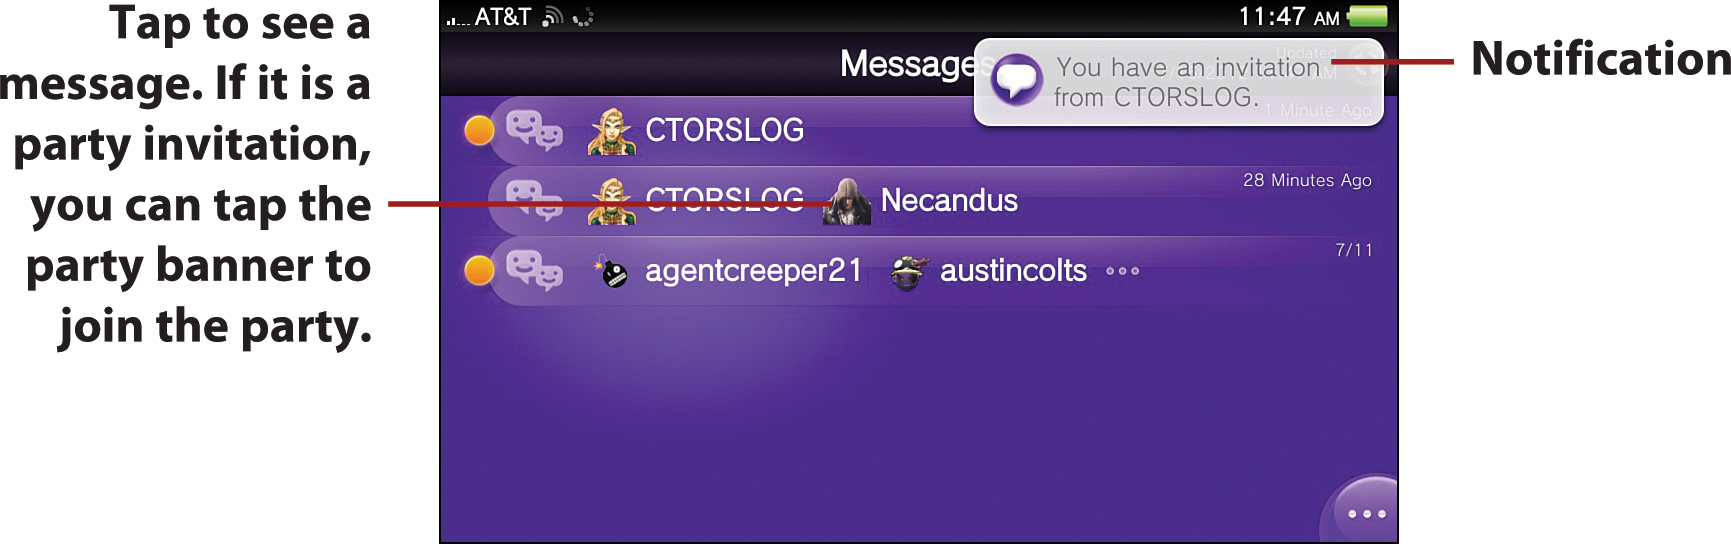
Of course, if you had to be in the Party app to see or receive an invite, you would miss out on a lot of parties; thus, party invitations go out via the Group Messaging application (see “Group Messaging with Friends” later in this chapter for more information on this application), enabling you to access the invitations no matter which application you are in on your Vita. When you see an invite come over Group Messaging, tap the text of the invitation to join the party, or if you see that you have notifications in the Notifications bubble, tap the bubble to see what they are. Invitations are listed there as well.
You can also join any parties that your friends are attending, provided the owner of the party enabled participation by friends of friends. You can find and join such parties from your friends’ profile screens. If you or your friends attend a party set to only include invited players, no information on these parties displays on your or your friends’ profile screens.
Conducting Text Chats
Chatting with party attendees is easy peasy. Follow these steps to get your yak on:
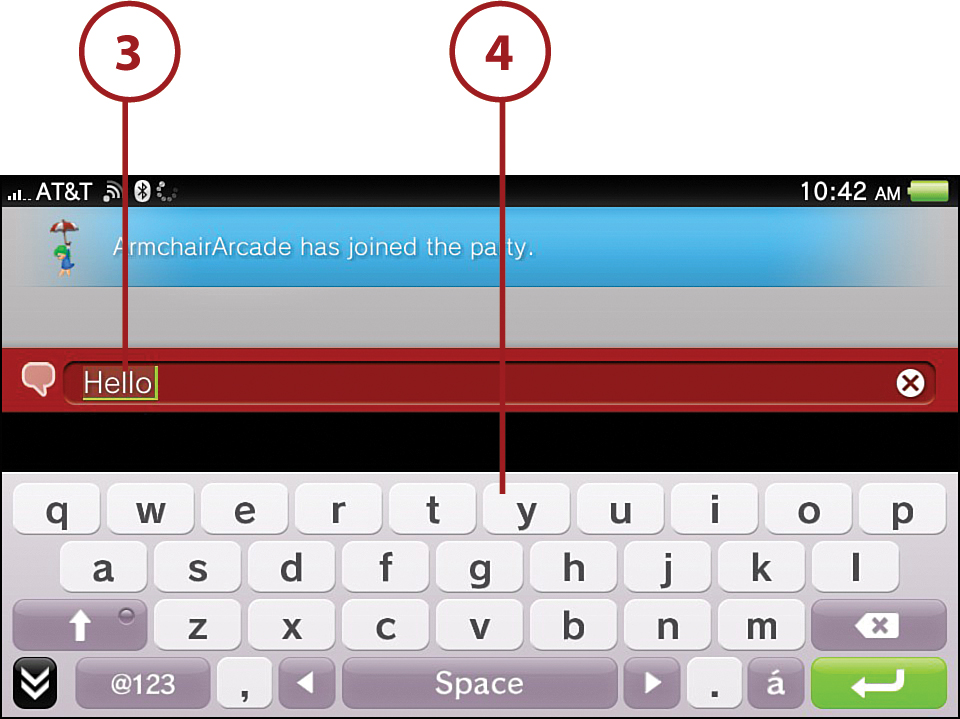
1. Enter a party.
2. Tap the chat (voice bubble) icon from the Party screen.
3. At the Chat & Events screen, tap the empty block next to the chat icon at the bottom of the screen.
4. Start typing your message with the virtual keyboard.
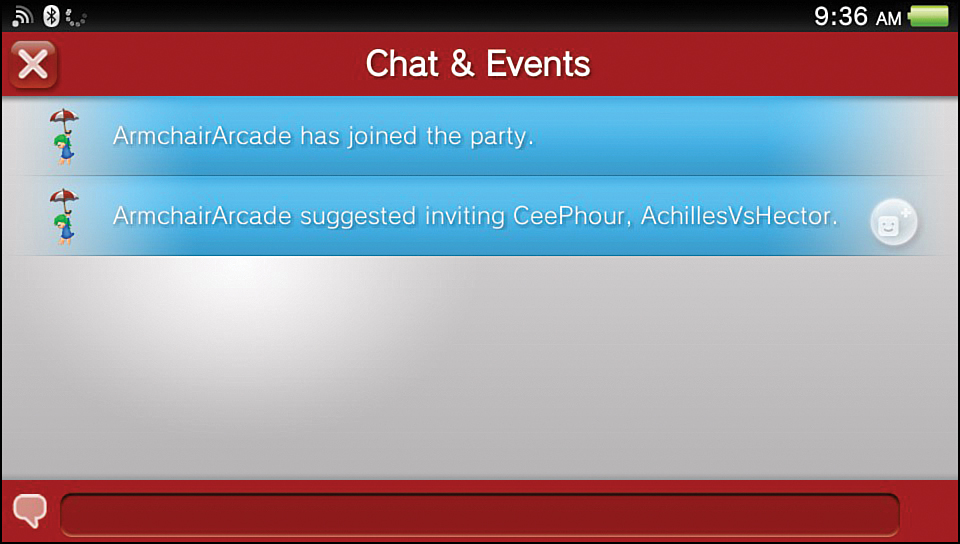
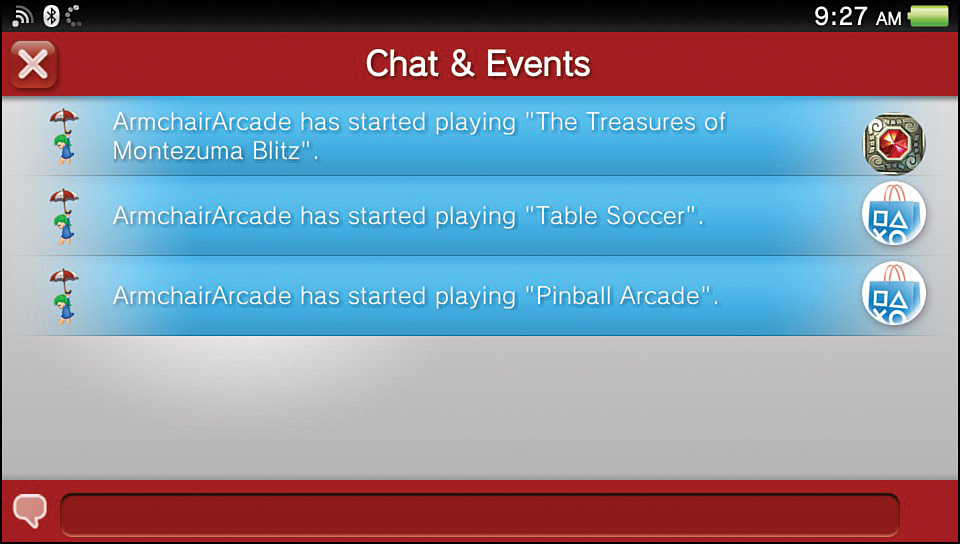
Optional Icons on Chats & Events Screen
As you no doubt noticed, chat occurs on a Chat & Events screen, so you should be aware of a couple icons that might make an appearance on this screen. They are as follow:
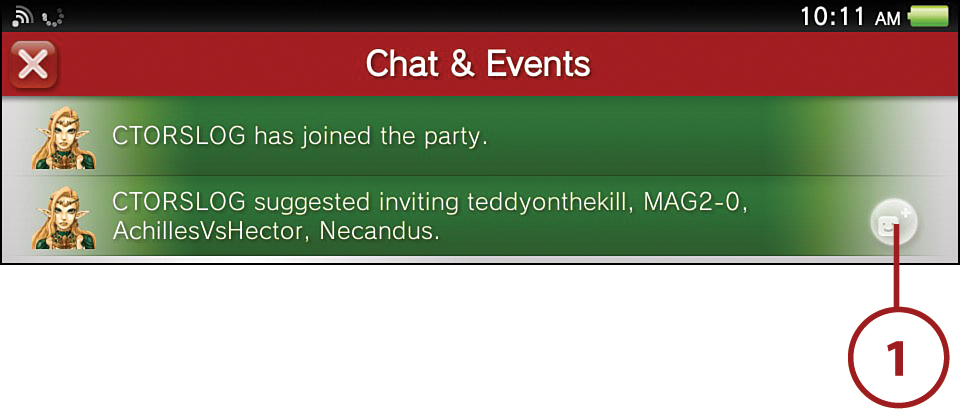
• Invitation icon—This icon appears in a banner when you are the owner of a party and one of your attendees recommends inviting others to attend.
• PlayStation Store icon—This icon appears when someone in your party starts a game that is not installed on your PS Vita. Tap the icon to access the PS Store to download or purchase the game. For more on downloading games from the PS Store, turn to “Downloading Content” in Chapter 5, “Shopping in the PlayStation Store.”
Recommending a Friend
If you are in an Invited Players Only party, but think it would be nice to expand the party to include a few of your friends, you can make this recommendation to the party owner. Remember, only eight people can be in a party at any given time. Follow these steps:
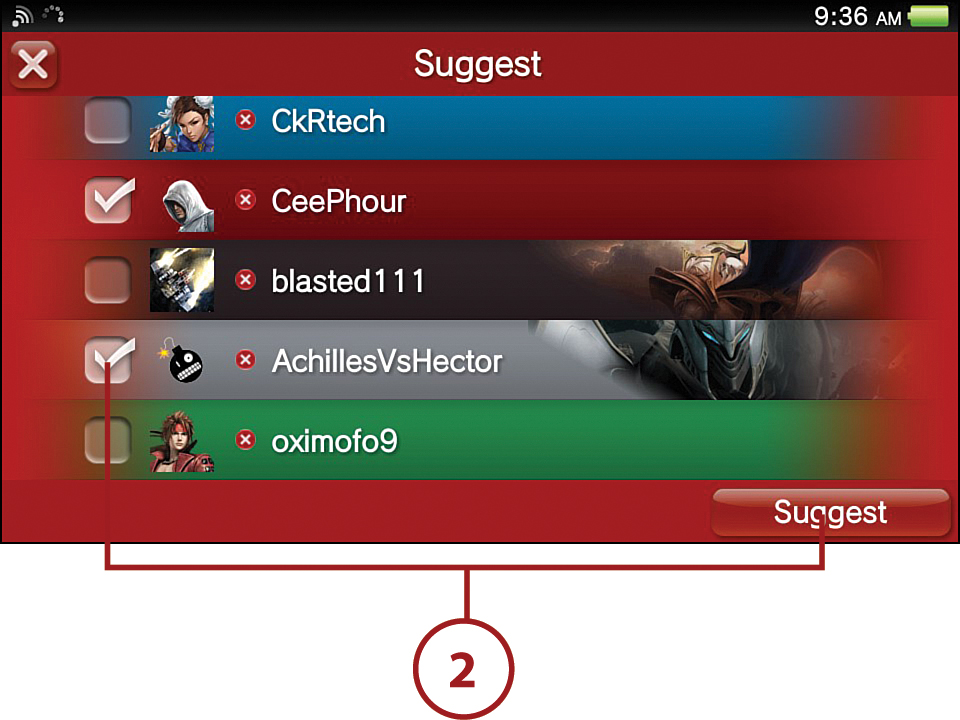
1. Tap the Invite icon on the Party screen.
2. At the Suggest screen, tap the friends you want to recommend to the party owner to check mark them and then tap the Suggest button. It is now up to the party owner to take action.
Approving Recommended Persons
If you are the party owner and set a party to Invited Players Only, you may receive recommendations from your party goers on additional people to invite. Follow these steps to give admittance to such persons:
1. On the Chats & Events screen, tap the Invite icon in the banner outlining the recommendation.
2. On the Invite screen, tap to uncheck any people you don’t want to extend the invitation to. Once happy with the list, tap the Invite button.
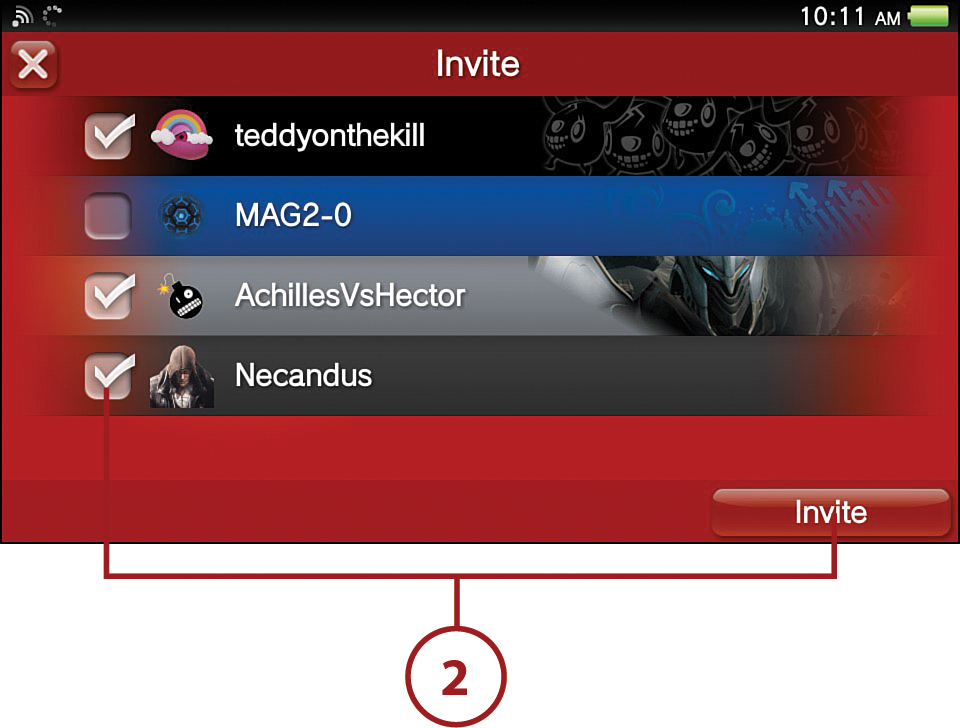
3. At the Messages screen, tap Send. The approved people have now been sent invitations.
Using the Friends App
The Friends application is where you keep track of individuals you are friends with over the PlayStation Network. It is the area from which you send and accept friend requests, check on friends’ statuses, access friends’ profiles, and comment on friends’ activities. This application also interfaces with other Vita-specific social media applications—namely, Party and Group Messaging.
Friends LiveArea and Application Screens
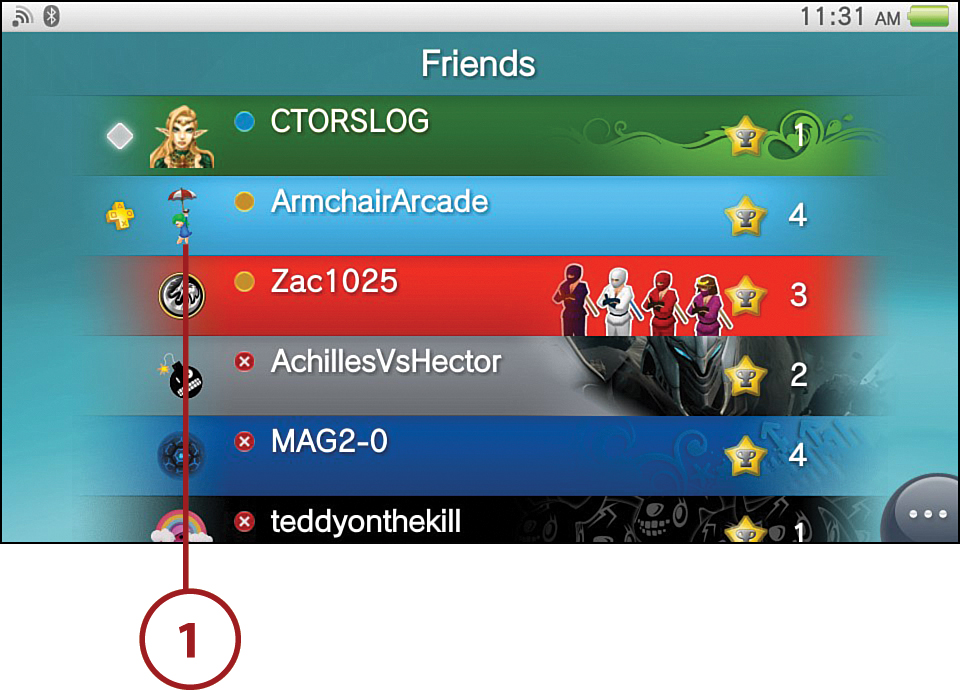
To get to the Friends Application screen, you need to pass through the LiveArea screen, which does not have much going on, except for its bright, cheerful colors. Once you get to the Application screen, you’ll see all of your friends. Follow these steps to navigate these screens:
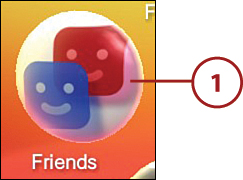
1. Tap or select the Friends icon from the Home screen to see the Friends LiveArea screen.
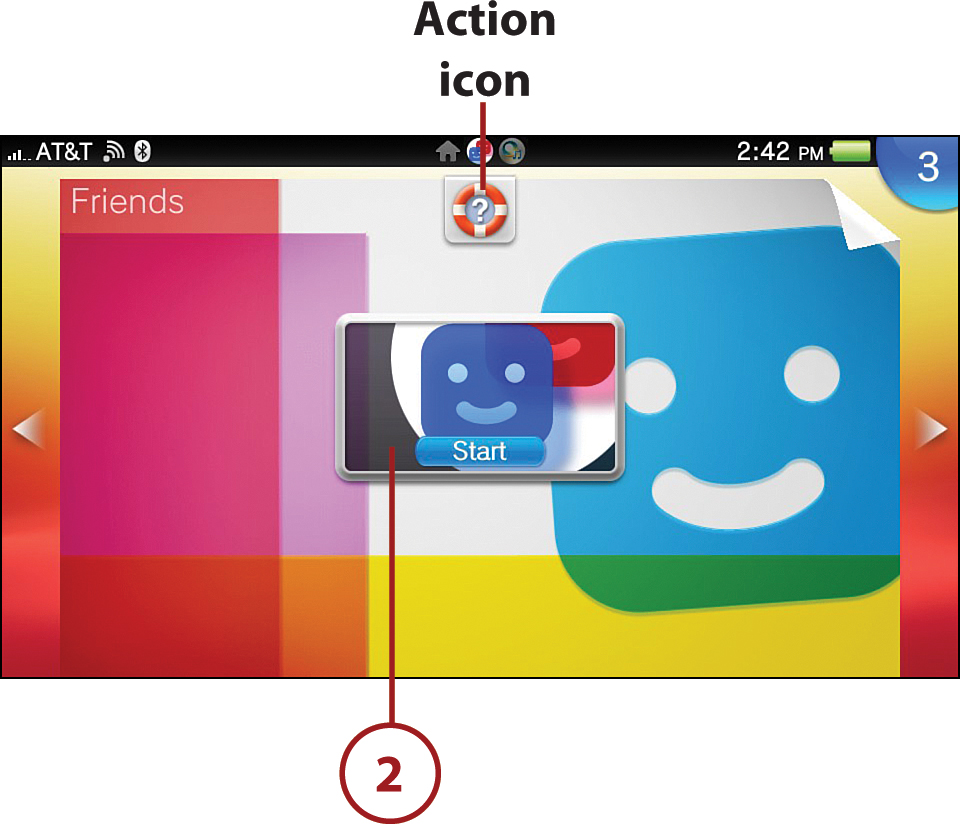
2. Tap or select the Gate to get into the app itself. (Alternatively, you can tap the Action icon, which brings you to the Friends application section of the PlayStation Vita User’s Guide.)
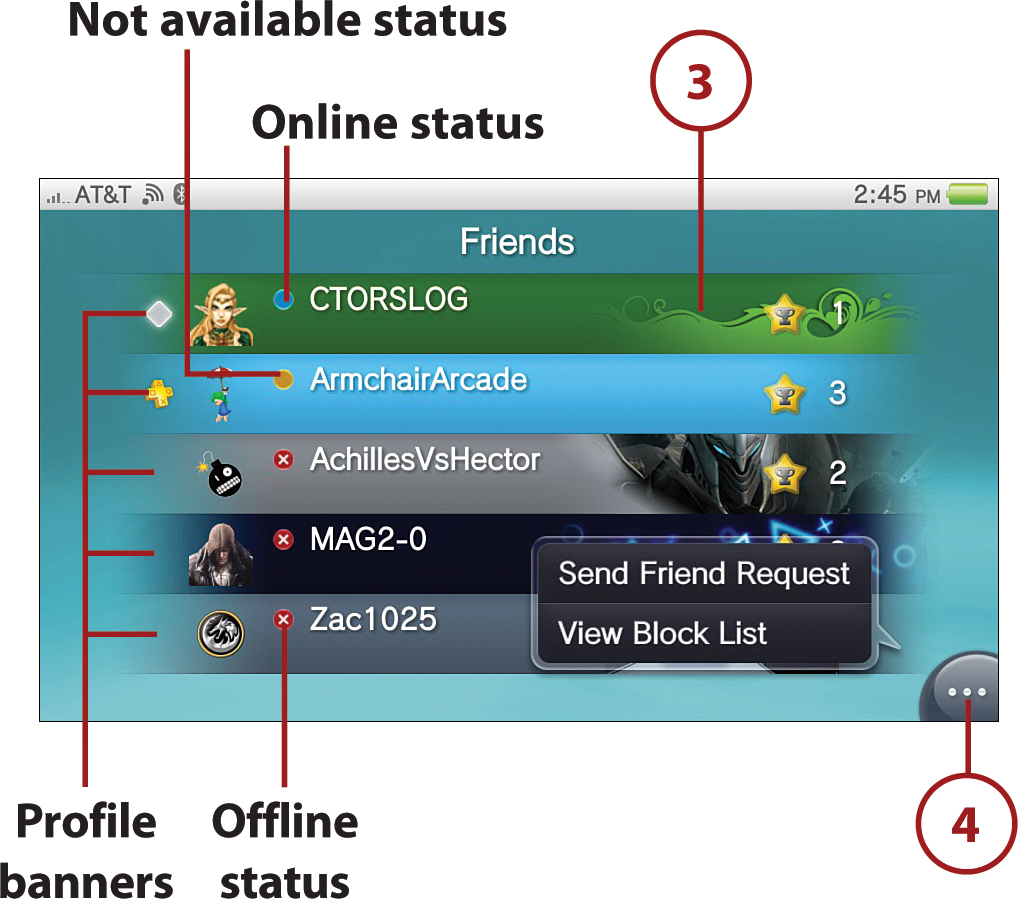
3. View a friend’s profile by tapping the banner for the friend whose profile you want to see. For more information on viewing and working with profiles, turn to “Working with Profiles” in Chapter 4, “Getting Oriented with Near and Maps.”
4. Tap the Options bubble to Send Friend Request and to View Block List.
Sending Friend Requests
See that your friends list is a little sparse, or simply want to add people to your playing posse? Then follow these steps:
1. At the Friends Application screen, tap the Options bubble.
2. Select Send Friend Request.

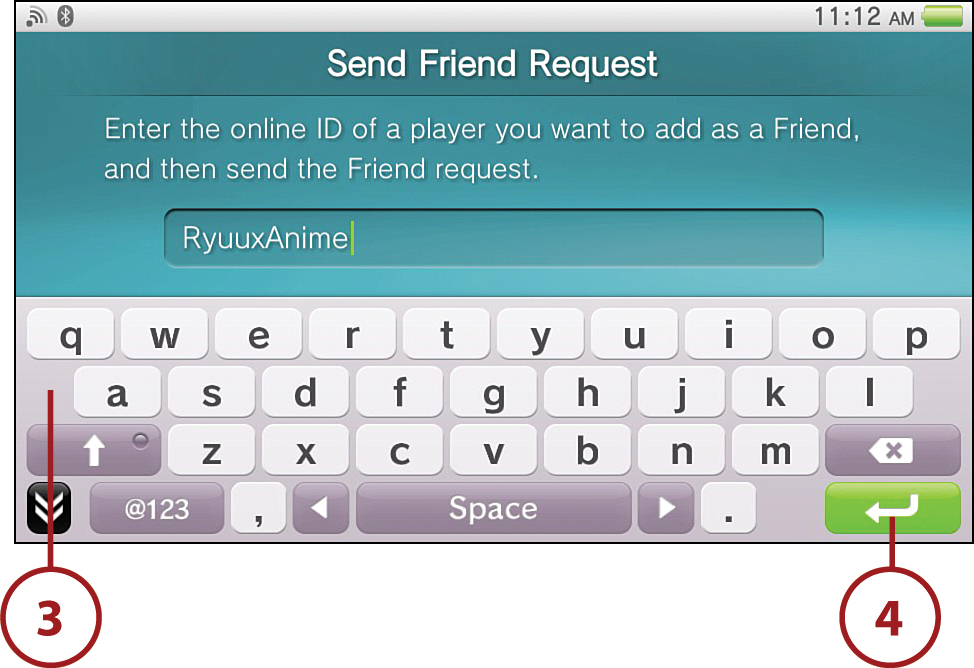
3. Use the virtual keyboard to enter the individual’s online ID.
4. Tap Enter.
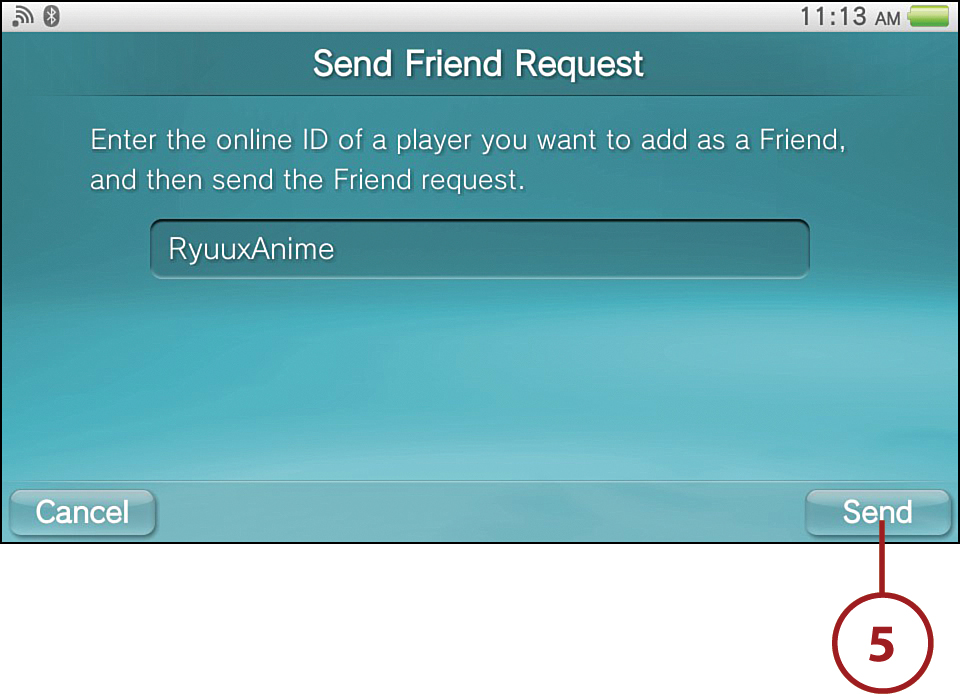
5. At the Send Friend Request screen, tap Send.
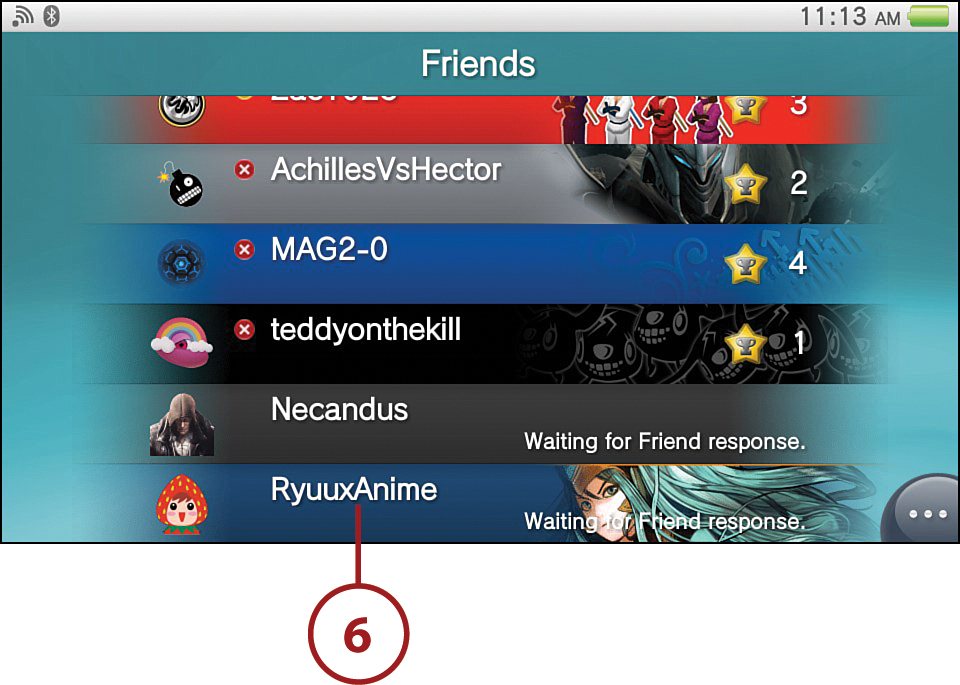
6. The person is listed on the Application screen with a Waiting for Friend Response notice.
Blocking Individuals
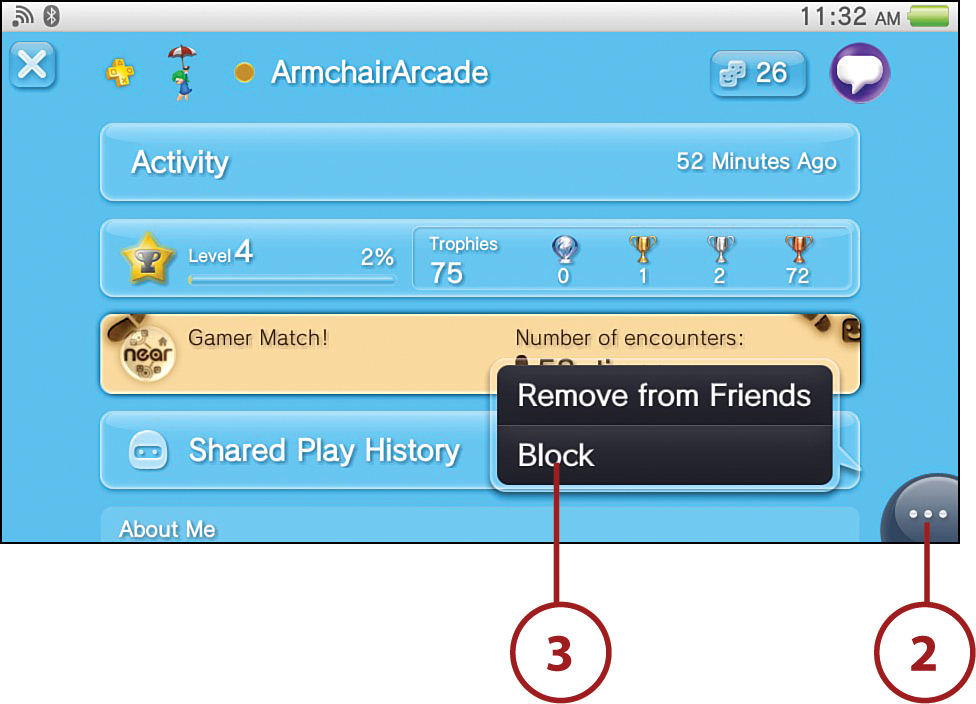
When you view someone’s profile, tapping the Options bubble provides you with the options to Remove from Friends and Block. If you select Remove from Friends, this individual is still able to contact you in the future. Blocking individuals removes them from your Friends list and ceases communications with them; thus, you are no longer able to receive messages from them and they are no longer able to see your activities and friends list. Follow these steps:
1. From the Friends Application screen, tap the friend you want to block.
2. At that person’s profile screen, tap the Options bubble.
3. Tap Block.
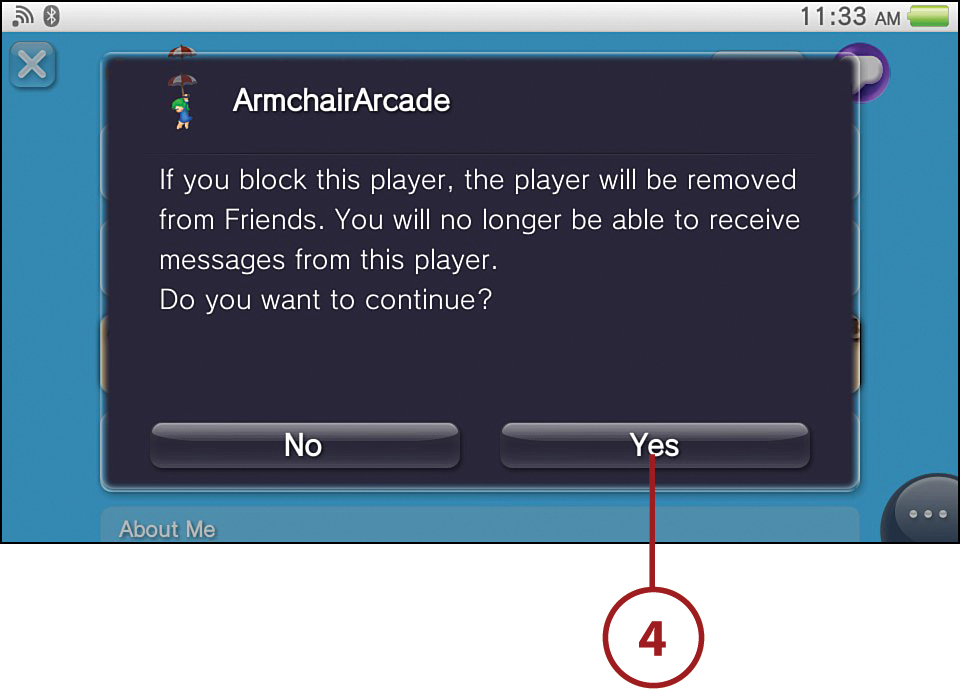
4. At the confirmation screen, tap Yes to proceed. This person is now blocked.
Unblocking Individuals
You can also unblock a person you have previously blocked:
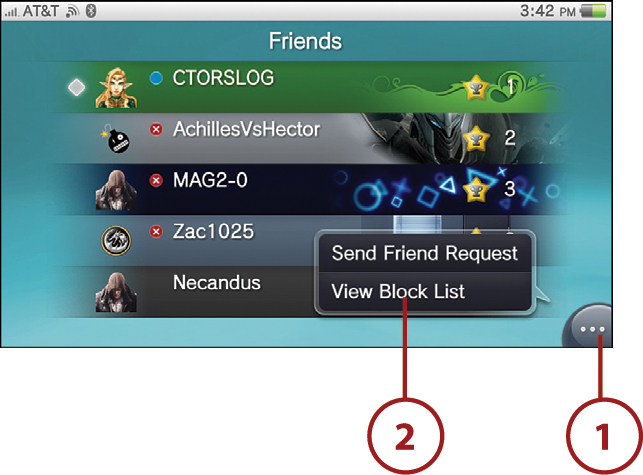
1. At the Friends Application screen, tap the Options bubble.
2. Select View Block List.
3. Tap the profile banner of the individual you want to unblock.
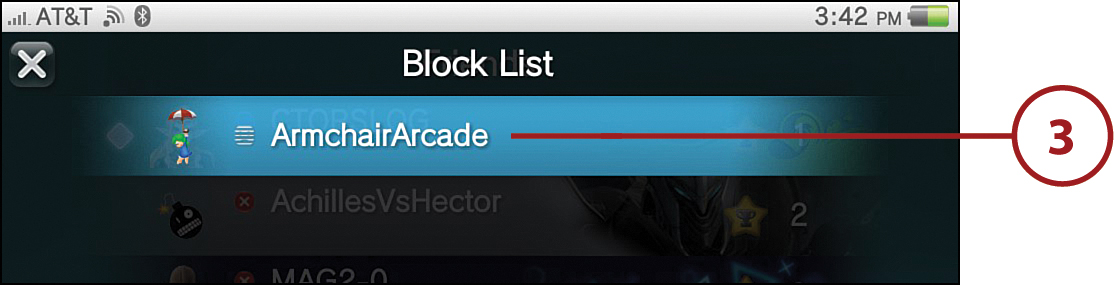
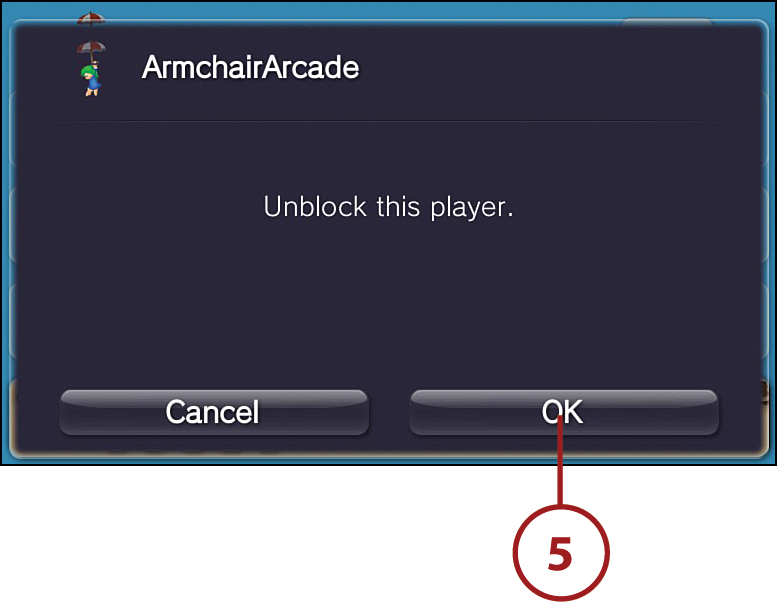
4. Tap the Options bubble and then tap Unblock.
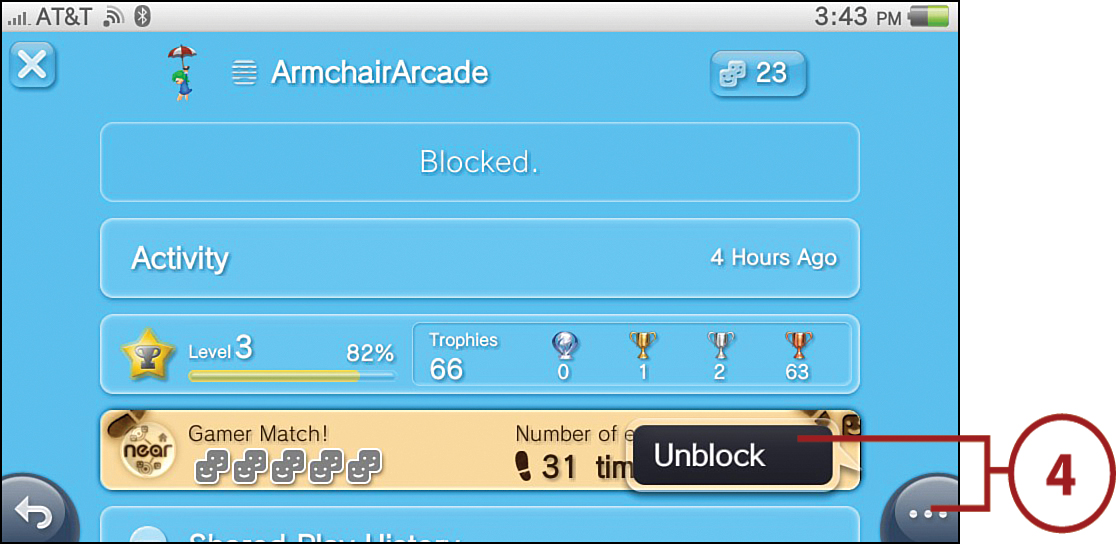
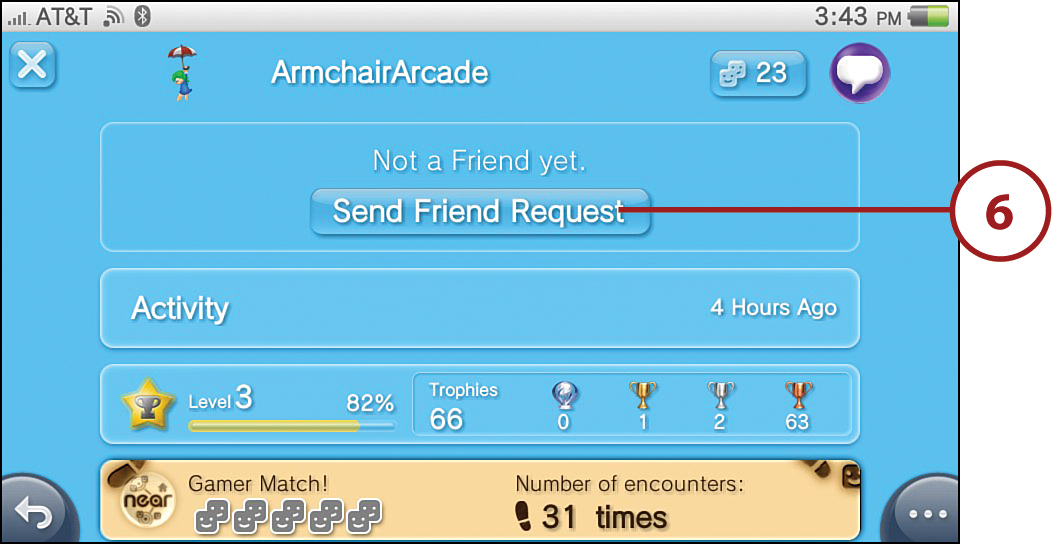
5. Tap OK. If you want to reestablish this person as a friend, proceed to step 6. If your objective was just to enable him or her to correspond with you again, you’re done.
6. Tap Send Friend Request.
Group Messaging with Friends
The Group Messaging application enables you exchange messages with other PlayStation Network members who have a Vita or a PlayStation 3. Unlike the Party application, where chat occurs in a chat room environment, the Group Messaging app is best thought of as a texting or email service specific to the PlayStation Network, albeit with a more substantial lag, as noted in the “It’s Not All Good” sidebar earlier in this chapter. In addition, just like you need to know a recipient’s email address to email him or her, you have to know your recipient’s online ID to send him or her a message via the Group Messaging application.
LiveArea Screen
In addition to the Action icon, which takes you the Group Messaging portion of the PlayStation Vita User’s Guide, and the Gate, which puts you into the application itself, two other icons appear on the LiveArea screen:
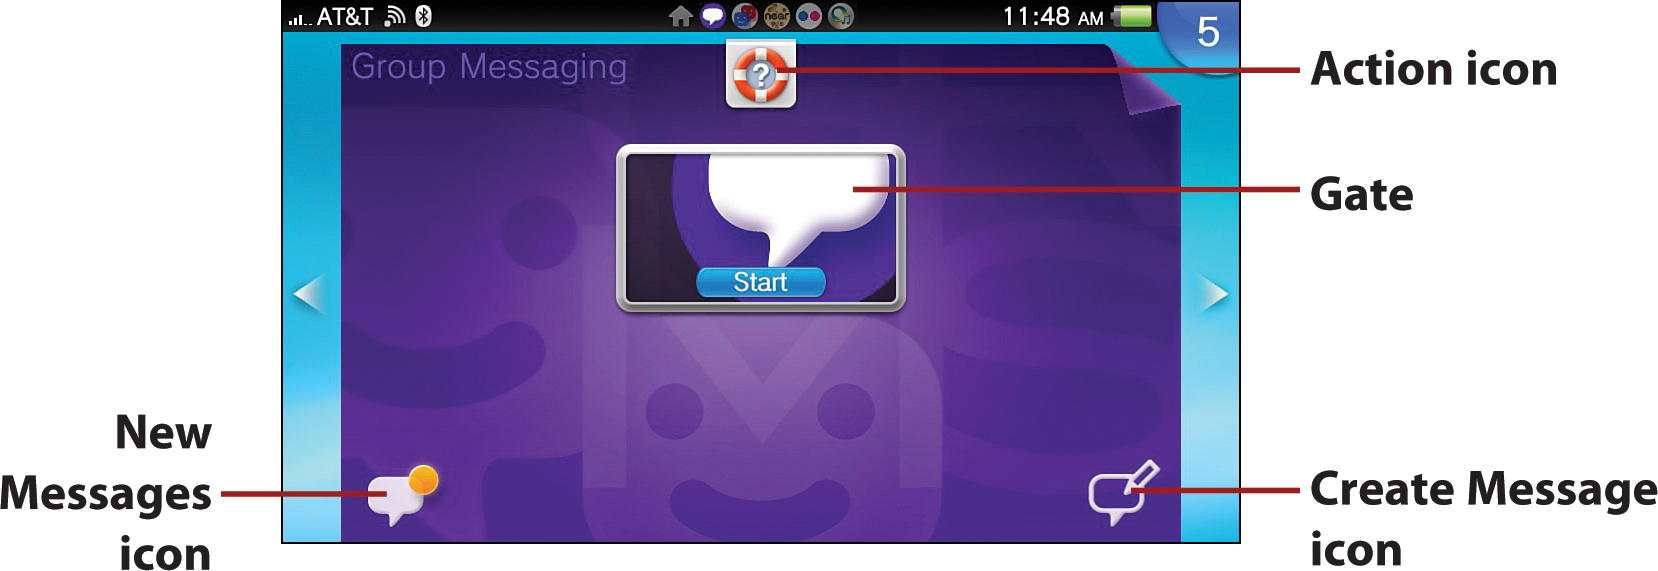
• New Messages icon—This icon appears only when you have received a new message. Tap it to access the Messages screen, from which you can view your new message.
• Create Message icon—This icon always appears here. Tap it to start composing a message.
Sending Messages
You can send messages to one individual or to groups of up to 16 people. Even one person is considered a “group” in the Group Messaging application. When creating a group, you are actually creating a message that will be sent to your designated group of individuals. You can use this message to send subsequent messages to this same group in the future. The Messages screen stores up to 30 groups.
If you’ve never sent a message to a particular group, the easiest way to do it is to tap the New Message icon on the LiveArea screen, enter the online ID for the individual(s) you want to send the message to, and proceed with composing your message.
To send messages to already-established groups, follow these steps:
1. At the Messages screen, tap the group you want to send a message to. The messages that have been exchanged within this group display.

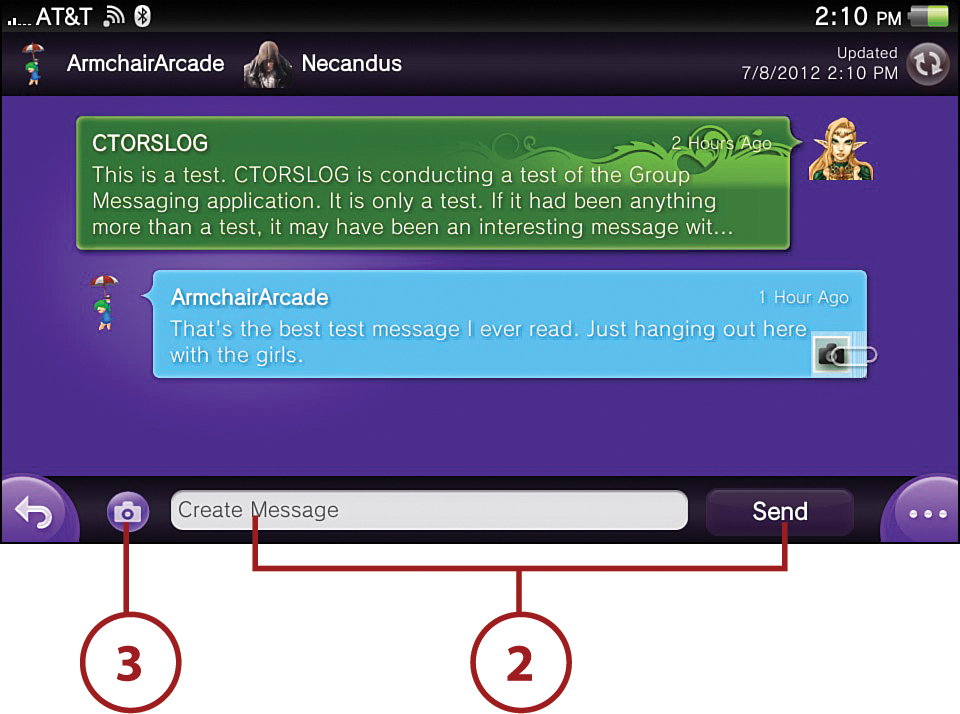
2. Tap the Create Message field at the bottom of the screen to launch the virtual keyboard and type your message. If you want to attach a photo, proceed to step 3. Otherwise, tap Send to send your message.
3. Tap the Photo icon.
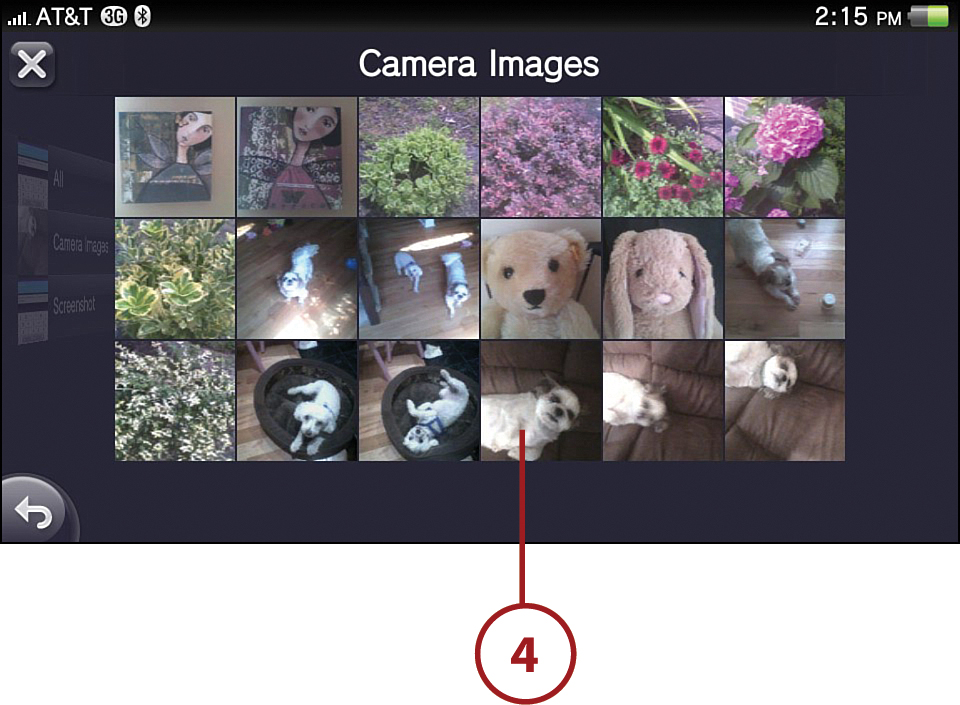
4. At the Photos screen, select the album you want to pull from and then tap the image you want.
5. You now see your image attached to your message. Tap Send.
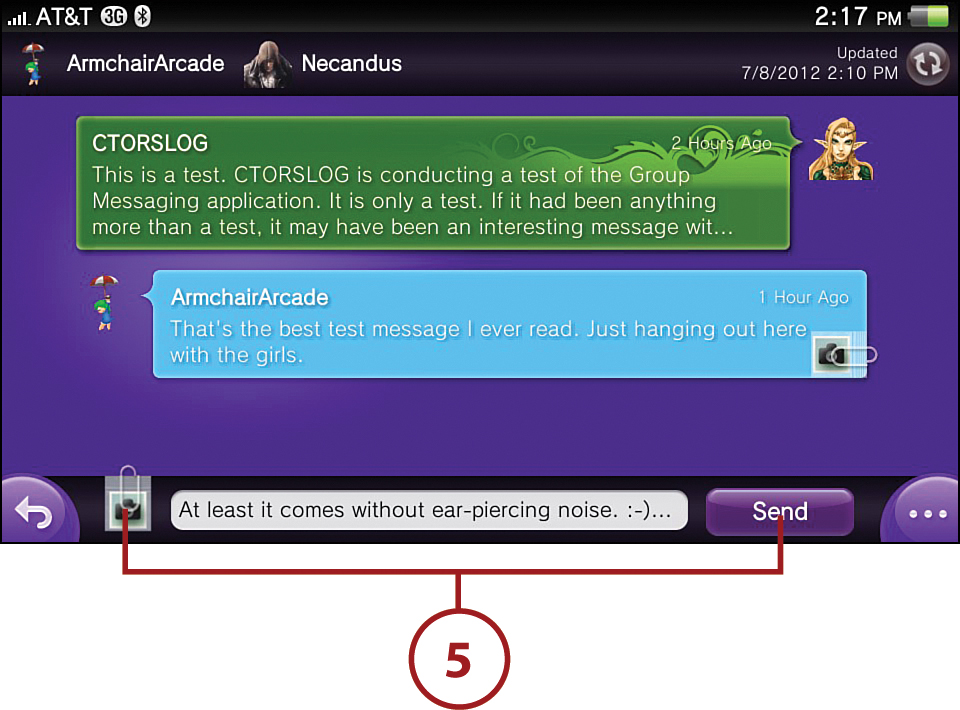
You can only attach one photo to each message, and that photo can be no larger than 1 MB. Also, as previously mentioned, any image sent via the Vita won’t be viewable on a PlayStation 3.
Managing Messages
Messages are received at the interval designated under Group Messaging settings, but you can also manually check for messages by tapping the Refresh button at the top of the Messages screen. A yellow circle that looks like the sun appears next to any new messages. To view a message, just tap the message to reveal its full text.

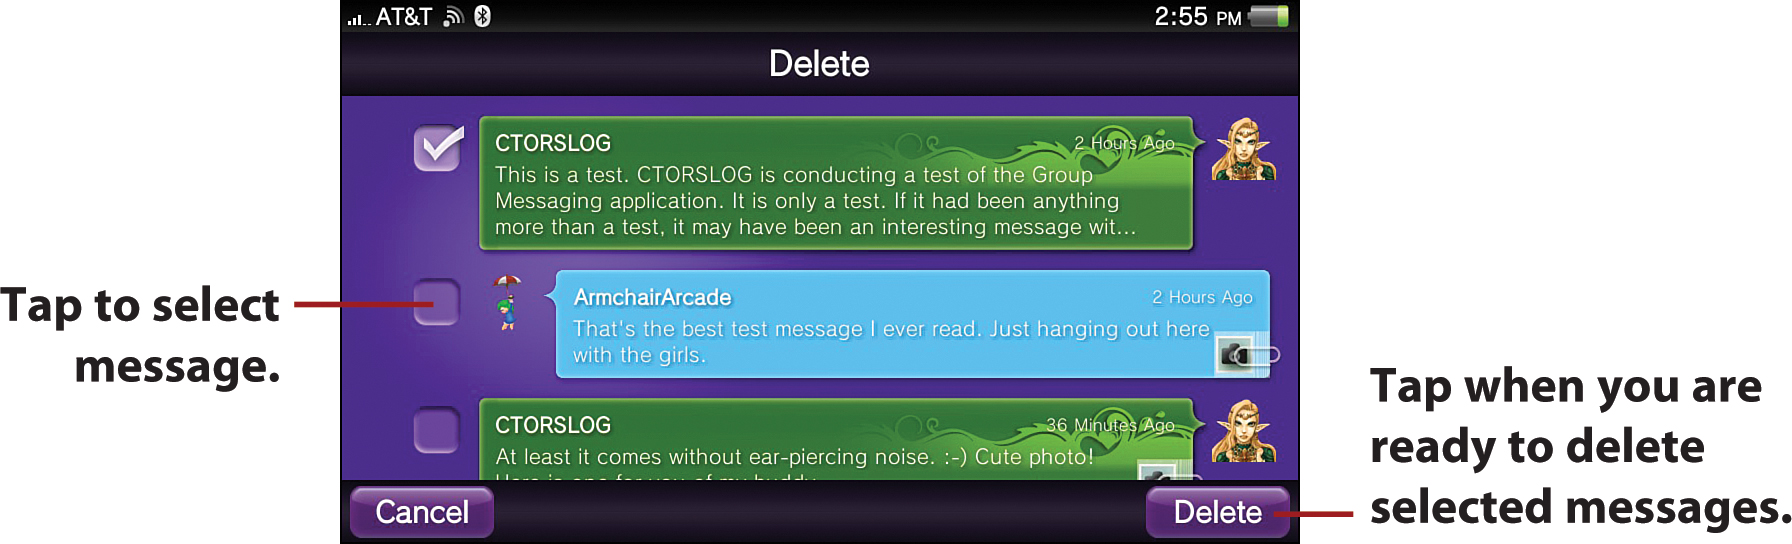
Up to 200 messages can be stored for each group. By default, these are the latest ones, unless you clear out messages you do not want to store to create room to accommodate new messages. To delete messages, open the group, tap the Options bubble, tap Delete, and then tap the boxes next to the messages to select the ones you want to delete.
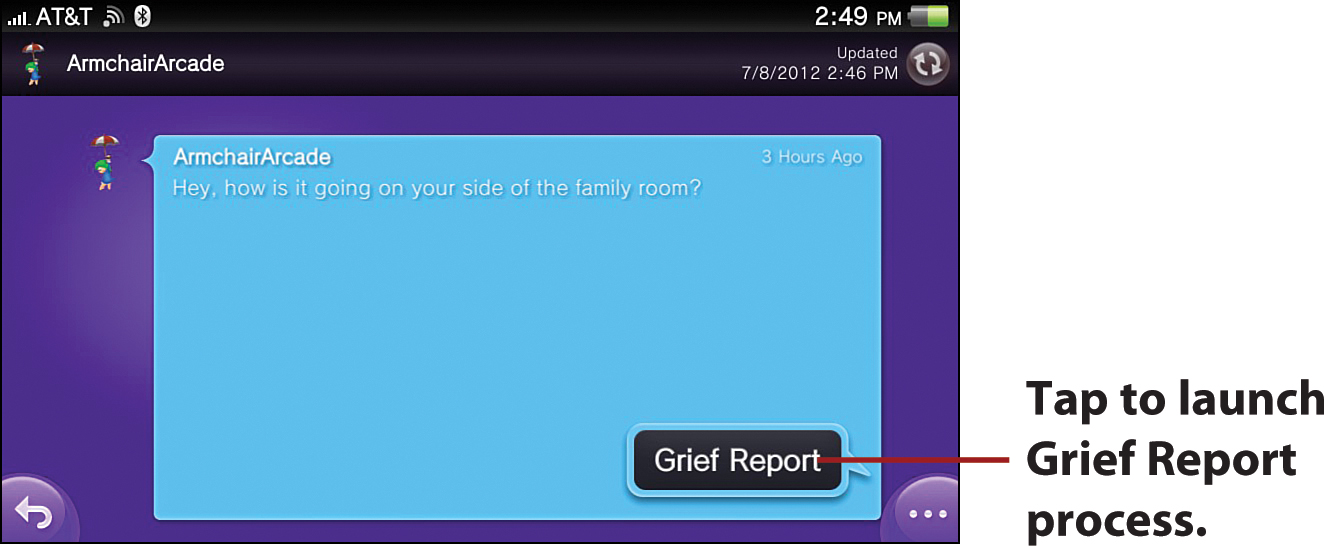
If the contents of a message are inappropriate, making you feel intimidated, threatened, or harassed, you can report it to Sony via a Grief Report. Just tap the Options bubble and then tap Grief Report. A series of prompts now guides you through outlining your grievance.
Connecting and Sharing with Facebook
You would be hard-pressed to find an individual on the planet who hasn’t heard of Facebook, the popular social networking application that touts more than 800 million active users. You can use Facebook to establish connections with friends, family, coworkers, acquaintances, special-interest groups and organizations, and other like-minded individuals, enabling regular communications with these entities in a protected environment. There is no cost to sign up for an account or to download the Facebook app to your Vita from the PlayStation Store.
If you are a current Facebook user, keep in mind that the app does not have all the same functionality you find when accessing Facebook on the Web. Although the interface is straightforward to navigate and enables you to post images to Facebook directly from your Vita, you can’t do some things, including uploading videos, sharing others’ links and photos, and updating your account settings directly from your Vita. However, it is probable that at least some of these issues will eventually be rectified with software updates. You’ll know there is a software update when you see the Software update icon (yellow icon with down arrow) next to the Browser icon on the LiveArea screen.
Getting the Latest, Greatest Facebook
If you notice a Software update icon (yellow icon with down arrow) on the Facebook LiveArea screen, it means that there is an update available for you to download. Tapping this icon opens a screen that tells you what has been added. Once you are ready to update your software, tap the Download button on this screen. After the software update downloads and you re-enter Facebook, you’ll have access to the latest version, putting the newest features and capabilities at your disposal.
Facebook LiveArea Screen
In addition to the Gate to get into the app, the Facebook LiveArea screen has several other icons.
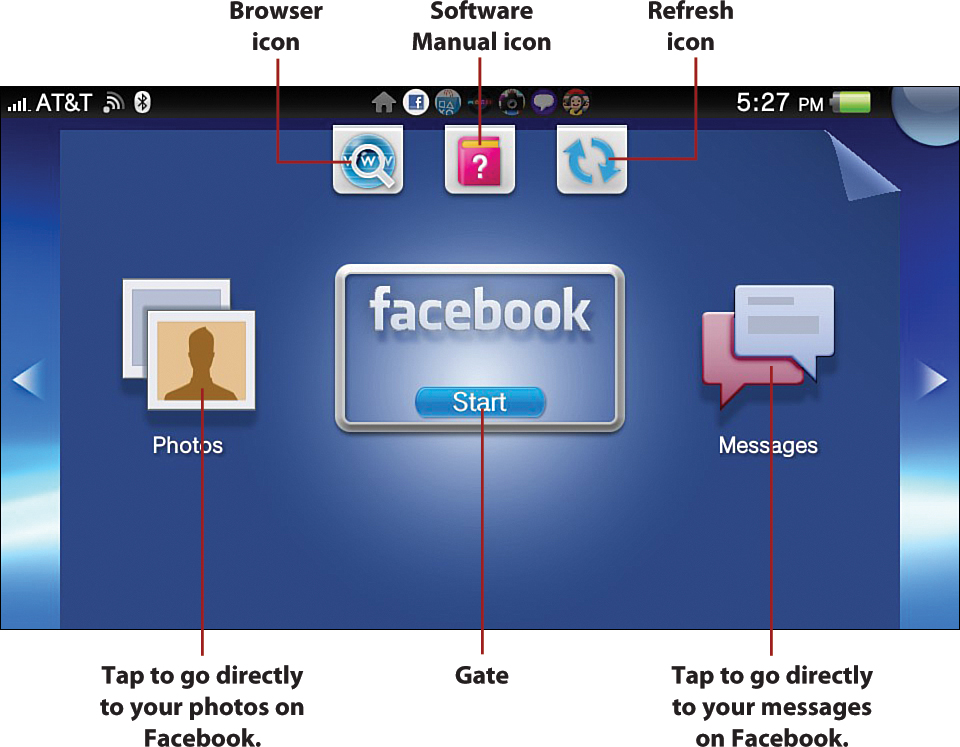
• Browser icon—Tap this icon to open the Browser to pull up Facebook search results in Google.
• Software Manual icon—Tap this icon to see the software manual for the application. No information on actually using the app is found here. Instead, you encounter a bunch of mumbo jumbo about the software license.
• Refresh icon—Tap this icon to refresh the screen.
• Photos icon—Tap this icon to go directly to your photo albums on Facebook.
• Messages icon—Tap this icon to go directly to your messages on Facebook.
Navigating the Facebook App
Before you can enter the Facebook app for the first time, you have to log in with your Facebook credentials. When you are in the app, you see your News Feed. Most Facebook features are accessible directly on this screen. These are as follows:
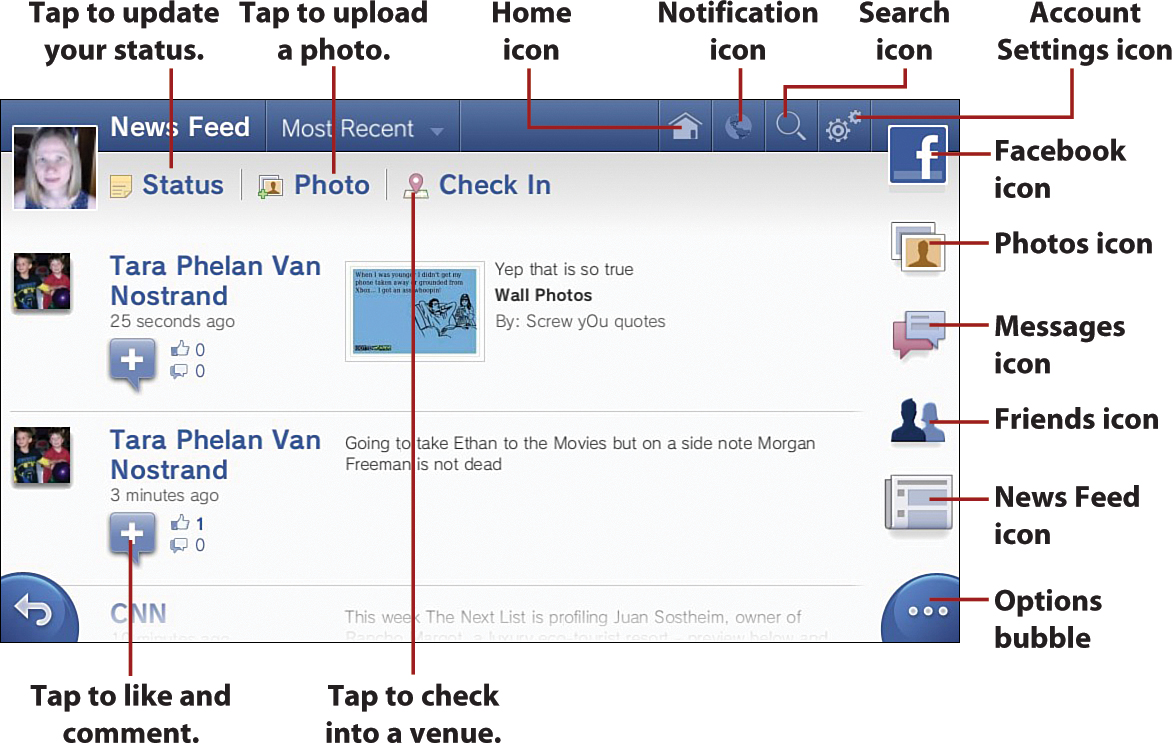
• Home icon—Tap the Home icon to go back to the Home screen, which is your News Feed.
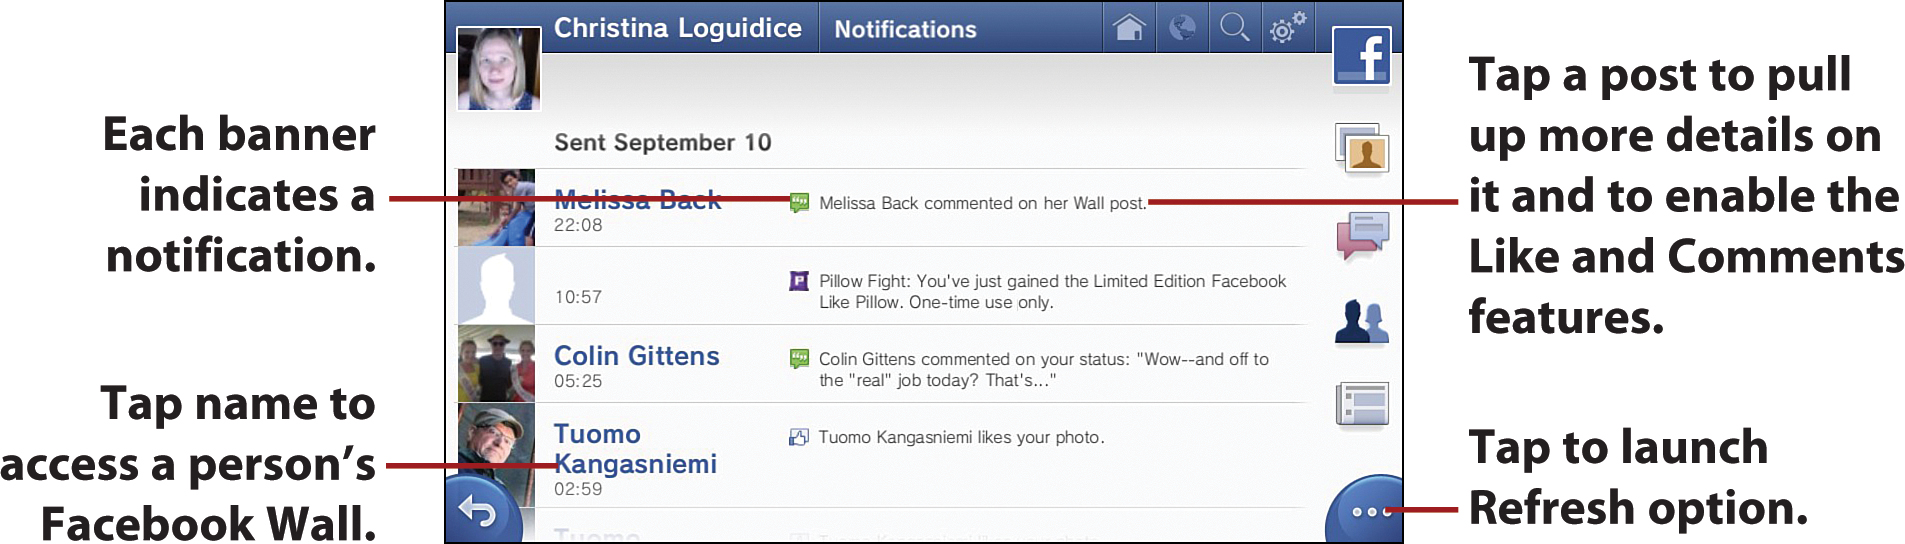
• Notifications icon—Tap this icon to review your Notifications, including comments others have made on your posts and comments you’ve made on others’ posts.
• Search icon—Tap to launch the virtual keyboard to enter a name or term to conduct a Facebook search.
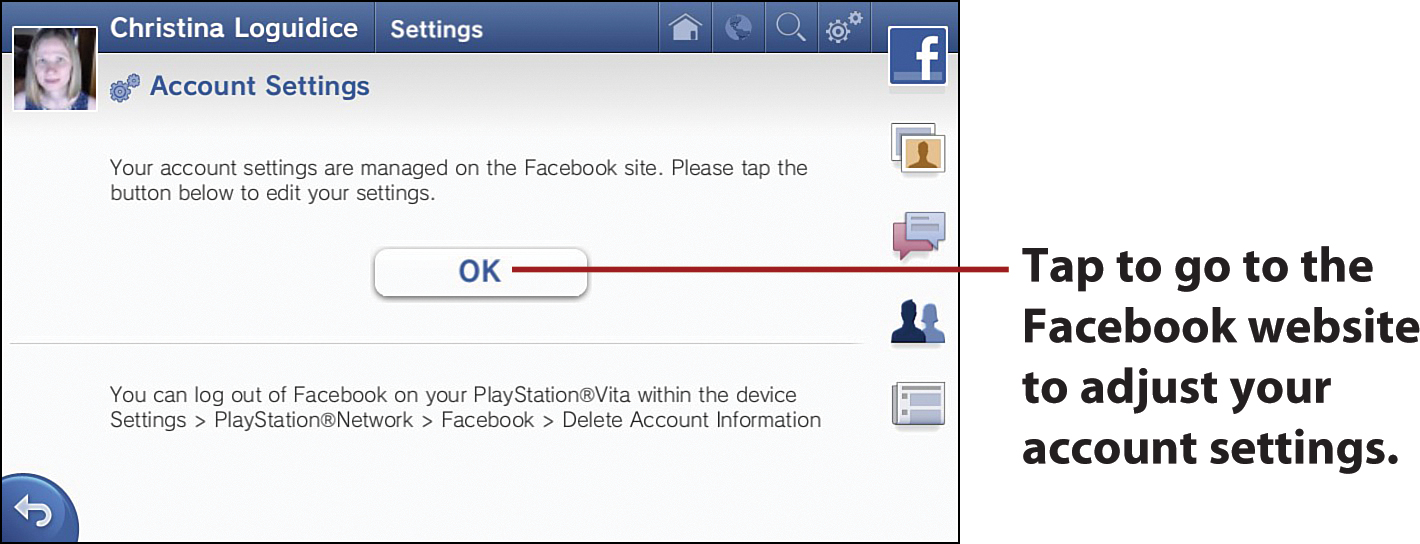
• Account Settings icon—Tap this icon to access a button that enables you to go to the Facebook website to adjust your account settings, including General information, Security settings, Notifications settings, Subscribe settings, App settings, Mobile settings, Payment information, and Facebook Ads.
• Update Status—Tap to launch the virtual keyboard to type your status update. After you tap Enter, your message posts.
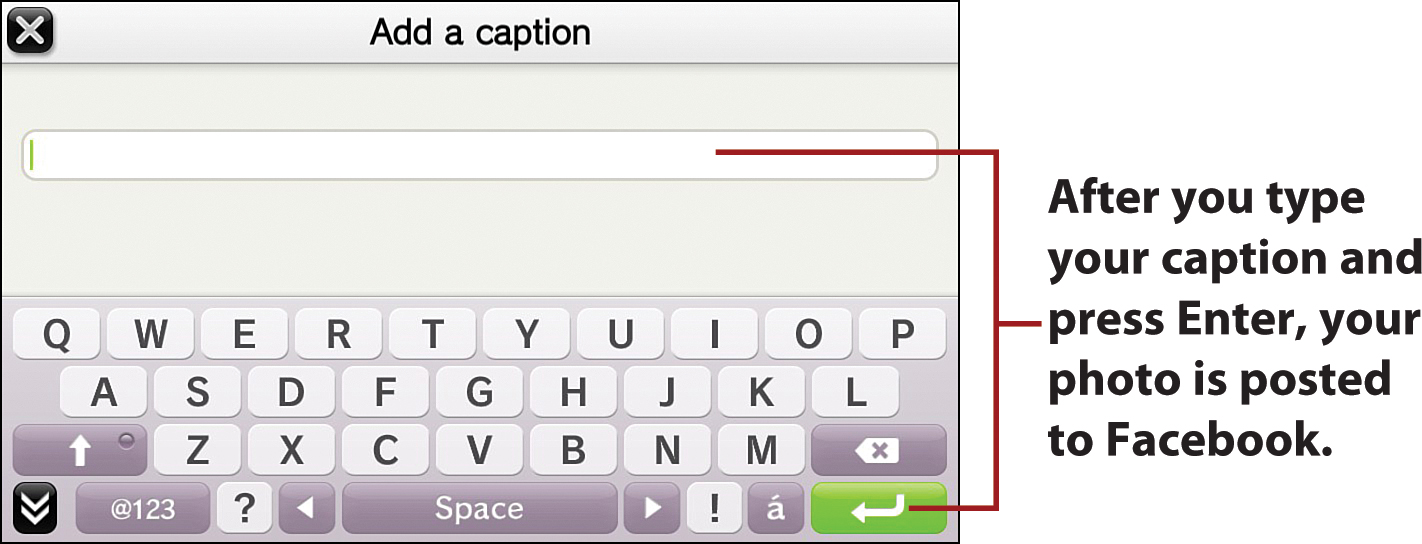
• Add Photo—This icon enables to add a photo to Facebook by pulling up the photos in your Vita’s Photo app (select Choose from Gallery) or by taking a photo directly with your Vita (select Take a Photo). Once you select or are happy with the photo you’ve taken, type your caption at the Add a Caption screen and press Enter. Your image is now posted.
• Facebook icon—Tap this icon to hide the icons that appear below it, such as the Photos and Messages icon. Tap to reveal them again.
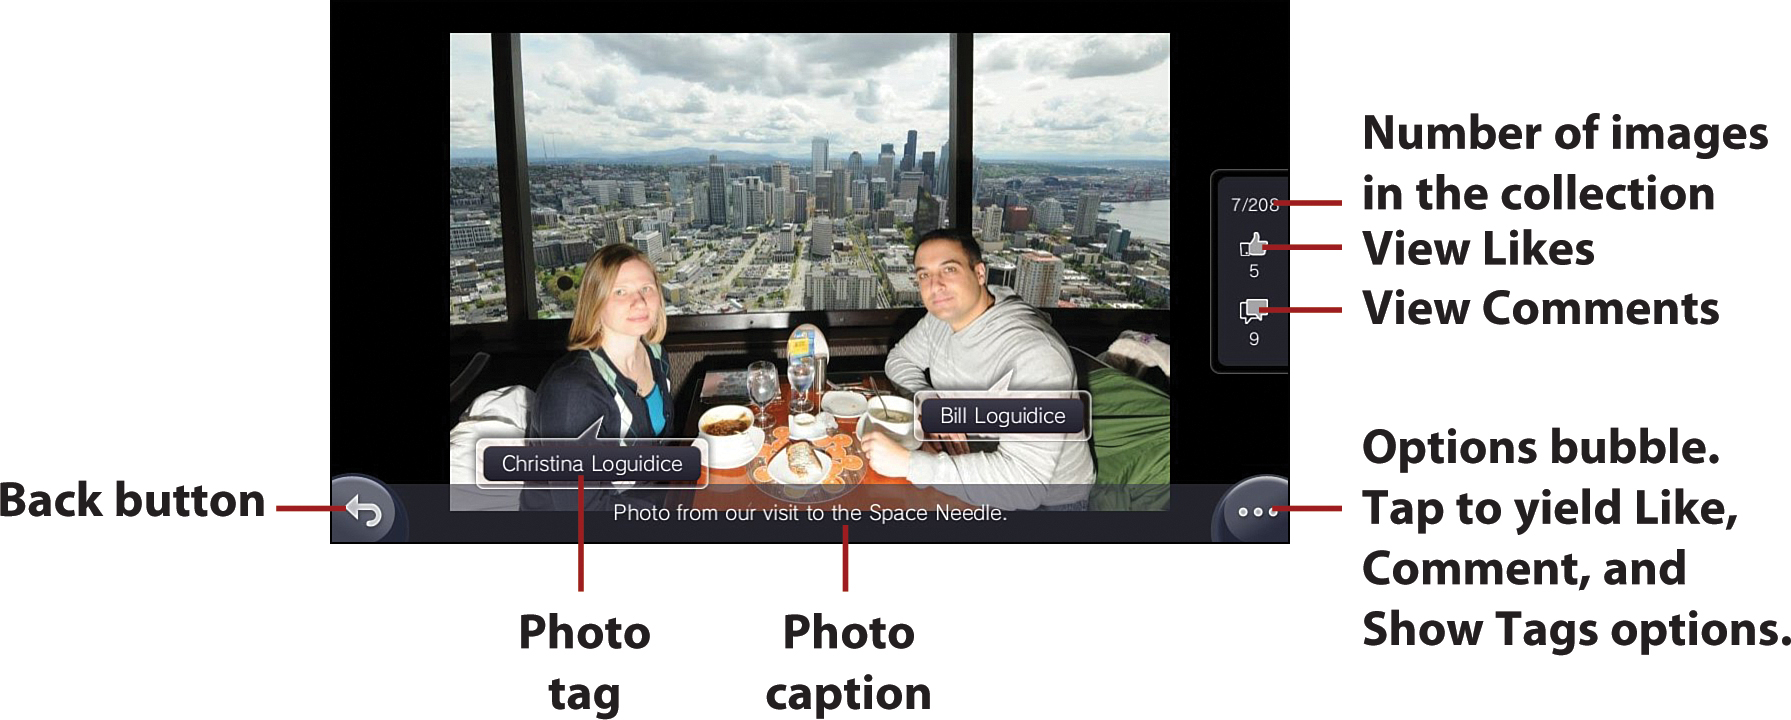
• Photos icon—Tap this icon to go directly to where your photos are housed on Facebook. If you tap an album, you see thumbnails for all the images contained in that album. When you tap a thumbnail, the full image appears onscreen and you can then swipe through the full-sized images of the pictures in the album using the touchscreen or the rear touchpad. Tap a full-sized image to see how many Likes the image has received and view its comments. If you tap and hold the rear touchpad, you’ll see tags (keywords) that have been added to the photo. If you are viewing someone else’s profile, tapping the Photos icon on their page pulls up their photos.
• Messages icon—Tap this icon to view your Messages. Depending on how much you use Facebook messaging, you might not see as many messages as are available via the website.
• Friends icon—Tap this icon to see your current Friends and Friend Requests.
• Newsfeed icon—Tap this icon to go back to your News Feed.
• Back button—Tap this button to go to the previous screen.
• Options bubble—Tap this bubble to access the Update Status, Add Photo, Check In, and Refresh options.
• Plus sign—Tap the plus sign to Like or Comment on a post.
• Profile image—Tap to access the user’s wall.

Sharing and Discovering with Twitter
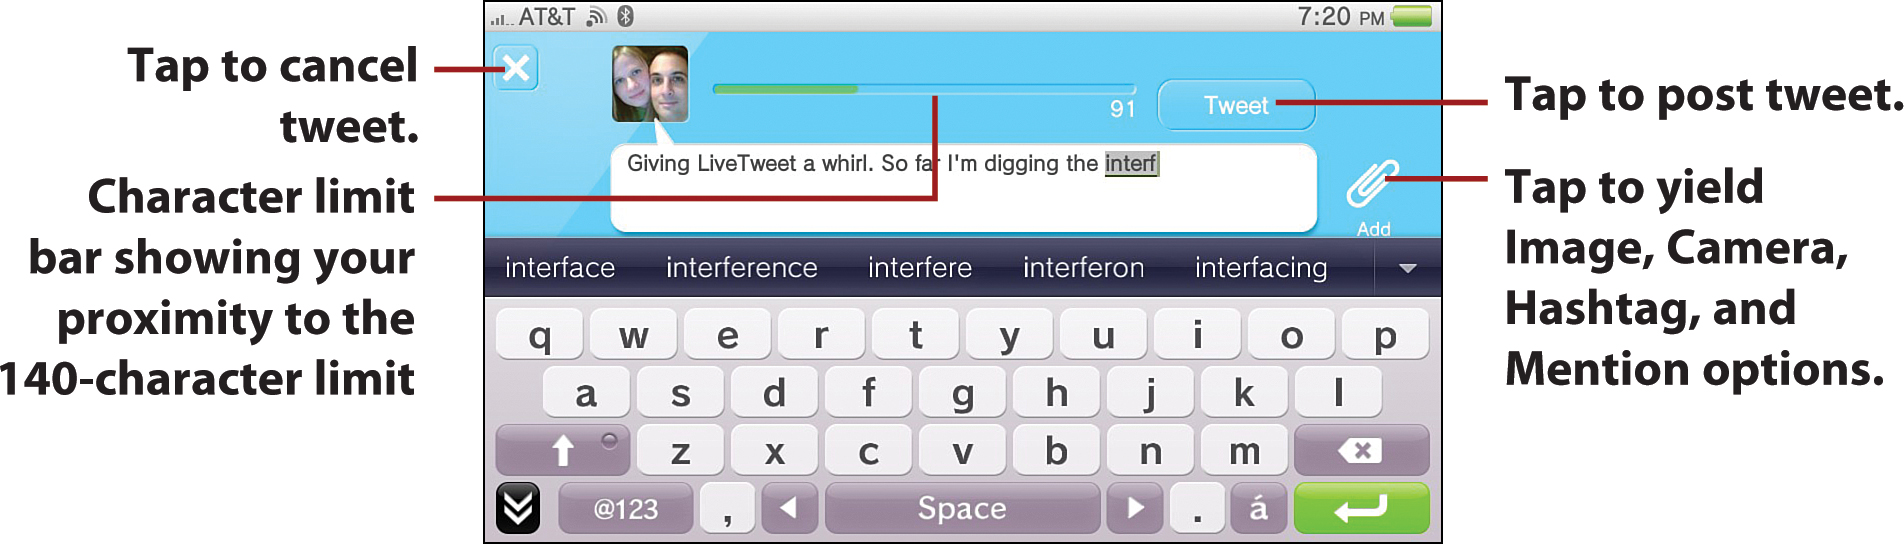
Twitter is another exceedingly powerful social media application. Unlike Facebook, you can follow anyone without the need to send a Friend Request, and many news organizations, celebrities, and corporate and business entities have accounts. In fact, the service boasts more than 300 million active users. Therefore, if you follow the right people, you might hear of news well before the headlines start to break. In addition, because Twitter messages (called “tweets”) are 140 characters or less in length, you can quickly scan through them, eliminating the need to give anyone even 2 minutes of your precious time.
The Twitter app for the Vita is called LiveTweet. Just as it is free to start a Twitter account, the LiveTweet app is free to download from the PlayStation Store. After you download the app, you can use it to access tweets in real time, compose your own tweets, find and follow people on Twitter, take photos with the Vita cameras and add them to your tweets, exchange direct messages with your followers, and review trending topics (these are up-to-the-minute hot topics).
Twitter LiveArea Screen
Compared with the Facebook LiveArea screen, the LiveTweet app has a rather sparse LiveArea screen.
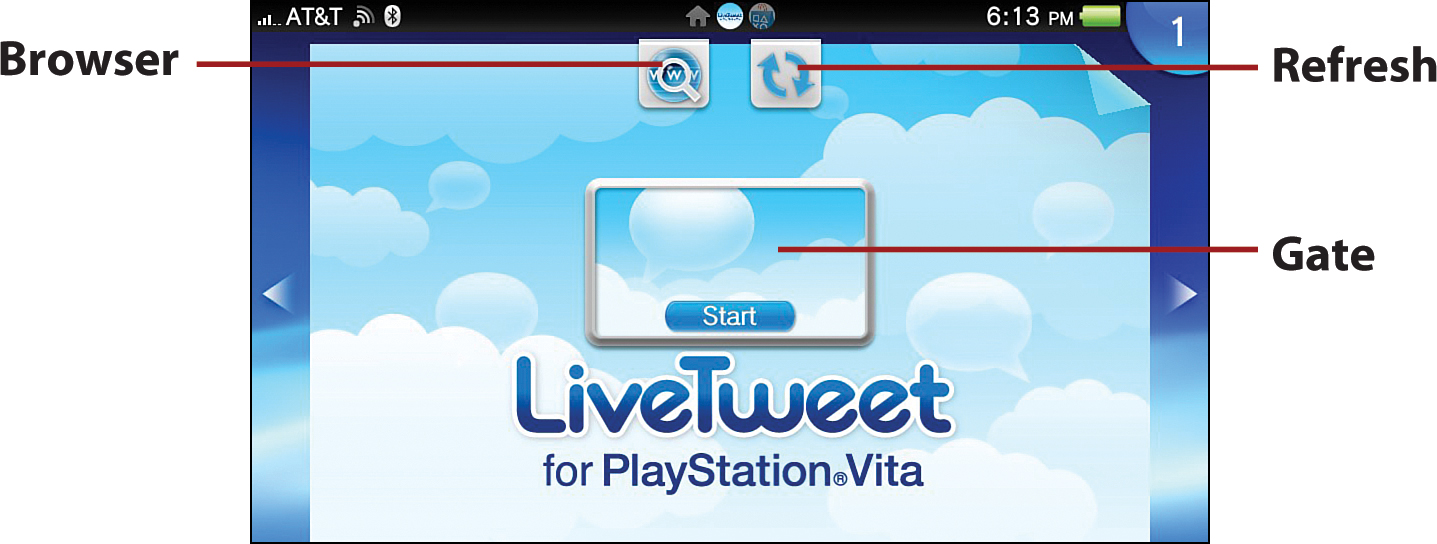
• Browser—Tap or select the Browser icon to open the Browser to pull up search results in Google on LiveTweet for PlayStation Vita.
• Refresh—Tap or select the Refresh icon to refresh the screen.
• Gate—Tap or select the Gate to enter LiveTweet.
Authorizing LiveTweet
Before you can get into LiveTweet, you must authorize it on the Twitter website.
1. Go into LiveTweet, tap next at the Welcome screen, and then tap the Go to the Twitter Website button on the instructional screen.

2. At the authorization page, enter your Twitter username or email address and password, and then tap the Authorize app button.
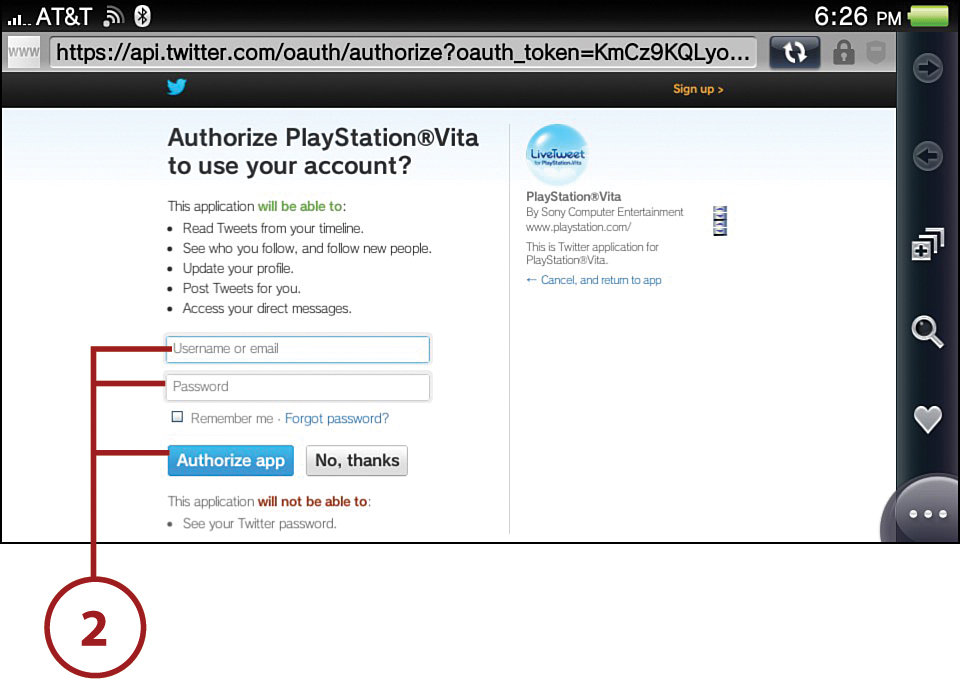
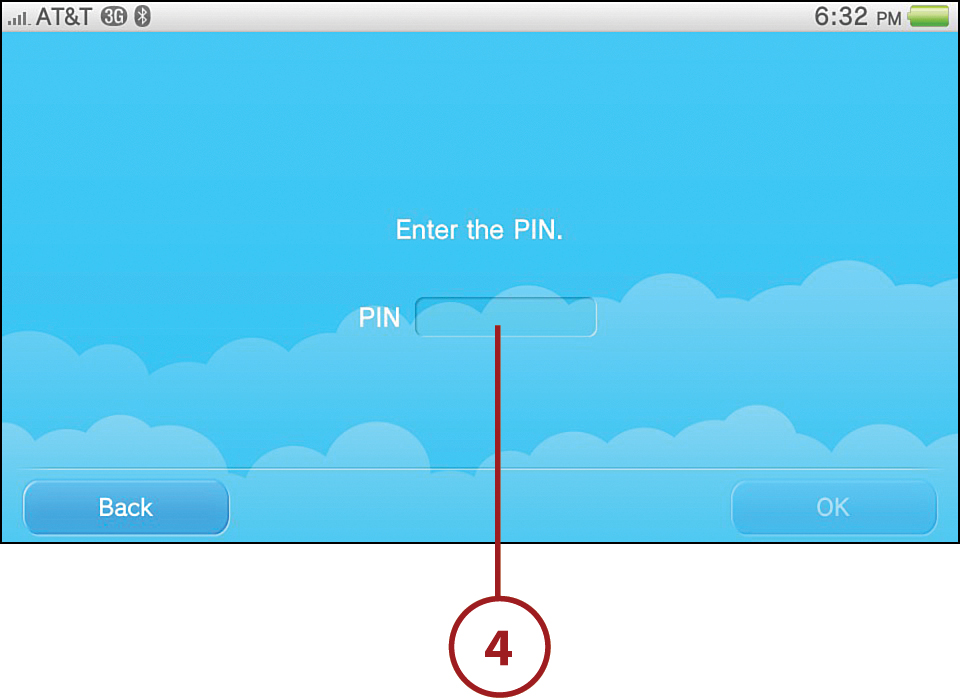
3. Write down or note the PIN shown onscreen and go back to LiveTweet.
4. Enter the PIN in the required field and tap Enter on the virtual keyboard or tap OK on the LiveTweet screen to enter LiveTweet.
Navigating LiveTweet
After you log into LiveTweet, you see your Twitter timeline, which is where all the tweets appear from the Twitter users that you follow. From this screen, you can also easily access your Mentions, Direct Messages, and Lists, as well as the Search and Settings options. The interface is tidy and easy to navigate.
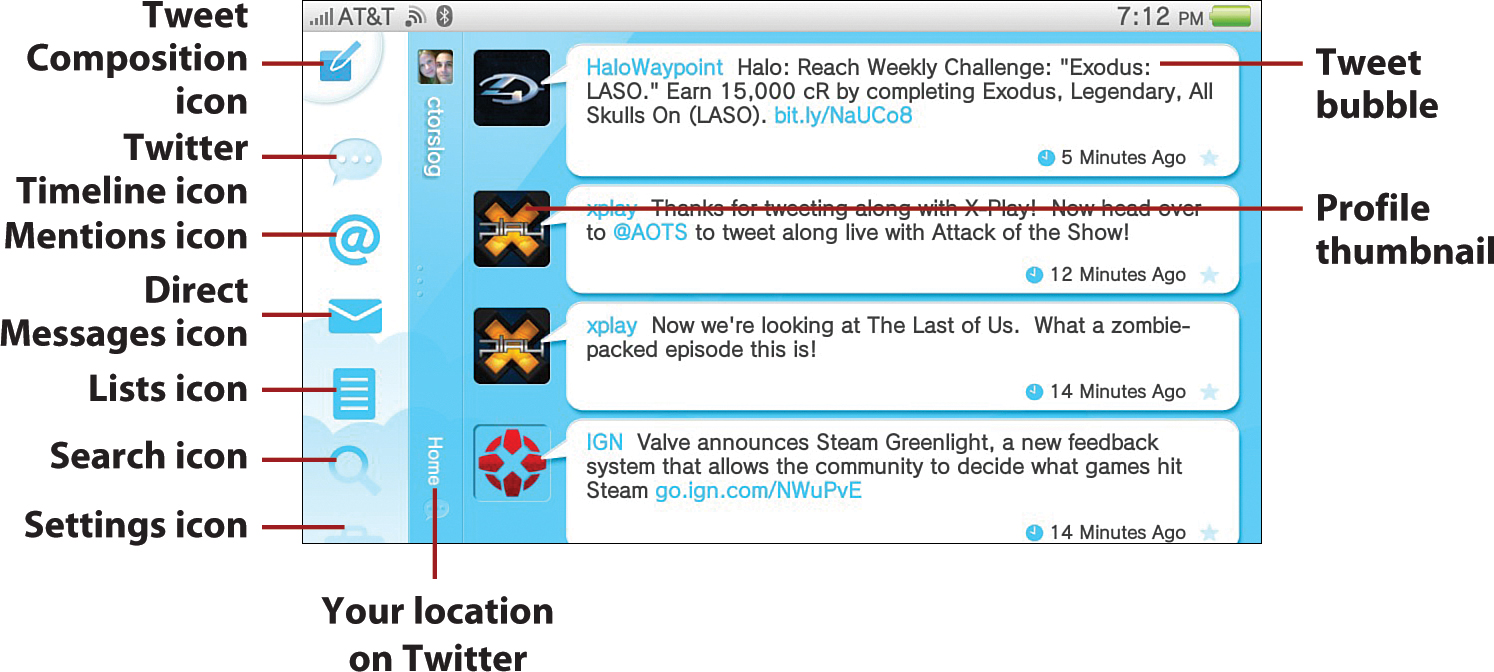
• Tweet Composition icon—Tap this icon to reveal a screen from which you can compose and issue your tweet.
• Twitter Timeline icon—Tap this icon to show all the tweets for individuals you follow. Tap it to return to your Twitter Timeline when you are on another main screen, such as Mentions or Direct Messages.
• Mentions icon—Tap this icon to access a page that outlines all the posts that mention you. A mention is any update in Twitter that contains @username anywhere in the body of the tweet.
Beware: If you see yourself mentioned in a tweet followed by just a URL, this is likely spam and you should not tap the link. Instead, you can block the “person” by tapping his or her Profile thumbnail, selecting Actions, and then tapping Block.
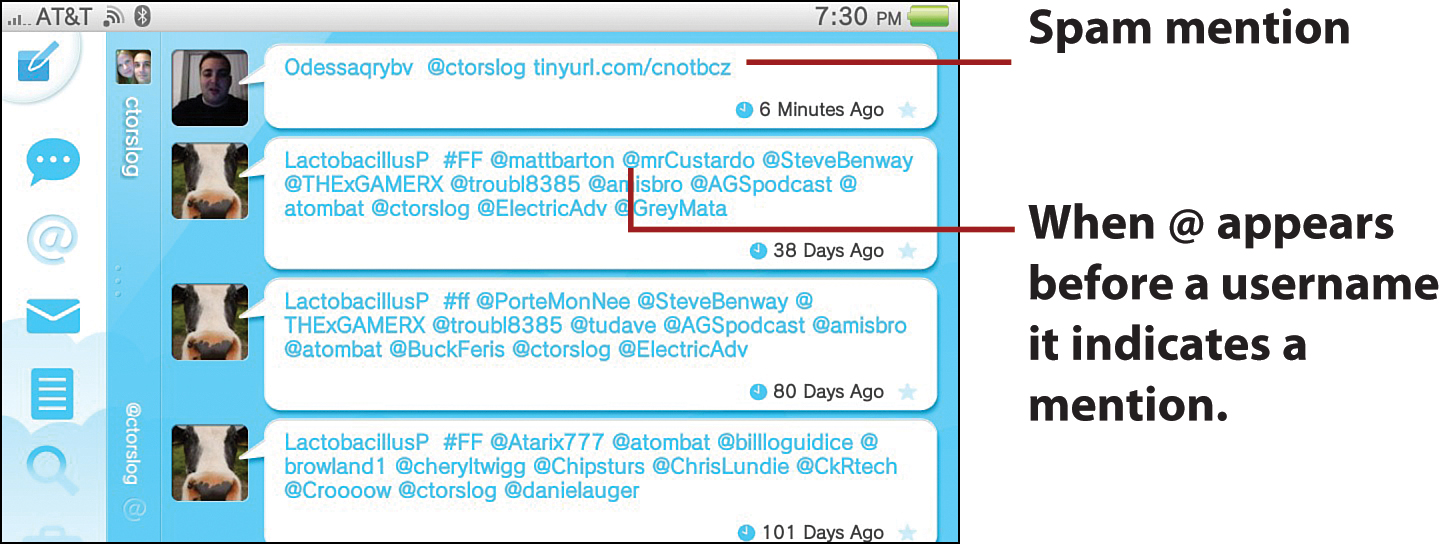
If you see a #FF followed by a bunch of Twitter usernames in your newsfeed on Fridays, this stands for #FollowFriday. Both of these are hashtags that people use on Fridays to suggest people for their followers to follow.
• Direct Messages—These are private messages sent directly to you. Sometimes when you follow an entity, you receive an automated message thanking you for the follow.
• Lists icon—Tap this icon to access Lists by You, Lists You Follow, Lists Following You, and Create a List options. For more comprehensive information on Twitter lists, visit https://support.twitter.com/articles/76460-how-to-use-twitter-lists.
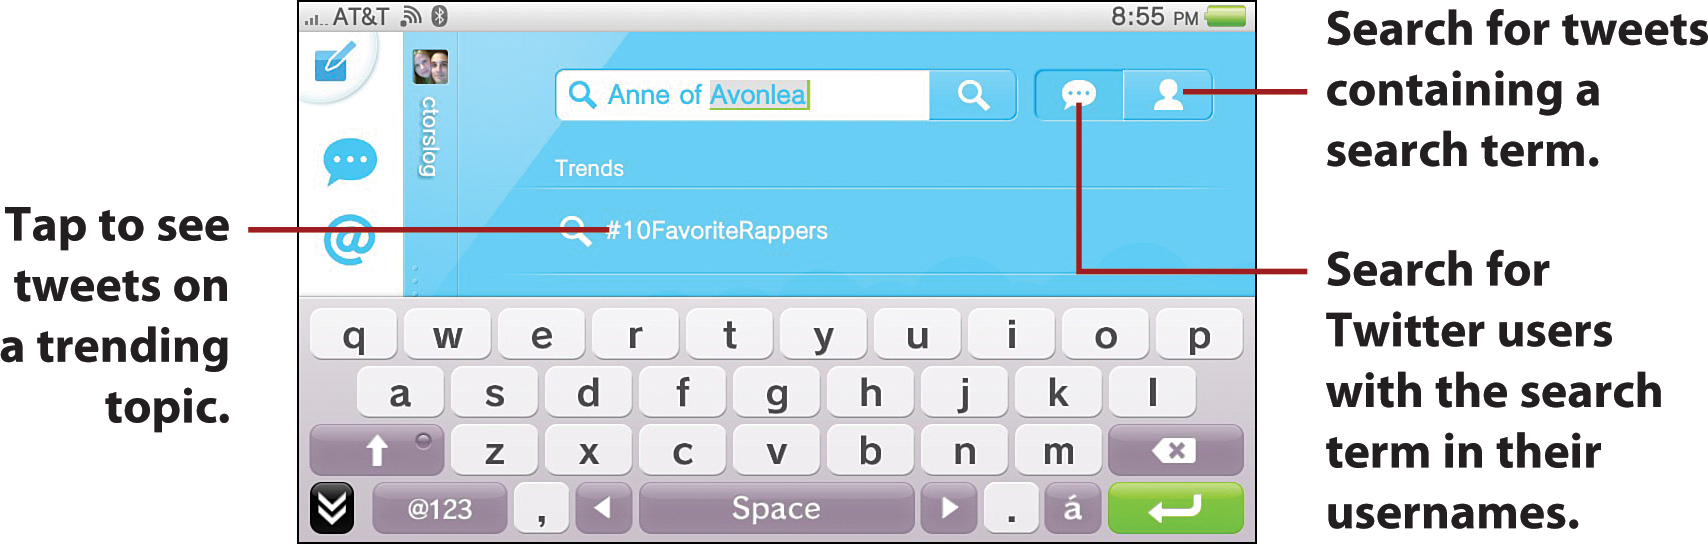
• Search icon—Tap this icon to conduct a search and view current trends.
• Settings icon—Tap this icon to access your account settings, including options to view your Profile, Delete Account Information from your Vita, and view Intellectual Property Notices.
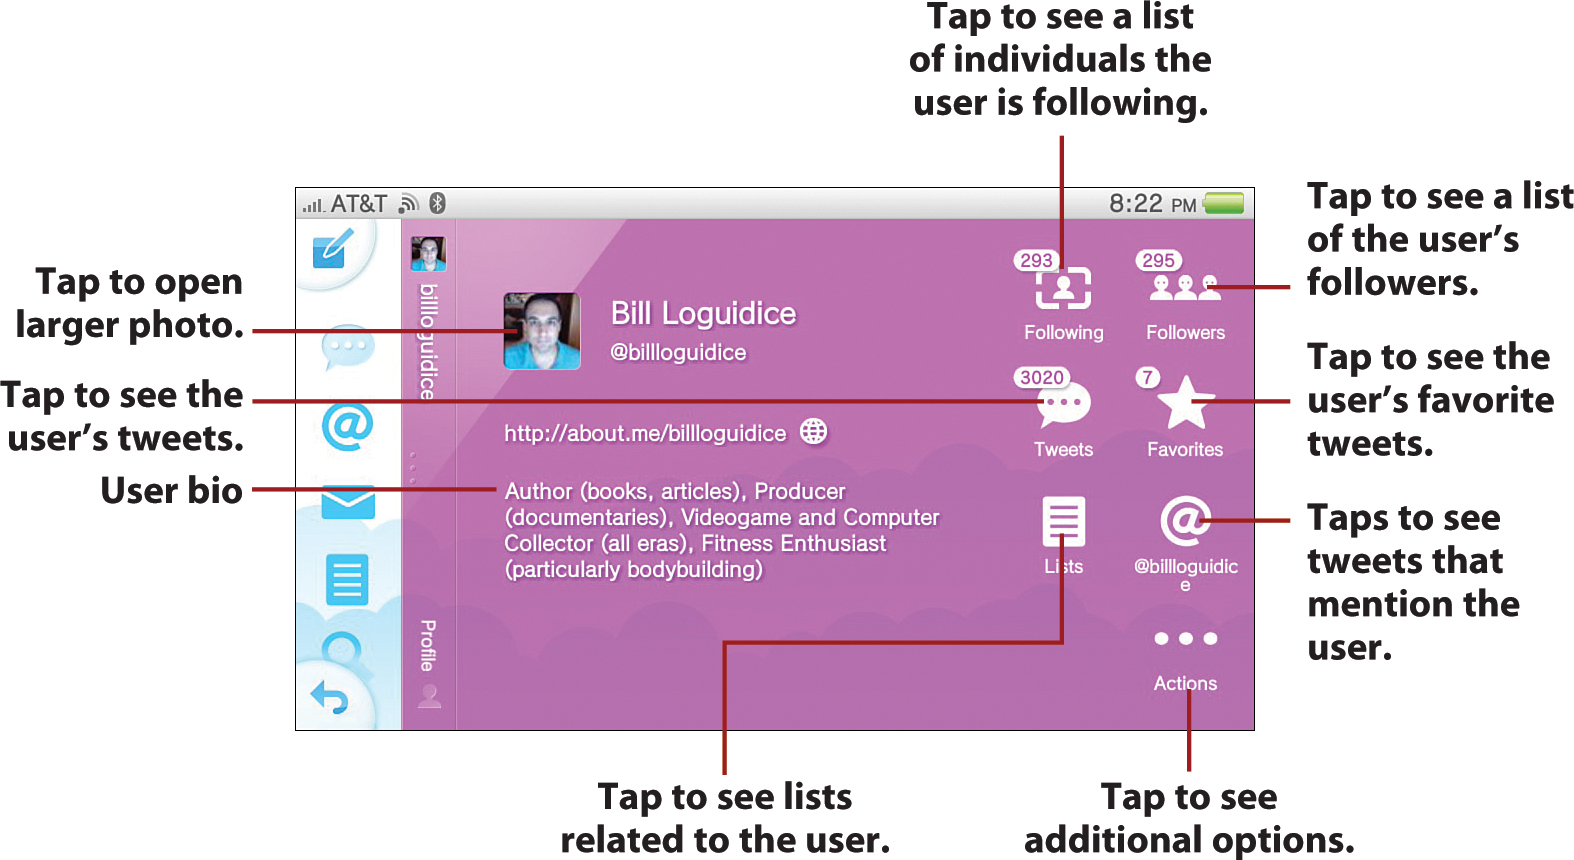
• Profile thumbnail—Tap to access an individual’s Profile screen, which provides information on who the person is following and his or her followers, tweets, favorite tweets, lists, and mentions. There is also an Action icon, which yields Unfollow, Direct Message, Add to List, and Block/Unblock options when tapped.
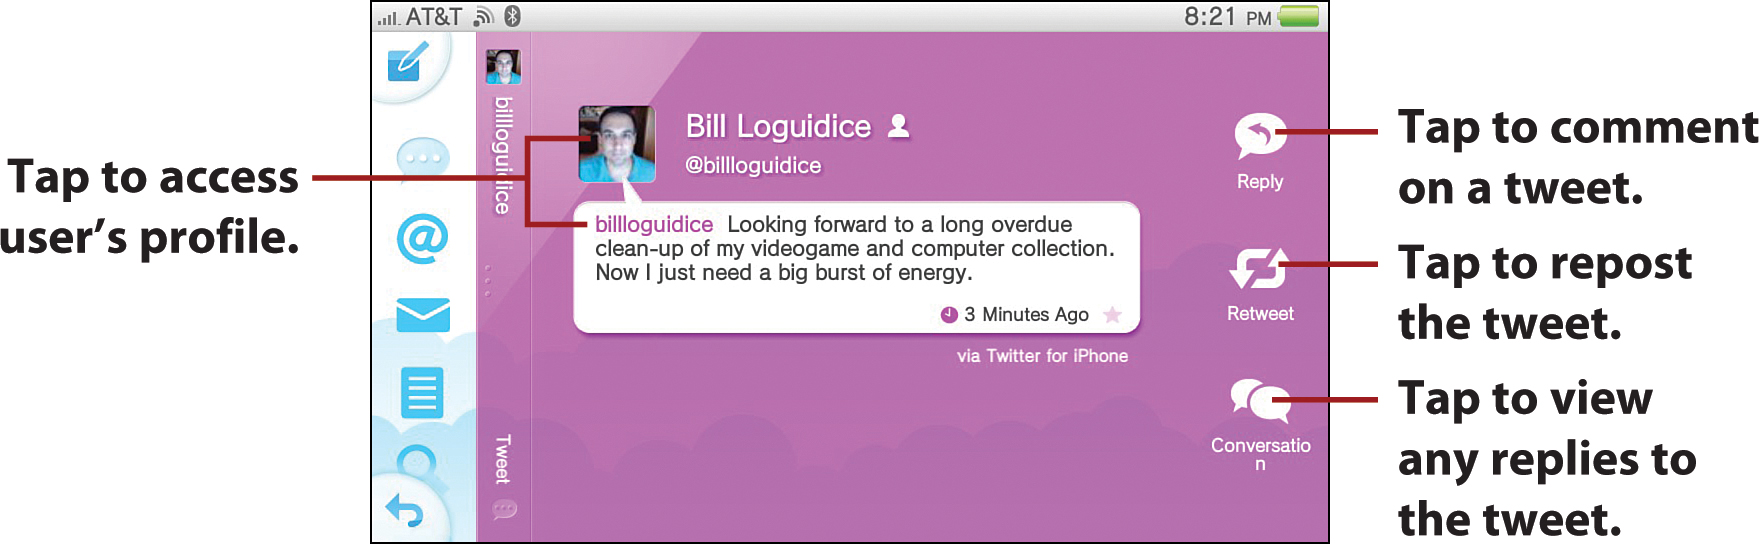
• Tweet bubble—When you tap the tweet bubble, you see the tweet on the full screen and enable Reply, Retweet, and Conversation functionality.
Checking in with foursquare
As a free, location-based social networking application, foursquare enables you to discover places of interest around you while earning virtual badges, such as by checking into an establishment, an act that might also net you real discounts. For example, if you check into a restaurant for the first time, you might receive an onscreen coupon that you can use to receive a percentage off your tab. If you check into an establishment more than any other recent foursquare patron, or are the very first foursquare user to check into a place, you might just become the mayor of said establishment. Sure, that doesn’t get you Bloomberg’s salary, or any salary for that matter, but it might give you some bragging rights with your friends and family.
Have the badges piqued your interest? If you have a collect-them-all mentality, you can find out more about the available foursquare badges and what it takes to earn them at www.4squarebadges.com/foursquare-badge-list/.
Another benefit to foursquare is that you can get the scoop on places you check into from other patrons who have been there and done that, so it serves as a mobile trip advisor. When you check into a place, you can post pictures related to that venue and leave a review, passing on your advice and experiences to subsequent visitors, provided they are foursquare connoisseurs. You can also connect your foursquare account with your Facebook and Twitter accounts, enabling your friends and followers to see how you roll.
foursquare LiveArea Screen
After you download the free foursquare app from the PlayStation Store and tap or select its associated icon on the Home screen, you see the LiveArea screen.
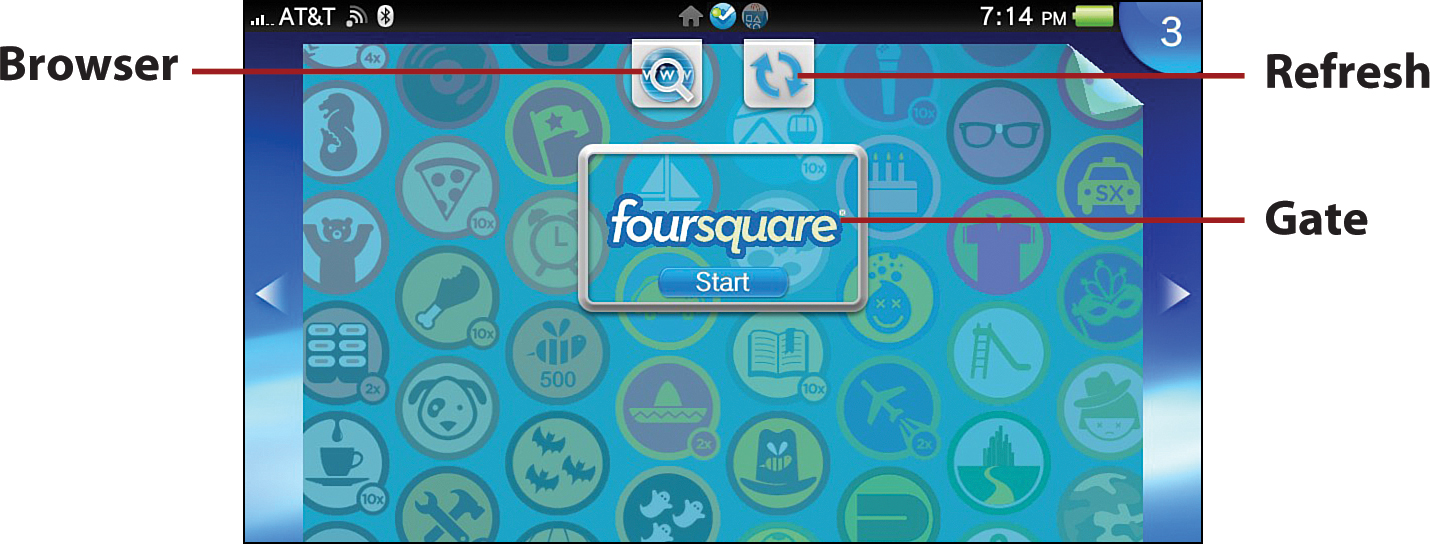
• Browser—Tap this icon to open the Browser to view results of a Google search for “foursquare.”
• Refresh—Tap this icon to refresh the screen.
• Gate—Tap this icon to enter foursquare.
Getting a Handle on foursquare
Although you don’t have to answer a riddle to get to the foursquare Applications screen, you’ll have to go through a requisite series of prompts to get there. The first prompt is instructional, basically stating that foursquare will use your location data when you “check-in” at locations. The second prompt asks you whether this is OK. After you answer “Yes,” you seal the deal by logging into your existing account or signing up for an account via email. When you’re in the application, you’ll see a top horizontal menu, right vertical menu, and options in the center.
The top horizontal menu contains the following options:
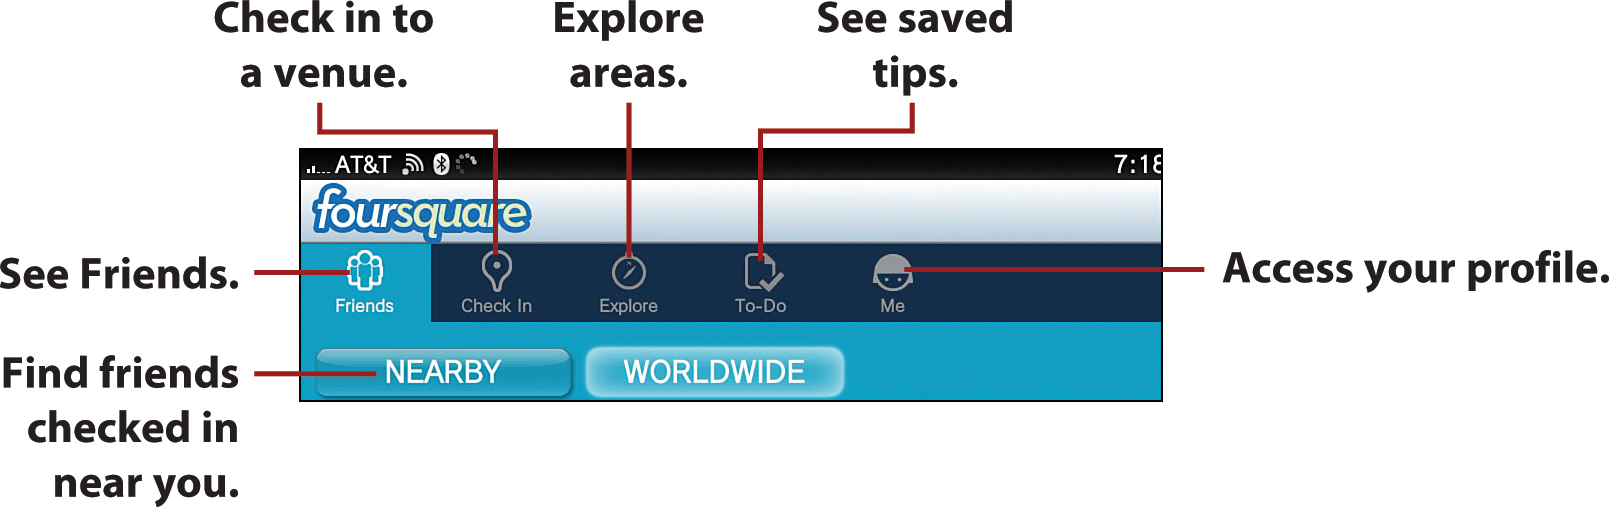
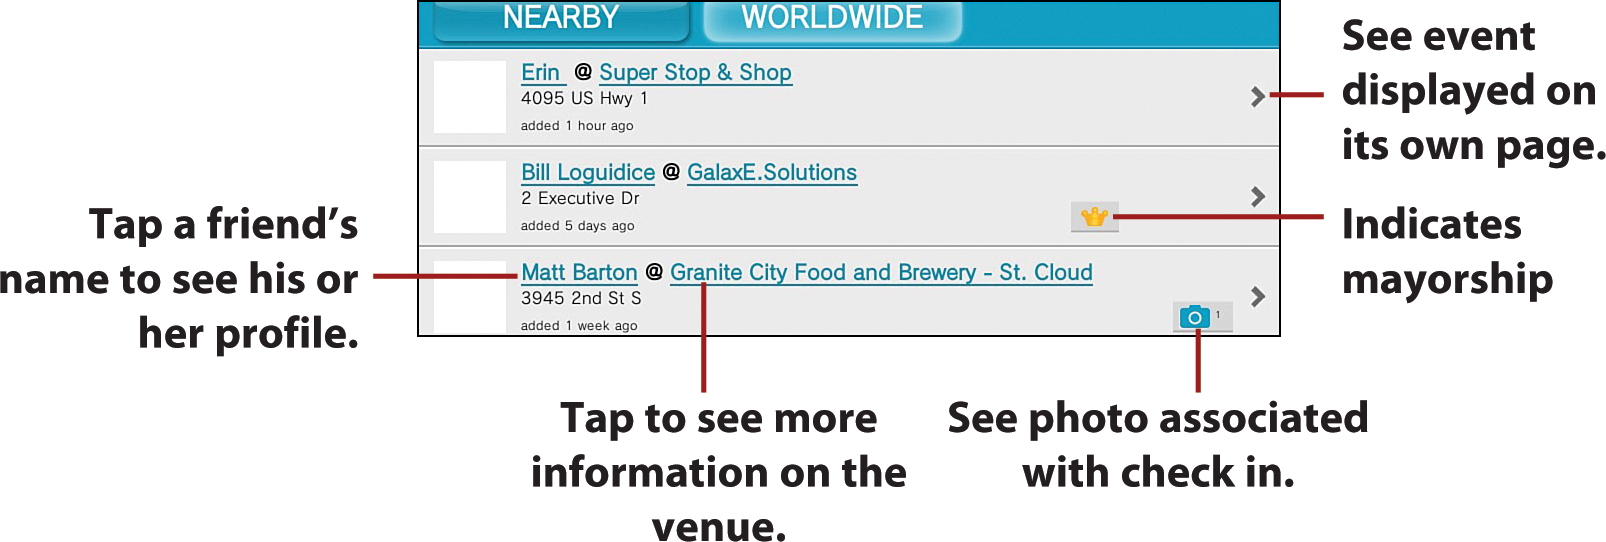
• Friends—This is the default page. Scroll to see your and your friends’ recent activity. Tap a friend’s name to see his or her foursquare profile, including number of check-ins, badges, and mayorships; friends’ list; and tips he or she wrote. Tap a venue to access information associated with it, including its location, who the mayor is, and tips and photos posted by past patrons.
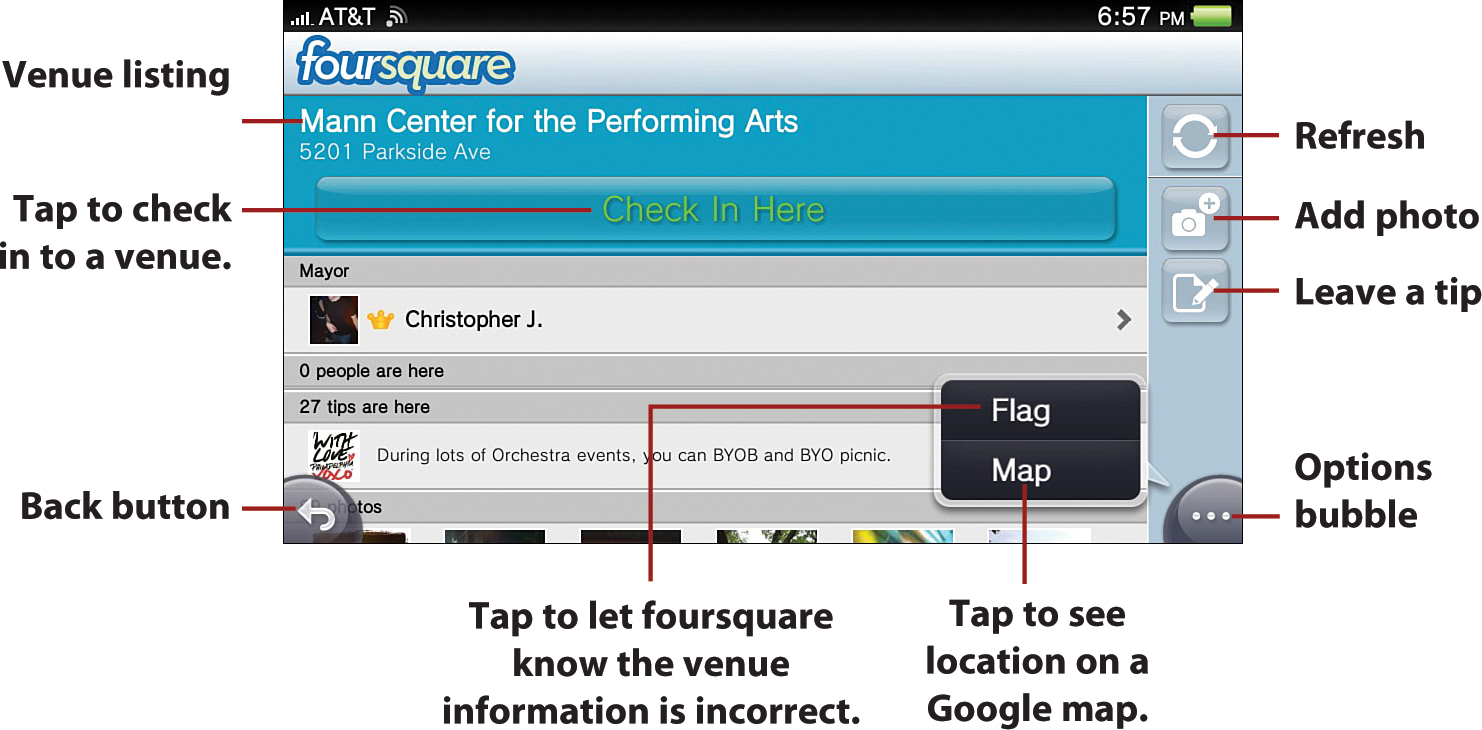
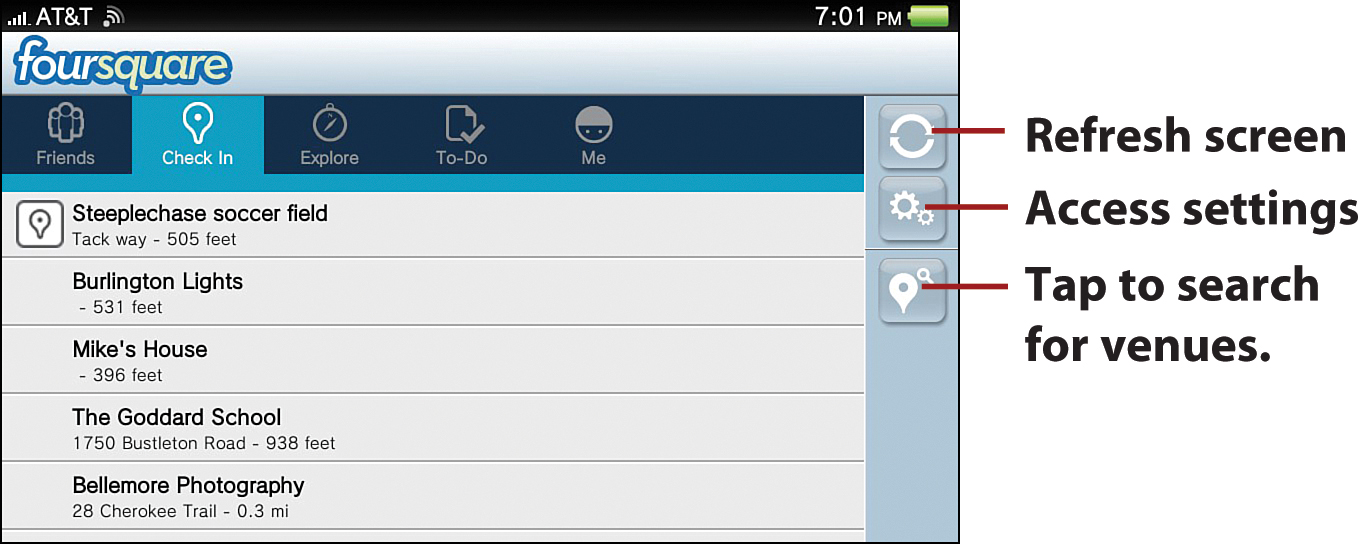
• Check In—Tap this tab to see venues that you can check into around you.
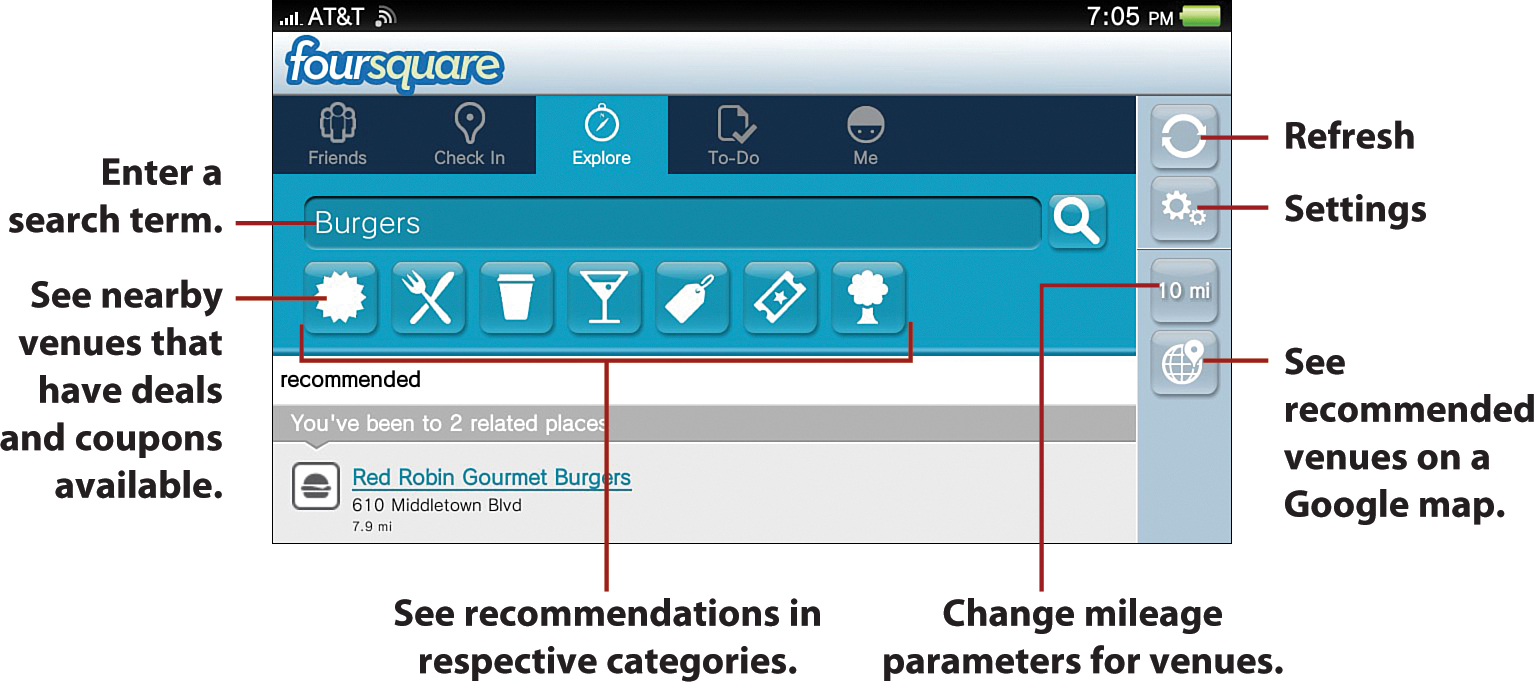
• Explore—Tap this tab to see recommendations for popular venues around you. Tap the Specials icon to see deals and discounts at nearby venues. If a search for a particular venue does not yield results, adjust the mileage parameters.
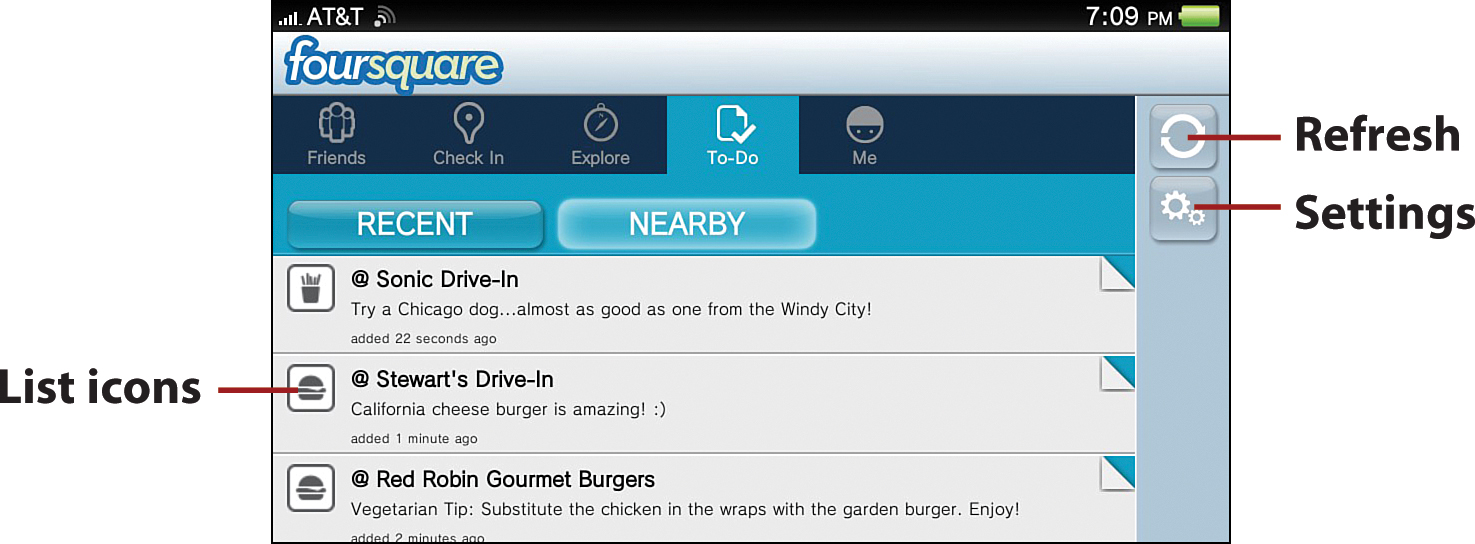
• To-Do—Tap this tab to access foursquare tips that you save. In other versions of foursquare, you can also save venues, but that is not yet possible in the Vita version.
Tap an icon in the to-do list entries to pull up a page from which you can access info on the venue and on the poster of the tip. You can also access options to remove the entry from your to-do or mark it as completed, which also appears just to remove it from the list.
• Me—Tap this tab to access your own profile, including your Check-Ins, Badges, and Mayorships. You can also peruse your Most Explored Categories and Top Places, the latter of which shows the venues you’ve checked into the most. You can also see your friends and search for friends to add.
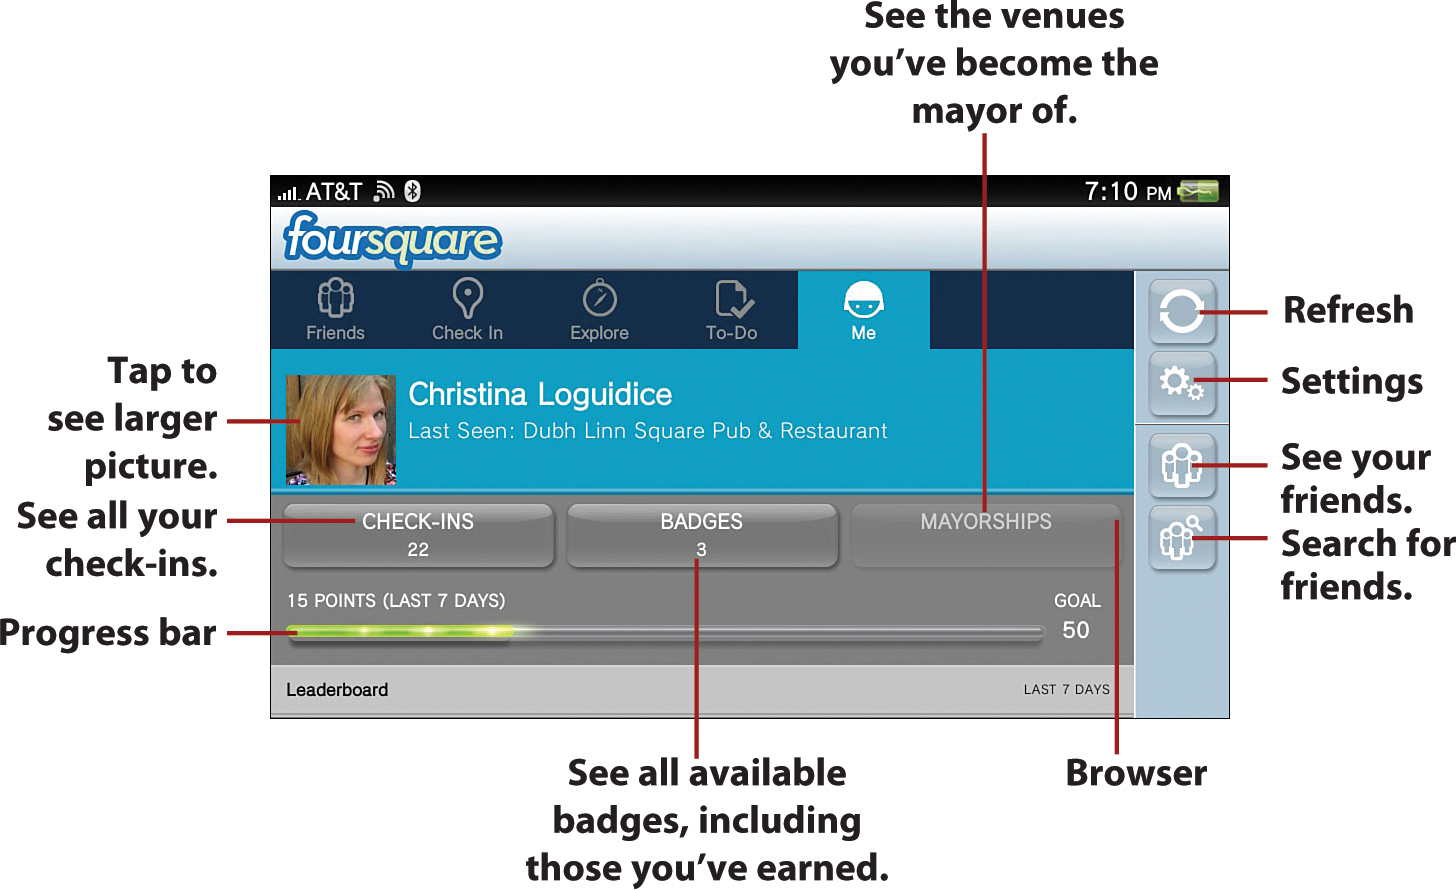
Each check in gives you points. The progress bar shows how close you are to achieving its set goal.
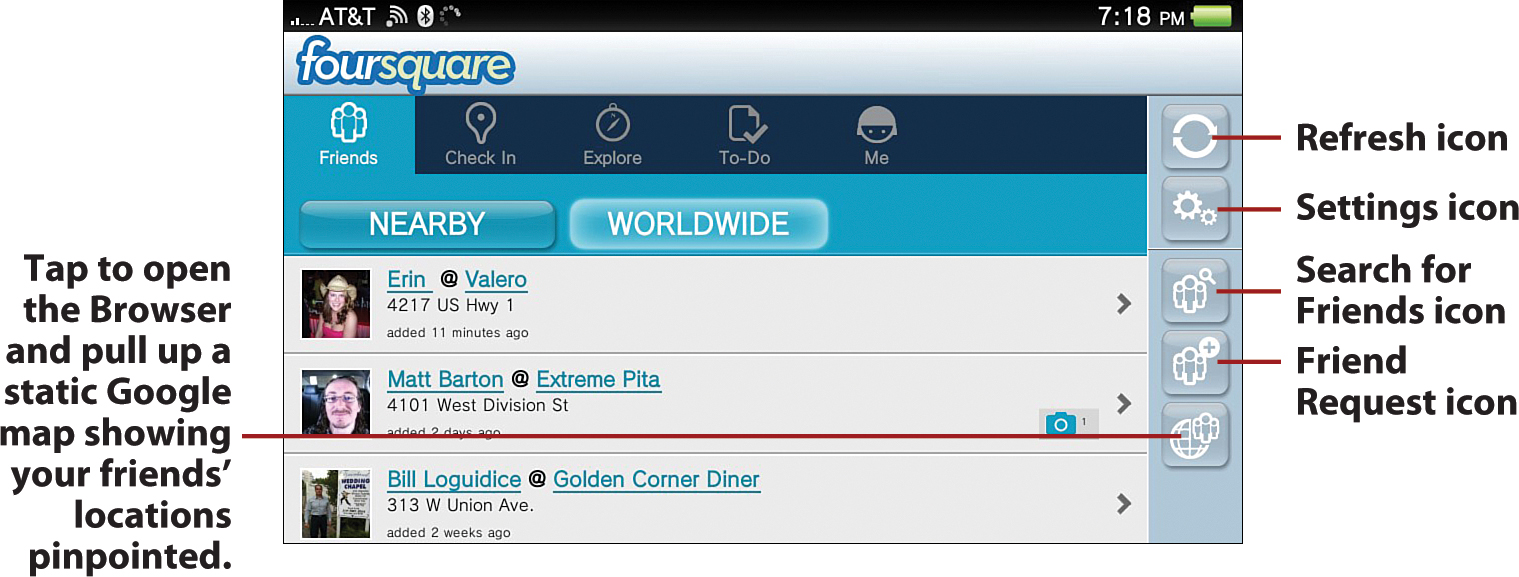
The right vertical bar includes the following options:
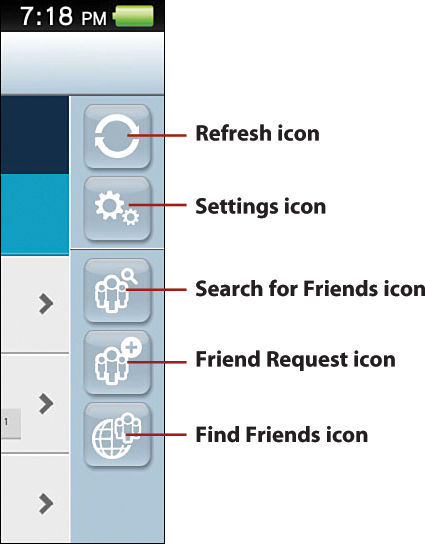
• Refresh icon—Tap to refresh the screen.
• Settings icon—Tap to access the Settings page, including Device Preferences (Distance Units), Friends (Add Friends and Friend Requests), Troubleshooting (Clear Image Cache and Clear Search History), About (Terms of Service and Privacy Policy), and Logout.
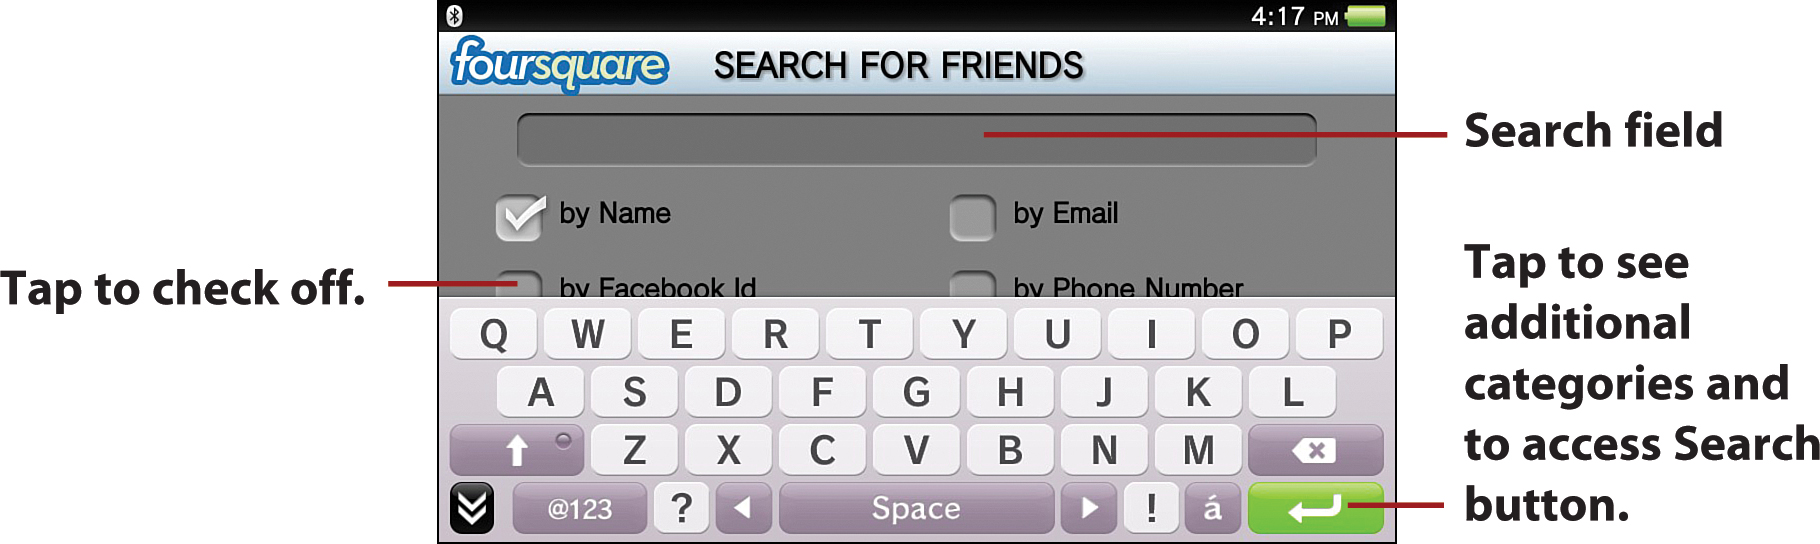
• Search for Friends icon—Tap to launch virtual keyboard and search for friends by Name, Facebook ID, Email, or Phone Number, Twitter Handle, or Twitter Source.
• Friend Request icon—Tap to access your friend requests.
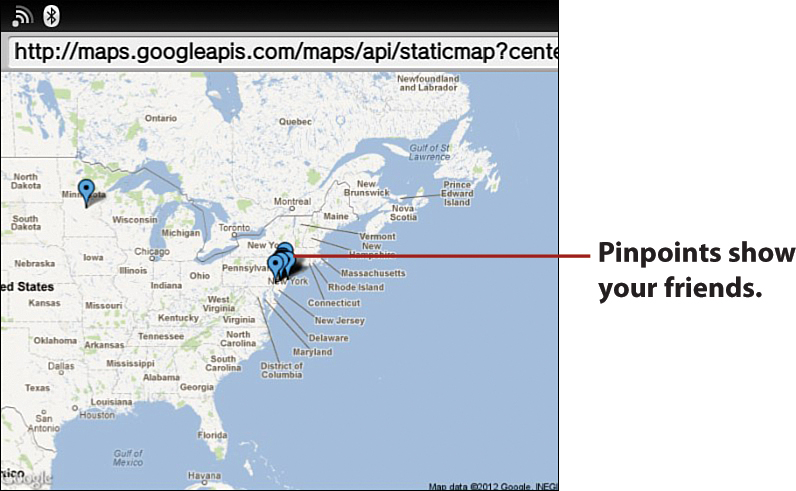
• Find Friends icon—Tap to open the Browser and pull up a static Google map showing your friends’ locations pinpointed.
The center of the screen shows your friends and their most recent activities. It also shows you photos associated with an activity and a crown icon if you or your friend is the mayor of any venue.
Making the Call with Skype
Skype is what is commonly referred to by technophiles as a VoIP (Voice over Internet Protocol) service. As such, you can use Skype to communicate with friends, family, and other persons via voice chat, video chat, and instant messaging over the Internet; however, the Skype application for Vita does not enable instant messaging. If the individual you are communicating with is on Skype, voice and video chatting are free. If the person does not have a Skype account, you can still call his or her mobile or landline, but at a cost. For more information on the available Skype plans, features, and costs, visit http://www.skype.com/intl/en-us/prices/.
Skype works in the background on your Vita, so you can receive calls while you are in other applications or your Vita is in standby mode. Although the service works over both 3G and Wi-Fi connections, performance over Wi-Fi is far smoother. In addition, with 3G you need to pay close attention to how much data your calls consume, as your monthly data plan allowances can be quickly devoured.
Skype uses network and battery resources as long as the application is open. To avoid this drain, close the application by peeling the LiveArea off the screen when you are done using the app.
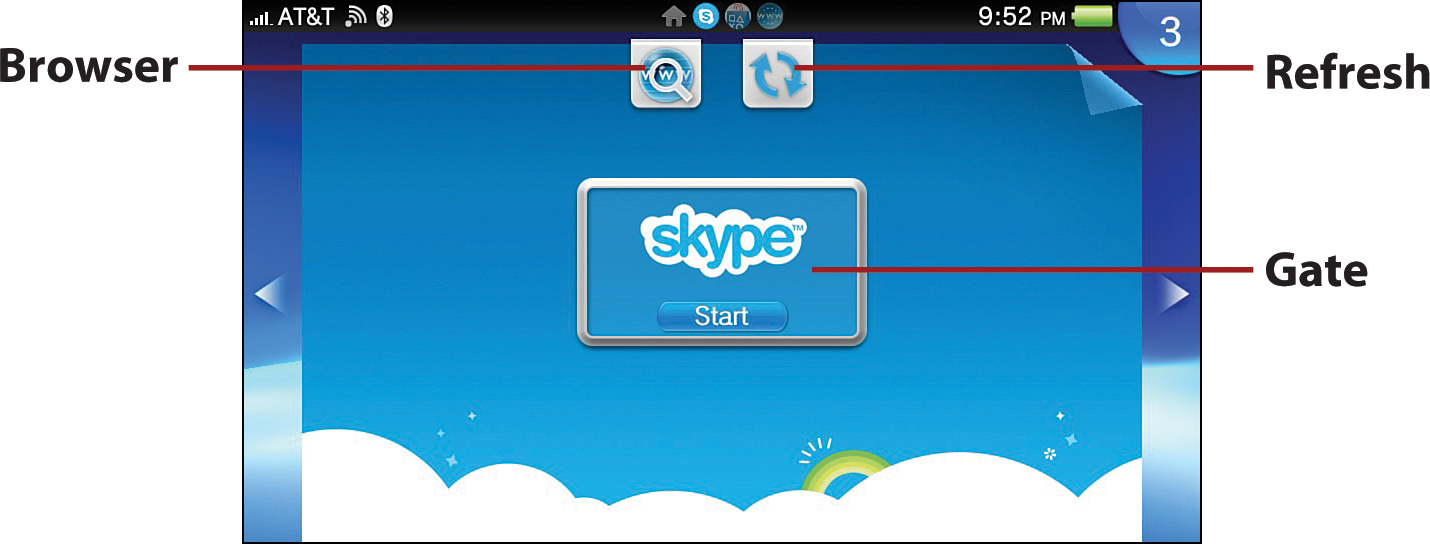
Getting Started with Skype
After you download the free Skype app from the PlayStation Store and tap or select its associated icon on the Home screen, you see the LiveArea screen. This screen is bare bones, featuring the Gate, through which you get into the application; the Browser button, which pulls up search results for the term “Skype” from Google; and the Refresh button, which refreshes the screen, although there isn’t anything that can be refreshed.
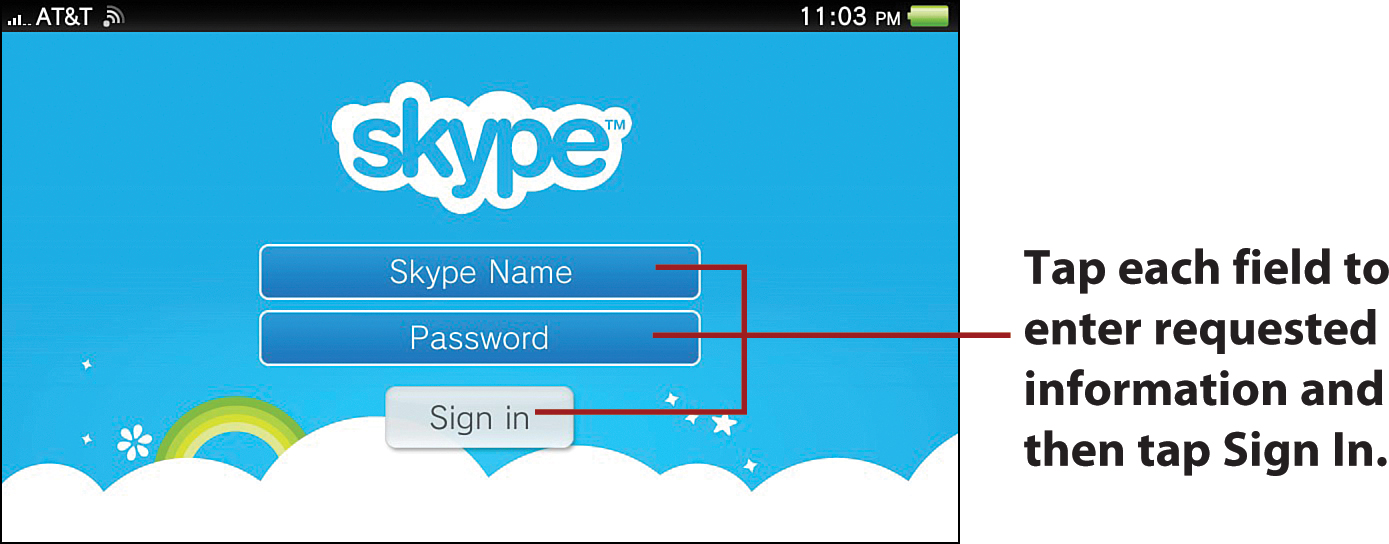
The first time you pass through the Gate, you have to sign into your Skype account. Creating a Skype account from the app itself is not possible, so if you don’t already have an account, you have to go online to www.skype.com to create one.
Examining the Skype Application
After you successfully log into your Skype account, you see the Application screen, which is the All Contacts screen.
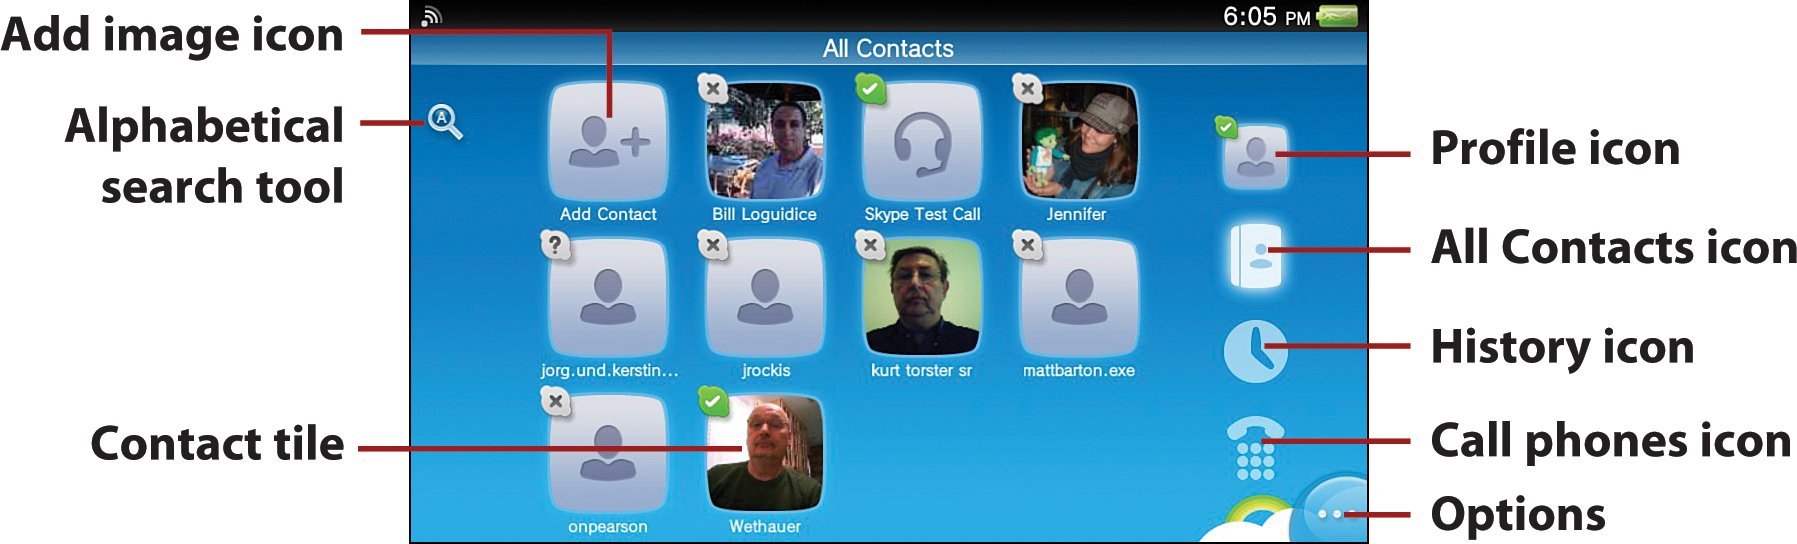
• Add Contact—Tap to add a new Skype contact, either with the Find a Skype Contact option, or the Add a Telephone Number option.
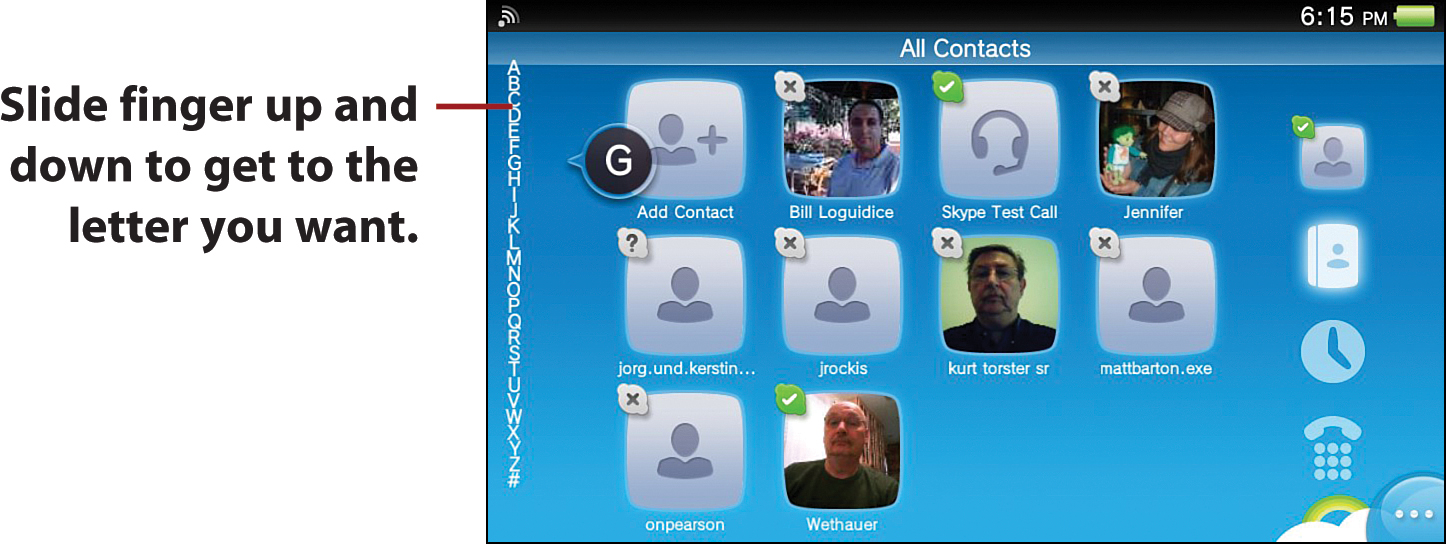
• Alphabet Search tool—If you have a lot of contacts, touch this icon and then scroll through the alphabetical index bar to the letter for the contact you want. If you don’t have many contacts, this bar is useless.
• Contact tiles—Tap a tile to pull up that contact’s profile and contact information. You also can tap buttons to Video Call or Call that person. Options allow you to Remove Contact, Block Contact, or Mark as Favorite Contact.
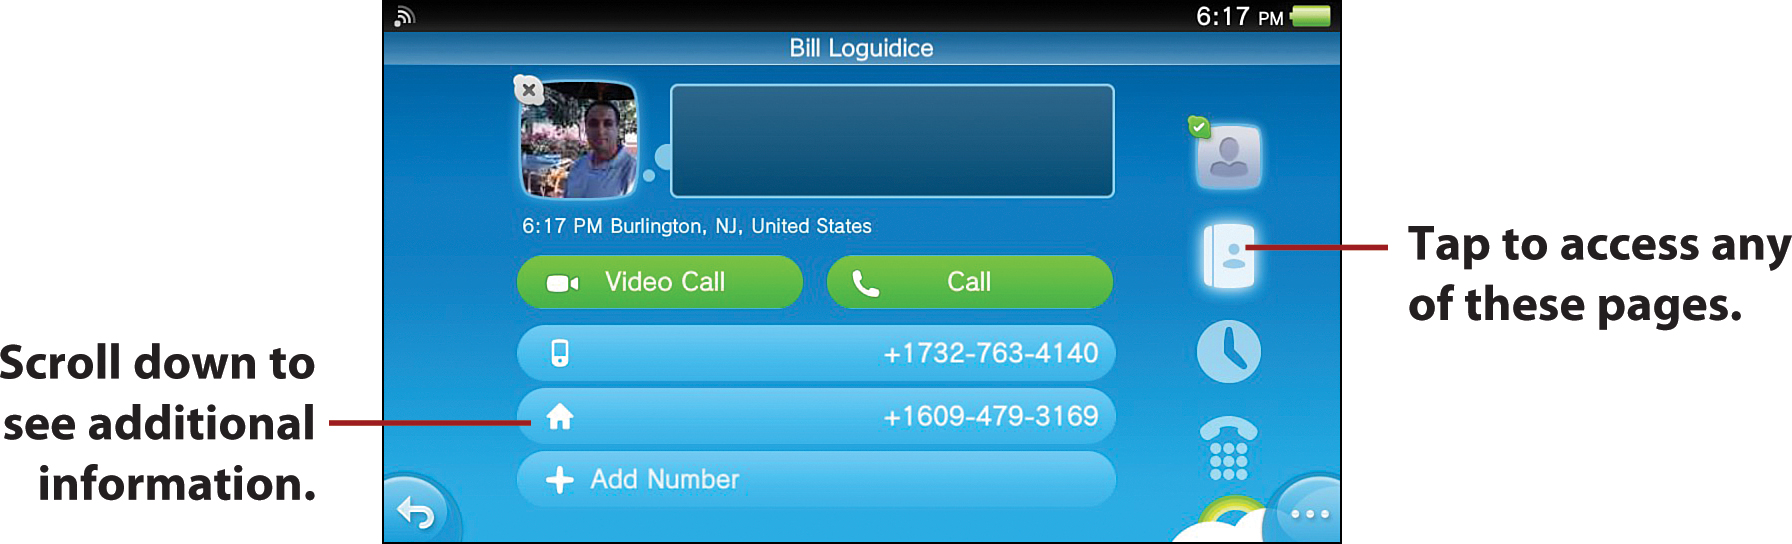
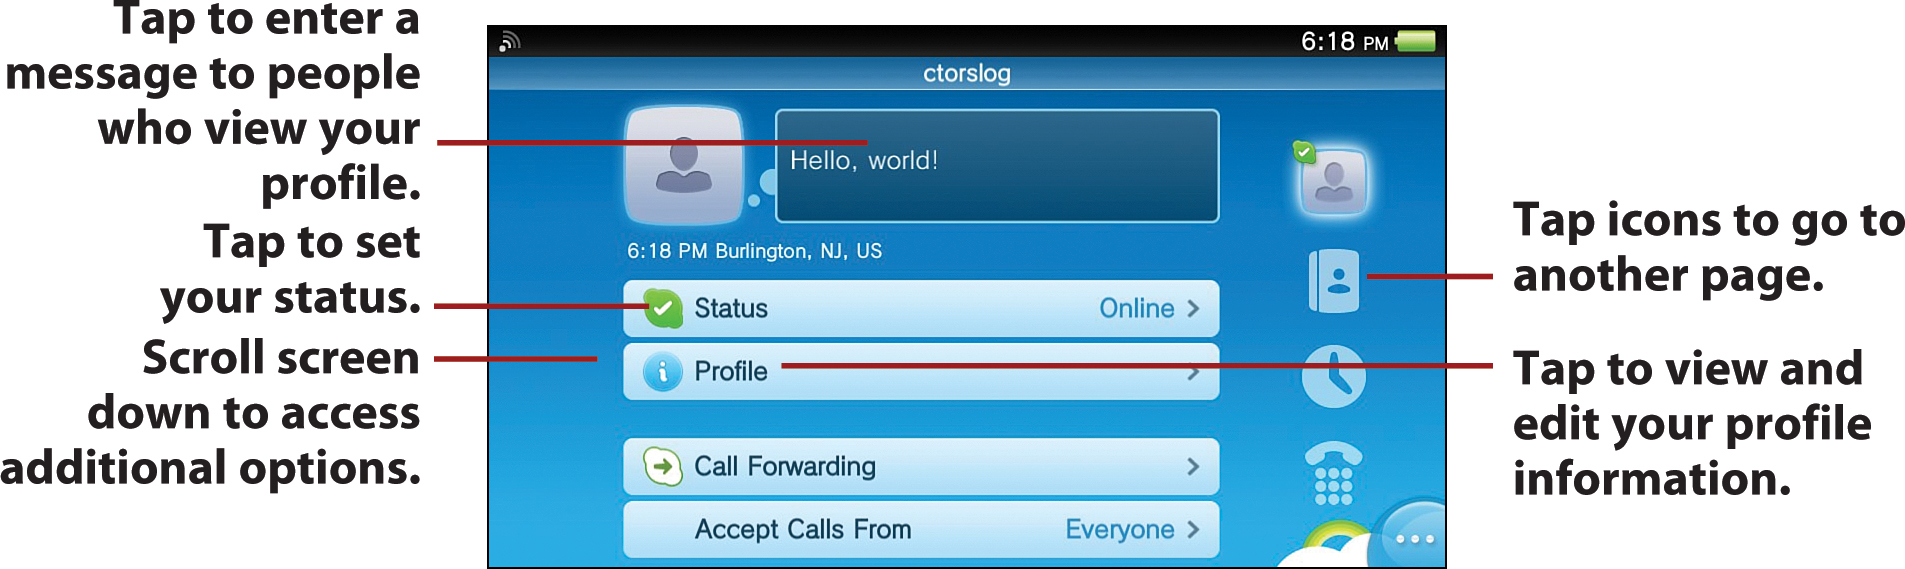
• Profile icon—Tap this icon to access your profile. From the profile screen, you can change your Skype status to Online, Away, Do Not Disturb, Invisible, and Offline; edit your profile information, including name, location information, gender, birth date, bio, and various phone numbers; see your Call Forwarding status; and edit who you accept calls from, namely, Everyone or Contacts Only. You can also see whether you have Skype Credit, adjust your password and sign-in settings, and opt to Sign Out of your account. Options allow you to Set Your Profile Picture.
• All Contacts icon—Tap to return to the All Contacts page when you are on another page, such as your profile screen or the Call Phones screen. Tap Options to view options for listing All Contacts, Favorite Contacts, Online Contacts, or Blocked Contacts. There is also an option to Search Contacts.
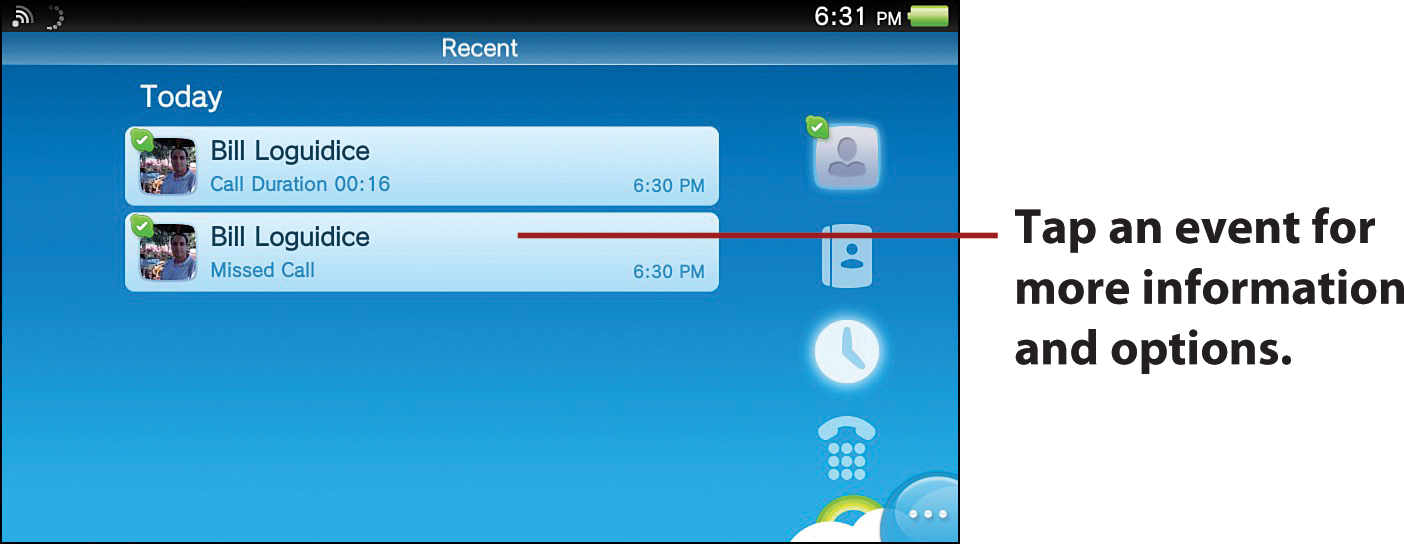
• History icon—Tap this icon to view your Skype history events. Tap a listing to pull up information on the individual you chatted with. Options allow you to Sort Messages and Delete Messages.
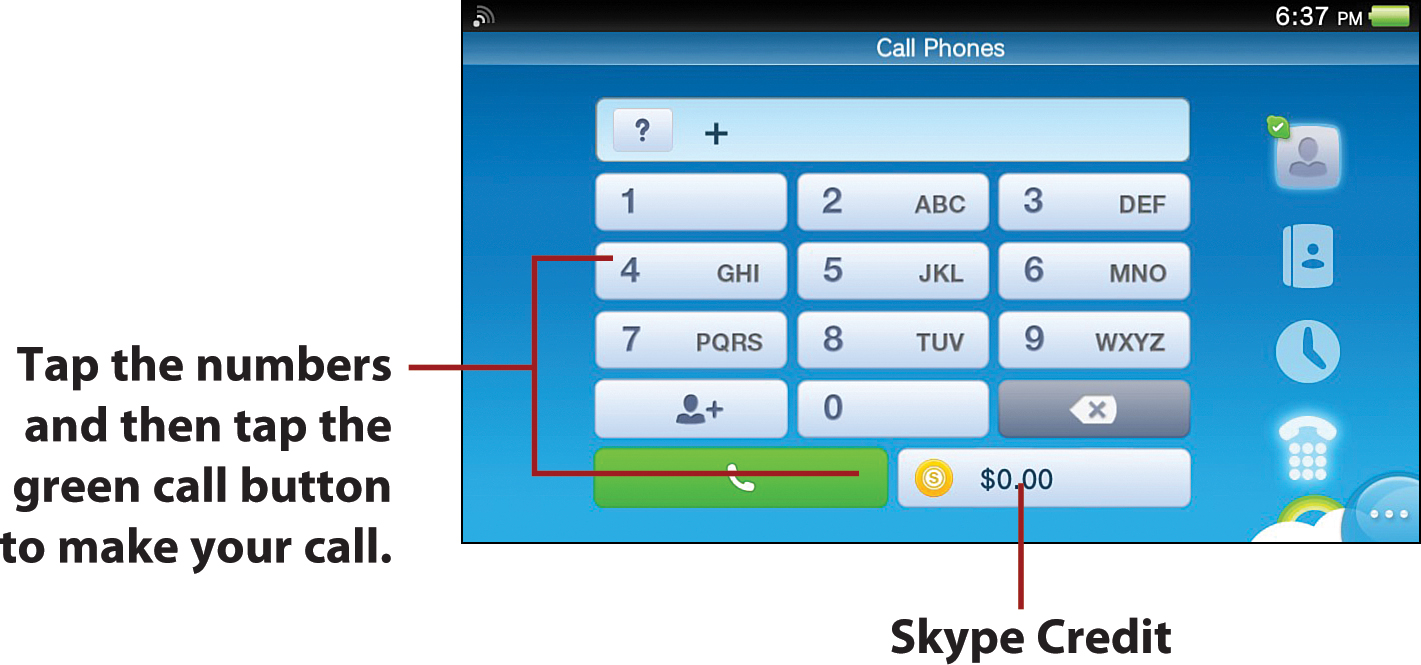
• Call Phones icon—Tap this icon to enter a number to call a mobile or landline. Tap the Skype Credit icon to buy additional Skype credits. Options allow you to Save a Phone Number.