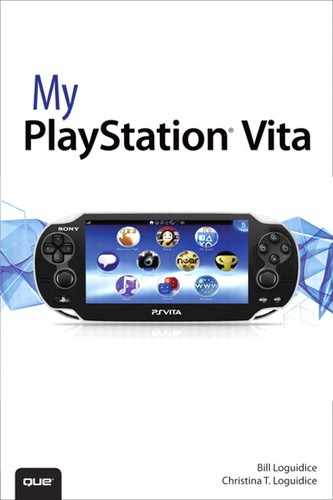
12. Tuning in to Music
In this chapter, you learn about the Music application and Music Unlimited, the latter of which is Sony’s streaming music service.
• Getting to Know Music Unlimited
• Getting Help with Your PlayStation Vita
If you want to “pump up the jam” on your Vita, you can do so by downloading music to your handheld from your computer or PlayStation 3. This music gets stored in your Vita’s Music app. If you are not happy with the scope of your music library, prefer having access to more artists and newer titles, or simply don’t have space to spare on your Vita, you might want to consider signing up for Music Unlimited, which is Sony’s streaming music service. According to Sony, this service enables you to access “millions of songs to fit your mood and lifestyle.” This chapter outlines all the moves required to get you in the groove via your Vita.
Understanding the Music App
Until you download music and playlists to your Vita, there is no point in accessing the Music app, because there are no preinstalled hidden musical gems waiting to be discovered. For instructions on downloading music and associated playlists to your Vita, turn to Chapter 8, “Managing Media with Content Manager,” which outlines Vita’s Content Manager. If you are copying music and playlists from your computer to your Vita, see “Copying and Deleting Content” under “Working with a Computer.” If you are copying music and playlists from your PlayStation 3 to your Vita, see “Copying and Deleting Content” under “Working with a PlayStation 3.”
The Music app supports MP3 (MPEG-1/2 Audio Layer 3), MP4 (MPEG-4 AAC), and WAVE (Linear PCM) audio file formats. If you’ll allow us a Martha Stewartism, this is a “good thing,” because these are among the most commonly used audio file types, which makes building your music library on your Vita easy. Keep in mind, however, that some files might have copyright blocks or other playback restrictions, and as crafty as your Vita is, it cannot circumvent these protections.
Examining the Music LiveArea Screen
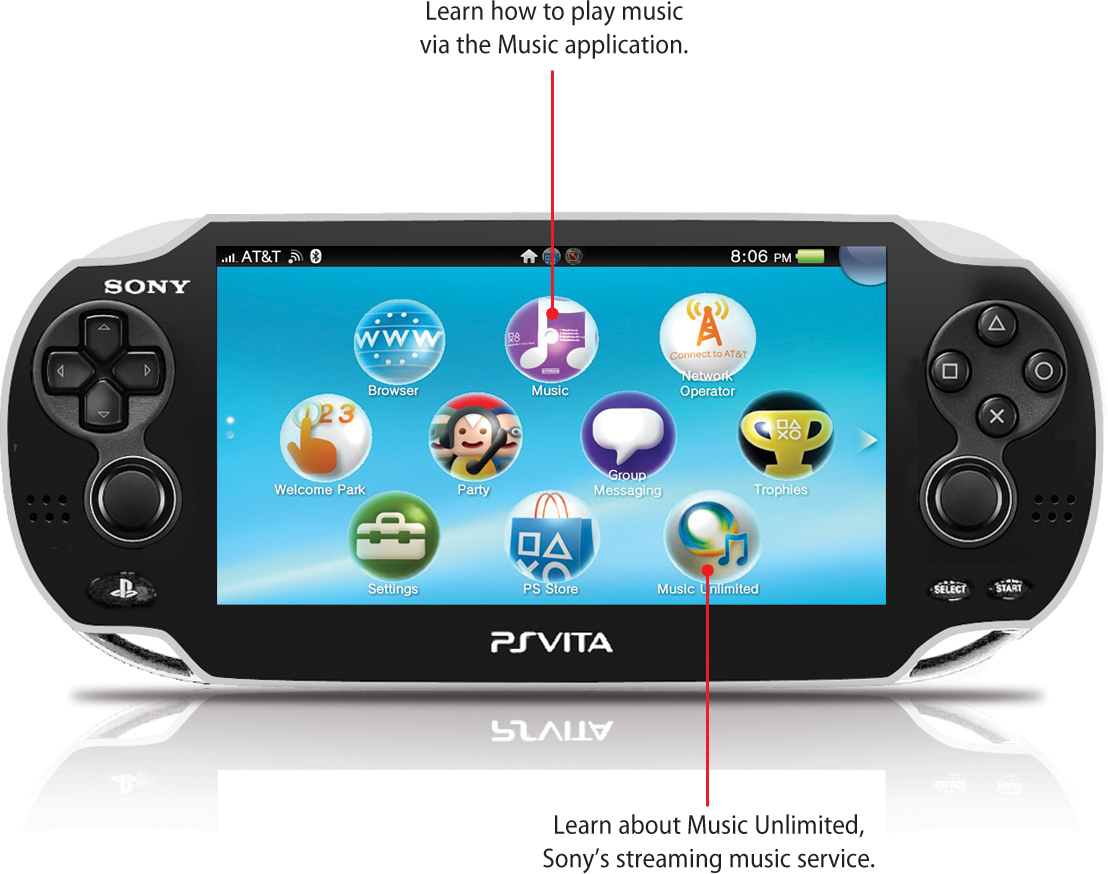
After you have some music stored on your Vita, you access it by tapping or selecting the Music icon from the Home screen and then going through the Music LiveArea. Let’s take a look at what this music portal has to offer:
• Action icon—Tap or select this icon to access the Music section of the PlayStation Vita User’s Guide via the Browser.
• Gate—Tap or select the Gate to access the Music application.
• Music controls—Tap or select the Back, Play/Pause, and Next icons as desired to control your music. The song title, artist, and album information for the song currently playing or last played appears above the controls. When you tap or select Back, you scroll backward through the collection you previously selected in the Music application, and when you tap Next, you move forward through this collection.
The music controls appear on the LiveArea screen only when a song has been selected from within the Music app.
Listening to Music via the Music App
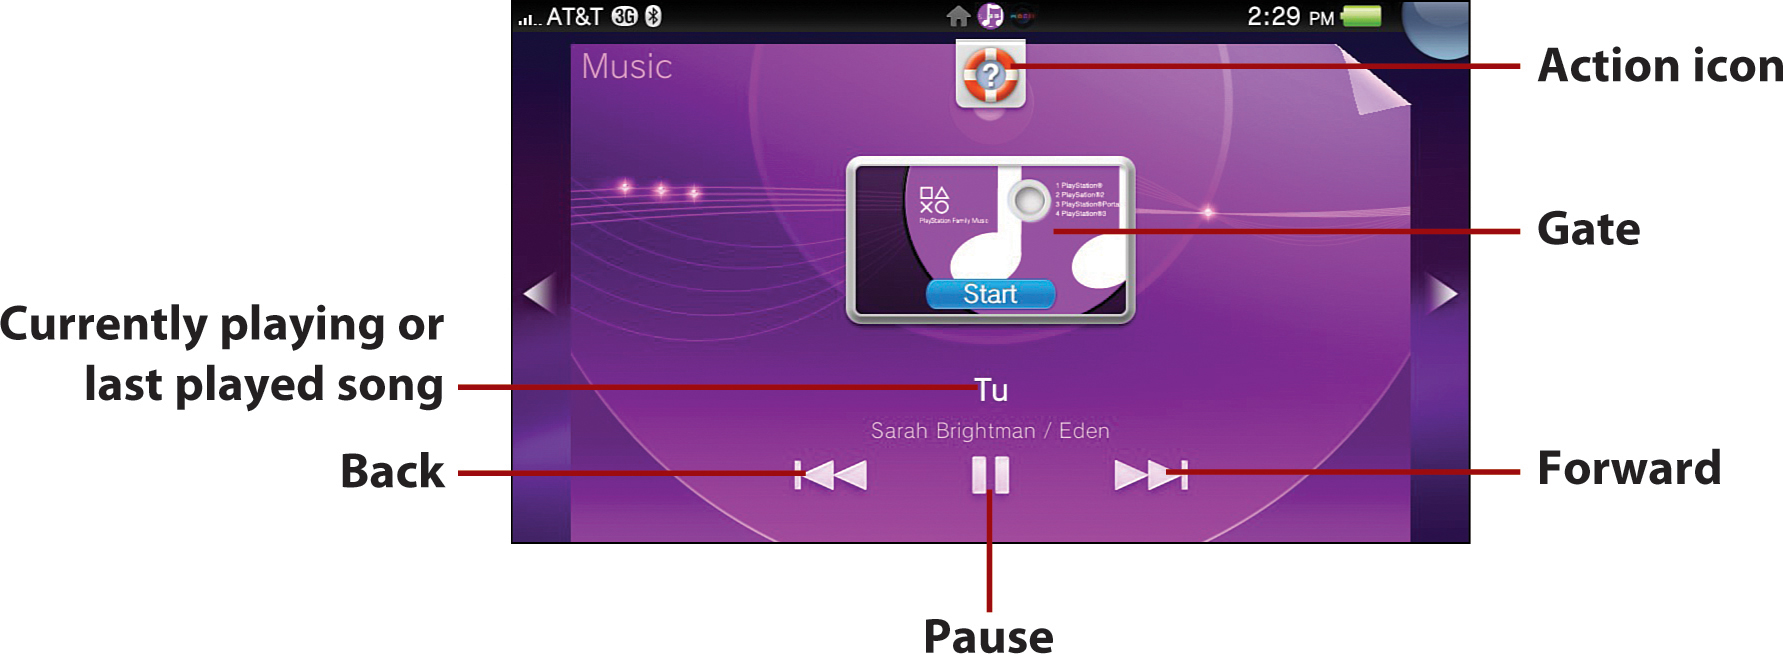
On the Music Application screen, you see several folders under which your downloaded music is stored, including Artists, Albums, Songs, and Genre. In addition, you can select Shuffle Play (All) to have your Vita randomly play your music, or Playlists to play your imported playlist selections. You can also view music that you have Frequently Played, Recently Played, and Recently Added. If your Vita is connected to a computer or to a PlayStation 3, a PC or PS3 System folder appears, respectively. You can access your song library on these external devices and play songs through your Vita, provided the file format for the music stored on these platforms is one that is accepted by your Vita.
Music Folders Screen
After you select the Artists, Albums, Songs, or Genre folder, several options become available:

• Index bar—Touch to display the Index bar and then slide your finger down the bar to get to the letter that corresponds with the Artist, Album, Song, or Genre you’re looking for. Keep in mind that the Index bar is specific to the music folder that you are in, so don’t go looking for a song title in the Albums folder.
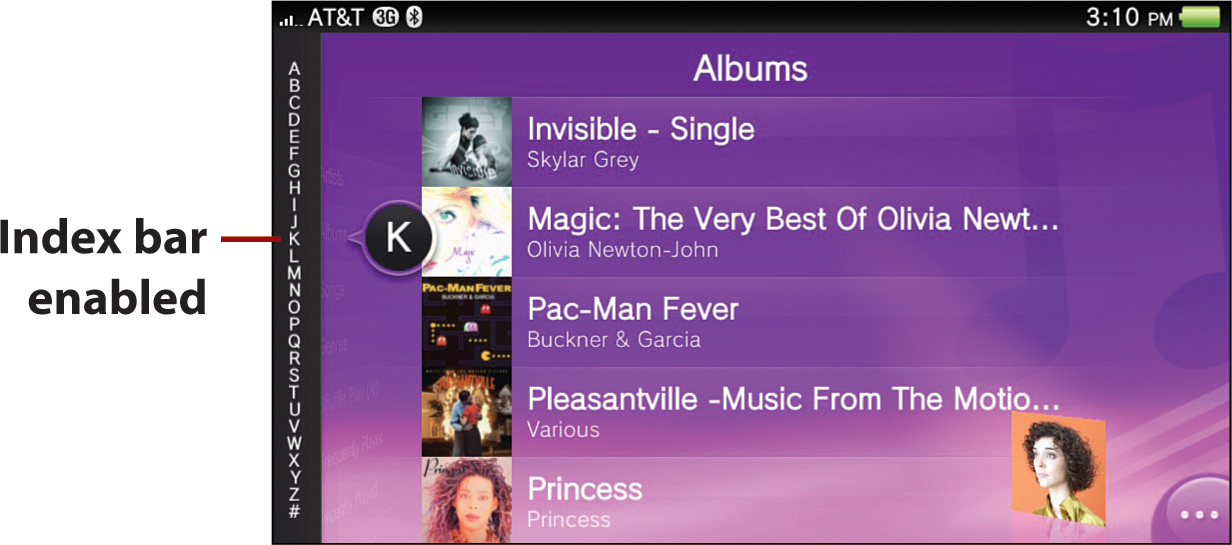
• Album thumbnail—Tap an album’s thumbnail to access a song or album.
• Back button—Tap this button to go back to the previous screen.
• Options bubble—Tap the bubble to access the Copy and Delete options. The Copy option requires a connection to a PlayStation 3 or to a computer. After you select either Copy or Delete, boxes appear next to each file in the folder you are in. Tap to select the files you want to copy or delete and then tap Copy or Delete, respectively. If you truly want to proceed, select OK at the confirmation screen.
• Cover thumbnail—The cover thumbnail shows the cover art associated with the song that is currently playing or was most recently played. If you tap the thumbnail, you are brought to the song’s Playback screen.
Music Playback Screen
After you select a song or album to play, you see the Playback screen. Several controls are available on it, including the following:
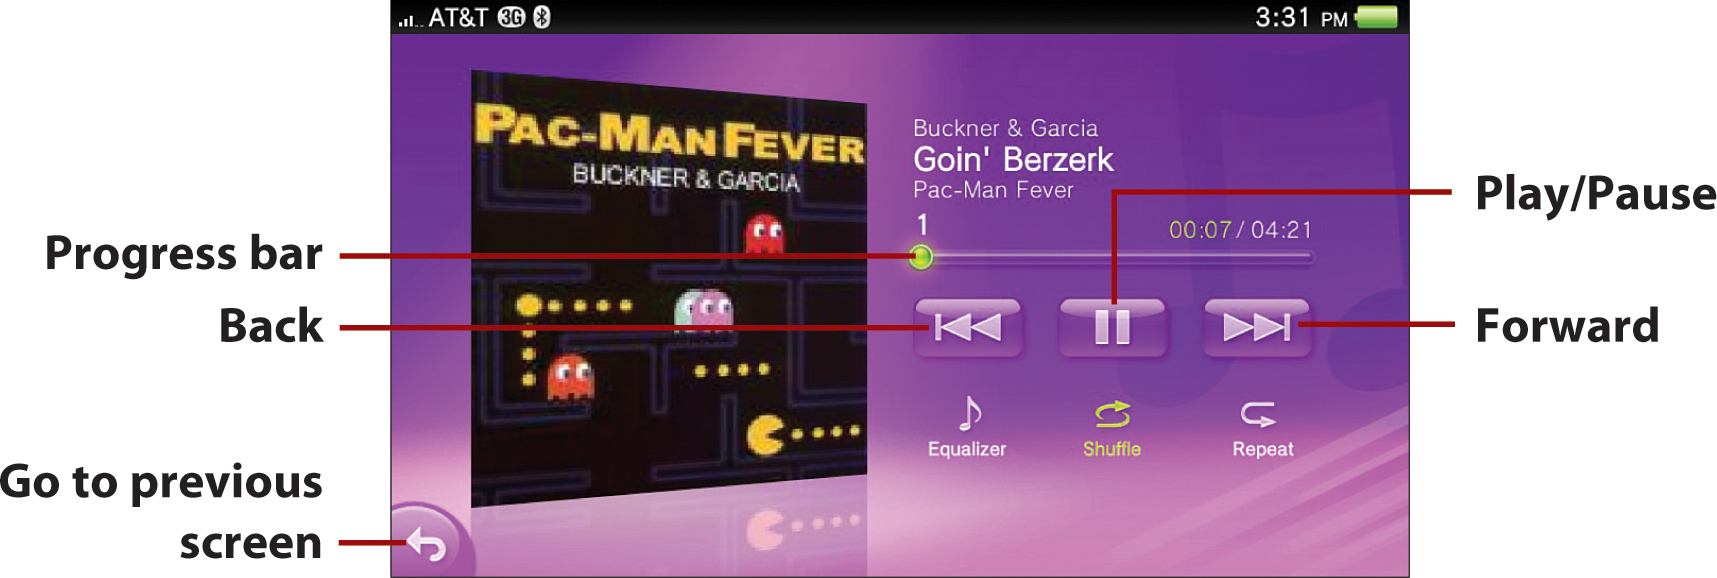
• Progress bar—This bar delineates the length of the song. Touch the slider on the bar and drag it forward or backward to get to the part of the song you want to hear.
• Back button—When listening to an individual song, tap the Back button to jump all the way back to the beginning of the song, or hold it down to fast-rewind to the part you want. If you are listening to an album, the initial tap brings you to the beginning of the song, and the subsequent tap brings you to the previous song in the album. Hold down to fast-rewind the song.
• Play/Pause—Tap to play or pause the song.
• Next button—When listening to an individual song, hold down the Next button to fast-forward, and when listening to an album, tap it to move to the next song.
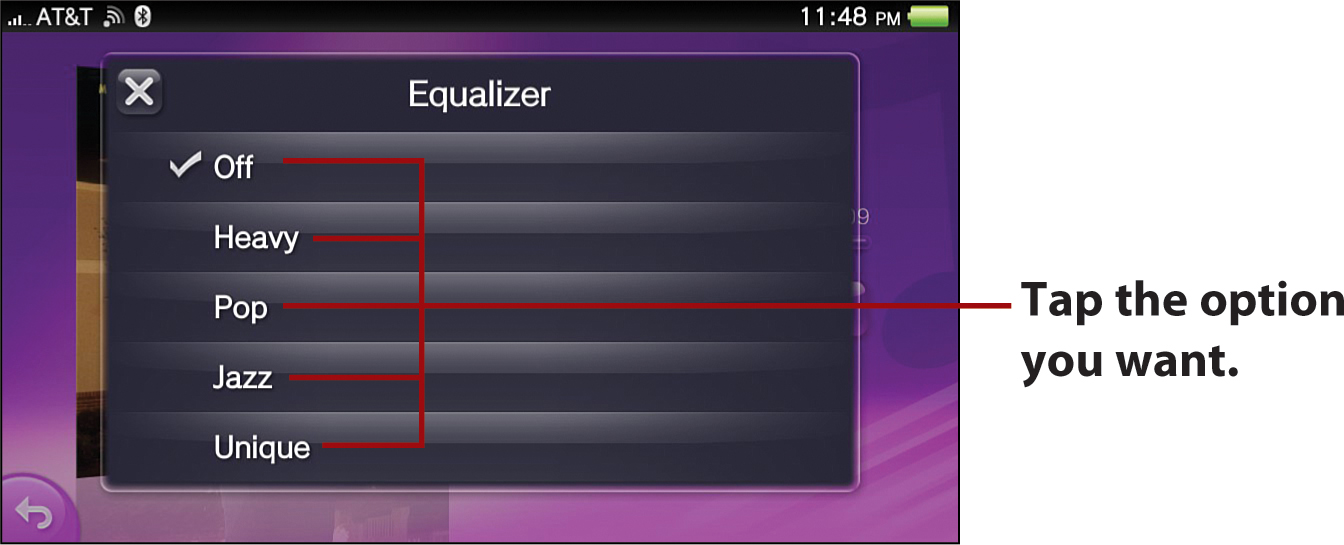
• Equalizer—Tap the Equalizer button to change the sound characteristics. The options are as follows: Off, which provides normal sound with no equalization (this is the default); Heavy, which provides a powerful tone to sounds in the high and low ranges; Pops, which emphasizes sounds in the middle ranges, an option noted to be suitable for vocals; Jazz, which provides a lively tone to sounds in the high and low ranges; and Unique, which emphasizes sounds in the high and low ranges in such a manner that even relatively quiet sounds are clearly audible.
• Shuffle—When listening to an album, tap Shuffle to randomize the order in which the items play. When turned on, this option appears green.
• Repeat—When listening to an album, tap Repeat once to repeat the entire album. Tap twice (which makes a little “1” appear next to the icon) to replay just the song that is currently playing. No other songs will play. When repeat functionality is enabled, the icon turns green.
Playing Music in the Background
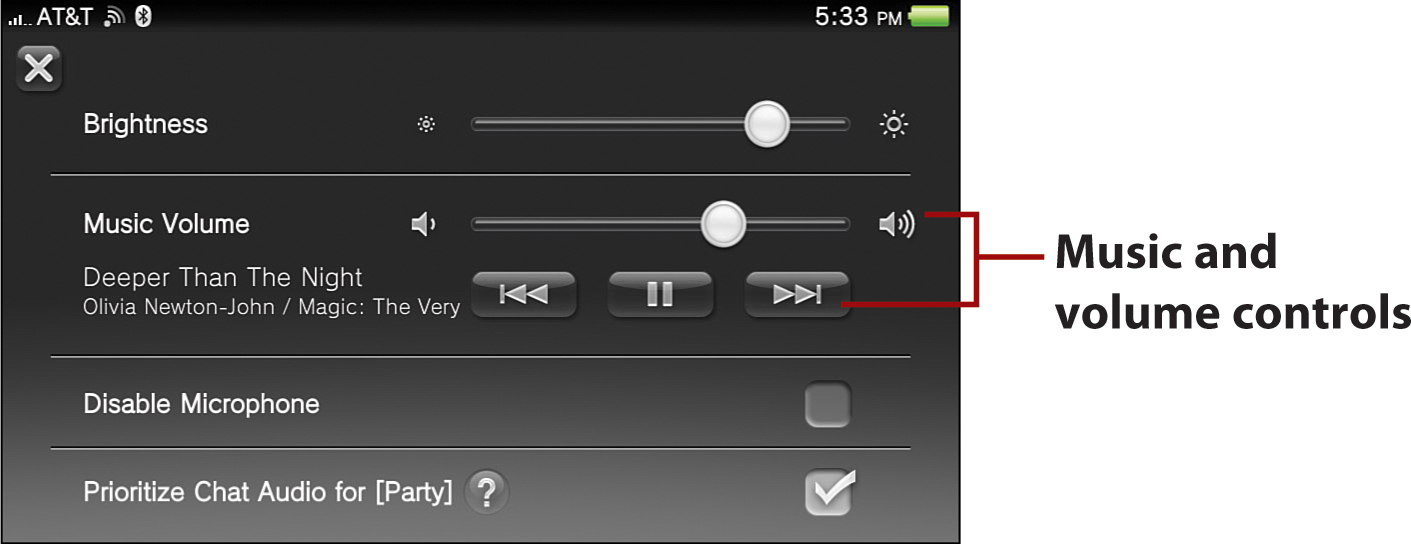
Your Vita is adept at multitasking, so you can listen to your own music when engaging in other activities, including playing games. In some cases, however, music playback is paused during a game’s initial loading procedure. To listen to Music on your Vita while engaging in another activity, simply start the music from the Music app before engaging in the other activity. If you want to change tracks or adjust the volume of your music while outside of the Music app, hold down the PS button for a few seconds. An audio screen appears from which you can adjust the volume by moving a slider up and down. You can also see what is currently playing and move between tracks.
Getting to Know Music Unlimited
Music Unlimited is Sony’s streaming music service that enables you to turn your Vita into a jukebox by putting millions of songs at your disposal, sans annoying ads, radio DJs, or song skip limits. Music Unlimited is compatible with computers, the PlayStation 3, Android phones, and iOS devices (iPhone, iPad, and so on), providing access well beyond your Vita.
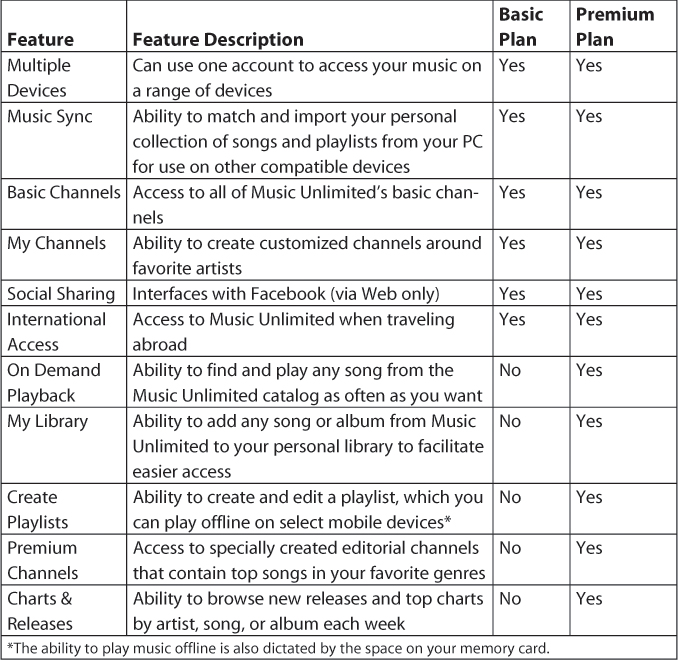
At the time of this writing, you can choose from two plans: Basic, which runs $3.99 per month; and Premium, which runs $9.99 per month. The features of both plans are outlined in Table 12.1.
Table 12.1. Comparison of Basic and Premium Music Unlimited Plans
Signing Up for Music Unlimited
Not sure if this service is worth the investment? No worries, as Sony generally enables you to try out the Premium plan for a few weeks via a free trial. To give this service a whirl, go to http://www.sonyentertainmentnetwork.com/music-unlimited/internet-radio/, select Start Free Trial, and follow the onscreen prompts. If you already have an account with Sony, sign in to your existing Sony Entertainment Network (PlayStation Network) account. If you don’t have an account, you’ll have to create one. To receive the trial, you must put a credit card on file with Sony and permit auto-renewal. Don’t worry! You can disable auto-renewal under your Wallet in the Account Manager immediately thereafter. See the next section, “Disabling Auto-Renewal.”
After you establish your Music Unlimited account, download the Music Unlimited app from the PlayStation Store. If you are unsure how to go about this, turn to “Downloading Content” in Chapter 5, “Shopping in the PlayStation Store.”
Disabling Auto-Renewal
To prevent your Music Unlimited subscription from automatically renewing, follow these steps.
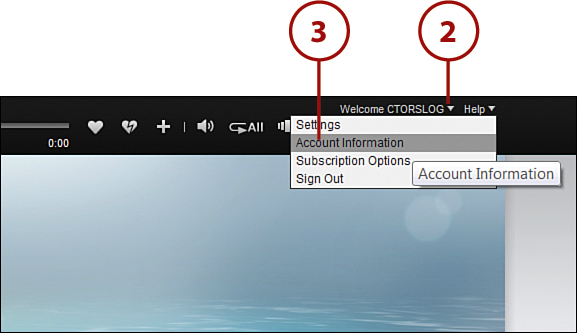
1. Use your computer to sign in to your Music Unlimited Account.
2. Select the arrowhead by your username to reveal the dropdown menu.
3. Select Account Information.
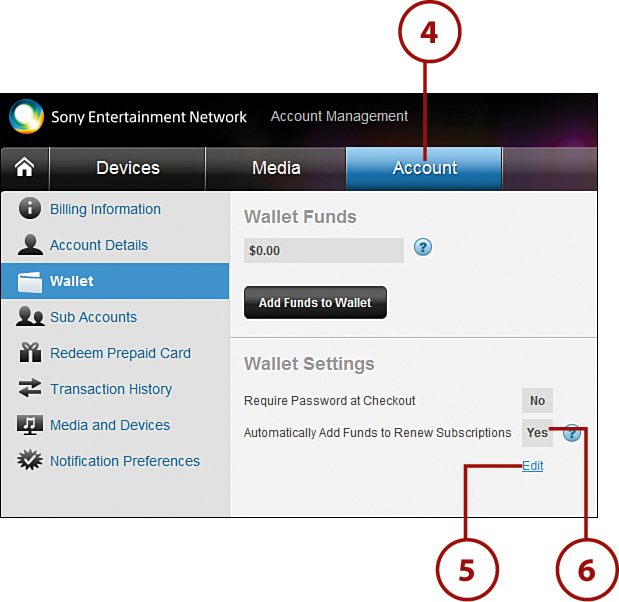
4. Select the Account tab and then select Wallet.
5. Under Wallet Settings, click Edit.
6. Change the Automatically Add Funds to Renew Subscriptions option to No and click Save.
Understanding the Music Unlimited Interface
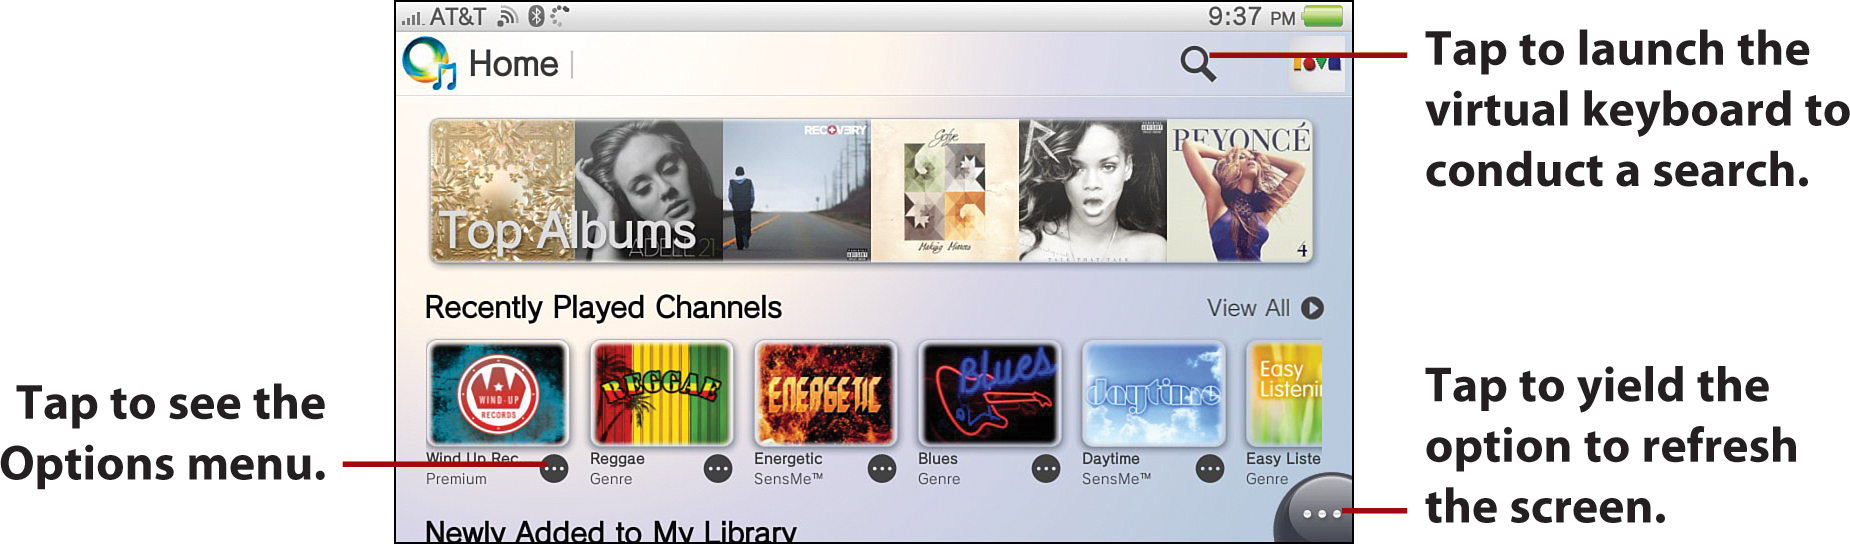
When you first enter the Music Unlimited application, you see the Home screen, but if you tap Home, you open a menu that enables you to access all the other main functions available. What follows is how each of these options breaks down for a Premium membership:
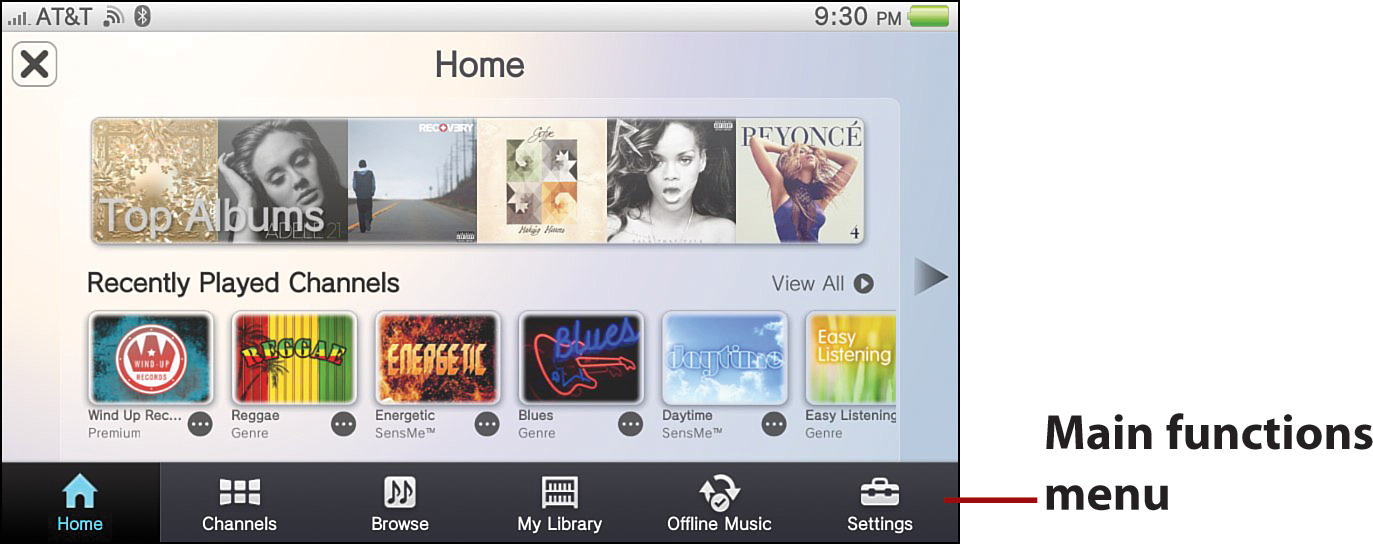
• Home—This is where you can access Top Albums, Top Songs, and Top Artists; Recently Updated Playlists (provided you created a playlist); Recently Played Channels; Newly Added to My Library; New Releases; and a You Might Like collection, which features music recommendations based on your listening history.
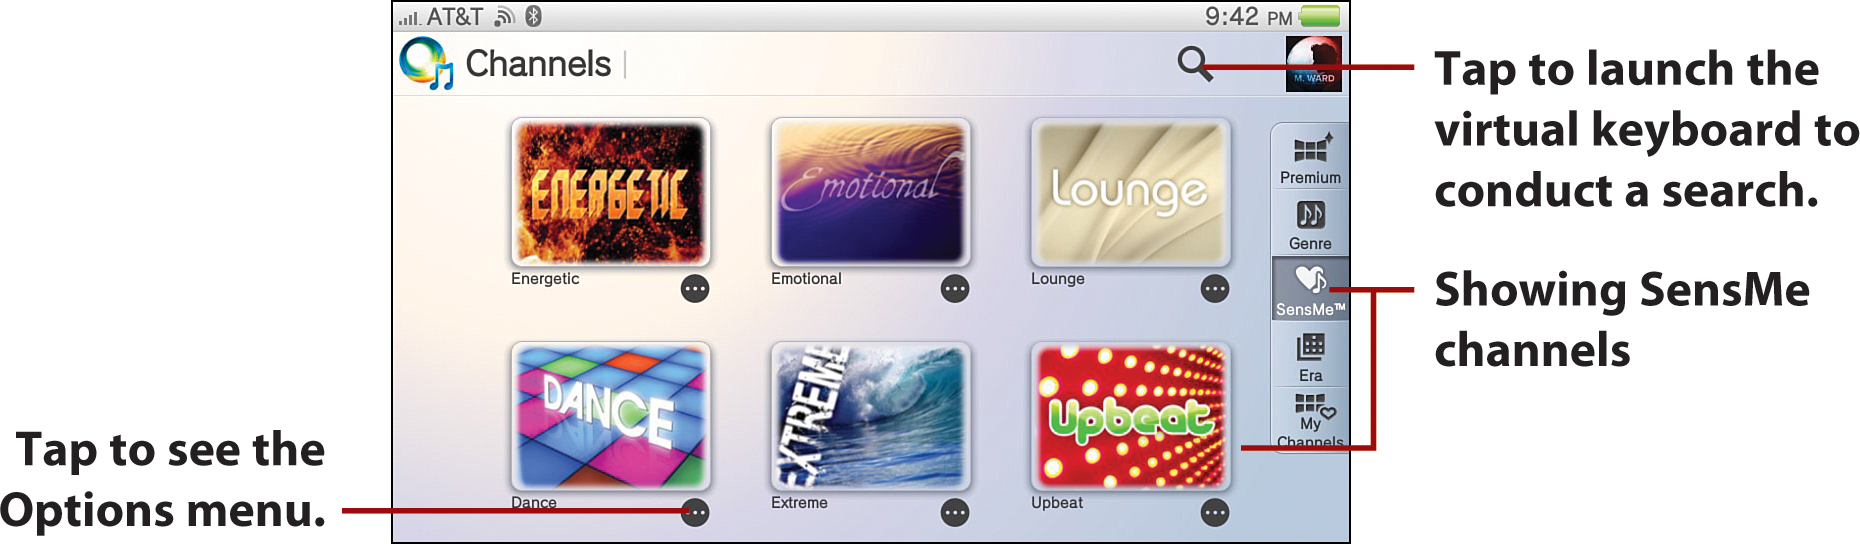
• Channels—Tap Channels to access various music channels. In addition to listening to a featured Premium channel (such as Hot Songs, Pop Top 100, and Bollywood), you can pull up additional channels by selecting from the Channels menu on the right. Via this menu you can access channels by Genre (such as Jazz, Rock, and Pop), emotion via SensMe (such as Relax, Energetic, and Extreme), Era (goes as far back as 1950), and My Channels (your custom channels based on artists of your choosing).
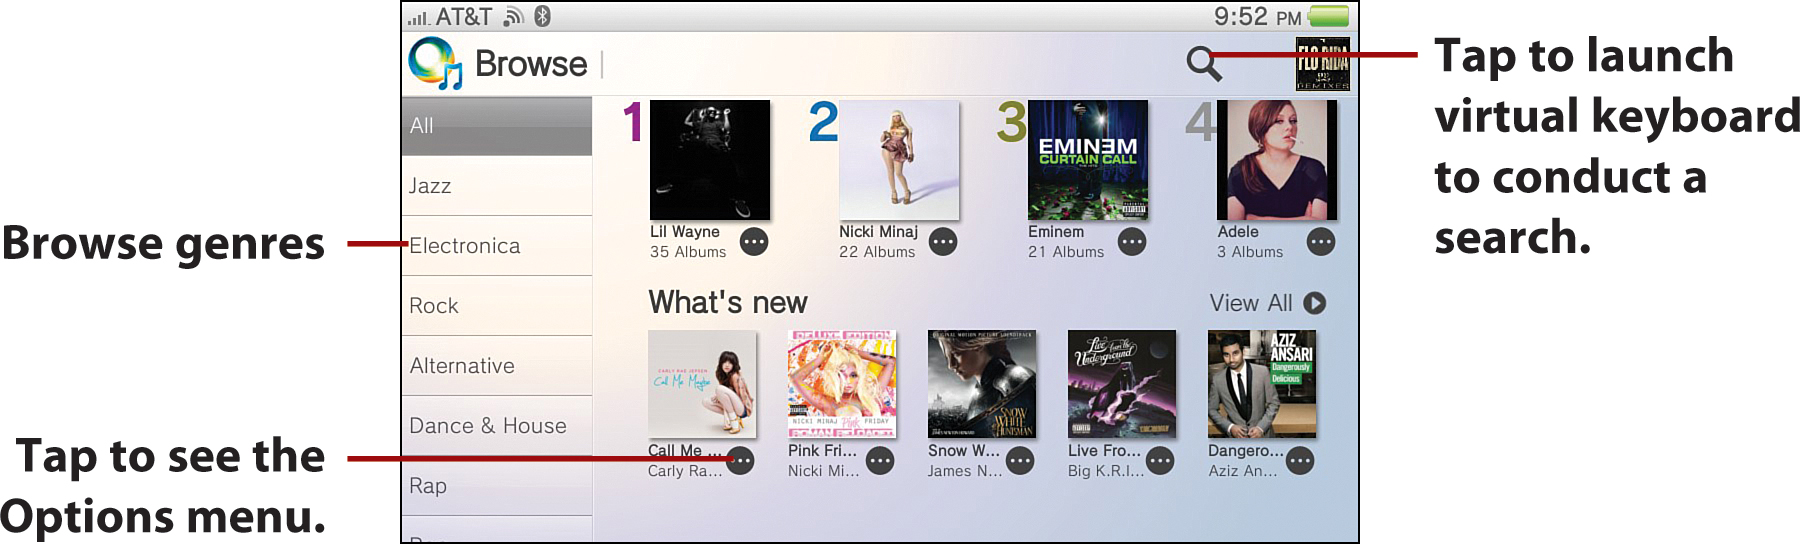
• Browse—Tap Browse to browse for music by genre and access Top Songs, Top Albums, Top Artists, and new titles through What’s New. Like on the other screens, you can also conduct your own search by tapping the magnifying glass and then using the virtual keyboard to enter a keyword.
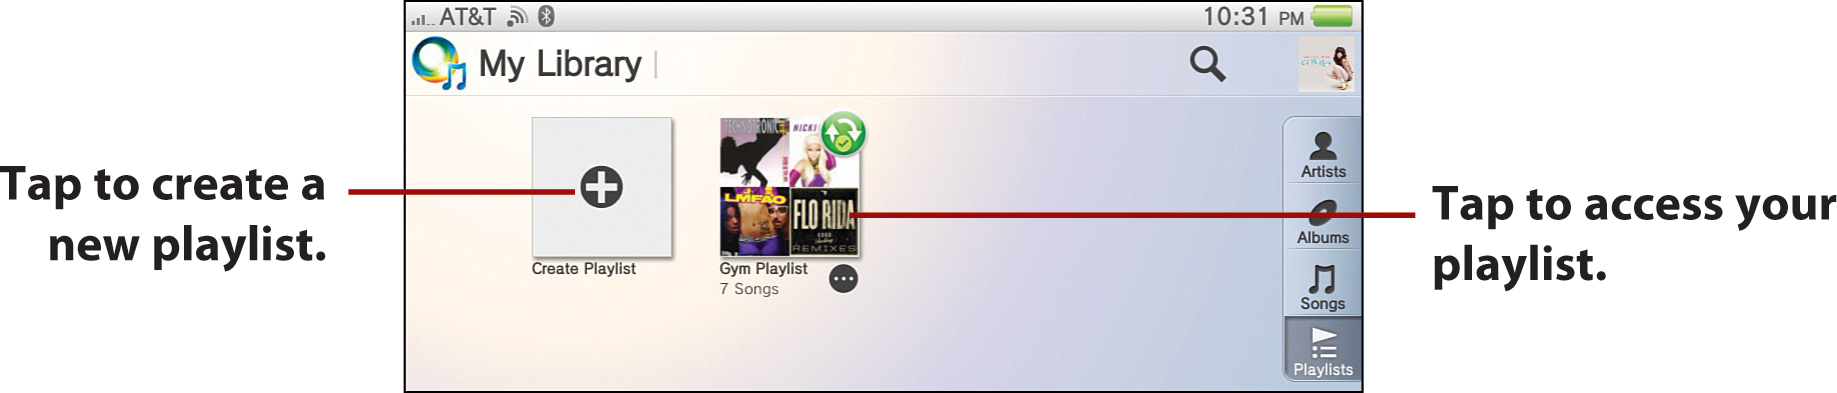
• My Library—This feature stores your music from your computer or titles you’ve added to your Library from Music Unlimited, including Artists, Albums, Songs, and Playlists.
• Offline Music—Tap this icon to see all the music you’ve opted to make available offline. Keep in mind, making music available offline takes space on your memory card, so plan accordingly. See the “Making Songs Available Offline” section later in this chapter for more information.
• Settings—View and adjust various settings, such as disabling explicit content, enabling use of offline music, and viewing how much space you are using of what you have available.
Using Song Screen
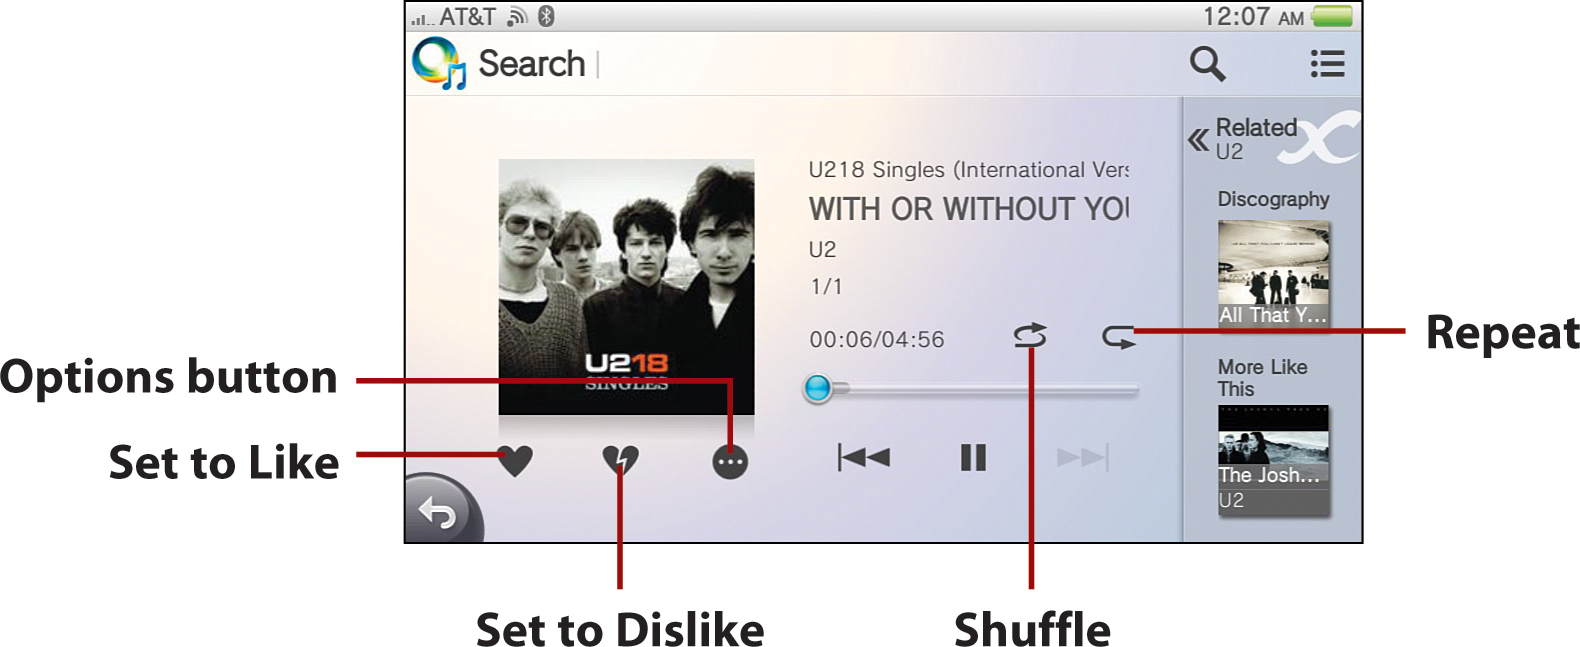
At the song screen, you have the same options that you find when on the Music Playback screen in the music app, and they function the same way here: Progress bar, Back button, Play, Pause/Stop, Forward, Shuffle, and Repeat. For more information on these, see “Music Playback Screen” earlier in this chapter.
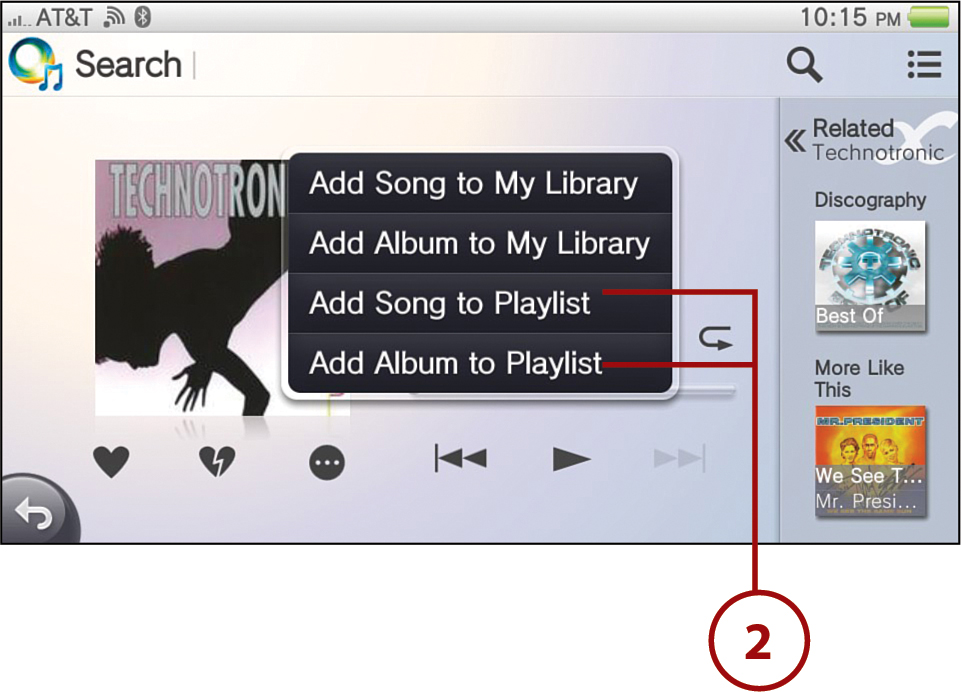
You also have some new options, including Set as Like (the song and others like it will play more frequently); Set as Dislike (immediately stops playing the song); and the Options button. Via the Options button, you can select Add Song to My Library, Add Album to My Library, Add Song to Playlist, and Add Album to Playlist. Music Unlimited also provides you with recommendations on similar titles under the Related menu.
When you exit Music Unlimited, but leave it running, the application might crash when you return to it, making it impossible to play any music. To remedy this, just close the application by peeling it off the screen; you can then relaunch it.
Making Songs Available Offline
To make songs available offline, you need to add them to a playlist. Follow these steps:
1. At the Song screen, select the Options button.
2. Select Add Song to Playlist or Add Album to Playlist.
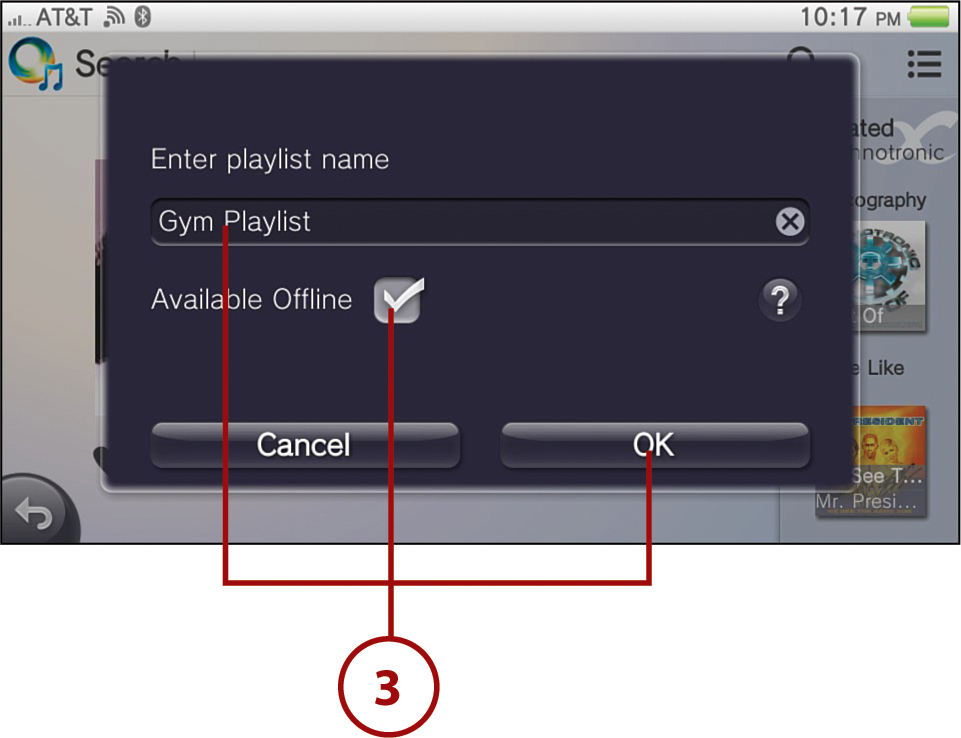
3. At the Playlist screen, enter the name of your playlist, select Available Offline, and then tap OK.
Offline Mode Enables Background Music
When you make a song available offline, you can also play it as background music when you are in other games and applications. If you have issues getting this initiated, go to Settings in Music Unlimited, scroll to Offline, and select Use Offline-Only Mode. You won’t be able to access anything other than your offline music at this time, but you can now listen to your music outside of the Music Unlimited application. If you want to return to Online mode, simply select any other category, such as Home, My Library, or Browse. A message appears with a Switch to Online Mode button. Tap the button to get back to Online mode.
Getting Help with Your PlayStation Vita
Technology can be a marvelous thing when it works correctly and a real pain in the derriere when it doesn’t. We tried to cover as much ground as possible regarding use of the Vita, its myriad features, and any third-party applications we thought you should check out. Still, technology is ever-changing. Your Vita, being the fine piece of technology that it is, will have frequent updates, ensuring you always have access to the latest and greatest features. This is a wonderful thing, but can also mean that some interfaces might change. Unfortunately, we cannot gaze into a crystal ball and predict what those things will be.
If you find that something in the book doesn’t match up with what you are seeing on your Vita, or you are wondering about something we simply didn’t cover, let Google be your guide. Simply type a few key words or phrases into Google’s search engine that describe the task or problem at hand, and answers will be delivered to you faster than you can say hocus pocus.
Of course, you can always contact Sony for support if you are not getting satisfaction via Google. Just go to http://us.playstation.com/support/ to find information on resetting your password, access various manuals, check out software updates, search the PlayStation Knowledge Center, browse the PlayStation Community forum, and access a host of other resources. If you would rather just contact Sony directly, you can do so by phone or Twitter.
Phone: (800) 345-SONY (7669)
Twitter: @AskPlayStation
Still not satisfied? We are always happy to help our readers. Feel free to contact us at [email protected] and [email protected], and we’ll certainly do our best to assist you.