
15. Lights, Camera, Action: Videos and Photos
The iPad’s video and photo features give you ways to watch movies, take photos, and record your own videos. In this chapter, you find out about:
• Watching videos from YouTube or iTunes
• Using the iPad’s cameras and apps
• Being safe with photos and videos
• Awesome apps for photos and videos
Your iPad is a great tool for watching movies and TV shows anywhere you go (imagine how much more bearable summer car trips with your family will be when you have your favorite TV shows with you), but it does a lot more than that. Thanks to its two cameras and big screen, it also lets you create your own movies and take your own photos. Whether you’re taking a picture of your friends, sending a video using Messages, or watching a cool new movie that you’ve rented from iTunes, your iPad makes using photos and videos easy.
Watching Videos from YouTube or iTunes
There are a lot of places online where you can watch videos, but two of the biggest are YouTube and iTunes. On YouTube, you can watch videos that people and companies post of all kinds of things, from people falling down to pets doing funny things to music videos and more. On iTunes, you can rent or buy movies and TV shows to watch on your iPad.
Finding Videos at YouTube
Enjoying videos at YouTube could hardly be easier on the iPad. That’s because your iPad comes with a YouTube app preinstalled. To use it, first make sure you’re connected to the Internet and then launch the YouTube app from your iPad’s home screen.
When the app opens, it shows some featured items. To watch one of them, tap it. There’s also a Search field that you can use to find specific videos.
There are a number of other ways to find YouTube videos, including searching for
• Top Rated—Tap this to see the videos that other YouTube users have given the most “thumbs up.”
• Most Viewed—To check out the most popular YouTube videos, tap this.
• Favorites—If you’ve marked any videos as your favorites, tap this for a shortcut to them. To favorite videos, you have to have a YouTube account. You need to be 13 to get one, so check with your parents.
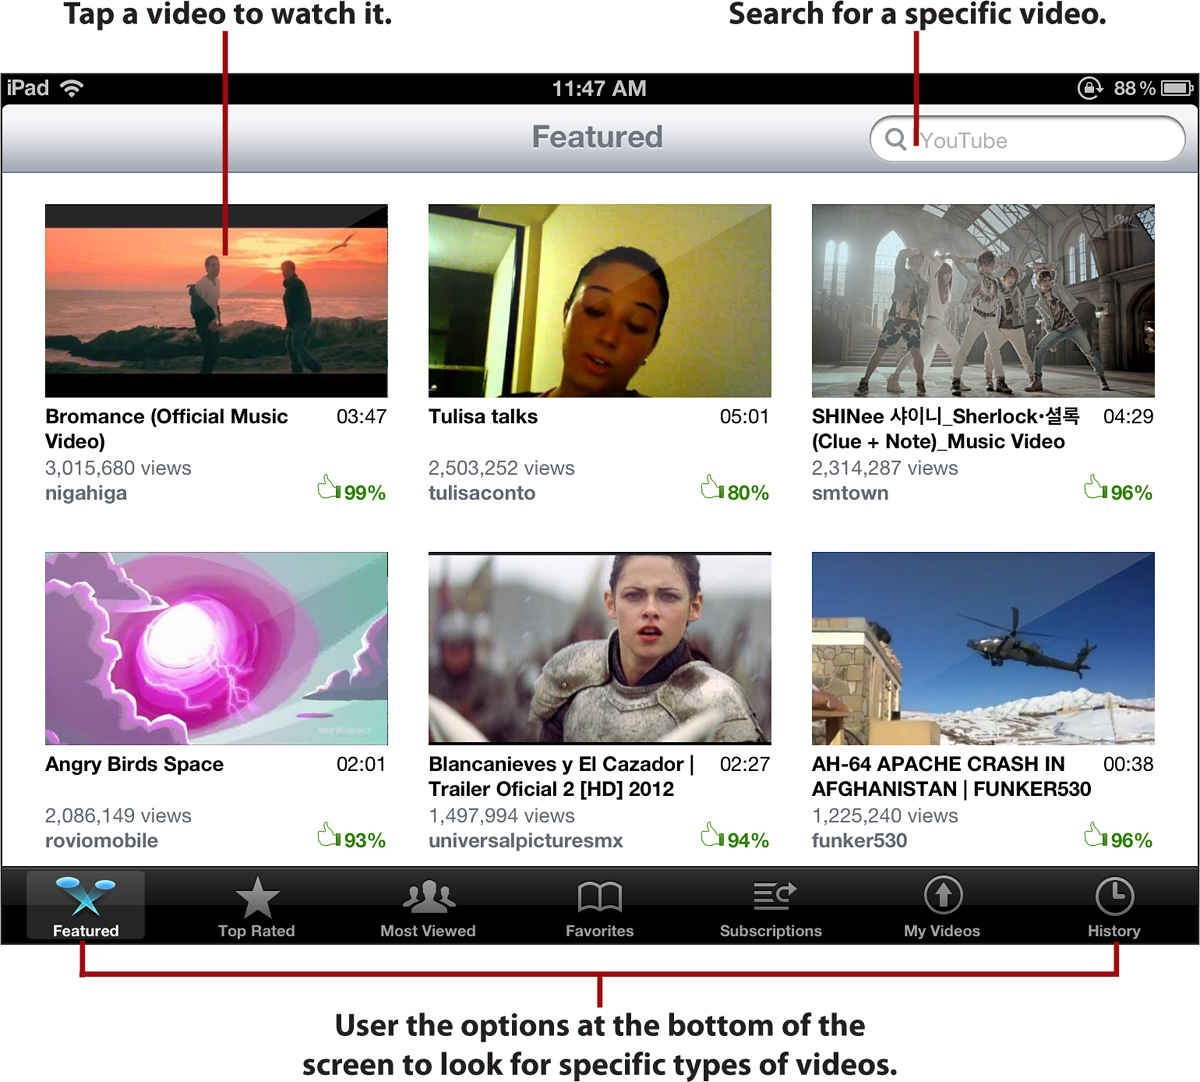
• Subscriptions—If you’ve subscribed to a regular series of videos, tap this to see the series and episodes.
• My Videos—If you’ve posted videos to YouTube, here is where you’ll find them.
• History—Tap this to see a list of the YouTube videos you’ve watched recently.
Watching Videos at YouTube
When you find a video you want to watch, tap it to stream it to your iPad and then follow these steps:
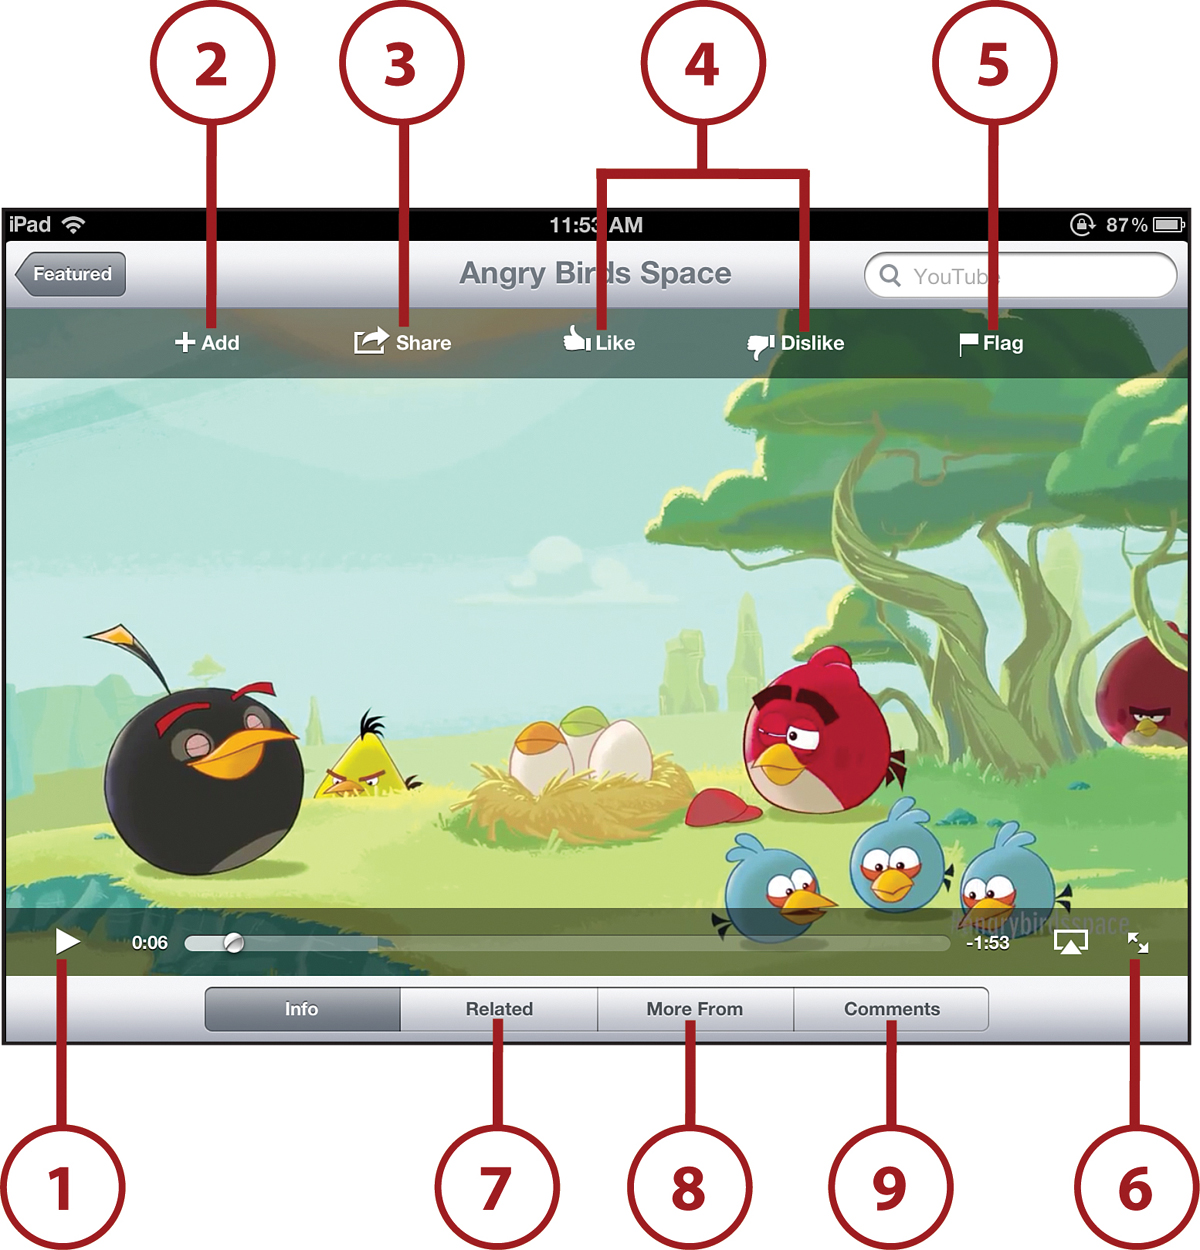
1. To watch the video, tap the Play button. If you’re using your iPad in Portrait mode (when the iPad is taller than it is long), you see a number of options.
2. Tap Add to save the video to your favorites.
3. Tap Share if you want to email or tweet a link to this video.
4. Tap Like or Dislike to place your vote for the video.
5. Tap Flag if you think the video you’re watching is offensive or in some way breaks the law.
6. Tap enlarge to see the video in a larger size.
7. If you liked the video and want to watch others that are like it, tap Related and then tap another video.
8. Tap More From for other videos uploaded by the same person. Tap one to watch it.
9. Tap Comments if you want to leave a comment about the video.
Getting Movies from iTunes
YouTube is a great place to find short videos, but you’re not going to find the latest blockbuster movies there. If you want to watch those, or other movies that you could see in the theater or on DVD/Blu-ray, one place you can go is iTunes.
iTunes lets you buy your favorite movies and store them on your iPad so you can watch them any time you want. It also lets you rent them for a lower price if you just want to watch them once.
Whichever you choose, remember a few things:
• Because both renting and buying costs money, your iTunes Allowance is charged or you need to ask your parents’ permission before you buy or rent. You can learn more about setting up an iTunes Allowance in Chapter 2, “Getting Started: Set Up and Sync Your iPad.”
• Movies you can watch on your iPad are really big and take a long time to download. Don’t try to download them over 4G; that takes forever and you’ll use up your monthly data quickly. Only buy or rent movies over Wi-Fi.
• Movies being big doesn’t just affect your downloads; it also limits the number you can store on your iPad. A full-length movie can take up 1GB or more, whereas a song is usually 4MB to 8MB (1GB equals 1,024MB, so it takes a lot of songs to equal one movie). You can keep a lot fewer movies on your iPad than songs, e-books, or photos.
• You can rent or buy some movies from iTunes, but others only have one option or the other. When you tap a movie you’re interested in, you can see which kind it is.
• Movies at iTunes have ratings just like movies at the theater. If your parents only let you see movies with certain ratings (for instance, no movies with R ratings), pay attention to that and follow their rules.
Buying or Renting Movies
The choice between renting and buying a movie has to do with more than just what the movie costs. If you bought the movie, it’s yours forever. If you rented the movie, you have up to 30 days to watch it before the rental ends and the movie disappears from your iPad. After you start watching the movie, you have to watch the whole thing in 24 hours or else the rental ends and the movie disappears.
To rent or buy a movie, connect to Wi-Fi, launch the iTunes app from your iPad’s home screen, and then follow these steps:
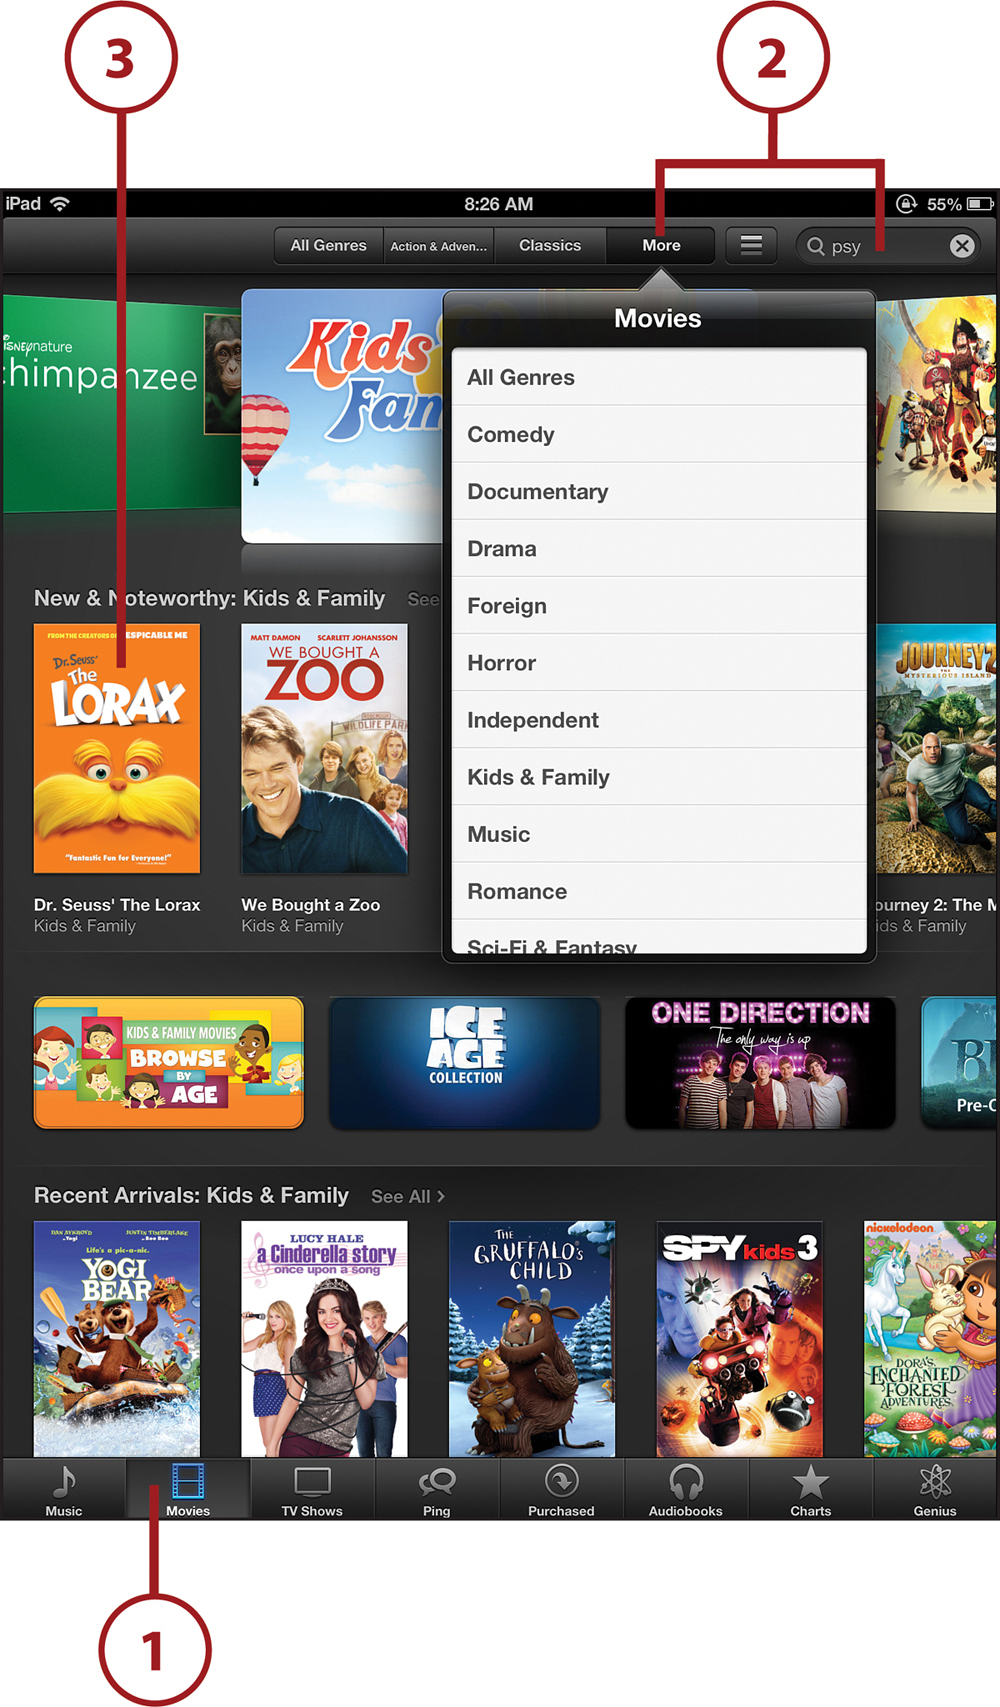
1. Tap the Movies button to go to the movies section of the iTunes Store.
2. You have three ways to find movies:
• Search—Tap in the search box and enter the name of the movie you’re looking for.
• Genre—Tap the More button and then tap the type of movie you want to see, such as Adventure or Sci-Fi & Fantasy.
• Featured—Tap one of the featured movies to learn more about it.
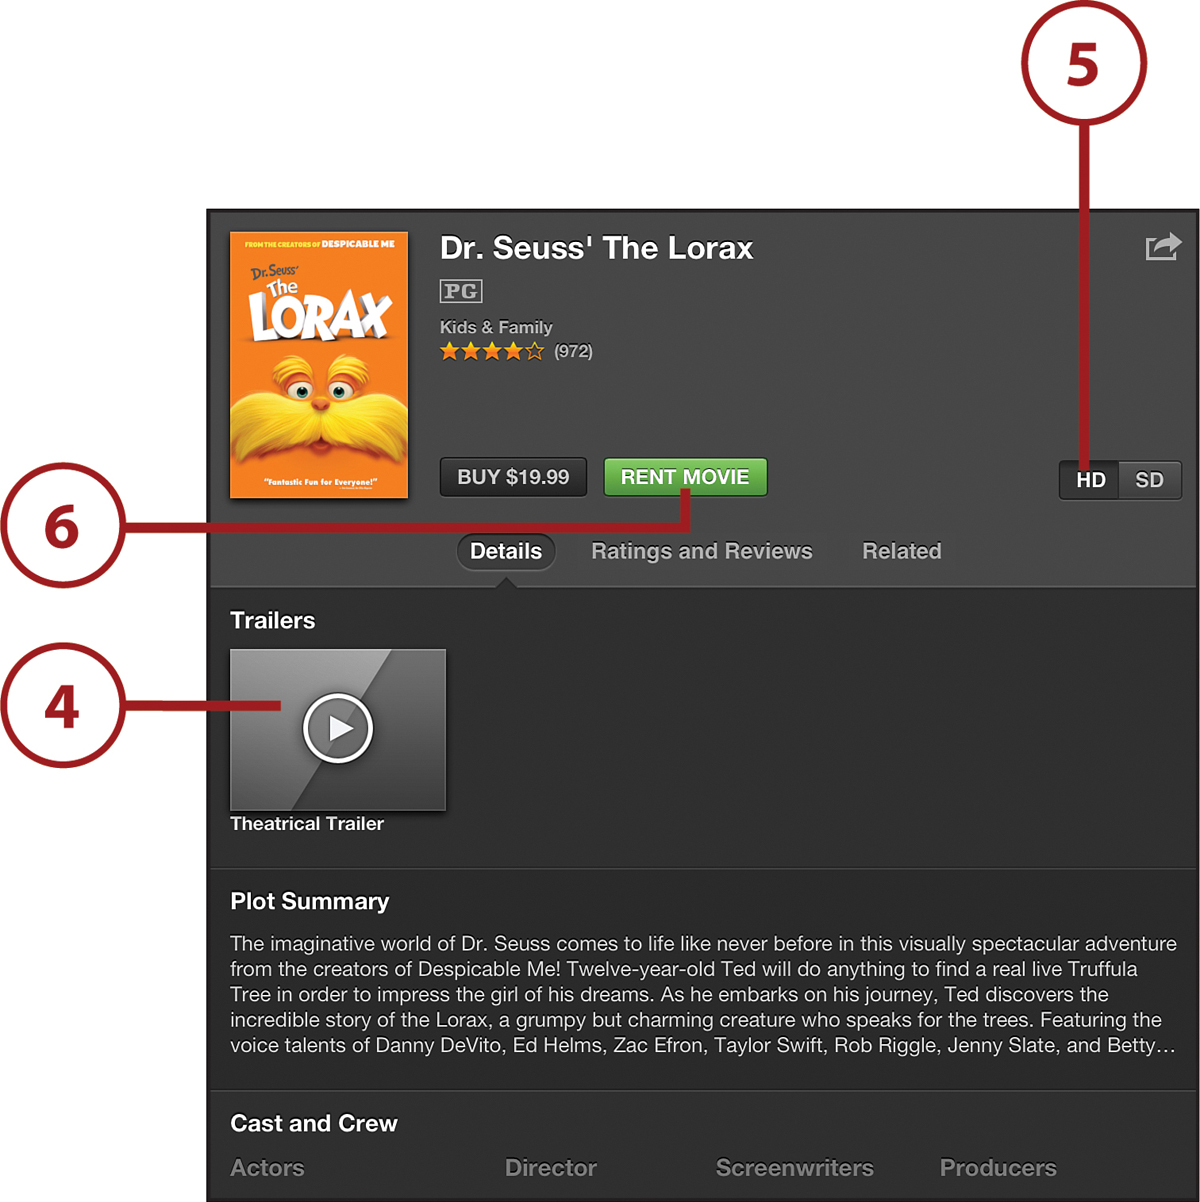
3. When you’ve found a movie you want to rent or buy, tap it to get more information. In the window that pops up, you see how much it costs to rent or buy the movie, whether you can get it in high-def, and information about the movie and the people in it.
4. To watch a movie’s trailer, tap the Theatrical Trailer.
5. If you decide you want to rent or buy the movie, first decide if you want it in HD by tapping that option. If you’re going to watch it on an HDTV or on the third-generation iPad, choose HD. Otherwise, you can choose SD (standard).
6. Decide if you want to rent or buy the movie. Tap the price for the option you want and then tap Buy Movie or Rent Movie. You might be asked to enter your Apple ID. Enter it and the movie starts downloading.
The iTunes app on your iPad isn’t the only place you can rent or buy a movie or TV show. You can also use the iTunes program on your desktop or laptop computer. Finding and buying or renting movies through iTunes works basically the same way. After you’ve downloaded movies there, you can watch them on your computer or sync them to your iPad to watch while you’re on the go.
Buying TV Shows from iTunes
Buying TV shows from iTunes is a lot like buying movies. (What about renting, you might be asking? Check out the section after this for the answer.) To do it, connect to a Wi-Fi network, tap the iTunes app to open it, and then follow these steps:
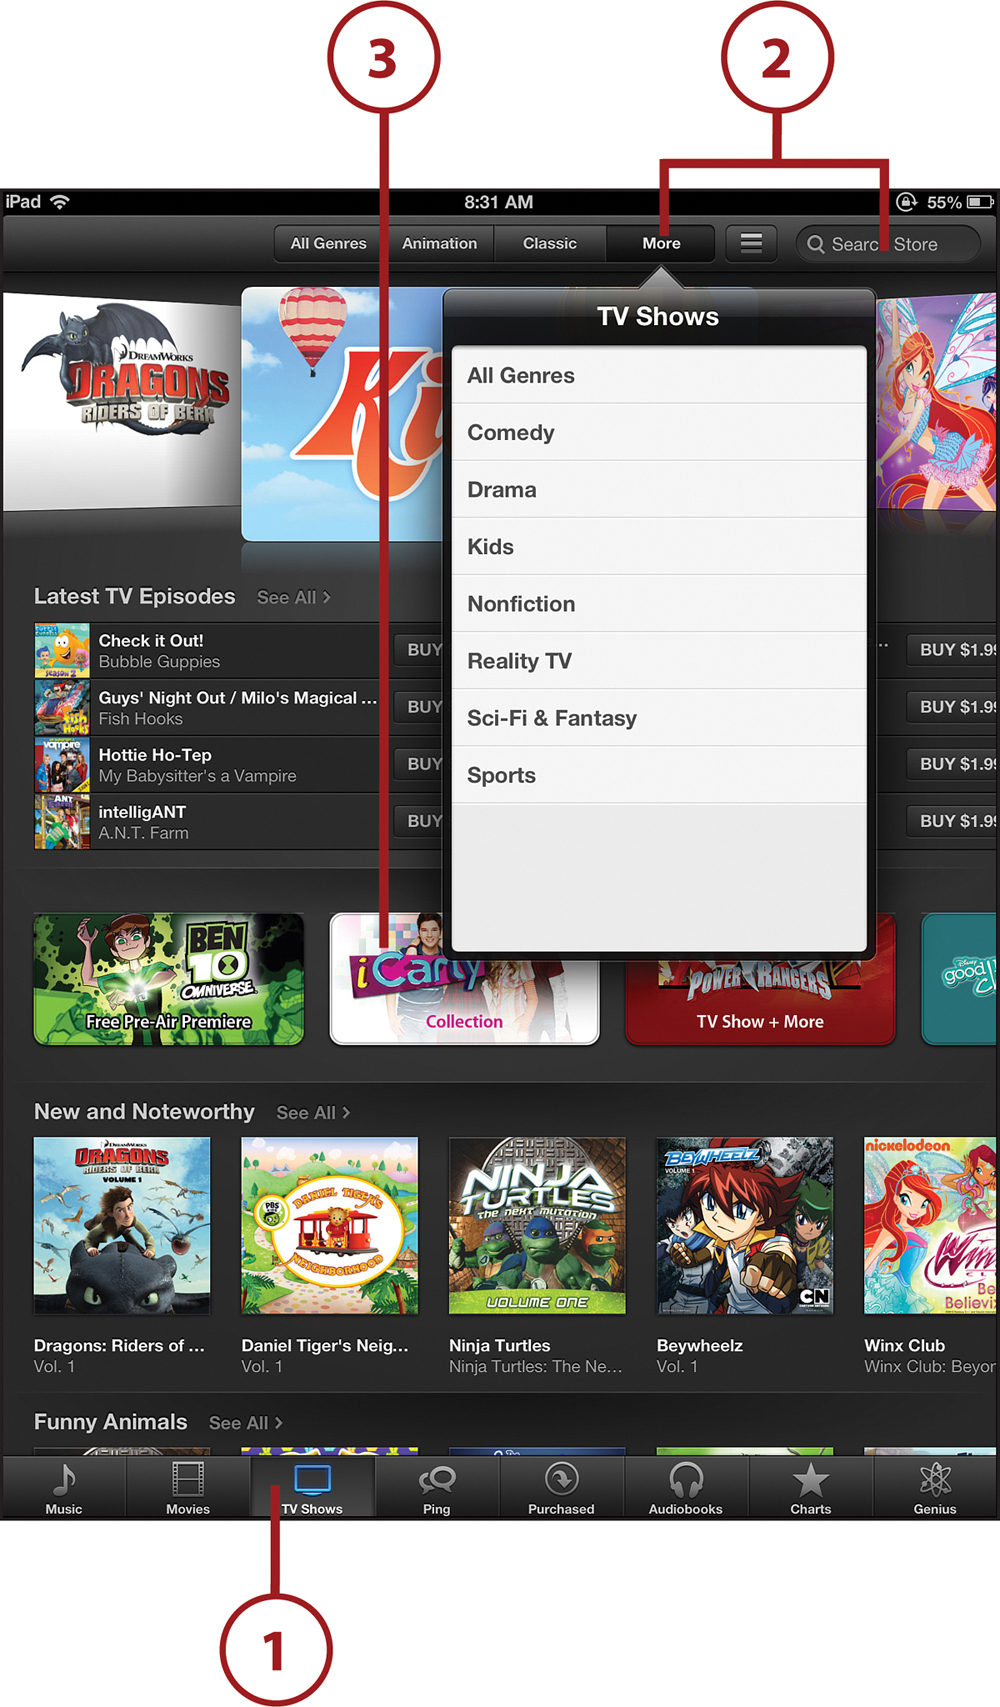
1. Tap the TV Shows button.
2. You have three ways to find the shows you want to watch:
• Search—Tap the box and type in the name of the show you want.
• Genre—Tap More and then pick the kind of show you want to watch, such as Animation or Kids, from the list.
• Featured—Tap one of the featured TV shows to learn more about it.
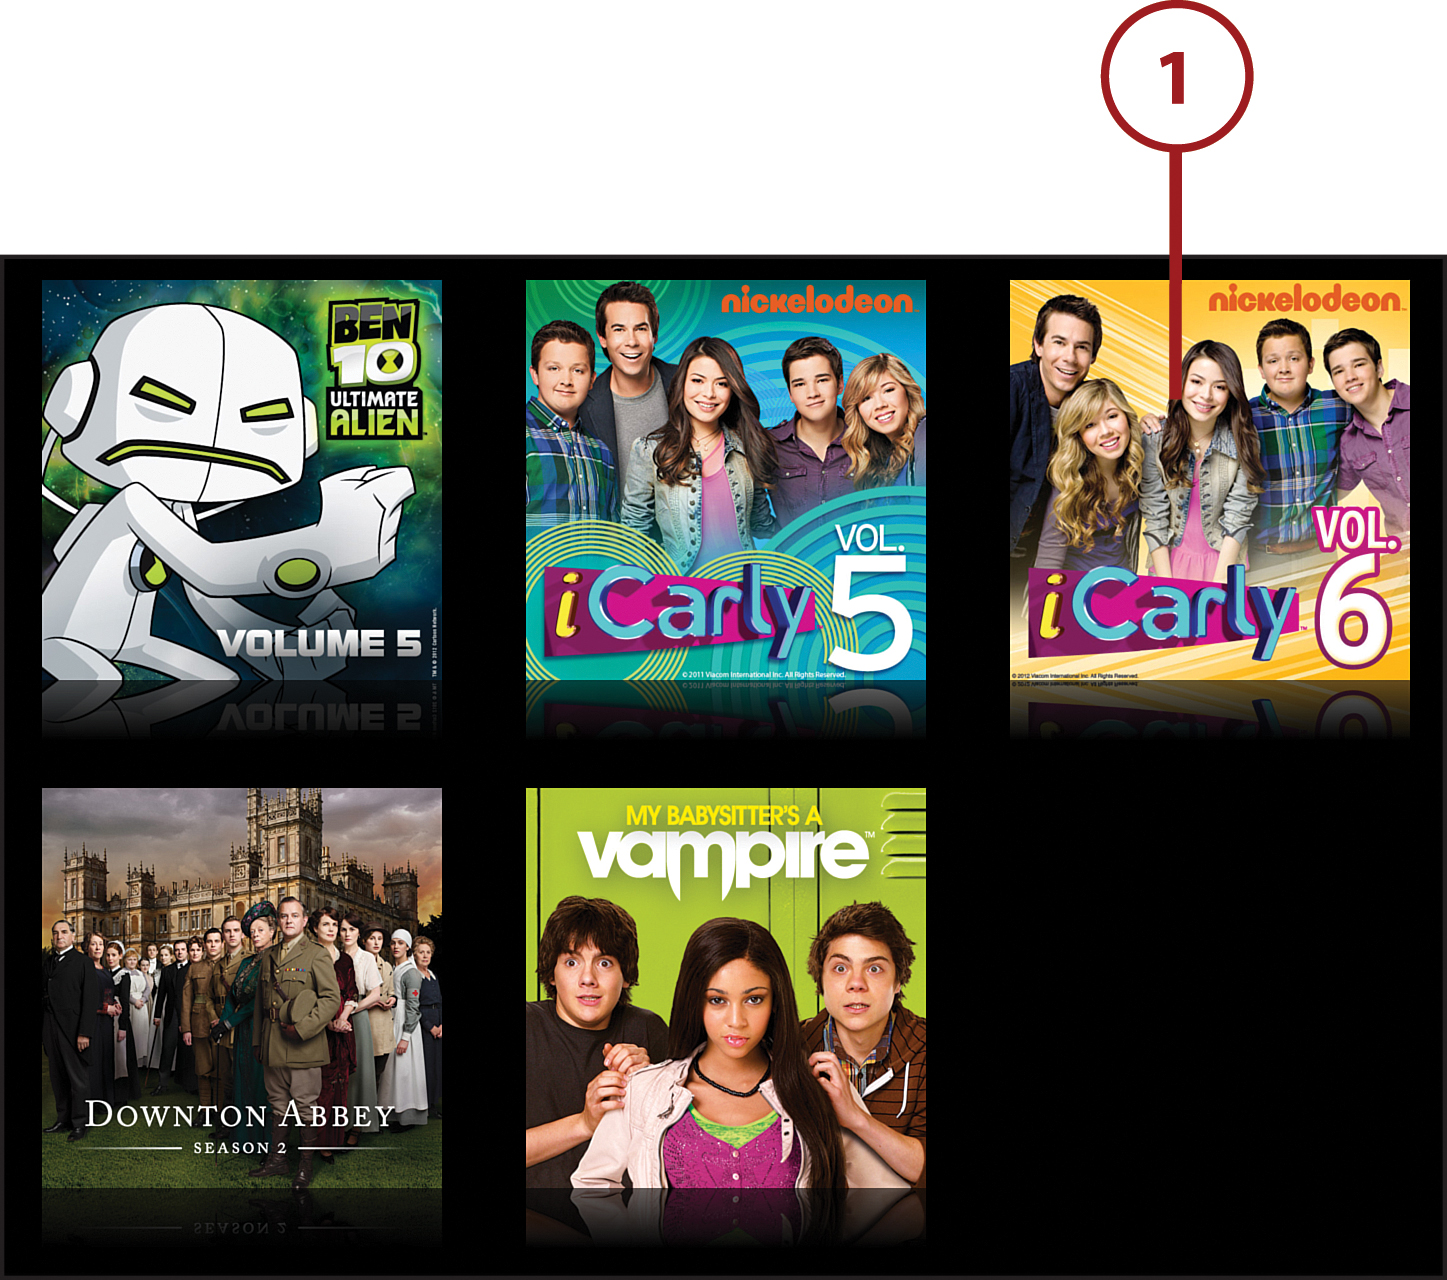
3. When you’ve found a show you’re interested in, tap it to get more information. When you do this, sometimes you just get information on that particular episode of the show. Other times, you get details of the whole season of episodes or a set of seasons. If you get multiple seasons, tap the season you’re interested in to get a list of episodes.
4. When the list of episodes comes up, you have a bunch of options. You can buy the episodes in that season all at once. To do that, tap the price and then tap Buy Season Pass.
5. You can choose to buy the episodes in high-def. If you’re going to watch the show on an HDTV or the new iPad, pick HD. Otherwise, you can choose SD.
6. You can also choose to buy just one episode at a time. To buy a single episode, tap the price next to it and then tap Buy Episode.
7. To watch a preview of each episode, tap the screenshot next to the listing for that episode.
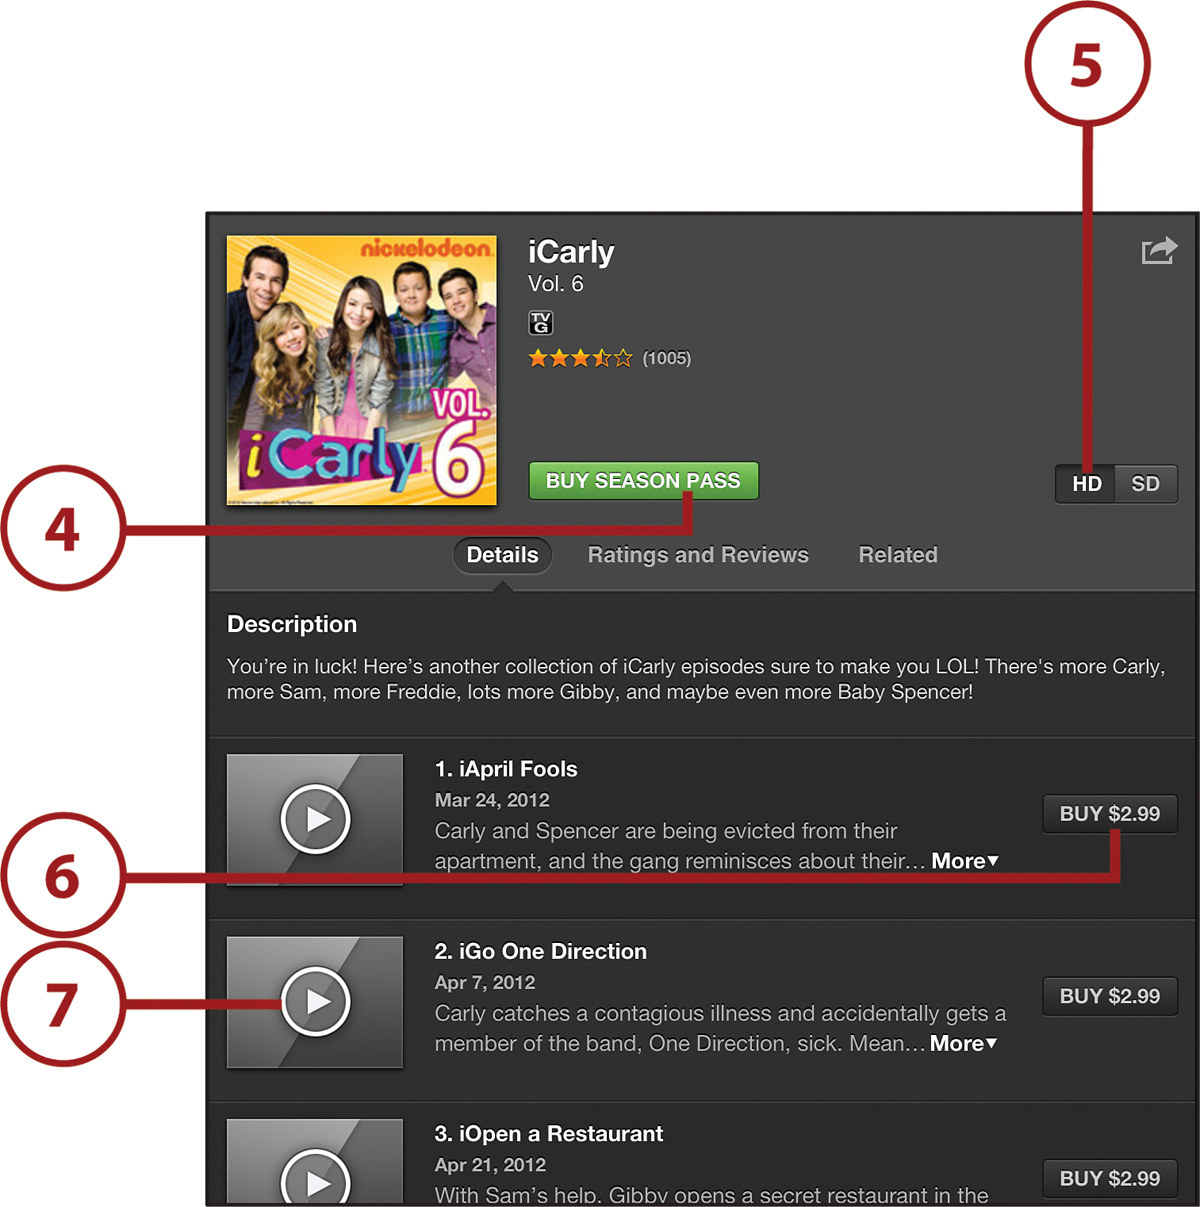
8. You might be asked to enter your Apple ID/iTunes account. Enter it, and the show starts downloading. Remember, just like with movies, buying a TV episode is charged either to your iTunes Allowance or your parents’ iTunes account. If you don’t have an iTunes Allowance, be sure to ask your parents before you buy.
Watching the Movies and TV Shows You Got from iTunes
After you’ve rented or bought a movie or TV show from iTunes, you’ll want to watch it. To find your purchase, you need to use the Videos app, which you can launch from your iPad’s home screen. Then follow these steps:
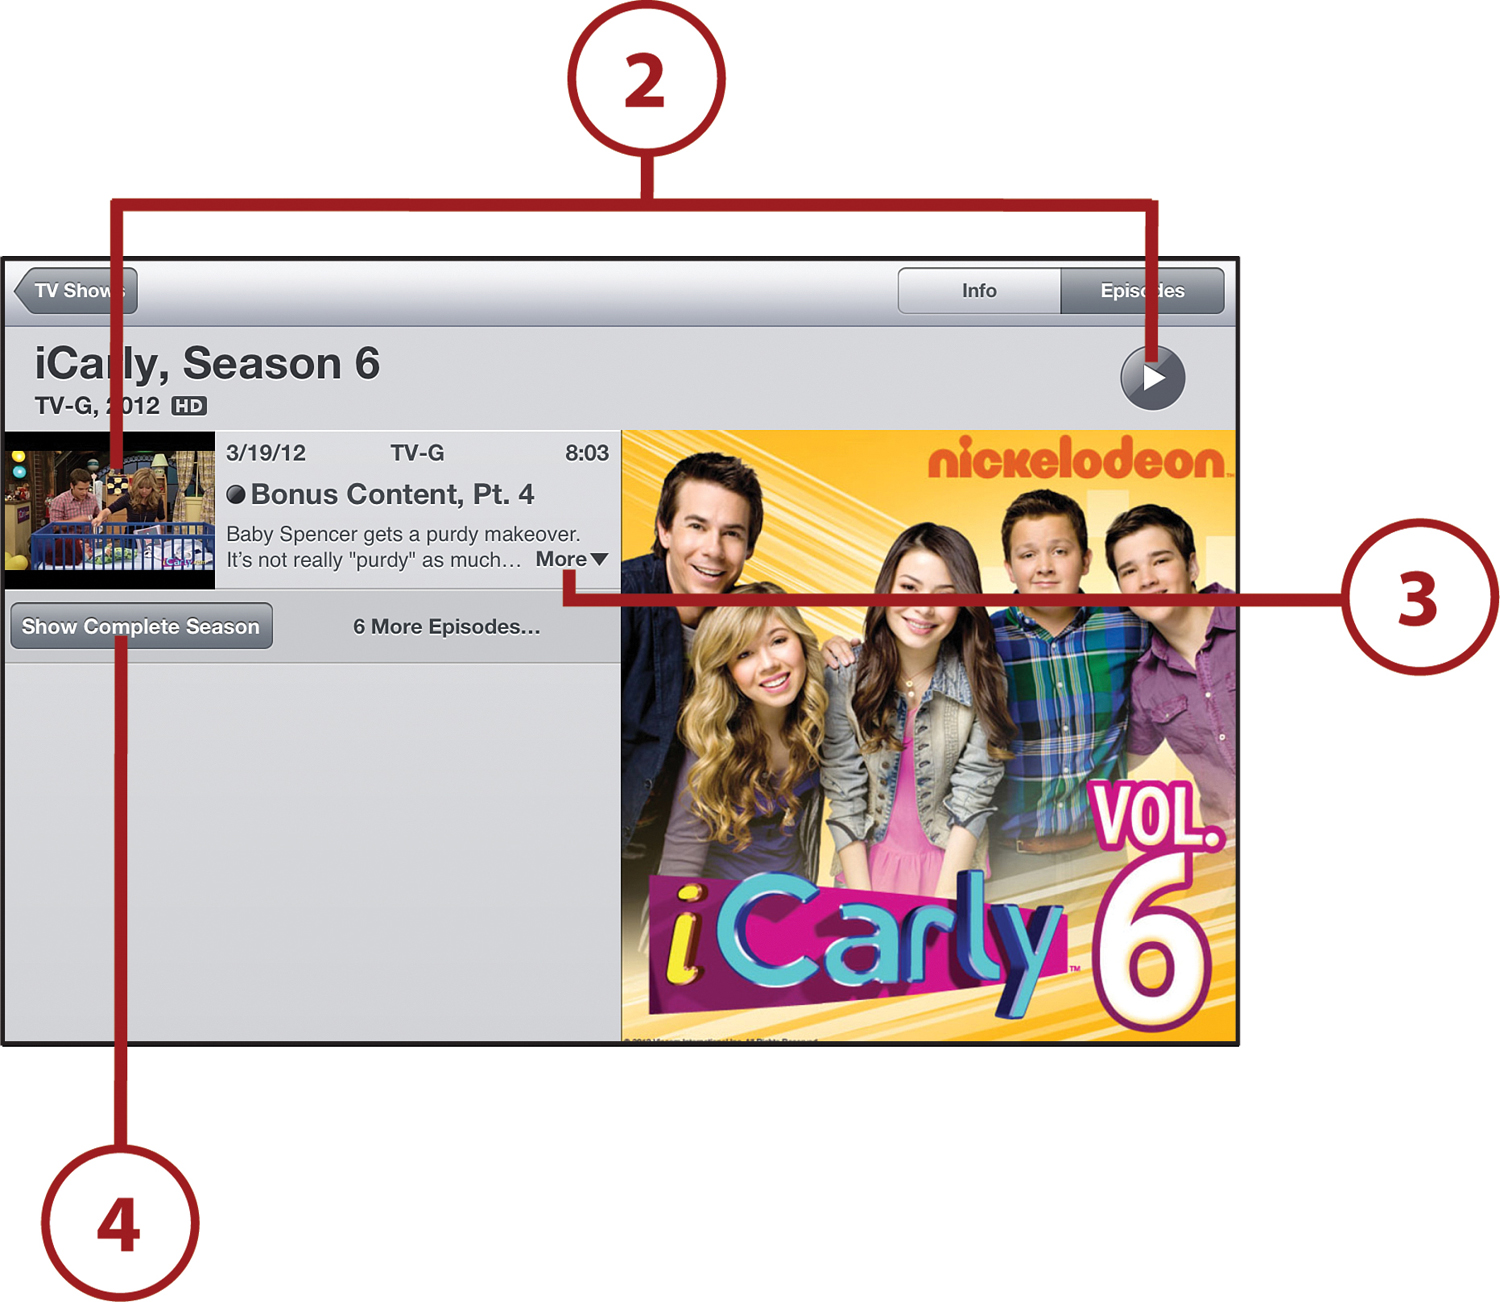
1. You see a list of all the videos you have on your iPad. Tap the one you want to watch.
2. Some more information about the video appears. If it’s a TV show, you get a list of all the episodes you have downloaded from that season. Tap the video you want to watch or tap the Play button and it begins playing.
3. To read a longer description of the episode, tap More.
4. To jump to the iTunes Store to buy more episodes of this show or another, tap Show Complete Season.
Using the iPad’s Cameras and Apps
The iPad is good for watching movies, but right above the screen that plays those movies is a camera, which means that your iPad can also take pictures. More than that, it can record videos.
Even though the two cameras on the iPad might look the same, they’re not. The one above the screen that faces you when you use the iPad takes low-resolution pictures and video. The camera on the back takes higher-quality video and photos. Neither camera is as good as the cameras on the iPhone or standalone digital cameras, but they’re both good enough for FaceTime (as you read about in Chapter 6, “Get Ready for Your Close Up! It’s FaceTime!”) and for taking photos or videos and sharing them with your friends and family.
Taking Photos
Taking photos with your iPad is simple. It all starts with opening the Camera app from your iPad’s home screen and then following these steps:
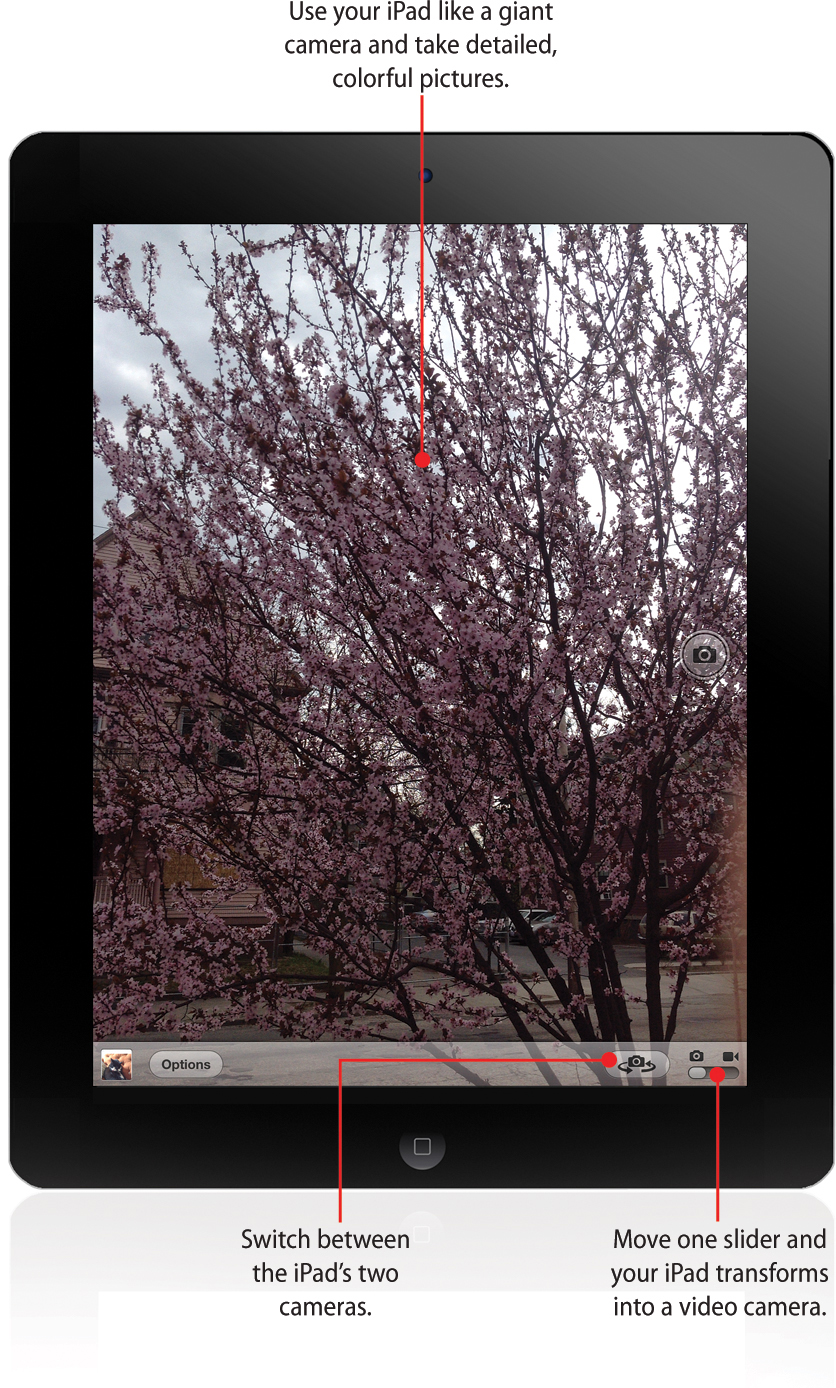
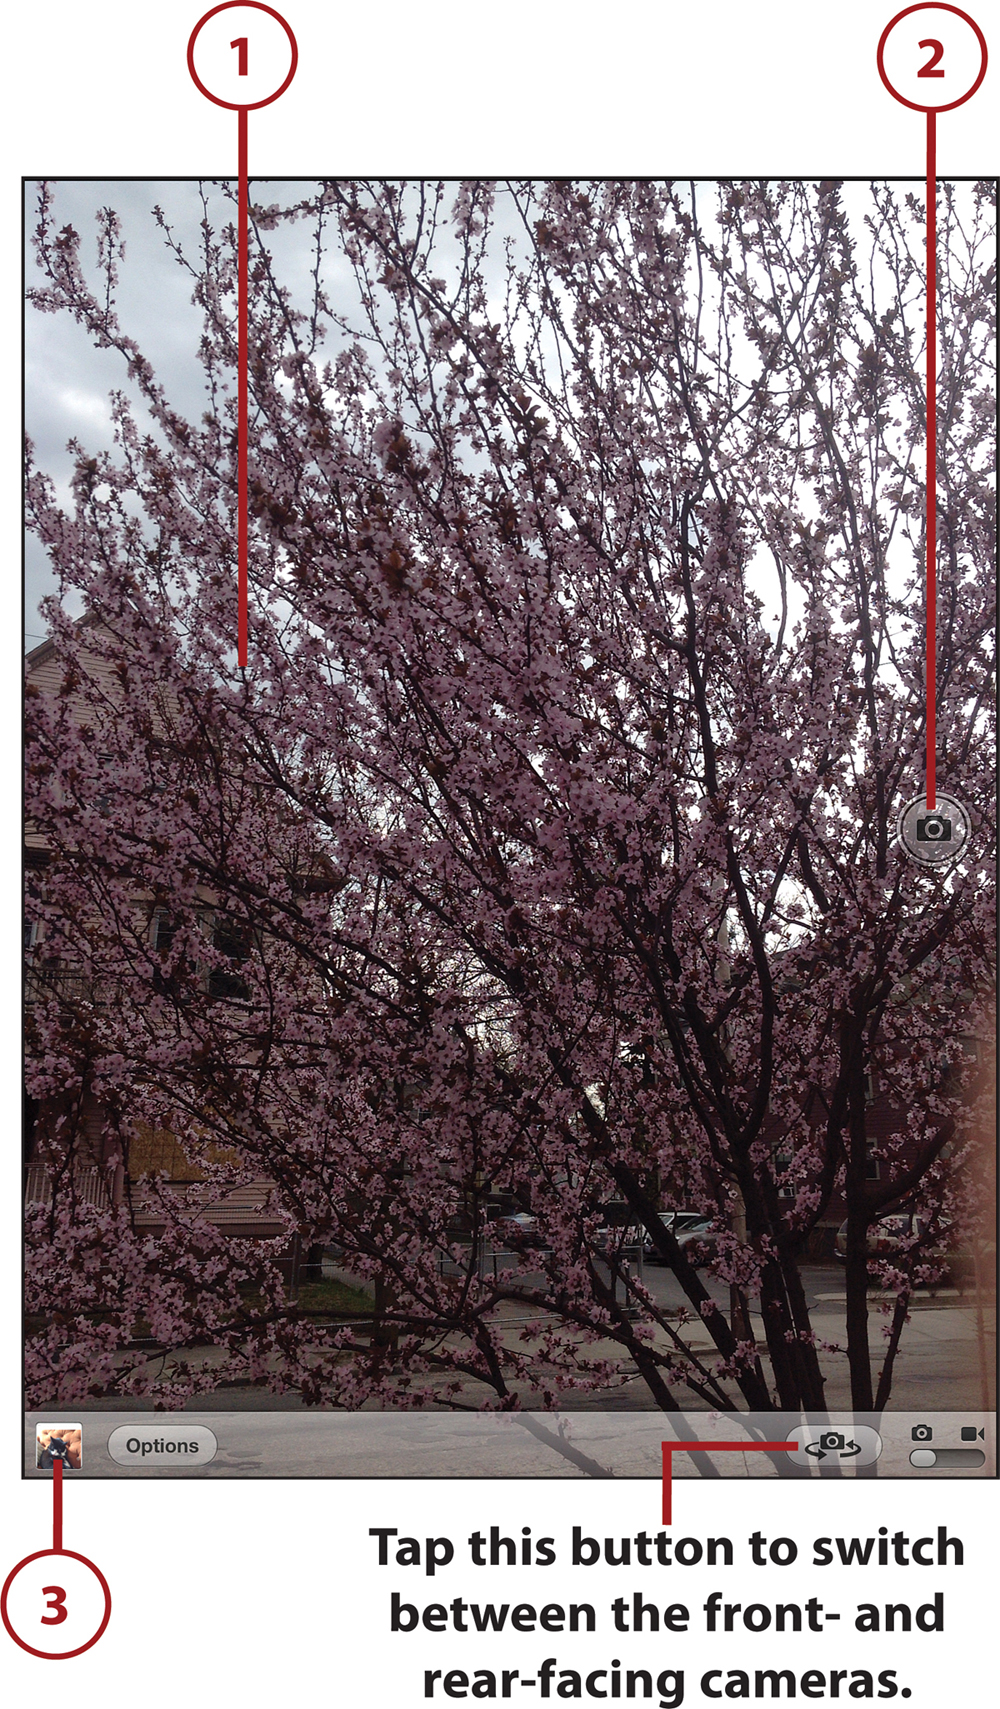
1. The iPad’s entire screen becomes like a camera’s viewfinder. Whatever you see on the iPad’s screen is what will be in your picture. Move the iPad so that you see what you want to take a picture of.
2. When you have your picture lined up perfectly, tap the Camera button. The photo you just took is saved to your iPad.
3. To view the photo, tap the tiny image of the photo in the bottom corner. This opens the Photos app and shows you the picture.
Emailing Photos to Your Friends
Got photos you want to share with your friends? You can send them by email or using Messages. To learn how to send them using both of those apps, check out the “Sharing Pictures and Video” section later in this chapter.
Zooming In for Photos
When you use a standalone digital camera or the camera on a phone, there’s often a zoom feature that lets you get closer to the image and get more detail in your picture. The iPad’s back camera (but not the front one) has a zoom feature. To use it, tap the Camera app to open it and then follow these steps:
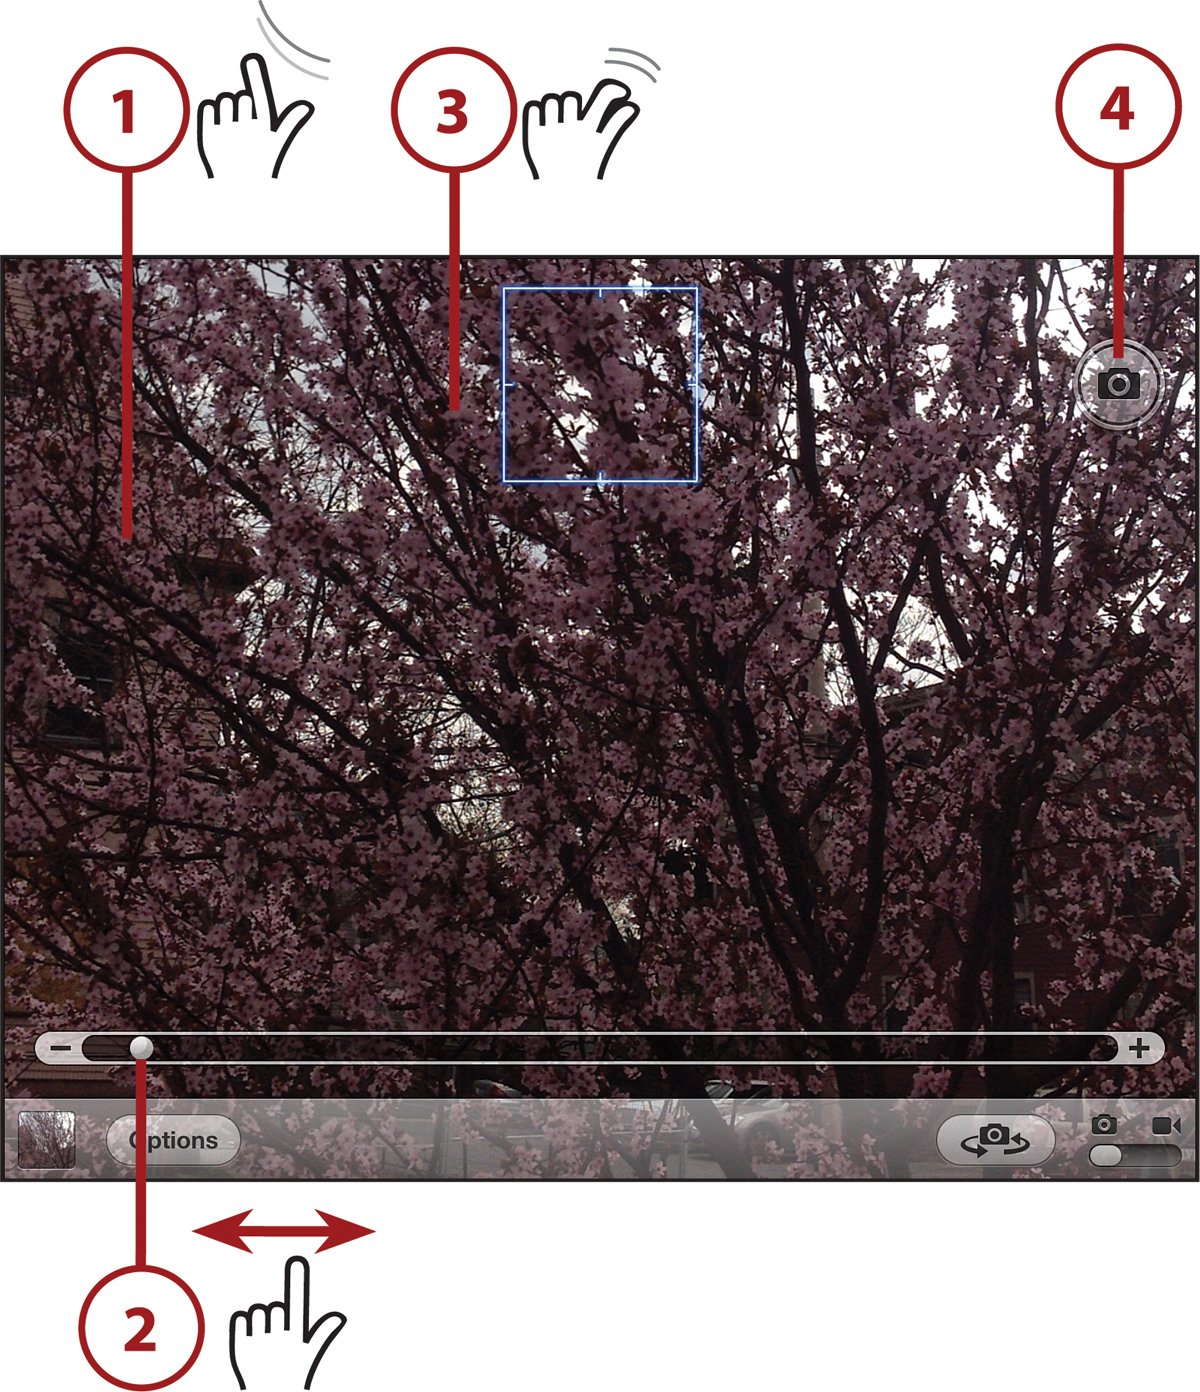
1. Tap the screen with your thumb and pointer finger together. Spread your fingers apart to pinch out.
2. A bar appears across the bottom of the screen. The more you pinch out, the more the camera zooms in. You can also drag this bar back and forth to adjust the zoom level.
3. To zoom back out, pinch your fingers in toward the center of the screen.
4. When you have the zoom where you want it, tap the Camera button to take the picture.
Focusing the iPad’s Cameras
Another trick of using the iPad’s cameras involves focus. Using the focus tool, you can make one part of your photo sharp and clear while the rest is fuzzy. This can help make the thing you’re taking the picture of stand out. You can use focus with both the front and back camera. To use this feature, tap the Camera app to launch it and then follow these steps:
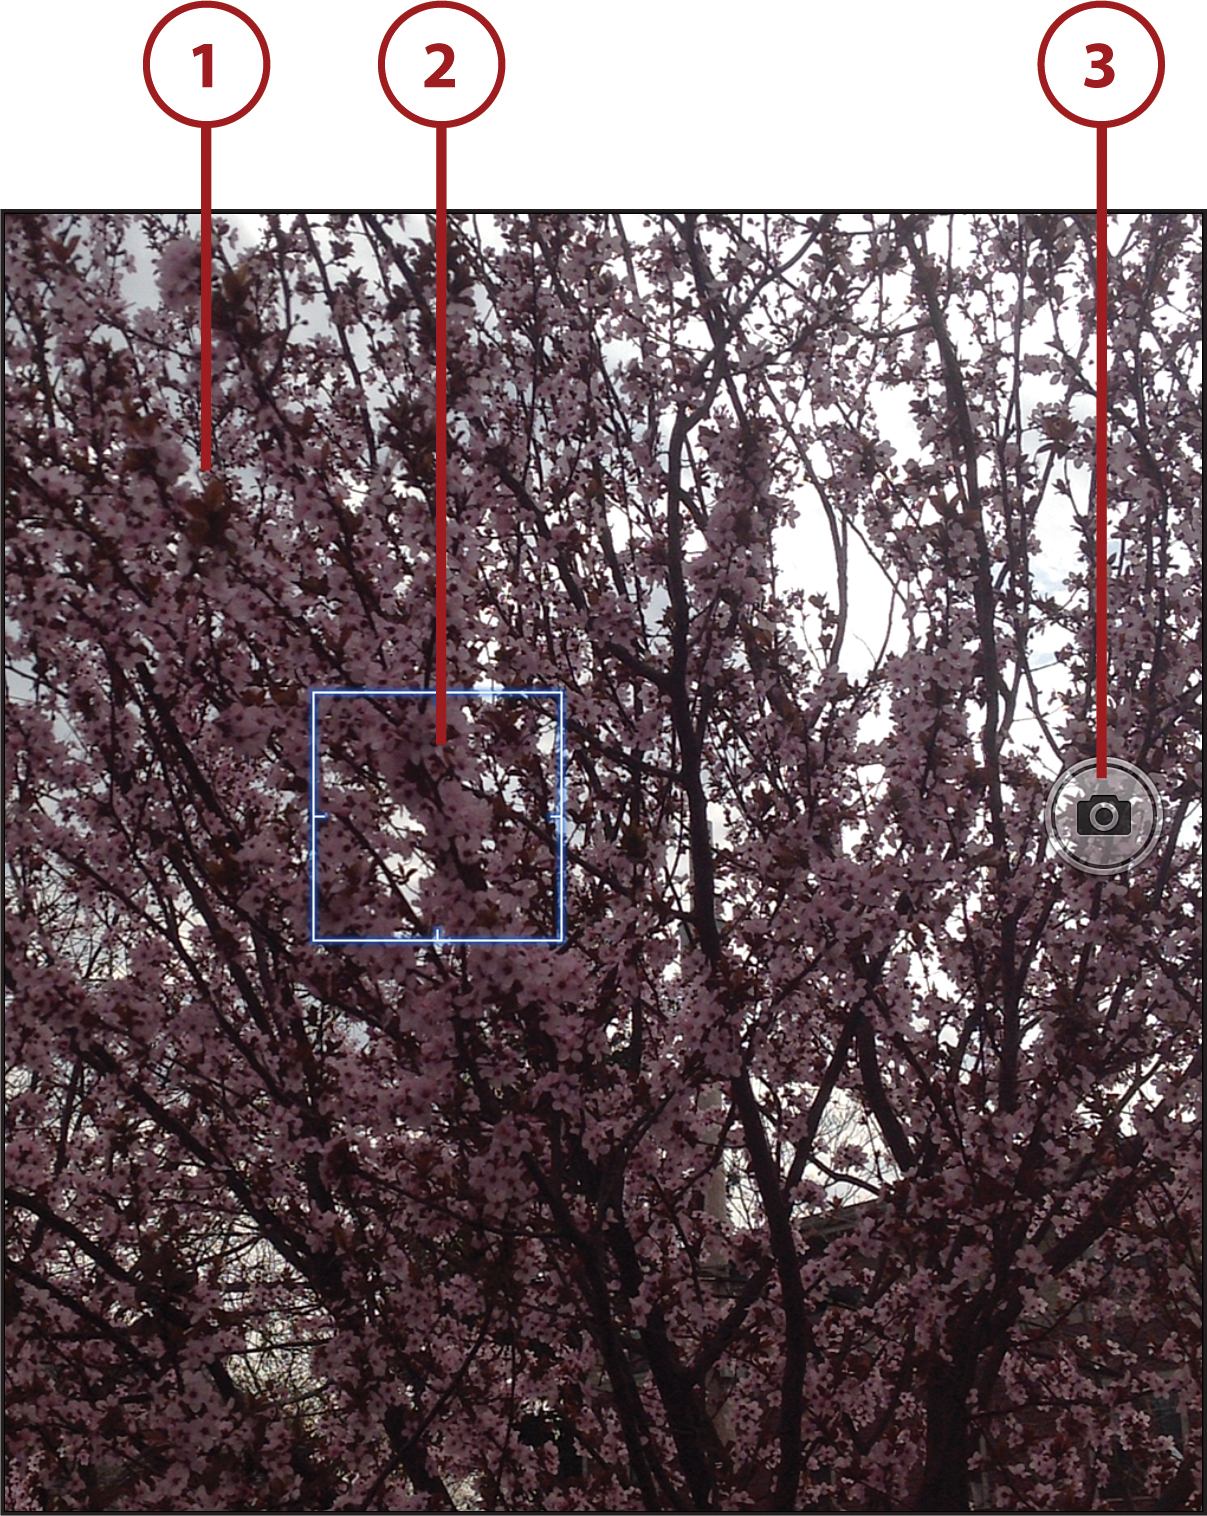
1. Move the iPad’s screen to show the thing you want to take a picture of.
2. When you have the picture the way you want it, tap the item you want to focus on. A blue square appears where you tapped. That’s where the focus will be (it might be hard to see on the iPad’s screen, but it will be there in the picture).
3. If you want to move the focus, tap again somewhere else. If you’re happy with that, tap the Camera button to take the photo.
Recording Video
The same cameras you use to take photographs are the ones you use to record videos with your iPad. In fact, you even use the same app! To record video, tap the Camera app to launch it and then follow these steps:
1. Move the slider from under the camera icon to under the video camera icon.
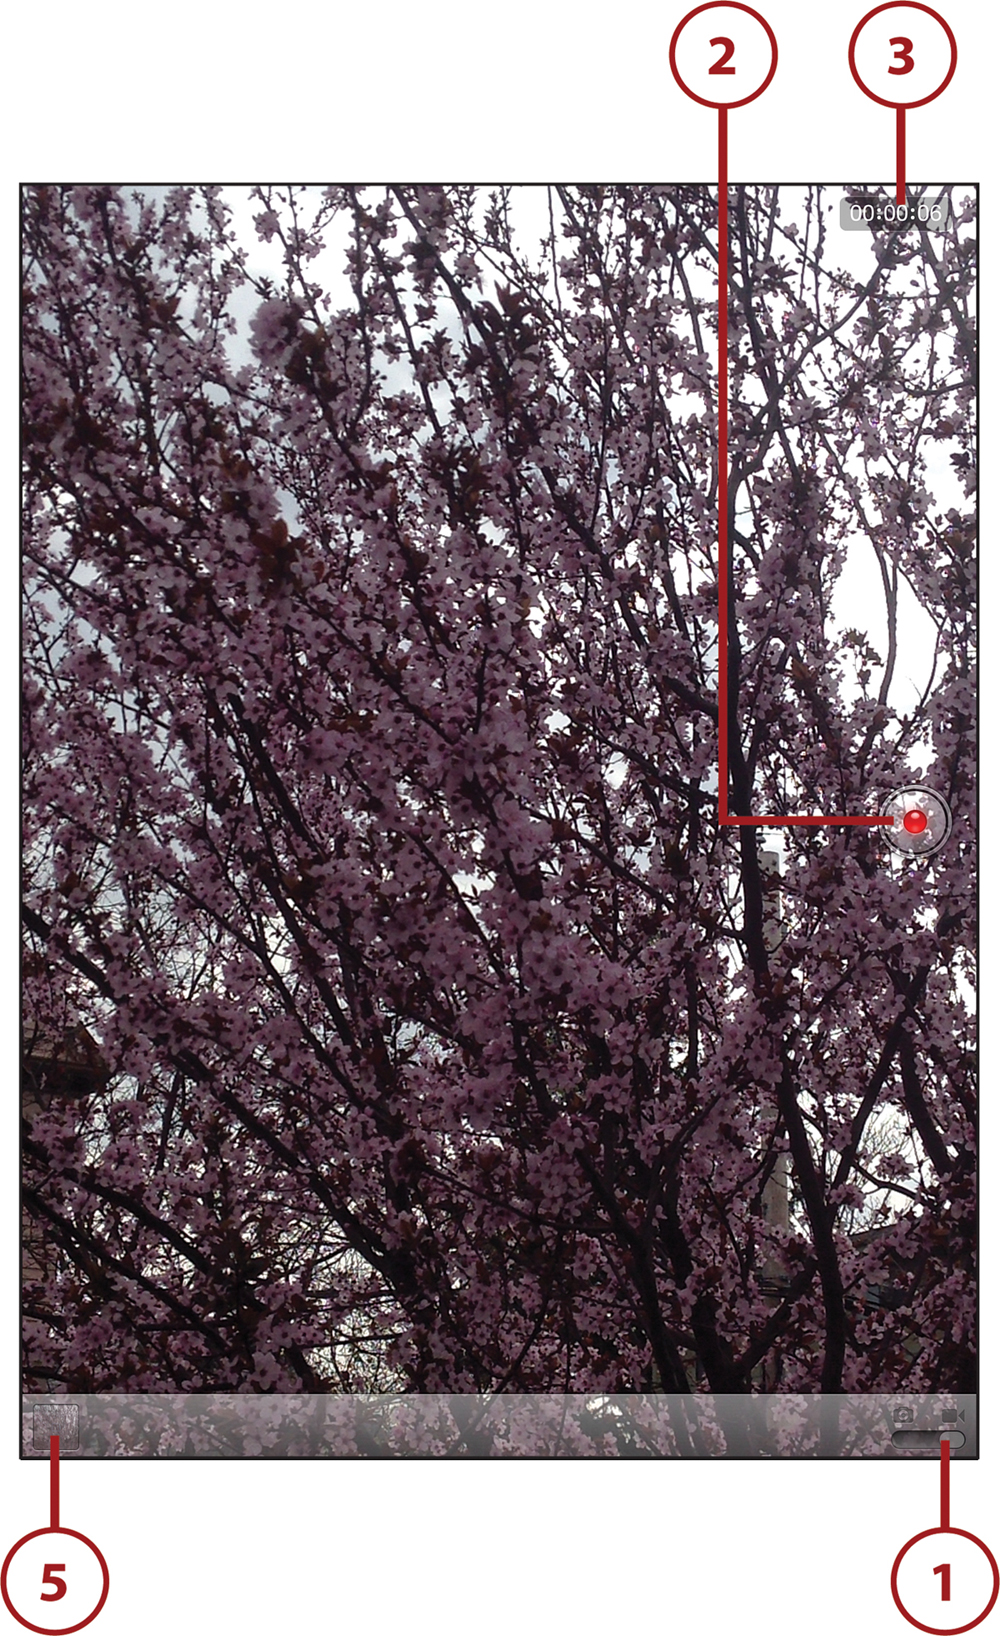
2. The Camera button changes to a red dot. When you want to start recording video, tap it.
3. You know you’re recording video because the red dot blinks, and a timer appears onscreen that lets you know how long you’ve been recording.
4. When you’re done recording the video, tap the blinking red dot again.
5. To view your video, tap the small version of it, just like you did with the photo in the earlier how-to. You can play the video in the Photos app.
Using Photo Booth
Your iPad comes preloaded with a fun app called Photo Booth. Photo Booth lets you apply all kinds of special effects to pictures to create cool, silly, and strange images. And after you’ve created them, you can share them with your friends. Tap the Photo Booth app from your iPad’s home screen and follow these steps:
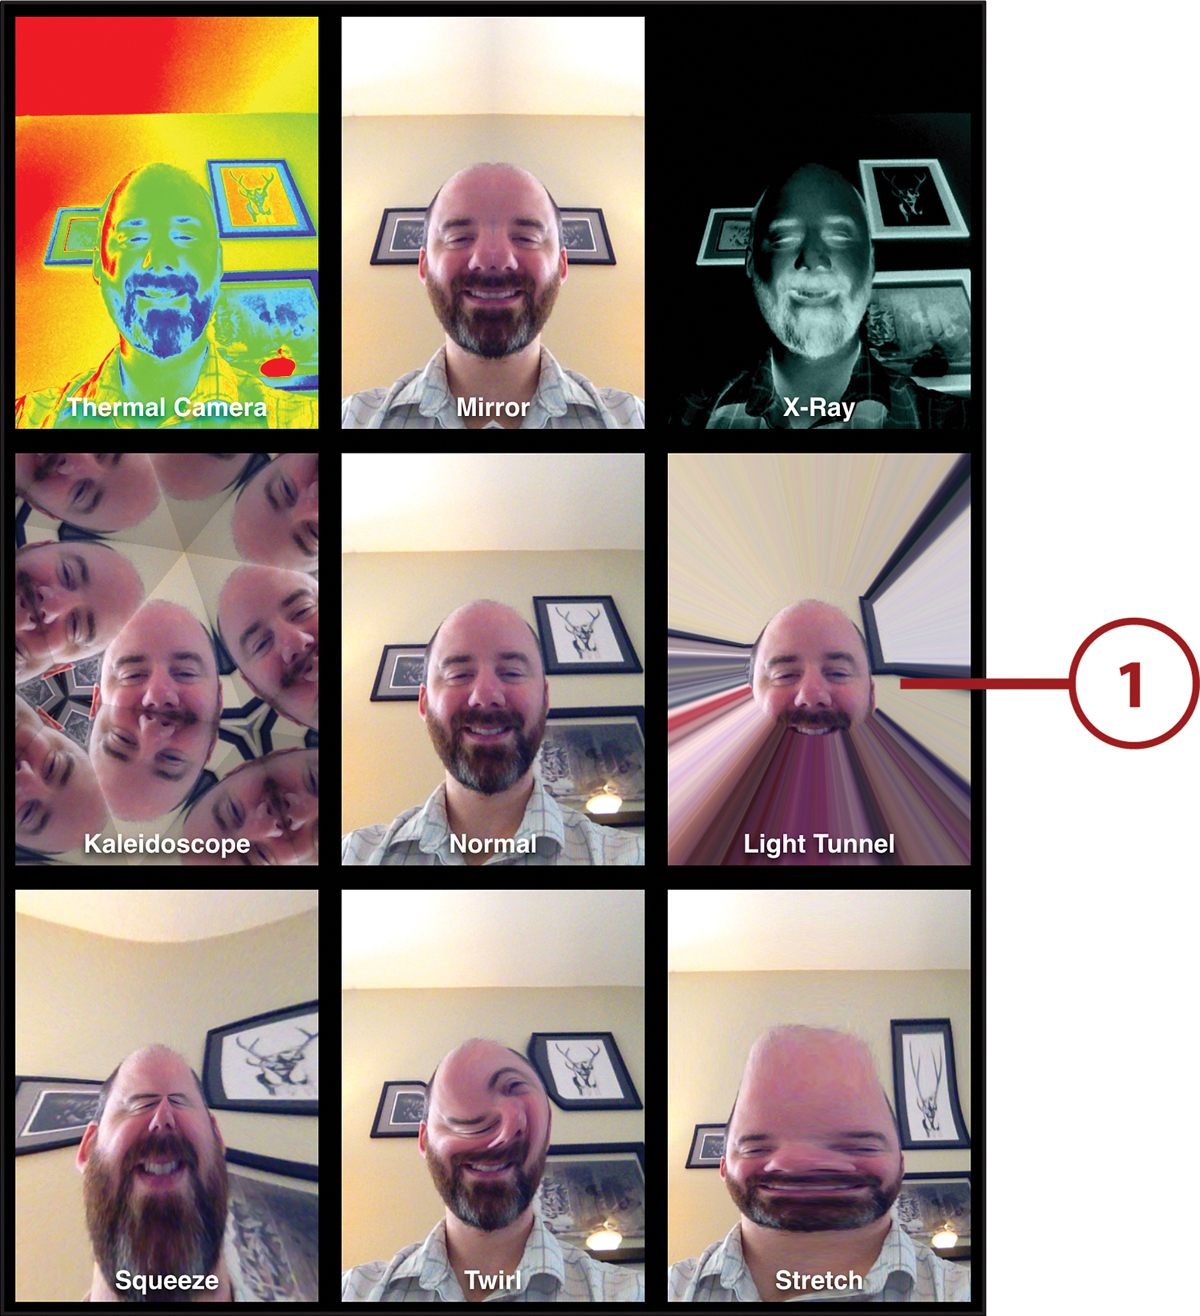
1. The screen is split into nine boxes, each one showing what a photo would look like with a different special effect applied to it. Tap the box that has the special effect you like.
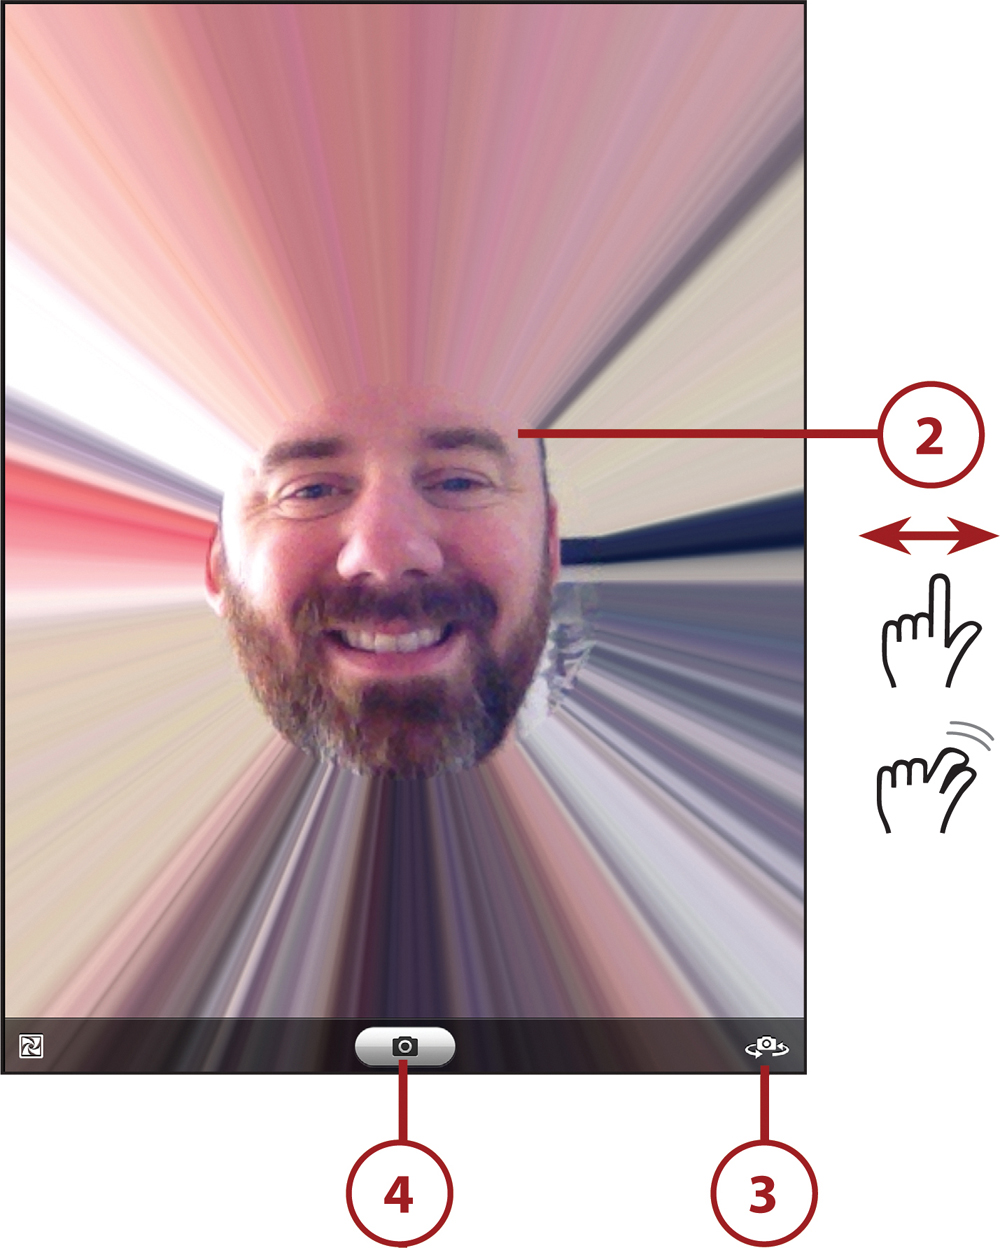
2. You can tweak and change nearly all the special effects. For instance, if you choose Light Tunnel, you can move the location of the tunnel by tapping and dragging it. You can also make the tunnel smaller or bigger by pinching in and out.
3. Tap the Switch Cameras button to change which of your iPad’s cameras Photo Booth is using.
4. After you’ve played with the special effect and created just the image you want, tap the Camera button to take the photograph.
5. When you’ve taken the photo, it appears on the screen in a small strip along the bottom. The pictures stay on the screen in this strip until you delete them. To see one of the pictures you’ve taken, just tap it.

Tapping and dragging to move the location of the effect, and making them bigger or smaller by pinching, works in nearly all the effects. The only ones where it doesn’t are Thermal Camera and X-Ray.
Deleting Photo Booth Photos
If you’d rather delete a photo than share it, open Photo Booth and then follow these steps:
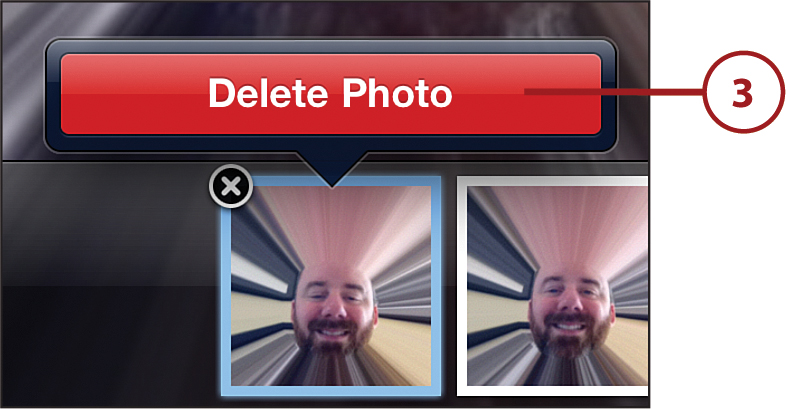
1. Tap the photo you want to delete.
2. Tap the X that appears on it.

3. Tap Delete Photo. To delete more than one photo at a time, tap the Action box, select the photos you want to delete, tap Delete, and then Delete Selected Photos.
Using the Photos App
The Photos app is the place where everything you do with the iPad’s cameras gets stored. Whether you’re taking photos, recording videos, or making silly faces in Photo Booth, every time you tap the Camera button, the photo or video you take is saved in Photos.
Viewing Your Photos
Looking at the photographs you’ve taken with your iPad’s cameras is simple. Open the Photos app from your iPad’s home screen and follow these steps:
1. You see a screen full of small versions of your photos. You can swipe up and down to see more photos.
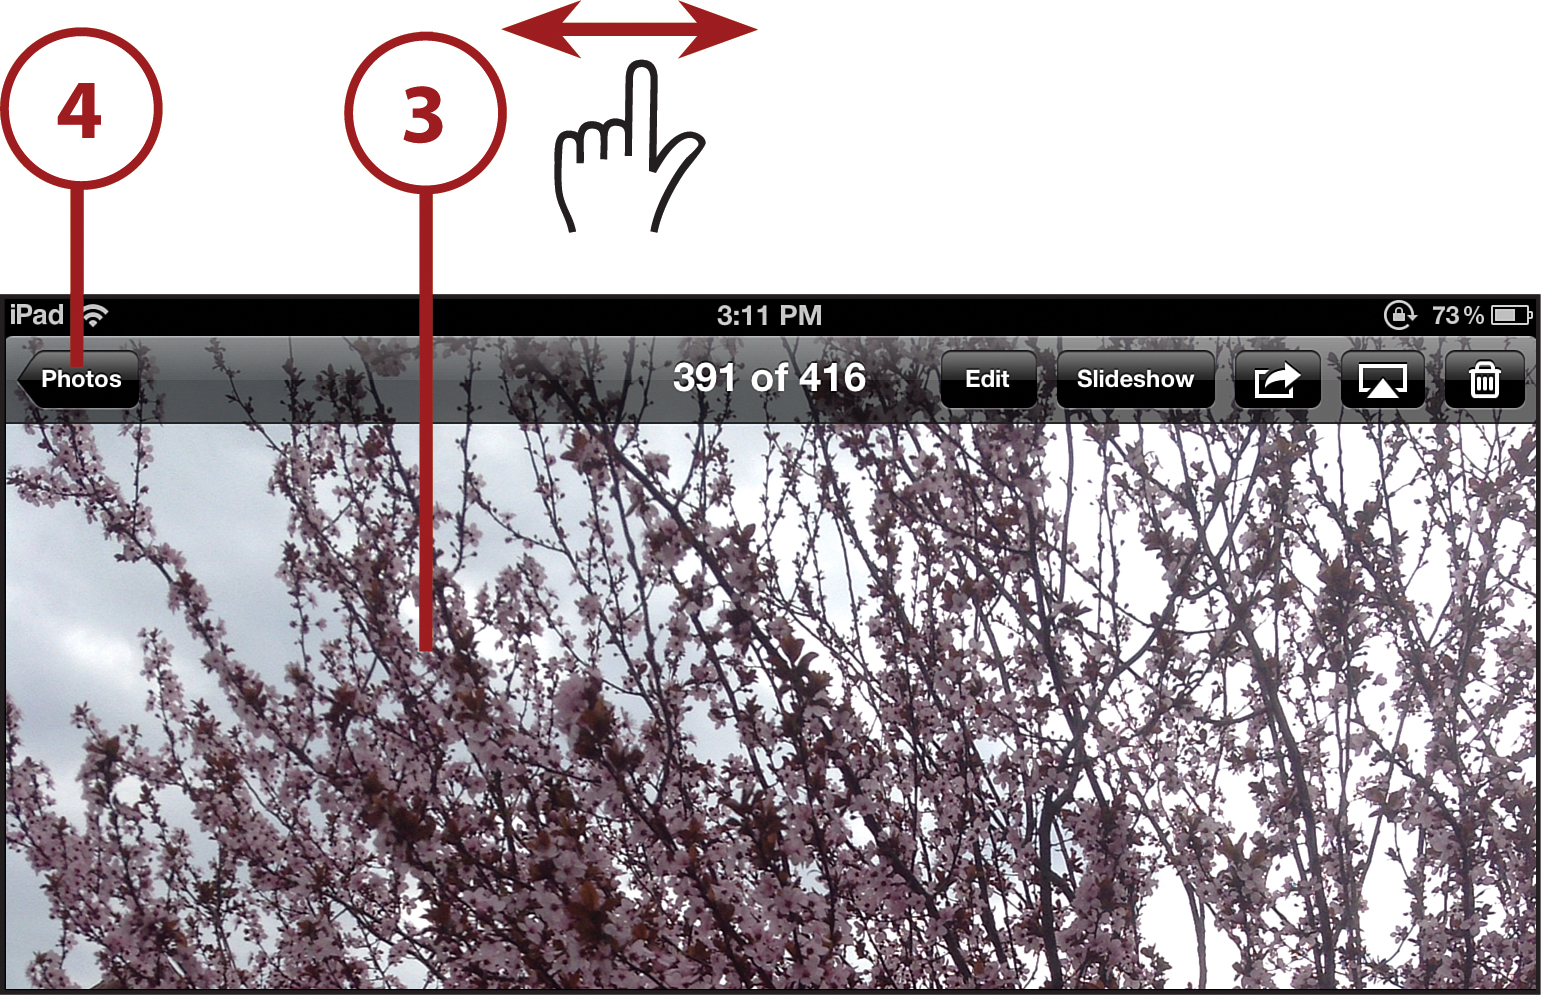
2. When you find one you want to see at full size, tap it.

3. Swipe from right to left to see the next photo. To see the previous one, swipe left to right.
4. Tap the screen and then tap Photos to go back to the list of photos.
Watching Your Videos
Watching the videos you have in Photos is similar to looking at photos. To begin, tap the Photos app and then follow these steps:
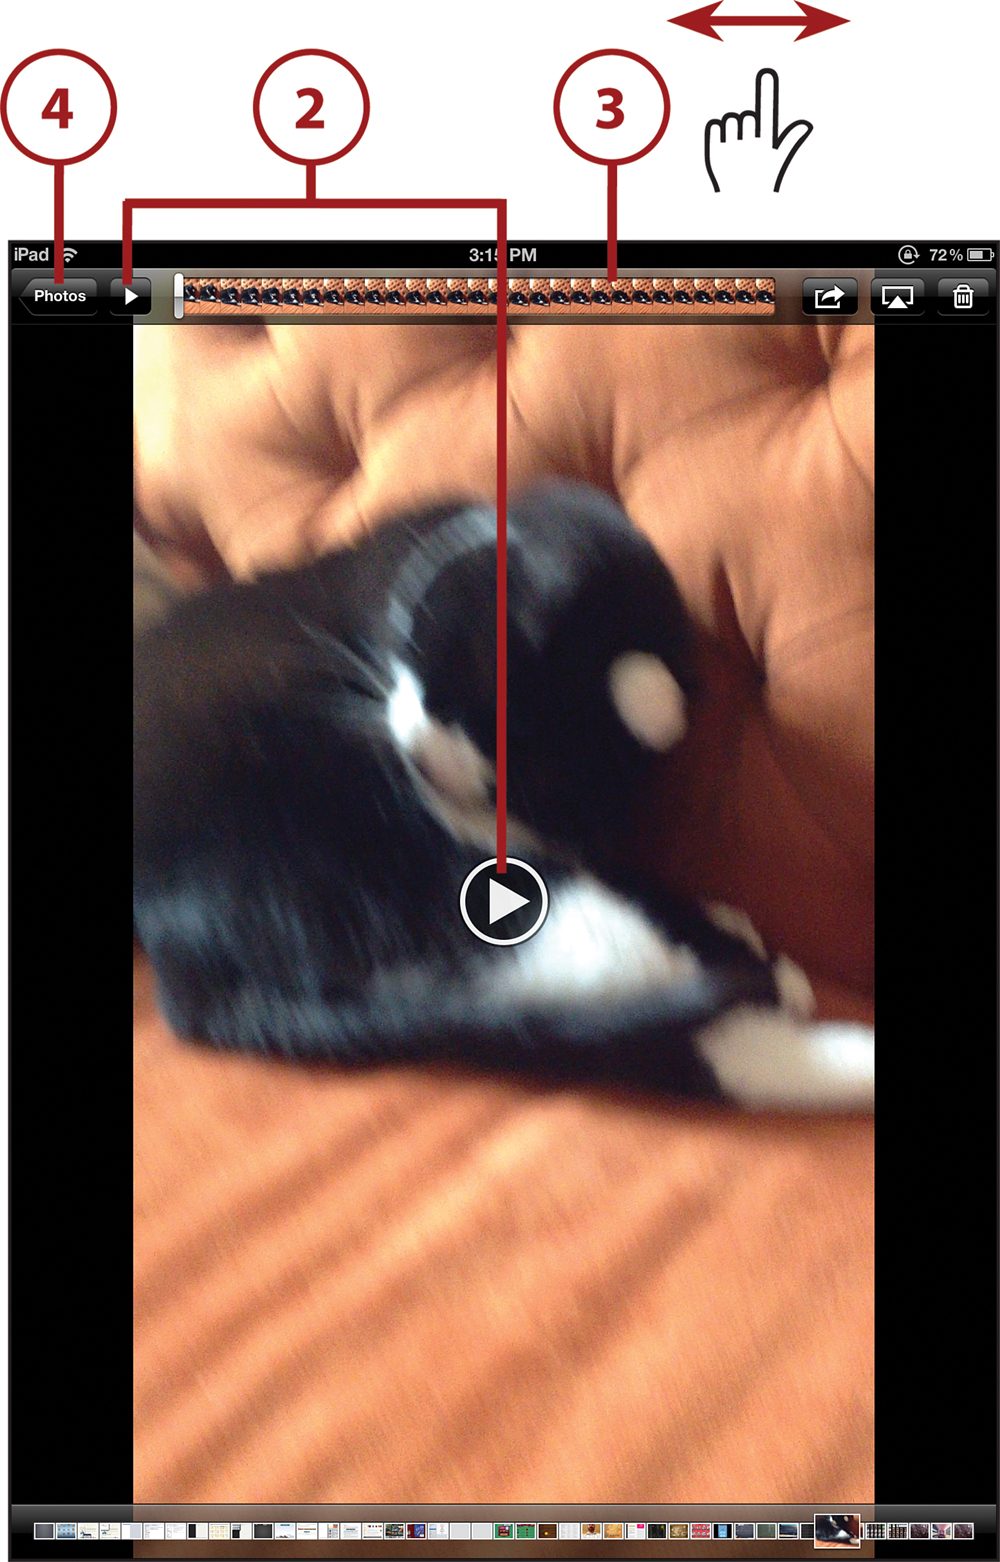
1. Find your videos on the overview screen. You can identify them because the video camera icon and their length appear on the small version. Tap the one you want to watch.

2. Tap the Play button in the center of the screen or the one at the top to watch the video.
3. Tap and drag the bar at the top of the screen to move backward and forward in the video. The video starts playing again wherever you let go of the bar.
4. Tap the screen and then tap Photos to go back to the list of photos and videos.
Deleting Photos
You’re going to take a lot of photos and videos that you don’t want to keep. That’s just the way it is with photography. Even professionals take way more pictures than they end up using. To delete photos or videos, start by tapping Photos and then follow these steps:
1. On the overview screen, tap Edit. (In iOS 5, tap the Action box instead. The other steps are the same.)
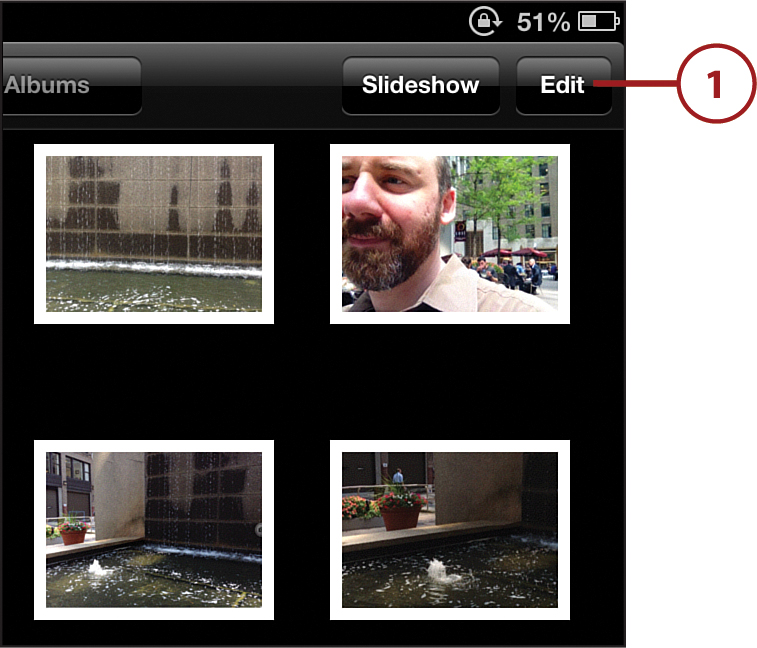
2. Tap each photo or video you want to delete. A blue check mark appears on the ones you select.

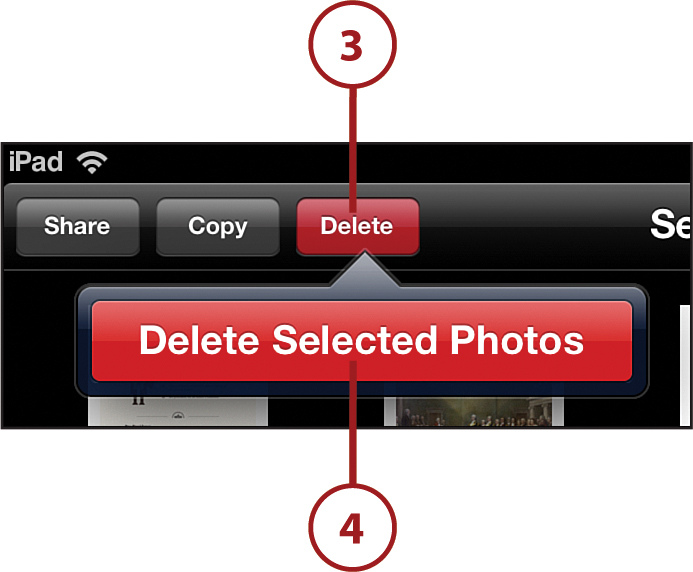
3. Tap Delete.
4. Tap Delete Selected Photos.
Deleting One Photo or Video at a Time
You can also delete photos and videos one at a time. In that case, tap the photo or video to view it and then tap the screen to bring up the options. Tap the trash can icon and then tap Delete Photo or Delete Video. The video will be gone.
Working with Photo Albums
Unless you change things, all your photos and videos are stored in the same photo album—Camera Roll. That makes it easy to know where everything is all the time, but you might want to store similar photos and videos together in their own albums. For instance, you might want all family photos in one place, all photos of your friends in another, and videos from your school plays or sports in a third.
For that, you need to know how to create and work with new photo albums.
Creating a New Album
To create a new album, start by tapping the Photos app to open it and then follow these steps:
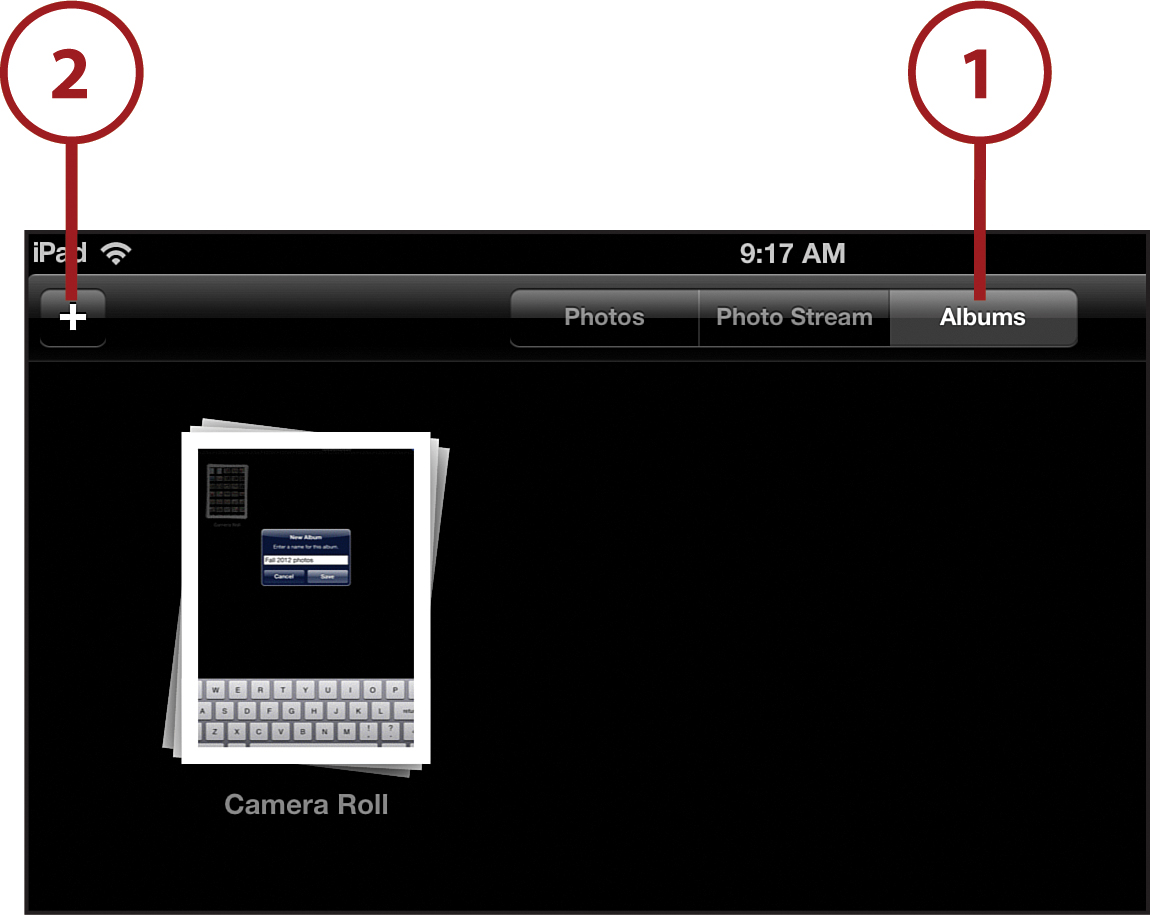
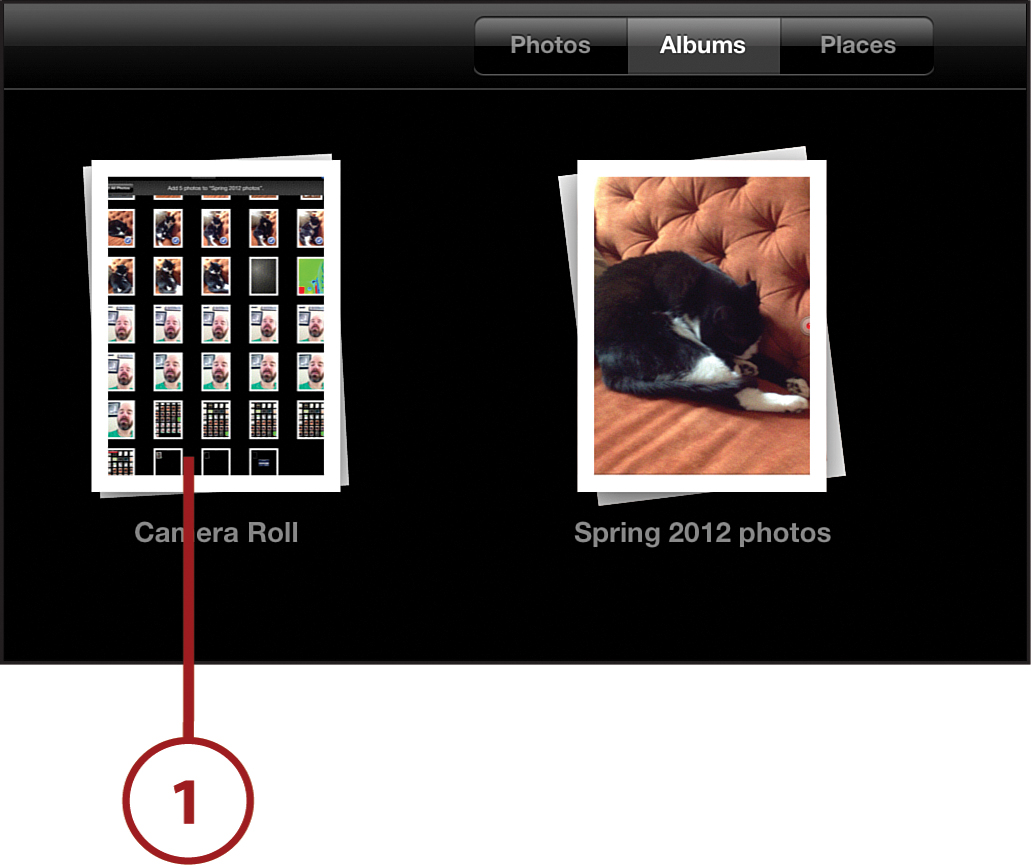
1. Tap Albums. If you haven’t created an album before now, all you see here is the Camera Roll album.
2. Tap +.
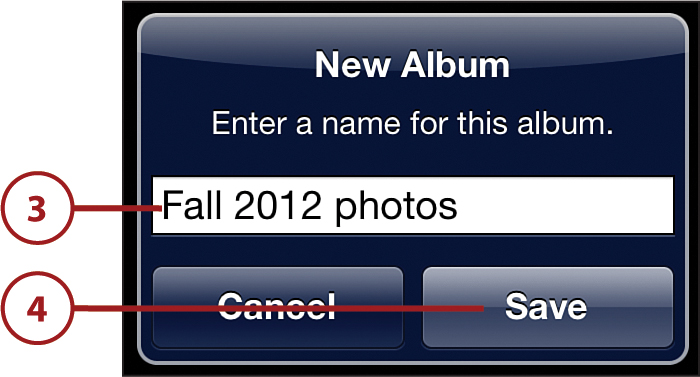
3. Give your new photo album a name.
4. Tap Save to create the album.
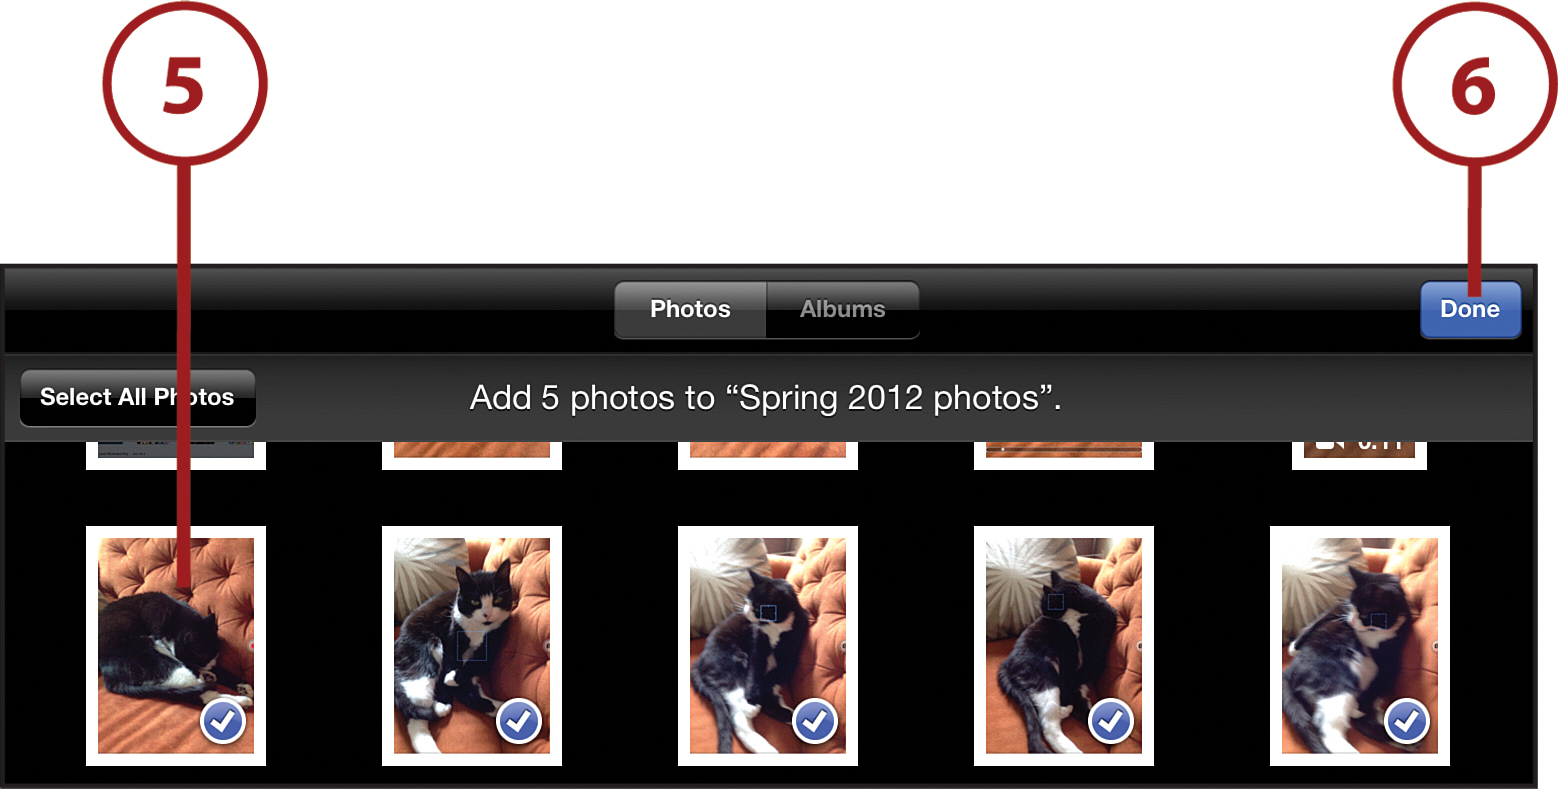
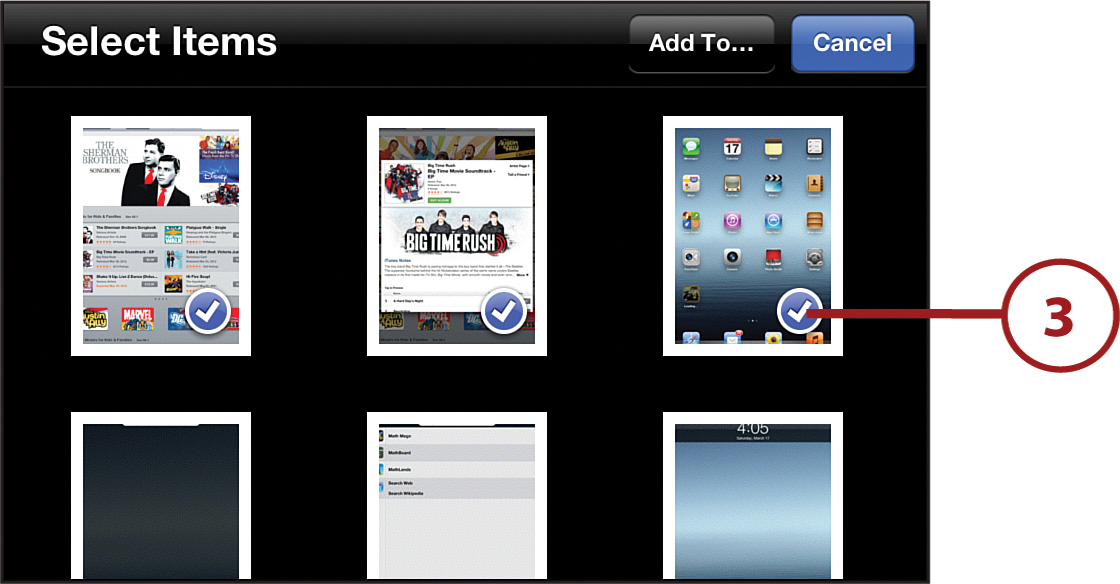
5. Decide what photos or videos from Camera Roll will go in the new album. Tap each photo or video you want to move. A blue check mark appears on them to let you know you’ve chosen them.
If you want to add all the photos in Camera Roll to your new album, tap Select All Photos. You can also leave a photo album empty for later use. Do that by tapping Done.
6. Tap Done when you’ve selected all the ones you want to move.
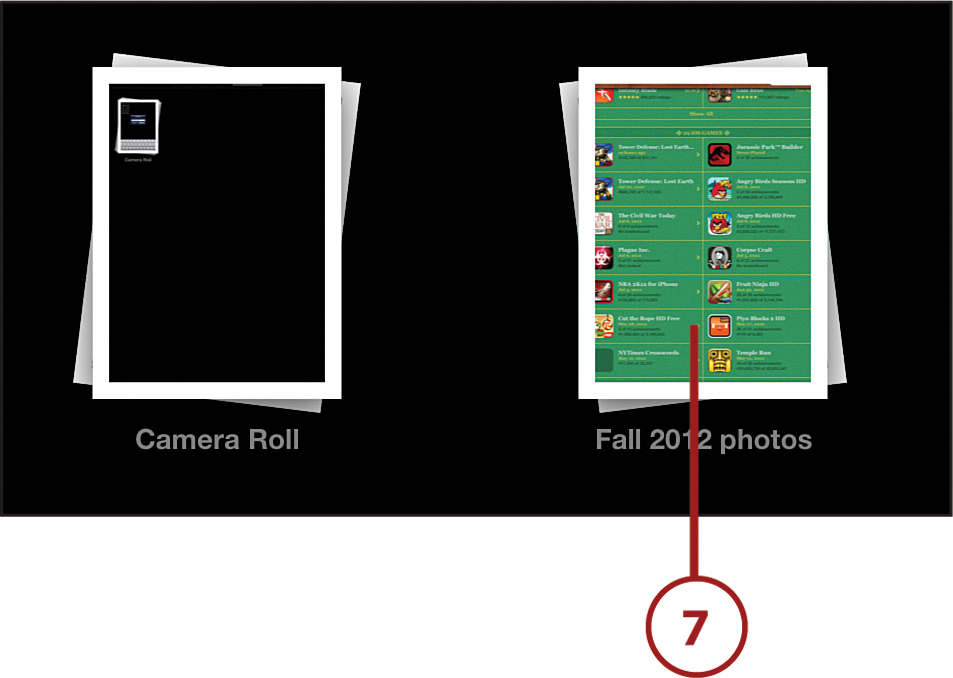
7. The new album—with the selected photos and videos in it—is created. Tap it to view the photos and videos you put in it.
Select Photos and Then Create Album
You can also choose the photos first and then create an album after, if you want. Tap the Edit box (or, in iOS 5, the Action box) and select the photos you want to add to the new album. Then tap Add To and Add to New Album. Give the album a name, tap Save, and the new album is saved with the photos in it.
Moving Photos to Photo Albums
After you’ve created new photo albums, you can add pictures or videos to them anytime you want. Open the Photos app from your iPad’s home screen and follow these steps:
1. Tap Camera Roll.
2. Tap the Edit button (or, in iOS 5, the Action box) in the upper-right corner of the screen (not pictured).
3. Tap the photos or videos you want to move. A blue check mark appears on each one you’ve selected.
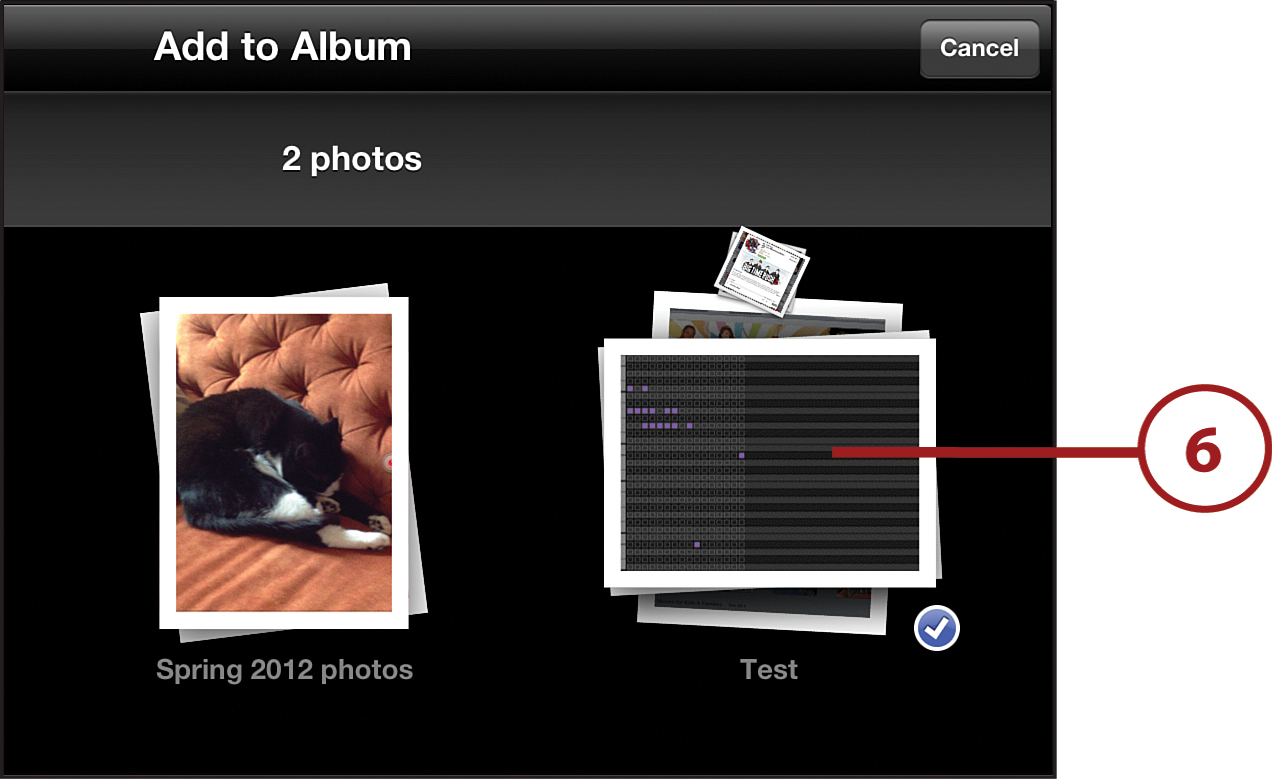
4. Tap Add To.
5. Tap Add to Existing Album (in iOS 5, tap Add to Existing Photo Album).

6. Tap the photo album you want to move the pictures or videos to. The photos jump to it.
Deleting Photo Albums
Sometimes you decide to reorganize your photos and videos and, when you do, you want to delete some photo albums. To do this, tap Photos to open it and then follow these steps:
1. Tap Albums.
2. Tap Edit.
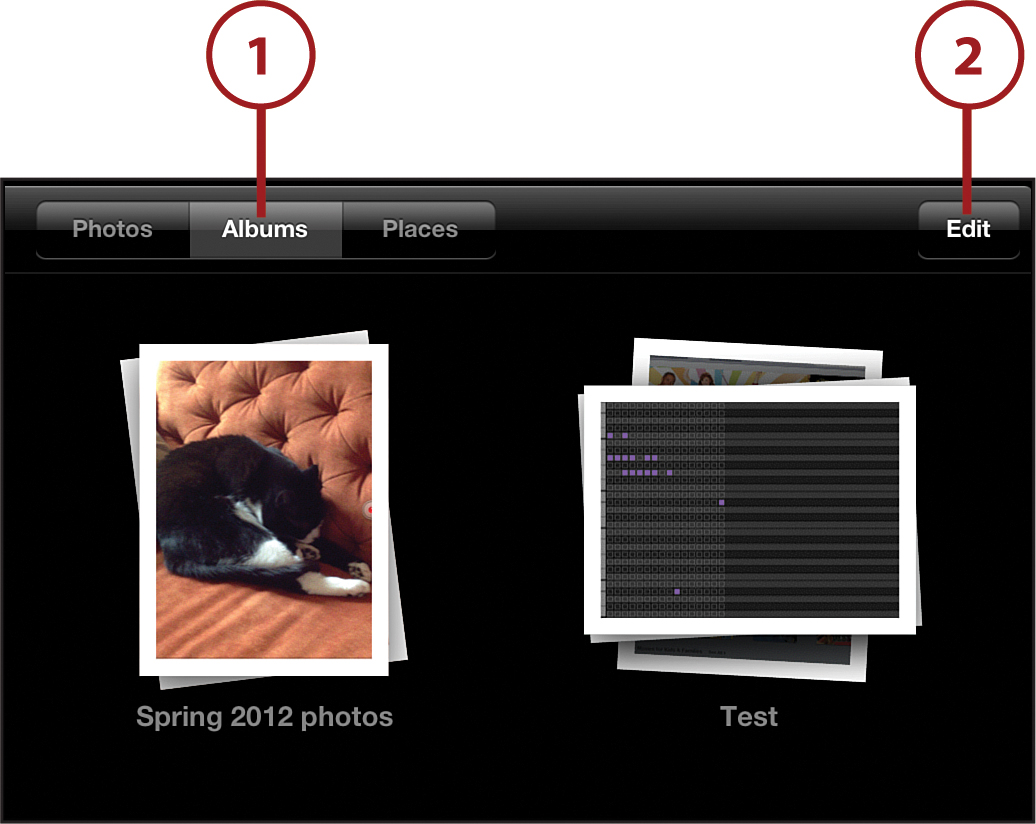
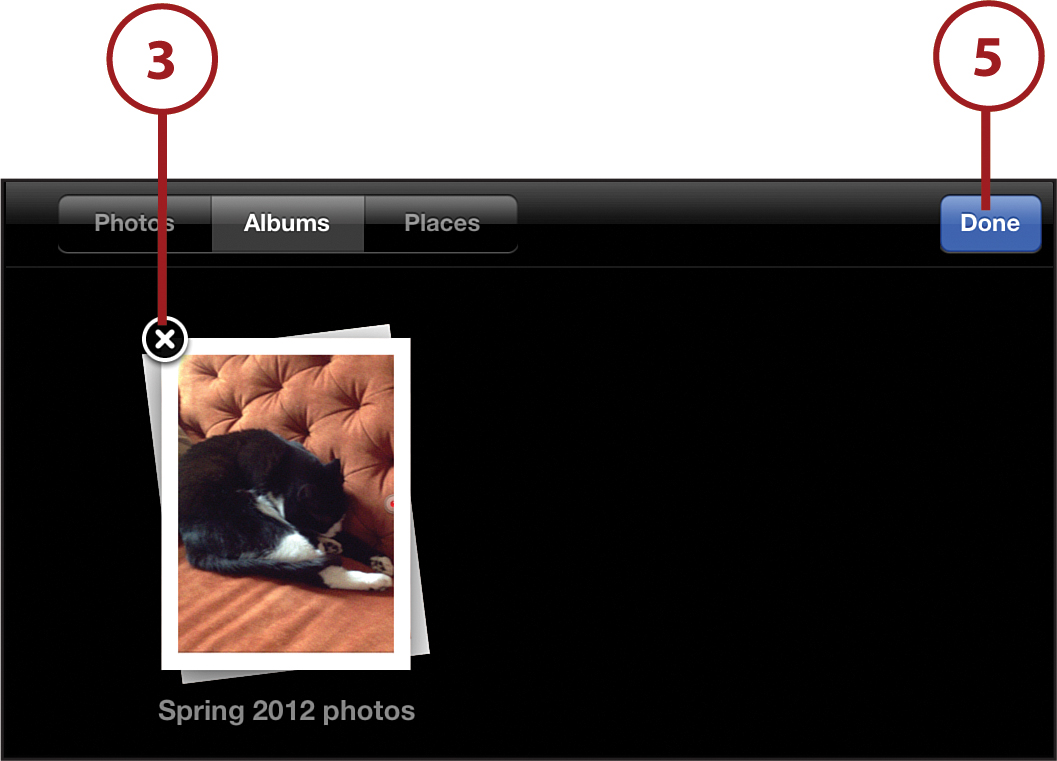
3. Tap the X that appears on the album or albums you want to delete. You can delete any albums you created, but you can’t delete Camera Roll.
4. Photos asks if you really want to delete the album. An important thing to know here is that deleting an album doesn’t delete the photos in it. They just move back to the Camera Roll, so feel free to delete albums.
5. The photo album you selected is deleted. Tap Done.

Sharing Pictures and Video
Having photographs and videos on your iPad is great for remembering fun times or for laughing over with your friends and family. But what if you want to share those memories or laughs with friends and family who don’t live close enough to see them in person? Then you need to use the Internet to share them.
Sharing by Email
Email is one of the easiest ways to share your photos or videos with other people. To do it, begin by tapping the Photos app to open it and then follow these steps:
1. Tap the photo or video you want to share.
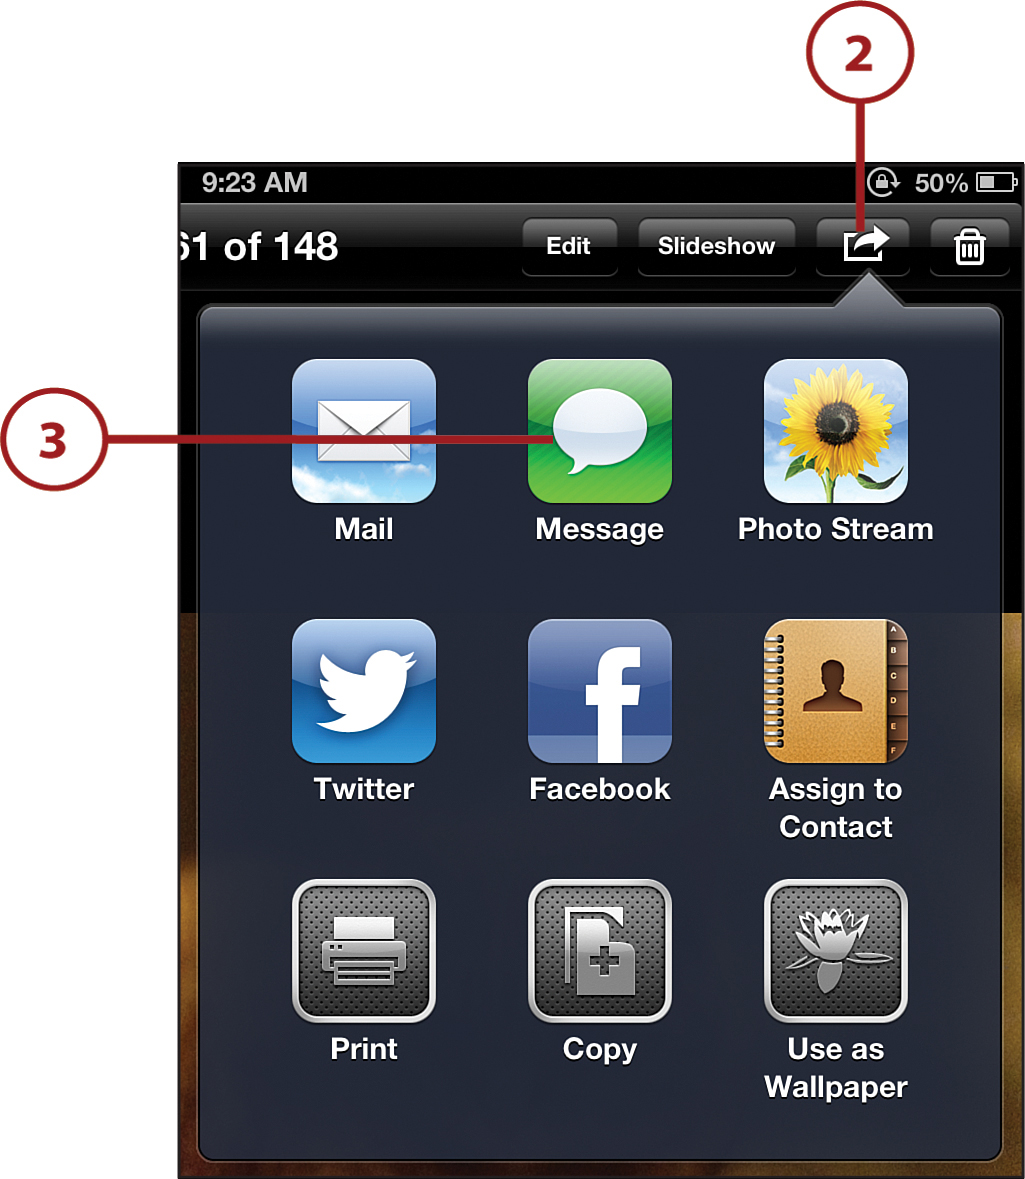
2. Tap the Action box to open it.
3. Tap Mail.

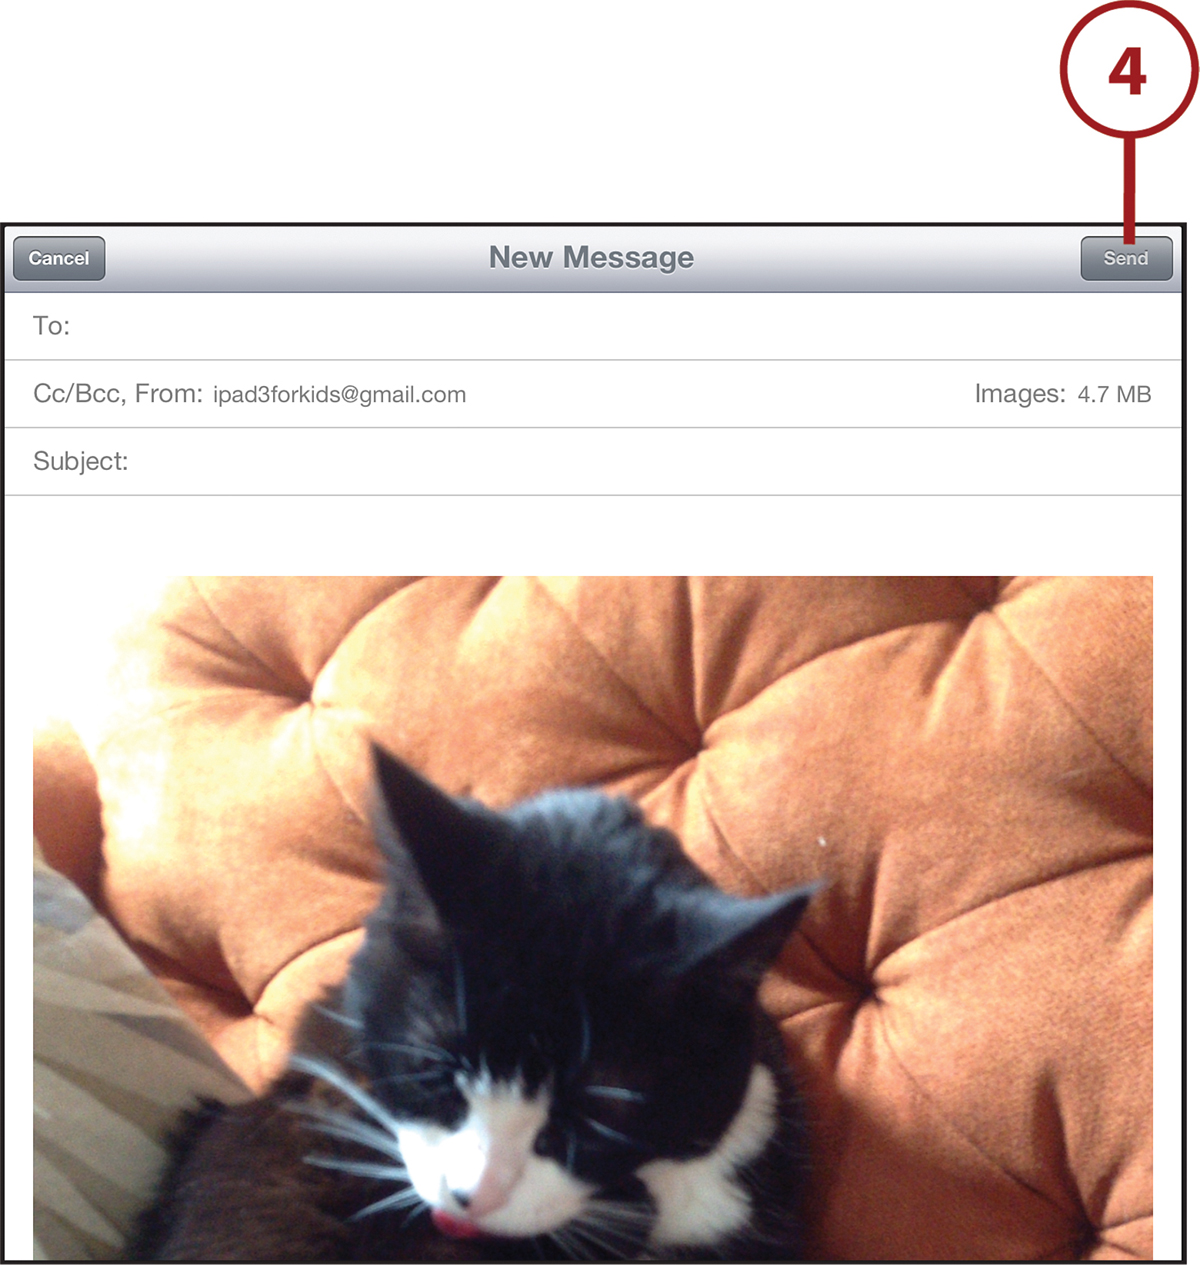
4. A new email opens with the photograph or video attached to it. Fill out the email like you normally would—by addressing it, adding a subject line and message, and so on—and then tap Send.
Sharing More Than One Photo at a Time
You can also share more than one photo or video in a single email. To do so, tap Edit (or the Action box in iOS 5) from the main Photos app screen and tap each photo you want to email. A blue check mark appears on the photos you’ve selected. Tap Share and Mail.
Sharing with Messages
Sometimes you need to share something right away and email isn’t fast enough. In that case, you might want to use Messages. Messages is great for texting and chatting, but it’s also a great way to give your friends and family who have iPads or iPhones a glimpse into where you are or what you’re doing right now. For more about Messages, check out “Using Messages” in Chapter 5, “Talk to Me: Texting, Chatting, and Email.”
To share using Messages, tap the Photos app to open it and then follow these steps:
1. Tap the picture or video you want to share.
2. Tap the Action box to open it.
3. Tap Message.
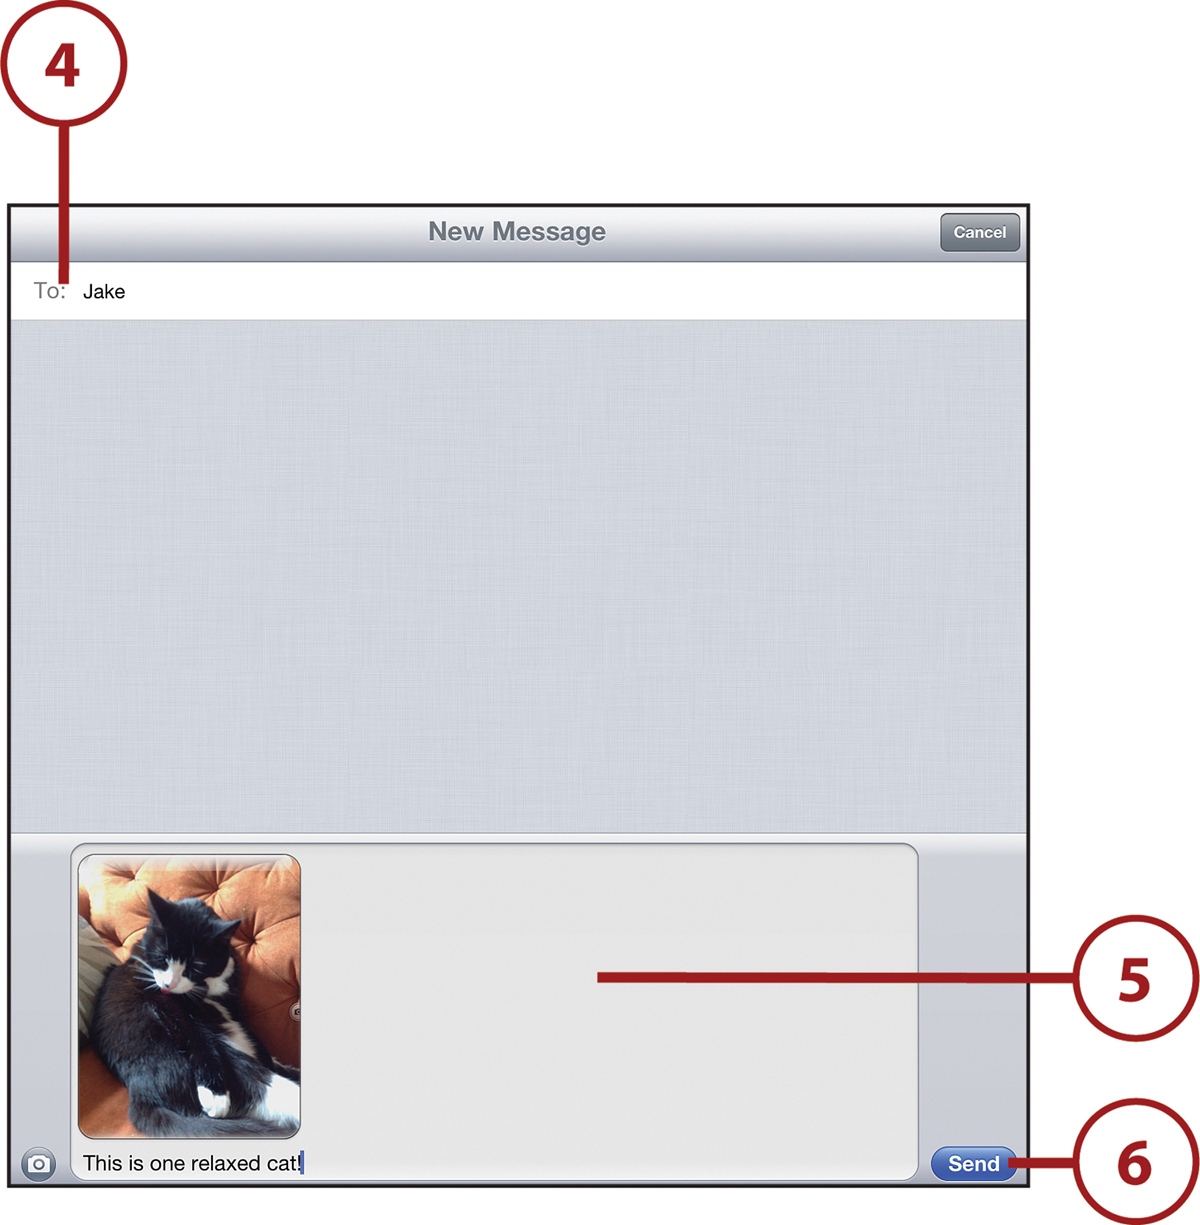
4. A new message appears with the photo or video in it. Address the message like you would any other normal message.
5. Enter any text you want to include.
6. Tap Send when you’re ready to send the message.
Just like with emails, you can send more than one photo or video in a message, but because people might be getting them on their cell phones, and cell phones often download things more slowly than computers, it’s better to send one at a time. And don’t try to send long videos; they take too long to download and use up the recipient’s monthly data plan.
Be Safe: With Photos and Videos
Sharing pictures and videos online with your friends and family is a lot of fun, but there are some rules you should follow to keep yourself safe and to keep from hurting other people’s feelings:
• Never send photos of yourself, your friends, or your family to people you don’t know in real life, even if they ask you to. If someone asks you to send them your picture, tell your parents right away.
• Never send your photos or videos to someone who you know only online, even if it feels like you really do know them. Again, if someone asks, tell your parents.
• If a stranger or someone you only know online sends you a photo or video, don’t open it, or only open it when your parents are around.
• Don’t take embarrassing pictures of yourself, your friends, or your family and then share them or post them online. Nobody likes to be embarrassed, especially where so many people can see.
• Don’t post mean pictures or videos of people online to make fun of them. That could hurt their feelings, and you wouldn’t like it if they did that to you.
• After you share a photo or post it online, it’s out of your control. That can mean that something you thought was fun to post now will bother you or someone else later, but you might not be able to do anything about it. So, before you post or share anything, make sure to consider the consequences.
Awesome Apps
The basic apps for photo and video that come with the iPad are great for doing things that are, well, basic. But if you want to get really cool—by creating photos or videos that look old, or have special effects, or get shared in different ways—you should check out these awesome apps.
For Photography
• Adobe Photoshop Express—Photoshop is the program that professional photographers use to transform their raw images into beautiful finished photographs. Photoshop Express is the iPad version. It lets you rotate images, add special effects, tweak the colors and brightness of your images, and much more. Free
• Color Splash for iPad—Have you ever seen those cool pictures that are all black and white except for one part of the picture that’s in rich, lively color? Color Splash helps you create that kind of picture. It takes any picture on your iPad, makes it black and white, and then lets you paint colors onto it using your finger. Save your creations on your iPad or share by email. You can also print your pictures or send them as postcards. $1.99
• FX Photo Studio HD—FX Photo Studio is a powerful app like Photoshop Express except that it offers more features and options. It comes with hundreds of prebuilt styles you can apply to your pictures to make them black and white, look like they were taken with vintage cameras, look like x-rays, and much more. Each image style has different settings that you can tweak so no two pictures ever look the same. $1.99
• Pocketbooth—Pocketbooth takes the classic photo booth (not the app, the box that you sit in to have your picture taken) experience and puts in on your iPad. With it, you hold your iPad still and the app takes four quick pictures of you and your friends. Then it saves the pictures on a strip, one picture on top of the other. You control special effects on the pictures, how long the app waits between each one, and much more. Share these neat vintage-style pictures by email. $0.99
For Making Videos
• 8mm HD—8mm HD does for video what apps such as FX Photo Studio HD do for photos. When you use this app, you can take video that looks like it was recorded using old-fashioned cameras that were common in the 1920s, 1960s, or 1970s, or that has all kinds of special effects that make it look cool. Your iPad videos have never looked as good as they do when you take them with 8mm HD. $1.99
• iMovie—Want to take a video you’ve recorded on your iPad and make it look like a real, professional movie? Then you need iMovie. Not only does iMovie let you cut out parts of the recording that you don’t like, but it lets you rearrange scenes, add music from your music library and sound effects, apply special effects, and even put text onscreen for your movie’s title and stars. $4.99
For Watching Videos
• Cartoon Network—Do you ever watch the shows on the Cartoon Network? From Ben 10 to Thundercats, Generator Rex to Looney Tunes, Cartoon Network is packed full of great cartoons—and so is this app. It’s a free way to watch your favorite Cartoon Network shows you might have missed, or you just want to see again. To watch all of its videos, your parents have to check to make sure it works with your cable company, but if it does, it’s your ticket to a ton of great cartoons. Even if it doesn’t work with your cable company, there are still some videos you can watch. Free
• Netflix—You know Netflix: The company sends DVDs to your house or lets you stream videos over the Internet to your TV, DVD player, or video game system. Well, now you can add your iPad to the list of devices where you can watch your favorite shows and movies. If your family has a Netflix account, just grab this app and you can watch Netflix wherever you are. Make sure to connect to Wi-Fi and not 4G, though. Streaming this much video really uses up your data plan. Free