1. Please Touch: How the iPad Works
Congratulations! You have an iPad. It’s an exciting, fun, helpful gadget. You’re going to love it. To get the most you can out of it, you need to learn how to use it. Let’s start with the basics:
• How the iPad works
• Knowing which iPad you have
• Understanding the buttons and ports
If you put an iPad next to a computer, you might think they don’t have much in common. One has a big screen, a DVD drive, a keyboard, and mouse; the other is just a flat slab of plastic and metal and glass. But appearances can be deceiving. It might not look like it, but the iPad is just a computer in a different package.
Just like a desktop or laptop computer, with the iPad you can run software, get on the Internet, play games, watch videos, listen to music, and communicate with your family, teachers, and friends. Unlike your desktop computer, you can chuck your iPad in your backpack so you have it with you wherever you go.
The On/Off/Sleep/Wake Button
Unlike a traditional computer, the iPad doesn’t have a button labeled “On” or even one that’s obviously designed to turn it on. But that doesn’t mean it doesn’t have one. In fact, the iPad’s On button does much more than a normal On button.
If you hold your iPad so that the screen is taller than it is wide (called portrait mode) and the Home button is at the bottom, you see a small flat button on the iPad’s top-right corner. This button does a lot of things: It turns the iPad on and off, puts it to sleep and wakes it up, and restarts the iPad.
Turning an iPad On and Off
To turn your iPad on or off, you just hold down this button. If you want to turn on the iPad, hold down the button until the white Apple logo appears. This means the iPad is starting up, and you can let go of the button.
To turn off the iPad, hold down the button until a red slider appears at the top of the screen. Slide it to the right, and the iPad shuts down.
Naptime for the iPad: Putting It to Sleep
Sometimes you don’t want to turn the iPad off, but you do want to save battery life and prevent other people from seeing what you’re doing. In that case, you can put the iPad to sleep.
To do this, press the On/Off button once. The iPad’s screen goes dark, indicating it is now in sleep mode.
To wake up the iPad, press the button again or press the Home button—but not for as long as you did when you turned the iPad on, or you might accidentally turn it off!—and the screen lights up. Move the slider at the bottom of the screen to the right and your iPad is ready for use again.
Another cool way to put the iPad to sleep and wake it up is with Smart Covers. These are the colorful covers you’ve probably seen on some iPads. They attach by magnets, and your iPad is smart enough to know when the Smart Cover is on. When it’s over the screen, the iPad goes to sleep. Open the Smart Cover and the iPad wakes up. If you don’t have one already, you can buy one at the Apple Store.
Nice to Meet You: How to Know Which iPad You Have
As you probably know, there’s more than one kind of iPad. In fact, Apple releases a new version of the iPad at least once a year—sometimes more.
The two most recent models of the iPad are the iPad mini (which is the first-generation mini) and what’s called “the new iPad” or the iPad 4 (the fourth-generation model). Both the iPad mini and the iPad 4 came out in fall 2012. The previous iPad—the third generation—was released in spring 2012.
Almost everything you read in this book applies to the iPad mini, and the third- and fourth-generation iPads. A lot of it even applies to the iPad 2 (released in 2011). There are two major things that work only on the iPad mini and the third- and fourth-generation iPads: 4G wireless networking (learn more in the “The Two Kinds of iPads” section of Chapter 4, “Surf’s Up: Using the Internet”) and Siri, the digital assistant (read more in “Meet Your Digital Sidekick: Siri” in Chapter 2, “Getting Started: Set Up and Sync Your iPad”).
Discovering What iPad Model You Have
Each generation of iPad has a different model number given to it by Apple. The best way to figure out what iPad you have is by looking at the model number. To do this, flip your iPad over so you’re looking at its back. At the bottom of the iPad’s back, under the word “iPad,” you’ll see a lot of small writing. On the first line, you’ll see “Model.”
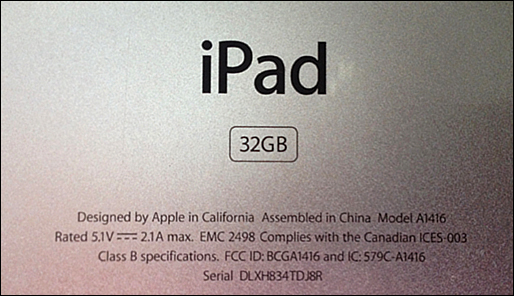
Model A1432, A1454, A1455—iPad mini
Model A1458, A1459, A1460—fourth-generation iPad
Model A1416, A1430, A1403—third-generation iPad
Model A1395, A1396, A1397—iPad 2
Model A1219, A1337—first-generation iPad
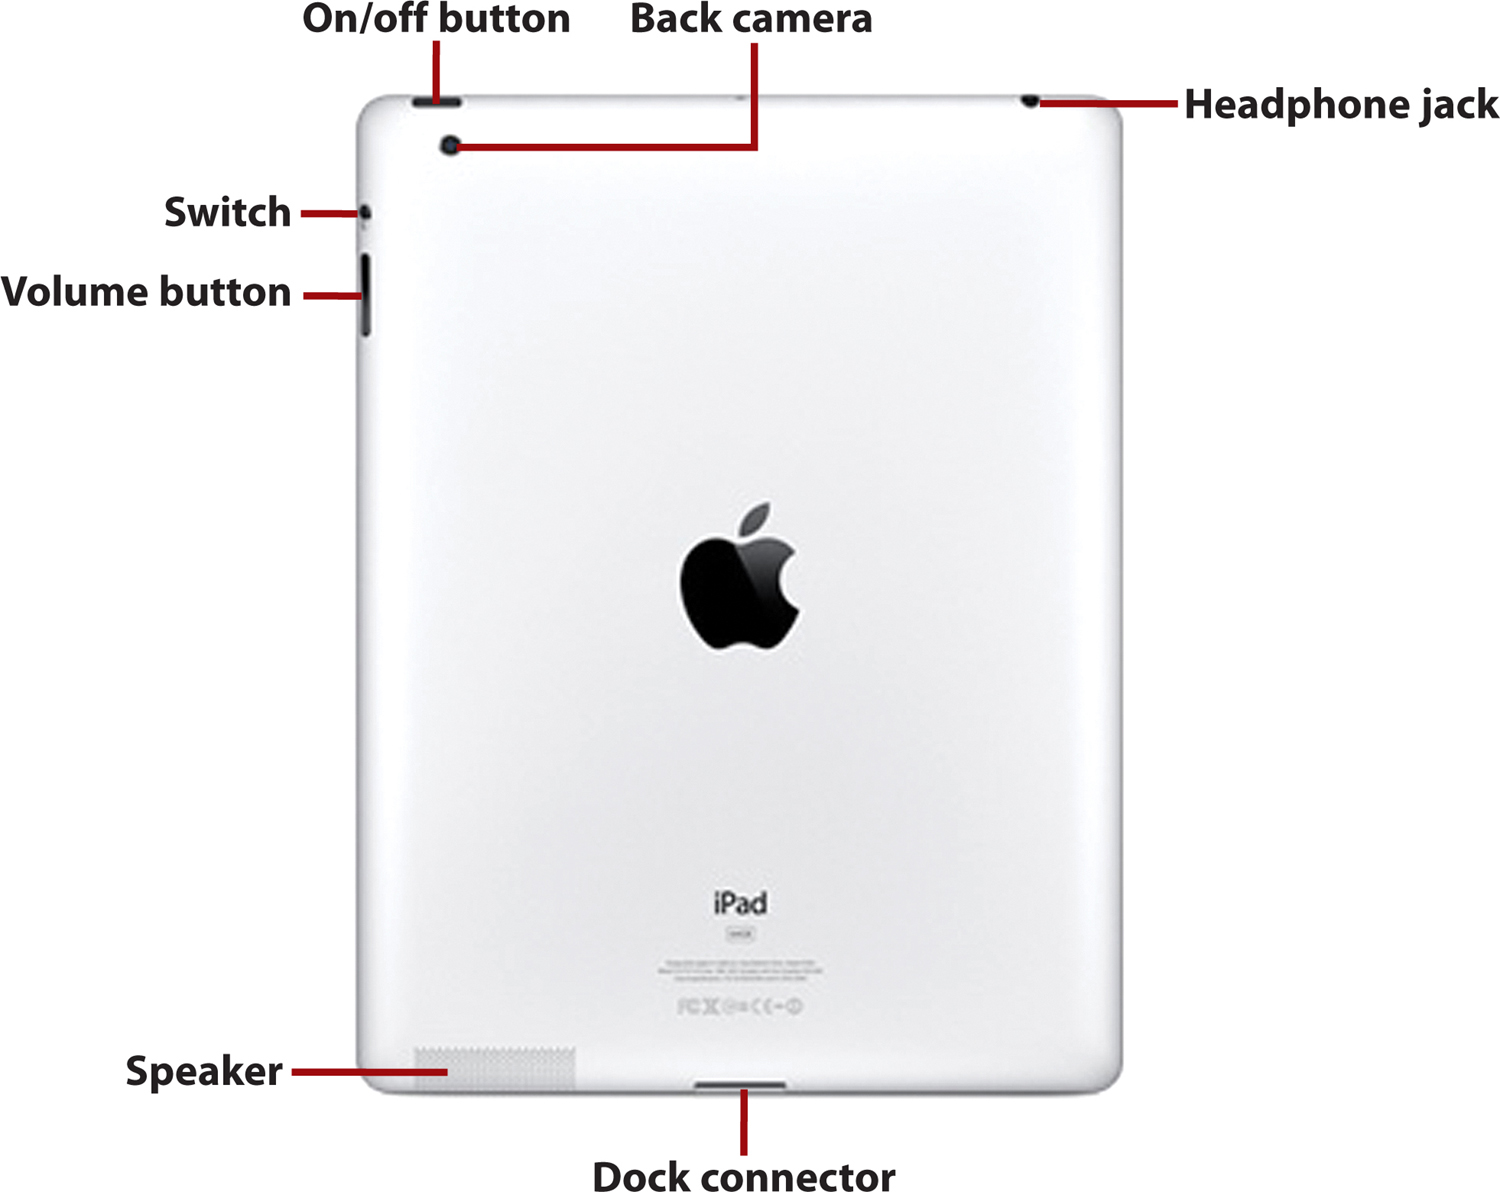
Understanding the Buttons and Ports
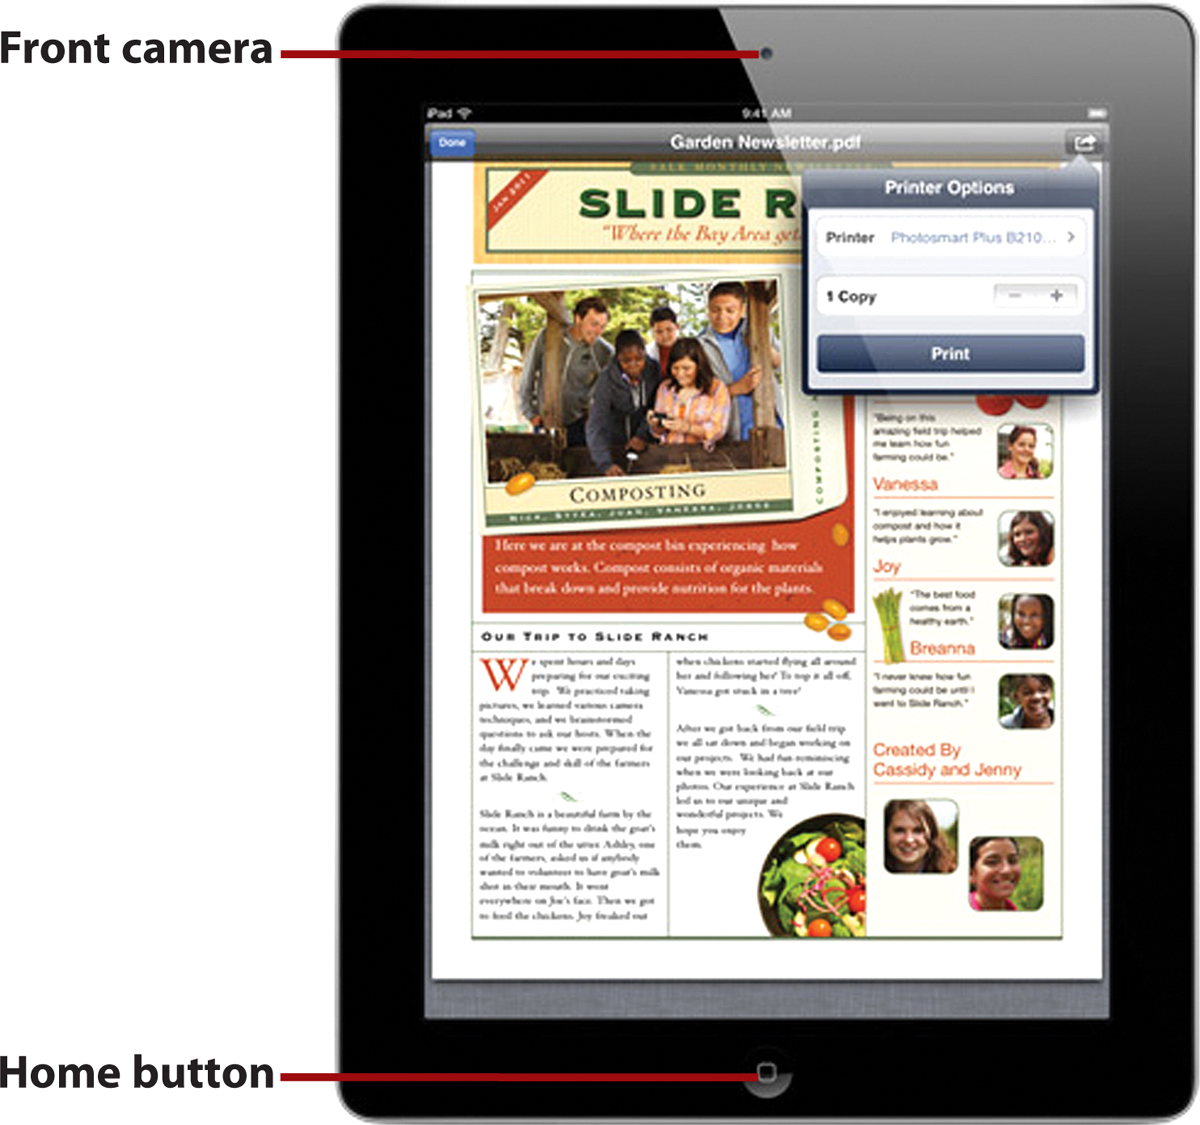
Compared to a traditional computer, with all its ports and buttons, the iPad is very simple. To use the iPad, you just need to be familiar with these buttons, ports, and features:
• Front camera—The tiny lens on the front above the screen is one of the iPad’s cameras. This one is lower resolution than the rear camera, meaning it takes less-detailed pictures. It’s mostly used for video chats via FaceTime, which I cover in Chapter 6, “Get Ready for Your Close Up! It’s FaceTime!”
• Home button—The Home button is very important. You see it coming up over and over in this book. You use it when you’re restarting the iPad, rearranging your app icons, and much more.
• Headphone jack—This hole is where you plug in headphones and certain other accessories.
• On/Off/Sleep/Wake button—Earlier in the chapter, you read about this flat button that you use to turn on and off the iPad as well as to put it to sleep and wake it up.
• Switch—The little switch on the side of the iPad (it’s on your right when you look at the screen, and on the left when you look at the back) has two purposes: It can lock the iPad’s screen so that it doesn’t rotate when you turn the iPad (more in the “Side Switch for Screen Lock or Mute” section later in this chapter), and it can also mute the speakers.
• Volume button—This button lets you raise or lower the iPad’s volume without touching the screen.
• Speaker—The little group of holes at the bottom of the back of the iPad is its speaker. Obviously, you get better-quality sound from a good pair of headphones, but the speaker does the job when you don’t have any better options.
• Dock connector—This port is used for two things. First, it’s where you plug the iPad’s included USB cable in when you want to sync it to your computer (more on syncing in “Setting Up and Syncing Your iPad,” in the next chapter). It’s also the place where you connect a lot of accessories, especially speaker docks. There are different dock connectors for different iPads. The first-, second-, and third-generation iPads use a large, rectangular port called the Dock Connector. The fourth-generation iPad and iPad mini use a tiny port called Lightning. While both connectors do the same thing, Lightning has new technology and is much smaller.
• Back camera—The small circle on the back of the iPad is the other of its two cameras. This camera takes still photos and videos and has a higher resolution—meaning the images look better—than the front camera.
Not all iPads have a MicroSIM card port, just ones that have 4G Internet access from AT&T (more on what this is and how to know if you have it in Chapter 4). This slot on the right side of the iPad holds the card that allows the AT&T-compatible iPad to access cell phone networks to get on the Internet.
Side Switch for Screen Lock or Mute
You can use the iPad’s switch to do a couple different things: lock the screen and mute the volume.
The iPad automatically changes the orientation of its screen depending on how you hold it. If you hold it up and down (portrait mode), the screen is oriented that way. But turn iPad to the side (landscape mode) and the screen turns to match it. The switch locks the screen so that when you turn the iPad, the screen doesn’t move.
You can also use the switch to turn off sound on the iPad.
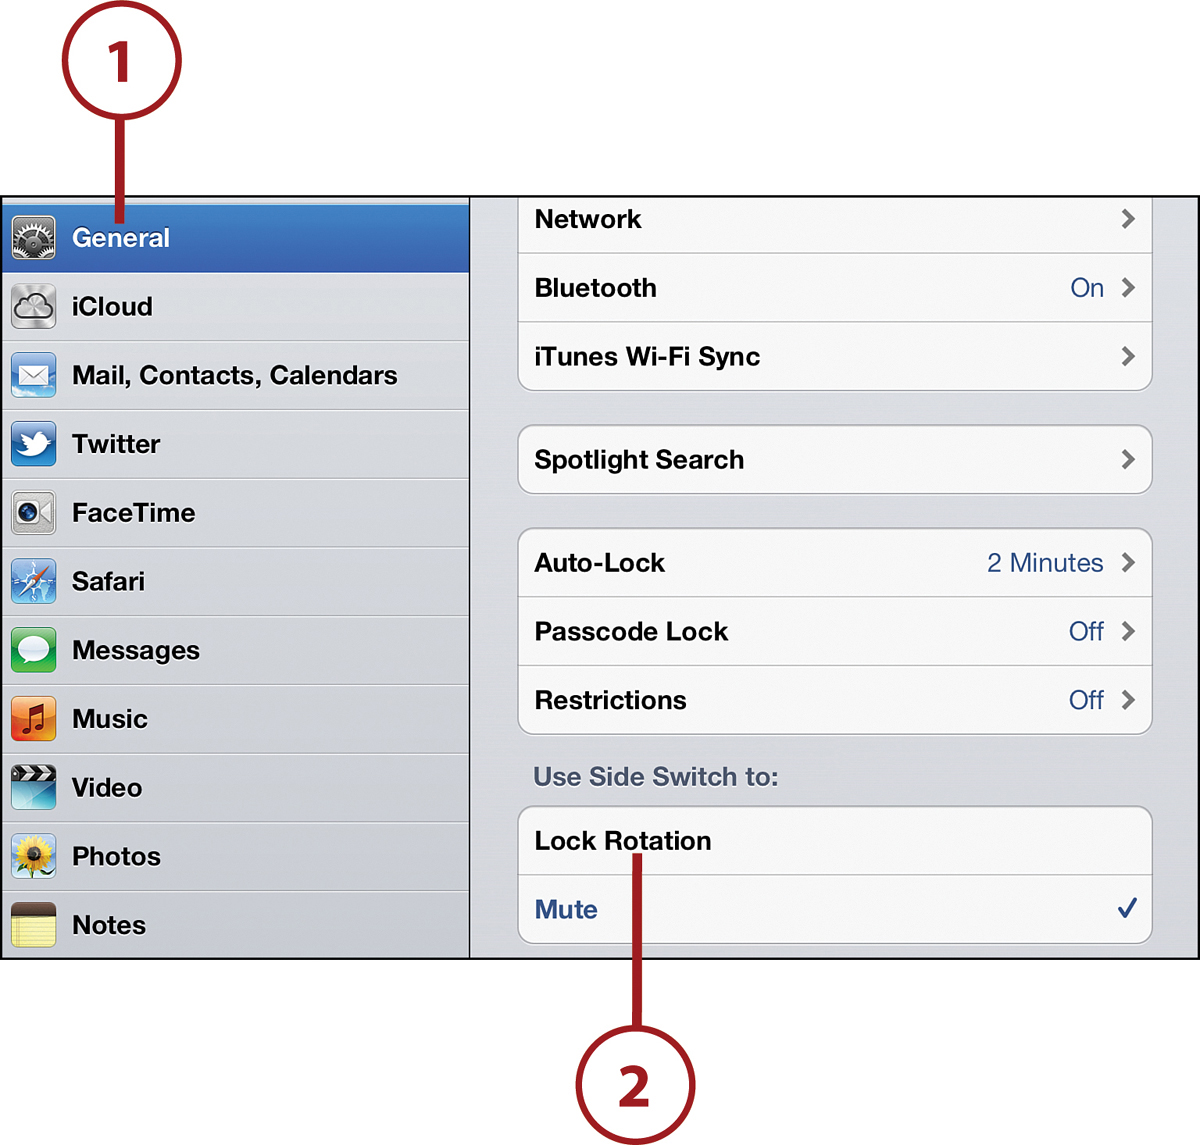
Changing How the Side Switch Works
To choose which action the iPad’s side switch performs, tap the Settings app on the Home screen and follow these steps:
1. Tap General.
2. In the box called Use Side Switch To, choose Lock Rotation if you don’t want the screen to move when you move the iPad. Choose Mute to shut off the sound. You can change this setting whenever you want by repeating these steps.
Controlling by Touch
Just because the iPad is really a computer doesn’t mean it works just like any other computer. It doesn’t—and that’s because the iPad doesn’t work only with a keyboard or mouse. Instead, you control it by touching the screen or tilting the iPad side to side.
Tap, swipe, and pinch might sound like things you want to do to your brother or sister, but they are actually movements you use to control the iPad:
• Tap—When you want to select something on the iPad’s screen, tap it with your finger. You don’t have to tap hard; just touching works. Use taps to launch apps, play songs, and use other onscreen controls.
• Double-tap—This is similar to a tap, but instead of just one, it’s two taps in a row done quickly. Double-taps don’t come up too often, but they’re useful for zooming in and out of things, especially magazine or comic book pages and websites (more on this in “Zooming In and Out” in Chapter 4).
• Tap and hold—This is just like a tap, except you keep your finger pressed down on the screen. Tapping and holding is used for moving apps, deleting things, and getting some menus to pop up.

• Tap and drag—Like tap and hold, except you move your finger across the screen. Moving your finger also moves the thing you just tapped (if it can be moved). To drop the item in a new place, just take your finger off the screen. You usually have to put an app into Edit mode in order to tap and drag things.

• Swipe—This is when you drag your finger lightly across the screen. Sometimes you use it for a slider bar that you’re moving. Other times, you’re swiping the entire screen to move to a new set of options or apps. You can swipe from almost anywhere. From the home screen, swiping to the right reveals the search tool, and swiping to the left reveals other screens of apps.
• Four- or five-finger swipe—If you have multitasking gestures turned on (see the “Using Multitasking Gestures” margin note at the end of this section), you can use this really handy gesture. Take four or five fingers, put them on the screen all at the same time, and swipe left or right to move between apps you’ve used recently.
• Pinch—To pinch something on your iPad’s screen, spread your thumb and index finger apart. Then put them on the iPad’s screen and bring them together so that they stay on the screen and meet in the middle. This is a pinch. You can also pinch out by starting with your fingers together and then spreading them apart. You most often use pinching in documents and websites where you want to control zooming in and out.
• Four- or five-finger pinch—When multitasking gestures are turned on, this neat shortcut takes you back to the home screen without tapping the Home button. Spread four or five fingers apart and place them on the iPad’s screen. Then, while keeping your fingers on the screen, pinch them all together and you jump back to the Home screen.

• Rotate—If you haven’t locked your screen rotation (learn more about this in the “Side Switch for Screen Lock or Mute” section earlier in this chapter), your iPad’s screen automatically rotates to match how you’re holding it.
• Shake and tilt—Besides touching the iPad’s screen, you can also control some apps based on how you move the iPad. Some apps respond when you tilt the iPad from side to side or shake it back and forth.
Want to use the four- or five-finger gestures just mentioned? Then you need to turn on multitasking gestures. To do this, go to the General page in the Settings app, scroll down to Multitasking Gestures, and move the slider to On.
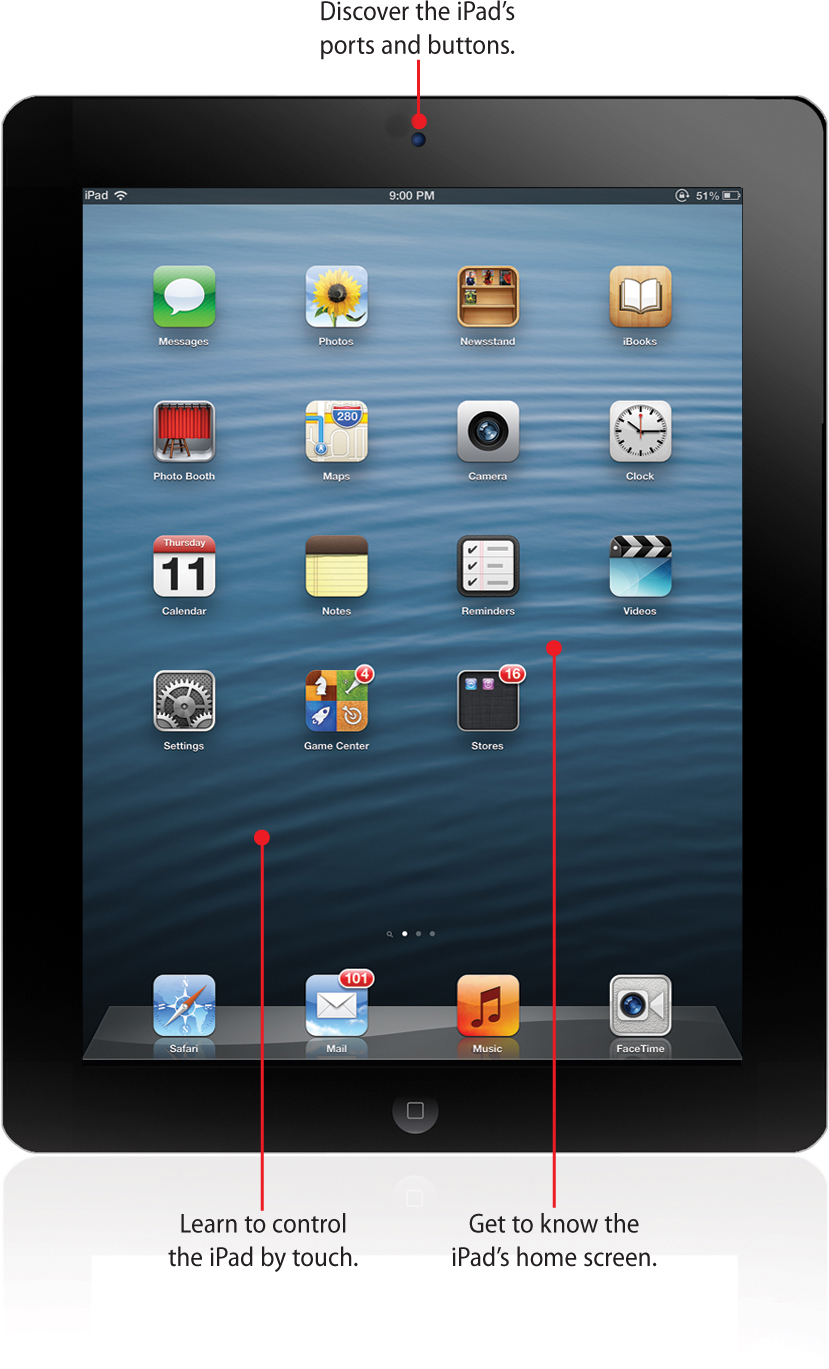
Using the Home Screen
The most common screen you see when using your iPad is the home screen. You use it practically every time you use your iPad. And if that’s case, you better learn what all those icons, apps, and other things on the screen do, right?
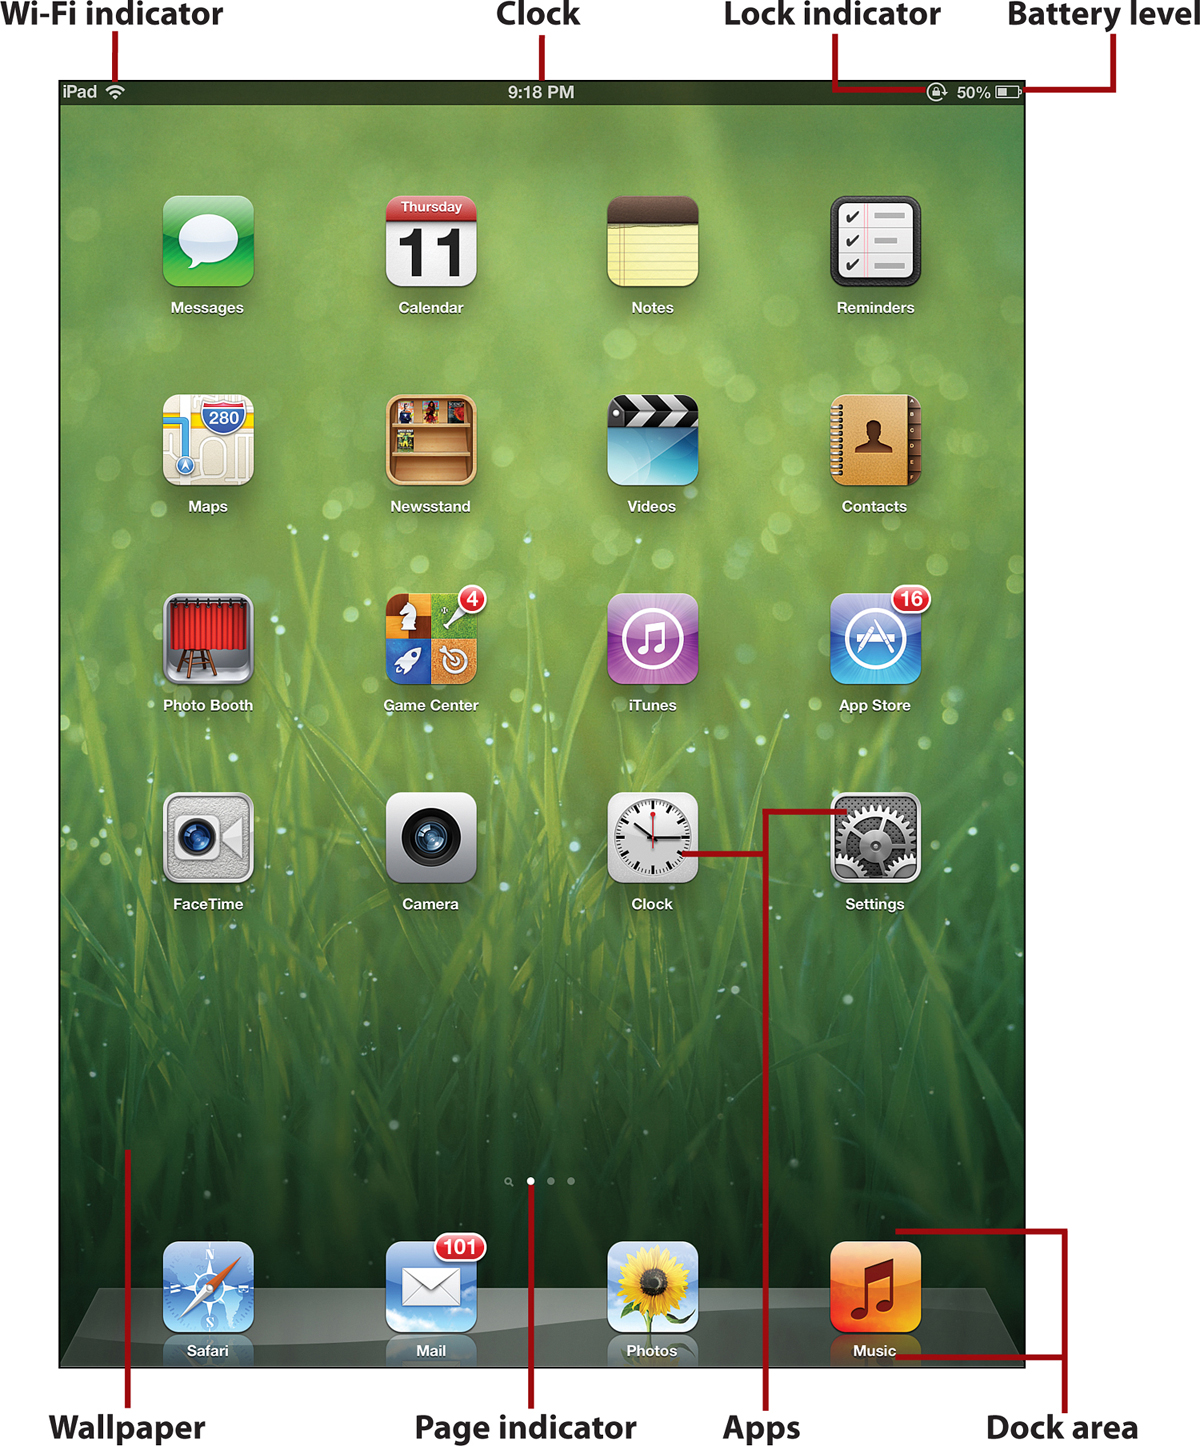
• Wi-Fi/4G Signal Strength—This icon tells you whether you’re connected to the Internet and how strong that connection is. If you’re connected using Wi-Fi, you see this icon. If you’re using 4G, you’ll see the word “4G,” the company you’re using for access (AT&T, Sprint, or Verizon if you live in the U.S.) and cell phone-like bars. Whether you’re on Wi-Fi or 4G, the more bars you have, the faster your connection will be.
• Clock—A handy clock that lets you know what time it is.
• Lock or Mute—Depending on how you set your side switch option earlier in the chapter, this icon either shows that, when used, your screen is unlocked, or that your volume is muted.
• Battery Meter—See how much battery life you have left with this percentage and graphic—100% is a fully charged battery. The closer you get to 0%, the sooner you need to plug your iPad in for a recharge.
• Wallpaper—The image behind your apps is called the wallpaper. You find out all about wallpaper, and how to change it, in Chapter 3, “It’s All Yours! Customizing Your iPad.”
• Apps—Each one of these icons is an app that lets you do different things (like access the Web, play games, or listen to music). To launch one, just tap the icon. You can add new apps to your iPad using the App Store. You see how to do this in Chapter 2.
• Screens—These dots let you know how many screens of apps your iPad has. Swipe left to see the other screens. Swipe right to go to Spotlight, the iPad’s search tool. Learn how to use Spotlight in Chapter 2.
• Dock—These four apps across the bottom of the screen are in the Dock. The Dock is where you can store your favorite and most-used apps for easy access. Learn how to move things in and out of the Dock in Chapter 3.
Know Your OS
Throughout this book there are references to iOS 5 and iOS 6, and the different features and options your iPad offers depending on which one you have. Because some things in this book work on one version of the iOS but not the other, it’s important to know which you have. But first, you need to know what iOS is.
iOS is the name of the software, or operating system, which runs on the iPad, iPhone, and iPod touch. Other operating systems you might know are Windows or Mac OS X. The operating system is the basic software that lets your iPad work. All of the apps that you get run on it.
Just like with Windows, there are different versions of the iOS. Each version adds features, fixes bugs, and changes how things look. All versions of the iOS are free (to find out how to get new versions—when they’re available—check out www.informit.com/title/9780789749512). Apple releases a major new version with a full number like iOS 6 every year. Smaller updates, with point numbers like iOS 5.1.1, come out a few times a year.
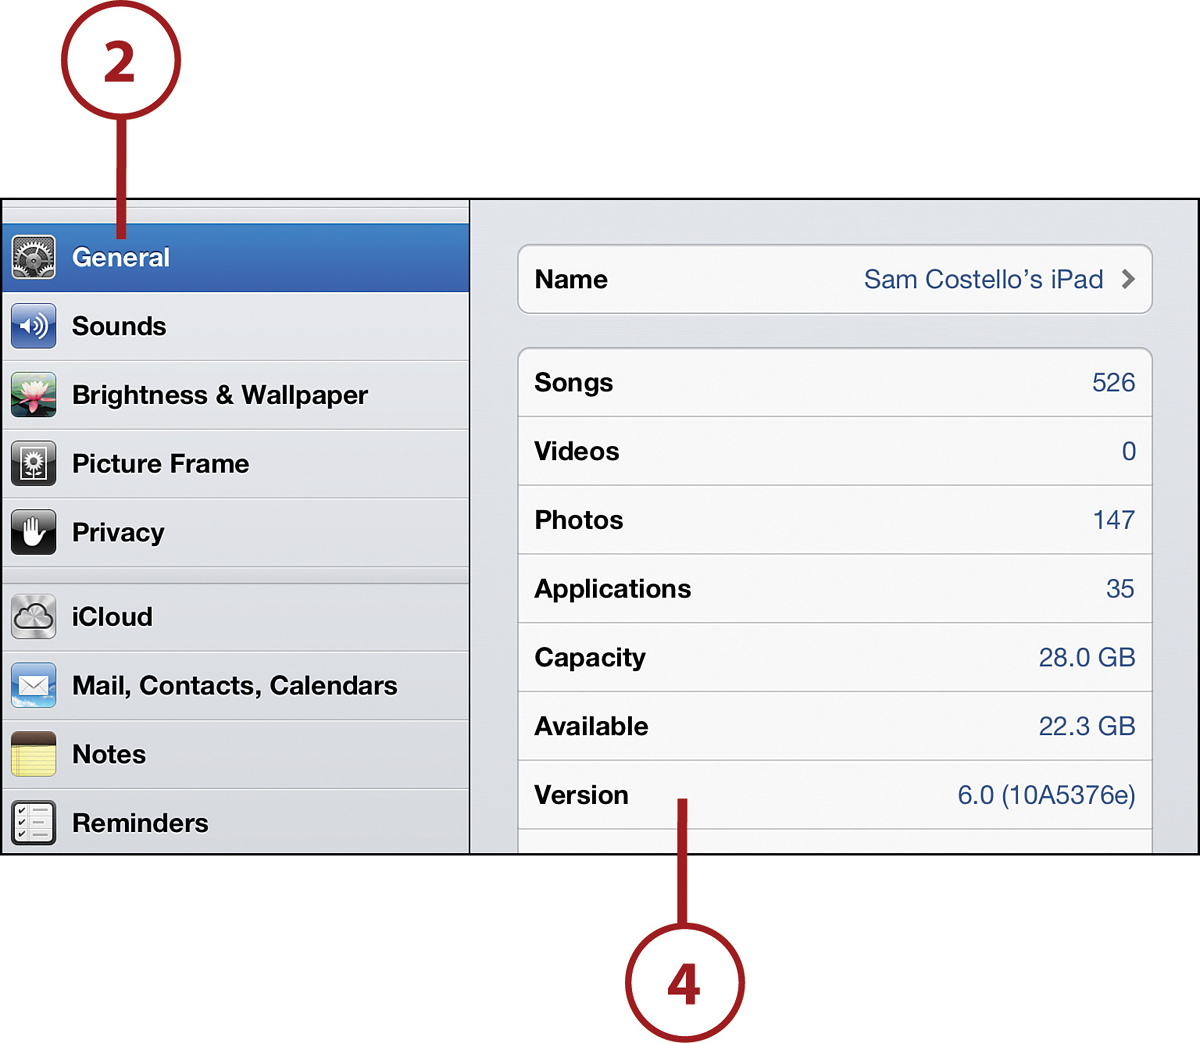
Finding Out What Version of iOS You’re Running
Because the version of the iOS running on your iPad can help determine what features and options you can use, it’s important to know what version you have.
1. Tap Settings on your home screen.
2. Tap General.
3. Tap About (not pictured).
4. Look for the Version line. It says something like 5.1.1 or 6.0. That’s the version of the iOS you’re running. Now, as you read this book, pay attention to which features of the iPad require one version of the iOS or another.