
2. Getting Started: Set Up and Sync Your iPad
Before you can put your iPad to work, there are a few steps you need to follow to set it up and ensure that it works the way you want it to. In this chapter, you learn all about those steps, including:
• Setting up and syncing your iPad
• Getting an Apple ID
• Getting music, apps, and more at the iTunes Store
• Using Spotlight search
• Meeting your digital sidekick: Siri
The basics of how you control the iPad are pretty simple, as you learned in Chapter 1, “Please Touch: How the iPad Works.” The techniques you learned—tapping, dragging, pinching—work in practically everything on your iPad. But how do you get the apps, music, videos, and other things that make the iPad so much fun onto it in the first place? And where do those things come from?
The answers to these questions depend on a number of the things you learn in this chapter. Sometimes music or books come from your desktop or laptop computer. Other times you download videos from the Web. And in other situations, you buy apps and games from online stores.
Before you do any of those things, though, you need to set up your iPad. The setup process helps you decide how your iPad will work and what content it will have on it. It also helps you set up the accounts you need to buy new things.
The steps that are part of setting it up can be a little tricky and some of them require your parents’ help. So, before you start on this chapter, ask your parents to help you with these tasks to make sure that everything goes smoothly.
Setting Up and Syncing Your iPad
To start using your iPad, you need to choose some basic settings and decide what content—such as music and movies—you want to sync from your computer to your iPad so you can begin using it.
Setting up your iPad is a two-step process. First, you choose some settings on the iPad itself. Then you connect it to your computer (if you have one; you can still use the iPad even if you don’t have a computer) to transfer music, movies, and other content to it.
One of the most important parts of the setup process is creating your Apple ID. As you see throughout this book, an Apple ID is an account that you use with your iPad for a wide range of things. It’s important for using FaceTime and finding lost iPads, for buying music or downloading new apps and games. Your Apple ID is also the way you pay for things on your iPad. Getting an Apple ID is free and crucial to getting the most out of your iPad.
Setting Up the iPad
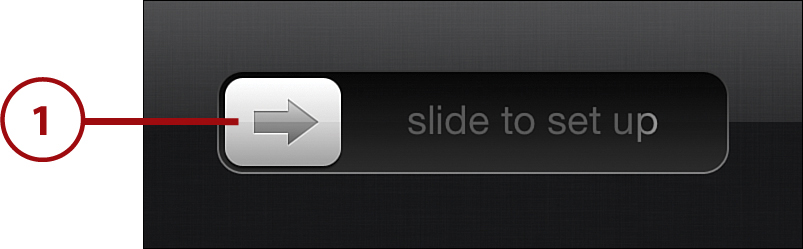
Begin by pressing the iPad’s power button to turn it on. Then follow these steps:
1. Drag the slider to the right to begin the setup process.
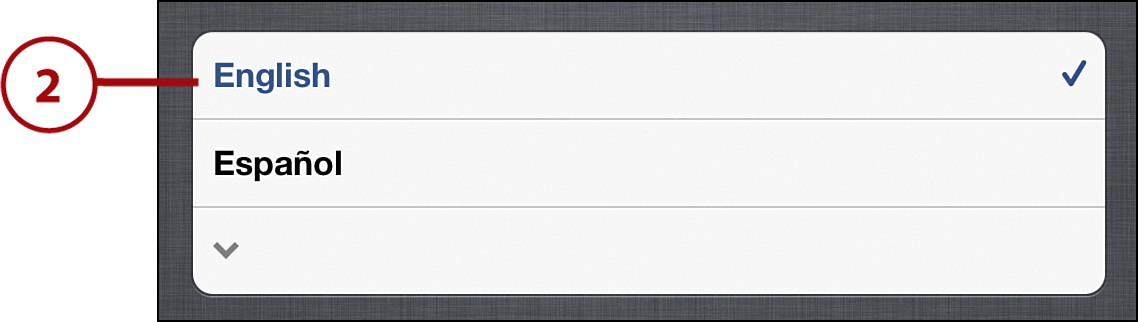
2. Choose the language you want the iPad to use (I’d strongly recommend it be a language you speak!) and then tap the arrow in the top-right corner to continue (not shown here).
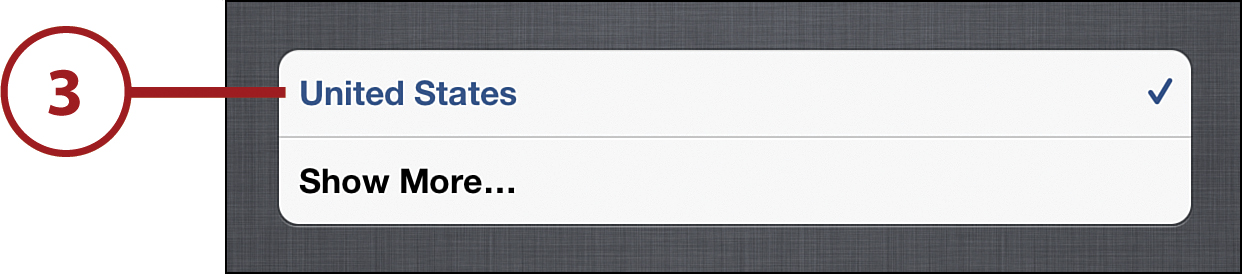
3. Choose the country where you’ll be using the iPad and tap the Next button in the top-right corner.
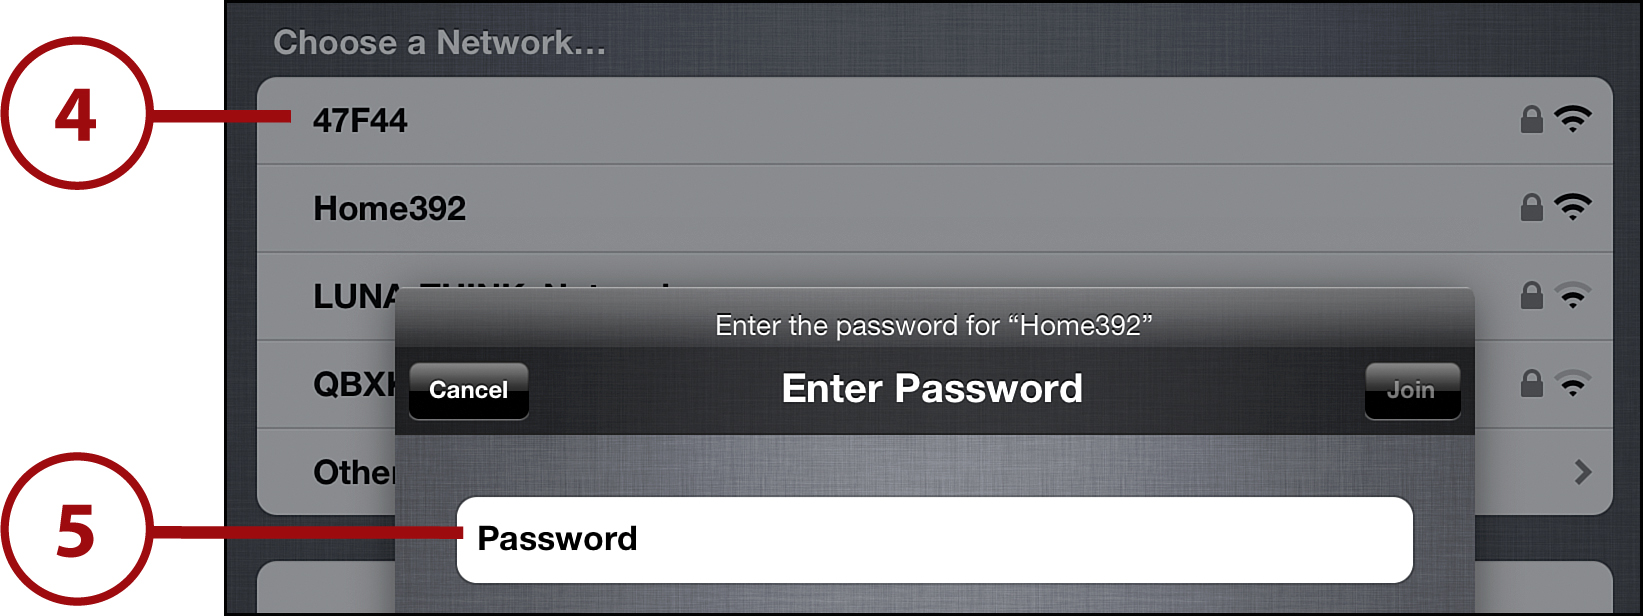
4. Any nearby Wi-Fi networks that you can use to connect to the Internet appear. Tap the one you want to connect to.
5. If the network you selected is password-protected, you need to know and enter its password to access to it. If you’re setting up your iPad at home, ask your parents for the name of your Wi-Fi network and its password. If you’re trying to connect at school, ask one of your teachers if there’s a Wi-Fi network you can use and what the password is. After you’ve entered the information, tap Join in the onscreen keyboard to access it.
If there isn’t a nearby Wi-Fi network, tap Connect to iTunes and use the included cable to plug your iPad into a USB port on your computer. At that point, skip the rest of these steps and move on to the “Syncing with iTunes” section.
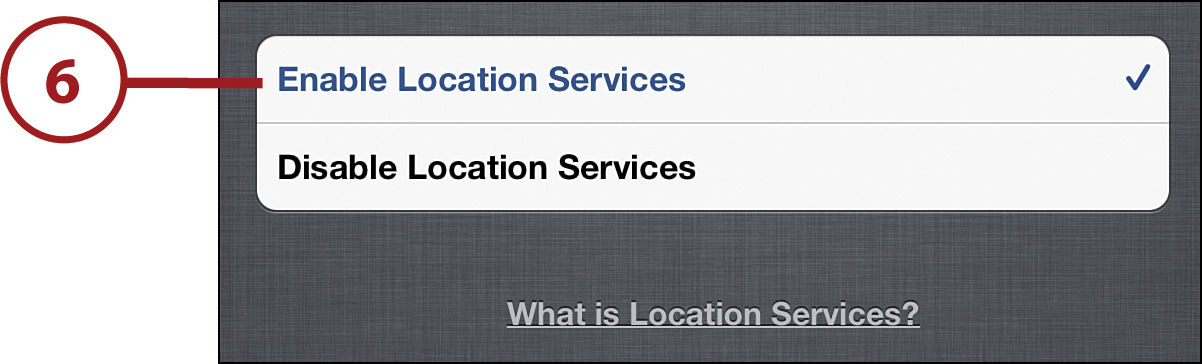
6. Decide whether you want to enable Location Services. When you’re connected to the Internet, Location Services lets your iPad know where you are and gives you information and search results based on that. If you’re in a certain neighborhood and want to know where to get a burrito or what time a movie is playing at the local theater, you need Location Services. I recommend using it. Make your choice and tap Next.
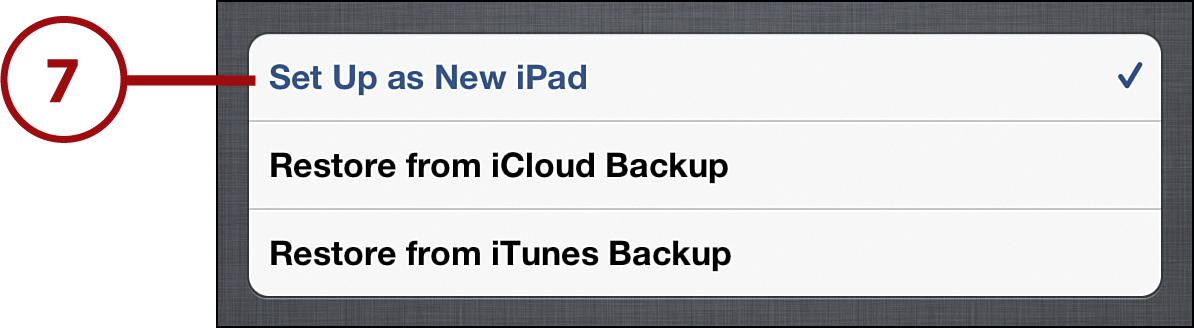
7. Choose whether this is a new iPad or if you have data already backed up somewhere else that you want to download to it. For most of you, this is probably your first iPad. If you’ve already had one or had an iPod or iPhone whose data you want to use, choose Restore from iCloud Backup or Restore from iTunes Backup (for instructions on how to put backed-up data on your iPad, check out “Restoring Your Data from Backup” in Chapter 17, “Fixing Problems Yourself”). When you’ve made your choice, tap Next.
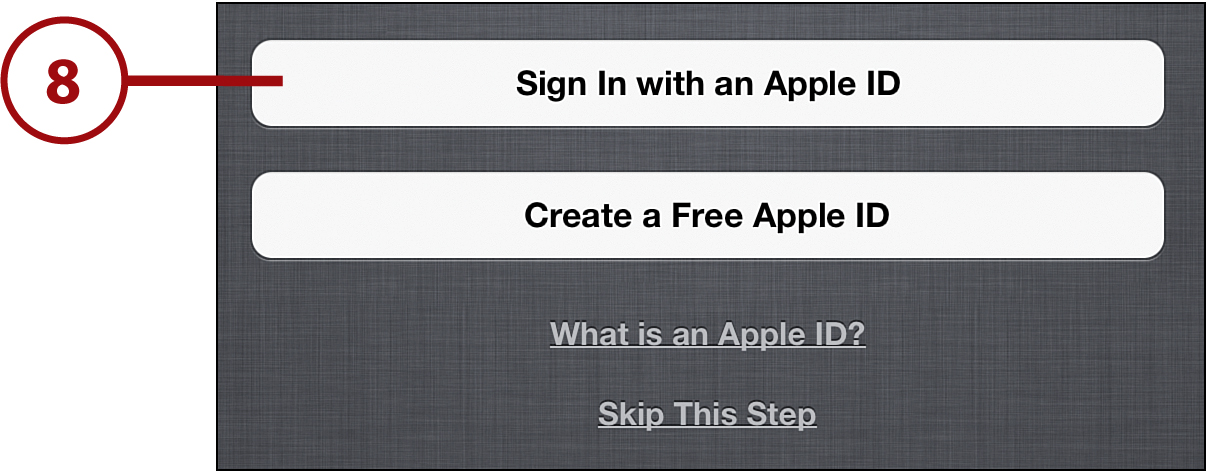
8. Log in with your Apple ID or create a new one. Although having an Apple ID isn’t required, you need one to get apps, download music, and use FaceTime, so I strongly recommend you get one.
If you don’t have one, you can set up one in this step. Skip to the next section, “Creating an Apple ID on the iPad,” to learn how.
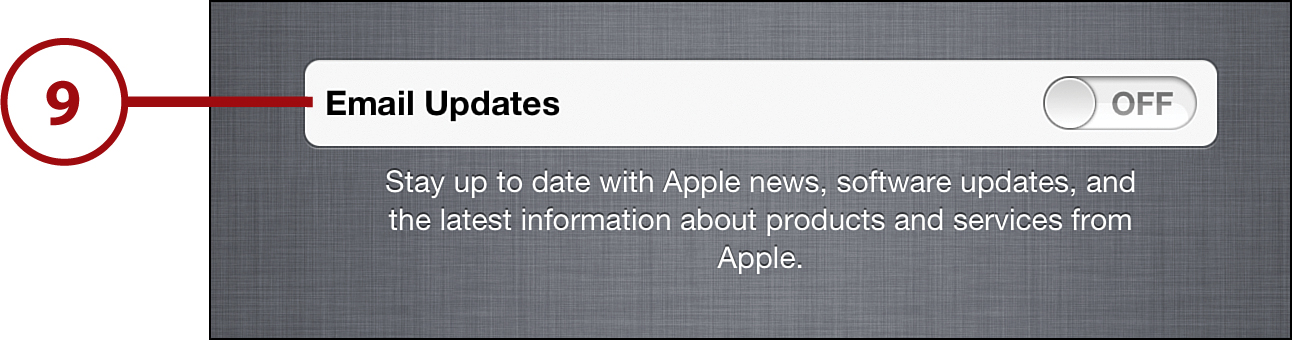
9. Choose whether you want to receive product and promotional emails from Apple. Make your choice and tap Next.
10. Agree to the terms of using the iPad and iTunes by tapping Agree. Then you need to decide whether to use iCloud. iCloud is a free service from Apple that enables you to back up data to the Internet and share it, too. I recommend using it, but it’s not required. Make your choice and tap Next.
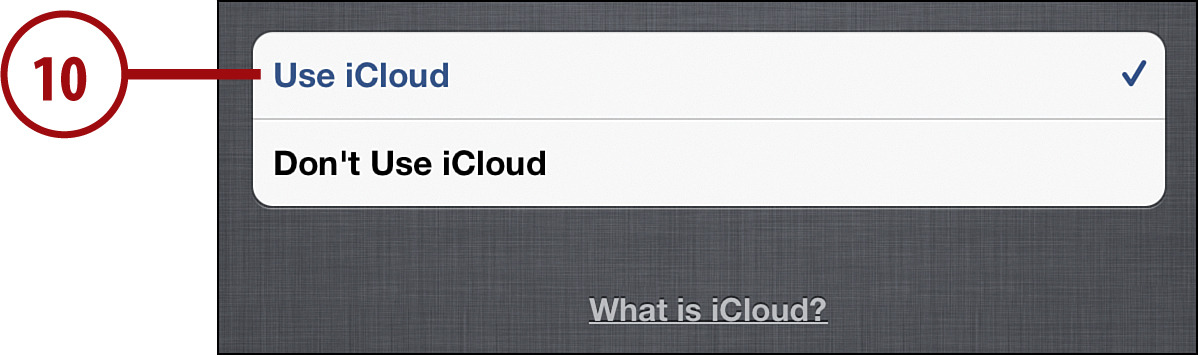
You can learn more about iCloud by tapping the What Is iCloud? link beneath the selection shown here.
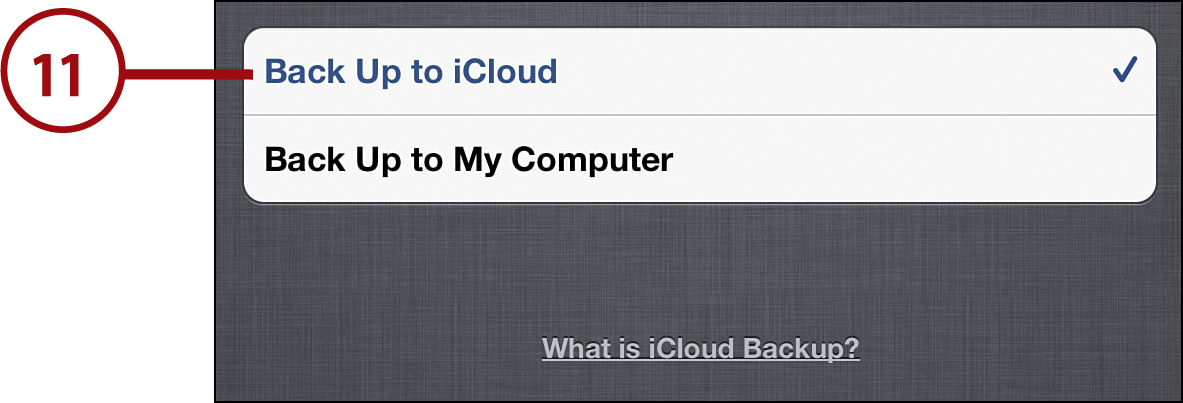
11. Your iPad can automatically back up its data, so if something goes wrong, you won’t lose it. Choose whether you want to back up to iCloud automatically each day (for this to work, you need to have turned on iCloud in the last step and be connected to the Internet) or to your computer. If you choose your computer, the backups happen only when you sync. Make your choice and tap Next.
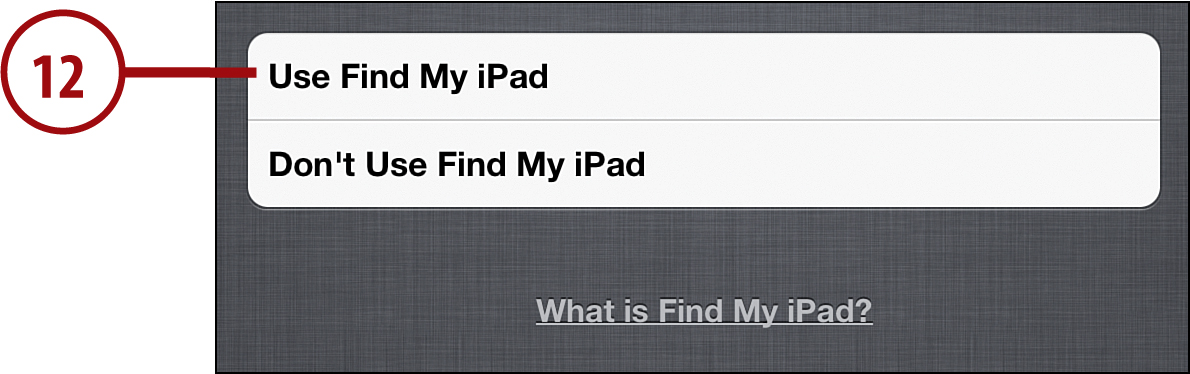
12. If you ever lose your iPad, you can try to get it back using the Find My iPad feature. This feature uses Location Services (which you turned on in step 6, right?) to find your iPad on a map and help you get it back. You don’t have to use this feature (and you can always turn it on later), but using it is pretty smart. Make your choice and tap Next.
13. Siri, Apple’s voice-activated digital assistant, can do all kinds of things. With it turned on, you can speak to your iPad and have it turn what you say into text. You can also ask Siri to search the Web for you or give you information about restaurants, movies, and sports. (To learn more about Siri, check out “Meet Your Digital Sidekick: Siri,” later in this chapter.) For all of these cool features to work, though, you have to turn Siri on. Tap Use Siri and then tap Next.
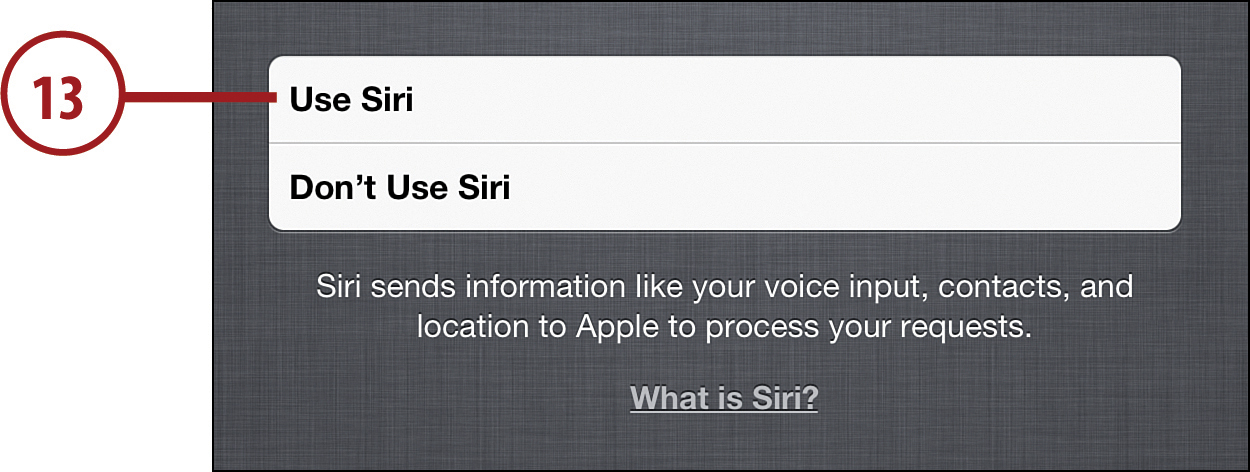
Siri is only available on iOS 6 and higher. If you’re running iOS 5, you can use Dictation instead.
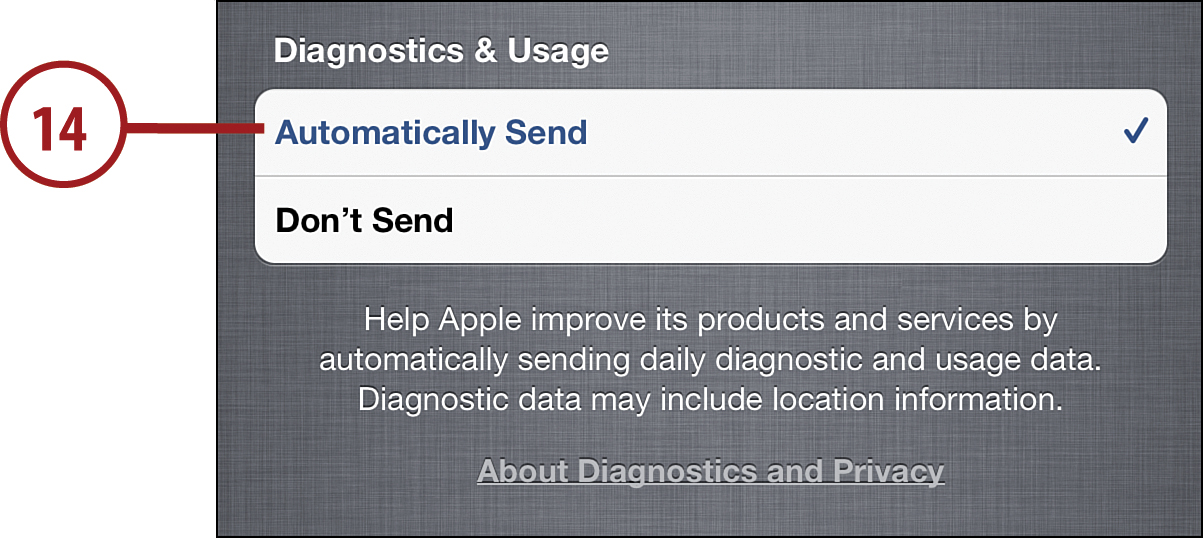
14. Apple asks you if it can use information about how your iPad works (or doesn’t!) to improve its software. If you choose this option, Apple doesn’t get any personal information about you or watch what you’re doing, so you don’t have to worry. Make your choice and tap Next.
15. Tap Start Using iPad to get on your way! If you’ve already set up an Apple ID, skip to “Syncing with iTunes.” If not, go to the next section.

Creating an Apple ID on the iPad
You need an Apple ID (aka an iTunes account) for many features of your iPad and to buy things at the iTunes or App Store. You can create a free Apple ID directly on your iPad. This is definitely a place where you should have your parents’ help because they may be paying for the music and apps you buy or so they can help you use your account. When you get to the Apple ID screen of the iPad setup process, as shown in step 8 in the previous section, if you don’t have an Apple ID, tap Create a Free Apple ID and follow these steps:
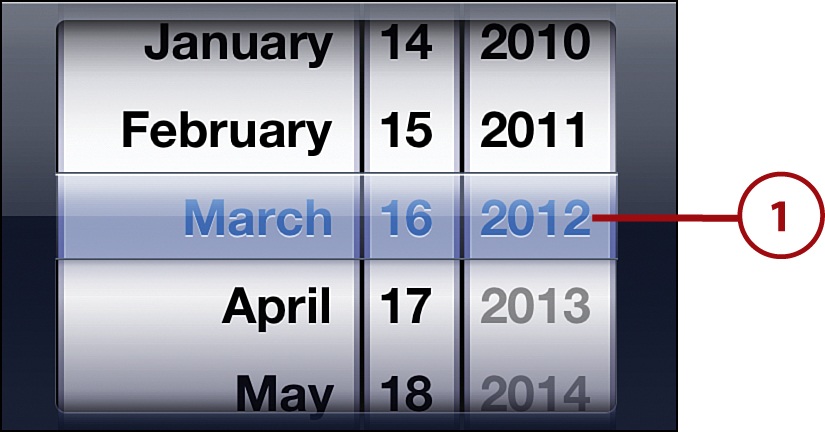
1. Enter your birthday using the spinners.
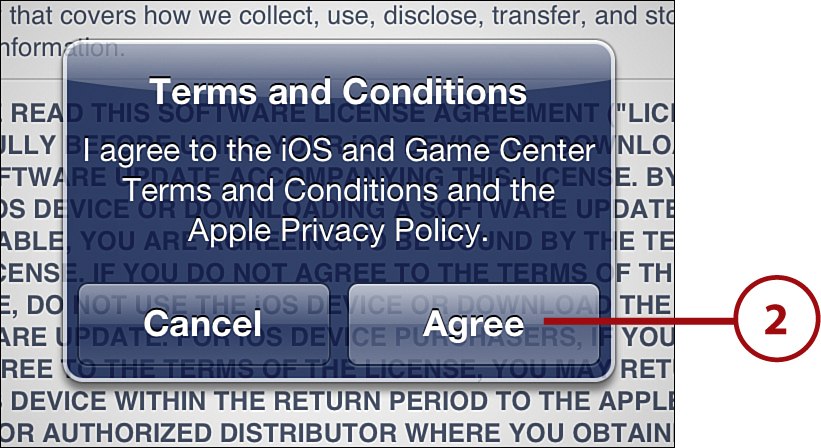
2. Agree to Apple’s terms for having an Apple ID by tapping the Agree button at the bottom right and then the Agree button in the pop-up window.
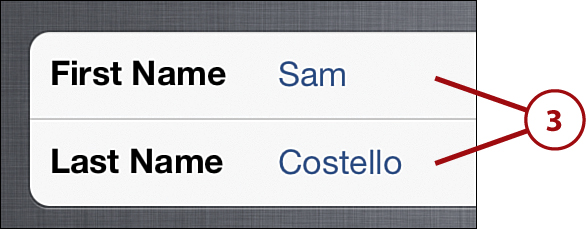
3. Enter your first name and last name.
4. Choose what email address you want to use for your Apple ID (use an address you’ll have access to for a long time). If you don’t have an email address, or want to get a new one, tap Get a Free iCloud Email Address. If you do have one you want to use, tap Use Your Current Email Address. Then tap Next.

5. If you chose to use your current email address, enter it and tap Next.

6. Choose a password that’s at least eight letters long, with at least one capital letter, one lowercase letter, and one number. Enter it a second time to make sure you know it and then tap Next.

If you don’t have an email address, or don’t want to use your main one for your Apple ID, you can choose to get a free iCloud email address. To do that, just tap that option and tap Next. The next screen lets you create your new icloud.com email address and continue.
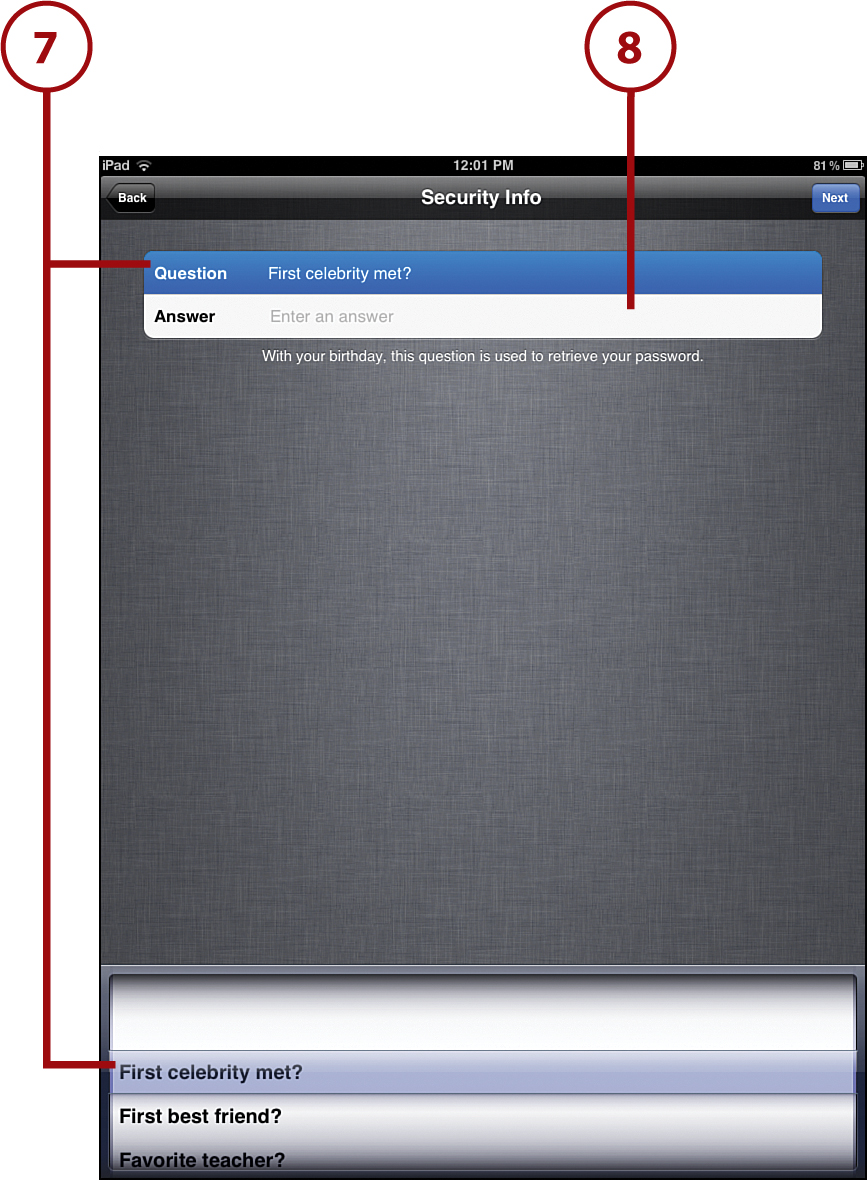
7. Enter a reminder in case you forget your password. Choose a question from the spinner or add one of your own in the Question field. Choose something you’ll remember but that even someone who knows you won’t be able to guess.
8. Enter the answer into the Answer field.
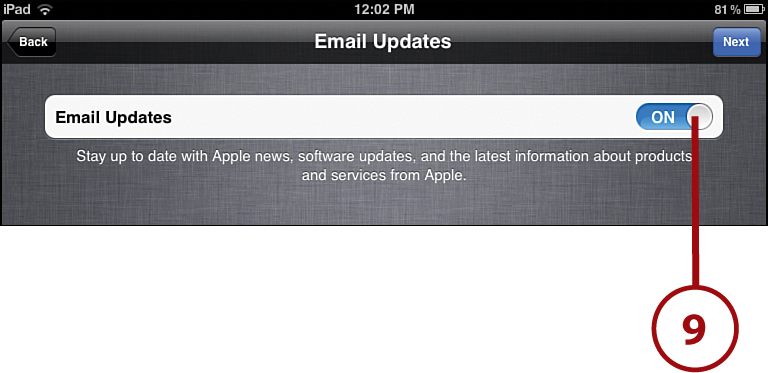
9. If you want Apple to send you emails announcing new products or sharing other news, leave the Email Updates slider On. Otherwise, move the slider to Off and tap Next. You see a screen with Apple’s terms for having an Apple ID. You must agree to these terms to use your Apple ID at the iTunes or App stores. When you do this, your Apple ID is created and you’re ready to go.
Syncing with iTunes
You can use an iPad if you don’t have a computer; but if you do have one, there’s a good chance it’s full of music, photos, and other things you’d like to put on your iPad. To do that, you have to sync (syncing also backs up the data on your iPad to your computer for safe keeping).
Syncing is an easy and useful way to get content from your computer to your iPad. What it’s not, though, is a way to get new music or movies that you don’t already have. For that, you need to use the iTunes Store app or iTunes on your computer (or App Store for new apps). Check out “Getting Music, Apps, and More at the iTunes Store” later in this chapter for tips on that.
It’s also important to keep in mind that your iPad doesn’t have unlimited storage space, so you might have to choose what you want on it. Learn more about that in “Go Further: Your iPad’s Storage Space” later in this section.
There are two ways to sync, but the easiest is to plug your iPad into your computer using the cable that came with it. Begin by plugging one end of the iPad cable into the dock connector. Plug the other end into a USB port on your computer. If you’re not sure how to do this, an adult should have no trouble helping you.
If it’s not already running, iTunes launches and the screen that lets you manage all the content on your iPad appears.
Each tab on this screen lets you control different kinds of content on your iPad. Click a tab (each one is discussed in one of the next several sections) to access that content. When you’ve made all your changes and want to save them and sync again, click the Apply button. You can do this after changing the settings on each tab or after you’ve completed all of them.
The Summary Tab
The Summary tab is the overview screen where you perform basic activities:
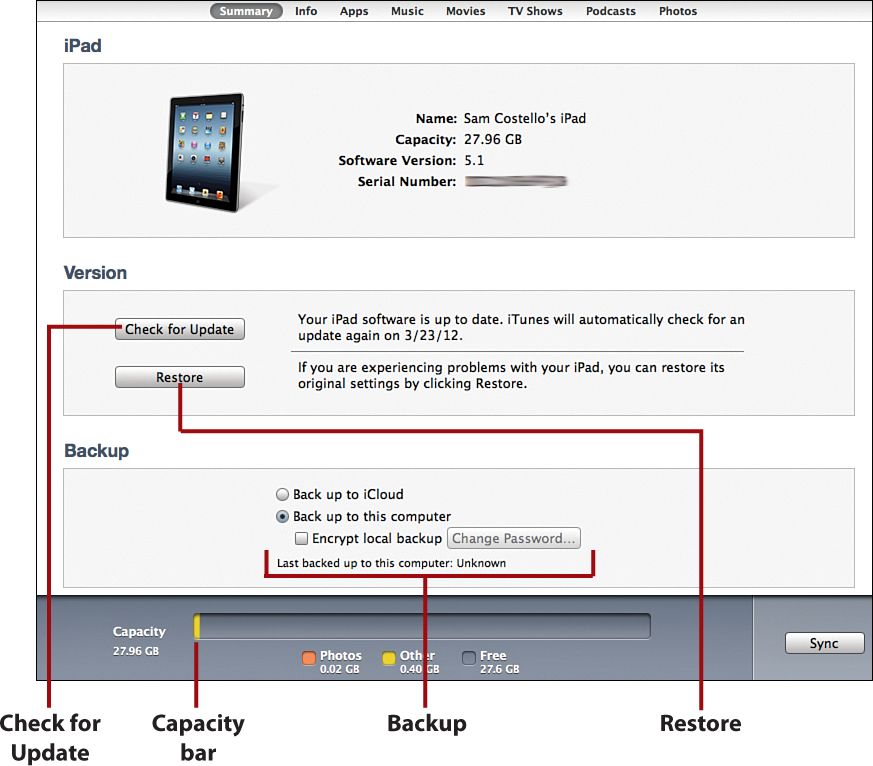
• Check for Update—Click this to check for, and install, an updated version of the iOS, the software that makes the iPad work (you can find instructions on this in the online extras at www.informit.com/title/9780789740512.
• Restore—If your iPad is having major problems, sometimes you need to erase it and start from scratch. That’s what this option does. (Learn more about this in Chapter 17’s “Restoring Your Data from Backup.”)
• Backup—This option lets you decide whether the data on your iPad is saved for safekeeping. The default setting is based on what you chose in step 10 of “Setting Up the iPad,” earlier in this chapter.
• Capacity bar—This color-coded bar at the bottom of iTunes shows how much of your iPad’s storage space you’re currently using and how much is still available. The default information shows you how much space is being taken up by each type of data—music, apps, books, and so on. If you click a category at the bottom (for example, Audio), you see other information, such as how many songs or apps are on your iPad.
The Info Tab
The Info tab is where you sync calendars, addresses, and email accounts. Here are the main options on this tab:
• Sync Contacts—If you have your friends’ and family’s names, addresses, phone numbers, and emails stored on your computer, you can sync them to your iPad by checking this box. If you have this information stored in different programs, you need to merge it all into one because the iPad can only sync with one address book program. On a Mac, your iPad syncs with the built-in Address Book program. On a PC, you can choose to sync with Outlook, Outlook Express, Windows Address Book, or Windows Contacts.
• Sync Calendars—You can also sync your calendar or a family calendar to the iPad, which is good for keeping track of your days off from school, big homework assignments, and people’s birthdays (learn more in Chapter 8, “Get Organized with Calendar and Reminders”). If you want to sync calendars, check this box, click Selected Calendars, and choose the calendars you want. You can also sync all the calendars on your computer by checking the All Calendars box.
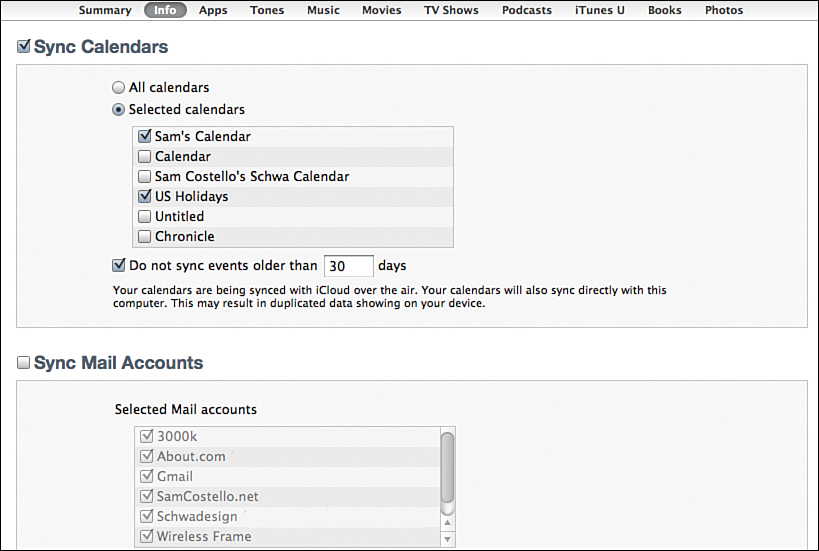
• Sync Mail Accounts—If you have an email address set up on your computer, you can add it to your iPad by checking this box and then clicking the account you want to add. If you don’t have an email address, that’s okay. You can set one up in Chapter 5, “Talk to Me: Texting, Chatting, and Email.”
• Sync Bookmarks—If you have your favorite websites saved as bookmarks in the web browser on your computer, you can sync all of those bookmarks to your iPad, too. Just check the box next to Sync Bookmarks. If you use a Mac, you’re done. On a PC, click the menu to choose what browser’s bookmarks you want to sync. Select the browser you use most often.
The Apps Tab
Here’s where things start to get really fun: adding apps to your iPad. When you use iTunes to download apps and games, they show up in this area. Here’s how you install them on your iPad:
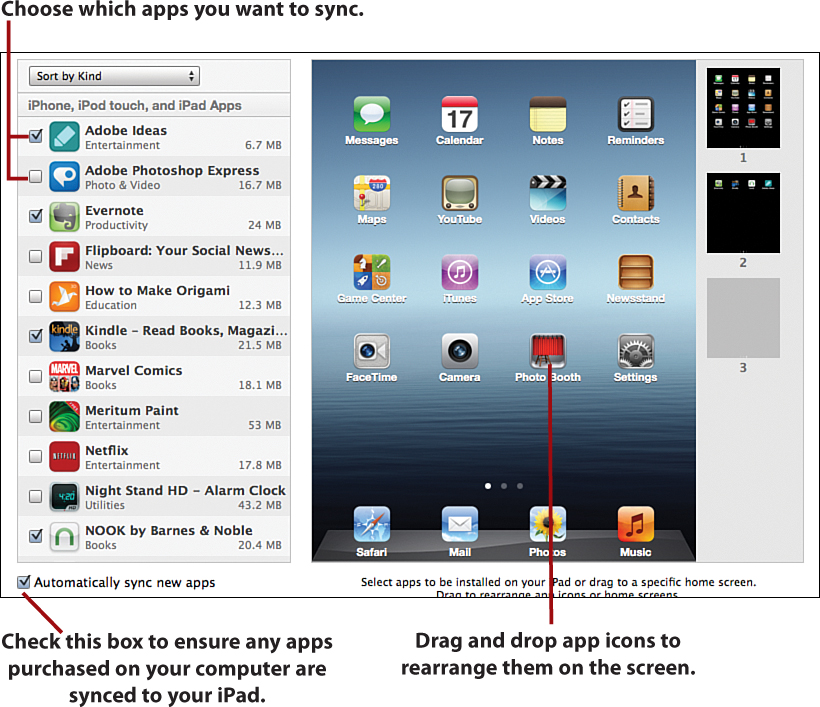
• Sync apps—Check this box to turn on the ability to sync apps. When you do this, the apps in the column below it light up.
• Select apps—To choose apps to sync to your iPad, check the box next to each app.
• Arrange apps—On the right is a picture of your iPad’s home screen. Next to that picture are other boxes with apps on them. These are other screens. Click the #2 screen to see the apps that will be installed there. If you want to put those apps somewhere else, you can drag and drop them onto another screen or to another place on the same screen. Check out “Arranging Apps” and “Making Folders” in Chapter 3, “It’s All Yours! Customizing Your iPad,” for more information.
• New screens—To create a third screen for your apps, click an app with your mouse and drag it over to the gray box labeled “3” next to the picture of your iPad screen. Let go of the mouse button to drop the app there; you’ve just added another screen of apps. Repeat to create more screens.
• Automatically sync new apps—If you get apps using iTunes on your computer instead of using the App Store on your iPad, use this option. Check it if you want new apps that you download on your computer to be added to your iPad every time it syncs.
The Tones Tab
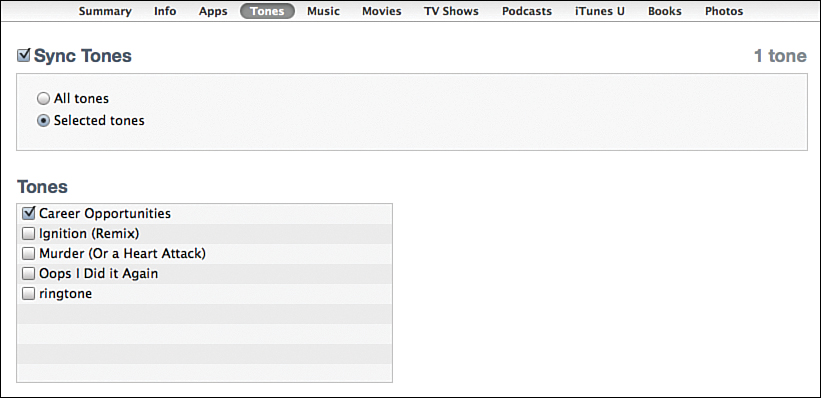
Tones are the sounds made by the iPad to let you know you have a FaceTime call, new email, text message, or reminder. The iPad comes with dozens of sounds, but you can also add your own to make your iPad more personal.
To sync tones to your iPad, click the Sync Tones button. You can sync all the tones on your computer by clicking All Tones. Alternatively, you can choose just some of them by clicking Selected Tones.
Read more about sounds and tones, and where to get them, in the “Choosing Your Sounds” section of Chapter 3.
The Music Tab
Here’s another fun tab. You can add music to your iPad so that you have your favorite songs with you wherever you go.
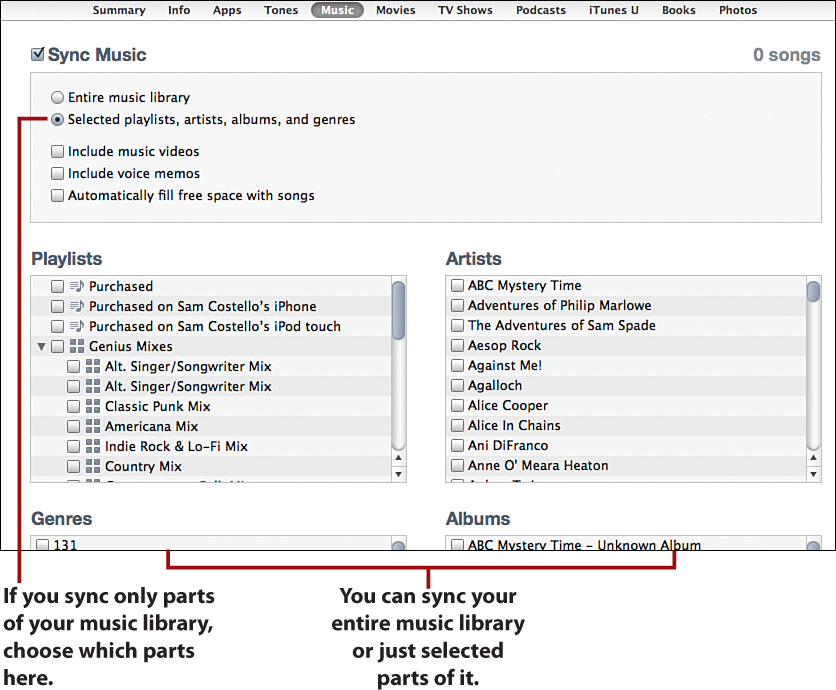
• Click the Sync Music box so a checkmark appears in it (if the box is already checked, you don’t need to click) to turn on the ability to add music to your iPad.
• Chances are your iPad won’t have enough space to hold all your music, apps, games, books, and everything else, so your best bet is to click Selected Playlists, Artists, Albums, and Genres so that a black dot appears. Then you can choose what music you want to have on your iPad.
• If you have music videos you want to watch on your iPad, click that box so a check mark appears in it. You can ignore the other two for now.
• If you decide to sync only selected songs, you have to choose which songs you want. There are four ways to do that: by playlist, artist, genre, and album:
• If you have created any playlists in iTunes and want to sync them, check the box next to the name of each playlist you want to add.
• If you want to add all the songs and albums by your favorite bands to your iPad with just one click, check the box next to their names.
• To sync all albums and songs in a certain genre, click the box next to the genre you want.
• To sync just one album at a time and have more control over what ends up on your iPad, click the individual album names.
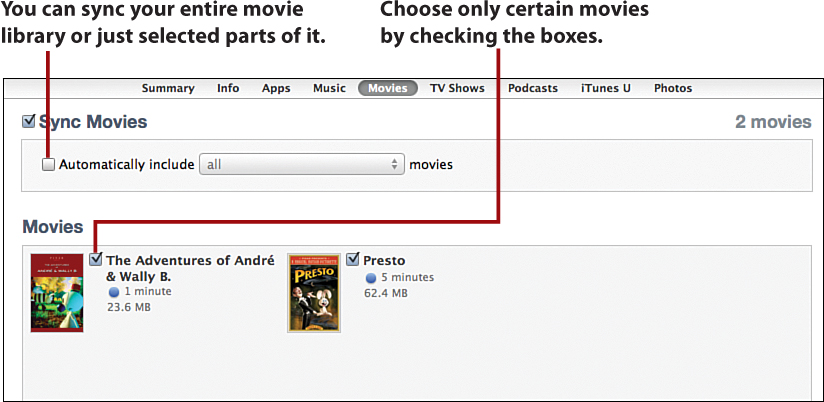
The Movies Tab
If you rent or buy movies from iTunes, or download video files from the Web, you can watch them on your iPad. This is especially fun if you’re taking a long trip and want some entertainment.
• Sync Movies—Check this box to turn on the ability to sync movies to your iPad.
• You have two choices for syncing movies: automatically and one at a time:
• To choose automatically, check that box and then select the number of movies you want to sync in the drop-down menu.
• If you want to choose your movies, check the box next to each movie you want to sync. Taking a movie off your iPad, but leaving it on your computer, works the same way: Uncheck the box next to that movie.
The TV Shows Tab
Just like with movies, you can also watch your favorite TV shows on your iPad. Here, however, you have a bit more flexibility because you can choose the specific episodes you want to sync.
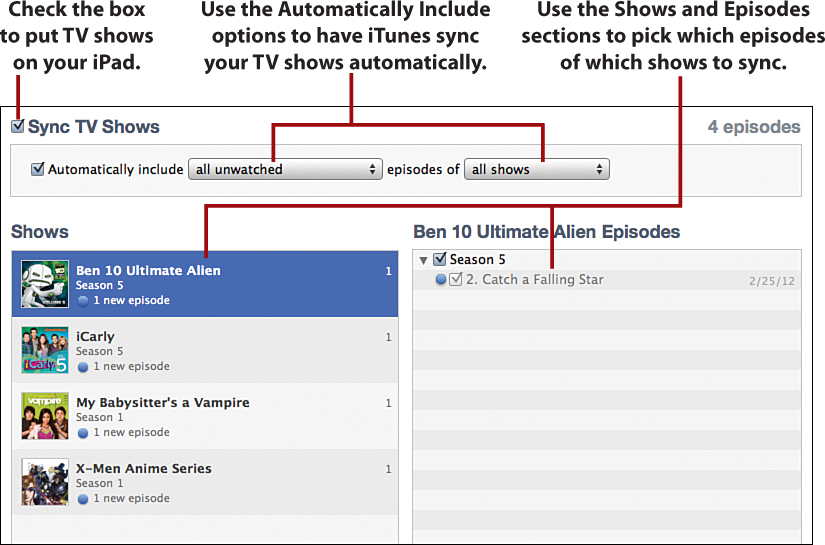
• Begin by checking the Sync TV Shows box. Just like with movies, you can either automatically sync shows or choose which ones you sync on a show-by-show basis.
• If you choose to automatically sync, you then decide what you want to sync. In the first drop-down box, your choices are all unwatched episodes, the newest shows, the newest shows you haven’t watched, and the oldest shows. Pick the one you want from the drop-down.
• Use the second drop-down box to choose whether you want this choice to apply to all shows or just the ones you selected. I recommend using just the ones you select, because you might want to keep shows you’ve seen on your computer, but don’t want to add them to your iPad.
• If you want to choose specific shows to sync, don’t check the box next to Automatically Include. Instead, check the boxes next to the show you want to add to your iPad and then click the box next to each episode you want to sync. You can do this for as many shows and episodes as will fit on your iPad.
The Podcasts Tab
Podcasts are like radio shows that you can download and listen to any time. Most of them are free, and there are thousands to choose from on all kinds of topics at the iTunes Store. In fact, you can even subscribe to your favorites so that when a new episode comes out, it’s automatically downloaded to your computer.
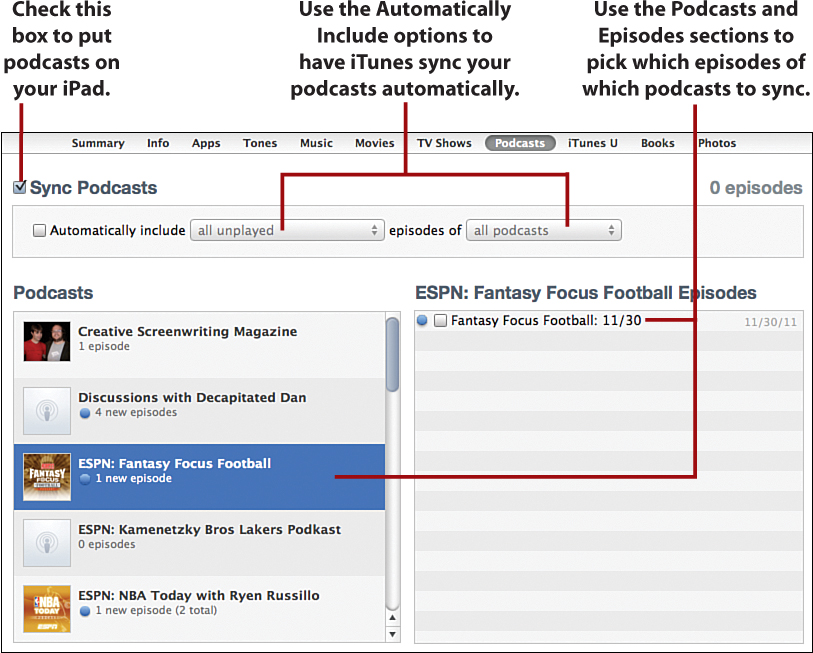
• To sync podcasts to your iPad, you first have to click the Sync Podcasts check box so that a check mark appears in it.
• Choosing what podcast to sync is a lot like choosing what TV shows to sync. You have to decide if you want to sync podcasts automatically or one at a time.
• If you choose automatically, then choose how many podcasts and whether you want to only sync ones you haven’t heard or all of them.
• If you want to sync only some podcasts, don’t check the box next to Automatically Include. Instead, check the box next to the podcast you want to sync. Then check the box next to each episode of that podcast that you want to sync.
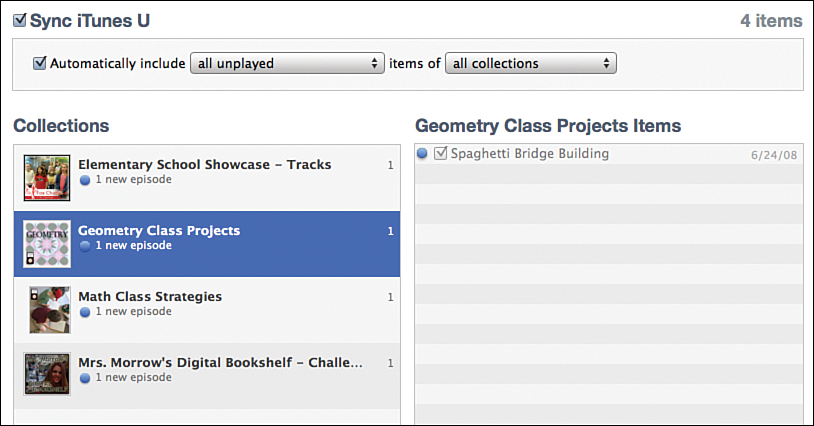
The iTunes U Tab
iTunes U is one of the best ways to use your iPad for learning. At the iTunes Store, you can download audio and video recordings of all kinds of classes on topics such as history, math, art, and English. Most of the stuff at iTunes U is for college students, but some of it is aimed at grade school audiences, so you might find something you like.
Syncing iTunes U classes works the same way as TV shows and podcasts.
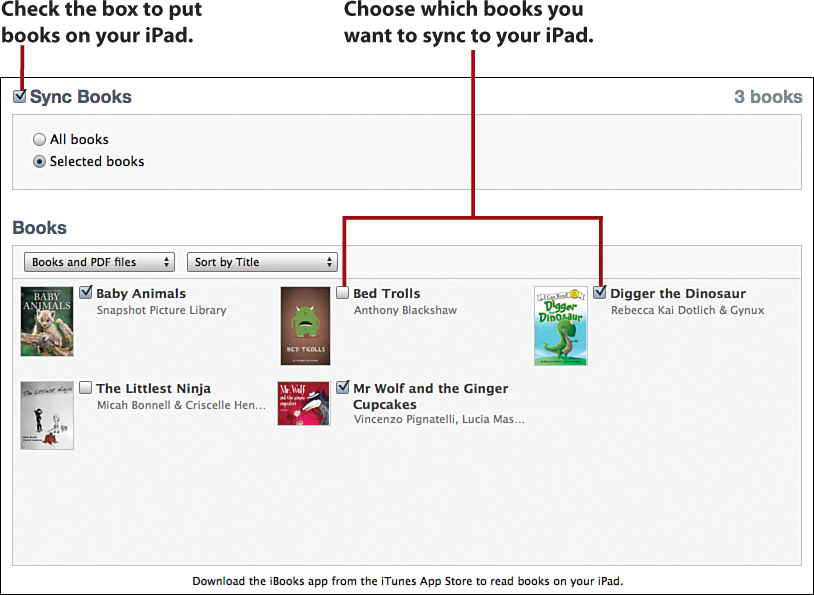
The Books Tab
You can get e-books and audiobooks from iTunes and other sources. The iPad is a great place to read or listen to books because it can hold hundreds of them and the books can have pictures, sound, and animations:
• To sync books to your iPad, first click the check box next to Sync Books so a check mark appears there. If you enable this option, use the buttons below to choose whether to sync all the books on your computer or just some of them.
• If you choose selected books, click the box next to the books you want.
• Adding audiobooks to your iPad works the same way. Scroll down the page to see and configure the Audiobooks options.
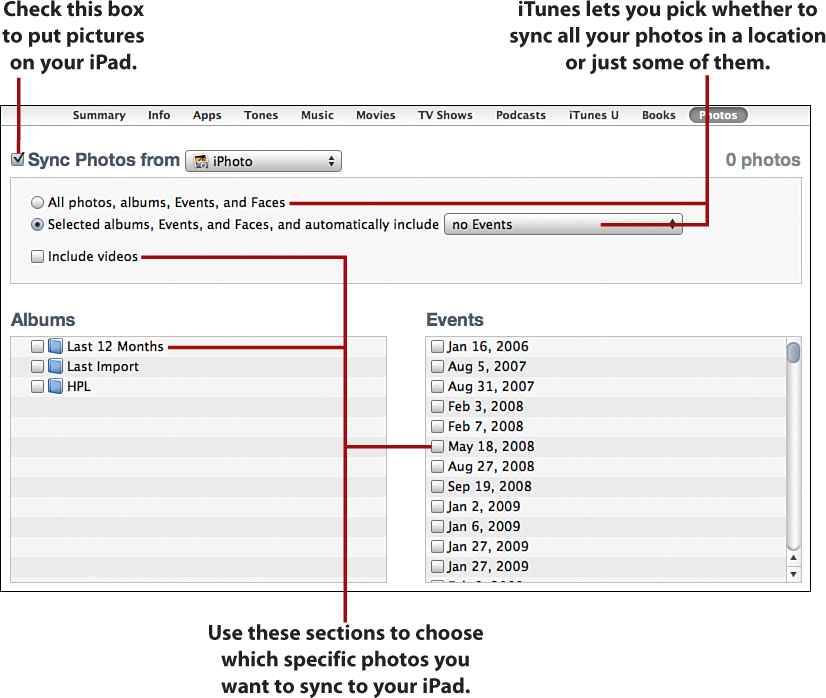
The Photos Tab
With its big screen, the iPad is awesome for looking at pictures—and having the built-in digital cameras makes it even better. If you store photos on your computer, you might want to sync your favorites to your iPad so you can have them with you wherever you go:
• Begin by clicking the Sync Photos check box and then choosing where to sync photos from the list. If your computer is a Mac, choose iPhoto. If you use Windows, choose the program you use (there can be a lot of options, depending on what you have installed on your computer, but Windows Live Photo Gallery is the most common).
• Just like with other things, you first have to decide whether you want to sync all your photos or just some. You might have more photos on your computer than you can store on your iPad. Because of that, it’s usually best to sync only your favorite photos.
• If you choose to sync only selected photos, you then have to choose what albums, events, or people (this option only works if you use iPhoto) to sync. Click the boxes in those sections.
You can always sync using the cable that comes with your iPad, but if you want to be really high tech, you should sync over Wi-Fi. To do this, you have to change a setting on the Summary page in iTunes when your iPad is synced.
On that page, click the box that says Sync with This iPad over Wi-Fi and then click Apply. After you do that, any time your iPad and computer are on the same Wi-Fi network, your iPad pops up in iTunes and syncs. Super easy!
Getting Music, Apps, and More at the iTunes Store
One of the best things about the iPad is that there’s a nearly unlimited supply of new music, apps, and games you can get at the iTunes Store. This isn’t a store where you can walk in and look at products, though. It’s an online store run by Apple that lets you buy things that work on your iPad (and iPhone, iPod, and computer). Instead of going to the store in person, you go to it in an app—the iTunes app that comes with your iPad.
The iTunes app is where you go to buy music, movies, TV shows, and audiobooks; it’s also one place you can download podcasts and iTunes U classes. Some things in iTunes are free, like free songs and iTunes U, but you have to pay for most things. That’s why you either need an iTunes Allowance or your parents’ permission to buy things using their credit cards.
These general instructions apply to getting basically any kind of content at iTunes. For specific steps for getting books, check out “Buying E-Books at the iBookstore” in Chapter 9, “E-books and iBooks.” To learn how to get movies and TV shows, read “Watching Videos from YouTube or iTunes” in Chapter 15, “Lights, Camera, Action: Videos and Photos.”
Downloading Using the iTunes App
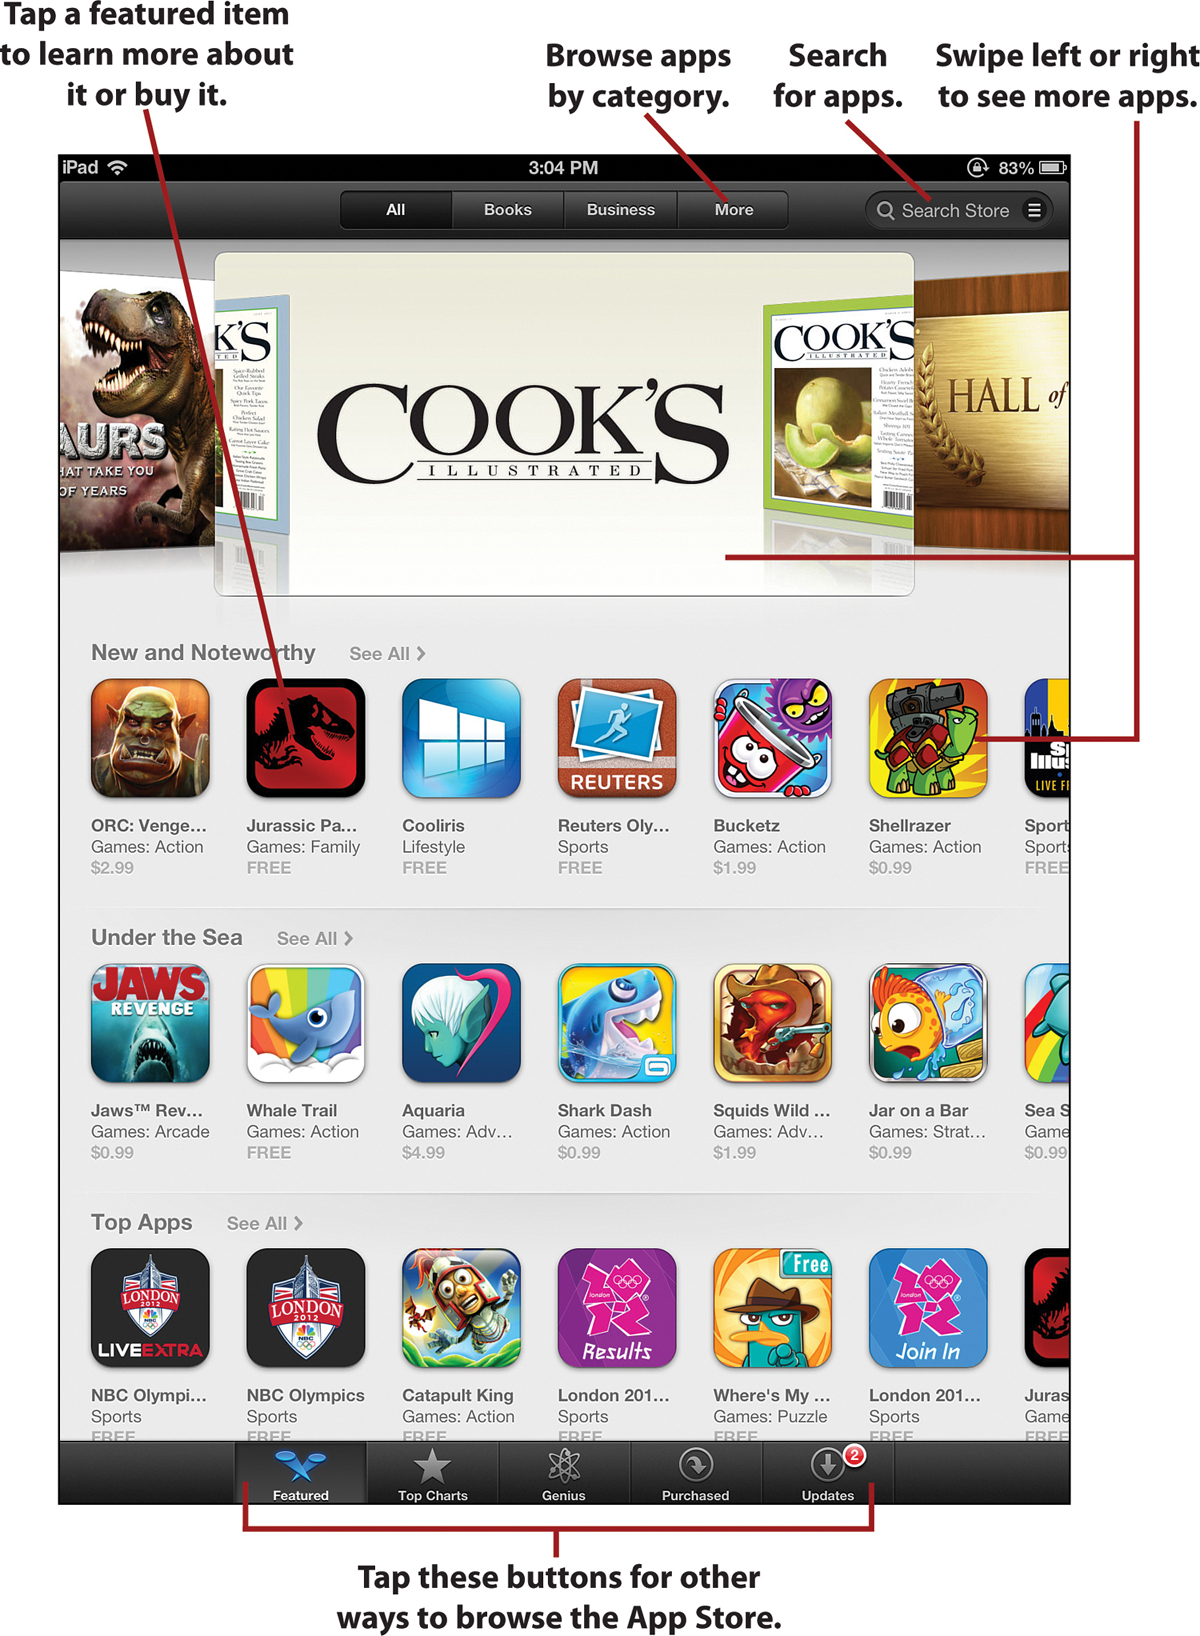
To use the iTunes Store and find out what music, movies, and other content is available for you to add to your iPad, make sure you’re connected to the Internet and then tap the iTunes app to launch it. I’ll take you on a tour!
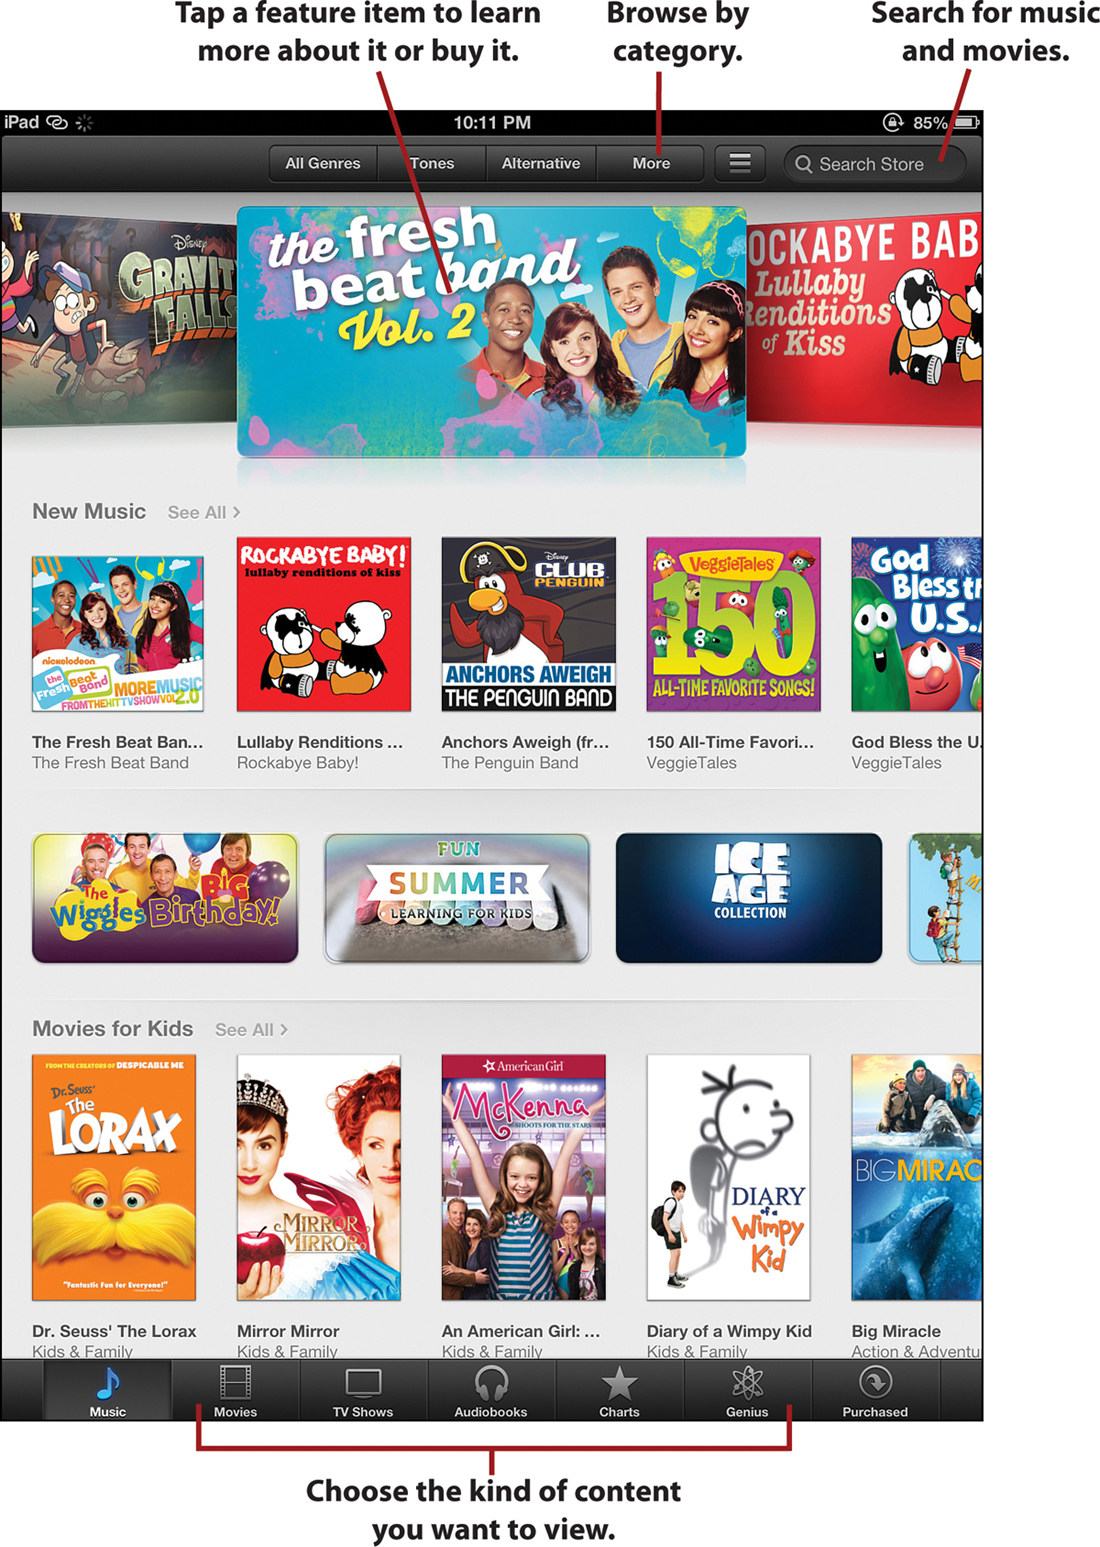
The first thing you see is the main screen for Music on the iTunes Store. You know you’re in the Music section because the Music button at the bottom of the screen is highlighted. You can tap any of the other buttons to move the sections for Movies, TV Shows, and so on. Tap the button for the kind of content you’re interested in.
When you’re in the section you want, there are three ways to find content. You can tap the More button to see a list of all content in that section by type (for instance, in music you see Country or Rock; in TV shows you see Animation or Sports). You can also tap the Search box and type in the thing you’re looking for. Or you can tap one of the featured items. To see more featured items, swipe the rows left and right, and swipe the screen up and down.
You can also jump to different ways of sorting items by tapping the buttons at the top of the screen. Tap All to return to the front page of each section.
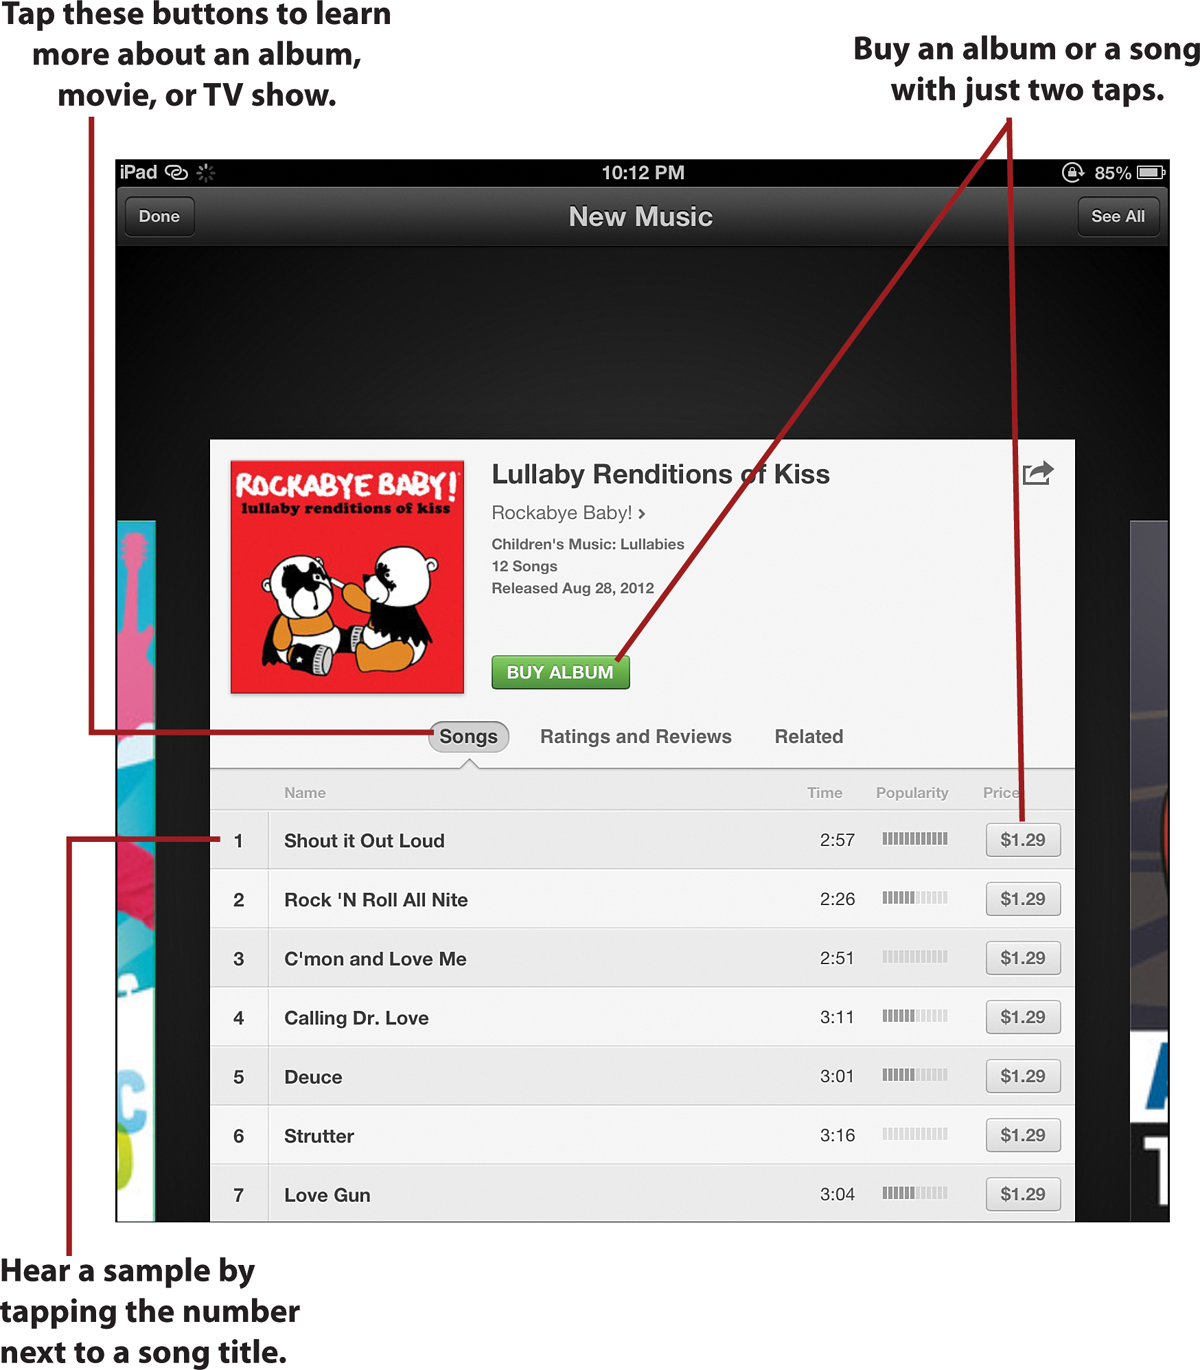
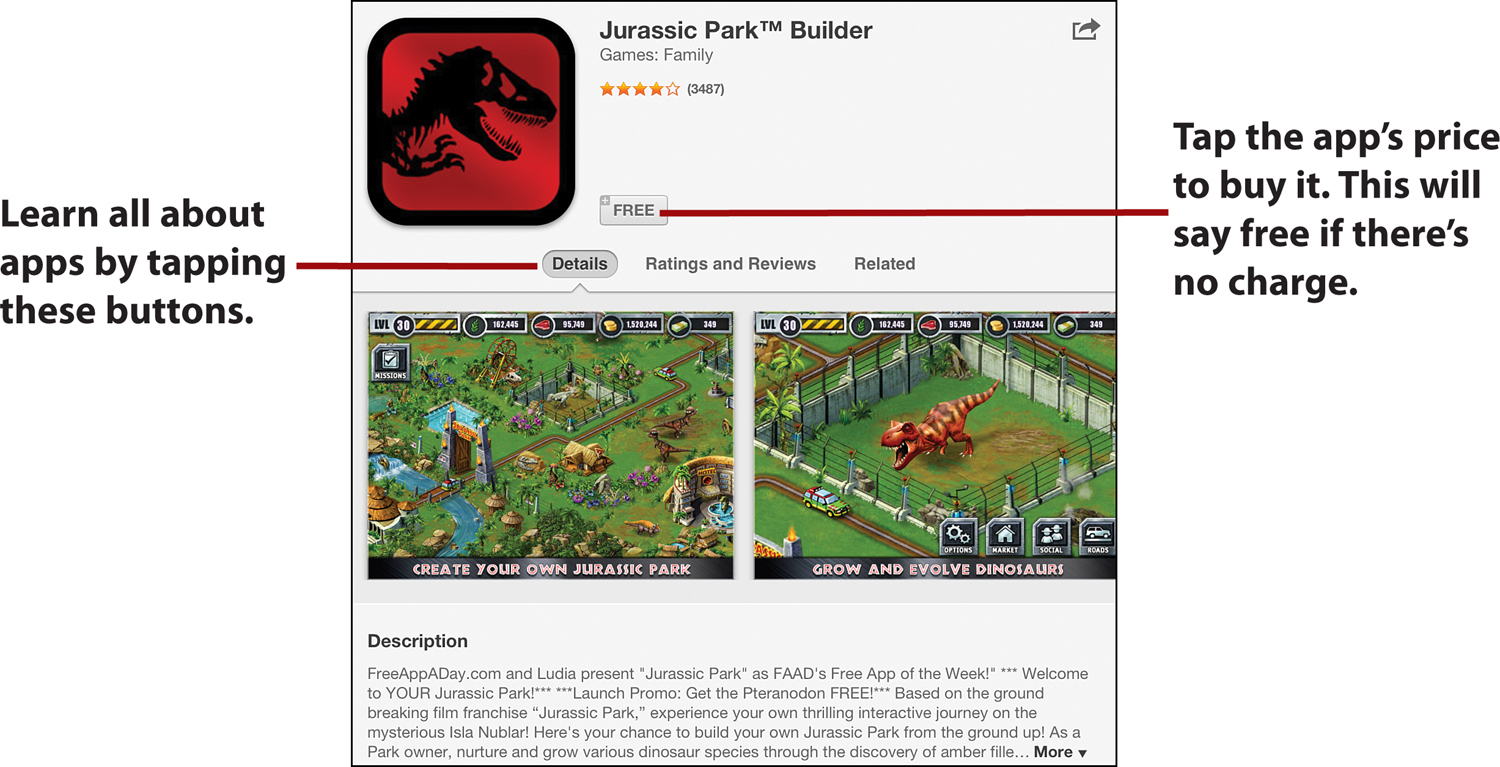
When you’ve found something you’re interested in, tap it. A window pops up with more information about it. You see the item’s price and buttons across the middle of the window (what those buttons are depends on what kind of content you’re looking at). When you’re looking at an album, the Songs button shows you all the songs on the album. Tap Ratings and Reviews to see what other iTunes users say about the item. Tap Related to see other, similar items you might enjoy.
If you want to hear a clip from a song to see if you like it, tap the number next to the song’s name and it starts playing.
To buy a single song, tap the price next to it and then tap Buy Song. To buy the entire album, tap the price at the top of the list and then tap Buy Album.
If you’re not already logged in, you need to log in with your Apple ID. If you haven’t bought from iTunes before, you have to agree to terms and conditions and try your purchase again.
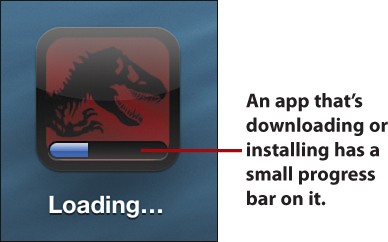
The new music, movie, or TV episode automatically downloads to your iPad. When the download is complete, the new item is ready for you to use. Music downloads to the Music app, and movies and TV shows download to the Videos app.
Downloading Using the App Store App
The App Store is like the iTunes Store—it’s an online store run by Apple where you can download apps and games for your iPad (programs from the App Store don’t work on desktops or laptops). Just like iTunes, you need to have an Apple ID to use it. Many apps and games are free, but some you have to pay for, so in that case you either need an iTunes Allowance or your parents’ permission to buy things.
Tap the App Store app to launch it. Just like in iTunes, there are three ways to find content. You can tap the Search box and type in the name or kind of app you’re looking for. You can also swipe the rows left and right to see more apps and tap one of the featured items. Lastly, you can tap the More button at the top of the app and browse through categories like Education, Games, and Photo & Video.
When you’ve found something you’re interested in, tap it. You see a screen with more information about the app. On that screen, you can find the app’s price and three buttons across the center. Tap the Details button to see screenshots from the app (swipe left and right to see them), a description of the app, and some other basic information. Tap Ratings and Reviews to see what other users think of the app. Tap Related to see other, similar apps that you might enjoy.
To download a free app, tap Free and then tap Install App. If the app costs money, you see its price instead. To buy a paid app, tap the price and then tap Buy App.
Just like with iTunes, if you’re not logged into your Apple ID, you’re asked to do that. After you do, the app or game starts downloading to your iPad. When it’s done, it will be on your home screen. Tap it to start using it.
iTunes Allowance: What It Is and Why Your Parents Should Give You One
Do you or someone you know get an allowance? Allowances—money that your parents give you to spend on just about anything you want—are pretty great. There’s a virtual version of an allowance, called an iTunes Allowance, that lets your parents give you money just to spend at iTunes or the App Store.
With an iTunes Allowance, your parents can put $10–$50 in your iTunes account every month. That way, you always have money to buy songs, apps, movies, and books at the iTunes or App Stores, and you don’t have to ask your parents to buy something for you. Yeah, it’s pretty great.
If your parents set one up for you, whatever amount of money they give you gets put into your iTunes account each month. You keep any money that’s left over at the end of the month (so, if you have $2 at the end of the month plus you get a $10 allowance each month, you have $12 at the start of the next month—the leftover $2 + the normal $10). An iTunes Allowance can come in pretty handy if your parents are okay with setting one up.
Of course, if your parents don’t want to give you an allowance every month, they can always give you the occasional iTunes Gift Card so that you have some money to spend at the iTunes or App Stores.
Setting Up an iTunes Allowance
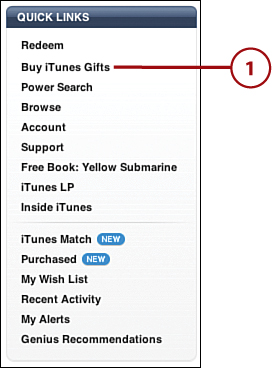
If your parents want to give you an iTunes Allowance (there are some tips on how to convince them in a minute), you need to have an iTunes account (like the one you set up earlier this chapter) and your parents need their own separate account. Then have one of your parents launch the iTunes program on a computer, log in with their account, and then follow these steps:
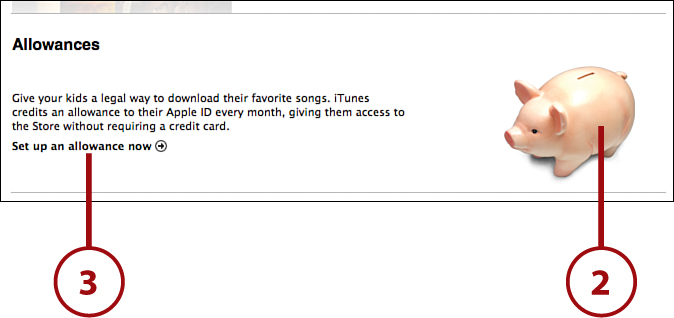
1. At the iTunes Store, click Buy iTunes Gifts.
2. Scroll to the Allowances section near the bottom of the screen.
3. Click the link Set Up an Allowance Now.
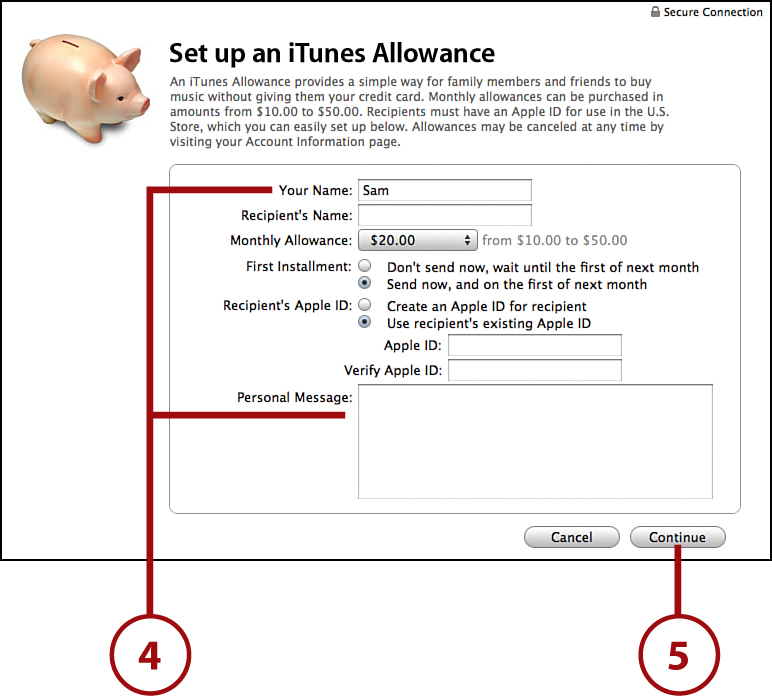
4. On the iTunes Allowance screen, fill out all the information.
5. Click Continue to create the allowance. Now, you’ll be able to get new music and apps and other iTunes goodies every month! The money from your iTunes Allowance is available in iTunes on your computer or the iTunes or App Store apps on your iPad. Just sign in to your account, and it will be there next to your username in the right corner of the screen.
Lost and Found: Find My iPad
With anything as expensive as an iPad, you really need to take care with where you put it; something this portable can be easily lost or stolen. If you ever lose your iPad, it doesn’t have to be the end of the world. In fact, it doesn’t even mean that you necessarily have to buy a new one. Thanks to a cool technology from Apple called Find My iPad, you can use the Internet to figure out where your iPad is (all the details on how to do that are in Chapter 17).
To use Find My iPad, you have to turn it on before you need to use it. That’s why Apple makes turning on this feature part of the iPad setup process. If you chose not to turn it on then, though, the good news is you can still turn it on later.
Setting Up Find My iPad
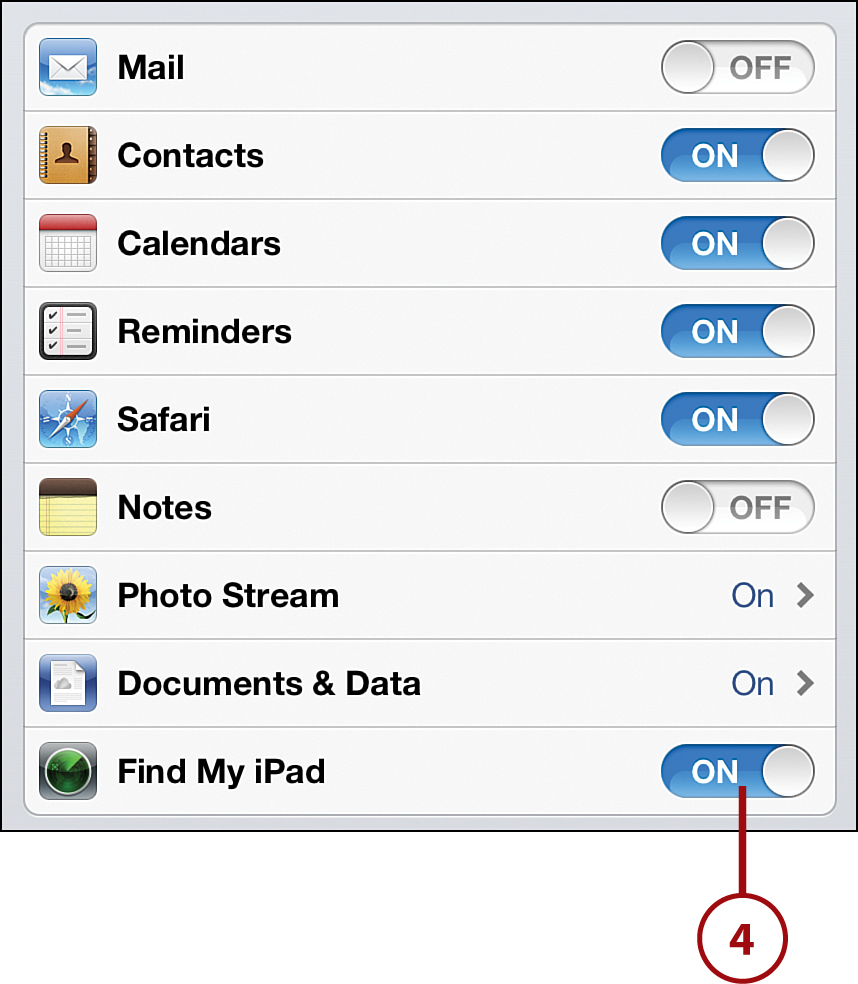
To turn on Find My iPad, start by opening the Settings app and then follow these steps:
1. Tap iCloud and log in using your Apple ID.
2. Move the Find My iPad slider to On.

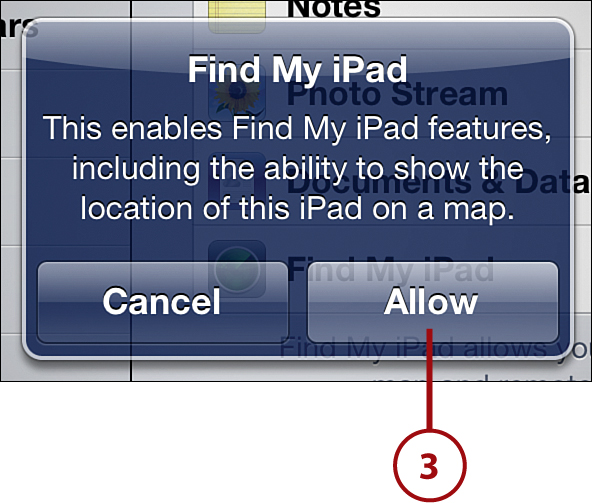
3. A window pops up asking you to allow iCloud to use your iPad’s location, which also enables Find My iPad. Tap Allow.
4. With that done, Find My iPad is enabled.
Now that Find My iPad is turned on, you’ll be able to track your iPad if it gets lost or stolen. To learn how to use Find My iPad, check out Chapter 17’s “Finding a Lost iPad.”
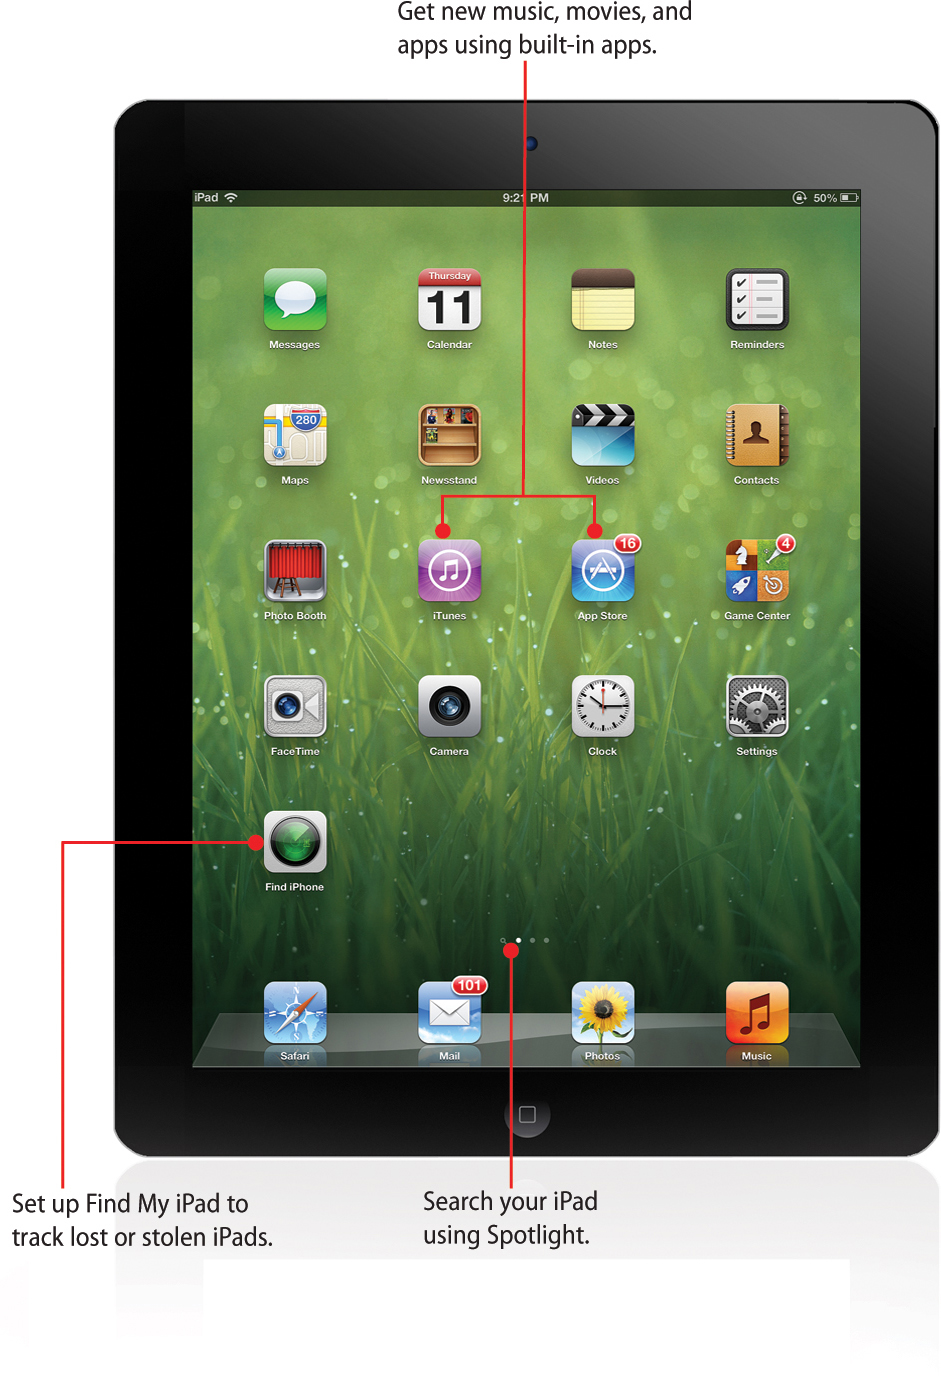
Spotlight Search
Ever known there was something on your computer but you just couldn’t find it? You probably used your computer’s search tool to find it. Your iPad works the same way.
The iPad’s search tool, Spotlight, is very powerful. Search on some computers only looks at the names of files, not what’s in them. That’s like trying to find an important fact in a library full of thousands of books just by looking at their covers, not reading them. Not very accurate! Spotlight does a better job, though, because it can search what’s in the built-in apps that came with your iPad. This means that Spotlight almost always finds what you’re looking for—on your iPad, that is. To search the Web, use the iPad’s built-in Safari web browser.
Using Spotlight
If you want to find something on your iPad using Spotlight:
1. From your iPad’s home screen, swipe to the right until all the apps disappear and you see a search bar at the top of the screen and a keyboard at the bottom.
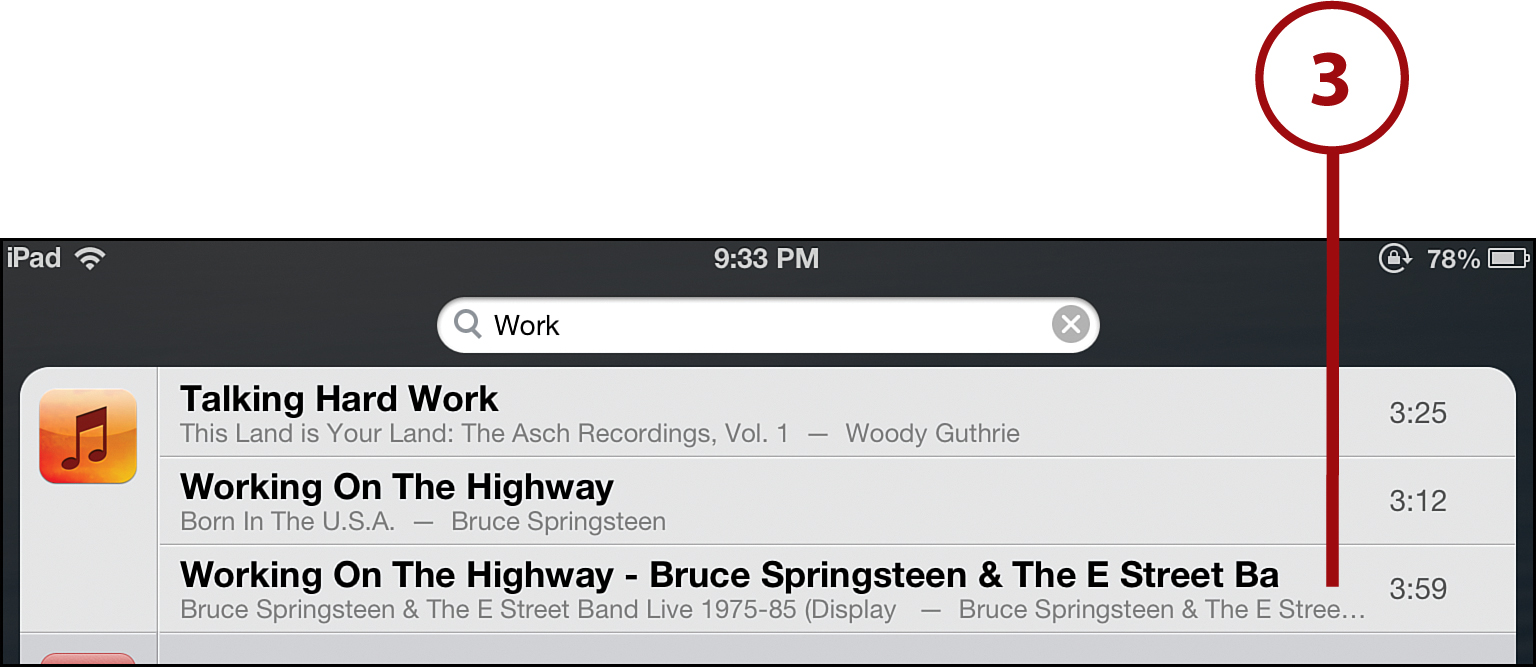
2. Type what you want to find. This could be a person’s name (which gets you their address book entry and any emails or texts they’ve sent you), the name of a book or a song (one tap on the search results opens or plays it) or a piece of information (if that information is in a document or email, it appears). Tap Search and you see a list of results.
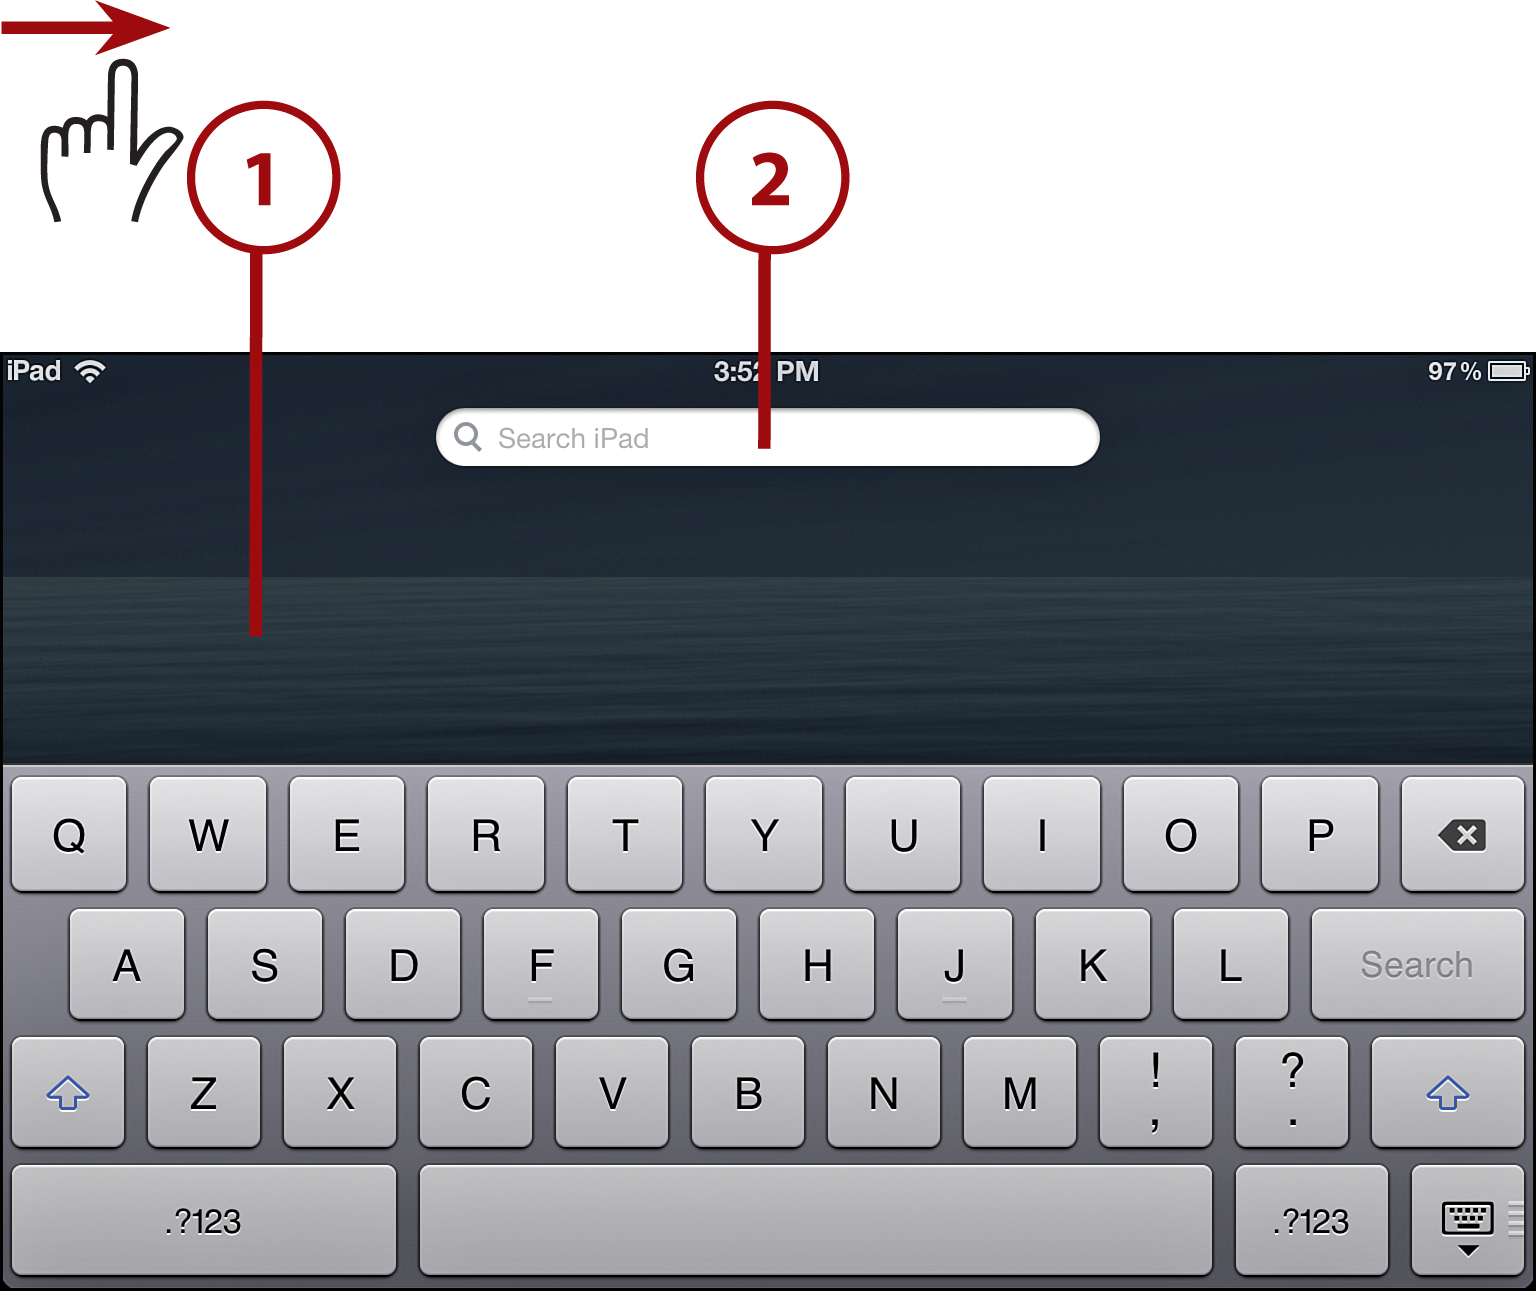
3. Tap the search result that you want to view.
Meet Your Digital Sidekick: Siri
You might not realize it, but if you have iOS 6 (released in Sept. 2012, and pre-loaded on every iPad sold after that) on your iPad, you have a digital sidekick that can help you do all kinds of things. (Learn more about how to upgrade your iOS online at www.informit.com/title/9780789749512) Your sidekick is named Siri.
Siri is unlike other features of your iPad in an important, and very cool, way: Instead of tapping on Siri, you speak to it. And Siri talks back!
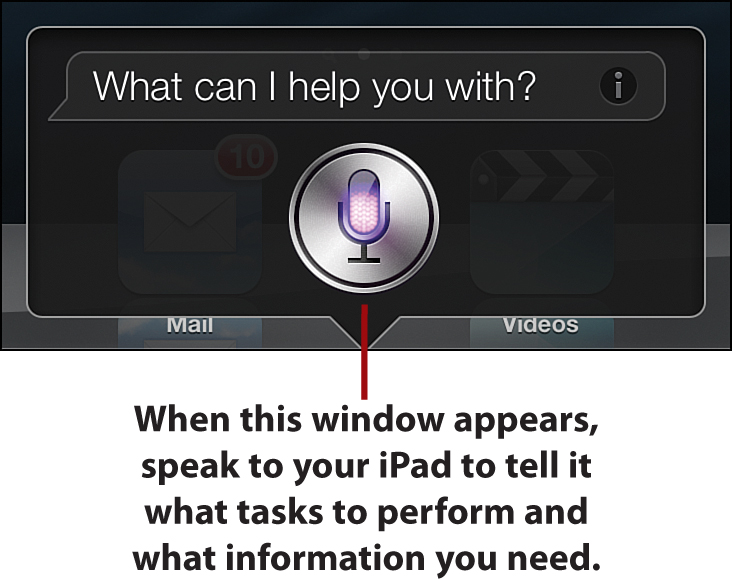
Siri is a voice-activated tool available on the third-generation and fourth-generation iPads, and the iPad mini, (but not the iPad 2 or the original iPad) that can help you do all sorts of things. To useit, make sure you’re connected to the Internet and then just hold down the Home button to activate Siri (a window pops up at the bottom of the screen) and speak to your iPad.
Learn to Use Siri
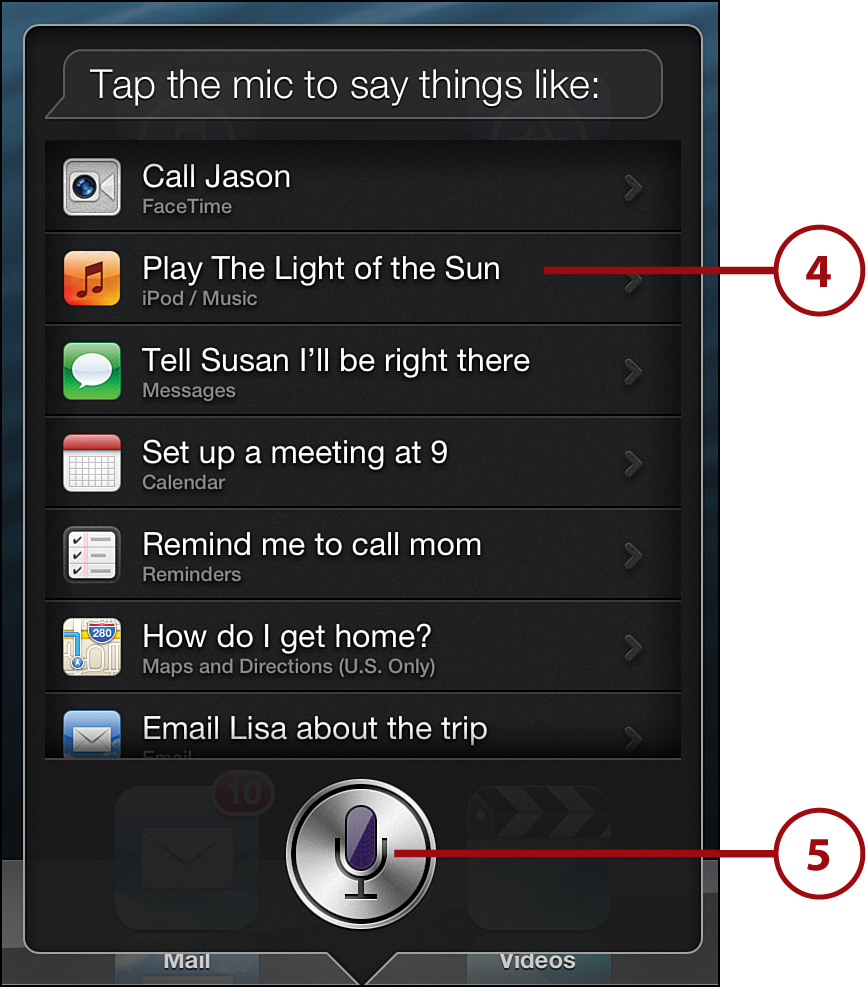
Not sure how to start using Siri? Then you’re in luck, because Siri comes with a built-in tutorial that gives you some suggestions.
1. Hold down the Home button until Siri’s What can I help you with? menu pops up.
2. Tap the I icon.
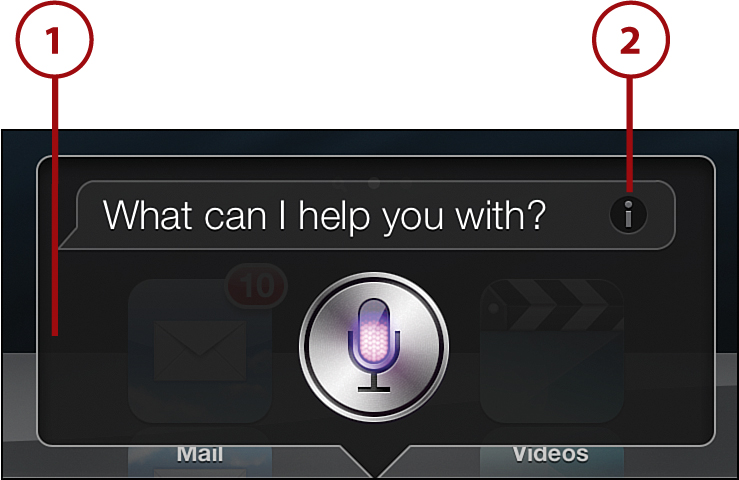
3. A list of the kinds of commands Siri responds to pops up. This is a good place to see what apps you can use Siri with, as well as suggestions for how to speak to Siri.
4. The phrases you see in this menu aren’t the only way to talk to Siri. For example, to see other ways to use the Music app, tap Play the Light of the Sun. To get tips on creating reminders, tap Remind me to call mom.
5. To use what you’ve learned, tap the Siri icon and speak something you want Siri to do.
Have you tried Siri and decided it’s not for you? You can turn it off. To do that, tap the Settings app on your home screen. Then tap General. Tap Siri and move the slider to Off. You can always move it back to On if you want to use Siri again later.
Getting Answers with Siri
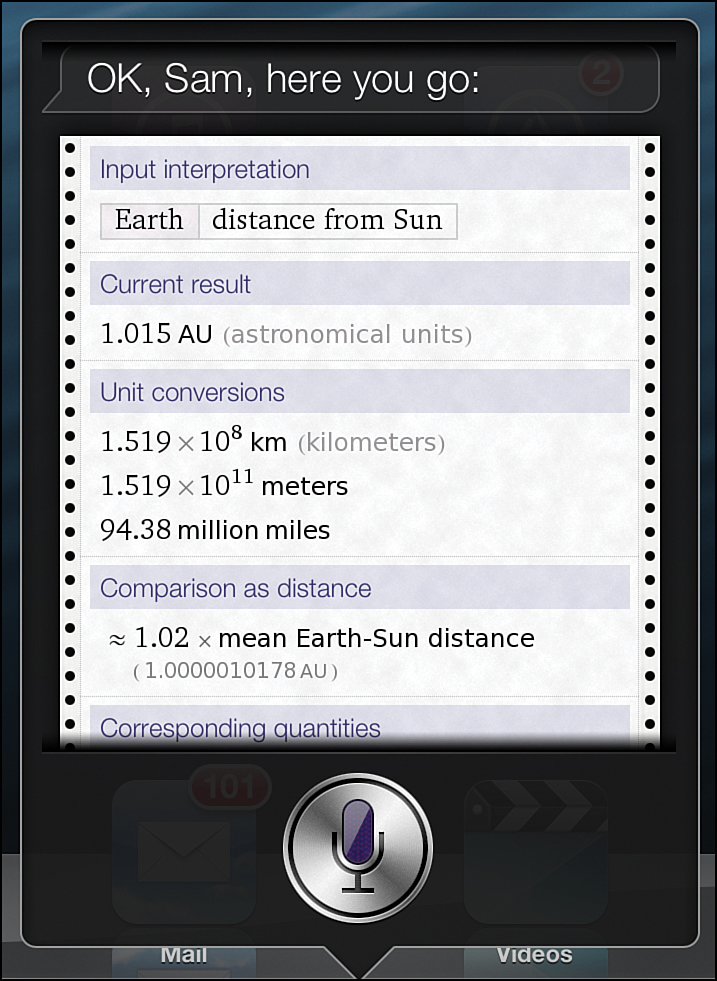
Besides doing things for you, Siri can also help you answer questions. Want to know the population of the United States? Ask Siri. How about the number of ounces in a pound? Siri knows.
Siri can do this because it gets information from a website called Wolfram Alpha, which is designed to help people answer questions.
If you want Siri to tell you the distance from the sun to the Earth, hold down the Home button and when Siri pops up, ask, “How far is the sun from the Earth?” You should get the answer in no time.
Siri is a powerful and useful tool to help you get information and use your iPad. But Siri isn’t completely serious; it also has a silly side. Try asking Siri questions like “What’s the meaning of life?” or “Will you marry me?” and see what answers you get. Siri can be pretty sassy if you ask the right questions.