
9. E-books and iBooks
In this chapter, you find out how to use your iPad to take a whole library’s worth of books, magazines, and newspapers with you in your backpack. You learn about:
• Where to get e-books
• Buying e-books at the iBookstore
• Getting e-books from Amazon and Barnes & Noble
• Getting e-books from the library
• Getting magazines and newspapers at Newsstand
Whether you like to read for fun or have to read books for school, the iPad makes it easy to get all the books you need. You have tons of choices for places to get books—from online stores like Amazon, Apple’s own offering called iBooks, or from many local libraries—and more books to choose from than you can find in big bookstores. And, because the books are on your iPad, they sometimes offer extras that you can’t get in a printed book, like audio and video.
You can choose from lots of e-book apps, but one you might want to start with is iBooks. Like most other e-book apps, the iBooks app itself is free, but if you want to get books to read in it, you usually have to buy them.
The iBooks app is free. To get it, just open the App Store app that comes with your iPad. You might get a pop-up window asking you to download iBooks. Say yes. If you don’t see the pop-up, search for iBooks, tap the price (free), and then tap Install. When you have it, you can dive into a lot of great books.
Where to Find and Buy E-books
There are lots of ways to get e-books for the iPad—some are free, some you have to pay for. The three major e-book stores for the iPad all have free apps, but lots of other apps and websites offer e-books, too.
You might want to check with your parents to find out if they have an e-book app they like or want you to use. If the whole family uses the same app, you can share books and accounts.
• iBooks—This is Apple’s e-book app. It has the cool page-turning animations you might have seen. You can buy books that work with it at the iBookstore in iTunes, through the iBooks app, or at some other online stores. Free
• Kindle—This app lets you use e-books from Amazon on your iPad (or any other compatible device, such as Amazon’s Kindle e-reader). To read Kindle books, you have to buy them from Amazon’s website or from stores that sell Kindle-compatible e-books, not through the app. Free
• Nook—This app works pretty much the same way as the Kindle app, except it’s from Barnes & Noble. The books you buy for Nook work in the app and on Barnes & Noble’s Nook e-reader. Like Kindle, you can’t buy books through the app here; you have to use the Barnes & Noble website. Free
• OverDrive—OverDrive is one of the most widely used apps by libraries. Instead of going with your library card and checking out a book, use this app to borrow e-books for your iPad over the Internet. Free
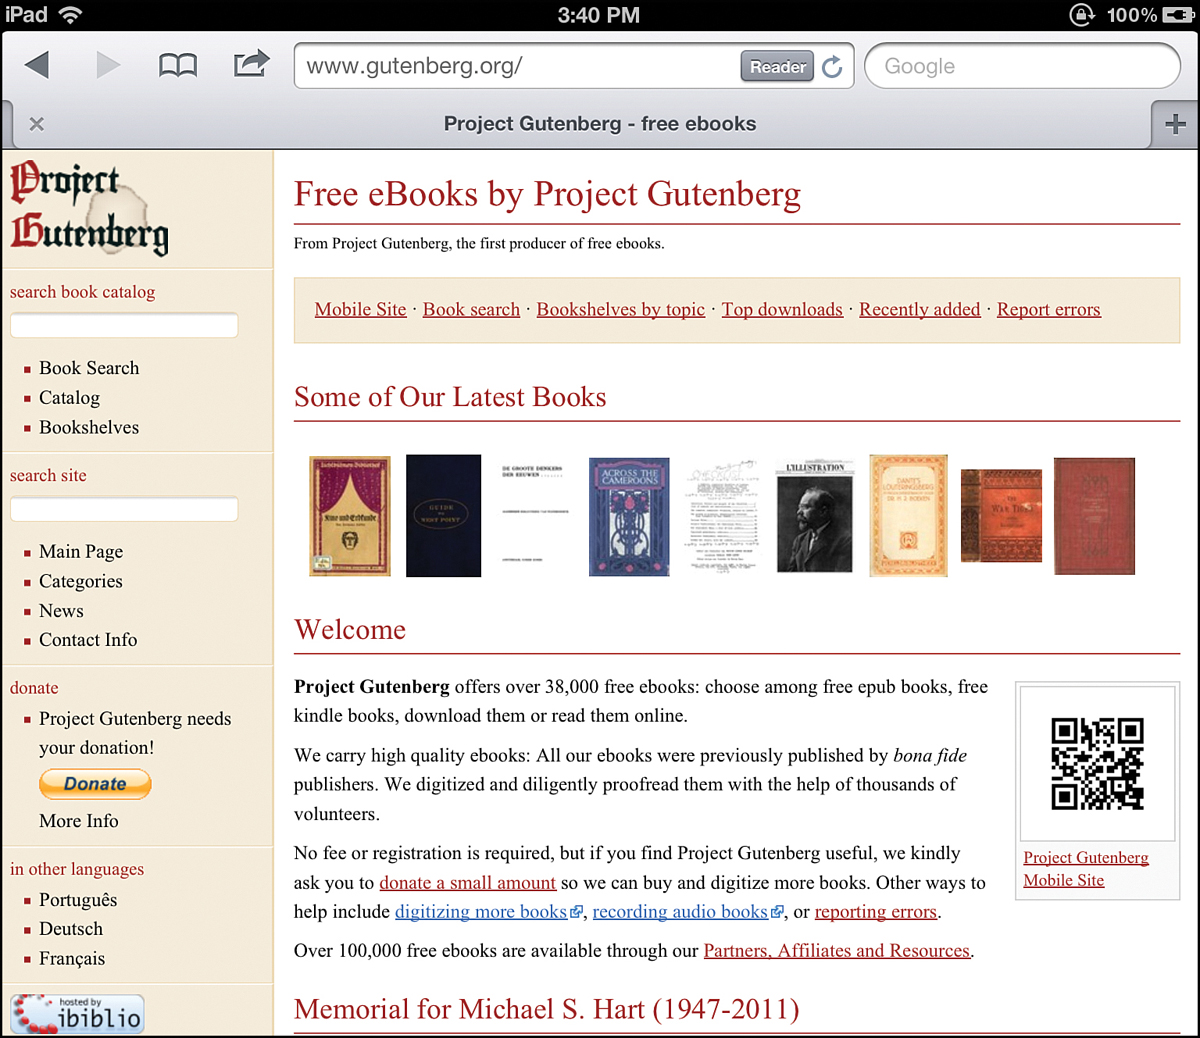
• Project Gutenberg—Project Gutenberg is a cool website that lets you download classic books for free. If you want Shakespeare, Dickens, or other classics, check out the Project Gutenberg website at www.projectgutenberg.org. Free
If none of these apps look interesting to you, the App Store has dozens of other e-book apps, some of which contain hundreds of books. Others are dedicated to just one book and include special features such as audio and video. Some e-book apps are free; others you have to buy.
After you have the iBooks app, grab some great books and start reading. Just like with everything else you download from Apple, you use your iTunes account/Apple ID to get books. If the books you want cost money, you pay for them using that account or your iTunes Allowance (read more in “iTunes Allowance: What It Is and Why Your Parents Should Give You One” in Chapter 2, “Getting Started: Set Up and Sync Your iPad”).
Buying E-books at the iBookstore
To begin, make sure your iPad is connected to the Internet, tap the iBooks app from your iPad’s home screen to open it, and then follow these steps:
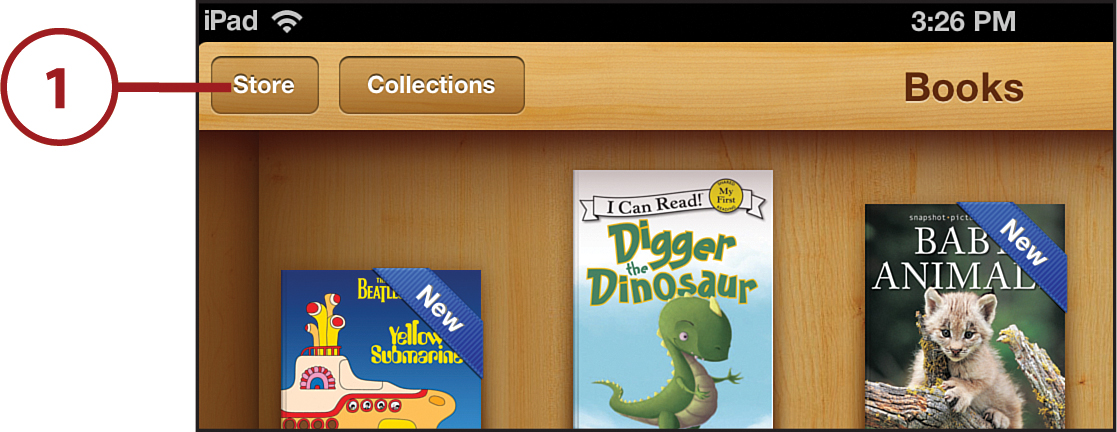
1. Tap Store to connect to the iBookstore.
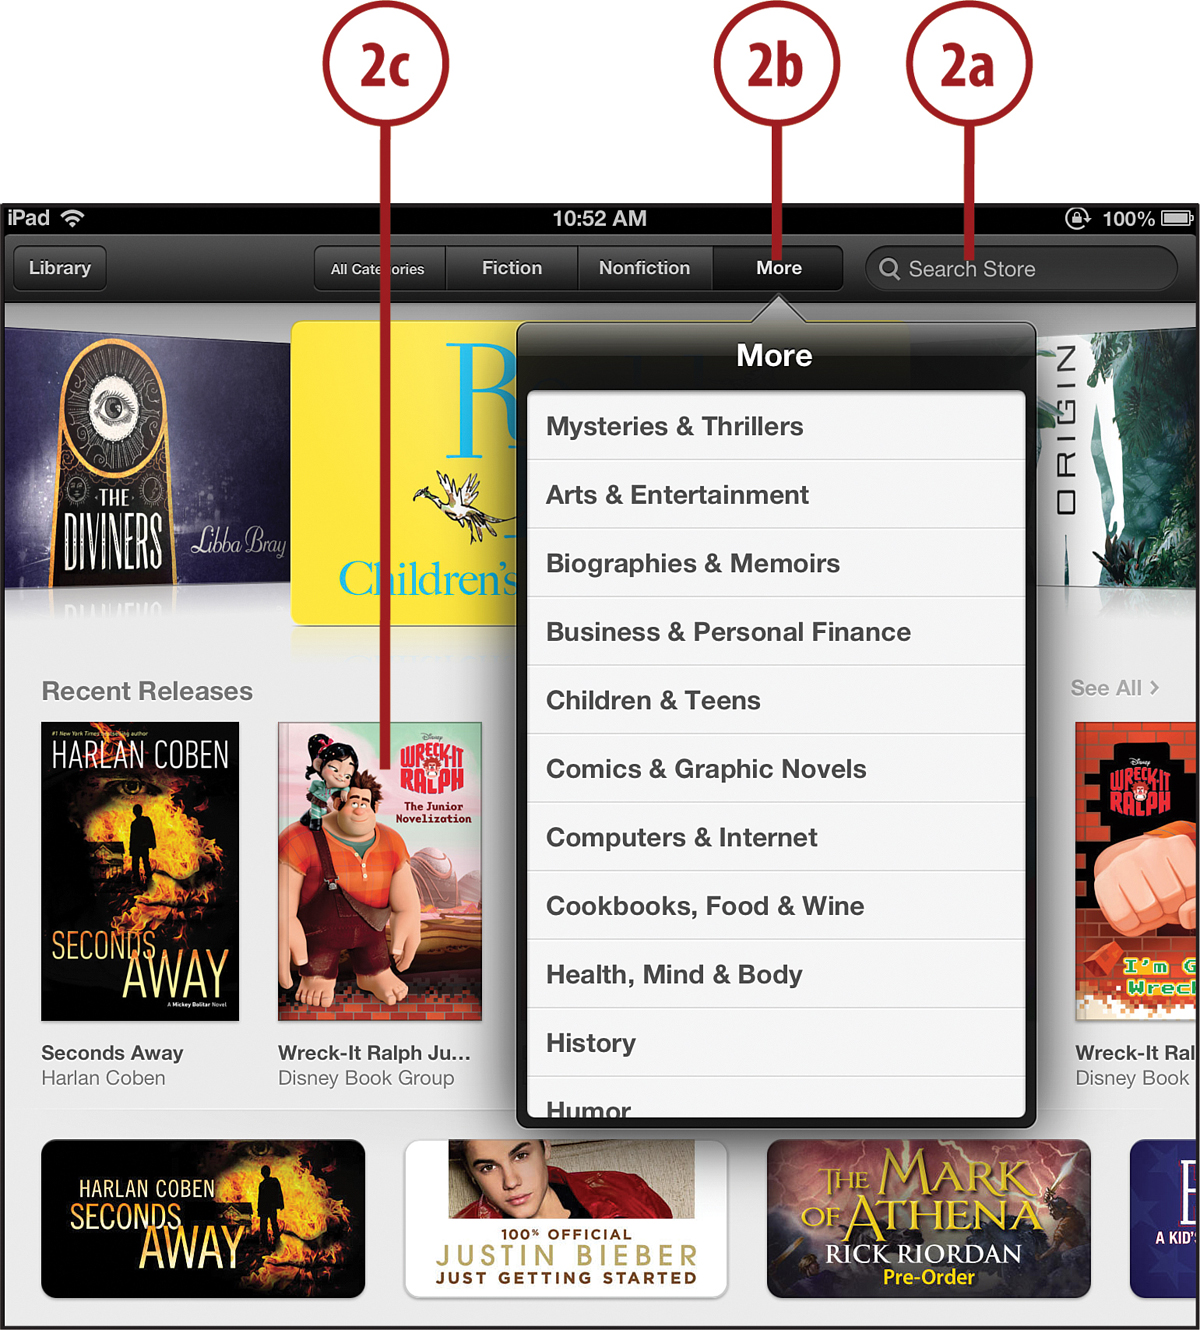
2. There are three ways to find books:
a. Search for the name of the book or writer you’re interested in.
b. Tap More and select one from the drop-down list.
c. Tap one of the featured items on any page. These items are usually grouped around a specific theme, such as holiday specials or particular genres, or bestsellers, such as the buttons at the bottom of the screen.
3. When you’ve found a book you’re interested in, tap the cover to see more information about it.
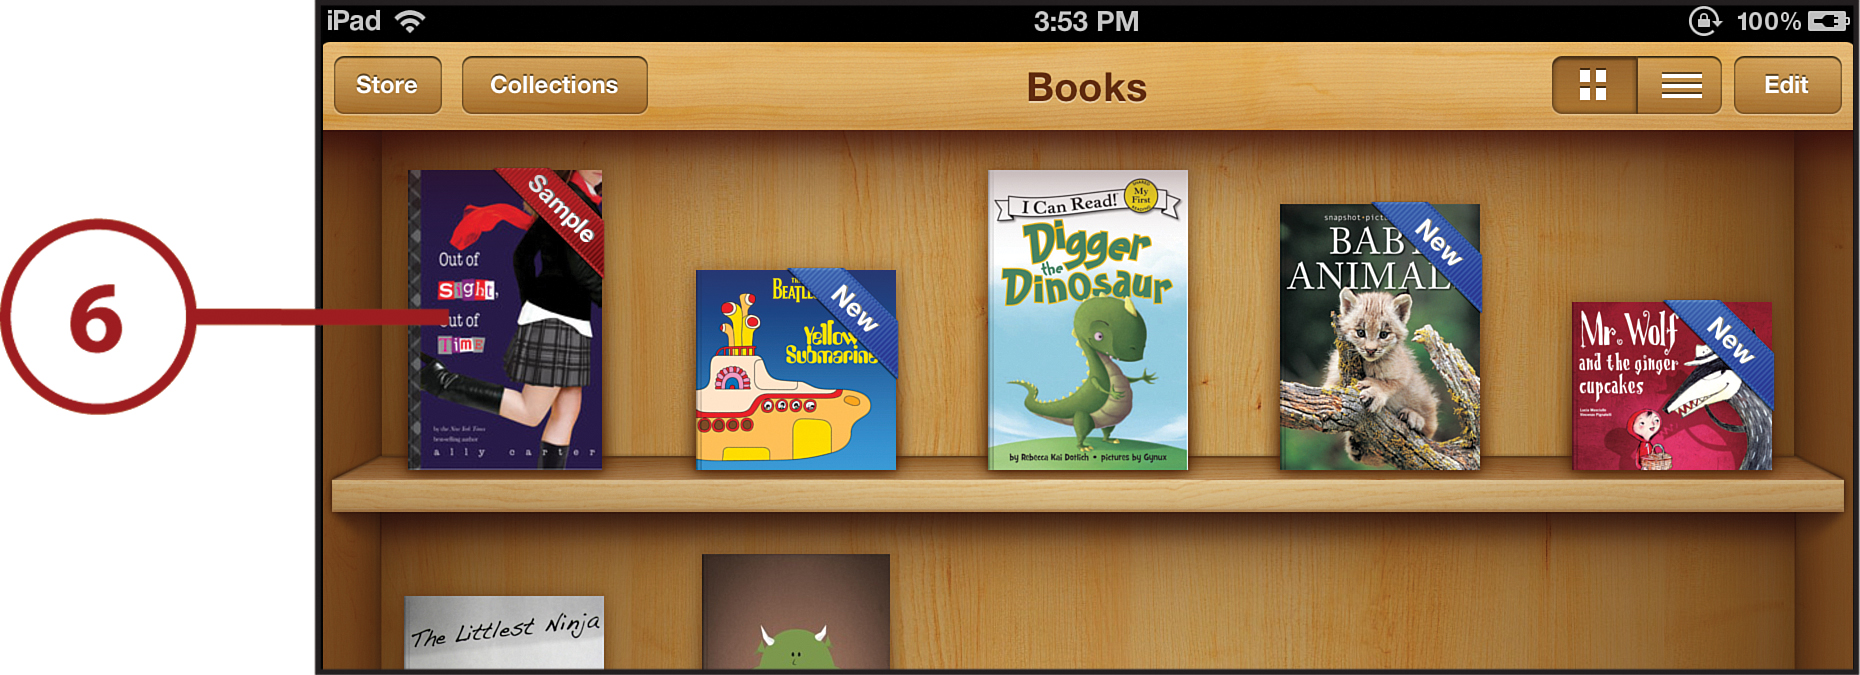
4. To read a sample of the book before you buy it, tap Sample. A chapter or two of the book downloads to your iBooks bookshelf. Return to your bookshelf and tap that book to read it.
5. To buy the book, go back to the iBookstore, tap the price, and then tap Buy Book (books can also be free; in that case, tap the Free button).
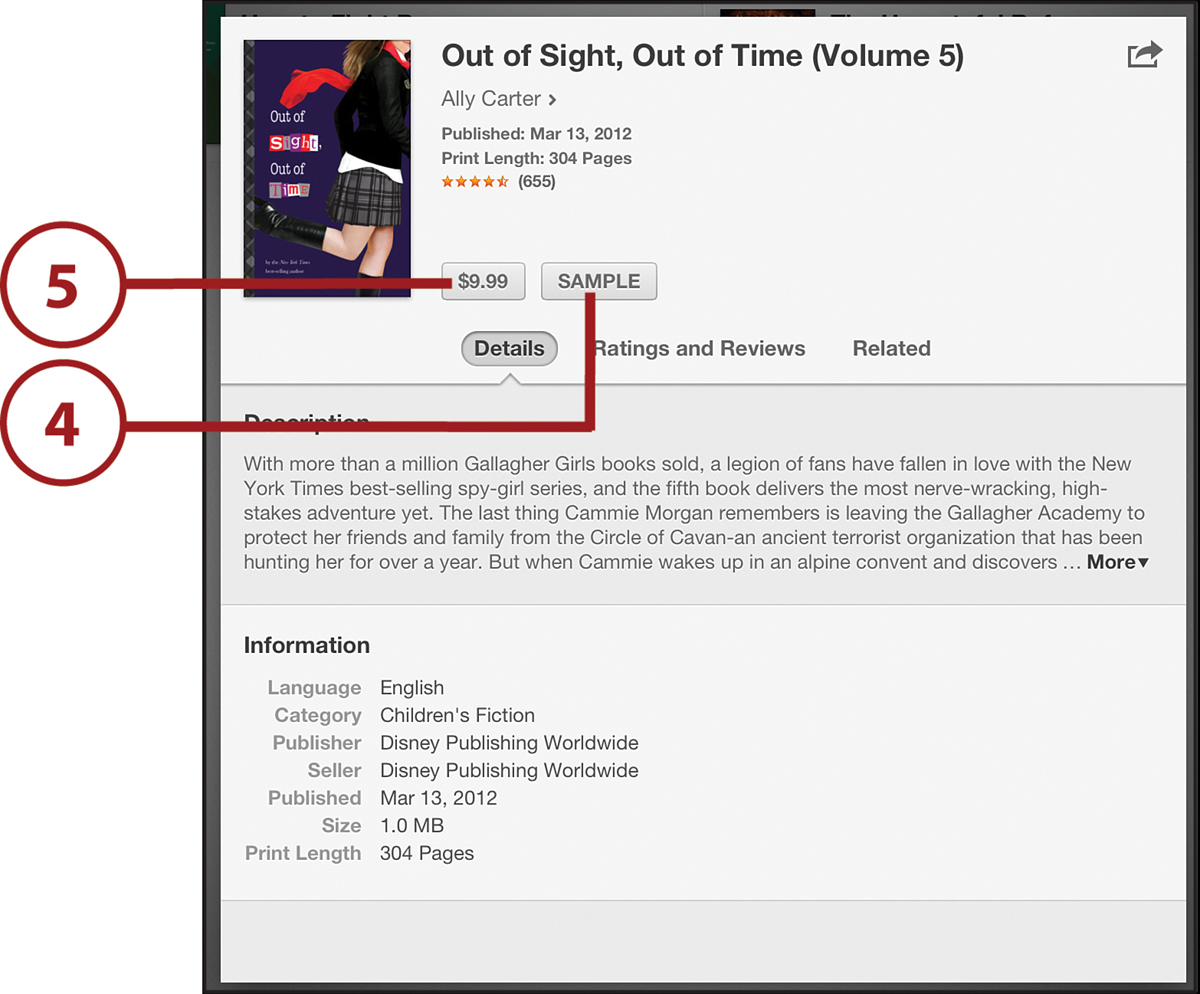
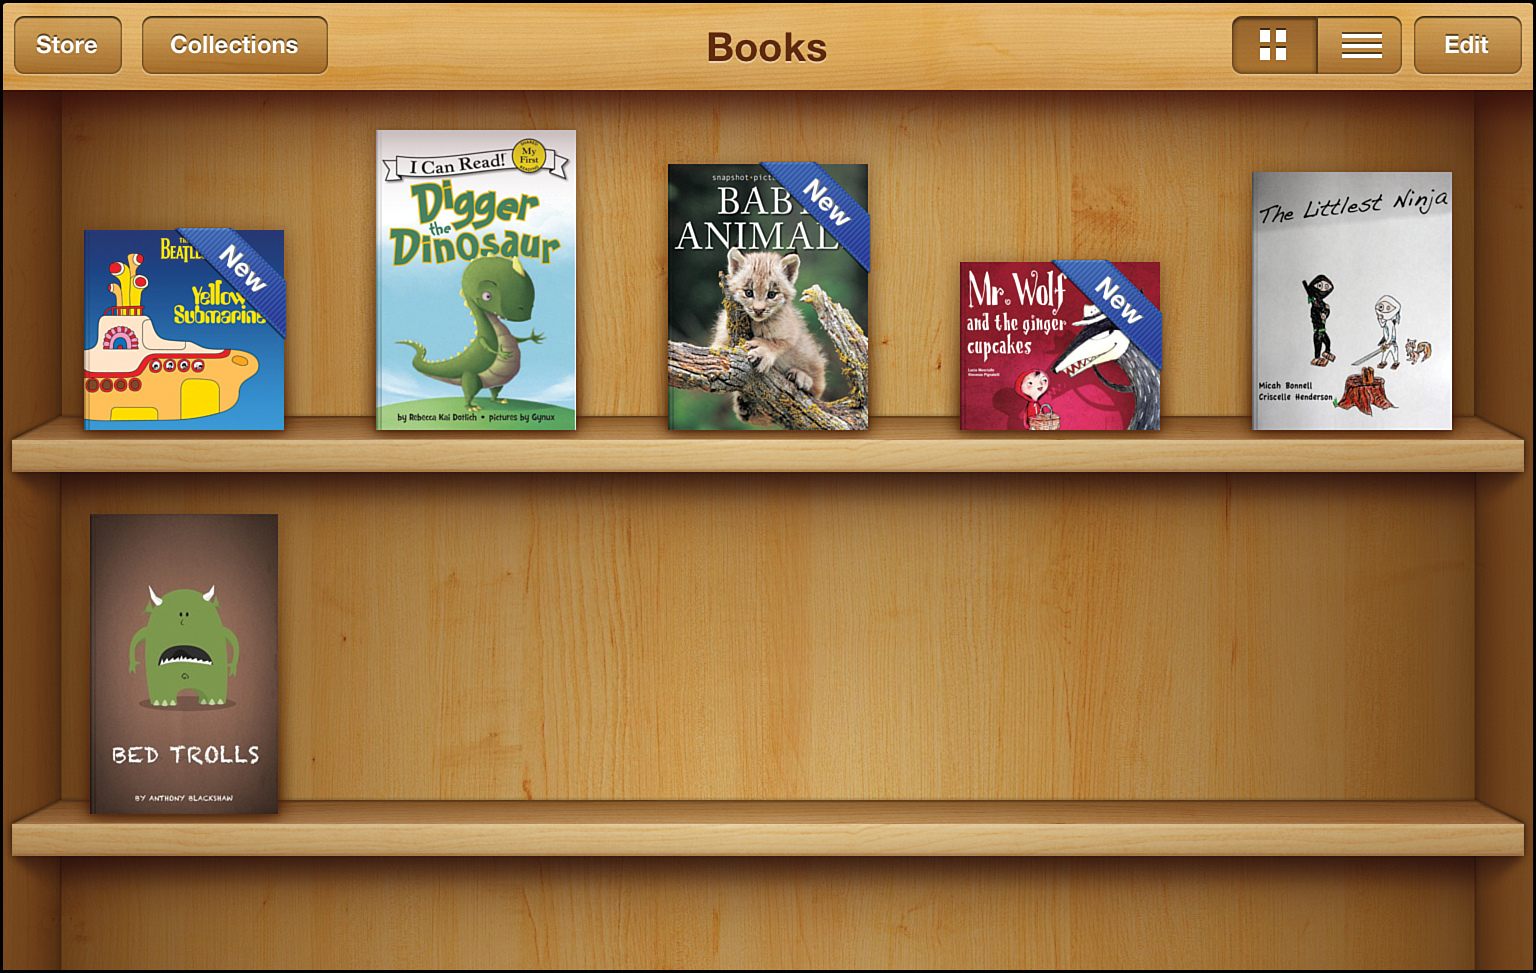
6. When you’ve bought the book, it downloads to your library. Tap the book on your bookshelf to read it.
Deleting Books
If you’ve finished a book and decide that you don’t want to keep it, you can delete it from iBooks. To do that, begin by opening iBooks and going to your library (if a book is open when the app opens, tap the center of the screen and then the Library button to go back to the Bookshelf). Then follow these steps:
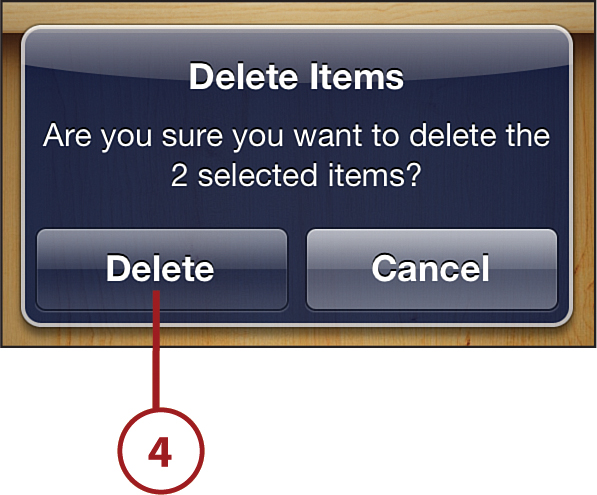
1. Tap Edit.

2. Tap the book or books you want to delete. A blue check mark appears on each one you select.
3. Tap Delete.

Whether you delete a book from just your iPad or from all devices, if you got at iBooks, it’s not gone for good. You purchased that book and it remains associated with your iCloud account. To redownload the book, tap Collections and then Purchased Books. This screen shows all the books you’ve bought from iBooks. Tap the book you want and it begins to redownload right away.
4. In the drop down menu, you have two choices: Delete This Copy or Delete From All Devices. Choose Delete This Copy to remove the book only from your iPad. Pick Delete From All Devices to delete it from the iBooks library of every device you have. Tap on your choice and the book is deleted.
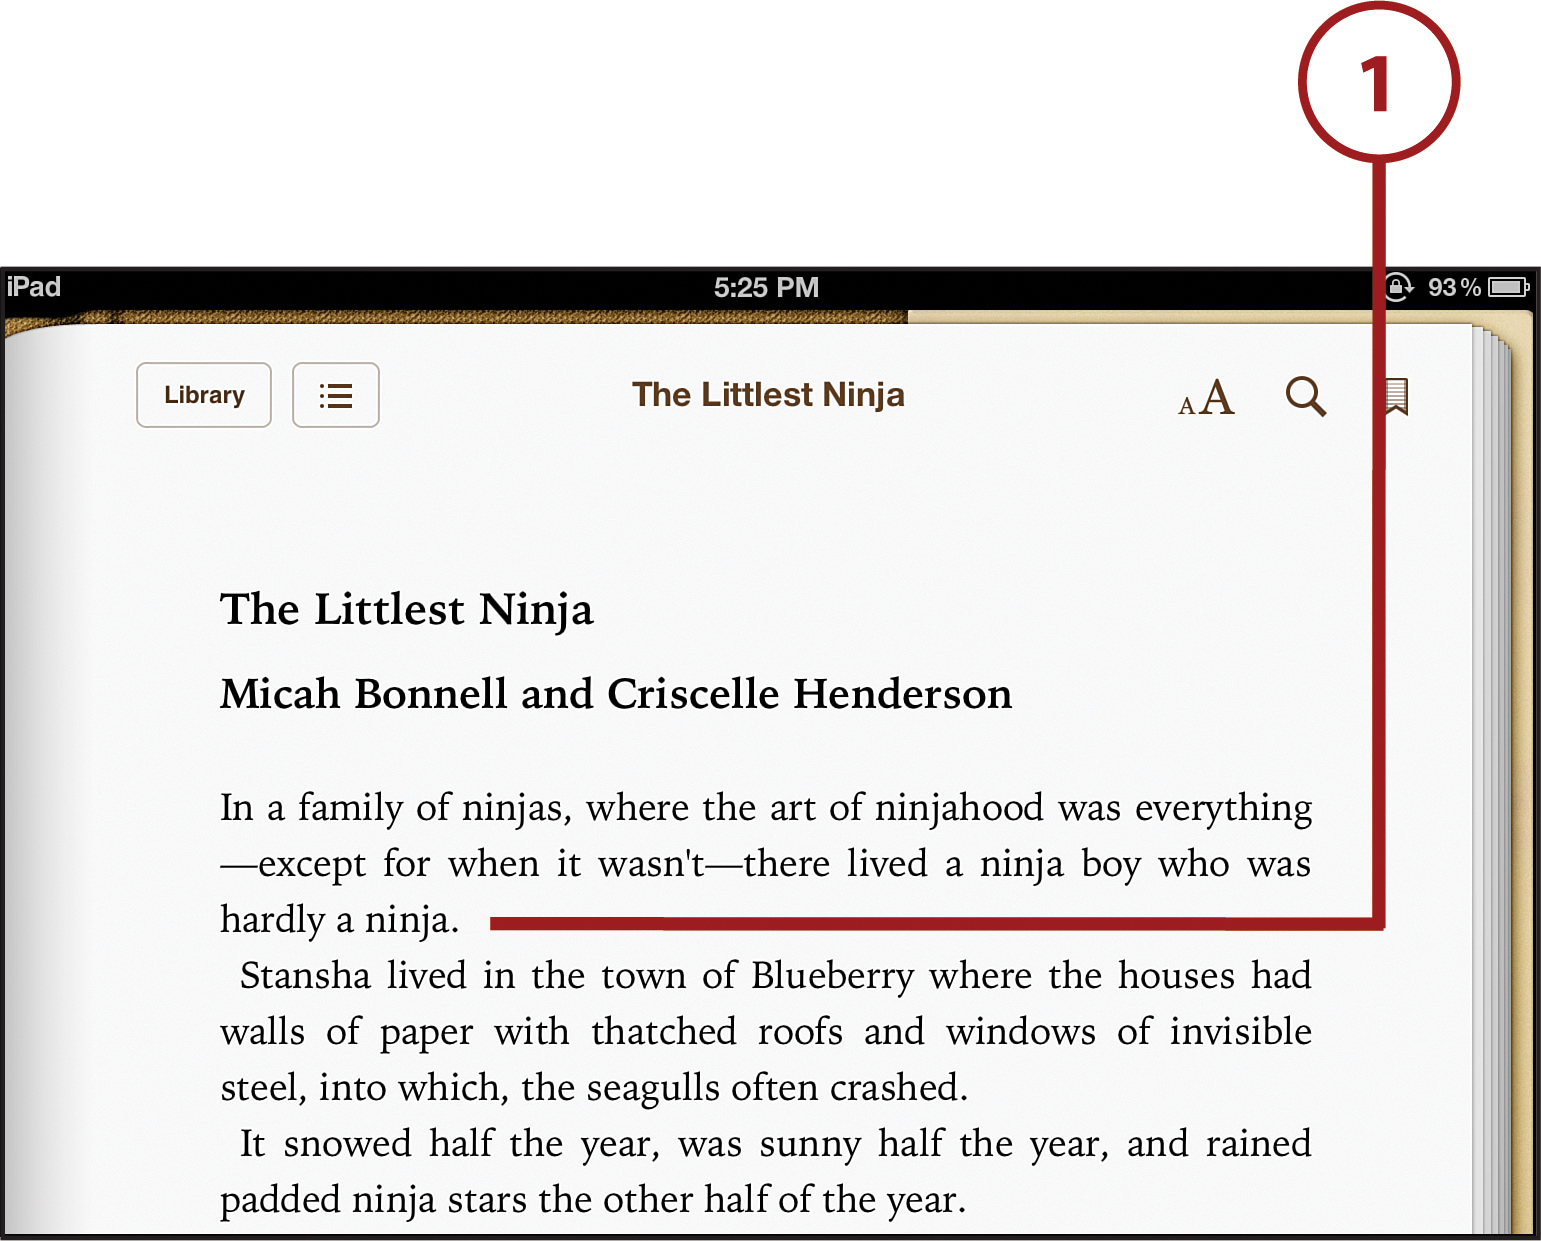
Reading Your iBook
A bunch of options let you control how the book looks when you read it. Use them to make the book look the way you prefer. After you’ve opened iBooks and started reading a book, you can access any of the following controls and options:
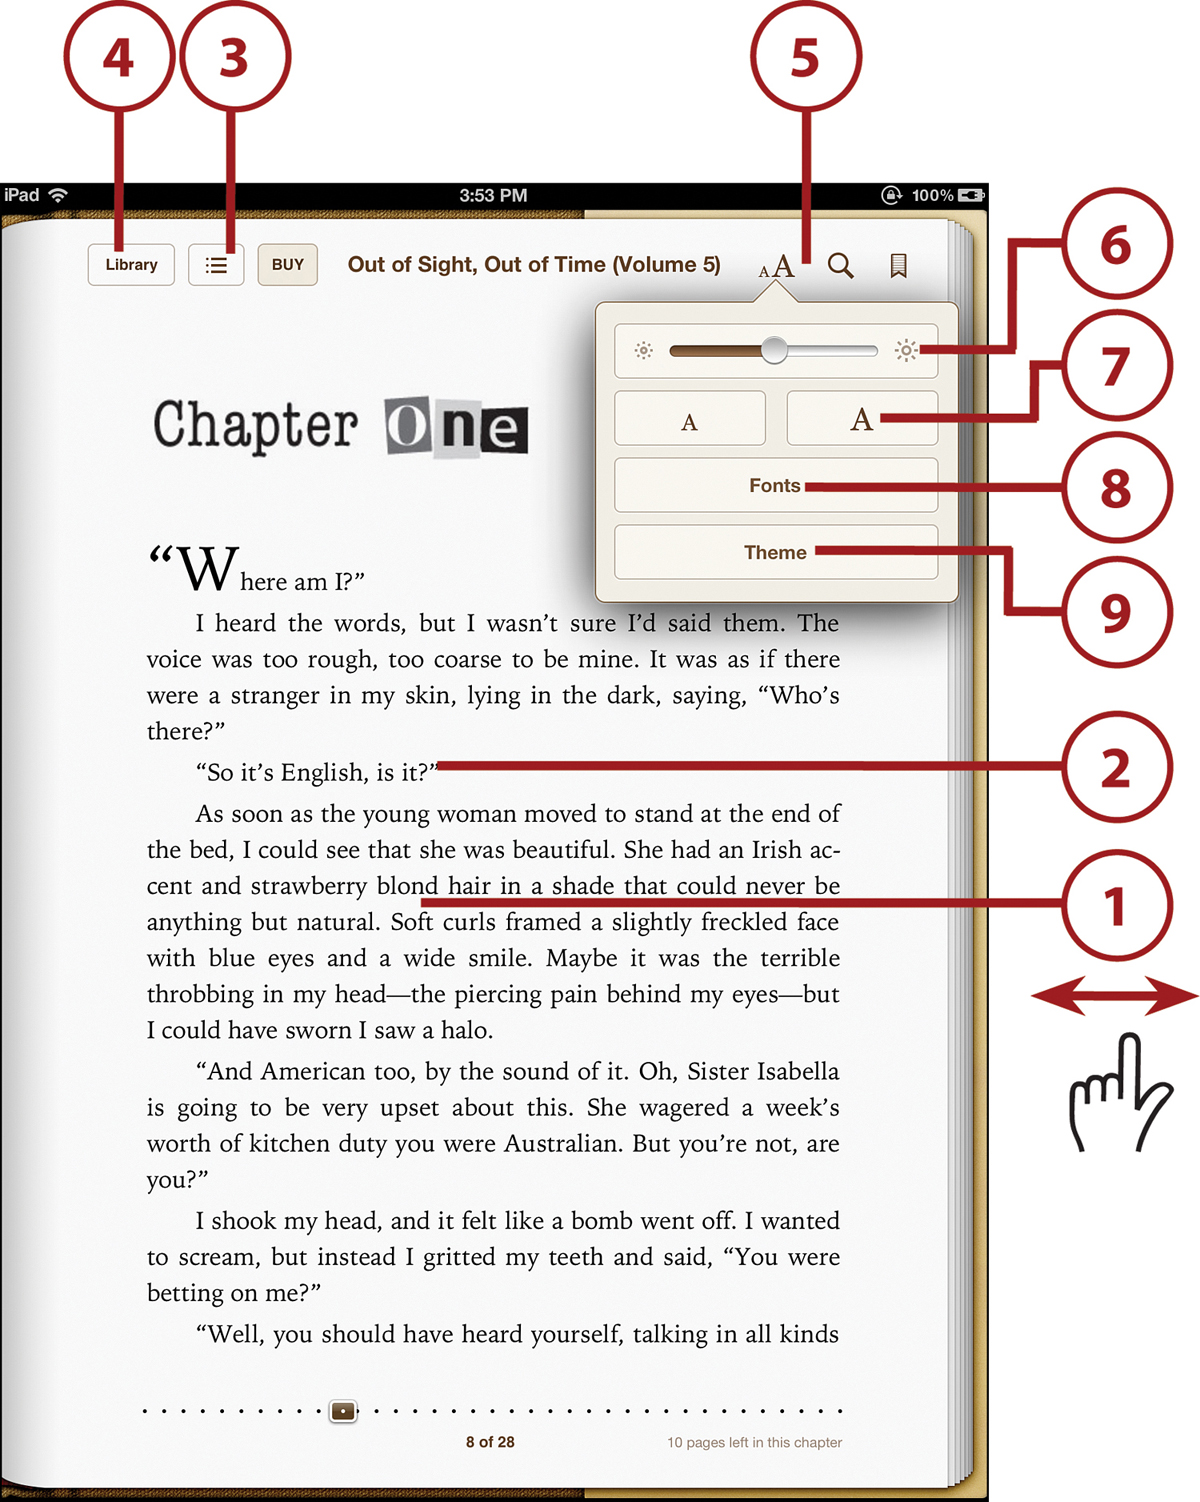
1. To move to the next page, swipe from right to left. To go back, swipe from left to right.
2. To access the options, tap the center of the screen. The options icons appear at the top of the screen.
3. Tap the Table of Contents button to view the book’s Table of Contents. You can jump to any chapter from there by tapping it.
4. Tap Library to go back to your bookshelf so you can read another book.
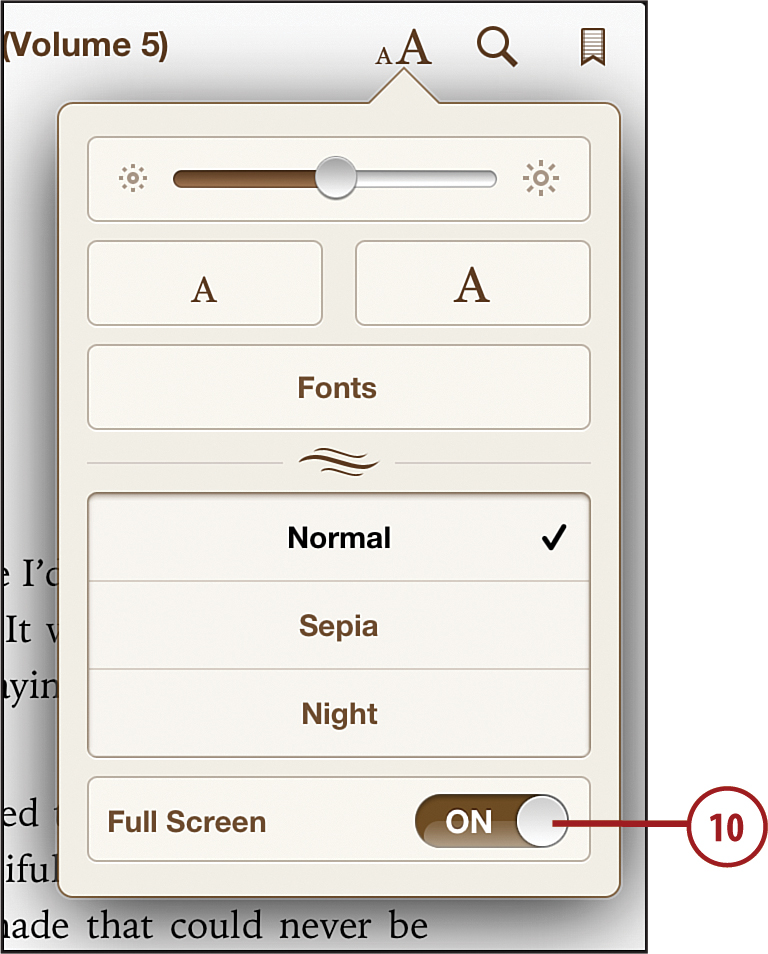
5. To change the way the book looks, tap the icon with the two As. The next few items are the options in the drop-down that appears when you tap this icon.
6. Move the slider to adjust the brightness of the screen to something that’s comfortable for your eyes. For a refresher on what adjusting the brightness of the screen can do for you, check out “Changing Screen Brightness” in Chapter 3, “It’s All Yours! Customizing Your iPad.”
7. Make the text bigger by tapping the big A or smaller by tapping the small one.
8. You can change what the book’s text looks like by tapping Fonts and then tapping the one you want to use. Each font option previews what the text will look like.
9. To change the color of the text and the background, tap Theme and then tap your choice.
10. You can also change the look of the book you’re reading using the Themes menu. You have three choices: Book, which is the standard style that shows the edges of a book; Full Screen, which removes the book edges; and Scroll, which totally changes how you read the book. Instead of turning between pages, the book no longer has pages—just swipe up and down to move forward and back. Tap the style you prefer.
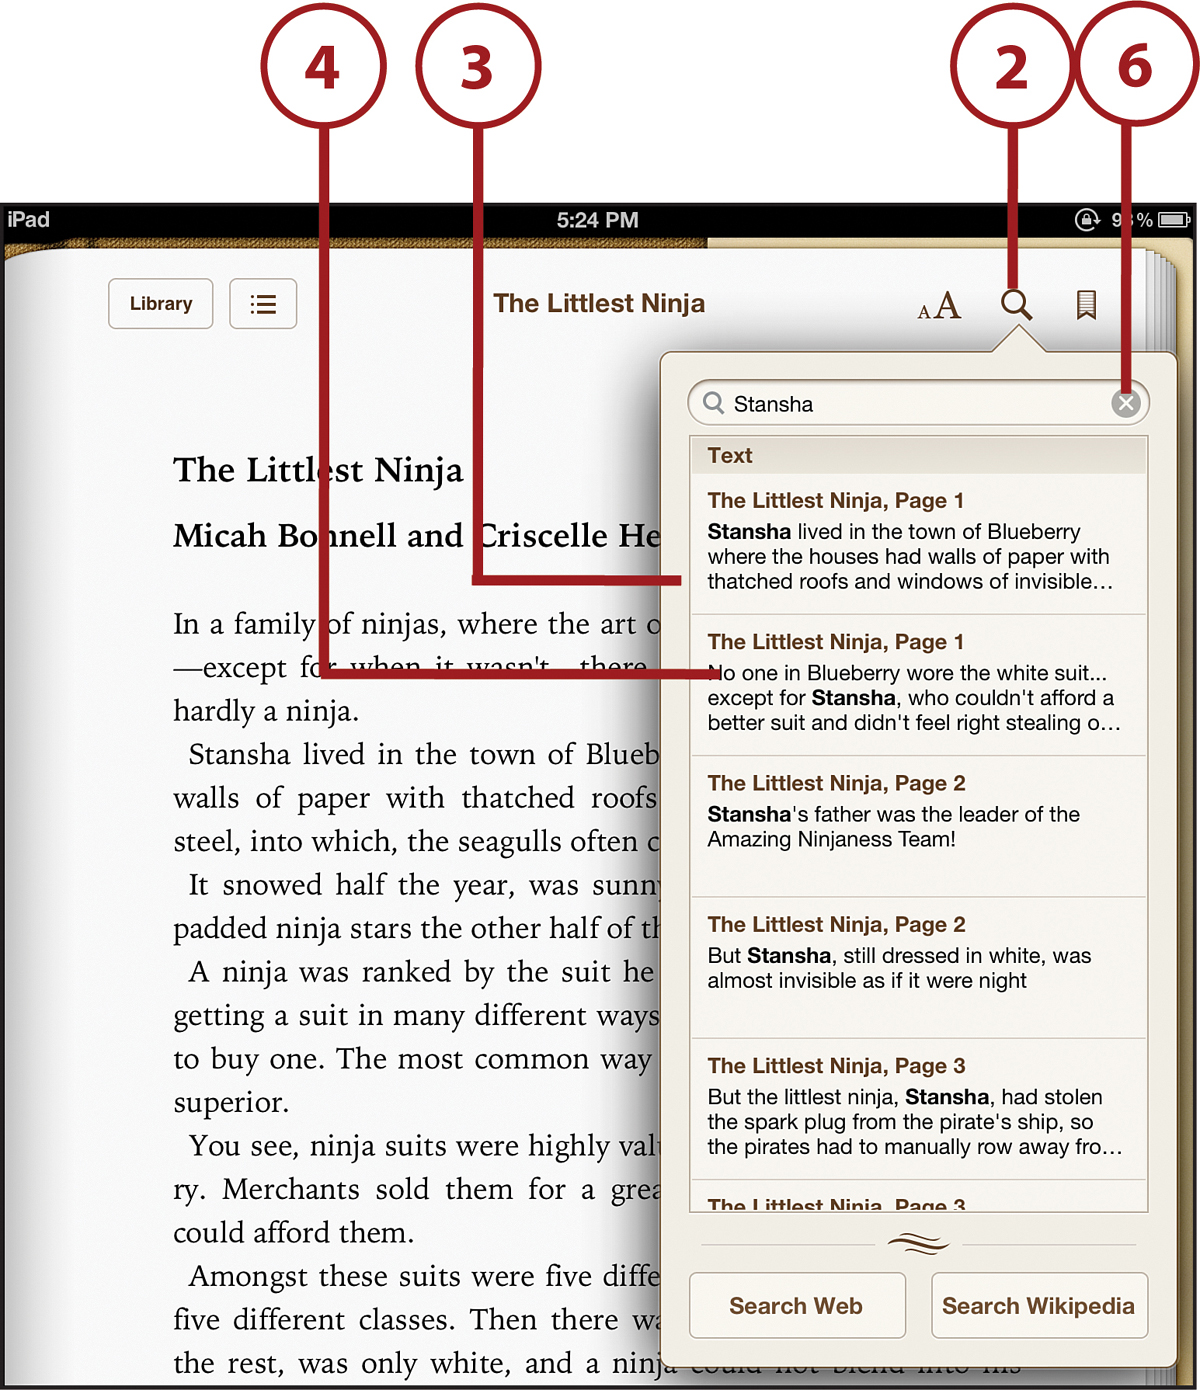
Searching in iBooks
When you’re seeking a particular bit of information in a book, there’s no need to flip through every page to find what you’re looking for. Just use iBooks’ Search tool.
1. To do this, tap the center of the screen to display the icons at the top.
2. Tap the magnifying glass and enter the text you want to search for.
3. A menu drops down to show every time the item you searched for appears in the book.
4. To jump to a particular result, tap it and you go to that page in the book.
5. If you want to go to a different part of the book, tap the magnifying glass again and tap another search result.
6. To clear the search, tap the X next to the text you searched for.
Making Bookmarks
If you come across something in an iBook that you really want to remember, or that you think you’ll come back to more than once, you should create a bookmark for it. These are the digital equivalent of real bookmarks that let you mark your place in a book except that you don’t need to create a bookmark to save your place when you stop reading. iBooks is smart enough to know where you stopped last and start you there the next time you open that book.
1. To bookmark a page so you can come back to it later, tap the screen so that the icons appear at the top of the screen.
2. Tap the bookmark icon to create the bookmark.
To remove a bookmark, just tap the bookmark icon again. The bookmark disappears.
3. To see a list of your bookmarks, tap the center of the screen and then the Table of Contents button.
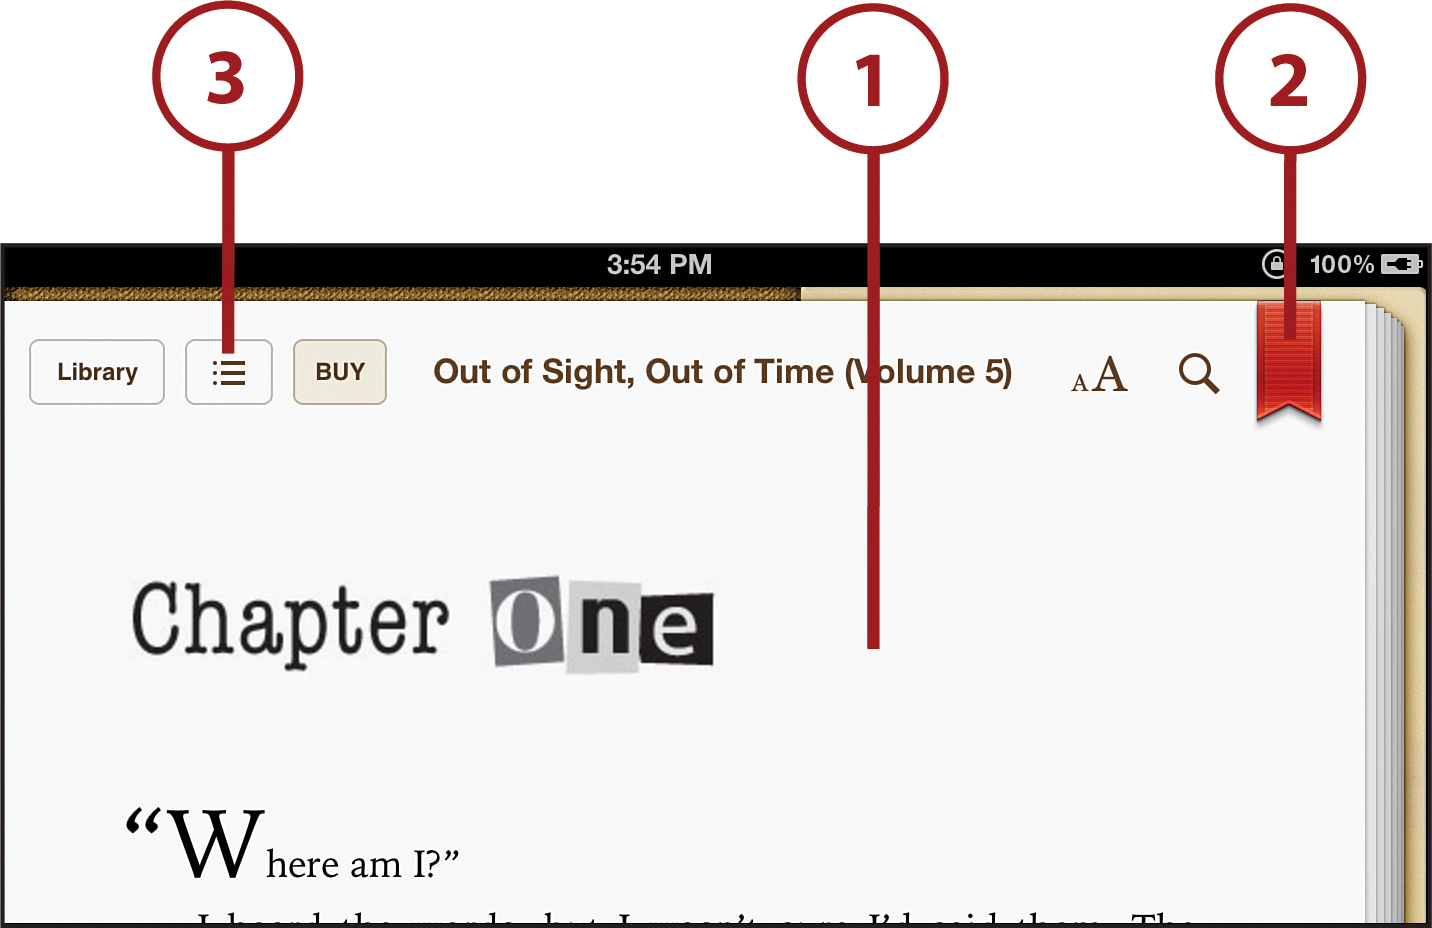
4. Tap Bookmarks.
5. To jump to a bookmark, tap it.

Highlighting Text
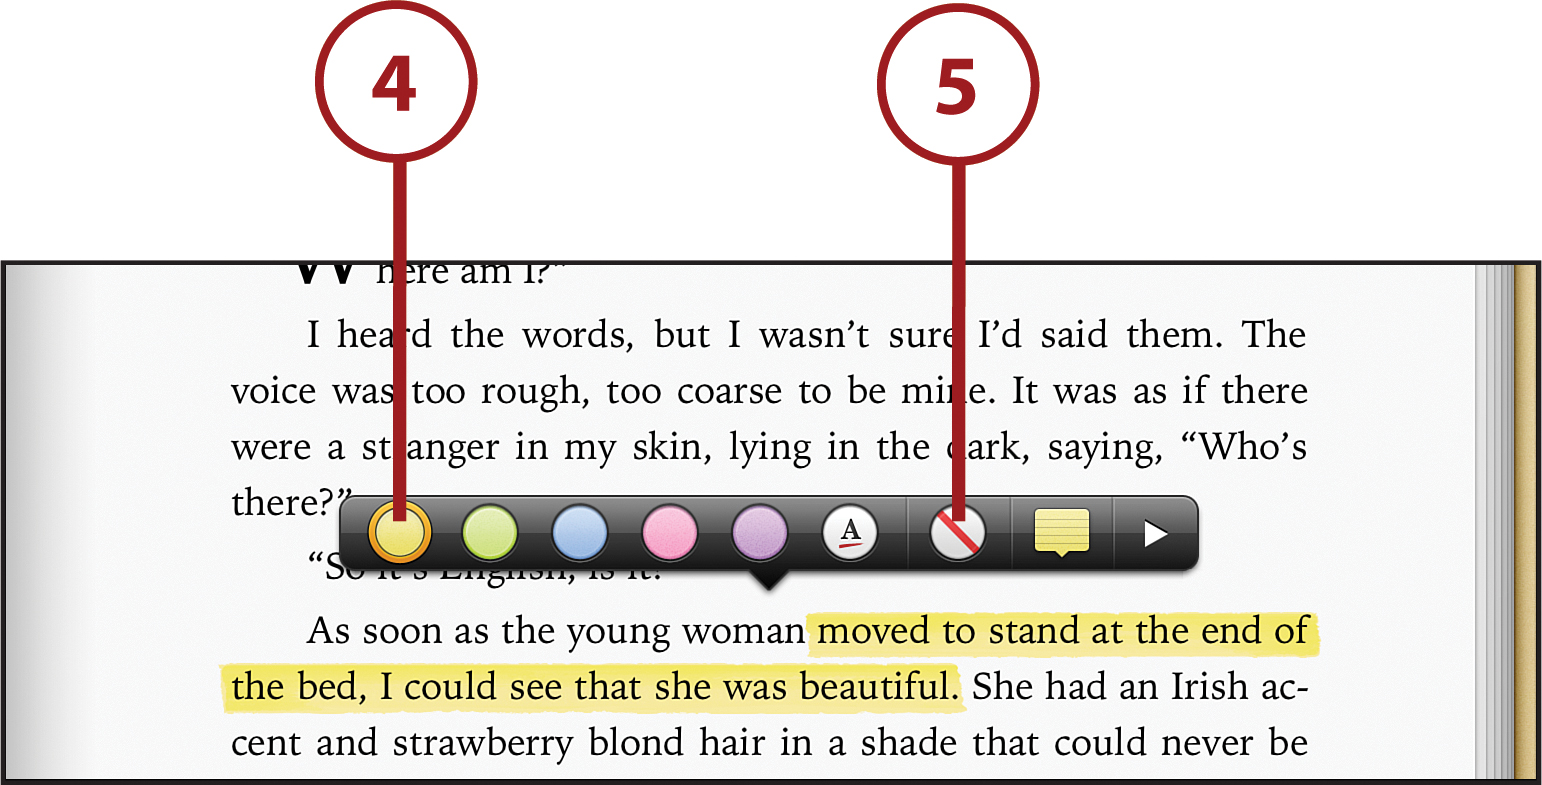
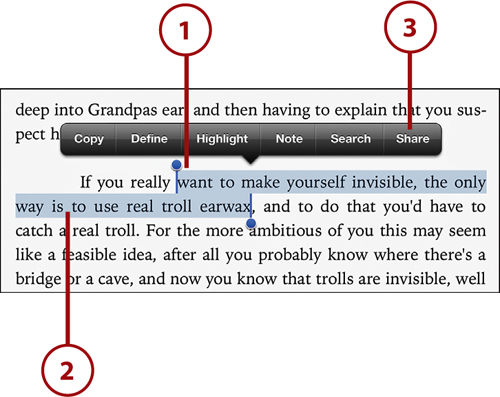
When you’re reading a printed book for school and want to make sure you remember something important, you can underline or highlight it to remind yourself. You can do the same thing in an e-book using iBooks’s highlight feature. To highlight text, first find the section you want and then follow these steps:
1. Tap and hold on the text you want to highlight for two or three seconds and then let go.
2. A word or section is highlighted in blue. If you want to change the highlighted section, tap the blue dot at either end and drag it until the blue highlight covers everything you want.
3. Tap Highlight in the pop-up menu to add highlighting to the text you selected.
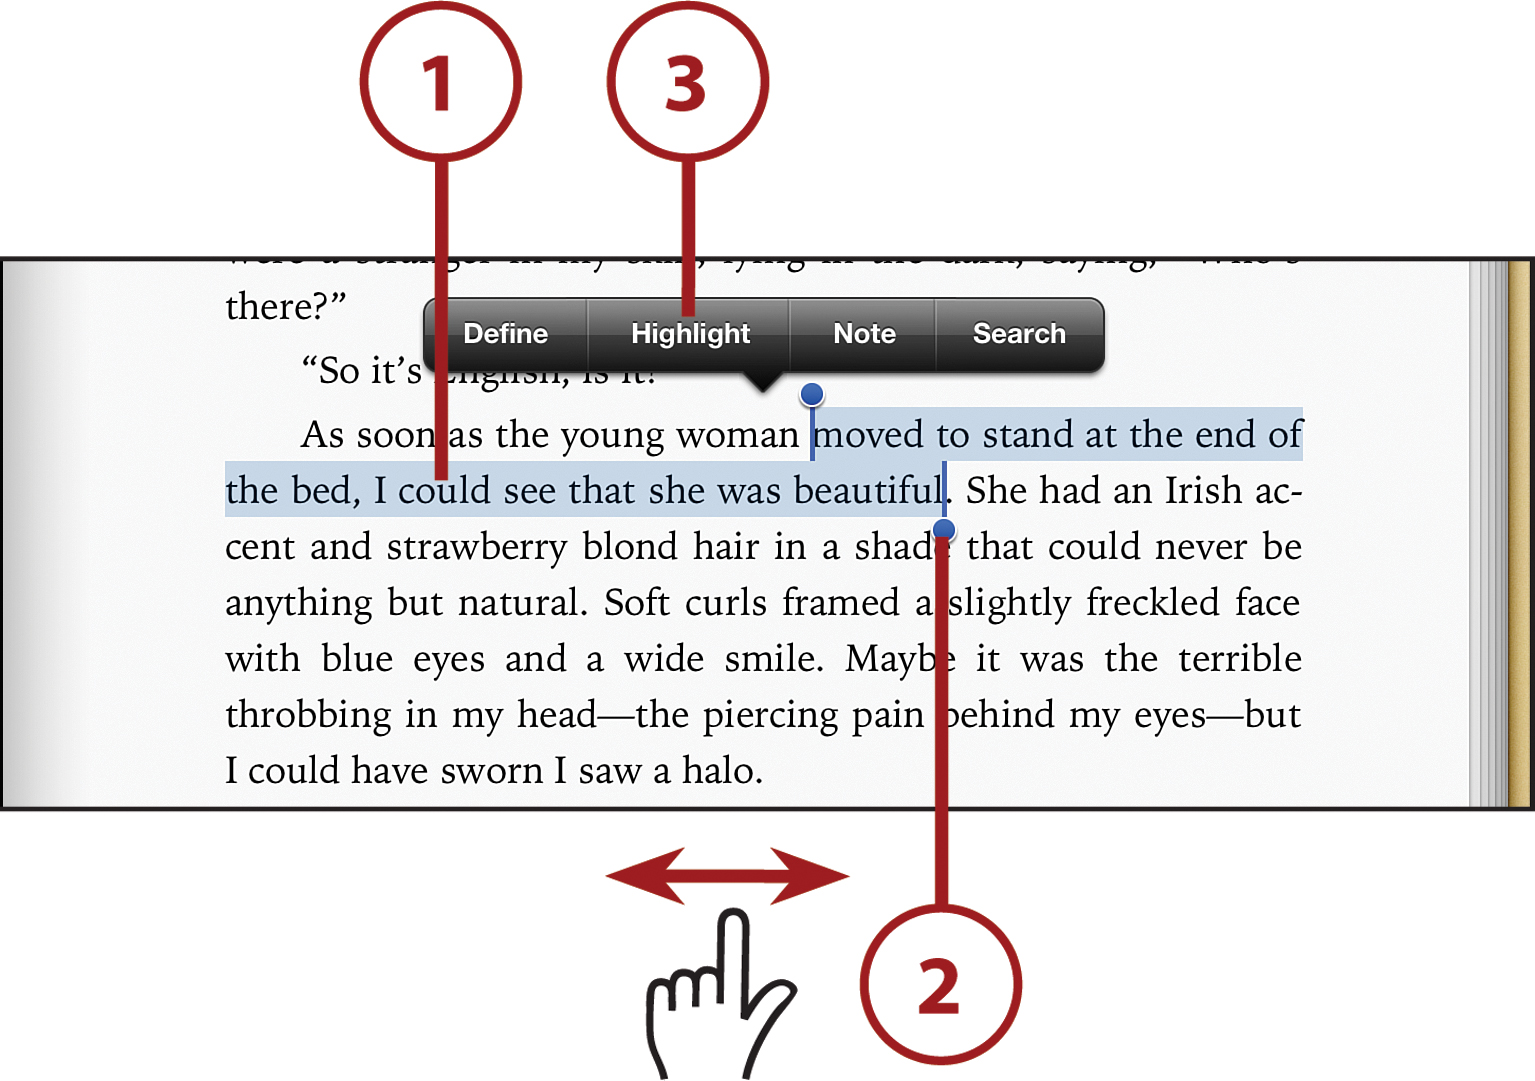
4. Tap the colored dots at the end of the pop-up menu. This shows all the colors you can use to highlight text. Tap the color you want to use for the highlight.
5. If you want to remove a highlight, select the highlighted text the same way you did when you created the highlight. Tap the Highlight button and tap the white circle with the red line through it.
Adding Notes to iBooks
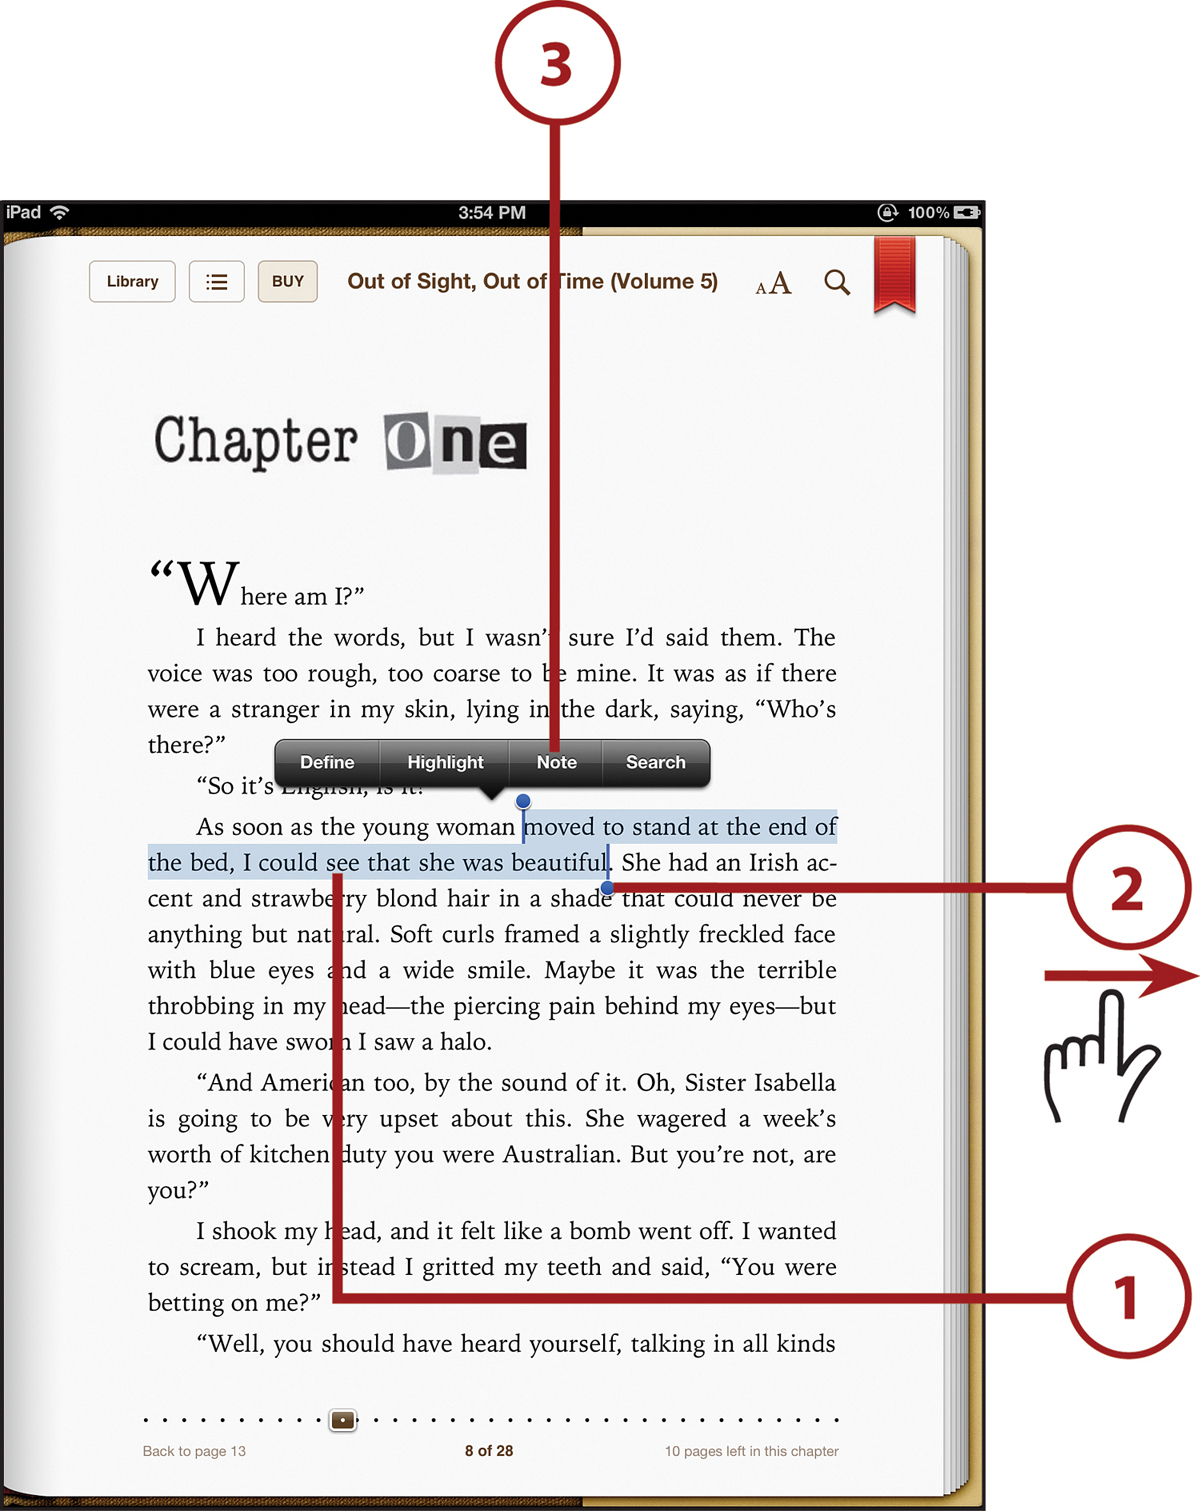
In physical books, sometimes you write in a book’s margins to add your thoughts about the text. Just like with highlights, iBooks has a Notes tool that lets you make notes with your e-books. First, find the section you want to add a note to and then follow these steps:
1. Tap and hold the text you want to mark for two or three seconds and then let go.
2. A word or section is highlighted in blue. If you want to change the highlighted section, tap the blue dot at either end and drag it until the blue highlight covers everything you want.
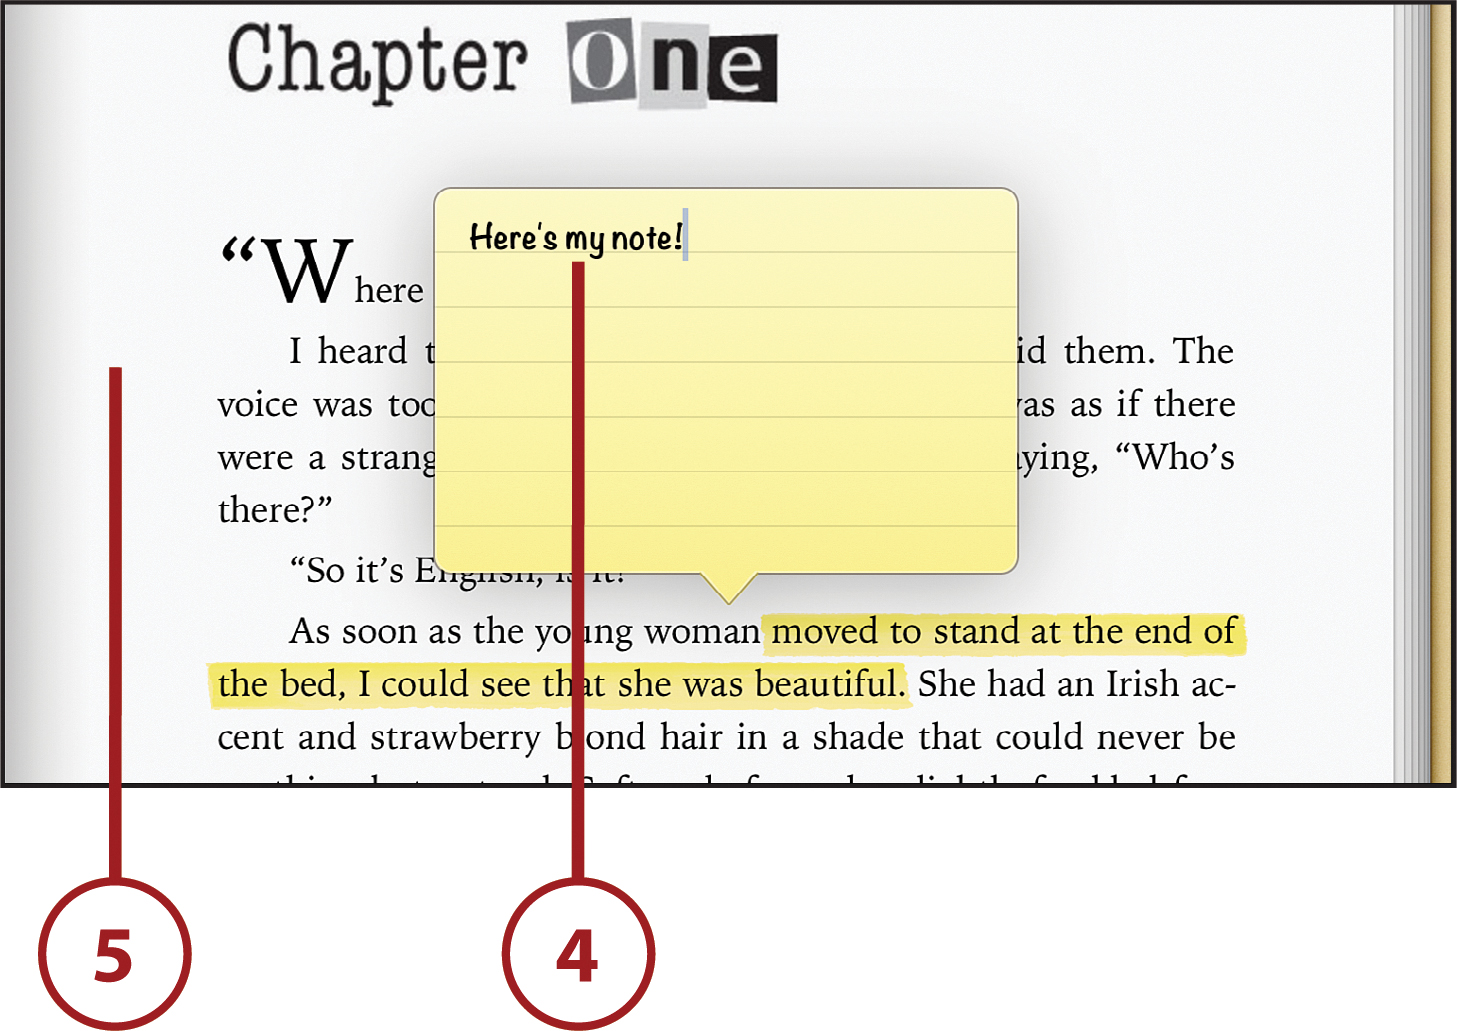
3. Tap Note in the pop-up menu.
4. Type your note using the onscreen keyboard or a physical keyboard.
5. When you’re done, tap anywhere on the page to hide the note.
Deleting Notes, Highlights, and Bookmarks
You can delete a note by tapping it and then erasing all the text in it. The pop up disappears, although the highlight on the text remains.
If you want to delete a few bookmarks, notes, or highlights at once, tap the Table of Contents button and then tap Notes. You see a list of notes. Swipe to the right on anything you want to erase and then tap Delete.
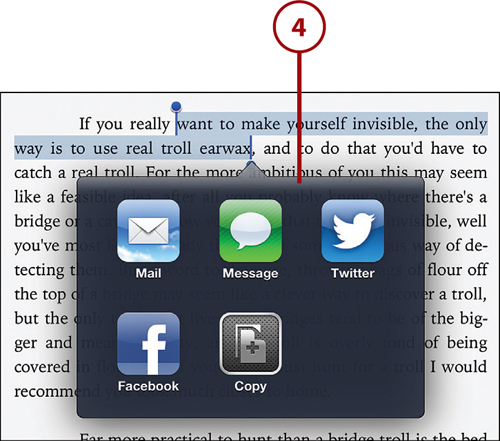
Sharing Text from iBooks
Ever found something in a book that you thought was so interesting or cool that you had to share it? Or how about something that you were just talking about with someone else? Using iBooks, you can share any text you select from an e-Book using email, Messages, or social media. To do that, follow these steps:
1.Tap and hold the text you want to highlight for two or three seconds, then let go.
2.A word or section is highlighted in blue. If you want to change the highlighted section, tap the blue dot at either end and drag it until the blue highlight covers everything you want.
3.Tap Share in the pop-up menu to reveal the choices for sharing the text.
4.To share by email, tap Mail. To text it, tap Messages. To share on social media (assuming your parents let you use it, that is), tap Twitter or Facebook. To copy the text so you can paste it into another app, tap Copy. The app you chose opens and the highlighted text is ready to be shared.
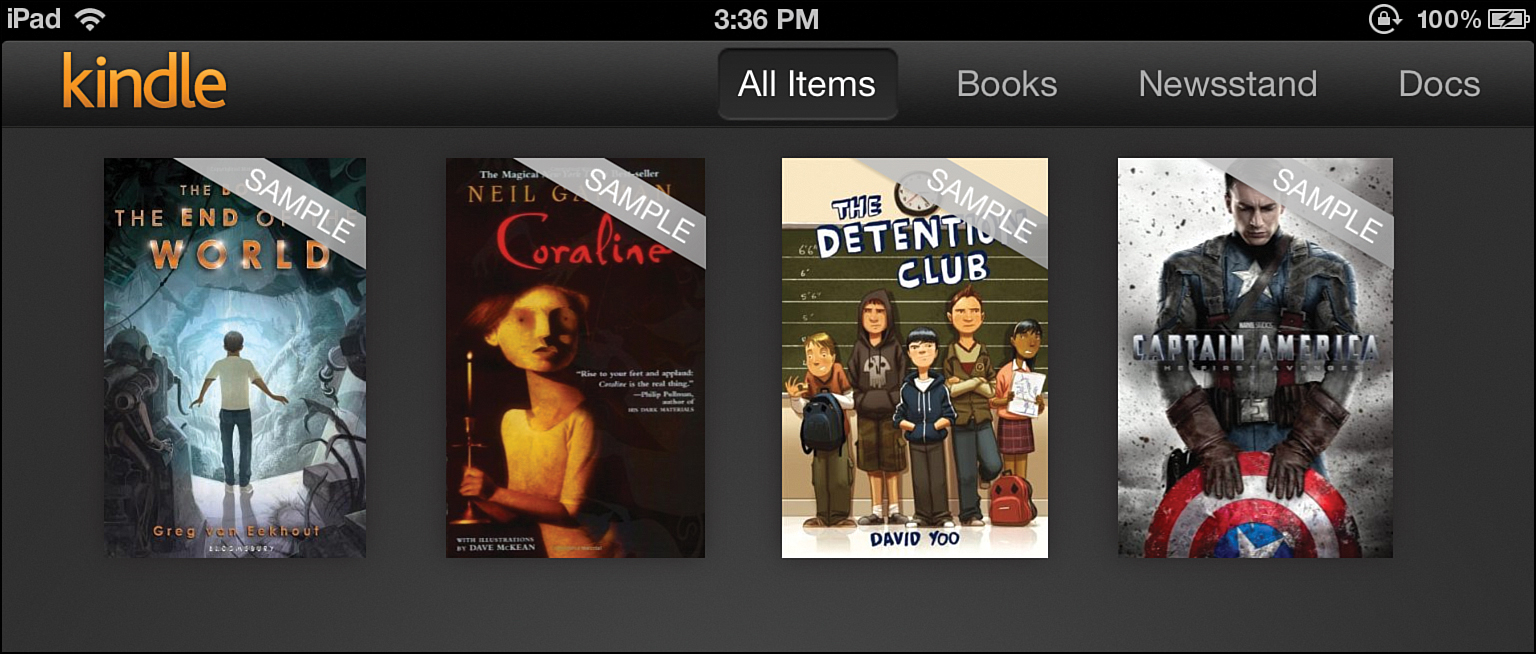
Getting E-books from Amazon and Barnes & Noble
Even though a lot of apps offer in-app purchases to let you buy extra features or content, many don’t. Two of the most important apps that don’t—and ones that you might think would—are Amazon’s Kindle and Barnes & Noble’s Nook e-book apps.
Unlike iBooks, neither of these apps includes a way to shop for, buy, and download e-books directly to the app. Instead, getting e-books for those apps means buying at the respective website and then downloading the book.
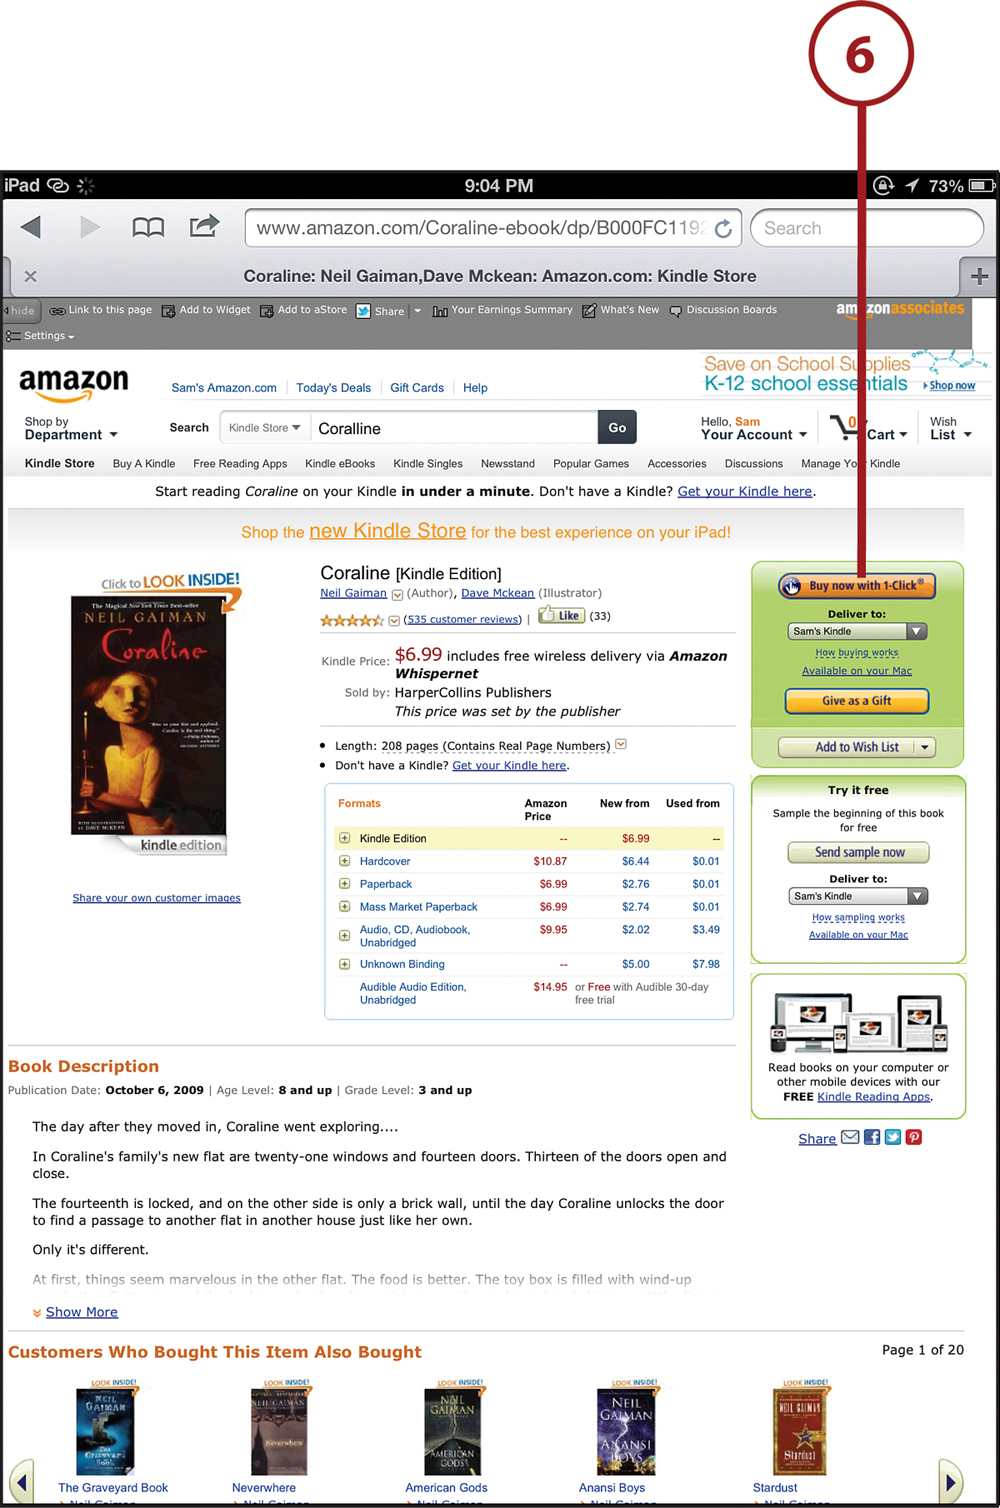
Buying an E-book at Amazon
To buy an e-book at Amazon to read on your iPad, make sure you have the Kindle app installed, are connected to the Internet, and have launched your Safari app from the home screen.
1. Go to http://www.amazon.com.
2. When you’re there, tap the drop-down menu next to the search bar.
3. Select Kindle Store to only search for Kindle books.
4. Type in the name of the book or author you’re looking for and then tap Enter.
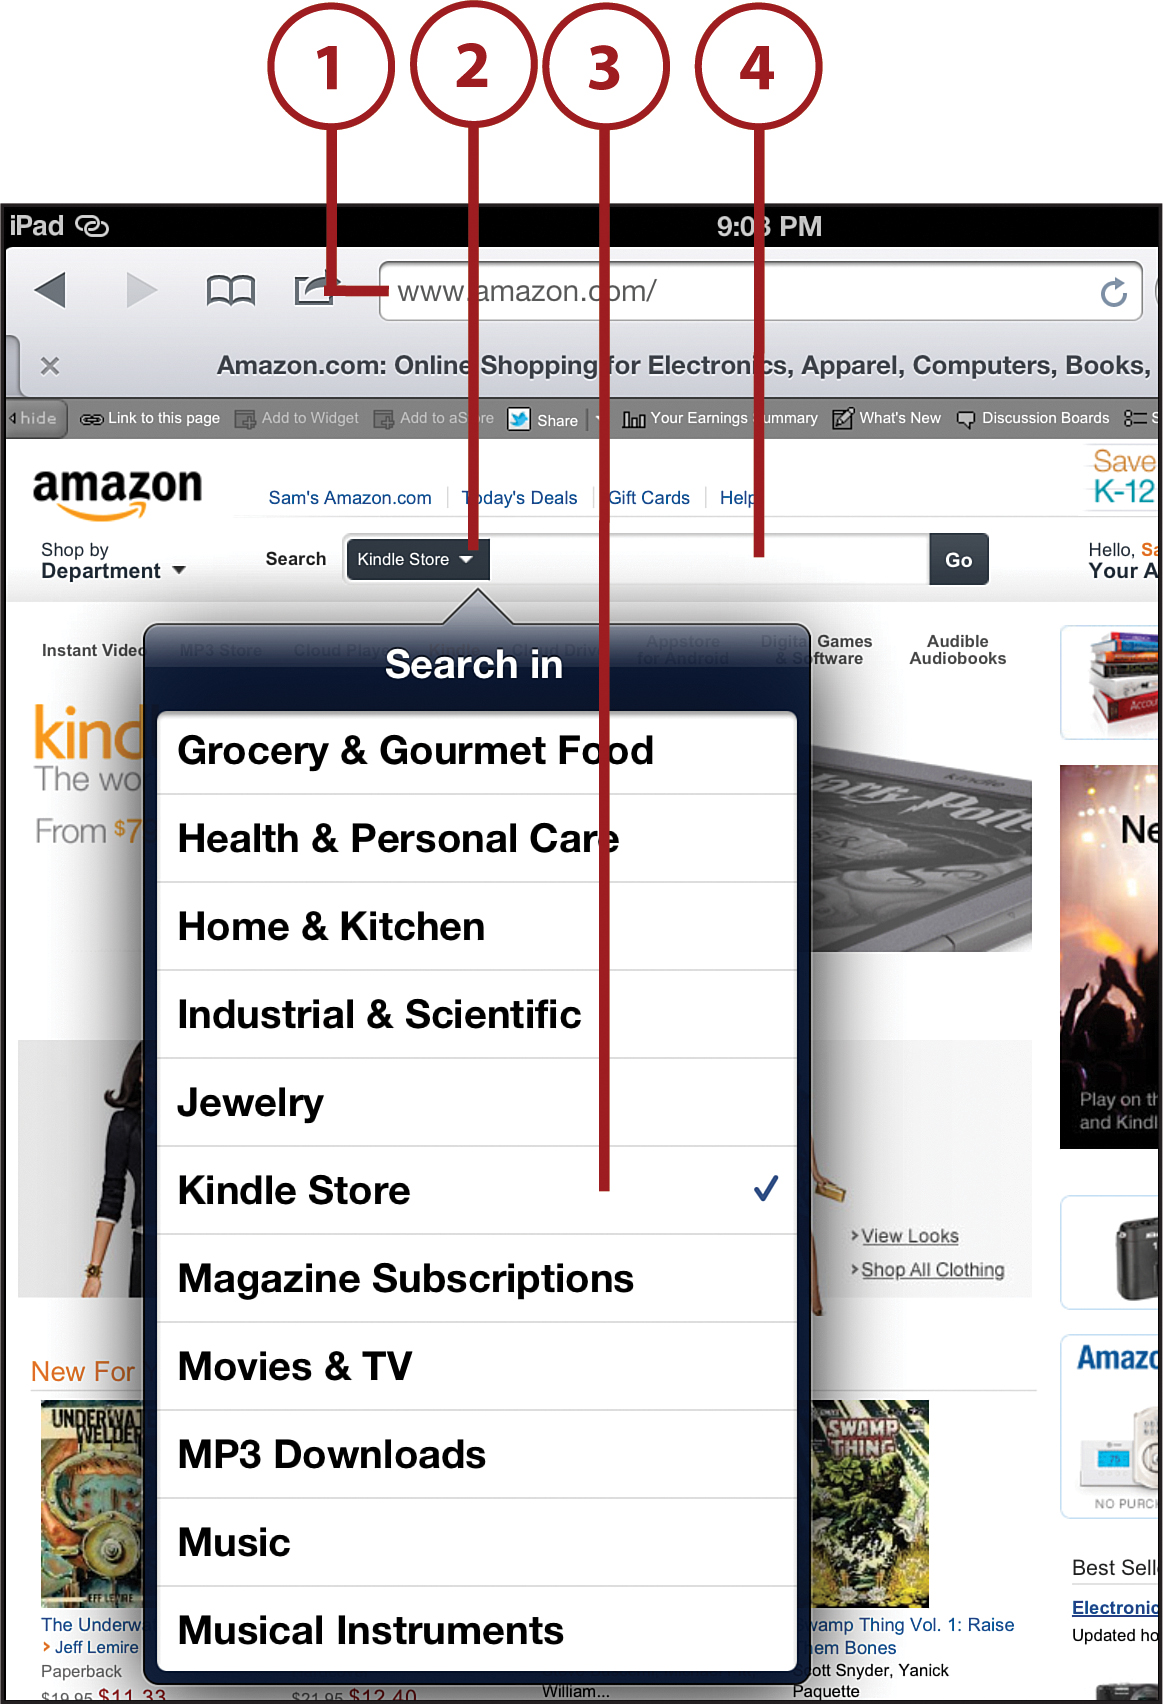
5. In the search results, tap the book you want. You go to a page full of information about that book.
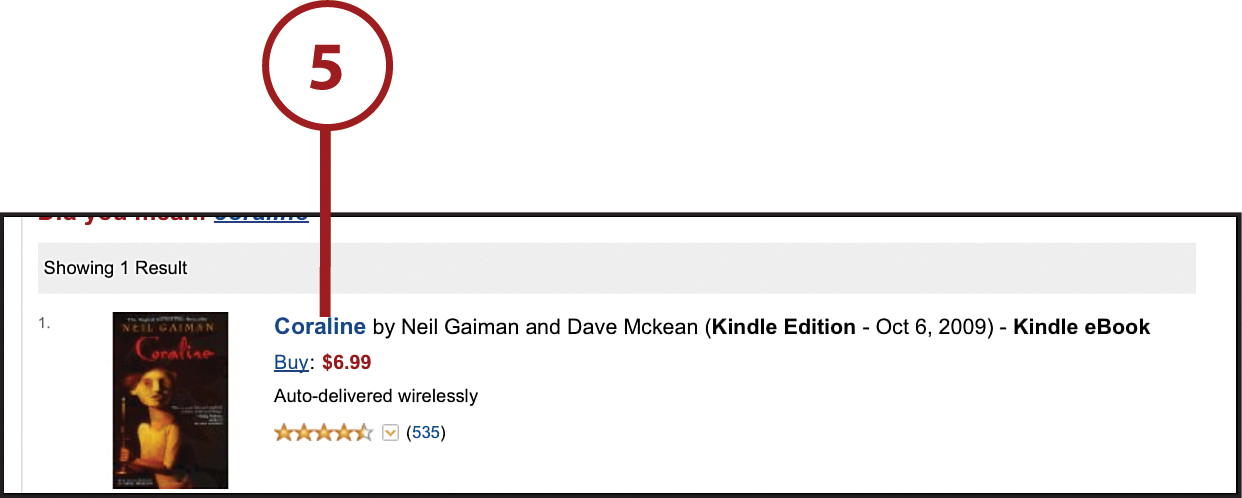
6. To buy it, tap on the Buy Now with 1-Click button. If you don’t have your own Amazon account (and you probably don’t), you need to get your parents’ permission before you buy. They need to use their existing Amazon account or create one in order to complete the purchase. (This is true even for free books.)
7. When you’ve completed buying the book, press the Home button on your iPad and tap the Kindle app to launch it.
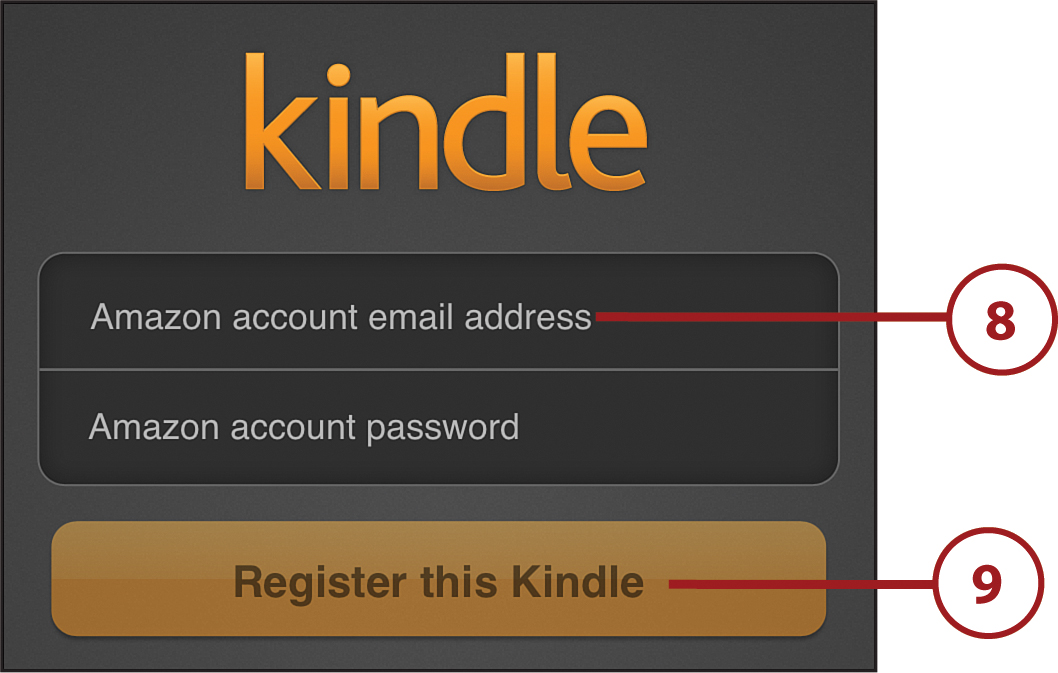
8. If you’re not already signed in to the app, enter the email address and password for the Amazon account you used to buy the book (probably your parents’).
9. Tap the Register This Kindle button.
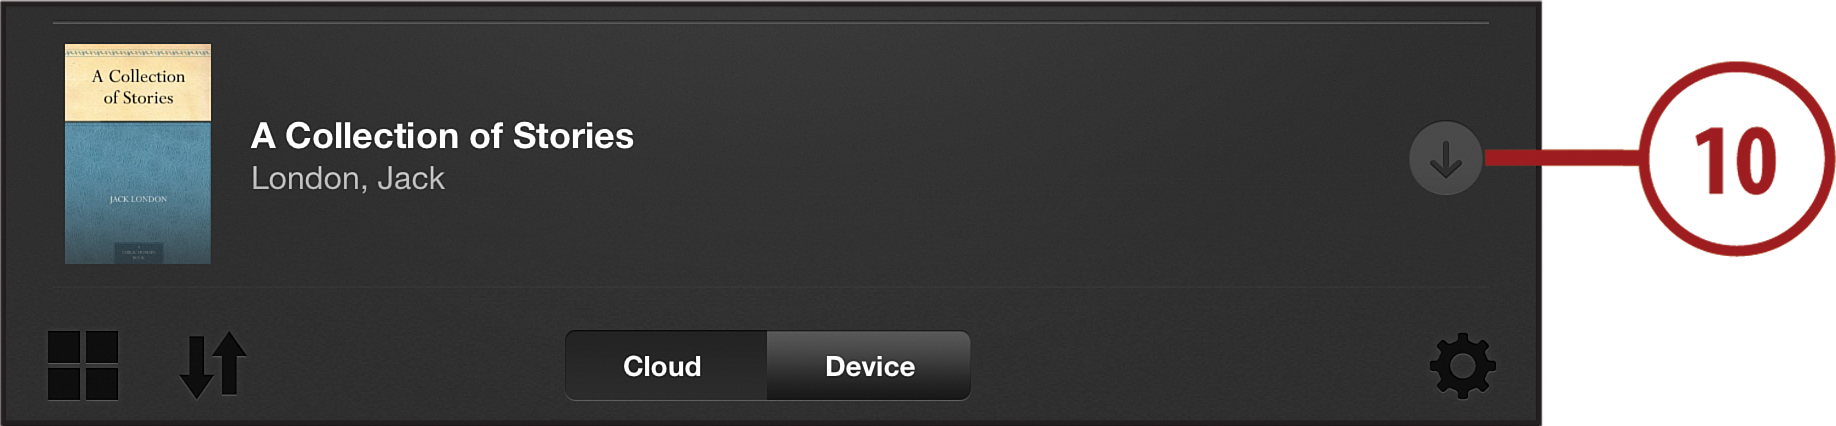
10. If you—or your parents, if you’re using their account—have purchased Kindle e-books for other devices, you can download them to your iPad. To do that, tap the Cloud button; then tap the down arrow to download the book you want. (If you’ve already registered your iPad, as you did in step 8, you can choose to send the book to your iPad in step 6 and it will automatically download.)
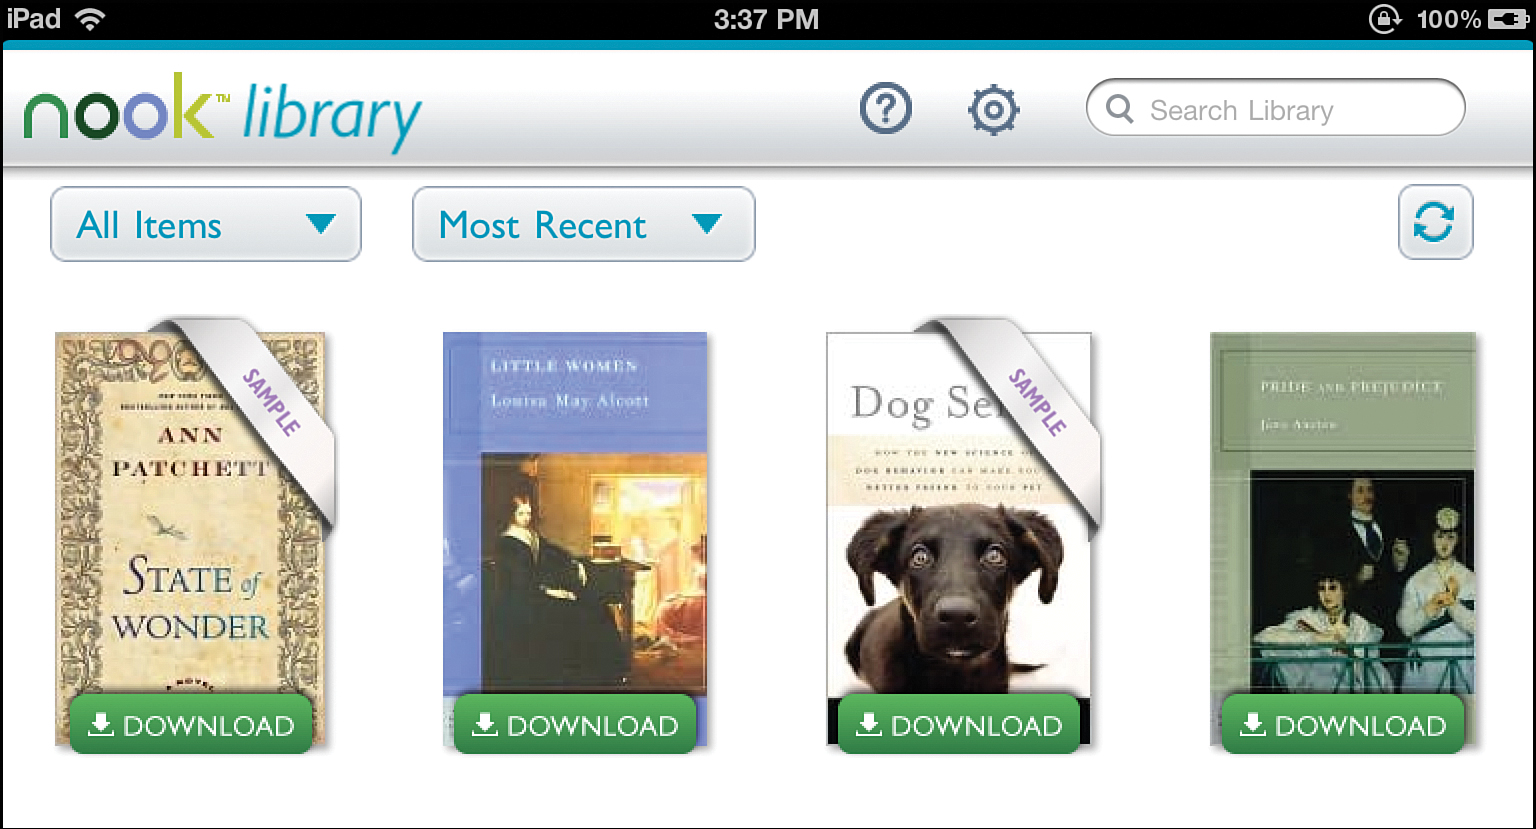
Buying an E-book at Barnes & Noble
To buy an e-book at Barnes & Noble to read on your iPad, make sure you have the Nook app, are connected to the Internet, and have launched the Safari app from the Start screen.
1. Go to http://www.bn.com.
2. When you’re there, tap the drop-down menu next to the search bar.
3. From the list of options that appear, tap Nook Store to search only for e-books.
4. Type in the name of the book or author you’re looking for and then tap Enter.
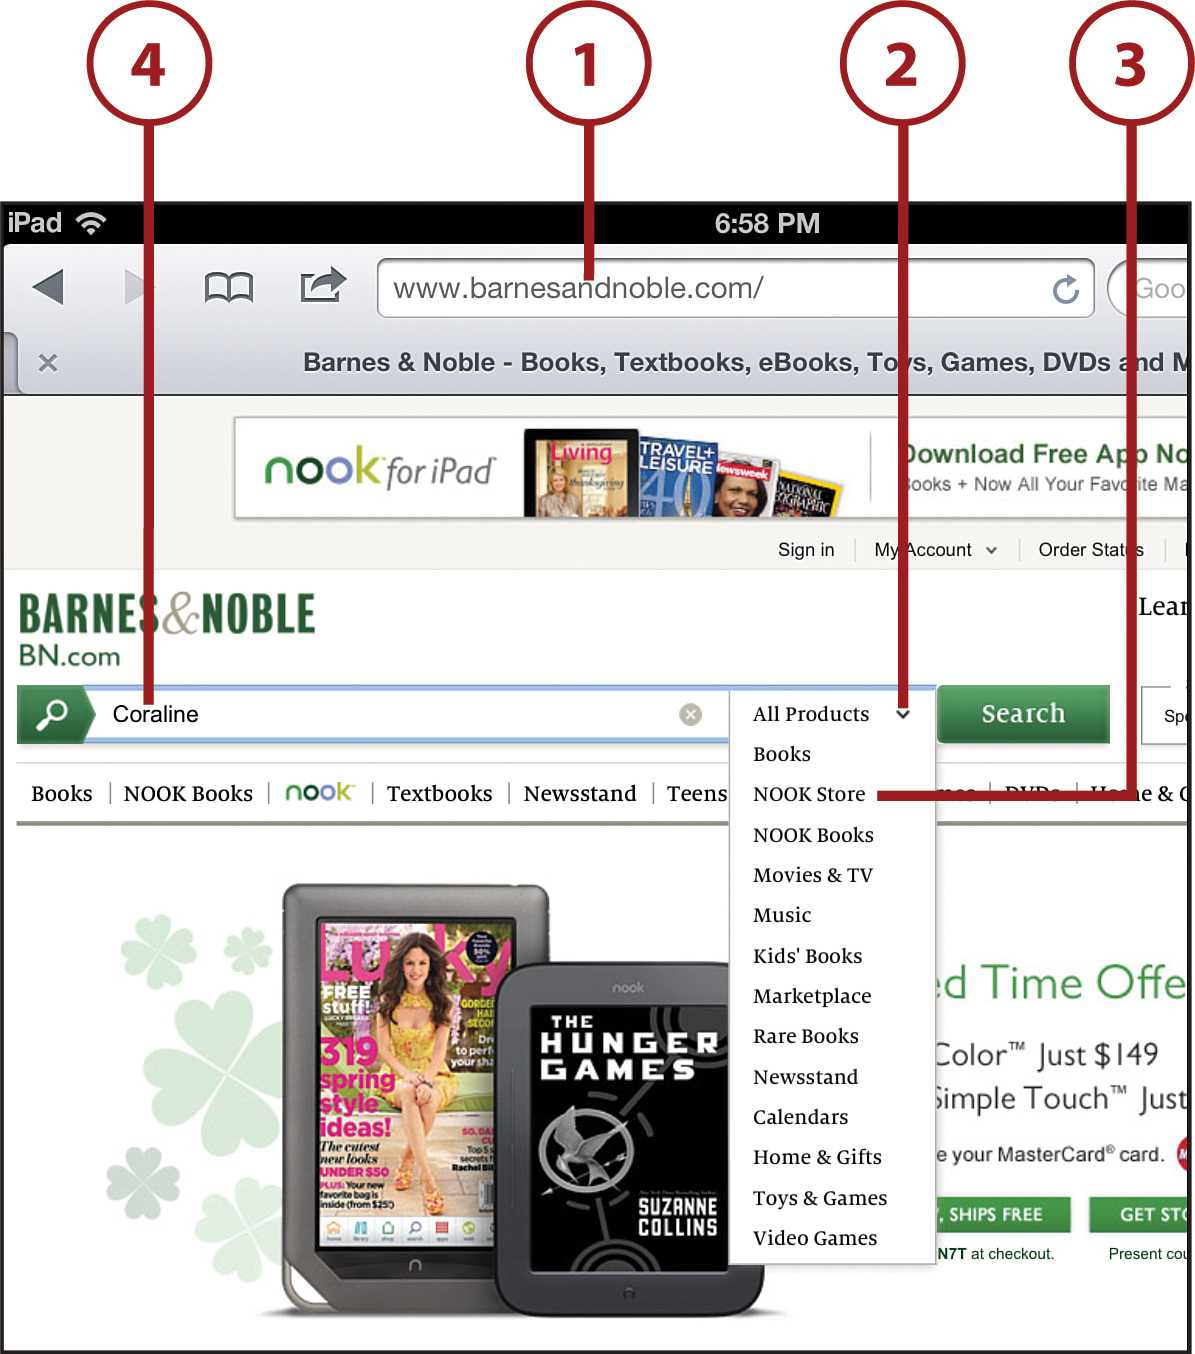
5. In the search results, tap the book you want. You go to a page full of information about the book.

6. To buy it, tap the Buy Now button. If you don’t have your own Barnes & Noble account (and you probably don’t), you need to get your parents’ permission before you buy. They need to use their existing Barnes & Noble account information or create a new account in order to complete the purchase (even for free books).

7. When you’ve completed buying the book, press the Home button on your iPad and tap the Nook app to launch it.
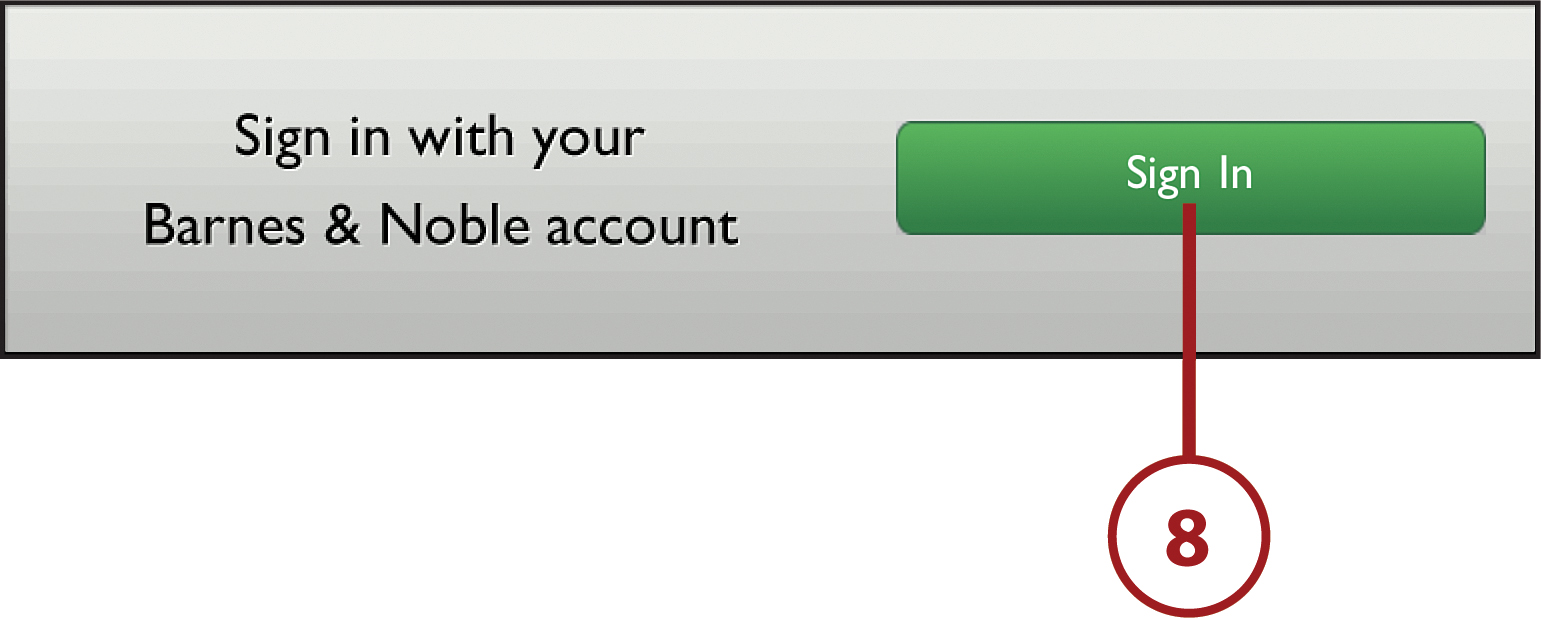
8. If you’re not already signed in to the app, tap Sign In and type in the Barnes & Noble account you used to buy the book (probably your parents’) and then tap the Sign In button.
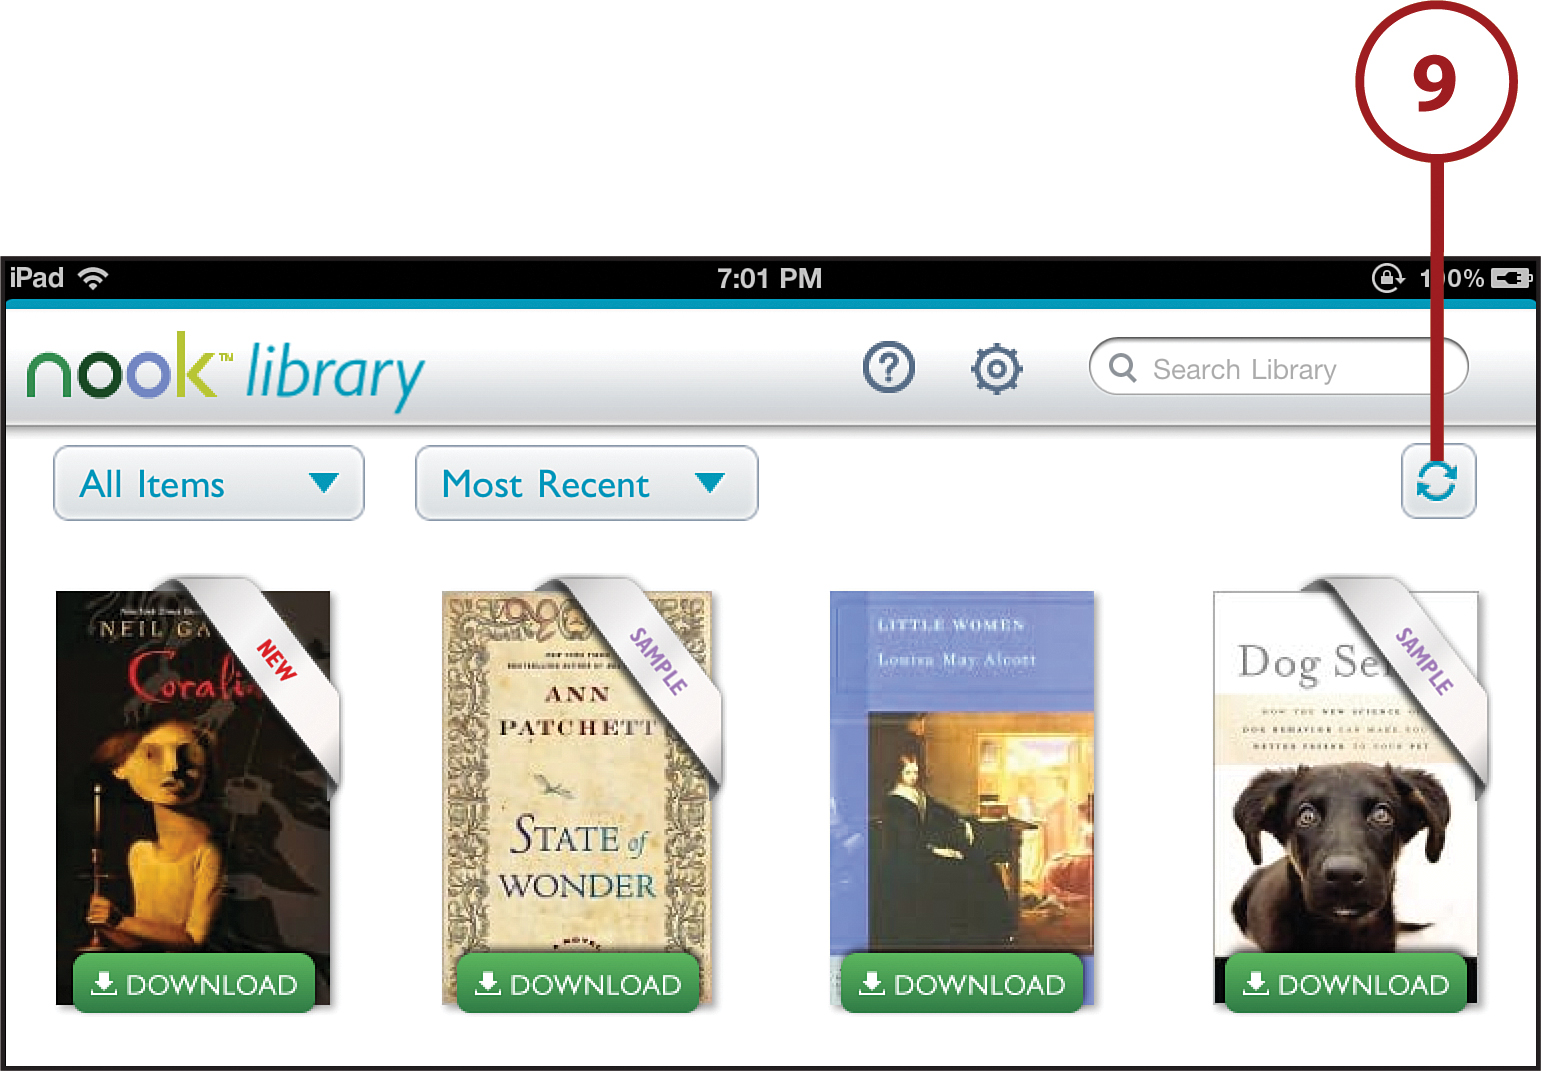
9. If your new book hasn’t already downloaded, tap the refresh button to update the screen, and your new e-book will download. Tap it to start reading.
Getting E-books from the Library
What if you don’t want to buy every book you read? What about the old tradition of borrowing books from your local library? Can you do that with e-books? If you have the right app, the answer is yes.
The app you want is called OverDrive. Many libraries use it to let people with library cards check out e-books and read them on their iPads. OverDrive is free and just requires that you have a library card. Get it at the App Store, and then read on to learn how to get e-books using it.
The Kindle app also lets you check e-books out from some libraries. Find out which app (or both!) your library supports and then you can use it to check out books for free.
Before you use OverDrive, there are two more things you need: a library card and an Adobe account. (Adobe is a company that makes, among many other things, e-book software.)
If you don’t have one already, ask your parents to take you to the library to get a card. They’re free and useful for borrowing all kinds of things, not just e-books. When you’re there, find out if your library will let you check out e-books or if your parents have to do it for you. To get an Adobe account, have your parents go to Adobe’s home page at www.adobe.com. Look for the Sign In or Create an Account button to get started.
Finding Your Library with OverDrive
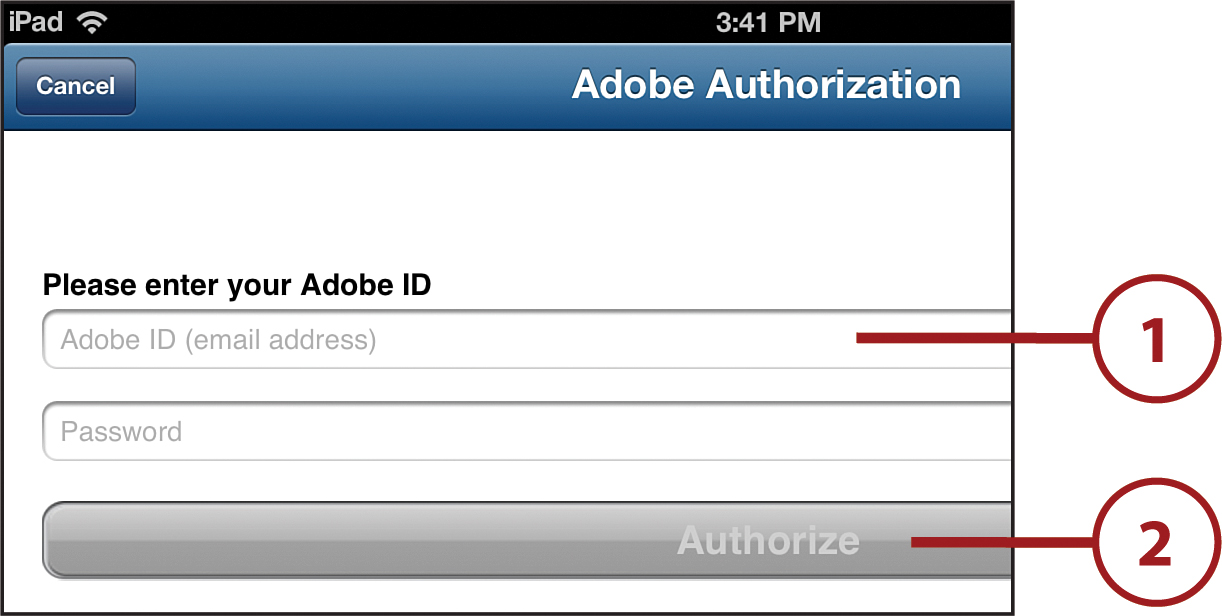
After you have an account and have OverDrive installed on your iPad, launch the app from your iPad’s home screen and follow these steps:
1. Type in your Adobe account information, which includes an Adobe ID and a password.
2. Tap Authorize. You should only have to do this the first time you use the app.
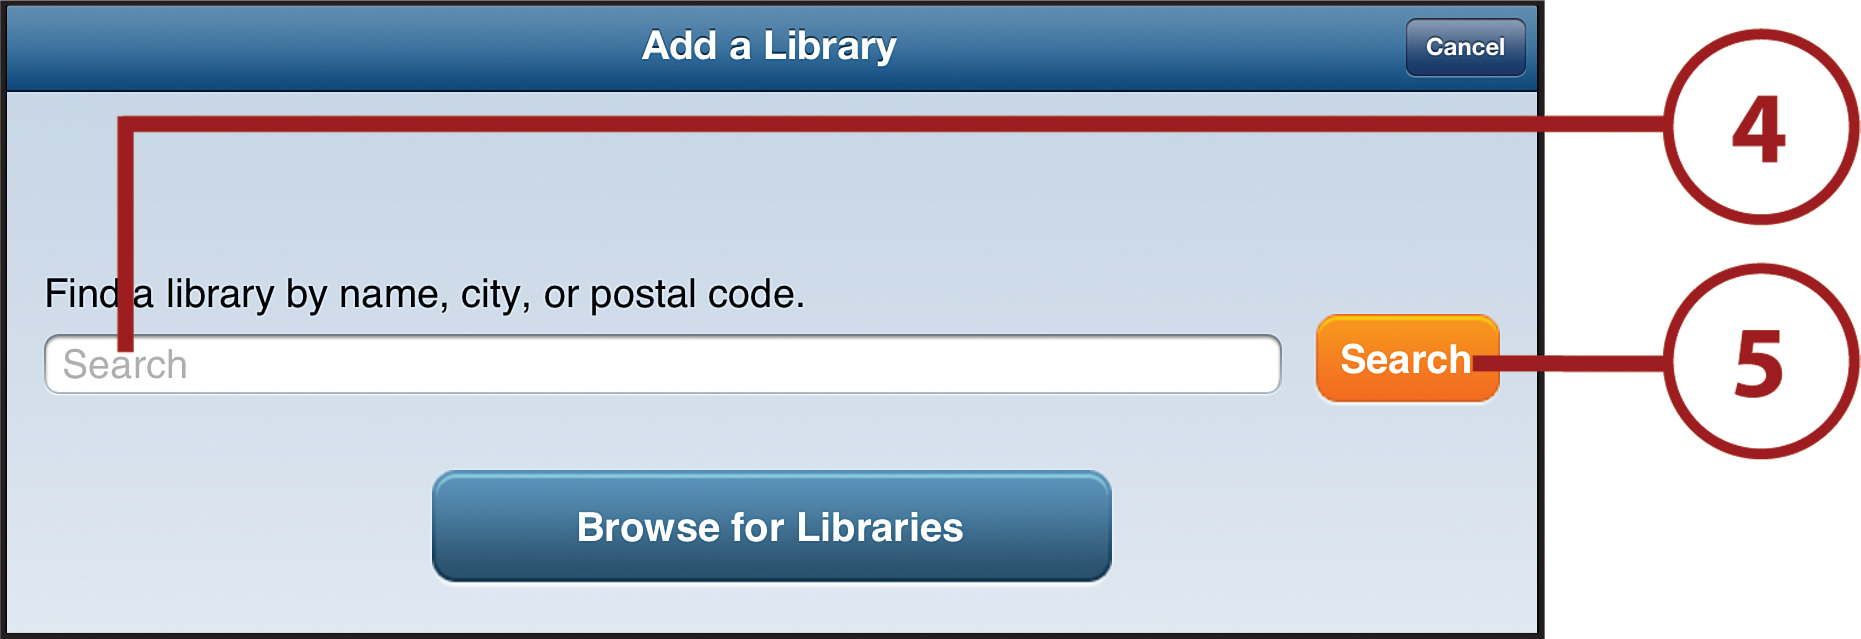
3. Tap Add a Library so you can add a library near you to your list.

4. Type in the city and state, or ZIP Code of the library where you have a library card.
5. Tap Search to have OverDrive search for your local library.
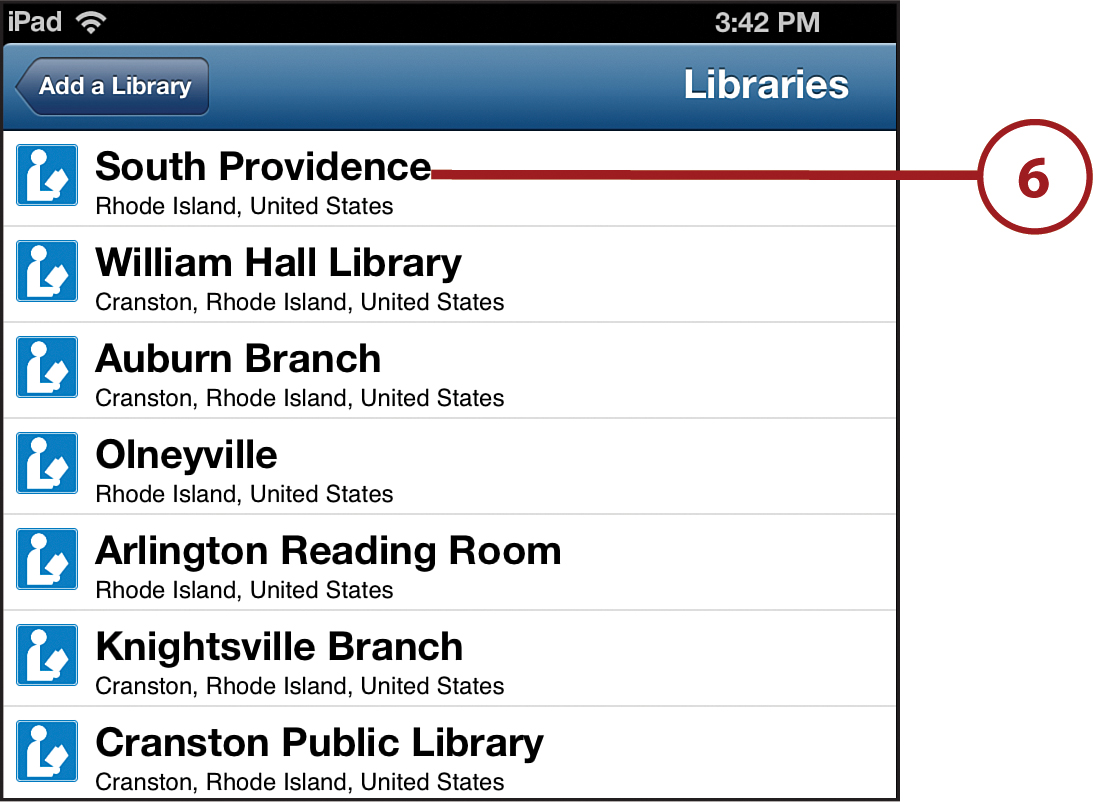
6. Scroll through the list of libraries and tap the one from which you want to check out an e-book.
7. Tap the library’s listing. You jump to Safari and go to the library’s website. Log in and continue.
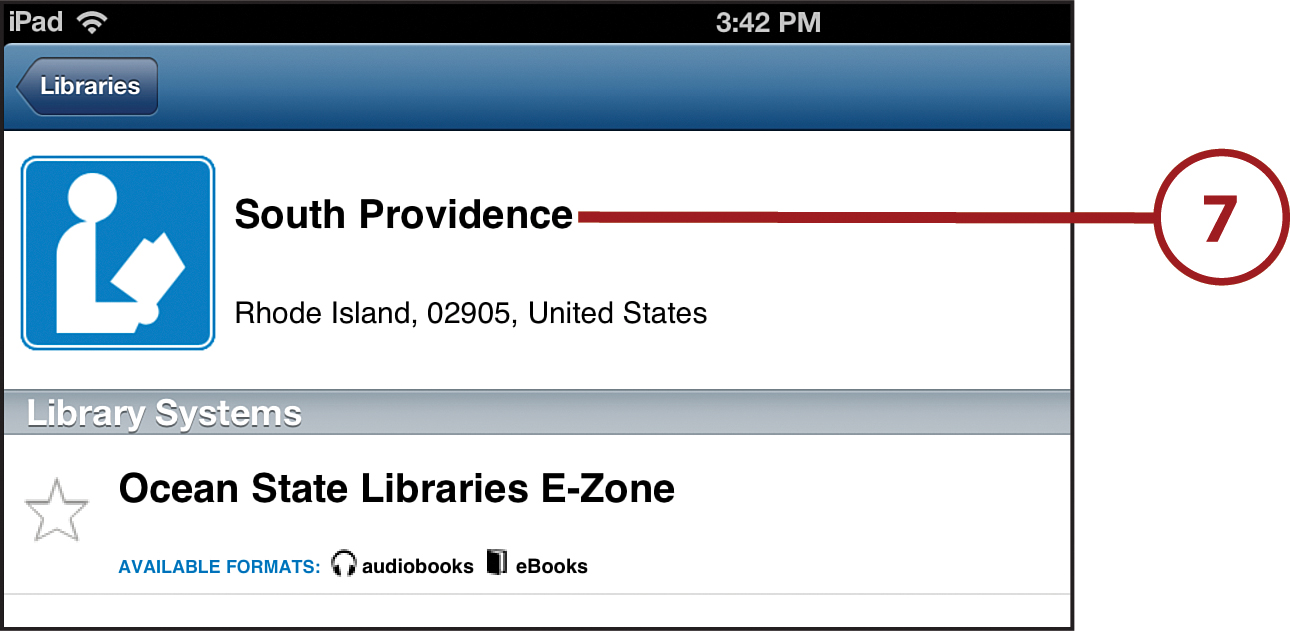
Different libraries handle their e-book lending differently, but most of them ask you to create an account or log in to an account using your library card. Have your parents follow the instructions specific to your library’s website.
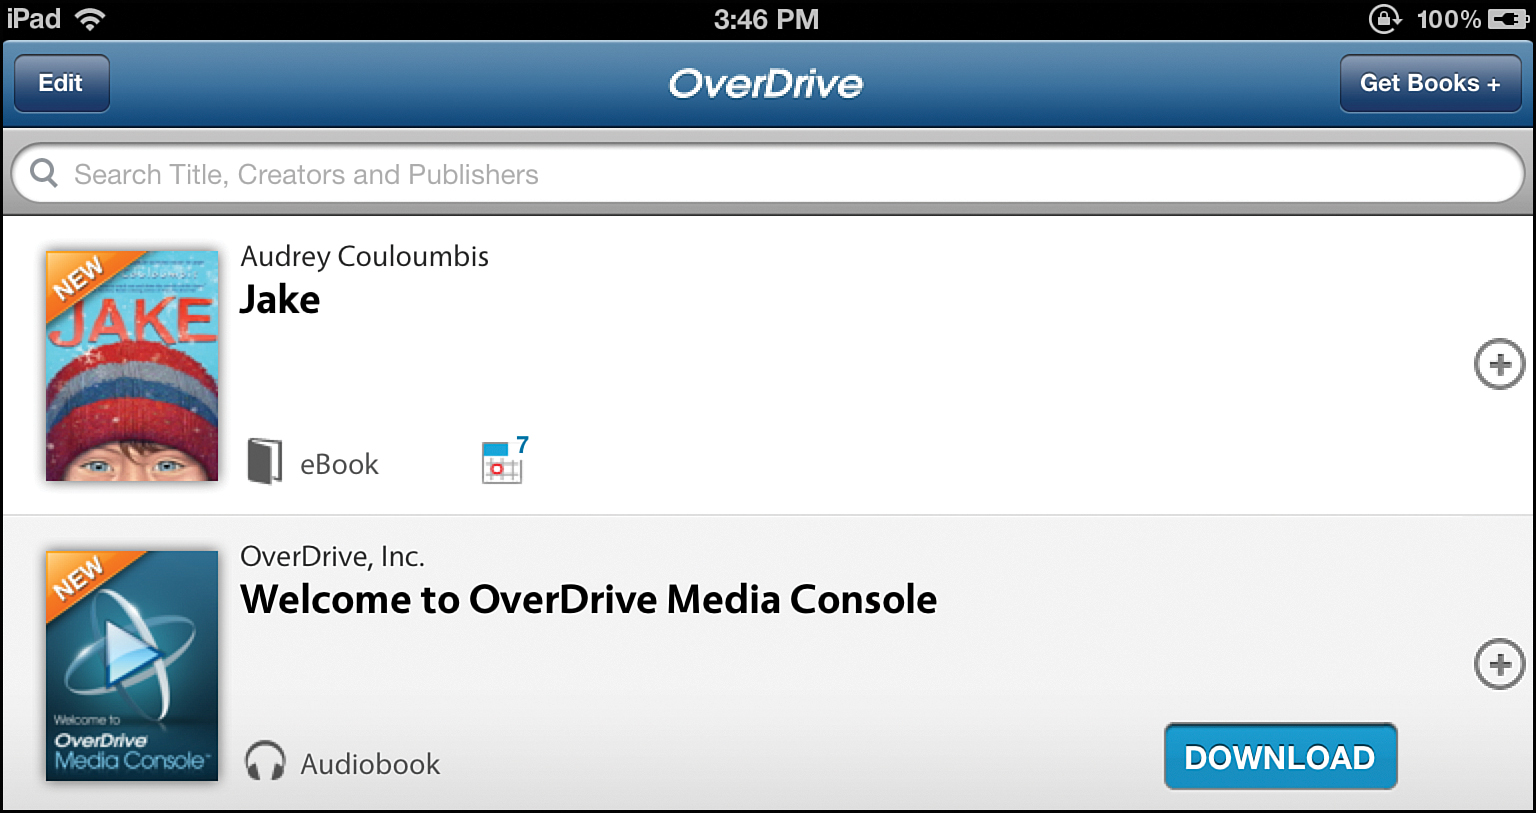
Checking Out a Book with OverDrive
After you’ve set up your OverDrive app with your account and your local library, it’s time to start borrowing books.
1. When you’re logged in, browse or search for the book you’re looking for. Even if there’s an e-book version of the book you’re looking for, you might not be able to check it out. That’s because libraries aren’t allowed to lend all e-books, just some.

2. When you find the book you want to check out, you have two choices: Kindle book or Adobe EPUB e-book. The Kindle book works in your Kindle app. The Adobe EPUB e-book version works in OverDrive. Tap the Add to Cart button next to the version you want.
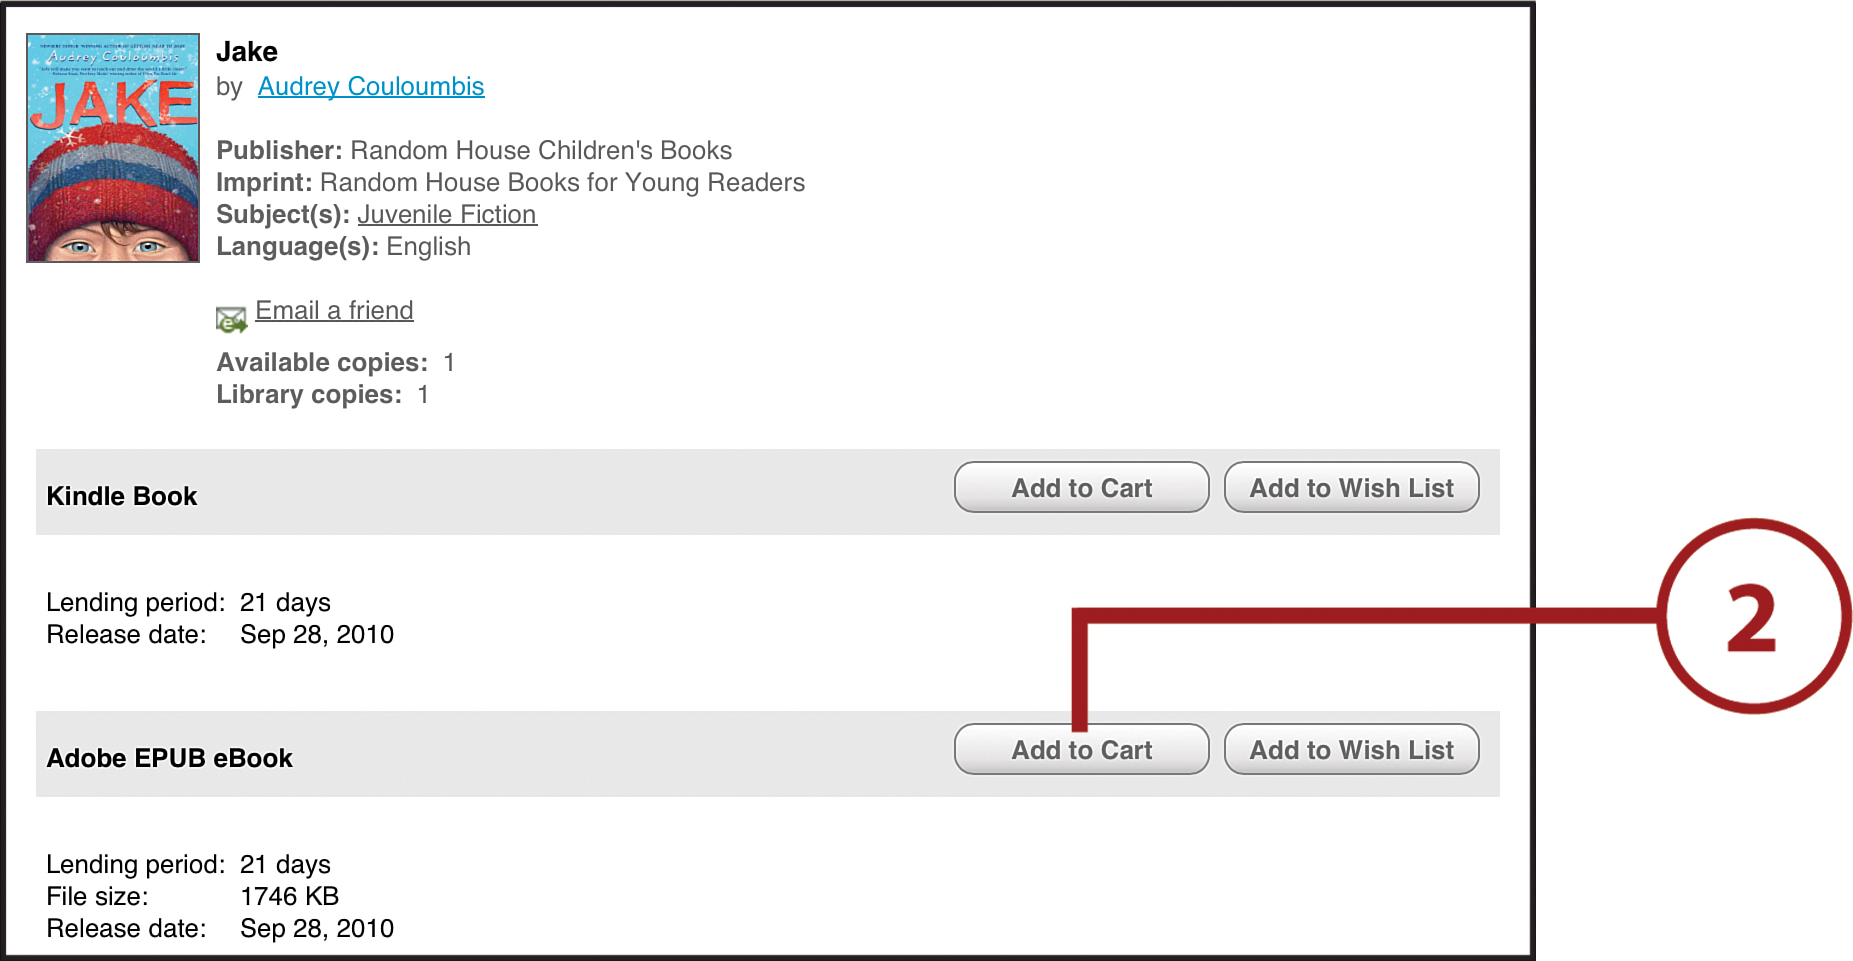
3. Choose how long you want to check the book out for (usually 7, 14, or 21 days) and then tap Proceed to Check Out.

4. Tap Download.
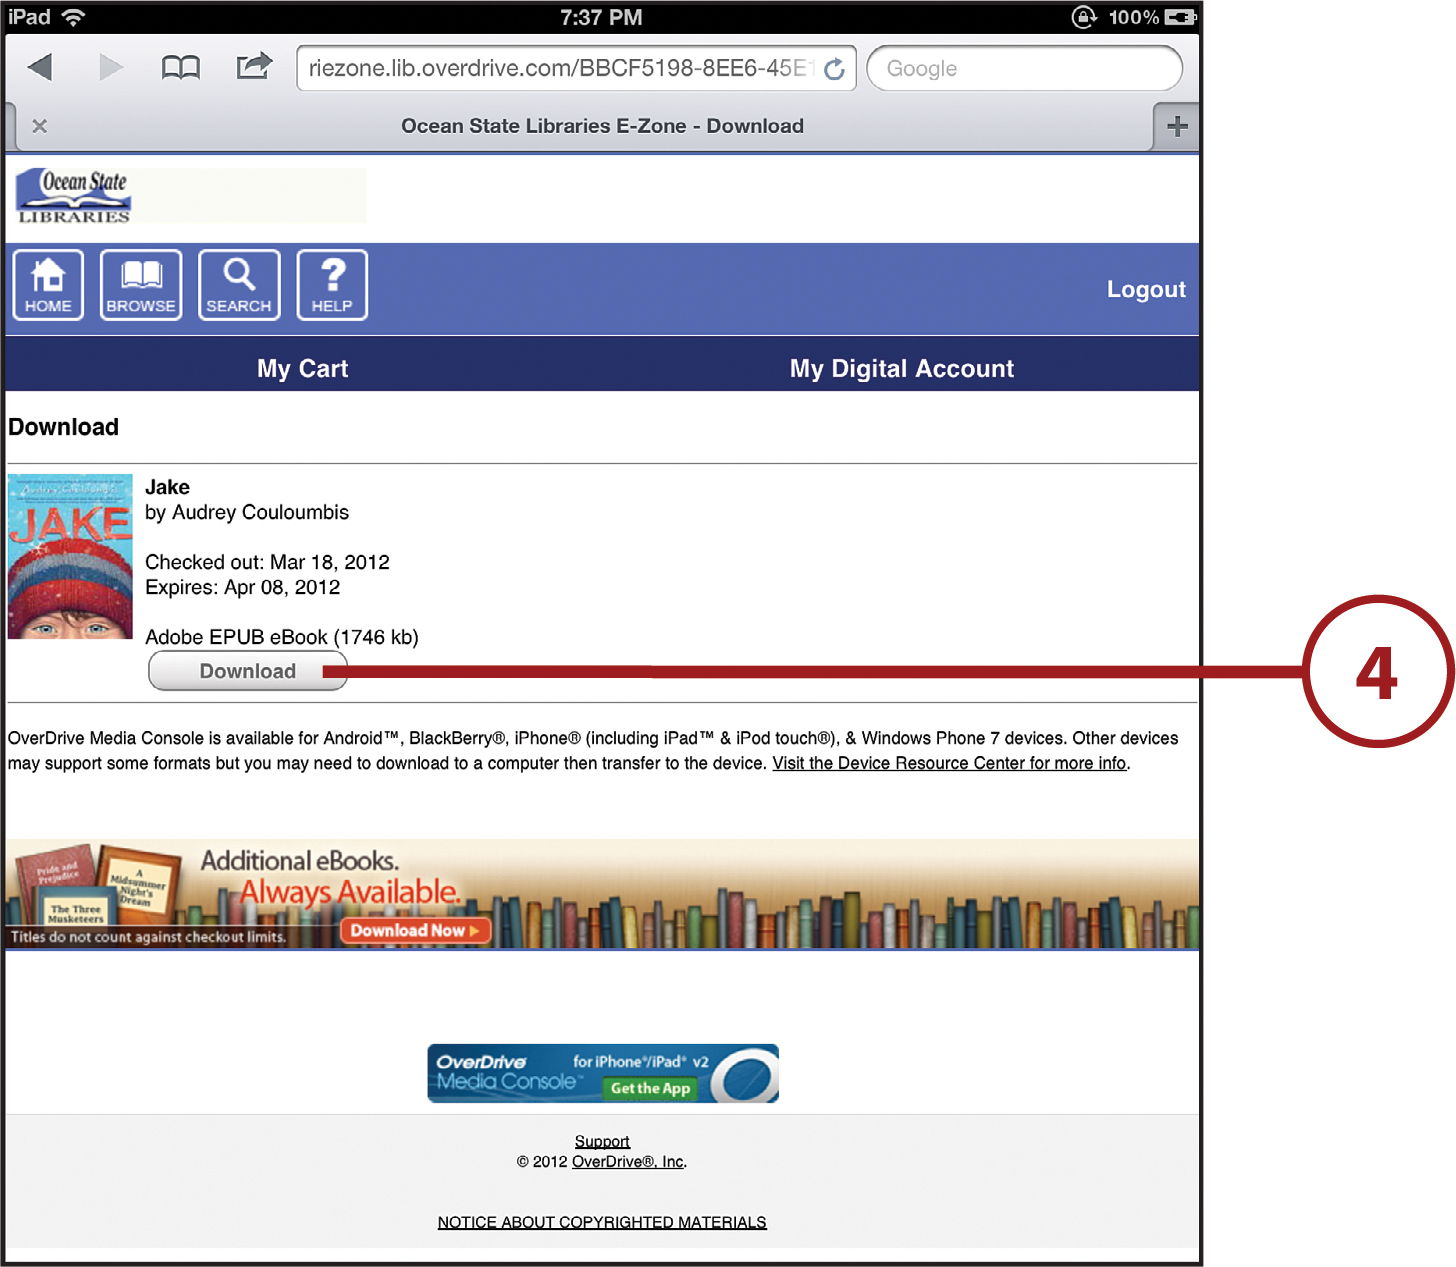
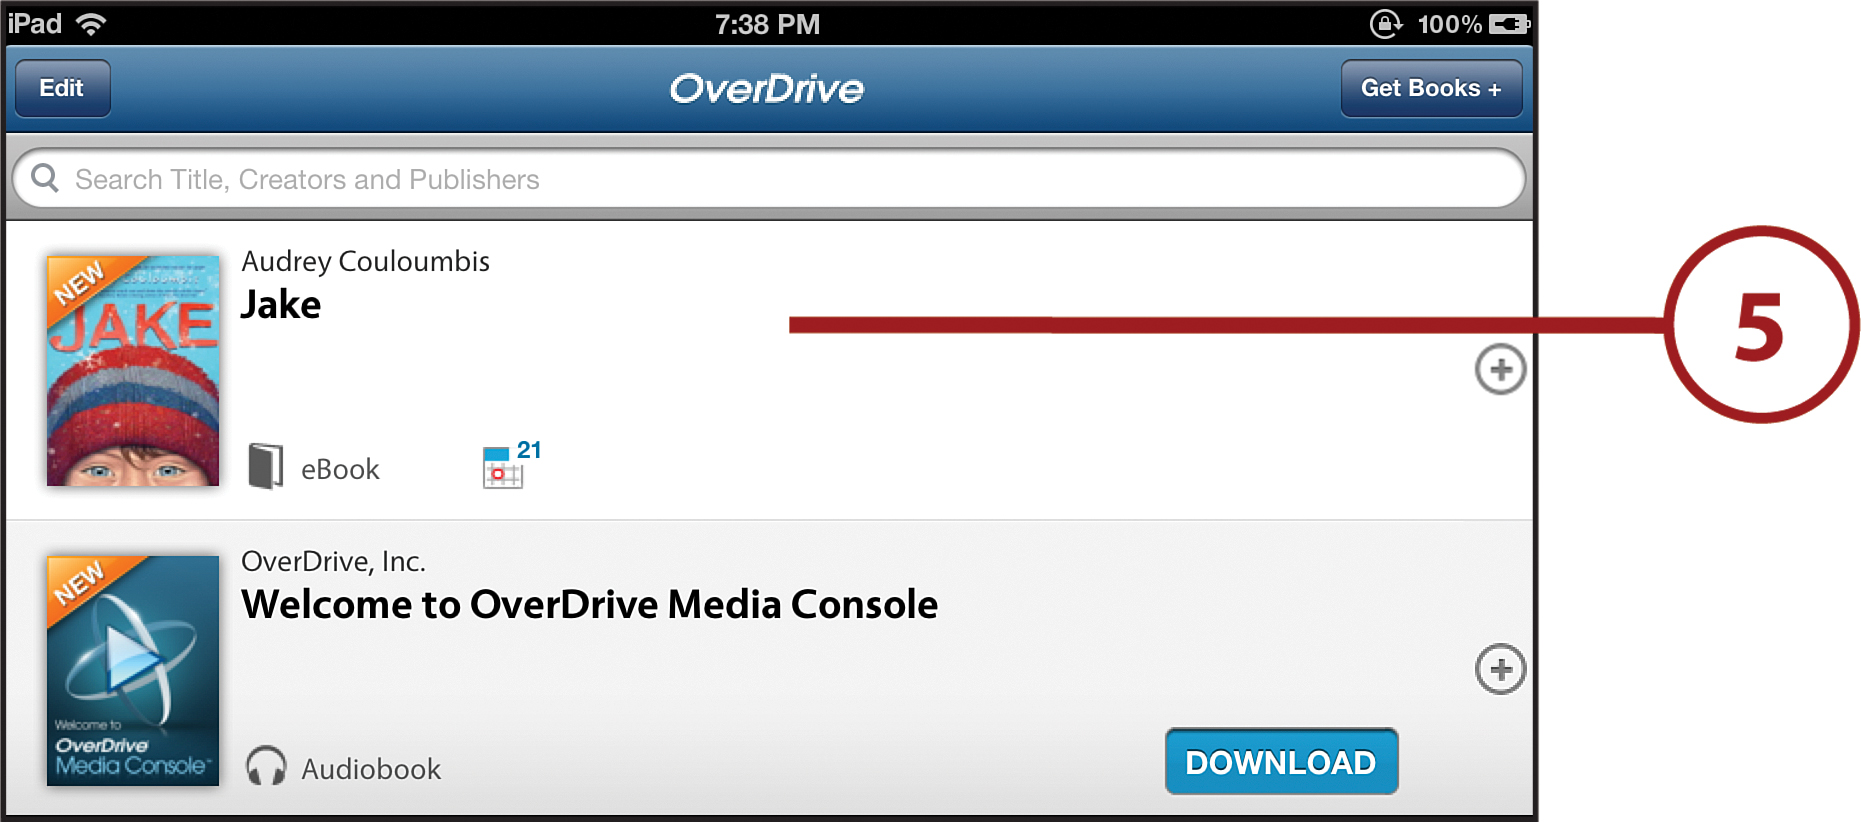
5. You jump back to the OverDrive app, where the book is downloading. To read the book, tap it. Swipe left and right to turn the pages, just like in any other e-book app.
Awesome Apps
Looking for something good to read on your iPad? There are thousands—probably millions, actually—of great options, from books to comics and more. Here are some suggestions for apps that give you a lot of choices:
• DC Comics—Like Batman, Superman, Wonder Woman, and other heroes of the DC Universe? You can read their adventures in this app. The DC Comics app lets you buy, download, and store individual issues of hundreds of comics right on your iPad. This way, you can take a huge comics collection anywhere you go. Free (Comics cost $1.99 to $3.99 each)
• Good Reader—If you want to read PDFs, Word documents, and other text files, Good Reader is a great option. It’s one of the best document readers available for the iPad and can read tons of kinds of files that other apps can’t. Free or $4.99
• Marvel Comics—Do you prefer Spider-man, Iron Man, Wolverine, or the X-Men for your comic book adventures? Then this app from Marvel Comics is for you. It works the same way as the DC app, but gives you access to the huge library of Marvel comics. Free (Comics cost $1.99 to $4.99 each)
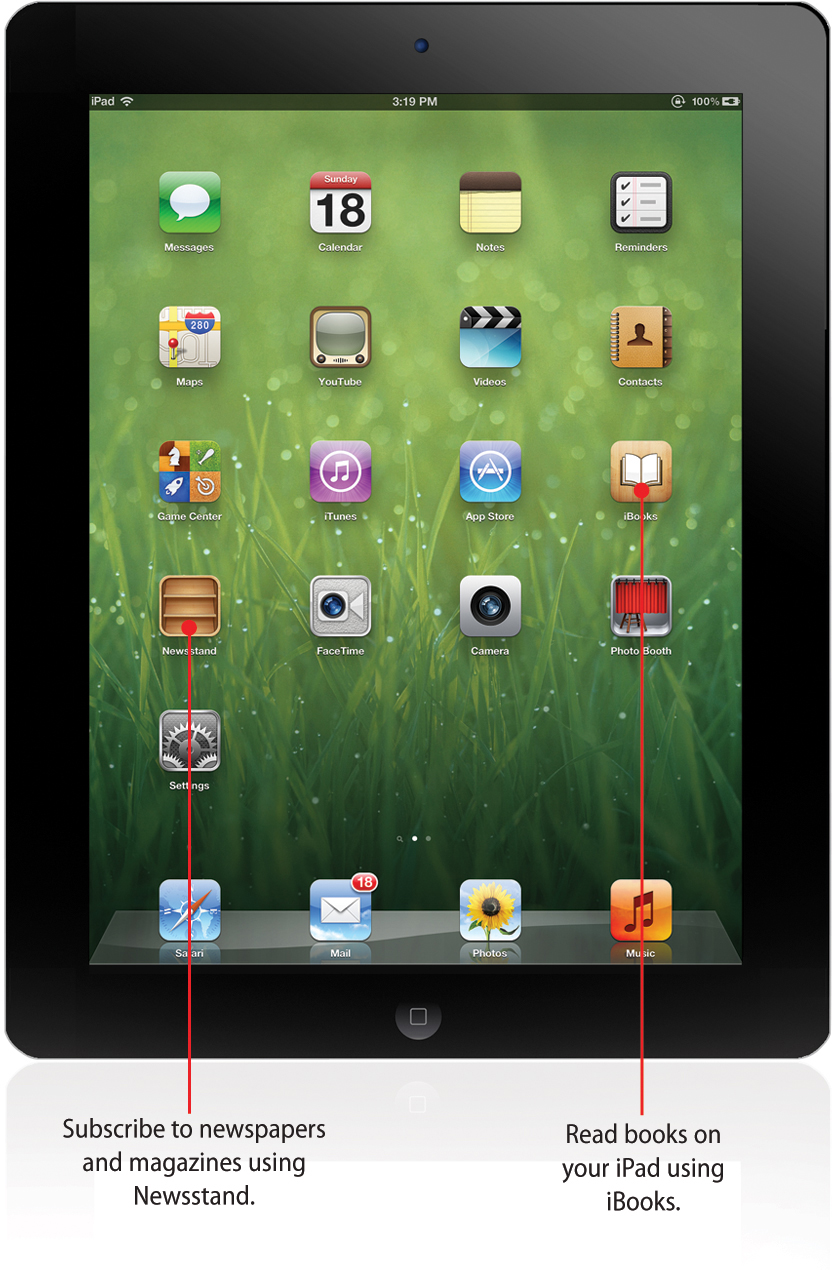
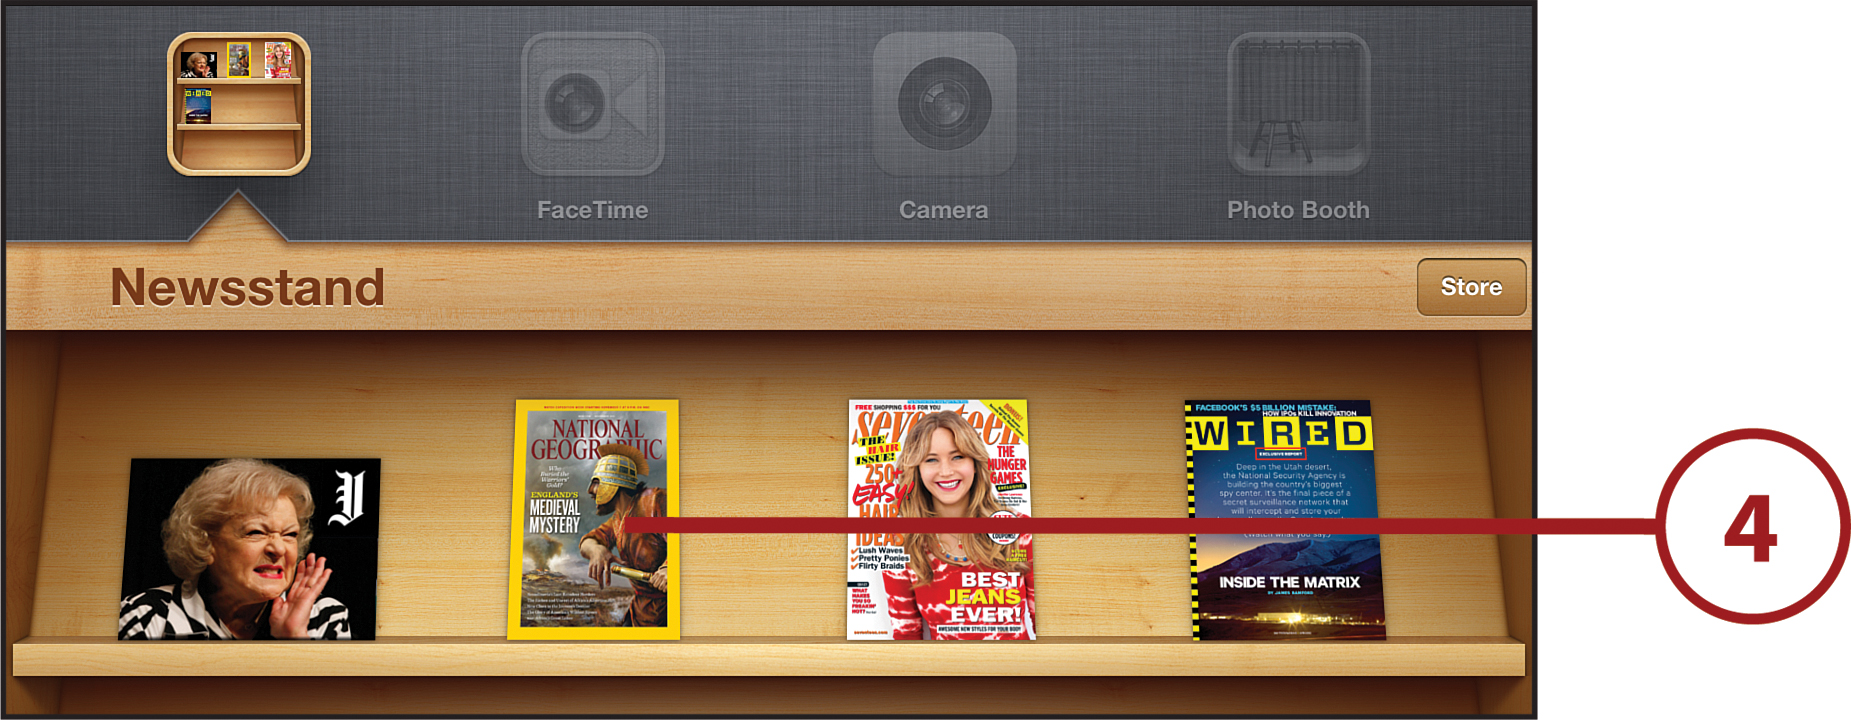
Getting Magazines and Newspapers with Newsstand
Your iPad isn’t just good for books; you can also use it to read magazines. Even better, though, you can subscribe to magazines and have new issues automatically download to your iPad when they come out. And because they’re digital, these magazines also have audio, video, and lots of interactive features that make them more interesting and educational. The program you use to get magazines and newspapers is Newsstand, which comes preloaded on your iPad. As usual, you use your Apple ID to buy issues and subscriptions, so if your parents pay for your iTunes purchases, get their permission before you buy anything.
Buying at Newsstand
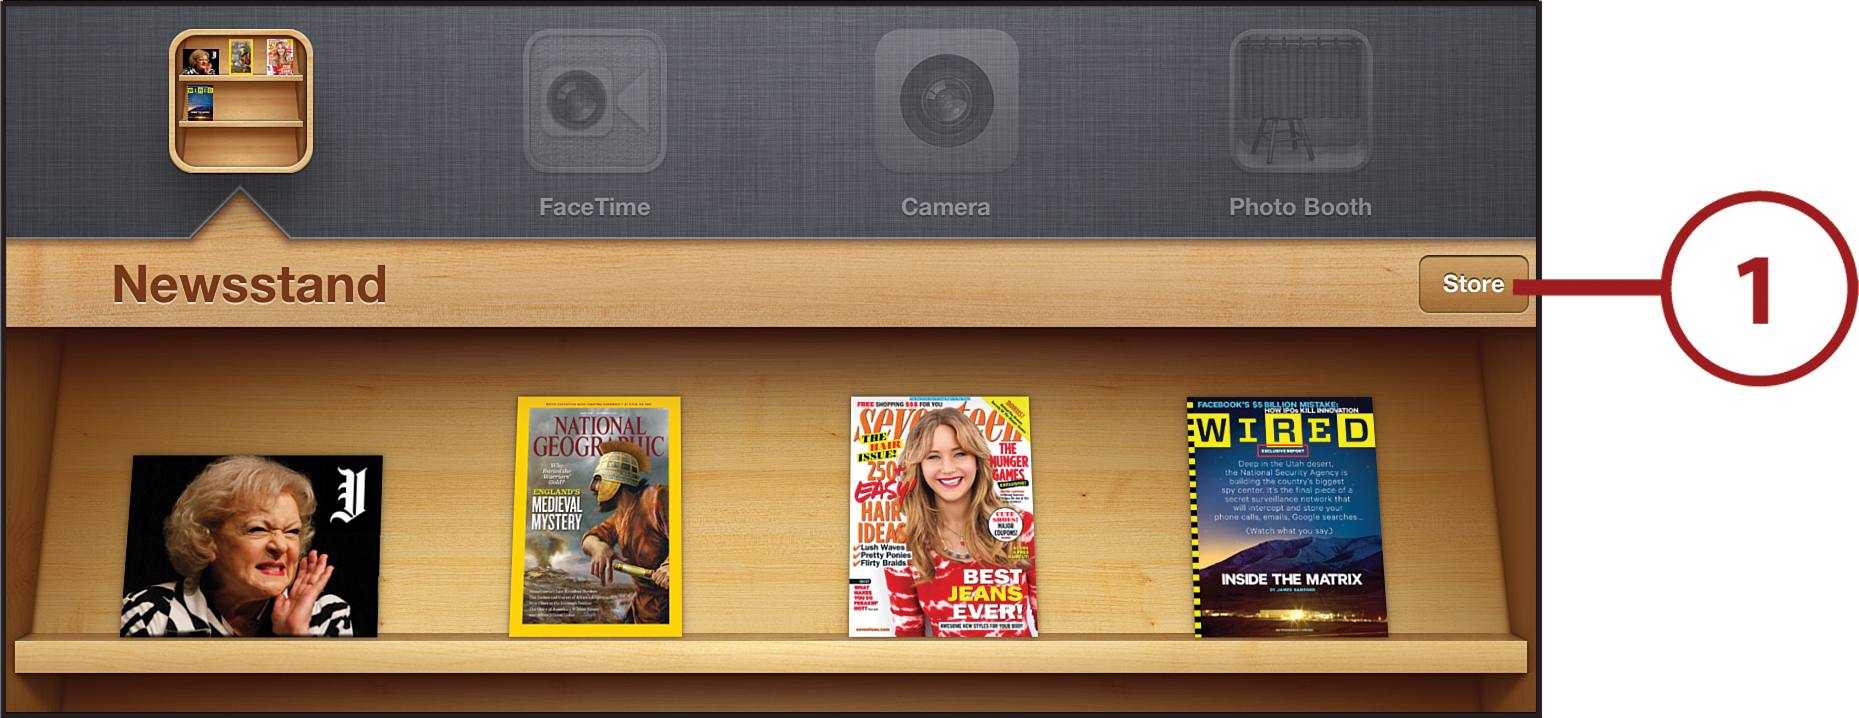
To buy a magazine or newspaper using Newsstand, you need to have the Newsstand app open (big surprise, right?). To do that, make sure you’re connected to the Internet, tap the app on your home screen, and then follow these steps:
1. Tap Store to connect to the Newsstand store.
2. To find the magazine or newspaper you want to read, either tap the featured items or browse the content. When you find something you’re interested in, tap it to get more information.
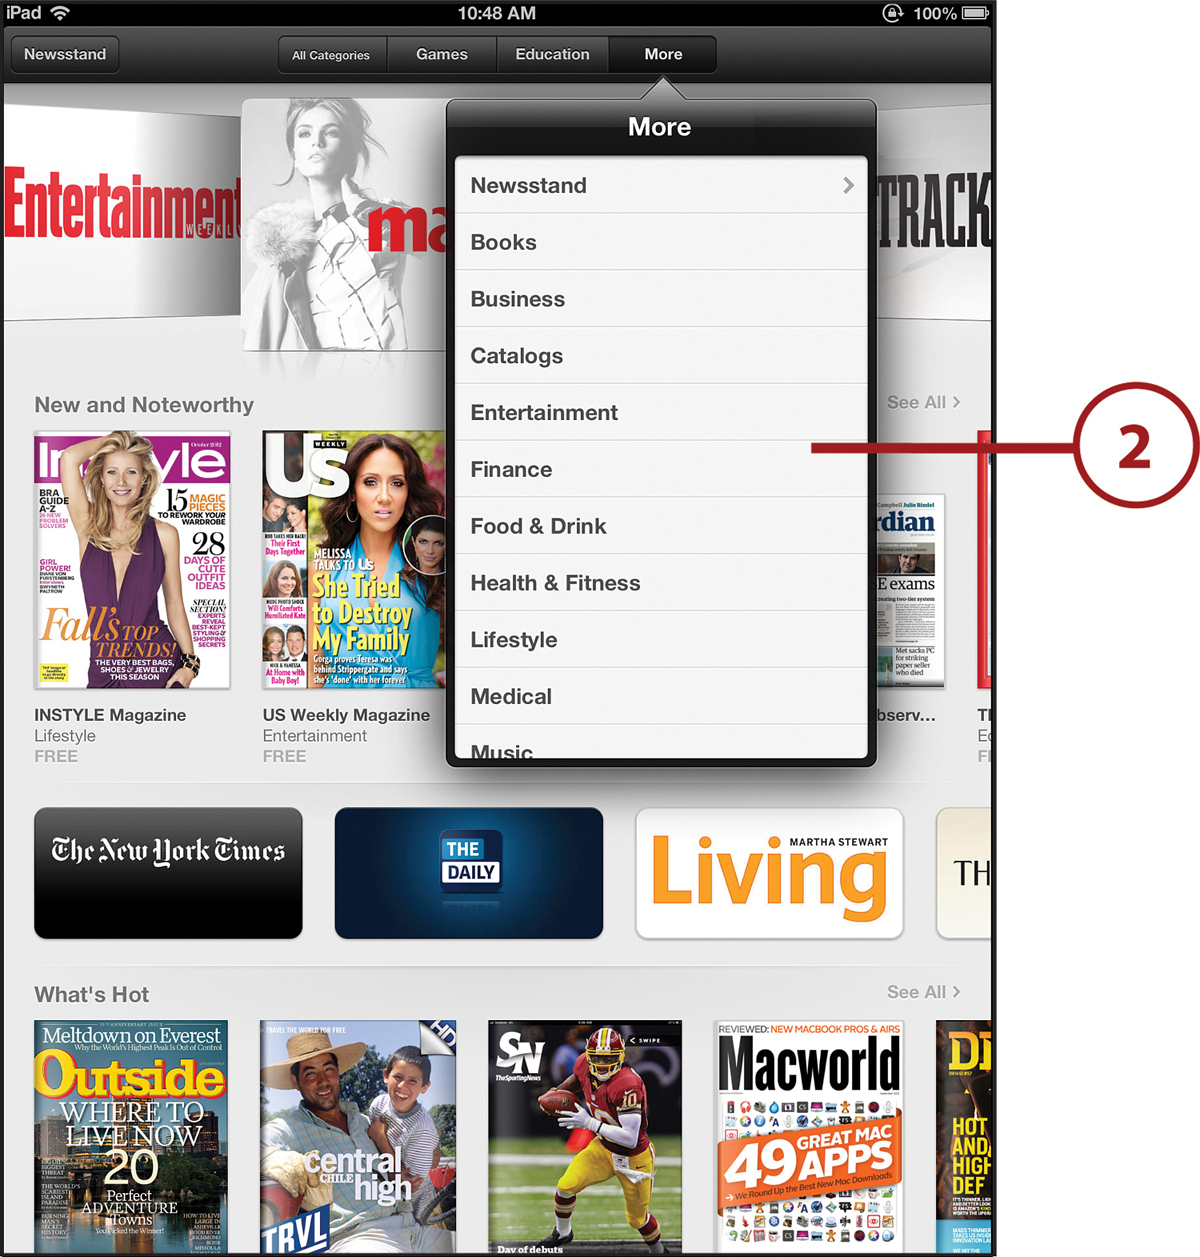
3. To download the app for the magazine or newspaper you want to read, tap the price and then tap Install.
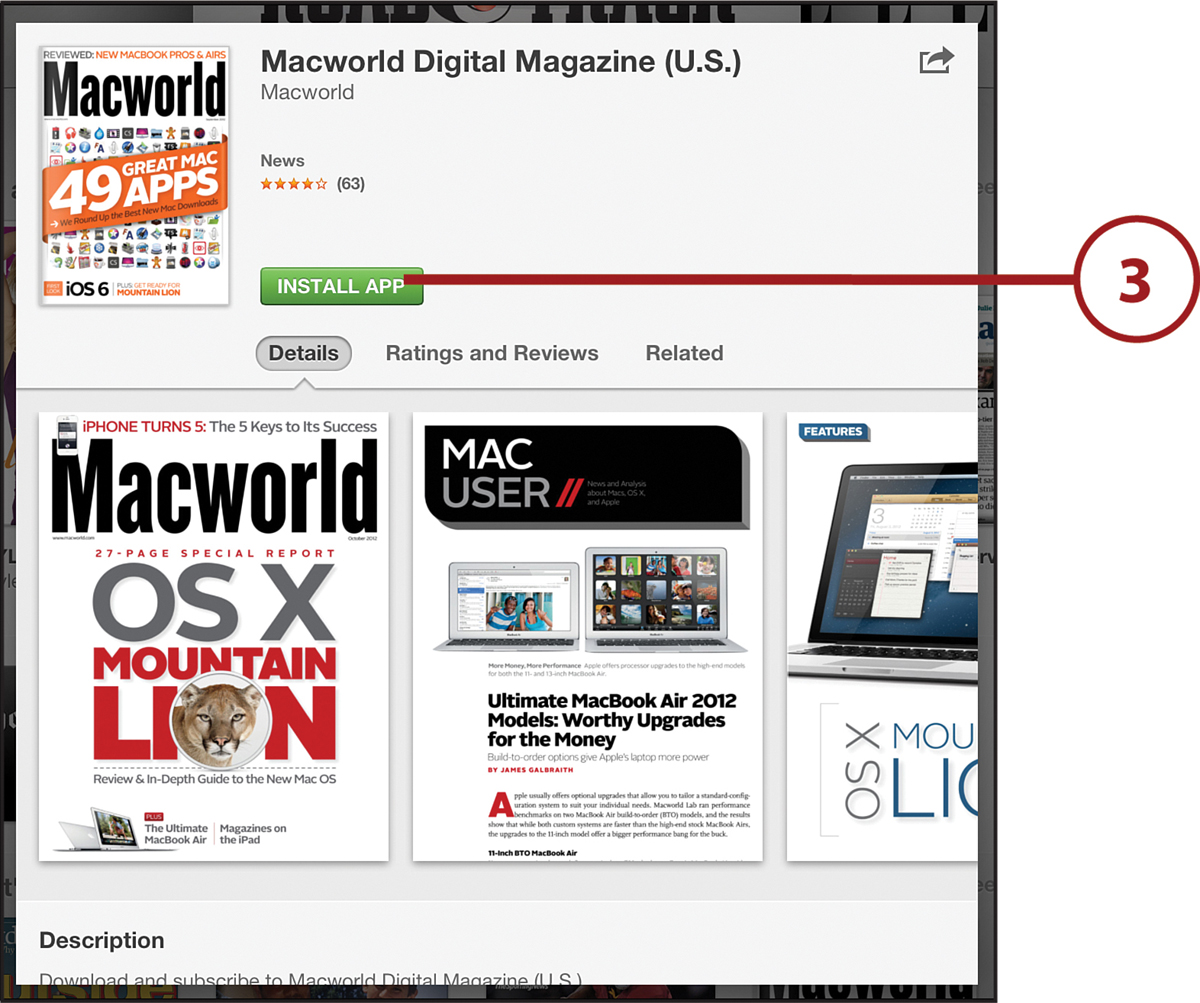
4. The app downloads to Newsstand. Tap it to launch the app. Many magazine/newspaper apps come with a sample of their latest issue. Depending on whether the magazine or newspaper is free or paid, if you want to read more, you might need to subscribe.
Buying Individual Issues or Subscriptions
Remember, when you get a magazine or newspaper app using Newsstand, you’re usually getting just one issue and sometimes not even that. In that case, you have to use in-app purchases to buy individual issues or to subscribe.
Each app works a little differently in terms of how you buy issues or subscriptions, so you first need to see how the app works. Most apps show you individual issues as well as a subscription, with the price listed next to each.
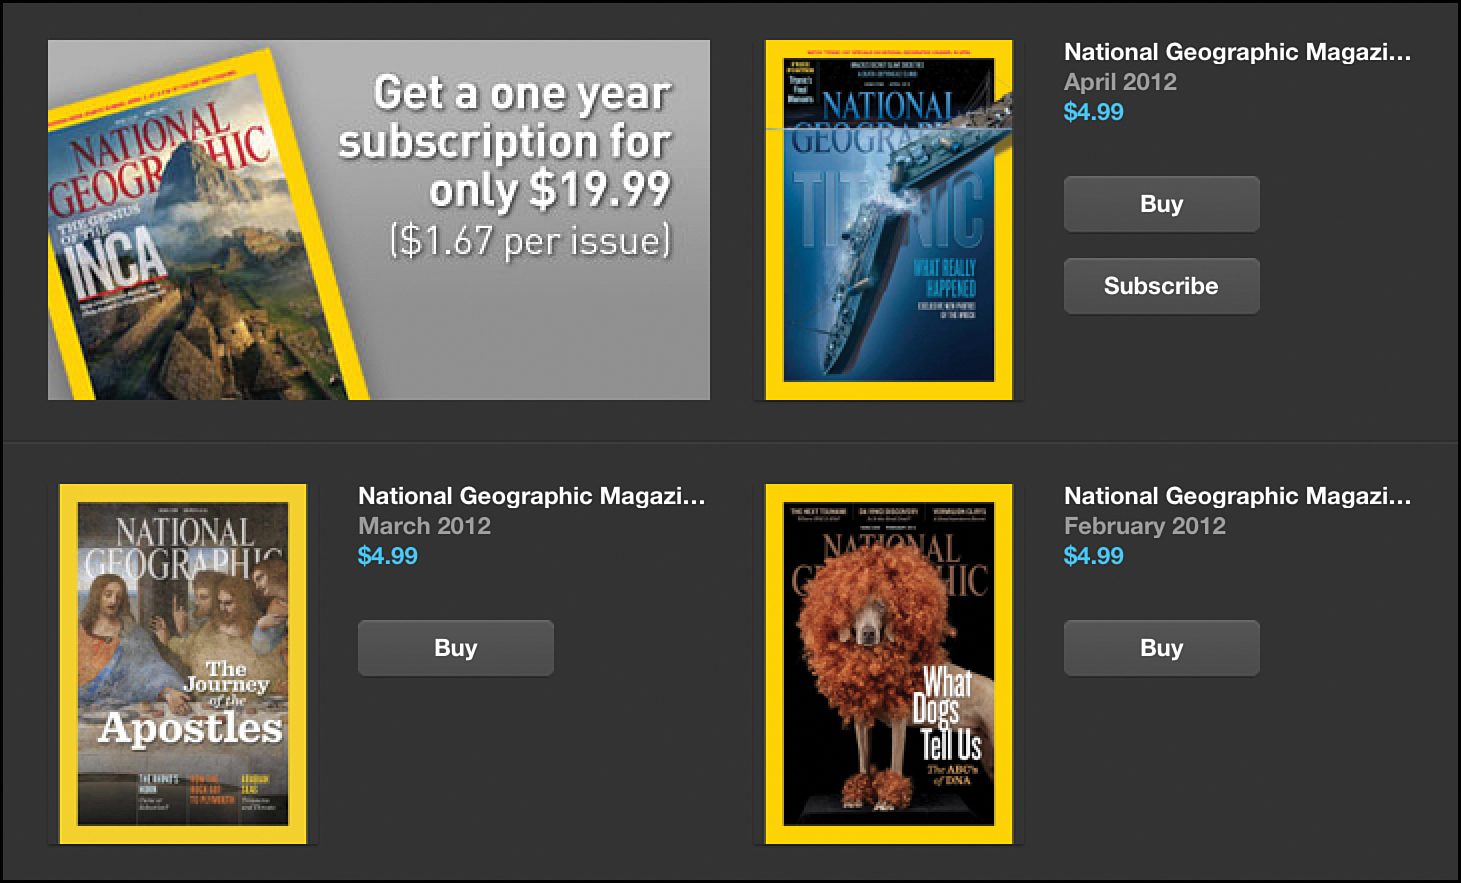
Tap the Buy button for either the issues or the subscription you want.
Remember, because these are in-app purchases, anything you buy gets billed to the iTunes account or iTunes allowance you use with your iPad. If your parents are paying for your purchases, make sure to get their permission before you buy.
If you buy a subscription, when a new issue is available, you tap the Download button to get and read it.
Reading Magazines and Newspapers
Because most magazines and newspaper apps are different, there’s no single set of buttons or controls to read magazines or newspapers on the iPad. Because of that, there’s no one set of instructions on how to use these apps. Instead, you have to learn the controls for each individual publication; many include how-to guides. Like with books, though, it’s always safe to try swiping left and right or up and down to move through the app.
Deleting Magazines and Newspapers from Newsstand
To delete a magazine or newspaper app from Newsstand, follow these steps:
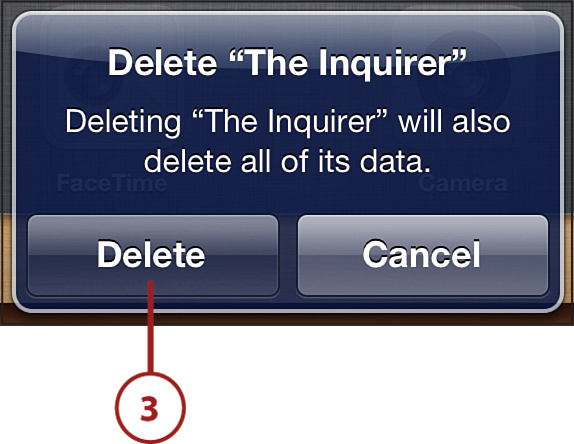
1. Tap and hold on the app you want to delete. Let go when the icon starts shaking.
2. Tap the X to begin deleting the app.
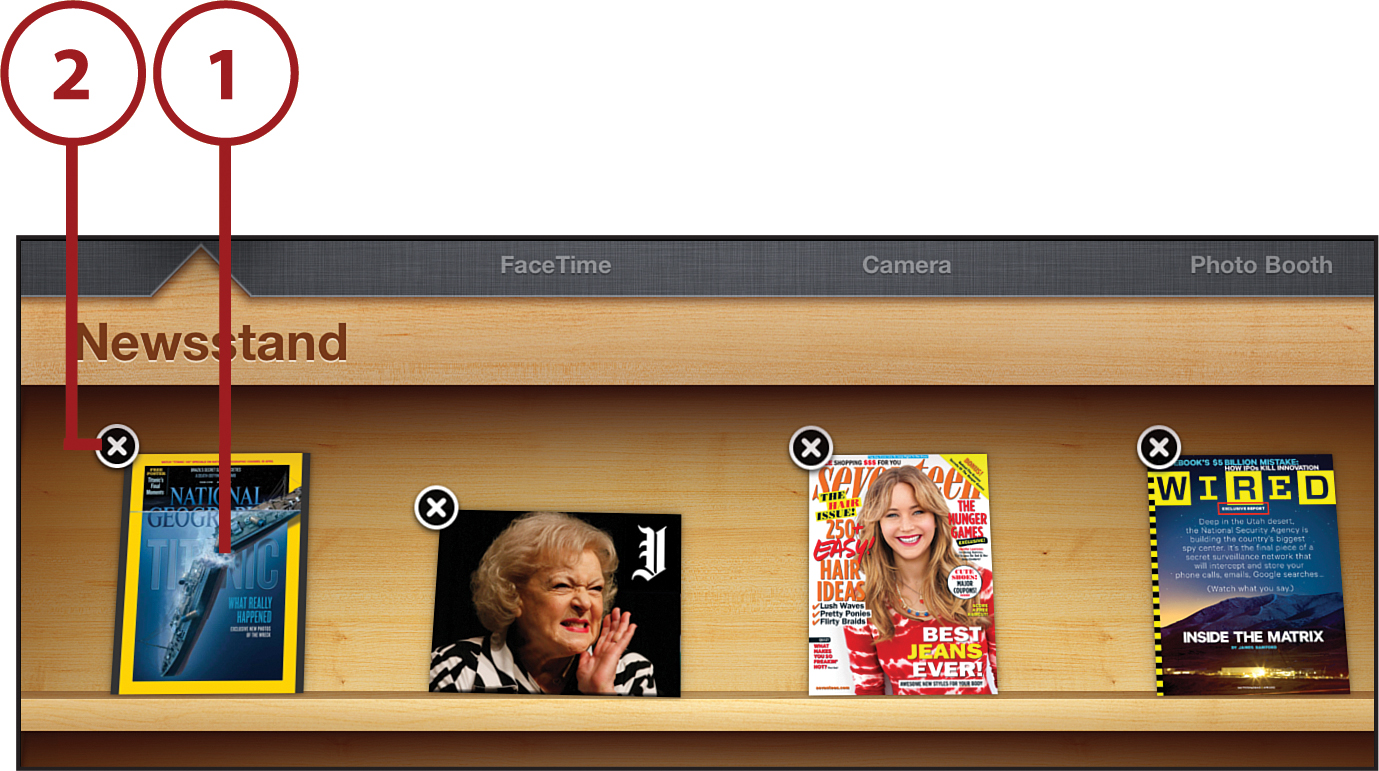
3. Tap Delete in the pop-up window. Remember, when you do this, you’re deleting the app and all the issues you’ve downloaded, so make sure you really want to do this
Getting Magazines and Newspapers Back
Like with any app, you can re-install the apps for magazines and newspapers that you remove. After you do that, in some cases you can redownload the issues of the magazines and newspapers you’ve already bought.
Awesome Apps
Like to read magazines? Here are some suggestions for magazines that you can read on your iPad that cover all kinds of interests. Remember, all of these apps are free, but you have to buy individual issues or subscriptions.
• Comic Heroes—If you like comics, especially superheroes, Comic Heroes magazine is a lot of fun. $6.99 per issue, $30.99 subscription

• FamilyFun Magazine—Get all kinds of great ideas for recipes, activities, parties, and games in this magazine. $2.99 per issue, $7.99 subscription
• Dolls’ House Magazine—Do you enjoy playing with dolls and imagining their lives in a doll-house? This magazine gives you great ideas for new doll furniture and more. $2.99 for the app, $4.99 per issue, $39.99 subscription

• Famous Monsters—If you like scary movies or classic monsters such as Frankenstein and The Mummy, you’ll get a thrill out of this magazine. $3.99 per issue, $23.99 subscription
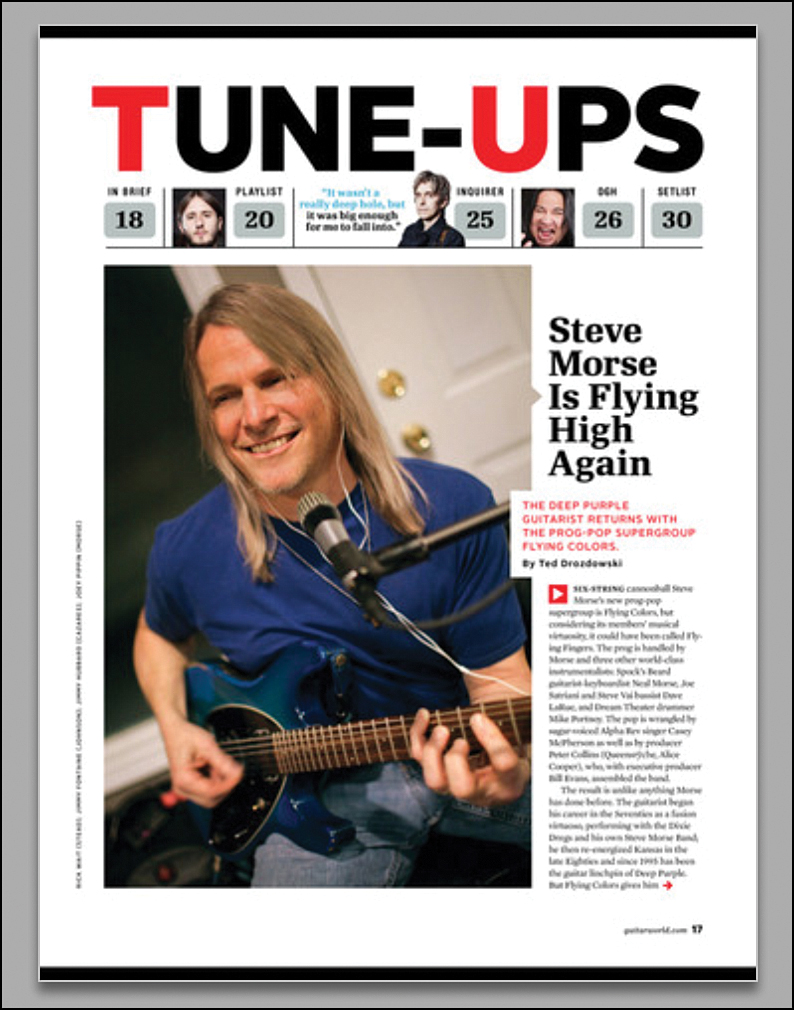
• Guitar World—Learning to play guitar? Then this magazine is essential reading. It has interviews and tons of tutorials on playing great rock songs. $7.99 per issue, $14.99 subscription
• How It Works—Curious about everything around you? Want to learn how different things—from science to technology to nature—work? Then this is your app. $3.99 per issue, $17.99 subscription
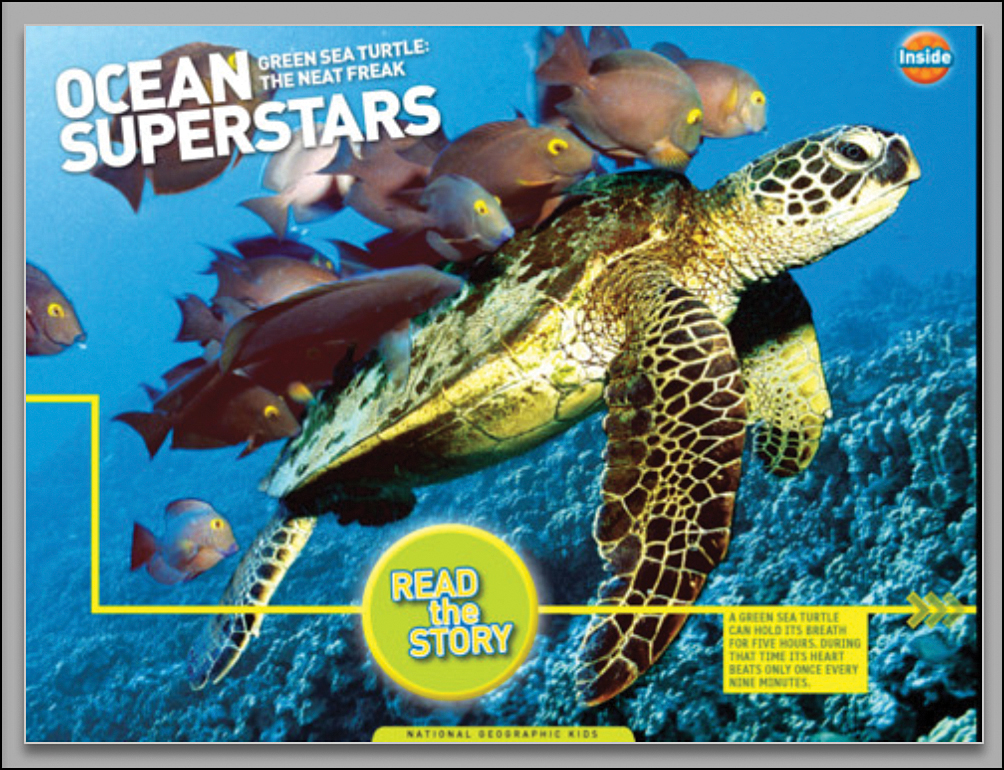
• National Geographic Kids—Are you interested in nature, animals, or how people live in other countries? Then check out this kids’ version of the classic magazine about geography and culture. $3.99 per issue, $19.99 subscription
• Papercraft Inspirations—Making things out of paper means a lot more than folding paper airplanes. If you like arts and crafts, check out this magazine for lots of fun ideas. $4.99 per issue, $39.99 subscription
• Popular Science+—If you’re interested in science and technology, Popular Science is one of the best magazines available. The iPad version offers all that and interactive features. $2.99 per issue, $14.99 subscription
• Writing Magazine—Do you like to write stories? Have you ever thought that you might want to be a writer? This magazine gives you tips on writing, ideas on where to send stories, and interviews with other writers. $4.99 per issue, $39.99 subscription