2. Getting Started with Your iPad
In this chapter, you learn the basic operation of your new iPad.
Now that you’ve taken your new iPad out of the box, charged it up, and performed the initial setup, it’s time to start using it. To do so, you need to know what’s what and what’s where on the iPad itself—and what you need to do to operate the darned thing!
Getting to Know Your iPad
Your iPad is a large, flat tablet with a screen on one side and a fairly plain back on the other. You can hold it either vertically (portrait mode) or horizontally (landscape mode); the screen flips to accommodate how you’re holding it.
There are physical buttons along the top and sides of the iPad and on the bottom front. Let’s look at these buttons now.
Front
Looking at the iPad from the front, the first thing you see is the screen. This is the touchscreen (technically, Apple calls it a Multi-Touch Display), which is how you perform most of the device’s operations—by literally touching the screen with your fingers. I go over all the multi-touch gestures (tapping, swiping, pinching, and more) in the “Learn Essential Multi-Touch Gestures” section later in this chapter.
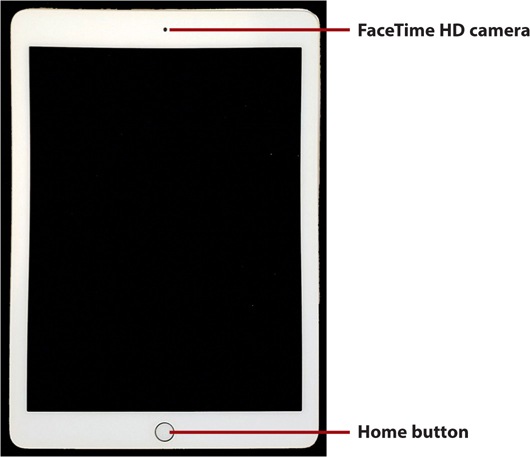
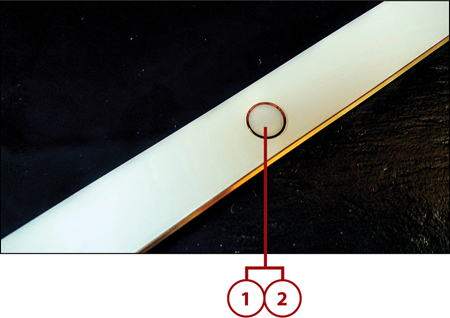
The front of a standard iPad; note the Home button.
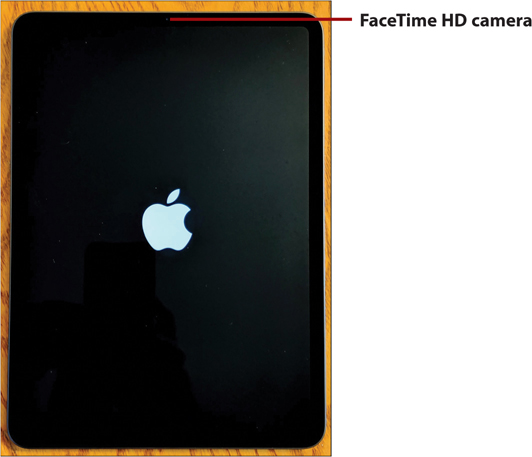
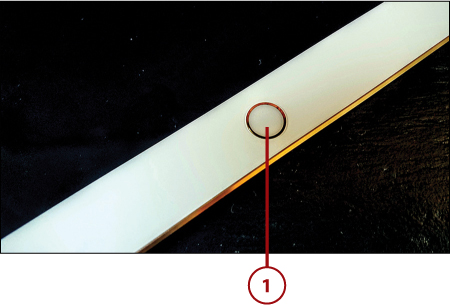
The front of an iPad Pro; no Home button.
Some iPads have a round button just beneath the screen; this is called the Home button. You press this button to return at any time to the iPad’s Home screen. The Home button also doubles as the Touch ID sensor; if you configure your iPad to unlock with your fingerprint, this is where you press your finger to unlock the device.
Touch ID and Face ID
Learn more about fingerprint and face unlocking in Chapter 6, “Keeping Your iPad Safe and Secure.”
Not all iPads have a Home button; iPad Pro models in particular have a clean front with no Home button. If your iPad doesn’t have a Home button, you use Face ID to unlock your device and touch gestures for all your navigation. For example, to go to the Home screen, swipe up from the bottom of the screen until the Home screen appears. (Again, I discuss these gestures later in this chapter.)
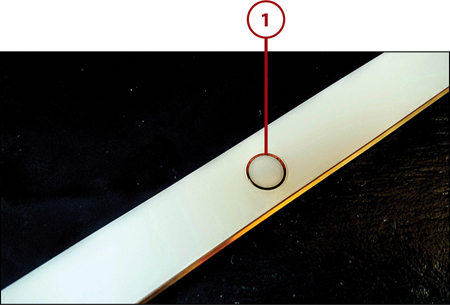
Directly above the screen is a small hole. This is the lens for the iPad’s front-facing camera—the one you use to take selfies or conduct video chats. Apple calls this the FaceTime HD camera, and you probably don’t want to cover it up.
Top
There are several items along the top edge of your iPad.
Some models, like the iPad Pros, have two speakers on the top of the device; others don’t. One or more microphones are near the center of the top of the unit.
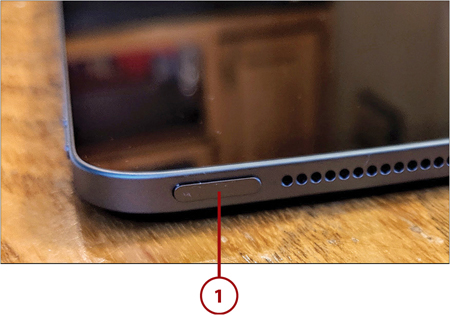
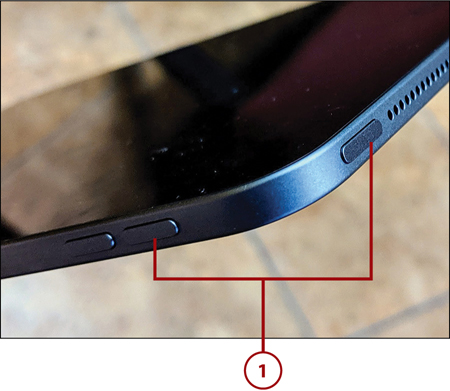
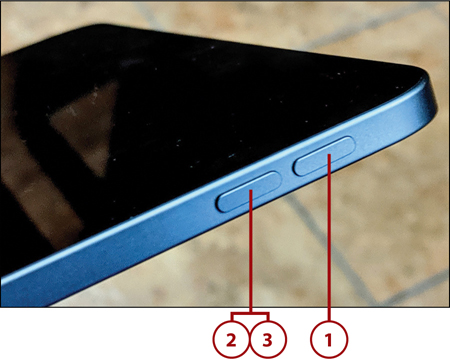
In addition, all iPads include a small button for turning your iPad on or off on the top right of the device; this is called, unsurprisingly, the On/Off button. You press this button to wake your iPad when it’s asleep or put it to sleep if you’re using it.

The top of an iPad Pro.
Some iPads have a 3.5mm headset jack for connecting earphones or headphones. Newer models, including all iPad Pro models, do away with this traditional headset jack. On these models, you need headphones or earphones that connect via USB-C at the bottom of the iPad, or a set of wireless Bluetooth earphones.
Sides
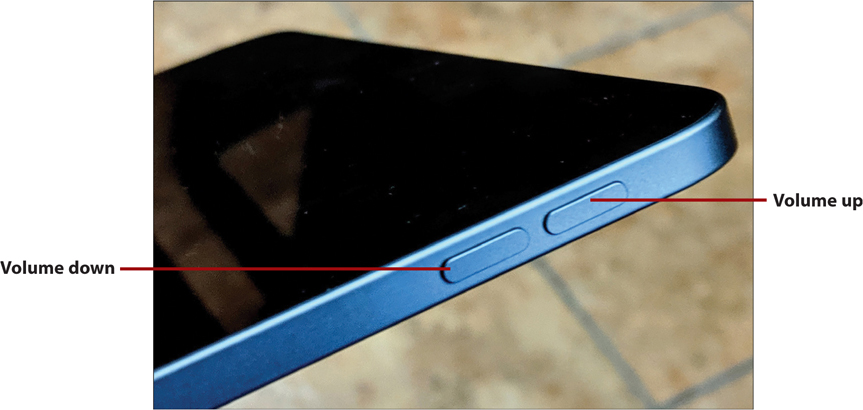
There’s nothing on the left side of your iPad. On the right side, however, you find the up and down volume buttons. Use these controls to raise and lower the iPad’s volume.
The right side of an iPad Pro.
Cellular Models
If your iPad offers cellular connectivity (in addition to the normal Wi-Fi wireless), it has a removable tray on the right side of the unit. This tray contains the iPad’s Nano-SIM card; insert the included removal tool (or a plain old paperclip) into the small hole to eject the tray.
Bottom
There are several important items along the bottom edge of your iPad, too.
In the very middle bottom is a small connector. On some models this is a Lightning connector; on others, it’s a USB-C connector. They look similar and do similar things.

The bottom of an iPad Pro.
You use the Lightning or USB-C connector to connect the cable that came with your iPad. The other end of the cable connects to the power adapter that you plug into the wall. (You can also plug it into your computer to transfer files.)
There are two speakers on the bottom of the iPad on either side of the Lightning or USB-C connector. Don’t cover up these speakers or you’ll adversely affect the sounds you hear.
Back
Finally, turn your iPad over and examine the back of the unit. The most obvious thing on the back is the big Apple logo, but that really doesn’t do anything.

The back of an iPad Pro.
Instead, direct your attention to the top-left corner. The big round thing you see there is the main camera. Apple calls this the iSight camera, and you use it to take pictures and videos of others.
Just beneath this, on some models, is a small hole that contains another microphone. On other models this may be in the top middle. Don’t cover up the microphone—or the camera, for that matter.
Finally, on iPad Pro models, you see three round metallic dots at the very bottom of the back. These are the magnetic connectors for your iPad’s Smart Connector. These magnetically connect so-called “smart” accessories, such as the iPad Pro Smart Keyboard, to your iPad Pro.
Turning Your iPad On and Off
Turning your iPad on and off is a little more complex than you might think. That’s because you can completely power off your unit or just put it to sleep. When the unit is completely powered off, it takes a minute or so to power back on. When it’s in sleep mode (or “locked,” as Apple puts it), it can immediately come back to life with the same apps running as when you put it to sleep.
Power On Your iPad
When your iPad is completely powered off (as it is when you first remove it from its box), you need to power it back on.
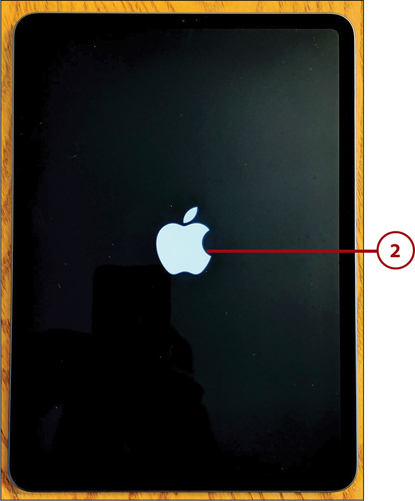
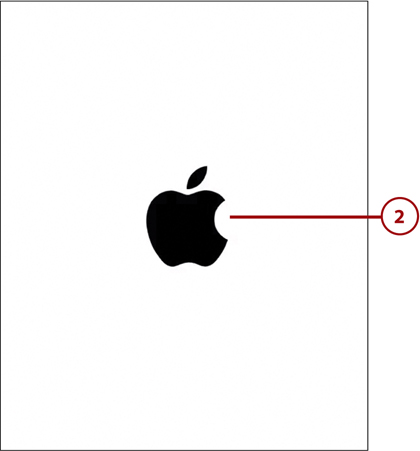
![]() Press and hold the On/Off button until the Apple logo appears onscreen.
Press and hold the On/Off button until the Apple logo appears onscreen.
![]() What happens after the Apple logo appears depends on your particular model of iPad and how you’ve opted to unlock the device. See the “Unlock Your iPad” tasks, next, to proceed and display the Home screen.
What happens after the Apple logo appears depends on your particular model of iPad and how you’ve opted to unlock the device. See the “Unlock Your iPad” tasks, next, to proceed and display the Home screen.
Setting Up Unlock Methods
Learn how to set up the different ways to unlock your iPad in Chapter 6.
Unlock Your iPad with Face ID
To reawaken a sleeping iPad, all you have to do is unlock it. If you have an iPad Pro or other model without a Home button, you can unlock your device with Face ID, which uses facial recognition technology. Obviously, you need to configure this first (which you probably did when you first set up your iPad), but then it’s a snap to use.
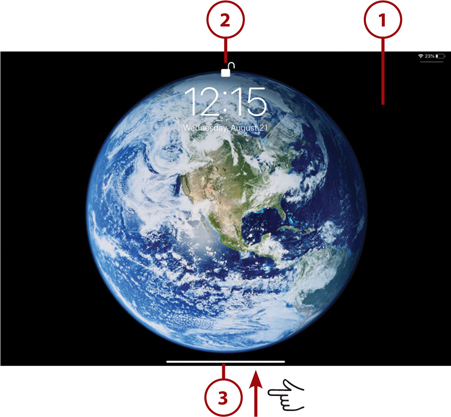
![]() Tap the iPad’s screen to wake it up.
Tap the iPad’s screen to wake it up.
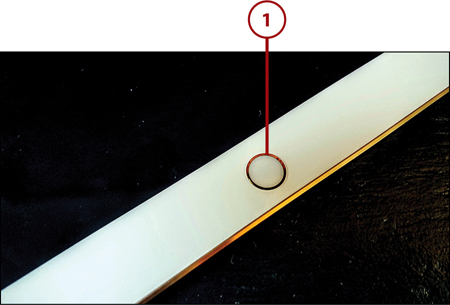
![]() Stare at the screen until the lock icon changes from closed to open.
Stare at the screen until the lock icon changes from closed to open.
![]() Swipe up from the bottom of the screen to unlock.
Swipe up from the bottom of the screen to unlock.
Unlock Your iPad with Touch ID
If your iPad has a Home button, you can use Touch ID to unlock your phone via fingerprint. (Again, this needs to be set up in advance.)
![]() Tap the Home button.
Tap the Home button.
![]() Rest your finger or thumb (whichever you’ve registered) on the Home button until the iPad unlocks.
Rest your finger or thumb (whichever you’ve registered) on the Home button until the iPad unlocks.
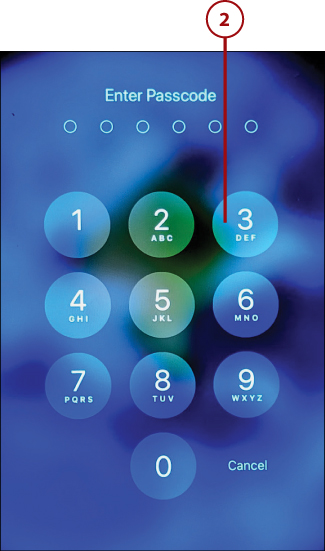
Unlock Your iPad with a Passcode
If you’ve configured your iPad with a passcode, you can unlock your iPad that way, too.
![]() Tap the Home button or, on models without a Home button, tap the screen.
Tap the Home button or, on models without a Home button, tap the screen.
![]() Enter your passcode.
Enter your passcode.
Wake Your iPad with No Lock
Although it’s not recommended, you don’t have to set up a passcode, Touch ID, or Face ID to unlock your iPad. This leaves your iPad entirely insecure so that anyone can use it. If you haven’t set up any lock protection, all you have to do to wake it up is tap the Home button or, on models without a Home button, tap the screen.
Lock Your iPad
You put your iPad to sleep (but not turn it completely off) by locking the device. This is how you most often “turn off” your iPad.
![]() Press the On/Off button.
Press the On/Off button.

![]() The screen goes blank, and the iPad is now locked (not shown).
The screen goes blank, and the iPad is now locked (not shown).
Inactivity Lock
By default, your iPad locks automatically if you haven’t touched the screen for two minutes. You can change this auto-lock time on the Settings screen, as discussed in Chapter 3, “Personalizing the Way Your iPad Looks and Works.”
Power Off Your iPad
Turning off the iPad shuts down the entire device. You have to power it back up again the next time you want to use it.
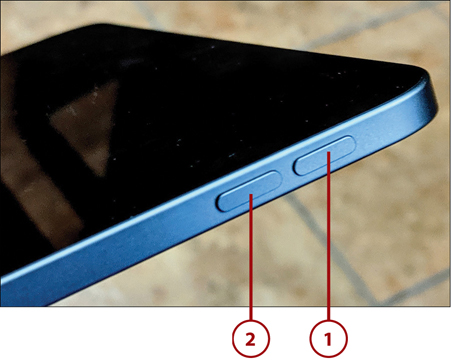
![]() On a regular iPad, press and hold the On/Off button for a few seconds; on an iPad Pro, press and hold the On/Off button and either the Volume Up or Volume Down button for a few seconds. Keep holding until the slider appears onscreen.
On a regular iPad, press and hold the On/Off button for a few seconds; on an iPad Pro, press and hold the On/Off button and either the Volume Up or Volume Down button for a few seconds. Keep holding until the slider appears onscreen.
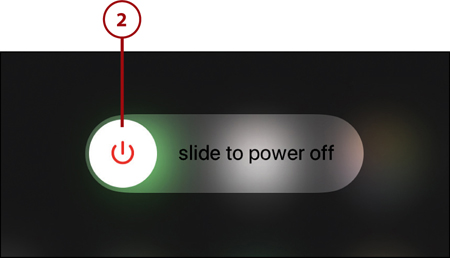
![]() Drag the Slide to Power Off slider to the right. The iPad now powers down.
Drag the Slide to Power Off slider to the right. The iPad now powers down.
Force a Restart on a Regular iPad
On rare occasions, an iPad may become frozen—tapping the screen does nothing. In this instance, you need to force a restart of your device. Here’s how you do it on an iPad with a Home button:
![]() Press and hold both the Top and Home buttons at the same time for at least ten seconds.
Press and hold both the Top and Home buttons at the same time for at least ten seconds.

![]() When the Apple logo appears onscreen, your iPad is restarting.
When the Apple logo appears onscreen, your iPad is restarting.
Force a Restart on an iPad Pro
On iPad models, such as the iPad Pro, that don’t have a Home button, you can’t use the previous method to force a restart. Instead, follow these steps:
![]() Press and release the Volume Up button.
Press and release the Volume Up button.
![]() Press and release the Volume Down button.
Press and release the Volume Down button.
![]() Press and hold the On/Off button until you see the Apple logo appear on screen. This means your iPad is restarting.
Press and hold the On/Off button until you see the Apple logo appear on screen. This means your iPad is restarting.
Using Your iPad
Okay, now you can turn your iPad on and off (and lock it and unlock it, too). But what do you do with it once you turn it on?
Learn Essential Multi-Touch Gestures
You operate your iPad with your finger(s). You can perform different operations with different gestures.
Most everything you can do onscreen is based on a half dozen basic gestures. These are detailed in the following table.
Basic Touch Gestures
Gesture |
Looks Like |
Description |
|---|---|---|
Tap |
|
Touch and quickly release a point on the screen with your finger. |
Press |
|
Touch your finger to the screen and hold it there. |
Drag |
|
Touch and hold your finger on an item on the screen, then slowly move your finger to drag the item to a new position. Release your finger to “drop” the item to the new position. |
Swipe |
|
This is like dragging, except faster. Place the tip of your finger on the screen, then quickly move it in the appropriate direction. You use swiping to scroll up or down a screen or move the screen left or right. |
Pinch |
|
Position your thumb and forefinger apart on the screen and then pinch them together. This is typically used to zoom out of a page or image. |
Expand |
|
This is the opposite of pinching. Position your thumb and forefinger together on the screen and then slide them apart. This is typically used to zoom into a page or an image. |


Perform Common Operations
You use variations of these basic gestures to perform common operations on your iPad. Here are some of the most useful:
Return to the Home screen by swiping up from the bottom of the screen until the Home screen displays. (You can also “pinch” with all five fingers on the screen.)
Display the Cover Sheet (which is similar to the Lock screen, but the iPad isn’t really locked) by swiping down from the middle of the screen.
Display the iPad’s Today View by swiping from left to right on any Home screen. This screen displays headlines, alerts, and notices from various apps. (Today View may be locked into place when in landscape mode, as described in Chapter 3.)
Display the Control Center by swiping from the top-right corner of the screen toward the middle. (You use the Control Center to adjust basic device settings.)
Display all open apps (called the App Switcher) by swiping up from the bottom edge of the screen and then to the right without lifting your finger as you swipe. (On those iPads with a Home button, you also can display the App Switcher by tapping the Home button twice.)
Switch from one open app to another by swiping left to right (or right to left) with four or five fingers.
With any app open, swipe up slightly from the bottom of the screen to display the Dock.
Open a second app in split screen mode by displaying the Dock and then dragging the icon for that app up and to the side of the screen.
While you’re in split screen mode, tap and drag a file, photo, or selected piece of text from one app to another.
Within an app, return to the top of a long page by tapping the top menu bar.
Zoom in and out of a document (or some web pages) by double-tapping the page.
In addition, the following gestures work when you’re editing a document:
Display a formatting bar by tapping and holding the screen with three fingers.
Select a word by double-tapping it.
Select a sentence by triple-tapping it.
Select a paragraph by tapping it four times.
Split the onscreen keyboard into two halves by expanding the keyboard with your thumb and forefinger. (Some people find this makes typing a little easier.) Pinch your fingers back together to rejoin the two halves into a whole keyboard.
Navigate the Home Screen
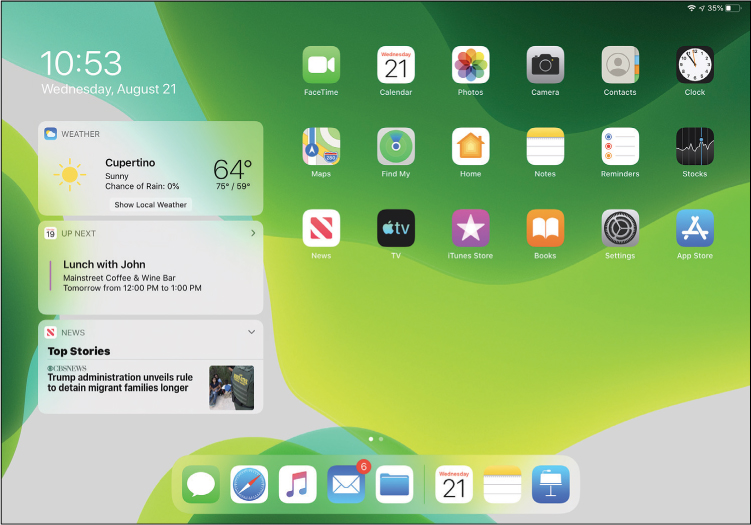
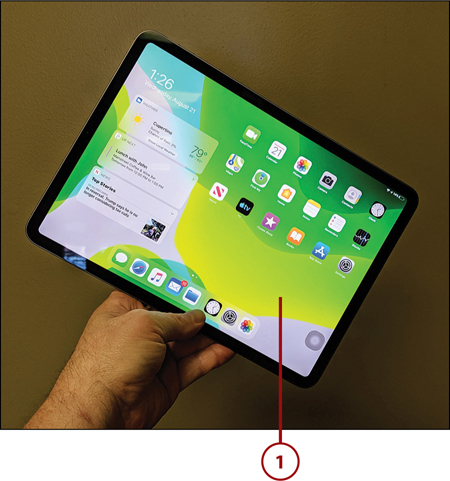
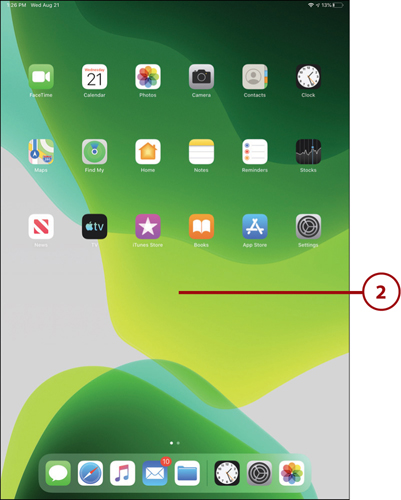
On your iPad, the Home screen is where everything starts. When you press the Home button (on those iPads with a Home button) or swipe up from the bottom of any page, you see the Home screen—or, more accurately, the first of several Home screens. All Home screens display a grid of icons that represent the apps installed on your device, along with a Dock of the most-used apps at the bottom of the screen. You have as many Home screens as you need to display all your apps.
![]() Press the Home button or swipe up from the bottom of any screen to display the first Home screen.
Press the Home button or swipe up from the bottom of any screen to display the first Home screen.
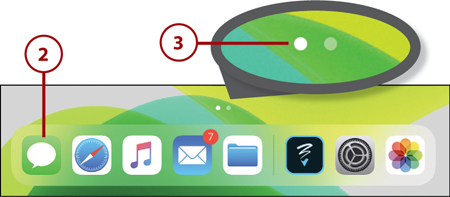
![]() At the bottom of the screen is the Dock, where app icons can be “docked” so that they appear on every Home page.
At the bottom of the screen is the Dock, where app icons can be “docked” so that they appear on every Home page.
![]() The number of Home screens on your iPad is indicated by a grouping of dots above the Dock; you see as many dots as you have Home screens. The screen you’re currently viewing is the solid white dot in the group.
The number of Home screens on your iPad is indicated by a grouping of dots above the Dock; you see as many dots as you have Home screens. The screen you’re currently viewing is the solid white dot in the group.
![]() Swipe left or right to view the next or previous Home screen.
Swipe left or right to view the next or previous Home screen.
![]() Tap an icon to open the corresponding app.
Tap an icon to open the corresponding app.

View Notifications on the Cover Sheet
As you recall, the iPad’s Lock screen can display system notifications and messages from selected apps. These notifications are collectively called the Cover Sheet, and you can view them at any time without having to unlock your device.
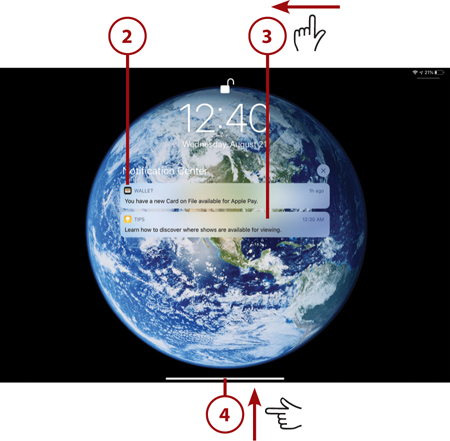
![]() Swipe down from the middle of any Home screen to display the Cover Sheet. (Or, if your iPad is locked, swipe up on the screen.)
Swipe down from the middle of any Home screen to display the Cover Sheet. (Or, if your iPad is locked, swipe up on the screen.)
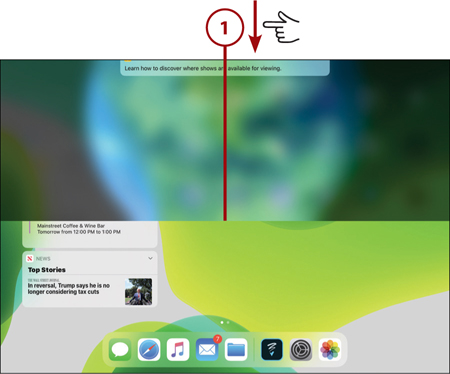
![]() Tap any notification to open the notification and accompanying app. Or…
Tap any notification to open the notification and accompanying app. Or…
![]() Swipe left on any notification to bring up options to view, manage, or clear that item.
Swipe left on any notification to bring up options to view, manage, or clear that item.
![]() Swipe up on the Cover Sheet to return to the previously viewed screen.
Swipe up on the Cover Sheet to return to the previously viewed screen.
Manage Open Apps
You open apps on your iPad by tapping the app’s icon on one of the Home screens or in the Dock. You can have multiple apps open at the same time and easily switch between them.
![]() To view all open apps, press the Home button twice if your iPad has a Home button. Or…
To view all open apps, press the Home button twice if your iPad has a Home button. Or…
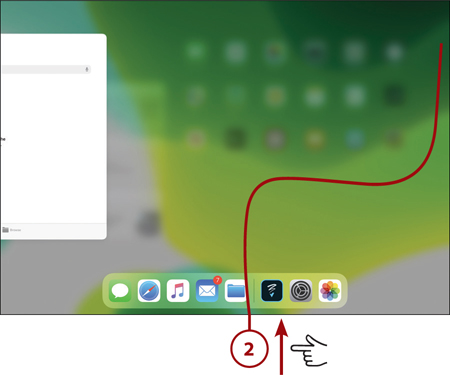
![]() From the bottom of any screen, swipe up, then to the right, then up again without lifting your finger as you swipe.
From the bottom of any screen, swipe up, then to the right, then up again without lifting your finger as you swipe.
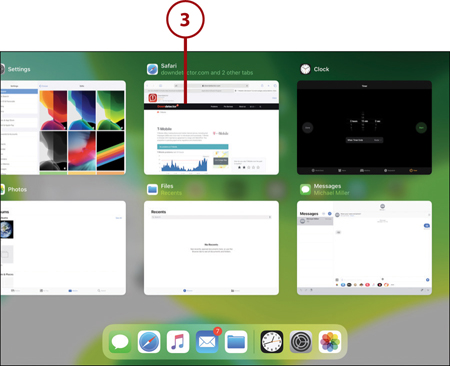
![]() You now see all your open apps. (The open apps are collectively called the App Switcher.) Tap an app to go to that app.
You now see all your open apps. (The open apps are collectively called the App Switcher.) Tap an app to go to that app.
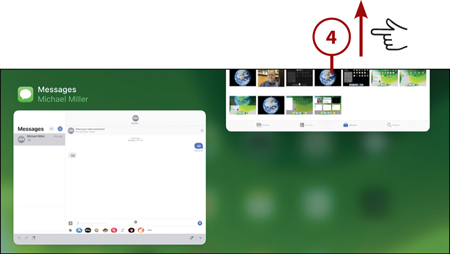
![]() Drag an app up and off the screen to close it.
Drag an app up and off the screen to close it.
Understand the Status Bar
Running across the top of every iPad screen is a transparent status bar. This status bar displays icons for various system operations and provides information that shows you how your iPad is working.
The following table details the more common icons you’ll find on the status bar and what they mean.
Status Bar Icons
Icon |
Name |
Description |
|---|---|---|
|
Lock |
The device is locked. |
|
Battery |
Shows the battery level or charging status. |
|
Alarm |
An alarm is set. |
|
Activity |
There is currently app or network activity. |
|
Orientation Lock |
Screen orientation is locked. |
|
Wi-Fi |
The iPad is connected to a Wi-Fi network; the more bars, the stronger the connection. |
|
Airplane Mode |
Airplane Mode is engaged (Wi-Fi and Bluetooth are both turned off). |
|
Do Not Disturb |
Do Not Disturb mode is turned on. |
|
Personal Hotspot |
A cellular-equipped iPad is providing a personal hotspot for other devices. |
|
Syncing |
The iPad is connected to your computer and syncing with iTunes. |
|
VPN |
The iPad is connected to a virtual private network (VPN). |
|
Location Services |
An app is using Location Services to establish the current location. |
|
Bluetooth |
If the icon is blue or white, Bluetooth is turned on and the iPad is paired with a device, such as a Bluetooth headset. If the icon is gray, Bluetooth is turned on and the iPad is paired with a device, but the device is turned off or out of range. |
|
Bluetooth Battery |
Shows the battery level of the connected Bluetooth device. |
Cellular Icons
If you have an iPad with cellular connectivity (Wi-Fi+Cellular), there are also icons for your cell signal and 3G/4G/LTE/EDGE/GPRS networks.
Performing Basic Operations
Now that you know where (almost) everything is on your iPad, it’s time to learn some of the most common operations necessary to get things done.
View and Respond to Alerts
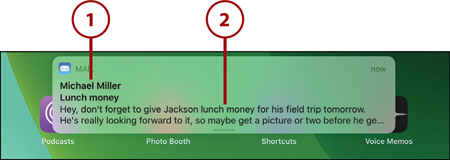
When your iPad or a specific app has something to tell you, you see an alert pop up onscreen. Depending on your settings and the importance of the alert, it may appear briefly at the top of the screen and then fade away, or it might remain in the center of the screen until you take some necessary action. Some alerts also appear on your iPad’s Home or Search screens.
![]() Most alerts appear at the top of the current screen.
Most alerts appear at the top of the current screen.
![]() Pull down on the alert to do something with it. Note that available options differ from app to app; for example, pulling down on a Messenger notification gives you options for Reply, Thumbs Up, Mute, and View Message. Pulling down a Mail notification gives you options for Archive or Mark as Read.
Pull down on the alert to do something with it. Note that available options differ from app to app; for example, pulling down on a Messenger notification gives you options for Reply, Thumbs Up, Mute, and View Message. Pulling down a Mail notification gives you options for Archive or Mark as Read.
Configure Alerts
To determine which alerts you see (and how you see them), turn to Chapter 3.
Display the Control Center
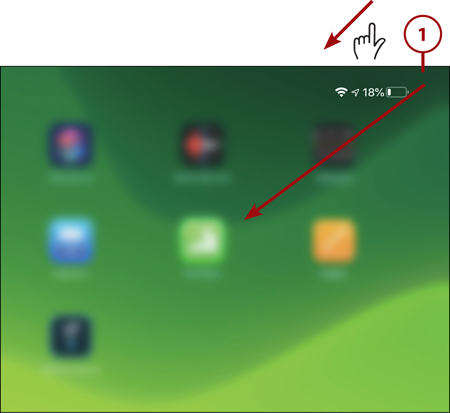
When you want instant access to key system settings, such as screen brightness and volume, open your iPad’s Control Center.
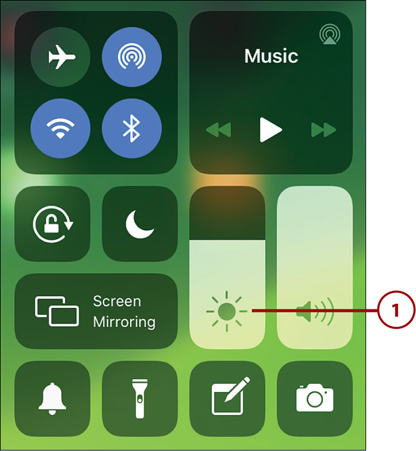
![]() Swipe from the top-right corner of the screen toward the middle to display the Control Center.
Swipe from the top-right corner of the screen toward the middle to display the Control Center.
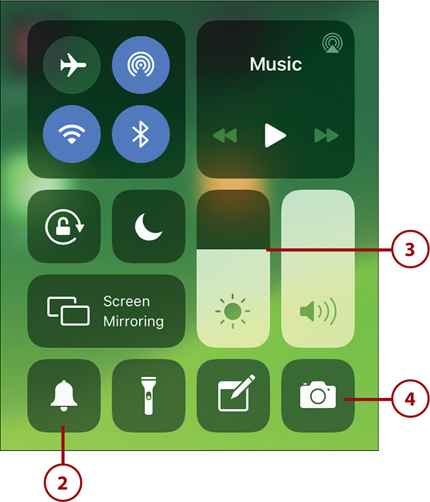
![]() Tap any panel to turn on or off that control.
Tap any panel to turn on or off that control.
![]() Tap and drag any slider to adjust that control.
Tap and drag any slider to adjust that control.
![]() Press and hold a panel (this is called a long press) to display additional options for a given control.
Press and hold a panel (this is called a long press) to display additional options for a given control.
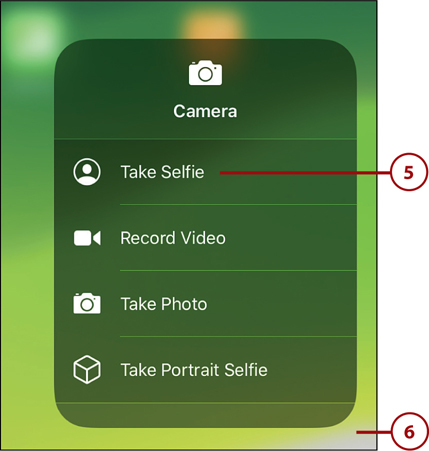
![]() For example, when you long press the Camera panel, you see additional options for taking a selfie, recording a video, and so forth.
For example, when you long press the Camera panel, you see additional options for taking a selfie, recording a video, and so forth.
![]() Tap outside the expanded panel to return to the normal Control Center. Close the Control Center by tapping on the background screen outside the controls. (You can also close the Control Center by pressing the Home button if your iPad has one.)
Tap outside the expanded panel to return to the normal Control Center. Close the Control Center by tapping on the background screen outside the controls. (You can also close the Control Center by pressing the Home button if your iPad has one.)
Adjust the Brightness
As noted, most of the more immediate iPad settings are accessed via the Control Center. You can control the device’s screen brightness control via the Control Center.
![]() From within the Control Center, touch and drag the Brightness slider up to increase screen brightness.
From within the Control Center, touch and drag the Brightness slider up to increase screen brightness.
![]() Touch and drag the Brightness slider down to decrease screen brightness.
Touch and drag the Brightness slider down to decrease screen brightness.

Conserve Battery Usage
Lower the screen brightness to conserve the battery.
Activate Night Shift
Night Shift mode subtly adjusts screen colors so that they’re warmer and easier to see at night. You can set a schedule for activating Night Shift, or simply go into Night Shift mode manually. (To configure Night Shift settings, tap Do Not Disturb on the Settings page.)
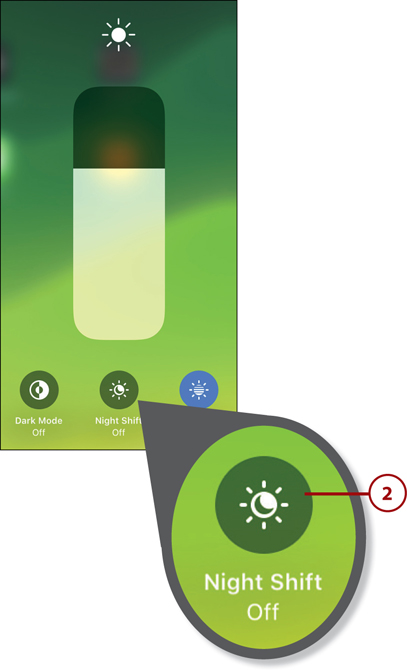
![]() From within the Control Center, long press the Brightness panel to bring up the larger control.
From within the Control Center, long press the Brightness panel to bring up the larger control.
![]() Tap the Night Shift icon to turn on Night Shift mode. (The first time you enable this feature, you are prompted to set the Night Shift schedule.) Tap the icon again to return to normal screen colors.
Tap the Night Shift icon to turn on Night Shift mode. (The first time you enable this feature, you are prompted to set the Night Shift schedule.) Tap the icon again to return to normal screen colors.
Change the Volume Level
Use the volume controls on the right side of your iPad to raise and lower the sounds you hear from the iPad’s speakers.
![]() Press the volume up button on the side of the iPad to increase the device’s volume level.
Press the volume up button on the side of the iPad to increase the device’s volume level.
![]() Press the volume down button on the side of the iPad to decrease the device’s volume level.
Press the volume down button on the side of the iPad to decrease the device’s volume level.
![]() Press and hold the volume down button to temporarily mute the sound. Press the volume up button to increase the sound again.
Press and hold the volume down button to temporarily mute the sound. Press the volume up button to increase the sound again.
![]() Alternatively, you can control the sound from the Control Center. Just open the Control Center and press and drag the Volume control up to increase the volume, or press and drag the control down to decrease the volume level.
Alternatively, you can control the sound from the Control Center. Just open the Control Center and press and drag the Volume control up to increase the volume, or press and drag the control down to decrease the volume level.

Rotate the iPad
As previously noted, you can use your iPad in either vertical (portrait) or horizontal (landscape) modes. The Home screen and most apps automatically rotate and adjust their displays to optimize how they work in either mode.
![]() To switch from horizontal to vertical mode, simply rotate the iPad 90 degrees left or right. (Rotating left—counterclockwise—puts the volume controls on top of the iPad and the Home button—if your iPad has one—on the right.)
To switch from horizontal to vertical mode, simply rotate the iPad 90 degrees left or right. (Rotating left—counterclockwise—puts the volume controls on top of the iPad and the Home button—if your iPad has one—on the right.)
![]() The Home screen automatically adapts to the new orientation.
The Home screen automatically adapts to the new orientation.
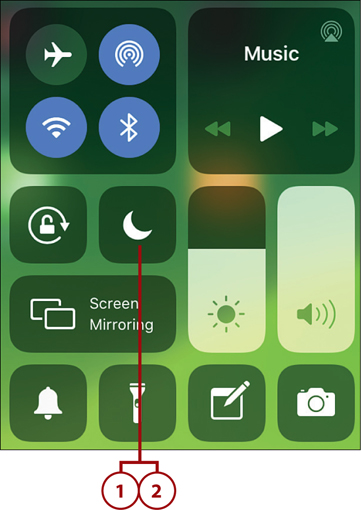
Activate Do Not Disturb Mode
There may be times when you don’t want to be disturbed by alerts and notifications or by requests to video chat via FaceTime. When you don’t want to be bothered by these and similar requests, activate your iPad’s Do Not Disturb mode. When Do Not Disturb is activated, you won’t see or hear notifications, alerts, and system sound effects. (Audio from music, movies, and TV shows is not muted.)
![]() From within the Control Center, tap the Do Not Disturb button to mute all system alerts and notifications.
From within the Control Center, tap the Do Not Disturb button to mute all system alerts and notifications.
![]() Tap the button again to return to normal operation.
Tap the button again to return to normal operation.
Enter Text with the Onscreen Keyboard
Many applications let you (or even require you!) to enter text onscreen. You might be writing a note or memo or browsing a web page that asks you to enter information into an onscreen form.
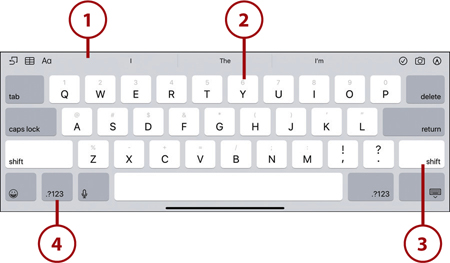
When you need to enter text onscreen, use your iPad’s onscreen keyboard. In most instances, the keyboard appears automatically, on the bottom half of the screen, when you tap within a form field or document.
![]() Tap within a document or form field to display the onscreen keyboard.
Tap within a document or form field to display the onscreen keyboard.
![]() Tap a key on the keyboard to enter that character onscreen.
Tap a key on the keyboard to enter that character onscreen.
![]() Tap the Shift key to enter a capital letter. Double-tap the Shift key to engage caps lock.
Tap the Shift key to enter a capital letter. Double-tap the Shift key to engage caps lock.
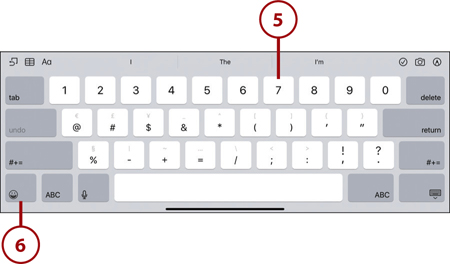
![]() Tap the Number key to display numbers and special characters.
Tap the Number key to display numbers and special characters.
![]() Tap to enter a number or special character.
Tap to enter a number or special character.
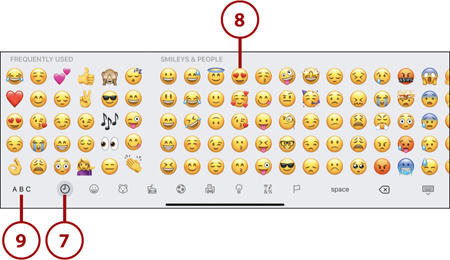
![]() Tap the Emoji key to display and enter an emoji.
Tap the Emoji key to display and enter an emoji.
![]() Tap a tab to display different types of emoji.
Tap a tab to display different types of emoji.
![]() Tap to enter an emoji.
Tap to enter an emoji.
![]() Tap the ABC key to return to the normal alphanumeric keyboard.
Tap the ABC key to return to the normal alphanumeric keyboard.
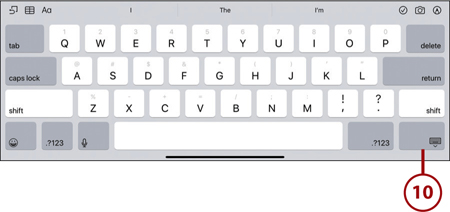
![]() Tap the Keyboard key to hide the onscreen keyboard.
Tap the Keyboard key to hide the onscreen keyboard.
Floating Keyboard
To make the keyboard “float” over your document, pinch your fingers on the keyboard. This shrinks the keyboard, and you can then move it around the screen.
Copy and Paste Text
Whether you’re using your iPad to write long letters or short Facebook posts, it’s handy to be able to copy and paste text from one location to another.
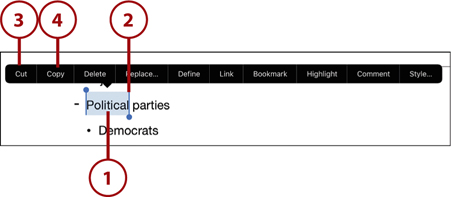
![]() Double-tap a word to highlight that word.
Double-tap a word to highlight that word.
![]() Tap and drag the starting and/or end points to select more or less text.
Tap and drag the starting and/or end points to select more or less text.
![]() Tap Cut to cut this selection (move it to another location).
Tap Cut to cut this selection (move it to another location).
![]() Tap Copy to copy this selection (duplicate it in another location).
Tap Copy to copy this selection (duplicate it in another location).
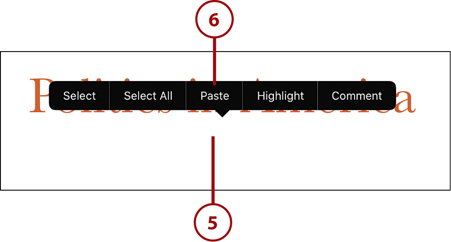
![]() Move to where you want to paste the selected text and then double-tap the screen. This displays a different menu of options. (The available options differ from app to app, too.)
Move to where you want to paste the selected text and then double-tap the screen. This displays a different menu of options. (The available options differ from app to app, too.)
![]() Tap Paste.
Tap Paste.
Set an Alarm
Your iPad includes a Clock app that lets you set a timer or an alarm. It also functions as a stopwatch.
If you want to use your iPad as a (very expensive!) alarm clock, use the Clock app to set an alarm.
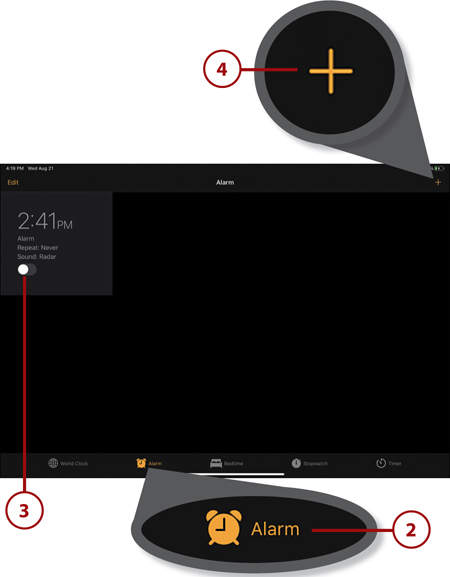
![]() Tap the Clock icon to open the Clock app.
Tap the Clock icon to open the Clock app.

![]() Tap Alarm at the bottom of the screen.
Tap Alarm at the bottom of the screen.
![]() Switch “on” any existing alarm to turn it on.
Switch “on” any existing alarm to turn it on.
![]() Tap + to create a new alarm.
Tap + to create a new alarm.
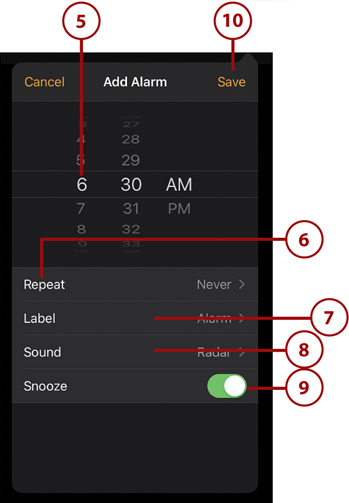
![]() Use the clock control to set the alarm time.
Use the clock control to set the alarm time.
![]() To have the alarm repeat on later days, tap Repeat and select which day(s) you want to use it.
To have the alarm repeat on later days, tap Repeat and select which day(s) you want to use it.
![]() Tap Label to create a name for this alarm.
Tap Label to create a name for this alarm.
![]() Tap Sound to select the sound you want to hear when the alarm goes off.
Tap Sound to select the sound you want to hear when the alarm goes off.
![]() Tap “off” the Snooze control if you don’t want to be able to snooze through the alarm.
Tap “off” the Snooze control if you don’t want to be able to snooze through the alarm.
![]() Tap Save. The alarm is created and activated.
Tap Save. The alarm is created and activated.
Turn Off an Alarm
When an alarm sounds, turn it off by pressing the iPad’s Home button. On an iPad without a Home button, tap the alarm notification to turn off the alarm.
Onscreen Switches
iOS uses a variety of onscreen switches to activate and deactivate various settings and functions. Just tap the switch to change its condition from “off” to “on,” or vice versa. An “on” switch is to the right with a green background; an “off” switch is to the left with a light gray background.
Set a Timer
There are times when you need to set a timer—when you’re cooking in the kitchen, for example, or putting the grandkids in a timeout. You can use the Clock app for all your timer needs.
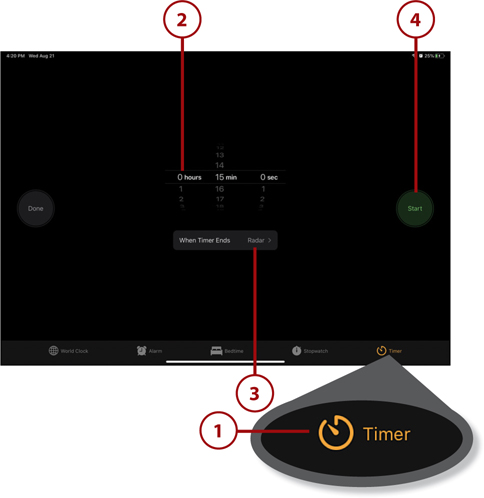
![]() From within the Clock app, tap Timer.
From within the Clock app, tap Timer.
![]() Use the timer controls to set the length of the timer.
Use the timer controls to set the length of the timer.
![]() Tap the sound icon to set the sound you hear when the timer goes off.
Tap the sound icon to set the sound you hear when the timer goes off.
![]() Tap Start to start the timer.
Tap Start to start the timer.
Turn Off the Timer
When the Timer ends, press the Home button or the timer alert to turn it off.
Use the Stopwatch
The Clock app also lets you use it as a stopwatch, so that you can time any ongoing event.
![]() From within the Clock app, tap Stopwatch.
From within the Clock app, tap Stopwatch.
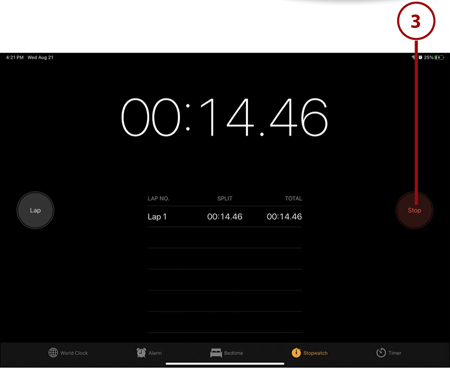
![]() Tap Start to start the stopwatch.
Tap Start to start the stopwatch.
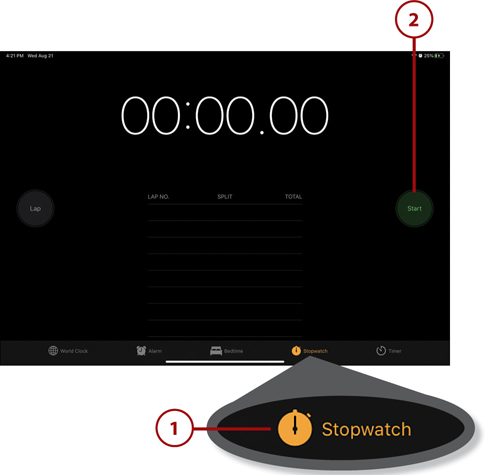
![]() Tap Stop to stop the stopwatch. The elapsed time is displayed onscreen.
Tap Stop to stop the stopwatch. The elapsed time is displayed onscreen.
Managing Your iPad’s Battery
Your iPad is powered by an internal battery that recharges when you connect it to the included power charger. How long the internal battery lasts before needing to be recharged depends on a lot of different factors—how you’re using the device, which apps you’re running, how bright you’ve set the screen, and so forth.
Recharge the Battery
Use the included power adapter to charge your iPad when you’re not using it—although you can continue to use the device when charging.
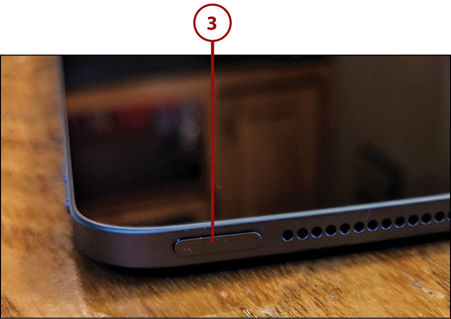
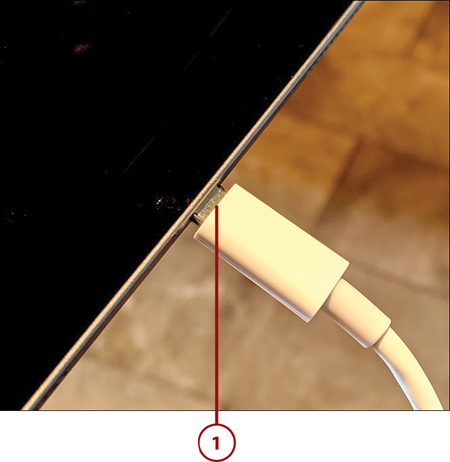
![]() Connect the Lightning or USB-C connector on the supplied cable to the port on the bottom of the iPad.
Connect the Lightning or USB-C connector on the supplied cable to the port on the bottom of the iPad.
It Works Either Way
One nice thing about both Lightning and USB-C connectors is that they’re symmetrical; you can plug the cable in right side up or upside down; it’s all the same. No more twisting and turning to fit cables into connectors!
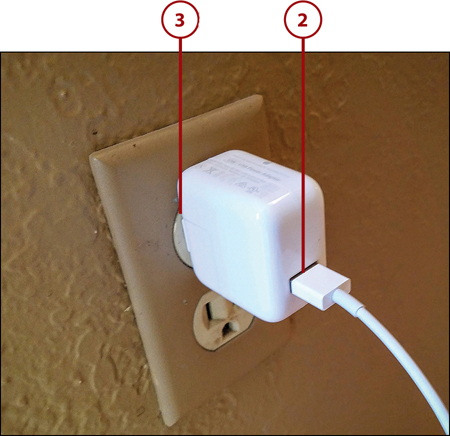
![]() Connect the USB connector on the cable to the USB port on the power adapter.
Connect the USB connector on the cable to the USB port on the power adapter.
![]() Connect the power adapter to any power outlet. Your iPad should fully charge in about 5 to 7 hours—longer if you’re using it while charging.
Connect the power adapter to any power outlet. Your iPad should fully charge in about 5 to 7 hours—longer if you’re using it while charging.
Monitor Battery Usage
The battery icon on the right side of the status bar indicates how much charge you have left. When the charge gets too low, the status bar displays the image of a nearly empty battery, and you need to plug in and charge up your iPad before you can continue to use it.
If you want to know which apps are using the most battery power, you can do that.
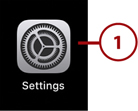
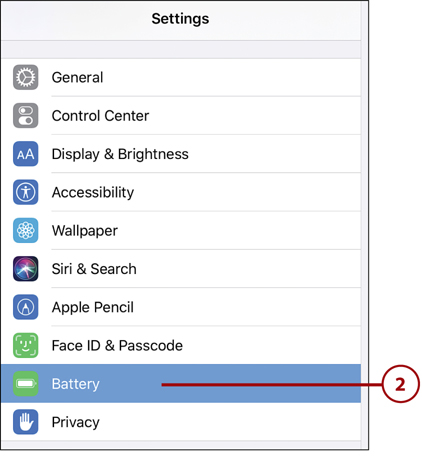
![]() From the Dock or Home screen, tap the Settings icon to open the Settings screen.
From the Dock or Home screen, tap the Settings icon to open the Settings screen.
![]() Tap Battery in the left column.
Tap Battery in the left column.
![]() The right side of the screen displays graphs for Battery Level and Activity. Examine these graphs to learn more about your iPad’s battery use.
The right side of the screen displays graphs for Battery Level and Activity. Examine these graphs to learn more about your iPad’s battery use.
![]() Tap to display usage for the last 24 hours or the last 10 days.
Tap to display usage for the last 24 hours or the last 10 days.
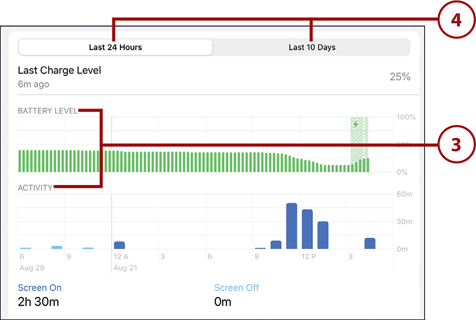
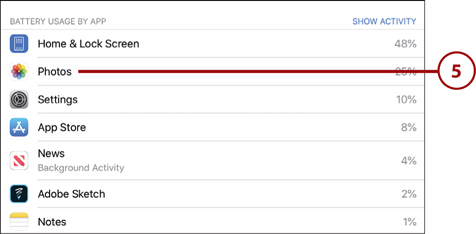
![]() You also see a list of those apps and system functions that have used the most battery power, in descending order. Tap any item to view how many minutes this and other items have been used.
You also see a list of those apps and system functions that have used the most battery power, in descending order. Tap any item to view how many minutes this and other items have been used.