
18. Controlling Your Smart Home
In this chapter, you learn how to use Apple HomeKit and the Home app on your iPad to control smart devices in your home.
![]() Controlling Your Smart Devices
Controlling Your Smart Devices
One of the big trends today is setting up so-called “smart” devices to control various functions in your home. We’re talking smart lighting that turns on and off according to a preset schedule, smart thermostats that learn your behavior and adjust the temperature accordingly, and smart locks and doorbells that let you see who’s at the door and unlock the door if you want to, all from a corresponding app on your iPad or smartphone.
Most smart devices come with their own mobile apps. This is fine—unless you have multiple smart devices, in which case you have to deal with multiple apps. You can get around this multiple-app mayhem by using Apple’s Home app on your iPad. The Home app works with Apple’s HomeKit protocol to control multiple smart devices from multiple manufacturers.
If you’d like more information about using smart home devices and apps, check out Que’s companion book, My Smart Home for Seniors, available wherever books are sold.
Understanding Apple HomeKit
Apple HomeKit is a system for controlling smart devices from a variety of suppliers with a single app—or with Apple’s Siri voice-controlled personal assistant. If a smart device is compatible with HomeKit (not all are), it’s a simple matter to link the device to the Home app on your iPad (or iPhone) and control it along with other devices with a tap of your finger.
It’s actually kind of a big deal to have centralized control of multiple smart devices with a single app. For one thing, using one app is a lot more convenient than using multiple apps. Beyond convenience, however, HomeKit also lets you centralize control of multiple devices in a single room, as well as create scenes that control multiple connected devices with a single tap. HomeKit makes possible a lot of combined automation that makes your smart devices work smarter together.
How HomeKit Works
HomeKit isn’t a smart home system per se; it doesn’t operate from a central hub, as do a lot of similar systems. Instead, HomeKit is more like the standalone smart controllers offered by Amazon (Echo) and Google (Home), but it works through a smartphone/tablet app instead of a piece of hardware (although you can control HomeKit devices, after they’ve been set up, with Apple’s HomePod smart speaker).
So how does HomeKit work? It all revolves around Apple’s Home app, which comes installed on your new iPad.
If a smart device is compatible with the HomeKit standard, it’s typically discovered by Apple’s Home app when you first power on the device. (If it’s not automatically discovered, you can add it manually to the app.) After a device is linked to the Home app, you specify what room it’s in. You can then control the device from the Home app or via any scenes or automations you create. (Your iPad must be connected to your home Wi-Fi network to do this; Home can’t control your smart devices remotely.)
What’s Compatible?
To work with HomeKit, smart devices need to be certified by Apple. Many are, but some aren’t. To determine what’s compatible, see the list at www.apple.com/ios/home/accessories/.
Adding Devices and Rooms
Before you can use the Home app to control devices from your iPad, you have to add those devices to the app. You can also assign devices to specific rooms in your home.
Apple calls smart devices, whether light bulbs or thermostats, “accessories.” If you have existing smart home devices, you’re prompted to set them up when you launch the Home app for the first time. When you see the Welcome screen, tap Continue and then follow the onscreen directions. You’re prompted to add your devices and create rooms. You can then add other devices and rooms manually at any time.
Add a New Accessory
Compatible accessories are relatively easy to add to the Home app. Just make sure the accessory is powered on and connected to your home’s Wi-Fi network—and that your iPad is connected to the same network.
![]() Tap the Home icon to launch the Home app.
Tap the Home icon to launch the Home app.

![]() From the Home screen, tap the + button.
From the Home screen, tap the + button.
![]() Tap Add Accessory.
Tap Add Accessory.

![]() Look for the HomeKit code on the new device or in the device’s documentation. Position the camera of your iPad to capture this code.
Look for the HomeKit code on the new device or in the device’s documentation. Position the camera of your iPad to capture this code.
![]() If for some reason step 4 doesn’t work, tap I Don’t Have a Code or Cannot Scan to enter the code with your tablet’s onscreen keyboard.
If for some reason step 4 doesn’t work, tap I Don’t Have a Code or Cannot Scan to enter the code with your tablet’s onscreen keyboard.

![]() If you want, change the name of this accessory by tapping the current name and then entering a new one. (Siri identifies this device by the name you give it here.)
If you want, change the name of this accessory by tapping the current name and then entering a new one. (Siri identifies this device by the name you give it here.)
![]() By default, the new accessory is added to your default room. To add the accessory to a different room, tap Location and select another room.
By default, the new accessory is added to your default room. To add the accessory to a different room, tap Location and select another room.
![]() Include this accessory in your favorites on the Home app’s home screen by tapping “on” the Include in Favorites switch.
Include this accessory in your favorites on the Home app’s home screen by tapping “on” the Include in Favorites switch.
![]() Tap Next.
Tap Next.

![]() If the accessory requires additional setup, tap View and follow the onscreen instructions.
If the accessory requires additional setup, tap View and follow the onscreen instructions.
![]() Tap Done to complete the installation.
Tap Done to complete the installation.

Add a New Room
When you install a new accessory, you assign this device to a given room in your home. You can create additional rooms corresponding to your actual physical rooms.
![]() Tap Rooms to display the Room screen.
Tap Rooms to display the Room screen.

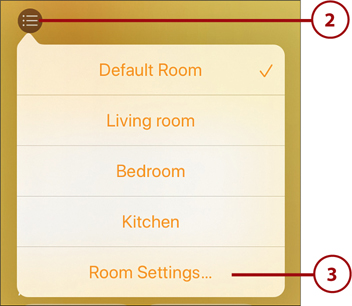
![]() Tap the Menu button in the upper-left corner of the screen.
Tap the Menu button in the upper-left corner of the screen.
![]() Tap Room Settings.
Tap Room Settings.
![]() Tap Add Room.
Tap Add Room.

![]() Enter a name for this room into the Room Name field.
Enter a name for this room into the Room Name field.
![]() Change the room’s background wallpaper by tapping Choose from Existing and then making a selection.
Change the room’s background wallpaper by tapping Choose from Existing and then making a selection.
![]() Alternatively, you can take a photo of the room to use for the wallpaper. Tap Take Photo and proceed from there.
Alternatively, you can take a photo of the room to use for the wallpaper. Tap Take Photo and proceed from there.
![]() Tap Save. The room is now created and added to your room list.
Tap Save. The room is now created and added to your room list.

Create a Scene
The Home app doesn’t limit you to controlling one device at a time. You can control multiple accessories at the same time by creating what Apple calls scenes.
For example, you can create a scene called “Good Morning” that turns on the smart lights in your bedroom and turns up your smart thermostat, or one called “Arrive Home” that turns on your living room lights and unlocks the front door. You activate a scene with a single tap from the home or room screen or via Siri command.
![]() On the Home screen, tap the +.
On the Home screen, tap the +.
![]() Tap Add Scene.
Tap Add Scene.

![]() Enter the name for this scene.
Enter the name for this scene.
![]() Tap Add Accessories.
Tap Add Accessories.

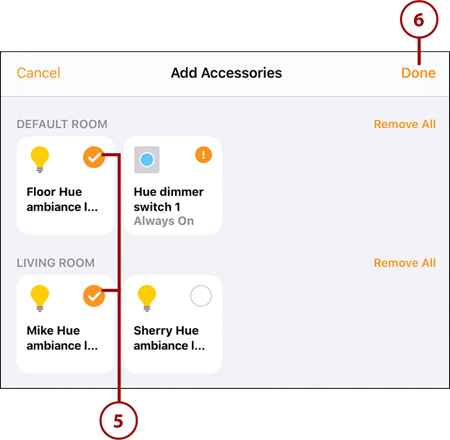
![]() Tap those accessories you want to add.
Tap those accessories you want to add.
![]() Tap Done.
Tap Done.
![]() Back in the New Scene pane, press and hold an accessory to adjust its settings.
Back in the New Scene pane, press and hold an accessory to adjust its settings.
![]() Tap Test This Scene to see if the scene works as you want.
Tap Test This Scene to see if the scene works as you want.
![]() Make sure the Include in Favorites switch is “on” to display this scene on the home screen.
Make sure the Include in Favorites switch is “on” to display this scene on the home screen.
![]() Tap Done to add this scene.
Tap Done to add this scene.

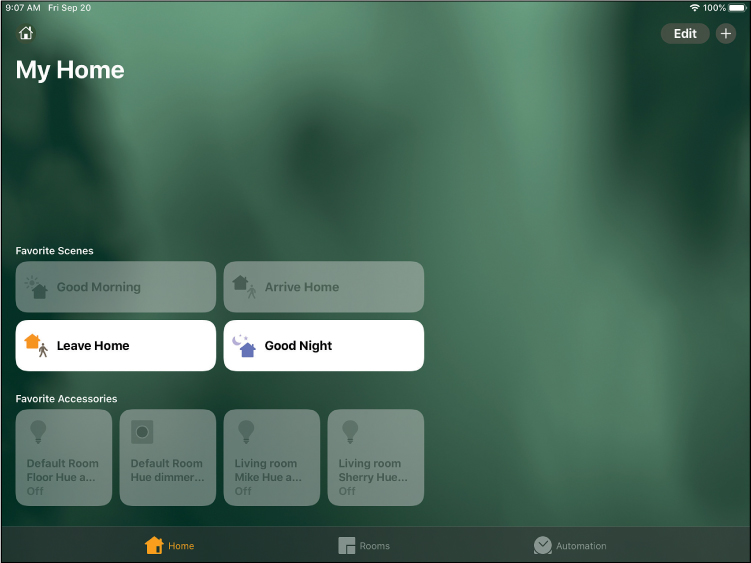
Controlling Your Smart Devices
Once you’ve installed a device/accessory in the Home app, you can use your iPad to control that device in various ways.
Control a Device or Scene from Your iPad
Turning a device on or off, or activating a scene, is as easy as tapping your tablet’s screen. For many devices, additional controls are also available.
![]() On either the Home or Rooms screen, tap an accessory or scene to turn it on or off. The tile for the accessory or scene dims when the device is turned off; the tile has a white background when the device is turned on.
On either the Home or Rooms screen, tap an accessory or scene to turn it on or off. The tile for the accessory or scene dims when the device is turned off; the tile has a white background when the device is turned on.
![]() Press and hold the tile for an accessory to access additional controls for that item.
Press and hold the tile for an accessory to access additional controls for that item.

Controlling Devices and Scenes with Siri
You’re probably used to asking your iPad’s Siri personal assistant to do all manner of things, from looking up information to reading the latest news and weather reports. Well, you can also use Siri within the Home app to control your connected smart devices using voice commands.
To use Siri to control any devices and scenes you’ve added to the Home app, all you have to do is say “Siri,” then speak the desired command. It’s that easy.
Obviously, which commands you speak depend on which devices you have installed and what you want them to do. For example, if you want to turn off the lights in your bedroom, say this:
Siri, turn off the lights in the bedroom.
Pretty simple. If you want to reduce the brightness for a given light or room, say this:
Siri, set brightness for the living room lights to 50 percent.
To set your smart thermostat, say this:
Siri, set the temperature to 70 degrees.
You can even ask questions of Siri regarding your smart devices, like this one:
Siri, did I lock the front door?
If you have scenes created (refer to the “Create a Scene” task earlier in this chapter), you can turn on a scene by saying
Siri, set my relaxing scene.
It’s all very common sense. All you have to do is speak to Siri via your iPad, and she works within the Home app to do the rest.