
13. Staying Organized with Calendar and Reminders

In this chapter, you learn how to use the iPad’s Calendar and Reminders apps to manage your schedule and to-do lists.
Sometimes it’s tough to keep track of your time. How are you supposed to juggle all the various things you’re supposed to do—appointments, events, and everything that’s on your to-do list?
Fortunately, you can use your iPad to help you manage just about everything on your schedule. Use the Calendar app to manage your appointments and events and the Reminders app to track all the items on your to-do list.
Using the Calendar App
Apple’s Calendar app is included with your iPad. Use the Calendar app to track everything you have on your schedule—what the app calls events.
View Events
You can view your calendar by day, week, month, or year.
![]() From the Home screen, tap the Calendar icon to open the Calendar app.
From the Home screen, tap the Calendar icon to open the Calendar app.

![]() Tap the Day tab to view a daily schedule. Scroll down to view times later in the day.
Tap the Day tab to view a daily schedule. Scroll down to view times later in the day.
![]() Swipe the top of the calendar to the left to advance a week, or swipe the middle of the calendar to the left to view the next day.
Swipe the top of the calendar to the left to advance a week, or swipe the middle of the calendar to the left to view the next day.
![]() Swipe the top of the calendar to the right to view the previous week, or swipe the middle of the calendar to the right to view the previous day.
Swipe the top of the calendar to the right to view the previous week, or swipe the middle of the calendar to the right to view the previous day.
![]() Tap a specific date at the top of the calendar to view events for that day.
Tap a specific date at the top of the calendar to view events for that day.
![]() Tap a specific event on the calendar to view details about that event.
Tap a specific event on the calendar to view details about that event.
![]() Tap Delete Event to delete the selected event.
Tap Delete Event to delete the selected event.

![]() Tap the Week tab to view all events this week.
Tap the Week tab to view all events this week.
![]() Swipe the calendar to the left to view the next week.
Swipe the calendar to the left to view the next week.
![]() Swipe the calendar to the right to view the previous week.
Swipe the calendar to the right to view the previous week.
![]() Tap an event to view details about that event.
Tap an event to view details about that event.

![]() Tap the Month tab to view all events this month.
Tap the Month tab to view all events this month.
![]() Scroll down the page to view events in the future.
Scroll down the page to view events in the future.
![]() Tap an event to view details about that event.
Tap an event to view details about that event.

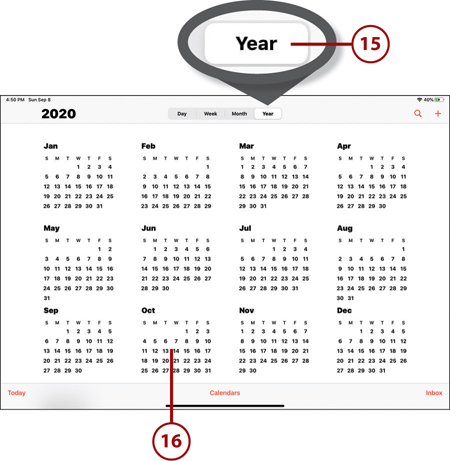
![]() Tap the Year tab to view a yearly calendar.
Tap the Year tab to view a yearly calendar.
![]() Tap within a given month to view that monthly calendar.
Tap within a given month to view that monthly calendar.
Add a New Event
By default, the Calendar app imports important dates from your contacts list—birthdays, anniversaries, and the like. It also creates events for major national holidays. (These show up in color shading.)
The real value of the Calendar app, of course, is evident when you add your own events to the calendar. You can add events for meetings, parties, sports games—you name it.
![]() From within the Calendar app, navigate to the day, week, month, or year you want and then tap the New (+) icon.
From within the Calendar app, navigate to the day, week, month, or year you want and then tap the New (+) icon.

![]() Tap within the Title field and add the name of this event.
Tap within the Title field and add the name of this event.
![]() Tap within the Location field and enter the location of this event. (This information is optional; the more detail you include—such as the street address—the better.)
Tap within the Location field and enter the location of this event. (This information is optional; the more detail you include—such as the street address—the better.)
![]() If this event lasts all day, tap the All-Day switch. Otherwise…
If this event lasts all day, tap the All-Day switch. Otherwise…
![]() Tap the Starts field to expand the panel.
Tap the Starts field to expand the panel.

![]() Use the spin control to select the date of the event.
Use the spin control to select the date of the event.
![]() Use the spin control to select the start time of the event. (The date, hour, minutes, and AM/PM controls spin separately.)
Use the spin control to select the start time of the event. (The date, hour, minutes, and AM/PM controls spin separately.)
![]() If necessary, select the appropriate time zone for the event.
If necessary, select the appropriate time zone for the event.
![]() Tap the Ends field to select the end date and time for the event.
Tap the Ends field to select the end date and time for the event.
![]() If you need to travel to this event, tap Travel Time and add the appropriate travel time.
If you need to travel to this event, tap Travel Time and add the appropriate travel time.
![]() Tap Add to add this event to your calendar.
Tap Add to add this event to your calendar.

Create a Recurring Event
Some events repeat. For example, you might have a standing golf match every Saturday morning or a neighborhood meeting the first Monday of each month. Fortunately, the Calendar app lets you create recurring events.
![]() From within the Calendar app, create a new event as normal and then tap the Repeat field.
From within the Calendar app, create a new event as normal and then tap the Repeat field.

![]() Tap how often this event recurs—Every Day, Every Week, Every 2 Weeks, Every Month, or Every Year.
Tap how often this event recurs—Every Day, Every Week, Every 2 Weeks, Every Month, or Every Year.
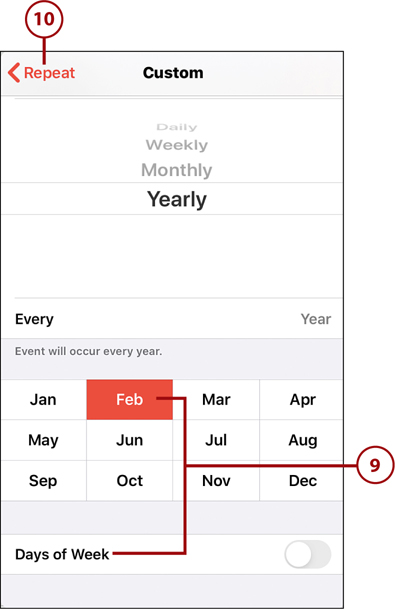
![]() Tap Custom if the occurrence is more complex.
Tap Custom if the occurrence is more complex.

![]() Tap Frequency to select how often the event recurs—Daily, Weekly, Monthly, or Yearly.
Tap Frequency to select how often the event recurs—Daily, Weekly, Monthly, or Yearly.
![]() Tap Every to determine how the event recurs—every 1, 2, 3, or so days, weeks, months, or years.
Tap Every to determine how the event recurs—every 1, 2, 3, or so days, weeks, months, or years.

![]() If you selected Weekly frequency, select which day(s) of the week this event recurs.
If you selected Weekly frequency, select which day(s) of the week this event recurs.

![]() If you selected Monthly frequency, select which day(s) of the month this event recurs. Or…
If you selected Monthly frequency, select which day(s) of the month this event recurs. Or…
![]() Tap On The and select which day(s) you want (First Sunday of the month, Second Thursday of the month, and so forth).
Tap On The and select which day(s) you want (First Sunday of the month, Second Thursday of the month, and so forth).

![]() If you selected Yearly frequency (perfect for birthdays, anniversaries, and other annual celebrations), select which month(s) of the year and days of the week this event recurs.
If you selected Yearly frequency (perfect for birthdays, anniversaries, and other annual celebrations), select which month(s) of the year and days of the week this event recurs.
![]() Tap the back arrow to return to the Repeat panel, and tap again to return to the New Event panel.
Tap the back arrow to return to the Repeat panel, and tap again to return to the New Event panel.
![]() Tap the End Repeat field, unless the event is ongoing. (If it’s ongoing—that is, if it doesn’t have a set end date—don’t tap End Repeat, and skip steps 12 and 13.)
Tap the End Repeat field, unless the event is ongoing. (If it’s ongoing—that is, if it doesn’t have a set end date—don’t tap End Repeat, and skip steps 12 and 13.)

![]() Tap On Date.
Tap On Date.

![]() Use the spin controls to select the last date this event occurs.
Use the spin controls to select the last date this event occurs.
![]() Tap the back arrow to return to the New Event panel and finish creating the event. Tap Add when done.
Tap the back arrow to return to the New Event panel and finish creating the event. Tap Add when done.

Create an Alert for an Event
Sometimes you want to be notified when an event is coming up. Maybe you need a full day to prepare for a big event or just a five-minute reminder to let you know what you need to do next. You can add alerts to any event you create in the Calendar app.
![]() From within the Calendar app, create a new event as normal and then tap the Alert field.
From within the Calendar app, create a new event as normal and then tap the Alert field.

![]() Tap when you want to be alerted, anywhere from at the time of the event to 1 week before. Your iPad displays an alert for this event at the designated time.
Tap when you want to be alerted, anywhere from at the time of the event to 1 week before. Your iPad displays an alert for this event at the designated time.
![]() If you’ve entered an address for the event, you can be alerted when it’s time to leave for the event (based on your location, the event’s location, and current traffic conditions). Tap to select Time to Leave.
If you’ve entered an address for the event, you can be alerted when it’s time to leave for the event (based on your location, the event’s location, and current traffic conditions). Tap to select Time to Leave.

Invite Others to an Event
Some events are personal. Others are quite public, involving lots of other people. (We’re talking meetings, parties, and the like.) With the Calendar app, you can invite your friends and family to new events you create so they’ll have these events on their calendars, too.
![]() From within the Calendar app, create a new event as normal and then tap the Invitees field.
From within the Calendar app, create a new event as normal and then tap the Invitees field.

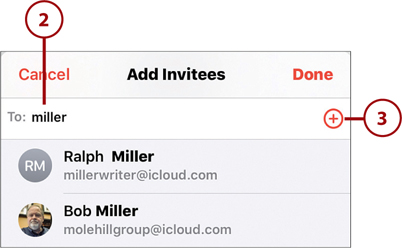
![]() From within the Add Invitees panel, tap the To field and enter the name or email address of the person you want to invite.
From within the Add Invitees panel, tap the To field and enter the name or email address of the person you want to invite.
![]() Alternatively, tap the + to display and select from people in your contacts list.
Alternatively, tap the + to display and select from people in your contacts list.
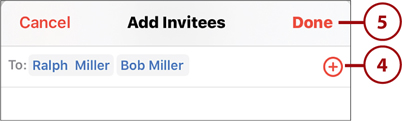
![]() This person is added to the invite list. Repeat steps 2 and 3 to add more invitees.
This person is added to the invite list. Repeat steps 2 and 3 to add more invitees.
![]() Tap Done. Each invitee is sent an email inviting him or her to your event.
Tap Done. Each invitee is sent an email inviting him or her to your event.
Using the Reminders App
I have trouble remembering things. Always have—it’s not an age thing; I just have a poor memory. As such, I can use all the assistance I can get to help me track the various things I need to do.
With Apple’s Reminders app, included with your iPad, you can create a digital to-do list containing all the various tasks and chores you need to remember. Add an item to the Reminders list and you’ll be prompted (or nagged, as the case may be) to complete that task.
View and Manage Your Reminders
By default, upcoming and past-due reminders are displayed in the Reminders widget on your iPad’s Cover Sheet screen (on your Lock screen). You also can review them all in the Reminders app itself.
![]() From the Cover Sheet screen, tap a reminder to view it in the Reminders app. Or…
From the Cover Sheet screen, tap a reminder to view it in the Reminders app. Or…

![]() From the Home screen, tap the Reminders icon to open the Reminders app.
From the Home screen, tap the Reminders icon to open the Reminders app.
![]() Tap All to view items you have not yet completed.
Tap All to view items you have not yet completed.
![]() Tap Scheduled to view items you want to complete by a given date.
Tap Scheduled to view items you want to complete by a given date.
![]() Tap the circle next to a given item to mark that item as completed.
Tap the circle next to a given item to mark that item as completed.

Change the Order
To change the order of the items in your Reminders list, press and drag any item to a new position.
Add a New Reminder
Adding a new item to your reminders list is as easy as adding a new event to your calendar.
![]() From within the Reminders app, go to the My Lists section and tap Reminders.
From within the Reminders app, go to the My Lists section and tap Reminders.
![]() Tap + New Reminder.
Tap + New Reminder.

![]() Enter the thing of which you need to be reminded.
Enter the thing of which you need to be reminded.
![]() Tap Done. Or…
Tap Done. Or…
![]() Tap Information (i) to enter more information about this reminder.
Tap Information (i) to enter more information about this reminder.

![]() Tap “on” the Remind Me on a Day switch to enter when you want to be reminded.
Tap “on” the Remind Me on a Day switch to enter when you want to be reminded.
![]() Tap “on” the Remind Me at a Location switch to be reminded when you’re near a specific location. (This is good for reminding you to pick up items at the grocery store.)
Tap “on” the Remind Me at a Location switch to be reminded when you’re near a specific location. (This is good for reminding you to pick up items at the grocery store.)
![]() Tap “on” the Remind Me When Messaging switch to be reminded when you’re messaging with a specific person.
Tap “on” the Remind Me When Messaging switch to be reminded when you’re messaging with a specific person.
![]() Tap “on” the Flagged switch to mark an item as important.
Tap “on” the Flagged switch to mark an item as important.
![]() Tap Priority and then select Low, Medium, or High to set the priority for the item.
Tap Priority and then select Low, Medium, or High to set the priority for the item.
![]() Tap Done when done.
Tap Done when done.
