7 Customizing How Your iPhone Looks

In this chapter, you learn how to make an iPhone look the way you want it to. Topics include the following:
➔ Customizing your Home screens
➔ Setting the screen’s appearance, brightness, lock/wake, text, view, and wallpaper options
There are lots of ways that you can customize the way your iPhone looks. You can design and organize your Home screens; choose the Dark or Light mode; and set the screen’s brightness, text size, and wallpaper.
Getting Started
In Chapter 6, “Making Your iPhone Work for You,” you learned how to change many aspects of how your iPhone works, the most significant of which were configuring notifications and choosing a ringtone. This chapter focuses on how you can change the way your iPhone looks and is organized. You learn how to customize your iPhone in two major groups of tasks:
Home screens—The iPhone’s Home screens are the starting point for most everything you do because these screens contain the icons that you tap to access the apps that you want to use. You see and use the Home screens constantly, so it’s a good idea to customize them to your preferences. You can place icons on specific screens, and you can use folders to make your Home screens work better for you.
Appearance, screen brightness, Auto-Lock, Raise to Wake, text, view, and wallpaper options—There are a number of ways you can change how your iPhone’s screen looks and works. For example, you can set its brightness level and text size.
Customizing Your Home Screens
You see and use the Home screens constantly, so it’s a good idea to customize them to your preferences.
In the background of the Lock screen and every Home screen is the wallpaper image. In the section called “Setting the Wallpaper on the Home and Lock Screens,” you learn how to configure your iPhone’s wallpaper in both locations.
As you know, you access apps on your Home screens by tapping them; the Home screens come configured with icons in default locations. You can change the location of these icons to be more convenient for you. As you install more apps on your iPhone, it’s a good idea to organize your Home screens so that you can quickly get to the apps you use most frequently. You can move icons around the same screen, move icons between the pages of the Home screen, and organize icons within folders. You can even change the icons that appear on the Home screen Dock. You also can delete icons that you no longer need.
Moving Icons Around Your Home Screens
You can move icons around on a Home screen, and you can move icons among screens to change where they are located.
![]() If you aren’t already on one, move to a Home screen.
If you aren’t already on one, move to a Home screen.
Going Home
If your iPhone doesn’t have a Touch ID/Home button, you move to a Home screen by swiping up from the bottom of the screen. If your iPhone has a Touch ID/Home button, press it once to move to a Home screen. The major differences in various models of iPhone are covered in Chapter 2, “Getting Started with Your iPhone.”
![]() Swipe to the left or right across the Home screen until the page containing an icon you want to move appears.
Swipe to the left or right across the Home screen until the page containing an icon you want to move appears.
![]() Touch (don’t tap because if you do, the app opens instead) and hold on any icon. After a moment, the Quick Actions menu appears.
Touch (don’t tap because if you do, the app opens instead) and hold on any icon. After a moment, the Quick Actions menu appears.

![]() Tap Rearrange Apps. The icons begin jiggling, which indicates that you can move icons on the Home screens. You also see the Delete icons (x) in the upper-left corner of some icons, which indicates that you can delete both the icon and app (more on this later in this section).
Tap Rearrange Apps. The icons begin jiggling, which indicates that you can move icons on the Home screens. You also see the Delete icons (x) in the upper-left corner of some icons, which indicates that you can delete both the icon and app (more on this later in this section).

![]() Touch and hold an icon you want to move; it becomes darker to show that you’ve selected it.
Touch and hold an icon you want to move; it becomes darker to show that you’ve selected it.

![]() Drag the icon to a new location on the current screen; as you move the icon around the page, other icons separate and are reorganized to enable you to place the icon in its new location.
Drag the icon to a new location on the current screen; as you move the icon around the page, other icons separate and are reorganized to enable you to place the icon in its new location.

![]() When the icon is in the location you want, lift your finger. The icon is set in that place. (You don’t have to be precise; the icon automatically snaps into the closest position when you lift your finger off the screen.)
When the icon is in the location you want, lift your finger. The icon is set in that place. (You don’t have to be precise; the icon automatically snaps into the closest position when you lift your finger off the screen.)
![]() Tap and hold on an icon you want to move to a different page.
Tap and hold on an icon you want to move to a different page.
![]() Drag the icon to the left edge of the screen to move it to a previous page or to the right edge of the screen to move it to a later page. As you reach the edge of the screen, you move to the previous or next page.
Drag the icon to the left edge of the screen to move it to a previous page or to the right edge of the screen to move it to a later page. As you reach the edge of the screen, you move to the previous or next page.

![]() Drag the icon to its location on the new Home screen and lift your finger off the icon.
Drag the icon to its location on the new Home screen and lift your finger off the icon.

![]() Continue moving icons until you’ve placed them in the locations you want; then tap Done (X models) or press the Touch ID/Home button (non-X models). The icons are locked in their current positions, they stop jiggling, and the Delete icons disappear.
Continue moving icons until you’ve placed them in the locations you want; then tap Done (X models) or press the Touch ID/Home button (non-X models). The icons are locked in their current positions, they stop jiggling, and the Delete icons disappear.

Creating and Naming Folders to Organize Apps on Your Home Screens
You can place icons into folders and name these folders to keep them organized and to make more icons available on the same page. To create a folder, do the following:
![]() Move to the Home screen containing icons you want to place in a folder.
Move to the Home screen containing icons you want to place in a folder.
![]() Touch and hold an icon until the Quick Action menu appears.
Touch and hold an icon until the Quick Action menu appears.
![]() Tap Rearrange Apps. The icons start jiggling; the Delete icons (x) appear on most icons.
Tap Rearrange Apps. The icons start jiggling; the Delete icons (x) appear on most icons.

![]() Drag one icon on top of another one that you want to be in the new folder together.
Drag one icon on top of another one that you want to be in the new folder together.

![]() When the first icon is on top of the second and a folder appears, lift your finger. The two icons are placed into the new folder, which is named based on the type of icons you place within it. The folder opens and you see its default name.
When the first icon is on top of the second and a folder appears, lift your finger. The two icons are placed into the new folder, which is named based on the type of icons you place within it. The folder opens and you see its default name.
![]() To delete the current name so you can create a completely new name, tap Delete (x); if you want to keep all or part of the current name, skip this step.
To delete the current name so you can create a completely new name, tap Delete (x); if you want to keep all or part of the current name, skip this step.

![]() Change the default name for the folder or type a completely new name if you deleted the previous one.
Change the default name for the folder or type a completely new name if you deleted the previous one.
![]() Tap done.
Tap done.

![]() Tap outside the folder to close it.
Tap outside the folder to close it.

![]() If you’re done organizing the Home screens, tap Done (X models) or press the Touch ID/Home button (non-X models). The icons are locked into place and stop jiggling.
If you’re done organizing the Home screens, tap Done (X models) or press the Touch ID/Home button (non-X models). The icons are locked into place and stop jiggling.


Locating Folders
You can move a folder to a new location in the same way you can move any icon. Touch and hold (don’t tap, or it opens instead) the folder’s icon until the Quick Action menu appears. Tap Rearrange Apps. The icons start jiggling. Drag the folder icon to where you want it to be.
Placing Icons in Existing Folders
You can add icons to an existing folder like so:
![]() Move to the Home screen containing an icon you want to place in a folder.
Move to the Home screen containing an icon you want to place in a folder.
![]() Touch and hold an icon until the Quick Action menu appears. (It doesn’t matter which icon you tap and hold because this starts the screen edit mode and you can get to all the icons once you are in this mode.)
Touch and hold an icon until the Quick Action menu appears. (It doesn’t matter which icon you tap and hold because this starts the screen edit mode and you can get to all the icons once you are in this mode.)

![]() Tap Rearrange Apps. The icons start jiggling; Delete icons (x) appear on most apps.
Tap Rearrange Apps. The icons start jiggling; Delete icons (x) appear on most apps.

![]() Drag the icon you want to place into a folder on top of the folder’s icon; the folder opens. (The icon doesn’t have to be on the same Home screen page; you can drag an icon from one page and drop it on a folder on a different page.)
Drag the icon you want to place into a folder on top of the folder’s icon; the folder opens. (The icon doesn’t have to be on the same Home screen page; you can drag an icon from one page and drop it on a folder on a different page.)

![]() When the folder opens, lift your finger from the screen. The icon is placed within the folder.
When the folder opens, lift your finger from the screen. The icon is placed within the folder.

Adding Apps to Folders Quickly
If you don’t want to change the icon’s location when you place it in the folder, lift your finger as soon as the folder’s icon is highlighted; this places the icon in the folder but doesn’t cause the folder to open. This is faster than waiting for the folder to open, but doesn’t allow you to position the icon within the folder.
![]() Drag the new icon to its location within the folder.
Drag the new icon to its location within the folder.
![]() Tap outside the folder. The folder closes.
Tap outside the folder. The folder closes.

![]() When you’re done adding icons to folders, tap Done (X models) or press the Touch ID/Home button (non-X models).
When you’re done adding icons to folders, tap Done (X models) or press the Touch ID/Home button (non-X models).

Removing Icons from Folders
To remove an icon from a folder, tap the folder from which you want to remove the icon to open it. Touch and hold the icon until the Quick Action menu appears. Tap Rearrange Apps. Drag the icon you want to remove from inside the folder to outside the folder. When you cross the border of the folder, the folder closes and you can place the icon on a Home screen.
Folders and Badges
When you place an icon that has a badge notification (the red circle with a number in it that indicates the number of new items in an app) in a folder, the badge transfers to the folder so that you see it on the folder’s icon. When you place more than one app with a badge notification in the same folder, the badge on the folder becomes the total number of new items for all the apps in the folder. You need to open a folder to see the badges for the individual apps it contains.
Configuring the Home Screen Dock
The Dock on the bottom of the Home screen appears on every page, making accessing those icons quick and easy. You can place any icons on the Dock that you want, including folder icons.
![]() Move to the Home screen containing an icon you want to place on the Dock.
Move to the Home screen containing an icon you want to place on the Dock.
![]() Touch and hold an icon until the Quick Action menu appears.
Touch and hold an icon until the Quick Action menu appears.

![]() Tap Rearrange Apps. The icons start jiggling; the Delete icons (x) appear on most apps.
Tap Rearrange Apps. The icons start jiggling; the Delete icons (x) appear on most apps.

![]() Drag an icon that is currently on the Dock from the Dock onto the Home screen to create an empty space on the Dock.
Drag an icon that is currently on the Dock from the Dock onto the Home screen to create an empty space on the Dock.

![]() Drag an icon or folder from the Home screen onto the Dock.
Drag an icon or folder from the Home screen onto the Dock.

![]() Drag the icons on the Dock around so they’re in the order you want them to be.
Drag the icons on the Dock around so they’re in the order you want them to be.

![]() If you’re done organizing the Home screen, tap Done (X models) or press the Touch ID/Home button (non-X models). The icons are locked into place and stop jiggling.
If you’re done organizing the Home screen, tap Done (X models) or press the Touch ID/Home button (non-X models). The icons are locked into place and stop jiggling.

Deleting Icons
You can delete most icons from a Home screen to remove them from your iPhone (there are exceptions as explained in “More on Organizing Home Screens”). When you delete an app’s icon, its data is also deleted and you won’t be able to use the app anymore. (Of course, you can download it again if you change your mind, but the data that the app was using is lost unless it’s stored elsewhere.)
![]() Move to the Home screen containing an icon you want to delete.
Move to the Home screen containing an icon you want to delete.
![]() Put the screen in Rearrange mode by touching and holding on an icon and then tapping Rearrange Apps (not shown in the figures).
Put the screen in Rearrange mode by touching and holding on an icon and then tapping Rearrange Apps (not shown in the figures).
![]() Tap Delete (x) on the app that you want to remove from your phone.
Tap Delete (x) on the app that you want to remove from your phone.

![]() Tap Delete. The app and any associated data on your iPhone are deleted.
Tap Delete. The app and any associated data on your iPhone are deleted.

Setting the Screen’s Appearance, Brightness, Lock/Wake, Text, View, and Wallpaper Options
There are a number of settings you can configure to suit your viewing preferences and how your iPhone locks/wakes:
Appearance—Your iPhone has a Light or Dark mode. In the Light mode, the screen’s background is bright, and the text is dark. The Dark mode “inverts” the screen so the background is dark and the text is light. You can switch modes manually and set a schedule so your phone changes modes automatically.
Brightness—Because you continually look at your iPhone’s screen, it should be the right brightness level for your eyes. However, the screen is also a large user of battery power, so the dimmer an iPhone’s screen is, the longer its battery lasts. You should find a good balance between viewing comfort and battery life.
True Tone—This feature attempts to adjust the display so that colors appear the same despite changes to the ambient light around the phone.
The Models Don’t Remain the Same
Different models of iPhones have different screen capabilities, so you might or might not see all of or the same options on your phone that are described in this section. If your iPhone doesn’t have a specific capability, such as True Tone, you can just ignore information related to that topic.
Night Shift—This feature changes the color profile of the screen after dark. It’s supposed to make the light produced by the iPhone more suitable to darker conditions. You can set the color temperature to your preferences and can set a schedule if you want Night Shift to be activated automatically.
Auto-Lock—The Auto-Lock setting causes your iPhone to lock and go to sleep after a specific amount of inactivity. This is good for security as it is less likely someone can pick up and use your phone if you let it sit for a while. It also extends battery life because it puts the iPhone to sleep when you aren’t using it.
Raise to Wake—This setting enables you to wake up the iPhone by lifting it. This is useful because you don’t even need to touch the screen or press a button, just lift the phone and you see the Lock screen, giving you quick access to the current time, the Audio Player, notifications, and widgets. However, some people find this feature more annoying than helpful so if the phone waking when you lift it bothers you, disable this setting on your phone.
Text Size/Bold—As you use your iPhone, you’ll be constantly working with text, so it’s important to configure the text size to meet your preferences. You can use the Bold setting to bold text to make it easier to read.
View—Some non-X models offer two views. The Standard view maximizes screen space and the Zoomed view makes things on the screen larger, making them easier to see, but less content fits on the screen. You can choose the view that works best for you. (X models don’t have this option.)
Wallpaper—Wallpaper is the image you see “behind” the icons on your Home screens. Because you see this image so often, you might as well have an image that you want to see or that you believe makes using the Home screens easier and faster. You can use the iPhone’s default wallpaper images, or you can use any photo available on your iPhone. You also can set the wallpaper you see on the iPhone’s Lock screen (you can use the same image as on the Home screens or a different one). Although it doesn’t affect productivity or usability of the iPhone very much, choosing your own wallpaper to see in the background of the Home and Lock screens makes your iPhone more personal to you and is just plain fun.
Configuring Light and Dark Modes Using the Settings App
To configure the Appearance mode your iPhone uses, perform the following steps:
![]() In the Settings app, tap Display & Brightness.
In the Settings app, tap Display & Brightness.

![]() Tap Light to use the Light mode or Dark to use the Dark Mode.
Tap Light to use the Light mode or Dark to use the Dark Mode.
![]() To have your iPhone automatically change modes, set Automatic to on (green). The default setting is to have your iPhone in Light mode until sunset at which time it changes to Dark mode. At sunrise, it changes back to Light mode. If you don’t want this change to happen automatically, set Automatic to off (white) and skip the rest of these steps.
To have your iPhone automatically change modes, set Automatic to on (green). The default setting is to have your iPhone in Light mode until sunset at which time it changes to Dark mode. At sunrise, it changes back to Light mode. If you don’t want this change to happen automatically, set Automatic to off (white) and skip the rest of these steps.

![]() To change the schedule for the automatic mode change, tap Options.
To change the schedule for the automatic mode change, tap Options.

![]() Tap Custom Schedule.
Tap Custom Schedule.
![]() Tap Light Appearance.
Tap Light Appearance.
![]() Swipe up or down on the hour, minute, and AM/PM columns to set the time at which your iPhone should switch into Light mode.
Swipe up or down on the hour, minute, and AM/PM columns to set the time at which your iPhone should switch into Light mode.
![]() Tap Dark Appearance and use the hour, minute, and AM/PM columns to set the time at which your iPhone switches into Dark mode.
Tap Dark Appearance and use the hour, minute, and AM/PM columns to set the time at which your iPhone switches into Dark mode.

Fully Automatic
To go back to the sunrise/sunset schedule, move to the Appearance Schedule screen and tap Sunset to Sunrise.
How Does It Know?
Your iPhone gets time and date information through you cellular or Wi-Fi network. The iPhone gathers your location through its GPS system. Based on your location, the time, and date, the iPhone can determine the time for sunrise and sunset each day. So, the actual times at which the Appearance mode changes vary with the change in sunrise and sunset times.
Setting Screen Brightness, True Tone, and Night Shift Using the Settings App
To set the screen brightness and Night Shift, perform the following steps:
![]() In the Settings app, tap Display & Brightness.
In the Settings app, tap Display & Brightness.

![]() Drag the slider to the right to raise the brightness or to the left to lower it. A brighter screen uses more battery power but is easier to see.
Drag the slider to the right to raise the brightness or to the left to lower it. A brighter screen uses more battery power but is easier to see.
![]() If you don’t want the True Tone feature to be active, set the True Tone switch to off (white).
If you don’t want the True Tone feature to be active, set the True Tone switch to off (white).

![]() To use True Tone, set the True Tone switch to on (green).
To use True Tone, set the True Tone switch to on (green).
![]() Tap Night Shift.
Tap Night Shift.

![]() To have Night Shift activate automatically, set the Scheduled switch to on (green); if you don’t want it to activate automatically, skip to step 13.
To have Night Shift activate automatically, set the Scheduled switch to on (green); if you don’t want it to activate automatically, skip to step 13.
![]() Tap the From/To setting.
Tap the From/To setting.

![]() To have Night Shift on between sunset and sunrise, tap Sunset to Sunrise and skip to step 12.
To have Night Shift on between sunset and sunrise, tap Sunset to Sunrise and skip to step 12.
![]() To set a custom schedule for Night Shift, tap Custom Schedule.
To set a custom schedule for Night Shift, tap Custom Schedule.
![]() Tap Turn On At and swipe up or down on the hour, minute, and AM/PM wheels to set the time when you want Night Shift to activate.
Tap Turn On At and swipe up or down on the hour, minute, and AM/PM wheels to set the time when you want Night Shift to activate.
![]() Tap Turn Off At and use the time wheels to set when you want Night Shift to turn off.
Tap Turn Off At and use the time wheels to set when you want Night Shift to turn off.
![]() Tap Night Shift.
Tap Night Shift.

![]() To manually turn Night Shift on at any time, set the Manually Enable Until Tomorrow switch to on (green). Night Shift activates and remains on until sunrise when it shuts off automatically. (You can manually turn off Night Shift by setting the Manually Enable Until Tomorrow switch to off [white]).
To manually turn Night Shift on at any time, set the Manually Enable Until Tomorrow switch to on (green). Night Shift activates and remains on until sunrise when it shuts off automatically. (You can manually turn off Night Shift by setting the Manually Enable Until Tomorrow switch to off [white]).
![]() Drag the COLOR TEMPERATURE slider to the right to make the Night Shift effect more pronounced or to the left to make it less pronounced. If Night Shift isn’t active when you drag the slider, it goes into effect as you move the slider so you can see the effect of the temperature you select.
Drag the COLOR TEMPERATURE slider to the right to make the Night Shift effect more pronounced or to the left to make it less pronounced. If Night Shift isn’t active when you drag the slider, it goes into effect as you move the slider so you can see the effect of the temperature you select.

Setting the Appearance, Screen Brightness, and Night Shift Using the Control Center
You can use the Control Center to quickly configure your iPhone’s screen as follows:
![]() Open the Control Center by swiping down from the upper-right corner of the screen (X models) or swiping up from the bottom of the screen (non-X models).
Open the Control Center by swiping down from the upper-right corner of the screen (X models) or swiping up from the bottom of the screen (non-X models).

![]() Swipe up or down on the Brightness slider to increase or decrease the brightness, respectively.
Swipe up or down on the Brightness slider to increase or decrease the brightness, respectively.

![]() To access more controls, press and hold on the Brightness slider.
To access more controls, press and hold on the Brightness slider.

![]() Use the Brightness slider to change the screen’s brightness (this does the same thing as using the slider on the Control Center, but it’s larger here, so it’s a bit easier to use).
Use the Brightness slider to change the screen’s brightness (this does the same thing as using the slider on the Control Center, but it’s larger here, so it’s a bit easier to use).
![]() To enable or disable True Tone, tap True Tone. The current status is indicated under the icon so you know when it’s on or off. The icon is blue when True Tone is on and black when it’s off.
To enable or disable True Tone, tap True Tone. The current status is indicated under the icon so you know when it’s on or off. The icon is blue when True Tone is on and black when it’s off.
![]() Tap Night Shift to turn Night Shift on. When on, the Night Shift icon is orange.
Tap Night Shift to turn Night Shift on. When on, the Night Shift icon is orange.

![]() Tap Night Shift to turn Night Shift off. When off, the Night Shift icon is black.
Tap Night Shift to turn Night Shift off. When off, the Night Shift icon is black.
![]() Tap Appearance to change modes. You see the current status of the Dark mode under the icon and the icon itself reflects the mode. When Dark mode is off, the icon is mostly dark; when Dark mode is on, the icon is mostly light (which seems backward to me).
Tap Appearance to change modes. You see the current status of the Dark mode under the icon and the icon itself reflects the mode. When Dark mode is off, the icon is mostly dark; when Dark mode is on, the icon is mostly light (which seems backward to me).
![]() Tap outside the tools to return to the Control Center.
Tap outside the tools to return to the Control Center.

![]() Tap on any area on the background of the Control Center to close it.
Tap on any area on the background of the Control Center to close it.

Setting Auto-Lock and Raise to Wake
To configure Auto-Lock or Raise to Wake, perform the following steps:
![]() Open the Display & Brightness settings screen.
Open the Display & Brightness settings screen.
![]() Tap Auto-Lock.
Tap Auto-Lock.

![]() Tap the amount of idle time you want to pass before the iPhone automatically locks and goes to sleep. You can choose from 30 seconds or 1 to 5 minutes; choose Never if you want to only manually lock your iPhone. I recommend that you keep Auto-Lock set to a relatively small value to conserve your iPhone’s battery and to make it more secure. Of course, the shorter you set this time to be, the more frequently you have to unlock your iPhone.
Tap the amount of idle time you want to pass before the iPhone automatically locks and goes to sleep. You can choose from 30 seconds or 1 to 5 minutes; choose Never if you want to only manually lock your iPhone. I recommend that you keep Auto-Lock set to a relatively small value to conserve your iPhone’s battery and to make it more secure. Of course, the shorter you set this time to be, the more frequently you have to unlock your iPhone.
You Looking at Me?
iPhone X models can detect when you’re looking at the screen. This is cool because the iPhone won’t lock while you’re looking at it but not touching the screen, such as when you are reading a book. This means you can set a very short Auto-Lock time and not have the iPhone sleep while you are looking at it.
![]() Tap Back (<).
Tap Back (<).

![]() If you want to be able to wake your phone by lifting it, set the Raise to Wake switch to on (green); to disable this feature, set the switch to off (white).
If you want to be able to wake your phone by lifting it, set the Raise to Wake switch to on (green); to disable this feature, set the switch to off (white).

Setting Text Size and Bold
To change the text size or make all text bold, perform the following steps:
![]() Open the Display & Brightness settings screen.
Open the Display & Brightness settings screen.
![]() Tap Text Size. This control changes the size of text in all the apps that support the iPhone’s Dynamic Type feature.
Tap Text Size. This control changes the size of text in all the apps that support the iPhone’s Dynamic Type feature.

![]() Drag the slider to the right to increase the size of text or to the left to decrease it. As you move the slider, the text at the top of the screen resizes so you can see the effect of the change you are making.
Drag the slider to the right to increase the size of text or to the left to decrease it. As you move the slider, the text at the top of the screen resizes so you can see the effect of the change you are making.

![]() When you’re happy with the size of the text, tap Back (<).
When you’re happy with the size of the text, tap Back (<).

![]() If you want to make all of the text on your iPhone bold, set the Bold Text switch to on (green).
If you want to make all of the text on your iPhone bold, set the Bold Text switch to on (green).

![]() To remove the bold on text, set the Bold Text switch to off (white).
To remove the bold on text, set the Bold Text switch to off (white).

Setting Text Size Using the Control Center
To change the text size with the Control Center, perform the following steps:
![]() Open the Control Center by swiping down from the upper-right corner of the screen (X models) or swiping up from the bottom of the screen (non-X models).
Open the Control Center by swiping down from the upper-right corner of the screen (X models) or swiping up from the bottom of the screen (non-X models).

![]() Tap the Text Size icon. (If you don’t see this icon, you need to add it to the Control Center. See Chapter 6 for details.)
Tap the Text Size icon. (If you don’t see this icon, you need to add it to the Control Center. See Chapter 6 for details.)

![]() Tap above the shaded area to increase the text size.
Tap above the shaded area to increase the text size.
![]() Tap below the shaded area to decrease the text size.
Tap below the shaded area to decrease the text size.
![]() Tap outside the tool to return to the Control Center.
Tap outside the tool to return to the Control Center.

![]() Tap on any area on the background of the Control Center to close it.
Tap on any area on the background of the Control Center to close it.

Choosing a View
Some iPhone models (such as the iPhone 8 Plus) enable you to choose between a Standard or Zoomed view. To configure the view you use, perform the following steps:
![]() In the Settings app, tap Display & Brightness to open the Display & Brightness settings screen.
In the Settings app, tap Display & Brightness to open the Display & Brightness settings screen.
![]() Tap View; if you don’t see this option, your iPhone doesn’t support it and you can skip the rest of these steps.
Tap View; if you don’t see this option, your iPhone doesn’t support it and you can skip the rest of these steps.

![]() Compare the two screens; the images on the screens change so you see examples of how various types of information will appear in each view. The images are representations and don’t show any detail so it can be hard to see the difference between the two views. The best way to decide is to try each view and see which one you prefer.
Compare the two screens; the images on the screens change so you see examples of how various types of information will appear in each view. The images are representations and don’t show any detail so it can be hard to see the difference between the two views. The best way to decide is to try each view and see which one you prefer.

![]() Tap the View you want to use.
Tap the View you want to use.
![]() Tap Set. (If Set is in gray, you’re already using that view and you can skip the rest of these steps.)
Tap Set. (If Set is in gray, you’re already using that view and you can skip the rest of these steps.)

![]() Tap Use Zoomed or Use Standard. The iPhone restarts. When it starts up, you see your iPhone in the selected view.
Tap Use Zoomed or Use Standard. The iPhone restarts. When it starts up, you see your iPhone in the selected view.


Setting the Wallpaper on the Home and Lock Screens
To configure your wallpaper, perform the following steps:
![]() In the Settings app, tap Wallpaper. You see the current wallpaper set for the Lock and Home screens.
In the Settings app, tap Wallpaper. You see the current wallpaper set for the Lock and Home screens.

![]() If you want your wallpaper to darken when your iPhone is in Dark mode, set the Dark Appearance Dims Wallpaper to on (green).
If you want your wallpaper to darken when your iPhone is in Dark mode, set the Dark Appearance Dims Wallpaper to on (green).
![]() Tap Choose a New Wallpaper. The Choose screen has two sections. The top section enables you to choose one of the default wallpaper images (Dynamic, Stills, or Live), whereas the lower section shows you the photos available on your iPhone. If you don’t have any photos stored on your iPhone, you can choose only from the default images. To choose a default image, continue with step 4; to use one of your photos as wallpaper, skip to step 9.
Tap Choose a New Wallpaper. The Choose screen has two sections. The top section enables you to choose one of the default wallpaper images (Dynamic, Stills, or Live), whereas the lower section shows you the photos available on your iPhone. If you don’t have any photos stored on your iPhone, you can choose only from the default images. To choose a default image, continue with step 4; to use one of your photos as wallpaper, skip to step 9.

![]() Tap Dynamic if you want to use dynamic wallpaper, Stills if you want to use a static image, or Live if you want to use a Live Photo. These steps show selecting the Stills option, but using a dynamic image or Live Photo is similar.
Tap Dynamic if you want to use dynamic wallpaper, Stills if you want to use a static image, or Live if you want to use a Live Photo. These steps show selecting the Stills option, but using a dynamic image or Live Photo is similar.

![]() Swipe up and down the screen to browse the images available to you.
Swipe up and down the screen to browse the images available to you.
![]() Tap the image you want to use as wallpaper.
Tap the image you want to use as wallpaper.

![]() Tap Perspective to use the Perspective view of the wallpaper; when the Perspective option is disabled, there is a slash through its icon.
Tap Perspective to use the Perspective view of the wallpaper; when the Perspective option is disabled, there is a slash through its icon.
![]() Tap Set and move to step 16.
Tap Set and move to step 16.

Keep It in Perspective
With the Perspective option, the images on “top” of the wallpaper to shift slightly when you move the phone. For example, when you tilt the phone with the Lock screen displayed, the time and date move relative to the wallpaper’s image. When you disable this, there is no motion. This is a fairly subtle effect so you might have to try it on and off a few times to see if you can tell the difference.
Dynamic Wallpaper
Dynamic wallpaper has motion (kind of like a screen saver on a computer). This type of wallpaper doesn’t have any options. You can only choose to set it.
Live Wallpaper
Live wallpaper uses a Live Photo (see Chapter 15, “Taking Photos and Video with Your iPhone” for a description of Live Photos). When you select a Live photo as wallpaper, you can enable or disable the Live aspect of that photo. You can also set perspective. Since you have to press the screen to see a Live photo’s motion, I don’t really get the point of this one, but it’s an option you might want to check out.
![]() To use a photo as wallpaper, swipe up the screen to browse the sources of photos available to you; these include All Photos, Favorites, Selfies, albums, and so on. (To learn how to work with the photos on your iPhone, see Chapter 16, “Viewing and Editing Photos and Video with the Photos App.”)
To use a photo as wallpaper, swipe up the screen to browse the sources of photos available to you; these include All Photos, Favorites, Selfies, albums, and so on. (To learn how to work with the photos on your iPhone, see Chapter 16, “Viewing and Editing Photos and Video with the Photos App.”)
![]() Tap the source containing the photo you want to use.
Tap the source containing the photo you want to use.
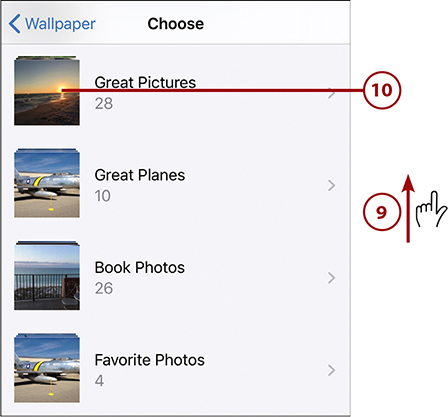
![]() Swipe up and down the selected source to browse its photos.
Swipe up and down the selected source to browse its photos.
![]() Tap the photo you want to use. (If the photo is not currently stored on your iPhone, it downloads, which can take a few seconds.) The photo appears and you can resize and move the image around the screen.
Tap the photo you want to use. (If the photo is not currently stored on your iPhone, it downloads, which can take a few seconds.) The photo appears and you can resize and move the image around the screen.

![]() Use your fingers to unpinch to zoom in or pinch to zoom out, and hold down and drag the photo around the screen until it appears how you want the wallpaper to look.
Use your fingers to unpinch to zoom in or pinch to zoom out, and hold down and drag the photo around the screen until it appears how you want the wallpaper to look.
![]() Tap Perspective to use the Perspective view of the wallpaper; if you selected a Live Photo, tap Live Photo to enable or disable its motion.
Tap Perspective to use the Perspective view of the wallpaper; if you selected a Live Photo, tap Live Photo to enable or disable its motion.
![]() Tap Set.
Tap Set.

![]() Tap Set Lock Screen or Set Home Screen to apply the wallpaper to only one of those screens; tap Set Both to apply the same wallpaper in both locations. The next time you move to the screen you selected, you see the wallpaper you chose.
Tap Set Lock Screen or Set Home Screen to apply the wallpaper to only one of those screens; tap Set Both to apply the same wallpaper in both locations. The next time you move to the screen you selected, you see the wallpaper you chose.

![]() If you set the wallpaper in only one location, tap Choose (not shown on a figure) to move back to the Choose screen and repeat steps 3–16 to set the wallpaper for the other location.
If you set the wallpaper in only one location, tap Choose (not shown on a figure) to move back to the Choose screen and repeat steps 3–16 to set the wallpaper for the other location.

Updating Current Wallpaper
To update the settings for the current wallpaper without changing the image, move to the Wallpaper screen and tap the wallpaper (tap the Lock or Home screen) you want to change. The Wallpaper screen opens and you can change the options for the type of wallpaper you’re using. For example, tap Perspective to enable or disable perspective for the photo. Or, if you’re working with a photo you’ve taken, you can resize and move it. To save your changes, tap Set; to leave it as it is, tap Cancel.