
In Chapter 7, “Rudimentary NMS Software Components,” we saw some simple software tools that can be used to experiment a little with MIBs and SNMP agents. Beyond experimentation, the software provides some of the bricks that might be used to construct the foundations of a basic NMS. In addition, we hope that this exercise has helped to crystallize many of the concepts introduced earlier in the book. Readers with access to MPLS NEs could, with a little effort, extend the Chapter 7 tools to read (and possibly write) to the MIBs described in the current chapter. In this chapter, we try to bring together as many as possible of the separate MPLS strands running through the book; specifically, we:
Look more closely at the IETF MPLS MIBs
Describe how the MIB elements relate to MPLS in general
Explain how to combine these MIB elements in an operational MPLS network
Without further ado, let's get started on these MIBs.
The two MIBs described in the IETF drafts “Multiprotocol Label Switching (MPLS) Label Switch Router (LSR) Management Information Base” and “Multiprotocol Label Switching (MPLS) Traffic Engineering Management Information Base” [IETF-LSR-MPLS] and [IETF-TE-MPLS] provide a framework for managing MPLS NEs. (There are other MPLS MIBs, but we have selected these for our current discussion). At the time of writing, these MIBs are draft standards, but it is highly likely that they will proceed to full IETF standard status. Broadly speaking, the two MIBs can be used to achieve the following:
Manage the low-level MPLS objects, such as interfaces, cross-connects, and segment tables
Create LSPs
Manage the high-level MPLS objects, such as traffic-engineered tunnels, EROs, and resource blocks
These two MIBs are now described. The LSR MIB objects include tables that describe:
MPLS interface configuration
In-segments
Out-segments
Cross-connects
Label stacks
Traffic parameters
Performance parameters
These objects are described in the following sections. Similarly, the TE MIB objects include tables that describe:
Traffic-engineered tunnels
Tunnel resources
Tunnel paths
Tunnel performance counters
We now start the discussion with MPLS devices.
MPLS devices are NEs on which MPLS technology is deployed, and they can include:
MPLS technology may be added as a firmware upgrade to such devices, or it may be included as a standard product component. This reflects the migration approach adopted for MPLS deployment: It can be switched on/off and used on an as-needed basis. In other words, a network operator can phase in the use of MPLS in conjunction with existing technologies such as ATM and FR. As the deployment (and planned deployment) of MPLS increases, the ability to smoothly (and slowly) apply its use in production networks is very useful. This is illustrated in Figure 8-1, where a multiservice switch supports a number of different technologies.

The multiservice switch in Figure 8-1 can originate and terminate a range of service types, such as Ethernet, X.25, TDM, IP, FR, and MPLS. Clearly, the switch is part of a broader network that supports these services. Over time, it is likely that such networks may migrate to just IP or possibly IP and MPLS. For this reason, it is important that the switch be capable of moving over to supporting just these service types without the need for expensive hardware upgrades. So, MPLS NEs implement the MPLS technology in firmware, and access to it is made through MPLS interfaces. The latter are described in the next section.
An MPLS interface is one on which MPLS has already been configured and may include the following:
An IP routing interface (recall interfaces from Chapter 1, “Large Enterprise Networks”).
An IGP routing protocol with traffic engineering extensions, such as OSPF-TE, IS-IS-TE. An IGP routing protocol is not mandatory—static routes can be used instead.
Possibly an EGP protocol if the node faces out of an autonomous system. Typically, IGP and EGP protocols are not used on the same interface. This is to avoid leaking routing information between adjacent networks.
A signaling protocol such as LDP or RSVP-TE.
In the next section, we will see MPLS interfaces.
Figure 8-2 illustrates MPLS interfaces with the letters A, B, C, and D, respectively. The lower half of the diagram has four more MPLS interfaces that have the following IP addresses: 5.5.4.1; 5.5.4.2; 5.5.5.1; and 5.5.5.2. This is the network that will be used for our MIB investigation. The ifIndex values for these interfaces are illustrated in parentheses. Also, interfaces in the lower half of the diagram are deliberately not labeled.
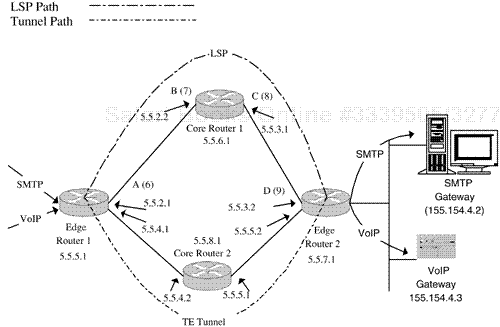
Figure 8-2 illustrates a four-node MPLS network that shares a boundary with an IP network. The MPLS network forwards real-time VoIP and non-real-time SMTP (email) traffic from one edge of the IP network in the direction of an adjacent subnetwork containing two gateways. Both sets of traffic are terminated on the latter devices. An LSP and a traffic-engineered tunnel have been configured in the MPLS network between the two edge nodes (LERs) with the core routers (LSRs) acting as transit nodes. The tunnel (called TE Tunnel in the diagram) is created using the TE MIB and the LSP is created using both the TE MIB and the LSR MIB. The TE Tunnel has been allocated sufficient bandwidth (640kbps) to simultaneously carry 10 uncompressed voice channels in its path. The LSP has no reserved bandwidth and offers a best-effort service level. Later in this chapter we show how the MIB is manipulated to create these entities.
A noteworthy item of interest about the LSP and tunnel is that they originate and terminate inside the LERs rather than on the external interfaces. Each of them serves a destination IP address (or prefix). Incoming IP traffic lands on the Edge Router 1 and is then pushed into the appropriate tunnel or LSP. Which one should be used? That depends on the nature of the IP traffic; if it has been marked to receive better than best effort (hop-by-hop) forwarding, then it may take the path provided by the tunnel. The ingress LER makes the decision about the path taken by the packet by encapsulating it with an appropriate MPLS label—one label for the LSP and another for the tunnel. The labeling decision may also be made based on any or all of the following:
The contents of the IP header DS field (and even the two Explicit Congestion Notification bits)
The destination or source IP address
The destination or source port
The important point to note is that the labeling decision can be based on a rich combination of parameters. In the example of Figure 8-2, we take the most basic option because IP traffic is pushed into either the tunnel or LSP based only on the destination IP address. The policies that dictate traffic treatment are generally the network operator's responsibility.
Each of the MPLS interfaces A, B, C, and D has a corresponding entry in the MIB table mplsInterfaceConfTable. The same is true of the unmarked interfaces in the lower half of Figure 8-2. The latter are not annotated in order to reduce clutter. An MPLS node would automatically populate this table with a row for each MPLS-capable interface. An entry in this table is illustrated in Figure 8-3. Please note that the MIB excerpts in the rest of the chapter take the form of SEQUENCEs of objects. These are ASN.1 constructs and are copied straight from the MIB definitions. The listed objects should be visualized as columns in a table (conceptually similar to a spreadsheet or a relational database table). Index objects are commented and appear in bold.
Following a description of the MIB tables, we illustrate how the tables would be manipulated to create the LSP and tunnel objects in Figure 8-2. The software provided in Chapter 7 could be extended to achieve this—that is, instead of addressing single MIB objects, the programs could address entire tables.
Example 8-3. The MPLS interface MIB table.
MplsInterfaceConfEntry ::= SEQUENCE {
 mplsInterfaceConfIndex             InterfaceIndexOrZero,  -- Index
  mplsInterfaceLabelMinIn           MplsLabel,
  mplsInterfaceLabelMaxIn           MplsLabel,
  mplsInterfaceLabelMinOut          MplsLabel,
  mplsInterfaceLabelMaxOut          MplsLabel,
  mplsInterfaceTotalBandwidth       MplsBitRate,
  mplsInterfaceAvailableBandwidth   MplsBitRate,
  mplsInterfaceLabelParticipationType BITS }
There is a relationship between the MPLS interface table and the interfaces.ifTable. This relationship is provided by the value of the mplsInterfaceConfIndex object. The range of MPLS label values that this interface can receive is indicated by the mplsInterfaceLabelMinIn and mplsInterfaceLabelMaxIn objects. The range of MPLS label values that this interface can send is indicated by the mplsInterfaceLabelMinOut and mplsInterfaceLabelMaxOut objects. The MplsLabel object is represented by four octets. Bits 0 to 19 represent the label with values supported, as we saw in Chapter 4, “Solving the Network Management Problem,” Figure 4-10—for example, Explicit Null (0), Router Alert (1). The remaining 12 bits encode the Exp, Stack, and TTL fields.
The total amount of usable bandwidth on this interface is indicated by mplsInterfaceTotalBandwidth and is specified in units of kilobits per second. The amount of bandwidth available at any given time is indicated by mplsInterfaceAvailableBandwidth; this is the difference between mplsInterface-TotalBandwidth and the amount of bandwidth in use. The mplsInterfaceLabelParticipationType object dictates whether the label space is distributed across the platform or the interfaces. Per-platform label participation indicates that labels are globally allocated across the platform. Per-interface label participation indicates that each interface shares the label space with a specified range.
An in-segment is the ingress leg of an LSP segment on a given MPLS NE. This is an object that controls the forwarding of packets into the LSP. Each of the in-segments on an MPLS node has a corresponding entry in the MIB table mplsInSegmentTable. An entry in this table is illustrated in Figure 8-4.
Example 8-4. The MPLS in-segment MIB table.
MplsInSegmentEntry ::= SEQUENCE {
  mplsInSegmentIfIndex              InterfaceIndexOrZero,   -- Index
  mplsInSegmentLabel                MplsLabel,    -- Index
  mplsInSegmentNPop                 Integer32,
  mplsInSegmentAddrFamily           AddressFamilyNumbers,
  mplsInSegmentXCIndex              Unsigned32,
  mplsInSegmentOwner                MplsInitialCreationSource ,
  mplsInSegmentTrafficParamPtr      RowPointer,
  mplsInSegmentRowStatus            RowStatus,
  mplsInSegmentStorageType          StorageType }
This table is indexed by a combination of the ifIndex of the incoming interface and the topmost label, that is, mplsInSegmentIfIndex and mplsInSegmentLabel. The number of labels to pop is indicated by the value of mplsInSegmentNPop; if this value is 2, then the node pops two labels off the stack. The mplsInSegmentAddrFamily gives the Internet Assigned Numbers Authority (IANA) address number; for instance, IPv4 has the value 1 and IPv6 is 2. The cross-connect associated with this segment is provided by the mplsInSegmentXCIndex. This is an index into the mplsXCTable. The mplsInSegmentOwner identifies the entity that created and owns this segment. The mplsInSegmentTrafficParamPtr indicates the entry (if any) in the mplsTrafficParamTable that contains the traffic details for this segment. The mplsInSegmentRowStatus is used when creating, modifying, or deleting an entry in this table. Its type is RowStatus, and the ways it can be used are described later in the section where we create an LSP. Finally, the storage type for the segment is described by mplsInSegmentStorageType. If this object has the value readOnly(5), then a setRequest cannot delete or modify it.
An out-segment is the egress leg of an LSP segment on a given MPLS NE. This is an object that controls the forwarding of packets along the path of the LSP. Each of the out-segments on an MPLS node has a corresponding entry in the MIB table mplsOutSegmentTable. An entry in this table is illustrated in Figure 8-5.
Example 8-5. The MPLS out-segment MIB table.
MplsOutSegmentEntry ::= SEQUENCE {
  mplsOutSegmentIndex                Unsigned32,  -- Index
  mplsOutSegmentIfIndex              InterfaceIndexOrZero,
  mplsOutSegmentPushTopLabel         TruthValue,
  mplsOutSegmentTopLabel             MplsLabel,
  mplsOutSegmentNextHopIpAddrType    InetAddressType,
  mplsOutSegmentNextHopIpAddr        InetAddress,
  mplsOutSegmentXCIndex              Unsigned32,
  mplsOutSegmentOwner                MplsOwner ,
  mplsOutSegmentTrafficParamPtr      RowPointer,
  mplsOutSegmentRowStatus            RowStatus,
  mplsOutSegmentStorageType          StorageType }
Entries in the out-segment table can be created based on index values obtained from the mplsOutSegmentIndexNext object. This object type is described later in this chapter. Once the index value is acquired, we can assign it to mplsOutSegmentIndex. The interface index of the outgoing interface is contained in mplsOutSegmentIfIndex. The boolean mplsOutSegmentPushTopLabel indicates if a label (the value of this label is found in mplsOutSegmentTopLabel) should be pushed onto the stack of an outgoing MPLS packet. The outSegment is concerned with where to send an outgoing MPLS packet; the type of destination is indicated by the value of mplsOutSegmentNextHopIpAddrType and can be IPv4 (1) or IPv6 (2). The mplsOutSegmentNextHopIpAddr contains either the IPv4 or IPv6 address of the next hop, depending on the value of mplsOutSegmentNextHopIpAddrType. The mplsOutSegmentXCIndex indicates the cross-connect table entry with which this segment is associated. The mplsOutSegmentOwner identifies the entity that created and owns this segment. The mplsOutSegmentTrafficParamPtr indicates the entry (if any) in the mplsTrafficParamTable that contains the traffic details for this segment. The mplsOutSegmentRowStatus has semantics identical to the corresponding object in the in-segment table. The same is true for the mplsOutSegmentStorageType.
Cross-connects are used to create associations between LSP segments. These associations serve as instructions for the MPLS NE to switch between the specified segments. The LSR MIB supports point-to-point, point-to-multipoint, and multipoint-to-point connections (we consider only point-to-point). Each of the cross-connects on an MPLS node has a corresponding entry in the MIB table mplsXCTable. An entry in this table is illustrated in Figure 8-6.
Example 8-6. The MPLS cross-connect MIB table.
MplsXCEntry ::= SEQUENCE {
  mplsXCIndex                 Unsigned32,  -- Index
  mplsXCInSegmentIfIndex      InterfaceIndexOrZero,  -- Index
  mplsXCInSegmentLabel        MplsLabel,  -- Index
  mplsXCOutSegmentIndex       Unsigned32,  -- Index
  mplsXCLspId                 MplsLSPID,
  mplsXCLabelStackIndex       Unsigned32,
  mplsXCIsPersistent          TruthValue,
  mplsXCOwner                 MplsOwner ,
  mplsXCRowStatus             RowStatus,
  mplsXCStorageType           StorageType,
  mplsXCAdminStatus           INTEGER,
  mplsXCOperStatus            INTEGER }
Entries in mplsXCTable can be created based on index values obtained from the mplsXCIndexNext object. The unique index value is assigned to mplsXCIndex. The mplsXCTable has an index made up of the first four objects in Figure 8-6. The object mplsXCInSegmentIfIndex represents the in-segment interface index for LSPs not originating on this node. For LSPs originating on this node, mplsXCInSegmentIfIndex is zero. The incoming label value on the cross-connect is mplsXCInSegmentLabel. The object mplsXCOutSegmentIndex is the out-segment index for LSPs passing through this node. For LSPs terminating on this node, mplsXCOutSegmentIndex is zero.
The LSP to which this cross-connect belongs is indicated by the value of mplsXCLspId. The object mplsXCLabelStackIndex indicates an entry in the label stack table. This indicates the label stack that should be pushed onto the MPLS label. If this cross-connect must be restored after a failure (e.g., a faulty port card or a switch power failure), then the value of mplsXCIsPersistent should be set to true(1). The value of mplsXCOwner identifies the entity that created and owns this cross-connect. The mplsXCAdminStatus object dictates the required administrative state of the cross-connect: up(1) means that packets can be forwarded. The value of mplsXCOperStatus is set only by the NE to indicate the actual operational status. If a failure occurs, then the value of mplsXCOperStatus should reflect it. This means that if an IP port card fails, then the LSP can no longer forward packets and the operational status should change to from up(1) to down(2).
The mplsLabelStackTable specifies the label stack to be pushed onto a packet. Entries to this table are referred to from mplsXCTable (via the mplsXCLabelStackIndex object). The topmost label is the one used by MPLS NEs for forwarding treatment. Labels beneath the topmost label become accessible when the topmost one is popped. This is useful when hierarchical routing behavior is required for a given packet; for example, let's say our label stack has two labels, label X and label Y. An IP packet arrives at MPLS Edge Router 1 in Figure 8-2. At this point the packet is MPLS-encoded and two labels are pushed, first X and then Y. The MPLS packet then proceeds to the next NE, but only the topmost label (Y) is used for forwarding treatment—X remains unchanged. When the MPLS packet reaches the edge of our domain at MPLS Edge Router 2, the topmost label is popped and the remaining label (X) can then be popped and used for additional routing. This type of hierarchical arrangement could be used when routing packets across transit SP networks, such as Interexchange Carriers (IXCs). An entry in this table is illustrated in Figure 8-7.
Example 8-7. The MPLS label stack MIB table.
MplsLabelStackEntry ::= SEQUENCE {
      mplsLabelStackIndex             Unsigned32,   -- Index
      mplsLabelStackLabelIndex        Unsigned32,  -- Secondary Index
      mplsLabelStackLabel             MplsLabel,
      mplsLabelStackRowStatus         RowStatus,
      mplsLabelStackStorageType       StorageType   }
Again, mplsLabelStackIndexNext is sampled to give the next free index in this table. This value can then be assigned to mplsLabelStackIndex. The object mplsLabelStackLabelIndex is a secondary index indicating position within the label stack. A smaller value of MplsLabelStackLabelIndex indicates entries higher up the stack. MplsLabelStackLabel is the label to be pushed onto the packet.
This table specifies the characteristics of traffic parameter objects for in-segments and out-segments. An entry in this table is illustrated in Figure 8-8.
Example 8-8. The MPLS traffic parameter MIB table.
MplsTrafficParamEntry ::= SEQUENCE {
      mplsTrafficParamIndex           Unsigned32,   -- Index
      mplsTrafficParamMaxRate         MplsBitRate,
      mplsTrafficParamMeanRate        MplsBitRate,
      mplsTrafficParamMaxBurstSize    MplsBurstSize,
      mplsTrafficParamRowStatus       RowStatus,
      mplsTrafficParamStorageType     StorageType   }
Entries in this table can be created by use of the mplsTrafficParamIndexNext object. The value of the latter can be assigned to mplsTrafficParamIndex. Each entry in this table can be viewed as a profile that describes the bandwidth characteristics of the associated LSP. The maximum rate in units of kilobits per second is indicated by the value of mplsTrafficParamMaxRate. This is the maximum required rate of packet forwarding. Similarly, the mean rate in units of kilobits per second is indicated by the value of mplsTrafficParamMeanRate. This is the required average rate of packet forwarding. The maximum burst size in bytes is indicated by the value of mplsTrafficParamMaxBurstSize. This is the required maximum burst size expected.
The LSR MIB includes a number of performance counters. One of these is the mplsInterfacePerfTable, which provides an entry for every interface on the LSR capable of supporting MPLS. This table augments the mplsInterfaceConfEntry discussed in Figure 8-3. An entry in this table is illustrated in Figure 8-9.
Example 8-9. The MPLS interface performance MIB table.
MplsInterfacePerfEntry ::= SEQUENCE {
      mplsInterfaceInLabelsUsed          Gauge32,
      mplsInterfaceFailedLabelLookup     Counter32,
      mplsInterfaceOutLabelsUsed         Gauge32,
      mplsInterfaceOutFragments          Counter32   }
The mplsInterfaceInLabelsUsed object counts the number of labels that are in use at this point in time on this interface in the incoming direction. The object mplsInterfaceFailedLabelLookup counts the number of MPLS packets that have been received on this interface and were discarded because no matching cross-connect entry was found. Each such occurrence is commonly called a label fault. The object mplsInterfaceOutLabelsUsed counts the number of top-most labels in the outgoing label stacks that are in use at this point in time on this interface. The object mplsInterfaceOutFragments counts the number of outgoing MPLS packets that required fragmentation before transmission on this interface.
The creation of LSPs, such as the one illustrated in Figure 8-2, involves the following steps:
Enabling MPLS on MPLS-capable interfaces (
mplsInterfaceConfTable). Our examples assume that this administrative step has been executed.Configuring in-segments (via the
mplsInSegmentTable) on LSRs and egress LERs (not needed on ingress LERs).Configuring out-segments (via the
mplsOutSegmentTable) on LSRs and ingress LERs (not needed on egress LERs).Setting up the cross-connect table to associate segments and/or to indicate connection origination and termination (
mplsXCTable).Configuring a tunnel object to point to the cross-connect on the ingress LER.
Optionally specifying label stack actions (
mplsLabelStackTable).Optionally specifying segment traffic parameters (
mplsTrafficParamTable).
We now look at these steps in more detail.
We now describe the way in which the LSR MIB tables are combined in order to create an LSP. This description is based on that in the IETF draft “Multiprotocol Label Switching (MPLS) Label Switch Router (LSR) Management Information Base.” [IETF-LSR-MPLS]. Our goal with the LSP in Figure 8-2 is to carry the non-real-time SMTP traffic through the MPLS cloud. Since there are no stringent real-time requirements, we can make do with a best-effort QoS for the LSP.
We can fulfill these requirements by creating a best-effort, unidirectional LSP segment that originates in a tunnel on the MPLS Edge Router 1 in Figure 8-2 and exits on interface A via an out-segment. This is not a complete LSP (in the end-to-end sense) but rather an LSP segment. Similar segments must be created in the MIBs of the neighboring devices in order to create the full end-to-end LSP. As can be seen from Figure 8-2, interface A has an ifIndex value of 6. The configuration is carried out in three steps. It is important to note that LSPs can be signalled (this takes away many of the manual steps we now describe).
As we mentioned earlier, three objects are required on an ingress LER:
A cross-connect
An out-segment
A tunnel
We now create one of each of these entities in turn on Edge Router 1.
A cross-connect entry is required between the tunnel and out-segment objects, respectively. In mplsXCTable, we insert the following values:
{ mplsXCIndex             = 1,  -- The first entry in this table
  mplsXCLspId             = '05050501'H, -- 5.5.5.1 IP address of the node
  mplsLabelStackIndex     = 0, -- only a single outgoing label
  mplsXCIsPersistent      = false (1),
  mplsXCRowStatus         = createAndGo(4),
  mplsXCAdminStatus       = up(1) }
An mplsOutSegmentTable row must now be created to point to the appropriate device interface (interface A in Figure 8-2) and any associated traffic parameter (not relevant for our best-effort LSP).
Setting mplsInSegmentTrafficParamPtr to zero-dot-zero indicates a best-effort LSP. The same applies to the mplsOutSegmentTrafficParamPtr object. In mplsOutSegmentTable, we create a row with the following values:
{ mplsOutSegmentIndex           = 1,
  mplsOutSegmentIfIndex         = 6, -- outgoing interface A
  mplsOutSegmentPushTopLabel    = true(1),
  mplsOutSegmentTopLabel        = 22, -- outgoing label (fed to adjacent node)
  mplsOutSegmentAddrType        =  IPv4(1)
  mplsOutSegmentNextHopIpv4Addr = '05050601'H, -- 5.5.6.1, -- Figure 8–2
  mplsOutSegmentXCIndex = mplsXCTable.1, -- Cross-connect just created above
  mplsOutSegmentTrafficParamPtr = 0,  -- Best effort
  mplsOutSegmentRowStatus       = createAndGo(4) }
Our cross-connect and out-segment objects are now logically associated with each other. To link this aggregate object to the IP domain, we now need a tunnel.
To associate IP traffic with our LSP,we must now create a tunnel. In mplsTunnelTable, we create a row with the following values:
{     mplsTunnelIndexIndex         = 1,
      mplsTunnelInstance           = 1,
      mplsTunnelIngressLSRId       = 5.5.5.1,
      mplsTunnelEgressLSRId        = 5.5.5.1,
      mplsTunnelName               = "LSP",
      mplsTunnelDescr              = "Best-effort for SMTP",
      mplsTunnelIsIf               = true (1),
The following setting assigns the cross-connect 1, ingress interface 0, ingress label 0, and out-segment 1 to the mplsTunnelXCPointer column. The LER then decides which tunnel to use. Label 0 indicates that unlabeled IP traffic is to be received.
    mplsTunnelXCPointer      = mplsXCIndex.1.0.0.1,
    mplsTunnelSignallingProto    = none (1),
    mplsTunnelSetupPrio          = 0,
    mplsTunnelHoldingPrio        = 0,
    mplsTunnelSessionAttributes  = 0,
    mplsTunnelOwner              = snmp (1),
    mplsTunnelLocalProtectInUse  = false (0),
    mplsTunnelResourcePointer    = 0,
    mplsTunnelInstancePriority   = 1,
    mplsTunnelHopTableIndex      = 1,
    mplsTunnelPrimaryInstance    = 0,
    mplsTunnelIncludeAnyAffinity = 0,
    mplsTunnelIncludeAllAffinity = 0,
   mplsTunnelExcludeAllAffinity = 0,
   mplsTunnelRole               = head (1),
-- Mandatory parameters needed to activate the row go here
   mplsTunnelRowStatus          = createAndGo (4) }
This completes the configuration required for the creation of an originating LSP on the MPLS Edge Router 1 in Figure 8-2.
We now move to the next node in line, Core Router 1 (Figure 8-2).
We must now create an in-segment, out-segment, and cross-connect on Core Router 1.
In the MIB on Core Router 1, we set the following values in the mplsInSegmentTable:
{ mplsInSegmentIfIndex   = 7, -- interface index (B) value for the transit LSP
  mplsInSegmentLabel     = 22, -- incoming label value from Edge Router 1
  mplsInSegmentNPop      = 1, -- default value
  mplsInSegmentAddrFamily =  IPv4(1)
  mplsInSegmentXCIndex = mplsXCTable.6, -- Please see Cross-connect section
  mplsInSegmentTrafficParamPtr  = 0,  -- Best effort
   mplsInSegmentRowStatus = createAndGo(4) }
The first two objects—mplsInSegmentIfIndex and mplsInSegmentLabel—are set to the values 7 and 22, respectively, to tie in with the originating segment of the LSP on Edge Router 1.
In mplsOutSegmentTable,
{ mplsOutSegmentIndex       = 1,
  mplsOutSegmentIfIndex     = 8, -- outgoing interface C
  mplsOutSegmentPushTopLabel      = true(1),
  mplsOutSegmentTopLabel    = 0, -- outgoing label explicit null, 3 = Implicit null
  mplsOutSegmentAddrType    =  IPv4(1)
  mplsOutSegmentNextHopIpv4Addr = '05050701'H, -- 5.5.7.1, -- Figure 8–2
  mplsOutSegmentXCIndex = mplsXCTable.6, -- Please see Cross-connect section
  mplsOutSegmentTrafficParamPtr   = 0,  -- Best effort
  mplsOutSegmentRowStatus         = createAndGo(4) }
The next step consists of configuring the cross-connect table.
A cross-connect entry is now created, thereby associating the newly created segments together. In mplsXCTable, we insert the following values:
{ mplsXCIndex            = 6,
   mplsXCLspId           = '05050601'H, -- 5.5.6.1
   mplsLabelStackIndex   = 0, -- only a single outgoing label
   mplsXCIsPersistent    = false (1),
   mplsXCRowStatus       = createAndGo(4),
   mplsXCAdminStatus     = up(1) }
This completes the configuration required for the creation of a transit LSP segment on the MPLS Core Router 1 in Figure 8-2. We now create the last remaining segment on Edge Router 2.
We must now create a cross-connect and in-segment on Edge Router 2.
In mplsXCTable, we insert the following values:
{ mplsXCIndex            = 8,
   mplsXCLspId           = '05050701'H, -- 5.5.7.1
   mplsLabelStackIndex   = 0, -- only a single outgoing label
   mplsXCIsPersistent    = false (1),
   mplsXCRowStatus      = createAndGo(4),
   mplsXCAdminStatus    = up(1) }
Finally, an in-segment must be created.
In the MIB on the Edge Router 2, we set the following values in the mplsInSegmentTable:
{ mplsInSegmentIfIndex    = 9, -- interface (D) index value for the terminating LSP
  mplsInSegmentLabel      = 0, -- incoming label value from Core Router 1
  mplsInSegmentNPop       = 1, -- default value
  mplsInSegmentAddrFamily =  IPv4(1)
  mplsInSegmentXCIndex = mplsXCTable.8, -- Please see Cross-connect section
  mplsInSegmentTrafficParamPtr    = 0,  -- Best effort
  mplsInSegmentRowStatus  = createAndGo(4) }
The first two objects—mplsInSegmentIfIndex and mplsInSegmentLabel—are set to the values 9 and 0, respectively, to tie in with the out-segment configuration on Core Router 1.
This completes the configuration required for the creation of a terminating LSP on the MPLS Edge Router 2 in Figure 8-2. After these steps, the LSP looks something like that illustrated in Figure 8-10.

We now describe a brief walkthrough of what happens to the IP traffic landing on the IP/MPLS boundary on the left-hand side of Figure 8-10:
A packet with destination IP address 155.154.4.2 arrives at Edge Router 1 ingress interface.
The ingress interface pushes the packet into Tunnel 1.
Tunnel 1 serves this IP address via the LSP illustrated in Figure 8-10.
The packet is MPLS-encapsulated with the label value 22.
Label value 22 is associated with outgoing interface index 6.
The MPLS packet is pushed out interface index 6.
At Core Router 1, the incoming packet with a label value of 22 arrives at interface index 7.
The label value of 22 is used to direct the packet to Core Router 1 interface index 8. The label value of 22 is then replaced with a new label value of zero (explicit null—some MPLS devices may use 3 for implicit null).
The MPLS packet arrives at Edge Router 2 interface index 9 with a label value of zero. The latter is a signal to Edge Router 2 to strip off the label and perform a normal IP lookup.
Edge Router 2 forwards the packet to its original destination, the SMTP Gateway at 155.154.4.2.
We now turn to the TE MIB to take a look at the traffic-engineering MPLS objects.
The TE MIB differs from the LSR MIB in a number of ways. The TE MIB provides a model for a traffic-engineered tunnel through an MPLS cloud; in other words, it provides an end-to-end picture. The LSR MIB deals only in terms of segments and cross-connects, and lacks an end-to-end perspective (though use of a signaling protocol, such as LDP, can compensate for this). The only real difference between a tunnel and an LSP is that the former is explicitly routed. Both can reserve resources and (depending on the implementation) both may support IntServ, DiffServ, and any other QoS models.
Tunnels can be created at the head-end (or originating) node (Edge Router 1 in Figure 8-2), and the MIBs for all nodes in the path are automatically updated via a signaling protocol (such as RSVP). This is a powerful facility because it provides a simple way of managing tunnels, using just a few MIB tables. The end result is a traffic-engineered tunnel that traverses an entire network. Tunnels can also be created with or without the assistance of a signaling protocol (such as LDP or RSVP-TE). The TE MIB supports five tables that are used for creating tunnels:
Tunnel table (
mplsTunnelTable), used for recording the tunnel parametersResource table (
mplsTunnelResourceTable), used for configuring end-to-end tunnel resources, such as required bandwidthTunnel hop tables for the specified, actual, and computed route (
mplsTunnelHopTable,mplsTunnelARHopTable, andmplsTunnelCHopTable) for strict and loose source routed tunnels
The tunnel hops indicate the exact route that will be taken. We now describe these tables.
Figure 8-11 illustrates a row from the mplsTunnelTable definition.
Example 8-11. The MPLS TE tunnel table.
MplsTunnelEntry ::= SEQUENCE {
1   mplsTunnelIndex             MplsTunnelIndex, -- Index
2   mplsTunnelInstance           MplsTunnelInstanceIndex,
3   mplsTunnelIngressLSRId       MplsLsrIdentifier, Index
4   mplsTunnelEgressLSRId        MplsLsrIdentifier, Index
5   mplsTunnelName               DisplayString,
6   mplsTunnelDescr              DisplayString,

7   mplsTunnelIsIf               TruthValue,
8   mplsTunnelIfIndex            InterfaceIndexOrZero,

9   mplsTunnelXCPointer          RowPointer,
10  mplsTunnelSignallingProto    INTEGER,

11  mplsTunnelSetupPrio          INTEGER,
12  mplsTunnelHoldingPrio        INTEGER,
13  mplsTunnelSessionAttributes  BITS,
14  mplsTunnelOwner              INTEGER,
15  mplsTunnelLocalProtectInUse  TruthValue,

16  mplsTunnelResourcePointer    RowPointer,

17  mplsTunnelInstancePriority   Unsigned32,

18  mplsTunnelHopTableIndex      MplsPathIndexOrZero,
19  mplsTunnelARHopTableIndex    MplsPathIndexOrZero,
20  mplsTunnelCHopTableIndex     MplsPathIndexOrZero,

21  mplsTunnelPrimaryInstance    MplsTunnelInstanceIndex,
22  mplsTunnelPrimaryTimeUp      TimeTicks,
23  mplsTunnelPathChanges        Counter32,
24  mplsTunnelLastPathChange     TimeTicks,
25  mplsTunnelCreationTime       TimeStamp,
26  mplsTunnelStateTransitions   Counter32,

27  mplsTunnelIncludeAnyAffinity MplsTunnelAffinity,
28  mplsTunnelIncludeAllAffinity MplsTunnelAffinity,
29  mplsTunnelExcludeAllAffinity MplsTunnelAffinity,

30  mplsTunnelPathInUse          MplsPathIndexOrZero,

31  mplsTunnelRole               INTEGER,
32  mplsTunnelTotalUpTime        TimeTicks,
33  mplsTunnelInstanceUpTime     TimeTicks,

34  mplsTunnelAdminStatus        INTEGER,  -- Set by the operator
35  mplsTunnelOperStatus         INTEGER,  -- Set by the NE

36  mplsTunnelRowStatus          RowStatus,
37  mplsTunnelStorageType        StorageType }
Because this is a large table, we inserted line numbers to make the description a little easier to follow. The objects are described as far as possible in related groups.
Each row in the tunnel table has a unique index identified by mplsTunnelIndex. This (in conjunction with the value of mplsTunnelInstance) is how each tunnel is differentiated by the NMS. For tunnel configurations that require protection (or load sharing), a tunnel instance can represent a backup copy of another tunnel. The object mplsTunnelInstance is used for this purpose. The latter then refers to another completely separate entry in the tunnel table. Multiple tunnel instances can also be used for load sharing. Each such tunnel instance can have its own path and reserved resources. The tunnel is also identified in the network by the mplsTunnelIngressLSRId object. The egress router for this tunnel is identified by mplsTunnelEgressLSRId. The tunnel name is mplsTunnelName and is useful (in conjunction with mplsTunnelIndex) for differentiating between many tunnels on a given node. Other information about the tunnel can be stored in mplsTunnelDescr.
A tunnel that corresponds to an interface is indicated by the value of the boolean mplsTunnelIsIf. If mplsTunnelIsIf is set to true, then mplsTunnelIfIndex contains the value of ifIndex from the associated entry in the ifTable.
The variable mplsTunnelXCPointer points to a row in the mplsXCTable (not needed for signaled tunnels). The mplsTunnelXCPointer serves to join a tunnel to the cross connect on the ingress node. We saw this in the LSP configuration example. Signaled tunnels store the value of the signaling protocol in mplsTunnelSignallingProto, for example, none(1) and rsvp(2).
The setup priority of the tunnel is stored in mplsTunnelSetupPrio—a high value for this means that a tunnel instance may pre-empt (i.e., tear down) another tunnel instance. A related object is mplsTunnelHoldingPrio, which sets the resistance to being torn down by another tunnel instance. Additional characteristics for the tunnel instance are specified in mplsTunnelSessionAttributes; for instance, isPersistent(2) indicates that this tunnel instance should be restored automatically following a failure (e.g., power down). The tunnel instance creator is indicated by the value of mplsTunnelOwner; for instance, admin(1) indicates a manual administrator such as an NMS user. mplsTunnelLocalProtectInUse indicates that the tunnel instance can be repaired in the event of a link failure on this node.
The mplsTunnelResourcePointer indicates the entry in the mplsTunnelResourceTable used by this tunnel. Assigning mplsTunnelResourcePointer the value zeroDotZero indicates best-effort treatment. When we create a traffic-engineered tunnel, we will see how the resources are used.
Zero is the lowest value that can be assigned to mplsTunnelInstancePriority. This object can be used to differentiate between groups of tunnel instances; for example, if all instances have the same priority value, then they can load-share traffic with the same destination address.
The mplsTunnelHopTableIndex indicates the entry in the hop table used by this tunnel. This indicates the administratively defined, required route for the tunnel. The mplsTunnelARHopTableIndex indicates the entry in the actual hop table used by this tunnel (this indicates the real route through the network taken by the tunnel). The mplsTunnelCHopTableIndex indicates an index into the computed hop table.
The primary instance index of this tunnel is indicated by mplsTunnelPrimaryInstance—this can be used to logically tie together all the tunnels instances. The time the primary instance has been active is indicated by mplsTunnelPrimaryTimeUp—this might be useful for billing and accounting purposes. Changes in the network (such as link failures) may result in a tunnel rerouting; mplsTunnelPathChanges records the number of such changes. The time since the last such path change is recorded in mplsTunnelLastPathChange. The mplsTunnelCreationTime records the value of SysUpTime (a member of the system table illustrated in the example programs in the previous chapter) when the first instance of this tunnel was created.
The overall number of tunnel state transitions (e.g., administrative and operational status changing from up to down) is recorded in mplsTunnelStateTransitions.
To provide finer control over which links a tunnel traverses, the mplsTunnelIncludeAnyAffinity constraint can be employed. Links are administratively assigned constraint values (often called colors). The tunnel uses a given link only if either the constraint is zero (i.e., no constraint) or the link fulfills at least one of the specified constraints. For example, in a tunnel that uses only links that have any of the colors gold and silver, any links that have either gold or silver can be included in the tunnel. The object mplsTunnelIncludeAllAffinity is similar except that it specifies the colors that a link must have for inclusion. For example, in a tunnel that uses only links that have all of the colors gold and silver, any links that have both gold and silver can be included in the tunnel. The object mplsTunnelExcludeAllAffinity has similar semantics to mplsTunnelIncludeAllAffinity except that it indicates the constraints that must not be fulfilled. For example, a tunnel that uses only links that do not have all of the colors gold and silver, depending on the implementation, link coloring may only apply to computed-path tunnels. These are tunnels with paths that are ultimately dictated by the network rather than by the values in an ERO.
Service providers could use colors to differentiate service—for instance, gold service can mean a higher level of service in terms of bandwidth, latency, jitter, and delay.
The mplsTunnelPathInUse object provides an index into the mplsTunnelHopTable and indicates the path that was chosen for the tunnel.
The value of mplsTunnelRole reflects the role played by the host node in the overall tunnel—an originating tunnel has mplsTunnelRole set to head(1), a transit tunnel has the value transit(2), while a terminating tunnel has the value tail(3). The aggregate up time for all instances of a tunnel is indicated by the value of mplsTunnelTotalUpTime. Similarly, mplsTunnelInstanceUpTime indicates the up time for this tunnel instance.
The administratively assigned operational status of the tunnel is indicated by the value of mplsTunnelAdminStatus. This can have values such as up(1), down(2), or testing(3). The actual operational status of the tunnel is indicated by the value of mplsTunnelOperStatus and can have values such as up(1), down(2), testing(3), and unknown(4).
The mplsTunnelResourceTable is used to indicate the resources (bandwidth, burst size, etc.) required for a given tunnel. When the tunnel is created across the network, the required resources are explicitly reserved for its use. An entry in this table is illustrated in Figure 8-12.
Example 8-12. The MPLS TE tunnel resource table.
MplsTunnelResourceEntry ::= SEQUENCE {
      mplsTunnelResourceIndex                Unsigned32,  -- Index
      mplsTunnelResourceMaxRate              MplsBitRate,
      mplsTunnelResourceMeanRate             MplsBitRate,
      mplsTunnelResourceMaxBurstSize         MplsBurstSize,
      mplsTunnelResourceMeanBurstSize        MplsBurstSize,
      mplsTunnelResourceExcessBurstSize      MplsBurstSize,
      mplsTunnelResourceFrequency            INTEGER,
      mplsTunnelResourceWeight               Unsigned32,
      mplsTunnelResourceRowStatus            RowStatus,
      mplsTunnelResourceStorageType          StorageType }
The mplsTunnelResourceIndex object uniquely identifies a tunnel resource block (i.e., a row) in this table. The maximum traffic rate is indicated (in units of bits per second) by the value of mplsTunnelResourceMaxRate. The average traffic rate is indicated by mplsTunnelResourceMeanRate. The mplsTunnelResourceMaxBurstSize in bytes specifies the maximum expected burst size. The mplsTunnelResourceMeanBurstSize specifies the average expected burst size. Another important traffic characteristic is mplsTunnelResourceExcessBurstSize. The availability of the tunnel resources is indicated by mplsTunnelResourceFrequency and can have the values unspecified(1), frequent(2), or veryFrequent(3). If the resources are not available at a given point in time, the result might be dropped or marked packets. The latter depends on the underlying platform network hardware. The mplsTunnelResourceWeight indicates the relative weight for using excess bandwidth above the reserved level. The mplsTunnelResourceRowStatus and mplsTunnelResourceStorageType follow the semantics seen in the other tables.
LSPs can be given pre-assigned routes or paths. These are referred to as Explicit Route Objects (EROs) and serve to indicate a set of hops that is traversed by a tunnel instance. An entry in this table is illustrated in Figure 8-13.
Example 8-13. The MPLS TE tunnel hop table.
MplsTunnelHopEntry ::= SEQUENCE {
      mplsTunnelHopListIndex          MplsPathIndex,    -- Index
      mplsTunnelHopPathOptionIndex    MplsPathIndex,  -- Index
      mplsTunnelHopIndex              MplsPathIndex,  -- Index
      mplsTunnelHopAddrType           INTEGER,
      mplsTunnelHopIpv4Addr           InetAddressIPv4,
      mplsTunnelHopIpv4PrefixLen      Unsigned32,
      mplsTunnelHopIpv6Addr           InetAddressIPv6,
      mplsTunnelHopIpv6PrefixLen      Unsigned32,
      mplsTunnelHopAsNumber           Unsigned32,
      mplsTunnelHopLspId              MplsLSPID,
      mplsTunnelHopType               INTEGER,
      mplsTunnelHopIncludeExclude     INTEGER,
      mplsTunnelHopPathOptionName     DisplayString,
      mplsTunnelHopEntryPathComp      INTEGER,
      mplsTunnelHopRowStatus          RowStatus,
      mplsTunnelHopStorageType        StorageType }
New index values in the mplsTunnelHopTable can be obtained from the mplsTunnelHopListIndexNext object. The mplsTunnelHopListIndex object uniquely identifies an ERO in this table. A particular set of hops (called a path option) is indicated by mplsTunnelHopPathOptionIndex. A specific hop in the table is indicated by the value of mplsTunnelHopIndex. The type of a tunnel hop is indicated by mplsTunnelHopAddrType and can have the value ipV4(1), ipV6(2), asNumber(3), or lspid(4). The value of mplsTunnelHopAddrType dictates the values in the next six objects.
If mplsTunnelHopAddrType is ipV4(1), then mplsTunnelHopIpv4Addr and mplsTunnelHopIpv4PrefixLen, respectively, contain the value of an IPv4 address and its prefix length. If mplsTunnelHopAddrType is ipV6(2), then mplsTunnelHopIpv6Addr and mplsTunnelHopIpv6PrefixLen, respectively, contain the value of an IPv6 address and its prefix length. If mplsTunnelHopAddrType is asNumber(3), then mplsTunnelHopAsNumber contains the autonomous system number of this hop. Finally, if mplsTunnelHopAddrType is lspid(4), then mplsTunnelHopLspId contains the LSPID of a tunnel of this hop.
The mplsTunnelHopType indicates if this tunnel hop is routed in either a strict (every hop is configured) or loose (where not all hops are configured—the path may include other networks) fashion.
The mplsTunnelHopIncludeExclude indicates if the current hop is to be excluded from the tunnel route computation. It can have the value include(1) or exclude(2).
The mplsTunnelHopPathOptionName describes the sequence of hops in relation to the tunnel path. If the operator requires a dynamically computed tunnel path, then the value of mplsTunnelHopEntryPathComp should be set to dynamic(1). This setting passes the responsibility for path determination over to the network. A value of explicit(2) indicates that the operator is providing the path via an ERO. Finally, the mplsTunnelHopRowStatus and mplsTunnelHopStorageType follow the semantics for these object types in other tables.
An MPLS tunnel is an explicitly routed LSP. Tunnels are created using the TE MIB and can reserve resources as well as follow strict or loose explicit routes. The NEs in the tunnel path configure the appropriate LER and LSR MIB objects in order to fulfill the required constraints. Tunnels can be created on just a single NE, and all the other components are automatically generated across the network.
Referring to Figure 8-2, we now construct an entry in the mplsTunnelTable. Since this is a bigger table than those in the previous sections, comments are included along with the column assignments. Most of the settings correspond to default MIB values.
{   mplsTunnelIndex               = 1,  -- We assume this is the first table entry
    mplsTunnelInstance           = 1,
    mplsTunnelIngressLSRId       = 5.5.5.1,  -- Edge Router 1
    mplsTunnelEgressLSRId        = 5.5.7.1, -- Edge Router 2
    mplsTunnelName               = "TE Tunnel",  -- as in Figure 8–2
    mplsTunnelDescr              = "A traffic-engineered tunnel",
    mplsTunnelIsIf               = true (1),  - Tunnel will appear in ifTable
    mplsTunnelXCPointer          = 0,  -- Not needed for signaled tunnels
    mplsTunnelSignallingProto    = rsvp (2),
    mplsTunnelSetupPrio          = 0,
    mplsTunnelHoldingPrio        = 0,
    mplsTunnelSessionAttributes  = 0,
    mplsTunnelOwner              = snmp (1),
    mplsTunnelLocalProtectInUse  = false (0),
    mplsTunnelResourcePointer    = mplsTunnelResourceIndex.5, -- Created below
    mplsTunnelInstancePriority   = 1,
    mplsTunnelHopTableIndex      = 1,  -- This ERO is created below
    mplsTunnelPrimaryInstance    = 0,
    mplsTunnelIncludeAnyAffinity = 0,  -- No link coloring
    mplsTunnelIncludeAllAffinity = 0,  -- No link coloring
    mplsTunnelExcludeAllAffinity = 0,  -- No link coloring
    mplsTunnelPathInUse          = 1,
    mplsTunnelRole                = head (1), -- The originating end of the tunnel
    mplsTunnelRowStatus          = createAndGo (4) }
Since this is a traffic-engineered tunnel, we must specify both the resources and the nodes required in the path. This is done next. Strictly speaking, the mplsTunnelTable entry would be created after the resources have been specified and the hop list created.
Our tunnel will have associated with it a set of resources that provides it with the ability to carry the traffic pushed into it. The resources are defined by a row in the mplsTunnelResourceTable. We arbitrarily select the index entry for this table as number 5 (e.g., this could be the next free value obtained from sampling the mplsTunnelResourceIndexNext object). This is set as follows:
{   mplsTunnelResourceIndex           = 5,
    mplsTunnelResourceMaxRate         = 640000,  -- 10 * 64kbps voice channels
    mplsTunnelResourceMeanRate        = 640000,
    mplsTunnelResourceMaxBurstSize    = 2000,
    mplsTunnelResourceRowStatus       = createAndGo (4) }
All five of these objects could be included in an SNMP setRequest message variable binding list. In our examples in Chapter 7, we included just a single object, but it is possible to include many objects in a single message. The last object to be set is the row status. This is an indication to the remote agent that the operation is a row creation. The value 4 is called createAndGo and indicates that the row is to be created with a status of active; that is, the row is to be ready for service.
The following steps create the hops associated with an ERO that is used by the tunnel. In mplsTunnelHopTable, the following entries are created:
   {   mplsTunnelHopListIndex    = 1,
       mplsTunnelPathOptionIndex = 1,
       mplsTunnelHopIndex        = 1,
       mplsTunnelHopAddrType     = 1,
       mplsTunnelHopIpv4Addr      = 5.5.5.1,  -- Node IP address of Edge Router 1
       mplsTunnelHopIpv4PrefixLen = 9,
       mplsTunnelHopType         = strict (1),
       mplsTunnelHopRowStatus    = createAndGo (4) }
   {   mplsTunnelHopListIndex    = 1,
       mplsTunnelPathOptionIndex = 1,
       mplsTunnelHopIndex        = 2,
       mplsTunnelHopAddrType     = 1,
       mplsTunnelHopIpv4Addr  = 5.5.4.2,  --              Ingress interface IP address on
 Core Router 2
       mplsTunnelHopIpv4PrefixLen   = 9,
       mplsTunnelHopType            = strict (1),
       mplsTunnelHopRowStatus       = createAndGo (4) }
{      mplsTunnelHopListIndex       = 1,
       mplsTunnelPathOptionIndex    = 1,
       mplsTunnelHopIndex           = 3,
       mplsTunnelHopAddrType        = 1,
       mplsTunnelHopIpv4Addr  = 5.5.5.2, --              Ingress interface IP address on
 Edge Router 2
       mplsTunnelHopIpv4PrefixLen    = 9,
       mplsTunnelHopType             = strict (1),
       mplsTunnelHopRowStatus      = createAndGo (4) }
Core Router 2
mplsTunnelHopIpv4PrefixLen = 9,
mplsTunnelHopType = strict (1),
mplsTunnelHopRowStatus = createAndGo (4) }
{ mplsTunnelHopListIndex = 1,
mplsTunnelPathOptionIndex = 1,
mplsTunnelHopIndex = 3,
mplsTunnelHopAddrType = 1,
mplsTunnelHopIpv4Addr = 5.5.5.2, -- Ingress interface IP address on
Edge Router 2
mplsTunnelHopIpv4PrefixLen = 9,
mplsTunnelHopType = strict (1),
mplsTunnelHopRowStatus = createAndGo (4) }
This ERO can then be incorporated into the tunnel by setting mplsTunnelHopTableIndex = 1.
The packet processing for the traffic-engineered tunnel is, in fact, very similar to that shown in Figure 8-10. The main differences are that:
A different tunnel is chosen.
The tunnel has an associated resource reservation.
Signaling and an ERO dictated the tunnel path.
This completes our description of creating LSPs and traffic-engineered tunnels.
The detailed steps we've described for creating LSPs and tunnels are manual in nature. An NMS would substantially reduce the workload involved in creating these objects. We now describe a possible workflow for both cases:
Open a topology map containing the MPLS nodes in Figure 8-2.
Click on the two edge nodes, selecting each as a connection endpoint.
If the tunnel type is selected, then the GUI should allow the creation of an ERO.
Optionally request a path computation (trivial in Figure 8-2 but more difficult when hundreds, thousands, or even hundreds of thousands of nodes are involved) between the two end nodes.
Select the required resources (bandwidth, maximum burst size, etc.).
View the computed path and modify it if necessary.
Accept the path and send the connection for provisioning
At this point, all the necessary MIB tables are updated by NMS provisioning software. For the case of the tunnel, just the ingress node (Edge Router 1) MIB needs to be updated, with the remainder being signaled. For the LSP, if no signaling is used, then the NMS provisioning code must painstakingly update the MIBs of all the nodes in the path (Edge Router 1, Core Router 1, and Edge Router 2). Finally, the NMS should then report on the success or failure of the overall operation. Beyond this, the NMS should then start to manage the created connections as owned objects—objects that it created. This differentiates between connections provisioned using the EMS (i.e., outside the NMS, using the CLI) rather than the NMS.
Several of the MPLS MIB tables support a nextObjectIndex counter (this was introduced in Chapter 3, “The Network Management Problem”). This provides a convenient means of learning the next available free entry in the table. A manager simply has to poll the value of this object to learn the next free index. An important aspect of this is synchronization when more than one user may attempt to use the same free index. This could occur if two clients simultaneously attempted to use the same value. The result of this would be that one of the two clients would inadvertently cause an SNMP bad value exception to occur. One solution to this would be for the clients to channel their requests for this object value through the NMS. The latter could then implement a synchronization procedure to ensure that multiple requests are queued. In this way, the clients are guaranteed that the index value they receive is unique. Alternatively, the intelligence can be put in the MIB so that when the object is retrieved, it is also automatically incremented. This is perhaps slightly less desirable because it means that a read of the object value results in a change. Another approach is to use the TestAndIncr type. In this, an object (let's call it indexSpinLock) of type TestAndIncr is used to store the current next available free index. The NMS reads the value of indexSpinLock and creates a new table row. At the same time, we also set the retrieved value of indexSpinLock (into the object indexSpinLock). If the current value of indexSpinLock and the value we set it to do not match, then the SNMP request will fail.
In the above discussion, we have used two of the IETF MPLS MIBs to illustrate the use of LSPs, tunnels, and their associated objects. An important point to note about standards in general is that they are detailed specifications that form engineering guidelines for implementers. If all vendors implement their MPLS products to conform to the standards, then the reward should be interoperability and uniformity of features in deployed technology. Mature standards such as IEEE 802.3 and ATM (though there are proprietary variants of the ATM control plane) provide a good example of the power of standards to produce interoperable NEs. The same can possibly be said for many of the SS7 protocol standards (though there are national variants of these). Let's hope MPLS proves to be both interoperable and generally easy to use.
The great merit of standard MIBs is that the network management software required to manipulate them need not change as new NEs are added. This facilitates ease of development of management solutions and potentially far fewer incompatibility problems in production networks.
We've now seen a detailed description of two of the IETF MPLS MIBs, indicating how these MIB objects might be manipulated by an NMS in order to create LSPs and tunnels. These MIBs differ in the level of abstraction offered—the TE MIB provides a useful tunnel metaphor. The LSR MIB requires that up to three tables be manipulated on each agent in the LSP path. These are the in-segment, out-segment, and cross-connect tables respectively, with the addition of the tunnel table on the ingress node. Manipulating just one head-end (or ingress LER) agent can achieve the same result with the TE MIB. The tables used in the latter case consist of a tunnel table, a hop table, and a resource table. The user of an NMS would generally not see the detailed manipulation of these MIB tables. Instead, the NMS would provide a simple interface that offers a limited set of choices, for example, either an LSP or a tunnel as the required connection type. Simplifying such operations is one of the many merits of effective NMS products. The many tables needed for MPLS provisioning underlines the importance of good table insertion discipline. This is particularly so in multiclient provisioning situations. The merit of vendor adoption of standard MIBs is considerable because NEs become easier to manage and to understand.