
CHAPTER 13
Portrait Photography
Portrait photography can be one of the easiest or most challenging types of photography. Almost anyone with a camera can do it, yet getting the perfect lighting can sometimes be difficult. Sometimes simply pointing a camera at someone and snapping a picture creates an interesting portrait; other times elaborate lighting setups may be needed to create a mood or to add drama to your subject.
A portrait, simply stated, is the likeness of a person — usually the subject's face — whether it is a drawing, a painting, or a photograph. A good portrait should go farther than that. It should go beyond showing your subject's likeness and delve a bit deeper, revealing some of your subject's character or emotion.
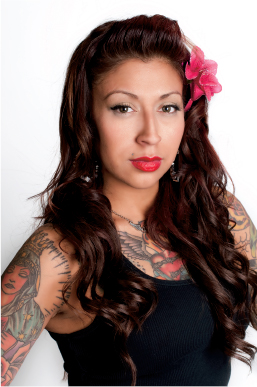
A good portrait should capture some personality of the subject. Exposure: ISO 200, f/4, 1/320 second using a Sigma 17-70mm f/2.8-4 OS at 70mm.
Portrait Settings
One of the most important parts of portrait photography is finding, or more likely creating, a suitable setting that captures the mood you want to project with the image. For a subdued or moody portrait, a dark background, such as black, dark gray, and brown, works best. If you're going for a more high-fashion look, keeping the background bright and uncluttered is the norm. White backgrounds work exceptionally well for fashion, though brightly colored backgrounds can work as well.
You can also shoot on location using the outdoor scenery as your setting or shoot indoors at a location of your choosing, be it bright and modern, cozy and warm, or dark and foreboding.
Lighting and background are the principal ways to create a certain mood or ambience in a portrait image, but there are other ways. Shooting the image in black and white can give your portrait an evocative feel. You can shoot your image so that the colors are more vivid, giving it a live, vibrant feeling, or you can tone the colors down for a more ethereal look.
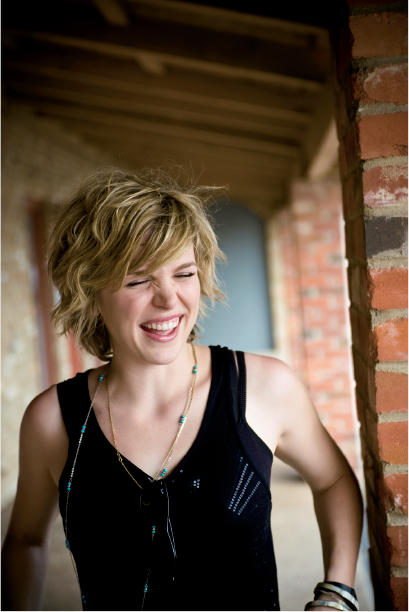
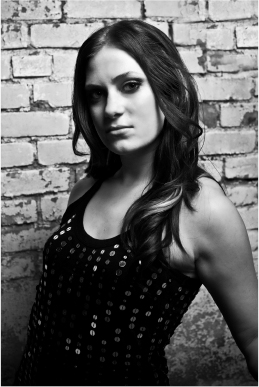
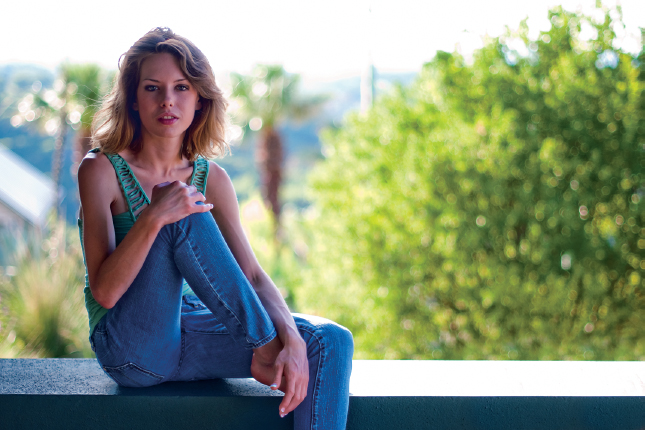
13.1 For this shot I used a rock wall in the background to create a gritty setting. Exposure: ISO 100, f/1.8, 1/60 second using a Nikon 35mm f/1.8G lens.
Indoor Portraits
Shooting portraits indoors can be quite easy once you know what pitfalls to avoid and learn a few tricks on how to overcome some of the main problems that you're likely to encounter. One of the most obvious problems that you find when attempting an indoor portrait is that there's often not enough light to make a correct exposure while still having a fast-enough shutter speed to avoid blur from camera shake; you may find that you need an additional light source. The most obvious additional light source is the built-in flash. Although the built-in flash on the D7000 sometimes works very well, especially outdoors as fill, you probably already know that the light from on-camera flash projects straight forward, making the subject look harsh, flat, and overall unflattering.
The best way to add additional light is to use an external Speedlight such as the Nikon SB-900. As with the built-in flash, you don't want to have your Speedlight pointed directly at the subject, so bouncing the flash off of the ceiling or a wall is your best option.
![]() For more information on using Speedlights, see Chapter 6.
For more information on using Speedlights, see Chapter 6.
Probably one of the easiest ways to achieve a more natural-looking portrait indoors is to move your subject close to a window. Window lighting gives you more light to work with and the window acts as a diffuser, softening the light and giving your subject a nice glow. In Figure 13.2, I positioned Toni next to the window to take advantage of the soft light.
I shot this portrait with a Nikkor 50mm lens with the aperture set to f/1.4 to blur the background. I chose Spot metering to make sure that the camera was exposing for her face, and I used a Single AF point and Single-servo AF mode.
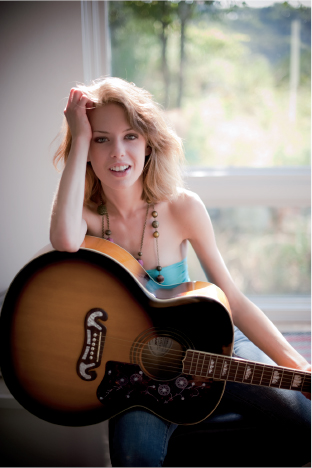
13.2 An indoor portrait shot using window light. Exposure: ISO 200, f/1.4, 1/500 second using a Nikon 50mm f/1.4G lens.
One thing to watch for when you use window lighting is mixed light, which occurs when you have two or more light sources in one setting. For example, if the ambient light from indoors is coming from a tungsten light bulb and you have your model sit in front of the window, the light coming from the window is going to have a bluish cast while the light from the light bulb will appear very orange.
There are a number of different ways you can deal with mixed lighting. I recommend using a Speedlight (bounced) to add some fill to overpower the tungsten lighting in the room. The light from the Speedlight is going to be close to the same color temperature of the window light. You will probably need to dial down the Flash Exposure Compensation (FEC) by about –1EV to ensure that the window light is overpowered. Another simple way to deal with mixed lighting is to convert the image to black and white.
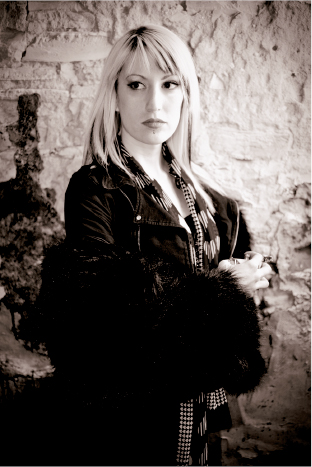
13.3 Here you can see the effect of mixed lighting on a window light portrait. Exposure: ISO 1600, f/1.4, 1/20 second using a Nikon 50mm f/1.4 lens.
Studio Portraits
Studio portraits are essentially indoor portraits except the lighting and background is controlled to a much greater extent. Although most professional portrait photographers use studio strobes to light their subjects, you can basically get the same results using a few Speedlights.
The most important part of a studio setting is the lighting setup. You have quite a few considerations to keep in mind when setting up for a studio portrait:
The quality of light is a photographic term that basically describes how the light reacts with your subject. Simply put, for portraits there are two different types of lighting: hard light and soft light. You can use either type of lighting depending on the effect you are going after. For the most part, portrait photographers prefer soft light. This type of light “wraps” around the subject, creating a smooth transition from shadow to highlight. It's the most flattering type of light for most portraits. To get this effect, photographers often use softboxes, umbrellas, diffusion panels, or bounce flash. Soft light is created by a large light source (in relation to the subject), so moving the light source closer to the subject gives you a softer light.
Conversely, hard light comes from a small bright light source (again in relation to the subject). Moving your light farther away from the subject makes the light harder, giving the image more contrast, darker shadows, and specular highlights. The shadow edge transfer is more abrupt, giving the image a stark contrast. Hard light is often used to make portraits more dramatic. The figure on the left illustrates soft light and the one on the right shows hard light.
- What kind of tone are you looking for? Do you want the portrait to be bright and playful or somber and moody? Consider these elements, and set up the appropriate lighting and background.
- Do you want to use props? Sometimes having a prop in the shot can add interest to an otherwise bland portrait.
- What kind of background is best for your shot? The back-ground is crucial to the mood and/or setting of the shot. For example, when shooting a high-key portrait, you must have a bright (usually white) background. You can also use props in the background to evoke a feeling or specific place.
- What type of lighting will achieve your mood? Decide which lighting pattern you are going to use, and light the background if needed.
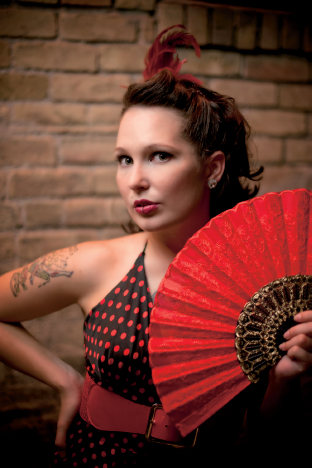
13.4 Planning out the lighting, background, and poses is important in studio photography. Adding the fan as a prop added some interest to the photo. Exposure: ISO 100, f/11, 1/60 second using a Nikon 50mm f/1.4G lens.
Studio portraits require more thought and planning than other types of portraits. They also require the most equipment — lights, stands, reflectors, backgrounds, and props are just a few of the things you may need.
Portrait Lighting Patterns
Professional photographers use different types of lighting patterns, generally to control where the shadow falls on the face of the subject. If you don't control the shadows while lighting your subject, your portrait can seem odd because strange shadows appear in unwanted places. In addition to the lighting patterns, there are two main types of lighting — broad lighting and short lighting. Broad lighting occurs when your main light is illuminating the side of the subject that is facing you. Short lighting occurs when your main light is illuminating the side of the subject that is facing away from you. In portrait lighting, there are five main types of lighting patterns.
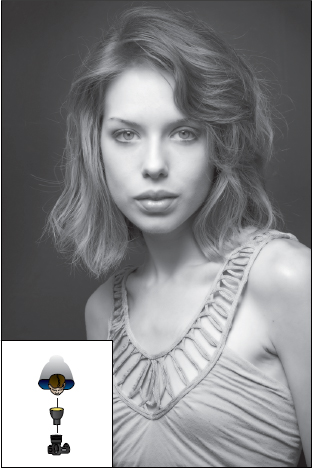
- Shadowless. This lighting pattern is when your main light and your fill light are at equal ratios. Generally, you will set up a light at 45° on both sides of your model. This type of light can be very flattering, although it can lack moodiness and drama. This can also be referred to as front lighting.
- Butterfly or Hollywood glamour. This type of lighting is mostly used in glamour photography. The name is derived from the butterfly shape of the shadow that the nose casts on the upper lip. You achieve this type of lighting by positioning the main light directly above and in front of your model.
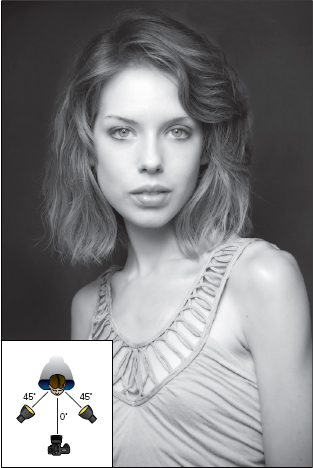
13.5 Shadowless lighting. Exposure: ISO 100, f/5.6, 1/200 second using a Nikon 50mm f/1.4G.
13.6 Butterfly lighting. Exposure: ISO 100, f/5.6, 1/200 second using a Nikon 50mm f/1.4G.
- Loop or Paramount. This is the most commonly used lighting technique for portraits. Paramount Studios used this pattern so extensively in Hollywood's golden age that this lighting pattern became synonymous with the studio's name. This lighting pattern is achieved by placing the main light at a 10° to 15° angle to the face, making sure to keep the light high enough that the shadow cast by the nose is at a downward angle and not horizontal.
- Rembrandt. The famous painter Rembrandt van Rijn used this dramatic lighting pattern extensively. It's a moody pattern achieved from using less fill light. The light is placed at a 45° angle and aimed a little bit down at the subject. Again, I emphasize using little or no fill light. This pattern is epitomized by a small triangle of light under one of the subject's eyes.
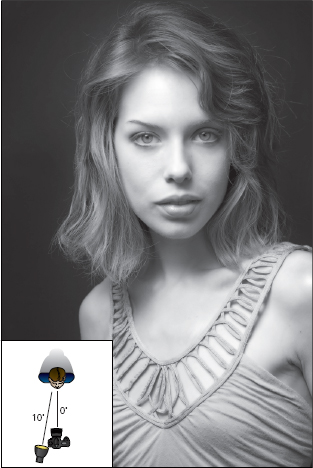
13.7 Loop, or Paramount, lighting. Exposure: ISO 100, f/5.6, 1/200 second using a Nikon 50mm f/1.4G.
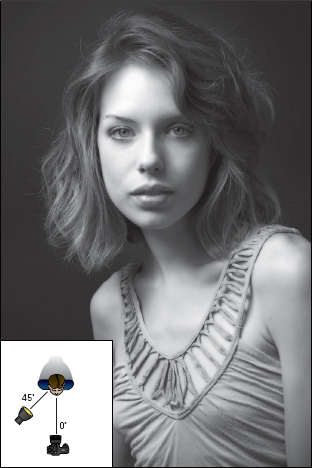
13.8 Rembrandt lighting. Exposure: ISO 100, f/5.6, 1/200 second using a Nikon 50mm f/1.4G.
- Split. This is another dramatic pattern that benefits from little or no fill. You can create it by simply placing the main light at a 90° angle to the model.
Posing and Composition Considerations
Through body language, a person can convey many different emotions and expressions, so it goes without saying that how a subject is posed can make a huge impact on the general mood of the image.
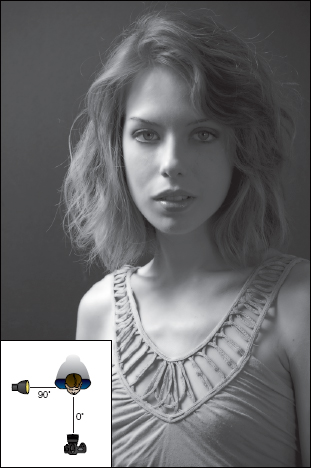
13.9 Split lighting. Exposure: ISO 100, f/5.6 second, 1/200 using a Nikon 50mm f/1.4G.
Posing your model can be one of the hardest things to learn when starting out in portrait photography, and getting good poses can separate a good portrait from a truly great one. It's important to remember that your models or clients expect you to know what you're doing. You need to be confident and assertive. Acting timid or being afraid to ask your model to do what you need will get you nowhere in the portrait business.
You should also pay close attention to your subject's hands. Hands can subliminally reveal a lot about how a person is feeling. Make a conscious effort to tell your models or clients to relax their hands. When a model's hands are relaxed, she looks and feels more relaxed. If the model's hands are clenched up or tense, your portraits look forced or she looks uncomfortable. Hands are an extension of the arms, and arms can have an emotional impact on your image, as well. For example, having your subject cross his arms can show strength and determination, or even that he's obstinate, depending on the facial expression.
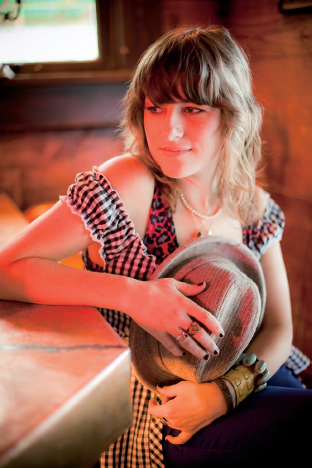
13.10 Different poses can give your portraits different feelings. Here the model appears relaxed and at ease. Exposure: ISO 100, f/1.4, 1/640 second using a Nikon 50mm f/1.4G lens.
One of the easiest ways to learn about posing is to study poses from other photographers or artists. Open a fashion magazine or browse the Internet. I keep a folder on my desktop where I copy small files of images with interesting poses. If I'm feeling particularly uninspired during a photo shoot, I open the folder to get some ideas and the creative juices flowing. Some of my favorite poses don't even come from other photographers, but from artists. Alberto Vargas and Gil Elvgren painted pinup girls in the 1940s, and their art is iconic and fun. Check out their work for some inspiration.
When posing your model, you need to keep an eye on everything from stray hairs and clothing bunching up in weird ways to awkward limb positions. Before you trip the shutter, be sure to take time to look closely at everything in the frame.
Here are a few more tips for posing subjects:
- Place one foot behind the other. One of the first things I do is have the person put one foot behind the other. This helps distribute the person's weight evenly and gives her a more relaxed appearance. Having the person lean back slightly is also helpful.
- Come in at an angle. For close-up portraits, you almost never want the subject to face straight ahead (unless you're a police photographer). Having your subject angled slightly away from the camera with one shoulder closer to the camera is a good idea.
- Tilt the head. Tilt your subject's head a bit to avoid having him look static; the tilt gives the portrait a casual feel. Of course, if you're shooting a formal portrait, you won't want to do this. For example, if you're shooting a CEO of a corporation, you want to portray strength and character, so keeping the subject's head straight is ideal.
- Watch the hands. Try to keep your subject's hands at an angle; the flat side of the back of the hand or the palm facing the camera can look odd. A three-quarter view or the side of the hand is preferable.
Outdoor Portraits
When you shoot portraits outdoors, the problems that you encounter are usually the exact opposite of those you have when you shoot indoors. The light tends to be too bright, causing the shadows on your subject to be too dark. This results in an image with too much contrast.
In order to combat this contrast problem, you can use your flash. I know that this sounds counterintuitive; you're probably thinking, “If I have too much light, why should I add more?” Using the flash in the bright sunlight fills in the dark shadows, resulting in a more evenly exposed image. This technique is known as fill flash.
Another way to combat images that have too much contrast when you shoot outdoors is to move your model into a shaded area, such as under a tree or a porch. This helps block the direct sunlight, providing you with a nice, soft light for your portrait. You can also have someone hold a diffusion panel in front of the sun, and it acts as a softbox.
In Figure 13.11 I was shooting at 1 o'clock in the bright midday sun, which is probably the worst time to shoot. I brought in a diffusion panel to block the stray sunlight, giving us a nice, diffuse light to work with.
An easy way to achieve a soft light when shooting outdoors is to wait for a cloudy or partly cloudy day. When the sun is behind a cloud, you get a diffused light, which is perfect for portraits.
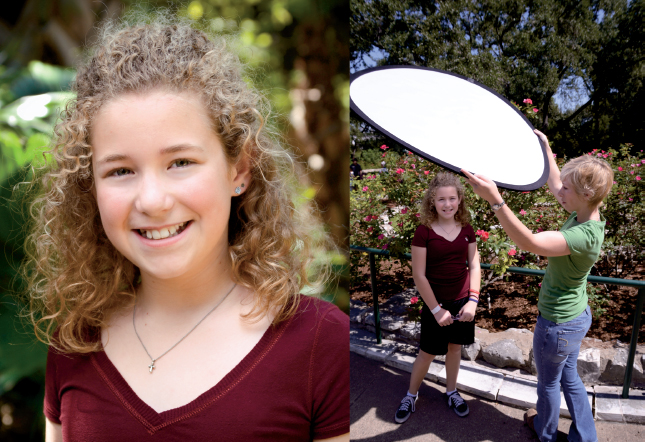
13.11 I shot this outdoor portrait of my niece J'Ana using a diffusion panel to reduce contrast. Exposure: ISO 100, f/4, 1/160 second using a Sigma 17-70mm f/2.8-4 OS lens at 70mm.
Portrait Photography Tips
There are a number of different techniques that you can use to make your portraits stand out. Some of them include
- Use a wide aperture. Using a wide aperture gives you a shallow depth of field. This isolates the subject from the background, allowing her to stand out.
- Use Single-point AF mode. Using a single focus point allows you to control exactly where the area of focus is in the image. Relying on the camera to choose which focus point is selected can sometimes give you unpredictable results.
- Focus on the eyes. Generally the eyes are the most important part of the portrait and you want them to be sharp. Always focus on the eyes unless you are trying for some sort of artistic effect using selective focus.
- Use a longer focal length. Avoid using a lens that is shorter than 50mm. Wide-angle lenses cause perspective distortion, which can make your models look, well, kind of funny. Generally a focal length of 75mm or longer is recommended. A telephoto lens tends to flatten the model's features and increases the background blur when you're shooting with a wide aperture.
- Don't sever limbs. Try not to frame the image in the middle of a knee joint or elbow. Don't cut off the toes or fingers. If a foot or hand is in the image, be sure to get all of it in the frame.
- Watch out formergers. Be aware of the background as well as the subject. Oftentimes you can get so involved with looking at the model, you can forget about the rest of the photograph. You don't want your model to look as though she has a tree sprouting out of her head or a lamp suddenly growing out of her shoulder.
- Fill the frame. Make your subject the dominant part of the image. Having too many details in the background can distract from the subject of the image.
