
CHAPTER 9
Event Photography
Event photography has become a popular way for some advanced amateur photographers to make a little extra cash. There are many different types of events, and photographers must handle each type in a specific way. For example, photographing a wedding involves much more than just showing up and snapping some photos of the ceremony, whereas photographing a concert doesn't involve much preparation at all.
The one caveat about taking on an event gig for pay is that it comes with serious responsibility to get all the coverage that's needed in a timely manner. Be sure that if you take on this sort of job, you're completely comfortable doing it. The best way to get the hang of any type of photography is to practice. Assisting an event photographer is a great way to get familiar with the process.
Concert lighting can be the most difficult lighting to deal with, but it also can give you some very cool effects.
Wedding
Many photographers assume wedding photography is the key to making a living as a working photographer. While this may be the case in many instances, jumping into the wedding photography business should not be taken lightly. Photographing a wedding is a very serious responsibility and should be treated as such. I recommend spending some time assisting a wedding photographer for a few weddings to get the hang of it before actually diving in and attempting to cover a wedding all on your own.
Wedding photography is one of the most challenging and nerve-racking types of photography. There are a lot of things going on and you only get one chance to get it right. Wedding photography can be very complicated, and while there isn't enough room in this book to cover all the facets, I will touch on some of the most basic ones to get you started. Many great books are dedicated solely to wedding photography, and if you plan on doing much of this type of photography I suggest you read some.
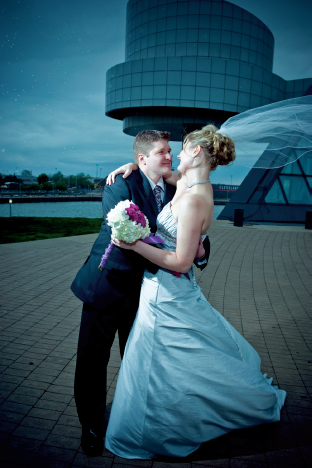
9.1 Capturing spontaneous moments is very important in wedding photography. Exposure: ISO 320, f/5.6, 1/30 second using a Nikon 16-35mm f/4 VR lens at 18mm.
Despite all the caveats, wedding photography can be a really fun and rewarding endeavor. Using your creative eye and your skill at composition to give the couple images they will cherish for many years is a great honor and is very rewarding. After the event is done, the food is gone, and the wedding dress has been put into storage, what remains are the memories and photographs. The memories will likely fade, but the photographs will be there for generations to come.
Getting started
Wedding photography isn't just all about showing up on the wedding day and taking pictures. As with any major event, there's a lot of planning involved and that includes some preplanning on the photographer's part. The first thing you want to do is sit down with the bride and groom (at the very least the bride) and talk about their expectations. Make sure that they know your style and are happy with that. Find out what kind of shots they are expecting. Establish a time frame for delivery of the images, and last but not least, discuss the payment (if any).
Shot list
One of the most important things to discuss with the couple is creating a must-have shot list. This might sound silly, but during all the hectic action going on during a wedding it's very easy to forget some key shots. Here's a short list of some of the most common shots.
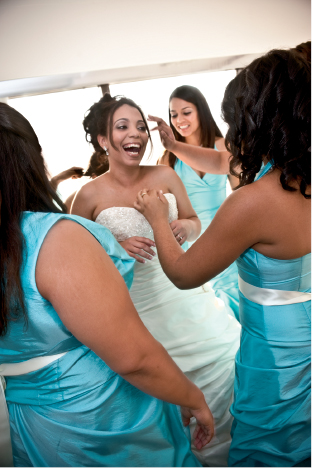
- Bride getting ready. This can include shots such as the bride applying makeup, the bridesmaids helping her into the dress, and her mom adjusting the veil, among other things.
- Groom getting ready. Some shots include the groom putting on the tie and boutonniére, groomsmen hanging around, and so on.
 Don't forget to get these portraits of the bride: headshots of her, and
  and full-length pictures.
 - Leaving for the venue. These are optional, but it's nice to get some candid photojournalistic-type shots of the bride and groom getting into the limo or whatever transportation.
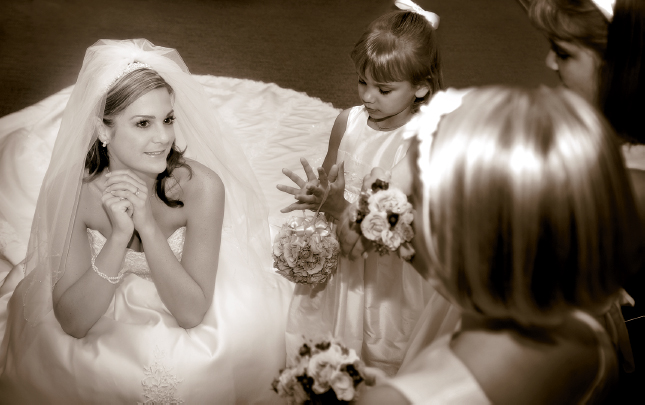
- The ceremony. This is where it starts getting hectic, but you should get pictures of the mothers of the bride and groom being escorted down the aisle as well as each bridesmaid and the maid of honor, and, of course, the bride being led down the aisle and given away. Of course, the exchange of the rings and the kiss should be photographed as well. Also, don't forget to photograph the recessional or the bride and groom leaving.
- Formal portraits. This can be one of the most frustrating aspects of the whole wedding. Everyone will be running around trying to get ready for the reception and congratulating the bride and groom. You will need to be assertive to get everyone together who you need for the shots. Here's a short list of some of the shots you might need:
- The reception. The reception is where you can relax and start having a little more fun, loosening up and being a little more creative. Some of the shots should include the first dance, the toasts, the cake-cutting, the bouquet and garter toss, and, of course, candid shots of the guests dancing and having fun.
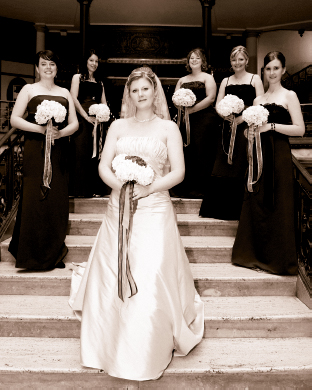
9.2 When shooting a group shot, try to vary head placement to avoid making the shot appear static. Exposure: ISO 900, f/5, 1/60 second using a Nikon 16-35mm f/4 VR lens at 16mm.
Even with a shot list, don't overlook small details. You should photograph such things as the rings, the bride's shoes, minute details of the dress, the table settings, the bouquet, and the cake (before it's cut).
Other preparations
Here are some other very important things to think about:
- Scout the location. Going to check out the location ahead of tim
e can help you figure out what equipment you may need or what settings you might have to use. If you know that the ceremony is going to be in a dark church, you may want to bring a faster lens such as a 50mm f/1.4. If you can, attend the rehearsal to get an idea of some of the angles you may want to shoot from. This can also help as a dry run to get an idea of the lighting and some of the settings you may want to use or some pitfalls to avoid.
9.3 Don't forget to capture intimate details. These are the types of shots that make your wedding photos special. Exposure: ISO 200, f/2.8, 1/60 +0.7EV using a Nikon 17-55mm f/2.8G lens at 22mm.
- Be prepared. Just like the Boy Scout motto. Although this may seem like a no-brainer, you need to be sure that you have spare formatted memory cards, extra batteries, and a lens cloth.
- Have a backup. One of the most important things to have is a backup camera. Whether you buy, borrow, or rent one, you should have one. Cameras, as with any electronic equipment, can fail at any time. You could drop it, the shutter could fail, or any number of things could happen. You only get one try at a wedding and if your camera is inoperable, you're sunk.
![]() Turn off the sound on your camera. You don't want your camera beeping during the ceremony. You're there to record the event as unobtrusively as possible. The sound can be turned off using CSM d1.
Turn off the sound on your camera. You don't want your camera beeping during the ceremony. You're there to record the event as unobtrusively as possible. The sound can be turned off using CSM d1.
Using flash
During the ceremony, it's important not to interrupt the bride and groom's biggest moment, so most often you are not allowed to shoot flash. Before and after the ceremony, you can usually use your Speedlight as much as you like. Generally when photographing weddings, I like to shoot both with and without flash so that my images don't all look the same. I actually have the Function button on my cameras programmed to be a flash cancel button so I can cancel the flash in a split second if I see a shot that would look best in natural light. One of the tricks of being a good wedding photographer is knowing when and when not to use your Speedlight. You can program the Function button on the D7000 using CSM f3 and set the function to Flash off.
First and foremost — and I cannot stress this point enough — use a diffuser. The SB-800 and SB-900 come with a diffusion dome, so use it. I can honestly say that I almost never shoot without the diffusion dome on my Speedlight. If you're using the Speedlight mounted to the hot shoe of your camera, put on the diffusion dome and aim the flash head up to the 60° position for the best results. This softens the light and allows some of it to bounce from a ceiling when you're shooting indoors. When you're shooting outdoors, it's okay to point the flash head straight ahead as long as there is nothing close to the subject in the background, such as a wall. If there is something directly behind your subject, you will get the nasty black shadow that I'm sure you've seen in many shots.
9.4 Off-camera flash adds some creative spark to wedding photography. Exposure: ISO 200, f/8, 1/250 second using a Nikon 17-55mm f/2.8G lens at 17mm.
There are many types of diffusers on the market today, from simple ones like the Sto-Fen Omni-Bounce to miniature softboxes made by LumiQuest. One of the most popular ones is the Gary Fong Lightsphere. I admit that I was taken in by the great marketing technique and I bought one, but I can honestly say that I didn't find it to work any better than the diffuser that came with the Speedlights (I use a Sto-Fen Omni-Bounce for my SB-600). As a matter of fact, the Lightsphere is so big and bulky that it causes the flash head to drop down all the time. Save your money and pass on this product.
Suggested Settings and Lenses for Weddings
Given weddings are generally pretty fast paced, I try to automate my camera as much as possible while still maintaining a good degree of control over the settings. My general settings include
- Auto ISO. This is a great mode that I think is underutilized. The current crop of Nikon cameras works so well at high ISO settings that I don't need to worry too much about it. I set the Max ISO to 1600 and let the camera do the rest of the work.
- Programmed Auto. This mode allows me to concentrate more on composition and worry less about the settings. The camera generally tries to keep the aperture at f/5.6–f/8 to get a depth of field that isn't too deep or too shallow. If I need to open the aperture for a shallow depth of field shot, I simply rotate the Main Command dial and use the flexible program feature.
- Matrix metering. This metering system is pretty accurate for the most part; a quick review of the histogram will tell you if you need to add some exposure compensation.
A good range of lenses is a necessity when shooting weddings. I find that fast zooms are the best option. A zoom lens allows you to quickly compose so that you can grab the shot. I prefer high-quality, pro-level lenses to ensure sharp images with a good degree of contrast.
- Nikkor 17-55mm f/2.8G. This is my go-to lens and it's the one that spends the most time on my main camera. It's a great standard focal length lens.
- Nikkor 70-200mm f/2.8G VR. This lens is great for getting close-ups without intruding on the action. Remember you want to record the wedding, not be a part of it.
- Nikkor 50mm f/1.4G. I use this lens mostly for the bridal portraits. It's a great portrait lens and gives a nice, smooth background.
- Sigma 10-20 f/3.5 EX HSM. This ultrawide lens gets only occasional use for special effect shots. I prefer this lens over the Nikon 10-24mm f/3.5-4.5 for its faster constant aperture.
- Use FEC. Don't be afraid to dial in some Flash Exposure Compensation (FEC). When photographing the bride, it is usually necessary to up the FEC by +1 to +2 EV (exposure value) to ensure that her dress looks white. The camera meter is thrown off by all the white and tends to underexpose. The opposite is true of the groom; the black tends to cause overexposures, so dialing the FEC down to –1 to –1.7 EV is usually advisable. When photographing them both together, be sure to check your histogram and adjust it appropriately.
- Bounce your flash. This is probably the easiest and one of the most important flash techniques you can use. Bounce off of ceilings, bounce off of walls, bounce off of whatever you can. Bouncing softens the light and makes the images appear more natural.
- Use Slow Sync. One great technique is dragging the shutter by using Slow Sync. As discussed previously, Slow Sync allows more ambient light in the exposure. As with other types of photography, you can use this technique to show motion and to keep the ambience of the scene. Shooting straight flash often gives you the black hole effect, where the background is completely dark and the subject is too bright. This technique works best when shooting candid shots, and I don't recommend using Slow Sync for the more important shots because you can sometimes have ghosting and blurring.
- Use off-camera flash. Utilizing the Creative Lighting System (CLS) and using the built-in flash to trigger off-camera Speedlights gives your images a more interesting and professional look.
After the wedding
After the wedding comes the real work: post-processing. You'll probably have at least a thousand images to sort through and this can be a very time-consuming process. As a matter of fact, I would venture to say that most of the cost of shooting a wedding is tied up in post-processing.
Establishing a good workflow is the first step to quickly sorting images. This also applies to other types of photography as well. The first step should be to import your images to some sort of software that allows you to organize and sort your images. Quite a few programs work great for this, including Adobe Lightroom and Apple Aperture. Both programs also allow you to do your most basic post-processing, including color management and tonal corrections. The latest versions of Adobe Photoshop are packaged with Adobe Bridge, which is a great browser and allows you to sort images. However, you must open Photoshop to do any corrections.
Concert
Concert photography is quickly becoming one of the most popular types of photography. Almost everyone loves music and capturing an iconic image of your favorite performer is an exciting prospect. Of course, don't expect that you're going to be able to head right out and shoot photos of the Rolling Stones or Aerosmith. One of the most frustrating aspects about concert photography is how hard it can be to obtain permission to photograph your favorite band. This leads me to the first part of concert photography: gaining access.
Gaining access
As I just mentioned, major performers are off limits for the most part. In the past, almost anyone with a camera could take it to a concert and snap off as many rolls of film as desired. These days, with dSLRs offering superb image quality and public relations firms and record labels concerned about image — not to mention the monetary aspect involved — access is severely limited. Therefore, to photograph a top musician, you need to be affiliated with some sort of publication or agency. In order to get this press affiliation, you need to start at the bottom and work your way up until you have built a good-enough portfolio to shop around.
The best way to start out is to get involved in your local music scene and scope out smaller venues and clubs. More often than not these small venues have no restrictions on shooting and the bands are generally happy to get the exposure. Just make sure you offer them some copies of your images. These will likely be posted to the band's Web site, which gives both of you exposure. It's a win/win situation. And you never know; if the band or performer likes your images, it could mean paid gigs later on.
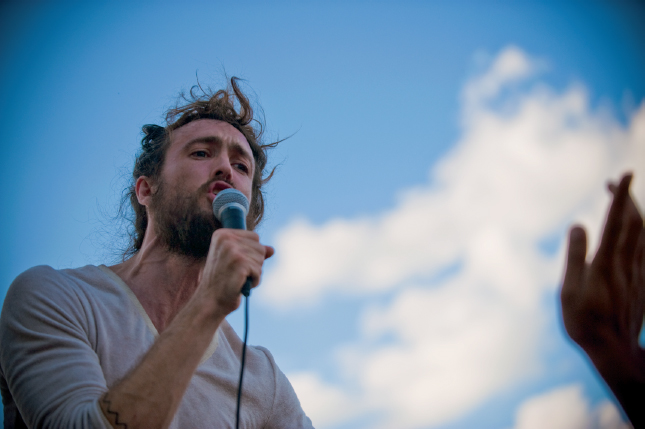
Although most major venues and national bands don't allow you to use flash, local bands and small clubs typically have no restrictions. I only use flash as a last resort, such as in Figure 9.5. I was photographing local Austin, Texas, punk rockers the Lower Class Brats and there wasn't a single light in the venue. I used the pop-up flash to add some light to the scene and a dragged the shutter to capture whatever ambient light I could while letting the flash freeze the action.
![]() It's often a good idea to call the venue in advance to check on the camera policy just to be sure.
It's often a good idea to call the venue in advance to check on the camera policy just to be sure.
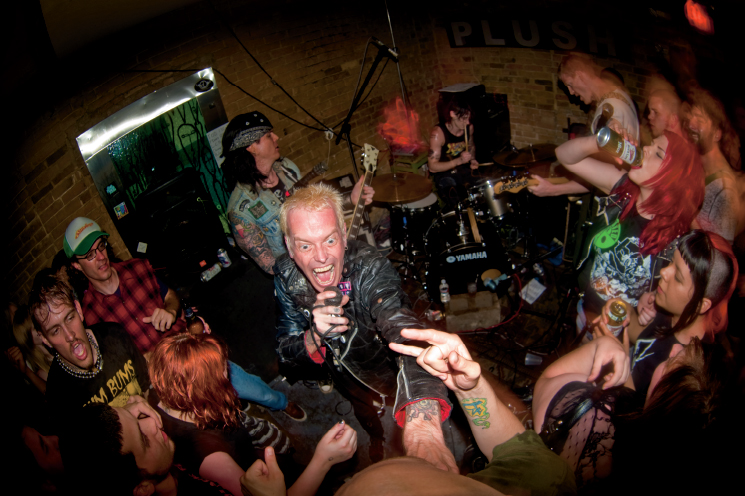
9.5 Photographing smaller venues can give you greater access to the performers, but you may have to jump into the fray to get a shot, as I did here with local Austin, Texas, punk rockers the Lower Class Brats. Exposure: ISO 200, f/5.6, 1/4 second using a Nikon 10.5mm f/2.8 fisheye lens.
Once you gain access to the local music scene, making friends with the staff can be of great benefit to you. The one thing that you want to remember is that being a pest could get you banned from taking photos at the venue. Try not to disrupt the band members or performers and give the crowd some deference as well. Most major artists limit photography to the first three songs, and following this rule when you're starting out is a good idea. Trust me; you can get plenty of images during only three songs. Of course, if there are no actual restrictions, you can always get some grab shots if anything exciting is going on; but the point is to act professionally — the band is playing first and foremost for the fans.
![]() When building your portfolio, try for variety. There are many types of music and a diverse portfolio is more interesting and broadens your marketability. I'm lucky enough to live in the “Live Music Capital of the World.” This allows me to shoot almost any type of music seven days a week, from country and blues to rock and beyond. My diverse portfolio has led to jobs shooting all types of gigs.
When building your portfolio, try for variety. There are many types of music and a diverse portfolio is more interesting and broadens your marketability. I'm lucky enough to live in the “Live Music Capital of the World.” This allows me to shoot almost any type of music seven days a week, from country and blues to rock and beyond. My diverse portfolio has led to jobs shooting all types of gigs.
After you pay your dues in the clubs and build a portfolio, you can start to shop it around. Start out with your local papers. The local alternative paper is usually a better candidate than the daily paper, which usually has a staff photographer on hand. Another option is to work for an online publication or blog (if you're really ambitious, you can start one of your own). Another even more ambitious option is to try to sign a contract with an agency. An agency provides photos for all types of publications, from print to online, including advertising. An agency provides a greater market with more high-profile clients than you will likely be able to get for yourself, but keep in mind it takes a substantial cut of the profit and sets the prices. You need a top-notch portfolio to get agency representation. I shot small events for many years before I signed with the Corbis agency, which grants me access to the top performers and events.
Techniques and settings
In this section, I show a few photographs of typical event situations and explain which settings I used as well as any special techniques I used to work around potential problems.
One of my favorite camera settings to use when shooting concerts is Auto ISO. This feature is perfect for concert photography where the lighting changes constantly from second to second and the performers move in and out of shadows. The easiest way to shoot a concert is to set the ISO and leave it. This can result in all your images having quite a bit of noise. I like to get at least a few shots at lower ISO settings, but I don't like to waste a lot of time constantly changing ISO settings. For this reason, I set the ISO sensitivity auto control to On, the maximum sensitivity to 1600, and the minimum shutter speed to 1/250 second. You can set the Auto ISO in the Shooting menu under the ISO sensitivity settings option.
9.6 Spot metering allows you to expose for the performers and ignore the flashing lights of the background. Exposure: ISO 360, f/2.8, 1/200 using a Nikon 17-55mm f/2.8G lens at 17mm.
Suggested Settings and Lenses for Concerts
When shooting concerts, I have typical settings that I generally stick with and modify if need be. Here's a list of the general settings that I start out with:
- Auto ISO. This is described in the preceding section. It's a great setting for making sure your images have as little noise as possible.
- Continuous AF (AF-C). I almost always set my AF to continuous because the performers are generally moving quite a bit. In rare circumstances, such as when I shot Bo Diddley and Etta James who were sitting in a chair, I switch focus to Single-servo.
- Single-point AF. Using the Multi-selector, I place the focus point exactly where I want the focus to be. In the past, I tried to use 3D-tracking but found that the flashing lights and colors confused the AF system, causing it to focus at the wrong spot. For the most part, I focus on the performer's face.
- Spot meter. As discussed later, spot metering ensures your subject is exposed properly.
There are many opinions on which lenses to use, but one thing is sure — you need a fast lens. Some people prefer to use very fast prime lenses. I prefer to use zooms mostly because you're generally in a small space where you won't be able to move much. The zoom lens is invaluable for helping with composition. Here's a list of the lenses I prefer for shooting concerts with a DX camera such as the D7000.
- Nikkor 17-55mm f/2.8G. This is the lens I get most of my shots with. It's a good wide to short telephoto, which works for most stages and venues.
- Sigma 10-20mm f/3.5. This is an ultrawide lens and it allows me to get some cool effects using perspective distortion. I use ultrawide lenses sparingly at concerts.
- Micro-Nikkor 105mm f/2.8 VR. This is the only prime I carry to concerts. I use the lens for close-ups and to get the drummer. I find that this focal length is perfect for these types of shots and this lens is much smaller than my alternative lens, the 80-200mm f/2.8.
- Nikkor 80-200mm f/2.8. I usually only bring this lens to exceptionally large concerts with very high stages. Sometimes I use it to shoot from outside of the photo pit to get a different perspective.
With most concert photography, the lighting comes from the stage lights. If you're shooting at a larger venue or concert, typically the stage lighting is all you need, and you can get amazing images using relatively low ISO settings. The stage lighting engineers are paid to make the performers look good; you essentially piggyback off their expertise and focus on the composition and settings.
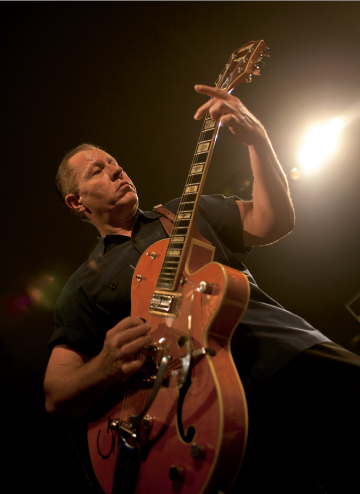
In Figure 9.6, rockabilly guitar hero Reverend Horton Heat was performing at a local amphitheater and most of the lighting was coming from behind. One of the main problems with this shot as well as with most concert photography is backlighting, which is, of course, light coming from behind your subject.
9.7 Backlighting adds some cool effects. Exposure: ISO 220, f/2.8, 1/100 using a Nikon 17-55mm f/2.8G lens at 70mm.
Because stage lights are often flashing on and off in front of and behind the performers, the best thing you can do is spot meter. Because the spot meter is tied to the focus point (providing you're using a CPU lens), you meter on the most important aspect of the shot: the subject. This can cause the bright areas of light to blow out and dark shadow areas to be blocked up, but this isn't generally a problem in this type of photography as it can add to the atmosphere of the shot.
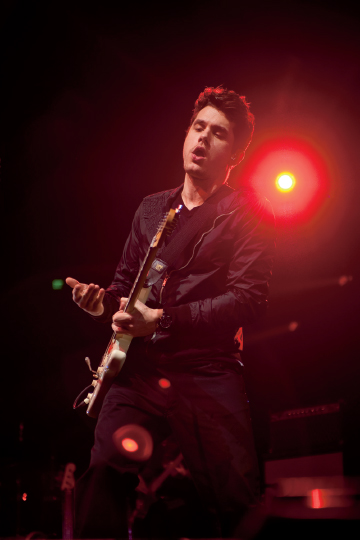
Although backlighting can be troublesome, it also provides cool effects, such as lens flare and rim lighting. The shot of John Mayer in Figure 9.7 has dramatic rim light highlighting his profile while still retaining detail in the facial area; some lens flare adds interest to the shot.
At all-day concerts, you often find that you can shoot performers in the daylight. Although this isn't the most dramatic type of lighting it's very simple. Even though it's light out, lighting techs usually add light that fills in some shadow and adds some splashes of colors. Figure 9.8 is a perfect example of this situation. I was shooting psychedelic rockers the Flaming Lips at an outdoor venue. Because it was daylight, I switched to Matrix metering. The only time I shoot Matrix is for concerts during midday. The stage was exceptionally tall, so I used my long 80-200mm telephoto lens zoomed out to about 155mm. Even though it was early evening and there was plenty of light, I opened up my aperture to get a shallow depth of field to try to isolate singer Wayne Coyne from the busy background.
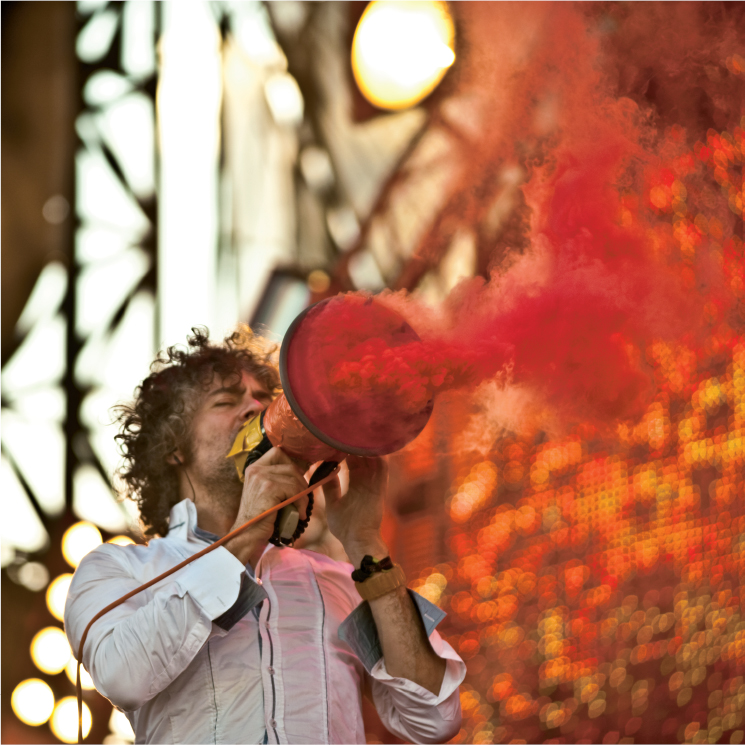
9.8 Daylight concerts afford you the best opportunity to get great exposures. Exposure: ISO100, f/2.8, 1/1000 second, –0.3EV using a Nikon 80-200mm f/2.8D AF-S lens at 155m