CHAPTER 12
Night and Low-Light Photography
Once the sun goes down and the light becomes low, a whole new world of photography opens up. This allows you to capture the world in an entirely different light, so to speak. Taking photographs at night or in low light brings a set of challenges that are not present when you take pictures during the day. The exposures become significantly longer, making it difficult for you to hand hold your camera and get sharp images. Your first instinct may be to use the flash to add light to the scene, but when you do this, the image may lose its nighttime charm.
Almost any type of photography can be accomplished in low light, from landscapes to portraits. Each type requires slightly different techniques and accessories, but the goal is the same: to get enough light to make a good exposure and capture the delicate interplay between light and dark.
Taking photos at night often gives you the most colorful photographs. Exposure: ISO 100, f/22, 30 seconds taken with a Sigma 10-20mm f/3.5 lens at 10mm.
How to Photograph at Night and in Low Light
One of the easiest ways to do night photography is simply to grab a tripod and venture out into the night. Set up the camera on the tripod and shoot! The tripod stabilizes your camera so that you don't have to worry about camera shake with long exposures.
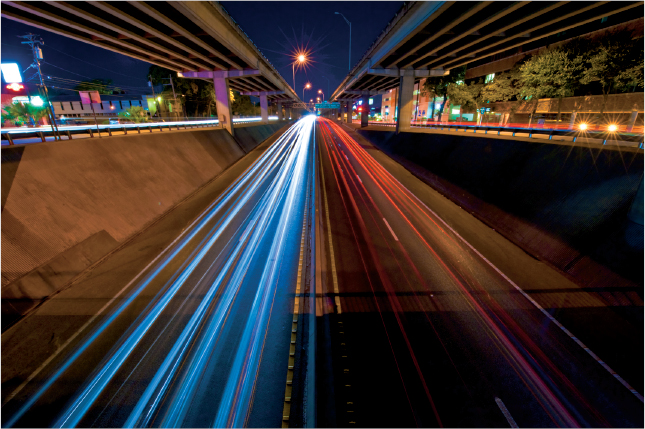
You can use the long exposures to create special effects like streaks of light from moving vehicles. One of my favorite things to do when I visit any city is to photograph the skyline at night. The multitudes of different-colored lights make these pictures vibrant and interesting. Even though they are shot in the dark, there is actually plenty of light to be found. Cities take on a different, and more intriguing, character when photographed at night.

12.1 A shot of the Austin, Texas, skyline. Exposure: ISO 200, f/8, 20 seconds using a Sigma 17-70mm f/2.8-4 OS lens at 17mm.
It's best to get a sturdy tripod for this type of work. Having a ball head on the tripod helps you quickly compose your images.
Generally, when shooting night landscapes or architecture, I use manual exposure and I bracket my exposures. Bracketing allows me to be sure that I get the exact exposure that I'm looking for, and if necessary, I can combine elements of different exposures. For my base exposure, I set the metering mode to Matrix and look at the light meter in the viewfinder.
I generally start my exposure settings where the meter says that the shot will be 1 stop underexposed. I find that this is typically pretty close to the right exposure. I bracket five frames at 1/2-stop intervals from my base exposure. You can use smaller or larger increments and bracket more frames if you want more or less latitude in your exposures.
When doing night photography such as this, I generally use small apertures and long shutter speeds.
Long shutter speeds
When you're photographing a city street scene using a shutter speed of 30 seconds, a person walking through the scene will not register as long as he keeps moving. This also allows you to capture streaks from any moving light sources such as a car or truck headlights.
I also like to use long shutter speeds from 4 to 30 seconds when shooting city skylines because most metropolitan cities are located near a river or lake and the reflection of the city in the water has a glass-like appearance with the longer exposure.
Small apertures
I use small apertures for two specific reasons. First, smaller apertures require longer shutter speeds to make an exposure. Second, when you use a small aperture, any points of light that are in the scene are rendered as starbursts. This occurs because the light diffracts from the aperture blades, and the smaller the aperture, the more pronounced the points are. Unfortunately, diffraction also causes the image to lose a little sharpness. Be aware of this when stopping down past f/16.
What to Watch For
One thing to watch for when doing night photography with long exposures is lens flare. This is especially prevalent if you are using an ultrawide-angle lens. Lens flare occurs when the various bright points of light are reflected off the glass lens elements and is usually exacerbated by long exposure times, making it more visible. Using a faster shutter speed makes lens flare of this type less noticeable.
If you find yourself without a tripod, don't fret. The D7000 is excellent in low light when you use high ISO sensitivity settings. Couple that with the Vibration Reduction (VR) on the kit lens, and shooting most still subjects in the darkness is easy.
You can also use wide-angle settings when shooting handheld in low light. Wide-angle settings are easier to hand hold at longer shutter speeds without camera shake.
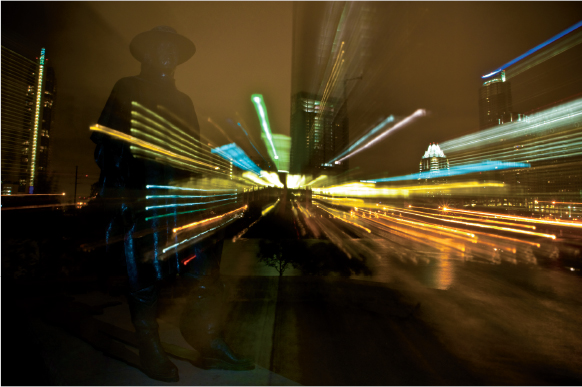
One cool technique you can try when shooting at night is using a long shutter speed and zooming your lens out to create light trails. This is a really simple trick that can be done handheld or with a tripod. For this shot of the Austin, Texas, skyline with the Stevie Ray Vaughan statue in the foreground, I simply mounted the camera on a tripod, set a long shutter speed of 20 seconds, and zoomed the lens out during the exposure.
Shooting Architecture
Architecture often lends itself well to night photography especially when the structure is lit up with bright colors as in Figure 12.2.
Setting up this shot was relatively easy. I set the camera on a tripod, composed the image, and checked the camera's analog light meter in the viewfinder. The camera was set to Manual mode, and I adjusted the settings so that the meter was reading about 1 stop underexposed so I could get a nice black sky and avoid getting blown-out highlights in the rest of the scene. I opted for a small aperture and a low ISO setting of 100 so I could get a long shutter speed that allowed the cars driving by to become invisible, leaving only the streaks of their headlights and taillights. The people in the scene were moving around, and have a ghost-like appearance that's pretty interesting.
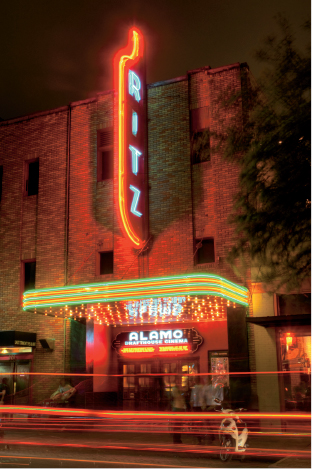
12.2 A shot of the Ritz Theater in Austin, Texas. Exposure: ISO 100, f/16, 25 seconds using a Sigma 17-70mm f/2.8-4 OS lens at 29mm.
Because there are many different light sources in this shot, I recorded the image in RAW so I could adjust the white balance manually in post-processing until I got the effect that I liked the most. The camera's white balance was set to Auto, and I composed the image using Live View.
The shot in Figure 12.3 shows a situation you might come across pretty often when photographing brightly lit buildings at night. The problem is that the difference between the bright sections and the dark sections in the scene is too far apart for the camera's sensor to capture accurately. The difference between the lightest and darkest areas of the scene is called dynamic range.
For this shot I bracketed three exposures, exposing one shot for the highlights, one shot for the mid-tones, and one for the shadow areas. I took these three images and combined them in Adobe Photoshop, creating an image with High Dynamic Range, more commonly referred to as HDR.
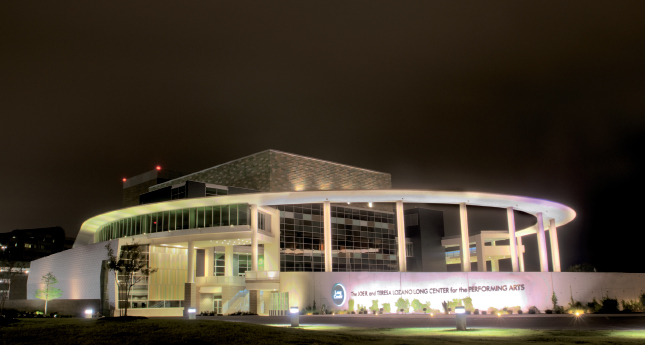
12.3 The Long Center for Performing Arts in Austin, Texas. Exposure: ISO 100, f/11, 30 seconds, 15 seconds, and 5 seconds using a Tamron 17-50mm f/2.8 VC lens at 20mm.
Shooting Low Light Indoors
Of course, not all of your low-light photography is going to consist of buildings or cityscapes. Sometimes you just may be indoors in a dark place and will want to take a photograph without using a flash. In this type of situation, it's best to have a fast lens. A lens with a maximum aperture of f/2.8 is suggested at the least and a faster lens such as an f/1.4 is ideal. Nikon offers a few fast primes that are great for low-light photography. The newest ones are the AF-S prime lenses: the 24mm f/1.4, 35mm f/1.4, and the 50mm f/1.4. The 24mm and 35mm options are very expensive at more than $2,000, but the 50mm is pretty affordable at just under $500. If you're looking for a bargain, consider some the older AF-D lenses, such as the 50mm f/1.8 or f/1.4. The 50mm f/1.8 is the best deal. You can find this lens for about $100 used.
Figure 12.4 shows a simple example of using a fast lens. To get this shot, I set the camera to Aperture Priority mode, set the aperture to f/1.4, and still had to crank up the ISO to 3200 to get a shutter speed of 1/80 second so I could be sure that I could hand hold the camera without getting blur from camera shake.
12.4 A quick and easy low-light portrait. Exposure: ISO 3200, f/1.4, 1/80 second using a Nikon 50mm f/1.4G lens.