CHAPTER 16
Viewing and In-camera Editing
With the D7000's bright, 3-inch, Hi-res, 930,000-dot VGA LCD monitor, you can view your images and even use the in-camera editing features that allow you to save some time in post-processing. These features give you the option to fine-tune your images for printing without ever having to download your images to a computer. You can even process RAW files right inside the D7000 and save the results directly to the memory card. Nikon has made enhancing your photos much more simple and fun.
The Retouch menu allows you to edit your images without a computer.
Viewing Your Images
The Nikon D7000 offers three ways to view your images while the memory card is still inserted in the camera. You can view the images directly on the LCD monitor on the camera or you can hook up your camera to a standard TV using the included EG-DG2 A/V cable. The D7000 also has an HDMI (High-Definition Multimedia Interface) output. With a Type C mini HDMI connector (available separately at most electronics stores) you can view your photos or even your HD video in full High Definition right on your HDTV.
When you're viewing images on an external device such as a TV, the view is the same as would normally be displayed on the LCD monitor. The camera's buttons and dials function exactly the same.
Standard TV
Before connecting the camera to a standard TV, you need to set the Video out mode. There are two video interface types: PAL and NTSC (NTSC is the camera default). These modes control how the electronic signal is processed. NTSC mode transmits 30 frames each second with each frame comprised of 525 scan lines. PAL mode transmits 25 frames per second with each frame comprised of 625 scan lines. It's unlikely you'll ever need to refer to this information but it can be nice to know how the modes work. The two different video modes are used in different parts of the world. Most of North and South America use the NTSC mode while Asia and Europe use the PAL video system. If you're unsure whether your TV accepts NTSC or PAL, you should check the owner's manual.
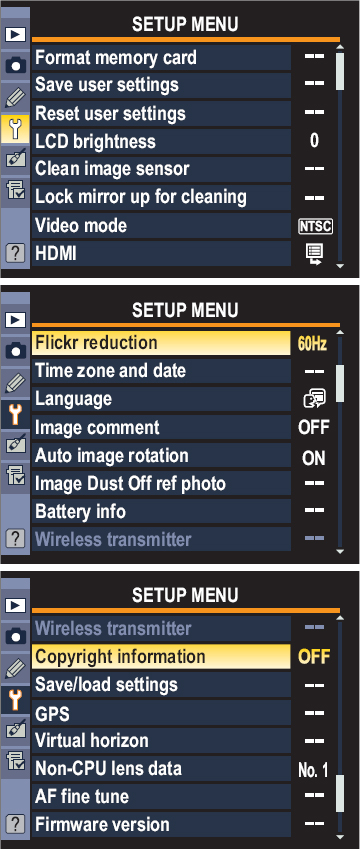
To set the Video mode, follow these steps:
- Turn the camera on.
- Press the Menu button.
- Use the Multi-selector to highlight the Setup menu.
- Use the Multi-selector to highlight Video mode, and then press the OK button.
- Use the Multi-selector to highlight NTSC (or PAL).
- Press the OK button to save the settings.
![]() For more information on playing back images, see Chapter 3.
For more information on playing back images, see Chapter 3.
To connect your camera to a standard TV
- Turn the camera off. This can prevent static electricity from damaging your camera.
- Open the connector cover. The connector cover is on the left side of the camera when the lens is facing away from you.
- Plug in the EG-D2 video cable. The cable is available separately from Nikon. Plug the cable into the Video out jack. This is the connection at the bottom.
- Connect the EG-D2 to the input jack of your TV or VCR.
- Set your TV to the video channel. This may differ depending on your TV. See the owner's manual if you are unsure.
- Turn on the camera, and press the Playback button.
HDTV
Being able to view your images and videos straight from the camera on your HDTV is a really nice feature. You can set up a slide show to show all your friends the photos you shot that day or you can edit your photos using the Retouch menu straight from the camera while being able to view the images larger than life. If your HDTV is device control compatible (HDMI-CEC), you can also use the remote control to browse the images and camera menus. Isn't technology great?
![]() If your HDTV is HDMI-CEC compatible, the camera displays CEC in place of the number of remaining frames.
If your HDTV is HDMI-CEC compatible, the camera displays CEC in place of the number of remaining frames.
Attaching the camera to your HDTV is a pretty simple affair:
- Turn the camera off. This can prevent static electricity from damaging your camera.
- Open the connector cover. The connector cover is on the left side of the camera when the lens is facing away from you.
- Plug in the type C mini-pin HDMI cable. The cable is available separately from almost any electronics or camera store. Plug the cable into the HDMI out jack. This is the connection just below the USB port. It's clearly labeled.
- Connect the HDMI cable to the input jack of your HDTV.
- Set your HDTV to the HD in setting. This may differ depending on your TV. See the owner's manual if you are unsure.
- Turn on the camera, and press the Playback button. The playback functions exactly the same as if you were looking at the LCD monitor.
![]() When connected to an HDMI-CEC device, the camera is not able to record video or still images.
When connected to an HDMI-CEC device, the camera is not able to record video or still images.
Downloading Images
After you finish taking your pictures, you're probably going to want to download them to your computer for further image editing and tweaking, posting them to the Web, or sending them to your friends and family.
Downloading your images is a fairly simple process, and there are a couple of ways to do it. The most common way is to remove the memory card from the camera and insert it into a card reader that is connected to your computer. This is probably the easiest way to get started. The other option is to use the USB cable supplied with the D7000 and connect the camera directly to the computer. Depending on your computer and the software you have installed, a program might pop up and offer to transfer the image for you. For example, Mac users might find that iPhoto recognizes the camera and opens up once the camera is connected to the computer via the USB cable.
![]() When you are downloading directly from the camera, the battery may become depleted more quickly.
When you are downloading directly from the camera, the battery may become depleted more quickly.
Another option for downloading is using the Nikon Transfer 2 software that was included with the Nikon ViewNX 2 software CD. The Nikon Transfer 2 software is easy to learn and works well, and I encourage you to use it if you don't have a card reader or prefer to plug your camera directly into the computer.
The Retouch Menu
The Nikon D7000 has a very handy Retouch menu. These in-camera editing options make it simple for you to print straight from the camera without downloading it to your computer or using any image-editing software.
One great feature of using the Retouch menu is that the camera saves the retouched image as a copy so you don't lose the original image. This can be beneficial if you decide that you would rather edit the photo on your computer or if you simply aren't happy with the outcome. There are two ways to access the Retouch menu.
The first and quickest method:
- Press the Play button to enter Playback mode. Your most recently taken image appears on the LCD screen.
- Use the Multi-selector to review your images.
- When you see an image you want to retouch, press the OK button to display the Retouch menu options.
- Use the Multi-selector to highlight the Retouch option you want to use. Depending on the Retouch option you choose, you may have to select additional settings.
- Make adjustments if necessary.
- Press the OK button to save the retouched copy.
The second method:
- Press the Menu button to view menu options.
- Use the Multi-selector to scroll down to the Retouch menu. It's the fourth menu down and appears as an icon with a paintbrush.
- Press the Multi-selector right, and then use the Multi-selector up and down buttons to highlight the Retouch option you want to use. Depending on the Retouch option you select, you may have to select additional settings. Once you have selected your option(s), thumbnails appear.
- Use the Multi-selector to select the image to retouch, and then press the OK button.
- Make the necessary adjustments.
- Press the OK button to save the retouched copy.
Retouch Menu Options
The Retouch menu allows you to process saved images and save retouched copies. The options include ones for cropping your image, adjusting the color balance, taking red-eye out of your pictures, and even processing RAW images. This is a great feature and can be a real timesaver.
![]() Don't worry about losing your original images; the D7000 saves copies of the original at the same resolution for JPEGs and Large Fine JPEGs from RAW files.
Don't worry about losing your original images; the D7000 saves copies of the original at the same resolution for JPEGs and Large Fine JPEGs from RAW files.
![]() When using both memory card slots, you can select images off either memory card. To switch between memory cards, press and hold the BKT button and press the Multi-selector up. A dialog screen will be displayed where you can select Slot 1 or Slot 2, highlight the desired Slot, and press the Multi-selector right to view available folders on the selected card.
When using both memory card slots, you can select images off either memory card. To switch between memory cards, press and hold the BKT button and press the Multi-selector up. A dialog screen will be displayed where you can select Slot 1 or Slot 2, highlight the desired Slot, and press the Multi-selector right to view available folders on the selected card.
D-Lighting
D-Lighting enables you to adjust the image by brightening the shadows. This is not the same as Active D-Lighting. D-Lighting uses a curves adjustment to help to bring out details in the shadow areas of an image. This option is for backlit subjects or images that may be slightly underexposed.
Once you have selected the D-Lighting option in the Retouch menu, you can use the Multi-selector to choose a thumbnail and the Zoom in button to get a closer look at the image. Press the OK button to choose the image to retouch, and two thumbnails are displayed; one is the original image, and the other is the image with D-Lighting applied.
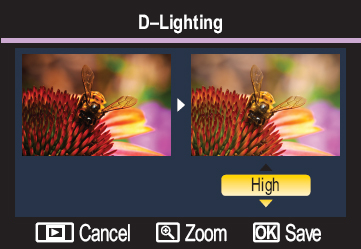
You can press the Multi-selector up or down to select the amount of D-Lighting: Low, Normal, or High. The results can be viewed in real time and compared with the original before saving. Press the OK button to save the results, the Playback button to cancel them, and the Zoom in button to view the full-frame image.
Red-eye correction
The Red-eye correction option enables the camera to automatically correct the red-eye effect that sometimes occurs when flash is used with pictures taken of people. This option is only available on photos taken with flash. When you press the OK button during preview to choose images to retouch from the Playback menu, this option is grayed out and cannot be selected if the camera detects that a flash was not used. When you attempt to choose an image directly from the Retouch menu, a message is displayed stating that this image cannot be used.
Once the image has been selected, press the OK button; the camera automatically corrects the red-eye and saves a copy of the image to your memory card.
If an image is selected that used flash but there is no red-eye present, the camera displays a message stating that red-eye is not detected in the image and no retouching will be done.
Trim
The Trim option enables you to crop your image to remove distracting elements or to crop closer to the subject. You can also use the Zoom in and Zoom out buttons to adjust the size of the crop. This allows you to crop closer in or back out if you find you've zoomed in too much.
Use the Multi-selector to move the crop around the image so you can center the crop on the part of the image that you think is most important. When you are happy with the crop you have selected, press the OK button to save a copy of your cropped image or press the Playback button to return to the main menu without saving the cropped image.
Rotating the Command dial allows you to choose different aspect ratios for your crop. You can choose the aspect ratio to conform to different print sizes. The options include
- 3:2. This is the default crop size. This ratio is good for prints sized 4 × 6, 8 × 12, and 12 × 18.
- 4:3. This is the ratio for prints sized 6 × 8 or 12 × 16.
- 5:4. This is the standard size for 8 × 10 prints.
- 1:1. This gives you a square crop.
- 16:9. This is what's known as a cinematic crop. It is the ratio that movie screens and widescreen TVs use.
Monochrome
The Monochrome option allows you to make a copy of your color image in a monochrome format. There are three options:
- Black-and-white. This changes your image to shades of black, white, and gray.
- Sepia. This gives your image the look of a black-and-white photo that has been sepia toned. Sepia-toning is a traditional photographic process that gives the photo a reddish-brown tint.
- Cyanotype. This option gives your photos a blue or cyan tint. Cyanotypes are a form of processing film-based photographic images.
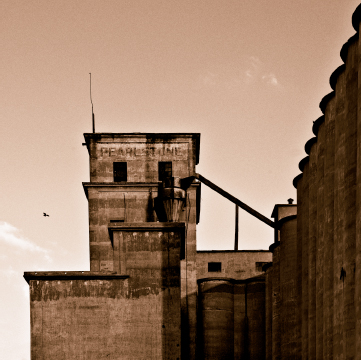
16.4 An image converted to sepia
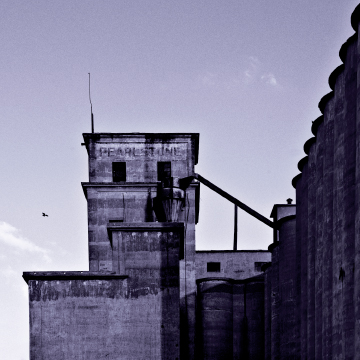
16.5 An image converted to cyanotype
When using the Sepia or Cyanotype options, you can use the Multi-selector up and down buttons to adjust the lightness or darkness of the effect. Press the OK button to save a copy of the image or press the Playback button to cancel without saving a copy.
Filter effects
Filter effects allow you to simulate the effects of using certain filters over your lens to subtly modify the colors of your image. There are seven filter effects available:
- Skylight. A skylight filter is used to absorb some of the UV rays emitted by the sun. The UV rays can give your image a slightly bluish tint. Using the skylight filter effect causes your image to be less blue.
- Warm filter. A warming filter adds a little orange to your image to give it a warmer hue. This filter effect can be useful when you use flash because flash may make your images feel a little too cool.
- Red intensifier. This effect boosts the saturation of reds in the image. You can press the Multi-selector up or down to lighten or darken the effect.
- Green intensifier. This effect boosts the saturation of greens in the image. You can press the Multi-selector up or down to lighten or darken the effect.
- Blue intensifier. This effect boosts the saturation of blues in the image. You can press the Multi-selector up or down to lighten or darken the effect.
- Cross screen. This effect simulates the use of a star filter. A star filter creates a star-shaped pattern on the bright highlights in your image. If your image doesn't have any bright highlights, the effect will not be apparent. Once an image is selected for the cross screen filter, you are shown a submenu with a few options that you can adjust. You can choose the number of points on the stars: 4, 6, or 8. You can also choose the amount; there are three settings that give you more or fewer stars. You can choose three angle settings, which control the angle at which the star is tilted. You also have three settings that control the length of the points on the stars.
- Soft. This effect applies a soft glow to your images. This effect is mostly used for portraiture but can also be used effectively for landscapes.
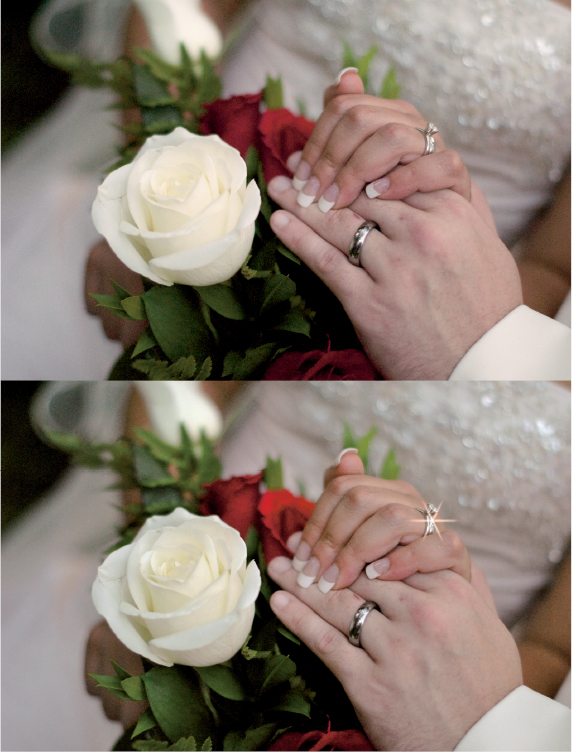
16.6 The cross screen filter effect is applied to the bottom image.
After choosing the desired filter effect, press the OK button to save a copy of your image with the effect added.
Color balance
You can use the color balance option to create a copy of an image on which you have adjusted the color balance. Using this option, you can use the Multi-selector to add a color tint to your image. You can use this effect to neutralize an existing color tint or to add a color tint for artistic purposes.
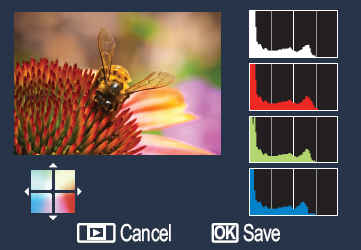
16.7 Color chart and histograms using the color balance option
Press the Multi-selector up to increase the amount of green, down to increase the amount of magenta, left to add blue, and right to add amber.
A color chart and color histograms are displayed along with an image preview so you can see how the color balance affects your image. When you are satisfied with your image, press the OK button to save a copy.
Image overlay
This option allows you to combine two RAW images and save them as one. You can only access this menu option by entering the Retouch menu using the Menu button (the longer route); you cannot access this option by pressing the OK button when in Playback mode.
![]() To use this option, you must have at least two RAW images saved to your memory card. This option is not available for use with JPEG.
To use this option, you must have at least two RAW images saved to your memory card. This option is not available for use with JPEG.
To use this option
- Press the Menu button to view the menu options.
- Use the Multi-selector to scroll down to the Retouch menu, and press the Multi-selector right to enter the Retouch menu.
- Press the Multi-selector up or down to highlight Image Overlay.
- Press the Multi-selector right. This displays the Image Overlay menu.
- Press the OK button to view RAW image thumbnails. Use the Multi-selector to highlight the first RAW image to be used in the overlay. Press the OK button to select it.
- Adjust the exposure of Image 1 by pressing the Multi-selector up or down. Press the OK button when the image is adjusted to your liking.
- Press the Multi-selector right to switch to Image 2.
- Press the OK button to view RAW image thumbnails. Use the Multi-selector to highlight the second RAW image to be used in the overlay. Press the OK button to select it.
- Adjust the exposure of Image 2 by pressing the Multi-selector up or down. Press the OK button when the image is adjusted to your liking.
- Press the Multi-selector right to highlight the Preview window.
- Press the Multi-selector up or down to highlight Overlay to preview the image, or use the Multi-selector to highlight Save to save the image without previewing.
NEF (RAW) processing
The NEF (RAW) processing option allows you to do some basic editing to images saved in the RAW format without downloading them to a computer and using image-editing software. This option has limited functionality but allows you to fine-tune your image more precisely when you are printing straight from the camera or memory card.
You can save a copy of your image in JPEG format. You can choose the image quality and size that the copy is saved as, adjust the white balance settings, fine-tune the exposure compensation, and select a Picture Control setting to be applied.
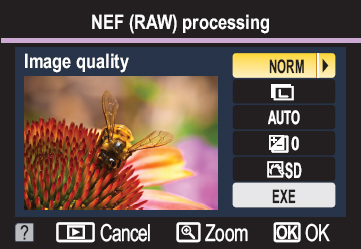
16.8 NEF (RAW) processing menu screen
To apply RAW processing
- Enter the NEF (RAW) Processing menu through the Retouch menu. Press the OK button to view thumbnails of the images stored on your card. Only images saved in RAW format are displayed.
- Press the Multi-selector left or right to scroll through the thumbnails. Press the OK button to select the highlighted image. This brings up a screen with the image adjustment submenu located to the right of the image you have selected.
- Press the Multi-selector up or down to highlight the adjustment you want to make. You can set image quality, image size, white balance, exposure compensation, and optimize the image. You can also use the Zoom in button to view a full screen preview.
- When you have made your adjustments, use the Multi-selector to highlight EXE and press the OK button to save changes or the Playback button to cancel without saving them. EXE sets the changes and saves a copy of the image in JPEG format at the size and quality that you have selected. The camera default saves the image as a Large, Fine JPEG.
![]() See Chapter 2 for more information on image size, quality, and white balance.
See Chapter 2 for more information on image size, quality, and white balance.
Resize
Resize is a handy little option that enables you to make a copy of your images that are a smaller size. These smaller pictures are more suitable for small prints or Web-sized images and for files to e-mail to friends and family.
![]() When using two memory cards, you will be asked to choose a destination for the saved copies.
When using two memory cards, you will be asked to choose a destination for the saved copies.
The first thing you need to do when creating a resized image is to select the Choose size option from the submenu. You have five options to choose from:
- 2.5M: 1920 × 1280 pixels
- 1.1M: 1280 × 856 pixels
- 0.6M: 960 × 640 pixels
- 0.3M: 640 × 424 pixels
- 0.1M: 320 × 216 pixels
After you decide the size you want your small pictures to be, choose the Select picture option. When the Select picture option is selected, the LCD displays thumbnails of all the images in the current folder. To scroll through your images, press the Multi-selector left or right. To select or deselect an image, press the Multi-selector up or down. You can select as many images as you have on your memory card. When all the images that you want to make a resized copy of are selected, press the OK button to make the copies.
Quick retouch
The Quick retouch option is the quickest and easiest option to use. The camera automatically adjusts the contrast and saturation, making your image brighter and more colorful, perfect for printing straight from the camera or memory card. In the event that your image is dark or backlit, the camera also automatically applies D-Lighting to help bring out details in the shadow areas of your picture.
Once your image has been selected for Quick retouch, you have the option to choose how much of the effect is applied. You can choose from High, Normal, or Low. The LCD monitor displays a side-by side comparison between the image as shot and the image retouched to give you a better idea of what the effect looks like.
Once you decide how much of the effect you want, press the OK button to save a copy of the retouched image, or press the Playback button to cancel the copy without making any changes to your picture.
Straighten
The Straighten feature enables you to fix images that may have been shot at a slight angle. When an image is selected, press the Multi-selector left and right to adjust the tilt amount. A grid overlay is displayed over the image so you can use it to align with the horizon or another straight object in the photo.
Distortion control
As you learn in Chapter 4, some lenses are prone to distortion. The Distortion control option enables you to correct for lens distortion right in camera. There are two options: Auto and Manual. Auto automatically applies any needed corrections; with Manual, you apply the effect using the Multi-selector. Press the Multi-selector right to reduce barrel distortion (wide-angles) and press the Multi-selector left to reduce pin-cushion distortion (telephotos).
![]() The Auto setting is recommended for use with Nikkor Gand D-type lenses only.
The Auto setting is recommended for use with Nikkor Gand D-type lenses only.
Fisheye
The Fisheye option does the opposite of what Distortion control does: It adds barrel distortion to the image to make it appear like it was taken using a fisheye lens. Press the Multi-selector to the left to add to the effect and to the right to decrease it. To be 100 percent honest, I think the effect looks terrible, so use at your own peril.
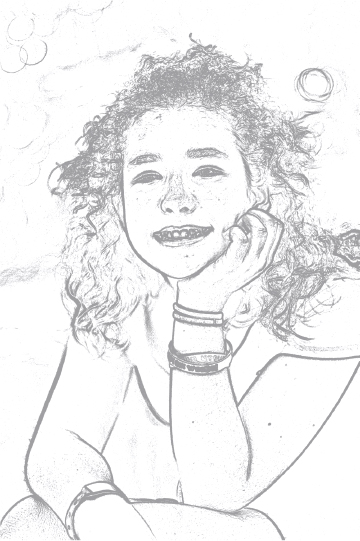
Color outline
The Color outline feature takes the selected image and creates an outline copy that can be opened using image-editing software, such as Adobe Photoshop or Corel Paintshop Pro, and colored in by hand. This option works best when it's used on an image with high contrast. It's a pretty cool effect and the image can even be used straight from the camera, which gives it the look of a drawing.
Color sketch
The Color sketch option makes your image look like it was drawn with colored pencils. Selecting Vividness allows you to increase the color saturation of the effect. The Outlines option allows you to change the thickness of the outlines of the “sketch.”
Perspective Control
This effect allows you to correct the distortion that happens when photographing tall things while looking up at them. This Retouch option lessens the effect of the distortion by making it appear as if the camera is parallel to the building.
Miniature effect
The Miniature effect is modeled after a technique that some people call (erroneously) the “tilt-shift effect” because it can be achieved optically with a tilt-shift lens. Quite simply, this effect simulates the shallow depth of field normally present in macro shots. This tricks the eye into seeing something large as something very tiny. The effect only works with very far-off subjects and works better when the vantage point is looking down. It's a pretty cool effect, but it only works with limited subjects.
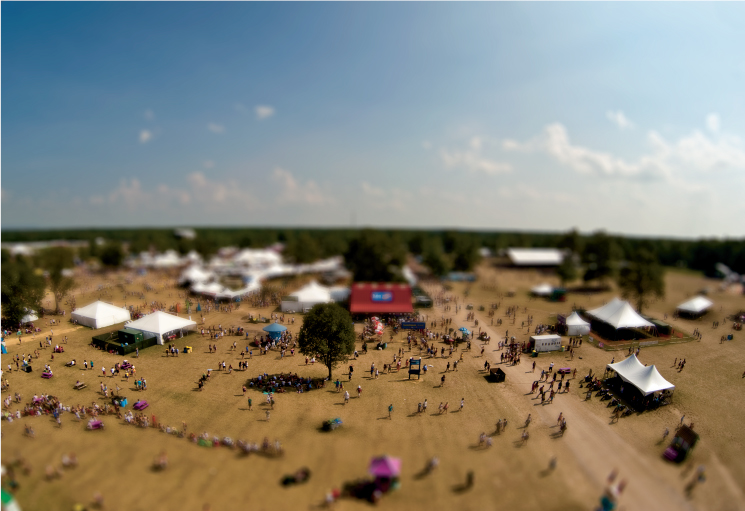
16.10 An overhead shot of the Bonnaroo festival grounds in Manchester, Tennessee, with the Miniature effect applied. Exposure: ISO 100, f/16, 1/125 using a Nikon 10.5mm f/2.8 fisheye lens.
Edit movie
The Edit movie option allows you to make basic edits to videos that you shoot with the D7000. You have three options: choose the starting frame, choose the ending frame, and grab a still image from the video. Each edit you make is saved as a new file so there's no need to worry about making any permanent changes to your original file. To edit your video
- Press the Menu button. Use the Multi-selector to select the Retouch menu.
- Select Edit Movie. Press OK or Multi-selector right to view menu options.
- Choose the edit you want to make. The options are Choose start point, Choose end point, or Save selected frame. Press OK or press the Multi-selector right. This pulls up a menu with all videos that are saved to the current card.
- Select the video. Use the Multi-selector to scroll through the available videos. The selected video is highlighted in yellow. Press the OK button when your video is selected.
- Play the video. Press the OK button to begin playback. Press the Multi-selector up at the moment you want to make the edit. You can press the Multi-selector down button to stop playback and press left or right to go back or forward in the video clip.
- Make the edit. Press the Multi-selector up to make the cut. I prefer to pause the movie by pressing the Multi-selector down so I can be absolutely sure that's where I want the edit. I then make the edit. The movie is automatically saved.
Side by side comparison
Side by side comparison allows you to view a before and after of the retouched image and the original image. You can only access this option by selecting an image that has been retouched. To use this option
- Press the Play button and use the Multi-selector to choose the retouched image to view.
- Press the OK button to display the Retouch menu.
- Use the Multi-selector to highlight Before and after, and then press the OK button.
- Use the Multi-selector to highlight either the original or retouched image. You can then use the Zoom in button to view it closer.
- Press the Play button to exit the Before and after comparison and return to Playback mode.