Creating a Custom Directive
The types of custom directives you can define are really limitless, and this makes AngularJS really extensible. Custom directives are the most complex portion of AngularJS to explain. The best way to get you started is to show you an example of two custom directives, to give you a feel for how to implement them and have them interact with each other.
Listing 24.7 implements two custom directives: myPhotos and myPhoto. The myPhotos directive is designed to be a container for the myPhoto directive. Notice that lines 7–18 define a controller that provides the functionality for the myPhotos directive, including an addPhoto() function. Because the code uses require:'^myPhotos' in the myPhoto directive, you can also call the addPhoto() method from the link() function by using the photosControl handle to the myPhotos controller.
Listing 24.8 implements the myPhotos and myPhoto directives in an AngularJS template. The myPhoto directives are nested inside the myPhotos directive. Notice that the title attribute is set on each myPhoto directive and linked to the scope in line 28 of Listing 24.7.
Listing 24.9 implements a partial template loaded by the myPhotos directive. It generates a <div> container and then uses the photos array in the myPhotos scope to build a list of links bound to the select() function, using ng-click. <div ng-transclude></div> provides the container for the myPhoto child elements.
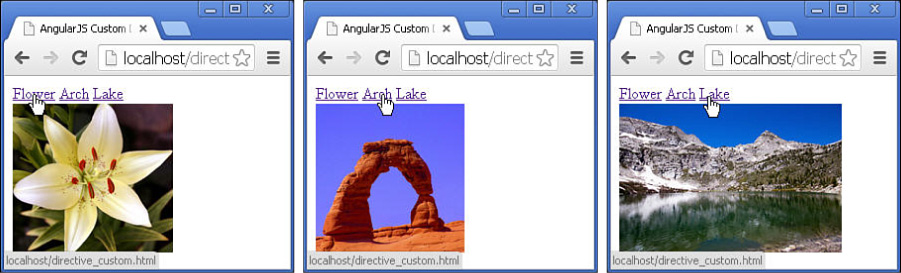
Figure 24.4 shows the webpage created by Listings 24.7, 24.8, and 24.9.
Listing 24.7 directive_custom.js: Implementing custom directives that interact with each other
01 angular.module('myApp', [])
02 .directive('myPhotos', function() {
03 return {
04 restrict: 'E',
05 transclude: true,
06 scope: {},
07 controller: function($scope) {
08 var photos = $scope.photos = [];
09 $scope.select = function(photo) {
10 angular.forEach(photos, function(photo) {
11 photo.selected = false;
12 });
13 photo.selected = true;
14 };
15 this.addPhoto = function(photo) {
16 photos.push(photo);
17 };
18 },
19 templateUrl: 'my_photos.html'
20 };
21 })
22 .directive('myPhoto', function() {
23 return {
24 require: '^myPhotos',
25 restrict: 'E',
26 transclude: true,
27 scope: { title: '@'},
28 link: function(scope, elem, attrs, photosControl) {
29 photosControl.addPhoto(scope);
30 },
31 template: '<div ng-show="selected" ng-transclude></div>'
32 };
33 });
Listing 24.8 directive_custom.html: An AngularJS template that implements nested custom directives
01 <!doctype html>
02 <html ng-app="myApp">
03 <head>
04 <title>AngularJS Custom Directive</title>
05 </head>
06 <body>
07 <my-photos>
08 <my-photo title="Flower">
09 <img src="/images/flower.jpg" height="150px"/>
10 </my-photo>
11 <my-photo title="Arch">
12 <img src="/images/arch.jpg" height="150px"/>
13 </my-photo>
14 <my-photo title="Lake">
15 <img src="/images/lake.jpg" height="150px"/>
16 </my-photo>
17 </my-photos>
18 <script src="http://code.angularjs.org/1.2.9/angular.min.js"></script>
19 <script src="/js/directive_custom.js"></script>
20 </body>
21 </html>
Listing 24.9 my_photos.html: A partial AngularJS template that provides the root element for the myPhotos custom directive
01 <div>
02 <span ng-repeat="photo in photos"
03 ng-class="{active:photo.selected}">
04 <a href="" ng-click="select(photo)">{{photo.title}}</a>
05 </span>
06 <div ng-transclude></div>
07 </div>