
- About This eBook
- Title Page
- Copyright Page
- Developer’s Library
- Dedication Page
- Contents
- Acknowledgments
- About the Author
- We Want to Hear from You!
- Reader Services
- Introduction
- Who Should Read This Book
- Why You Should Read This Book
- What You Will Learn from This Book
- What Is Node.js?
- What Is MongoDB?
- What Is AngularJS?
- How This Book Is Organized
- Getting the Code Examples
- A Final Word
- 1. Introducing the Node.js-to-AngularJS Stack
- 2. JavaScript Primer
- II: Learning Node.js
- 3. Getting Started with Node.js
- 4. Using Events, Listeners, Timers, and Callbacks in Node.js
- 5. Handling Data I/O in Node.js
- 6. Accessing the File System from Node.js
- 7. Implementing HTTP Services in Node.js
- 8. Implementing Socket Services in Node.js
- Implementing TLS Servers and Clients
- Summary
- Up Next
- Understanding the process Module
- Implementing Child Processes
- Using the cluster Module
- Understanding the Worker Object
- Implementing an HTTP Cluster
- Summary
- Up Next
- 10. Using Additional Node.js Modules
- III: Learning MongoDB
- 11. Understanding NoSQL and MongoDB
- Why NoSQL?
- Understanding MongoDB
- MongoDB Data Types
- Planning Your Data Model
- Normalizing Data with Document References
- Denormalizing Data with Embedded Documents
- Using Capped Collections
- Understanding Atomic Write Operations
- Considering Document Growth
- Identifying Indexing, Sharding, and Replication Opportunities
- Large Collections Versus Large Numbers of Collections
- Deciding on Data Life Cycles
- Considering Data Usability and Performance
- Up Next
- 12. Getting Started with MongoDB
- Adding the MongoDB Driver to Node.js
- Connecting to MongoDB from Node.js
- Understanding the Db Object
- Understanding the Admin Object
- Understanding the Collection Object
- Understanding the Cursor Object
- 11. Understanding NoSQL and MongoDB
- Accessing and Manipulating Databases
- Accessing and Manipulating Collections
- Summary
- Up Next
- 14. Manipulating MongoDB Documents from Node.js
- Understanding Database Change Options
- Understanding Database Update Operators
- Adding Documents to a Collection
- Updating Documents in a Collection
- Atomically Modifying Documents in a Collection
- Saving Documents in a Collection
- Using upsert to Insert Documents in a Collection
- Deleting Documents from a Collection
- Removing a Single Document from a Collection
- Summary
- 15. Accessing MongoDB Documents from Node.js
- 16. Using Mongoose for Structured Schema and Validation
- Understanding Mongoose
- Defining a Schema
- Compiling a Model
- Understanding the Query Object
- Understanding the Document Object
- Finding Documents by Using Mongoose
- Adding Documents by Using Mongoose
- Updating Documents by Using Mongoose
- Removing Documents by Using Mongoose
- Aggregating Documents by Using Mongoose
- Using the Validation Framework
- Implementing Middleware Functions
- Summary
- Up Next
- 17. Advanced MongoDB Concepts
- IV: Using Express to Make Life Easier
- 19. Implementing Express Middleware
- V: Learning AngularJS
- 20. Getting Started with AngularJS
- Why AngularJS?
- Understanding AngularJS
- An Overview of the AngularJS Life Cycle
- Integrating AngularJS with Existing JavaScript and jQuery
- Adding AngularJS to the Node.js Environment
- Bootstrapping AngularJS in an HTML Document
- Using the Global APIs
- Creating a Basic AngularJS Application
- Summary
- Up Next
- 21. Understanding AngularJS Modules and Dependency Injection
- 22. Implementing the Scope as a Data Model
- 23. Using AngularJS Templates to Create Views
- 24. Implementing Directives in AngularJS Views
- 25. Implementing AngularJS Services in Web Applications
- 20. Getting Started with AngularJS
- VI: Building Practical Web Application Components
- Libraries Used
- Project Directory Structure
- Defining the User Model
- Creating the Server
- Implementing Routes
- Implementing the User Signup Route
- Implementing the User Login Route
- Implementing the Get User Profile Route
- Implementing the Update User Route
- Implementing the Delete User Route
- Full User Controller Code
- Implementing the User and Authentication Views
- Implementing the AngularJS Module and Controller
- Using Social Media Accounts as Authentication Sources
- Summary
- Up Next
- 27. Adding Comment Threads to Pages
- Libraries Used
- Defining the Comment, Reply, Photo, and Page Models
- Creating the Comments Server
- Implementing Routes to Support Viewing and Adding Comments
- Implementing the Model-Based Controller Routes
- Implementing Photo and Comment Views
- Implementing the AngularJS Module and Controller to Support Comment Views
- Initializing the Application
- Summary
- Up Next
- 28. Creating Your Own Shopping Cart
- Project Description
- Libraries Used
- Project Directory Structure
- Defining the Customer, Product, and Orders Models
- Creating the Shopping Cart Server
- Implementing Routes to Support Product, Cart, and Order Requests
- Implementing the Model-Based Controller Routes
- Implementing Shopping Cart and Checkout Views
- Implementing the AngularJS Module and Controller to Support Shopping Cart Views
- Initializing the Application
- Summary
- Up Next
- 29. Building Interactive Web 2.0 Application Components
- Project Description
- Libraries Used
- Project Directory Structure
- Defining the Project Model
- Creating the Application Server
- Implementing Routes to Support the Views
- Implementing a Tabbed View
- Creating the Backend Weather Service
- Defining the Weather AngularJS Controller
- Defining the Weather AngularJS View
- Styling the Weather View
- Implementing Draggable Elements
- Implementing Dynamic Data Access
- Initializing the Application
- Summary
- Index
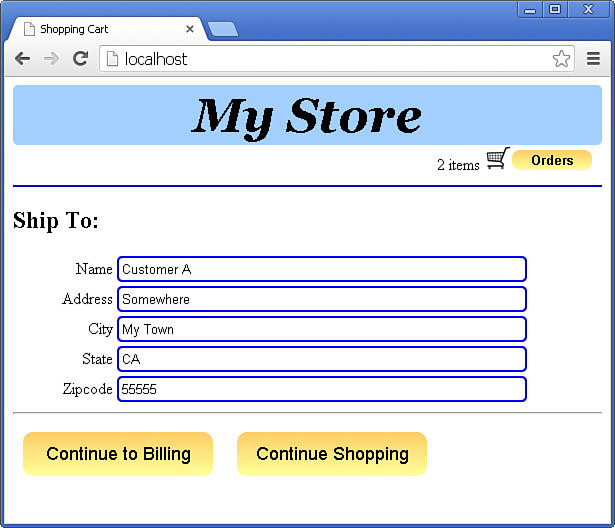
Implementing the Shipping View
When the user clicks the Checkout button in the shopping cart, the shipping view appears, allowing the user to enter shipping information. The shipping view, shown in Listing 28.16, provides a series of input fields to input the shipping information.
The shipping template code is very straightforward. There are a series of text inputs with labels for each shipping field value. The fields are linked to the customer.shipping[0] object in the scope model, using the ng-model directive. When the user changes the field, the scope changes automatically. This is very useful when sending customer changes back to the database. When the user clicks the Continue to Billing button, the shipping data is updated on the server as well, and the user is taken to the billing view. Figure 28.5 shows the rendered shipping view.
Listing 28.16 shipping.html: Implementing the partial shipping template
01 <div id="shippingContainer">
02 <h2>Ship To:</h2>
03 <label>Name</label>
04 <input type="text" ng-model="customer.shipping[0].name" /><br>
05 <label>Address</label>
06 <input type="text" ng-model="customer.shipping[0].address" /><br>
07 <label>City</label>
08 <input type="text" ng-model="customer.shipping[0].city" /><br>
09 <label>State</label>
10 <input type="text" ng-model="customer.shipping[0].state" /><br>
11 <label>Zipcode</label>
12 <input type="text" ng-model="customer.shipping[0].zip" />
13 <hr>
14 <div>
15 <span class="button" ng-click="setShipping()">
16 Continue to Billing
17 </span>
18 <span class="button" ng-click="setContent('products.html')">
19 Continue Shopping
20 </span>
21 </div>
22 </div>
-
No Comment