
7
Implementing HTTP Services in Node.js
One of the most important aspects of Node.js is the ability to quickly implement HTTP and HTTPS servers and services. Node.js provides the http and https modules out of the box, and they provide the basic framework to do most everything you need from an HTTP and HTTPS standpoint. In fact, it is not difficult to implement a full webserver using just the http module.
That said, you will likely use a different module, such as express, to implement a full-on webserver. This is because the http module is pretty low level. It doesn’t provide calls to handle routing, cookies, caching, and so on. When you get to the Express chapters later in this book, you will see the advantages it provides.
What you will more likely be using the http module for is implementing backend web services for your applications to use. That is where the http module becomes an invaluable tool in your arsenal. You can create basic HTTP servers that provide an interface for communications behind your firewall and then basic HTTP clients that interact with those services.
Therefore, this chapter focuses on understanding the objects that come into play when implementing clients and servers using the http module. The examples in this chapter are basic so that they are easy to consume and expand on.
Processing URLs
The Uniform Resource Locator (URL) acts as an address label for the HTTP server to handle requests from the client. It provides all the information needed to get the request to the correct server on a specific port and access the proper data.
The URL can be broken down into several different components, each providing a basic piece of information for the webserver on how to route and handle the HTTP request from the client. Figure 7.1 illustrates the basic structure of a URL and the components that may be included. Not all these components are included in every HTTP request. For example, most requests do not include the auth component, and many do not include a query string or hash location.

Understanding the URL Object
HTTP requests from the client include the URL string with the information shown in Figure 7.1. To use the URL information more effectively, Node.js provides the url module that provides functionality to convert the URL string into a URL object.
To create a URL object from the URL string, pass the URL string as the first parameter to the following method:
url.parse(urlStr, [parseQueryString], [slashesDenoteHost])
The url.parse() method takes the URL string as the first parameter. The parseQueryString parameter is a Boolean that when true also parses the query string portion of the URL into an object literal. The default is false. The slashesDenoteHost is also a Boolean that when true parses a URL with the format of //host/path to {host: 'host', pathname: '/path'} instead of {pathname: '//host/path'}. The default is false.
You can also convert a URL object into a string form using the following url.parse() method. Table 7.1 lists the attributes of the URL objects created by url.parse():
url.format(urlObj)
The following shows an example of parsing a URL string into an object and then converting it back into a string:
var url = require('url');
var urlStr = 'http://user:[email protected]:80/resource/path?query=string#hash';
var urlObj = url.parse(urlStr, true, false);
urlString = url.format(urlObj);
Table 7.1 Properties of the URL object
Property |
Description |
|
This is the full URL string that was originally parsed. |
|
The |
|
The full |
|
The |
|
The |
|
The |
The |
|
|
The |
|
The full |
|
This is either the |
|
The |
Resolving the URL Components
Another useful feature of the url module is the ability to resolve URL components in the same manner as a browser would. This allows you to manipulate the URL strings on the server side to make adjustments in the URL. For example, you might want to change the URL location before processing the request because a resource has moved or changed parameters.
To resolve a URL to a new location use the following syntax:
url.resolve(from, to)
The from parameter specifies the original base URL string. The to parameter specifies the new location where you want the URL to resolve. The following code illustrates an example of resolving a URL to a new location.
var url = require('url');
var originalUrl = 'http://user:[email protected]:80/resource/path?query=string#hash';
var newResource = '/another/path?querynew';
console.log(url.resolve(originalUrl, newResource));
The output of the previous code snippet is shown below. Notice that only the resource path and beyond are altered in the resolved URL location:
http://user:[email protected]:80/another/path?querynew
Processing Query Strings and Form Parameters
HTTP requests often include query strings in the URL or parameter data in the body for form submissions. The query string can be obtained from the URL object defined in the previous section. The parameter data sent by a form request can be read out of the body of the client request, as described later in this chapter.
The query string and form parameters are just basic key-value pairs. To actually consume these values in your Node.js webserver you need to convert the string into a JavaScript object using the parse() method from the querystring module:
querystring.parse(str, [sep], [eq], [options])
The str parameter is the query or parameter string. The sep parameter allows you to specify the separator character used. The default separator character is &. The eq parameter allows you to specify the assignment character to use when parsing. The default is =. The options parameter is an object with the property maxKeys that allows you to limit the number of keys the resulting object can contain. The default is 1000. If you specify 0, there is no limit.
The following shows an example of using parse() to parse a query string:
var qstring = require('querystring');
var params = qstring.parse("name=Brad&color=red&color=blue");
The params object created would be:
{name: 'Brad', color: ['red', 'blue']}
You can also go back the other direction and convert an object to a query string using the stringify() function shown here:
querystring.stringify(obj, [sep], [eq])
Understanding Request, Response, and Server Objects
To use the http module in Node.js applications, you first need to understand the request and response objects. They provide the information and much of the functionality that comes into and out of the HTTP clients and servers. Once you see the makeup of these objects—including properties, events, and methods they provide—it will be simple to implement your own HTTP servers and clients.
The following sections cover the purpose and behavior of the ClientRequest, ServerResponse, IncomingMessage, and Server objects. The most important events, properties, and methods that each provides also are covered.
The http.ClientRequest Object
The ClientRequest object is created internally when you call http.request() when building the HTTP client. This object represents the request while it is in progress to the server. You use the ClientRequest object to initiate, monitor, and handle the response from the server.
The ClientRequest implements a Writable stream, so it provides all the functionality of a Writable stream object. For example, you can use the write() method to write to it as well as pipe a Readable stream into it.
To implement a ClientRequest object, you use a call to http.request() using the following syntax:
http.request(options, callback)
The options parameter is an object whose properties define how to open and send the client HTTP request to the server. Table 7.2 lists the properties that you can specify. The callback parameter is a callback function that is called after the request is sent to the server and handles the response back from the server. The only parameter to the callback is an IncomingMessage object that will be the response from the server.
The following code shows the basics of implementing the ClientRequest object:
var http = require('http');
var options = {
  hostname: 'www.myserver.com',
  path: '/',
  port: '8080',
  method: 'POST'
};
var req = http.request(options, function(response){
  var str = ''
  response.on('data', function (chunk) {
    str += chunk;
  });
  response.on('end', function () {
    console.log(str);
  });
});
req.end();
Table 7.2 Options that can be specified when creating a ClientRequest
Property |
Description |
|
The domain name or IP address of the server to issue the request to. Defaults to |
|
Same as |
|
Port of remote server. Defaults to 80. |
|
Local interface to bind for network connections. |
|
Unix Domain Socket (use one of |
|
A string specifying the HTTP request method. For example, |
|
A string specifying the requested resource path. Defaults to /book.html?chapter=12 |
|
An object containing request headers. For example: { 'content-length': '750', 'content-type': 'text/plain' } |
|
Basic authentication in the form of |
|
Defines the
|
The ClientRequest object provides several events that enable you to handle the various states the request may experience. For example, you can add a listener that is called when the response event is triggered by the server’s response. Table 7.3 lists the events available on ClientResponse objects.
Table 7.3 Events available on ClientRequest objects
Property |
Description |
|
Emitted when a response to this request is received from the server. The callback handler receives back an |
|
Emitted after a socket is assigned to this request. |
|
Emitted every time a server responds to a request that was initiated with a |
|
Emitted when the server responds to a request that includes an Update request in the headers. |
|
Emitted when the server sends a |
In addition to events, the ClientRequest object also provides several methods that can be used to write data to the request, abort the request, or end the request. Table 7.4 lists the methods available on the ClientRequest object.
Table 7.4 Methods available on ClientRequest objects
Method |
Description |
|
Writes a chunk, |
|
Writes the optional data out to the request body and then flushes the |
|
Aborts the current request. |
|
Sets the socket timeout for the request. |
Disables the Nagle algorithm, which buffers data before sending it. The |
|
|
Enables and disables the |
The http.ServerResponse Object
The ServerResponse object is created by the HTTP server internally when a request event is received. It is passed to the request event handler as the second argument. You use the ServerRequest object to formulate and send a response to the client.
The ServerResponse implements a Writable stream, so it provides all the functionality of a Writable stream object. For example, you can use the write() method to write to it as well as pipe a Readable stream into it to write data back to the client.
When handling the client request, you use the properties, events, and methods of the ServerResponse object to build and send headers, write data, and send the response. Table 7.5 lists the event and properties available on the ServerResponse object. Table 7.6 lists the methods available on the ServerResponse object.
Table 7.5 Events available on ServerResponse objects
Property |
Description |
|
Emitted when the connection to the client is closed prior to sending the |
|
A Boolean that is |
|
A Boolean that, when set to |
|
Allows you to specify the response status code without having to explicitly write the headers. For example: response.statusCode = 500; |
Table 7.6 Methods available on ServerResponse objects
Method |
Description |
|
Sends an |
|
Writes a response header to the request. The response.writeHead(200, 'Success', {
'Content-Length': body.length,
'Content-Type': 'text/plain' }); |
|
Sets the socket timeout for the client connection in milliseconds along with a |
|
Sets the value of a specific header where |
|
Gets the value of an HTTP header that has been set in the response. |
|
Removes an HTTP header that has been set in the response. |
|
Writes a |
|
Adds HTTP trailing headers to the end of the response. |
|
Writes the optional data out to the response body and then flushes the |
The http.IncomingMessage Object
The IncomingMessage object is created either by the HTTP server or the HTTP client. On the server side, the client request is represented by an IncomingMessage object, and on the client side the server response is represented by an IncomingMessage object. The IncomingMessage object can be used for both because the functionality is basically the same.
The IncomingMessage implements a Readable stream, allowing you to read the client request or server response as a streaming source. This means that the readable and data events can be listened to and used to read data from the stream.
In addition to the functionality provided by the Readable class, the IncomingMessage object also provides the properties, events, and methods listed in Table 7.7. These allow you to access information from the client request or server response.
Table 7.7 Events, properties, and methods available on IncomingMessage objects
Method/Event/Property |
Description |
|
Emitted when the underlying socket is closed. |
|
Specifies the version of HTTP used to build the client request/response. |
|
This is an object containing the headers sent with the request/response. |
|
This is an object containing any trailer headers sent with the request/response. |
|
Specifies the method for the request/response. For example: |
|
The URL string sent to the server. This is the string that can be passed to |
|
Specifies the three-digit status code from the server. This attribute is only valid on the HTTP client when handling a server response. |
|
This is a handle to the |
|
Sets the socket timeout for the connection in milliseconds along with a |
The http.Server Object
The Node.js HTTP Server object provides the fundamental framework to implement HTTP servers. It provides an underlying socket that listens on a port and handles receiving requests and then sends responses out to client connections. While the server is listening, the Node.js application will not end.
The Server object implements EventEmitter and emits the events listed in Table 7.8. As you implement an HTTP server, you need to handle at least some or all of these events. For example, at a minimum you need an event handler to handle the request event that is triggered when a client request is received.
Table 7.8 Events that can be triggered by Server objects
Event |
Description |
|
Triggered each time the server receives a client request. The callback should accept two parameters. The first is an function callback (request, response){} |
|
Triggered when a new TCP stream is established. The callback receives the socket as the only parameter. For example: function callback (socket){} |
|
Triggered when the server is closed. The callback receives no parameters. |
|
Triggered when a request that includes the function callback (request, response){} |
|
Emitted when an HTTP function callback (request, socket, head){} |
|
Emitted when the client requests an HTTP upgrade. If this event is not handled clients sending an upgrade request will have their connections closed. The callback receives the request, socket, and head, which is a function callback (request, socket, head){} |
|
Emitted when the client connection socket emits an error. The callback receives an error as the first parameter and the socket as the second. For example: function callback (error, socket){} |
To start the HTTP server, you need to first create a Server object using the createServer() method shown below. This method returns the Server object. The optional requestListener parameter is a callback that is executed when the request event is triggered. The callback should accept two parameters. The first is an IncomingMessage object representing the client request, and the second is a ServerResponse object you use to formulate and send the response:
http.createServer([requestListener])
Once you have created the Server object, you can begin listening on it by calling the listen() method on the Server object:
listen(port, [hostname], [backlog], [callback])
The first method listen(port, [hostname], [backlog], [callback]) is the one that you will most likely use. The following list describes each of the parameters:
![]() port: Specifies the port to listen on.
port: Specifies the port to listen on.
![]() hostname: Specifies when the hostname will accept connections, and if omitted, the server will accept connections directed to any IPv4 address (INADDR_ANY).
hostname: Specifies when the hostname will accept connections, and if omitted, the server will accept connections directed to any IPv4 address (INADDR_ANY).
![]() backlog: Specifies the maximum number of pending connections that are allowed to be queued. This defaults to 511.
backlog: Specifies the maximum number of pending connections that are allowed to be queued. This defaults to 511.
![]() callback: Specifies the callback handler to execute once the server has begun listening on the specified port.
callback: Specifies the callback handler to execute once the server has begun listening on the specified port.
The following code shows an example of starting an HTTP server and listening on port 8080. Notice the request callback handler:
var http = require('http');
http.createServer(function (req, res) {
  <<handle the request and response here>>
}).listen(8080);
Two other methods can be used to listen for connections through the file system. The first accepts a path to a file to listen on, and the second accepts an already open file descriptor handle:
listen(path, [callback])
listen(handle, [callback])
To stop the HTTP server from listening once it has started, use the following close() method:
close([callback]).
Implementing HTTP Clients and Servers in Node.js
Now that you understand the ClientRequest, ServerResponse, and IncomingMessage objects, you are ready to implement some Node.js HTTP clients and servers. This section guides you through the process of implementing basic HTTP clients and servers in Node.js. To do this, a client and server are implemented in each section to show you how the two interact.
The examples in the following sections are basic to make it easy for you to grasp the concepts of starting the client/server and then handling the different requests and responses. There is no error handling, protection against attacks, or much of the other functionality built in. However, the examples provide a good variety of the basic flow and structure required to handle general HTTP requests using the http module.
Serving Static Files
The most basic type of HTTP server is one that serves static files. To serve static files from Node.js, you need to first start the HTTP server and listen on a port. Then in the request handler, you open the file locally using the fs module and write the file contents to the response.
Listing 7.1 shows the basic implementation of a static file server. Notice that line 5 creates the server using createServer() and also defines the request event handler shown in lines 6–15. Also notice that the server is listening on port 8080 by calling listen() on the Server object.
Inside the request event handler on line 6, the url.parse() method is used to parse the url so that we can use the pathname attribute when specifying the path for the file in line 7. The static file is opened and read using fs.readFile(), and in the readFile() callback the contents of the file are written to the response object using res.end(data) on line 14.
Listing 7.1 http_server_static.js: Implementing a basic static file webserver
01 var fs = require('fs');
02 var http = require('http');
03 var url = require('url');
04 var ROOT_DIR = "html/";
05 http.createServer(function (req, res) {
06   var urlObj = url.parse(req.url, true, false);
07   fs.readFile(ROOT_DIR + urlObj.pathname, function (err,data) {
08     if (err) {
09       res.writeHead(404);
10       res.end(JSON.stringify(err));
11       return;
12     }
13     res.writeHead(200);
14     res.end(data);
15   });
16 }).listen(8080);
Listing 7.2 shows a basic implementation of an HTTP client that sends a get request to the server to retrieve the file contents. Notice that the options for the request are set in lines 2–6, and then the client request is initiated in lines 16–18 passing the options.
When the request completes, the callback function uses the on('data') handler to read the contents of the response from the server and then the on('end') handler to log the file contents to a file. Figure 7.2 and Listing 7.2 Output show the output of the HTTP client as well as accessing the static file from a web browser.
Listing 7.2 http_client_static.js: Basic web client retrieving static files
01 var http = require('http');
02 var options = {
03     hostname: 'localhost',
04     port: '8080',
05     path: '/hello.html'
06   };
07 function handleResponse(response) {
08   var serverData = '';
09   response.on('data', function (chunk) {
10     serverData += chunk;
11   });
12   response.on('end', function () {
13     console.log(serverData);
14   });
15 }
16 http.request(options, function(response){
17   handleResponse(response);
18 }).end();
Listing 7.2 Output Implementing a basic static file webserver
C:ooks
odech07>node http_server_static.js
<html>
  <head>
    <title>Static Example</title>
  </head>
  <body>
    <h1>Hello from a Static File</h1>
  </body>
</html>

Figure 7.2 Implementing a basic static file web server
Implementing Dynamic GET Servers
More often than not you will use Node.js webservers to serve dynamic content rather than static content. This content may be dynamic HTML files or snippets, JSON data, or a number of other data types. To serve a GET request dynamically, you need to implement code in the request handler that dynamically populates the data you want to send back to the client, writes it out to the response, and then calls end() to finalize the response and flush the Writable stream.
Listing 7.3 shows the basic implementation of a dynamic web service. In this case, the web service simply responds with a dynamically generated HTTP file. The example is designed to show the process of sending the headers, building the response, and then sending the data in a series of write() requests.
Notice that line 6 creates the server using createServer(), and line 15 begins listening on port 8080 using listen(). Inside the request event handler defined in lines 7–15, the Content-Type header is set and then the headers are sent with a response code of 200. In reality you would have already done a lot of processing to prepare the data. But in this case, the data is just the messages array defined in lines 2–5.
Notice that in lines 11–13 the loop iterates through the messages and calls write() each time to stream the response to the client. Then in line 14 the response is completed by calling end().
Listing 7.3 http_server_get.js: Implementing a basic GET webserver
01 var http = require('http');
02 var messages = [
03   'Hello World',
04   'From a basic Node.js server',
05   'Take Luck'];
06 http.createServer(function (req, res) {
07   res.setHeader("Content-Type", "text/html");
08   res.writeHead(200);
09   res.write('<html><head><title>Simple HTTP Server</title></head>');
10   res.write('<body>');
11   for (var idx in  messages){
12     res.write('
<h1>' + messages[idx] + '</h1>');
13   }
14   res.end('
</body></html>');
15 }).listen(8080);
Listing 7.4 shows a basic implementation of an HTTP client that reads the response from the server in Listing 7.3. This is similar to the example in Listing 7.2; however, note that no path was specified since the service doesn’t really require one. For more complex services, you would implement query strings or complex path routes to handle a variety of calls.
Note that on line 11 the statusCode from the response is logged to the console. Also on line12 the headers from the response are also logged. Then on line 13 the full response from the server is logged. Figure 7.3 and Listing 7.4 Output show the output of the HTTP client as well as accessing the dynamic get server from a web browser.
Listing 7.4 http_client_get.js: Basic web client that makes a GET request to the server in Listing 7.3
01 var options = {
02     hostname: 'localhost',
03     port: '8080',
04   };
05 function handleResponse(response) {
06   var serverData = '';
07   response.on('data', function (chunk) {
08     serverData += chunk;
09   });
10   response.on('end', function() {
11     console.log("Response Status:", response.statusCode);
12     console.log("Response Headers:", response.headers);
13     console.log(serverData);
14   });
15 }
16 http.request(options, function(response){
17   handleResponse(response);
18 }).end
Listing 7.4 Output Implementing a basic HTTP GET service
C:ooks
odech07>node http_server_get.js
Response Status: 200
Response Headers: { 'content-type': 'text/html',
  date: 'Mon, 26 Sep 2016 17:10:33 GMT',
  connection: 'close',
  'transfer-encoding': 'chunked' }
<html><head><title>Simple HTTP Server</title></head><body>
<h1>Hello World</h1>
<h1>From a basic Node.js server</h1>
<h1>Take Luck</h1>
</body></html>
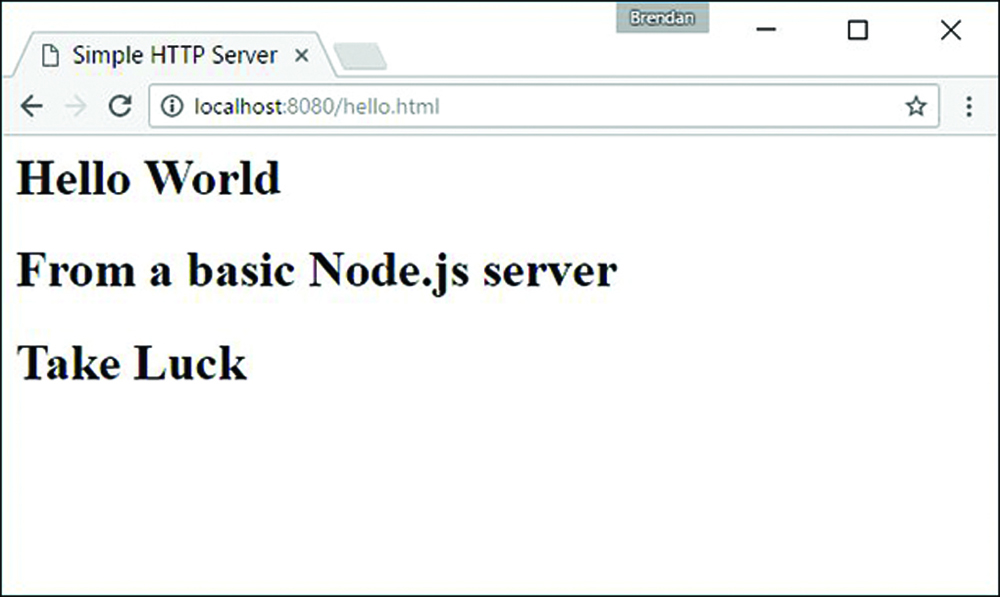
Figure 7.3 Output of a basic HTTP GET server
Implementing POST Servers
Implementing a POST service is similar to implementing a GET server. In fact, you may end up implementing them together in the same code for the sake of convenience. POST services are handy if you need to send data to the server to be updated, as for form submissions. To serve a POST request, you need to implement code in the request handler that reads the contents of the post body out and processes it.
Once you have processed the data, you dynamically populate the data you want to send back to the client, write it out to the response, and then call end() to finalize the response and flush the Writable stream. Just as with a dynamic GET server, the output of a POST request may be a webpage, HTTP snippet, JSON data, or some other data.
Listing 7.5 shows the basic implementation of a dynamic web service handling POST requests. In this case, the web service accepts a JSON string from the client representing an object that has name and occupation properties. The code in lines 4–6 read the data from the request stream, and then in the event handler in lines 7–14, the data is converted to an object and used to build a new object with message and question properties. Then in line 14 the new object is stringified and sent back to the client in the end() call.
Listing 7.5 http_server_post.js: Implementing a basic HTTP server that handles HTTP POST requests
01 var http = require('http');
02 var options = {
03   host: '127.0.0.1',
04   path: '/',
05   port: '8080',
06   method: 'POST'
07 };
08 function readJSONResponse(response) {
09   var responseData = '';
10   response.on('data', function (chunk) {
11     responseData += chunk;
12   });
13   response.on('end', function () {
14     var dataObj = JSON.parse(responseData);
15     console.log("Raw Response: " +responseData);
16     console.log("Message: " + dataObj.message);
17     console.log("Question: " + dataObj.question);
18   });
19 }
20 var req = http.request(options, readJSONResponse);
21 req.write('{"name":"Bilbo", "occupation":"Burgler"}');
22 req.end();
Listing 7.6 shows a basic implementation of an HTTP client that sends JSON data to the server as part of a POST request. The request is started in line 20. Then in line 21 a JSON string is written to the request stream, and line 22 finishes the request with end().
Once the server sends the response back, the on('data') handler in lines 10–12 reads the JSON response. Then the on('end') handler in lines 13–18 parses the response into a JSON object and outputs the raw response, message, and question. Output 7.6 shows the output of the HTTP POST client.
Listing 7.6 http_client_post.js: Basic HTTP client that sends JSON data to the server using POST and handles the JSON response
01 var http = require('http');
02 var options = {
03   host: '127.0.0.1',
04   path: '/',
05   port: '8080',
06   method: 'POST'
07 };
08 function readJSONResponse (response) {
09   var responseData = '';
10   response.on('data', function (chunk) {
11     responseData += chunk;
12   });
13   response.on('end', function () {
14     var dataObj = JSON.parse(responseData);
15     console.log("Raw Response: " +responseData);
16     console.log("Message: " + dataObj.message);
17     console.log("Question: " + dataObj.question);
18   });
19 }
20 var req = http.request(options, readJSONResponse);
21 req.write('{"name":"Bilbo", "occupation":"Burgler"}');
22 req.end();
Listing 7.6 Output Implementing an HTTP POST server serving JSON data
C:ooks
odech07>node http_server_post.js
Raw Response: {"message":"Hello Bilbo","question":"Are you a good Burgler?"}
Message: Hello Bilbo
Question: Are you a good Burgler?
Interacting with External Sources
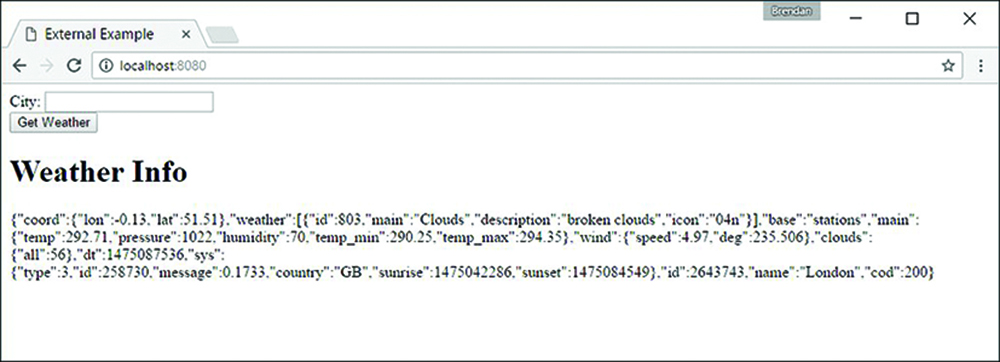
A common use of the HTTP services in Node.js is to access external systems to get data to fulfill client requests. A variety of external systems provide data that can be used in various ways. In this example, the code connects to the openweathermap.org API to retrieve weather information about a city. To keep the example simple, the output from openweathermap.org is pushed to the browser in a raw format. In reality, you would likely massage the pieces of data needed into your own pages, widgets, or data responses.
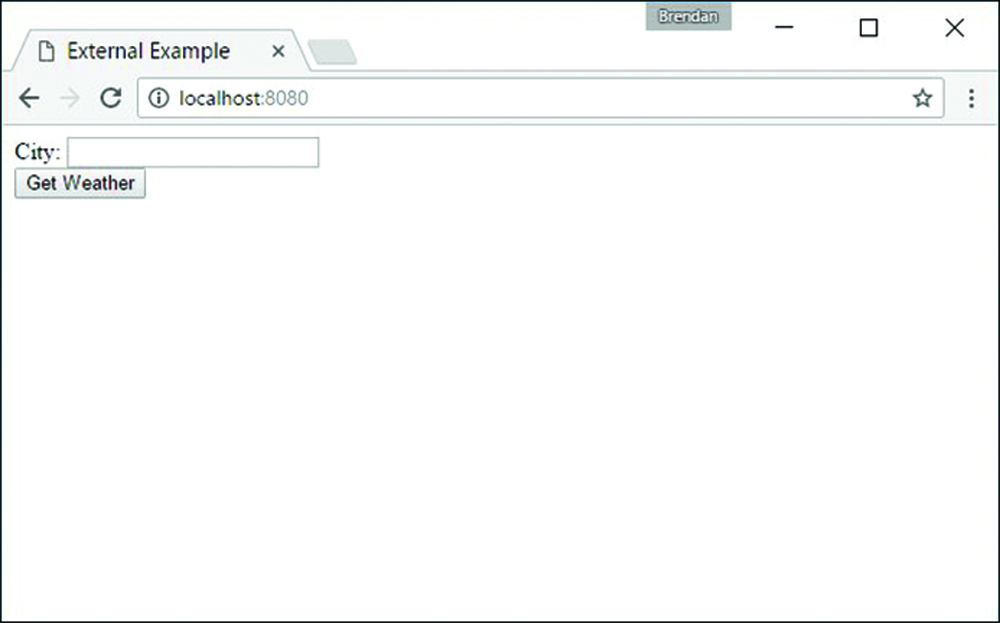
Listing 7.7 shows the implementation of the web service that accepts both GET and POST requests. For the GET request, a simple webpage with a form is returned that allows the user to post a city name. Then in the POST request the city name is accessed, and the Node.js web client starts up and connects remotely to openweathermap.org to retrieve weather information for that city. Then that info is returned to the server along with the original web form.
The big difference between this example and the previous examples is that the webserver also implements a local web client to connect to the external service and get data used to formulate the response. The webserver is implemented in lines 35–49. Notice that if the method is POST, we read the form data from the request stream and use querystring.parse() to get the city name and call into the getWeather() function.
The getWeather() function in lines 27–33 implements the client request to openweathermap.org. Then the parseWeather() request handler in lines 17–25 reads the response from openweathermap.org and passes that data to the sendResponse() function defined in lines 4–16 that formulates the response and sends it back to the client. Figure 7.4 shows the implementation of the external service in a web browser.
Note
You must go to http://openweathermap.org/ to create an account and get an API key to use the following application.
Listing 7.7 http_server_external: Implementing an HTTP web service that connects remotely to an external source for weather data
01 var http = require('http');
02 var url = require('url');
03 var qstring = require('querystring');
04 var APIKEY = ""//place your own api key within the quotes;
05 function sendResponse(weatherData, res){
06   var page = '<html><head><title>External Example</title></head>' +
07     '<body>' +
08     '<form method="post">' +
09     'City: <input name="city"><br>' +
10     '<input type="submit" value="Get Weather">' +
11     '</form>';
12   if(weatherData){
13     page += '<h1>Weather Info</h1><p>' + weatherData +'</p>';
14   }
15   page += '</body></html>';
16   res.end(page);
17 }
18 function parseWeather(weatherResponse, res) {
19   var weatherData = '';
20   weatherResponse.on('data', function (chunk) {
21     weatherData += chunk;
22   });
23   weatherResponse.on('end', function () {
24     sendResponse(weatherData, res);
25   });
26 }
27 function getWeather(city, res){
28   city = city.replace(' ', '-');
29   console.log(city);
30   var options = {
31     host: 'api.openweathermap.org',
32     path: '/data/2.5/weather?q=' + city + '&APPID=' + APIKEY
33   };
34   http.request(options, function(weatherResponse){
35     parseWeather(weatherResponse, res);
36   }).end();
37 }
38 http.createServer(function (req, res) {
39   console.log(req.method);
40   if (req.method == "POST"){
41     var reqData = '';
42     req.on('data', function (chunk) {
43       reqData += chunk;
44     });
45     req.on('end', function() {
46       var postParams = qstring.parse(reqData);
47       getWeather(postParams.city, res);
48     });
49   } else {
50     sendResponse(null, res);
51   }
52 }).listen(8080);
Implementing HTTPS Servers and Clients
Hypertext Transfer Protocol Secure (HTTPS) is a communications protocol that provides secure communication between HTTP clients and servers. HTTPS is really just HTTP running on top of the SSL/TLS protocol, which is where it gets its security capabilities. HTTP provides security in two main ways. First, it uses long-term public and secret keys to exchange a short-term session key so that data can be encrypted between client and server. Second, it provides authentication so that you can ensure that the webserver you are connecting to is the one you actually think it is, thus preventing man-in-the-middle attacks where requests are rerouted through a third party.
The following sections discuss implementing HTTP servers and clients in your Node.js environment using the https module. Before getting started using HTTPS, you need to generate a private key and a public certificate. There are several ways to do this, depending on your platform. One of the simplest methods is to use the OpenSSL library for your platform.
To generate the private key, first execute the following OpenSSL command:
openssl genrsa -out server.pem 2048
Next, use the following command to create a certificate signing request file:
openssl req -new -key server.pem -out server.csr
Note
When creating the certificate signing request file, you will be asked several questions. When prompted for the Common Name, you should put in the domain name of the server you want to connect to. Otherwise, the certificate will not work. Also you can put in additional domain names and IP addresses in the Subject Alternative Names field.
Then to create a self-signed certificate that you can use for your own purpose or for testing, use the following command:
openssl x509 -req -days 365 -in server.csr -signkey server.pem -out server.crt
Note
The self-signed certificate is fine for testing purposes or internal use. However, if you are implementing an external web service that needs to be protected on the Internet, you may want to get a certificate signed by a certificate authority. If you want to create a certificate that is signed by a third-party certificate authority, you need to take additional steps.
Creating an HTTPS Client
Creating an HTTPS client is almost exactly like the process of creating an HTTP client discussed earlier in this chapter. The only difference is that there are additional options, shown in Table 7.9, that allow you to specify the security options for the client. The most important options you really need to worry about are key, cert, and agent.
The key option specifies the private key used for SSL. The cert value specifies the x509 public key to use. The global agent does not support options needed by HTTPS, so you need to disable the agent by setting the agent to null, as shown here:
var options = {
  key: fs.readFileSync('test/keys/client.pem'),
  cert: fs.readFileSync('test/keys/client.crt),
  agent: false
};
You can also create your own custom Agent object that specifies the agent options used for the request:
options.agent = new https.Agent (options);
Once you have defined the options with the cert, key, and agent settings, you can call the https.request(options, [responseCallback]), and it will work exactly the same as the http.request() call. The only difference is that the data between the client and server is encrypted.
var options = {
  hostname: 'encrypted.mysite.com',
  port: 443,
  path: '/',
  method: 'GET',
  key: fs.readFileSync('test/keys/client.pem'),
  cert: fs.readFileSync('test/keys/client.crt),
  agent: false
};
var req = https.request(options, function(res)) {
  <handle the response the same as an http.request>
}
Table 7.9 Additional options for https.request() and https.createServer()
Event |
Description |
|
A string or |
|
A string or |
|
A string containing the passphrase for the private key or pfx. |
|
A string or |
|
An |
|
A string describing the ciphers to use or exclude. |
|
A Boolean that, when |
|
Either a string or list of strings of PEM encoded CRLs (Certificate Revocation List) only for |
|
The SSL method to use. For example, |
Creating an HTTPS Server
Creating an HTTPS server is almost exactly like the process of creating an HTTP server discussed earlier in this chapter. The only difference is that there are additional options parameters that you must pass into https.createServer(). The options, listed previously in Table 7.9, allow you to specify the security options for the server. The most important options you really need to worry about are key and cert.
The key option specifies the private key used for SSL. The cert value specifies the x509 public key to use. The following shows an example of creating an HTTPS server in Node.js:
var options = {
  key: fs.readFileSync('test/keys/server.pem'),
  cert: fs.readFileSync('test/keys/server.crt')
};
https.createServer(options, function (req, res) {
  res.writeHead(200);
  res.end("Hello Secure World
");
}).listen(8080);
Once the HTTPS server has been created, the request/response handling works the same way as for the HTTP servers described earlier in this chapter.
Summary
An important aspect of Node.js is the ability to quickly implement HTTP and HTTPS servers and services. The http and https modules provide everything you need to implement webserver basics. For your full webserver, you should use a more extended library, such as Express. However, the http and https modules work well for some basic web services and are simple to implement.
The examples in this chapter covered the HTTP basics to give you a good start on implementing your own services. You also saw how the url and querystring modules are used to parse URLs and query strings into objects and back.