
12
Getting Started with MongoDB
This chapter gets you up to speed with MongoDB. Whereas Chapter 11, “Understanding NoSQL and MongoDB,” focused more on the theory side of MongoDB, this chapter is all about practical application. You learn what it takes to install MongoDB, start and stop the engine, and access the MongoDB shell. The MongoDB shell allows you to administer the MongoDB server as well as perform every necessary function on the databases. Using the MongoDB shell is a vital aspect of the development process as well as database administration.
This chapter covers installing MongoDB and accessing the shell. The chapter focuses on some basic administrative tasks such as setting up user accounts and authentication. The chapter then wraps up by describing how to administer databases, collections, and documents.
Building the MongoDB Environment
To get started with MongoDB, the first task is to install it on your development system. Once installed on your development system, you can play around with the functionality, learn the MongoDB shell, and prepare for Chapter 13, “Getting Started with MongoDB and Node.js,” in which you begin integrating MongoDB into your Node.js applications.
The following sections cover installation, starting and stopping the database engine, and accessing the shell client. Once you can do those things you are ready to begin using MongoDB in your environment.
Installing MongoDB
The first step in getting MongoDB implemented into your Node.js environment is installing the MongoDB server. There is a version of MongoDB for each of the major platforms, including Linux, Windows, Solaris, and OS X. There is also an enterprise version available for the Red Hat, SuSE, Ubuntu, and Amazon Linux distributions. The enterprise version of MongoDB is subscription-based and provides enhanced security, management, and integration support.
For the purposes of this book and learning MongoDB, the standard edition of MongoDB is perfect. Before continuing, go to the MongoDB website at http://docs.mongodb.org/manual/installation/. Follow the links and instructions to download and install MongoDB in your environment:
As part of the installation and setup process, perform the following steps:
1. Download and extract the MongoDB files.
2. Add the <mongo_install_location>/bin to your system path.
3. Create a data files directory: <mongo_data_location>/data/db.
4. Start MongoDB using the following command from the console prompt: mongod –dbpath <mongo_data_location>/data/db
Starting MongoDB
Once you have installed MongoDB, you need to be able to start and stop the database engine. The database engine starts by executing the mongod (mongod.exe on Windows) executable in the <mongo_install_location>/bin location. This executable starts MongoDB and begins listening for database requests on the configured port.
The mongod executable accepts several different parameters that provide methods of controlling its behavior. For example, you can configure the IP address and port MongoDB listens on as well as logging and authentication. Table 12.1 provides a list of some of the most commonly used parameters.
Here is an example of starting MongoDB with a port and dbpath parameters:
mongod –port 28008 –dbpath <mongo_data_location>/data/db
Table 12.1 mongod command-line parameters
Parameter |
Description |
|
Returns basic help and usage text. |
|
Returns the version of MongoDB. |
|
Specifies a configuration file that contains runtime-configurations. |
|
Increases the amount of internal reporting sent to the console and written to the log file specified by |
|
Reduces the amount of reporting sent to the console and log file. |
|
Specifies a TCP port for |
Specifies the IP address on which |
|
|
Specifies the maximum number of simultaneous connections that |
|
Specifies a path for the log file. On restart, the log file is overwritten unless you also specify |
|
Enables database authentication for users connecting from remote hosts. |
|
Specifies a directory for the |
|
Disables the HTTP interface. |
|
Disables the durability journaling. |
|
Disables the preallocation of data files, which shortens the startup time but can cause significant performance penalties during normal operations. |
|
Runs a repair routine on all databases. |
Stopping MongoDB
Each platform has different methods of stopping the mongod executable once it has started. However, one of the best methods is to stop it from the shell client because that cleanly shuts down the current operations and forces the mongod to exit.
To stop the MongoDB database from the shell client, use the following commands to switch to the admin database and then shut down the database engine:
use admin
db.shutdownServer()
Accessing MongoDB from the Shell Client
Once you have installed, configured, and started MongoDB, you can access it through the MongoDB shell. The MongoDB shell is an interactive shell provided with MongoDB that allows you to access, configure, and administer MongoDB databases, users, and much more. You use the shell for everything from setting up user accounts to creating databases to querying the contents of the database.
The following sections take you through some of the most common administration tasks that you perform in the MongoDB shell. Specifically, you need to be able to create user accounts, databases, and collections to follow the examples in the rest of the book. Also you should be able to perform at least rudimentary queries on documents to help you troubleshoot any problems with accessing data.
To start the MongoDB shell, first make sure that mongod is running, and then run the mongod command, then execute the mongo command from the console prompt. The shell should start up as shown in Figure 12.1.
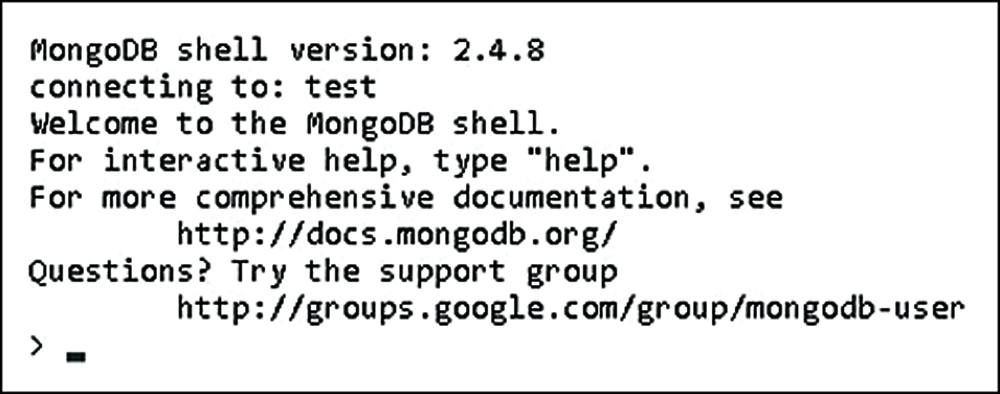
Figure 12.1 Starting the MongoDB console shell
Once you have accessed the MongoDB shell, you can administer all aspects of MongoDB. There are a couple of things to keep in mind when using MongoDB. First is that it is based on JavaScript and most of its syntax is available. Second, the shell provides direct access to the database and collections on the server so changes you make directly impact the data on the server.
Understanding MongoDB Shell commands
The MongoDB shell provides several commands that can be executed from the shell prompt. You need to be familiar with these commands as you will use them a lot. The following list describes each command and its purpose:
![]()
help <option>: Displays syntax help for MongoDB shell commands. The option argument allows you to specify an area where you want help.
![]()
use <database>: Changes the current database handle. Database operations are processed on the current database handle.
![]()
db.help: Displays help options for the database methods.
![]()
show <option>: Shows a list based on the option argument. The value of option can be:
![]()
dbs: Displays a list of databases.
![]()
collections: Displays a list of collections for the current database.
![]()
profile: Displays the five most recent system.profile entries taking more than 1 millisecond.
![]()
databases: Displays a list of all available databases.
![]()
roles: Displays a list of all roles for the current database, both built-in and user-defined.
![]()
users: Displays a list of all users for that database.
![]()
exit: Exits the database.
Understanding MongoDB Shell Methods
The MongoDB shell also provides a number of methods to perform administrative functions. These methods can be called directly from the MongoDB shell or from a script executed in the MongoDB shell.
There are many methods that you can use to perform various administrative functions. Some of these are covered in later sections and chapters in this book. For now, you need to be aware of the types of shell methods and how to access them. The following list provides a few examples of shell methods:
![]()
load(script): Loads and runs a JavaScript file inside the shell. This is a great way to script operations for the database.
![]()
UUID(string): Converts a 32-byte hex string into a BSON UUID.
![]()
db.auth(username, password): Authenticates you to the current database.
There are a lot of different shell methods. Many of them are covered in subsequent sections. For a full list of the native methods, check out http://docs.mongodb.org/manual/reference/method/#native.
Understanding Command Parameters and Results
The MongoDB shell is an interactive JavaScript shell that is tightly coupled with the MongoDB data structure. That means that much of the data interaction—from parameters passed to methods to data being returned from methods—is standard MongoDB documents, which are in most respects JavaScript objects. For example, when creating a user you pass in a document similar to the following to define the user:
db.createUser( { user: "testUser",
              roles: [ "read" ],
              otherDBRoles: { testDB2: [ "readWrite" ] } } )
And when listing the users for a database to the shell, the users are shown as a list of documents similar to this:
> use admin
switched to db admin
> db.system.users.find()
{ "_id" : ObjectId("529e71927c798d1dd56a63d9"), "user" : "dbadmin", "pwd" :
"78384f4d73368bd2d3a3e1da926dd269", "roles"
: [  "readWriteAnyDatabase",  "dbAdminAnyDatabase",  "clusterAdmin" ] }
{ "_id" : ObjectId("52a098861db41f82f6e3d489"), "user" : "useradmin", "pwd" :
"0b4568ab22a52a6b494fd54e64fcee9f", "roles
" : [  "userAdminAnyDatabase" ] }
Scripting the MongoDB Shell
As you have seen, the commands, methods, and data structure of the MongoDB shell are based on interactive JavaScript. A great method of administering MongoDB is creating scripts that can be run multiple times, or be ready to run at specific times; for example, as for an upgrade.
The script file can contain any number of MongoDB commands using JavaScript syntax such as conditional statements and loops. There are two methods to run a MongoDB shell script. The first is from the console command line using --eval. The --eval parameter accepts a JavaScript string or a JavaScript file, launches the MongoDB shell, and immediately executes the JavaScript.
For example, the following command starts the MongoDB shell, executes db.getCollections() on the test database, and outputs the JSON string results as shown in Figure 12.2:
mongo test --eval "printjson(db.getCollectionNames())"
Note
If you are using authentication, and you should, the script might need to authenticate to perform the commands.

Figure 12.2 Executing a JavaScript file from the MongoDB console shell command line
The second method is to execute a JavaScript from the MongoDB shell prompt using the load(script_path) method. This method loads a JavaScript file and immediately executes it. For example, the following shell command loads and executes the db_update.js script file:
load("/tmp/db_update.js")
Administering User Accounts
Once you have MongoDB up and running, one of the first things you want to do is add users to be able to access the database. MongoDB provides the ability to add, remove, and configure users from the MongoDB shell. The following sections discuss using the MongoDB shell to administer user accounts.
Listing Users
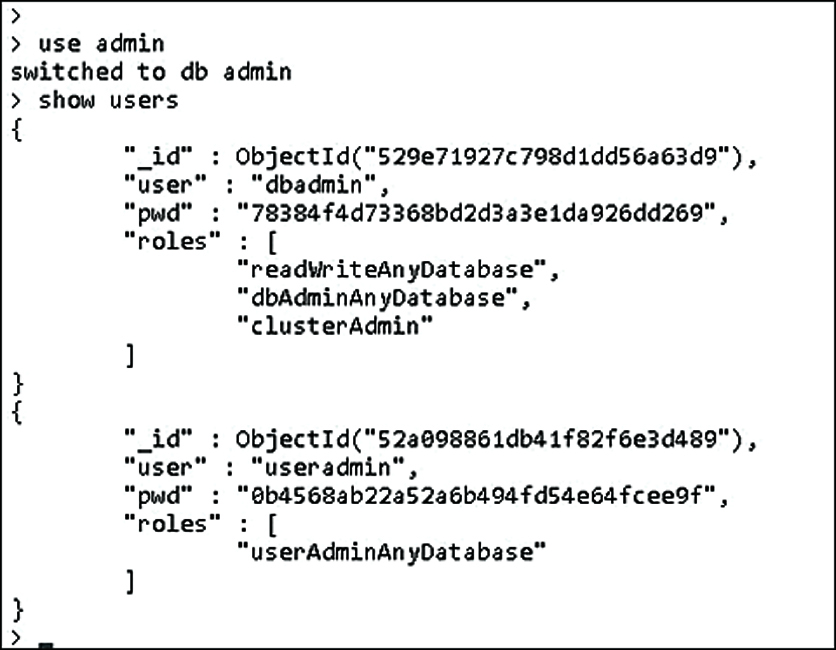
User accounts are stored in the db.system.users collection of each database. The User object contains _id, user, pwd, roles, and sometimes otherDBRoles fields. There are a couple of ways to get a list of user objects. The first is to change to the database you want to list users on and then execute the show users command. The following commands show changing to the admin database and listing users, as shown in Figure 12.3:
use admin
show users
You can also use a query such as find on the db.system.users collection. The difference is that db.system.users.find() returns a cursor object that you can use to access the User documents. For example, the following code gets a cursor for users in the admin database and returns the count of users:
use admin
cur = db.system.users.find()
cur.count()
Creating User Accounts
You can use the MongoDB shell to create user accounts that can administer, read, and write to the databases. User accounts are added using the createUser() method inside the MongoDB shell. The createUser() method accepts a document object that allows you to specify the username, roles, and password that apply to that user. Table 12.2 lists the fields that can be specified in the document object.
Table 12.2 Fields used when creating users with the db.createUser() method
Field |
Format |
Description |
|
|
Specifies a unique username. |
|
|
Specifies an array of user roles. MongoDB provides a large number of roles that can be assigned to a user. Table 12.3 lists a few of the common roles. |
|
|
(Optional.) Specifies a user password. When creating the user, this can be a hash or a string; however, it is stored in the database as a hash. |
MongoDB provides a number of different roles that can be assigned to a user account. These roles give you the ability to implement intricate privileges and restrictions on user accounts. Table 12.3 lists some of the more common roles that can be assigned to users.
Table 12.3 Database roles that can be assigned to user accounts
Role |
Description |
|
Allows the user to read data from any collection within the database. |
|
Same as |
|
Provides all the functionality of |
|
Same as |
|
Allows the user to read from and write to the database, as well as clean, modify, compact, get statistics profile, and perform validations. |
|
Same as |
|
Allows the user to generally administer MongoDB, including connections, clustering, replication listing databases, creating databases, and deleting databases. |
|
Allows the user to create and modify user accounts on the database. |
|
Same as |
Note
The readAnyDatabase, readWriteAnyDatabase, dbAdminAnyDatabase, and userAdminAnyDatabase roles can only be applied to users in the admin database since they must apply to all databases.
To create a user you should switch to that database and then use the createUser() method to create the user object. The following MongoDB shell command illustrates creating a basic administrator user to the test database:
use test
db.createUser( { user: "testUser",
    pwd: "test",
    roles: [ "readWrite", "dbAdmin" ] } )
Now here’s a more complex example. The following commands add the same user to the newDB database with only read rights and give them readWrite privileges to the testDB2 database:
use newDB
db.createUser( { user: "testUser",
    roles: [ "read" ],
    otherDBRoles: { testDB2: [ "readWrite" ] } } )
Removing Users
Users can be removed from MongoDB using the removeUser(<username>) method. You need to change to the database that the user is on first. For example, to remove the testUser user from the testDB database, use the following commands from the MongoDB shell:
use testDB
db.removeUser("testUser")
Configuring Access Control
One of the first administration tasks that you will want to perform in the MongoDB shell is to add users to configure access control. MongoDB provides authentication and authorization at a database level, meaning that users exist in the context of a single database. For basic authentication purposes, MongoDB stores user credentials inside a collection called system.users in each database.
Initially, the admin database does not have any users assigned to it. When no users are defined in the admin database, MongoDB allows connections on the local host to have full administrative access to the database. Therefore, your first step in setting up a new MongoDB instance is to create User Administrator and Database Administrator accounts. The User Administrator account provides the ability to create user accounts in the admin and other databases. You also need to create a Database Administrator account that you can use as a superuser to manage databases, clustering, replication, and other aspects of MongoDB.
Note
The User Administrator and Database Administrator accounts are created in the admin database. If you are using authentication for your MongoDB database, you must authenticate to the admin database as one of those users to administer users or databases. You should also create user accounts for each database for access purposes as described in the previous section.
Creating a User Administrator Account
The first step in configuring access control is implementing a User Administrator account. The User Administrator should only have rights to create users and not manage the database or perform any other administration functions at all. This keeps a clean separation between database administration and user account administration.
Creating a User Administrator account is done by executing the following two commands in the MongoDB shell to access the admin database and then add a user with userAdminAnyDatabase rights.
use admin
db.createUser( { user: "<username>",
    pwd: "<password>",
    roles: [ "userAdminAnyDatabase" ] } )
The User Administrator account should be created with userAdminAnyDatabase as the only role. This gives the User Administrator the ability to create new user accounts but not to manipulate the database beyond that. For example, create a User Administrator account with the username useradmin and a password of test as shown in Figure 12.4:
use admin
db.createUser( { user: "useradmin",
    pwd: "test",
    roles: [ "userAdminAnyDatabase" ] } )
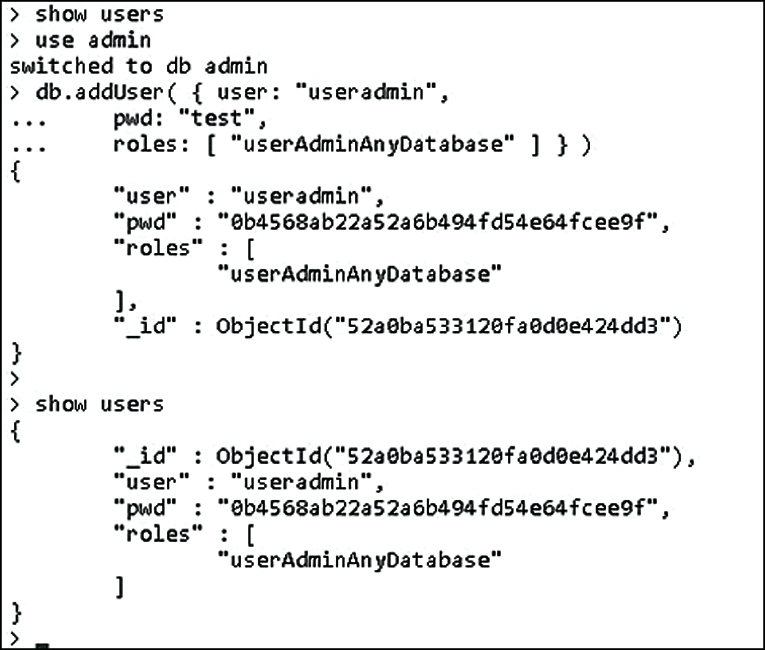
Figure 12.4 Creating the User Administrator account
Turning on Authentication
Once the User Administrator account has been created, restart the MongoDB database using the --auth parameter. For example:
mongod –dbpath <mongo_data_location>/data/db --auth
Clients will now have to use a username and password to access the database. Also, when you access MongoDB from the shell, you need to execute the following commands to authenticate to the admin database so that you can add users with rights to the database:
use admin
db.auth("useradmin", "test")
You can also authenticate to the admin database when starting the MongoDB shell using the --username and --password options, for example:
mongo --username "useradmin" --password "test"
Creating a Database Administrator Account
Creating a Database Administrator account is done by executing the createuser method in the MongoDB shell to access the admin database and then adding a user with readWriteAnyDatabase, dbAdminAnyDatabase, and clusterAdmin rights. This gives the user the ability to access all databases in the system, create new databases, and manage MongoDB clusters and replicas. The following example shows creating a Database Administrator named dbadmin:
use admin
db.createUser( { user: "dbadmin",
    pwd: "test",
    roles: [ "readWriteAnyDatabase", "dbAdminAnyDatabase", "clusterAdmin" ] } )
You can then use that user in the MongoDB shell to administer databases. Once you have created the new administrator account, you can authenticate as that user using the following commands:
use admin
db.auth("dbadmin", "test")
You can also authenticate to the admin database as the Database Administrator when starting the MongoDB shell using the --username and --password options, for example:
mongo --username "dbadmin" --password "test"
Administering Databases
When administering databases in the MongoDB shell, you need to use a user account that has clusterAdmin privileges—for example, the Database Administrator account described earlier in this chapter. Once you have a Database Administrator account created, you can authenticate as that user and perform the tasks described in the following sections.
Displaying a List of Databases
Often you may need to just see a list of databases that have been created, especially if you have created a large number of databases or are not the only one administering the system. To see a list of databases in the system, use the following show dbs command, which displays a list of databases that have been created:
show dbs
Changing the Current Database
Database operations are performed using the handle db, which is built into MongoDB. Many operations can only be applied on one database, and therefore to perform operations on other databases, you need to change the db handle to point to the new database.
To switch the current database, you can use the db.getSiblingDB(database) method or the use <database> method. For example, both of the following methods switch the current database handle to testDB. Either one is acceptable and sets the value of db to the database specified. You can then use db to manage the new current database:
db = db.getSiblingDB('testDB')
use testDB
Creating Databases
MongoDB doesn’t provide a command in the shell to explicitly create databases. Instead you can simply use the use <new_database_name> to create a new database handle. Keep in mind that the new database is not actually saved until you add a collection to it. For example, the following commands create a new database named newDB and then add a collection named newCollection to it:
use newDB
db.createCollection("newCollection")
To verify that the new database exists, you can then use show dbs as shown in Figure 12.5.
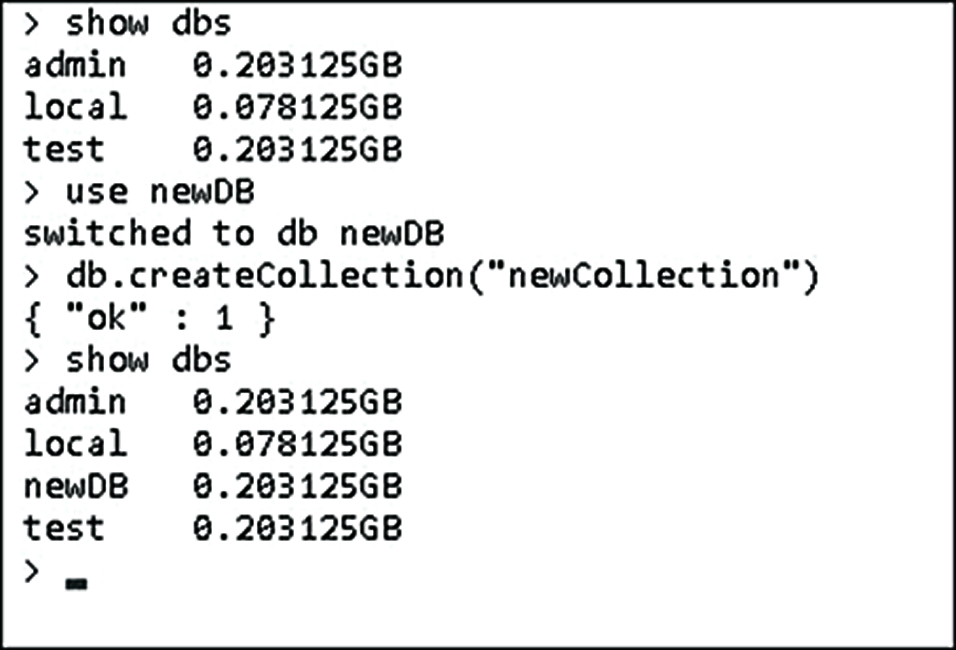
Figure 12.5 Creating a new database in the MongoDB console shell
Deleting Databases
Once a database has been created, it exists in MongoDB until it is deleted by the administrator. Deleting a database is a common task on some systems. Especially when databases are created to contain temporary data, it is sometimes easier to delete databases when they become stale and simply create new ones as needed instead of trying to clean up the entries in a database.
To delete a database from the MongoDB shell, use the dropDatabase() method. For example, to delete the newDB database, use the following commands to change to the newDB database and then delete it:
use newDB
db.dropDatabase()
Be aware that dropDatabase() removes the current database, but it does not change the current database handle. That means that if you drop a database and then create a collection using the handle without changing the current database first, the dropped database is re-created.
Figure 12.6 shows an example of deleting the newDB from MongoDB:
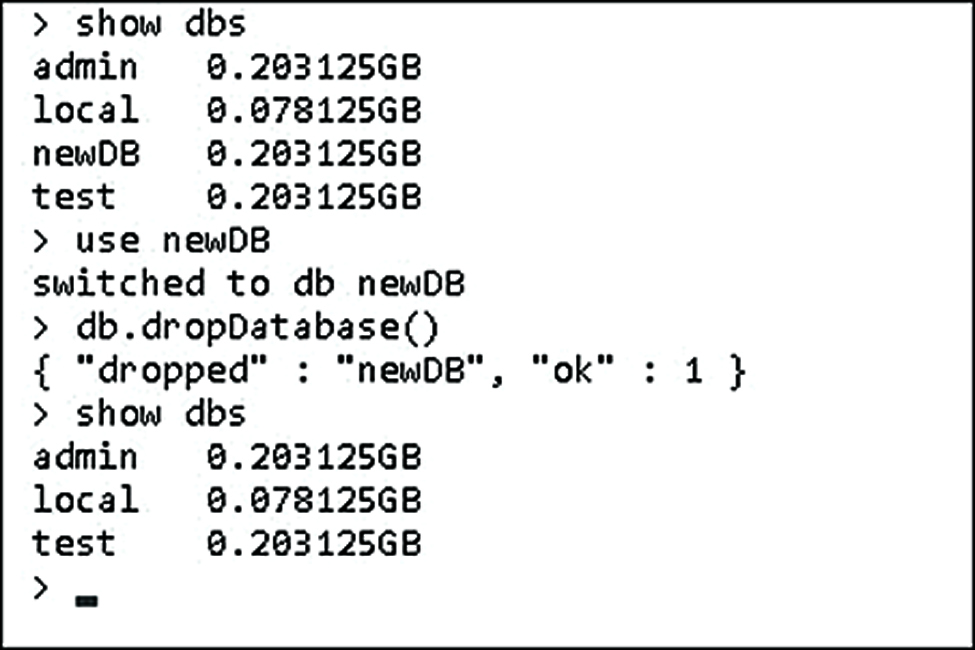
Figure 12.6 Deleting a database in the MongoDB console shell
Copying Databases
Another common task with databases is copying them. Copying a database creates an exact duplicate of the database, only with a different name. You might want to create a copy of a database for various reasons, such as to have a backup while you perform heavy changes or to use as an archive.
To create a copy of a database, you switch to that database and then use copyDatabase(origin, destination, [hostname]) to create a copy. The origin parameter is a string specifying the name of the database to copy. The destination parameter specifies the name of the database to create on this MongoDB server. The optional hostname parameter specifies a hostname of the origin database MongoDB server if you are copying a database from a different host. For example:
db.copyDatabase('customers', 'customers_archive')
Managing Collections
As a database admin, you may also find yourself administering collections within a database. MongoDB provides the functionality in the MongoDB shell to create, view, and manipulate collections in a database. The following sections cover the basics that you need to know to use the MongoDB shell to list collections, create new ones, and access the documents contained within them.
Displaying a List of Collections in a Database
Often you may need to just see a list of collections contained in a database—for example, to verify that a collection exists or to find the name of a collection that you cannot remember. To see a list of collections in a database, you need to switch to that database and then use show collections to get the list of collections contained in the database. For example, the following commands list the collections in the test database:
use test
show collections
Creating Collections
You must create a collection in MongoDB database before you can begin storing documents. To create a collection, you need to call createCollection(name, [options]) on the database handle. The name parameter is the name of the new database. The optional options parameter is an object that can have the properties listed in Table 12.4 that define the behavior of the collection.
Table 12.4 Options that can be specified when creating collections
Role |
Description |
|
A Boolean; when |
|
A Boolean; when |
|
Specifies the size in bytes for the |
|
Specifies the maximum number of documents allowed in a |
|
Allows users to specify validation rules or expressions for the collection. |
Determines the strictness MongoDB applies to the validation rules on documents during updates. |
|
|
Determines whether an invalid document is errored or warned but still can be inserted. |
|
Allows users to specify a default index configuration when a collection is created. |
For example, the following lines of code create a new collection called newCollection in the testDB database as shown in Figure 12.7:
db.createCollection("newCollection")
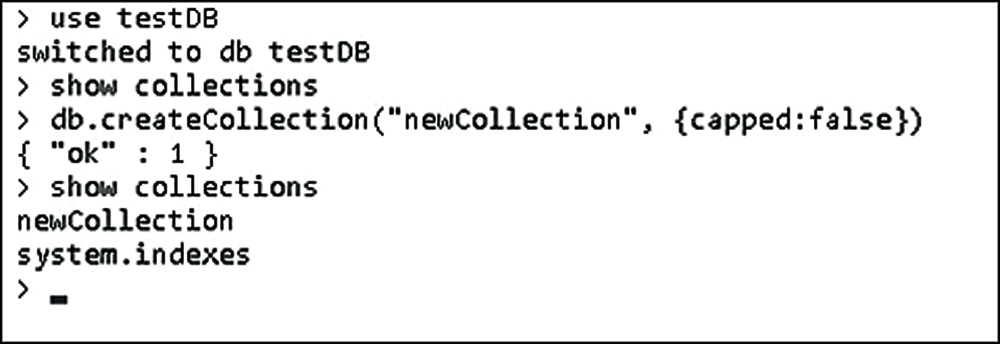
Figure 12.7 Creating a new collection in the MongoDB console shell
Deleting Collections
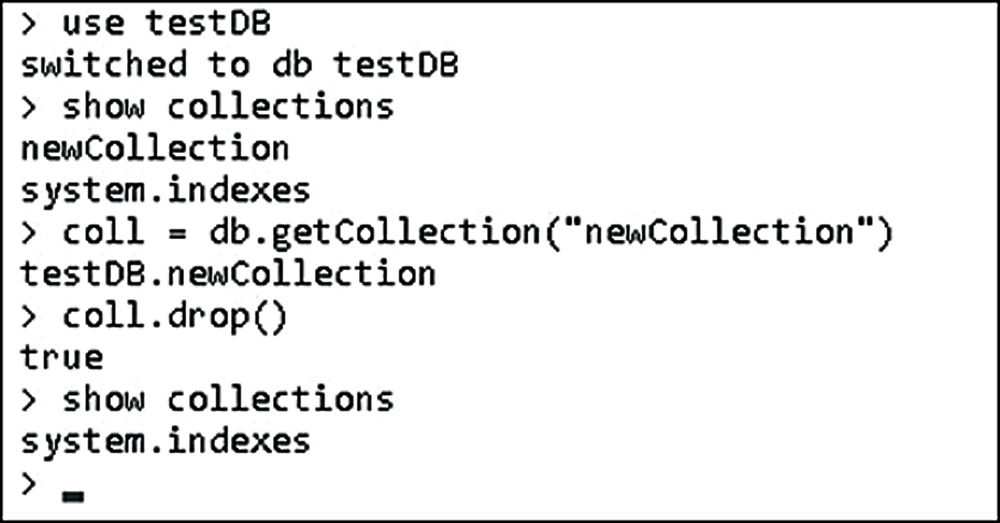
Occasionally you also want to remove old collections when they are no longer needed. Removing old collections frees up disk space and eliminates any overhead such as indexing associated with the collection.
To delete a collection in the MongoDB shell, you need to switch to the correct database, get the collection object, and then call the drop() function on that object. For example, the following code deletes the newCollection collection from the testDB database as shown in Figure 12.8:
use testDB
show collections
coll = db.getCollection("newCollection")
coll.drop()
show collections
Finding Documents in a Collection
Most of the time you use a library such as the native MongoDB driver or Mongoose to access documents in a collection. However, sometimes you might need to look at documents inside the MongoDB shell.
The MongoDB shell provides full querying functionality to find documents in collections using the find(query) method on the collection object. The optional query parameter specifies a query document with fields and values to match documents against in the collection. The documents that match the query are removed from the collection. Using the find() method with no query parameter returns all documents in the collection.
For example, the following lines of code first query every item in the collection and then retrieve the documents whose speed field is equal to 120mph. The results are shown in Figure 12.9.
use testDB
coll = db.getCollection("newCollection")
coll.find()
coll.find({speed:"120mph"})
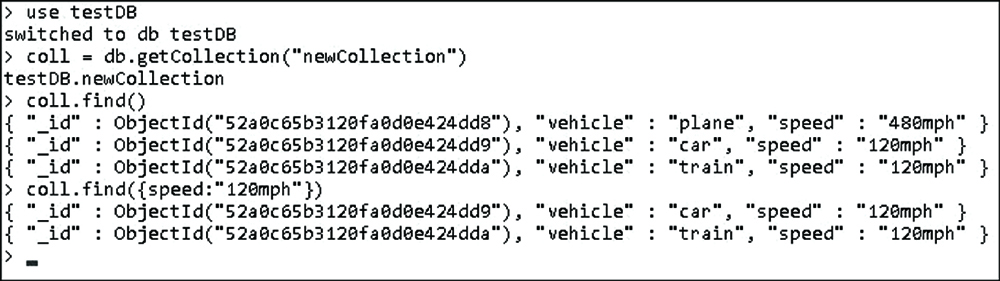
Figure 12.9 Finding documents in a collection
Adding Documents to a Collection
Typically, insertion of documents in a collection should be done through your Node.js application. However, at times you may need to manually insert a document from an administrative point of view to preload a database, to fix a database, or for testing purposes.
To add documents to a collection, you need to get the collection object and then call the insert(document) or save(document) method on that object. The document parameter is a well-formatted JavaScript object that is converted to BSON and stored in the collection. As an example, the following commands create three new objects inside a collection as shown in Figure 12.10:
use testDB
coll = db.getCollection("newCollection")
coll.find()
coll.insert({ vehicle: "plane", speed: "480mph" })
coll.insert({ vehicle: "car", speed: "120mph" })
coll.insert({ vehicle: "train", speed: "120mph" })
coll.find()
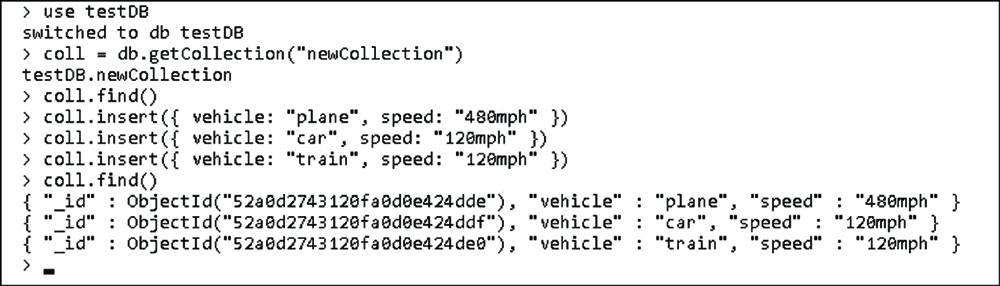
Figure 12.10 Creating documents in a collection
Deleting Documents in a Collection
Deletion of documents in a collection also is typically done through your Node.js application. However, at times you may need to manually remove a document from an administrative point of view to fix a database or for testing purposes.
To remove documents from a collection, you need to get the collection object and then call the remove(query) method on that object. The optional query parameter specifies a query document with fields and values to match documents against in the collection. The documents that match the query are removed from the collection. Using the remove() method with no query parameter removes all documents in the collection. As an example, the following commands first remove documents where the vehicle is plane and then all documents from the collection, as shown in Figure 12.11:
use testDB
coll = db.getCollection("newCollection")
coll.find()
coll.remove({vehicle: "plane"})
coll.find()
coll.remove()
coll.find()
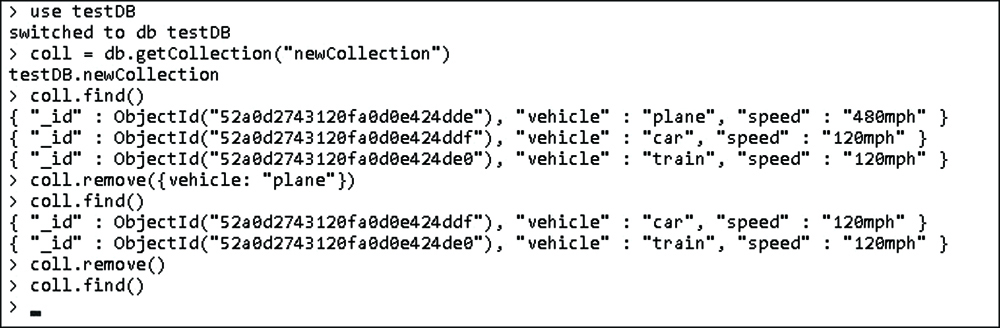
Figure 12.11 Deleting documents from a collection
Updating Documents in a Collection
Updates of documents in a collection should also be done through your Node.js application. However, at times you may need to manually update a document from an administrative point of view to fix a database or for testing purposes.
To update documents in a collection, you need to get the collection. Then you can use a couple of different methods: The save(object) method saves changes that you have made to an object, and the update(query, update, options) method queries for documents in the collection and then updates them as they are found.
When using the update() method, the query parameter specifies a query document with fields and values to match documents against in the collection. The update parameter is an object that specifies the update operator to use when making the update. For example, $inc increments the value of the field, $set sets the value of the field, $push pushes an item onto an array, and so on. For example, the following update object increments one field, sets another, and then renames a third:
{ $inc: {count: 1}, $set: {name: "New Name"}, $rename: {"nickname": "alias"} }
The options parameter of update() is an object that has two properties—multi and upsert—that are both Boolean values. If upsert is true, a new document is created if none are found. If multi is true, all documents that match the query are updated; otherwise, only the first document is updated.
For example, the following commands update documents with a speed of 120mph by setting the speed to 150 and adding a new field called updated. Also the save() method is used to save changes to the plane document. The console output is shown in Figure 12.12:
use testDB
coll = db.getCollection("newCollection")
coll.find()
coll.update({ speed: "120mph" },
            { $set: { speed: "150mph" , updated: true } },
            { upsert: false, multi: true })
coll.save({ "_id" : ObjectId("52a0caf33120fa0d0e424ddb"),
            "vehicle" : "plane", "speed" : "500mph" })
coll.find()
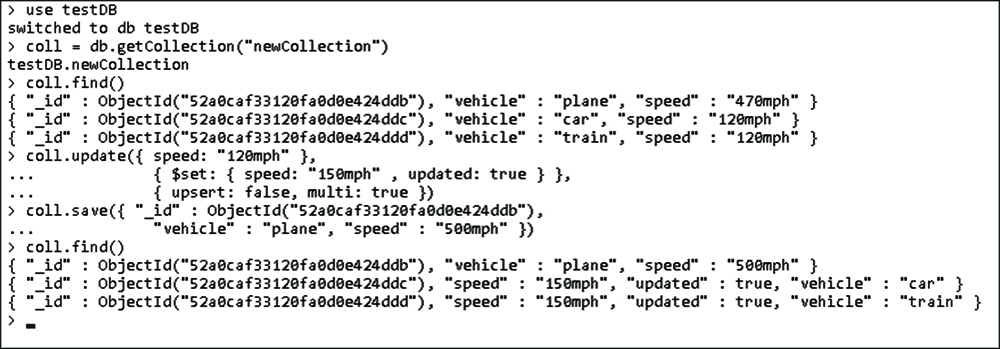
Figure 12.12 Updating documents from a collection
Summary
From a development perspective, most of the interaction that you have with MongoDB is from a library, such as the native MongoDB driver for Node.js. However, before you can begin implementing MongoDB in your applications, you need to install the MongoDB server and configure it to run. You should also create administrative and database accounts and then turn on authentication to ensure security even in your development environment.
This chapter discussed the process of installing MongoDB and accessing the MongoDB shell. You learned how to interact with the shell to create user accounts, databases, collections, and documents.