
10
Universal JavaScript for Web Applications
JavaScript was born with the goal of giving web developers the power to execute code directly on the browser and build dynamic and interactive websites.
Since its inception, JavaScript has grown up a lot. If, at the very beginning, JavaScript was a very simple and limited language, today, it can be considered a complete general-purpose language that can be used even outside the browser to build almost any kind of application. In fact, JavaScript now powers frontend applications, web servers, and mobile applications, as well as embedded devices such as wearable devices, thermostats, and flying drones.
The language's availability across platforms and devices is fostering a new trend among JavaScript developers: being able to simplify code reuse across different environments in the same project. With Node.js, developers have the opportunity to build web applications where it is easy to share code between the server (backend) and the browser (frontend). This quest for code reuse was originally identified with the term Isomorphic JavaScript, but today, it's mostly recognized as Universal JavaScript.
In this chapter, we are going to explore the wonders of Universal JavaScript, specifically in the field of web development, and discover many tools and techniques we can use to share code between the server and the browser.
We will explore what a module bundler is and why we need one. We will then learn how module bundlers work and we will practice with one of the most popular, webpack. Then, we will discuss some generic patterns that can help us with code reuse across platforms.
Finally, we will learn the basic functionalities of React and we will use it to build a complete Universal JavaScript application that features universal rendering, universal routing, and universal data loading.
To summarize, here's a list of topics we will be covering in this chapter:
- How to share code between the browser and Node.js
- Fundamentals of cross-platform development (code branching, module swapping, and other useful patterns)
- A brief introduction to React
- How to build a complete Universal JavaScript application using React and Node.js
Sit tight, this is going to be an exciting chapter!
Sharing code with the browser
One of the main selling points of Node.js is the fact that it's based on JavaScript and runs on V8, a JavaScript engine that actually powers some of the most popular browsers: Google Chrome and Microsoft Edge. We might think that sharing the same JavaScript engine is enough to make sharing code between Node.js and the browser an easy task; however, as we will see in this chapter, this is not always true, unless we want to share only simple, self-contained, and generic fragments of code.
Developing code for both the client and the server requires a non-negligible level of effort in making sure that the same code can run properly in two environments that are intrinsically different. For example, in Node.js, we don't have the DOM or long-living views, while on the browser, we surely don't have the filesystem and many other interfaces to interact with the underlying operating system.
Another contention point is the level of support for modern JavaScript features. When we target Node.js, we can safely adopt modern language features because we know which Node.js version runs on our servers. For instance, for our server code, we can safely decide to adopt async/await if we know it will run on Node.js version 8 (or on a more recent version). Unfortunately, we can't have the same confidence when writing JavaScript code for the browser.
This is because different users will have different browsers with different levels of compatibility with the latest language features. Some users might be using a modern browser with full support for async/await, while other users might still be using an old device with an old browser that does not support async/await.
So, most of the effort required when developing for both platforms is to make sure to reduce those differences to a minimum. This can be done with the help of abstractions, patterns, and tools that enable the application to switch, dynamically or at build time, between browser-compatible code and Node.js code.
Luckily, with the rising interest in this new mind-blowing possibility, many libraries and frameworks in the ecosystem have started to support both environments. This evolution is also backed by a growing number of tools supporting this new kind of workflow, which, over the years, have been refined and perfected. This means that if we are using an npm package on Node.js, there is a good probability that it will work seamlessly on the browser as well. However, this is often not enough to guarantee that our application can run without problems on both the browser and Node.js. As we will see, a careful design is always needed when developing cross-platform code.
In this section, we are going to explore the fundamental problems we might encounter when writing code for both Node.js and the browser, and we are going to propose some tools and patterns that can help us with tackling this new and exciting challenge.
JavaScript modules in a cross-platform context
The first wall we hit when we want to share some code between the browser and the server is the mismatch between the module system used by Node.js and the heterogeneous landscape of the module systems used on the browser. Another problem is that on the browser, we don't have a require() function or the filesystem from which we can resolve modules. Most modern browsers support import and ES modules, but again, some of the users visiting our website might not have already adopted one of those modern browsers.
In addition to these problems, we have to take into account the differences in distributing code for the server and the browser. On the server, modules are loaded directly from the filesystem. This is generally a performant operation and therefore developers are encouraged to split their code into small modules to keep the different logic units small and organized.
On the browser, the script loading model is totally different. The process generally starts with the browser downloading an HTML page from a remote endpoint. The HTML code is parsed by the browser, which might find references to script files that need to be downloaded and executed. If we are dealing with a large application, there might be many scripts to download, so the browser will have to issue a significant number of HTTP requests and download and parse multiple script files before the application can be fully initialized. The higher the number of script files, the larger the performance penalty that we will have to pay to run an application on the browser, especially on slow networks. Even though some of this performance penalty can be mitigated with the adoption of HTTP/2 Server Push (nodejsdp.link/http2-server-push), client-side caching, preloading, or similar techniques, the underlying problem still stands: having to receive and parse a large number of files is generally worse than having to deal with a few optimized files.
A common practice to address this problem is to "build" packages (or bundles) for the browser. A typical build process will collate all the source files into a very small number of bundles (for instance, one JavaScript file per page) so that the browser won't have to download a huge number of scripts for each page visit. A build process is not limited to just reducing the number of files, in fact, it can perform other interesting optimizations. Another common optimization is code minification, which allows us to reduce the number of characters to a minimum without altering the functionality. This is generally done by removing comments, removing unused code, and renaming function and variable names.
Module bundlers
If we want to write large portions of code that can work as seamlessly as possible both on the server and on the browser, we need a tool to help us with "bundling" all the dependencies together at build time. These tools are generally called module bundlers. Let's visualize this with an example of how shared code can be loaded on to the server and the client using a module bundler:
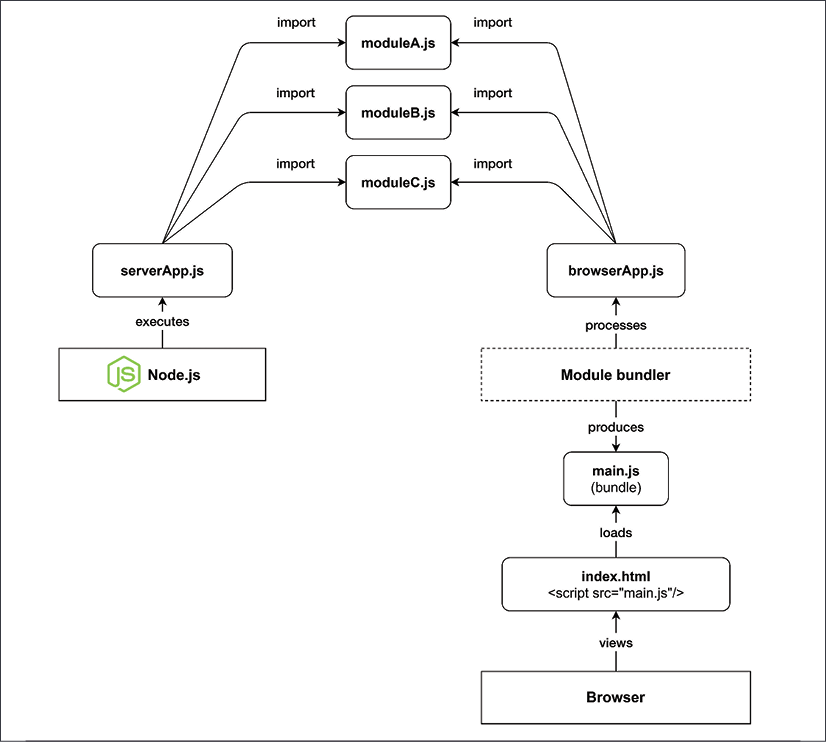
Figure 10.1: Loading shared modules on the server and on the browser (using a module bundler)
By looking at Figure 10.1, we can see that the code is processed and loaded differently on the server side and on the browser:
- On the server side: Node.js can directly execute our
serverApp.js, which, in turn, will import the modulesmoduleA.js,moduleB.js, andmoduleC.js. - On the browser: We have
browserApp.js, which also importsmoduleA.js,moduleB.js, andmoduleC.js. If our index file were to includebrowserApp.jsdirectly, we would have to download a total of five files (index.html,browserApp.js, and the three dependency modules) before the app would be fully initialized. The module bundler allows us to reduce the total number of files to only two by preprocessingbrowserApp.jsand all its dependencies and producing a single equivalent bundle calledmain.js, which is then referenced byindex.htmland therefore loaded by the browser.
To summarize, on the browser, we generally have to deal with two logical phases, build and runtime, while on the server, we generally don't need a build phase and we can execute our source code directly.
When it comes to picking a module bundler, the most popular option is probably webpack (nodejsdp.link/webpack). Webpack is one of the most complete and mature module bundlers currently available and it is the one we are going to use in this chapter. It's worth mentioning, though, that there is a quite prosperous ecosystem full of alternatives, each one with its own strengths. If you are curious, here are some of the most well-known alternatives to webpack:
- Parcel (nodejsdp.link/parcel): Aims to be fast and to work "auto-magically" without any configuration.
- Rollup (nodejsdp.link/rollup): One of the first module bundlers to fully support ESM and to offer a number of optimizations like tree shaking and dead code elimination.
- Browserify (nodejsdp.link/browserify): The first module bundler with support for CommonJS and is still widely adopted.
Other trending module bundlers are FuseBox (nodejsdp.link/fusebox), Brunch (nodejsdp.link/brunch), and Microbundle (nodejsdp.link/microbundle).
In the next section, we will discuss in greater detail how a module bundler works.
How a module bundler works
We can define a module bundler as a tool that takes the source code of an application (in the form of an entry module and its dependencies) and produces one or more bundle files. The bundling process doesn't change the business logic of the app; it just creates files that are optimized to run on the browser. In a way, we can think of a bundler as a compiler for the browser.
In the previous section, we saw how a bundler can help to reduce the total number of files that the browser will need to load, but in reality, a bundler can do so much more than that. For instance, it can use a transpiler like Babel (nodejsdp.link/babel). A transpiler is a tool that processes the source code and makes sure that modern JavaScript syntax is converted into equivalent ECMAScript 5 syntax so that a large variety of browsers (including older ones) can run the application correctly. Some module bundlers allow us to preprocess and optimize not just JavaScript code but also other assets such as images and stylesheets.
In this section, we will provide a simplified view of how a module bundler works and how it navigates the code of a given application to produce an equivalent bundle optimized for the browser. The work of a module bundler can be divided into two steps that we will call dependency resolution and packing.
Dependency resolution
The dependency resolution step has the goal of traversing the codebase, starting from the main module (also called the entry point), and discovering all the dependencies. The way a bundler can do this is by representing dependencies as an acyclic direct graph, known as a dependency graph.
Let's explore this concept with an example: a fictional calculator application. The implementation is intentionally incomplete as we only want to focus on the module structure, how the different modules depend on each other, and how the module bundler can build the dependency graph of this application:
// app.js                                                   (1)
import { calculator } from './calculator.js'
import { display } from './display.js'
display(calculator('2 + 2 / 4'))
// display.js                                               (5)
export function display () {
  // ...
}
// calculator.js                                            (2)
import { parser } from './parser.js'
import { resolver } from './resolver.js'
export function calculator (expr) {
  return resolver(parser(expr))
}
// parser.js                                                (3)
export function parser (expr) {
  // ...
}
// resolver.js                                              (4)
export function resolver (tokens) {
  // ...
}
Let's see how the module bundler will walk through this code to figure out the dependency graph:
- The module bundler starts its analysis from the entry point of the application, the module
app.js. In this phase, the module bundler will discover dependencies by looking atimportstatements. The bundler starts to scan the code of the entry point and the firstimportit finds references thecalculator.jsmodule. Now, the bundler suspends the analysis ofapp.jsand jumps immediately intocalculator.js. The bundler will keep tabs on the open files: it will remember that the first line ofapp.jswas already scanned so that when it eventually restarts processing this file, it will continue from the second line. - In
calculator.js, the bundler immediately finds a new import forparser.jsso that the processing ofcalculator.jsis interrupted to move intoparser.js. - In
parser.js, there's noimportstatement, so after the file has been scanned entirely, the bundler goes back intocalculator.js, where the nextimportstatement refers toresolver.js. Again, the analysis ofcalculator.jsis suspended and the bundler jumps immediately intoresolver.js. - The module
resolver.jsdoes not contain any imports, so the control goes back tocalculator.js. Thecalculator.jsmodule does not contain other imports, so the control goes back toapp.js. Inapp.js, the next import isdisplay.jsand the bundler jumps straight into it. display.jsdoes not contain any imports. So, again the control goes back toapp.js. There are no more imports inapp.js, so the code has been fully explored, and the dependency graph has been fully constructed.
Every time the module bundler jumps from one file to another, it means we are discovering a new dependency and adding a new node to the dependency graph. A visual representation of the steps described in the preceding list can be found in Figure 10.2:
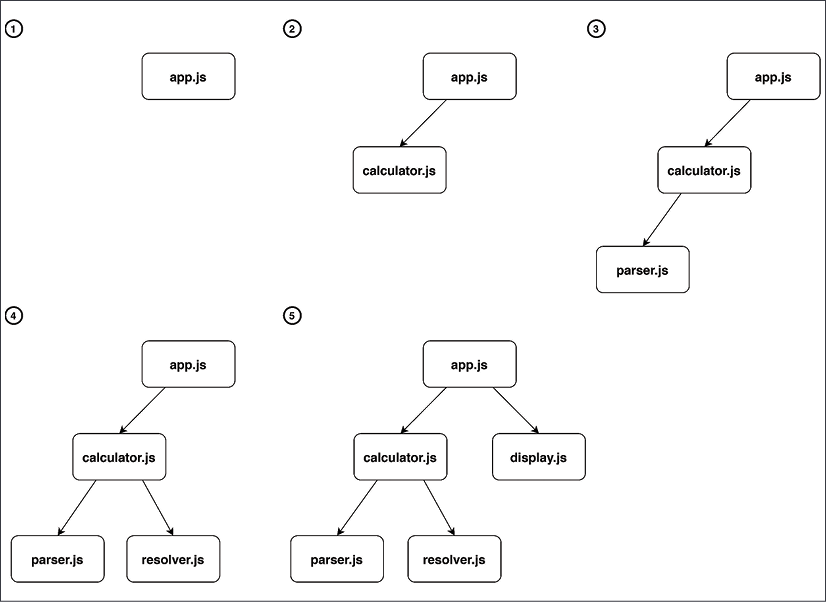
Figure 10.2: Dependency graph resolution
This way of resolving dependencies also works with cyclic dependencies. In fact, if the bundler encounters the same dependency for a second time, the dependency will be skipped because it's already present in the dependency graph.
Tree shaking
It's worth noting that if we have entities (for example, functions, classes, or variables) in our project modules that are never imported, then these won't appear in this dependency graph, so they won't be included in the final bundle.
A more advanced module bundler could also keep track of the entities imported from every module and the exported entities found in the dependency graph. This allows the bundle to figure out if there are exported functionalities that are never used in the application so that they can be pruned from the final bundle. This optimization technique is called tree shaking (nodejsdp.link/tree-shaking).
During the dependency resolution phase, the module bundler builds a data structure called modules map. This data structure is a hash map that has unique module identifiers (for example, file paths) as keys and a representation of the module source code as values. In our example, a simplified representation of the modules map might look like this:
{
  'app.js': (module, require) => {/* ... */},
  'calculator.js': (module, require) => {/* ... */},
  'display.js': (module, require) => {/* ... */},
  'parser.js': (module, require) => {/* ... */},
  'resolver.js': (module, require) => {/* ... */}
}
Every module in the modules map is a factory function that accepts two arguments: module and require. We will see in more detail what those arguments are in the next section. What is important to understand now is that every module here is a complete representation of the code in the original source module. If we take, for example, the code for the calculator.js module, it might be represented as follows:
(module, require) => {
  const { parser } = require('parser.js')
  const { resolver } = require('resolver.js')
  module.exports.calculator = function (expr) {
    return resolver(parser(expr))
  }
}
Note how the ESM syntax has been converted into something that resembles the syntax of the CommonJS module system. Remember that the browser does not support CommonJS and that these variables are not global, so there is no risk of a naming collision here. In this simplified implementation, we decided to use exactly the same identifiers as in CommonJS (module, require, and module.exports) to make the similarity with CommonJS look more apparent. In reality, every module bundler will use its own unique identifiers. For instance, webpack uses identifiers such as __webpack_require__ and __webpack_exports__.
Packing
The modules map is the final output of the dependency resolution phase. In the packing phase, the module bundler takes the modules map and converts it into an executable bundle: a single JavaScript file that contains all the business logic of the original application.
The idea is simple: we already have a representation of the original codebase of our application inside the modules map; we have to find a way to convert it into something that the browser can execute correctly and save it into the resulting bundle file.
Given the structure of our modules map, this can actually be done with just a few lines of code wrapping the modules map:
((modulesMap) => {                                       // (1)
  const require = (name) => {                            // (2)
    const module = { exports: {} }                       // (3)
    modulesMap[name](module, require)                    // (4)
    return module.exports                                // (5)
  }
  require('app.js')                                      // (6)
})(
  {
    'app.js': (module, require) => {/* ... */},
    'calculator.js': (module, require) => {/* ... */},
    'display.js': (module, require) => {/* ... */},
    'parser.js': (module, require) => {/* ... */},
    'resolver.js': (module, require) => {/* ... */},
  }
)
This is not a lot of code, but there's a lot happening here, so let's go through it together, step by step:
- In this code snippet, we have an Immediately Invoked Function Expression (IIFE) that receives the entire modules map as an argument.
- When the function is executed, it defines a custom
requirefunction. This function receives a modulenameas input and it will load and execute the corresponding module frommodulesMap. - In the
requirefunction, amoduleobject is initialized. This object has only one property calledexports, which is an object with no attributes. - At this point, the factory function of the given module is invoked and we pass to it the
moduleobject we just created and a reference to therequirefunction itself. Note that this is essentially an implementation of the Service Locator pattern (nodejsdp.link/service-locator-pattern). Here, the factory function, once executed, modifies themoduleobject by attaching to it the functionality that the module exports. The factory function can also recursively require other modules by using therequirefunction passed as an argument. - Finally, the
requirefunction returns themodule.exportsobject, which was populated by the factory function that was invoked in the previous step. - The last step is to require the entry point of our dependency graph, which in our case is the module
app.js. This last step is what actually bootstraps the entire application. In fact, by loading the entry point, it will, in turn, load and execute all its dependencies in the right order and then execute its own business logic.
With this process, we essentially created a self-sufficient module system that is capable of loading modules that have been properly organized within the same file. In other words, we managed to convert an app originally organized in multiple files into an equivalent app where all the code has been moved into a single file. This is the resulting bundle file.
Note that the preceding code has been intentionally simplified just to illustrate how module bundlers work. There are many edge cases that we did not take into account. For instance, what happens if we require a module that does not exist in the modules map?
Using webpack
Now that we know how a module bundler works, let's build a simple application that can work both on Node.js and on the browser. Throughout this exercise, we will learn how to write a simple library that can be used without changes from the browser app and the server app. We will be using webpack to build the browser bundle.
To keep things simple, our application will be nothing more than a simple "hello world" for now, but don't worry, we will be building a more realistic application in the Creating a Universal JavaScript app section, later in this chapter.
Let's start by installing the webpack CLI in our system with:
npm install --global webpack-cli
Let's now initialize a new project in a new folder with:
npm init
Once the guided project initialization is complete, since we want to use ESM in Node.js, we need to add the property "type": "module" to our package.json.
Now, we can run:
webpack-cli init
This guided procedure will install webpack in your project and it will help you to automatically generate a webpack configuration file. At the time of writing, using webpack 4, the guided procedure does not realize that we want to use ESM in Node.js, so we have to apply two small changes to the generated files:
- Rename
webpack.config.jstowebpack.config.cjs - Change the following npm scripts in
package.json:"build": "webpack --config webpack.config.cjs" "start": "webpack-dev-server --config webpack.config.cjs"
Now, we are ready to start writing our application.
Let's first write the module we want to share in src/say-hello.js:
import nunjucks from 'nunjucks'
const template = '<h1>Hello <i>{{ name }}</i></h1>'
export function sayHello (name) {
  return nunjucks.renderString(template, { name })
}
In this code, we are using the nunjucks template library (nodejsdp.link/nunjucks), which must be installed with npm. This module is exporting a simple sayHello function that accepts a name as the only argument and uses it to construct an HTML string.
Let's now write the browser application that will use this module (src/index.js):
import { sayHello } from './say-hello.js'
const body = document.getElementsByTagName('body')[0]
body.innerHTML = sayHello('Browser')
This code uses the sayHello function to build an HTML fragment saying Hello Browser and then inserts it into the body section of the current HTML page.
If you want to preview this application, you can run npm start in your terminal. This should open your default browser and you should see the application running.
If you want to generate a static version of the application, you can run:
npm run build
This will generate a folder called dist containing two files: an index.html and our bundle file (whose name will look like main.12345678901234567890.js).
The file name of the bundle is generated by using a hash of the file content. This way, every time our source code changes, we will obtain a new bundle with a different name. This is a useful optimization technique, called cache busting, that webpack adopts by default and it is particularly convenient when deploying our assets to a content delivery network (CDN). With CDNs, it is generally quite expensive to override files that are geographically distributed across multiple servers and already cached in multiple layers, possibly including our users' browsers. By generating new files with every change, we avoid cache invalidation entirely.
You can open the index.html file with your browser to see a preview of your application.
If you are curious, you can have a look at the generated bundle file. You will notice that it is a bit more convoluted and verbose than the sample bundle we illustrated in the previous section. However, you should be able to recognize the structure and notice that the entire nunjucks library, as well as our sayHello module, have been embedded in the bundle code.
Now, what if we want to build an equivalent application that runs in Node.js? For instance, we could use the sayHello function and display the resulting code in the terminal:
// src/server.js
import { sayHello } from './say-hello.js'
console.log(sayHello('Node.js'))
That's it!
If we run this code with:
node src/server.js
We will see the following output:
<h1>Hello <i>Node.js</i></h1>
Yes, displaying HTML in the terminal is not particularly useful, but right now we achieved our goal of being able to use a library from both the browser and the server without any changes in the library codebase.
In the next sections, we will discuss some patterns that allow us to actually change the code where necessary if we want to provide more specialized behaviors on the browser or Node.js.
Fundamentals of cross-platform development
When developing for different platforms, the most common problem we face is how can we reuse as much code as possible and, at the same time, provide specialized implementations for details that are platform-specific. We will now explore some of the principles and the patterns to use when facing this challenge, such as code branching and module swapping.
Runtime code branching
The most simple and intuitive technique for providing different implementations based on the host platform is to dynamically branch our code. This requires that we have a mechanism to recognize the host platform at runtime and then dynamically switch the implementation with an if...else statement. Some generic approaches involve checking global variables that are available only on Node.js or only on the browser.
For example, we can check the existence of the window global variable. Let's modify our say-hello.js module to use this technique to provide a slightly different functionality depending on whether the module is running on the browser or on the server:
import nunjucks from 'nunjucks'
const template = '<h1>Hello <i>{{ name }}</i></h1>'
export function sayHello (name) {
  if (typeof window !== 'undefined' && window.document) {
    // client-side code
    return nunjucks.renderString(template, { name })
  }
  // Node.js code
  return `Hello u001b[1m${name}u001b[0m`
}
The escape sequence u001b[1m is a special terminal formatting indicator that sets the text to bold. The sequence u001b[0m instead resets the formatting to normal. If you are curious to find out more about escape sequences and their history, check out ANSI escape sequences: nodejsdp.link/ansi-escape-sequences.
Try again to run our application on Node.js and on the browser and see the differences! If you do that, you will not see HTML code on the terminal when running the Node.js application. Instead, you will see a string with proper terminal formatting. The frontend application on the browser remains unchanged.
Challenges of runtime code branching
Using a runtime branching approach for switching between Node.js and the browser is definitely the most intuitive and simple pattern we can use for this purpose; however, there are some inconveniences:
- The code for both platforms is included in the same module and therefore in the final bundle. This increases the bundle size, adding unreachable and unnecessary code. It is also possible that the unreachable code contains sensitive information like encryption keys or API keys that are not meant to be sent to a user's browser. In this case, this approach might also raise significant security concerns.
- If used too extensively, it can considerably reduce the readability of the code, as the business logic would be mixed with logic meant only to add cross-platform compatibility.
- Using dynamic branching to load a different module, depending on the platform, will result in all the modules being added to the final bundle, regardless of their target platform. For example, if we consider the following code fragment, both
clientModuleandserverModulewill be included in a bundle generated with webpack, unless we explicitly exclude one of them from the build:import { clientFunctionality } from 'clientModule' import { serverFunctionality } from 'serverModule' if (typeof window !== 'undefined' && window.document) { clientFunctionality() } else { serverFunctionality() }
This last inconvenience happens because of the following reasons:
- Bundlers have no sure way of knowing the value of a runtime variable at build time (unless the variable is a constant), so, in the preceding example, both branches of the
if...elsestatement are always included in the final bundle, even though it is obvious that the browser will always execute only one of them. - ES module imports are always defined declaratively at the top of the file and we don't have a way to filter the imports based on the current environment. The bundler will not try to understand whether you are conditionally using only a subset of the imported feature and it will include all the imported code anyway.
A consequence of this last property is that modules imported dynamically using variables are not included in the bundle. For example, from the following code, no module will be bundled:
moduleList.forEach(function(module) {
  import(module)
})
It's worth underlining that webpack overcomes some of these limitations and, under certain specific circumstances, it is able to guess all the possible values for a dynamic requirement. For instance, if you have a snippet of code like the following:
function getControllerModule (controllerName) {
  return import(`./controller/${controllerName}`)
}
Webpack will include all the modules available in the controller folder in the final bundle.
It's highly recommended to have a look at the official documentation to understand all the supported cases (nodejsdp.link/webpack-dynamic-imports).
Build-time code branching
In this section, we are going to see how to use webpack plugins to remove, at build time, all parts of the code that we want to run only on the server. This allows us to obtain lighter bundle files and to avoid accidentally exposing code containing sensible information (for instance, secrets, passwords, or API keys) that should only live on the server.
Webpack offers support for plugins, which allows us to extend webpack's capabilities and add new processing steps that can be used to produce the bundle file. To perform build-time code branching, we can leverage a built-in plugin called DefinePlugin and a third-party plugin called terser-webpack-plugin (nodejsdp.link/terser-webpack).
DefinePlugin can be used to replace specific code occurrences in our source files with custom code or variables. terser-webpack-plugin allows us to compress the resulting code and remove unreachable statements (dead code elimination).
Let's start by rewriting our say-hello.js module to explore these concepts:
import nunjucks from 'nunjucks'
export function sayHello (name) {
  if (typeof __BROWSER__ !== 'undefined') {
    // client-side code
    const template = '<h1>Hello <i>{{ name }}</i></h1>'
    return nunjucks.renderString(template, { name })
  }
  // Node.js code
  return `Hello u001b[1m${name}u001b[0m`
}
Note that we are checking for the existence of a generic variable called __BROWSER__ to enable the browser code. This is the variable that we will replace at build time using DefinePlugin.
Now, let's install terser-webpack-plugin with:
npm install --save-dev terser-webpack-plugin
Finally, let's update our webpack.config.cjs file:
// ...
const TerserPlugin = require('terser-webpack-plugin')
module.exports = {
  mode: 'production',
  // ...
  plugins: [
    // ...
    new webpack.DefinePlugin({
      __BROWSER__: true
    })
  ],
  // ...
  optimization: {
    // ...
    minimize: true,
    minimizer: [new TerserPlugin()]
  }
}
The first change here is to set the option mode to production. This option will enable optimizations such as code minification (or minimization). Optimization options are defined in the dedicated optimization object. Here, we are enabling minification by setting minimize to true and we are providing a new instance of terser-webpack-plugin as the minimizer. Finally, we are also adding webpack.DefinePlugin and configuring it to replace the string __BROWSER__ with the value true.
Every value in the configuration object of DefinePlugin represents a piece of code that will be evaluated by webpack at build time and then used to replace the currently matched snippet of code. This allows us to add external dynamic values containing, for instance, the content of an environment variable, the current timestamp, or the hash of the last git commit to the bundle.
With this configuration, when we build a new bundle, every occurrence of __BROWSER__ is replaced with true. The first if statement will internally look like if (true !== 'undefined'), but webpack is smart enough to understand that this expression will always be evaluated as true, so it transforms the resulting code again into if (true).
Once webpack has finished processing all the code, it will invoke terser-webpack-plugin to minimize the resulting code. terser-webpack-plugin is a wrapper around Terser (nodejsdp.link/terser), a modern JavaScript minifier. Terser is capable of removing dead code as part of its minimization algorithm, so given that, at this stage, our code will look like this:
if (true) {
  const template = '<h1>Hello <i>{{ name }}</i></h1>'
  return nunjucks.renderString(template, { name })
}
return `Hello u001b[1m${name}u001b[0m`
Terser will reduce it to:
const template = '<h1>Hello <i>{{ name }}</i></h1>'
return nunjucks.renderString(template, { name })
This way, we got rid of all the server-side code in our browser bundle.
Even if build-time code branching is way better than runtime code branching because it produces much leaner bundle files, it can still make our source code cumbersome when abused. In fact, if you overuse this technique, you will end up with code that contains too many if statements, which will be hard to understand and debug.
When this happens, it is generally better to move all the platform-specific code into dedicated modules. We will discuss this alternative approach in the next section.
Module swapping
Most of the time, we already know at build time what code has to be included in the client bundle and what shouldn't. This means that we can take this decision upfront and instruct the bundler to replace the implementation of an entire module at build time. This often results in a leaner bundle, as we are excluding unnecessary modules, and more readable code because we don't have all the if...else statements required by runtime and build-time branching.
Let's find out how to adopt module swapping with webpack by updating our example.
The main idea is that we want to have two separate implementations of our sayHello functionality: one optimized for the server (say-hello.js) and one optimized for the browser (say-hello-browser.js). We will then tell webpack to replace any import of say-hello.js with say-hello-browser.js. Let's see what our new implementation looks like now:
// src/say-hello.js
import chalk from 'chalk'
export function sayHello (name) {
  return `Hello ${chalk.green(name)}`
}
// src/say-hello-browser.js
import nunjucks from 'nunjucks'
const template = '<h1>Hello <i>{{ name }}</i></h1>'
export function sayHello (name) {
  return nunjucks.renderString(template, { name })
}
Note that, on the server-side version, we introduced a new dependency, chalk (nodejsdp.link/chalk), a utility library that allows us to format text for the terminal. This is to demonstrate one of the main advantages of this approach. Now that we've separated our server-side code from the client-side code, we can introduce new functionalities and libraries without worrying about the impact that those might have on the frontend-only bundle. At this point, in order to tell webpack to swap the modules at build time, we have to replace webpack.DefinePlugin with a new plugin in our webpack.config.cjs, as follows:
plugins: [
  // ...
  new webpack.NormalModuleReplacementPlugin(
    /src/say-hello.js$/,
    path.resolve(__dirname, 'src', 'say-hello-browser.js')
  )
]
We are using webpack.NormalModuleReplacementPlugin, which accepts two arguments. The first argument is a regular expression and the second one is a string representing a path to a resource. At build time, if a module path matches the given regular expression, it is replaced with the one provided in the second argument.
Note that this technique is not limited to our internal modules, but it can also be used with external libraries in our node_modules folder.
Thanks to webpack and the module replacement plugin, we can easily deal with structural differences between platforms. We can focus on writing separate modules that are meant to provide platform-specific code and we can then swap Node.js-only modules with browser-specific ones in the final bundle.
Design patterns for cross-platform development
Let's now revise some of the design patterns we discussed in the previous chapters to see how we can leverage those for cross-platform development:
- Strategy and template: These two are probably the most useful patterns when sharing code with the browser. Their intent is, in fact, to define the common steps of an algorithm, allowing some of its parts to be replaced, which is exactly what we need! In cross-platform development, these patterns allow us to share the platform-agnostic part of our components, while allowing their platform-specific parts to be changed using a different strategy or template method (which can be changed using code branching (runtime or build-time) or module swapping).
- Adapter: This pattern is probably the most useful when we need to swap an entire component. We have already seen several examples in Chapter 8, Structural Design Patterns. If your server application is using a database like SQLite, you could use the Adapter pattern to provide an alternative data storage implementation that works in the browser. For instance you could use the
localStorageAPI (nodejsdp.link/localstorage) or theIndexedDBAPI (nodejsdp.link/indexdb). - Proxy: When code meant to run on the server runs on the browser, we often need functionality that is used on the server to be available on the browser as well. This is where the remote Proxy pattern is useful. Imagine if we wanted to access the filesystem of the server from the browser: we could think of creating an
fsobject on the client that proxies every call to thefsmodule living on the server, using Ajax or WebSockets as a way of exchanging commands and return values. - Dependency injection and service locator: Both dependency injection and service locator can be useful to replace the implementation of a module at the moment of its injection. When we introduced the concept of modules maps, in the Packing section, we also saw how the Service Locator pattern was intrinsically used by module bundlers to collate all the code from different modules into one file.
As we can see, the arsenal of patterns at our disposal is quite powerful, but the most powerful weapon is still the ability of the developer to choose the best approach and adapt it to the specific problem at hand.
Now that we understand the fundamentals of module bundlers and we have learned a number of useful patterns to write cross-platform code, we are ready to move into the second part of this chapter, where we will learn about React and write our first universal JavaScript application.
A brief introduction to React
React is a popular JavaScript library created and maintained by Facebook. React is focused on providing a comprehensive set of functions and tools to build the view layer in web applications. React offers a view abstraction focused on the concept of a component. A component could be a button, a form input, a simple container such as an HTML div, or any other element in your user interface. The idea is that you should be able to construct the user interface of your application by just defining and composing highly reusable components with specific responsibilities.
What makes React different from other view libraries for the web is that it is not bound to the DOM by design. In fact, it provides a high-level abstraction called the virtual DOM (nodejsdp.link/virtual-dom) that fits very well with the web but that can also be used in other contexts, for example, for building mobile apps, modeling 3D environments, or even defining the interaction between hardware components. In simple terms, the virtual DOM can be seen as an efficient way to re-render data organized in a tree-like structure.
"Learn it once, use it everywhere."
This is the motto used by Facebook to introduce React. It intentionally mocks the famous Java motto Write it once, run it everywhere with the clear intention to underline a fundamental shift from the Java philosophy. The original design goal of Java was to allow developers to write applications once and run them on as many platforms as possible without changes. Conversely, the React philosophy acknowledges that every platform is inherently different and therefore encourages developers to write different applications that are optimized for the related target platform. React, as a library, shifts its focus on providing convenient design and architecture principles and tools that, once mastered, can be easily used to write platform-specific code.
If you are curious to learn about the applications of React in contexts not strictly related to the field of web development, you can have a look at the following projects: React Native for mobile apps (nodejsdp.link/react-native), React PIXI for 2D rendering with OpenGL (nodejsdp.link/react-pixi), react-three-fiber to create 3D scenes (nodejsdp.link/react-three-fiber), and React Hardware (nodejsdp.link/react-hardware).
The main reason why React is so interesting in the context of Universal JavaScript development is because it allows us to render React components both on the client and on the server using almost the same code. To put it another way, with React, we are able to render the HTML code that is required to display the page directly from Node.js. Then, when the page is loaded on the browser, React will perform a process called hydration (nodejsdp.link/hydration), which will add all the frontend-only side effects like click handlers, animations, additional asynchronous data fetching, dynamic routing, and so on. Hydration converts a static markup into a fully interactive experience.
This approach allows us to build single-page applications (SPAs), where the first render happens mostly on the server, but then, once the page is loaded on the browser and the user starts to click around, only the parts of the page that need to be changed are dynamically refreshed, without requiring a full page reload.
This design offers two main advantages:
- Better search engine optimization (SEO): Since the page markup is pre-rendered by the server, various search engines can make sense of the content of the page by just looking at the HTML returned by the server. They won't need to simulate a browser environment and wait for the page to be fully loaded to see what a given page is about.
- Better performance: Since we are pre-rendering the markup, this will be already available and visible on the browser, even while the browser is still downloading, parsing, and executing the JavaScript code included with the page. This approach can lead to a better user experience as the content is perceived to load faster and there are less browser "flashes" during rendering.
It is worth mentioning that the React virtual DOM is capable of optimizing the way changes are rendered. This means that the DOM is not rendered in full after every change, but instead React uses a smart in-memory diffing algorithm that is able to pre-calculate the minimum number of changes to apply to the DOM in order to update the view. This results in a very efficient mechanism for fast browser rendering.
Now that we know what React is, in the next section, we will write our first React component!
Hello React
Without further ado, let's start to use React and jump to a concrete example. This will be a "Hello World" type of example but it will help us to illustrate the main ideas behind React, before we move onto more realistic examples.
Let's start by creating a new webpack project in a new folder with:
npm init -y
npm install --save-dev webpack webpack-cli
node_modules/.bin/webpack init
Then, follow the guided instructions. Now, let's install React:
npm install --save react react-dom
Now, let's create a file, src/index.js, with the following content:
import react from 'react'
import ReactDOM from 'react-dom'
const h = react.createElement                            // (1)
class Hello extends react.Component {                    // (2)
  render () {                                            // (3)
    return h('h1', null, [                               // (4)
      'Hello ',
      this.props.name || 'World'                         // (5)
    ])
  }
}
ReactDOM.render(                                         // (6)
  h(Hello, { name: 'React' }),
  document.getElementsByTagName('body')[0]
)
Let's review what's happening with this code:
- The first thing that we do is to create a handy alias for the
react.createElementfunction. We will be using this function a couple of times in this example to create React elements. These could be plain DOM nodes (regular HTML tags) or instances of React components. - Now, we define our
Hellocomponent, which has to extend thereact.Componentclass. - Every React component has to implement a
render()method. This method defines how the component will be displayed on the screen when it is rendered on the DOM and it has to return a React element. - We are using the
react.createElementfunction to create anh1DOM element. This method expects three or more arguments. The first argument is the tag name (as a string) or a React component class. The second argument is an object used to pass attributes (or props) to the component (ornullif we don't need to specify any attribute). Finally, the third argument is an array (or you can pass multiple arguments as well) of children elements. Elements can also be text (text nodes), as in our current example. - Here, we are using
this.propsto access the attributes that are passed to this component at runtime. In this specific case, we are looking for thenameattribute. If this is passed, we use it to construct a text node; otherwise, we default to the string"World". - In this last block of code, we use
ReactDOM.render()to initialize our application. This function is responsible for attaching a React application to the existing page. An application is nothing more than an instance of a React component. Here, we are instantiating ourHellocomponent and passing the string"React"for thenameattribute. Finally, as the last argument, we have to specify which DOM node in the page will be the parent element of our application. In this case, we are using thebodyelement of the page, but you can target any existing DOM element in the page.
Now, you can see a preview of your application by running:
npm start
You should now see "Hello React" in your browser window. Congratulations, you have built your first React application!
Alternatives to react.createElement
Repeated usage of react.createElement() might compromise the readability of our React components. In fact, nesting many invocations of react.createElement(), even with our h() alias, will make it hard to understand the HTML structure we want our components to render.
For this reason, it is not very common to use react.createElement() directly. To address this problem, the React team offers and encourages an alternative syntax called JSX (nodejsdp.link/jsx).
JSX is a superset of JavaScript that allows you to embed HTML-like code into JavaScript code. JSX makes the creation of React elements similar to writing HTML code. With JSX, React components are generally more readable and easier to write. It is easier to see what we mean here by looking at a concrete example, so let's rewrite our "Hello React" application using JSX:
import react from 'react'
import ReactDOM from 'react-dom'
class Hello extends react.Component {
  render () {
    return <h1>Hello {this.props.name || 'World'}</h1>
  }
}
ReactDOM.render(
  <Hello name="React"/>,
  document.getElementsByTagName('body')[0]
)
Much more readable, isn't it?
Unfortunately, since JSX is not a standard JavaScript feature, adopting JSX would require us to "compile" JSX code into standard equivalent JavaScript code. In the context of Universal JavaScript applications, we would have to do this both on the client-side code and the server-side code, so, for the sake of simplicity, we are not going to use JSX throughout the rest of this chapter.
There are some relatively new JSX alternatives that rely on standard JavaScript tagged template literals (you can read more about JavaScript tagged template literals at nodejsdp.link/template-literals). Using template literals seems to be a good compromise between code that is still quite easy to read and write and not having to perform an intermediate compilation process. Two of the most promising libraries providing this functionality are htm (nodejsdp.link/htm) and esx (nodejsdp.link/esx).
In the rest of this chapter, we will be using htm, so let's rewrite once more our "Hello React" example, this time using htm:
import react from 'react'
import ReactDOM from 'react-dom'
import htm from 'htm'
const html = htm.bind(react.createElement)          // (1)
class Hello extends react.Component {
  render () {                                       // (2)
    return html`<h1>
      Hello ${this.props.name || 'World'}
    </h1>`
  }
}
ReactDOM.render(
  html`<${Hello} name="React"/>`,                   // (3)
  document.getElementsByTagName('body')[0]
)
This code looks quite readable, but let's quickly clarify how we are using htm here:
- The first thing that we have to do is create the template tag function
html. This function allows us to use template literals to generate React elements. At runtime, this template tag function will be callingreact.createElement()for us when needed. - Here, we use a tagged template literal with the
htmltag function to create anh1tag. Note that, as this is a standard tagged template literal, we can use the regular placeholder syntax (${expression}) to insert dynamic expressions into the string. Remember that template literals and tagged template literals use backticks (`) instead of single quotes (') to delimit the template string. - Similarly, we can use the placeholder syntax to create instances of React components (
<${ComponentClass}>). Note that, if a component instance contains children elements, we can use the special</>tag to indicate the end of the component (for example,<${Component}><child/></>). Finally, we can pass props to the component as normal HTML attributes.
At this point, we should be able to understand the basic structure of a simple "Hello World" React component. In the next section, we will show you how to manage states in a React component, an important concept for most real-world applications.
Stateful components
In the previous example, we saw how to build a stateless React component. By stateless, we mean that the component only receives input from the outside (in our example, it was receiving a name property) and it doesn't need to calculate or manage any internal information to be able to render itself to the DOM.
While it's great to have stateless components, sometimes, you have to manage some kind of state. React allows us to do that, so let's learn how with an example.
Let's build a React application that displays a list of projects that have been recently updated on GitHub.
We can encapsulate all the logic for asynchronously fetching the data from GitHub and displaying it on a dedicated component: the RecentGithubProjects component. This component is configurable through the query prop, which allows us to filter the projects on GitHub. The query prop will receive a keyword such as "javascript" or "react", and this value will be used to construct the API call to GitHub.
Let's finally have a look at the code of the RecentGithubProjects component:
// src/RecentGithubProjects.js
import react from 'react'
import htm from 'htm'
const html = htm.bind(react.createElement)
function createRequestUri (query) {
  return `https://api.github.com/search/repositories?q=${
    encodeURIComponent(query)
  }&sort=updated`
}
export class RecentGithubProjects extends react.Component {
  constructor (props) {                                    // (1)
    super(props)                                           // (2)
    this.state = {                                         // (3)
      loading: true,
      projects: []
    }
  }
  async loadData () {                                      // (4)
    this.setState({ loading: true, projects: [] })
    const response = await fetch(
      createRequestUri(this.props.query),
      { mode: 'cors' }
    )
    const responseBody = await response.json()
    this.setState({
      projects: responseBody.items,
      loading: false
    })
  }
  componentDidMount () {                                   // (5)
    this.loadData()
  }
  componentDidUpdate (prevProps) {                         // (6)
    if (this.props.query !== prevProps.query) {
      this.loadData()
    }
  }
  render () {                                              // (7)
    if (this.state.loading) {
      return 'Loading ...'
    }
                                                           // (8)
    return html`<ul>
      ${this.state.projects.map(project => html`
        <li key=${project.id}>
          <a href=${project.html_url}>${project.full_name}</a>:
          ${' '}${project.description}
        </li>
      `)}
    </ul>`
  }
}
There are some new React concepts in this component, so let's discuss the main details here:
- In this new component, we are overriding the default constructor. A constructor accepts the props passed to the component as an argument.
- The first thing we have to do is call the original constructor and propagate the props so that the component can be initialized correctly by React.
- Now, we can define the initial component state. Our final state is going to be a list of GitHub projects, but those won't be available immediately as we will need to load them dynamically. Therefore, we define the initial state as a boolean flag, indicating that we are loading the data and the list of projects as an empty array.
- The function
loadData()is the function that is responsible for making the API request, fetching the necessary data, and updating the internal state usingthis.setState(). Note thatthis.setState()is called twice: before we issue the HTTP request (to activate the loading state) and when the request is completed (to unset the loading flag and populate the list of projects). React will re-render the component automatically when the state changes. - Here, we are introducing another new concept: the
componentDidMountlifecycle function. This function is automatically invoked by React once the component has been successfully instantiated and attached (or mounted) to the DOM. This is the perfect place to load our data for the first time. - The function
componentDidUpdateis another React lifecycle function and it is automatically invoked every time the component is updated (for instance, if new props have been passed to the component). Here, we check if thequeryprop has changed since the last update. If that's the case, then we need to reload the list of projects. - Finally, let's see what happens in our
render()function. The main thing to note is that here we have to handle the two different states of the component: the loading state and the state where we have the list of projects available for display. Since React will invoke therender()function every time the state or the props change, just having anifstatement here will be enough. This technique is often called conditional rendering. - In this final step, we are rendering a list of elements using
Array.map()to create a list element for every project fetched using the GitHub API. Note that every list element receives a value for thekeyprop. Thekeyprop is a special prop that is recommended whenever you are rendering an array of elements. Every element should provide a uniquekey. This prop helps the virtual DOM optimize every rendering pass (If you are curious to understand in detail what React does in this situation you can have a look at nodejsdp.link/react-reconciliation).
You might have noticed that we are not handling potential errors while fetching the data. There are several ways we can do this in React. The most elegant solution is probably implementing an ErrorBoundary component (nodejsdp.link/error-boundary), but we will leave that as an exercise for you.
Let's now write the main application component. Here, we want to display a navigation menu where the user can select different queries ("JavaScript", "Node.js", and "React") to filter for different types of GitHub projects:
// src/App.js
import react from 'react'
import htm from 'htm'
import { RecentGithubProjects } from './RecentGithubProjects.js'
const html = htm.bind(react.createElement)
export class App extends react.Component {
  constructor (props) {
    super(props)
    this.state = {
      query: 'javascript',
      label: 'JavaScript'
    }
    this.setQuery = this.setQuery.bind(this)
  }
  setQuery (e) {
    e.preventDefault()
    const label = e.currentTarget.text
    this.setState({ label, query: label.toLowerCase() })
  }
  render () {
    return html`<div>
      <nav>
        <a href="#" onClick=${this.setQuery}>JavaScript</a>
        ${' '}
        <a href="#" onClick=${this.setQuery}>Node.js</a>
        ${' '}
        <a href="#" onClick=${this.setQuery}>React</a>
      </nav>
      <h1>Recently updated ${this.state.label} projects</h1>
      <${RecentGithubProjects} query=${this.state.query}/>
    </div>`
  }
}
This component is using its internal state to track the currently selected query. Initially, the "javascript" query is set and passed down to the RecentGithubProjects component. Then, every time a keyword in the navigation menu is clicked, we update the state with the new selected keyword. When this happens, the render() method will be automatically invoked and it will pass the new value for the query prop to RecentGithubProjects. In turn, RecentGithubProjects will be marked as updated, and it will internally reload and eventually update the list of projects for the new query.
One interesting detail to underline is that, in the constructor, we are explicitly binding the setQuery() function to the current component instance. The reason why we do this is because this function is used directly as an event handler for the click event. In this case, the reference to this would be undefined without the bind and it would not be possible to call this.setState() from the handler.
At this point, we only need to attach the App component to the DOM to run our application. Let's do this:
// src/index.js
import react from 'react'
import ReactDOM from 'react-dom'
import htm from 'htm'
import { App } from './App.js'
const html = htm.bind(react.createElement)
ReactDOM.render(
  html`<${App}/>`,
  document.getElementsByTagName('body')[0]
)
Finally, let's just run the application with npm start and test it on the browser.
Note that since we used async/await in our application, the default configuration generated by webpack might not work straight away. If you have any issues, compare your configuration file with the one in the code examples provided with this book (nodejsdp.link/wpconf).
Try to refresh the page and click on the various keywords on the navigation menu. After a few seconds, you should see the list of projects being refreshed.
At this point, it should be quite clear to you how React works, how to compose components together, and how to take advantage of state and props. Hopefully, this simple exercise will also help you to find new, interesting, open source JavaScript projects that you might want to contribute to!
We've covered just enough ground for us to be able to build our first Universal React application. But if you want to be proficient with React, we recommend that you read the official React documentation (nodejsdp.link/react-docs) for a more exhaustive overview of the library.
We are finally ready to take what we learned about webpack and React to create a simple, yet complete, universal JavaScript application.
Creating a Universal JavaScript app
Now that we've covered the basics, let's start to build a more complete Universal JavaScript application. We are going to build a simple "book library" application where we can list different authors and see their biography and some of their masterpieces. Although this is going to be a very simple application, it will allow us to cover more advanced topics such as universal routing, universal rendering, and universal data fetching. The idea is that you can later use this application as a scaffold for a real project and build on top of it your next universal JavaScript application.
In this experiment, we are going to use the following technologies:
- React (nodejsdp.link/react), which we just introduced
- React Router (nodejsdp.link/react-router), a companion routing layer for React
- Fastify (nodejsdp.link/fastify), a fast and ergonomic framework to build web servers in Node.js
- Webpack as the module bundler
For practical reasons, we selected a very specific set of technologies for this exercise, but we will try to focus as much as possible on the design principles and patterns rather than the technologies themselves. As you learn these patterns, you should be able to use the acquired knowledge with any other combination of technologies and achieve similar results.
In order to keep things simple, we will be using webpack only to process the frontend code and we will leave the backend code unchanged, leveraging the native Node.js support for ESM.
At the time of writing, there are some subtle discrepancies between how webpack interprets the semantics of ESM imports as opposed to how Node.js does it, especially when importing modules written using the CommonJS syntax. For this reason, we recommend running the examples in the rest of this chapter using esm (nodejsdp.link/esm), a Node.js library that will preprocess ESM imports in a way that minimizes those differences. Once you have installed the esm module in your project, you can run a script with esm as follows:
node –r esm script.js
Frontend-only app
In this section, we are going to focus on building our app on the frontend only, using webpack as a development web server. In the next sections, we will expand and update this basic app to convert it to a full Universal JavaScript application.
This time, we will be using a custom webpack configuration, so let's start by creating a new folder and copying the package.json and webpack.config.cjs files from the code repository provided with this book (nodejsdp.link/frontend-only-app), then install all the necessary dependencies with:
npm install
The data we will be using is stored in a JavaScript file (as a simple substitute for a database), so make sure you copy the file data/authors.js into your project as well. This file contains some sample data in the following format:
export const authors = [
  {
    id: 'author's unique id',
    name: 'author's name',
    bio: 'author's biography',
    books: [ // author's books
      {
        id: 'book unique id',
        title: 'book title',
        year: 1914 // book publishing year
      },
      // ... more books
    ]
  },
  // ... more authors
]
Of course, feel free to change the data in this file if you want to add your favorite authors and books!
Now that we have all the configuration in place, let's quickly discuss what we want our application to look like.

Figure 10.3: Application mockup
Figure 10.3 shows that our application will have two different types of page: an index page, where we list all the authors available in our data store, and then a page to visualize the details of a given author, where we will see their biography and some of their books.
These two types of page will only have a header in common. This will allow us to go back to the index page at any time.
We will be exposing the index page at the root path of our server (/), while we will be using the path /author/:authorId for the author's page.
Finally, we will also have a 404 page.
In terms of file structure, we will organize our project as follows:
src
├── data
│   └── authors.js              – data file
└── frontend
    ├── App.js                  – application component
    ├── components
    │   ├── Header.js           – header component
    │   └── pages
    │       ├── Author.js       – author page
    │       ├── AuthorsIndex.js – index page
    │       └── FourOhFour.js   – 404 page
    └── index.js                – project entry point
Let's start by writing the index.js module, which will serve as the entry point for loading our frontend application and attaching it to the DOM:
import react from 'react'
import reactDOM from 'react-dom'
import htm from 'htm'
import { BrowserRouter } from 'react-router-dom'
import { App } from './App.js'
const html = htm.bind(react.createElement)
reactDOM.render(
  html`<${BrowserRouter}><${App}/></>`,
  document.getElementById('root')
)
This code is quite simple as we are mainly importing the App component and attaching it to the DOM in an element with the ID equal to root. The only detail that stands out is that we are wrapping the application into a BrowserRouter component. This component comes from the react-router-dom library and it provides our app with client-side routing capabilities. Some of the components we will be writing next will showcase how to fully take advantage of these routing capabilities and how to connect different pages together using links. Later on, we will revisit this routing configuration to make it available on the server side as well.
Right now, let's focus on the source code for App.js:
import react from 'react'
import htm from 'htm'
import { Switch, Route } from 'react-router-dom'
import { AuthorsIndex } from './components/pages/AuthorsIndex.js'
import { Author } from './components/pages/Author.js'
import { FourOhFour } from './components/pages/FourOhFour.js'
const html = htm.bind(react.createElement)
export class App extends react.Component {
  render () {
    return html`
      <${Switch}>
        <${Route}
          path="/"
          exact=${true}
          component=${AuthorsIndex}
        />
        <${Route}
          path="/author/:authorId"
          component=${Author}
        />
        <${Route}
          path="*"
          component=${FourOhFour}
        />
      </>
    `
  }
}
As you can tell from this code, the App component is responsible for loading all the page components and configuring the routing for them.
Here, we are using the Switch component from react-router-dom. This component allows us to define Route components. Every Route component needs to have a path and a component prop associated with it. At render time, Switch will check the current URL against the paths defined by the routes, and it will render the component associated to the first Route component that matches.
As in a JavaScript switch statement, where the order of case statements is important, here, the order of the Route components is important too. Our last route is a catch-all route, which will always match if none of the previous routes matches..
Note also that we are setting the prop exact for the first Route. This is needed because react-router-dom will match based on prefixes, so a plain / will match any URL. By specifying exact: true, we are telling the router to only match this path if it is exactly / (and not if it just starts with /).
Let's now have a quick look at our Header component:
import react from 'react'
import htm from 'htm'
import { Link } from 'react-router-dom'
const html = htm.bind(react.createElement)
export class Header extends react.Component {
  render () {
    return html`<header>
      <h1>
        <${Link} to="/">My library</>
      </h1>
    </header>`
  }
}
This is a very simple component that just renders an h1 title containing "My library." The only detail worth discussing here is that the title is wrapped by a Link component from the react-router-dom library. This component is responsible for rendering a clickable link that can interact with the application router to switch to a new route dynamically, without refreshing the entire page.
Now, we have to write, one by one, our page components. Let's start with the AuthorsIndex component:
import react from 'react'
import htm from 'htm'
import { Link } from 'react-router-dom'
import { Header } from '../Header.js'
import { authors } from '../../../data/authors.js'
const html = htm.bind(react.createElement)
export class AuthorsIndex extends react.Component {
  render () {
    return html`<div>
      <${Header}/>
      <div>${authors.map((author) =>
        html`<div key=${author.id}>
          <p>
            <${Link} to="${`/author/${author.id}`}">
              ${author.name}
            </>
          </p>
        </div>`)}
      </div>
    </div>`
  }
}
Yet another very simple component. Here, we are rendering some markup dynamically based on the list of authors available in our data file. Note that we are using, once again, the Link component from react-router-dom to create dynamic links to the author page.
Now, let's have a look at the Author component code:
import react from 'react'
import htm from 'htm'
import { FourOhFour } from './FourOhFour.js'
import { Header } from '../Header.js'
import { authors } from '../../../data/authors.js'
const html = htm.bind(react.createElement)
export class Author extends react.Component {
  render () {
    const author = authors.find(
      author => author.id === this.props.match.params.authorId
    )
    if (!author) {
      return html`<${FourOhFour} error="Author not found"/>`
    }
    return html`<div>
      <${Header}/>
      <h2>${author.name}</h2>
      <p>${author.bio}</p>
      <h3>Books</h3>
      <ul>
        ${author.books.map((book) =>
          html`<li key=${book.id}>${book.title} (${book.year})</li>`
        )}
      </ul>
    </div>`
  }
}
This component has a little bit of logic in it. In the render() method, we filter the authors dataset to find the current author. Notice that we are using props.match.params.authorId to get the current author ID. The match prop will be passed to the component by the router at render time and the nested params object will be populated if the current path has dynamic parameters.
It is common practice to memoize (nodejsdp.link/memoization) the result of any complex calculation performed in the render() method. This prevents the complex calculation from running again in case its inputs haven't changed since the last render. In our example, a possible target for this type of optimization is the call to authors.find(). We leave this to you as an exercise. If you want to know more about this technique take a look at nodejsdp.link/react-memoization.
There's a chance that we are receiving an ID that doesn't match any author in our dataset, so in this case, author will be undefined. This is clearly a 404, so instead of rendering the author data, we delegate the render logic to the FourOhFour component, which is responsible for rendering the 404 error page.
Finally, let's see the source code for the FourOhFour component:
import react from 'react'
import htm from 'htm'
import { Link } from 'react-router-dom'
import { Header } from '../Header.js'
const html = htm.bind(react.createElement)
export class FourOhFour extends react.Component {
  render () {
    return html`<div>
      <${Header}/>
      <div>
        <h2>404</h2>
        <h3>${this.props.error || 'Page not found'}</h3>
        <${Link} to="/">Go back to the home page</>
      </div>
    </div>`
  }
}
This component is responsible for rendering the 404 page. Note that we made the error message configurable through the error prop and also that we are using a Link from the react-router-dom library to allow the user to travel back to the home page when landing on this error page.
This was quite a lot of code, but we are finally ready to run our frontend-only React application: just type npm start in your console and you should see the application running in your browser. Pretty barebones, but if we did everything correctly, it should work as expected and allow us to see our favorite authors and their masterpieces.
It is worth using the app with the browser developer tools open so that we can verify that our dynamic routing is working correctly, that is, once the first page is loaded, transitions to other pages happen without any page refresh.
For a better understanding of what happens when you interact with a React application, you can install and use the React Developer Tools browser extension on Chrome (nodejsdp.link/react-dev-tools-chrome) or Firefox (nodejsdp.link/react-dev-tools-firefox).
Server-side rendering
Our application works and this is great news. However, the app is running only on the client side, which means that if we try to curl one of the pages, we will see something like this:
<!DOCTYPE html>
<html>
  <head>
    <meta charset="UTF-8">
    <title>My library</title>
  </head>
  <body>
  <div id="root"></div>
  <script type="text/javascript" src="/main.js"></script></body>
</html>
No content whatsoever! There's only an empty container (the root div), which is where our application is mounted at runtime.
In this section, we will modify our application to be able to render the content also from the server.
Let's start by adding fastify and esm to our project:
npm install --save fastify fastify-static esm
Now, we can create our server application in src/server.js:
import { resolve, dirname } from 'path'
import { fileURLToPath } from 'url'
import react from 'react'
import reactServer from 'react-dom/server.js'
import htm from 'htm'
import fastify from 'fastify'
import fastifyStatic from 'fastify-static'
import { StaticRouter } from 'react-router-dom'
import { App } from './frontend/App.js'
const __dirname = dirname(fileURLToPath(import.meta.url))
const html = htm.bind(react.createElement)
// (1)
const template = ({ content }) => `<!DOCTYPE html>
<html>
  <head>
    <meta charset="UTF-8">
    <title>My library</title>
  </head>
  <body>
    <div id="root">${content}</div>
    <script type="text/javascript" src="/public/main.js"></script>
  </body>
</html>`
const server = fastify({ logger: true })                   // (2)
server.register(fastifyStatic, {                           // (3)
  root: resolve(__dirname, '..', 'public'),
  prefix: '/public/'
})
server.get('*', async (req, reply) => {                    // (4)
  const location = req.raw.originalUrl
                                                           // (5)
  const serverApp = html`
    <${StaticRouter} location=${location}>
      <${App}/>
    </>
  `
  const content = reactServer.renderToString(serverApp)    // (6)
  const responseHtml = template({ content })
  reply.code(200).type('text/html').send(responseHtml)
})
const port = Number.parseInt(process.env.PORT) || 3000     // (7)
const address = process.env.ADDRESS || '127.0.0.1'
server.listen(port, address, function (err) {
  if (err) {
    console.error(err)
    process.exit(1)
  }
})
There's a lot of code here, so let's discuss step by step the main concepts introduced here:
- Since we are not going to use the webpack dev server, we need to return the full HTML code of the page from our server. Here, we are defining the HTML template for all our pages using a function and a template literal. We will be passing the result of our server-rendered React application as
contentto this template to get the final HTML to return to the client. - Here, we create a Fastify server instance and enable logging.
- As you might have noticed from our template code, our web application will load the script
/public/main.js. This file is the frontend bundle that is generated by webpack. Here, we are letting the Fastify server instance serve all static assets from thepublicfolder using thefastify-staticplugin. - In this line, we define a catch-all route for every
GETrequest to the server. The reason why we are doing a catch-all route is because the actual routing logic is already contained in the React application. When we render the React application, it will display the correct page component based on the current URL. - On the server side, we have to use an instance of
StaticRouterfromreact-router-domand wrap our application component with it.StaticRouteris a version of React Router that can be used for server-side rendering. This router, rather than taking the current URL from the browser window, allows us to pass the current URL directly from the server through thelocationprop. - Here, we can finally generate the HTML code for our
serverAppcomponent by using React'srenderToString()function. The generated HTML is the same as the one generated by the client-side application on a given URL. In the next few lines, we wrap this code with our page layout using thetemplate()function and finally, we send the result to the client. - In the last few lines of code, we tell our Fastify
serverinstance to listen on a given address and port defaulting tolocalhost:3000.
Now, we can run npm run build to create the frontend bundle and finally, we can run our server, as follows:
node -r esm src/server.js
Let's open our browser on http://localhost:3000/ and see if our app is still working as expected. All good, right? Great! Now, let's try to curl our home page to see if the server-generated code looks different:
curl http://localhost:3000/
This time, this is what we should see:
<!DOCTYPE html>
<html>
  <head>
    <meta charset="UTF-8">
    <title>My library</title>
  </head>
  <body>
    <div id="root"><div><header><h1><a href="/">My library</a></h1></header><div><h2>Authors</h2><div><div><a href="/author/joyce"><p>James Joyce</p></a></div><div><a href="/author/h-g-wells"><p>Herbert George Wells</p></a></div><div><a href="/author/orwell"><p>George Orwell</p></a></div></div></div></div></div>
    <script type="text/javascript" src="/public/main.js"></script>
  </body>
</html>
Great! This time, our root container is not empty: we are rendering the list of authors directly from the server. You should also try some author pages and see that it works correctly for those as well. Mission complete! Well, almost... what happens if we try to render a page that does not exist? Let's have a look:
curl -i http://localhost:3000/blah
This will print:
HTTP/1.1 200 OK
content-type: text/html
content-length: 367
Date: Sun, 05 Apr 2020 18:38:47 GMT
Connection: keep-alive
<!DOCTYPE html>
<html>
  <head>
    <meta charset="UTF-8">
    <title>My library</title>
  </head>
  <body>
    <div id="root"><div><header><h1><a href="/">My library</a></h1></header><div><h2>404</h2><h3>Page not found</h3><a href="/">Go back to the home page</a></div></div></div>
    <script type="text/javascript" src="/public/main.js"></script>
  </body>
</html>
At first glance, this might seem correct because we are rendering our 404 page, but we are actually returning a 200 status code… not good!
We can actually fix this with just a little extra effort, so let's do it.
React StaticRouter allows us to pass a generic context prop that can be used to exchange information between the React application and the server. We can leverage this utility to allow our 404 page to inject some information into this shared context so that on the server side, we are aware of whether we should return a 200 or a 404 status code.
Let's update the catch-all route on the server side first:
server.get('*', async (req, reply) => {
  const location = req.raw.originalUrl
  const staticContext = {}
  const serverApp = html`
    <${StaticRouter}
      location=${location}
      context=${staticContext}
    >
      <${App}/>
    </>
  `
  const content = reactServer.renderToString(serverApp)
  const responseHtml = template({ content })
  let code = 200
  if (staticContext.statusCode) {
    code = staticContext.statusCode
  }
  reply.code(code).type('text/html').send(responseHtml)
})
The changes from the previous version are highlighted in bold. As you can see, we create an empty object called staticContext and pass it to the router instance in the context prop. Later on, after the server-side rendering is completed, we check if staticContext.statusCode was populated during the rendering process. If it was, it will now contain the status code that we have to return to the client, together with the rendered HTML code.
Let's now change the FourOhFour component to actually populate this value. To do this, we just need to update the render() function with the following code before we return the elements to render:
if (this.props.staticContext) {
  this.props.staticContext.statusCode = 404
}
Note that the context prop passed to StaticRouter is passed only to direct children of Route components using the prop staticContext. For this reason, if we rebuild the frontend bundle and relaunch our server, this time, we will see a correct 404 status for http://localhost:3000/blah, but it won't work for URLs that match the author page such as http://localhost:3000/author/blah.
In order to make this work, we also need to propagate staticContext from the Author component into the FourOhFour component. To do this, in the Author component's render() method, we have to apply the following change:
if (!author) {
  return html`<${FourOhFour}
    staticContext=${this.props.staticContext}
    error="Author not found"
  />`
}
// ...
Now, the 404 status code will be returned correctly from the server, even on author pages for non-existent authors.
Great—we now have a fully functional React application that uses server-side rendering! But don't celebrate just yet, we still have some work to do...
Asynchronous data retrieval
Now, imagine for a second that we are asked to build the website for the Library of Trinity College in Dublin, one of the most famous libraries in the world. It has about 300 years of history and about 7 million books. Ok, now let's imagine we have to allow the users to browse this massive collection of books. Yes, all 7 million of them... a simple data file is not going to be a great idea here!
A better approach would be to have a dedicated API to retrieve the data about the books and use it to dynamically fetch only the minimum amount of data needed to render a given page. More data will be fetched as the user navigates through the various pages of the website.
This approach is valid for most web applications, so let's try to apply the same principle to our demo application. We will be using an API with two endpoints:
/api/authors, to get the list of authors/api/author/:authorId, to get the information for a given author
For the sake of this demo application, we will keep things very simple. We only want to demonstrate how our application is going to change as soon as we introduce asynchronous data fetching, so we are not going to bother with using a real database to back our API or with introducing more advanced features like pagination, filtering, or search.
Since building such an API server leveraging our existing data file is a rather trivial exercise (one that doesn't add much value in the context of this chapter), we are going to skip the walkthrough of the API implementation. You can get the source code of the API server from the code repository of this book (nodejsdp.link/authors-api-server).
This simple API server runs independently from our backend server, so it uses another port (or potentially even on another domain). In order to allow the browser to make asynchronous HTTP requests to a different port or domain, we need our API server to support cross-origin resource sharing or CORS (nodejsdp.link/cors), a mechanism that allows secure cross-origin requests. Thankfully, enabling CORS with Fastify is as easy as installing the fastify-cors (nodejsdp.link/fastify-cors) plugin.
We are also going to need an HTTP client that works seamlessly on both the browser and Node.js. A good option is superagent (nodejsdp.link/superagent).
Let's install the new dependencies then:
npm install --save fastify-cors superagent
Now we are ready to run our API server:
node -r esm src/api.js
And let's try some requests with curl, for instance:
curl -i http://localhost:3001/api/authors
curl -i http://localhost:3001/api/author/joyce
curl -i http://localhost:3001/api/author/invalid
If everything worked as expected, we are now ready to update our React components to use these new API endpoints rather than reading directly from the authors dataset. Let's start by updating the AuthorsIndex component:
import react from 'react'
import htm from 'htm'
import { Link } from 'react-router-dom'
import superagent from 'superagent'
import { Header } from '../Header.js'
const html = htm.bind(react.createElement)
export class AuthorsIndex extends react.Component {
  constructor (props) {
    super(props)
    this.state = {
      authors: [],
      loading: true
    }
  }
  async componentDidMount () {
    const { body } = await superagent.get('http://localhost:3001/api/authors')
    this.setState({ loading: false, authors: body })
  }
  render () {
    if (this.state.loading) {
      return html`<${Header}/><div>Loading ...</div>`
    }
    return html`<div>
      <${Header}/>
      <div>${this.state.authors.map((author) =>
        html`<div key=${author.id}>
          <p>
            <${Link} to="${`/author/${author.id}`}">
              ${author.name}
            </>
          </p>
        </div>`)}
      </div>
    </div>`
  }
}
The main changes from the previous version are highlighted in bold. Essentially, we converted our React component into a stateful component. At construction time, we initialized the state to an empty array of authors and we set the loading flag to true. Then, we used the componentDidMount lifecycle method to load the authors data using the new API endpoint. Finally, we updated the render() method to display a loading message while the data was being loaded asynchronously.
Now, we have to update our Author component:
import react from 'react'
import htm from 'htm'
import superagent from 'superagent'
import { FourOhFour } from './FourOhFour.js'
import { Header } from '../Header.js'
const html = htm.bind(react.createElement)
export class Author extends react.Component {
  constructor (props) {
    super(props)
    this.state = {
      author: null,
      loading: true
    }
  }
  async loadData () {
    let author = null
    this.setState({ loading: false, author })
    try {
      const { body } = await superagent.get(
        `http://localhost:3001/api/author/${
          this.props.match.params.authorId
        }`)
      author = body
    } catch (e) {}
    this.setState({ loading: false, author })
  }
  componentDidMount () {
    this.loadData()
  }
  componentDidUpdate (prevProps) {
    if (prevProps.match.params.authorId !==
      this.props.match.params.authorId) {
      this.loadData()
    }
  }
  render () {
    if (this.state.loading) {
      return html`<${Header}/><div>Loading ...</div>`
    }
    if (!this.state.author) {
      return html`<${FourOhFour}
        staticContext=${this.props.staticContext}
        error="Author not found"
      />`
    }
    return html`<div>
      <${Header}/>
      <h2>${this.state.author.name}</h2>
      <p>${this.state.author.bio}</p>
      <h3>Books</h3>
      <ul>
        ${this.state.author.books.map((book) =>
          html`<li key=${book.id}>
            ${book.title} (${book.year})
          </li>`
        )}
      </ul>
    </div>`
  }
}
The changes here are quite similar to the ones we applied to the previous component. In this component, we also generalized the data loading operation into the loadData() method. We did this because this component implements not just the componentDidMount() but also the componentDidUpdate() lifecycle method. This is necessary because if we end up passing new props to the same component instance, we want the component to update correctly. This will happen, for instance, if we have a link in the author page that points to another author page, something that could happen if we implement a "related authors" feature in our application.
At this point, we are ready to try this new version of the code. Let's regenerate the frontend bundle with npm run build and start both our backend server and our API server, then point our browser to http://localhost:3000/.
If you navigate around the various pages, everything should work as expected. You might also notice that page content gets loaded interactively as you navigate through the pages.
But what happens to our server-side rendering? If we try to use curl on our home page, we should see the following HTML markup being returned:
<!DOCTYPE html>
<html>
  <head>
    <meta charset="UTF-8">
    <title>My library</title>
  </head>
  <body>
    <div id="root"><div><header><h1><a href="/">My library</a></h1></header><div>Loading ...</div></div></div>
    <script type="text/javascript" src="/public/main.js"></script>
  </body>
</html>
Did you notice that there's no content anymore, but just a quite useless "Loading …" indicator? This is not good. Also, this is not the only problem here. If you try to use curl on an invalid author page, you will notice that you will get the same HTML markup with the loading indicator and no content and that the returned status code is 200 rather than 404!
We don't see any real content on the server-side rendered markup because the componentDidMount lifecycle method is executed only on the browser while it's ignored by React during server-side rendering.
Furthermore, server-side rendering is a synchronous operation, so even if we move our loading code somewhere else, we still won't be able to perform any asynchronous data loading while rendering on the server.
In the next section of this chapter, we will explore a pattern that can help us to achieve full universal rendering and data loading.
Universal data retrieval
Server-side rendering is a synchronous operation and this makes it tricky to preload all the necessary data effectively. Being able to avoid the problems we underlined at the end of the previous section is not as straightforward as you might expect.
The root of the problem is that we are keeping our routing logic within the React application, so, on the server, we cannot know which page we are actually going to render before we call renderToString(). This is why the server cannot establish whether we need to preload some data for a particular page.
Universal data retrieval is still quite a nebulous area in React, and different frameworks or libraries that facilitate React server-side rendering have come up with different solutions to this problem.
As of today, the two patterns that we believe are worth discussing are two-pass rendering and async pages. These two techniques have different ways of figuring out which data needs to be preloaded. In both cases, once the data is fully loaded on the server, the generated HTML page will provide an inline script block to inject all the data into the global scope (the window object) so that when the application runs on the browser, the same data already loaded on the server won't have to be reloaded from the client.
Two-pass rendering
The idea of two-pass rendering is to use the React router static context as a vector to exchange information between React and the server. Figure 10.4 shows us how this works:

Figure 10.4: Two-pass rendering schematic
The steps of two-pass rendering are as follows:
- The server calls
renderToString(), passing the URL received from the client and an empty static context object to the React application. - The React application will perform the routing process and select the components that need to be rendered for the given URL. Every component that requires to load some data asynchronously will need to implement some extra logic to allow such data to be preloaded on the server as well. This can be done by attaching a promise representing the result of the data loading operation to the router static context. This way, at the end of the rendering process, the server will receive an incomplete markup (representing the current loading state) and the static context will contain a number of promises representing data loading operations.
- At this point, the server can look at the static context and wait for all the promises to settle to make sure that all the data has been preloaded completely. During this process, the server builds a new static context that contains the results returned by the promises. This new static context is used for a second round of rendering. This is why this technique is called two-pass rendering.
- Now, the ball is again on the React side of the field. The routing process should pick the same components used during the first rendering pass, since the URL has not changed. This time, the components that need data preloading should see that such data is already available in the static context and they can render the view straight away. This step produces a complete static markup that the server can now use.
- At this point, the server has the complete markup and it uses it to render the final HTML page. The server can also include all the preloaded data in a
scripttag so that, on the browser, the data will be already available so there won't be any need to load it again while visiting the first page of the application.
This technique is very powerful and has some interesting advantages. For instance, it allows you to organize your React components tree in a very flexible way. You can have multiple components requesting asynchronous data, and they can be placed at any level of the components tree.
In more advanced use cases, you can also have data being loaded over multiple rendering passes. For instance, during the second pass, a new component in the tree might be rendered and this component might also need to load data asynchronously so it can just add new promises to the static context. To support this particular case, the server will have to continue the rendering loop until there are no more promises left in the static context. This particular variation of the two-pass rendering technique is referred to as multi-pass rendering.
The biggest disadvantage of this technique is that every call to renderToString() is not cheap and in real-life applications, this technique might force the server to go through multiple rendering passes, making the whole process very slow.
This might lead to severe performance degradation on the entire application, which can dramatically affect the user experience.
A simpler but potentially more performant alternative will be discussed in the next section.
Async pages
The technique we are going to describe here, which we are going to call "async pages," is based on a more constrained structure of the React application.
The idea is to structure the top layers of the application components tree in a very specific way. Let's have a look at a possible structure first, then it will be easier to discuss how this specific approach can help us with asynchronous data loading.

Figure 10.5: Async pages components tree structure
In Figure 10.5, we have represented the structure that allows us to apply the async pages technique. Let's discuss in detail the scope of every layer in the components tree:
- The root of the application is always a
Routercomponent (StaticRouteron the server andBrowserRouteron the client). - The application component is the only child of the
Routercomponent. - The only child of the application component is a
Switchcomponent from thereact-router-dompackage. - The
Switchcomponent has one or moreRoutecomponents as children. These are used to define all the possible routes and which component should be rendered for every route. - This is the most interesting layer as we actually introduce the concept of a "page component." The idea is that a page component is responsible for the look and feel of an entire page. A page component can have an arbitrary subtree of components used to render the current view; for instance, a header, a body, and a footer. We can have two types of page components: regular page components that behave as any other React components and
AsyncPagecomponents. Async pages are special stateful components that need to preload data for the page to be rendered both on the server- and the client side. They implement a special static method calledpreloadAsyncData()that contains the logic necessary to preload the data for the given page.
You can see that layers 1 to 4 are responsible for the routing logic, while level 5 is responsible for data loading and for actually rendering the current page. There are no other nested layers for additional routing and data loading.
Technically, there could be additional layers for routing and data loading after level 5, but those won't be universally available as they will be resolved only on the client side after the page has been rendered.
Now that we've discussed this more rigid structure, let's see how it can be useful to avoid multiple rendering passes and achieve universal data retrieval.
Here's the idea: if we have our routes defined in a dedicated file as an array of paths and components, we can easily reuse this file on the server side and determine, before the React rendering phase, which page component we will actually end up rendering.
Then, we can see if this page component is an AsyncPage. If it is, it means we have to preload some data on the server side before the rendering. We can do this by calling the preloadAsyncData() method from the given component.
Once the data has been preloaded, this can be added in the static context and we can render the entire application. During the rendering phase, the AsyncPage component will see that its data is already preloaded and available in the static context and it will be able to render straight away, skipping the loading state.
Once the rendering is finished, the server can add the same preloaded data in a script tag so that, on the browser side, the user won't have to wait for the data to be loaded again.
The Next.js framework (nodejsdp.link/nextjs) is a popular framework for Universal JavaScript applications and adopts a similar technique to the one described here, so it is a good example of this pattern in the wild.
Implementing async pages
Now that we know how to solve our data fetching problems, let's implement the async pages technique in our application.
Our components tree is already structured in a way that it's compliant to what's expected by this technique. Our pages are the AuthorsIndex component, the Author component, and the FourOhFour component. The first two require universal data loading, so we will have to convert them into async pages.
Let's start to update our application by extrapolating the route definitions into a dedicated file, src/frontend/routes.js:
import { AuthorsIndex } from './components/pages/AuthorsIndex.js'
import { Author } from './components/pages/Author.js'
import { FourOhFour } from './components/pages/FourOhFour.js'
export const routes = [
  {
    path: '/',
    exact: true,
    component: AuthorsIndex
  },
  {
    path: '/author/:authorId',
    component: Author
  },
  {
    path: '*',
    component: FourOhFour
  }
]
We want this configuration file to be the source of truth for the router configuration across the various parts of the application, so let's refactor the frontend App component to use this file as well:
// src/frontend/App.js
import react from 'react'
import htm from 'htm'
import { Switch, Route } from 'react-router-dom'
import { routes } from './routes.js'
const html = htm.bind(react.createElement)
export class App extends react.Component {
  render () {
    return html`<${Switch}>
      ${routes.map(routeConfig =>
        html`<${Route}
          key=${routeConfig.path}
          ...${routeConfig}
        />`
      )}
    </>`
  }
}
As you can see, the only change here is that, rather than defining the various Route components inline, we build them dynamically starting from the routes configuration array. Any change in the routes.js file will be automatically reflected in the application as well.
At this point, we can update the server-side logic in src/server.js.
The first thing that we want to do is import a utility function from the react-router-dom package that allows us to see if a given URL matches a given React router path definition. We also need to import the routes array from the new routes.js module.
// ...
import { StaticRouter, matchPath } from 'react-router-dom'
import { routes } from './frontend/routes.js'
// ...
Now, let's update our server-side HTML template generation function to be able to embed preloaded data in our page:
// ...
const template = ({ content, serverData }) => `<!DOCTYPE html>
<html>
  <head>
    <meta charset="UTF-8">
    <title>My library</title>
  </head>
  <body>
    <div id="root">${content}</div>
    ${serverData ? `<script type="text/javascript">
window.__STATIC_CONTEXT__=${JSON.stringify(serverData)}
    </script>` : ''}
    <script type="text/javascript" src="/public/main.js"></script>
  </body>
</html>`
// ...
As you can see, our template now accepts a new argument called serverData. If this argument is passed to the template function, it will render a script tag that will inject this data into a global variable called window.__STATIC_CONTEXT__.
Now, let's get into the meaty bit; let's rewrite the server-side rendering logic:
// ...
server.get('*', async (req, reply) => {
  const location = req.raw.originalUrl
  let component                                            // (1)
  let match
  for (const route of routes) {
    component = route.component
    match = matchPath(location, route)
    if (match) {
      break
    }
  }
  let staticData                                           // (2)
  let staticError
  let hasStaticContext = false
  if (typeof component.preloadAsyncData === 'function') {
    hasStaticContext = true
    try {
      const data = await component.preloadAsyncData({ match })
      staticData = data
    } catch (err) {
      staticError = err
    }
  }
  const staticContext = {
    [location]: {
      data: staticData,
      err: staticError
    }
  }
                                                           // (3)
  const serverApp = html`
    <${StaticRouter}
      location=${location}
      context=${staticContext}
    >
      <${App}/>
    </>
  `
  const content = reactServer.renderToString(serverApp)
  const serverData = hasStaticContext ? staticContext : null
  const responseHtml = template({ content, serverData })
  const code = staticContext.statusCode
    ? staticContext.statusCode
    : 200
  reply.code(code).type('text/html').send(responseHtml)
// ...
There are quite some changes here. Let's discuss the main blocks one by one:
- The first change aims to detect which page will be rendered for the current URL. We loop through the defined
routesand we use thematchPathutility to verify iflocationmatches the currentroutedefinition. If it does, we stop the loop and record which component will be rendered in thecomponentvariable. We can be sure a component will be matched here because our last route (the404page) will always match. Thematchvariable will contain information about the match. For instance, if the route contains some parameters,matchwill contain the path fragment that matched every parameter. For instance, for the URL/author/joyce,matchwill have the propertyparamsequal to{ authorId: 'joyce' }. This is the same prop that a page component will receive from the router when rendered. - In the second block of changes, we check if the selected component is an
AsyncPage. We do that by checking if the component has a static method calledpreloadAsyncData. If that's the case, we invoke that function by passing an object that contains thematchobject as an argument (this way, we propagate any parameter that might be needed to fetch the data, such asauthorId). This function should return a promise. If the promise resolves, we have successfully preloaded the data for this component. If it rejects, we make sure to record the error. Finally, we create thestaticContextobject. This object maps the preloaded data (or the rejection error) to the current location. The reason why we keep the location as a key is to be sure that if, for any reason, the browser renders another page from the one we preloaded (because of a programmatic error or because of a user action, like hitting the back button on the browser before the page is fully loaded), we won't end up using preloaded data that is not relevant to the current page on the browser. - In the last block of changes, we invoke the
renderToString()function to get the rendered HTML of the application. Note that since we are passing a static context containing the preloaded data, we expect that the application will be able to completely render the page without returning a loading state view. This does not happen magically, of course. We will need to add some logic to our React component to check if the necessary data is already available in the static context. Once we have the generated HTML, we use ourtemplate()function to generate the complete page markup and we return it to the browser. We also make sure to respect the status code. For instance, if we ended up rendering theFourOhFourcomponent, we will have thestatusCodeproperty in the static context changed, so if that's the case, we use that value for the final status code; otherwise, we default to200.
That's it for our server-side rendering.
Now, it's time to create the async page abstraction in our React application. Since we are going to have two distinct async pages, a good way to reuse some code is to create a base class and to use the Template pattern that we already discussed in Chapter 9, Behavioral Design Patterns. Let's define this class in src/frontend/components/pages/AsyncPage.js:
import react from 'react'
export class AsyncPage extends react.Component {
  static async preloadAsyncData (props) {                   // (1)
    throw new Error('Must be implemented by sub class')
  }
  render () {
    throw new Error('Must be implemented by sub class')
  }
  constructor (props) {                                     // (2)
    super(props)
    const location = props.match.url
    this.hasData = false
    let staticData
    let staticError
    const staticContext = typeof window !== 'undefined'
      ? window.__STATIC_CONTEXT__ // client-side
      : this.props.staticContext  // server-side
    if (staticContext && staticContext[location]) {
      const { data, err } = staticContext[location]
      staticData = data
      staticError = err
      this.hasStaticData = true
      typeof window !== 'undefined' &&
        delete staticContext[location]
    }
    this.state = {
      ...staticData,
      staticError,
      loading: !this.hasStaticData
    }
  }
  async componentDidMount () {                              // (3)
    if (!this.hasStaticData) {
      let staticData
      let staticError
      try {
        const data = await this.constructor.preloadAsyncData(
          this.props
        )
        staticData = data
      } catch (err) {
        staticError = err
      }
      this.setState({
        ...staticData,
        loading: false,
        staticError
      })
    }
  }
}
This class provides helper code for building a stateful component that can handle three possible scenarios:
- We are rendering on the server and we already have the data preloaded (no need to load the data).
- We are rendering on the client and the data is already available in the page through the
__STATIC_CONTEXT__variable (no need to load the data). - We are rendering on the client and the data is not available (for instance, if this page was not rendered by the server, but a page the user navigated to after the first load). In this case, the data has to be dynamically loaded from the client when the component is mounted.
Let's review the main points of this implementation together:
- This component class should not be instantiated directly but only extended when implementing async pages. When this class is extended, the async page component will need to implement the methods
static async preloadAsyncData(props)andrender(). - In the constructor, we have to initialize the component state. There are two possible outcomes here: the data is already available (so we can set it in the state) or the data is not available (so we need to set the state to "loading" and let the component load the data once it's mounted on the page). If we are on the browser and we load the data from the static context, we also make sure to delete this data from the context. This will allow the user to see fresh data if they happen to go back to this page during the navigation.
- The method
componentDidMount()is executed by React only on the browser. Here, we handle the case where the data was not preloaded and we have to dynamically load it at runtime.
Now that we have this useful abstraction in place, we can rewrite our AuthorsIndex and Author components and convert them into async pages. Let's start with AuthorsIndex:
import react from 'react'
import htm from 'htm'
import { Link } from 'react-router-dom'
import superagent from 'superagent'
import { AsyncPage } from './AsyncPage.js'
import { Header } from '../Header.js'
const html = htm.bind(react.createElement)
export class AuthorsIndex extends AsyncPage {
  static async preloadAsyncData (props) {
    const { body } = await superagent.get(
      'http://localhost:3001/api/authors'
    )
    return { authors: body }
  }
  render () {
    // unchanged...
  }
}
As you can see here, our AuthorsIndex component now extends AsyncPage. Since the AsyncPage template will take care of all the state management in its constructor, we don't need a constructor here anymore; we just need to specify the business logic to load the data in the preloadAsyncData() method.
If you compare this implementation with the previous one, you might notice that the logic of this method is almost the same as what we had previously in componentDidMount(). The method componentDidMount() has been removed from here because the one we inherit from AsyncPage will suffice. The only difference between the previous version of componentDidMount() and preloadAsyncData() is that in preloadAsyncData(), we don't set the internal state directly; we just need to return the data. The underlying code in AsyncPage will update the state as needed for us.
Let's now rewrite the Author component:
import react from 'react'
import htm from 'htm'
import superagent from 'superagent'
import { AsyncPage } from './AsyncPage.js'
import { FourOhFour } from './FourOhFour.js'
import { Header } from '../Header.js'
const html = htm.bind(react.createElement)
export class Author extends AsyncPage {
  static async preloadAsyncData (props) {
    const { body } = await superagent.get(
      `http://localhost:3001/api/author/${
         props.match.params.authorId
      }`
    )
    return { author: body }
  }
  render () {
    // unchanged...
  }
}
The changes here are perfectly in line with the changes we made for the AuthorsIndex component. We are only moving the data loading logic into preloadAsyncData() and letting the underlying abstraction manage the state transition for us.
Now, we can apply just a last small optimization in our src/frontend/index.js file. We can swap the reactDOM.render() function call with reactDOM.hydrate(). Since we will produce exactly the same markup from both the server side and the client side, this will make React a bit faster to initialize during the first browser load.
We are finally ready to try all these changes. Make sure to rebuild the frontend bundle and relaunch the server. Have a look at the application and the code that is generated by the server; it should contain all the preloaded data for every page. Also, 404 errors should be reported correctly for every 404 page, including the ones for missing authors.
Great! We finally managed to build an application that efficiently shares code, logic, and data between the client and the server: a true Universal JavaScript application!
Summary
In this chapter, we explored the innovative and fast-moving world of Universal JavaScript. Universal JavaScript opens up a lot of new opportunities in the field of web development and it can help you build single-page applications that load fast, are accessible, and are optimized for search engines.
In this chapter, we focused on introducing all the basics of this subject. We started from exploring module bundlers, why we need them, and how they work. We learned how to use webpack, and then we introduced React and discussed some of its functionality. We learned how to build component-oriented user interfaces and then started to build an application from scratch to explore universal rendering, universal routing, and universal data retrieval.
Even though we discussed a lot of topics, we barely scratched the surface of this wide topic, but you should have gained all the necessary knowledge to keep exploring this world on your own if you are interested in knowing more. Given that this field is still evolving quite rapidly, tools and libraries will probably change a lot in the next few years, but all the basic concepts should stay there, so don't be afraid to keep exploring and experimenting. Becoming an expert on this topic is now just a matter of using the acquired knowledge to build a first real-world app with real, business-driven use cases.
It's also worth underlining that the knowledge acquired here might be useful for projects that cross the boundaries of web development, like mobile app development. If you are interested in this topic, React Native might be a good starting point.
In the next chapter, we are going to take a problem-solution approach to explore some more advanced topics. Are you ready?
Exercises
- 10.1 A matter of style: Our little library application looks very barebone. It could look a lot better with some style and images. Why don't you try to improve the look of the app? If you get stuck or need some inspiration, you can check our version of this exercise on GitHub (nodejsdp.link/univ).
- 10.2 Proper data management: As we said, keeping a lot of data in a file is not a great idea. Why don't you try to move all the data into a real database backend of your choice? At this point, you might also want to take this application to the next level and write some script to import data from a big collection of books like the Open Library archive (nodejsdp.link/open-libary-api).
- 10.3 Pagination and search: Now that you have a more significant database, it's probably time to add some important features like search and pagination.
- 10.4 A Universal… Blog!: Build a new universal JavaScript app from scratch that implements a blog. Then, try the same exercise using a framework like Next.js (nodejsdp.link/nextjs) or Gatsby (nodejsdp.link/gatsby).