
4
Asynchronous Control Flow Patterns with Callbacks
Moving from a synchronous programming style to a platform such as Node.js, where continuation-passing style (CPS) and asynchronous APIs are the norm, can be frustrating. Asynchronous code can make it hard to predict the order in which statements are executed. Simple problems such as iterating over a set of files, executing tasks in sequence, or waiting for a set of operations to complete require the developer to take on new approaches and techniques just to avoid ending up writing inefficient and unreadable code. When using callbacks to deal with asynchronous control flow, the most common mistake is to fall into the trap of callback hell and see the code growing horizontally, rather than vertically, with a nesting that makes even simple routines hard to read and maintain.
In this chapter, you will see how it's actually possible to tame callbacks and write clean, manageable asynchronous code by using some discipline and with the aid of some patterns. Knowing how to properly deal with callbacks will pave the way for adopting modern approaches such as promises and async/await.
In short, in this chapter, you will learn about:
- The challenges of asynchronous programming.
- Avoiding callback hell and other callback best practices.
- Common asynchronous patterns such as sequential execution, sequential iteration, parallel execution, and limited parallel execution.
The difficulties of asynchronous programming
Losing control of asynchronous code in JavaScript is undoubtedly easy. Closures and in-place definitions of anonymous functions allow for a smooth programming experience that doesn't require the developer to jump to other points in the codebase. This is perfectly in line with the KISS principle (Keep It Simple, Stupid); it's simple, it keeps the code flowing, and we get it working in less time. Unfortunately, sacrificing qualities such as modularity, reusability, and maintainability will, sooner or later, lead to the uncontrolled proliferation of callback nesting, functions growing in size, and poor code organization. Most of the time, creating callbacks as in-place functions is not strictly required, so it's more a matter of discipline than a problem related to asynchronous programming. Recognizing that our code is becoming unwieldy or, even better, knowing in advance that it might become unwieldy and then acting accordingly with the most adequate solution, is what differentiates a novice from an expert.
Creating a simple web spider
To explain this problem, we will create a little web spider, a command-line application that takes in a web URL as input and downloads its contents locally into a file. In the code presented in this chapter, we are going to use a couple of npm dependencies:
superagent: A library to streamline HTTP calls (nodejsdp.link/superagent)mkdirp: A small utility to create directories recursively (nodejsdp.link/mkdirp)
Also, we will often refer to a local module named ./utils.js, which contains some helpers that we will be using in our application. We will omit the contents of this file for brevity, but you can find the full implementation, along with a package.json file containing the full list of dependencies, in the official repository at nodejsdp.link/repo.
The core functionality of our application is contained inside a module named spider.js. Let's see how it looks. To start with, let's load all the dependencies that we are going to use:
import fs from 'fs'
import path from 'path'
import superagent from 'superagent'
import mkdirp from 'mkdirp'
import { urlToFilename } from './utils.js'
Next, let's create a new function named spider(), which takes in the URL to download and a callback function that will be invoked when the download process completes:
export function spider (url, cb) {
  const filename = urlToFilename(url)
  fs.access(filename, err => {                                // (1)
    if (err && err.code === 'ENOENT') {
      console.log(`Downloading ${url} into ${filename}`)
      superagent.get(url).end((err, res) => {                 // (2)
        if (err) {
          cb(err)
        } else {
          mkdirp(path.dirname(filename), err => {             // (3)
            if (err) {
              cb(err)
            } else {
              fs.writeFile(filename, res.text, err => {       // (4)
                if (err) {
                  cb(err)
                } else {
                  cb(null, filename, true)
                }
              })
            }
          })
        }
      })
    } else {
      cb(null, filename, false)
    }
  })
}
There is a lot going on here, so let's discuss in more detail what happens in every step:
- The code checks whether the URL was already downloaded by verifying that the corresponding file was not already created. If
erris defined and has typeENOENT, then the file does not exist and it's safe to create it:fs.access(filename, err => ... - If the file is not found, the URL is downloaded using the following line of code:
superagent.get(url).end((err, res) => ... - Then, we make sure that the directory that will contain the file exists:
mkdirp(path.dirname(filename), err => ... - Finally, we write the body of the HTTP response to the filesystem:
fs.writeFile(filename, res.text, err => ...
To complete our web spider application, we just need to invoke the spider() function by providing a URL as an input (in our case, we read it from the command-line arguments). The spider() function is exported from the file we defined previously. Let's now create a new file called spider-cli.js that can be directly invoked from the command line:
import { spider } from './spider.js'
spider(process.argv[2], (err, filename, downloaded) => {
  if (err) {
    console.error(err)
  } else if (downloaded) {
    console.log(`Completed the download of "${filename}"`)
  } else {
    console.log(`"${filename}" was already downloaded`)
  }
})
Now, we are ready to try our web spider application, but first, make sure you have the utils.js module and the package.json file containing the full list of dependencies in your project directory. Then, install all the dependencies by running the following command:
npm install
Now, let's execute the spider-cli.js module to download the contents of a web page with a command like this:
node spider-cli.js http://www.example.com
Our web spider application requires that we always include the protocol (for example, http://) in the URL we provide. Also, do not expect HTML links to be rewritten or resources such as images to be downloaded, as this is just a simple example to demonstrate how asynchronous programming works.
In the next section, you will learn how to improve the readability of this code and, in general, how to keep callback-based code as clean and readable as possible.
Callback hell
Looking at the spider() function we defined earlier, you will likely notice that even though the algorithm we implemented is really straightforward, the resulting code has several levels of indentation and is very hard to read. Implementing a similar function with a direct style blocking API would be straightforward, and most likely, the code would be much more readable. However, using asynchronous CPS is another story, and making bad use of in-place callback definitions can lead to incredibly bad code.
The situation where the abundance of closures and in-place callback definitions transforms the code into an unreadable and unmanageable blob is known as callback hell. It's one of the most widely recognized and severe anti-patterns in Node.js and JavaScript in general. The typical structure of code affected by this problem looks as follows:
asyncFoo(err => {
  asyncBar(err => {
    asyncFooBar(err => {
      //...
    })
  })
})
You can see how code written in this way assumes the shape of a pyramid due to deep nesting, and that's why it is also colloquially known as the pyramid of doom.
The most evident problem with code such as the preceding snippet is its poor readability. Due to the nesting being so deep, it's almost impossible to keep track of where a function ends and where another one begins.
Another issue is caused by the overlapping of the variable names used in each scope. Often, we have to use similar or even identical names to describe the content of a variable. The best example is the error argument received by each callback. Some people often try to use variations of the same name to differentiate the object in each scope, for example, err, error, err1, err2, and so on. Others prefer to just shadow the variable defined in the upper scope by always using the same name, for example, err. Both alternatives are far from perfect, and cause confusion and increase the probability of introducing defects.
Also, we have to keep in mind that closures come at a small price in terms of performance and memory consumption. In addition, they can create memory leaks that are not very easy to identify. In fact, we shouldn't forget that any context referenced by an active closure is retained from garbage collection.
For a great introduction to how closures work in V8, you can refer to the following blog post by Vyacheslav Egorov, a software engineer at Google working on V8, which you can read at nodejsdp.link/v8-closures.
If you look at our spider() function, you will notice that it clearly represents a callback hell situation and has all the problems just described. That's exactly what we are going to fix with the patterns and techniques that are covered in the following sections of this chapter.
Callback best practices and control flow patterns
Now that you have met your first example of callback hell, you know what you should definitely avoid; however, that's not the only concern when writing asynchronous code. In fact, there are several situations where controlling the flow of a set of asynchronous tasks requires the use of specific patterns and techniques, especially if we are only using plain JavaScript without the aid of any external library. For example, iterating over a collection by applying an asynchronous operation in sequence is not as easy as invoking forEach() over an array; it actually requires a technique similar to recursion.
In this section, you will learn not only about how to avoid callback hell, but also how to implement some of the most common control flow patterns, using only simple and plain JavaScript.
Callback discipline
When writing asynchronous code, the first rule to keep in mind is to not abuse in-place function definitions when defining callbacks. It can be tempting to do so, because it does not require any additional thinking for problems such as modularization and reusability; however, you have seen how this can have more disadvantages than advantages. Most of the time, fixing the callback hell problem does not require any libraries, fancy techniques, or changes of paradigm; you just need some common sense.
These are some basic principles that can help us keep the nesting level low and improve the organization of our code in general:
- Exit as soon as possible. Use
return,continue, orbreak, depending on the context, to immediately exit the current statement instead of writing (and nesting) completeif...elsestatements. This will help to keep our code shallow. - Create named functions for callbacks, keeping them out of closures and passing intermediate results as arguments. Naming our functions will also make them look better in stack traces.
- Modularize the code. Split the code into smaller, reusable functions whenever possible.
Now, let's put these principles into practice.
Applying the callback discipline
To demonstrate the power of the ideas mentioned in the previous section, let's apply them to fix the callback hell in our web spider application.
For the first step, we can refactor our error-checking pattern by removing the else statement. This is made possible by returning from the function immediately after we receive an error. So, instead of having code such as the following:
if (err) {
  cb(err)
} else {
  // code to execute when there are no errors
}
We can improve the organization of our code by writing the following instead:
if (err) {
  return cb(err)
}
// code to execute when there are no errors
This is often referred to as the early return principle. With this simple trick, we immediately have a reduction in the nesting level of our functions. It is easy and doesn't require any complex refactoring.
A common mistake when executing the optimization just described is forgetting to terminate the function after the callback is invoked. For an error-handling scenario, the following code is a typical source of defects:
if (err) {
  callback(err)
}
// code to execute when there are no errors.
We should never forget that the execution of our function will continue even after we invoke the callback. It is then important to insert a return instruction to block the execution of the rest of the function. Also, note that it doesn't really matter what value is returned by the function; the real result (or error) is produced asynchronously and passed to the callback. The return value of the asynchronous function is usually ignored. This property allows us to write shortcuts such as the following:
return callback(...)
Otherwise, we'd have to write slightly more verbose code, such as the following:
callback(...)
return
As a second optimization for our spider() function, we can try to identify reusable pieces of code. For example, the functionality that writes a given string to a file can be easily factored out into a separate function, as follows:
function saveFile (filename, contents, cb) {
  mkdirp(path.dirname(filename), err => {
    if (err) {
      return cb(err)
    }
    fs.writeFile(filename, contents, cb)
  })
}
Following the same principle, we can create a generic function named download() that takes a URL and a filename as input, and downloads the URL into the given file. Internally, we can use the saveFile() function we created earlier:
function download (url, filename, cb) {
  console.log(`Downloading ${url}`)
  superagent.get(url).end((err, res) => {
    if (err) {
      return cb(err)
    }
    saveFile(filename, res.text, err => {
      if (err) {
        return cb(err)
      }
      console.log(`Downloaded and saved: ${url}`)
      cb(null, res.text)
    })
  })
}
For the last step, we modify the spider() function, which, thanks to our changes, will now look like the following:
export function spider (url, cb) {
  const filename = urlToFilename(url)
  fs.access(filename, err => {
    if (!err || err.code !== 'ENOENT') {   // (1)
      return cb(null, filename, false)
    }
    download(url, filename, err => {
      if (err) {
        return cb(err)
      }
      cb(null, filename, true)
    })
  })
}
The functionality and the interface of the spider() function remained exactly the same; what changed was the way the code was organized. One important detail to notice (1) is that we inverted the check for the file's existence so that we could apply the early return principle discussed previously.
By applying the early return principle and the other callback discipline principles, we were able to drastically reduce the nesting of our code and, at the same time, increase its reusability and testability. In fact, we could think about exporting both saveFile() and download() so that we could reuse them in other modules. This would also allow us to test their functionality as independent units.
The refactoring we carried out in this section clearly demonstrates that most of the time, all we need is some discipline to make sure we do not abuse closures and anonymous functions. It works brilliantly, requires minimal effort, and it doesn't require external libraries.
Now that you know how to write clean asynchronous code using callbacks, we are ready to explore some of the most common asynchronous patterns, such as sequential and parallel execution.
Sequential execution
In this section, we will look at asynchronous control flow patterns and start by analyzing the sequential execution flow.
Executing a set of tasks in sequence means running them one at a time, one after the other. The order of execution matters and must be preserved, because the result of a task in the list may affect the execution of the next. Figure 4.1 illustrates this concept:

Figure 4.1: An example of sequential execution flow with three tasks
There are different variations of this flow:
- Executing a set of known tasks in sequence, without propagating data across them.
- Using the output of a task as the input for the next (also known as chain, pipeline, or waterfall).
- Iterating over a collection while running an asynchronous task on each element, one after the other.
Sequential execution, despite being trivial when implemented using a direct style blocking API, is usually the main cause of the callback hell problem when using asynchronous CPS.
Executing a known set of tasks in sequence
We already looked at a sequential execution flow while implementing the spider() function in the previous section. By applying some simple rules, we were able to organize a set of known tasks in a sequential execution flow. Taking that code as a guideline, we can now generalize the solution with the following pattern:
function task1 (cb) {
  asyncOperation(() => {
    task2(cb)
  })
}
function task2 (cb) {
  asyncOperation(() => {
    task3(cb)
  })
}
function task3 (cb) {
  asyncOperation(() => {
    cb() // finally executes the callback
  })
}
task1(() => {
  // executed when task1, task2 and task3 are completed
  console.log('tasks 1, 2 and 3 executed')
})
The preceding pattern shows how each task invokes the next upon completion of a generic asynchronous operation. The pattern puts the emphasis on the modularization of tasks, showing how closures are not always necessary to handle asynchronous code.
Sequential iteration
The pattern described in the previous section works perfectly if we know in advance what and how many tasks are to be executed. This allows us to hardcode the invocation of the next task in the sequence, but what happens if we want to execute an asynchronous operation for each item in a collection? In cases such as this, we can't hardcode the task sequence anymore; instead, we have to build it dynamically.
Web spider version 2
To show an example of sequential iteration, let's introduce a new feature to the web spider application. We now want to download all the links contained in a web page recursively. To do that, we are going to extract all the links from the page and then trigger our web spider on each recursively and in sequence.
The first step is modifying our spider() function so that it triggers a recursive download of all the links of a page by using a function named spiderLinks(), which we are going to create shortly.
Also, instead of checking whether the file already exists, we will try to read it and start spidering its links. This way, we will be able to resume interrupted downloads. As a final change, we need to make sure we propagate a new parameter, nesting, which will help us to limit the recursion depth. The code is as follows:
export function spider (url, nesting, cb) {
  const filename = urlToFilename(url)
  fs.readFile(filename, 'utf8', (err, fileContent) => {
    if (err) {
      if (err.code !== 'ENOENT') {
        return cb(err)
      }
      // The file doesn't exist, so let's download it
      return download(url, filename, (err, requestContent) => {
        if (err) {
          return cb(err)
        }
        spiderLinks(url, requestContent, nesting, cb)
      })
    }
    // The file already exists, let's process the links
    spiderLinks(url, fileContent, nesting, cb)
  })
}
In the next section, we will explore how the spiderLinks() function can be implemented.
Sequential crawling of links
Now, we can create the core of this new version of our web spider application, the spiderLinks() function, which downloads all the links of an HTML page using a sequential asynchronous iteration algorithm. Pay attention to the way we are going to define that in the following code block:
function spiderLinks (currentUrl, body, nesting, cb) {
  if (nesting === 0) {
    // Remember Zalgo from chapter 3?
    return process.nextTick(cb)
  }
  const links = getPageLinks(currentUrl, body)            // (1)
  if (links.length === 0) {
    return process.nextTick(cb)
  }
  function iterate (index) {                              // (2)
    if (index === links.length) {
      return cb()
    }
    spider(links[index], nesting - 1, function (err) {    // (3)
      if (err) {
        return cb(err)
      }
      iterate(index + 1)
    })
  }
  iterate(0)                                              // (4)
}
The important steps to understand from this new function are as follows:
- We obtain the list of all the links contained in the page using the
getPageLinks()function. This function returns only the links pointing to an internal destination (the same hostname). - We iterate over the links using a local function called
iterate(), which takes theindexof the next link to analyze. In this function, the first thing we do is check whether theindexis equal to the length of thelinksarray, in which case we immediately invoke thecb()function, as it means we have processed all the items. - At this point, everything should be ready for processing the link. We invoke the
spider()function by decreasing the nesting level and invoking the next step of the iteration when the operation completes. - As the last step in the
spiderLinks()function, we bootstrap the iteration by invokingiterate(0).
The algorithm that was just presented allows us to iterate over an array by executing an asynchronous operation in sequence, which in our case is the spider() function.
Finally, we can change our spider-cli.js a bit so that we can specify the nesting level as an additional command-line interface (CLI) argument:
import { spider } from './spider.js'
const url = process.argv[2]
const nesting = Number.parseInt(process.argv[3], 10) || 1
spider(url, nesting, err => {
  if (err) {
    console.error(err)
    process.exit(1)
  }
  console.log('Download complete')
})
We can now try this new version of the spider application and watch it download all the links of a web page recursively, one after the other. To interrupt the process, which can take a while if there are many links, remember that we can always use Ctrl + C. If we then decide to resume it, we can do so by launching the spider application and providing the same URL we used for the first run.
Now that our web spider application can potentially trigger the download of an entire website, please consider using it carefully. For example, do not set a high nesting level or leave the spider running for more than a few seconds. It is not polite to overload a server with thousands of requests. In some circumstances, this can also be considered illegal. Spider responsibly!
The pattern
The code of the spiderLinks() function from the previous section is a clear example of how it's possible to iterate over a collection while applying an asynchronous operation. You may also notice that it's a pattern that can be adapted to any other situation where we need to iterate asynchronously over the elements of a collection or, in general, over a list of tasks. This pattern can be generalized as follows:
function iterate (index) {
  if (index === tasks.length) {
    return finish()
  }
  const task = tasks[index]
  task(() => iterate(index + 1))
}
function finish () {
  // iteration completed
}
iterate(0)
It's important to notice that these types of algorithms become really recursive if task() is a synchronous operation. In such a case, the stack will not unwind at every cycle and there might be a risk of hitting the maximum call stack size limit.
The pattern that was just presented is very powerful and can be extended or adapted to address several common needs. Just to mention some examples:
- We can map the values of an array asynchronously.
- We can pass the results of an operation to the next one in the iteration to implement an asynchronous version of the
reducealgorithm. - We can quit the loop prematurely if a particular condition is met (asynchronous implementation of the
Array.some()helper). - We can even iterate over an infinite number of elements.
We could also choose to generalize the solution even further by wrapping it in a function with a signature such as the following:
iterateSeries(collection, iteratorCallback, finalCallback)
Here, collection is the actual dataset you want to iterate over, iteratorCallback is the function to execute over every item, and finalCallback is the function that gets executed when all the items are processed or in case of an error. The implementation of this helper function is left to you as an exercise.
The Sequential Iterator pattern
Execute a list of tasks in sequence by creating a function named iterator, which invokes the next available task in the collection and makes sure to invoke the next step of the iteration when the current task completes.
In the next section, we will explore the parallel execution pattern, which is more convenient when the order of the various tasks is not important.
Parallel execution
There are some situations where the order of execution of a set of asynchronous tasks is not important, and all we want is to be notified when all those running tasks are completed. Such situations are better handled using a parallel execution flow, as shown in Figure 4.2:

Figure 4.2: An example of parallel execution with three tasks
This may sound strange if you consider that Node.js is single-threaded, but if you remember what we discussed in Chapter 1, The Node.js Platform, you'll realize that even though we have just one thread, we can still achieve concurrency, thanks to the non-blocking nature of Node.js. In fact, the word parallel is used improperly in this case, as it does not mean that the tasks run simultaneously, but rather that their execution is carried out by an underlying, non-blocking API and interleaved by the event loop.
As you know, a task gives control back to the event loop when it requests a new asynchronous operation, allowing the event loop to execute another task. The proper word to use for this kind of flow is concurrency, but we will still use parallel for simplicity.
The following diagram shows how two asynchronous tasks can run in parallel in a Node.js program:

Figure 4.3: An example of how asynchronous tasks run in parallel
In Figure 4.3, we have a Main function that executes two asynchronous tasks:
- The Main function triggers the execution of Task 1 and Task 2. As they trigger an asynchronous operation, they immediately return control back to the Main function, which then returns it to the event loop.
- When the asynchronous operation of Task 1 is completed, the event loop gives control to it. When Task 1 completes its internal synchronous processing as well, it notifies the Main function.
- When the asynchronous operation triggered by Task 2 is complete, the event loop invokes its callback, giving control back to Task 2. At the end of Task 2, the Main function is notified once more. At this point, the Main function knows that both Task 1 and Task 2 are complete, so it can continue its execution or return the results of the operations to another callback.
In short, this means that in Node.js, we can only execute asynchronous operations in parallel, because their concurrency is handled internally by the non-blocking APIs. In Node.js, synchronous (blocking) operations can't run concurrently unless their execution is interleaved with an asynchronous operation, or interleaved with setTimeout() or setImmediate(). You will see this in more detail in Chapter 11, Advanced Recipes.
Web spider version 3
Our web spider application seems like a perfect candidate to apply the concept of parallel execution. So far, our application is executing the recursive download of the linked pages in a sequential fashion. We can easily improve the performance of this process by downloading all the linked pages in parallel.
To do that, we just need to modify the spiderLinks() function to make sure we spawn all the spider() tasks at once, and then invoke the final callback only when all of them have completed their execution. So, let's modify our spiderLinks() function as follows:
function spiderLinks (currentUrl, body, nesting, cb) {
  if (nesting === 0) {
    return process.nextTick(cb)
  }
  const links = getPageLinks(currentUrl, body)
  if (links.length === 0) {
    return process.nextTick(cb)
  }
  let completed = 0
  let hasErrors = false
  function done (err) {
    if (err) {
      hasErrors = true
      return cb(err)
    }
    if (++completed === links.length && !hasErrors) {
      return cb()
    }
  }
  links.forEach(link => spider(link, nesting - 1, done))
}
Let's discuss what we changed. As mentioned earlier, the spider() tasks are now started all at once. This is possible by simply iterating over the links array and starting each task without waiting for the previous one to finish:
links.forEach(link => spider(link, nesting - 1, done))
Then, the trick to make our application wait for all the tasks to complete is to provide the spider() function with a special callback, which we call done(). The done() function increases a counter when a spider task completes. When the number of completed downloads reaches the size of the links array, the final callback is invoked:
function done (err) {
  if (err) {
    hasErrors = true
    return cb(err)
  }
  if (++completed === links.length && !hasErrors) {
    return cb()
  }
}
The hasErrors variable is necessary because if one parallel task fails, we want to immediately call the callback with the given error. Also, we need to make sure that other parallel tasks that might still be running won't invoke the callback again.
With these changes in place, if we now try to run our spider against a web page, we will notice a huge improvement in the speed of the overall process, as every download will be carried out in parallel, without waiting for the previous link to be processed.
The pattern
Finally, we can extract our nice little pattern for the parallel execution flow. Let's represent a generic version of the pattern with the following code:
const tasks = [ /* ... */ ]
let completed = 0
tasks.forEach(task => {
  task(() => {
    if (++completed === tasks.length) {
      finish()
    }
  })
})
function finish () {
  // all the tasks completed
}
With small modifications, we can adapt the pattern to accumulate the results of each task into a collection, to filter or map the elements of an array, or to invoke the finish() callback as soon as one or a given number of tasks complete (this last situation in particular is called competitive race).
The Unlimited Parallel Execution pattern
Run a set of asynchronous tasks in parallel by launching them all at once, and then wait for all of them to complete by counting the number of times their callbacks are invoked.
When we have multiple tasks running in parallel, we might have race conditions, that is, contention to access external resources (for example, files or records in a database). In the next section, we will talk about race conditions in Node.js and explore some techniques to identify and address them.
Fixing race conditions with concurrent tasks
Running a set of tasks in parallel can cause issues when using blocking I/O in combination with multiple threads. However, you have just seen that, in Node.js, this is a totally different story. Running multiple asynchronous tasks in parallel is, in fact, straightforward and cheap in terms of resources.
This is one of the most important strengths of Node.js, because it makes parallelization a common practice rather than a complex technique to only use when strictly necessary.
Another important characteristic of the concurrency model of Node.js is the way we deal with task synchronization and race conditions. In multithreaded programming, this is usually done using constructs such as locks, mutexes, semaphores, and monitors, and it can be one of the most complex aspects of parallelization, and has a considerable impact on performance. In Node.js, we usually don't need a fancy synchronization mechanism, as everything runs on a single thread. However, this doesn't mean that we can't have race conditions; on the contrary, they can be quite common. The root of the problem is the delay between the invocation of an asynchronous operation and the notification of its result.
To see a concrete example, we will refer again to our web spider application, and in particular, the last version we created, which actually contains a race condition (can you spot it?). The problem we are talking about lies in the spider() function, where we check whether a file already exists before we start to download the corresponding URL:
export function spider (url, nesting, cb) {
  const filename = urlToFilename(url)
  fs.readFile(filename, 'utf8', (err, fileContent) => {
    if (err) {
      if (err.code !== 'ENOENT') {
        return cb(err)
      }
      return download(url, filename, (err, requestContent) => {
        // ...
The problem is that two spider tasks operating on the same URL might invoke fs.readFile() on the same file before one of the two tasks completes the download and creates a file, causing both tasks to start a download. Figure 4.4 explains this situation:

Figure 4.4: An example of a race condition in our spider() function
Figure 4.4 shows how Task 1 and Task 2 are interleaved in the single thread of Node.js, as well as how an asynchronous operation can actually introduce a race condition. In our case, the two spider tasks end up downloading the same file.
How can we fix that? The answer is much simpler than you might think. In fact, all we need is a variable to mutually exclude multiple spider() tasks running on the same URL. This can be achieved with some code, such as the following:
const spidering = new Set()
function spider (url, nesting, cb) {
  if (spidering.has(url)) {
    return process.nextTick(cb)
  }
  spidering.add(url)
// ...
The fix does not require many comments. We simply exit the function immediately if the given url is already present in the spidering set; otherwise, we add the url to the set and continue with the download. In our case, we don't need to release the lock, as we are not interested in downloading a URL twice, even if the spider tasks are executed at two completely different points in time. If you are building a spider that might have to download hundreds of thousands of web pages, removing the downloaded url from the set once a file is downloaded will help you to keep the set cardinality, and therefore the memory consumption, from growing indefinitely.
Race conditions can cause many problems, even if we are in a single-threaded environment. In some circumstances, they can lead to data corruption and are usually very hard to debug because of their ephemeral nature. So, it's always good practice to double-check for these types of situations when running tasks in parallel.
Also, running an arbitrary number of parallel tasks can be a dangerous practice. In the next section, you will discover why it can be a problem and how to keep the number of parallel tasks under control.
Limited parallel execution
Spawning parallel tasks without control can often lead to excessive load. Imagine having thousands of files to read, URLs to access, or database queries to run in parallel. A common problem in such situations is running out of resources. The most common example is when an application tries to open too many files at once, utilizing all the file descriptors available to the process.
A server that spawns unbounded parallel tasks to handle a user request could be exploited with a denial-of-service (DoS) attack. That is when a malicious actor can forge one or more requests to push the server to consume all the available resources and become unresponsive. Limiting the number of parallel tasks is, in general, a good practice that helps with building resilient applications.
Version 3 of our web spider does not limit the number of parallel tasks and therefore, it is susceptible to crashing in a number of cases. For instance, if we try to run it against a significantly big website, we might see it running for a few seconds and then failing with the error code ECONNREFUSED. When we are downloading too many pages concurrently from a web server, the server might decide to start rejecting new connections from the same IP. In this case, our spider would just crash and we would be forced to relaunch the process if we wanted to continue crawling the website. We could just handle ECONNREFUSED to stop the process from crashing, but we would still be risking allocating too many parallel tasks and might run into other issues.
In this section, you will see how we can make our spider more resilient by keeping the concurrency limited.
The following diagram shows a situation where we have five tasks that run in parallel with a concurrency limit of two:
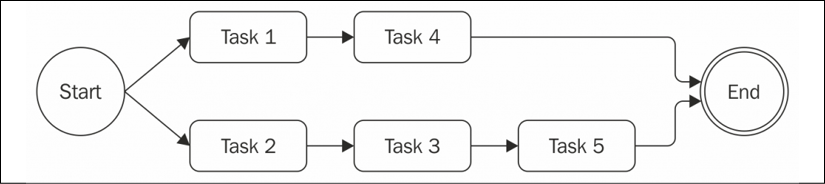
Figure 4.5: An example of how concurrency can be limited to a maximum of two parallel tasks
From Figure 4.5, it should be clear how our algorithm works:
- Initially, we spawn as many tasks as we can without exceeding the concurrency limit.
- Then, every time a task is completed, we spawn one or more tasks until we reach the limit again.
In the next section, we will explore a possible implementation of the limited parallel execution pattern.
Limiting concurrency
We will now look at a pattern that will execute a set of given tasks in parallel with limited concurrency:
const tasks = [
  // ...
]
const concurrency = 2
let running = 0
let completed = 0
let index = 0
function next () {                                          // (1)
  while (running < concurrency && index < tasks.length) {
    const task = tasks[index++]
    task(() => {                                            // (2)
      if (++completed === tasks.length) {
        return finish()
      }
      running--
      next()
    })
    running++
  }
}
next()
function finish() {
  // all tasks finished
}
This algorithm can be considered a mixture of sequential execution and parallel execution. In fact, you might notice similarities with both patterns:
- We have an iterator function, which we call
next(), and then an inner loop that spawns as many tasks as possible in parallel while staying within the concurrency limit. - The next important part is the callback we pass to each task, which checks whether we completed all the tasks in the list. If there are still tasks to run, it invokes
next()to spawn another set of tasks.
Pretty simple, isn't it?
Globally limiting concurrency
Our web spider application is perfect for applying what we just learned about limiting the concurrency of a set of tasks. In fact, to avoid the situation in which we have thousands of links being crawled at the same time, we can enforce a limit on the concurrency of this process by adding some predictability regarding the number of concurrent downloads.
We could apply this implementation of the limited concurrency pattern to our spiderLinks() function, but by doing that, we would only be limiting the concurrency of tasks spawned from the links found within a given page. If we chose, for example, a concurrency of two, we would have, at most, two links downloaded in parallel for each page. However, as we can download multiple links at once, each page would then spawn another two downloads, causing the grand total of download operations to grow exponentially anyway.
In general, this implementation of the limited concurrency pattern works very well when we have a predetermined set of tasks to execute, or when the set of tasks grows linearly over time. When, instead, a task can spawn two or more tasks directly, as happens with our web spider, this implementation is not suitable for limiting the global concurrency.
Queues to the rescue
What we really want, then, is to limit the global number of download operations we can have running in parallel. We could slightly modify the pattern shown in the previous section, but this is left as an exercise for you. Instead, let's discuss another mechanism that makes use of queues to limit the concurrency of multiple tasks. Let's see how this works.
We are now going to implement a simple class named TaskQueue, which will combine a queue with the algorithm that was presented while discussing limited concurrency. Let's create a new module named taskQueue.js:
export class TaskQueue {
  constructor (concurrency) {
    this.concurrency = concurrency
    this.running = 0
    this.queue = []
  }
  pushTask (task) {
    this.queue.push(task)
    process.nextTick(this.next.bind(this))
    return this
  }
  next () {
    while (this.running < this.concurrency && this.queue.length) {
      const task = this.queue.shift()
      task(() => {
        this.running--
        process.nextTick(this.next.bind(this))
      })
      this.running++
    }
  }
}
The constructor of this class takes, as input, only the concurrency limit, but besides that, it initializes the instance variables running and queue. The former variable is a counter used to keep track of all the running tasks, while the latter is the array that will be used as a queue to store the pending tasks.
The pushTask() method simply adds a new task to the queue and then bootstraps the execution of the worker by asynchronously invoking this.next(). Note that we have to use bind because otherwise, the next function will lose its context when invoked by process.nextTick.
The next() method spawns a set of tasks from the queue, ensuring that it does not exceed the concurrency limit.
You may notice that this method has some similarities with the pattern presented at the beginning of the Limiting concurrency section. It essentially starts as many tasks from the queue as possible, without exceeding the concurrency limit. When each task is complete, it updates the count of running tasks and then starts another round of tasks by asynchronously invoking next() again. The interesting property of the TaskQueue class is that it allows us to dynamically add new items to the queue. The other advantage is that, now, we have a central entity responsible for the limitation of the concurrency of our tasks, which can be shared across all the instances of a function's execution. In our case, it's the spider() function, as you will see in a moment.
Refining the TaskQueue
The previous implementation of TaskQueue is sufficient to demonstrate the queue pattern, but in order to be used in real-life projects, it needs a couple of extra features. For instance, how can we tell when one of the tasks has failed? How do we know whether all the work in the queue has been completed?
Let's bring back some of the concepts we discussed in Chapter 3, Callbacks and Events, and let's turn the TaskQueue into an EventEmitter so that we can emit events to propagate task failures and to inform any observer when the queue is empty.
The first change we have to make is to import the EventEmitter class and let our TaskQueue extend it:
import { EventEmitter } from 'events'
export class TaskQueue extends EventEmitter {
  constructor (concurrency) {
    super()
    // ...
  }
  // ...
}
At this point, we can use this.emit to fire events from within the TaskQueue next() method:
next () {
  if (this.running === 0 && this.queue.length === 0) {         // (1)
    return this.emit('empty')
  }
  while (this.running < this.concurrency && this.queue.length) {
    const task = this.queue.shift()
    task((err) => {                                            // (2)
      if (err) {
        this.emit('error', err)
      }
      this.running--
      process.nextTick(this.next.bind(this))
    })
    this.running++
  }
}
Comparing this implementation with the previous one, there are two additions here:
- Every time the
next()function is called, we check that no task is running and whether the queue is empty. In such a case, it means that the queue has been drained and we can fire theemptyevent. - The completion callback of every task can now be invoked by passing an error. We check whether an error is actually passed, indicating that the task has failed, and in that case, we propagate such an error with an
errorevent.
Notice that in case of an error, we are deliberately keeping the queue running. We are not stopping other tasks in progress, nor removing any pending tasks. This is quite common with queue-based systems. Errors are expected to happen and rather than letting the system crash on these occasions, it is generally better to identify errors and to think about retry or recovery strategies. We will discuss these concepts a bit more in Chapter 13, Messaging and Integration Patterns.
Web spider version 4
Now that we have our generic queue to execute tasks in a limited parallel flow, let's use it straightaway to refactor our web spider application.
We are going to use an instance of TaskQueue as a work backlog; every URL that we want to crawl needs to be appended to the queue as a task. The starting URL will be added as the first task, then every other URL discovered during the crawling process will be added as well. The queue will manage all the scheduling for us, making sure that the number of tasks in progress (that is, the number of pages being downloaded or read from the filesystem) at any given time is never greater than the concurrency limit configured for the given TaskQueue instance.
We have already defined the logic to crawl a given URL inside our spider() function. We can consider this to be our generic crawling task. For more clarity, it's best to rename this function spiderTask:
function spiderTask (url, nesting, queue, cb) {             // (1)
  const filename = urlToFilename(url)
  fs.readFile(filename, 'utf8', (err, fileContent) => {
    if (err) {
      if (err.code !== 'ENOENT') {
        return cb(err)
      }
      return download(url, filename, (err, requestContent) => {
        if (err) {
          return cb(err)
        }
        spiderLinks(url, requestContent, nesting, queue)    // (2)
        return cb()
      })
    }
    spiderLinks(url, fileContent, nesting, queue)           // (3)
    return cb()
  })
}
Other than renaming the function, you might have noticed that we applied some other small changes:
- The function signature now accepts a new parameter called
queue. This is an instance ofTaskQueuethat we need to carry over to be able to append new tasks when necessary. - The function responsible for adding new links to crawl is
spiderLinks, so we need to make sure that we pass the queue instance when we call this function after downloading a new page. - We also need to pass the queue instance to
spiderLinkswhen we are invoking that from an already downloaded file.
Let's revisit the spiderLinks() function. This function can now be greatly simplified as it doesn't have to keep track of task completion anymore, as this work has been delegated to the queue. Its job becomes effectively synchronous now; it just needs to invoke the new spider() function (which we will define shortly) to push a new task to the queue, one for each discovered link:
function spiderLinks (currentUrl, body, nesting, queue) {
  if (nesting === 0) {
    return
  }
  const links = getPageLinks(currentUrl, body)
  if (links.length === 0) {
    return
  }
  links.forEach(link => spider(link, nesting - 1, queue))
}
Let's now revisit the spider() function, which needs to act as the entry point for the first URL; it will also be used to add every new discovered URL to the queue:
const spidering = new Set()                               // (1)
export function spider (url, nesting, queue) {
  if (spidering.has(url)) {
    return
  }
  spidering.add(url)
  queue.pushTask((done) => {                              // (2)
    spiderTask(url, nesting, queue, done)
  })
}
As you can see, this function now has two main responsibilities:
- It manages the bookkeeping of the URLs already visited or in progress by using the
spideringset. - It pushes a new task to the
queue. Once executed, this task will invoke thespiderTask()function, effectively starting the crawling of the given URL.
Finally, we can update the spider-cli.js script, which allows us to invoke our spider from the command line:
import { spider } from './spider.js'
import { TaskQueue } from './TaskQueue.js'
const url = process.argv[2]                                    // (1)
const nesting = Number.parseInt(process.argv[3], 10) || 1
const concurrency = Number.parseInt(process.argv[4], 10) || 2
const spiderQueue = new TaskQueue(concurrency)                 // (2)
spiderQueue.on('error', console.error)
spiderQueue.on('empty', () => console.log('Download complete'))
spider(url, nesting, spiderQueue)                              // (3)
This script is now composed of three main parts:
- CLI arguments parsing. Note that the script now accepts a third additional parameter that can be used to customize the concurrency level.
- A
TaskQueueobject is created and listeners are attached to theerrorandemptyevents. When an error occurs, we simply want to print it. When the queue is empty, that means that we've finished crawling the website. - Finally, we start the crawling process by invoking the
spiderfunction.
After we have applied these changes, we can try to run the spider module again. When we run the following command:
node spider-cli.js https://loige.co 1 4
We should notice that no more than four downloads will be active at the same time.
With this final example, we've concluded our exploration of callback-based patterns. In the next section, we will close this chapter by looking at a famous library that provides a production-ready implementation of these patterns and many other asynchronous utilities.
The async library
If you take a look for a moment at every control flow pattern we have analyzed so far, you will see that they can be used as a base to build reusable and more generic solutions. For example, we could wrap the unlimited parallel execution algorithm into a function that accepts a list of tasks, runs them in parallel, and invokes the given callback when all of them are complete. This way of wrapping control flow algorithms into reusable functions can lead to a more declarative and expressive way of defining asynchronous control flows, and that's exactly what async (nodejsdp.link/async) does.
The async library (not to be confused with the async/await keywords, which we will discuss later in this book) is a very popular solution, in Node.js and JavaScript in general, for dealing with asynchronous code. It offers a set of functions that greatly simplify the execution of tasks in different configurations, and it also provides useful helpers for dealing with collections asynchronously. Even though there are several other libraries with a similar goal, async is the de facto standard in Node.js due to its historic popularity, especially when using callbacks to define asynchronous tasks.
Just to give you an idea of some of the most important capabilities of the async module, here is a sample of the functionalities it exposes:
- Execute asynchronous functions over a collection of elements (in series or in parallel with limited concurrency).
- Execute a chain of asynchronous functions (waterfall) where the output of every function becomes the input of the next one.
- Offers a queue abstraction functionally equivalent to the one we implemented with our
TaskQueueutility. - Provides other interesting asynchronous patterns such as race (executes multiple asynchronous functions in parallel and stops when the first one completes).
Check out the async documentation (nodejsdp.link/async) to find out more about the module and to see some examples.
Once you've understood the fundamentals of the asynchronous patterns described in this chapter, you shouldn't rely on the simplified implementations presented here for your everyday control flow needs. Instead, it's better to adopt a broadly used and battle-tested library like async for your production applications, unless your use case is so advanced that you require a custom algorithm.
Summary
At the beginning of this chapter, it was stated that Node.js programming can be tough because of its asynchronous nature, especially for people used to developing on other platforms. However, throughout this chapter, you saw how asynchronous APIs can be bent to your will. You discovered that the tools at your disposal are indeed versatile and provide good solutions to most of your problems, in addition to offering a programming style for every taste.
In this chapter, we also kept refactoring and improving our web crawler example. When dealing with asynchronous code, it can sometimes be challenging to figure out the right ergonomics that can keep your code simple and effective, so allow yourself some time to digest the concepts explored in this chapter and to experiment with them.
Our journey with asynchronous Node.js programming has just started. In the next few chapters, you will be introduced to other broadly adopted techniques that leverage promises, and async/await. After you've learned all these techniques, you will be able to choose the best solution for your needs or use many of them together in the same project.
Exercises
- 4.1 File concatenation: Write the implementation of
concatFiles(), a callback-style function that takes two or more paths to text files in the filesystem and a destination file:function concatFiles (srcFile1, srcFile2, srcFile3, ... , dest, cb) { // ... }This function must copy the contents of every source file into the destination file, respecting the order of the files, as provided by the arguments list. For instance, given two files, if the first file contains foo and the second file contains bar, the function should write foobar (and not barfoo) in the destination file. Note that the preceding example signature is not valid JavaScript syntax: you need to find a different way to handle an arbitrary number of arguments. For instance, you could use the rest parameters syntax (nodejsdp.link/rest-parameters).
- 4.2 List files recursively: Write
listNestedFiles(), a callback-style function that takes, as the input, the path to a directory in the local filesystem and that asynchronously iterates over all the subdirectories to eventually return a list of all the files discovered. Here is what the signature of the function should look like:function listNestedFiles (dir, cb) { /* ... */ }Bonus points if you manage to avoid callback hell. Feel free to create additional helper functions if needed.
- 4.3 Recursive find: Write
recursiveFind(), a callback-style function that takes a path to a directory in the local filesystem and a keyword, as per the following signature:function recursiveFind(dir, keyword, cb) { /* ... */ }The function must find all the text files within the given directory that contain the given keyword in the file contents. The list of matching files should be returned using the callback when the search is completed. If no matching file is found, the callback must be invoked with an empty array. As an example test case, if you have the files
foo.txt,bar.txt, andbaz.txtinmyDirand the keyword'batman'is contained in the filesfoo.txtandbaz.txt, you should be able to run the following code:recursiveFind('myDir', 'batman', console.log) // should print ['foo.txt', 'baz.txt']Bonus points if you make the search recursive (it looks for text files in any subdirectory as well). Extra bonus points if you manage to perform the search within different files and subdirectories in parallel, but be careful to keep the number of parallel tasks under control!