
11
Advanced Recipes
In this chapter, we'll take a problem-solution approach and, like in a cookbook, we'll present a set of ready-to-use recipes to solve some common Node.js programming problems.
You shouldn't be surprised by the fact that most of the problems presented in this chapter arise when we try to do things asynchronously. In fact, as we've seen repeatedly in the previous chapters of this book, tasks that are trivial in traditional synchronous programming can become more complicated when applied to asynchronous programming. A typical example is trying to use a component that requires an asynchronous initialization step. In this case, we have the inconvenience of delaying any attempt to use the component until the initialization completes. We'll show you how to solve this elegantly later.
But this chapter is not just about recipes involving asynchronous programming. You will also learn the best ways to run CPU-intensive tasks in Node.js.
These are the recipes you will learn in this chapter:
- Dealing with asynchronously initialized components
- Asynchronous request batching and caching
- Canceling asynchronous operations
- Running CPU-bound tasks
Let's get started.
Dealing with asynchronously initialized components
One of the reasons for the existence of synchronous APIs in the Node.js core modules and many npm packages is because they are handy to use for implementing initialization tasks. For simple programs, using synchronous APIs at initialization time can streamline things a lot and the drawbacks associated with their use remain contained because they are used only once, which is when the program or a particular component is initialized.
Unfortunately, this is not always possible. A synchronous API might not always be available, especially for components using the network during their initialization phase to, for example, perform handshake protocols or to retrieve configuration parameters. This is the case for many database drivers and clients for middleware systems such as message queues.
The issue with asynchronously initialized components
Let's consider an example where a module called db is used to interact with a remote database. The db module will accept API requests only after the connection and handshake with the database server have been successfully completed. Therefore, no queries or other commands can be sent until the initialization phase is complete. The following is the code for such a sample module (the db.js file):
import { EventEmitter } from 'events'
class DB extends EventEmitter {
  connected = false
  connect () {
    // simulate the delay of the connection
    setTimeout(() => {
      this.connected = true
      this.emit('connected')
    }, 500)
  }
  async query (queryString) {
    if (!this.connected) {
      throw new Error('Not connected yet')
    }
    console.log(`Query executed: ${queryString}`)
  }
}
export const db = new DB()
This is a typical example of an asynchronously initialized component. Under these assumptions, we usually have two quick and easy solutions to this problem, which we can call local initialization check and delayed startup. Let's analyze them in more detail.
Local initialization check
The first solution makes sure that the module is initialized before any of its APIs are invoked; otherwise, we wait for its initialization. This check has to be done every time we want to invoke an operation on the asynchronous module:
import { once } from 'events'
import { db } from './db.js'
db.connect()
async function updateLastAccess () {
  if (!db.connected) {
    await once(db, 'connected')
  }
  await db.query(`INSERT (${Date.now()}) INTO "LastAccesses"`)
}
updateLastAccess()
setTimeout(() => {
  updateLastAccess()
}, 600)
As we already anticipated, any time we want to invoke the query() method on the db component, we have to check if the module is initialized; otherwise, we wait for its initialization by listening for the 'connected' event. A variation of this technique performs the check inside the query() method itself, which shifts the burden of the boilerplate code from the consumer to the provider of the service.
Delayed startup
The second quick and dirty solution to the problem of asynchronously initialized components involves delaying the execution of any code relying on the asynchronously initialized component until the component has finished its initialization routine. We can see an example of such a technique in the following code fragment:
import { db } from './db.js'
import { once } from 'events'
async function initialize () {
  db.connect()
  await once(db, 'connected')
}
async function updateLastAccess () {
  await db.query(`INSERT (${Date.now()}) INTO "LastAccesses"`)
}
initialize()
  .then(() => {
    updateLastAccess()
    setTimeout(() => {
      updateLastAccess()
    }, 600)
  })
As we can see from the preceding code, we first wait for the initialization to complete, and then we proceed with executing any routine that uses the db object.
The main disadvantage of this technique is that it requires us to know, in advance, which components will make use of the asynchronously initialized component, which makes our code fragile and exposed to mistakes. One solution to this problem is delaying the startup of the entire application until all the asynchronous services are initialized. This has the advantage of being simple and effective; however, it can add a significant delay to the overall startup time of the application and moreover, it won't take into account the case in which the asynchronously initialized component has to be reinitialized.
As we will see in the next section, there is a third alternative that allows us to transparently and efficiently delay every operation until the asynchronous initialization step has completed.
Pre-initialization queues
Another recipe to make sure that the services of a component are invoked only after the component is initialized involves the use of queues and the Command pattern. The idea is to queue the method invocations (only those requiring the component to be initialized) received while the component is not yet initialized, and then execute them as soon as all the initialization steps have been completed.
Let's see how this technique can be applied to our sample db component:
import { EventEmitter } from 'events'
class DB extends EventEmitter {
  connected = false
  commandsQueue = []
  async query (queryString) {
    if (!this.connected) {
      console.log(`Request queued: ${queryString}`)
      return new Promise((resolve, reject) => {            // (1)
        const command = () => {
          this.query(queryString)
            .then(resolve, reject)
        }
        this.commandsQueue.push(command)
      })
    }
    console.log(`Query executed: ${queryString}`)
  }
  connect () {
    // simulate the delay of the connection
    setTimeout(() => {
      this.connected = true
      this.emit('connected')
      this.commandsQueue.forEach(command => command())     // (2)
      this.commandsQueue = []
    }, 500)
  }
}
export const db = new DB()
As we already mentioned, the technique described here consists of two parts:
- If the component has not been initialized—which, in our case, is when the
connectedproperty isfalse—we create a command from the parameters received with the current invocation and push it to thecommandsQueuearray. When the command is executed, it will run the originalquery()method again and forward the result to thePromisewe are returning to the caller. - When the initialization of the component is completed—which, in our case, means that the connection with the database server is established—we go through the
commandsQueue, executing all the commands that have been previously queued.
With the DB class we just implemented, there is no need to check if the component is initialized before invoking its methods. In fact, all the logic is embedded in the component itself and any consumer can just transparently use it without worrying about its initialization status.
We can also go a step further and try to reduce the boilerplate of the DB class we just created and, at the same time, improve its modularity. We can achieve that by applying the State pattern, which we learned about in Chapter 9, Behavioral Design Patterns, with two states:
- The first state implements all the methods that require the component to be initialized, and it's activated only when there is a successful initialization. Each of these methods implements its own business logic without worrying about the initialization status of the
dbcomponent - The second state is activated before the initialization has completed and it implements the same methods as the first state, but their only role here is to add a new command to the queue using the parameters passed to the invocation.
Let's see how we can apply the structure we just described to our db component. First, we create the InitializedState, which implements the actual business logic of our component:
class InitializedState {
  async query (queryString) {
    console.log(`Query executed: ${queryString}`)
  }
}
As we can see, the only method that we need to implement in the InitializedState class is the query() method, which will print a message to the console when it receives a new query.
Next, we implement the QueuingState, the core of our recipe. This state implements the queuing logic:
const METHODS_REQUIRING_CONNECTION = ['query']
const deactivate = Symbol('deactivate')
class QueuingState {
  constructor (db) {
    this.db = db
    this.commandsQueue = []
    METHODS_REQUIRING_CONNECTION.forEach(methodName => {
      this[methodName] = function (...args) {
        console.log('Command queued:', methodName, args)
        return new Promise((resolve, reject) => {
          const command = () => {
            db[methodName](...args)
              .then(resolve, reject)
          }
          this.commandsQueue.push(command)
        })
      }
    })
  }
  [deactivate] () {
    this.commandsQueue.forEach(command => command())
    this.commandsQueue = []
  }
}
It's interesting to note how the QueuingState is mostly built dynamically at creation time. For each method that requires an active connection, we create a new method for the current instance, which queues a new command representing the function invocation. When the command is executed at a later time, when a connection is established, the result of the invocation of the method on the db instance is forwarded to the caller (through the returned promise).
The other important part of this state class is [deactivate](). This method is invoked when the state is deactivated (which is when the component is initialized) and it executes all the commands in the queue. Note how we used a Symbol to name the method.
This will avoid any name clashes in the future if we add more methods to the state (for example, what if we need to decorate a hypothetical deactivate() method of the DB class?).
Now, it's time to reimplement the DB class using the two states we just described:
class DB extends EventEmitter {
  constructor () {
    super()
    this.state = new QueuingState(this)                    // (1)
  }
  async query (queryString) {
    return this.state.query(queryString)                   // (2)
  }
  connect () {
    // simulate the delay of the connection
    setTimeout(() => {
      this.connected = true
      this.emit('connected')
      const oldState = this.state                          // (3)
      this.state = new InitializedState(this)
      oldState[deactivate] && oldState[deactivate]()
    }, 500)
  }
}
export const db = new DB()
Let's further analyze the most important parts of the new DB class:
- In the constructor, we initialize the current
stateof the instance. It's going to be theQueuingStateas the asynchronous initialization of the component hasn't been completed yet. - The only method of our class implementing some (stub) business logic is the
query()method. Here, all we have to do is invoke the homonymous method on the currently active state. - Finally, when we establish the connection with the database (initialization complete), we switch the current state to the
InitializedStateand we deactivate the old one. The effect of deactivating theQueuedState, as we've seen previously, is that any command that had been queued is now executed.
We can immediately see how this approach allows us to reduce the boilerplate and, at the same time, create a class that is purely business logic (the InitializedState) free from any repetitive initialization check.
The approach we've just seen will only work if we can modify the code of our asynchronously initialized component. In all those cases in which we can't make modifications to the component, we will need to create a wrapper or proxy, but the technique will be mostly similar to what we've seen here.
In the wild
The pattern we just presented is used by many database drivers and ORM libraries. The most notable is Mongoose (nodejsdp.link/mongoose), which is an ORM for MongoDB. With Mongoose, it's not necessary to wait for the database connection to open in order to be able to send queries. This is because each operation is queued and then executed later when the connection with the database is fully established, exactly as we've described in this section. This is clearly a must for any API that wants to provide a good developer experience (DX).
Take a look at the code of Mongoose to see how every method in the native driver is proxied to add the pre-initialization queue. This also demonstrates an alternative way of implementing the recipe we presented in this section. You can find the relevant code fragment at nodejsdp.link/mongoose-init-queue.
Similarly, the pg package (nodejsdp.link/pg), which is a client for the PostgreSQL database, leverages pre-initialization queues, but in a slightly different fashion. pg queues every query, regardless of the initialization status of the database, and then immediately tries to execute all the commands in the queue. Take a look at the relevant code line at nodejsdp.link/pg-queue.
Asynchronous request batching and caching
In high-load applications, caching plays a critical role and it's used almost everywhere on the web, from static resources such as web pages, images, and stylesheets, to pure data such as the result of database queries. In this section, we are going to learn how caching applies to asynchronous operations and how a high request throughput can be turned to our advantage.
What's asynchronous request batching?
When dealing with asynchronous operations, the most basic level of caching can be achieved by batching together a set of invocations to the same API. The idea is very simple: if we invoke an asynchronous function while there is still another one pending, we can piggyback on the already running operation instead of creating a brand new request. Take a look at the following diagram:
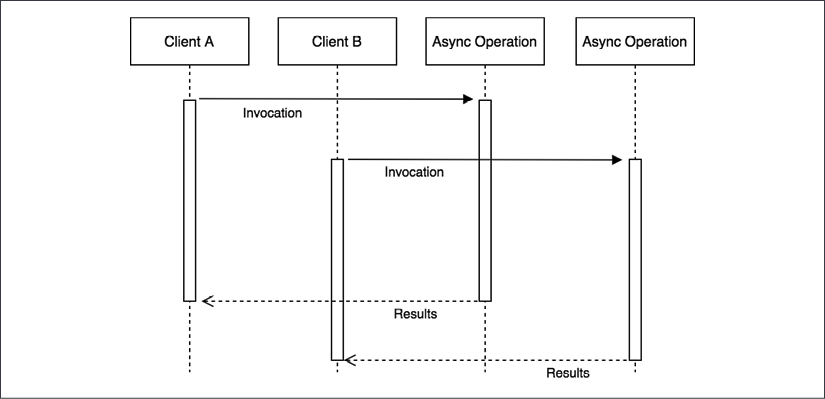
Figure 11.1: Two asynchronous requests with no batching
The previous diagram shows two clients invoking the same asynchronous operation with exactly the same input. Of course, the natural way to picture this situation is with the two clients starting two separate operations that will complete at two different moments.
Now, consider the following scenario:

Figure 11.2: Batching of two asynchronous requests
Figure 11.2 shows us how two identical requests—which invoke the same API with the same input—can be batched, or in other words, appended to the same running operation. By doing this, when the operation completes, both clients are notified, even though the async operation is actually executed only once. This represents a simple, yet extremely powerful, way to optimize the load of an application while not having to deal with more complex caching mechanisms, which usually require an adequate memory management and invalidation strategy.
Optimal asynchronous request caching
Request batching is less effective if the operation is fast enough or if matching requests are spread across a longer period of time. Also, most of the time, we can safely assume that the result of two identical API invocations will not change so often, so simple request batching will not provide the best performance. In all these circumstances, the best candidate to reduce the load of an application and increase its responsiveness is definitely a more aggressive caching mechanism.
The idea is simple: as soon as a request completes, we store its result in the cache, which can be an in-memory variable or an item in a specialized caching server (such as Redis). Hence, the next time the API is invoked, the result can be retrieved immediately from the cache, instead of spawning another request.
The idea of caching should not be new to an experienced developer, but what makes this technique different in asynchronous programming is that it should be combined with request batching to be optimal. The reason for this is because multiple requests might run concurrently while the cache is not set and when those requests complete, the cache would be set multiple times.
Based on these assumptions, we can illustrate the Combined Request Batching and Caching pattern as follows:

Figure 11.3: Combined batching and caching
The preceding figure shows the two phases of an optimal asynchronous caching algorithm:
- The first phase is totally identical to the batching pattern. Any request received while the cache is not set will be batched together. When the request completes, the cache is set, once.
- When the cache is finally set, any subsequent request will be served directly from it.
Another crucial detail to consider is the Zalgo anti-pattern (as we saw in Chapter 3, Callbacks and Events). Since we are dealing with asynchronous APIs, we must be sure to always return the cached value asynchronously, even if accessing the cache involves only a synchronous operation, such as in the case in which the cached value is retrieved from an in-memory variable.
An API server without caching or batching
Before we start diving into this new challenge, let's implement a small demo server that we will use as a reference to measure the impact of the various techniques we are going to implement.
Let's consider an API server that manages the sales of an e-commerce company. In particular, we want to query our server for the sum of all the transactions of a particular type of merchandise. For this purpose, we are going to use a LevelUP database through the level npm package (nodejsdp.link/level). The data model that we are going to use is a simple list of transactions stored in the sales sublevel (a subsection of the database), which is organized in the following format:
transactionId {amount, product}
The key is represented by transactionId and the value is a JSON object that contains the amount of the sale (amount) and the product type (product).
The data to process is really basic, so let's implement a simple query over the database that we can use for our experiments. Let's say that we want to get the total amount of sales for a particular product. The routine would look as follows (file totalSales.js):
import level from 'level'
import sublevel from 'subleveldown'
const db = level('example-db')
const salesDb = sublevel(db, 'sales', { valueEncoding: 'json' })
export async function totalSales (product) {
  const now = Date.now()
  let sum = 0
  for await (const transaction of salesDb.createValueStream()) {
    if (!product || transaction.product === product) {
      sum += transaction.amount
    }
  }
  console.log(`totalSales() took: ${Date.now() - now}ms`)
  return sum
}
The totalSales() function iterates over all the transactions of the sales sublevel and calculates the sum of the amounts of a particular product. The algorithm is intentionally slow as we want to highlight the effect of batching and caching later on. In a real-world application, we would have used an index to query the transactions by product or, even better, we could have used an incremental map/reduce algorithm to continuously calculate the sum for every product
We can now expose the totalSales() API through a simple HTTP server (the server.js file):
import { createServer } from 'http'
import { totalSales } from './totalSales.js'
createServer(async (req, res) => {
  const url = new URL(req.url, 'http://localhost')
  const product = url.searchParams.get('product')
  console.log(`Processing query: ${url.search}`)
  const sum = await totalSales(product)
  res.setHeader('Content-Type', 'application/json')
  res.writeHead(200)
  res.end(JSON.stringify({
    product,
    sum
  }))
}).listen(8000, () => console.log('Server started'))
Before we start the server for the first time, we need to populate the database with some sample data. We can do this with the populateDb.js script, which can be found in this book's code repository in the folder dedicated to this section. This script creates 100,000 random sales transactions in the database so that our query spends some time crunching data:
node populateDb.js
Okay! Now, everything is ready. Let's start the server:
node server.js
To query the server, you can simply navigate with a browser to the following URL:
http://localhost:8000?product=book
However, to have a better idea of the performance of our server, we will need more than one request. So, we will use a small script named loadTest.js, which sends 20 requests at intervals of 200 ms. The script can be found in the code repository of this book and it's already configured to connect to the local URL of the server, so, to run it, just execute the following command:
node loadTest.js
We will see that the 20 requests will take a while to complete. Take note of the total execution time of the test. Now, we are going to apply our optimizations and measure how much time we can save. We'll start by implementing both batching and caching by leveraging the properties of promises.
Batching and caching with promises
Promises are a great tool for implementing asynchronous batching and caching of requests. Let's see why.
If we recall what we learned about promises in Chapter 5, Asynchronous Control Flow Patterns with Promises and Async/Await, there are two properties that can be exploited to our advantage in this circumstance:
- Multiple
then()listeners can be attached to the same promise. - The
then()listener is guaranteed to be invoked (only once), and it works even if it's attached after the promise is already resolved. Moreover,then()is guaranteed to always be invoked asynchronously.
In short, the first property is exactly what we need for batching requests, while the second means that a promise is already a cache for the resolved value and offers a natural mechanism for returning a cached value in a consistent, asynchronous way. In other words, this means that batching and caching become extremely simple and concise with promises.
Batching requests in the total sales web server
Let's now add a batching layer on top of our totalSales API. The pattern we are going to use is very simple: if there is another identical request pending when the API is invoked, we will wait for that request to complete instead of launching a new one. As we will see, this can easily be implemented with promises. In fact, all we have to do is save the promise in a map, associating it to the specified request parameters (the product type, in our case) every time we launch a new request. Then, at every subsequent request, we check if there is already a promise for the specified product and if there is one, we just return it; otherwise, we launch a new request.
Now, let's see how this translates into code. Let's create a new module named totalSalesBatch.js. Here, we're going to implement a batching layer on top of the original totalSales() API:
import { totalSales as totalSalesRaw } from './totalSales.js'
const runningRequests = new Map()
export function totalSales (product) {
  if (runningRequests.has(product)) {                      // (1)
    console.log('Batching')
    return runningRequests.get(product)
  }
  const resultPromise = totalSalesRaw(product)             // (2)
  runningRequests.set(product, resultPromise)
  resultPromise.finally(() => {
    runningRequests.delete(product)
  })
  return resultPromise
}
The totalSales() function of the totalSalesBatch module is a proxy for the original totalSales() API, and it works as follows:
- If a promise for the given
productalready exists, we just return it. This is where we piggyback on an already running request. - If there is no request running for the given
product, we execute the originaltotalSales()function and we save the resulting promise into therunningRequestsmap. Next, we make sure to remove the same promise from therunningRequestsmap as soon as the request completes.
The behavior of the new totalSales() function is identical to that of the original totalSales() API, with the difference that, now, multiple calls to the API using the same input are batched, thus saving us time and resources.
Curious to know what the performance improvement compared to the raw, non-batched version of the totalSales() API is? Let's then replace the totalSales module used by the HTTP server with the one we just created (the app.js file):
// import { totalSales } from './totalSales.js'
import { totalSales } from './totalSalesBatch.js'
createServer(async (req, res) => {
  // ...
If we now try to start the server again and run the load test against it, the first thing we will see is that the requests are returned in batches. This is the effect of the recipe we just implemented, and it's a great practical demonstration of how it works.
Besides that, we should also observe a considerable reduction in the total time for executing the test. It should be at least four times faster than the original test performed against the plain totalSales() API!
This result substantiates the huge performance boost that we can obtain by just applying a simple batching layer, without all the complexity of managing a full-fledged cache and, more importantly, without worrying about invalidation strategies.
The Request Batching pattern reaches its best potential in high-load applications and with slow APIs. This is because it's exactly in these circumstances that we can batch together a high number of requests.
Let's now see how we can implement both batching and caching using a slight variation of the technique we've just explored.
Caching requests in the total sales web server
Adding a caching layer to our batching API is straightforward, thanks to promises. All we have to do is leave the promise in our request map, even after the request has completed.
Let's implement the totalSalesCache.js module straightaway:
import { totalSales as totalSalesRaw } from './totalSales.js'
const CACHE_TTL = 30 * 1000 // 30 seconds TTL
const cache = new Map()
export function totalSales (product) {
  if (cache.has(product)) {
    console.log('Cache hit')
    return cache.get(product)
  }
  const resultPromise = totalSalesRaw(product)
  cache.set(product, resultPromise)
  resultPromise.then(() => {
    setTimeout(() => {
      cache.delete(product)
    }, CACHE_TTL)
  }, err => {
    cache.delete(product)
    throw err
  })
  return resultPromise
}
The relevant code that enables caching is highlighted. All we have to do is remove the promise from the cache after a certain time (CACHE_TTL) after the request has completed, or immediately if the request has failed. This is a very basic cache invalidation technique, but it works perfectly for our demonstration.
Now, we are ready to try the totalSales() caching wrapper we just created. To do that, we only need to update the app.js module, as follows:
// import { totalSales } from './totalSales.js'
// import { totalSales } from './totalSalesBatch.js'
import { totalSales } from './totalSalesCache.js'
createServer(async (req, res) => {
  // ...
Now, the server can be started again and profiled using the loadTest.js script, as we did in the previous examples. With the default test parameters, we should see a 10% reduction in the execution time compared to simple batching. Of course, this is highly dependent on a lot of factors; for example, the number of requests received and the delay between one request and the other. The advantages of using caching over batching will be much more substantial when the number of requests is higher and spans a longer period of time.
Notes about implementing caching mechanisms
We must remember that in real-life applications, we may want to use more advanced cache invalidation techniques and storage mechanisms. This is necessary for the following reasons:
- A large amount of cached values can easily consume a lot of memory. In this case, a least recently used (LRU) or a first in first out (FIFO) policy can be applied to maintain constant memory utilization.
- When the application is distributed across multiple processes, keeping the cache in memory may produce different results across each server instance. If that's undesired for the particular application we are implementing, the solution is to use a shared store for the cache. This is also more performant than a simple in-memory solution as the cache is shared across multiple instances. Popular caching solutions include Redis (nodejsdp.link/redis) and Memcached (nodejsdp.link/memcached).
- A manual cache invalidation (for example, when the related non-cached value changes), as opposed to a timed expiry, can enable a longer-living cache and at the same time provide more up-to-date data, but, of course, it would be a lot more complex to manage. Let's not forget the famous quote by Phil Karlton (principal engineer at Netscape, Silicon Graphics, and more): "There are only two hard things in Computer Science: cache invalidation and naming things."
With this, we conclude this section on request batching and caching. Next, we are going to learn how to tackle a tricky business: canceling asynchronous operations.
Canceling asynchronous operations
Being able to stop a long-running operation is particularly useful if the operation has been canceled by the user or if it has become redundant. In multithreaded programming, we can just terminate the thread, but on a single-threaded platform such as Node.js, things can get a little bit more complicated.
In this section, we'll be talking about canceling asynchronous operations and not about canceling promises, which is a different matter altogether. By the way, the Promises/A+ standard doesn't include an API for canceling promises. However, you can use a third-party promise library such as bluebird if you need such a feature (more at nodejsdp.link/bluebird-cancelation). Note that canceling a promise doesn't mean that the operation the promise refers to will also be canceled; in fact, bluebird offers an onCancel callback in the promise constructor, in addition to resolve and reject, which can be used to cancel the underlying async operation when the promise is canceled. This is actually what this section is about.
A basic recipe for creating cancelable functions
Actually, in asynchronous programming, the basic principle for canceling the execution of a function is very simple: we check if the operation has been canceled after every asynchronous call, and if that's the case, we prematurely quit the operation. Consider, for example, the following code:
import { asyncRoutine } from './asyncRoutine.js'
import { CancelError } from './cancelError.js'
async function cancelable (cancelObj) {
  const resA = await asyncRoutine('A')
  console.log(resA)
  if (cancelObj.cancelRequested) {
    throw new CancelError()
  }
  const resB = await asyncRoutine('B')
  console.log(resB)
  if (cancelObj.cancelRequested) {
    throw new CancelError()
  }
  const resC = await asyncRoutine('C')
  console.log(resC)
}
The cancelable() function receives, as input, an object (cancelObj) containing a single property called cancelRequested. In the function, we check the cancelRequested property after every asynchronous call, and if that's true, we throw a special CancelError exception to interrupt the execution of the function.
The asyncRoutine() function is just a demo function that prints a string to the console and returns another string after 100 ms. You will find its full implementation, along with that of CancelError, in the code repository for this book.
It's important to note that any code external to the cancelable() function will be able to set the cancelRequested property only after the cancelable() function gives back control to the event loop, which is usually when an asynchronous operation is awaited. This is why it's worth checking the cancelRequested property only after the completion of an asynchronous operation and not more often.
The following code demonstrates how we can cancel the cancelable() function:
const cancelObj = { cancelRequested: false }
cancelable(cancelObj)
  .catch(err => {
    if (err instanceof CancelError) {
      console.log('Function canceled')
    } else {
      console.error(err)
    }
  })
setTimeout(() => {
  cancelObj.cancelRequested = true
}, 100)
As we can see, all we have to do to cancel the function is set the cancelObj.cancelRequested property to true. This will cause the function to stop and throw a CancelError.
Wrapping asynchronous invocations
Creating and using a basic asynchronous cancelable function is very easy, but there is a lot of boilerplate involved. In fact, it involves so much extra code that it becomes hard to identify the actual business logic of the function.
We can reduce the boilerplate by including the cancelation logic inside a wrapping function, which we can use to invoke asynchronous routines.
Such a wrapper would look as follows (the cancelWrapper.js file):
import { CancelError } from './cancelError.js'
export function createCancelWrapper () {
  let cancelRequested = false
  function cancel () {
    cancelRequested = true
  }
  function cancelWrapper (func, ...args) {
    if (cancelRequested) {
      return Promise.reject(new CancelError())
    }
    return func(...args)
  }
  return { cancelWrapper, cancel }
}
Our wrapper is created through a factory function called createCancelWrapper(). The factory returns two functions: the wrapper function (cancelWrapper) and a function to trigger the cancelation of the asynchronous operation (cancel). This allows us to create a wrapper function to wrap multiple asynchronous invocations and then use a single cancel() function to cancel all of them.
The cancelWrapper() function takes, as input, a function to invoke (func) and a set of parameters to pass to the function (args). The wrapper simply checks if a cancelation has been requested and if positive, it will return a promise rejected with a CancelError object as the rejection reason; otherwise, it will invoke func.
Let's now see how our wrapper factory can greatly improve the readability and modularity of our cancelable() function:
import { asyncRoutine } from './asyncRoutine.js'
import { createCancelWrapper } from './cancelWrapper.js'
import { CancelError } from './cancelError.js'
async function cancelable (cancelWrapper) {
  const resA = await cancelWrapper(asyncRoutine, 'A')
  console.log(resA)
  const resB = await cancelWrapper(asyncRoutine, 'B')
  console.log(resB)
  const resC = await cancelWrapper(asyncRoutine, 'C')
  console.log(resC)
}
const { cancelWrapper, cancel } = createCancelWrapper()
cancelable(cancelWrapper)
  .catch(err => {
    if (err instanceof CancelError) {
      console.log('Function canceled')
    } else {
      console.error(err)
    }
  })
setTimeout(() => {
  cancel()
}, 100)
We can immediately see the benefits of using a wrapper function for implementing our cancelation logic. In fact, the cancelable() function is now much more concise and readable.
Cancelable async functions with generators
The cancelable wrapper function we just created is already a big step ahead compared to embedding the cancelation logic directly in our code. However, it's still not ideal for two reasons: it is error prone (what if we forget to wrap one function?) and it still affects the readability of our code, which makes it not ideal for implementing cancelable asynchronous operations that are already large and complex.
An even neater solution involves the use of generators. In Chapter 9, Behavioral Design Patterns, we introduced generators as a means to implement iterators. However, they are a very versatile tool and can be used to implement all sorts of algorithms. In this case, we will be using generators to build a supervisor to control the asynchronous flow of a function. The result will be an asynchronous function that is transparently cancelable, whose behavior resembles an async function in which the await instruction is replaced by yield.
Let's see how we can implement this cancelable function using generators (the createAsyncCancelable.js file):
import { CancelError } from './cancelError.js'
export function createAsyncCancelable (generatorFunction) {   // (1)
  return function asyncCancelable (...args) {
    const generatorObject = generatorFunction(...args)        // (3)
    let cancelRequested = false
    function cancel () {
      cancelRequested = true
    }
    const promise = new Promise((resolve, reject) => {
      async function nextStep (prevResult) {                  // (4)
        if (cancelRequested) {
          return reject(new CancelError())
        }
        if (prevResult.done) {
          return resolve(prevResult.value)
        }
        try {                                                 // (5)
          nextStep(generatorObject.next(await prevResult.value))
        } catch (err) {
          try {                                               // (6)
            nextStep(generatorObject.throw(err))
          } catch (err2) {
            reject(err2)
          }
        }
      }
      nextStep({})
    })
    return { promise, cancel }                                // (2)
  }
}
The createAsyncCancelable() function may seem complex, so let's analyze it in more detail:
- First, we should note that the
createAsyncCancelable()function takes, as input, a generator function (the supervised function) and returns another function (asyncCancelable()) that wraps the generator function with our supervising logic. TheasyncCancelable()function is what we will use to invoke the asynchronous operation. - The
asyncCancelable()function returns an object with two properties:- The
promiseproperty, which contains the promise representing the eventual resolution (or rejection) of the asynchronous operation. - The
cancelproperty, which is a function that can be used to cancel the supervised asynchronous flow.
- The
- When invoked, the first task of
asyncCancelable()is to invoke the generator function with the arguments received as input (args) and obtain a generator object, which we can use to control the execution flow of the running coroutine. - The entire logic of the supervisor is implemented within the
nextStep()function, which is responsible for iterating over the values yielded by the supervised coroutine (prevResult). Those can be actual values or promises. If a cancelation is requested, we throw the usualCancelError; otherwise, if the coroutine has been terminated (for example,prevResult.doneistrue), we immediately resolve the outer promise and complete the return. - The core part of the
nextStep()function is where we retrieve the next value yielded by the supervised coroutine (which, let's not forget, it's a generator). Weawaiton that value so we can make sure we get the actual resolution value in case we are dealing with a promise. This also makes sure that ifprevResult.valueis a promise and it rejects, we end up in thecatchstatement. We can end up in thecatchstatement even if the supervised coroutine actually throws an exception. - In the
catchstatement, we throw the caught error inside the coroutine. This is redundant if that error was already thrown by the coroutine, but not if it's the result of a promise rejection. Even if not optimal, this trick can simplify our code a bit for the sake of this demonstration. We invokenextStep()using whatever value is yielded next after throwing it inside the coroutine, but if the result is another exception (for example, the exception is not caught inside the coroutine or another one is thrown), we immediately reject the outer promise and complete the asynchronous operation.
As we saw, there are a lot of moving parts in the createAsyncCancelable() function. But we should appreciate the fact that, in just a few lines of code, we were able to create a cancelable function that doesn't require any manual cancelation logic. As we will see now, the results are impressive.
Let's rewrite our sample asynchronous cancelable operation using the supervisor we implemented in the createAsyncCancelable() function:
import { asyncRoutine } from './asyncRoutine.js'
import { createAsyncCancelable } from './createAsyncCancelable.js'
import { CancelError } from './cancelError.js'
const cancelable = createAsyncCancelable(function * () {
  const resA = yield asyncRoutine('A')
  console.log(resA)
  const resB = yield asyncRoutine('B')
  console.log(resB)
  const resC = yield asyncRoutine('C')
  console.log(resC)
})
const { promise, cancel } = cancelable()
promise.catch(err => {
  if (err instanceof CancelError) {
    console.log('Function canceled')
  } else {
    console.error(err)
  }
})
setTimeout(() => {
  cancel()
}, 100)
We can immediately see that the generator wrapped by createAsyncCancelable() closely resembles an async function, but we are using yield instead of await. Also, there is no visible cancelation logic at all. The generator function maintains the excellent properties of async functions (for example, to make asynchronous code look like synchronous code), but unlike the async function and thanks to the supervisor introduced by createAsyncCancelable(), it's also possible to cancel the operation.
The second interesting aspect is that createAsyncCancelable() creates a function (called cancelable) that can be invoked like any other function but at the same time returns a promise representing the result of the operation and a function to cancel the operation.
This technique of using generators represents the best option we have to implement cancelable asynchronous operations.
For use in production, most of the time, we can rely on a widely used package from the Node.js ecosystem such as caf (the acronym means Cancelable Async Flows), which you can find at nodejsdp.link/caf.
Running CPU-bound tasks
The totalSales() API that we implemented in the Asynchronous request batching and caching section was (intentionally) expensive in terms of resources and took a few hundred milliseconds to run. Nonetheless, invoking the totalSales() function did not affect the ability of the application to process concurrent incoming requests. What we learned about the event loop in Chapter 1, The Node.js Platform, should explain this behavior: invoking an asynchronous operation always causes the stack to unwind back to the event loop, leaving it free to handle other requests.
But what happens when we run a synchronous task that takes a long time to complete and that never gives back the control to the event loop until it has finished? This kind of task is also known as CPU-bound, because its main characteristic is that it is heavy on CPU utilization rather than being heavy on I/O operations.
Let's work immediately on an example to see how these types of task behave in Node.js.
Solving the subset sum problem
Let's now choose a computationally expensive problem to use as a base for our experiment. A good candidate is the subset sum problem, which decides whether a set (or multiset) of integers contains a non-empty subset that has a sum equal to zero. For example, if we had as input the set [1, 2, –4, 5, –3], the subsets satisfying the problem are [1, 2, –3] and [2, –4, 5, –3].
The simplest algorithm is the one that checks every possible combination of subsets of any size and has a computational cost of O(2n), or in other words, it grows exponentially with the size of the input. This means that a set of 20 integers would require up to 1,048,576 combinations to be checked, which is not bad for testing our assumptions. For our example, we are going to consider the following variation of the subset sum problem: given a set of integers, we want to calculate all the possible combinations whose sum is equal to a given arbitrary integer, not just zero.
Now, let's work to implement such an algorithm. First, let's create a new module called subsetSum.js. We will start by creating a class called SubsetSum:
export class SubsetSum extends EventEmitter {
  constructor (sum, set) {
    super()
    this.sum = sum
    this.set = set
    this.totalSubsets = 0
  }
//...
The SubsetSum class is extending EventEmitter. This allows us to produce an event every time we find a new subset matching the sum received as input. As we will see, this will give us a lot of flexibility.
Next, let's see how we can generate all the possible combinations of subsets:
_combine (set, subset) {
  for (let i = 0; i < set.length; i++) {
    const newSubset = subset.concat(set[i])
    this._combine(set.slice(i + 1), newSubset)
    this._processSubset(newSubset)
  }
}
We will not go into too much detail about the algorithm, but there are two important things to notice:
- The
_combine()method is completely synchronous. It recursively generates every possible subset without ever giving back control to the event loop. - Every time a new combination is generated, we provide it to the
_processSubset()method for further processing.
The _processSubset() method is responsible for verifying that the sum of the elements of the given subset is equal to the number we are looking for:
_processSubset (subset) {
  console.log('Subset', ++this.totalSubsets, subset)
  const res = subset.reduce((prev, item) => (prev + item), 0)
  if (res === this.sum) {
    this.emit('match', subset)
  }
}
Trivially, the _processSubset() method applies a reduce operation to the subset in order to calculate the sum of its elements. Then, it emits an event of the type match when the resulting sum is equal to the one we are interested in finding (this.sum).
Finally, the start() method puts all the preceding pieces together:
start () {
  this._combine(this.set, [])
  this.emit('end')
}
The start() method triggers the generation of all the combinations by invoking _combine(), and lastly, emits an end event, signaling that all the combinations were checked and any possible match has already been emitted. This is possible because _combine() is synchronous; therefore, the end event is emitted as soon as the function returns, which means that all the combinations have been calculated.
Next, we have to expose the algorithm we just created over the network. As always, we can use a simple HTTP server for this task. In particular, we want to create an endpoint that accepts requests in the format /subsetSum?data=<Array>&sum=<Integer> that invokes the SubsetSum algorithm with the given array of integers and sum to match.
Let's implement this simple server in a module named index.js:
import { createServer } from 'http'
import { SubsetSum } from './subsetSum.js'
createServer((req, res) => {
  const url = new URL(req.url, 'http://localhost')
  if (url.pathname !== '/subsetSum') {
    res.writeHead(200)
    return res.end('I'm alive!
')
  }
  const data = JSON.parse(url.searchParams.get('data'))
  const sum = JSON.parse(url.searchParams.get('sum'))
  res.writeHead(200)
  const subsetSum = new SubsetSum(sum, data)
  subsetSum.on('match', match => {
    res.write(`Match: ${JSON.stringify(match)}
`)
  })
  subsetSum.on('end', () => res.end())
  subsetSum.start()
}).listen(8000, () => console.log('Server started'))
Thanks to the fact that the SubsetSum object returns its results using events, we can stream the matching subsets as soon as they are generated by the algorithm, in real time. Another detail to mention is that our server responds with the text I'm alive! every time we hit a URL different than /subsetSum. We will use this for checking the responsiveness of our server, as we will see in a moment.
We are now ready to try our subset sum algorithm. Curious to know how our server will handle it? Let's fire it up, then:
node index.js
As soon as the server starts, we are ready to send our first request. Let's try it with a multiset of 17 random numbers, which will result in the generation of 131,071 combinations, a nice amount to keep our server busy for a while:
curl -G http://localhost:8000/subsetSum --data-urlencode "data=[16, 19,1,1,-16,9,1,-5,-2,17,-15,-97,19,-16,-4,-5,15]" --data-urlencode "sum=0"
After a few seconds, we should see the results coming from the server. But if we try the following command in another terminal while the first request is still running, we will spot a huge problem:
curl -G http://localhost:8000
We will immediately see that this last request hangs until the subset sum algorithm of the first request has finished: the server is unresponsive! This was actually expected. The Node.js event loop runs in a single thread, and if this thread is blocked by a long synchronous computation, it will be unable to execute even a single cycle in order to respond with a simple I'm alive!
We quickly understand that this behavior does not work for any kind of application meant to process multiple concurrent requests. But don't despair. In Node.js, we can tackle this type of situation in several ways. So, let's analyze the three most popular methods, which are "interleaving with setImmediate," "using external processes," and "using worker threads."
Interleaving with setImmediate
Usually, a CPU-bound algorithm is built upon a set of steps. This can be a set of recursive invocations, a loop, or any variation/combination of these. So, a simple solution to our problem would be to give back the control to the event loop after each of these steps completes (or after a certain number of them). This way, any pending I/O can still be processed by the event loop in those intervals in which the long-running algorithm yields the CPU. A simple way to achieve this is to schedule the next step of the algorithm to run after any pending I/O requests. This sounds like the perfect use case for the setImmediate() function (we already introduced this API in Chapter 3, Callbacks and Events).
Interleaving the steps of the subset sum algorithm
Let's now see how this technique applies to our subset sum algorithm. All we have to do is slightly modify the subsetSum.js module. For convenience, we are going to create a new module called subsetSumDefer.js, taking the code of the original subsetSum class as a starting point.
The first change we are going to make is to add a new method called _combineInterleaved(), which is the core of the technique we are implementing:
_combineInterleaved (set, subset) {
  this.runningCombine++
  setImmediate(() => {
    this._combine(set, subset)
    if (--this.runningCombine === 0) {
      this.emit('end')
    }
  })
}
As we can see, all we had to do is defer the invocation of the original (synchronous) _combine() method with setImmediate(). However, now, it becomes more difficult to know when the function has finished generating all the combinations, because the algorithm is not synchronous anymore.
To fix this, we have to keep track of all the running instances of the _combine() method using a pattern very similar to the asynchronous parallel execution flow that we saw in Chapter 4, Asynchronous Control Flow Patterns with Callbacks. When all the instances of the _combine() method have finished running, we can emit the end event, notifying any listener that the process has completed.
To finish refactoring the subset sum algorithm, we need to make a couple more tweaks. First, we need to replace the recursive step in the _combine() method with its deferred counterpart:
_combine (set, subset) {
  for (let i = 0; i < set.length; i++) {
    const newSubset = subset.concat(set[i])
    this._combineInterleaved(set.slice(i + 1), newSubset)
    this._processSubset(newSubset)
  }
}
With the preceding change, we make sure that each step of the algorithm will be queued in the event loop using setImmediate() and, therefore, executed after any pending I/O request instead of being run synchronously.
The other small tweak is in the start() method:
start () {
  this.runningCombine = 0
  this._combineInterleaved(this.set, [])
}
In the preceding code, we initialized the number of running instances of the _combine() method to 0. We also replaced the call to _combine() with a call to _combineInterleaved() and removed the emission of the end event because this is now handled asynchronously in _combineInterleaved().
With this last change, our subset sum algorithm should now be able to run its CPU-bound code in steps interleaved by intervals, where the event loop can run and process any other pending request.
The last missing bit is updating the index.js module so that it can use the new version of the SubsetSum API. This is actually a trivial change:
import { createServer } from 'http'
// import { SubsetSum } from './subsetSum.js'
import { SubsetSum } from './subsetSumDefer.js'
createServer((req, res) => {
  // ...
We are now ready to try this new version of the subset sum server. Start the server again and then try to send a request to calculate all the subsets matching a given sum:
curl -G http://localhost:8000/subsetSum --data-urlencode "data=[16, 19,1,1,-16,9,1,-5,-2,17,-15,-97,19,-16,-4,-5,15]" --data-urlencode "sum=0"
While the request is running, check again whether the server is responsive:
curl -G http://localhost:8000
Cool! The second request should return almost immediately, even while the SubsetSum task is still running, confirming that our technique is working well.
Considerations on the interleaving approach
As we saw, running a CPU-bound task while preserving the responsiveness of an application is not that complicated; it just requires the use of setImmediate() to schedule the next step of an algorithm to run after any pending I/O. However, this is not the best recipe in terms of efficiency. In fact, deferring a task introduces a small overhead that, multiplied by all the steps that an algorithm has to run, can have a significant impact on the overall running time. This is usually the last thing we want when running a CPU-bound task. A possible solution to mitigate this problem would be using setImmediate() only after a certain number of steps—instead of using it at every single step—but still, this would not solve the root of the problem.
Also, this technique doesn't work very well if each step takes a long time to run. In this case, in fact, the event loop would lose responsiveness, and the whole application would start lagging, which is undesirable in a production environment.
Bear in mind that this does not mean that the technique we have just seen should be avoided at all costs. In certain situations in which the synchronous task is executed sporadically and doesn't take too long to run, using setImmediate() to interleave its execution is sometimes the simplest and most effective way to avoid blocking the event loop.
Note that process.nextTick() cannot be used to interleave a long-running task. As we saw in Chapter 3, Callbacks and Events, nextTick() schedules a task to run before any pending I/O, and this will cause I/O starvation in case of repeated calls. You can verify this yourself by replacing setImmediate() with process.nextTick() in the previous example.
Using external processes
Deferring the steps of an algorithm is not the only option we have for running CPU-bound tasks. Another pattern for preventing the event loop from blocking is using child processes. We already know that Node.js gives its best when running I/O-intensive applications such as web servers, which allows us to optimize resource utilization thanks to its asynchronous architecture. So, the best way we have to maintain the responsiveness of an application is to not run expensive CPU-bound tasks in the context of the main application and, instead, use separate processes. This has three main advantages:
- The synchronous task can run at full speed, without the need to interleave the steps of its execution.
- Working with processes in Node.js is simple, probably easier than modifying an algorithm to use
setImmediate(), and allows us to easily use multiple processors without the need to scale the main application itself. - If we really need maximum performance, the external process could be created in lower-level languages, such as good old C or more modern compiled languages like Go or Rust. Always use the best tool for the job!
Node.js has an ample toolbelt of APIs for interacting with external processes. We can find all we need in the child_process module. Moreover, when the external process is just another Node.js program, connecting it to the main application is extremely easy and allows seamless communication with the local application. This magic happens thanks to the child_process.fork() function, which creates a new child Node.js process and also automatically creates a communication channel with it, allowing us to exchange information using an interface very similar to the EventEmitter. Let's see how this works by refactoring our subset sum server again.
Delegating the subset sum task to an external process
The goal of refactoring the SubsetSum task is to create a separate child process responsible for handling the synchronous processing, leaving the event loop of the main server free to handle requests coming from the network. This is the recipe we are going to follow to make this possible:
- We will create a new module named
processPool.jsthat will allow us to create a pool of running processes. Starting a new process is expensive and requires time, so keeping them constantly running and ready to handle requests allows us to save time and CPU cycles. Also, the pool will help us limit the number of processes running at the same time to prevent exposing the application to denial-of-service (DoS) attacks. - Next, we will create a module called
subsetSumFork.jsresponsible for abstracting aSubsetSumtask running in a child process. Its role will be communicating with the child process and forwarding the results of the task as if they were coming from the current application. - Finally, we need a worker (our child process), a new Node.js program with the only goal of running the subset sum algorithm and forwarding its results to the parent process.
The purpose of a DoS attack is to make a machine unavailable to its users. This is usually achieved by exhausting the capacity of such a machine by exploiting a vulnerability or massively overloading it with requests (DDoS – distributed DoS).
Implementing a process pool
Let's start by building the processPool.js module piece by piece:
import { fork } from 'child_process'
export class ProcessPool {
  constructor (file, poolMax) {
    this.file = file
    this.poolMax = poolMax
    this.pool = []
    this.active = []
    this.waiting = []
  }
//...
In the first part of the module, we import the fork() function from the child_process module, which we will use to create new processes. Then, we define the ProcessPool constructor, which accepts a file parameter representing the Node.js program to run, and the maximum number of running instances in the pool (poolMax). We then define three instance variables:
poolis the set of running processes ready to be used.activecontains the list of the processes currently being used.waitingcontains a queue of callbacks for all those requests that could not be fulfilled immediately because of the lack of an available process.
The next piece of the ProcessPool class is the acquire() method, which is responsible for eventually returning a process ready to be used, when one becomes available:
acquire () {
  return new Promise((resolve, reject) => {
    let worker
    if (this.pool.length > 0) {                            // (1)
      worker = this.pool.pop()
      this.active.push(worker)
      return resolve(worker)
    }
    if (this.active.length >= this.poolMax) {              // (2)
      return this.waiting.push({ resolve, reject })
    }
    worker = fork(this.file)                               // (3)
    worker.once('message', message => {
      if (message === 'ready') {
        this.active.push(worker)
        return resolve(worker)
      }
      worker.kill()
      reject(new Error('Improper process start'))
    })
    worker.once('exit', code => {
      console.log(`Worker exited with code ${code}`)
      this.active = this.active.filter(w => worker !== w)
      this.pool = this.pool.filter(w => worker !== w)
    })
  })
}
The logic of acquire() is very simple and is explained as follows:
- If we have a process in the
poolready to be used, we simply move it to theactivelist and then use it to fulfill the outer promise withresolve(). - If there are no available processes in the
pooland we have already reached the maximum number of running processes, we have to wait for one to be available. We achieve this by queuing theresolve()andreject()callbacks of the outer promise, for later use. - If we haven't reached the maximum number of running processes yet, we create a new one using
child_process.fork(). Then, we wait for thereadymessage coming from the newly launched process, which indicates that the process has started and is ready to accept new jobs. This message-based channel is automatically provided with all processes started withchild_process.fork().
The last method of the ProcessPool class is release(), whose purpose is to put a process back into the pool once we are done with it:
release (worker) {
  if (this.waiting.length > 0) {                           // (1)
    const { resolve } = this.waiting.shift()
    return resolve(worker)
  }
  this.active = this.active.filter(w => worker !== w)      // (2)
  this.pool.push(worker)
}
This is how the release() method works:
- If there is a request in the
waitinglist, we simply reassign theworkerwe are releasing by passing it to theresolve()callback at the head of thewaitingqueue. - Otherwise, we remove the worker that we are releasing from the
activelist and put it back into thepool.
As we can see, the processes are never stopped but just reassigned, allowing us to save time by not restarting them at each request. However, it's important to observe that this might not always be the best choice, and this greatly depends on the requirements of your application.
Other possible tweaks for reducing long-term memory usage and adding resilience to our process pool are:
- Terminate idle processes to free memory after a certain time of inactivity.
- Add a mechanism to kill non-responsive processes or restart those that have crashed.
In this example, we will keep the implementation of our process pool simple as the details we could add are really endless.
Communicating with a child process
Now that our ProcessPool class is ready, we can use it to implement the SubsetSumFork class, whose role is to communicate with the worker and forward the results it produces. As we already mentioned, starting a process with child_process.fork() also gives us a simple message-based communication channel, so let's see how this works by implementing the subsetSumFork.js module:
import { EventEmitter } from 'events'
import { dirname, join } from 'path'
import { fileURLToPath } from 'url'
import { ProcessPool } from './processPool.js'
const __dirname = dirname(fileURLToPath(import.meta.url))
const workerFile = join(__dirname,
  'workers', 'subsetSumProcessWorker.js')
const workers = new ProcessPool(workerFile, 2)
export class SubsetSum extends EventEmitter {
  constructor (sum, set) {
    super()
    this.sum = sum
    this.set = set
  }
  async start () {
    const worker = await workers.acquire()                 // (1)
    worker.send({ sum: this.sum, set: this.set })
    const onMessage = msg => {
      if (msg.event === 'end') {                           // (3)
        worker.removeListener('message', onMessage)
        workers.release(worker)
      }
      this.emit(msg.event, msg.data)                       // (4)
    }
    worker.on('message', onMessage)                        // (2)
  }
}
The first thing to note is that we created a new ProcessPool object using the file ./workers/subsetSumProcessWorker.js as the child worker. We also set the maximum capacity of the pool to 2.
Another point worth mentioning is that we tried to maintain the same public API of the original SubsetSum class. In fact, SubsetSumFork is an EventEmitter whose constructor accepts sum and set, while the start() method triggers the execution of the algorithm, which, this time, runs on a separate process. This is what happens when the start() method is invoked:
- We try to acquire a new child process from the pool. When the operation completes, we immediately use the
workerhandle to send a message to the child process with the data of the job to run. Thesend()API is provided automatically by Node.js to all processes started withchild_process.fork(). This is essentially the communication channel that we were talking about. - We then start listening for any message sent by the worker process using the
on()method to attach a new listener (this is also a part of the communication channel provided by all processes started withchild_process.fork()). - In the
onMessagelistener, we first check if we received anendevent, which means that theSubsetSumtask has finished, in which case we remove theonMessagelistener and release theworker, putting it back into the pool. - The worker produces messages in the format
{event, data}, allowing us to seamlessly forward (re-emit) any event produced by the child process.
That's it for the SubsetSumFork wrapper. Let's now implement the worker (our child process).
It is good to know that the send() method available on a child process instance can also be used to propagate a socket handle from the main application to a child process (look at the documentation at nodejsdp.link/childprocess-send). This is actually the technique used by the cluster module to distribute the load of an HTTP server across multiple processes. We will see this in more detail in the next chapter.
Implementing the worker
Let's now create the workers/subsetSumProcessWorker.js module, our worker process:
import { SubsetSum } from '../subsetSum.js'
process.on('message', msg => {                             // (1)
  const subsetSum = new SubsetSum(msg.sum, msg.set)
  subsetSum.on('match', data => {                          // (2)
    process.send({ event: 'match', data: data })
  })
  subsetSum.on('end', data => {
    process.send({ event: 'end', data: data })
  })
  subsetSum.start()
})
process.send('ready')
We can immediately see that we are reusing the original (and synchronous) SubsetSum as it is. Now that we are in a separate process, we don't have to worry about blocking the event loop anymore; all the HTTP requests will continue to be handled by the event loop of the main application without disruptions.
When the worker is started as a child process, this is what happens:
- It immediately starts listening for messages coming from the parent process. This can be easily done with the
process.on()function (a part of the communication API provided when the process is started withchild_process.fork()).The only message we expect from the parent process is the one providing the input to a new
SubsetSumtask. As soon as such a message is received, we create a new instance of theSubsetSumclass and register the listeners for thematchandendevents. Lastly, we start the computation withsubsetSum.start(). - Every time an event is received from the running algorithm, we wrap it in an object having the format
{event, data}and send it to the parent process. These messages are then handled in thesubsetSumFork.jsmodule, as we have seen in the previous section.
As we can see, we just had to wrap the algorithm we already built, without modifying its internals. This clearly shows that any portion of an application can be easily put in an external process by simply using the technique we have just seen.
When the child process is not a Node.js program, the simple communication channel we just described (on(), send()) is not available. In these situations, we can still establish an interface with the child process by implementing our own protocol on top of the standard input and standard output streams, which are exposed to the parent process. To find out more about all the capabilities of the child_process API, you can refer to the official Node.js documentation at nodejsdp.link/child_process.
Considerations for the multi-process approach
As always, to try this new version of the subset sum algorithm, we simply have to replace the module used by the HTTP server (the index.js file):
import { createServer } from 'http'
// import { SubsetSum } from './subsetSum.js'
// import { SubsetSum } from './subsetSumDefer.js'
import { SubsetSum } from './subsetSumFork.js'
createServer((req, res) => {
//...
We can now start the server again and try to send a sample request:
curl -G http://localhost:8000/subsetSum --data-urlencode "data=[16, 19,1,1,-16,9,1,-5,-2,17,-15,-97,19,-16,-4,-5,15]" --data-urlencode "sum=0"
As for the interleaving approach that we saw previously, with this new version of the SubsetSum module, the event loop is not blocked while running the CPU-bound task. This can be confirmed by sending another concurrent request, as follows:
curl -G http://localhost:8000
The preceding command should immediately return the text I'm alive!
More interestingly, we can also try to start two SubsetSum tasks concurrently and we will be able to see that they will use the full power of two different processors in order to run (if your system has more than one processor, of course). Instead, if we try to run three SubsetSum tasks concurrently, the result should be that the last one to start will hang. This is not because the event loop of the main process is blocked, but because we set a concurrency limit of two processes for the SubsetSum task, which means that the third request will be handled as soon as at least one of the two processes in the pool becomes available again.
As we saw, the multi-process approach has many advantages compared to the interleaving approach. First, it doesn't introduce any computational penalty when running the algorithm. Second, it can take full advantage of a multi-processor machine.
Now, let's see an alternative approach that uses threads instead of processes.
Using worker threads
Since Node 10.5.0, we have a new mechanism for running CPU-intensive algorithms outside of the main event loop called worker threads. Worker threads can be seen as a lightweight alternative to child_process.fork() with some extra goodies. Compared to processes, worker threads have a smaller memory footprint and a faster startup time since they run within the main process but inside different threads.
Even though worker threads are based on real threads, they don't allow the deep synchronization and sharing capabilities supported by other languages such as Java or Python. This is because JavaScript is a single-threaded language and it doesn't have any built-in mechanism to synchronize access to variables from multiple threads. JavaScript with threads simply wouldn't be JavaScript. The solution to bring all the advantages of threads within Node.js without actually changing the language is worker threads.
Worker threads are essentially threads that, by default, don't share anything with the main application thread; they run within their own V8 instance, with an independent Node.js runtime and event loop. Communication with the main thread is possible thanks to message-based communication channels, the transfer of ArrayBuffer objects, and the use of SharedArrayBuffer objects whose synchronization is managed by the user (usually with the help of Atomics).
You can read more about SharedArrayBuffer and Atomics in the following article: nodejsdp.link/shared-array-buffer. Even though the article focuses on Web Workers, a lot of concepts are similar to Node.js's worker threads.
This extensive level of isolation of worker threads from the main thread preserves the integrity of the language. At the same time, the basic communication facilities and data-sharing capabilities are more than enough for 99% of use cases.
Now, let's use worker threads in our SubsetSum example.
Running the subset sum task in a worker thread
The worker threads API has a lot in common with that of ChildProcess, so the changes to our code will be minimal.
First, we need to create a new class called ThreadPool, which is our ProcessPool adapted to operate with worker threads instead of processes. The following code shows the differences between the new ThreadPool class and the ProcessPool class. There are only a few differences in the acquire() method, which are highlighted; the rest of the code is identical:
import { Worker } from 'worker_threads'
export class ThreadPool {
  // ...
  acquire () {
    return new Promise((resolve, reject) => {
      let worker
      if (this.pool.length > 0) {
        worker = this.pool.pop()
        this.active.push(worker)
        return resolve(worker)
      }
      if (this.active.length >= this.poolMax) {
        return this.waiting.push({ resolve, reject })
      }
      worker = new Worker(this.file)
      worker.once('online', () => {
        this.active.push(worker)
        resolve(worker)
      })
      worker.once('exit', code => {
        console.log(`Worker exited with code ${code}`)
        this.active = this.active.filter(w => worker !== w)
        this.pool = this.pool.filter(w => worker !== w)
      })
    })
  }
  //...
}
Next, we need to adapt the worker and place it in a new file called subsetSumThreadWorker.js. The main difference from our old worker is that instead of using process.send() and process.on(), we'll have to use parentPort.postMessage() and parentPort.on():
import { parentPort } from 'worker_threads'
import { SubsetSum } from '../subsetSum.js'
parentPort.on('message', msg => {
  const subsetSum = new SubsetSum(msg.sum, msg.set)
  subsetSum.on('match', data => {
    parentPort.postMessage({ event: 'match', data: data })
  })
  subsetSum.on('end', data => {
    parentPort.postMessage({ event: 'end', data: data })
  })
  subsetSum.start()
})
Similarly, the module subsetSumThreads.js is essentially the same as the subsetSumFork.js module except for a couple of lines of code, which are highlighted in the following code fragment:
import { EventEmitter } from 'events'
import { dirname, join } from 'path'
import { fileURLToPath } from 'url'
import { ThreadPool } from './threadPool.js'
const __dirname = dirname(fileURLToPath(import.meta.url))
const workerFile = join(__dirname,
  'workers', 'subsetSumThreadWorker.js')
const workers = new ThreadPool(workerFile, 2)
export class SubsetSum extends EventEmitter {
  constructor (sum, set) {
    super()
    this.sum = sum
    this.set = set
  }
  async start () {
    const worker = await workers.acquire()
    worker.postMessage({ sum: this.sum, set: this.set })
    const onMessage = msg => {
      if (msg.event === 'end') {
        worker.removeListener('message', onMessage)
        workers.release(worker)
      }
      this.emit(msg.event, msg.data)
    }
    worker.on('message', onMessage)
  }
}
As we've seen, adapting an existing application to use worker threads instead of forked processes is a trivial operation. This is because the API of the two components are very similar, but also because a worker thread has a lot in common with a full-fledged Node.js process.
Finally, we need to update the index.js module so that it can use the new subsetSumThreads.js module, as we've seen for the other implementations of the algorithm:
import { createServer } from 'http'
// import { SubsetSum } from './subsetSum.js'
// import { SubsetSum } from './subsetSumDefer.js'
// import { SubsetSum } from './subsetSumFork.js'
import { SubsetSum } from './subsetSumThreads.js'
createServer((req, res) => {
  // ...
Now, you can try the new version of the subset sum server using worker threads. As for the previous two implementations, the event loop of the main application is not blocked by the subset sum algorithm as it runs in a separate thread.
The example we've seen uses only a small subset of all the capabilities offered by worker threads. For more advanced topics such as transferring ArrayBuffer objects or SharedArrayBuffer objects, you can read the official API documentation at nodejsdp.link/worker-threads.
Running CPU-bound tasks in production
The examples we've seen so far should give you an idea of the tools at our disposal for running CPU-intensive operations in Node.js. However, components such as process pools and thread pools are complex pieces of machinery that require proper mechanisms to deal with timeouts, errors, and other types of failures, which, for brevity, we left out from our implementation. Therefore, unless you have special requirements, it's better to rely on more battle-tested libraries for production use. Two of those libraries are workerpool (nodejsdp.link/workerpool) and piscina (nodejsdp.link/piscina), which are based on the same concepts we've seen in this section. They allow us to coordinate the execution of CPU-intensive tasks using external processes or worker threads.
One last observation is that we must consider that if we have particularly complex algorithms to run or if the number of CPU-bound tasks exceeds the capacity of a single node, we may have to think about scaling out the computation across multiple nodes. This is a completely different problem and we'll learn more about this in the next two chapters.
Summary
This chapter added some great new weapons to our toolbelt, and as you can see, our journey is getting more focused on advanced problems. Due to this, we have started to delve deeply into more complex solutions. This chapter gave us not only a set of recipes to reuse and customize for our needs, but also some great demonstrations of how mastering a few principles and patterns can help us tackle the most complex problems in Node.js development.
The next two chapters represent the peak of our journey. After studying the various tactics of Node.js development, we are now ready to move on to the strategies and explore the architectural patterns for scaling and distributing our Node.js applications.
Exercises
- 11.1 Proxy with pre-initialization queues: Using a JavaScript Proxy, create a wrapper for adding pre-initialization queues to any object. You should allow the consumer of the wrapper to decide which methods to augment and the name of the property/event that indicates if the component is initialized.
- 11.2 Batching and caching with callbacks: Implement batching and caching for the
totalSalesAPI examples using only callbacks, streams, and events (without using promises or async/await). Hint: Pay attention to Zalgo when returning cached values! - 11.3 Deep async cancelable: Extend the
createAsyncCancelable()function so that it's possible to invoke other cancelable functions from within the main cancelable function. Canceling the main operation should also cancel all nested operations. Hint: Allow toyieldthe result of anasyncCancelable()from within the generator function. - 11.4 Compute farm: Create an HTTP server with a
POSTendpoint that receives, as input, the code of a function (as a string) and an array of arguments, executes the function with the given arguments in a worker thread or in a separate process, and returns the result back to the client. Hint: You can useeval(),vm.runInContext(), or neither of the two. Note: Whatever code you produce for this exercise, please be aware that allowing users to run arbitrary code in a production setting can pose serious security risks, and you should never do it unless you know exactly what the implications are.