We're coming to the end of this journey of learning Node.js. But there is one important topic left to discuss: security. The security of your applications is very important. Do you want to get into the news because your application is the greatest thing since Twitter, or do you want to be known for a massive cybersecurity incident launched through your website?
Cybersecurity officials around the world have for years clamored for greater security on the internet. Security holes in things as innocent as internet-connected security cameras have been weaponized by miscreants into vast botnets and are used to bludgeon websites or commit other mayhem. In other cases, rampant identity theft from security intrusions are a financial threat to us all. Almost every day, the news includes more revelations of cybersecurity problems.
We've mentioned this issue several times in this book. Starting in Chapter 10, Deploying Node.js Applications on Linux, we discussed the need to segment the deployment of Notes to present internal barriers against invasion, and specifically to keep the user database isolated in a protected container. The more layers of security you put around critical systems, the less likely it is that attackers can get in. While Notes is a toy application, we can use it to learn about implementing web application security.
Security shouldn't be an afterthought, just as testing should not be an afterthought. Both are incredibly important, if only to keep your company from getting in the news for the wrong reasons.
In this chapter, we will cover the following topics:
- Implementing HTTPS/SSL on AWS ECS for an Express application
- Using the Helmet library to implement headers for Content Security Policy, DNS Prefetch Control, Frame Options, Strict Transport Security, and mitigating XSS attacks
- Preventing cross-site request forgery attacks against forms
- SQL injection attacks
- Pre-deployment scanning for packages with known vulnerabilities
- Reviewing security facilities available on AWS
If you haven't yet done so, duplicate the Chapter 13, Unit Testing and Functional Testing, source tree, which you may have called chap13, to make a Security source tree, which you can call chap14.
By the end of this chapter, you will have experienced the details of provisioning SSL certificates, using them to implement an HTTPS reverse-proxy. Following that, you will read about several tools to improve the security of Node.js web applications. This should give you a foundation in web application security.
Let's start with implementing HTTPS support for the deployed Notes application.
Implementing HTTPS in Docker for deployed Node.js applications
The current best practice is that every website must be accessed with HTTPS. Gone are the days when it was okay to transmit unencrypted information over the internet. That old model is susceptible to problems such as man-in-the-middle attacks, and other threats.
Using SSL and HTTPS means that connections over the internet are authenticated and encrypted. The encryption is good enough to keep out all but the most advanced of snoops, and the authentication means we are assured the website is what it says it is. HTTPS uses the HTTP protocol but is encrypted using SSL, or Secure Sockets Layers. Implementing HTTPS requires getting an SSL certificate and implementing HTTPS support in the web server or web application.
Given a suitable SSL certificate, Node.js applications can easily implement HTTPS because a small amount of code gives us an HTTPS server. But there's another route that offers an additional benefit. NGINX is a well-regarded web server, and proxy server, that is extremely mature and feature-filled. We can use it to implement the HTTPS connection, and at the same time gain another layer of shielding between potential miscreants and the Notes application.
We have already deployed Notes using Docker swarm on an AWS EC2 cluster. Using NGINX is a simple matter of adding another container to the swarm, configured with the tools required to provision SSL certificates. For that purpose, we will use a Docker container that combines NGINX with a Let's Encrypt client program, and scripting to automate certificate renewal. Let's Encrypt is a non-profit operating an excellent service for free SSL certificates. Using their command-line tools, we can provision and otherwise manage SSL certificates as needed.
In this section, we will do the following:
- Configure a domain name to point to our swarm
- Incorporate a Docker container containing NGINX, Cron, and Certbot (one of the Let's Encrypt client tools)
- Implement automated processes in that container for managing certificate renewal
- Configure NGINX to listen on port 443 (HTTPS) alongside port 80 (HTTP)
- Configure the Twitter application to support the website on HTTPS
This may seem like a lot of work, but every task is simple. Let's get started.
Assigning a domain name for an application deployed on AWS EC2
The Notes application is deployed using a Docker swarm built on AWS EC2 instances. One of those instances has a public IP address and a domain name assigned by AWS. It is best to assign a domain name to the EC2 instance because the name assigned by AWS is not only user-unfriendly, but will change the next time you redeploy the cluster. Giving the EC2 instance a domain name requires having a registered domain name, adding an A record listing its IP address, and updating the A record every time the EC2 IP address changes.
What does it mean to add an A record? The domain name system (DNS) is what lets us use a name such as geekwisdom.net for a website rather than the IP address, 216.239.38.21. In the DNS protocol, there are several types of records that can be associated with domain name entries in the system. For this project, we need to only concern ourselves with one of those record types, the A record, for recording IP addresses for domain names. A web browser that's been told to visit any domain looks up the A record for that domain and uses that IP address to send HTTP(S) requests for website content.
The specific method to add an A record to the DNS entries of a domain varies considerably from one domain registrar to another. For example, one registrar (Pair Domains) has this screen:
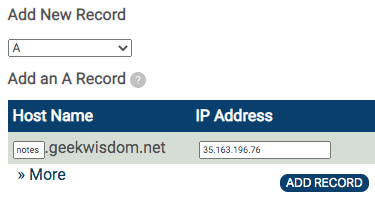
In the dashboard for a specific domain, there might be a section for adding new DNS records. In this registrar, a dropdown lets you choose among the record types. Select the A record type, then for your domain name enter the IP address in the right-hand box, and in the left-hand box enter the subdomain name. In this case, we are creating a subdomain, notes.geekwisdom.net, so we can deploy a test site without disturbing the main site hosted on that domain. This also lets us avoid the expense of registering a new domain for this project.
As soon as you click the ADD RECORD button, the A record will be published. Since it usually takes some time for DNS records to propagate, you might not be able to visit the domain name right away. If this takes more than a couple of hours, you might have done something wrong.
Once the A record is successfully deployed, your users will be able to visit the Notes application at a nice domain like notes.geekwisdom.net.
Note that the IP address will change every time the EC2 instances are redeployed. If you redeploy the EC2 instances, you will need to update the A record for the new address.
In this section, we have learned about assigning a domain name to the EC2 instance. This will make it easier for our users to access Notes, while also letting us provision an HTTPS/SSL certificate.
Adding the domain name means updating the Twitter application configuration so that Twitter knows about the domain name.
Updating the Twitter application
Twitter needs to know which URLs are valid for our application. So far, we've told Twitter about test URLs on our laptop. We have Notes on a live domain, we need to tell Twitter about this.
We've already done this several times, so you already know what to do. Head to developers.twitter.com, logging in with your Twitter account, and go to the Apps dashboard. Edit the application related to your Notes instance, and add your domain name to the list of URLs.
We will be implementing both HTTP and HTTPS for the Notes application, and therefore Notes will have both http:// and https:// URLs. This means you must not only add the HTTP URLs to the Twitter configuration site, but also the HTTPS URLs.
In the compose-stack/docker-compose.yml file, the TWITTER_CALLBACK_HOST environment variable in the svc-notes configuration must also be updated with the domain.
We now have both a domain name associated with the EC2 cluster, and we've informed Twitter of the domain name. We should be able to redeploy Notes to the swarm and be able to use it with the domain name. That includes being able to log in using Twitter, creating and deleting notes, and so forth. At this point, you cannot put an HTTPS URL into TWITTER_CALLBACK_HOST because we've not implemented HTTPS support.
These steps prepared the way for implementing HTTPS on Notes using Let's Encrypt. But first, let's examine how Let's Encrypt works so we can better implement it for Notes.
Planning how to use Let's Encrypt
Like every HTTPS/SSL certificate provider, Let's Encrypt is required to be certain that you own the domain for which you're requesting the certificate. Successfully using Let's Encrypt requires successful validation before any SSL certificates are issued. Once a domain is registered with Let's Encrypt, the registration must be renewed at least every 90 days, because that's the expiry time for their SSL certificates. Domain registration, and certificate renewal, are therefore the two primary tasks we must accomplish.
In this section, we'll discuss how the registration and renewal features work. The goal is gaining an overview of how we'll manage an HTTPS service for any domain we plan to use.
Let's Encrypt supports an API and there are several client applications for this API. Certbot is the recommended user interface for Let's Encrypt requests. It is easily installed on a variety of operating systems. For example, it is available through the Debian/Ubuntu package management system.
For Certbot documentation, see https://certbot.eff.org/docs/intro.html.
Validated domain ownership is a core feature of HTTPS, making it a core requirement for any SSL certificate supplier to be certain it is handing out SSL certificates correctly. Let's Encrypt has several validation strategies, and in this project, we'll focus on one, the HTTP-01 challenge.
The HTTP-01 challenge involves the Let's Encrypt service making a request to a URL such as http://<YOUR_DOMAIN>/.well-known/acme-challenge/<TOKEN>. The <TOKEN> is a coded string supplied by Let's Encrypt, which the Certbot tool will write as a file in a directory. Our task is then to somehow allow the Let's Encrypt servers to retrieve that file using this URL.
Once Certbot successfully registers the domain with Let's Encrypt, it receives a pair of PEM files comprising the SSL certificate. Certbot tracks various administrative details, and the SSL certificates, in a directory, by default /etc/letsencrypt. The SSL certificate in turn must be used to implement the HTTPS server for Notes.
Let's Encrypt SSL certificates expire in 90 days, and we must create an automated administrative task to renew the certificates. Certbot is also used for certificate renewal, by running certbot renew. This command looks at the domains registered on this server, and for any that require renewal it reruns the validation process. Therefore the directory required for the HTTP-01 challenge must remain enabled.
With SSL certificates in hand, we must configure some an HTTP server instance to use those certificates to implement HTTPS. It's very possible to configure the svc-notes service to handle HTTPS on its own. In the Node.js runtime is an HTTPS server object that could handle this requirement. It would be a small rewrite in notes/app.mjs to accommodate SSL certificates to implement HTTPS, as well as the HTTP-01 challenge.
But there is another possible approach. Web servers such as NGINX are very mature, robust, well tested, and, most importantly, support HTTPS. We can use NGINX to handle the HTTPS connection, and use what's called a reverse proxy to pass along the traffic to svc-notes as HTTP. That is, NGINX would be configured to accept in-bound HTTPS traffic, converting it to HTTP traffic to send to svc-notes.
Beyond the security goal of implementing HTTPS, this has an additional advantage of using a well-regarded web server (NGINX) to act as a shield against certain kinds of attacks.
Having looked over the Let's Encrypt documentation, we have a handle on how to proceed. There is a Docker container available that handles everything we need to do with NGINX and Let's Encrypt. In the next section, we'll learn how to integrate that container with the Notes stack, and implement HTTPS.
Using NGINX and Let's Encrypt in Docker to implement HTTPS for Notes
We just discussed how to implement HTTPS for Notes using Let's Encrypt. The approach we'll take is to use a pre-baked Docker container, Cronginx (https://hub.docker.com/r/robogeek/cronginx), which includes NGINX, Certbot (a Let's Encrypt client), and a Cron server with a Cron job for managing SSL certificate renewal. This will simply require adding another container to the Notes stack, a little bit of configuration, and running a command to register our domain with Let's Encrypt.
Before starting this section, make sure you have set aside a domain name that we will use in this project.
In the Cronginx container, Cron is used for managing a background task to renew SSL certificates. Yes, Cron, the server Linux/Unix administrators have used for decades for managing background tasks.
The NGINX configuration will both handle the HTTP-01 challenge and use a reverse proxy for the HTTPS connection. A proxy server acts as an intermediary; it receives requests from clients and uses other services to satisfy those requests. A reverse proxy is a kind of proxy server that retrieves resources from one or more other servers, while making it look like the resource came from the proxy server. In this case, we will configure NGINX to access the Notes service at http://svc-notes:3000, while making the appearance that the Notes service is hosted by the NGINX proxy.
If you don't know how to configure NGINX, don't worry because we'll show exactly what to do, and it's relatively simple.
Adding the Cronginx container to support HTTPS on Notes
We've determined that adding HTTPS support requires the addition of another container to the Notes stack. This container will handle the HTTPS connection and incorporate tools for managing SSL certificates provisioned from Let's Encrypt.
In the compose-stack directory, edit docker-compose.yml like so:
services:
  ...
  svc-notes:
    ...
    # ports:
    # - "80:3000"
    ...
    environment:
      TWITTER_CALLBACK_HOST: "http://YOUR-DOMAIN"
  ...
  cronginx:
    image: robogeek/cronginx
    container_name: cronginx
    deploy:
      replicas: 1
      placement:
        constraints:
          - "node.labels.type==public"
    networks:
      - frontnet
    ports:
      - 80:80
      - 443:443
    dns:
      - 8.8.8.8
      - 9.9.9.9
    restart: always
    volumes:
      - type: bind
        source: /home/ubuntu/etc-letsencrypt
        target: /etc/letsencrypt
      - type: bind
        source: /home/ubuntu/webroots
        target: /webroots
      - type: bind
        source: /home/ubuntu/nginx-conf-d
        target: /etc/nginx/conf.d
Because the svc-notes container will not be handling inbound traffic, we start by disabling its ports tag. This has the effect of ensuring it does not export any ports to the public. Instead, notice that in the cronginx container we export both port 80 (HTTP) and port 443 (HTTPS). That container will take over interfacing with the public internet.
Another change on svc-notes is to set the TWITTER_CALLBACK_HOST environment variable. Set this to the domain name you've chosen. Remember that correctly setting this variable is required for successful login using Twitter. Until we finish implementing HTTPS, this should have an HTTP URL.
The deploy tag for Cronginx is the same as for svc-notes. In theory, because svc-notes is no longer interacting with the public it could be redeployed to an EC2 instance on the private network. Because both are attached to frontnet, either will be able to access the other with a simple domain name reference, which we'll see in the configuration file.
This container uses the same DNS configuration, because Certbot needs to be able to reach the Let's Encrypt servers to do its work.
The final item of interest is the volume mounts. In the previous section, we discussed certain directories that must be mounted into this container. As with the database containers, the purpose is to persist the data in those directories while letting us destroy and recreate the Cronginx container as needed. Each directory is mounted from /home/ubuntu because that's the directory that is available on the EC2 instances. The three directories are as follows:
- /etc/letsencrypt: As discussed earlier, Certbot uses this directory to track administrative information about domains being managed on the server. It also stores the SSL certificates in this directory.
- /webroots: This directory will be used in satisfying the HTTP-01 request to the http://<YOUR_DOMAIN>/.well-known/acme-challenge/<TOKEN> URL.
- /etc/nginx/conf.d: This directory holds the NGINX configuration files for each domain we'll handle using this Cronginx instance.
For NGINX configuration, there is a default config file at /etc/nginx/nginx.conf. That file automatically includes any configuration file in /etc/nginx/conf.d, within an http context. What that means is each such file should have one or more server declarations. It won't be necessary to go deeper into learning about NGINX since the config files we will use are very straightforward.
Further documentation for the commercial NGINX Plus product is at https://www.nginx.com/resources/admin-guide/.
The NXING website has a Getting Started section with many useful recipes at https://www.nginx.com/resources/wiki/start/.
It will be a useful convention to follow to have one file in the /etc/nginx/conf.d directory for each domain you are hosting. That means, in this project, you will have one domain, and therefore you'll store one file in the directory named YOUR-DOMAIN.conf. For the example domain we configured earlier, that file would be notes.geekwisdom.net.conf.
Creating an NGINX configuration to support registering domains with Let's Encrypt
At this point, you have selected a domain you will use for Notes. To register a domain with Let's Encrypt, we need a web server configured to satisfy requests to the http://<YOUR_DOMAIN>/.well-known/acme-challenge/<TOKEN> URL, and where the corresponding directory is writable by Certbot. All the necessary elements are contained in the Cronginx container.
What we need to do is create an NGINX configuration file suitable for handling registration, then run the shell script supplied inside Cronginx. After registration is handled, there will be another NGINX configuration file that's suitable for HTTPS. We'll go over that in a later section.
Create a file for your domain named initial-YOUR-DOMAIN.conf, named this way because it's the initial configuration file for the domain. It will contain this:
# HTTP — redirect all traffic to HTTPS
server {
  listen 80;
  # listen [::]:80 default_server ipv6only=on;

  # Here put the domain name the server is to be known as.
  server_name YOUR-DOMAIN www.YOUR-DOMAIN;
  access_log /var/log/YOUR-DOMAIN.access.log main;
  error_log /var/log/YOUR-DOMAIN.error.log debug;

  # This is for handling the ACME challenge. Substitute the
  # domain name here.
  location /.well-known/ {
    root /webroots/YOUR-DOMAIN/;
  }

  # Use this to proxy for another service
  location / {
    proxy_pass http://svc-notes:3000/;
  }
}
As we said, the NGINX configuration files are relatively simple. This declares a server, in this case listening to port 80 (HTTP). It is easy to turn on IPv6 support if you wish.
The server_name field tells NGINX which domain name to handle. The access_log and error_log fields, as the name implies, specify where to send logging output.
The location blocks describe how to handle sections of the URL space for the domain. In the first, it says that HTTP-01 challenges on the /.well-known URL are handled by reading files from /webroots/YOUR-DOMAIN. We've already seen that directory referenced in the docker-compose.yml file.
The second location block describes the reverse proxy configuration. In this case, we configure it to run an HTTP proxy to the svc-notes container at port 3000. That corresponds to the configuration in the docker-compose.yml file.
That's the configuration file, but we need to do a little work before we can deploy it to the swarm.
Adding the required directories on the EC2 host
We've identified three directories to use with Cronginx. Remember that each of the EC2 hosts is configured by a shell script we supply in the user_data field in the Terraform files. That script installs Docker and performs another setup. Therefore, we should use that script to create the three directories.
In terraform-swarm, edit ec2-public.tf and make this change:
resource "aws_instance" "public" {
...
    user_data = join("
", [
        ...
        // Make directories required for cronginx container
        "mkdir /home/ubuntu/etc-letsencrypt",
        "mkdir /home/ubuntu/webroots",
        "mkdir /home/ubuntu/nginx-conf-d"
    ]);
}
There is an existing shell script that performs the Docker setup. These three lines are appended to that script and create the directories.
With this in place, we can redeploy the EC2 cluster, and the directories will be there ready to be used.
Deploying the EC2 cluster and Docker swarm
Assuming that the EC2 cluster is currently not deployed, we can set it up as we did in Chapter 12, Deploying a Docker Swarm to AWS EC2 with Terraform. In terraform-swarm, run this command:
$ terraform apply
By now you will have done this several times and know what to do. Wait for it to finish deploying, record the IP addresses and other data, then initialize the swarm cluster and set up remote control access so you can run Docker commands on your laptop.
A very important task is to take the IP address and go to your DNS registrar and update the A record for the domain with the new IP address.
We need to copy the NGINX configuration file into /home/ubuntu/nginx-conf-d, so let's do so as follows:
$ ssh ubuntu@PUBLIC-IP-ADDRESS sudo chown ubuntu nginx-conf-d
$ scp initial-YOUR-DOMAIN.conf
      ubuntu@PUBLIC-IP-ADDRESS:/home/ubuntu/nginx-conf-d/
       YOUR-DOMAIN.conf
The chown command is required because when Terraform created that directory it became owned by the root user. It needs to be owned by the ubuntu user for the scp command to work.
At this point make sure that, in compose-swarm/docker-compose.yml, the TWITTER_CALLBACK_HOST environment variable for svc-notes is set to the HTTP URL (http://YOUR-DOMAIN) rather than the HTTPS URL. Obviously you have not yet provisioned HTTPS and can only use the HTTP domain.
With those things set up, we can run this:
$ printf '...' | docker secret create TWITTER_CONSUMER_SECRET -
xgfpl4f7grcx33e7hn3pjmep9
$ printf '...' | docker secret create TWITTER_CONSUMER_KEY -
1xen2h4cjige0uonxnyyg8icq

$ docker stack deploy --with-registry-auth
                      --compose-file docker-compose.yml notes
...
Creating network notes_frontnet
Creating network notes_authnet
Creating network notes_svcnet
Creating service notes_db-notes
Creating service notes_svc-notes
Creating service notes_redis
Creating service notes_cronginx
Creating service notes_db-userauth
Creating service notes_svc-userauth
This adds the required secrets to the swarm, and then deploys the Notes stack. After a few moments, the services should all show as having launched. Notice that Cronginx is one of the services.
Once it's fully launched, you should be able to use Notes as always, but using the domain you configured. You should even be able to log in using Twitter.
Registering a domain with Let's Encrypt
We have just deployed the Notes stack on the AWS EC2 infrastructure. A part of this new deployment is the Cronginx container with which we'll handle HTTPS configuration.
We have Notes deployed on the swarm, with the cronginx container acting as an HTTP proxy. Inside that container came pre-installed the Certbot tool and a script (register.sh) to assist with registering domains. We must run register.sh inside the cronginx container, and once the domain is registered we will need to upload a new NGINX configuration file.
Starting a shell inside the cronginx container can be this easy:
$ docker ps
.... look for container name for cronginx
$ docker exec -it notes_cronginx.1.CODE-STRING bash
root@d4a81204cca4:/scripts# ls
register.sh renew.sh
You see there is a file named register.sh containing the following:
#!/bin/sh
mkdir -p /webroots/$1/.well-known/acme-challenge
certbot certonly --webroot -w /webroots/$1 -d $1
This script is designed to both create the required directory in /webroots, and to use Certbot to register the domain and provision the SSL certificates. Refer to the configuration file and you'll see how the /webroots directory is used.
The certbot certonly command only retrieves SSL certificates and does not install them anywhere. What that means is it does not directly integrate with any server, but simply stashes the certificates in a directory. That directory is within the /etc/letsencrypt hierarchy.
The --webroot option means that we're running in cooperation with an existing web server. It must be configured to serve the /.well-known/acme-challenge files from the directory specified with the -w option, which is the /webroots/YOUR-DOMAIN directory we just discussed. The -d option is the domain name to be registered.
In short, register.sh fits with the configuration file we created.
The script is executed like so:
root@d4a81204cca4:/scripts# sh -x register.sh notes.geekwisdom.net
+ mkdir -p /webroots/notes.geekwisdom.net/.well-known/acme-challenge
+ certbot certonly --webroot -w /webroots/notes.geekwisdom.net -d notes.geekwisdom.net
Saving debug log to /var/log/letsencrypt/letsencrypt.log
Plugins selected: Authenticator webroot, Installer None
Enter email address (used for urgent renewal and security notices) (Enter 'c' to
cancel): ...
We run the shell script using sh -x register.sh and supply our chosen domain name as the first argument. Notice that it creates the /webroots directory, which is required for the Let's Encrypt validation. It then runs certbot certonly, and the tool starts asking questions required for registering with the service.
The registration process ends with this message:
Obtaining a new certificate
Performing the following challenges:
http-01 challenge for notes.geekwisdom.net
Using the webroot path /webroots/notes.geekwisdom.net for all unmatched domains.
Waiting for verification...
Cleaning up challenges

IMPORTANT NOTES:
 - Congratulations! Your certificate and chain have been saved at:
   /etc/letsencrypt/live/notes.geekwisdom.net/fullchain.pem
   Your key file has been saved at:
   /etc/letsencrypt/live/notes.geekwisdom.net/privkey.pem
   Your cert will expire on 2020-09-23. To obtain a new or tweaked
   version of this certificate in the future, simply run certbot
   again. To non-interactively renew *all* of your certificates, run
   "certbot renew"
 - Your account credentials have been saved in your Certbot
   configuration directory at /etc/letsencrypt. You should make a
   secure backup of this folder now. This configuration directory will
   also contain certificates and private keys obtained by Certbot so
   making regular backups of this folder is ideal.
The key data is the pathnames for the two PEM files that make up the SSL certificate. It also tells you to run certbot renew every so often to renew the certificates. We already took care of that by installing the Cron job.
As they say, it is important to persist this directory elsewhere. We took the first step by storing it outside the container, letting us destroy and recreate the container at will. But what about when it's time to destroy and recreate the EC2 instances? Place a task on your backlog to set up a backup procedure, and then during EC2 cluster initialization install this directory from the backup.
Now that our domain is registered with Let's Encrypt, let's change the NGINX configuration to support HTTPS.
Implementing an NGINX HTTPS configuration using Let's Encrypt certificates
Alright, we're getting so close we can taste the encryption. We have deployed NGINX plus Let's Encrypt tools into the Notes application stack. We've verified that the HTTP-only NGINX configuration works correctly. And we've used Certbot to provision SSL certificates for HTTPS from Let's Encrypt. That makes it time to rewrite the NGINX configuration to support HTTPS and to deploy that config to the Notes stack.
In compose-stack/cronginx create a new file, YOUR-DOMAIN.conf, for example notes.geekwisdom.net.conf. The previous file had a prefix, initial, because it served us for the initial phase of implementing HTTPS. Now that the domain is registered with Let's Encrypt, we need a different configuration file:
# HTTP — redirect all traffic to HTTPS
server {
  listen 80;
  # listen [::]:80 default_server ipv6only=on;

  # Here put the domain name the server is to be known as.
  server_name YOUR-DOMAIN www.YOUR-DOMAIN;
  access_log /var/log/YOUR-DOMAIN.access.log main;
  error_log /var/log/YOUR-DOMAIN.error.log debug;

  # This is for handling the ACME challenge. Substitute the
  # domain name here.
  location /.well-known/ {
    root /webroots/YOUR-DOMAIN/;
  }

  # Use this to force a redirect to the SSL/HTTPS site
  return 301 https://$host$request_uri;
}
This reconfigures the HTTP server to do permanent redirects to the HTTPS site. When an HTTP request results in a 301 status code, that is a permanent redirect. Any redirect tells web browsers to visit a URL provided in the redirect. There are two kinds of redirects, temporary and permanent, and the 301 code makes this a permanent redirect. For permanent redirects, the browser is supposed to remember the redirect and apply it in the future. In this case, the redirect URL is computed to be the request URL, rewritten to use the HTTPS protocol.
Therefore our users will silently be sent to the HTTPS version of Notes, with no further effort on our part.
To implement the HTTPS server, add this to the config file:
# HTTPS service
server { # simple reverse-proxy
  # Enable HTTP/2
  listen 443 ssl http2;
  # listen [::]:443 ssl http2;

  # Substitute here the domain name for the site
  server_name YOUR-DOMAIN www.YOUR-DOMAIN;
  access_log /var/log/YOUR-DOMAIN.access.log main;
  error_log /var/log/YOUR-DOMAIN.error.log debug;

  # Use the Let’s Encrypt certificates
  # Substitute in the domain name
  ssl_certificate /etc/letsencrypt/live/YOUR-DOMAIN/fullchain.pem;
  ssl_certificate_key /etc/letsencrypt/live/YOUR-DOMAIN/privkey.pem;

  # Replication of the ACME challenge handler. Substitute
  # the domain name.
  location /.well-known/ {
    root /webroots/YOUR-DOMAIN/;
  }

  # See:
  # https://stackoverflow.com/questions/29043879/socket-io-with-nginx
  location ^~ /socket.io/ {
    proxy_set_header X-Real-IP $remote_addr;
    proxy_set_header X-Forwarded-For $proxy_add_x_forwarded_for;
    proxy_set_header Host $http_host;
    proxy_set_header X-NginX-Proxy false;

    proxy_pass http://svc-notes:3000;
    proxy_redirect off;

    proxy_http_version 1.1;
    proxy_set_header Upgrade $http_upgrade;
    proxy_set_header Connection "upgrade";
  }

  # Use this for proxying to a backend service
  # The HTTPS session is terminated at this Proxy.
  # The back end service will see a simple HTTP service.
  location / {
    proxy_set_header X-Real-IP $remote_addr;
    proxy_set_header X-Forwarded-For $proxy_add_x_forwarded_for;
    proxy_set_header X-NginX-Proxy true;
    proxy_pass http://svc-notes:3000/;
    proxy_ssl_session_reuse off;
    proxy_set_header Host $http_host;
    proxy_cache_bypass $http_upgrade;
    proxy_redirect off;
  }
}
This is an HTTPS server implementation in NGINX. There are many similarities to the HTTP server declaration, but with a couple of HTTPS – specific items. It listens on port 443, the standard port for HTTPS, and tells NGINX to use SSL. It has the same configuration for the server name and logging.
The next segment tells NGINX the location of the SSL certificates. Simply replace this with the pathname that Certbot gave you.
The next segment handles the /.well-known URL for future validation requests with Let's Encrypt. Both the HTTP and HTTPS server definitions have been configured to handle this URL from the same directory. We don't know whether Let's Encrypt will request validation through the HTTP or HTTPS URL, so we might as well support this on both servers.
The next segment is a proxy server to handle the /socket.io URL. This requires specific settings because Socket.IO must negotiate an upgrade from HTTP/1.1 to WebSocket. Otherwise, an error is printed in the JavaScript console, and the Socket.IO features will not work. For more information, see the URL shown in the code.
The last segment is a reverse proxy set up to proxy HTTPS traffic to an HTTP backend server. In this case, the backend server is the Notes application running on port 3000.
Having created a new configuration file, we can upload it to the notes-public EC2 instance like so:
$ scp YOUR-DOMAIN.conf
      [email protected]:/home/ubuntu/nginx-conf-d/YOUR-DOMAIN.conf
The next question is how do we restart the NGINX server so it reads the new configuration file? One way is to send a SIGHUP signal to the NGINX process, causing it to reload the configuration:
$ docker exec -it notes_cronginx.1.8c2in59gz7b4g2asxfxgd1y3q bash
root@31a813dad28c:/scripts# kill -HUP `cat /var/run/nginx.pid`
The nginx.pid file contains the process ID of the NGINX process. Many background services on Unix/Linux systems store the process ID in such a file. This command sends the SIGHUP signal to that process, and NGINX is written to reread its configuration upon receiving that signal. SIGHUP is one of the standard Unix/Linux signals, and is commonly used to cause background processes to reload their configuration like this. For more information, see the signal(2) man page.
However, using Docker commands we can do this:
$ docker service update --force notes_cronginx
notes_cronginx
overall progress: 1 out of 1 tasks
1/1: running
verify: Service converged
That will kill the existing container and start a new one.
Instead of that rosy success message, you might get this instead:
service update paused: update paused due to failure or early termination of task flueg3xg8aclciq05r1o2bk1w
This says that Docker swarm saw that the container exited, and it was therefore unable to restart the service.
It is easy to make mistakes in NGINX configuration files. First take a careful look at the configuration to see what might be amiss. The next stage of diagnosis is to look at the NGINX logs. We can do that with the docker logs command, but we need to know the container name. Because the container has exited, we must run this:
$ docker ps -a
The -a option causes docker ps to return information about every container, even the ones that are not currently running. With the container name in hand, we can run this:
$ docker logs notes_cronginx.1.bytadzur7fyj0c3xtwokpcrv0
2020/06/25 18:36:18 [emerg] 8#8: unknown directive "Use" in /etc/nginx/conf.d/YOUR-DOMAIN.conf:26
And indeed, the issue is a syntax error, and it even helpfully tells you the line number.
Once you have successfully restarted the cronginx service, visit the Notes service you've deployed and verify that it is in HTTPS mode.
In this section, we successfully deployed HTTPS support for the Notes application stack on our AWS EC2 based Docker swarm. We used the files Docker container created in the previous section and deployed the updated Notes Stack to the swarm. We then ran Certbot to register our domain with Let's Encrypt. And we rewrote the NGINX configuration to support HTTPS.
Our next task is to verify the HTTPS configuration is working correctly.
Testing HTTPS support for the Notes application
We have done ad hoc testing, and more formal testing, of Notes all through this book. Therefore you know what to do to ensure Notes is working in this new environment. But there are a couple of HTTPS-specific things to check.
In your browser, head to the domain name where you've hosted the application. If all went well, you will be greeted by the application, and it will have redirected to the HTTPS port automatically.
So that we humans know that a website is on HTTPS, most browsers show a lock icon in the location bar.
You should be able to click on that lock icon, and the browser will show a dialog giving information about the certificate. The certificate will verify that this is indeed the correct domain, and will also show the certificate was issued by Let's Encrypt via the Let's Encrypt Authority X3.
You should be able to browse around the entire application and still see the lock icon.
You should be on the lookout for mixed content warnings. These will appear in the JavaScript console and occur when some content on an HTTPS-loaded page is loaded using an HTTP URL. The mixed content scenario is less secure, and therefore browsers issue warnings to the user. Messages might appear in the JavaScript console inside the browser. If you have followed the instructions in this book correctly you will not see this message.
Finally, head to the Qualys SSL Labs test page for SSL implementations. This service will examine your website, especially the SSL certificates, and give you a score. To examine your score, see https://www.ssllabs.com/ssltest/.
Having completed this task, you may want to bring down the AWS EC2 cluster. Before doing so, it's good form to de-register the domain from Let's Encrypt. That's also a simple matter of running Certbot with the right command:
$ docker ps
...
$ docker exec -it notes_cronginx.1.lgz1bi8cvr2c0gapuvibegkrn bash
root@f896d97f30d5:/scripts#
root@f896d97f30d5:/scripts# certbot delete --domain YOUR-DOMAIN
...
As before, we run docker ps to find out the exact container name. With that name, we start a command shell inside the container. The actual act is simple, we just run certbot delete and specify the domain name.
Certbot doesn't just go ahead and delete the registration. Instead, it asks you to verify that's what you want to do, then it deletes the registration.
In this section, we have finished implementing HTTPS support for Notes by learning how to test that it is implemented correctly.
We've accomplished a redesign of the Notes application stack using a custom NGINX-based container to implement HTTPS support. This approach can be used for any service deployment, where an NGINX instance is used as the frontend to any kind of backend service.
But we have other security fish to fry. Using HTTPS solves only part of the security problem. In the next section, we'll look at Helmet, a tool for Express applications to set many security options in the HTTP headers.
Using Helmet for across-the-board security in Express applications
While it was useful to implement HTTPS, that's not the end of implementing security measures. It's hardly the beginning of security, for that matter. The browser makers working with the standards organizations have defined several mechanisms for telling the browser what security measures to take. In this section, we will go over some of those mechanisms, and how to implement them using Helmet.
Helmet (https://www.npmjs.com/package/helmet) is, as the development team says, not a security silver bullet (do Helmet's authors think we're trying to protect against vampires?). Instead, it is a toolkit for setting various security headers and taking other protective measures in Node.js applications. It integrates with several packages that can be either used independently or through Helmet.
Using Helmet is largely a matter of importing the library into node_modules, making a few configuration settings, and integrating it with Express.
In the notes directory, install the package like so:
$ npm install helmet --save
Then add this to notes/app.mjs:
import helmet from 'helmet';
...
const app = express();
export default app;

app.use(helmet());
That's enough for most applications. Using Helmet out of the box provides a reasonable set of default security options. We could be done with this section right now, except that it's useful to examine closely what Helmet does, and its options.
Helmet is actually a cluster of 12 modules for applying several security techniques. Each can be individually enabled or disabled, and many have configuration settings to make. One option is instead of using that last line, to initialize and configure the sub-modules individually. That's what we'll do in the following sections.
Using Helmet to set the Content-Security-Policy header
The Content-Security-Policy (CSP) header can help to protect against injected malicious JavaScript and other file types.
We would be remiss to not point out a glaring problem with services such as the Notes application. Our users could enter any code they like, and an improperly behaving application will simply display that code. Such applications can be a vector for JavaScript injection attacks among other things.
To try this out, edit a note and enter something like this:
<script src="https://pirates.den/malicious.js"></script>
Click the Save button, and you'll see this code displayed as text. A dangerous version of Notes would instead insert the <script> tag in the notes view page so that the malicious JavaScript would be loaded and cause a problem for our visitors. Instead, the <script> tag is encoded as safe HTML so it simply shows up as text on the screen. We didn't do anything special for that behavior, Handlebars did that for us.
Actually, it's a little more interesting. If we look at the Handlebars documentation, http://handlebarsjs.com/expressions.html, we learn about this distinction:
{{encodedAsHtml}}

{{{notEncodedAsHtml}}}
In Handlebars, a value appearing in a template using two curly braces ({{encoded}}) is encoded using HTML coding. For the previous example, the angle bracket is encoded as < and so on for display, rendering that JavaScript code as neutral text rather than as HTML elements. If instead, you use three curly braces ({{{notEncoded}}}), the value is not encoded and is instead presented as is. The malicious JavaScript would be executed in your visitor's browser, causing problems for your users.
We can see this problem by changing views/noteview.hbs to use raw HTML output:
{{#if note}}<div id="notebody">{{{ note.body }}}</div>{{/if}}
We do not recommend doing this except as an experiment to see what happens. The effect is, as we just said, to allow our users to enter HTML code and have it displayed as is. If Notes were to behave this way, any note could potentially hold malicious JavaScript snippets or other malware.
Let's return to Helmet's support for the Content-Security-Policy header. With this header, we instruct the web browser the scope from which it can download certain types of content. Specifically, it lets us declare which domains the browser can download JavaScript, CSS, or Font files from, and which domains the browser is allowed to connect to for services.
This header, therefore, solves the named issue, namely our users entering malicious JavaScript code. But it also handles a similar risk of a malicious actor breaking in and modifying the templates to include malicious JavaScript code. In both cases, telling the browser a specific list of allowed domains means references to JavaScript from malicious sites will be blocked. That malicious JavaScript that's loaded from pirates.den won't run.
To see the documentation for this Helmet module, see https://helmetjs.github.io/docs/csp/.
There is a long list of options. For instance, you can cause the browser to report any violations back to your server, in which case you'll need to implement a route handler for /report-violation. This snippet is sufficient for Notes:
app.use(helmet.contentSecurityPolicy({
  directives: {
    defaultSrc: ["'self'"],
    scriptSrc: ["'self'", "'unsafe-inline'" ],
    styleSrc: ["'self'", 'fonts.googleapis.com' ],
    fontSrc: ["'self'", 'fonts.gstatic.com' ],
    connectSrc: [ "'self'", 'wss://notes.geekwisdom.net' ]
  }
}));
For better or for worse, the Notes application implements one security best practice—all CSS and JavaScript files are loaded from the same server as the application. Therefore, for the most part, we can use the 'self' policy. There are several exceptions:
- scriptSrc: Defines where we are allowed to load JavaScript. We do use inline JavaScript in noteview.hbs and index.hbs, which must be allowed.
- styleSrc, fontSrc: We're loading CSS files from both the local server and from Google Fonts.
- connectSrc: The WebSockets channel used by Socket.IO is declared here.
To develop this, we can open the JavaScript console or Chrome DevTools while browsing the website. Errors will show up listing any domains of failed download attempts. Simply add such domains to the configuration object.
Making the ContentSecurityPolicy configurable
Obviously, the ContentSecurityPolicy settings shown here should be configurable. If nothing else the setting for connectSrc must be, because it can cause a problem that prevents Socket.IO from working. As shown here, the connectSrc setting includes the URL wss://notes.geekwisdom.net. The wss protocol here refers to WebSockets and is designed to allow Socket.IO to work while Notes is hosted on notes.geekwisdom.net. But what about when we want to host it on a different domain?
To experiment with this problem, change the hard coded string to a different domain name then redeploy it to your server. In the JavaScript console in your browser you will get an error like this:
Refused to connect to wss://notes.geekwisdom.net/socket.io/?EIO=3&transport=websocket&sid=x-WiqH-g6uKIqoNqAAPA because it does not appear in the connect-src directive of the Content Security Policy.
What's happened is that the statically defined constant was no longer compatible with the domain where Notes was deployed. You had reconfigured this setting to limit connections to a different domain, such as notes.newdomain.xyz, but the service was still hosted on the existing domain, such as notes.geekwisdom.net. The browser no longer believed it was safe to connect to notes.geekwisdom.net because your configuration said to trust only notes.newdomain.xyz.
The best solution is to make this a configurable setting by declaring another environment variable that can be set to customize behavior.
In app.mjs, change the contentSecurityPolicy section to this:
const csp_connect_src = [ "'self'" ];
if (typeof process.env.CSP_CONNECT_SRC_URL === 'string'
 && process.env.CSP_CONNECT_SRC_URL !== '') {
 csp_connect_src.push(process.env.CSP_CONNECT_SRC_URL);
}
app.use(helmet.contentSecurityPolicy({
  directives: {
    defaultSrc: ["'self'"],
    scriptSrc: ["'self'", "'unsafe-inline'" ],
    styleSrc: ["'self'", 'fonts.googleapis.com' ],
    fontSrc: ["'self'", 'fonts.gstatic.com' ],
    connectSrc: csp_connect_src
  }
}));
This lets us define an environment variable, CSP_CONNECT_SRC_URL, which will supply a URL to be added into the array passed to the connectSrc parameter. Otherwise, the connectSrc setting will be limited to "'self'".
Then in compose-swarm/docker-compose.yml, we can declare that variable like so:
services:
  ...
  svc-notes:
    ...
    environment:
      ...
      CSP_CONNECT_SRC_URL: "wss://notes.geekwisdom.net"
      ...
We can now set that in the configuration, changing it as needed.
After rerunning the docker stack deploy command, the error message will go away and Socket.IO features will start to work.
In this section, we learned about the potential for a site to send malicious scripts to browsers. Sites that accept user-supplied content, such as Notes, can be a vector for malware. By using this header, we are able to notify the web browser which domains to trust when visiting this website, which will then block any malicious content added by malicious third parties.
Next, let's learn about preventing excess DNS queries.
Using Helmet to set the X-DNS-Prefetch-Control header
DNS Prefetch is a nicety implemented by some browsers where the browser will preemptively make DNS requests for domains referred to by a given page. If a page has links to other websites, it will make DNS requests for those domains so that the local DNS cache is pre-filled. This is nice for users because it improves browser performance, but it is also a privacy intrusion and can make it look like the person visited websites they did not visit. For documentation, see https://helmetjs.github.io/docs/dns-prefetch-control.
Set the DNS prefetch control with the following:
app.use(helmet.dnsPrefetchControl({ allow: false })); // or true
In this case, we learned about preventing the browser from making premature DNS queries. The risk is that excess DNS queries give a false impression of which websites someone has visited.
Let's next look at how to control which browser features can be enabled.
Using Helmet to control enabled browser features using the Feature-Policy header
Web browsers nowadays have a long list of features that can be enabled, such as vibrating a phone, or turning on the camera or microphone, or reading the accelerometer. These features are interesting and very useful in some cases, but can be used maliciously. The Feature-Policy header lets us notify the web browser about which features to allow to be enabled, or to deny enabling.
For Notes we don't need any of those features, though some look intriguing as future possibilities. For instance, we could pivot to taking on Instagram if we allowed people to upload photos, maybe? In any case, this configuration is very strict:
app.use(helmet.featurePolicy({
  features: {
    accelerometer: ["'none'"],
    ambientLightSensor: ["'none'"],
    autoplay: ["'none'"],
    camera: ["'none'"],
    encryptedMedia: ["'self'"],
    fullscreen: ["'self'"],
    geolocation: ["'none'"],
    gyroscope: ["'none'"],
    vibrate: ["'none'"],
    payment: ["'none'"],
    syncXhr: ["'none'"]
  }
}));
To enable a feature, either set it to 'self' to allow the website to turn on the feature, or a domain name of a third-party website to allow to enable that feature. For example, enabling the payment feature might require adding 'paypal.com' or some other payment processor.
In this section, we have learned about allowing the enabling or disabling of browser features.
In the next section, let's learn about preventing clickjacking.
Using Helmet to set the X-Frame-Options header
Clickjacking has nothing to do with carjacking but instead is an ingenious technique for getting folks to click on something malicious. The attack uses an invisible <iframe>, containing malicious code, positioned on top of a thing that looks enticing to click on. The user would then be enticed into clicking on the malicious thing.
The frameguard module for Helmet will set a header instructing the browser on how to treat an <iframe>. For documentation, see https://helmetjs.github.io/docs/frameguard/.
app.use(helmet.frameguard({ action: 'deny' }));
This setting controls which domains are allowed to put this page into an <iframe>. Using deny, as shown here, prevents all sites from embedding this content using an <iframe>. Using sameorigin allows the site to embed its own content. We can also list a single domain name to be allowed to embed this content.
In this section, you have learned about preventing our content from being embedded into another website using <iframe>.
Now let's learn about hiding the fact that Notes is powered by Express.
Using Helmet to remove the X-Powered-By header
The X-Powered-By header can give malicious actors a clue about the software stack in use, informing them of attack algorithms that are likely to succeed. The Hide Powered-By submodule for Helmet simply removes that header.
Express can disable this feature on its own:
app.disable('x-powered-by')
Or you can use Helmet to do so:
app.use(helmet.hidePoweredBy())
Another option is to masquerade as some other stack like so:
app.use(helmet.hidePoweredBy({ setTo: 'Drupal 5.7.0' }))
There's nothing like throwing the miscreants off the scent.
We've learned how to let your Express application go incognito to avoid giving miscreants clues about how to break in. Let's next learn about declaring a preference for HTTPS.
Improving HTTPS with Strict Transport Security
Having implemented HTTPS support, we aren't completely done. As we said earlier, it is best for our users to use the HTTPS version of Notes. In our AWS EC2 deployment, we forced the user to use HTTPS with a redirect. But in some cases we cannot do that, and instead must try to encourage the users to visit the HTTPS site over the HTTP site.
The Strict Transport Security header notifies the browser that it should use the HTTPS version of the site. Since that's simply a notification, it's also necessary to implement a redirect from the HTTP to HTTPS version of Notes.
We set Strict-Transport-Security like so:
const sixtyDaysInSeconds = 5184000 // 60 * 24 * 60 * 60
app.use(helmet.hsts({
  maxAge: sixtyDaysInSeconds
}));
This tells the browser to stick with the HTTPS version of the site for the next 60 days, and never visit the HTTP version.
And, as long as we're on this issue, let's learn about express-force-ssl, which is another way to implement a redirect so the users use HTTPS. After adding a dependency to that package in package.json, add this in app.mjs:
import forceSSL from 'express-force-ssl';
...
app.use(forceSSL);
app.use(bodyParser.json());
With this package installed, the users don't have to be encouraged to use HTTPS because we're silently forcing them to do so.
With our deployment on AWS EC2, using this module will cause problems. Because HTTPS is handled in the load balancer, the Notes app does not know the visitor is using HTTPS. Instead, Notes sees an HTTP connection, and if forceSSL were in use it would then force a redirect to the HTTPS site. But because Notes does not see the HTTPS session at all, it only sees HTTP requests to which forceSSL will always respond with a redirect.
These settings are not useful in all circumstances. Your context may require these settings, but for a context like our deployment on AWS EC2 it is simply not needed. For the sites where this is useful, we have learned about notifying the web browser to use the HTTPS version of our website, and how to force a redirect to the HTTPS site.
Let's next learn about cross-site-scripting (XSS) attacks.
Mitigating XSS attacks with Helmet
XSS attacks attempt to inject JavaScript code into website output. With malicious code injected into another website, the attacker can access information they otherwise could not retrieve, or cause other sorts of mischief. The X-XSS-Protection header prevents certain XSS attacks, but not all of them, because there are so many types of XSS attacks:
app.use(helmet.xssFilter());
This causes an X-XSS-Protection header to be sent specifying 1; mode=block. This mode tells the browser to look for JavaScript in the request URL that also matches JavaScript on the page, and it then blocks that code. This is only one type of XSS attack, and therefore this is of limited usefulness. But it is still useful to have this enabled.
In this section, we've learned about using Helmet to enable a wide variety of security protections in web browsers. With these settings, our application can work with the browser to avoid a wide variety of attacks, and therefore make our site significantly safer.
But with this, we have exhausted what Helmet provides. In the next section, we'll learn about another package that prevents cross-site request forgery attacks.
Addressing Cross-Site Request Forgery (CSRF) attacks
CSRF attacks are similar to XSS attacks in that both occur across multiple sites. In a CSRF attack, malicious software forges a bogus request on another site. To prevent such an attack, CSRF tokens are generated for each page view. The tokens are to be included as hidden values in HTML FORMs and then checked when the FORM is submitted. A mismatch on the tokens causes the request to be denied.
The csurf package is designed to be used with Express https://www.npmjs.com/package/csurf . In the notes directory, run this:
$ npm install csurf --save
This installs the csurf package, recording the dependency in package.json.
Then install the middleware like so:
import csrf from 'csurf';
...
app.use(cookieParser());
app.use(csrf({ cookie: true }));
The csurf middleware must be installed following the cookieParser middleware.
Next, for every page that includes a FORM, we must generate and send a token with the page. That requires two things, in the res.render call we generate the token, sending the token with other data for the page, and then in the view template we include the token as a hidden INPUT on any form in the page. We're going to be touching on several files here, so let's get started.
In routes/notes.mjs, add the following as a parameter to the res.render call for the /add, /edit, /view, and /destroy routes:
csrfToken: req.csrfToken()
This generates the CSRF token, ensuring it is sent along with other data to the template. Likewise, do the same for the /login route in routes/users.mjs. Our next task is to ensure the corresponding templates render the token as a hidden INPUT.
In views/noteedit.hbs and views/notedestroy.hbs, add the following:
{{#if user}}
    <input type="hidden" name="_csrf" value="{{csrfToken}}">
    ...
{{/if}}
This is a hidden INPUT, and whenever the FORM containing this is submitted this value will be carried along with the FORM parameters.
The result is that code on the server generates a token that is added to each FORM. By adding the token to FORMs, we ensure it is sent back to the server on FORM submission. Other software on the server can then match the received token to the tokens that have been sent. Any mismatched token will cause the request to be rejected.
In views/login.hbs, make the same addition but adding it inside the FORM like so:
<form method='POST' action='/users/login'>
  <input type="hidden" name="_csrf" value="{{csrfToken}}">
  ...
</form>
In views/noteview.hbs, there's a form for submitting comments. Make this change:
<form id="submit-comment" class="well" data-async data-
 target="#rating-modal"
      action="/notes/make-comment" method="POST">
    <input type="hidden" name="_csrf" value="{{csrfToken}}">
    ...
</form>
In every case, we are adding a hidden INPUT field. These fields are not visible to the user and are therefore useful for carrying a wide variety of data that will be useful to receive on the server. We've already used hidden INPUT fields in Notes, such as in noteedit.hbs for the docreate flag.
This <input> tag renders the CSRF token into the FORM. When the FORM is submitted, the csurf middleware checks it for the correctness and rejects any that do not match.
In this section, we have learned how to stop an important type of attack, CSRF.
Denying SQL injection attacks
SQL injection is another large class of security exploits, where the attacker puts SQL commands into input data. See https://www.xkcd.com/327/ for an example.
The best practice for avoiding this problem is to use parameterized database queries, allowing the database driver to prevent SQL injections simply by correctly encoding all SQL parameters. For example, we do this in the SQLite3 model:
db.get("SELECT * FROM notes WHERE notekey = ?", [ key ] ...);
This uses a parameterized string, and the value for key is encoded and inserted in the place of the question mark. Most database drivers have a similar feature, and they already know how to encode values into query strings. Even if a miscreant got some SQL into the value of key, because the driver correctly encodes the contents of key the worst that will result is an SQL error message. That automatically renders inert any attempted SQL injection attack.
Contrast this with an alternative we could have written:
db.get(`SELECT * FROM notes WHERE notekey = ${key}`, ...);
The template strings feature of ES6 is very tempting to use everywhere. But it is not appropriate in all circumstances. In this case, the database query parameter would not be screened nor encoded, and if a miscreant can get a custom string to that query it could cause havoc in the database.
In this section, we learned about SQL injection attacks. We learned that the best defense against this sort of attack is the coding practice all coders should follow anyway, namely to use parameterized query methods offered by the database driver.
In the next section, we will learn about an effort in the Node.js community to screen packages for vulnerabilities.
Scanning for known vulnerabilities in Node.js packages
Built-in to the npm command-line tool is a command, npm audit, for reporting known vulnerabilities in the dependencies of your application. To support this command is a team of people, and software, who scan packages added to the npm registry. Every third-party package used by your application is a potential security hole.
It's not just that a query against the application might trigger buggy code, whether in your code or third-party packages. In some cases, packages that explicitly cause harm have been added to the npm registry.
Therefore the security audits of packages in the npm registry are extremely helpful to every Node.js developer.
The audit command consults the vulnerability data collected by the auditing team and tells you about vulnerabilities in packages your application uses.
When running npm install, the output might include a message like this:
found 8 vulnerabilities (7 low, 1 moderate)
 run `npm audit fix` to fix them, or `npm audit` for details
This tells us there are eight known vulnerabilities among the packages currently installed. Each vulnerability is assigned a criticality on this scale (https://docs.npmjs.com/about-audit-reports):
- Critical: Address immediately
- High: Address as quickly as possible
- Moderate: Address as time allows
- Low: Address at your discretion
In this case, running npm audit tells us that every one of the low-priority issues is in the minimist package. For example, the report includes this:
# Run npm install [email protected] to resolve 1 vulnerability
┌───────────────┬──────────────────────────────────────────────────────┐
│ Low           │ Prototype Pollution                                  │
├───────────────┼──────────────────────────────────────────────────────┤
│ Package       │ minimist                                             │
├───────────────┼──────────────────────────────────────────────────────┤
│ Dependency of │ hbs                                                  │
├───────────────┼──────────────────────────────────────────────────────|
│ Path          │ hbs > handlebars > optimist > minimist               │
├───────────────┼──────────────────────────────────────────────────────┤
│ More info     │ https://npmjs.com/advisories/1179                    │
└───────────────┴──────────────────────────────────────────────────────┘
In this case, minimist is reported because hbs uses handlebars, which uses optimist, which uses minimist. There are six more instances where minimist is used by some package that's used by another package that our application is using.
In this case, we're given a recommendation, to upgrade to [email protected], because that release results in depending on the correct version of minimist.
In another case, the chain of dependencies is this:
sqlite3 > node-pre-gyp > rc > minimist
In this case, no recommended fix is available because none of these packages have released a new version that depends on the correct version of minimist. The recommended solution for this case is to file issues with each corresponding package team requesting they update their dependencies to the later release of the offending package.
In the last case, it is our application that directly depends on the vulnerable package:
# Run npm update jquery --depth 1 to resolve 1 vulnerability
┌───────────────┬─────────────────────────────────────────────────────┐
│ Moderate      │ Cross-Site Scripting                                │
├───────────────┼─────────────────────────────────────────────────────┤
│ Package       │ jquery                                              │
├───────────────┼─────────────────────────────────────────────────────┤
│ Dependency of │ jquery                                              │
├───────────────┼─────────────────────────────────────────────────────┤
│ Path          │ jquery                                              │
├───────────────┼─────────────────────────────────────────────────────┤
│ More info     │ https://npmjs.com/advisories/1518                   │
└───────────────┴─────────────────────────────────────────────────────┘
Therefore it is our responsibility to fix this problem because it is in our code. The good news is that this particular package is not executed on the server side since jQuery is a client-side library that just so happens to be distributed through the npm repository.
The first step is to read the advisory to learn what the issue is. That way, we can evaluate for ourselves how serious this is, and what we must do to correctly fix the problem.
What's not recommended is to blindly update to a later package release just because you're told to do so. What if the later release is incompatible with your application? The best practice is to test that the update does not break your code. You may need to develop tests that illustrate the vulnerability. That way, you can verify that updating the package dependency fixes the problem.
In this case, the advisory says that jQuery releases before 3.5.0 have an XSS vulnerability. We are using jQuery in Notes because it is required by Bootstrap, and on the day we read the Bootstrap documentation we were told to use a much earlier jQuery release. Today, the Bootstrap documentation says to use jQuery 3.5.1. That tells us the Bootstrap team has already tested against jQuery 3.5.1, and we are therefore safe to go ahead with updating the dependency.
In this section, we have learned about the security vulnerability report we can get from the npm command-line tool. Unfortunately for Yarn users, it appears that Yarn doesn't support this command. In any case, this is a valuable resource for being warned about known security issues.
In the next section, we'll learn about the best practices for cookie management in Express applications.
Using good cookie practices
Some nutritionists say eating too many sweets, such as cookies, is bad for your health. Web cookies, however, are widely used for many purposes including recording whether a browser is logged in or not. One common use is for cookies to store session data to aid in knowing whether someone is logged in or not.
In the Notes application, we're already following the good practices described in the Express security guidelines:
- We're using an Express session cookie name different from the default shown in the documentation.
- The Express session cookie secret is not the default shown in the documentation.
- We use the express-session middleware, which only stores a session ID in the cookie, rather than the whole session data object.
Taken together, an attacker can't exploit any known vulnerability that relies on the default values for these items. While it is convenient that many software products have default values, such as passwords, those defaults could be security vulnerabilities. For example, the default Raspberry Pi login/password is pi and raspberry. While that's cute, any Raspbian-based IoT device that's left with the default login/password is susceptible to attack.
But there is more customization we can do to the cookie used with express-session. That package has a few options available for improving security. See https://www.npmjs.com/package/express-session, and then consider this change to the configuration:
app.use(session({
  store: sessionStore,
  secret: sessionSecret,
  resave: true,
  saveUninitialized: true,
  name: sessionCookieName,
  secure: true,
  maxAge: 2 * 60 * 60 * 1000 // 2 hours
}));
These are additional attributes that look useful. The secure attribute requires that cookies be sent ONLY over HTTPS connections. This ensures the cookie data is encrypted by HTTPS encryption. The maxAge attribute sets an amount of time that cookies are valid, expressed in milliseconds.
Cookies are an extremely useful tool in web browsers, even if there is a lot of over-hyped worry about what websites do with cookies. At the same time, it is possible to misuse cookies and create security problems. In this section, we learned how to mitigate risks with the session cookie.
In the next section, we'll review the best practices for AWS ECS deployment.
Hardening the AWS EC2 deployment
There is an issue left over from Chapter 12, Deploying a Docker Swarm to AWS EC2 with Terraform, which is the security group configuration for the EC2 instances. We configured the EC2 instances with permissive security groups, and it is better for them to be strictly defined. We rightly described that, at the time, as not the best practice, and promised to fix the issue later. This is where we do so.
In AWS, remember that a security group describes a firewall that allows or disallows traffic based on the IP port and IP address. This tool exists so we can decrease the potential attack surface miscreants have to gain illicit access to our systems.
For the ec2-public-sg security group, edit ec2-public.tf and change it to this:
resource "aws_security_group" "ec2-public-sg" {
  name = "${var.project_name}-public-sg"
  description = "allow inbound access to the EC2 instance"
  vpc_id = aws_vpc.notes.id

  ingress {
    description = "SSH"
    protocol = "TCP"
    from_port = 22
    to_port = 22
    cidr_blocks = [ "0.0.0.0/0" ]
  }

  ingress {
    description = "HTTP"
    protocol = "TCP"
    from_port = 80
    to_port = 80
    cidr_blocks = [ "0.0.0.0/0" ]
  }

  ingress {
    description = "HTTPS"
    protocol = "TCP"
    from_port = 443
    to_port = 443
    cidr_blocks = [ "0.0.0.0/0" ]
  }

  ingress {
    description = "Redis"
    protocol = "TCP"
    from_port = 6379
    to_port = 6379
    cidr_blocks = [ aws_vpc.notes.cidr_block ]
  }

  ingress {
    description = "Docker swarm management"
    from_port = 2377
    to_port = 2377
    protocol = "tcp"
    cidr_blocks = [ aws_vpc.notes.cidr_block ]
  }

  ingress {
    description = "Docker container network discovery"
    from_port = 7946
    to_port = 7946
    protocol = "tcp"
    cidr_blocks = [ aws_vpc.notes.cidr_block ]
  }

  ingress {
    description = "Docker container network discovery"
    from_port = 7946
    to_port = 7946
    protocol = "udp"
    cidr_blocks = [ aws_vpc.notes.cidr_block ]
  }

  ingress {
    description = "Docker overlay network"
    from_port = 4789
    to_port = 4789
    protocol = "udp"
    cidr_blocks = [ aws_vpc.notes.cidr_block ]
  }

  egress {
    description = "Docker swarm (udp)"
    from_port = 0
    to_port = 0
    protocol = "udp"
    cidr_blocks = [ aws_vpc.notes.cidr_block ]
  }

  egress {
    protocol = "-1"
    from_port = 0
    to_port = 0
    cidr_blocks = [ "0.0.0.0/0" ]
  }
}
This declares many specific network ports used for specific protocols. Each rule names the protocol in the description attribute. The protocol attribute says whether it is a UDP or TCP protocol. Remember that TCP is a stream-oriented protocol that ensures packets are delivered, and UDP, by contrast, is a packet-oriented protocol that does not ensure delivery. Each has characteristics making them suitable for different purposes.
Something missing is an ingress rule for port 3306, the MySQL port. That's because the notes-public server will not host a MySQL server based on the placement constraints.
Another thing to note is which rules allow traffic from public IP addresses, and which limit traffic to IP addresses inside the VPC. Many of these ports are used in support of the Docker swarm, and therefore do not need to communicate anywhere but other hosts on the VPC.
An issue to ponder is whether the SSH port should be left open to the entire internet. If you, or your team, only SSH into the VPC from a specific network, such as an office network, then this setting could list that network. And because the cidr_blocks attribute takes an array, it's possible to configure a list of networks, such as a company with several offices each with their own office network.
In ec2-private.tf, we must make a similar change to ec2-private-sg:
resource "aws_security_group" "ec2-private-sg" {
  name = "${var.project_name}-private-sg"
  description = "allow inbound access to the EC2 instance"
  vpc_id = aws_vpc.notes.id

  ingress {
    description = "SSH"
    protocol = "TCP"
    from_port = 22
    to_port = 22
    cidr_blocks = [ aws_vpc.notes.cidr_block ]
  }

  ingress {
    description = "HTTP"
    protocol = "TCP"
    from_port = 80
    to_port = 80
    cidr_blocks = [ aws_vpc.notes.cidr_block ]
  }

  ingress {
    description = "MySQL"
    protocol = "TCP"
    from_port = 3306
    to_port = 3306
    cidr_blocks = [ aws_vpc.notes.cidr_block ]
  }

  ingress {
    description = "Redis"
    protocol = "TCP"
    from_port = 6379
    to_port = 6379
    cidr_blocks = [ aws_vpc.notes.cidr_block ]
  }

  ingress {
    description = "Docker swarm management"
    from_port = 2377
    to_port = 2377
    protocol = "tcp"
    cidr_blocks = [ aws_vpc.notes.cidr_block ]
  }

  ingress {
    description = "Docker container network discovery"
    from_port = 7946
    to_port = 7946
    protocol = "tcp"
    cidr_blocks = [ aws_vpc.notes.cidr_block ]
  }

  ingress {
    description = "Docker container network discovery"
    from_port = 7946
    to_port = 7946
    protocol = "udp"
    cidr_blocks = [ aws_vpc.notes.cidr_block ]
  }

  ingress {
    description = "Docker overlay network"
    from_port = 4789
    to_port = 4789
    protocol = "udp"
    cidr_blocks = [ aws_vpc.notes.cidr_block ]
  }

  egress {
    description = "Docker swarm (udp)"
    from_port = 0
    to_port = 0
    protocol = "udp"
    cidr_blocks = [ aws_vpc.notes.cidr_block ]
  }

  egress {
    protocol = "-1"
    from_port = 0
    to_port = 0
    cidr_blocks = [ "0.0.0.0/0" ]
  }
}
This is largely the same but for some specific differences. First, because the private EC2 instances can have MySQL databases, we have declared a rule for port 3306. Second, all but one of the rules restrict traffic to IP addresses inside the VPC.
Between these two security group definitions, we have strictly limited the attack surface of the EC2 instances. This will throw certain barriers in the path of any miscreants attempting to intrude on the Notes service.
While we've implemented several security best practices for the Notes service, there is always more that can be done. In the next section, we'll discuss where to learn more.
AWS EC2 security best practices
At the outset of designing the Notes application stack deployment, we described a security model that should result in a highly secure deployment. Are we the kind of security experts that can design a secure deployment infrastructure on the back of a napkin? Probably not. But the team at AWS does employ engineers with security expertise. When we turned to AWS EC2 for deployment, we learned it offered a wide range of security tools we hadn't considered in the original plan, and we ended up with a different deployment model.
In this section, let's review what we did and also review some additional tools available on AWS.
The AWS Virtual Private Cloud (VPC) contains many ways to implement security features, and we used a few of them:
- Security Groups act as a firewall with strict controls over the traffic that can enter or leave the things protected by a Security Group. Security Groups are attached to every infrastructure element we used, and in most cases, we configured them to allow only the absolutely necessary traffic.
- We ensured the database instances were created within the VPC, rather than hosted on the public internet. This hides the databases from public access.
While we did not implement the originally envisioned segmentation, there are enough barriers surrounding Notes that it should be relatively safe.
In reviewing the AWS VPC security documentation, there are a few other facilities that are worth exploring.
In this section, you've had a chance to review the security of the application that was deployed to AWS ECS. While we did a fairly good job, there is more that can be done to exploit tools offered by AWS to beef up the internal security of the application.
With that, it's time to close out this chapter.
Summary
In this chapter, we've covered an extremely important topic, application security. Thanks to the hard work of the Node.js and Express communities, we've been able to tighten the security simply by adding a few bits of code here and there to configure security modules.
We first enabled HTTPS because it is now a best practice, and has positive security gains for our users. With HTTPS, the browser session is authenticated to positively identify the website. It also protects against man-in-the-middle security attacks, and encrypts communications for transmission across the internet, preventing most snooping.
The helmet package provides a suite of tools to set security headers that instruct web browsers on how to treat our content. These settings prevent or mitigate whole classes of security bugs. With the csurf package, we're able to prevent cross-site request forgery (CSRF) attacks.
These few steps are a good start for securing the Notes application. But you should not stop here because there is a never-ending set of security issues to fix. None of us can neglect the security of the applications we deploy.
Over the course of this book, the journey has been about learning the major life cycle steps required to develop and deploy a Node.js web application. This started from the basics of using Node.js, proceeded to an application concept to develop, and from there we covered every stage of developing, testing, and deploying that application.
Throughout the book, we've learned how advanced JavaScript features such as async functions and ES6 modules are used in Node.js applications. To store our data, we learned how to use several database engines, and a methodology to make it easy to switch between engines.
Mobile-first development is extremely important in today's environment, and to fulfill that goal, we learned how to use the Bootstrap framework.
Real-time communication is expected on a wide variety of websites because advanced JavaScript capabilities mean we can now offer more interactive services in our web applications. To fulfill that goal, we learned how to use the Socket.IO real-time communications framework.
Deploying application services to cloud hosting is widely used, both for simplifying the system setup and to scale services to meet the demands of our user base. To fulfill that goal, we learned to use Docker, and then we learned how to deploy Docker services to AWS ECS using Terraform. We not only used Docker for production deployment but for deploying a test infrastructure, within which we can run unit tests and functional tests.