
13
Messaging and Integration Patterns
If scalability is about distributing systems, integration is about connecting them. In the previous chapter, we learned how to distribute an application, fragmenting it across several processes and machines. For this to work properly, all those pieces have to communicate in some way and, hence, they have to be integrated.
There are two main techniques to integrate a distributed application: one is to use shared storage as a central coordinator and keeper of all the information, the other one is to use messages to disseminate data, events, and commands across the nodes of the system. This last option is what really makes the difference when scaling distributed systems, and it's also what makes this topic so fascinating and sometimes complex.
Messages are used in every layer of a software system. We exchange messages to communicate on the Internet; we can use messages to send information to other processes using pipes; we can use messages within an application as an alternative to direct function invocation (the Command pattern), and also device drivers use messages to communicate with the hardware. Any discrete and structured data that is used as a way to exchange information between components and systems can be seen as a message. However, when dealing with distributed architectures, the term messaging system is used to describe a specific class of solutions, patterns, and architectures that are meant to facilitate the exchange of information over the network.
As we will see, several traits characterize these types of systems. We might choose to use a broker versus a peer-to-peer structure, we might use a request/reply message exchange or one-way type of communication, or we might use queues to deliver our messages more reliably; the scope of the topic is really broad. The book Enterprise Integration Patterns by Gregor Hohpe and Bobby Woolf gives us an idea about the vastness of the topic. Historically, it is considered the Bible of messaging and integration patterns and has more than 700 pages describing 65 different integration patterns. In this final chapter, we will explore the most important of those well-known patterns—plus some more modern alternatives—considering them from the perspective of Node.js and its ecosystem.
To sum up, in this chapter, we will learn about the following topics:
- The fundamentals of a messaging system
- The Publish/Subscribe pattern
- Task distribution patterns and pipelines
- Request/reply patterns
Let's begin with the fundamentals.
Fundamentals of a messaging system
When talking about messages and messaging systems, there are four fundamental elements to take into consideration:
- The direction of the communication, which can be one-way only or a request/reply exchange
- The purpose of the message, which also determines its content
- The timing of the message, which can be sent and received in-context (synchronously) or out-of-context (asynchronously)
- The delivery of the message, which can happen directly or via a broker
In the sections that follow, we are going to formalize these aspects to provide a base for our later discussions.
One way versus request/reply patterns
The most fundamental aspect in a messaging system is the direction of the communication, which often also determines its semantics.
The simplest communication pattern is when the message is pushed one way from a source to a destination; this is a trivial situation, and it doesn't need much explanation:

Figure 13.1: One-way communication
A typical example of one-way communication is an email or a web server that sends a message to a connected browser using WebSockets, or a system that distributes tasks to a set of workers.
On the other side, we have the Request/Reply exchange pattern, where the message in one direction is always matched (excluding error conditions) by a message in the opposite direction. A typical example of this exchange pattern is the invocation of a web service or sending a query to a database. The following diagram shows this simple and well-known scenario:

Figure 13.2: Request/Reply message exchange pattern
The Request/Reply pattern might seem a trivial pattern to implement, however, as we will see later, it becomes more complicated when the communication channel is asynchronous or involves multiple nodes. Take a look at the example represented in the next diagram:
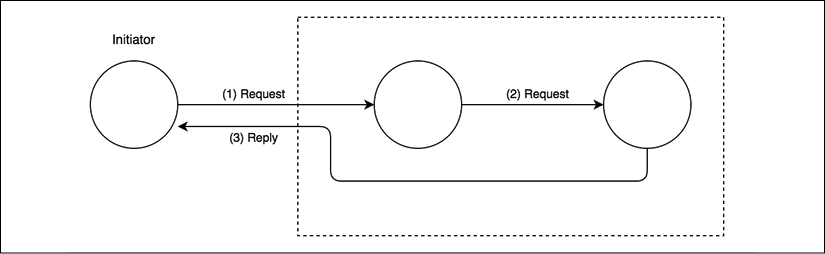
Figure 13.3: Multi-node request/reply communication
With the setup shown in Figure 13.3, we can better appreciate the complexity of some request/reply patterns. If we consider the direction of the communication between any two nodes, we can surely say that it is one way. However, from a global point of view, the initiator sends a request and in turn receives an associated response, even if from a different node. In these situations, what really differentiates a Request/Reply pattern from a bare one-way loop is the relationship between the request and the reply, which is kept in the initiator. The reply is usually handled in the same context as the request.
Message types
A message is essentially a means to connect different software components and there are different reasons for doing so: it might be because we want to obtain some information held by another system or component, to execute operations remotely, or to notify some peers that something has just happened.
The message content will also vary depending on the reason for the communication. In general, we can identify three types of messages, depending on their purpose:
- Command Messages
- Event Messages
- Document Messages
Command Messages
You should already be familiar with the Command Message as it's essentially a serialized Command object (we learned about this in the Command section in Chapter 9, Behavioral Design Patterns)
The purpose of this type of message is to trigger the execution of an action or a task on the receiver. For this to be possible, the Command Message has to contain the essential information to run the task, which usually includes the name of the operation and a list of arguments. The Command Message can be used to implement remote procedure call (RPC) systems, distributed computations, or can be more simply used to request some data. RESTful HTTP calls are simple examples of commands; each HTTP verb has a specific meaning and is associated with a precise operation: GET, to retrieve the resource; POST, to create a new one; PUT/PATCH, to update it; and DELETE, to destroy it.
Event Messages
An Event Message is used to notify another component that something has occurred. It usually contains the type of the event and sometimes also some details such as the context, the subject, or the actor involved.
In web development, we are using an Event Message when, for example, we leverage WebSockets to send notifications from the server to the client to communicate changes to some data or mutations in the state of the system.
Events are a very important integration mechanism in distributed applications, as they enable us to keep all the nodes of the system on the same page.
Document Messages
The Document Message is primarily meant to transfer data between components and machines. A typical example is a message used to transfer the results of a database query.
The main characteristic that differentiates a Document Message from a Command Message (which might also contain data) is that the message does not contain any information that tells the receiver what to do with the data. On the other hand, the main difference between a Document Message and an Event Message is the absence of an association with a particular occurrence with something that happened. Often, the replies to Command Messages are Document Messages, as they usually contain only the data that was requested or the result of an operation.
Now that we know how to categorize the semantics of a message, let's learn about the semantic of the communication channel used to move our messages around.
Asynchronous messaging, queues, and streams
At this point in the book, you should already be familiar with the characteristics of an asynchronous operation. Well, it turns out that the same principles can be applied to messaging and communications.
We can compare synchronous communications to a phone call: the two peers must be connected to the same channel at the same time and they should exchange messages in real time. Normally, if we want to call someone else, we either need another phone or terminate the ongoing communication to start a new one.
Asynchronous communication is similar to an SMS: it doesn't require the recipient to be connected to the network the moment we send it; we might receive a response immediately or after an unknown delay, or we might not receive a response at all. We might send multiple SMSes to multiple recipients one after the other and receive their responses (if any) in any order. In short, we have better parallelism with the use of fewer resources.
Another important characteristic of asynchronous communications is that the messages can be stored and then delivered as soon as possible or at a later time. This can be useful when the receiver is too busy to handle new messages or when we want to guarantee delivery. In messaging systems, this is made possible using a message queue, a component that mediates the communication between the producer of the messages and the consumer, storing any message before it gets delivered to its destination, as shown in the following diagram:

Figure 13.4: A message queue
If for any reason the consumer crashes, disconnects from the network, or experiences a slowdown, the messages are accumulated in the queue and dispatched as soon as the consumer comes back online. The queue can be located in the producer, or be split between the producer and the consumer (in peer-to-peer architectures), or live in a dedicated external system acting as middleware for the communication (broker).
Another data structure that has a similar (but not the same!) goal as a message queue is the log. A log is an append-only data structure, which is durable and whose messages can be read as they arrive or by accessing its history. In the context of messaging and integration systems, this is also known as a data stream.
Compared to a queue, in a stream, messages are not removed when they are retrieved or processed. This way, consumers can retrieve the messages as they arrive or can query the stream at any time to retrieve past messages. This means that a stream provides more freedom when it comes to accessing the messages, while queues usually expose only one message at a time to their consumers. Most importantly, a stream can be shared by more than one consumer, which can access the messages (even the same messages) using different approaches.
Figure 13.5 gives you an idea of the structure of a stream compared to that of a message queue:
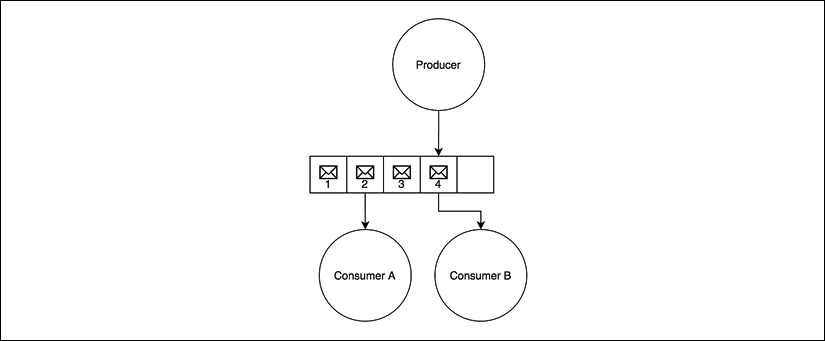
Figure 13.5: A stream
You will be able to better appreciate the difference between a queue and a stream later in the chapter when we implement a sample application using both approaches.
The final fundamental element to consider in a messaging system is the way the nodes of the system are connected together, which can be directly or through an intermediary.
Peer-to-peer or broker-based messaging
Messages can be delivered directly to the receiver in a peer-to-peer fashion, or through a centralized intermediary system called a message broker. The main role of the broker is to decouple the receiver of the message from the sender. The following diagram shows the architectural difference between the two approaches:
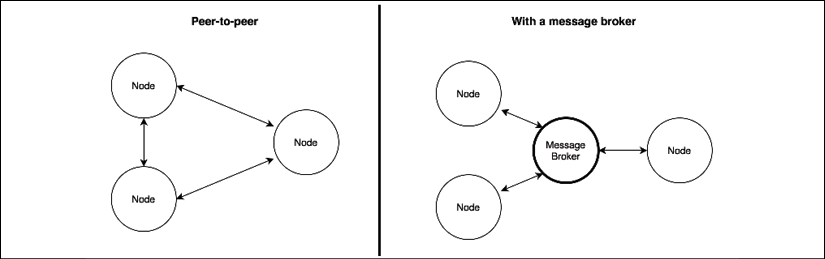
Figure 13.6: Peer-to-peer communication versus message brokering
In a peer-to-peer architecture, every node is directly responsible for the delivery of the message to the receiver. This implies that the nodes have to know the address and port of the receiver and they have to agree on a protocol and message format. The broker eliminates these complexities from the equation: each node can be totally independent and can communicate with an unspecified number of peers without directly knowing their details.
A broker can also act as a bridge between different communication protocols. For example, the popular RabbitMQ broker (nodejsdp.link/rabbitmq) supports Advanced Message Queuing Protocol (AMQP), Message Queue Telemetry Transport (MQTT), and Simple/Streaming Text Orientated Messaging Protocol (STOMP), enabling multiple applications supporting different messaging protocols to interact.
MQTT (nodejsdp.link/mqtt) is a lightweight messaging protocol, specifically designed for machine-to-machine communications (such as the Internet of things). AMQP (nodejsdp.link/amqp) is a more complex messaging protocol, designed to be an open source alternative to proprietary messaging middleware. STOMP (nodejsdp.link/stomp) is a lightweight text-based protocol, which comes from "the HTTP school of design". All three are application layer protocols and are based on TCP/IP.
Besides the advantages in terms of decoupling and interoperability, a broker can offer additional features such as persistent queues, routing, message transformations, and monitoring, without mentioning the broad range of messaging patterns that many brokers support out of the box.
Of course, nothing prevents us from implementing all these features using a peer-to-peer architecture, but unfortunately, there is much more effort involved. Nonetheless, there might be different reasons for choosing a peer-to-peer approach instead of a broker:
- By removing the broker, we are removing a single point of failure from the system
- A broker has to be scaled, while in a peer-to-peer architecture we only need to scale the single nodes of the application
- Exchanging messages without intermediaries can greatly reduce the latency of the communication
By using a peer-to-peer messaging system we can have much more flexibility and power because we are not bound to any particular technology, protocol, or architecture.
Now that we know the basics of a messaging system, let's explore some of the most important messaging patterns. Let's start with the Publish/Subscribe pattern.
Publish/Subscribe pattern
Publish/Subscribe (often abbreviated to Pub/Sub) is probably the best-known one-way messaging pattern. We should already be familiar with it, as it's nothing more than a distributed Observer pattern. As in the case of Observer, we have a set of subscribers registering their interest in receiving a specific category of messages. On the other side, the publisher produces messages that are distributed across all the relevant subscribers. Figure 13.7 shows the two main variants of the Pub/Sub pattern; the first is based on a peer-to-peer architecture, and the second uses a broker to mediate the communication:

Figure 13.7: Publish/Subscribe messaging pattern
What makes Pub/Sub so special is the fact that the publisher doesn't know in advance who the recipients of the messages are. As we said, it's the subscriber that has to register its interest to receive a particular message, allowing the publisher to work with an unspecified number of receivers. In other words, the two sides of the Pub/Sub pattern are loosely coupled, which makes this an ideal pattern to integrate the nodes of an evolving distributed system.
The presence of a broker further improves the decoupling between the nodes of the system because the subscribers interact only with the broker, not knowing which node is the publisher of a message. As we will see later, a broker can also provide a message queuing system, allowing reliable delivery even in the presence of connectivity problems between the nodes.
Now, let's work on an example to demonstrate this pattern.
Building a minimalist real-time chat application
To show a real-life example of how the Pub/Sub pattern can help us integrate a distributed architecture, we are now going to build a very basic real-time chat application using pure WebSockets. Then, we will scale it by running multiple instances, and finally, using a messaging system, we will build a communication channel between all the server instances.
Implementing the server side
Now, let's take one step at a time. Let's first build a basic chat application, then we'll scale it to multiple instances.
To implement the real-time capabilities of a typical chat application, we will rely on the ws package (nodejsdp.link/ws), which is a pure WebSocket implementation for Node.js. Implementing real-time applications in Node.js is pretty simple, and the code we are going to write will confirm this assumption. So, let's create the server side of our chat application in a file called index.js:
import { createServer } from 'http'
import staticHandler from 'serve-handler'
import ws from 'ws'
// serve static files
const server = createServer((req, res) => {                // (1)
  return staticHandler(req, res, { public: 'www' })
})
const wss = new ws.Server({ server })                      // (2)
wss.on('connection', client => {
  console.log('Client connected')
  client.on('message', msg => {                            // (3)
    console.log(`Message: ${msg}`)
    broadcast(msg)
  })
})
function broadcast (msg) {                                 // (4)
  for (const client of wss.clients) {
    if (client.readyState === ws.OPEN) {
      client.send(msg)
    }
  }
}
server.listen(process.argv[2] || 8080)
That's it! That's all we need to implement the server-side component of our chat application. This is how it works:
- We first create an HTTP server and forward every request to a special handler (nodejsdp.link/serve-handler), which will take care to serve all the static files from the
wwwdirectory. This is needed to access the client-side resources of our application (for example, HTML, JavaScript, and CSS files). - We then create a new instance of the WebSocket server, and we attach it to our existing HTTP server. Next, we start listening for incoming WebSocket client connections by attaching an event listener for the
connectionevent. - Each time a new client connects to our server, we start listening for incoming messages. When a new message arrives, we broadcast it to all the connected clients.
- The
broadcast()function is a simple iteration over all the known clients, where thesend()function is invoked on each connected client.
This is the magic of Node.js! Of course, the server that we just implemented is very minimal and basic, but as we will see, it does its job.
Implementing the client side
Next, it's time to implement the client side of our chat application. This can be done with another compact and simple fragment of code, essentially a minimal HTML page with some basic JavaScript code. Let's create this page in a file named www/index.html as follows:
<!DOCTYPE html>
<html>
  <body>
    Messages:
    <div id="messages"></div>
    <form id="msgForm">
      <input type="text" placeholder="Send a message" id="msgBox"/>
      <input type="submit" value="Send"/>
    </form>
    <script>
      const ws = new WebSocket(
        `ws://${window.document.location.host}`
      )
      ws.onmessage = function (message) {
        const msgDiv = document.createElement('div')
        msgDiv.innerHTML = message.data
        document.getElementById('messages').appendChild(msgDiv)
      }
      const form = document.getElementById('msgForm')
      form.addEventListener('submit', (event) => {
        event.preventDefault()
        const message = document.getElementById('msgBox').value
        ws.send(message)
        document.getElementById('msgBox').value = ''
      })
    </script>
  </body>
</html>
The HTML page we just created doesn't really need many comments, it's just a piece of straightforward web development. We use the native WebSocket object to initialize a connection to our Node.js server, and then start listening for messages from the server, displaying them in new div elements as they arrive. For sending messages, instead, we use a simple textbox and a button within a form.
Please note that when stopping or restarting the chat server, the WebSocket connection is closed and the client will not try to reconnect automatically (as we might expect from a production-grade application). This means that it is necessary to refresh the browser after a server restart to reestablish the connection (or implement a reconnection mechanism, which we will not cover here for brevity). Also, in this initial version of our app, the clients will not receive any message sent while they were not connected to the server.
Running and scaling the chat application
We can try to run our application immediately. Just launch the server with the following command:
node index.js 8080
Then, open a couple of browser tabs or even two different browsers, point them at http://localhost:8080, and start chatting:

Figure 13.8: Our new chat application in action
Now, we want to see what happens when we try to scale our application by launching multiple instances. Let's try to do that. Let's start another server on another port:
node index.js 8081
The desired outcome should be that two different clients, connected to two different servers, should be able to exchange chat messages. Unfortunately, this is not what happens with our current implementation. We can test this by opening another browser tab to http://localhost:8081.
In a real-world application, we would use a load balancer to distribute the load across our instances, but for this demo we will not use one. This allows us to access each server instance in a deterministic way to verify how it interacts with the other instances.
When sending a chat message on one instance, we only broadcast the message locally, distributing it only to the clients connected to that particular server. In practice, the two servers are not talking to each other. We need to integrate them, and that's exactly what we are going to see next.
Using Redis as a simple message broker
We start our analysis of the most common Pub/Sub implementations by introducing Redis (nodejsdp.link/redis), which is a very fast and flexible in-memory data structure store. Redis is often used as a database or a cache server, however, among its many features there is a pair of commands specifically designed to implement a centralized Pub/Sub message exchange pattern.
Redis' message brokering capabilities are (intentionally) very simple and basic, especially if we compare them to those of more advanced message-oriented middleware. However, this is one of the main reasons for its popularity. Often, Redis is already available in an existing infrastructure, for example, used as a cache server or as a session data store. Its speed and flexibility make it a very popular choice for sharing data in a distributed system. So, as soon as the need for a publish/subscribe broker arises in a project, the most simple and immediate choice is to reuse Redis itself, avoiding the need to install and maintain a dedicated message broker.
Let's now work on an example to demonstrate the simplicity and power of using Redis as a message broker.
This example requires a working installation of Redis, listening on its default port. You can find more details at nodejsdp.link/redis-quickstart.
Our plan of action is to integrate our chat servers using Redis as a message broker. Each instance publishes any message received from its clients to the broker, and at the same time, it subscribes for any message coming from other server instances. As we can see, each server in our architecture is both a subscriber and a publisher. The following diagram shows a representation of the architecture that we want to obtain:
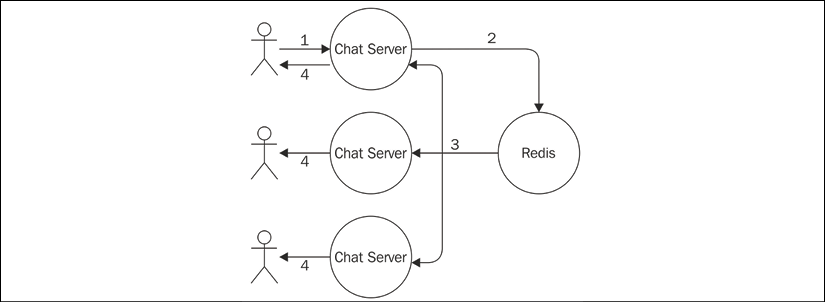
Figure 13.9: Using Redis as a message broker for our chat application
Based on the architecture described in Figure 13.9, we can sum up the journey of a message as follows:
- The message is typed into the textbox of the web page and sent to the connected instance of our chat server.
- The message is then published to the broker.
- The broker dispatches the message to all the subscribers, which in our architecture are all the instances of the chat server.
- In each instance, the message is distributed to all the connected clients.
Let's see in practice how this works. Let's modify the server code by adding the publish/subscribe logic:
import { createServer } from 'http'
import staticHandler from 'serve-handler'
import ws from 'ws'
import Redis from 'ioredis'                                // (1)
const redisSub = new Redis()
const redisPub = new Redis()
// serve static files
const server = createServer((req, res) => {
  return staticHandler(req, res, { public: 'www' })
})
const wss = new ws.Server({ server })
wss.on('connection', client => {
  console.log('Client connected')
  client.on('message', msg => {
    console.log(`Message: ${msg}`)
    redisPub.publish('chat_messages', msg)                 // (2)
  })
})
redisSub.subscribe('chat_messages')                        // (3)
redisSub.on('message', (channel, msg) => {
  for (const client of wss.clients) {
    if (client.readyState === ws.OPEN) {
      client.send(msg)
    }
  }
})
server.listen(process.argv[2] || 8080)
The changes that we made to our original chat server are highlighted in the preceding code. This how the new implementation works:
- To connect our Node.js application to the Redis server, we use the
ioredispackage (nodejsdp.link/ioredis), which is a complete Node.js client supporting all the available Redis commands. Next, we instantiate two different connections, one used to subscribe to a channel, the other to publish messages. This is necessary in Redis, because once a connection is put in subscriber mode, only commands related to the subscription can be used. This means that we need a second connection for publishing messages. - When a new message is received from a connected client, we publish the message in the
chat_messageschannel. We don't directly broadcast the message to our clients because our server is subscribed to the same channel (as we will see in a moment), so it will come back to us through Redis. For the scope of this example, this is a simple and effective mechanism. However, depending on the requirements of your application, you may instead want to broadcast the message immediately and ignore any message arriving from Redis and originating from the current server instance. We leave this to you as an exercise. - As we said, our server also has to subscribe to the
chat_messageschannel, so we register a listener to receive all the messages published into that channel (either by the current server instance or any other chat server instance). When a message is received, we simply broadcast it to all the clients connected to the current WebSocket server.
These few changes are enough to integrate all the chat server instances that we might decide to start. To prove this, you can try starting multiple instances of our application:
node index.js 8080
node index.js 8081
node index.js 8082
You can then connect multiple browser tabs to each instance and verify that the messages you send to one instance are successfully received by all the other clients connected to the other instances.
Congratulations! We just integrated multiple nodes of a distributed real-time application using the Publish/Subscribe pattern.
Redis allows us to publish and subscribe to channels identified by a string, for example, chat.nodejs. But it also allows us to use glob-style patterns to define subscriptions that can potentially match multiple channels, for example, chat.*.
Peer-to-peer Publish/Subscribe with ZeroMQ
The presence of a broker can considerably simplify the architecture of a messaging system. However, in some circumstances, this may not be the best solution. This includes all the situations where a low latency is critically important, or when scaling complex distributed systems, or when the presence of a single point of failure is not an option. The alternative to using a broker is, of course, implementing a peer-to-peer messaging system.
Introducing ZeroMQ
If our project is a good candidate for a peer-to-peer architecture, one of the best solutions to evaluate is certainly ZeroMQ (nodejsdp.link/zeromq, also known as zmq or ØMQ). ZeroMQ is a networking library that provides the basic tools to build a large variety of messaging patterns. It is low-level, extremely fast, and has a minimalistic API, but it offers all the basic building blocks to create a solid messaging system, such as atomic messages, load balancing, queues, and many more. It supports many types of transport, such as in-process channels (inproc://), inter-process communication (ipc://), multicast using the PGM protocol (pgm:// or epgm://), and, of course, the classic TCP (tcp://).
Among the features of ZeroMQ, we can also find tools to implement a Publish/Subscribe pattern, which is exactly what we need for our example. So, what we are going to do now is remove the broker (Redis) from the architecture of our chat application and let the various nodes communicate in a peer-to-peer fashion, leveraging the publish/subscribe sockets of ZeroMQ.
A ZeroMQ socket can be considered as a network socket on steroids, which provides additional abstractions to help implement the most common messaging patterns. For example, we can find sockets designed to implement publish/subscribe, request/reply, or one-way push communications.
Designing a peer-to-peer architecture for the chat server
When we remove the broker from our architecture, each instance of the chat server has to directly connect to the other available instances in order to receive the messages they publish. In ZeroMQ, we have two types of sockets specifically designed for this purpose: PUB and SUB. The typical pattern is to bind a PUB socket to a local port where it will start listening for incoming subscription requests from sockets of type SUB.
A subscription can have a filter that specifies what messages are delivered to the connected SUB sockets. The filter is a simple binary buffer (so it can also be a string), which will be matched against the beginning of the message (which is also a binary buffer). When a message is sent through the PUB socket it is broadcast to all the connected SUB sockets, but only after their subscription filters are applied. The filters will be applied to the publisher side only if a connected protocol is used, such as, for example, TCP.
The following diagram shows the pattern applied to our distributed chat server architecture (with only two instances, for simplicity):
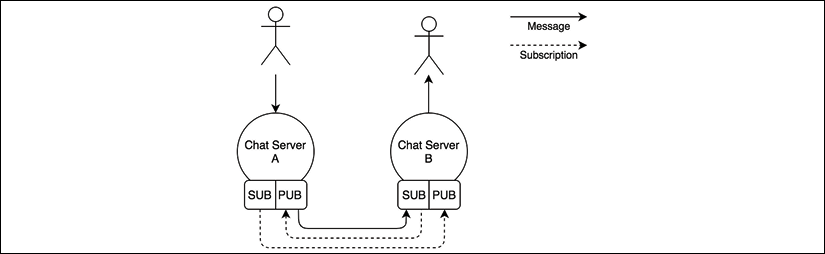
Figure 13.10: Chat server messaging architecture using ZeroMQ PUB/SUB sockets
Figure 13.10 shows us the flow of information when we have two instances of the chat application, but the same concept can be applied to N instances. This architecture tells us that each node must be aware of the other nodes in the system to be able to establish all the necessary connections. It also shows us how the subscriptions go from a SUB socket to a PUB socket, while messages travel in the opposite direction.
Using the ZeroMQ PUB/SUB sockets
Let's see how the ZeroMQ PUB/SUB sockets work in practice by modifying our chat server:
import { createServer } from 'http'
import staticHandler from 'serve-handler'
import ws from 'ws'
import yargs from 'yargs'                                    // (1)
import zmq from 'zeromq'
// serve static files
const server = createServer((req, res) => {
  return staticHandler(req, res, { public: 'www' })
})
let pubSocket
async function initializeSockets () {
  pubSocket = new zmq.Publisher()                            // (2)
  await pubSocket.bind(`tcp://127.0.0.1:${yargs.argv.pub}`)
  const subSocket = new zmq.Subscriber()                     // (3)
  const subPorts = [].concat(yargs.argv.sub)
  for (const port of subPorts) {
    console.log(`Subscribing to ${port}`)
    subSocket.connect(`tcp://127.0.0.1:${port}`)
  }
  subSocket.subscribe('chat')
  for await (const [msg] of subSocket) {                     // (4)
    console.log(`Message from another server: ${msg}`)
    broadcast(msg.toString().split(' ')[1])
  }
}
initializeSockets()
const wss = new ws.Server({ server })
wss.on('connection', client => {
  console.log('Client connected')
  client.on('message', msg => {
    console.log(`Message: ${msg}`)
    broadcast(msg)
    pubSocket.send(`chat ${msg}`)                            // (5)
  })
})
function broadcast (msg) {
  for (const client of wss.clients) {
    if (client.readyState === ws.OPEN) {
      client.send(msg)
    }
  }
}
server.listen(yargs.argv.http || 8080)
The preceding code clearly shows that the logic of our application became slightly more complicated, however, it's still straightforward considering that we are implementing a peer-to-peer Publish/Subscribe pattern. Let's see how all the pieces come together:
- We import two new packages. First, we import
yargs(nodejsdp.link/yargs), which is a command-line argument parser; we need this to easily accept named arguments. Secondly, we import thezeromqpackage (nodejsdp.link/zeromq), which is a Node.js client for ZeroMQ. - In the
initializeSockets()function, we immediately create ourPublishersocket and bind it to the port provided in the--pubcommand-line argument. - We create the
Subscribersocket and we connect it to thePublishersockets of the other instances of our application. The ports of the targetPublishersockets are provided in the--subcommand-line arguments (there might be more than one). We then create the actual subscription, by providingchatas a filter, which means that we will receive only the messages beginning withchat. - We start listening for messages arriving at our
Subscribersocket using afor await...ofloop, sincesubSocketis an async iterable. With each message we receive, we do some simple parsing to remove thechatprefix, and then webroadcast()the actual payload to all the clients connected to the current WebSocket server. - When a new message is received by the WebSocket server of the current instance, we broadcast it to all the connected clients but we also publish it through our
Publishersocket. We usechatas a prefix followed by a space, so that the message will be published to all the subscriptions usingchatas a filter.
We have now built a simple distributed system, integrated using a peer-to-peer Publish/Subscribe pattern!
Let's fire it up, let's start three instances of our application by making sure to connect their Publisher and Subscriber sockets properly:
node index.js --http 8080 --pub 5000 --sub 5001 --sub 5002
node index.js --http 8081 --pub 5001 --sub 5000 --sub 5002
node index.js --http 8082 --pub 5002 --sub 5000 --sub 5001
The first command will start an instance with an HTTP server listening on port 8080, while binding its Publisher socket on port 5000 and connecting the Subscriber socket to ports 5001 and 5002, which is where the Publisher sockets of the other two instances should be listening at. The other two commands work in a similar way.
Now, the first thing you will see is that ZeroMQ will not complain if a Subscriber socket can't establish a connection to a Publisher socket. For example, at the time of the first command, there are no Publisher sockets listening on ports 5001 and 5002, however, ZeroMQ is not throwing any error. This is because ZeroMQ is built to be resilient to faults and it implements a built-in connection retry mechanism. This feature also comes in particularly handy if any node goes down or is restarted. The same forgiving logic applies to the Publisher socket: if there are no subscriptions, it will simply drop all the messages, but it will continue working.
At this point, we can try to navigate with a browser to any of the server instances that we started and verify that the messages are properly propagated to all the chat servers.
In the previous example, we assumed a static architecture where the number of instances and their addresses are known in advance. We can introduce a service registry, as explained in Chapter 12, Scalability and Architectural Patterns, to connect our instances dynamically. It is also important to point out that ZeroMQ can be used to implement a broker using the same primitives we demonstrated here.
Reliable message delivery with queues
An important abstraction in a messaging system is the message queue (MQ). With a message queue, the sender and the receiver(s) of the message don't necessarily need to be active and connected at the same time to establish a communication, because the queuing system takes care of storing the messages until the destination is able to receive them. This behavior is opposed to the fire-and-forget paradigm, where a subscriber can receive messages only during the time it is connected to the messaging system.
A subscriber that is able to always reliably receive all the messages, even those sent when it's not listening for them, is called a durable subscriber.
We can summarize the delivery semantic of a messaging system in three categories:
- At most once: Also known as fire-and-forget, the message is not persisted, and the delivery is not acknowledged. This means that the message can be lost in cases of crashes or disconnections of the receiver.
- At least once: The message is guaranteed to be received at least once, but duplicates might occur if, for example, the receiver crashes before notifying the sender of the reception. This implies that the message has to be persisted in the eventuality it has to be sent again.
- Exactly once: This is the most reliable delivery semantic. It guarantees that the message is received once and only once. This comes at the expense of a slower and more data-intensive mechanism for acknowledging the delivery of messages.
We have a durable subscriber when our messaging system can achieve an "at least once" or an "exactly once" delivery semantic and to do that, the system has to use a message queue to accumulate the messages while the subscriber is disconnected. The queue can be stored in memory or persisted on disk to allow the recovery of its messages even if the queuing system restarts or crashes.
The following diagram shows a graphical representation of a durable subscriber backed by a message queue:
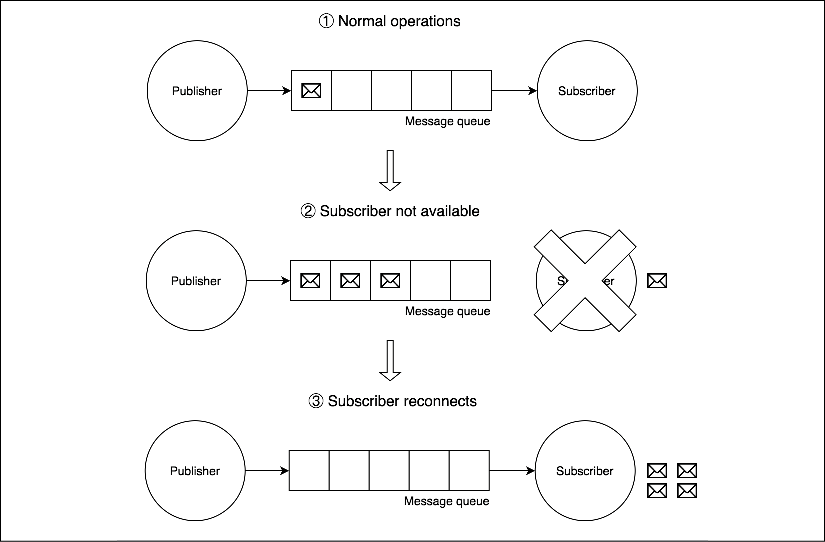
Figure 13.11: Example behavior of a messaging system backed by a queue
Figure 13.11 shows us how a message queue can help us implement the Durable Subscriber pattern. As we can see, during normal operations (1) messages travel from the publisher to the subscriber through the message queue. When the subscriber goes offline (2) because of a crash, a malfunction, or simply a planned maintenance period, any message sent by the publisher is stored and accumulated safely in the message queue. Afterward, when the subscriber comes back online (3), all messaged accumulated in the queue are sent to the subscriber, so no message is lost.
The durable subscriber is probably the most important pattern enabled by a message queue, but it's certainly not the only one, as we will see later in the chapter.
Next, we are going to learn about AMQP, which is the protocol we are going to use throughout the rest of the chapter to implement our message queue examples.
Introducing AMQP
A message queue is normally used in situations where messages must not be lost, which includes mission-critical applications such as banking systems, air traffic management and control systems, medical applications, and so on. This usually means that the typical enterprise-grade message queue is a very complex piece of software, which utilizes bulletproof protocols and persistent storage to guarantee the delivery of the message even in the presence of malfunctions. For this reason, enterprise messaging middleware has been, for many years, a prerogative of tech giants such as Oracle and IBM, each one of them usually implementing their own proprietary protocol, resulting in a strong customer lock-in. Fortunately, it's been a few years now since messaging systems entered the mainstream, thanks to the growth of open protocols such as AMQP, STOMP, and MQTT. Throughout the rest of the chapter we are going to use AMQP as the messaging protocol for our queuing system, so let's give it a proper introduction.
AMQP is an open standard protocol supported by many message-queuing systems. Besides defining a common communication protocol, it also provides a model to describe routing, filtering, queuing, reliability, and security.
The following diagram shows us all the AMQP components at a glance:
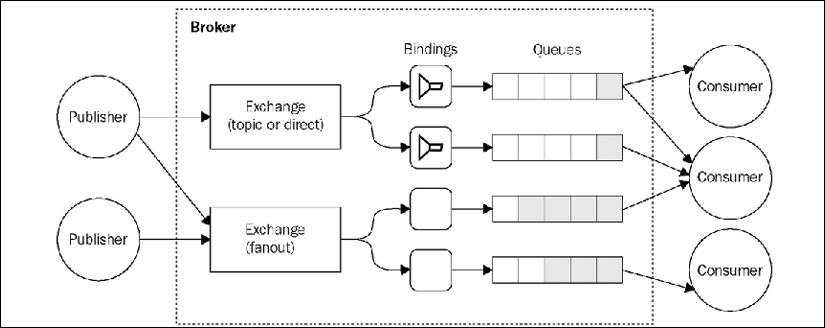
Figure 13.12: Example of an AMQP-based messaging system
As shown in Figure 13.12, in AMQP there are three essential components:
- Queue: The data structure responsible for storing the messages consumed by the clients. The messages from a queue are pushed (or pulled) to one or more consumers. If multiple consumers are attached to the same queue, the messages are load balanced across them. A queue can be any of the following:
- Durable: This means that the queue is automatically recreated if the broker restarts. A durable queue does not imply that its contents are preserved as well; in fact, only messages that are marked as persistent are saved to the disk and restored in case of a restart.
- Exclusive: This means that the queue is bound to only one particular subscriber connection. When the connection is closed, the queue is destroyed.
- Auto-delete: This will cause the queue to be deleted when the last subscriber disconnects.
- Exchange: This is where a message is published. An exchange routes the messages to one or more queues depending on the algorithm it implements:
- Direct exchange: It routes the messages by matching an entire routing key (for example,
chat.msg) - Topic exchange: It distributes the messages using a glob-like pattern matched against the routing key (for example,
chat.#matches all the routing keys starting withchat.) - Fanout exchange: It broadcasts a message to all the connected queues, ignoring any routing key provided
- Direct exchange: It routes the messages by matching an entire routing key (for example,
- Binding: This is the link between exchanges and queues. It also defines the routing key or the pattern used to filter the messages that arrive from the exchange.
These components are managed by a broker, which exposes an API for creating and manipulating them. When connecting to a broker, a client creates a channel—an abstraction of a connection—which is responsible for maintaining the state of the communication with the broker.
In AMQP, we can obtain the Durable Subscriber pattern by creating any type of queue that is not exclusive or auto-delete.
The AMQP model is way more complex than the messaging systems we have used so far (Redis and ZeroMQ). However, it offers a set of features and a level of reliability that would be very hard to obtain using only primitive publish/subscribe mechanisms.
You can find a detailed introduction to the AMQP model on the RabbitMQ website at nodejsdp.link/amqp-components.
Durable subscribers with AMQP and RabbitMQ
Let's now practice what we learned about durable subscribers and AMQP and work on a small example. A typical scenario where it's important to not lose any message is when we want to keep the different services of a microservice architecture in sync (we already described this integration pattern in the previous chapter). If we want to use a broker to keep all our services on the same page, it's important that we don't lose any information, otherwise we might end up in an inconsistent state.
Designing a history service for the chat application
Let's now extend our small chat application using a microservice approach. Let's add a history service that persists our chat messages inside a database, so that when a client connects, we can query the service and retrieve the entire chat history. We are going to integrate the history service with the chat server using the RabbitMQ broker (nodejsdp.link/rabbitmq) and AMQP.
The following diagram shows our planned architecture:

Figure 13.13: Architecture of our chat application with AMQP and history service
As shown in Figure 13.13, we are going to use a single fanout exchange; we don't need any complicated routing logic, so our scenario does not require any exchange more complex than that. Next, we will create one queue for each instance of the chat server.
These queues are exclusive since we are not interested in receiving any messages missed while a chat server is offline; that's the job of our history service, which can eventually also implement more complicated queries against the stored messages. In practice, this means that our chat servers are not durable subscribers and their queues will be destroyed as soon as the connection is closed. The history service instead cannot afford to lose any messages, otherwise it would not fulfill its very purpose. Therefore, the queue we are going to create for it has to be durable, so that any message that is published while the history service is disconnected will be kept in the queue and delivered when it comes back online.
We are going to use the familiar LevelUP as the storage engine for the history service, while we will use the amqplib package (nodejsdp.link/amqplib) to connect to RabbitMQ using the AMQP protocol.
The example that follows requires a working RabbitMQ server, listening on its default port. For more information, please refer to its official installation guide at nodejsdp.link/rabbitmq-getstarted.
Implementing a history service using AMQP
Let's now implement our history service! We are going to create a standalone application (a typical microservice), which is implemented in the historySvc.js module. The module is made up of two parts: an HTTP server to expose the chat history to clients, and an AMQP consumer responsible for capturing the chat messages and storing them in a local database.
Let's see what this looks like in the code that follows:
import { createServer } from 'http'
import level from 'level'
import timestamp from 'monotonic-timestamp'
import JSONStream from 'JSONStream'
import amqp from 'amqplib'
async function main () {
  const db = level('./msgHistory')
  const connection = await amqp.connect('amqp://localhost')  // (1)
  const channel = await connection.createChannel()
  await channel.assertExchange('chat', 'fanout')             // (2)
  const { queue } = channel.assertQueue('chat_history')      // (3)
  await channel.bindQueue(queue, 'chat')                     // (4)
  channel.consume(queue, async msg => {                      // (5)
    const content = msg.content.toString()
    console.log(`Saving message: ${content}`)
    await db.put(timestamp(), content)
    channel.ack(msg)
  })
  createServer((req, res) => {
    res.writeHead(200)
    db.createValueStream()
      .pipe(JSONStream.stringify())
      .pipe(res)
  }).listen(8090)
}
main().catch(err => console.error(err))
We can immediately see that AMQP requires a little bit of setting up, which is necessary to create and connect all the components of the model. Let's see in detail how it works:
- We first establish a connection with the AMQP broker, which in our case is RabbitMQ. Then, we create a channel, which is similar to a session that will maintain the state of our communications.
- Next, we set up an exchange, named
chat. As we already mentioned, it is a fanout exchange. TheassertExchange()command will make sure that the exchange exists on the broker, otherwise it will create it. - We also create a queue called
chat_history. By default, the queue is durable (not exclusive and not auto-delete), so we don't need to pass any extra options to support durable subscribers. - Next, we bind the queue to the exchange we previously created. Here, we don't need any other particular option (such as a routing key or pattern), as the exchange is of the type fanout, so it doesn't perform any filtering.
- Finally, we can begin to listen for messages coming from the queue we just created. We save every message that we receive in a LevelDB database using a monotonic timestamp as the key (see nodejsdp.link/monotonic-timestamp) to keep the messages sorted by date. It's also interesting to see that we are acknowledging every message using
channel.ack(msg), but only after the message is successfully saved into the database. If the ACK (acknowledgment) is not received by the broker, the message is kept in the queue to be processed again.
If we are not interested in sending explicit acknowledgments, we can pass the { noAck: true } option to the channel.consume() API.
Integrating the chat application with AMQP
To integrate the chat servers using AMQP, we have to use a setup very similar to the one we implemented in the history service, but with some small variations. So, let's see how the new index.js module looks with the introduction of AMQP:
import { createServer } from 'http'
import staticHandler from 'serve-handler'
import ws from 'ws'
import amqp from 'amqplib'
import JSONStream from 'JSONStream'
import superagent from 'superagent'
const httpPort = process.argv[2] || 8080
async function main () {
  const connection = await amqp.connect('amqp://localhost')
  const channel = await connection.createChannel()
  await channel.assertExchange('chat', 'fanout')
  const { queue } = await channel.assertQueue(               // (1)
    `chat_srv_${httpPort}`,
    { exclusive: true }
  )
  await channel.bindQueue(queue, 'chat')
  channel.consume(queue, msg => {                            // (2)
    msg = msg.content.toString()
    console.log(`From queue: ${msg}`)
    broadcast(msg)
  }, { noAck: true })
  // serve static files
  const server = createServer((req, res) => {
    return staticHandler(req, res, { public: 'www' })
  })
  const wss = new ws.Server({ server })
  wss.on('connection', client => {
    console.log('Client connected')
    client.on('message', msg => {
      console.log(`Message: ${msg}`)
      channel.publish('chat', '', Buffer.from(msg))          // (3)
    })
    // query the history service
    superagent                                               // (4)
      .get('http://localhost:8090')
      .on('error', err => console.error(err))
      .pipe(JSONStream.parse('*'))
      .on('data', msg => client.send(msg))
  })
  function broadcast (msg) {
    for (const client of wss.clients) {
      if (client.readyState === ws.OPEN) {
        client.send(msg)
      }
    }
  }
  server.listen(httpPort)
}
main().catch(err => console.error(err))
As we can see, AMQP made the code a little bit more verbose on this occasion too, but at this point we should already be familiar with most of it. There are just a few aspects to be aware of:
- As we mentioned, our chat server doesn't need to be a durable subscriber: a fire-and-forget paradigm is enough. So when we create our queue, we pass the
{ exclusive: true }option, indicating that the queue is scoped to the current connection and therefore it will be destroyed as soon as the chat server shuts down. - For the same reason as in the previous point, we don't need to send back any acknowledgement when we read a message from the queue. So, to make things easier, we pass the
{ noAck: true }option when starting to consume the messages from the queue. - Publishing a new message is also very easy. We simply have to specify the target exchange (
chat) and a routing key, which in our case is empty ('') because we are using a fanout exchange, so there is no routing to perform. - The other peculiarity of this version of our chat server is that we can now present to the user the full history of the chat, thanks to our history microservice. We do that by querying the history microservice and sending every past message to the client as soon as a new connection is established.
We can now run our new improved chat application. To do that, first make sure to have RabbitMQ running locally on your machine, then let's start two chat servers and the history service in three different terminals:
node index.js 8080
node index.js 8081
node historySvc.js
We should now focus our attention on how our system, and in particular the history service, behaves in case of downtime. If we stop the history server and continue to send messages using the web UI of the chat application, we will see that when the history server is restarted, it will immediately receive all the messages it missed. This is a perfect demonstration of how the Durable Subscriber pattern works!
It is interesting to see how the microservice approach allows our system to survive even without one of its components—the history service. There would be a temporary reduction of functionality (no chat history available) but people would still be able to exchange chat messages in real time. Awesome!
Reliable messaging with streams
At the beginning of this chapter, we mentioned that a possible alternative to message queues are streams. The two paradigms are similar in scope, but fundamentally different in their approach to messaging. In this section, we are going to unveil the power of streams by leveraging Redis Streams to implement our chat application.
Characteristics of a streaming platform
In the context of system integration, a stream (or log) is an ordered, append-only, durable data structure. Messages—which in the context of streams would be more appropriately called records—are always added at the end of the stream and, unlike queues, they are not automatically deleted when they are consumed. Essentially, this characteristic makes a stream more similar to a data store than to a message broker. And like a data store, a stream can be queried to retrieve a batch of past records or replayed starting from a specific record.
Another important characteristic of streams is that records are pulled by the consumer from the stream. This intrinsically allows the consumer to process the records at its own pace without risking being overwhelmed.
Based on these features, a stream allows us to implement reliable message delivery out of the box, since no data is ever lost from the stream (even though data can still be removed explicitly or can be deleted after an optional retention period). In fact, as Figure 13.14 shows, if a consumer crashes, all it has to do is start reading the stream from where it left off:

Figure 13.14: Reliable message delivery with streams
As Figure 13.14 shows, during normal operations (1) the consumer processes the records in the stream as soon as they are added by the producer. When the consumer becomes unavailable (2) because of a problem or a scheduled maintenance, the producer simply continues to add records to the stream as normal. When the consumer comes back online (3), it starts processing the records from the point where it left. The main aspect of this mechanism is that it's very simple and barebone, but it's quite effective at making sure that no message is lost even when the consumer is not available.
Streams versus message queues
As we have seen so far, there are a lot of differences, but also a lot of similarities between a message queue and a stream. So, when should you use one in place of the other?
Well, the obvious use case for streams is when we have to process sequential data (streaming data) that may also require the consumer to process messages in batch or to look for correlations in past messages. Also, modern streaming platforms allow the ingestion of gigabytes of data per second and the distribution of both the data and the processing of the data across multiple nodes.
Both message queues and streams are well suited to implement simple Publish/Subscribe patterns, even with reliable message delivery. However, message queues are better suited for complex system integration tasks, since they provide advanced routing of messages and allow us to have different priorities for different messages (in streams, the order of the records is always preserved).
As we will see later, both can also be used to implement task distribution patterns, even though, in a standard architecture, message queues could be more suitable thanks to message priorities and more advanced routing mechanisms.
Implementing the chat application using Redis Streams
At the moment of writing, the most popular streaming platforms out there are Apache Kafka (nodejsdp.link/kafka) and Amazon Kinesis (nodejsdp.link/kinesis). However, for simpler tasks, we can rely again on Redis, which implements a log data structure called Redis Streams.
In the next code sample, we are going to see Redis Streams in action by adapting our chat application. The immediate advantage of using a stream over a message queue is that we don't need to rely on a dedicated component to store and retrieve the history of the messages exchanged in a chat room, but we can simply query the stream every time we need to access older messages. As we will see, this simplifies a lot the architecture of our application and certainly makes streams a better choice than message queues, at least for our very simple use case.
So, let's dive into some code. Let's update the index.js of our chat application to use Redis Streams:
import { createServer } from 'http'
import staticHandler from 'serve-handler'
import ws from 'ws'
import Redis from 'ioredis'
const redisClient = new Redis()
const redisClientXRead = new Redis()
// serve static files
const server = createServer((req, res) => {
  return staticHandler(req, res, { public: 'www' })
})
const wss = new ws.Server({ server })
wss.on('connection', async client => {
  console.log('Client connected')
  client.on('message', msg => {
    console.log(`Message: ${msg}`)
    redisClient.xadd('chat_stream', '*', 'message', msg)     // (1)
  })
  // Load message history
  const logs = await redisClient.xrange(                     // (2)
    'chat_stream', '-', '+')
  for (const [, [, message]] of logs) {
    client.send(message)
  }
})
function broadcast (msg) {
  for (const client of wss.clients) {
    if (client.readyState === ws.OPEN) {
      client.send(msg)
    }
  }
}
let lastRecordId = '$'
async function processStreamMessages () {                    // (3)
  while (true) {
    const [[, records]] = await redisClientXRead.xread(
      'BLOCK', '0', 'STREAMS', 'chat_stream', lastRecordId)
    for (const [recordId, [, message]] of records) {
      console.log(`Message from stream: ${message}`)
      broadcast(message)
      lastRecordId = recordId
    }
  }
}
processStreamMessages().catch(err => console.error(err))
server.listen(process.argv[2] || 8080)
As always, the overall structure of the application has remained the same; what changed is the API we used to exchange messages with the other instances of the application.
Let's take a look at those APIs more closely:
- The first command we want to analyze is
xadd. This command appends a new record to a stream, and we are using it to add a new chat message as it arrives from a connected client. We pass toxaddthe following arguments:- The name of the stream, which in our case is
chat_stream. - The ID of the record. In our case, we provide an asterisk (
*), which is a special ID that asks Redis to generate an ID for us. This is usually what we want, as IDs have to be monotonic to preserve the lexicographic order of the records and Redis takes care of that for us. - It follows a list of key-value pairs. In our case, we specify only a
'message'key of the valuemsg(which is the message we receive from the client).
- The name of the stream, which in our case is
- This is one of the most interesting aspects of using streams: we query the past records of the stream to retrieve the chat history. We do this every time a client connects. We use the
xrangecommand for that, which, as the name implies, allows us to retrieve all the records in the stream within the two specified IDs. In our case we are using the special IDs'-'(minus) and'+'(plus) which indicate the lowest possible ID and the highest possible ID. This essentially means that we want to retrieve all the records currently in the stream. - The last interesting part of our new chat application is where we wait for new records to be added to the stream. This allows each application instance to read new chat messages as they are added into the queue, and it's an essential part for the integration to work. We use an infinite loop and the
xreadcommand for the task, providing the following arguments:BLOCKmeans that we want the call to block until new messages arrive.- Next, we specify the timeout after which the command will simply return with a
nullresult. In our case,0means that we want to wait forever. STREAMSis a keyword that tells Redis that we are now going to specify the details of the streams we want to read.chat_streamis the name of the stream we want to read.- Finally, we supply the record ID (
lastRecordId) after which we want to start reading the new messages. Initially, this is set to$(dollar sign), which is a special ID indicating the highest ID currently in the stream, which should essentially start to read the stream after the last record currently in the stream. After we read the first record, we update thelastRecordIdvariable with the ID of the last record read.
Within the previous example, we also made use of some clever destructuring instructions. Consider for example the following code:
for (const [, [, message]] of logs) {...}
This instruction could be expanded to something like the following:
for (const [recordId, [propertyId, message]] of logs) {...}
But since we are not interested in getting the recordId and the propertyId, we are simply keeping them out of the destructuring instruction. This particular destructuring, in combination with the for...of loop, is necessary to parse the data returned from the xrange command, which in our case is in the following form:
[
  ["1588590110918-0", ["message", "This is a message"]],
  ["1588590130852-0", ["message", "This is another message"]]
]
We applied a similar principle to parse the return value of xread. Please refer to the API documentation of those instructions for a detailed explanation of their return value.
You can read more about the xadd command and the format of record IDs in the official Redis documentation at nodejsdp.link/xadd.
The xread command has also a fairly complicated arguments list and return value that you can read more about at nodejsdp.link/xread.
Also, check out the documentation for xrange at nodejsdp.link/xrange.
Now, you can start a couple of server instances again and test the application to see how the new implementation works.
It's interesting to highlight again the fact that we didn't need to rely on a dedicated component to manage our chat history, but instead, all we needed to do was to retrieve the past records from the stream with xrange. This aspect of streams makes them intrinsically reliable as no message is lost unless explicitly deleted.
Records can be removed from the stream with the xdel (nodejsdp.link/xdel) or xtrim commands (nodejsdp.link/xtrim) or with the MAXLEN option of xadd (nodejsdp.link/xadd-maxlen).
This concludes our exploration of the Publish/Subscribe pattern. Now, it's time to discover another important category of messaging patterns: task distribution patterns.
Task distribution patterns
In Chapter 11, Advanced Recipes, you learned how to delegate costly tasks to multiple local processes. Even though this was an effective approach, it cannot be scaled beyond the boundaries of a single machine, so in this section, we are going to see how it's possible to use a similar pattern in a distributed architecture, using remote workers located anywhere in a network.
The idea is to have a messaging pattern that allows us to spread tasks across multiple machines. These tasks might be individual chunks of work or pieces of a bigger task split using a divide and conquer approach.
If we look at the logical architecture represented in the following diagram, we should be able to recognize a familiar pattern:
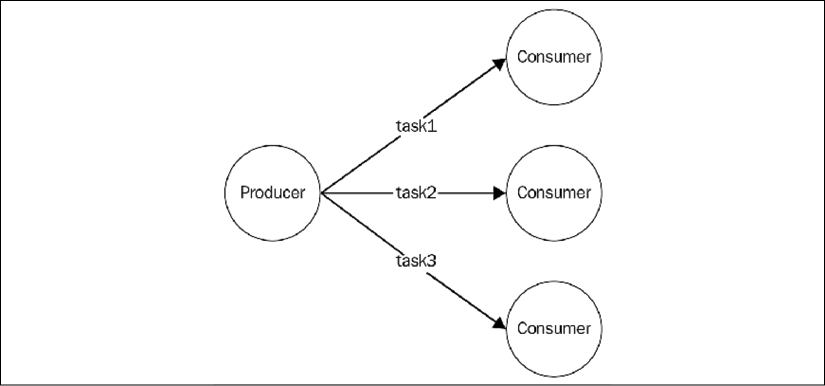
Figure 13.15: Distributing tasks to a set of consumers
As we can see from the diagram of Figure 13.15, the Publish/Subscribe pattern is not suitable for this type of application, as we absolutely don't want a task to be received by multiple workers. What we need instead, is a message distribution pattern similar to a load balancer that dispatches each message to a different consumer (also called a worker, in this case). In messaging systems terminology, this pattern is also known as competing consumers, fanout distribution, or ventilator.
One important difference to the HTTP load balancers that we saw in the previous chapter is that, here, the consumers have a more active role. In fact, as we will see later, most of the time it's not the producer that connects to the consumers, but the consumers themselves that connect to the task producer or to the task queue in order to receive new jobs. This is a great advantage in a scalable system as it allows us to seamlessly increase the number of workers without modifying the producer or adopting a service registry.
Also, in a generic messaging system, we don't necessarily have request/reply communication between the producer and the workers. Instead, most of the time, the preferred approach is to use one-way asynchronous communication, which enables better parallelism and scalability. In such an architecture, messages can potentially always travel in one direction, creating pipelines, as shown in the following diagram:
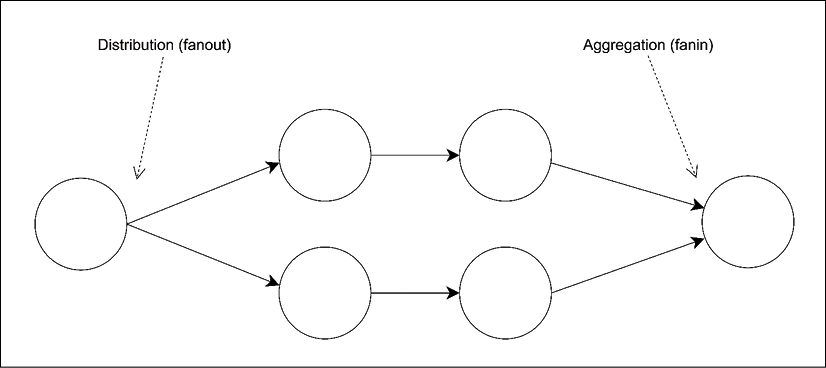
Figure 13.16: A messaging pipeline
Pipelines allow us to build very complex processing architectures without the overhead of a synchronous request/reply communication, often resulting in lower latency and higher throughput. In Figure 13.16, we can see how messages can be distributed across a set of workers (fanout), forwarded to other processing units, and then aggregated into a single node (fanin), usually called the sink.
In this section, we are going to focus on the building blocks of these kinds of architectures, by analyzing the two most important variations: peer-to-peer and broker-based.
The ZeroMQ Fanout/Fanin pattern
We have already discovered some of the capabilities of ZeroMQ for building peer-to-peer distributed architectures. In the previous section, in fact, we used PUB and SUB sockets to disseminate a single message to multiple consumers, and now, we are going to see how it's possible to build parallel pipelines using another pair of sockets called PUSH and PULL.
PUSH/PULL sockets
Intuitively, we can say that the PUSH sockets are made for sending messages, while the PULL sockets are meant for receiving. It might seem a trivial combination, however, they have some extra features that make them perfect for building one-way communication systems:
- Both can work in connect mode or bind mode. In other words, we can create a
PUSHsocket and bind it to a local port listening for the incoming connections from aPULLsocket, or vice versa, aPULLsocket might listen for connections from aPUSHsocket. The messages always travel in the same direction, fromPUSHtoPULL, it's only the initiator of the connection that can be different. The bind mode is the best solution for durable nodes, such as, for example, the task producer and the sink, while the connect mode is perfect for transient nodes, such as the task workers. This allows the number of transient nodes to vary arbitrarily without affecting the more stable, durable nodes. - If there are multiple
PULLsockets connected to a singlePUSHsocket, the messages are evenly distributed across all thePULLsockets. In practice, they are load balanced (peer-to-peer load balancing!). On the other hand, aPULLsocket that receives messages from multiplePUSHsockets will process the messages using a fair queuing system, which means that they are consumed evenly from all the sources—a round-robin applied to inbound messages. - The messages sent over a
PUSHsocket that doesn't have any connectedPULLsockets do not get lost. They are instead queued until a node comes online and starts pulling the messages.
We are now starting to understand how ZeroMQ is different from traditional web services and why it's a perfect tool for building a distributed messaging system.
Building a distributed hashsum cracker with ZeroMQ
Now it's time to build a sample application to see the properties of the PUSH/PULL sockets we just described in action.
A simple and fascinating application to work with would be a hashsum cracker: A system that uses a brute-force approach to try to match a given hashsum (such as MD5 or SHA1) to the hashsum of every possible variation of characters of a given alphabet, thus discovering the original string the given hashsum was created from.
This is an embarrassingly parallel workload (nodejsdp.link/embarrassingly-parallel), which is perfect for building an example demonstrating the power of parallel pipelines.
Never use plain hashsums to encrypt passwords as they are very easy to crack. Use instead a purpose-built algorithm such as bcrypt (nodejsdp.link/bcrypt), scrypt (nodejsdp.link/scrypt), PBKDF2 (nodejsdp.link/pbkdf2), or Argon2 (nodejsdp.link/argon2).
For our application, we want to implement a typical parallel pipeline where we have the following:
- A node to create and distribute tasks across multiple workers
- Multiple worker nodes (where the actual computation happens)
- A node to collect all the results
The system we just described can be implemented in ZeroMQ using the following architecture:

Figure 13.17: The architecture of a typical pipeline with ZeroMQ
In our architecture, we have a ventilator generating intervals of variations of characters in the given alphabet (for example, the interval 'aa' to 'bb' includes the variations 'aa', 'ab', 'ba', 'bb') and distributing those intervals to the workers as tasks. Each worker, then, calculates the hashsum of every variation in the given interval, trying to match each resulting hashsum against the control hashsum given as input. If a match is found, the result is sent to a results collector node (sink).
The durable nodes of our architecture are the ventilator and the sink, while the transient nodes are the workers. This means that each worker connects its PULL socket to the ventilator and its PUSH socket to the sink, this way we can start and stop as many workers as we want without changing any parameter in the ventilator or the sink.
Implementing the producer
To represent intervals of variations, we are going to use indexed n-ary trees. If we imagine having a tree in which each node has exactly n children, where each child is one of the n elements of the given alphabet and we assign an index to each node in breadth-first order, then, given the alphabet [a, b] we should obtain a tree such as the following:

Figure 13.18: Indexed n-ary tree for alphabet [a, b]
It's then possible to obtain the variation corresponding to an index by traversing the tree from the root to the given index, appending the element of the nodes found along the way to the variation being calculated. For example, given the tree in Figure 13.18, the variation corresponding to the index 13 will be 'bba'.
We'll leverage the indexed-string-variation package (nodejsdp.link/indexed-string-variation) to aid us in calculating the corresponding variation given its index in the n-ary tree. This operation is done in the workers, so all we have to do in the ventilator is to produce intervals of indexes to give to the workers, which in turn will calculate all the variations of characters represented by those intervals.
Now, after the necessary theory, let's start to build our system by implementing the component responsible to generate the tasks to distribute (generateTasks.js):
export function * generateTasks (searchHash, alphabet,
  maxWordLength, batchSize) {
  let nVariations = 0
  for (let n = 1; n <= maxWordLength; n++) {
    nVariations += Math.pow(alphabet.length, n)
  }
  console.log('Finding the hashsum source string over ' +
    `${nVariations} possible variations`)
  let batchStart = 1
  while (batchStart <= nVariations) {
    const batchEnd = Math.min(
      batchStart + batchSize - 1, nVariations)
    yield {
      searchHash,
      alphabet: alphabet,
      batchStart,
      batchEnd
    }
    batchStart = batchEnd + 1
  }
}
The generateTasks() generator creates intervals of integers of batchSize size, starting from 1 (we exclude 0, which is the root of the tree, corresponding to the empty variation) and ending at the largest possible index (nVariations) for the given alphabet and the maximum word length provided (maxLength). Then, we pack all the data about the task into an object and yield it to the caller.
Please consider that to generate longer strings it may be necessary to switch to BigInt (nodejsdp.link/bigint) to represent their indexes, since the maximum safe integer manageable by JavaScript is currently 253 – 1, which is the value of Number.MAX_SAFE_INTEGER. Note that using very large integers may have a negative impact on the performances of the variations generator.
Now, we need to implement the logic of our producer, which is responsible for distributing the tasks across all workers (in the producer.js file):
import zmq from 'zeromq'
import delay from 'delay'
import { generateTasks } from './generateTasks.js'
const ALPHABET = 'abcdefghijklmnopqrstuvwxyz'
const BATCH_SIZE = 10000
const [, , maxLength, searchHash] = process.argv
async function main () {
  const ventilator = new zmq.Push()                          // (1)
  await ventilator.bind('tcp://*:5016')
  await delay(1000) // wait for all the workers to connect
  const generatorObj = generateTasks(searchHash, ALPHABET,
    maxLength, BATCH_SIZE)
  for (const task of generatorObj) {
    await ventilator.send(JSON.stringify(task))              // (2)
  }
}
main().catch(err => console.error(err))
To avoid generating too many variations, our generator uses only the lowercase letters of the English alphabet and sets a limit on the size of the words generated. This limit is provided as an input in the command-line arguments (maxLength) together with the hashsum to match (searchHash).
But the part that we are most interested in analyzing is how we distribute the tasks across the workers:
- We first create a
PUSHsocket and we bind it to the local port5016, which is where thePULLsocket of the workers will connect to receive their tasks. We then wait 1 second for all the workers to connect: we do this because if the producer starts while the workers are already running, the workers may connect at different times (because of their timer-based reconnection algorithm) and that may cause the first connecting worker to receive most of the tasks. - For each generated task, we stringify it and send it to a worker using the
send()function of theventilatorsocket. Each connected worker will receive a different task following a round-robin approach.
Implementing the worker
Now it's time to implement the worker, but first, let's create a component to process the incoming tasks (in the processTask.js file):
import isv from 'indexed-string-variation'
import { createHash } from 'crypto'
export function processTask (task) {
  const variationGen = isv.generator(task.alphabet)
  console.log('Processing from ' +
    `${variationGen(task.batchStart)} (${task.batchStart}) ` +
    `to ${variationGen(task.batchEnd)} (${task.batchEnd})`)
  for (let idx = task.batchStart; idx <= task.batchEnd; idx++) {
    const word = variationGen(idx)
    const shasum = createHash('sha1')
    shasum.update(word)
    const digest = shasum.digest('hex')
    if (digest === task.searchHash) {
      return word
    }
  }
}
The logic of the processTask() function is quite simple: it iterates over the indexes within the given interval, then for each index it generates the corresponding variation of characters (word). Next, it calculates the SHA1 checksum for the word and it tries to match it against the searchHash passed within the task object. If the two digests match, then it returns the source word to the caller.
Now we are ready to implement the main logic of our worker (worker.js):
import zmq from 'zeromq'
import { processTask } from './processTask.js'
async function main () {
  const fromVentilator = new zmq.Pull()
  const toSink = new zmq.Push()
  fromVentilator.connect('tcp://localhost:5016')
  toSink.connect('tcp://localhost:5017')
  for await (const rawMessage of fromVentilator) {
    const found = processTask(JSON.parse(rawMessage.toString()))
    if (found) {
      console.log(`Found! => ${found}`)
      await toSink.send(`Found: ${found}`)
    }
  }
}
main().catch(err => console.error(err))
As we said, our worker represents a transient node in our architecture, therefore, its sockets should connect to a remote node instead of listening for the incoming connections. That's exactly what we do in our worker, we create two sockets:
- A
PULLsocket that connects to the ventilator, for receiving the tasks - A
PUSHsocket that connects to the sink, for propagating the results
Besides this, the job done by our worker is very simple: it processes every task received, and if a match is found, we send a message to the results collector through the toSink socket.
Implementing the results collector
For our example, the results collector (sink) is a very basic program that simply prints the messages received by the workers to the console. The contents of the collector.js file are as follows:
import zmq from 'zeromq'
async function main () {
  const sink = new zmq.Pull()
  await sink.bind('tcp://*:5017')
  for await (const rawMessage of sink) {
    console.log('Message from worker: ', rawMessage.toString())
  }
}
main().catch(err => console.error(err))
It's interesting to see that the results collector (as the producer) is also a durable node of our architecture and therefore we bind its PULL socket instead of connecting it explicitly to the PUSH socket of the workers.
Running the application
We are now ready to launch our application; let's start a couple of workers and the results collector (each one in a different terminal):
node worker.js
node worker.js
node collector.js
Then it's time to start the producer, specifying the maximum length of the words to generate and the SHA1 checksum that we want to match. The following is a sample command line:
node producer.js 4 f8e966d1e207d02c44511a58dccff2f5429e9a3b
When the preceding command is run, the producer will start generating tasks and distributing them to the set of workers we started. We are telling the producer to generate all possible words with 4 lowercase letters (because our alphabet comprises only lowercase letters) and we also provide a sample SHA1 checksum that corresponds to a secret 4-letter word.
The results of the computation, if any, will appear in the terminal of the results collector application.
Please note that given the low-level nature of PUSH/PULL sockets in ZeroMQ and in particular the lack of message acknowledgments, if a node crashes, then all the tasks it was processing will be lost. It's possible to implement a custom acknowledgment mechanism on top of ZeroMQ but we'll leave that as an exercise for the reader.
Another known limitation of this implementation is the fact that the workers won't stop processing tasks if a match is found. This feature was intentionally left out to make the examples as focused as possible on the pattern being discussed. You can try adding this "stopping" mechanism as an exercise.
Pipelines and competing consumers in AMQP
In the previous section, we saw how a parallel pipeline can be implemented in a peer-to-peer context. Now, we are going to explore this pattern when applied in a broker-based architecture using RabbitMQ.
Point-to-point communications and competing consumers
In a peer-to-peer configuration, a pipeline is a very straightforward concept to imagine. With a message broker in the middle, though, the relationships between the various nodes of the system are a little bit harder to understand: the broker itself acts as an intermediary for our communications and, often, we don't really know who is on the other side listening for messages. For example, when we send a message using AMQP, we don't deliver it directly to its destination, but instead to an exchange and then to a queue. Finally, it will be for the broker to decide where to route the message, based on the rules defined in the exchange, the bindings, and the destination queues.
If we want to implement a pipeline and a task distribution pattern using a system like AMQP, we have to make sure that each message is received by only one consumer, but this is impossible to guarantee if an exchange can potentially be bound to more than one queue. The solution, then, is to send a message directly to the destination queue, bypassing the exchange altogether. This way, we can make sure that only one queue will ever receive the message. This communication pattern is called point-to-point.
Once we are able to send a set of messages directly to a single queue, we are already half-way to implementing our task distribution pattern. In fact, the next step comes naturally: when multiple consumers are listening on the same queue, the messages will be distributed evenly across them, following a fanout distribution pattern. As we already mentioned, in the context of message brokers this is better known as the Competing Consumers pattern.
Next, we are going to reimplement our simple hashsum cracker using AMQP, so we can appreciate the differences to the peer-to-peer approach we have discussed in the previous section.
Implementing the hashsum cracker using AMQP
We just learned that exchanges are the point in a broker where a message is multicast to a set of consumers, while queues are the place where messages are load balanced. With this knowledge in mind, let's now implement our brute-force hashsum cracker on top of an AMQP broker (which in our case is RabbitMQ). The following figure gives you an overview of the system we want to implement:
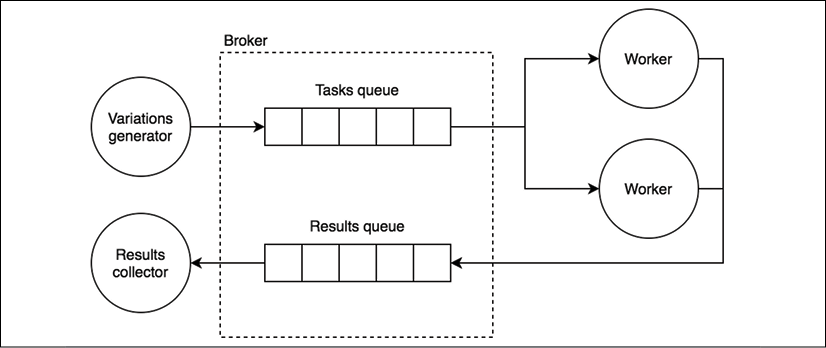
Figure 13.19: Task distribution architecture using a message queue broker
As we discussed, to distribute a set of tasks across multiple workers, we need to use a single queue. In Figure 13.19, we called this the tasks queue. On the other side of the tasks queue, we have a set of workers, which are competing consumers: in other words, each one will receive a different message from the queue. The effect is that multiple tasks will execute in parallel on different workers.
The results generated by the workers are published into another queue, which we called the results queue, and then consumed by the results collector, which is actually equivalent to a sink. In the entire architecture, we don't make use of any exchange, we only send messages directly to their destination queue, implementing a point-to-point type of communication.
Implementing the producer
Let's see how to implement such a system, starting from the producer (in the producer.js file):
import amqp from 'amqplib'
import { generateTasks } from './generateTasks.js'
const ALPHABET = 'abcdefghijklmnopqrstuvwxyz'
const BATCH_SIZE = 10000
const [, , maxLength, searchHash] = process.argv
async function main () {
  const connection = await amqp.connect('amqp://localhost')
  const channel = await connection.createConfirmChannel()    // (1)
  await channel.assertQueue('tasks_queue')
  const generatorObj = generateTasks(searchHash, ALPHABET,
    maxLength, BATCH_SIZE)
  for (const task of generatorObj) {
    channel.sendToQueue('tasks_queue',                       // (2)
      Buffer.from(JSON.stringify(task)))
  }
  await channel.waitForConfirms()
  channel.close()
  connection.close()
}
main().catch(err => console.error(err))
As we can see, the absence of any exchange or binding makes the setup of an AMQP-based application much simpler. There are however a few details to note:
- Instead of creating a standard channel, we are creating a
confirmChannel. This is necessary as it creates a channel with some extra functionality, in particular, it provides thewaitForConfirms()function that we use later in the code to wait until the broker confirms the reception of all the messages. This is necessary to prevent the application from closing the connection to the broker too soon, before all the messages have been dispatched from the local queue. - The core of the producer is the
channel.sendToQueue()API, which is actually new to us. As its name says, that's the API responsible for delivering a message straight to a queue—thetasks_queuein our example—bypassing any exchange or routing.
Implementing the worker
On the other side of the tasks_queue, we have the workers listening for the incoming tasks. Let's update the code of our existing worker.js module to use AMQP:
import amqp from 'amqplib'
import { processTask } from './processTask.js'
async function main () {
  const connection = await amqp.connect('amqp://localhost')
  const channel = await connection.createChannel()
  const { queue } = await channel.assertQueue('tasks_queue')
  channel.consume(queue, async (rawMessage) => {
    const found = processTask(
      JSON.parse(rawMessage.content.toString()))
    if (found) {
      console.log(`Found! => ${found}`)
      await channel.sendToQueue('results_queue',
        Buffer.from(`Found: ${found}`))
    }
    await channel.ack(rawMessage)
  })
}
main().catch(err => console.error(err))
Our new worker is also very similar to the one we implemented in the previous section using ZeroMQ, except for the parts related to the exchange of messages. In the preceding code, we can see how we first get a reference to the queue called tasks_queue and then we start listening for incoming tasks using channel.consume(). Then, every time a match is found, we send the result to the collector via the results_queue, again using point-to-point communication. It's also important to note how we are acknowledging every message with channel.ack() after the message has been completely processed.
If multiple workers are started, they will all listen on the same queue, resulting in the messages being load balanced between them (they become competing consumers).
Implementing the result collector
The results collector is again a trivial module, simply printing any message received to the console. This is implemented in the collector.js file, as follows:
import amqp from 'amqplib'
async function main () {
  const connection = await amqp.connect('amqp://localhost')
  const channel = await connection.createChannel()
  const { queue } = await channel.assertQueue('results_queue')
  channel.consume(queue, msg => {
    console.log(`Message from worker: ${msg.content.toString()}`)
  })
}
main().catch(err => console.error(err))
Running the application
Now everything is ready to give our new system a try. First, make sure that the RabbitMQ server is running, then you can launch a couple of workers (in two separate terminals), which will both connect to the same queue (tasks_queue) so that every message will be load balanced between them:
node worker.js
node worker.js
Then, you can run the collector module and then the producer (by providing the maximum word length and the hash to crack):
node collector.js
node producer.js 4 f8e966d1e207d02c44511a58dccff2f5429e9a3b
With this, we implemented a message pipeline and the Competing Consumers pattern using AMQP.
It's interesting to note that our new version of the hashsum cracker based on AMQP takes slightly longer (compared to the ZeroMQ-based version) to execute all the tasks and find a match. This is a practical demonstration of how a broker can actually introduce a negative performance impact, compared to a more low-level peer-to-peer approach. However, let's not forget that with AMQP we are getting much more out of the box compared to our ZeroMQ implementation. For example, with the AMQP implementation, if a worker crashes, the messages it was processing won't be lost and will eventually be passed to another worker. So, remember to always look at the bigger picture when choosing the right approach to use for your application: a small delay may mean nothing compared to a massive increase in the overall complexity of the system or to a lack of some important features.
Now, let's consider another broker-based approach for implementing task distribution patterns, this time built on top of Redis Streams.
Distributing tasks with Redis Streams
After seeing how the Task Distribution pattern can be implemented using ZeroMQ and AMQP, we are now going to see how we can implement this pattern leveraging Redis Streams.
Redis consumer groups
Before diving into some code, we need to learn about a critical feature of Redis that allows us to implement a Task Distribution pattern using Redis Streams. This feature is called consumer groups and is an implementation of the Competing Consumer pattern (with the addition of some useful accessories) on top of Redis Streams.
A consumer group is a stateful entity, identified by a name, which comprises a set of consumers identified by a name. When the consumers in the group try to read the stream, they will receive the records in a round-robin configuration.
Each record has to be explicitly acknowledged, otherwise, the record will be kept in a pending state. Each consumer can only access its own history of pending records unless it explicitly claims the records of another consumer. This is useful if a consumer crashes while processing a record. When the consumer comes back online, the first thing it should do is retrieve its list of pending records and process those before requesting new records from the stream. Figure 13.20 provides a visual representation of how consumer groups work in Redis.

Figure 13.20: A Redis Stream consumer group
We can note how the two consumers in the group receive two different records (B for Consumer 1 and C for Consumer 2) when they try to read from the stream. The consumer group also stores the ID of the last retrieved record (record C), so that at the successive read operation the consumer group knows what's the next record to read. We can also note how Consumer 1 has a pending record (A), which is a record that it's still processing or couldn't process. Consumer 1 can implement a retry algorithm to make sure to process all the pending records assigned to itself.
A Redis Stream can have multiple consumer groups. This way it's possible to simultaneously apply different types of processing to the same data.
Now let's put into practice what we just learned about Redis consumer groups to implement our hashsum cracker.
Implementing the hashsum cracker using Redis Streams
The architecture of our hashsum cracker with Redis Streams is going to resemble closely that of the previous AMQP example. In fact, we are going to have two different streams (in the AMQP examples they were queues): one stream to hold the tasks to be processed (tasks_stream) and another stream to hold the results coming from the workers (results_stream).
Then, we are going to use a consumer group to distribute the tasks from the tasks_stream to the workers of our application (our workers are the consumers).
Implementing the producer
Let's start by implementing the producer (in the producer.js file):
import Redis from 'ioredis'
import { generateTasks } from './generateTasks.js'
const ALPHABET = 'abcdefghijklmnopqrstuvwxyz'
const BATCH_SIZE = 10000
const redisClient = new Redis()
const [, , maxLength, searchHash] = process.argv
async function main () {
  const generatorObj = generateTasks(searchHash, ALPHABET,
    maxLength, BATCH_SIZE)
  for (const task of generatorObj) {
    await redisClient.xadd('tasks_stream', '*',
      'task', JSON.stringify(task))
  }
  redisClient.disconnect()
}
main().catch(err => console.error(err))
As we can see, there is nothing new to us in the implementation of the new producer.js module. In fact, we already know very well how to add records to a stream; all we have to do is invoke xadd() as discussed in the Reliable messaging with streams section.
Implementing the worker
Next, we need to adapt our worker so it can interface with a Redis Stream using a consumer group. This is the core of all the architecture, as in here, in the worker, we leverage consumer groups and their features. So, let's implement the new worker.js module:
import Redis from 'ioredis'
import { processTask } from './processTask.js'
const redisClient = new Redis()
const [, , consumerName] = process.argv
async function main () {
  await redisClient.xgroup('CREATE', 'tasks_stream',         // (1)
    'workers_group', '$', 'MKSTREAM')
    .catch(() => console.log('Consumer group already exists'))
  const [[, records]] = await redisClient.xreadgroup(        // (2)
    'GROUP', 'workers_group', consumerName, 'STREAMS',
    'tasks_stream', '0')
  for (const [recordId, [, rawTask]] of records) {
    await processAndAck(recordId, rawTask)
  }
  while (true) {
    const [[, records]] = await redisClient.xreadgroup(      // (3)
      'GROUP', 'workers_group', consumerName, 'BLOCK', '0',
      'COUNT', '1', 'STREAMS', 'tasks_stream', '>')
    for (const [recordId, [, rawTask]] of records) {
      await processAndAck(recordId, rawTask)
    }
  }
}
async function processAndAck (recordId, rawTask) {           // (4)
  const found = processTask(JSON.parse(rawTask))
  if (found) {
    console.log(`Found! => ${found}`)
    await redisClient.xadd('results_stream', '*', 'result',
      `Found: ${found}`)
  }
  await redisClient.xack('tasks_stream', 'workers_group', recordId)
}
main().catch(err => console.error(err))
OK, there are a lot of moving parts in the new worker code. So, let's analyze it one step at a time:
- First, we need to make sure that the consumer group exists before we can use it. We can do that with the
xgroupcommand, which we invoke with the following parameters:'CREATE'is the keyword to use when we want to create a consumer group. In fact, with thexgroupcommand, we can also destroy the consumer group, remove a consumer, or update the last read record ID, using different subcommands.'tasks_stream'is the name of the stream we want to read from.'workers_group'is the name of the consumer group.- The fourth argument represents the record ID from where the consumer group should start consuming records from the stream. Using
'$'(dollar sign) means that the consumer group should start reading the stream from the ID of the last record currently in the stream. 'MKSTREAM'is an extra parameter that instructs Redis to create the stream if it doesn't exist already.
- Next, we read all the pending records belonging to the current consumer. Those are the leftover records from a previous run of the consumer that weren't processed because of an abrupt interruption of the application (such as a crash). If the same consumer (with the same name) terminated properly during the last run, without errors, then this list would most likely be empty. As we already mentioned, each consumer has access only to its own pending records. We retrieve this list with a
xreadgroupcommand and the following arguments:'GROUP', 'workers_group', consumerNameis a mandatory trio where we specify the name of the consumer group ('workers_group') and the name of the consumer (consumerName) that we read from the command-line inputs.- Then we specify the stream we would like to read with
'STREAMS', 'tasks_stream'. - Finally, we specify
'0'as the last argument, which is the ID from which we should start reading. Essentially, we are saying that we want to read all pending messages belonging to the current consumer starting from the first message.
- Then, we have another call to
xreadgroup(), but this time it has a completely different semantic. In this case, in fact, we want to start reading new records from the stream (and not access the consumer's own history). This is possible with the following list of arguments:- As in the previous call of
xreadgroup(), we specify the consumer group that we want to use for the read operation with the three arguments:'GROUP', 'workers_group', consumerName. - Then we indicate that the call should block if there are no new records currently available instead of returning an empty list. We do that with the following two arguments:
'BLOCK', '0'. The last argument is the timeout after which the function returns anyway, even without results.'0'means that we want to wait indefinitely. - The next two arguments,
'COUNT'and'1', tell Redis that we are interested in getting one record per call. - Next, we specify the stream we want to read from with
'STREAMS', 'tasks_stream'. - Finally, with the special ID
'>'(greater than symbol), we indicate that we are interested in any record not yet retrieved by this consumer group.
- As in the previous call of
- Finally, in the
processAndAck()function, we check if we have a match and if that's the case, we append a new record to theresults_stream. At last, when all the processing for the record returned byxreadgroup()completes, we invoke the Redisxackcommand to acknowledge that the record has been successfully consumed, which results in the record being removed from the pending list for the current consumer.
Phew! There was a lot going on in the worker.js module. It's interesting to note that most of the complexity comes from the large amount of arguments required by the various Redis commands.
You may be surprised to know that this example just scratches the surface, as there is a lot more to know about Redis Streams, and in particular, consumer groups. Check out the official Redis introduction to Streams for more details at nodejsdp.link/redis-streams.
Now, everything should be ready for us to try out this new version of the hashsum cracker. Let's start a couple of workers, but this time remember to assign them a name, which will be used to identify them in the consumer group:
node worker.js workerA
node worker.js workerB
Then, you can run the collector and the producer as we did in the previous examples:
node collector.js
node producer.js 4 f8e966d1e207d02c44511a58dccff2f5429e9a3b
This concludes our exploration of the task distribution patterns, so now, we'll take a closer look at the request/reply patterns.
Request/Reply patterns
One-way communications can give us great advantages in terms of parallelism and efficiency, but alone they are not able to solve all our integration and communication problems. Sometimes, a good old request/reply pattern might just be the perfect tool for the job. But, there are situations in which all we have is an asynchronous one-way channel. It's therefore important to know the various patterns and approaches required to build an abstraction that would allow us to exchange messages in a request/reply fashion on top of a one-way channel. That's exactly what we are going to learn next.
Correlation Identifier
The first Request/Reply pattern that we are going to learn is called the Correlation Identifier and it represents the basic block for building a request/reply abstraction on top of a one-way channel.
The pattern involves marking each request with an identifier, which is then attached to the response by the receiver: this way, the sender of the request can correlate the two messages and return the response to the right handler. This elegantly solves the problem in the context of a one-way asynchronous channel, where messages can travel in any direction at any time. Let's take a look at the example in the following diagram:
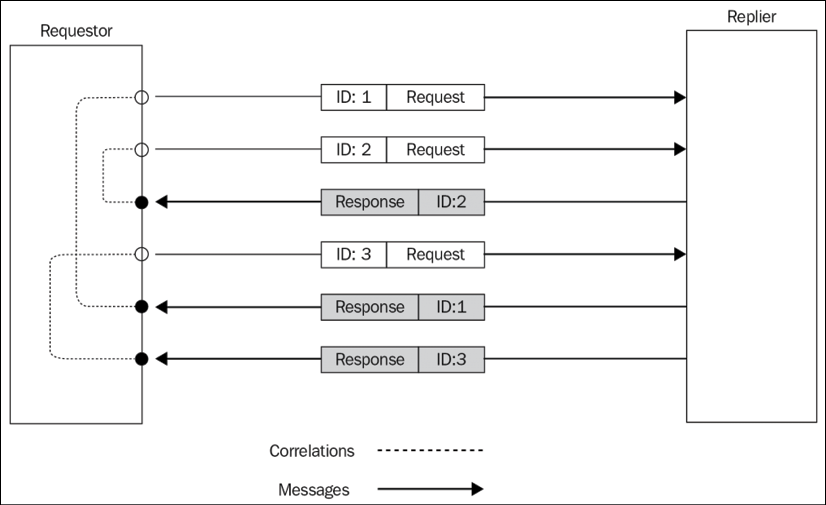
Figure 13.21: Request/reply message exchange using correlation identifiers
The scenario depicted in Figure 13.21 shows how using a correlation ID allows us to match each response with the right request, even if those are sent and then received in a different order. The way this works will be much clearer once we start working on our next example.
Implementing a request/reply abstraction using correlation identifiers
Let's now start working on an example by choosing the simplest type of one-way channel; one that is point-to-point (which directly connects two nodes of the system) and fully duplex (messages can travel in both directions).
In this simple channel category, we can find, for example, WebSockets: they establish a point-to-point connection between the server and browser, and the messages can travel in any direction. Another example is the communication channel that is created when a child process is spawned using child_process.fork() (we already met this API in Chapter 11, Advanced Recipes). This channel too is asynchronous, point-to-point, and duplex since it connects the parent only with the child process and it allows messages to travel in any direction. This is probably the most basic channel of this category, so that's what we are going to use in the next example.
The plan for the next application is to build an abstraction in order to wrap the channel created between the parent process and the child process. This abstraction should provide a request/reply communication channel by automatically marking each request with a correlation identifier and then matching the ID of any incoming reply against the list of request handlers awaiting a response.
From Chapter 11, Advanced Recipes, we should remember that the parent process can send a message to a child with child.send(message), while receiving messages is possible with the child.on('message', callback) event handler.
In a similar way, the child process can send a message to the parent process using process.send(message) and receive messages with process.on('message', callback).
This means that the interface of the channel available in the parent process is identical to the one available in the child. This will allow us to build a common abstraction that can be used from both ends of the channel.
Abstracting the request
Let's start building this abstraction by considering the part responsible for sending new requests. Let's create a new file called createRequestChannel.js with the following content:
import { nanoid } from 'nanoid'
export function createRequestChannel (channel) {             // (1)
  const correlationMap = new Map()
  function sendRequest (data) {                              // (2)
    console.log('Sending request', data)
    return new Promise((resolve, reject) => {
      const correlationId = nanoid()
      const replyTimeout = setTimeout(() => {
        correlationMap.delete(correlationId)
        reject(new Error('Request timeout'))
      }, 10000)
      correlationMap.set(correlationId, (replyData) => {
        correlationMap.delete(correlationId)
        clearTimeout(replyTimeout)
        resolve(replyData)
      })
      channel.send({
        type: 'request',
        data,
        id: correlationId
      })
    })
  }
  channel.on('message', message => {                         // (3)
    const callback = correlationMap.get(message.inReplyTo)
    if (callback) {
      callback(message.data)
    }
  })
  return sendRequest
}
This is how our request abstraction works:
- The
createRequestChannel()is a factory that wraps the input channel and returns asendRequest()function used to send a request and receive a reply. The magic of the pattern lies in thecorrelationMapvariable, which stores the association between the outgoing requests and their reply handlers. - The
sendRequest()function is used to send new requests. Its job is to generate a correlation ID using thenanoidpackage (nodejsdp.link/nanoid) and then wrap the request data in an envelope that allows us to specify the correlation ID and the type of the message. The correlation ID and the handler responsible for returning the reply data to the caller (which usesresolve()under the hood) are then added to thecorrelationMapso that the handler can be retrieved later using the correlation ID. We also implemented a very simple request timeout logic. - When the factory is invoked, we also start listening for incoming messages. If the correlation ID of the message (contained in the
inReplyToproperty) matches any of the IDs contained in thecorrelationMapmap, we know that we just received a reply, so we obtain the reference to the associated response handler and we invoke it with the data contained in the message.
That's it for the createRequestChannel.js module. Let's move on to the next part.
Abstracting the reply
We are just a step away from implementing the full pattern, so let's see how the counterpart of the request channel, which is the reply channel, works. Let's create another file called createReplyChannel.js, which will contain the abstraction for wrapping the reply handler:
export function createReplyChannel (channel) {
  return function registerHandler (handler) {
    channel.on('message', async message => {
      if (message.type !== 'request') {
        return
      }
      const replyData = await handler(message.data)      // (1)
      channel.send({                                     // (2)
        type: 'response',
        data: replyData,
        inReplyTo: message.id
      })
    })
  }
}
Our createReplyChannel() function is again a factory that returns another function used to register new reply handlers. This is what happens when a new handler is registered:
- When we receive a new request, we immediately invoke the handler by passing the data contained in the message.
- Once the handler has done its work and returned its reply, we build an envelope around the data and include the type of the message and the correlation ID of the request (the
inReplyToproperty), then we put everything back into the channel.
The amazing thing about this pattern is that in Node.js it comes very easily: everything for us is already asynchronous, so an asynchronous request/reply communication built on top of a one-way channel is not very different from any other asynchronous operation, especially if we build an abstraction to hide its implementation details.
Trying the full request/reply cycle
Now we are ready to try our new asynchronous request/reply abstraction. Let's create a sample replier in a file named replier.js:
import { createReplyChannel } from './createReplyChannel.js'
const registerReplyHandler = createReplyChannel(process)
registerReplyHandler(req => {
  return new Promise(resolve => {
    setTimeout(() => {
      resolve({ sum: req.a + req.b })
    }, req.delay)
  })
})
process.send('ready')
Our replier simply calculates the sum between the two numbers received in the request and returns the result after a certain delay (which is also specified in the request). This will allow us to verify that the order of the responses can be different from the order in which we sent the requests, to confirm that our pattern is working. With the last instruction of the module, we send a message back to the parent process to indicate that the child is ready to accept requests.
The final step to complete the example is to create the requestor in a file named requestor.js, which also has the task of starting the replier using child_process.fork():
import { fork } from 'child_process'
import { dirname, join } from 'path'
import { fileURLToPath } from 'url'
import { once } from 'events'
import { createRequestChannel } from './createRequestChannel.js'
const __dirname = dirname(fileURLToPath(import.meta.url))
async function main () {
  const channel = fork(join(__dirname, 'replier.js'))          // (1)
  const request = createRequestChannel(channel)
  try {
    const [message] = await once(channel, 'message')       // (2)
    console.log(`Child process initialized: ${message}`)
    const p1 = request({ a: 1, b: 2, delay: 500 })         // (3)
      .then(res => {
        console.log(`Reply: 1 + 2 = ${res.sum}`)
      })
    const p2 = request({ a: 6, b: 1, delay: 100 })         // (4)
      .then(res => {
        console.log(`Reply: 6 + 1 = ${res.sum}`)
      })
    await Promise.all([p1, p2])                            // (5)
  } finally {
    channel.disconnect()                                   // (6)
  }
}
main().catch(err => console.error(err))
The requestor starts the replier (1) and then passes its reference to our createRequestChannel() abstraction. We then wait for the child process to be available (2) and run a couple of sample requests (3, 4). Finally, we wait for both requests to complete (5) and we disconnect the channel (6) to allow the child process (and therefore the parent process) to exit gracefully.
To try out the sample, simply launch the requestor.js module. The output should be something similar to the following:
Child process initialized: ready
Sending request { a: 1, b: 2, delay: 500 }
Sending request { a: 6, b: 1, delay: 100 }
Reply: 6 + 1 = 7
Reply: 1 + 2 = 3
This confirms that our implementation of the Request/Reply messaging pattern works perfectly and that the replies are correctly associated with their respective requests, no matter in what order they are sent or received.
The technique we've discussed in this section works great when we have a single point-to-point channel. But what happens if we have a more complex architecture with multiple channels or queues? That's what we are going to see next.
Return address
The Correlation Identifier is the fundamental pattern for creating a request/reply communication on top of a one-way channel. However, it's not enough when our messaging architecture has more than one channel or queue, or when there can be potentially more than one requestor. In these situations, in addition to a correlation ID, we also need to know the return address, a piece of information that allows the replier to send the response back to the original sender of the request.
Implementing the Return Address pattern in AMQP
In the context of an AMQP-based architecture, the return address is the queue where the requestor is listening for incoming replies. Because the response is meant to be received by only one requestor, it's important that the queue is private and not shared across different consumers. From these properties, we can infer that we are going to need a transient queue scoped to the connection of the requestor, and that the replier has to establish a point-to-point communication with the return queue to be able to deliver its responses.
The following diagram gives us an example of this scenario:

Figure 13.22: Request/reply messaging architecture using AMQP
Figure 13.22 shows us how each requestor has its own private queue, specifically intended to handle the replies to their requests. All requests are sent instead to a single queue, which is then consumed by the replier. The replier will route the replies to the correct response queue thanks to the return address information specified in the request.
In fact, to create a Request/Reply pattern on top of AMQP, all we need to do is to specify the name of the response queue in the message properties, so that the replier knows where the response message has to be delivered.
The theory seems very straightforward, so let's see how to implement this in a real application.
Implementing the request abstraction
Let's now build a request/reply abstraction on top of AMQP. We will use RabbitMQ as a broker, but any compatible AMQP broker should do the job. Let's start with the request abstraction, implemented in the amqpRequest.js module. We will show the code here one piece at a time to make the explanation easier. Let's start from the constructor of the AMQPRequest class:
export class AMQPRequest {
  constructor () {
    this.correlationMap = new Map()
  }
  //...
As we can see from the preceding code, we will again be using the Correlation Identifier pattern, so we are going to need a map to hold the association between the message ID and the relative handler.
Then, we need a method to initialize the AMQP connection and its objects:
async initialize () {
  this.connection = await amqp.connect('amqp://localhost')
  this.channel = await this.connection.createChannel()
  const { queue } = await this.channel.assertQueue('',       // (1)
    { exclusive: true })
  this.replyQueue = queue
  this.channel.consume(this.replyQueue, msg => {             // (2)
    const correlationId = msg.properties.correlationId
    const handler = this.correlationMap.get(correlationId)
    if (handler) {
      handler(JSON.parse(msg.content.toString()))
    }
  }, { noAck: true })
}
The interesting thing to observe here is how we create the queue to hold the replies (1). The peculiarity is that we don't specify any name, which means that a random one will be chosen for us. In addition to this, the queue is exclusive, which means that it's bound to the currently active AMQP connection and it will be destroyed when the connection closes. There is no need to bind the queue to an exchange as we don't need any routing or distribution to multiple queues, which means that the messages have to be delivered straight into our response queue. In the second part of the function (2), we start to consume the messages from the replyQueue. Here we match the ID of the incoming message with the one we have in our correlationMap and invoke the associated handler.
Next, let's see how it's possible to send new requests:
send (queue, message) {
  return new Promise((resolve, reject) => {
    const id = nanoid()                                    // (1)
    const replyTimeout = setTimeout(() => {
      this.correlationMap.delete(id)
      reject(new Error('Request timeout'))
    }, 10000)
    this.correlationMap.set(id, (replyData) => {           // (2)
      this.correlationMap.delete(id)
      clearTimeout(replyTimeout)
      resolve(replyData)
    })
    this.channel.sendToQueue(queue,                        // (3)
      Buffer.from(JSON.stringify(message)),
      { correlationId: id, replyTo: this.replyQueue }
    )
  })
}
The send() method accepts as input the name of the requests queue and the message to send. As we learned in the previous section, we need to generate a correlation ID (1) and associate it to a handler responsible for returning the reply to the caller (2). Finally, we send the message (3), specifying the correlationId and the replyTo property as metadata. In AMQP, in fact, we can specify a set of properties (or metadata) to be passed to the consumer, together with the main message. The metadata object is passed as the third argument of the sendToQueue() method.
It's important to note that we are using the channel.sentToQueue() API instead of channel.publish() to send the message. This is because we are not interested in implementing a publish/subscribe distribution pattern using exchanges, but a more basic point-to-point delivery straight into the destination queue.
The last piece of our AMQPRequest class is where we implement the destroy() method, which is used to close the connection and the channel:
  destroy () {
    this.channel.close()
    this.connection.close()
  }
}
That's it for the amqpRequest.js module.
Implementing the reply abstraction
Now it's time to implement the reply abstraction in a new module named amqpReply.js:
import amqp from 'amqplib'
export class AMQPReply {
  constructor (requestsQueueName) {
    this.requestsQueueName = requestsQueueName
  }
  async initialize () {
    const connection = await amqp.connect('amqp://localhost')
    this.channel = await connection.createChannel()
    const { queue } = await this.channel.assertQueue(        // (1)
      this.requestsQueueName)
    this.queue = queue
  }
  handleRequests (handler) {                                 // (2)
    this.channel.consume(this.queue, async msg => {
      const content = JSON.parse(msg.content.toString())
      const replyData = await handler(content)
      this.channel.sendToQueue(                              // (3)
        msg.properties.replyTo,
        Buffer.from(JSON.stringify(replyData)),
        { correlationId: msg.properties.correlationId }
      )
      this.channel.ack(msg)
    })
  }
}
In the initialize() method of the AMQPReply class, we create the queue that will receive the incoming requests (1): we can use a simple durable queue for this purpose. The handleRequests() method (2) is used to register new request handlers from where new replies can be sent. When sending back a reply (3), we use channel.sendToQueue() to publish the message straight into the queue specified in the replyTo property of the message (our return address). We also set the correlationId in the reply, so that the receiver can match the message with the list of pending requests.
Implementing the requestor and the replier
Everything is now ready to give our system a try, but first, let's build a pair sample requestor and replier to see how to use our new abstraction.
Let's start with the replier.js module:
import { AMQPReply } from './amqpReply.js'
async function main () {
  const reply = new AMQPReply('requests_queue')
  await reply.initialize()
  reply.handleRequests(req => {
    console.log('Request received', req)
    return { sum: req.a + req.b }
  })
}
main().catch(err => console.error(err))
It's nice to see how the abstraction we built allows us to hide all the mechanisms to handle the correlation ID and the return address. All we need to do is initialize a new reply object, specifying the name of the queue where we want to receive our requests ('requests_queue'). The rest of the code is just trivial; in practice, our sample replier simply calculates the sum of the two numbers received as the input and sends back the result in an object.
On the other side, we have a sample requestor implemented in the requestor.js file:
import { AMQPRequest } from './amqpRequest.js'
import delay from 'delay'
async function main () {
  const request = new AMQPRequest()
  await request.initialize()
  async function sendRandomRequest () {
    const a = Math.round(Math.random() * 100)
    const b = Math.round(Math.random() * 100)
    const reply = await request.send('requests_queue', { a, b })
    console.log(`${a} + ${b} = ${reply.sum}`)
  }
  for (let i = 0; i < 20; i++) {
    await sendRandomRequest()
    await delay(1000)
  }
  request.destroy()
}
main().catch(err => console.error(err))
Our sample requestor sends 20 random requests at one-second intervals to the requests_queue queue. In this case, also, it's interesting to see that our abstraction is doing its job perfectly, hiding all the details behind the implementation of the asynchronous Request/Reply pattern.
Now, to try out the system, simply run the replier module followed by a couple of requestor instances:
node replier.js
node requestor.js
node requestor.js
You will see a set of operations published by the requestors and then received by the replier, which in turn will send back the responses to the right requestor.
Now we can try other experiments. Once the replier is started for the first time, it creates a durable queue and this means that if we now stop it and then run the replier again, no request will be lost. All the messages will be stored in the queue until the replier is started again!
Note that based on how we implemented the application, a request will time out after 10 seconds. So, in order for a reply to reach the requestor in time, the replier can afford to have only a limited downtime (certainly less than 10 seconds).
Another nice feature that we get for free by using AMQP is the fact that our replier is scalable out of the box. To test this assumption, we can try to start two or more instances of the replier, and watch the requests being load balanced between them. This works because, every time a requestor starts, it attaches itself as a listener to the same durable queue, and as a result, the broker will load balance the messages across all the consumers of the queue (remember the Competing Consumers pattern?). Sweet!
ZeroMQ has a pair of sockets specifically meant for implementing request/reply patterns, called REQ/REP, however, they are synchronous (only one request/response at a time). More complex request/reply patterns are possible with more sophisticated techniques. For more information, you can read the official guide at nodejsdp.link/zeromq-reqrep.
A Request/Reply pattern with a return address is also possible on top of Redis Streams and resembles very closely the system we implemented with AMQP. We'll leave this to you to implement as an exercise.
Summary
You have reached the end of this chapter. Here, you learned the most important messaging and integration patterns and the role they play in the design of distributed systems. You should now have mastered the three most important types of message exchange patterns: Publish/Subscribe, Task Distribution, and Request/Reply, implemented either on top of a peer-to-peer architecture or using a broker. We analyzed the pros and cons of each pattern and architecture, and we saw that by using a broker (implementing either a message queue or data stream), it's possible to implement reliable and scalable applications with little effort, but at the cost of having one more system to maintain and scale.
You have also learned how ZeroMQ allows you to build distributed systems where you can have total control over every aspect of the architecture, fine tuning its properties around your very own requirements.
Ultimately, both approaches will give you all the tools that you need to build any type of distributed systems, from basic chat applications to web-scale platforms used by millions of people.
This chapter also closes the book. By now, you should have a toolbelt full of patterns and techniques that you can go and apply in your projects. You should also have a deeper understanding of how Node.js development works and what its strengths and weaknesses are. Throughout the book, you also had the chance to work with a myriad of packages and solutions developed by many extraordinary developers. In the end, this is the most beautiful aspect of Node.js: its people, a community where everybody plays their part in giving something back.
We hope you enjoyed our small contribution and we look forward to seeing yours.
Sincerely, Mario Casciaro and Luciano Mammino.
Exercises
- 13.1 History service with streams: In our publish/subscribe example with Redis Stream, we didn't need a history service (as we did instead in the related AMQP example) because all the message history was saved in the stream anyway. Now, implement such a history service, storing all the incoming messages in a separate database and use this service to retrieve the chat history when a new client connects. Hint: the history service will need to remember the ID of the last message retrieved across restarts.
- 13.2 Multiroom chat: Update the chat application example we created in this chapter to be able to support multiple chat rooms. The application should also support displaying the message history when the client connects. You can choose the messaging system you prefer, and even mix different ones.
- 13.3 Tasks that stop: Update the hashsum cracker examples we implemented in this chapter and add the necessary logic to stop the computation on all nodes once a match has been found.
- 13.4 Reliable task processing with ZeroMQ: Implement a mechanism to make our hashsum cracker example with ZeroMQ more reliable. As we already mentioned, with the implementation we saw in this chapter, if a worker crashes, all the tasks it was processing are lost. Implement a peer-to-peer queuing system and an acknowledgment mechanism to make sure that the message is always processed at least once (excluding errors due to hypothetical unprocessable tasks).
- 13.5 Data aggregator: Create an abstraction that can be used to send a request to all the nodes connected to the system and then returns an aggregation of all the replies received by those nodes. Hint: you can use publish/reply to send the request, and any one-way channel to send back the replies. Use any combination of the technologies we have learned.
- 13.6 Worker status CLI: Use the data aggregator component defined in Exercise 13.5 to implement a command-line application that, when invoked, displays the current status of all the workers of the hashsum cracker application (for example, which chunk they are processing, whether they found a match, and so on).
- 13.7 Worker status UI: Implement a web application (from client to server) to expose the status of the workers of the hashsum cracker application through a web UI that can report in real time when a match is found.
- 13.8 Pre-initialization queues are back: In the AMQP request/reply example, we implemented a Delayed Startup pattern to deal with the fact that the
initialize()method is asynchronous. Now, refactor that example by adding pre-initialization queues as we learned in Chapter 11, Advanced Recipes. - 13.9 Request/reply with Redis Streams: Build a request/reply abstraction on top of Redis Streams.
- 13.10 Kafka: If you are brave enough, try to reimplement all relevant examples in this chapter using Apache Kafka (nodejsdp.link/kafka) instead of Redis Streams.