
4 Chapter 4
Off-line find on-line editing
OH-line
Off-line editing is a process that has evolved from film and videotape. In essence the editing medium is not the finished product but an intermediate process. For film this is a work print or a one-light print and for videotape low-end recording systems have been employed, for example VHS and U-matic. From both film and videotape the editing decisions are output as lists or text statements of what is required to make the finished programme. For film this is known as a cut list and for videotape it is an edit decision list or EDL. The actual programme will be created when the instructions in the cut list/EDL are applied to the original media.
With computerized nonlinear systems, working off-line usually means working at a low picture quality, using a high compression ratio (this is analogous to the one-light or work print in film and the U-matic/VHS used in video). By using a high compression, storage is maximized on the hard disk drives but still provides a vision quality that is good enough to make editing decisions. This is particularly useful when working on large projects like documentaries or a drama series. Working off-line offers the opportunity to have the complete series stored and available within the system. If a producer/director or even the editor needs to change the pace or feel of a programme it can be done quickly but with reference to all the relevant episodes.
The output is usually the edit decision list saved onto a floppy disk. This EDL can then be transferred to an on-line videotape edit suite where the programme can be auto-conformed by assembling the programme according to the instructions from the EDL. If it is a film project that is being cut off-line then the output will be a cut list.
The film and video process
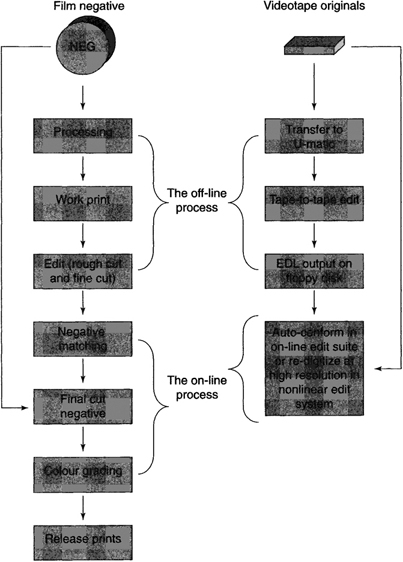
Note that in both sases the creative editing process is performed on an intermediate medium, the work print for film and U-matic or VHS for Video.
On-line
On-line editing is the process whereby the finished product is the on-air programme. Typically a compression ratio of 2:1 is used although in some environments, e.g. news, ratios of 5:1 may be used. Within the context of nonlinear editing many broadcasters are accepting the 2:1 compression ratio as broadcastable. There is a debate as to whether broadcastable is actually broadcast quality as most compression systems, including JPEG, are destructive so that even with mild compression of 2:1 there is some picture degradation. The acceptability of nonlinear systems to provide the finished programme is growing but the debate will continue as new distribution systems that use heavy compression in the transmission process will demand a very high level of technical quality prior to transmission.
The on-line process
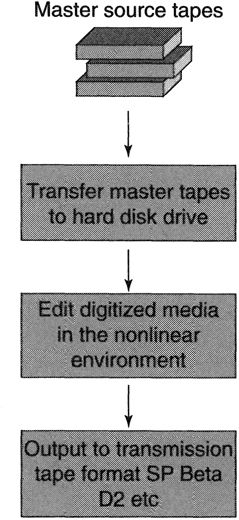
Vision and audio transferred to disk at a high resolution. Edited and finished with visual effects and audio sweetening then output to tape for transmission. Some systems are designed to air direct from the hard drives.
The digitizing process
It is very straightforward to copy or digitize material into a nonlinear system. The system offers a user interface not dissimilar to a basic tape-to-tape editing system. The interface has controls for tape transport, a means for defining both what is to be recorded to disk in terms of audio or video, plus a means of defining how much or how little of the rushes is to be digitized. In effect the rushes are ‘edited’ to the hard disk drives. As some flexibility will be required during the real editing process it is usual to capture a little more of each shot than might be actually required. There are two reasons for this: to give some scope for trimming or adjusting the edit points within the programme; and, if effects are going to be used, even the humble dissolve, then some overlap is required from both incoming and outgoing shots.
This digitizing process differs from normal tape-to-tape editing in that the rushes captured are on a tape-by-tape basis rather than shots in any particular order. That process comes later. As well as the selecting tools, there are also tools to advise on the amount of storage that is available at particular resolutions depending on the type of project being worked on. If working off-line a low resolution or high compression ratio is used which maximizes the storage available.
When digitizing to the hard drives it is well worth performing a video and audio line-up, whatever compression ratio is being used. With a high compression ratio chosen the vision quality will be degraded to a VHS type of quality. If no line-up is performed one could reject shots due to apparent poor picture quality, whereas in fact the original was fine. If working on-line then a proper record line-up is a must, so the engineering aspect is important whatever resolution is in use. Ideally the system should have a vectorscope and waveform monitor attached so that picture quality can be monitored and adjusted to meet standard operating practices as appropriate, i.e. for PAL or NTSC. With more digital cameras being used the process of digitizing becomes a little more hands-off, mainly as input processing is not available on many nonlinear systems, so any adjustment will have to be performed on the playback deck or an external digital legalizer These devices will alter the input signal so that no illegal levels are digitized. Audio is not usually compressed, primarily because it is not the enemy in terms of storage as it generates proportionally very small files on the hard drives. So a proper line-up procedure should be followed for any audio. As we shall see later, considerable savings can be made by treating audio as ‘for broadcast’ at all stages of the process (see Chapter 9 on Audio).
Digitizing

When digitizing at high resolution with a view to finishing a programme for transmission, line-up of the audio and video is important. The technical quality of the finished item is governed very much by the input process.
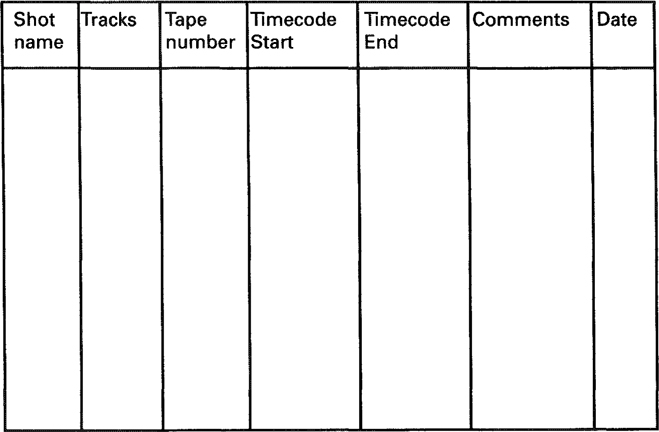
As the digitizing process gets under way a database is automatically built. All systems create a record of the following:
• the number of tracks digitized (video and audio);
• the tape number;
• the marked timecode for the start of the shot (the ‘in point’) and
• the marked timecode for the end of the shot (the ‘out point’);
• the name of the shot.
While other fields may be offered or can be user created, the above represents a minimum of information that would be required to create an accurate and usable edit decision list. The following is a typical selection of additional fields that may be offered:
• the date and time of digitizing;
• which hard drive the file for each shot has been recorded to;
• the recording resolution chosen for each shot;
• the programme to which the shot belongs.
A simple database
Logging accurately while digitizing or media logging can save considerable time. Establish a working practice that can be used with naming tapes and naming shots, in practice the database will contain extensive information, e.g. where the digital files are, duration of material captured and so on.
It is very important to develop good discipline in correctly naming tapes that are being digitized from and using workable and sensible names for the shots captured. User inputs are the tape name or number, and the name of the shot. If all tapes end up being named as ‘Tape V, the process of creating an EDL will be invalidated as during auto-conforming whatever system is in use will assume all shots are on just the one tape called ‘Tape 1’! Timecode is a referencing mechanism for defining every frame on a tape, but a project may well have tapes with the same timecode. So the only way to differentiate between two shots with the same timecode is to qualify every shot with both the tape name and the timecode for that shot. In the event of two tapes having the same name/number, then just give one a new designation for the period of the post-production process. Do mark both the box and the tape. Chinagraph is a good way to temporarily mark a tape, so that confusion does not occur.
If you are ever unlucky enough to come across a rushes tape with the same timecode on it more than once (although a good cameraman will ensure that this never happens) your only safe solution is to re-timecode and then re-log the tape. If re-timecod-ing is not an option then take the tape down a generation and add new timecode.
If digitizing from some DV (domestic Digital Video) tapes then it is possible for the timecode to be duplicated on a tape. The tapecode on these systems (not true SMPTE timecode) will reset when changing batteries, changing tapes and de-powering. It is quite common for these tapes to be transferred to a professional tape format and then re-logged with consistent timecode.
Tape labelling
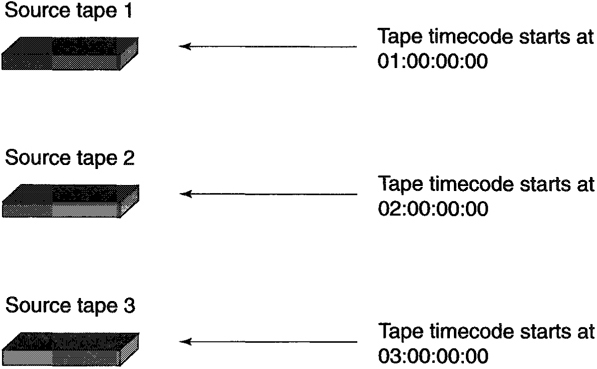
If tapes 1 and 2 get digitized with the same name/number, problems will be encountered if an EDL is generated for on-line use. Number designations are usually best, as some on-line edit controllers will not accept letters as a tape name. If possible, arrange for the camera operator to change the hour of the timecode to match the tape – i.e. tape 1 starts 01:00:00:00, tape 2 starts 02:00:00:00, etc. If tapes have the same timecode then create a look-up list for the new designations you create for the tapes.
Some special eases
Some source material has no timecode, for example any of the following:
• audio CD;
• audio cassette;
• audio ¼ inch tape;
• VHStape;
• DV tape (some do offer timecode, while others just offer tapecode, which can be zeroed at any point in recording!).
The best option is to transfer all such sources to a professional timecode format that your installation supports, e.g. SP Betacam, which allows the non-timecode rushes to be used later during auto-conforming. Even if the programme is being digitized as an on-line project, having all the rushes available on timecoded sources offers a little protection against either hard drive failure or operator error where digitized rushes get deleted by mistake! If they exist on timecoded sources, they can be reloaded as an automated process. While a little inconvenient, having the ability to automate all your actions from the digitizing and editing process can be well worthwhile.
Non-titnecodecl sources
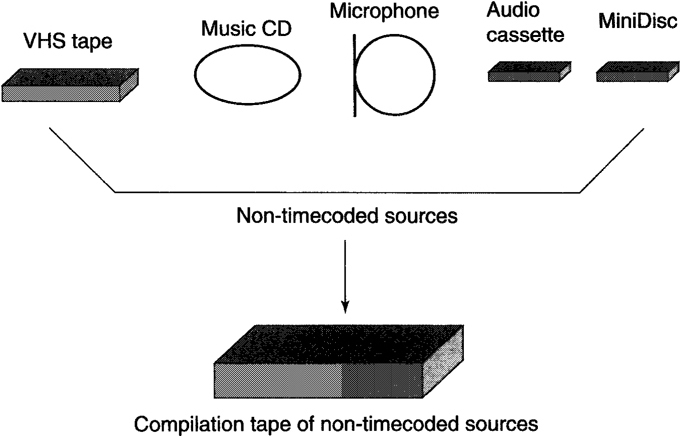
Some productions will require ai! non-timecoded sources to be compiled onto a professional timecode master. This could be for either the video on-line edit or for sound dubbing.
Editing
Given that nonlinear editing systems are designed to edit audio and video (or film), all systems offer controls/features that are a replication of their respective video or film environment. For example, there is a window or monitor for viewing the rushes, there is a window for viewing the compiled programme and there are controls for moving through the rushes or programme (transport controls). In addition there are the usual editing controls to define what shots to select and where to place them (mark in and mark out).
Nonlinear differs from a tape-to-tape environment in that many other features can be built within the ‘virtual’ environment. For example, multiple audio and video tracks can be created which can range from just two tracks to an unlimited number of tracks. But they are virtual and the maximum number of video tracks that can be replayed as a real-time process is usually only two. To replay multi-layered video tracks, a rendering process must be initiated to compile the multiple tracks into a single file for replay. For audio, depending on the systems configuration, 2, 4 or even 8 audio tracks can be replayed. With audio there is a further consideration that some systems allow up to 8 audio tracks to be monitored but only 2 audio tracks can be output to tape. Essentially this is a ‘how deep is your pocket’ problem, plus consideration of how the system is going to be used. A 2 input, 8 monitor, 2 output (2:8:2) configuration is not uncommon. With careful management by the editor this can be used effectively for many programme types.
In addition to the above, many other features can be provided including captioning, transition effects, and other tools to provide picture manipulation. For many editors, however, these additions are just a bonus – the real benefit of nonlinear is its speed and flexibility of editing material together.
To try to understand how this speed and flexibility is possible it is worthwhile understanding what the virtual environment of a nonlinear system is actually doing. First, the video and sound stored on the hard disk drives just sit there. During the editing process the system does not actually copy media from one part of a disk to another. When a shot is selected and edited into the record/edit monitor, all that happens is that a simple statement is created. This statement will indicate which shot (defined by timecode in and timecode out) was used, if it has sound with it and which tracks, and where it is in the programme being made. When it comes to playing this ‘statement’ the system looks up the appropriate shot at the correct point and replays it from its original position on the hard drive. At a transition to a new shot, the system then looks for and replays that shot from wherever it is on the hard drive. In essence the media just sit on the drives and are replayed as required. They are not recopied as each edit decision is made.
The editing environment
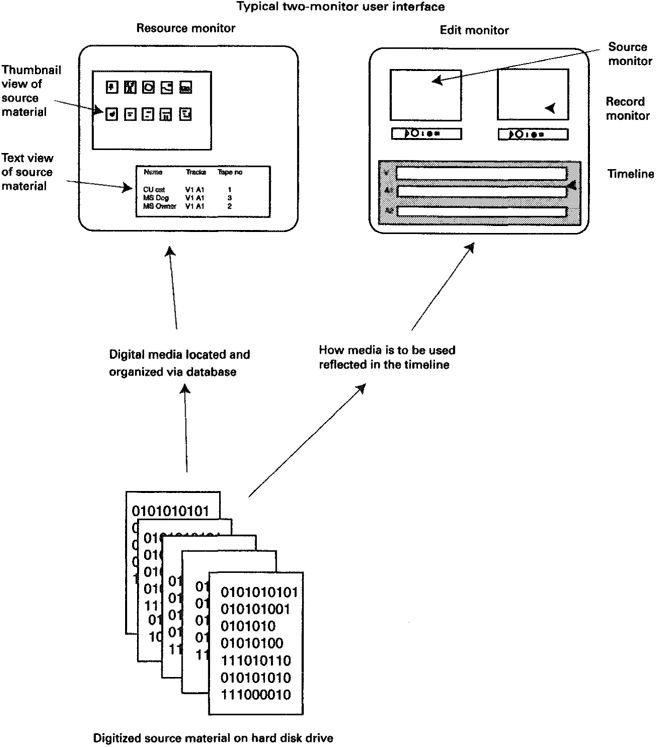
The computerized nonlinear environment provides a virtual editing environment. Much of its power is derived from the database and the timeline.
One of the most powerful features of all nonlinear systems is the timeline. The timeline is a graphic representation of the statement that represents the programme being made. It is possible to drag and drop audio and vision direct to the timeline and get immediate feedback on how the programme has changed. Remember that any selected shots just sit on the hard drive and do not need to be moved, so the editing process can be faster than real time. A shot 10 minutes long can be selected and edited to the timeline in the same amount of time as a 5-second shot. Just as important, a shot can be removed from the middle of a sequence and the created gap can be automatically closed up. These basic features are very much the reason why nonlinear is popular with both film and video editors. This speed and flexibility offers new opportunities of creativity.
Before going further, it is necessary to define some common editing terms and how they relate to the nonlinear environment:
• Mark in (or in point)
A term used to define where the editor wants a shot to start from.
• Mark out (or out point)
A term used to define where an editor wants a shot to end.
• Three-point editing
A process that allows the in and out points to be set on either the source or the master edit and one other point to be defined. For example, the in and out point for a piece of dialogue can be defined on the source with only the in point of where that dialogue should go being marked on the master edit. The fourth point, the record out, is automatically calculated based on the duration of the source.
• Four-point editing (fit to fill)
A process in which the in and out points are defined on the source and the master edit and a fit to fill operation is performed. For example, a shot on the source with a marked duration of 5 seconds when edited to a marked duration of 10 seconds on the master edit will apply a motion effect to match durations.
Usually the four-point edit is an option that needs to be enabled in some way depending on the software concerned.
More commonly if four points are defined the record master marked in and out points will take priority followed by the marked in or out of the source. So in the above example even if 5 seconds was defined on the source the record master will take 10 seconds as defined on the record master, ignoring the out point marked on the source.
• Splice (insert)
A film type of operation whereby a shot edited into the programme as a splice will open the programme for the duration of the source material, thereby increasing the programme duration.
This type of edit offers great potential and is not possible on tape-based systems (although it could have been performed on the very first broadcast video recorders – the Quadraplex machine from Ampex).
• Over-reeord (overlay, overwrite)
A process whereby source material is placed in the programme and removes or replaces what was originally there for the duration of the source material used. This process will not increase programme duration.
A process whereby frames or complete shots can be defined and removed from the programme. This process will close up any shots following the point where this operation is performed. In general, programme duration will be shortened using this operation.
• Lift
Removal of material from the programme and colour black and silence used to replace the removed material. This process does not alter the duration of the programme.
Transition
The change from one shot to another. It can be an instantaneous transition known as a cut or can occur over a period of time. This latter category is usually known as an effect transition and can be a two-dimensional transition, e.g. dissolve or wipe, or a three-dimensional transition, e.g. a page turn.
• Trimming
A combination of most of the above can be applied to a transition. Frames can be added or subtracted from either side of a transition or from both sides. If both sides of a transition are being trimmed then what is added to one side in terms of numbers of frames will be removed from the other side.
• Timeline
Part of the GUI, which will show the location of video and audio as it is edited into the programme. The timeline provides immediate feedback on what is happening as the programme develops and is a very powerful feature of all nonlinear editing environments.
Editing terms 1
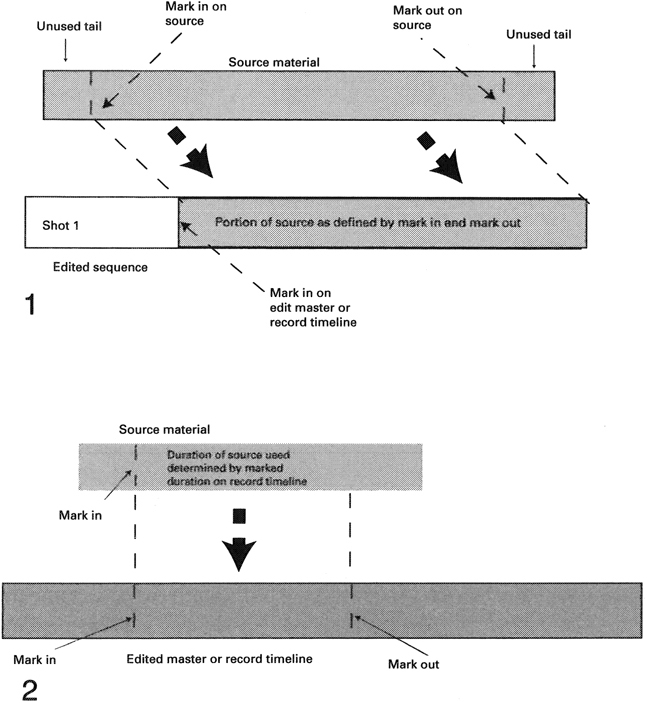
(1) Mark in and mark out points.
(2) Three-point editing can be referenced to either the source material or the record timeline. Typically priority will be given to the record timeline and if a marked in and out exists on the source the marked out point will be ignored (the exception being if four-point editing is enabled).
Editing terms 2
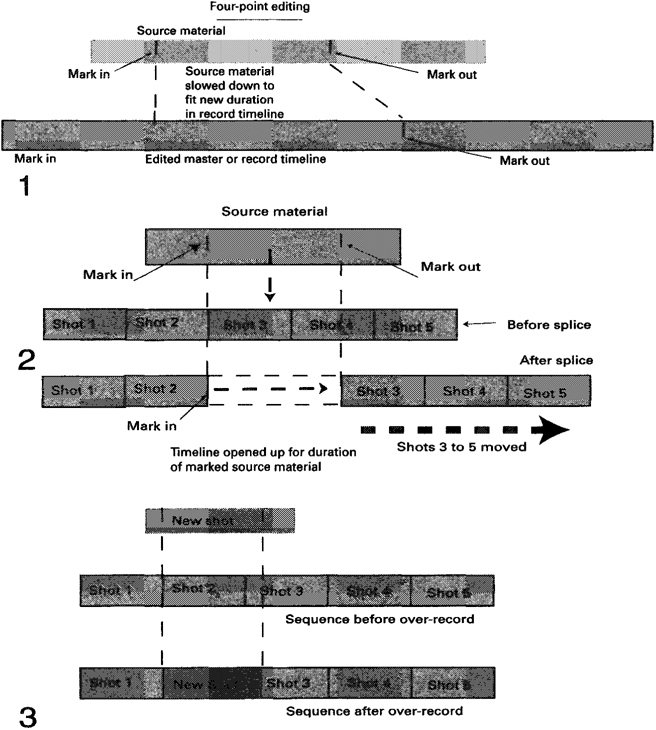
(1) Four-point editing offers fit to fill. Usually not available for the audio.
(2) The insert or splice edit. Timeline opens to accommodate the new material.
(3) Over-record replaces any material that may have existed in the timeline.
Editing terms 3
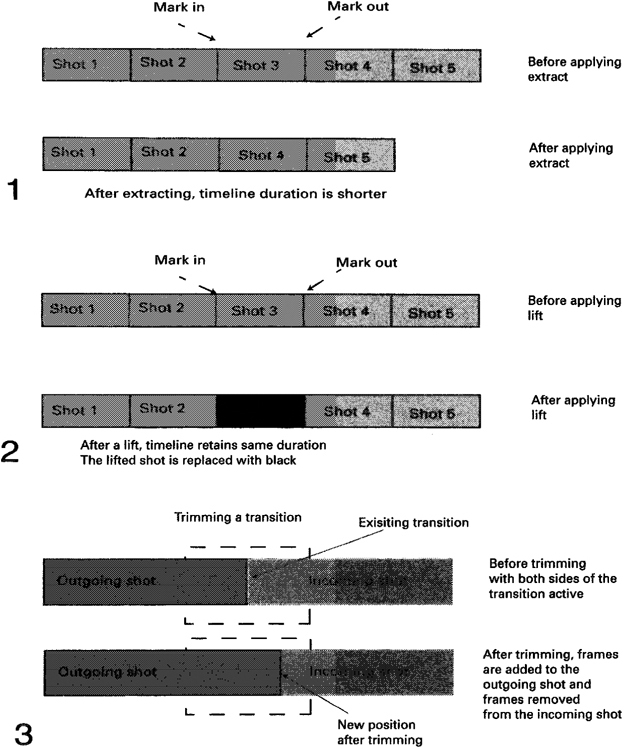
(1) Extract allows single frames or any number of shots to be removed but the timeline duration will get shorter based on the duration removed.
(2) Lift wili aliow single frames or any number of shots to be removed but leaves the timeline duration untouched.
(3) Trimming is a combination of several individual tools all in one operation.
Output
The output options wifi largely depend on both the type of project and the resolution being used. The prime output options are:
• an edit decision list {EDL), plus VHS viewing copy of the programme;
• the programme at an on-line quality;
• digital files for use in another application.
EDLs
If working on an off-line project, the vision will be at VHS quality, and in fact it is not uncommon to make VHS copies as viewing tapes for producers/clients. But the real output at this stage is the EDL, which is a set of instructions that can be generated within the nonlinear system then saved to disk for use in an on-line tape edit suite. Care must be exercised in the generation of this EDL. One reason is that tape edit suites cannot understand an EDL with more than one vision track and more than four audio tracks (there are some exceptions – see Appendix B on EDLs). If there is a situation where more than one video track was used in the nonlinear system, then a separate EDL for each track must be made. Videotape edit controllers also work to different formats so it is important to make sure that the correct format is used when generating an EDL for use in a tape edit suite. The process of assembling a programme in a tape edit suite is frequently called auto-conforming.
On-line output
If the programme is a short form item, for example a trailer, then all digitizing may well be done at a high quality ready for output to tape direct from the hard drives. This disk to tape, or print to tape as it is sometimes called, requires the same output line-up that should have been exercised at the input stage. The principle is very simple: if you put X volts into the system then X volts should be output from the system without any variations. There is the proviso that no colour correction or adjustments have been made for creative effect.
Possible outputs
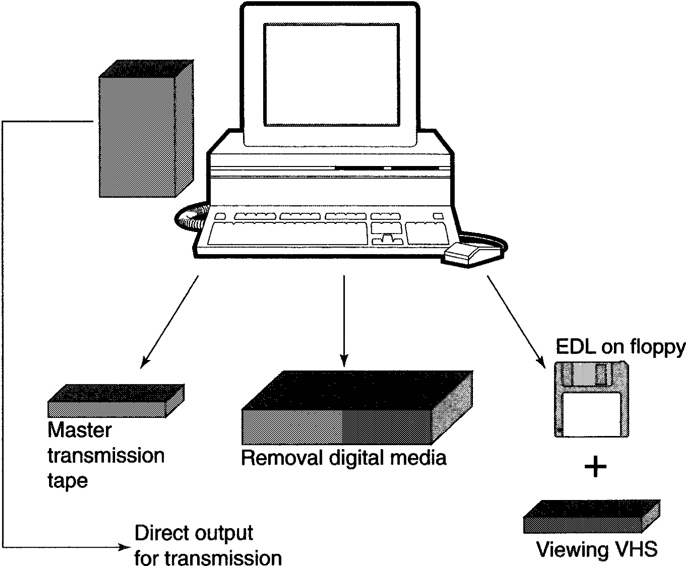
Output options vary according to the installation and the type of programming being undertaken. Direct to air can be found in news and on some stations for ident and commercial play-out.