Chapter 9 Diagnosis and Recovery Techniques
Previous chapters discuss the different tools available and the information necessary to diagnose problems with an NDS/eDirectory tree. This chapter looks at some different ways of using that information.
This chapter examines some techniques for combining the different tools available to maximize your ability to resolve tree-related issues. The various tools that are available enhance your ability to diagnose problems and resolve them.
Before you jump into solving a directory services (DS) problem with both feet, though, you need to first establish a plan of attack.
Chapter 1, “The Four Basics of eDirectory Troubleshooting,” mentions that a typical troubleshooting process is comprised of five steps:
1. Gather information.
2. Develop a plan of attack.
3. Execute the plan.
4. Evaluate the results. Go back to step 1 if necessary.
5. Document the solution.
When faced with a DS problem, it is important that you follow a consistent set of troubleshooting procedures—that you use every time—to solve and resolve the problem. The following sections examine each of these five troubleshooting steps as well as some other parts of the troubleshooting process.
Before you attempt to deal with a problem, you need to first determine what the problem is and what the scope of the problem is. You need to know what you are getting yourself into so you can properly allocate time and resources for the task.
NDS/eDirectory problems can manifest in a number of ways. They can appear directly in the form of error or warning messages in utilities or on the server console. They can also show up indirectly as part of an error message when you attempt to perform a DS operation. Sometimes a DS error shows up as a side effect of other system or network problems. For instance, a -625 error is a DS error that indicates communication failure. However, the cause of this error is not DS itself but has to do with the subsystem that is responsible for data communication—which DS has no control over. Therefore, you need to be able to differentiate between the symptoms and the problem.
TIP
Two key points to keep in mind at this initial phase of the troubleshooting process are to keep an open mind about the possible causes of the error and to consider the whole system—not just the DS portion—as a unit. Not all error messages you see indicate situations that you need to deal with right away or concurrently. Often, error conditions snowball: One initial error can result in dozens of other warning and error messages that may or may not point back to the initial error condition.
NOTE
I once saw a Cobol program compilation error listing that was over 15 pages long (the program itself was only 3 pages long). It all resulted from a single missing period starting about the fifth line from the beginning!
Users tend to cry wolf fairly easily. Therefore, before jumping to any conclusions, you should not panic; rather, you should confirm the error condition by either looking for concrete evidence of a problem or try to duplicate the problem. When you have established that there is indeed a problem, you must determine the extent of that problem.
You need to determine two facets of the problem. First, you need to determine the size of impact, such as how many people the error is affecting (including whether the CEO is one of the affected users) and the potential dollar cost of the error to the company. You also need to determine in which subcomponent the error condition happens. You can use these two facets to help prioritize your work schedule and troubleshooting efforts.
Our experience indicates that most of the time the DS errors you are mostly likely to encounter fall into the following three categories:
![]() Communication
Communication
![]() Time synchronization
Time synchronization
![]() Replica synchronization
Replica synchronization
During the discovery process, you should check each of these areas in the order listed. You should make note of the following information, as it will help you determine the likely cause of the error:
![]() The symptom or steps required to reproduce the problem
The symptom or steps required to reproduce the problem
![]() The exact error code and text of the error message
The exact error code and text of the error message
![]() Whether the error is seen on only one server or happens on others; if the error shows up on other servers, is there anything common between these servers, such as being in the same replica ring?
Whether the error is seen on only one server or happens on others; if the error shows up on other servers, is there anything common between these servers, such as being in the same replica ring?
![]() The version of NDS/eDirectory running on the server(s) that reported the error
The version of NDS/eDirectory running on the server(s) that reported the error
![]() The version of the operating system and patch level of the affected server(s)
The version of the operating system and patch level of the affected server(s)
It is important to quickly ascertain whether the error condition is occurring at the server, partition, replica, or object level. For instance, assume that the error code you receive is -601 when you’re trying to read the Title attribute of a User object from Server A. Do you get the same error when you try to access the Title attribute from another server in the replica ring? If you do not get the error when you’re trying to access this attribute from another server, the likely source of the problem is Server A itself. Otherwise, all the servers in the replica ring may be suspect.
eDirectory reports problems or generates errors if a certain condition within the network prevents one or more eDirectory background processes from starting or completing. In most cases, your only indication of a DS error is in the form of an error code, which you see only when you perform a health check or enable the DSTrace screen. The following is a list of common DS errors:
![]() Physical communication problems between servers or between servers and client workstations
Physical communication problems between servers or between servers and client workstations
![]() NDS/eDirectory version incompatibility
NDS/eDirectory version incompatibility
![]() Replica inconsistency
Replica inconsistency
![]() Improperly moved or removed servers
Improperly moved or removed servers
![]() An improperly changed server network address
An improperly changed server network address
![]() Synchronization problems (perhaps due to schema mismatch)
Synchronization problems (perhaps due to schema mismatch)
![]() Performance issues (such as low memory)
Performance issues (such as low memory)
![]() Human error
Human error
To determine or narrow down the cause of the problem, you need to first ascertain whether it is an actual eDirectory problem or some other type of error that is manifesting itself as an eDirectory issue. When you are certain that the problem is indeed an eDirectory problem, you need to analyze the information you have gathered about the error condition and narrow it down to the particular background process that caused it. Then, using the various resources at your disposal, such as online error code listings that show possible causes and the Novell Knowledge Base, you should try to gain a handle on the real cause of the problem.
You can almost always use more than one method or tool to fix a given eDirectory problem. When you search the TIDs for a possible solution to a particular problem, you shouldn’t be surprised to find multiple documents that suggest different ways to resolve the problem. However, before you implement any of the solutions, you should do the following:
![]() List all the possible solutions
List all the possible solutions
![]() List the possible consequences of each action (such as doing X will take 2 hours to complete, and doing Y will only take 45 minutes but involves shutting down seven servers)
List the possible consequences of each action (such as doing X will take 2 hours to complete, and doing Y will only take 45 minutes but involves shutting down seven servers)
![]() Check the latest available NDS/eDirectory updates and operating system patches to see whether the problem is one of the addressed issues
Check the latest available NDS/eDirectory updates and operating system patches to see whether the problem is one of the addressed issues
When installing a patch, you should always select to back up files that will be replaced when the installer prompts you. If the installer does not offer such an option, you should abort the update process, perform a backup of your system files (including those on the DOS partition, in the case of NetWare servers), and then restart the patch update. Furthermore, it is always good practice to keep a library of older patches that you have installed in case the new patch doesn’t fix your problem or causes more problems; this way, you can roll back to an older patch that you know to work.
TIP
One of the possible solutions that you should always consider is doing nothing. NDS/eDirectory is designed to self-heal in many instances. Often, an error you encounter occurs when you try to perform some major operation as soon as a change (such as adding a replica) is made. Generally, the rule of thumb is to give DS an hour or two to “settle down” after such a change, and the error you see will resolve itself. Of course, you don’t always have the luxury of letting DS sit for a few hours to see whether the problem goes away—especially when there are a score of people standing around (and one of them is the CEO), asking, “What’s happening?” (Refer to Chapter 4, “Don’t Panic,” for a discussion on how to deal with such situations.) Nonetheless, you should not easily discount the value of the DS self-healing process.
WARNING
Depending on the DS error in question, some of the recommended fixes can be quite drastic. For instance, a TID may recommend that you forcefully remove a replica or even DS from the server as one of the steps to resolve object renames. You need to appreciate the full consequence of each step taken in your error-resolving process before taking it, and you need to have a back-out plan in place. If you are uncomfortable with any of the steps, you should consult with someone who is more experienced or open an incident with Novell so you have someone to back you up.
When you have a list of possible solutions to the problem you’re experiencing, you then need to rank them based the following criteria:
![]() The odds that the action will resolve the error condition
The odds that the action will resolve the error condition
![]() The risks associated with the corrective action (for example, if the action fails, it could make the problem worse or result in additional complications, such as extended system downtime)
The risks associated with the corrective action (for example, if the action fails, it could make the problem worse or result in additional complications, such as extended system downtime)
![]() Additional fixes that may be required as a result of the action (For instance, if the fix calls for you to remove the server from the tree and then add it back in, file system trustee rights may be lost, and you might need to allow extra time to restore the trustee assignments.)
Additional fixes that may be required as a result of the action (For instance, if the fix calls for you to remove the server from the tree and then add it back in, file system trustee rights may be lost, and you might need to allow extra time to restore the trustee assignments.)
![]() The ease with which the fix can be applied (that is, how long will it take?)
The ease with which the fix can be applied (that is, how long will it take?)
![]() How the users will be further affected during the time when the corrective action is taking place (for example, will the users lose access to resources they now have access to?)
How the users will be further affected during the time when the corrective action is taking place (for example, will the users lose access to resources they now have access to?)
There is a medium to high degree of risk that if a corrective action does not work, it may lead to more harm to the system, and a sign-off from upper management is often warranted. You should present to management the rational for selecting the action but also lay out for them the possible consequences and rollback options.
TIP
If some of your solutions seem to contradict each other, you should consult with a knowledgeable co-worker or a friend. You should also make use of the expertise available to you, free of charge, at various online newsgroups, especially the Novell-sponsored ones available at http://support-forums.novell.com.
TIP
It is usually a good idea to solve a problem yourself so you can learn from the experience. Novell Support provides access to certain tools that are not available to the general public, and using these tools could save you hours of work. When you compare the cost of your downtime with the cost of an incident call, you see that there are circumstances when it is more expedient and cost-effective to open an incident with Novell and have Novell dial in to your system to perform the fix. You can always monitor Novell’s progress and learn more about DS troubleshooting at the same time.
If at all possible, you should test solutions in a lab environment before attempting them on a production network. At the very least, you should always have a test server available so you can dry-run a procedure before attempting it on a production server.
When you have decided on a course of action and received the necessary management approval, you need to make a backup of the Directory Information Base (DIB) files on the affected servers before implementing the fix. This will provide you with a back-out option in case something goes wrong.
You can find information on how to do this in the “Backing Up a Server’s DS Database” section of Chapter 13, “eDirectory Health Checks.”
If you are running eDirectory 8.7 or higher, you can use either the hot backup or the cold backup feature of eDirectory Backup eMTool, as discussed in Chapter 8, “eDirectory Data Recovery Tools,” to take a snapshot of the current view of the replicas on the servers that you will be working with.
TIP
Before you perform any replica ring–related repairs, it is best to first do a local database repair. This ensures that the data in the local DIB is in good order before it is allowed to be replicated to other servers.
The effects of your corrective actions may not show up immediately. You should allow some time for the various eDirectory background processes to perform their tasks. For example, assume that you were unable to merge two partitions because of stuck obituaries. After implementing your fix, you might not be able to merge the partitions right away because you need to allow the obit processes to advance the flags through the different stages and clear out the dead objects. Because this generally involves communication between a couple servers, at least a few minutes will be required before the stuck obits are cleared out. After that, you can perform the partition merge.
After the eDirectory processes report “All processed = YES” (and you might want to wait until you see this being reported a couple times to be on the safe side), you should verify that the problem has indeed been resolved. You can accomplish this in one of two ways:
![]() Attempt the initial action that caused the error to surface and see whether you can now perform it successfully
Attempt the initial action that caused the error to surface and see whether you can now perform it successfully
![]() Perform an abbreviated DS health check (as outlined in Chapter 13) to ensure that no more errors are being reported
Perform an abbreviated DS health check (as outlined in Chapter 13) to ensure that no more errors are being reported
If the problem persists, you should return to your list of possible solutions and consider taking another action. You might need to go back and reexamine and reconsider the possible causes of the problem to ensure that you are on the correct track.
You should keep a logbook that contains information about your servers, network configuration, and any special NDS/eDirectory information (such as any special naming convention used for designating administrative users or ACL assignments made to protect admin users). This logbook should also contain maintenance data about your servers and network, such as what operating system or NDS/eDirectory patch was applied and when. This allows you to determine whether the DS or other error condition may be a result of one of these updates. It is also a good idea to keep a copy of the patches installed as part of the logbook so you have ready access to older patches in case you need to roll back an update.
TIP
As the saying goes, “If you didn’t write it down, it didn’t happen.” This is why keeping the logbook is so critical.
In your logbook, you should also document the DS errors that have occurred, their causes, and the solutions you have identified. Even if an error was not resolved by a given solution, you should note it for future reference and label it as an “unlikely” solution. Whatever you do, you shouldn’t totally discount it from consideration the next time around because the same or a similar error condition could show up again. Even if a solution didn’t work the first time around, it might very well work the next time because the condition that causes the same or similar error message or code might be different the next time around.
Depending on the type of error, you are likely to encounter it again sometime down the road. For instance, no matter how careful you are about your tree, stuck obits will continue to surface from time to time. Having the steps on error resolution clearly documented helps to ensure that if you need to solve a given problem, you have a “play book” that you can follow.
It is estimated that more than 90% of the software-related problems you encounter are due to human error. They can be caused by unintentional actions taken by an inexperienced administrator or procedures not being properly followed. They can also be due to a number of other causes. For example, someone might simply turn off the server and remove it from the network instead of first removing DS from the server before removing it from the network.
Once you have identified the source of a DS problem, you should review existing published procedures to ensure that any oversights or omissions that resulted in the error are promptly amended, and you should be sure that the information is passed on to your co-workers.
TIP
New support staff should be adequately trained before being permitted to have physical access to the servers where most harm may occur. At the very least, you should have each new staff member pair up with an experienced member of your staff when performing certain tasks the first couple times.
At the end of a problem-resolution session, depending on the scope of the error involved, you should hold a meeting with your support staff to go over lessons learned and discuss how the problem can be avoided in the future. You should not, however, use such a meeting to assign blame of any sort.
As discussed in Chapter 7, “Diagnostic and Repair Tools,” there are a number of Novell-supplied tools that you can use to diagnose and troubleshoot NDS/eDirectory error conditions. In many cases, these tools may not be the most convenient to use, but the server-based utilities are often the most effective because frequently the error is confined to a given server in a replica ring. In addition, server-centric information is useful, and you simply cannot obtain it by using a workstation-based tool.
The following sections discuss using the Novell server-based tools to diagnose and troubleshoot DS errors.
NDS iMonitor first shipped with eDirectory 8.5 and is available for all supported operating system platforms. It provides a Web-based portal for accessing server-centric eDirectory information, using a Web browser from any workstation on the network.
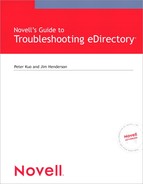
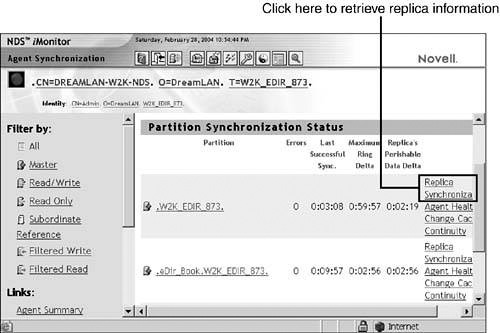
You don’t need to hunt through a number of different screens in DSRepair and DSBrowse for the necessary information because NDS iMonitor presents you with the easy-to-locate data about a partition, a replica, or a server. Figure 9.1 shows the synchronization status for a partition; you can obtain the server-centric replica status (see Figure 9.2) by clicking the Replica Synchronization link to the right of the partition name. By clicking the NCP server object name in the Replica Status screen, you can retrieve information about the server.
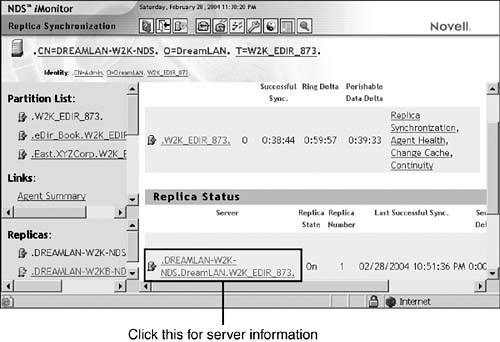
When diagnosing a DS problem, you generally make use of the Partition Synchronization and Replica Synchronization screens in NDS iMonitor. You start by looking at the big picture at the partition level. When you notice a partition showing a nonzero error count, you can drill down to the replica level. From there, you can examine each of the servers in the replica ring that are reporting DS errors. Depending on your screen resolution, you might need to scroll to the far right of the entry in order to see the error code. Then you click the error code listed to see its meaning, possible causes, and possible actions to take. You can also enable DSTrace with various filter settings to gather additional diagnostic information (see Figure 9.3).
NOTE
The number of features (such as DSTrace) and amount of information you can see in NDS iMonitor depend on the DS username (thus access rights you have in the tree) you used to access the application. Some options (such as DIB caching information) may not be available, depending on the version of the NDS/eDirectory agent you are monitoring.
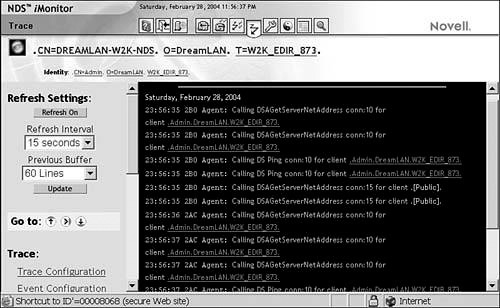
When trace is enabled, you can use the additional Live Trace link to view the DSTrace messages in real-time, as shown in Figure 9.4. You can adjust how often the screen is updated; the default is every 15 seconds.
NOTE
When working with an NDS/eDirectory server in NDS iMonitor’s proxy mode, you will not be able to access the DSTrace, DSRepair, and Background Process Schedule options. For more information about the proxy mode, refer to Chapter 7.
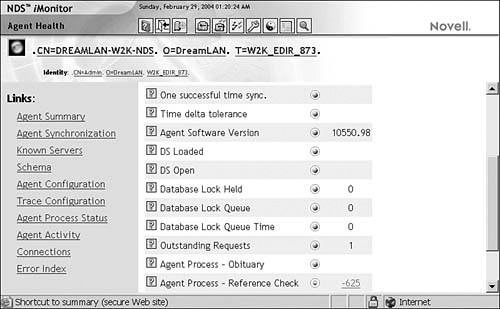
You can also use the Agent Health link and its sublinks to get a quick overview of the status of the partitions and local replicas. Figure 9.5 shows the overall health status of the local DS agent (DSA).
If you do not have time to perform health checks on a regular basis, you can use NDS iMonitor to periodically check the agent and replica/partition health status and run health reports on each server. Refer to Chapter 13 for more information about performing DS health checks.
Similar to NDS iMonitor, iManager is a Web-based management utility from Novell. It, too, first shipped with eDirectory 8.5 and is available for all supported operating system platforms. Designed to be a replacement for ConsoleOne and NetWare Administrator, iManager does not require a Novell Client to be installed on the workstation—all its functions are performed through Tomcat servlets that are running on the server.
NOTE
Because of the dependency on other applications, such as a working Apache Web server and LDAP server, sometimes you might need to troubleshoot the troubleshooter—your iManager setup—before you can troubleshoot eDirectory problems. You can find some tips on troubleshooting and setting up iManager in Chapter 7.
iManager provides a functionality called role-based services (RBS) that uses the concepts of roles (what the job functions are) and tasks (responsibilities associated with the job) such that members of the role will see only the tools necessary for their assigned roles. Two predefined DS management-related roles are included with iManager:
![]() eDirectory Maintenance
eDirectory Maintenance
![]() Partition and Replicas
Partition and Replicas
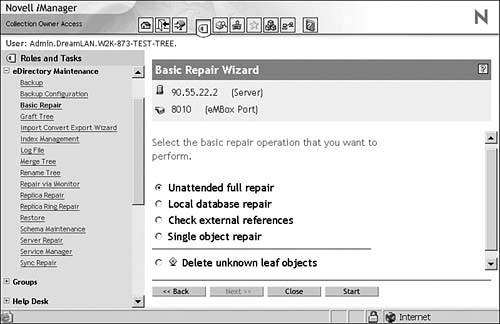
The tasks associated with these roles are identical to many of the DSRepair and DSMerge functions, and you can access them through simple wizards. As you can see in Figure 9.6, you have access to the same repair functions in iManager as you do in DSRepair—tasks such as single object repair and local database repair. You also have access to advanced repair functions such as schema maintenance and replica ring repair. Also available are other functions, such as tree merge (a function otherwise provided by the DSMerge utility).
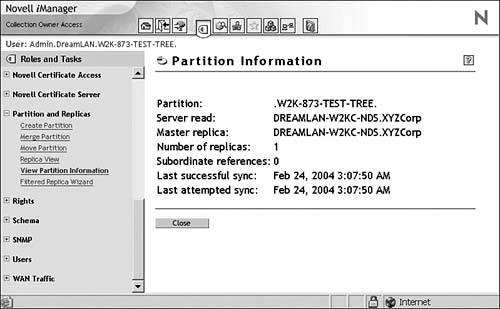
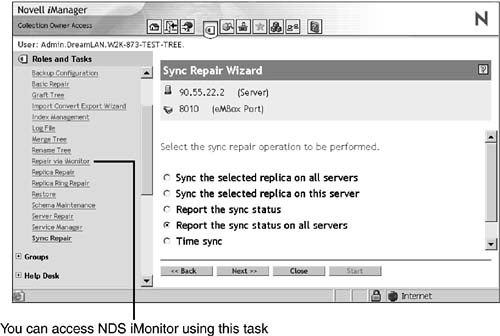
By using the View Partition Information task (see Figure 9.7) and Sync Repair task (see Figure 9.8), you can easily get a quick, overall view of your tree’s health. The wizards offer some advanced options in DSRepair but do not allow you to use any of the special command-line options, such as -XK2. However, you can pop over to NDS iMonitor easily via the Repair option under the iMonitor task, and you can use DSRepair command-line switches there.
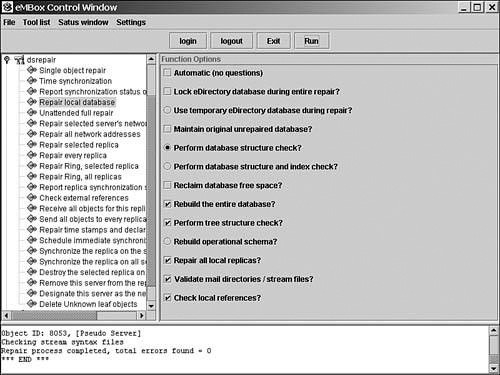
Instead of using Tomcat servlets, iManager accesses the eDirectory database via the eDirectory Management Tool Box (eMBox) utility. This means that if you have the proper DS rights, you can perform all the RBS-based eDirectory Maintenance and Partition and Replicas tasks without using iManager by using the eMBox client instead. Because the eMBox client is Java based, you can run it from a server or workstation and perform tasks for a number of servers (as long as they are running the eMBox server, which is part of eDirectory 8.7 and above).
You can perform a large number of repair tasks by using the eMBox client. When you’re performing DS troubleshooting and repair procedures, it is easiest—and best—to run it in the graphical mode, as illustrated in Figure 9.9. You don’t want to use the command-line text mode and enter a wrong option mistakenly or leave out a necessary flag and have some crucial information not be reported.
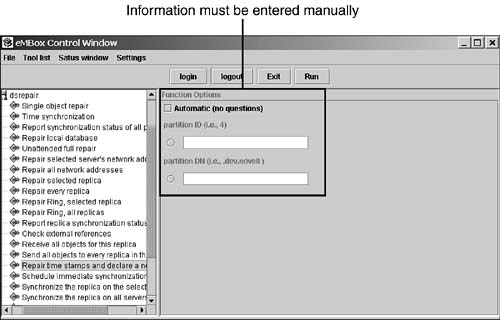
The one drawback of using the eMBox client instead of iManager or other tools (such as DSRepair) is the inability to browse for an object. You need to know in advance the distinguished name (DN) of the object/partition or the object’s ID for certain operations and enter that manually (see Figure 9.10). This can be a dangerous limitation when you are in a rush or are under pressure to expedite a fix.
Web-based tools such as NDS iMonitor and iManager are great when you are working from a remote location. However, sometimes, network security policies (such as firewall configuration) or communication disruptions force you to work directly at the server console, where using a Web-based tool becomes unpractical. Therefore, you should also be familiar with using the server-based “legacy” tools: DSRepair, DSTrace, and so on.
The other advantage of these server-based tools (with the exception of Windows versions) is that they are generally “processor efficient” because they are text based. As a result, these tools are generally fast in nature, and most of the processor cycles they consume go directly to collecting and reporting DS information. Note that the Windows versions of these server-based tools are also not overly processor unfriendly. The graphics (dialog boxes and so on) use standard Microsoft Foundation Class APIs and are fairly processor efficient. When compared with text-based applications, however, the GUI-oriented ones always seem to be not as efficient. The tradeoff is in the data representation: It is a lot easier to gain an overall picture of the situation from a graphical view than by having to wade through lines of messages for the necessary information.
When you use server-based tools for troubleshooting DS issues, you should generally start with DSTrace because it is non-intrusive (that is, it doesn’t modify the DIB files in any way) and can point to the general problematic area where you should focus your attention. From there, you can move on to using DSRepair to get a closer view of partition and replica status. The following sections cover how you can get the most information out of the available tools by using a number of them so you can see the problem from different angles.
Being able to combine information from multiple diagnostic tools can give you a better idea of what is really happening. As discussed previously in this book, having as much information as possible available increases your chances for correctly identifying the source of a problem, and correctly identifying the source of a problem is as important as resolving the problem.
Chapter 7 examines a number of different Novell tools for diagnosing problems:
![]() DSRepair
DSRepair
![]() DSTrace
DSTrace
![]() DSView, DSBrowse, and DSDiag
DSView, DSBrowse, and DSDiag
![]() NDS iMonitor and iManager
NDS iMonitor and iManager
![]() NetWare Administrator and ConsoleOne
NetWare Administrator and ConsoleOne
![]() Schema Manager
Schema Manager
Chapter 7 also examines four tools for looking up and providing general DS information and information on the tree:
![]() LogicSource for eDirectory
LogicSource for eDirectory
![]() Online and CD-ROM–based knowledge bases
Online and CD-ROM–based knowledge bases
![]() Help files
Help files
![]() NList
NList
Individually, these tools provide a number of useful functions, but when combined, their usefulness increases significantly.
One combination that you are probably already familiar with is using a diagnostic tool to determine an error condition followed by using an information tool to define an error message. For example, you have probably used DSRepair to determine that there was an error -625 in the NDS synchronization process and then used the help files, knowledge bases, LogicSource for eDirectory, or this book to look up what an error -625 was and possible causes and resolutions. This is a very simple example, but it is intuitive and something you probably do on a day-to-day basis.
Combining different tools needs to become as second nature to you as using an information resource to look up an error code. When you are attempting to determine whether a problem exists, it is important to look at the problem from multiple angles—and that frequently involves using multiple tools.
The diagnostic tools listed previously are good at specific things; in cases where functions and features of two tools overlap—for example, both NDS iMonitor and DSRepair can report replica synchronization status—using both tools to validate a problem is recommended. Doing this enables you to see two different views of the same problem—even to the extent of giving you different views of the same error conditions.
NOTE
Using different tools to examine a problem is highly recommended, especially if the problem is something you have not encountered before or if the symptoms are confusing or inconsistent. This is similar to your being ill with a not-so-common sickness; it may be a good idea to ask for additional opinions from a second doctor so you are presented with a different viewpoint.
Suppose that during a routine health check using NDS iMonitor, you find a partition reporting synchronization errors. You can use the features in NDS iMonitor to isolate the server that is having the problem and isolate the error code itself. The data presented with the Agent Synchronization link (refer to Figure 9.1) is server-centric. To gain a “ringwide” view of the situation, you could switch to either the Replica Synchronization view or the Continuity view (see Figure 9.11) by clicking the appropriate link to the right of the entry. This shows you which server(s) in the replica ring is reporting what error; sometimes two servers in the same replica ring may not report the same error condition because one server is the sender and the other server is the receiver.
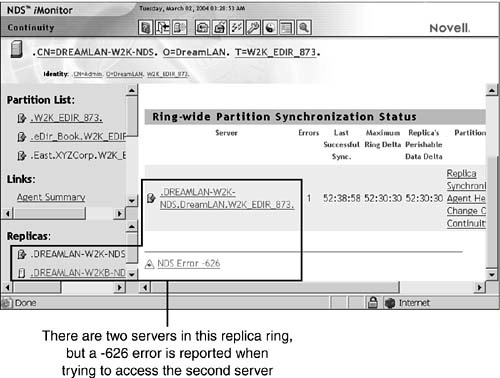
Depending on the view you use (Replica Synchronization versus Continuity, in this example), you can get different error codes for the same error condition. In this particular example, two servers are in the replica ring, and one of the servers is taken offline. The Continuity view (refer to Figure 9.11) reports a -626 error when you try to query the downed server for the status flag. A -626 error means “all referrals failed”—that is, the local agent knows about the server but cannot connect to it over the network. The online help for the error code lists a number of causes. You can either try each of those suggested actions or try to narrow down the possibilities.
If you checked the Replica Synchronization view, it would immediately become clear that there is a communication problem because the view shows a -625 error. Simply by looking at different views of the same issue, you can quickly narrow down the possibilities and save yourself from needlessly looking down the wrong alley.
NOTE
Generally, the synchronization status is based on reading the status flag from the partition root object of only one server in each replica ring. Therefore, a utility such as NDS iMonitor may show that everything is running okay, but it does not necessarily mean that synchronization is running correctly across all servers. You should treat this option as a quick-check diagnostic and not a definitive one.
Now, suppose the error is something more complex than a -625 error—for example, a -694 error (ERR_ENTRY_LOST). At this point, in order to isolate the object that the -694 error is being reported on, you need to switch to a different tool. For instance, you can use DSTrace to watch the synchronization take place and observe the error.
This combination of using diagnostic tools and viewing the error from different perspectives is frequently necessary to completely diagnose a problem. Remember that the better you diagnose a problem, the better your chances are for resolving the issue and returning to normal operation.
After you diagnose a problem, you need to work toward resolving the problem. Sometimes, though, complete recovery involves the use of multiple recovery tools because a single tool does not have the complete capability you need to resolve the issue.
Chapter 8 examines a number of different recovery tools, including the following:
![]() UImport and NDS Import Convert Export (ICE)
UImport and NDS Import Convert Export (ICE)
![]() SMS Backup and Restore
SMS Backup and Restore
![]() eMBox
eMBox
In addition to using these tools, you can use a number of the diagnostic tools previously discussed for recovery as well:
![]() DSRepair
DSRepair
![]() DSDiag and DSBrowse
DSDiag and DSBrowse
![]() NetWare Administrator and ConsoleOne
NetWare Administrator and ConsoleOne
![]() NDS iMonitor and iManager
NDS iMonitor and iManager
You might have noticed that the functions of the recovery tools overlap significantly with those of the management tools, and this is not accidental. You should try to work with all these tools on a day-to-day basis so that you are familiar enough with them to understand how they can help you during a data recovery situation. It is usually difficult to have to use a separate set of tools during data recovery, especially if you don’t need to use them frequently; part of your time spent on recovery will be wasted in refamiliarizing yourself with this separate set of tools.
Chapter 11, “Examples from the Real World,” provides examples in which combining recovery tools results in a faster solution than using a single recovery tool. Remember that in a disaster-recovery situation, when you have a diagnosis, you need to work as quickly as possible to resolve the problem.
Working with a combination of recovery tools requires a good knowledge of the tools themselves. If you do not know for certain what a tool does or how it can help in resolving a problem, you might end up using a tool that will get you most of the way to a complete resolution but not let you finish the job. Let’s continue with the previous example of a -694 error in synchronization. DSTrace showed the object name that was causing synchronization problems, and now you need to work to resolve the issue.
The first thing you should do is to verify that the object on the server that holds the Master replica is good; if it is, you can recover the object without deleting it. You can use DSBrowse (or DSView) to examine the attribute values of this object on the Master replica to make sure they are what you expected.
NOTE
At the time of this writing, DSBrowse is not available on Unix/Linux. Instead, you can use LDAP to export an object’s attribute values for examination. Examples of using LDAP to export (and import) object data from a tree can be found in the section “LDAP Import Convert Export Utility” in Chapter 12, “eDirectory Management Tools.”
If, on examination, the object appears to be fine, you can run DSRepair on the server that is reporting that it lost the entry. You can select either an unattended full repair of the database or a repair of the local database from the advanced options menu. You do this to ensure that the database is consistent locally. Then you force a replica synchronization with the Master replica.
The best way to proceed is to force a synchronization of all objects within the replica. You can do this most effectively by using the Receive All Objects option in DSRepair, as illustrated in Figure 9.12. This option essentially deletes the partition from the server that is reporting the error (by changing the replica state to New) and re-creating it by using the information received from the Master replica.
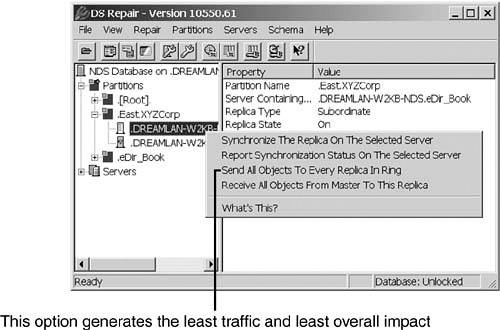
This is the least destructive of all fixes because only the replica on the problem server is affected, and the synchronization traffic is between the Master replica and the affected replica. If you use the Send All option instead, all non-Master replicas in the replica ring are set to the New state and are re-created. If the involved partition is large in size, a high volume of network traffic can result between the servers.
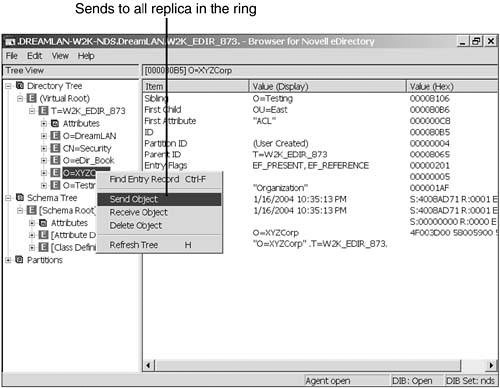
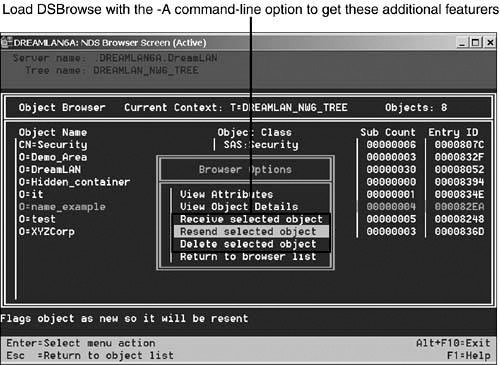
You could also use the advanced mode in DSBrowse to send a single object from the Master replica to the other replicas in the ring (see Figures 9.13 and 9.14). The one drawback of this is that DSBrowse is not available on Unix/Linux, where you need to use the DSRepair solution described previously.
The previous section discusses using diagnostic tools with recovery tools in order to resolve an issue with a -694 error in synchronization. The technique for combining diagnostic tools and recovery tools is really no different from the process of combining any of the other tools.
Using diagnostic tools and recovery tools together in the recovery phase of the troubleshooting process provides more flexibility than categorizing each of the tools and using them only during specific phases of the process. Troubleshooting is an iterative process that sometimes involves many trips through the process of examining the problem, making a change, looking at the result, and reexamining the problem to see whether it has been resolved.
As with other combinations of tools, knowing the features and functionality of each tool is critical. If you are using tools that produce output or take input, knowing what the formats are and how to convert them is also a significant part of getting the tools to work together. Chapter 11 examines a situation that calls for the combination of NList and UImport to recover lost group membership information.
This idea of combining tools is central to resolving critical DS issues. If you don’t effectively use the tools you have at hand, your troubleshooting approach is more likely to be disorganized and take longer than necessary to resolve the issue.
In discussing how to combine tools, we have not yet touched on how to bridge the functional gaps between tools. The preceding section mentions an example that combines NList and UImport to resolve an issue with lost group memberships. These two tools may not appear to have much in common that can be used to resolve problems. On the one hand, NList is a utility that is very powerful but clumsy to use because it has a complex
command-line interface but has output that is intended to be human readable. On the other hand, UImport is a utility that is designed to take machine-readable input and update attribute values for existing User objects or to create a new object from the data.
NOTE
The same technique discussed for combining NList and UImport works equally well if you prefer to use ICE instead of NList and UImport because ICE supports the use of .csv files for input. You can find more details in Chapter 12.
There are a few ways to bridge, or “link” utilities together—that is, to take the output from one and turn it into a format that the other can use. For instance, you could take the output from one, import it into a spreadsheet, and use some complex formulas to extract the information you need. If the information is limited in scope, you could even use the Notepad utility and its primitive search-and-replace capability to remove excess information.
However you choose to manipulate the data, the key in bridging the different utilities is to learn how to manipulate data by using whatever tools you are comfortable with. If you are not a programmer, you can pick up an introductory programming book and learn how to program. Which programming language you use doesn’t matter; it’s the programming skills that are important. For instance, the “Group Membership Recovery” section in Chapter 11 shows that the combination of programming skills along with network administration is a very strong combination that can make your life a lot easier.
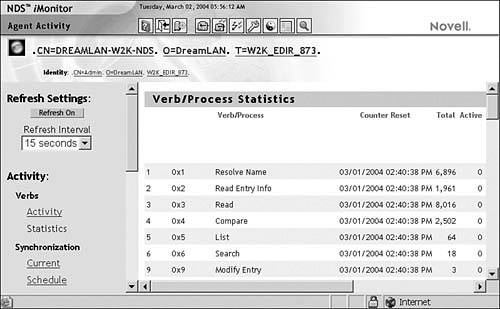
Troubleshooting system performance bottlenecks is not an easy topic to address because you need to check many components. The Agent Activity page in NDS iMonitor provides you with some useful information about eDirectory performance.
Figure 9.15 shows a sample DSA verb/process statistics report. It provides the traffic pattern—in terms of how many hits over a given time period—broken down by type. For instance, since the time the counters were reset, there have been almost 2,000 requests to read entry info but only 3 modify-entry requests. This suggests that this server is read-intensive. In the event of a performance problem with this server, you should check things such as the DS cache allocation, operating system cache availability, and anything else that could affect read functions.
Chapter 16, “Tuning eDirectory,” covers the details of how you can tune NDS/eDirectory for better performance by setting up indexes and proper DIB cache allocations. It also includes discussions that are operating system specific.
This chapter looks at a number of techniques for combining tools for troubleshooting purposes. By using various combinations of diagnostic tools and recovery tools, you can effectively handle many critical situations that may arise in your DS implementation. Chapter 10, “Programming for eDirectory,” introduces some programming concepts that can help you in data-recovery situations.