![]() ConsoleOne is a Java-based tool for managing your network and its resources. It can be launched by running
ConsoleOne is a Java-based tool for managing your network and its resources. It can be launched by running CONSOLEONE.EXE from where it was installed (default: SYS:PUBLICMGMTCONSOLEONE1.2BIN). By default, it enables you to manage Novell eDirectory objects, schema, partitions, replicas, and NetWare server resources.
![]() If you install other Novell products, the appropriate management capabilities are snapped automatically into the version of ConsoleOne installed on that server.
If you install other Novell products, the appropriate management capabilities are snapped automatically into the version of ConsoleOne installed on that server.
![]() ConsoleOne is installed during the OES NetWare installation, but can also be reinstalled or installed locally from the Novell client’s CD.
ConsoleOne is installed during the OES NetWare installation, but can also be reinstalled or installed locally from the Novell client’s CD.
![]() ConsoleOne also supports remote server console access through a Java applet called RConsoleJ.
ConsoleOne also supports remote server console access through a Java applet called RConsoleJ.
![]() To access the OES NetWare server console remotely, launch ConsoleOne and browse to the server you want. Select Tools, Remote Console.
To access the OES NetWare server console remotely, launch ConsoleOne and browse to the server you want. Select Tools, Remote Console.
![]() Web Manager is a web-based “home page” for accessing most of the OES NetWare web-based tools and services.
Web Manager is a web-based “home page” for accessing most of the OES NetWare web-based tools and services.
![]() To access Web Manager, open your web browser and enter your web server’s domain name or IP address, followed by a colon and the Web Manager port, which by default is
To access Web Manager, open your web browser and enter your web server’s domain name or IP address, followed by a colon and the Web Manager port, which by default is 2200. For example:
https://www.quills.com:2200
or
https://137.65.192.1:2200
![]() iManager provides role-based management of your NetWare network, together with a nearly comprehensive set of administrative tools. After it’s loaded, you will use iManager to perform most of the day-to-day administrative tasks in your NetWare environment, including management of most additional services that are available with OES NetWare.
iManager provides role-based management of your NetWare network, together with a nearly comprehensive set of administrative tools. After it’s loaded, you will use iManager to perform most of the day-to-day administrative tasks in your NetWare environment, including management of most additional services that are available with OES NetWare.
![]() You can access the iManager web page by appending the iManager path (
You can access the iManager web page by appending the iManager path (/nps/iManager.html) to the IP address or DNS name of the server running iManager. For example:
https://www.quills.com/nps/iManager.html
or
https://137.65.192.1/nps/iManager.html
![]() To force iManager into Simple mode to support federal accessibility guidelines, use the Simple mode path (
To force iManager into Simple mode to support federal accessibility guidelines, use the Simple mode path (/nps/Simple.html). For example:
https://www.quills.com/nps/Simple.html
or
https://137.65.192.1/nps/Simple.html
![]() You will be prompted to authenticate using a valid eDirectory username. Users can access only iManager features for which they have been assigned rights.
You will be prompted to authenticate using a valid eDirectory username. Users can access only iManager features for which they have been assigned rights.
Novell Remote Manager (NoRM) is used for remote management of OES NetWare servers:
![]() You can launch NoRM from Web Manager, or you can launch NoRM directly by the OES NetWare server’s domain name or IP address, followed by a colon and the port number, which by default is
You can launch NoRM from Web Manager, or you can launch NoRM directly by the OES NetWare server’s domain name or IP address, followed by a colon and the port number, which by default is 8009. For example:
https://www.quills.com:8009
or
https://137.65.192.1:8009
![]() You can also launch NoRM directly from the graphical server console by clicking the red N icon on the icon bar at the bottom of the GUI.
You can also launch NoRM directly from the graphical server console by clicking the red N icon on the icon bar at the bottom of the GUI.
![]() You will be prompted to authenticate. If your user object is in the same context as the server object, you can authenticate by common name only. Otherwise, you need to specify a full eDirectory username, including the leading dot. For access to all NoRM features, the user should have supervisory rights to the NetWare server.
You will be prompted to authenticate. If your user object is in the same context as the server object, you can authenticate by common name only. Otherwise, you need to specify a full eDirectory username, including the leading dot. For access to all NoRM features, the user should have supervisory rights to the NetWare server.
![]() iMonitor is used for web-based management of Novell eDirectory in your OES NetWare network.
iMonitor is used for web-based management of Novell eDirectory in your OES NetWare network.
![]() Launch iMonitor from NoRM by selecting NDS iMonitor from the Managing eDirectory section in the left navigation frame. Alternatively, you can go straight to iMonitor by appending the iMonitor path (
Launch iMonitor from NoRM by selecting NDS iMonitor from the Managing eDirectory section in the left navigation frame. Alternatively, you can go straight to iMonitor by appending the iMonitor path (/nds) to the NoRM URL. For example:
https://www.quills.com:8009/nds
or
https://137.65.192.1:8009/nds
Since the release of NetWare 4 in the early 1990s, Novell has been working toward a consolidated management interface from which all administrative tasks can be performed. In that time, the primary issue hampering this effort has been how to deliver that management interface.
The first version of a centralized management interface was NWAdmin. NWAdmin is a Windows-based utility that enables administrators to see the whole network from a directory-centric, rather than server-centric, perspective. It requires the Novell client to provide network communications and access.
NWAdmin supports an extendable plug-in architecture so new functionality can be added as necessary to manage new features and new products. However, NWAdmin runs only on Windows and uses a proprietary architecture. Rather than try to support multiple versions of NWAdmin, Novell has moved toward a more open and standards-based management architecture based on Java programming techniques.
In 1998, with the release of NetWare 5, Novell introduced its second-generation administrative utility known as ConsoleOne. Similar to NWAdmin, ConsoleOne is an extendable management architecture that supports snap-ins to extend its capabilities. Its Java-based design enables it to run on both workstations and the NetWare server itself, providing the first-ever graphical server console. However, it still required some type of Novell client support for network communications and access. In the years since its release, ConsoleOne has achieved respectable performance, a major deficiency in its early versions, and still serves as the preferred tool for managing Novell and third-party products and services.
With the release of NetWare 6, Novell started making the final management interface transition necessary to support its One Net initiative by introducing a set of web-based management tools. iManager offers a true platform-independent management interface that can be used from any workstation at any location to perform network management and maintenance of any kind.
iManager v2.5, which ships with OES NetWare, provides a nearly complete set of tools for managing OES. However, some applications and tools may still require ConsoleOne, so you need to be familiar with the capabilities of each management interface. This chapter provides an introduction to the primary Novell management utilities, from ConsoleOne to iManager. It provides requirements and installation information for each utility, as well as an overview of its features and capabilities.
First, the chapter presents ConsoleOne and shows how ConsoleOne can be used for both local and remote server administration, as well as full eDirectory management.
Next, OES NetWare’s web-based management tools are presented, including iManager, Novell Remote Manager (NoRM), and iMonitor. These browser-based utilities largely eclipse ConsoleOne today and offer much more flexibility for network administrators looking to get their jobs done from any place at any time.
OES NetWare includes ConsoleOne v1.3.6c. ConsoleOne is a Java-based tool for managing your network and its resources. By default, it enables you to manage
![]() Novell eDirectory objects, schema, partitions, and replicas
Novell eDirectory objects, schema, partitions, and replicas
![]() NetWare server resources
NetWare server resources
If you install other Novell products, additional capabilities are snapped in to ConsoleOne automatically. For example, if you install Novell eDirectory, the capability to configure the LDAP interface to eDirectory is snapped in to ConsoleOne automatically.
Because ConsoleOne is a Java-based application, it has a similar look and feel across all platforms. ConsoleOne is shown in Figure 4.1.

Before looking at specific administrative tasks that are described throughout this book, it’s a good idea to get a feel for the basics of ConsoleOne administration. If you need a more detailed introduction to ConsoleOne, see the OES online documentation.
The whole purpose of using eDirectory to manage your network is that it enables you to organize network resources so they can be managed more easily. A principal way of doing this is to organize objects into logical groupings known as containers. Because of inheritance rules, objects in a container are security-equivalent to the container itself; so, general object rights can be managed at the container level rather than the individual object level. For more information on eDirectory tree design, see Chapter 6, “Novell eDirectory.” For information on network security with eDirectory, see Chapter 7, “Users and Network Security.”
After you have located the objects you want to manage, you can change their behavior by modifying their properties. You can also create, delete, move, and rename objects as needed. To do any of these, right-click the object(s) you want to manage and select the operation you want from the drop-down menu. For example, to create a new object, complete the following steps:
1. Right-click the container in which you want the object stored, select New, and then choose the type of object you want to create. ConsoleOne automatically limits the list of object types to those that are valid for the selected container.
2. Enter a name for the object.
3. Specify any other required or optional information and then select OK.
Warning
If you are attempting to modify a service-specific object for which you don’t have a snap-in, ConsoleOne shows you only a generic list of properties. Make sure you have a snap-in installed for all the objects with which you will be working.
ConsoleOne enables you to modify the properties of multiple objects of the same type simultaneously. To do this, complete the following steps:
1. Select the objects using one of the following methods:
![]() In the right pane, Shift-click or Ctrl-click multiple objects of the same type.
In the right pane, Shift-click or Ctrl-click multiple objects of the same type.
![]() Click a group or template object to modify its members.
Click a group or template object to modify its members.
![]() Click a container to modify the objects it contains.
Click a container to modify the objects it contains.
2. With the appropriate objects highlighted, select File from the menu bar and then select Properties of Multiple Objects.
3. (Conditional) If you selected a container in step 1, in the Properties of Multiple Objects dialog box, double-click the object type from the Available Classes list that you want to modify.
4. On the Objects to Modify page, make sure only the objects that you want to modify are listed.
5. On the other property pages, make any changes you want to apply to all selected objects and then select OK.
This greatly reduces the effort necessary to manage objects with similar attributes.
In the left pane, see the eDirectory container, which holds the eDirectory trees you are currently logged in to. If you log in to multiple trees, you will see them all listed here. To log in to a new eDirectory tree, select the NDS Authenticate button on the ConsoleOne toolbar and specify the tree name, context, username, and password.
If you are using DNS tree federation, you can access containers in other trees without logging in. To do this, complete the following steps:
1. In the ConsoleOne menu bar, select View and then select Set Context.
2. Enter the full DNS name for the eDirectory context you are trying to access, including an ending dns and period (.). For example:
testing.provo.quills.com.dns.
3. Click OK.
When you are in an eDirectory tree or context and its objects are listed in the right pane, you typically browse to an object by opening container objects in the left pane until you arrive at the object.
ConsoleOne gives you the flexibility to customize views in both the left and right panes. However, except for window size, position, and view title, other custom viewing settings are lost when you exit ConsoleOne.
You can define the topmost object in the left pane by doing one of the following:
![]() If the object is a container that’s below the current top object, right-click the container object and select Set as Root.
If the object is a container that’s below the current top object, right-click the container object and select Set as Root.
![]() If the object is a container that’s above the current top object, double-click in the left pane until the container you want appears.
If the object is a container that’s above the current top object, double-click in the left pane until the container you want appears.
![]() If you want to reset My World as the Top object, right-click the up arrow in the left pane and select Show My World.
If you want to reset My World as the Top object, right-click the up arrow in the left pane and select Show My World.
The right pane in ConsoleOne defaults to the Console view. This is the most-used view for managing directory and server resources. However, you can switch back and forth between the Console view and other views, such as the Partition and Replica view, by right-clicking an object in the right pane, selecting Views, and then selecting the view you want. For more information on the Partition and Replica view see Chapter 6.
Regardless of which view the right pane contains, you can show or hide the view title at the top of the right pane by selecting View from the menu bar and then selecting Show View Title. A check mark is added to or removed from the menu item, depending on whether the view title is being shown or hidden.
ConsoleOne is installed automatically to SYS:PUBLICMGMTCONSOLEONE1.2 during the OES NetWare server installation. Furthermore, any products installed on the server automatically place their ConsoleOne snap-ins in the correct location (SYS:PUBLICMGMTCONSOLEONE1.2SNAPINS) to function with this version. However, this means that different servers with different product sets may not have all the necessary snap-ins to manage services networkwide. So, if you are doing service-specific management, you should run ConsoleOne from a server where the service is actually installed.
The following sections describe requirements for running ConsoleOne on one of its supported operating systems.
The following system requirements apply to ConsoleOne in the Windows environment:
|
OS version |
Windows 95/98 with Novell client 3.2 or later Windows NT/2000 with Novell client 4.9 or later |
|
RAM |
64MB minimum 128MB recommended (required for generating ConsoleOne reports) |
|
Processor |
200MHz or faster |
|
Disk space |
50MB (required for a local installation only) |
|
Video resolution |
800×600×256 colors (minimum) |
To enable ConsoleOne Accessibility features for a Windows environment, you must first install the Java Access Bridge. The Java Access Bridge exposes the Java Accessibility API in a Windows DLL so that Windows Assistive Technologies can interact with Java applications that use the Java Accessibility API.
To set up the Java Access Bridge for use with ConsoleOne, complete the following steps:
1. Download the Java Access Bridge from the Java Access Bridge website at http://java.sun.com/products/accessbridge.
2. Unpack the Java Access Bridge into the C:ACCESSBRIDGE-1_0 directory and run the following command:
C:ACCESSBRIDGE-1_0INSTALLERINSTALL
Tip
For more information on installing and configuring the Java Access Bridge, see the Java Access Bridge readme at
3. Place a copy of the following files in your CONSOLEONEEXT folder. By default, this folder is at C:NOVELLCONSOLEONE1.2:
JACCESS-1_3.JAR
ACCESS-BRIDGE.JAR
4. Place a copy of following file in your JRELIB folder. By default, this folder is at C:NOVELLCONSOLEONE1.2:
ACCESSIBILITY.PROPERTIES
5. Copy the following files to your Windows DLL directory (for example, C:WINNTSYSTEM32 or C:WINDOWSSYSTEM):
JAVAACCESSBRIDGE.DLL
WINDOWSACCESSBRIDGE.DLL
With this installation process complete, ConsoleOne will now be able to interact properly with Windows Accessibility features.
In addition to being installed during the OES NetWare installation, you can install ConsoleOne on existing NetWare servers. The following system requirements apply to ConsoleOne in the NetWare environment:
|
OS version |
NetWare 5 Support Pack 6a or later |
|
RAM |
Use NetWare recommended minimums At least 128MB recommended |
|
Processor |
200MHz or faster |
|
Disk space |
38MB available |
|
Video resolution |
800×600×256 colors (minimum) |
Warning
ConsoleOne v1.3.6 is compatible with existing ConsoleOne v1.2 snap-ins, but not with v1.1 snap-ins. If you have any older applications that use these snap-ins, ConsoleOne v1.3 should not be installed on that server.
Complete the following steps to install ConsoleOne on an existing NetWare server:
1. At the NetWare server console, type JAVA –EXIT to unload Java and any Java applications running on the server.
2. Make sure network users exit any ConsoleOne sessions currently in use.
3. From a Windows client, map a drive letter to the root of the server’s SYS volume.
4. Download the latest ConsoleOne files from http://download.novell.com. Version 1.3.6c is the version that ships with OES. The downloadable file is C1.EXE.
5. Launch C1.EXE and follow the onscreen prompts to complete the installation. If you do not need ConsoleOne reporting, you can choose not to install that snap-in.
After ConsoleOne has been installed on the server, you can start the NetWare GUI and ConsoleOne simultaneously by typing the following command:
C1START
If the GUI is already started, select the Novell button in the lower-left corner and select ConsoleOne from the menu. You will be required to authenticate to eDirectory before ConsoleOne will load.
You can also run ConsoleOne remotely from a Windows computer. First make sure you have a drive mapped to the SYS: volume of the NetWare server, and then you can create a shortcut to CONSOLEONE.EXE at the location where you installed it.
You can access ConsoleOne on Linux locally or remotely from another system through an X terminal session, provided the remote computer has an X Window subsystem.
Note
This release of ConsoleOne for Linux has been tested only on the IBM 1.3 Java Runtime Environment (JRE). This JRE is included in the ConsoleOne installation package in case you don’t have it. If you do have it, you can choose not to install it.
The following system requirements apply to ConsoleOne in the Linux environment:
|
OS version |
SUSE 8 or later |
|
Red Hat OpenLinux 6 or later |
|
|
RAM |
128MB recommended |
|
Processor |
200MHz or faster |
|
Disk space |
With JRE installation: 32MB; without JRE installation: 5MB |
|
Video resolution |
800×600×256 colors (minimum) |
Warning
This release of ConsoleOne is not compatible with eDirectory versions prior to v8.5. If the installation routine detects an unsupported version of eDirectory, it will abort the installation.
Complete the following steps to install ConsoleOne on an existing Linux server:
1. Download the latest ConsoleOne files from http://download.novell.com to a temporary location. Version 1.3.6c is the version that ships with OES. The downloadable file for this version is c1-136c-linux.tar.gz.
2. Unpack the file you have downloaded.
3. Change to the ConsoleOne/linux directory that was created by unpacking the download file.
4. Start the installation by typing the following at the system prompt: c1-install. Follow the onscreen prompts to complete the installation. Remember, if you already have the IBM JRE v1.3 installed, you can skip that portion of the installation.
Note
You can uninstall ConsoleOne by entering c1-uninstall at the system prompt. c1-install and c1-uninstall both include some optional parameters for running in unattended mode or installing/uninstalling individual components. For details on the command syntax, type c1-install -h or c1-uninstall -h at the system prompt.
Both the install and uninstall routines maintain a log file in the /var directory that you can review at any time.
Use the following command to start ConsoleOne from either a local session or an X terminal (remote) session:
/usr/ConsoleOne/bin/ConsoleOne
ConsoleOne can also be run from a Solaris workstation. The installation process is nearly identical to that described in the last section for Linux, but the downloadable is c1-136-solaris.tar.gz.
Because the web-based management tools are much easier to develop to, management of some of the newer NetWare features are bypassing ConsoleOne and going straight to iManager. This includes, for example, Licensing and iPrint, which are managed through iManager and are not available from ConsoleOne.
Much of the server management that previously required access to the NetWare server console can now be done with NoRM, discussed later in this chapter. NoRM enables you to perform most management tasks that normally require access to the server console from a remote workstation or even from across the Internet. However, to manage any version of NetWare 5 or NetWare 6 remotely, you can also use RConsoleJ, which is part of ConsoleOne. Although RConsoleJ does not offer the flexibility of NoRM, it can save significant time by enabling you to manage servers to which you have a LAN/WAN connection.
Note
If you have NetWare 4.x or earlier servers on your network, you have to use the DOS-based RConsole utility that shipped with these versions of NetWare. Consult your server documentation for more information.
RConsoleJ is a Java applet that provides a server “window” on your workstation from which you can use console utilities, load/unload NLMs, and change server configuration as if you were using the server’s actual keyboard and monitor. Using RConsoleJ enables you to access the server from any workstation on the network, which gives you greater freedom when administering your network.
RConsoleJ requires the IP protocol to connect to NetWare servers remotely. However, if you want to use it to connect to a server that is running IPX only, you can do so by routing RConsoleJ communications through a secondary proxy server, which has both IP and IPX protocol stacks loaded. The proxy server acts as a gateway between RConsoleJ and the IPX server.
Because RConsoleJ is part of ConsoleOne, you can run it from any platform that supports ConsoleOne, including Windows, NetWare, Linux, Solaris, and Tru64.
To set up your network for RConsoleJ, you have to do the following:
![]() Set up the target server, which is the server you want to access remotely.
Set up the target server, which is the server you want to access remotely.
![]() (Conditional) Install proxy software on an IP server if the target server is running only IPX.
(Conditional) Install proxy software on an IP server if the target server is running only IPX.
![]() Install RConsoleJ software on the workstation or server from which you want to run the remote console session.
Install RConsoleJ software on the workstation or server from which you want to run the remote console session.
The target server is the server whose console you want to access during the remote console session. The target server can be running IP or IPX.
To prepare a target server, complete the following steps:
1. At the server console prompt load the following NLM:
RCONAG6
2. Enter the password you want administrators to use when accessing the target server from RConsoleJ. You do not need an eDirectory password because RConsoleJ does not use eDirectory.
3. Enter the TCP port number for the unencrypted session. The default value is 2034. If the server communicates using IPX only, enter –1 to disable TCP listening. To enable listening over a dynamically assigned port, enter 0.
4. Enter the TCP port number for the secure session. The default port number is 2036. Ensure the Key Material object named SSL CertificateDNS has been created.
5. Enter the SPX port number on which RCONAG6 will listen for a proxy server. The default port number is 16800. If the server communicates using IP only, enter –1 to disable SPX listening. To enable listening over a dynamically assigned port, enter 0.
This is done conditionally so the server will act as a middleman between the RConsoleJ client, which communicates only via IP and a NetWare server running on IPX. To do this, the RConsoleJ proxy server must have both IP and IPX protocol stacks loaded:
1. At the server console prompt, enter the following command:
RCONPRXY
2. Enter the TCP port number on which RCONPRXY will listen for RConsoleJ. The default value is 2035. To enable listening over a dynamically assigned port, enter 0.
After the NetWare server is running the RConsoleJ proxy agent, the RConsoleJ client can communicate through it with the IPX target server.
The default AUTOEXEC.NCF file in OES NetWare includes an optional command that you can uncomment to auto-load RConsoleJ modules at startup. However, because loading these modules requires you to specify a remote password, it is more secure to use LDRCONAG.NCF, which enables you to encrypt the password so that it cannot be viewed by anyone with access to the AUTOEXEC.NCF. LDRCONAG.NCF includes all the necessary RConsoleJ commands necessary to support RConsoleJ.
To create an encrypted remote password, complete the following steps:
1. Type the following command:
RCONAG6 ENCRYPT
2. Enter the password you want to use for remote console sessions.
3. Enter the other required port information, as outlined in the previous section. The system displays the encrypted password value and a message prompting whether the RCONAG6 command should be written to the SYS:SYSTEMLDRCONAG.NCF file. To include the RCONAG6 command with your encrypted password in the LDRCONAG.NCF file, enter Y.
4. The system places a LOAD RCONAG command into the LDRCONAG.NCF file with the encrypted password as a parameter. To auto-load RCONAG6.NLM with an encrypted password on startup, use either NWCONFIG or EDIT to open the AUTOEXEC.NCF file. At the end of the file, enter the following:
LDRCONAG
5. Save and exit the AUTOEXEC.NCF file.
The server will now load the necessary remote modules and your encrypted password automatically whenever it is started.
To run RConsoleJ from a supported workstation or OES NetWare server, do the following:
Note
If you are running RConsoleJ from a NetWare server, you can start it directly from the server GUI by selecting the Novell button and then selecting Programs and RConsoleJ. You can then continue with step 3.
1. Open ConsoleOne and browse to the server object you want to control.
2. Right-click the server object and select Remote Console.
3. In the RConsoleJ screen, shown in Figure 4.2, specify the required information and select Connect.
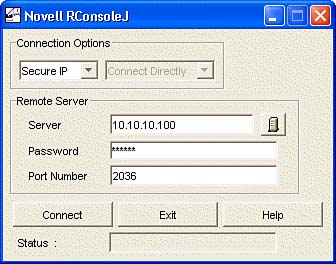
The choices available include
![]() Connection Options—Specify whether you are connecting via Secure or Unsecure IP. If you are using Unsecure IP, you can choose whether to connect directly or through a proxy.
Connection Options—Specify whether you are connecting via Secure or Unsecure IP. If you are using Unsecure IP, you can choose whether to connect directly or through a proxy.
![]() Remote Server—Specify the target server’s name for a direct connection or the proxy server’s name for a proxy connection. Enter the remote password. The port number will be inserted automatically unless you have changed it from the default.
Remote Server—Specify the target server’s name for a direct connection or the proxy server’s name for a proxy connection. Enter the remote password. The port number will be inserted automatically unless you have changed it from the default.
Note
If you are running ConsoleOne from a different server, or if you have installed ConsoleOne locally, you may be prompted to accept an unknown certificate. If so, click OK to accept the certificate and launch the RConsoleJ window.
For more information on using RConsoleJ, see the OES online documentation.
OES NetWare includes iManager 2.5, a web-based tool for administering, managing, and configuring NetWare products, services, and eDirectory objects. iManager provides Role-Based Services (RBS) to give you a way to focus the user on a specified set of tasks and objects as determined by the user’s role(s). What users see when they access iManager is based on their role assignments in eDirectory.
iManager has been redesigned to use Novell’s exteNd web services platform, and is in effect a management portal for Novell’s products and services. It runs on the Apache Web Server for NetWare. For more information on Apache Web Server for NetWare, see Chapter 13, “OES Web Foundations.”
Most of the default management tasks formerly requiring ConsoleOne can now be done through iManager. Among other things, you can define management roles to administer Novell Licensing Services (NLS), iPrint, and DNS/DHCP services, and to perform eDirectory object management. iManager is now Novell’s preferred management platform.
In some OES NetWare installations and patterns, iManager will not be installed automatically. If you did not select to install iManager during the server installation, it can be manually reinstalled through Deployment Manager or the graphical server console. To install iManager via Deployment Manager, complete the following steps:
1. Make sure you are logged in as a user with administrative rights to eDirectory and the NetWare server.
2. At the workstation, insert the NetWare 6.5 SP3 CD 1 (Operating System). Deployment Manager should start automatically. If not, run NWDEPLOY.EXE from the root of the CD-ROM.
3. Under Post-Install Tasks in the left pane, select Install NetWare 6.5 Products. Click Remote Product Install in the right pane.
4. Browse to, or specify, the name of the target server and click Next. Provide Admin user information when requested.
5. Select Customized NetWare Server from the list of patterns and click Next.
6. At the Components screen, select iManager 2.50 and Apache 2 Web Server and Tomcat 4 Servlet Container and click Next. Make sure all other products are deselected.
7. At the Summary screen, review your selections and click Copy Files. All the necessary application files will be copied to the target server. You will be prompted to insert the NetWare 6.5 SP3 CD 1 (Products) CD-ROM.
8. At the Installation Complete screen, click Reset Apache to restart Tomcat and the Apache Web Server. Close Deployment Manager after the installation is finished.
Note
You can restart Tomcat and Apache manually, if this becomes necessary for any reason. To do this, stop Tomcat by typing TC4STOP and stop Apache by typing AP2WEBDN. Restart the services by typing AP2WEBUP to restart Apache and TOMCAT4 to restart Tomcat.
After it’s installed, you can open iManager from its URL, using either HTTP or HTTPS, at <server IP address>/nps/iManager.html. You will be required to authenticate to access iManager and will have access to only those features to which you have rights. For full access to all iManager features, authenticate as a user with supervisory rights to the eDirectory tree (see Figure 4.3).
You can also open iManager in Simple mode, suitable for compliance with federal accessibility guidelines. It provides the same functionality as Regular mode, but with an interface optimized for accessibility by those with disabilities (for example, expanded menus for blind users who rely upon spoken commands). To use Simple mode, replace iManager.html with Simple.html in the iManager URL. For example:
https://www.quills.com/nps/Simple.html
or
https://137.65.192.1/nps/Simple.html
Using either interface, you have access to only those features to which you have rights. For full access to all iManager features, authenticate as a user with supervisory rights to the eDirectory tree.
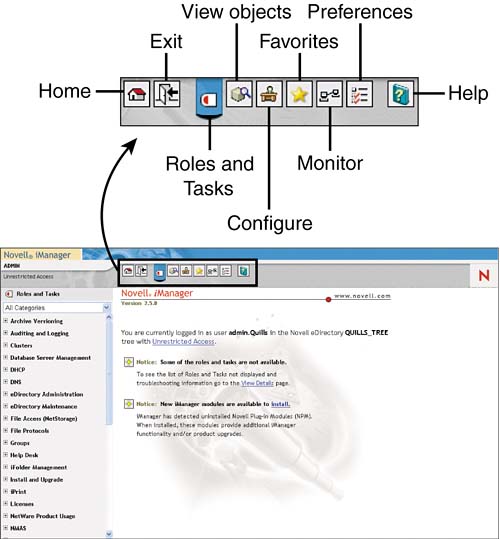
As shown in Figure 4.3, iManager is organized into three main sections, or frames:
![]() Header frame—The Header frame is located at the top of the screen. Its buttons provide access to the various views, or content categories, available through iManager, as well as an Exit link to close the browser window.
Header frame—The Header frame is located at the top of the screen. Its buttons provide access to the various views, or content categories, available through iManager, as well as an Exit link to close the browser window.
![]() Navigation frame—The Navigation frame is located on the left side of the screen. It enables you to navigate among the various management tasks associated with the selected iManager view. The rights of your authenticated identity further constrain what you see.
Navigation frame—The Navigation frame is located on the left side of the screen. It enables you to navigate among the various management tasks associated with the selected iManager view. The rights of your authenticated identity further constrain what you see.
![]() Content frame—The Content frame occupies the middle-right of the screen. When you select a link in the Header or Navigation frames, the appropriate information is displayed in the Content frame.
Content frame—The Content frame occupies the middle-right of the screen. When you select a link in the Header or Navigation frames, the appropriate information is displayed in the Content frame.
Role-based Services (RBS) enable administrators to assign users a management role. A role is a specific set of functions, or tasks, that the user is authorized to perform. After given a role, or roles, what a User sees and has access to in iManager is based on their role assignments. Only the tasks assigned to the authenticated user are displayed.
RBS has been significantly expanded in iManager 2.5, and offers very robust configuration and assignment of network management responsibilities. RBS is configured through iManager and all RBS-related information is maintained in a set of RBS objects in eDirectory. These object types include the following:
![]() RBS Collection—A container object that holds a set of RBS modules that will be assigned to a given portion of your eDirectory tree.
RBS Collection—A container object that holds a set of RBS modules that will be assigned to a given portion of your eDirectory tree.
![]() RBS Module—A container inside the RBS collection that organizes available RBS Tasks and Books into functional groups. RBS modules enable you to assign users responsibility for specific functionality within a product or service.
RBS Module—A container inside the RBS collection that organizes available RBS Tasks and Books into functional groups. RBS modules enable you to assign users responsibility for specific functionality within a product or service.
![]() RBS Role—An object type that specifies the tasks that users (members) are authorized to perform. Defining a role includes creating an RBS Role object and linking it to the tasks that the role can perform. RBS roles can be created only in an RBS Collection container.
RBS Role—An object type that specifies the tasks that users (members) are authorized to perform. Defining a role includes creating an RBS Role object and linking it to the tasks that the role can perform. RBS roles can be created only in an RBS Collection container.
![]() RBS Task—An object type representing a linear process that can be performed via iManager. An RBS Task looks like a wizard utility that will guide you through the steps necessary to complete some operation. RBS Task objects are located only in RBS Module containers.
RBS Task—An object type representing a linear process that can be performed via iManager. An RBS Task looks like a wizard utility that will guide you through the steps necessary to complete some operation. RBS Task objects are located only in RBS Module containers.
![]() RBS Book—An object type representing a nonlinear collection of configuration options that can be modified in any order or combination. For example, the attributes associated with a user object can be modified in iManager via the Modify Object RBS Book. RBS Books are located only in RBS Module containers.
RBS Book—An object type representing a nonlinear collection of configuration options that can be modified in any order or combination. For example, the attributes associated with a user object can be modified in iManager via the Modify Object RBS Book. RBS Books are located only in RBS Module containers.
![]() RBS Scope—An object type representing the context in the tree where a role will be performed, and which is associated with RBS Role objects. This object is dynamically created when needed, and automatically deleted when no longer needed.
RBS Scope—An object type representing the context in the tree where a role will be performed, and which is associated with RBS Role objects. This object is dynamically created when needed, and automatically deleted when no longer needed.
Warning
Never change the configuration of an RBS Scope object. Doing so can have very serious consequences and could potentially break the system.
During the iManager installation, the schema of your eDirectory tree was extended to support the RBS object types specified previously. To set up RBS for the first time, complete the following steps in iManager:
1. In the Header frame, select the Configure button.
2. In the Navigation frame, open the Role-based Services group and select RBS Configuration.
3. Select Configure iManager in the Content frame.
4. Specify the name and location for the RBS Collection and click Next.
5. In the RBS Modules page, make your selections and click Start.
![]() Specify the RBS Modules that you want installed in this RBS Collection. Each module provides a different set of management tasks that can be assigned as a group.
Specify the RBS Modules that you want installed in this RBS Collection. Each module provides a different set of management tasks that can be assigned as a group.
![]() Specify a scope for the RBS Modules you have selected. The scope specifies the container in which those assigned this management role will be able to perform those management tasks. Select Inheritable if you want the management tasks to be applicable to all subcontainers of the Scope you specify.
Specify a scope for the RBS Modules you have selected. The scope specifies the container in which those assigned this management role will be able to perform those management tasks. Select Inheritable if you want the management tasks to be applicable to all subcontainers of the Scope you specify.
6. When the installation of iManager modules completes, click Close.
Based on your selections, this procedure creates all the appropriate RBS objects in your eDirectory tree. After you have configured your RBS Collection, selecting RBS Configuration in the Navigation frame opens the RBS Configuration task, as shown in Figure 4.4.
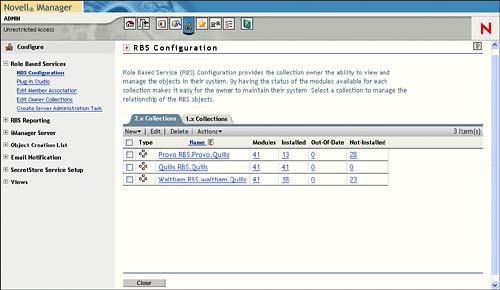
From RBS Configuration you have full control over the structure of your role-based management system, including creating new collections, adding/deleting modules within collections, and creating/assigning roles to users.
When you install RBS, iManager creates specific relationships between tasks, modules, and roles. However, you can modify task assignments, create customized roles, or do most anything else to align the RBS system to the realities of your network. For example, to assign a role object to a specific user, complete the following steps in iManager:
1. In the Header frame, select the Configure button.
2. In the Navigation frame, open the Role-based Services group and select RBS Configuration.
3. Select the Collection in which you want to work by clicking its name in the Content frame.
4. From the Roles tab, select the role you want to assign and click Actions, Member Associations.
5. In the Member Associations screen, provide the requested information and click Add. You can repeat this process for as many users as you want.
![]() Browse to, or specify, the user object you want to assign to this role.
Browse to, or specify, the user object you want to assign to this role.
![]() Specify the scope for which the specified user should have access to the role. The scope specifies the directory context under which the user can perform the management tasks associated with this role. By default, the scope will be inheritable, meaning that the role will be active from that point down in the eDirectory tree for this user.
Specify the scope for which the specified user should have access to the role. The scope specifies the directory context under which the user can perform the management tasks associated with this role. By default, the scope will be inheritable, meaning that the role will be active from that point down in the eDirectory tree for this user.
When finished assigning users to this role, click OK.
After the roles are assigned, users have access to the iManager pages associated with the assigned role.
RBS is a powerful framework for configuring and managing administrative access to your network. Consider your assignments carefully and you can greatly increase the security of your environment by giving only the level of access necessary for a user to perform his or her job.
If a good acronym is a sign of a successful product, Novell Remote Manager (NoRM) is well on its way to greatness! Essentially, NoRM takes most of the functionality of the console Monitor utility, together with functionality from several other console utilities, and makes it available from a web browser.
You can use NoRM to monitor your server’s health, change the configuration of your server, and perform diagnostic and debugging tasks. The following list outlines some of the major tasks you can perform with NoRM:
![]() Manage server health—Monitoring the health status of one or more servers, building groups of servers to monitor together, and accessing eDirectory health and troubleshooting tools (iMonitor)
Manage server health—Monitoring the health status of one or more servers, building groups of servers to monitor together, and accessing eDirectory health and troubleshooting tools (iMonitor)
![]() Configure server environment—Managing disk partitions; viewing information about hardware adapters, hardware resources, and processor(s); loading or unloading NLM programs, LAN drivers, or disk drivers (also uploading new NLMs from NoRM); monitoring server disk space and memory resources; accessing files on volumes and DOS partitions; managing server connections; configuring
Configure server environment—Managing disk partitions; viewing information about hardware adapters, hardware resources, and processor(s); loading or unloading NLM programs, LAN drivers, or disk drivers (also uploading new NLMs from NoRM); monitoring server disk space and memory resources; accessing files on volumes and DOS partitions; managing server connections; configuring SET parameters; scheduling console commands to run; and shutting down, restarting, or resetting a server
![]() Troubleshoot server problems—Finding CPU hogs, finding high memory users, tracing ABEND sources, locating server process hogs, finding disk space hogs, seeing who is using a file
Troubleshoot server problems—Finding CPU hogs, finding high memory users, tracing ABEND sources, locating server process hogs, finding disk space hogs, seeing who is using a file
Primary features of NoRM include the following:
![]() Console Screens link—From this link on the Console Screens page, a Java applet enables you to view and run all the console screens as though you were using the keyboard at the server console.
Console Screens link—From this link on the Console Screens page, a Java applet enables you to view and run all the console screens as though you were using the keyboard at the server console.
![]() Console Commands link—From this link you can access a list of all the console commands. Viewing and printing them is now much easier.
Console Commands link—From this link you can access a list of all the console commands. Viewing and printing them is now much easier.
![]() Logging in—When you point your browser at NoRM, you are prompted to authenticate before seeing any pages.
Logging in—When you point your browser at NoRM, you are prompted to authenticate before seeing any pages.
![]() Admin and Non-Admin views—If you log in to Novell Remote Manager as a user with supervisory rights to the server object, you can access and perform all management options. If you log in as a user without these rights, you can see only the volumes, directories, and files to which you have rights. You can view files where you have read access rights and upload files into directories where you have write access. No management functions are available.
Admin and Non-Admin views—If you log in to Novell Remote Manager as a user with supervisory rights to the server object, you can access and perform all management options. If you log in as a user without these rights, you can see only the volumes, directories, and files to which you have rights. You can view files where you have read access rights and upload files into directories where you have write access. No management functions are available.
![]() Disk partition operations—As an alternative to using ConsoleOne to create, change, or remove partitions, volumes, and pools, you can now use the Partition Disks Operation features in NoRM.
Disk partition operations—As an alternative to using ConsoleOne to create, change, or remove partitions, volumes, and pools, you can now use the Partition Disks Operation features in NoRM.
![]() Profile CPU execution per NLM program—On multiprocessor servers, you can view how each NLM program is distributing its activity across the available processors.
Profile CPU execution per NLM program—On multiprocessor servers, you can view how each NLM program is distributing its activity across the available processors.
NoRM is a very robust management utility that promises extremely flexible operation for OES administrators.
With most installations and patterns for OES NetWare, NoRM is installed automatically. After the installation, use a web browser from a client computer in your network to access NoRM. To access NoRM from an Internet connection outside your firewall, you need to make sure that TCP port 8009 is opened through the firewall to the IP address of your web server. Port 8009 is the default port through which you will access the Web Manager interface. This port can be changed as long as it doesn’t conflict with any other service on the OES server.
To use NoRM, you must have a 4.x or newer web browser such as Internet Explorer or Netscape Communicator. Make sure that Java or JavaScript is enabled on your web browser.
NoRM is accessible directly, or from the server console. To open NoRM directly, open your web browser and enter your web server’s domain name or IP address, followed by a colon and the port number, which by default is 8009. For example:
https://www.quills.com:8009
or
https://137.65.192.1:8009
You might be prompted to accept an unknown certificate. At the Authentication dialog, enter the full username, with a leading dot, and password of a user with administrative rights to this server and then select OK (see Figure 4.5).
To open NoRM from the graphical server console, click the red N button from the GUI.
Note
If you don’t log in as a user with administrative rights to the server, you will not have access to all pages necessary to manage your server remotely. You will see only pages that display the volumes, directories, and files for which you have trustee rights. In this case, you can view files (where you have read access), and upload files into directories where you have write access. You will not have access to any other management functions.
After logging in, your NoRM session remains open until you close all your browser windows at that workstation. To log out of NoRM, close all the browser windows at the workstation from which you logged in.
As with iManager, NoRM’s user interface is organized into three main sections, or frames:
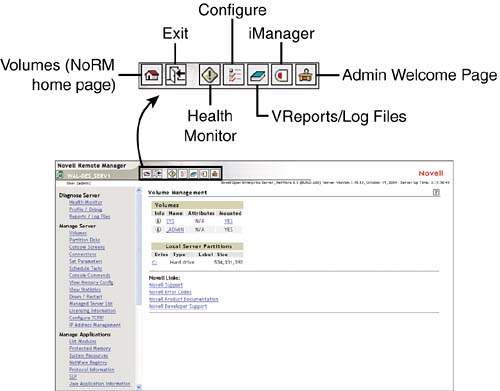
![]() Header frame—The Header frame is located at the top of the screen. It provides a semaphore (Green, Yellow, Red) assessment of the server’s health, in addition to other tools and the Volumes and Health Monitor pages in NoRM. Clicking the Novell Remote Manager title in the header takes you to an About NoRM description of the software components of NoRM. Selecting the semaphore icon next to your server name also takes you to the Health Monitor page. By default, the Volumes page is always displayed when NoRM first starts.
Header frame—The Header frame is located at the top of the screen. It provides a semaphore (Green, Yellow, Red) assessment of the server’s health, in addition to other tools and the Volumes and Health Monitor pages in NoRM. Clicking the Novell Remote Manager title in the header takes you to an About NoRM description of the software components of NoRM. Selecting the semaphore icon next to your server name also takes you to the Health Monitor page. By default, the Volumes page is always displayed when NoRM first starts.
![]() Navigation frame—The Navigation frame is located on the left side of the screen. It lists different management tasks, organized into groups that you can perform with NoRM. Each link takes you to the specific page(s) for performing that task. The list of available tasks in the Navigation frame can change based on the services and NLMs that you have loaded on the server.
Navigation frame—The Navigation frame is located on the left side of the screen. It lists different management tasks, organized into groups that you can perform with NoRM. Each link takes you to the specific page(s) for performing that task. The list of available tasks in the Navigation frame can change based on the services and NLMs that you have loaded on the server.
![]() Content frame—The Content frame occupies the middle-right of the screen. When you select a link in the Header or Navigation frames, the appropriate information will be displayed in the Content frame. If an Information icon appears in the upper-right corner of the page, you can view help for the page that is displayed in the main content frame.
Content frame—The Content frame occupies the middle-right of the screen. When you select a link in the Header or Navigation frames, the appropriate information will be displayed in the Content frame. If an Information icon appears in the upper-right corner of the page, you can view help for the page that is displayed in the main content frame.
From these frames you can view and modify all features accessible through NoRM.
You can access NoRM configuration options by selecting the Configure button in the header (see Figure 4.6). To access the configuration options you must be logged in as a user with supervisory rights to the server from which NoRM is being run.

The NoRM Configuration settings are organized into four groups:
![]() Novell Remote Manager Configuration options—These settings enable you to configure what is visible in NoRM, manage special access accounts in case problems arise, and restart NoRM when configuration changes are made.
Novell Remote Manager Configuration options—These settings enable you to configure what is visible in NoRM, manage special access accounts in case problems arise, and restart NoRM when configuration changes are made.
Note
Even if hidden, any SET parameter or console command can still be activated from either NoRM or the server console as long as you know the proper syntax.
![]() Novell Remote Manager Health Logging controls—These settings enable you to view and control the server health log. With these settings you can view, clear, enable/disable, and restrict the maximum size of the server health log.
Novell Remote Manager Health Logging controls—These settings enable you to view and control the server health log. With these settings you can view, clear, enable/disable, and restrict the maximum size of the server health log.
![]() HTTP logging controls—These settings control NoRM’s HTTP log file and allow you to enable the Debug screen, when necessary for troubleshooting.
HTTP logging controls—These settings control NoRM’s HTTP log file and allow you to enable the Debug screen, when necessary for troubleshooting.
Warning
The Debug Screen option will create significant server overhead and should be used only to help diagnose problems with the HTTPSTK module that is used by NoRM. Do not enable Debug Screen during normal operation.
![]() HTTP Interface Management—These settings configure NoRM’s basic environment—including TCP and SSL ports, default login contexts, and startup parameters—and restrict NoRM access by IP address.
HTTP Interface Management—These settings configure NoRM’s basic environment—including TCP and SSL ports, default login contexts, and startup parameters—and restrict NoRM access by IP address.
Note
By clicking the word Novell in the upper-right portion of the header frame, you can access the Novell Support Connection at http://support.novell.com/. From this site, you can get current updates, locate troubleshooting information, or open an online support incident.
You can add text, graphics, and custom links to the home (Volumes) page of NoRM by creating an HTML file named PRTLANNC.HTM, which contains the HTML code you want to add, and placing it in the server’s SYS:LOGIN directory. Any information in this file will appear at the bottom of the home page. See the OES online documentation for more information.
Note
Because this file will be used as part of the HTML code that generates the front page, do not include the <body> and </body> tags.
NoRM is a powerful web-based tool for managing your network servers. For more information on server management, see Chapter 5, “OES NetWare Server Management.”
OES NetWare ships with iMonitor v2.1. It is accessible as a component of NoRM, and it provides eDirectory management and repair capabilities similar to the server management capabilities offered by NoRM. The goal of iMonitor is to provide a web-based alternative, and eventual replacement, for many of the traditional eDirectory management and troubleshooting tools, such as DSBrowse, DSTrace, DSDiag, and much of DSRepair.
iMonitor is capable of gathering information not only from OES servers, but from most any version of eDirectory, including NDS version 4.11 or higher, and NDS or eDirectory running on any supported platform (NetWare, Windows NT/2000, Solaris, Linux, and Tru64).
Although iMonitor does provide treewide management, it is designed to get “down in the weeds” like the console-based tools that you may have used in the past. It keeps track of the activities of the DSAgent running on each eDirectory server, so you can get an accurate picture of what is happening at any given time.
The following list identifies some of the major features offered by iMonitor in OES:
![]() General eDirectory tasks—This category of features includes search for eDirectory object(s), status of DirXML in your environment (if applicable), both preconfigured and customizable eDirectory reports, and detailed eDirectory error code and troubleshooting references.
General eDirectory tasks—This category of features includes search for eDirectory object(s), status of DirXML in your environment (if applicable), both preconfigured and customizable eDirectory reports, and detailed eDirectory error code and troubleshooting references.
![]() Monitor eDirectory agent health—This includes synchronization status, detailed synchronization information, known eDirectory servers, and partition and replica status for this server.
Monitor eDirectory agent health—This includes synchronization status, detailed synchronization information, known eDirectory servers, and partition and replica status for this server.
![]() Browse eDirectory agent—This enables you to view eDirectory objects and attributes from the perspective of the server, as well as view eDirectory schema on the server.
Browse eDirectory agent—This enables you to view eDirectory objects and attributes from the perspective of the server, as well as view eDirectory schema on the server.
![]() Configuring eDirectory agent—This category enables you to configure partition lists, replication filters, background processes, agent triggers, login settings, schema and partition synchronization, and database cache settings.
Configuring eDirectory agent—This category enables you to configure partition lists, replication filters, background processes, agent triggers, login settings, schema and partition synchronization, and database cache settings.
![]() Server-centric tasks—This includes web-based versions of DSTrace, simplified DSRepair, and a background process scheduler. These services are available only for the server from which iMonitor is running.
Server-centric tasks—This includes web-based versions of DSTrace, simplified DSRepair, and a background process scheduler. These services are available only for the server from which iMonitor is running.
As you can see, much of what was previously accomplished by console-based tools is now available via the web-based interface of iMonitor.
iMonitor is installed automatically during the installation of OES NetWare. Because it shares resources with NoRM, the PORTAL and HTTPSTK.NLM programs must be loaded on the server. Entries are placed in the AUTOEXEC.NCF to accomplish this.
After the installation, use a web browser from a client computer in your network to access iMonitor. To access iMonitor from an Internet connection outside your firewall, you need to make sure that TCP port 8009 is opened through the firewall to the IP address of your web server. Port 8009 is the default port through which you will access the Web Manager interface. This port can be changed as long as it doesn’t conflict with any other service on the OES NetWare server.
To use iMonitor, use a current version of a web browser, and make sure that Java or JavaScript is enabled on your web browser.
To access iMonitor, open NoRM and browse down to the Manage eDirectory heading in the Navigation frame and then select NDS iMonitor.
Alternatively, you can open iMonitor directly by opening your web browser and entering your web server’s domain name or IP address, the NoRM port number (8009), and the iMonitor path (/nds). For example:
https://www.quills.com:8009/nds
or
https://137.65.192.1:8009/nds
You might be prompted to accept a certificate. At the Authentication dialog box, enter the full username, with a leading dot, and password of a user with administrative rights to this server, and then select OK to display the screen shown in Figure 4.7.
As with NoRM, your iMonitor session remains open until all browser windows at your workstation are closed.
Because it is a component of NoRM, iMonitor adheres to a page layout similar to the one for NoRM and iManager. There are four possible frames to an iMonitor page:
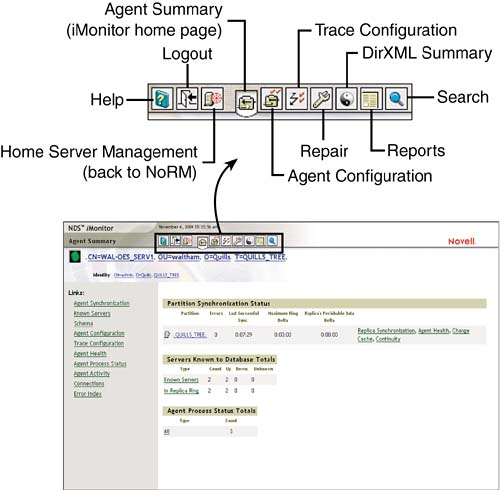
![]() Header frame—The Header frame is located at the top of the screen. It provides a semaphore (Green, Yellow, Red) assessment of the eDirectory tree’s health, in addition to access to other iMonitor tools and the iMonitor configuration. Clicking the NDS iMonitor title in the header takes you to an About iMonitor description of iMonitor software components. By default, the Agent Summary page is always displayed when iMonitor first starts.
Header frame—The Header frame is located at the top of the screen. It provides a semaphore (Green, Yellow, Red) assessment of the eDirectory tree’s health, in addition to access to other iMonitor tools and the iMonitor configuration. Clicking the NDS iMonitor title in the header takes you to an About iMonitor description of iMonitor software components. By default, the Agent Summary page is always displayed when iMonitor first starts.
![]() Navigation frame—The Navigation frame is located on the left side of the screen. It lists different management tasks, organized into groups, which you can perform with iMonitor. Each link takes you to the specific page(s) for performing that task.
Navigation frame—The Navigation frame is located on the left side of the screen. It lists different management tasks, organized into groups, which you can perform with iMonitor. Each link takes you to the specific page(s) for performing that task.
![]() Content frame—The Content frame occupies the middle-right of the screen. When you select a link in the Header or Navigation frames, the appropriate information is displayed in the Content frame.
Content frame—The Content frame occupies the middle-right of the screen. When you select a link in the Header or Navigation frames, the appropriate information is displayed in the Content frame.
![]() (Conditional) Replica frame—When needed, the Replica frame appears in the lower-left corner of iMonitor. This happens when another replica of the requested data exists, or when another replica has a different view of the information being presented in the Main Content frame. From the Replica frame you can change the replica that you are using to view the requested data.
(Conditional) Replica frame—When needed, the Replica frame appears in the lower-left corner of iMonitor. This happens when another replica of the requested data exists, or when another replica has a different view of the information being presented in the Main Content frame. From the Replica frame you can change the replica that you are using to view the requested data.
The amount and type of information that you see in iMonitor is dependent on your current eDirectory identity and the version of the DSAgent with which you are currently working. As new versions of eDirectory are released, they are updated to provide more information to iMonitor. Therefore, older versions of eDirectory or NDS, while still accessible via iMonitor, will not provide the same level of detail offered by current versions of eDirectory.
iMonitor can function in one of two possible modes. You don’t need to do anything to select between the two modes; iMonitor handles it automatically. However, it is important to understand them to interpret iMonitor data and navigate the eDirectory tree properly:
![]() Direct mode—Direct mode is used when iMonitor is gathering information or executing an operation on the same server from which iMonitor is running. The server-centric iMonitor features mentioned previously, which include DSTrace, DSRepair, and Background Scheduler, are available only from Direct mode. Direct mode gives you full access to all iMonitor features and is faster than Proxy mode.
Direct mode—Direct mode is used when iMonitor is gathering information or executing an operation on the same server from which iMonitor is running. The server-centric iMonitor features mentioned previously, which include DSTrace, DSRepair, and Background Scheduler, are available only from Direct mode. Direct mode gives you full access to all iMonitor features and is faster than Proxy mode.
![]() Proxy mode—Proxy mode is used when iMonitor is gathering information or executing an operation on a server other than that from which iMonitor is running. Proxy mode makes it possible to gather information and statistics from older versions of eDirectory or NDS. Proxy mode is the default method of operation for iMonitor, meaning that when iMonitor is opened, it will continue to run from the specified server until explicitly told to switch to an instance of iMonitor on a different server.
Proxy mode—Proxy mode is used when iMonitor is gathering information or executing an operation on a server other than that from which iMonitor is running. Proxy mode makes it possible to gather information and statistics from older versions of eDirectory or NDS. Proxy mode is the default method of operation for iMonitor, meaning that when iMonitor is opened, it will continue to run from the specified server until explicitly told to switch to an instance of iMonitor on a different server.
iMonitor chooses the mode based on the URL request submitted from your browser. If the URL contains a server query, iMonitor will use Proxy mode. If no server query is present, iMonitor will run the query against the local DSAgent using Direct mode.
The default configuration of iMonitor is suitable for most environments. However, iMonitor offers a configuration file, SYS:SYSTEMNDSIMON.INI, that enables you to customize iMonitor. It enables you to change both the general execution of iMonitor, as well as customize specific iMonitor features. For more information on iMonitor, see the OES online documentation.